

Gigaset E365 User Guide
Issued by
Gigaset Communications GmbH
Schlavenhorst 66, D-46395 Bocholt
Gigaset Communications GmbH is a trademark licensee of Siemens AG
© Gigaset Communications GmbH 2008
All rights reserved.
Subject to availability. Rights of modifications reserved.
www.gigaset.com
Gigaset
E365
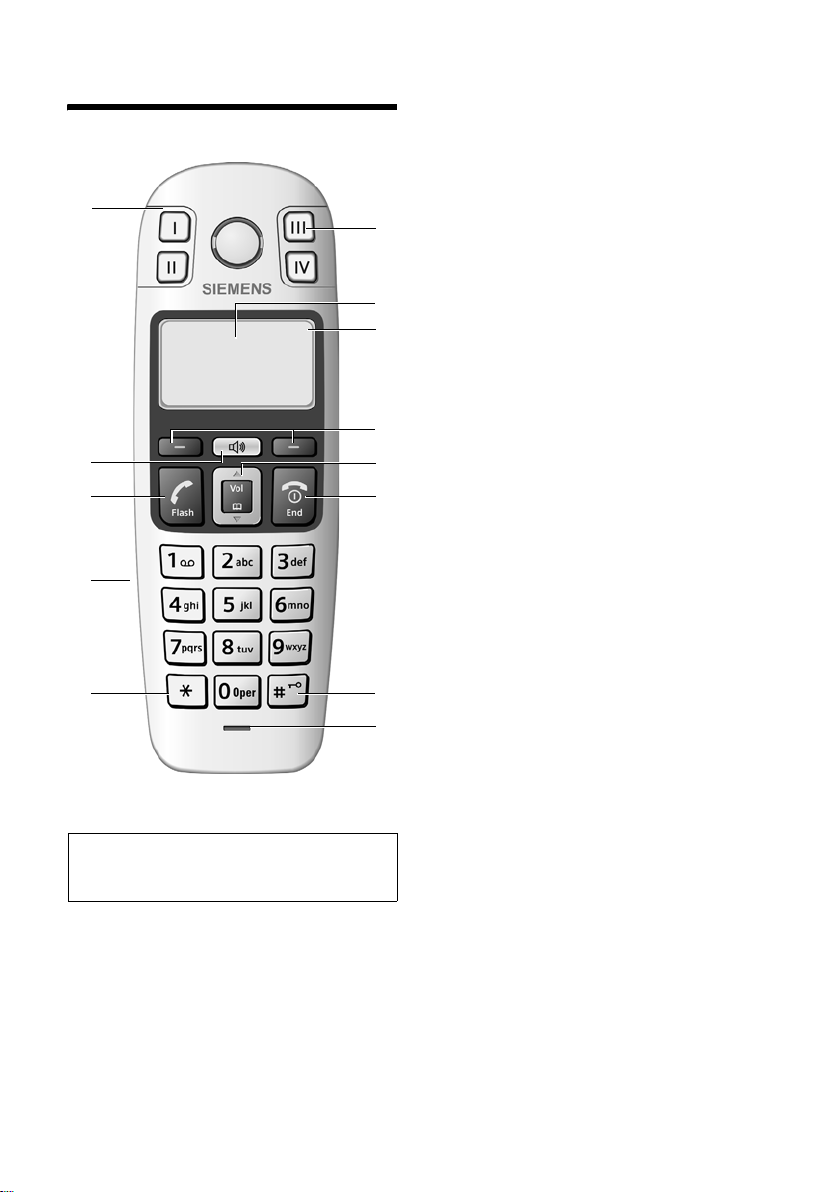
The handset at a glance
13
U
09:19am
Redial§ §§Menu §
12
11
10
9
Note:
Pictures in this user manual may differ from
the actual product.
The handset at a glance
1 Direct Dialing keys (II to IV)
Key II: factory preset for internal calls
1
2 Display in idle status (example)
3 Battery charge level
e V U
(1/3 charged to fully charged)
2
3
4
5
6
7
8
= Flashes: batteries almost empty
e V U Flashes: battery charging
4 Display keys (page 19)
5 Control key (page 18)
6 End Call key, On/Off key
End call, cancel function, go back one menu
level (press briefly), back to idle status (press
and hold), activate/deactivate handset
(press and hold in idle status)
7 Pound (#) key
Keypad lock on/off (press and hold in idle
status, page 18)
Insert a dialing pause (press and hold)
Switch between uppercase/lowercase let-
ters and digits for text entry (page 20)
8 Microphone
9 Star (*) key
Insert star (press briefly).
Send flash, when off hook (press and hold).
During a call: temporarily switch from pulse
to tone dialing.
10 Connection socket for headset
11 Tal k key / F lash
Answer a call, start dialing
During a call: flash functionality
12 Handsfree key
Switch between earpiece and handsfree
mode
Lights up: handsfree activated
Flashes: incoming call
13 Direct Dialing/SOS key with SOS LED
1
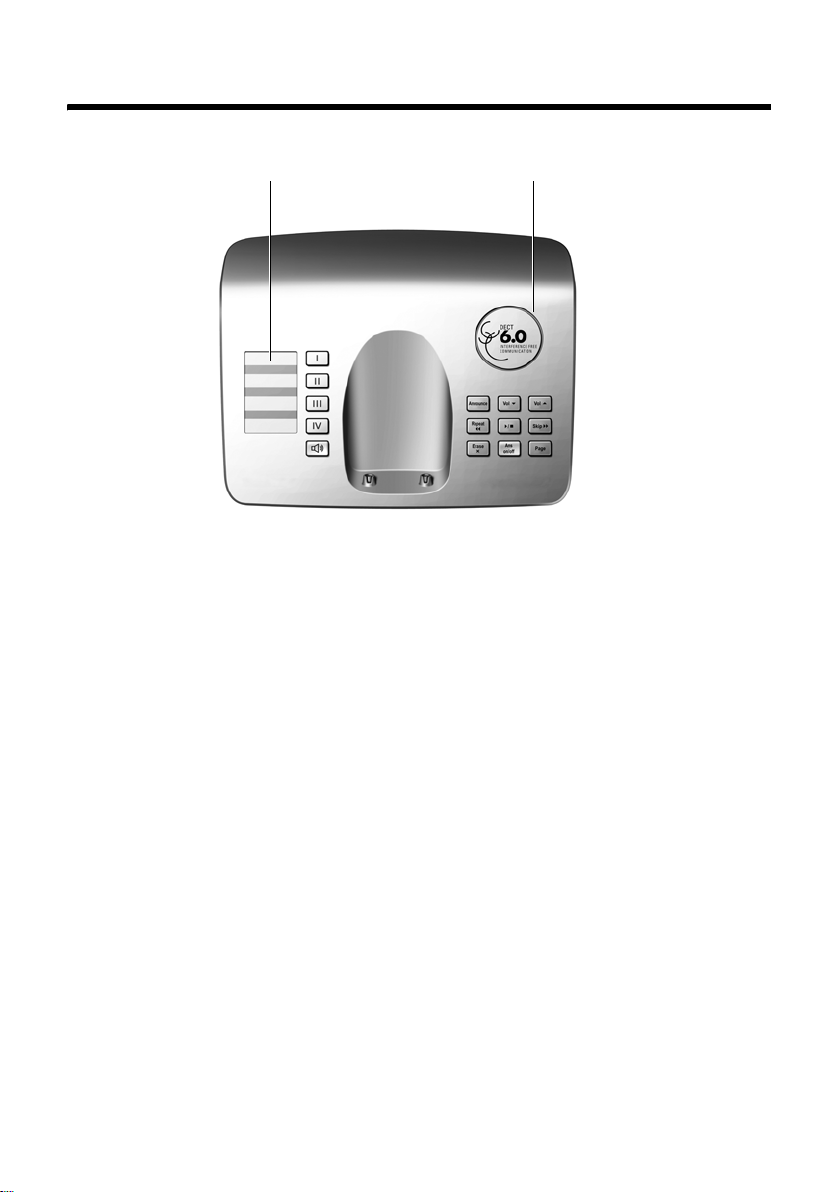
Gigaset E365 base station at a glance
Gigaset E365 base station at a glance
LoudspeakerIndex card
Direct Dialing/SOS key with
é
SOS LED (see page 22)
Direct Dialing keys
... ì
ê
(see page 22)
Handsfree key: answer/end a call
î
Registration/Paging key:
ù
– Page handsets (press briefly for pag-
ing: see page 29).
– Register handsets (press and hold: see
page 29).
Answering machine keys
On/Off key: activate and deactivate
ö
answering machine.
– Lights up: answering machine is
activated.
– Flashes: there is at least one new
message, or a message is being
recorded.
– Flickers for about four seconds:
memory is full.
Playback/Stop key: Play back messages
ó
from the answering machine or cancel
playback.
Forward key: Skip to next message.
ô
Back key: Skip to previous message.
ò
Delete key: Delete the current message
õ
during message playback, or delete all old
messages in idle status.
Announcement key: Record, play back,
ï
and delete a personal announcement.
–Press and hold: record announce-
ment. Press again to end recording.
–Press briefly: play back
announcement.
If desired, delete announcement during
playback using
Volume keys: adjust volume
ð
(ð = softer; ñ = louder)
ñ
– During message playback: adjust
loudspeaker volume.
– While an external call is being sig-
naled: adjust ringer volume.
Please remember:
– If you are operating the answering machine
from a handset, or if the handset is recording a message, you cannot operate the
handset from the base station.
– If the On/Off key flashes when the answer-
ing machine is switched off, there is still at
least one new message that has not been
played back.
õ.
2

Contents
Contents
The handset at a glance . . . . . . . 1
Gigaset E365 base station
at a glance . . . . . . . . . . . . . . . . . . . 2
Safety precautions . . . . . . . . . . . . 5
Notes on the
operating instructions . . . . . . . . . 7
Symbols and conventions used . . . . . . 7
Special features
of the Gigaset E365 . . . . . . . . . . . . 8
SOS mode . . . . . . . . . . . . . . . . . . . . 8
Gigaset E365 –
more than just a telephone . . . . 10
First steps . . . . . . . . . . . . . . . . . . . 10
Package contents . . . . . . . . . . . . . . . . 10
Installing the base station . . . . . . . . . 10
Connecting the base station . . . . . . . 11
Setting up the handset for use . . . . . . 11
Area codes . . . . . . . . . . . . . . . . . . . . . 14
Menu tree . . . . . . . . . . . . . . . . . . 15
Making calls . . . . . . . . . . . . . . . . . 17
Making external calls
and ending calls . . . . . . . . . . . . . . . . . 17
Answering a call . . . . . . . . . . . . . . . . . 17
Caller ID . . . . . . . . . . . . . . . . . . . . . . . 17
Handsfree operation . . . . . . . . . . . . . 18
Muting . . . . . . . . . . . . . . . . . . . . . . . . 18
Operating the handset . . . . . . . . 18
Switching the handset on/off . . . . . . . 18
Activating/deactivating the
keypad lock . . . . . . . . . . . . . . . . . . . . . 18
Control key on the handset . . . . . . . . 18
Display keys . . . . . . . . . . . . . . . . . . . . 19
Returning to idle status . . . . . . . . . . . 19
Using the menus . . . . . . . . . . . . . . . . 19
Writing and editing a text message . . 20
Correcting incorrect entries . . . . . . . . 21
CID 2.5 services (network services) . . 21
Using the directory,
Direct Dialing keys, and lists . . 21
Directory . . . . . . . . . . . . . . . . . . . . . . . 21
Direct Dialing and SOS keys . . . . . . . . 22
Last number redial list . . . . . . . . . . . . 24
Opening the message list
with the Display key . . . . . . . . . . . . . . 24
Operating the base station
answering machine . . . . . . . . . . 26
Operation via the handset . . . . . . . . . 26
Activating/deactivating call screening 28
Setting up the answering machine . . . 28
Resetting fast access on the answering
machine to Network Voice Mail . . . . . 28
Using the network mailbox . . . 29
Using the network mailbox to
set fast access . . . . . . . . . . . . . . . . . . . 29
Viewing your network mailbox
messages . . . . . . . . . . . . . . . . . . . . . . . 29
Using several handsets . . . . . . . 29
Registering handsets . . . . . . . . . . . . . . 29
Locating a handset ("paging") . . . . . . 29
Making internal calls . . . . . . . . . . . . . . 30
Listening in on an external call . . . . . . 31
Handset settings . . . . . . . . . . . . 31
Changing the display language . . . . . 31
Screensaver . . . . . . . . . . . . . . . . . . . . . 31
Auto answer . . . . . . . . . . . . . . . . . . . . 31
Adjusting the loudspeaker volume . . . 31
Changing ringers . . . . . . . . . . . . . . . . 32
Activating/deactivating
suppression of the first ringer . . . . . . . 32
Advisory tones . . . . . . . . . . . . . . . . . . 32
Using the handset as an alarm
clock . . . . . . . . . . . . . . . . . . . . . . . . . . 33
Restoring the handset default
settings . . . . . . . . . . . . . . . . . . . . . . . . 33
Base station settings . . . . . . . . . 33
Changing the system PIN . . . . . . . . . . 33
Changing ringers . . . . . . . . . . . . . . . . 33
Restoring the base station to
factory settings . . . . . . . . . . . . . . . . . . 34
3

Contents
Operating the base station
on a PABX . . . . . . . . . . . . . . . . . . . 34
Appendix . . . . . . . . . . . . . . . . . . . 35
Care . . . . . . . . . . . . . . . . . . . . . . . . . . 35
Contact with liquid . . . . . . . . . . . . . . . 35
Troubleshooting . . . . . . . . . . . . . . . . . 35
Technical data . . . . . . . . . . . . . . . . . . . 36
Industry Canada Certification . . . . . . 36
Safety precautions . . . . . . . . . . . . . . . 37
Service (Customer Care) . . . . . . . . . . 38
End-user limited warranty . . . . . . . . . 38
Wall mounting for base station . 42
Index . . . . . . . . . . . . . . . . . . . . . . . 43
4
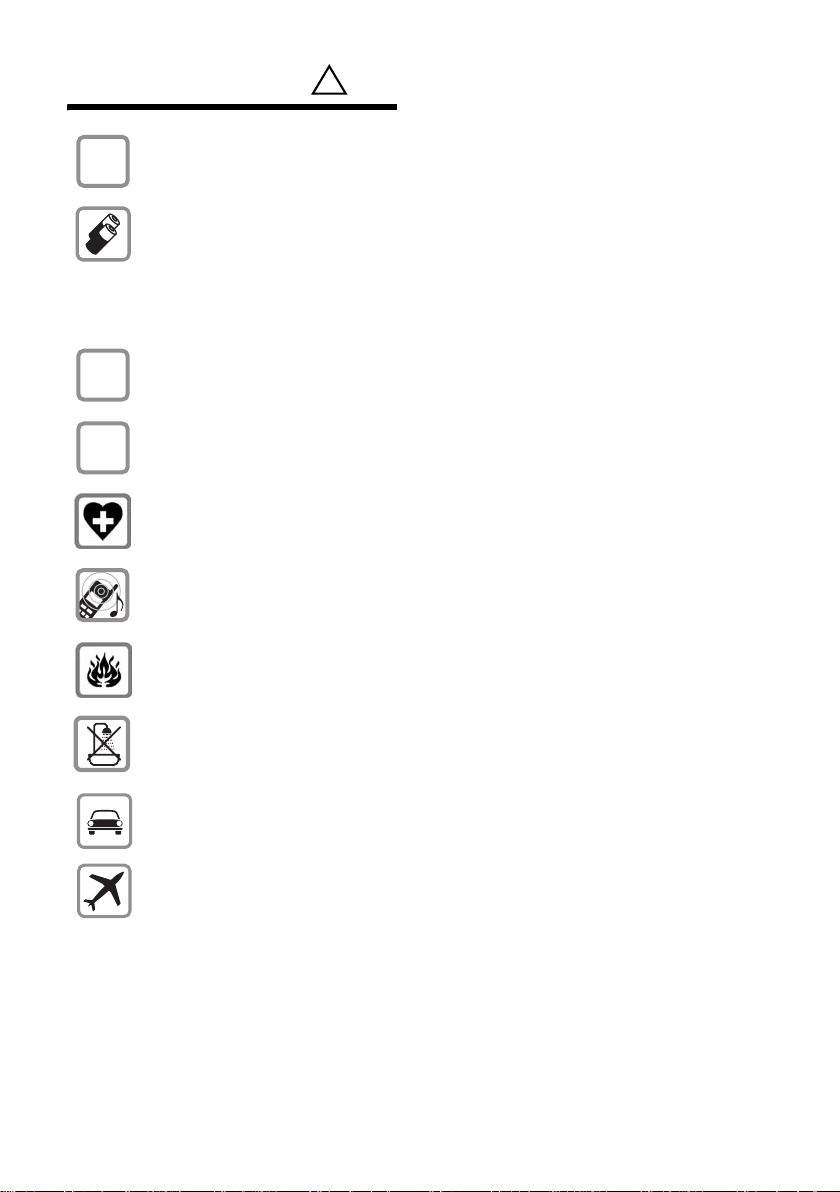
Safety precautions
Safety precautions*
$
‹
Œ
Use only the power supply unit supplied as indicated on the underside of the
device.
Only insert UL- approved rechargeable nickel-metal hydride (NiMH) AAA batteries.
Never use ordinary (non-rechargeable) batteries as they may pose a health
hazard or cause injury.
Do not charge the handset in charging unit or base station while the headset is
connected.
Make sure the rechargeable battery is inserted with the polarity in the correct
direction.
Use the battery specified in these operating instructions.
The phone may affect medical equipment so always switch your phone off
before entering hospitals or doctors’ practices.
Notice to Hearing Aid Wearers:
This phone system is compatible with inductively coupled hearing aids.
Do not operate the phone in places where there is a risk of explosion
(such as paint workshops).
!
Do not install the base station in bathrooms or shower rooms. The handset and
base station are not splash-proof (see page 35).
Drivers must not use the phone while driving.
The phone must be switched off at all times in an aircraft. Make sure it cannot
be switched on accidentally.
* see also page 37
5

Safety precautions
ƒ
If you give your Gigaset E365 to a third party you should also give them the
operating instructions.
Dispose of batteries and the phone carefully. Do not pollute the environment.
Emergency numbers cannot be dialed if the keypad lock is activated!
6

Notes on the operating instructions
This section explains the meaning of certain symbols and typographical conventions that are used in this user guide.
Symbols and conventions used
~ Enter digits or letters.
§Menu§ The display keys' current func-
tions are shown in reverse and
are highlighted in the bottom
display line. Press the display
key below to launch the function.
q Press the top or the bottom of
the control key: scroll up or
down.
c / Q / P etc.
Press the corresponding key
on the handset.
External Calls / Internal Calls (example)
Select one of the menu functions (External Calls or Internal
Calls) from the list and
§OK§.
press
§§Menu§ ¢ Audio Settings ¢ §OK§
¢ Ringer Melody (example) ¢ §OK§
§Menu§. Select Audio Set-
Press
tings using q and press
Select Ringer Melody using q
and press §OK§.
§OK§.
Notes on the operating instructions
7
Special features of the Gigaset E365
Special features
of the Gigaset E365
u Large keys
u Text and symbols display clearly in large type on the screen
u Jumbo Font
u SOS mode
u Direct dialing keys
u Internal calls between handset and base station
u Voice prompted answering machine
u Compatibility with Hearing Aids (HAC – Hearing Aid Compatibility)
u Connection for headset (headset not included)
u Index card for labeling the SOS/Direct Dialing keys (reverse side of user guide)
SOS mode
Your Gigaset E365 is equipped with a special SOS function or SOS procedure. Use this SOS
function to request assistance in case of emergency. You can store up to four SOS num-
bers.
SOS numbers can be stored in SOS/Direct Dialing key I. In the event of an emergency, you
only have to press Direct Dialing key I. The SOS procedure is initiated when you press this
key.
The SOS procedure automatically dials the first SOS number you entered. If this number is
busy or if the person called is not at home, the SOS procedure automatically dials the next
SOS number.
To use the SOS procedure, you have to first program SOS/Direct Dialing key I and activate
SOS mode (page 22).
When SOS mode is activated, the SOS LED lights up permanently on the SOS keys
i
of the handset and base station.
8
SOS mode
SOS procedure
The SOS procedure operates as described below.
Press the SOS/Direct Dialing key é of the base station and the device immediately
dials.
You must press and hold the SOS/Direct Dialing key é of the handset to immediately
launch the function.
If you press the key briefly and do not hold it down, you must confirm with §Yes§ to prevent
an emergency call from being initiated inadvertently.
Å
The first SOS number is dialed as soon as you press the SOS Direct Dialing key. At the same
time, the message "Emergency call being sent" is played back over the loudspeaker.
Å
If the SOS call is answered, the called party automatically hears the message "This is an
emergency call." Your name is then announced after this message. You must have pro-
grammed the SOS key accordingly for your name to be announced (see page 22). This is
followed by the message "To answer the emergency call, please press key 5." If the called
party now presses key 5, you can converse with one another.
Å
If the called party does not answer the call, for example, the called party is not at home
or his or her answering machine is on, the SOS procedure automatically dials the next SOS
number. In the following cases, the SOS procedure automatically calls the next SOS
number after 60 seconds:
u The call is not answered
u The answering machine for the selected SOS number is on
u The SOS number is busy
Å
The procedure is repeated up to four times. If none of the calls are answered, the SOS procedure is ended with an error tone.
Recipients of the emergency call must have their telephones set to tone dialing, otherwise
confirmation of the SOS call with key 5 will not be recognized.
– During the entire procedure, all SOS keys flash on all registered handsets and on
the base station. The message "Emergency call being sent" is displayed on the
handset that initiated the emergency call.
– If an internal call is also programmed, the SOS call can also be answered by an
internal user. The text "Emergency call" is displayed on all registered handsets and
i
9
the base station.
– You should perform a test run of the SOS procedure to ensure that SOS mode is
programmed correctly. The police, emergency services, or fire department must
not be used for a test run.
– Please note that the standby time of the handset will be reduced when SOS mode
is activated.
– The SOS LED lights up permanently when SOS mode is activated.

Gigaset E365 – more than just a telephone
Gigaset E365 –
more than just a telephone
Your phone not only enables you to store
up to 100 telephone numbers (page 21),
it can do a whole lot more:
u You can program the keys of your
phone with important phone numbers.
A programmed number is then dialed
by simply pressing the corresponding
key (page 22).
u Use the handsfree function (page 18)
to keep your hands free when making a
call.
u Use your handset as an alarm clock
(page 33)
u Select 12- or 24-hour format for dis-
playing the time (page 14).
ECO DECT – What does it mean?
ECO DECT reduces power consumption
by using a power supply with low power
consumption and also reduces the transmission power of the base station when
the handset is docked and only one handset is registered on the base station.
Also, your handset automatically reduces
transmitting power depending on its distance to the base station (close-up
range).
First steps
Package contents
The product includes one Gigaset E365
base station, one handset, one power
adapter, one telephone cable, two batteries, one battery cover, one belt clip and a
user guide.
Installing the base station
The base station is designed for use in dry
rooms in a temperature range of +41°F to
+113°F.
Set up or wall mount the base station at a
central location in your home.
Please refer to the end of the user guide
for information on wall mounting the base
station.
Please remember:
u Never expose the telephone to heat
sources, direct sunlight, other electrical
appliances.
u Protect your telephone from moisture,
dust, corrosive liquids, and fumes.
Have fun using your new phone!
10
First steps
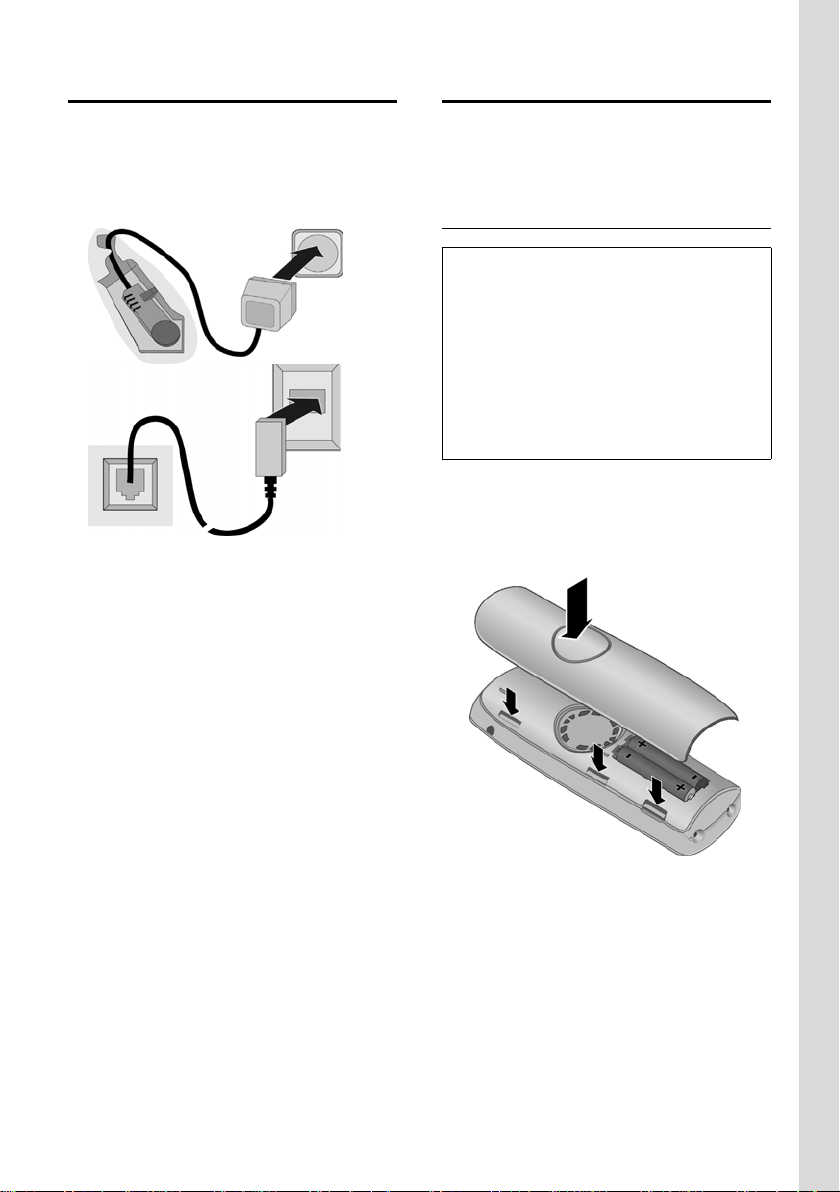
Connecting the base station
¤ First connect the power adapter and
then the phone jack as shown below,
and place the cables into the cable
recesses.
2
1
1
3
1
1
1 Underside of the base (partial view)
2 110-V power adapter
3 Phone jack with phone cord
Please note:
u This phone requires at least a 26 AWG
telecommunication line cord.
u The power adapter must be always
connected, as the phone will not oper-
ate without an electrical connection.
Setting up the handset for use
Carry out the following steps for each
handset.
Inserting the batteries and closing the cover
Caution:
Use only rechargeable nickel-metal hydride
(NiMH) UL-approved AAA batteries. Never use
conventional (non-rechargeable) batteries or
other battery types as this may cause significant damage to health and property. For
example, the outer casing of the batteries
could be destroyed or the batteries could
explode. The phone could also malfunction or
be damaged as a result of using batteries that
are not of the recommended type.
¤ Insert the batteries according to the
correct polarity (see diagram).
The polarity is indicated in the battery
compartment.
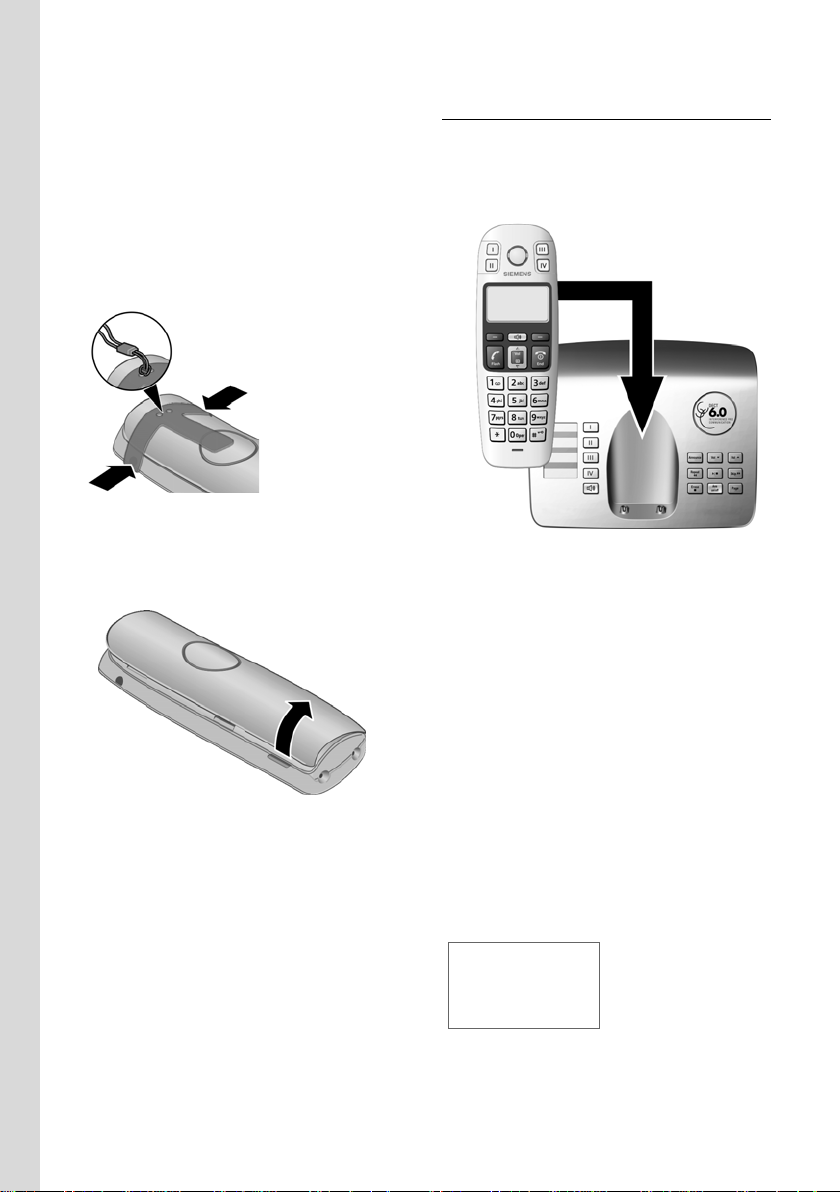
¤ First align the notches on the side of
the battery cover with the lugs on the
inside of the casing.
¤ Then press the cover so that it clicks
into place.
11
First steps
Attaching the belt clip
There are notches for attaching the belt
clip on the side of the handset at the same
height as the direct dialing keys.
¤ Press the belt clip onto the back of the
handset so that the protrusions on the
belt clip engage the notches.
You can also attach a cord for carrying the
handset in your hand or wearing it around
your neck.
Opening the battery cover
¤ Remove the belt clip, if necessary.
¤ Reach into the housing cavity and pull
the battery cover upwards.
Placing the handset into the base station and registering
¤ To start the automatic registration of
your handset, please place the handset
in the base with the display facing
outwards.
¤ The handset registers automatically.
Please do NOT remove your handset
from the base station during the registration procedure.
The registration can take up to 5 minutes.
While registration is in progress the screen
displays Registering . The handset will be
assigned the lowest unassigned internal
number (1–4). If several handsets are registered to the base, the internal number is
shown on the screen after registration (for
example, 2). This means that the handset
has been assigned the internal number 2.
12
2 U
Redial§ §§Menu §
First steps
Notes:
– Automatic registration is only possible
when the base station you want to register
the handset to is not being used to make a
call.
– Pressing a key cancels automatic registra-
tion.
– If four handsets are already registered to
the base station, there are two options:
– The handset with the internal number 4
is put on idle status: the handset you
want to register is assigned the number
4. The handset that was previously
number 4 is de-registered.
– The handset with internal number 4 is in
use: the handset you want to register
cannot be registered.
– If automatic registration does not work, the
handset must be registered manually
(page 29).
Initial charging of batteries
¤ To charge the batteries, leave the hand-
set in the base station or charging cradle continuously for ten hours. Your
handset need not be switched on for it
to charge.
Notes:
– The handset must only be placed in the
base/charging cradle provided for it.
– If the handset switches off because its bat-
teries are empty, it will automatically
switch on again when it is placed into the
base station.
Headset socket
Which headsets are compatible?
The following headsets have been tested
with the Gigaset E365:
u Plantronics MX200
u Plantronics MX250
u Top-Nice EP-21-RS (C39453-Z5-C361)
Caution:
Do not charge the handset in charging unit or
base station while the headset is connected.
Note:
The appendix contains explanations of the
symbols and typographical conventions used
in this user guide (see page 7).
For questions and troubleshooting, see
page 35.
Now please continue directly
storage of the local area code (see the
Chapter "Area codes" on page 14). This
step is not essential.
However, if you skip the step, the complete functions of the local area codes will
not be available.
with the
Battery charging is indicated in the upper
right corner of the display by a flashing
battery icon e, V, or U. During
handset operation, the battery icon indicates the charge status of the batteries
(page 1).
Please remember:
u The batteries may warm up as they are
charging. This is not dangerous.
u For technical reasons, the charge
capacity of the batteries will decrease
after a certain period of time.
13
 Loading...