


Congratulations on your purchase of the GIGABYTE Notebook.
This manual will help you to get started with setting up your notebook. The final product configuration depends on the model at the point of your purchase. GIGABYTE reserves the right to amend without prior notice. For more detailed information, please visit our website at www.gigabyte.com
1 English
3
 2 1
2 1 
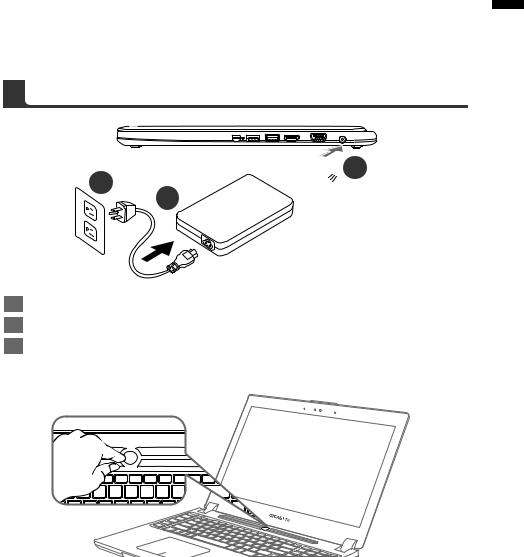
1Connect the power cord to the AC adapter.
2Connect the AC adapter to the DC-in jack on the right side of the notebook.
3Connect the power cord to the power outlet.
Switching on the Power
After you turn on the Notebook for the very first time, do not turn it off until the operating system has been configured. Please note that the volume for the audio will not function until Windows®
Setup has completed.
Booting Up the Notebook for the First Time
Depending on your configuration, the Microsoft® Windows® Boot Screen will be the first screen that you will see as the notebook starts up. Follow the on-screen prompts and instructions and enter your personal information to complete the setup of the Windows® Operating System.

2 English
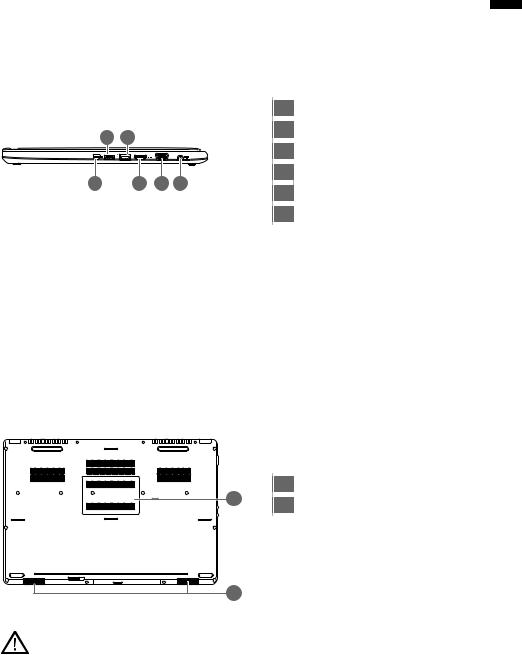
Top View & Front View
2 |
1 |
3
4
5
7
6
8
Left View
4 5
5
1 |
2 |
3 |
6 |
1Light sensor
2Webcam
3Microphone
4Power Button
5TouchPad
6LED Indicators
7Battery Indicator Button
8Swappable Storage Bay
 Bluetooth Status LED Wireless Lan Status LED
HDD Status LED
Battery Status LED
 Power Status LED
Press the right button of touchpad to check the remaining battery power. Right click to show the remaining power percentage. As shown below, the battery life indicator is available when the laptop is shut down, in stand-by or hibernation.(Battery mode)
1
2
<10% 11-30% 31-50% 51-70% 71-90% >90%
1Kensington Lock Slot
2Ethernet Port
3USB 2.0 Port
4SD Card Reader
5Headphone Jack
6Microphone Jack
Right View
|
|
|
|
1 |
Mini Display Port |
||
2 |
3 |
|
|
2 |
USB 3.0 |
Port |
|
|
|
3 |
USB 3.0 |
Port (USB Charge) |
|||
|
|
|
|
||||
1 |
4 |
5 |
6 |
4 |
HDMI Port |
||
5 |
External Display (VGA) Port |
||||||
|
|
|
|
||||
|
|
|
|
6 |
DC-in Jack |
||
Base View
1 |
2
1Memory Compartment
2Speakers
3 English
Warning:
DO NOT remove the built-in lithium battery. For any service needs, please contact your local GIGABYTE Authorized Service Center.
4 English
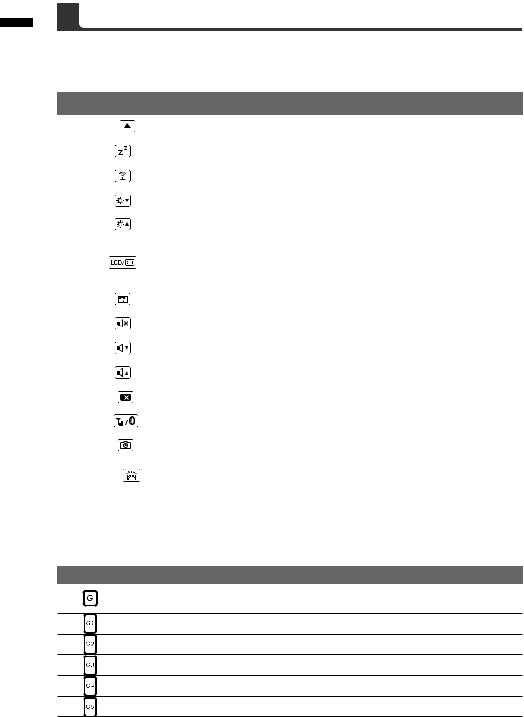
The computer employs hotkeys or key combinations to access most of the computer’s controls like screen brightness and volume output. To activate hotkeys, press and hold the <Fn> key before pressing the other key in the hotkey combination.
Hotkey |
Function |
Description |
||||||
Fn+ESC |
|
|
|
Eject ODD |
Eject ODD |
|||
|
|
|
|
|
|
|
|
|
Fn+F1 |
Sleep |
Put the computer in Sleep mode. |
||||||
|
|
|
|
|
|
|
|
|
Fn+F2 |
Wireless LAN |
Enables/disable the Wireless LAN function. |
||||||
|
|
|
|
|
|
|
|
|
Fn+F3 |
Brightness Down |
Decrease the screen brightness. |
||||||
|
|
|
|
|
|
|
|
|
Fn+F4 |
Brightness Up |
Increase the screen brightness. |
||||||
|
|
|
|
|
|
|
|
|
|
|
|
|
|
|
|
Switche display output between the display |
|
Fn+F5 |
Display Toggle |
screen, external monitor (if connected) and |
||||||
|
|
|
|
|
|
|
both. |
|
|
|
|
|
|
|
|
|
|
Fn+F6 |
|
|
|
|
Touchpad Toggle |
Turn the internal touchpad on and off. |
||
|
|
|
||||||
|
|
|
|
|
|
|
|
|
Fn+F7 |
Speaker Toggle |
Turn the speaker on and off. |
||||||
|
|
|
|
|
|
|
|
|
Fn+F8 |
Volume Down |
Decrease the sound volume. |
||||||
|
|
|
|
|
|
|
|
|
Fn+F9 |
Volume Up |
Increase the sound volume. |
||||||
|
|
|
|
|
|
|
|
|
Fn+F10 |
Screen Display Toggle |
Turn the screen display on and off. |
||||||
|
|
|
|
|
|
|
|
|
Fn+F11 |
|
|
Bluetooth |
Enable/disable the Bluetooth function. |
||||
|
||||||||
|
|
|
|
|
|
|
|
|
Fn+F12 |
Webcam |
Turn the internal webcam on and off. |
||||||
|
|
|
|
|
|
|
|
|
Fn+Space |
Keyboard Backlight |
Turn the keyboard backlight on and off. |
||||||
Toggle |
||||||||
|
|
|
|
|
|
|
||
|
|
|
|
|
|
|
|
|
Macro key
Macro keys can be set via Macro Hub, setting combination keys for complicated and/or general operation.
Macro key |
Macro key |
Description |
|
G |
Macro group switch, press around 3 secconds as hardware |
|
switch on/off. |
|
|
|
|
|
G1 |
User Programmable Macro key |
|
G2 |
User Programmable Macro key |
|
G3 |
User Programmable Macro key |
|
G4 |
User Programmable Macro key |
|
G5 |
User Programmable Macro key |
5 English
2 |
1 |
|
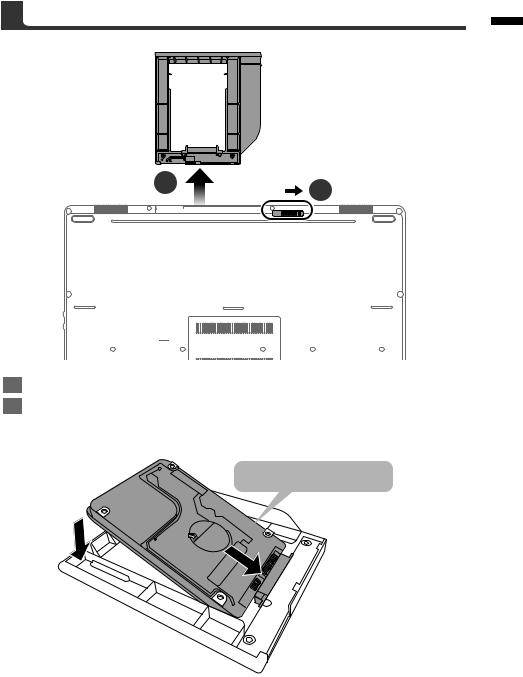
1Unlock swappable bay locker.
2Draw the swappable bay out.
9.5mm/7mm HDD/SSD only
Connect the HDD or SSD pin by sliding it into the connecter.
 Loading...