


Congratulations on your purchase of the GIGABYTE Notebook.
This manual will help you to get started with setting up your notebook. The final product configuration depends on the model at the point of your purchase. GIGABYTE reserves the right to amend without prior notice. For more detailed information, please visit our website at www.gigabyte.com
1 English
 2
2


 1
1  3
3 
1Connect the power cord to the AC adapter.
2Connect the AC adapter to the DC-in jack on the right side of the notebook.
3Connect the power cord to the power outlet.
Switching on the Power
After you turn on the Notebook for the very first time, do not turn it off until the operating system has been configured. Please note that the volume for the audio will not function until Windows®
Setup has completed.
Booting Up the Notebook for the First Time
Depending on your configuration, the Microsoft® Windows® Boot Screen will be the first screen that you will see as the notebook starts up. Follow the on-screen prompts and instructions and enter your personal information to complete the setup of the Windows® Operating System.
2
|
|
|
|
|
|
|
English |
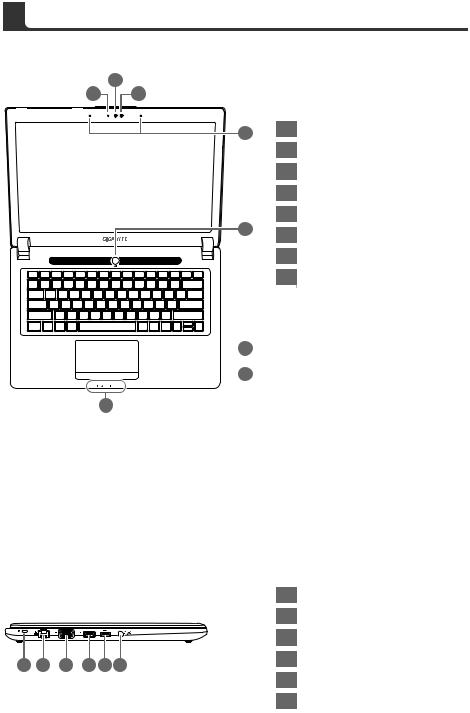
Top View |
|
||||
|
|
|||||
|
|
|
|
|
|
2 |
|
1 |
3 |
||||
|
|
|
|
|
|
|
4
5
 6
6
 7
7
8
1Webcam Status LED Indicator
2Webcam
3Light sensor
4Microphone x 2
5Power Button
6TouchPad
7Battery Indicator Button
8LED Indicators
Press the right button of touchpad to check the remaining battery power.
 Bluetooth Status LED
 Wireless Lan Status LED
 HDD Status LED
 Battery Status LED

 Power Status LED
Left View
|
|
|
|
|
|
1 |
Kensington Lock Slot |
|
|
|
|
|
|
2 |
Ethernet Port |
|
|
|
|
|
|
3 |
D-sub (VGA) Port |
1 |
2 |
3 |
4 |
5 |
6 |
4 |
USB Port (Support USB Charge) |
|
|
||||||
|
|
|
|
|
|
5 |
USB Port |
|
|
|
|
|
|
6 |
Combo Audio Jack |
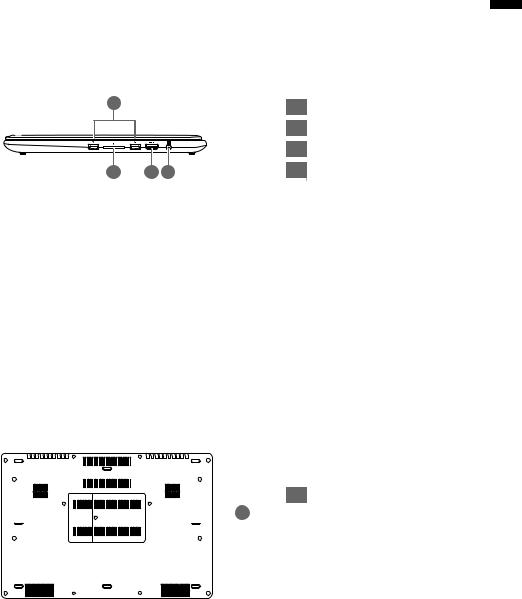
Right View
1 |
|
1 |
USB Port x2 |
|
|
2 |
SD Card Reader |
|
|
3 |
HDMI Port |
2 |
3 4 |
4 |
DC-in Jack |
Base View
1 Memory Compartment
 1
1
3 English
 Loading...