


Congratulations on your purchase of the GIGABYTE Notebook!
This Manual will help you to get started with setting up your notebook. For more detailed information, please visit our website at http://www.gigabyte.com. All specifications are subject to the manufacturer's configuration at the time of shipping and may change without prior notice, written or otherwise.
1 |
3 |
2
1 English
To install the battery please follow these steps:
1Target the battery’s direction into the tenon-mortise.
2Circulate the battery downwards until hearing the "snap" sound to lock the battery.
3Remember to slide the switch to the "Lock" position.
2 |
3 |
 1
1
1Connect the power cord to the AC adapter.
2Connect the AC adapter to the DC-in jack on the left side of the notebook.
3Connect the power cord to the power outlet.
2 English
-
+
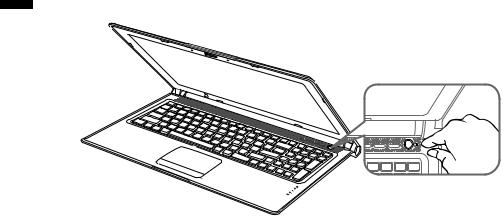
Switching on the Power :
After you turn on the Notebook for the very first time, do not turn it off until the operating system has been configured. Please note that the volume for the audio will not function until Windows®
Setup has completed.
Booting Up the Notebook for the First Time :
Depending on your configuration, the Microsoft® Windows® Boot Screen will be the first screen that you will see as the notebook starts up. Follow the on-screen prompts and instructions and enter your personal information to complete the setup of the Windows® Operating System.
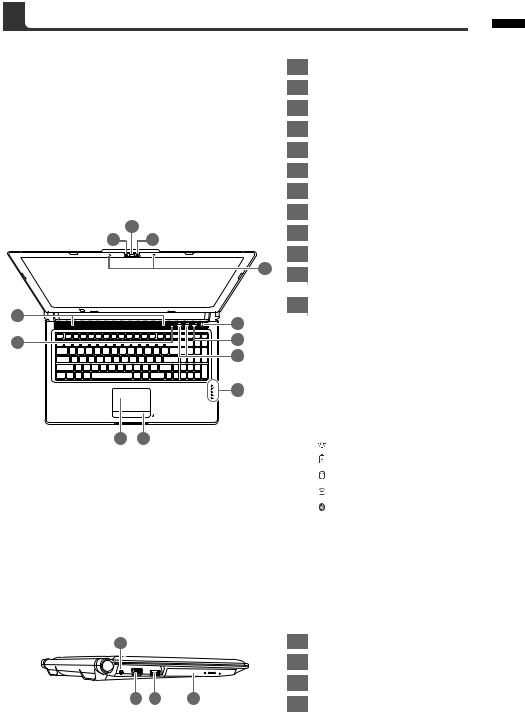
Top & Front View |
|
|
|
|
|
|
|
|
|
|
|
|
1 |
Webcam Status LED indicator |
|
|
|
|
|
|
2 |
|
Webcam |
|
|
|
|
|
3 |
|
Light sensor |
|
|
|
|
|
4 |
|
Microphone x 2 |
|
|
|
|
|
5 |
|
Power Button |
|
|
|
|
|
6 |
|
Smart+ Button |
|
|
|
|
|
7 |
|
Volume Setting |
|
|
|
|
|
8 |
|
LED Indicators |
2 |
|
|
|
|
9 |
Battery Indicator Button |
|
1 |
3 |
|
|
|
|||
|
|
|
10 |
TouchPad |
|||
|
|
|
|
|
|||
|
|
|
|
4 |
11 |
Num Lock & Caps Lock |
|
|
|
|
|
|
|||
|
|
|
|
|
|
|
Indicator |
12 |
|
|
|
|
12 |
Stereo speakers |
|
- |
+ |
5 |
|
|
To call out smart manager function. |
||
|
|
||||||
11 |
|
|
6 |
|
|
|
● Smart Setup: |
|
|
|
|
|
Under off condition, Push "Smart+" |
||
|
|
7 |
|
|
|
||
|
|
|
|
|
|
to enter "Smart Setup" menu in off |
|
|
|
|
|
|
|
|
mode. You can choose BIOS Setup |
|
|
|
8 |
|
|
|
Utility, Smart Recovery in the setup |
|
|
|
|
|
|
menu. |
|
|
|
|
|
|
|
|
|
|
|
|
|
|
|
|
● Smart Manager: |
|
|
|
|
|
|
|
In Windows® Mode Press "Smart+" |
10 |
9 |
|
|
|
|
|
button to initiate "Smart Manager". |
|
|
|
|
Power Status LED |
|||
|
|
|
|
|
|||
|
|
|
|
|
|
|
Battery Status LED |
|
|
|
|
|
|
|
HDD Status LED |
|
|
|
|
|
|
|
Wireless Lan Status LED |
|
|
|
|
|
|
|
Bluetooth Status LED |
|
|
|
|
|
The LED indicators will show the |
||
|
|
|
|
|
|
|
battery capacity status when battery is |
|
|
|
|
|
|
|
inserted in power off mode. 5 indicator |
|
|
|
|
|
|
|
lights on indicates that the battery |
|
|
|
|
|
|
|
capacity is 100%. Only 1 indicator |
|
|
|
|
|
|
|
light on indicates that the remaining |
Left View |
|
|
|
|
|
|
battery capacity is 20%. |
|
|
|
|
|
|
|
|
1 |
|
|
|
|
1 |
|
DC-in Jack |
|
|
|
|
|
2 |
External Display (VGA) Port |
|
|
|
|
|
|
3 |
|
eSATA/USB Combo |
2 |
3 |
|
4 |
|
4 |
|
Optical Disc Drive |
|
|
|
|
|
|
||
3 English
4 English
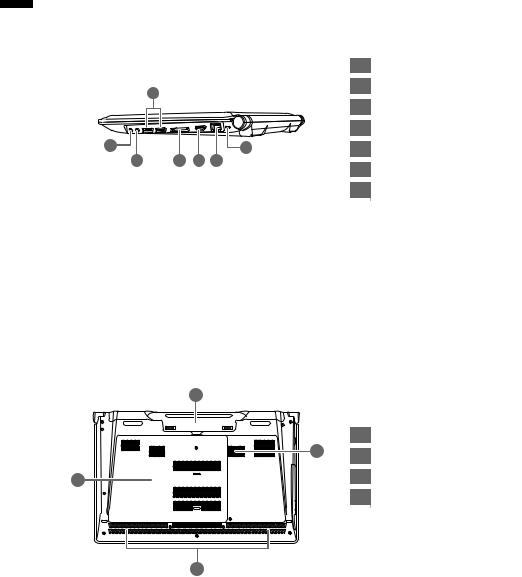
Right View
|
|
|
|
1 |
Microphone Jack |
|
3 |
|
|
2 |
Headphone Jack |
|
|
|
3 |
USB Port x 2 |
|
|
|
|
|
||
|
|
|
|
4 |
Secure Digital Card Reader |
1 |
|
|
7 |
5 |
HDMI Port |
2 |
4 |
5 |
6 |
6 |
Ethernet Port |
|
|
|
|
||
|
|
|
|
7 |
Kensington Lock Slot |
Rear & Bottom View
|
1 |
|
|
|
|
1 |
Battery Bay |
|
2 |
2 |
Woofer Speaker |
|
|
||
4 |
|
3 |
Stereo Speakers |
|
|
|
|
|
|
4 |
Hard Disk Bay/Memory Bay |
3
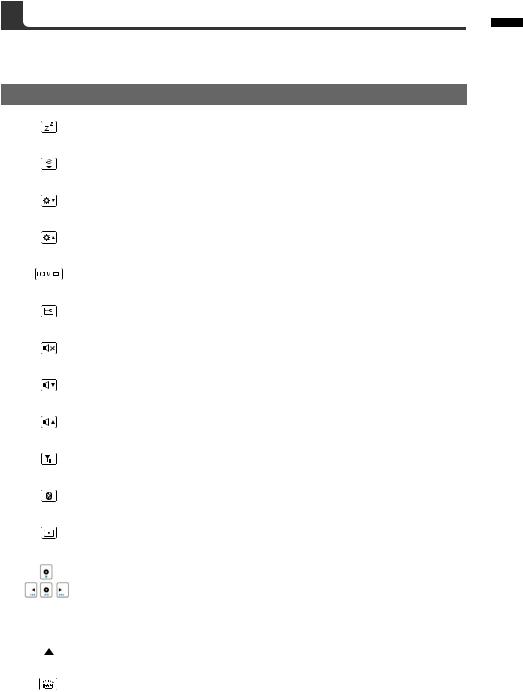
The computer employs hotkeys or key combinations to access most of the computer’s controls like screen brightness and volume output. To activate hotkeys, press and hold the <Fn> key before pressing the other key in the hotkey combination.
Hotkey |
Function |
Description |
||
Fn+F1 |
Sleep |
Put the computer in Sleep mode. |
||
|
|
|
||
|
|
|
|
|
Fn+F2 |
Wireless LAN |
Enables/disable the Wireless LAN function. |
||
|
|
|
||
|
|
|
|
|
Fn+F3 |
Brightness Down |
Decrease the screen brightness. |
||
|
|
|
||
|
|
|
|
|
Fn+F4 |
Brightness Up |
Increase the screen brightness. |
||
|
|
|
||
|
|
|
|
|
Fn+F5 |
Display Toggle |
Switche display output between the display screen, |
||
|
|
|
external monitor (if connected) and both. |
|
|
|
|
|
|
|
|
|
|
|
Fn+F6 |
Touchpad Toggle |
Turn the internal touchpad on and off. |
||
|
|
|
||
|
|
|
|
|
Fn+F7 |
Speaker Toggle |
Turn the speaker on and off. |
||
|
|
|
||
|
|
|
|
|
Fn+F8 |
Volume Down |
Decrease the sound volume. |
||
|
|
|
||
|
|
|
|
|
Fn+F9 |
Volume Up |
Increase the sound volume. |
||
|
|
|
||
|
|
|
|
|
Fn+F10 |
N/A |
There is no function for this model. |
||
|
|
|
||
|
|
|
||
|
|
|
|
|
Fn+F11 |
Bluetooth |
Enable/disable the Bluetooth function. |
||
|
|
|
||
|
|
|
|
|
Fn+F12 |
Webcam |
Turn the internal webcam on and off. |
||
|
|
|
||
|
|
|
|
|
Fn+▲ ▼ ◄ ► |
|
|
||
|
|
|
Playback |
Media Playback control. |
|
|
|
|
|
Fn+~ |
Screen Toggle |
Turn the screen on and off. |
||
|
|
|
|
|
Fn+Esc |
ODD Tray Quit |
To quit the ODD tray instantly. |
||
|
|
|
||
|
|
|
|
|
|
|
|
|
|
Fn+Space |
Keyboard |
Turn the keyboard backlight on and off. |
||
|
|
|
Backlight Toggle |
|
|
|
|
|
|
|
|
|
|
|
This function is limited to the keyboard which has backlight.
5 English
 Loading...