


UX10
USER MANUAL
Rugged Mobile Computing Solutions

July 2019
TRADEMARKS
All brand and product names are trademarks or registered trademarks of their respective companies.
NOTE
The information in this manual is subject to change without notice. For the latest version of the manual, please visit the Getac website at www.getac.com.

Table of Contents
Chapter 1 |
Getting Started................................................................. |
1 |
|
Getting the Tablet PC Running................................................. |
2 |
|
Unpacking .............................................................................. |
2 |
|
Installing the Battery Pack .................................................... |
3 |
|
Installing the Micro-SIM Card (Optional)............................. |
4 |
|
Using the Tether .................................................................... |
5 |
|
Connecting to AC Power....................................................... |
6 |
|
Turning On and Off the Tablet PC ....................................... |
7 |
|
Identifying Hardware Components .......................................... |
8 |
|
Front Components................................................................. |
8 |
|
Rear Components ................................................................ |
11 |
|
Right-Side Components....................................................... |
12 |
|
Left-Side Components ......................................................... |
13 |
|
Top Components.................................................................. |
14 |
|
Bottom Components ........................................................... |
15 |
Chapter 2 Operating Your Tablet PC .............................................. |
16 |
|
|
Navigating on the Screen........................................................ |
17 |
|
Using the Touchscreen ........................................................ |
17 |
|
Using the Dual Mode Display (Optional) ........................... |
20 |
|
Using Network and Wireless Connections ............................. |
21 |
|
Using the LAN (Optional).................................................... |
21 |
|
Using the WLAN................................................................... |
22 |
|
Using the Bluetooth Feature .............................................. |
23 |
|
Using the WWAN Feature (Optional) ................................ |
24 |
Chapter 3 |
Managing Power ............................................................ |
25 |
|
AC Adapter............................................................................... |
26 |
|
Battery Pack.............................................................................. |
27 |
|
Charging the Battery Pack .................................................. |
27 |
|
Initializing the Battery Pack................................................ |
28 |
|
i |
|

Checking the Battery Level ................................................. |
28 |
Battery Low Signals and Actions ........................................ |
29 |
Replacing the Battery Pack ................................................. |
30 |
Hot Swapping the Battery Pack (Optional) ....................... |
32 |
Power-Saving Tips .................................................................... |
34 |
Chapter 4 Using Options and Peripherals...................................... |
35 |
Using the Fingerprint Scanner (Optional) .............................. |
36 |
Enrolling a Fingerprint ........................................................ |
36 |
Fingerprint Login................................................................. |
37 |
Using the Barcode Scanner (Optional) ................................... |
38 |
Connecting Peripheral Devices ............................................... |
39 |
Connecting a Display Monitor ............................................ |
39 |
Connecting a USB Device .................................................... |
40 |
Connecting a Serial Device.................................................. |
41 |
Connecting an Audio Device .............................................. |
42 |
Using Various Card Readers .................................................... |
43 |
Using MicroSD Cards (Optional) ......................................... |
43 |
Using Smart Cards (Optional) ............................................. |
44 |
Using the RFID Reader (Optional) ...................................... |
45 |
Reading Magnetic Stripe Cards (Optional) ........................ |
46 |
Chapter 5 Using BIOS Setup............................................................ |
47 |
When and How to Use............................................................. |
48 |
Menu Descriptions ................................................................... |
49 |
Information Menu ............................................................... |
49 |
Main Menu........................................................................... |
49 |
Advanced Menu................................................................... |
49 |
Security Menu ...................................................................... |
51 |
Boot Menu ........................................................................... |
52 |
Exit Menu ............................................................................. |
53 |
Chapter 6 Using Getac Software .................................................... |
54 |
OSD Control Panel ................................................................... |
55 |
G-Manager ............................................................................... |
56 |
G-Camera.................................................................................. |
57 |
Chapter 7 Care and Maintenance................................................... |
58 |
Protecting the Tablet PC.......................................................... |
59 |
Using an Anti-Virus Strategy............................................... |
59 |
Using the Cable Lock ........................................................... |
59 |
Taking Care of the Tablet PC .................................................. |
60 |
Location Guidelines ............................................................. |
60 |
General Guidelines .............................................................. |
60 |
ii |
|

Cleaning Guidelines............................................................. |
61 |
Battery Pack Guidelines....................................................... |
61 |
Touchscreen Guidelines....................................................... |
63 |
When Traveling........................................................................ |
64 |
Chapter 8 Troubleshooting............................................................. |
65 |
Preliminary Checklist................................................................ |
66 |
Solving Common Problems...................................................... |
67 |
Battery Problems ................................................................. |
67 |
Bluetooth Problems............................................................. |
67 |
Display Problems.................................................................. |
68 |
Fingerprint Scanner Problems............................................. |
68 |
Hardware Device Problems ................................................. |
69 |
Power Management Problems ........................................... |
69 |
Sensor Problems................................................................... |
70 |
Software Problems .............................................................. |
71 |
Sound Problems ................................................................... |
71 |
Startup Problems ................................................................. |
71 |
WLAN Problems ................................................................... |
72 |
Other Problems.................................................................... |
73 |
Resetting the Tablet PC ........................................................... |
74 |
System Recovery....................................................................... |
75 |
Using Windows RE............................................................... |
75 |
Using Recovery Partition ..................................................... |
76 |
Using the Driver Disc (Optional) ............................................. |
77 |
Appendix A Specifications ................................................................. |
78 |
Appendix B Regulatory Information................................................. |
80 |
On the Use of the System........................................................ |
81 |
Class B Regulations .............................................................. |
81 |
ANSI Warning....................................................................... |
82 |
Safety Notices....................................................................... |
83 |
On the Use of the RF Device.................................................... |
87 |
USA and Canada Safety Requirements and Notices.......... |
87 |
European Union CE Marking and Compliance Notices..... |
89 |
User Notification of Take-back Service................................... |
91 |
ENERGY STAR 7.0 ..................................................................... |
92 |
Battery Recycling...................................................................... |
94 |
About Battery and External Enclosure Replacement ............ |
95 |
Battery .................................................................................. |
95 |
External Enclosure ............................................................... |
95 |
iii |
|

Chapter 1
Getting Started
This chapter first tells you step by step how to get the Tablet PC up and running. Then, you will find a section briefly introducing the external components of the Tablet PC.
NOTE: Depending on the model you purchased, the appearance of your Tablet PC may not be exactly the same as those shown in this manual.
1
Getting the Tablet PC Running
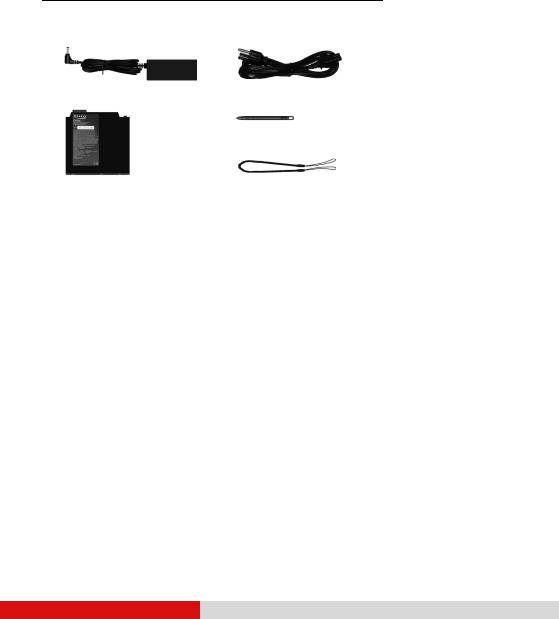
Unpacking
After unpacking the shipping carton, you should find these standard items:
UX10 Tablet PC
AC adapter |
AC power cord |
|
|
Battery pack |
Stylus |
|
|
|
Tether |
|
|
Document(s) |
Driver disc (optional) |
|
|
Inspect all the items. If any item is damage or missing, notify your dealer immediately.
2
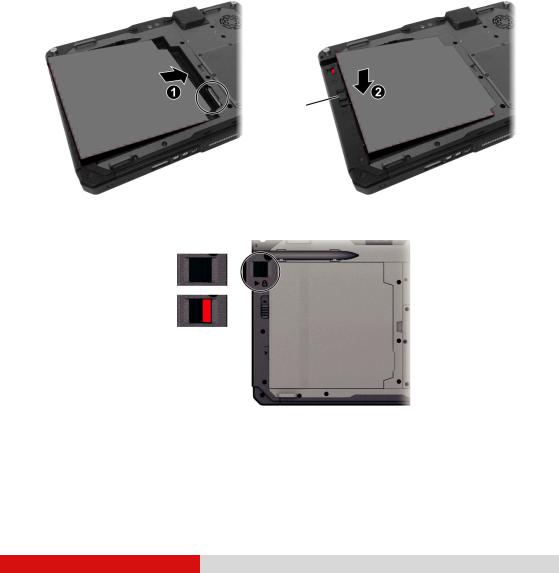
Installing the Battery Pack
1.With the battery pack correctly oriented, attach its connector side to the battery compartment at an angle () and then press down the other side (). The battery release latch should automatically engage.
NOTE: If you have the high capacity battery model, the battery pack looks different from the one shown here. The removal and installation method is the same.
Battery release latch
2. Slide the security lock to the locked position (  ).
).
Locked
Unlocked
CAUTION: Make sure the lock is correctly locked, not revealing the underneath red part.
3

Installing the Micro-SIM Card (Optional)
1.Locate the micro-SIM card slot. Slide the protective cover to the unlocked position (  ) and open the cover.
2.Remove one screw to detach the small metal plate that covers the micro-SIM card slot.
3.Noting the orientation, insert the micro-SIM card all the way into the slot.
NOTE: To remove the micro-SIM card, just push in the card to release it and then pull it out.
4
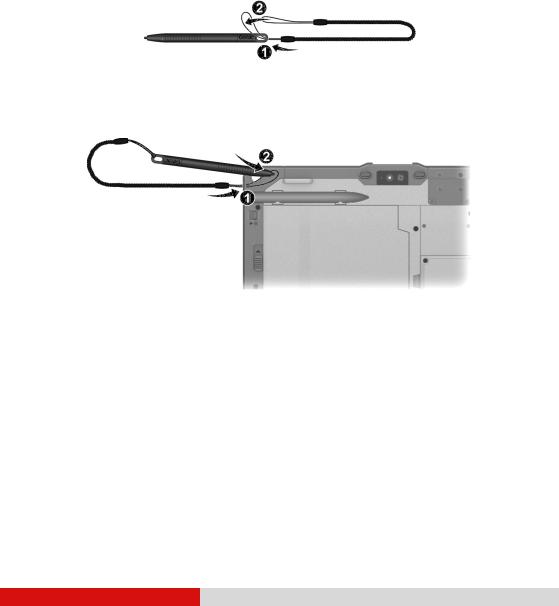
Using the Tether
A tether is provided for attaching the stylus to your Tablet.
1.Insert one of the tether’s loop ends through the hole of the stylus (as indicated by below). Then, insert the other end through the first loop (as indicated by below) and pull it tight.
2.Insert the other loop end to the tether hole on the Tablet PC (as indicated by below). Then, insert the stylus end through the loop (as indicated by below) and pull it tight.
NOTE: If the hard handle is installed, attach the tether to the D-ring on the hard handle.
5
Connecting to AC Power
CAUTION: Use only the AC adapter included with your Tablet PC. Using other AC adapters may damage the Tablet PC.
NOTE:
The battery pack is shipped to you in power saving mode that protects it from charging/discharging. It will get out of the mode to be ready for use when you install the battery pack and connect AC power to the Tablet PC for the very first time.
When the AC adapter is connected, it also charges the battery pack. For information on using battery power, see Chapter 3.
You must use AC power when starting up the Tablet PC for the very first time.
1.Plug the DC cord of the AC adapter to the power connector ().
2.Plug the female end of the AC power cord to the AC adapter and the male end to an electrical outlet ().
3.Power is being supplied from the electrical outlet to the AC adapter and onto your Tablet PC. Now, you are ready to turn on the Tablet PC.
6

Turning On and Off the Tablet PC
Turning On
Press the power button (  ) to start up. The Windows operating system should start.
NOTE: Tapping the screen during startup may invoke a pre-boot menu (unless the default settings have been changed). If the menu appears, simply select Continue.
Turning Off
When you finish a working session, you can stop the system by turning off the power or leaving it in Sleep or Hibernation mode:
To... |
|
|
|
|
|
Do this... |
Power off |
Select |
|
|
Power Shut down. |
||
|
||||||
|
||||||
(Shutdown) |
|
|
|
|
|
|
|
|
|
|
|
||
Sleep |
Press the power button.* |
|||||
|
-or- |
|
|
|
|
|
|
Tap |
|
Power Sleep. |
|||
|
|
|
|
|||
|
|
|||||
|
|
|
|
|
||
Hibernate |
By default, this option is not shown in the Start menu. If |
|||||
|
you want to use the feature, set up accordingly in Windows |
|||||
|
settings. |
|
|
|||
|
|
|
|
|
|
|
* “Sleep” is the default result of the action. You can change what the action does through Windows settings.
7

Identifying Hardware Components
CAUTION: You need to open the protective covers to access the connectors. When not using a connector, make sure to close the cover completely for waterand dust-proof integrity. (Engage the locking mechanism if existing.)
Front Components
8

Ref |
Component |
|
Description |
Camera cover |
Covers the camera lens. |
||
|
|
Slide the cover to open or close it. The cover |
|
|
|
provides privacy protection. |
|
|
|
|
|
Camera lens |
Allows you to use the camera function. |
||
IR sensor |
Detects the infrared energy of objects to form an |
||
|
(optional) |
image. The sensor flashes red light when in use. |
|
|
|
The near infrared (IR) imaging capability allows |
|
|
|
you to use Windows Hello face authentication. |
|
|
|
|
|
Camera indicator |
Lights up when the camera is in use. |
||
Touchscreen |
Displays and receives information for the Tablet PC. |
||
Light sensor |
Detects the surrounding lighting condition for |
||
|
|
automatic adjustment of the LCD brightness. |
|
|
|
|
|
P1 button |
Opens or closes the OSD Control Panel. |
||
|
|
When pressed longer: |
|
|
|
Serves as the Ctrl+Alt+Del keyboard keys. |
|
|
|
|
|
P2 button |
The default function is Camera or Barcode Trigger |
||
|
|
depending on your model. |
|
|
|
|
|
|
|
Camera |
Starts the G-Camera application. |
|
|
|
|
|
|
Barcode |
Serves as the trigger button for the barcode |
|
|
Trigger |
scanner if your model has the module. |
|
|
|
|
Windows logo Opens or closes the Start menu. button
Plus button |
Increases the sound volume. |
Minus button |
Decreases the sound volume. |
Power button |
Turns the power on or off. (The default “off” state |
|
is “Sleep mode.”) |
Speaker |
Sends out sound and voice from your Tablet PC. |
Microphone |
Receives sound and voice to record voice. |
9
Ref Component |
Description |
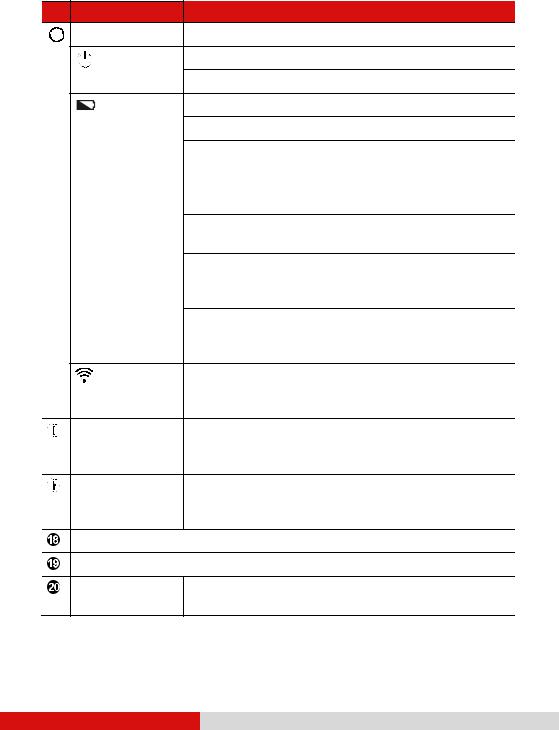
Indicators |
|
Power |
Lights blue when the power is on. |
Blinks blue when the system is in Sleep mode.
Battery |
Lights amber when the battery is being charged. |
|
Lights green when battery charging is completed. |
|
Blinks green to indicate the battery’s built-in high |
|
temperature protection mechanism is activated. |
|
CAUTION: Do not remove the battery during this |
|
period |
|
Blinks red (once per second) when the battery’s |
|
capacity is below 10%. |
|
Blinks red rapidly (once per 0.5 second) when there |
|
is a thermal protection problem. Ask for repair |
|
service in case this happens. |
|
Blinks amber when the battery charging is in an |
|
abnormal state. Replace the battery in case this |
|
happens. |
Airplane |
Lights blue when the RF radio of any RF feature |
mode |
(WLAN/Bluetooth/WWAN) is on. If Airplane mode |
|
is switched on, the light turns off. |
Fingerprint |
Serves as the fingerprint verification, preventing |
scanner |
unauthorized access to your Tablet PC. |
(optional) |
|
Magnetic stripe |
Reads magnetic stripe cards. |
reader |
|
(optional) |
|
See no. 2 in the “Right-Side Components” section.
See no. 3 in the “Right-Side Components” section.
HF RFID antenna Reads data from HF RFID tags. (optional)
NOTE: The hardware buttons (except the power button) can be re-defined using G-Manager.
10
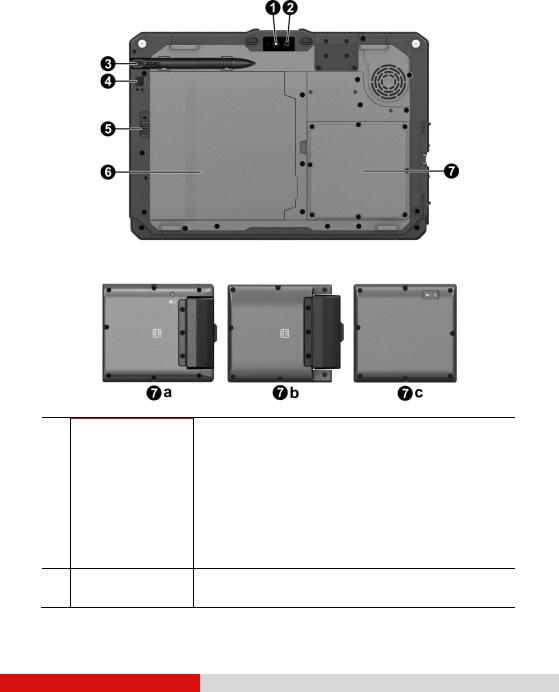
Rear Components
Ref |
Component |
Description |
Flash |
Provides extra light when taking pictures. |
|
Camera lens |
Allows you to use the camera function. |
|
|
|
When the camera lens is in use, the indicator |
|
|
beside it lights up. |
|
|
|
Stylus holder |
Holds the stylus. |
|
Security lock |
Locks the battery release latch. |
|
Battery release Releases the battery pack. latch
11

Ref |
|
Component |
Description |
|
Battery pack |
Supplies power to your Tablet PC when external |
|
|
|
|
power is not connected. |
|
|
|
NOTE: If you have the high capacity battery model, |
|
|
|
the battery pack looks different from the one |
|
|
|
shown here. |
|
|
|
|
|
Select models have one of the below components. |
||
|
a |
Bridge battery |
Provides enough extra power for the purpose of |
|
|
and smart card |
hot swapping the battery pack. |
|
|
reader module |
|
|
|
Accepts a smart card for additional security feature. |
|
|
|
|
|
|
b |
Smart card |
Accepts a smart card for additional security feature. |
|
|
reader module |
|
|
|
|
|
|
c |
Bridge battery |
Provides enough extra power for the purpose of |
|
|
module |
hot swapping the battery pack. |
|
|
|
|
Right-Side Components
Ref |
Component |
Description |
|
Kensington |
Locks the Tablet PC to a stationary object for |
||
|
lock |
security. |
|
RJ-45 connector Connects the LAN cable. (optional)
RS232 serial Connects a serial device. connector
(optional)
12

Left-Side Components
Slide the cover toward the unlocked position (  ) to open the cover.
Ref |
Component |
Description |
|
|
HDMI connector |
Connects a HDMI monitor or TV set. |
|
|
Micro-SIM card |
Accepts a micro-SIM card for models having the |
|
|
slot (optional) |
WWAN module. |
|
|
|
NOTE: The slot still exists but cannot be used for |
|
|
|
models without the WWAN module. |
|
|
|
|
|
|
USB 3.1 Gen 2 |
Connects a USB device. |
|
|
port |
|
|
|
|
|
|
|
Combo audio |
Connects a set of headphones or external |
|
|
connector |
speakers with amplifier. |
|
|
|
|
|
|
|
Supports a headset microphone with 4-pole TRRS |
|
|
|
3.5mm jack. |
|
|
|
|
|
|
Power connector |
Connects the AC adapter. |
13

Top Components
14
Ref |
|
Component |
Description |
|
|||
|
a |
None |
|
|
Or can be one of the below components depending on your model: |
||
|
|
|
|
|
b |
Barcode scanner |
Scans and reads barcodes. |
|
|
lens |
|
|
|
|
|
|
c |
HF RFID antenna |
Reads data from HF RFID tags. |
|
|
|
|
|
d |
USB 3.0 port |
Connects a USB device. |
|
|
|
|
|
e |
USB 3.1 Gen1 |
Connects a USB device that supports USB Type-C |
|
|
Type-C port |
connection. |
|
|
|
|
|
f |
RS232 serial |
Connects a serial device. |
|
|
connector |
|
|
|
|
|
|
g |
VGA connector |
Connects an external display monitor. |
|
|
|
|
|
h |
RJ-45 connector |
Connects the LAN cable. |
|
|
|
|
|
i |
MicroSD card |
Accepts a microSD card for removable storage |
|
|
slot |
media. |
|
|
|
|
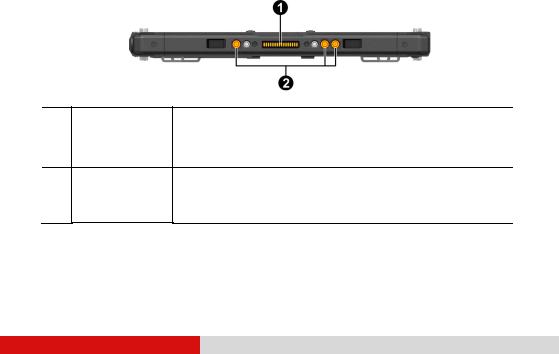
Bottom Components
Ref |
Component |
Description |
|
Docking |
Connects a proprietary dock such as the keyboard |
||
|
connector |
dock, office dock, and vehicle dock. |
|
Tri antenna Connects to the docking station for using external passthrough GPS/WWAN/WLAN antenna.
(optional)
15
Chapter 2
Operating Your
Tablet PC
This chapter provides information about the use of the Tablet PC.
If you are new to computers, reading this chapter will help you learn the operating basics. If you are already a computer user, you may choose to read only the parts containing information unique to your Tablet PC.
CAUTION:
Do not expose your skin to the Tablet PC when operating it in a very hot or cold environment.
The Tablet PC can get uncomfortably warm when you use it in high temperatures. As a safety precaution in such a circumstance, do not place the Tablet PC on your lap or touch it with your bare hands for extended periods of time. Prolonged body contact can cause discomfort and potentially a burn.
16
Navigating on the Screen
The screen of your Tablet PC is touch-sensitive. You can operate the Tablet PC by touching the screen with your finger or the stylus.
CAUTION: Do not use a sharp object such as a ballpoint pen or pencil on the touchscreen. Doing so may damage the touchscreen surface.
NOTE: An optical film has been attached to the screen before shipment. The film is a consumable, which will be worn out by possible scratches. You can purchase a new one when replacement is required.
Using the Touchscreen
Your Tablet PC has a capacitive touchscreen. This type of touchscreen responds to objects that have conductive properties, such as fingertips and a capacitive-tipped stylus.
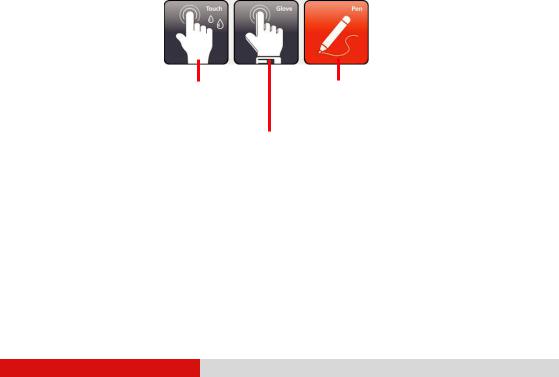
You can change the touchscreen sensitivity settings to suit your scenario. Double-tap the Touch Screen Mode shortcut on Windows desktop to open the settings menu and select one of the options (as shown below).
Select this if you prefer using fingertips. Also, select this when raindrops are falling on the screen and should be rejected as input.
Select this if you are using the stylus. (You must use the one supplied with your model.)
Select this if you are wearing gloves (referring to warm gloves or work gloves, not referring to touchscreen-capable gloves).
NOTE:
In high temperatures (above 60 oC / 140 °F), set the mode to Touch instead of Glove or Pen mode.
If liquid is spilled on the touchscreen causing a wet area, the area will stop responding to any inputs. For the area to function again, you must dry it.
17
The following table shows how you use the touchscreen to obtain equivalent mouse functions.
|
Term/Action |
|
Equivalent |
|
|
Mouse Function |
|
|
|
|
|
Tap: Touch the screen once. |
Click/Point |
||
|
|
||
Double-tap: Touch the screen twice rapidly. |
Double-click |
||
|
|
||
Tap and hold: Tap and hold until a popup menu appears. |
Right-click |
||
|
|
||
Drag: Hold the stylus (or finger) on the screen and drag |
Drag |
||
across the screen until reaching your destination. |
|
||
|
|
|
|
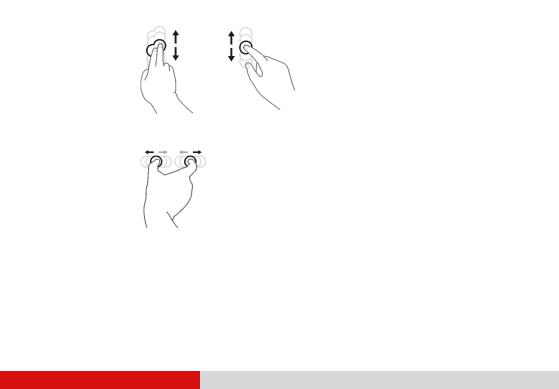
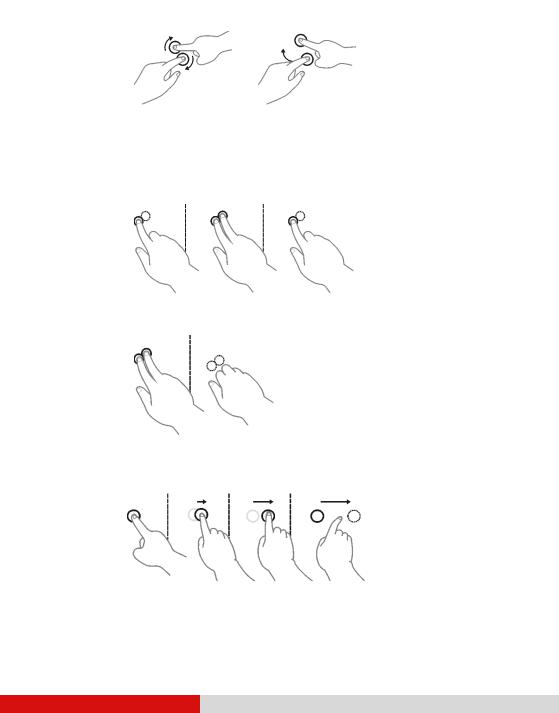
Using Multi-touch Gestures
You can interact with your Tablet PC by placing two fingers on the screen. The movement of the fingers across the screen creates “gestures,” which send commands to the Tablet PC.
Here are the multi-touch gestures that you can use:
|
Gestures |
|
|
Actions |
|
|
|
Descriptions |
|
|
|
|
( = finger down; |
= finger up) |
|
|
|
||
|
|
|
|
|
|
|
|
||
|
Pan |
|
|
|
|
|
Use panning to see |
||
|
(Scroll) |
|
|
|
|
|
another part of a page |
||
|
|
|
|
|
|
|
|
that has scroll bars. |
|
|
|
|
|
or |
|
|
|
|
|
|
|
|
|
Drag 1 or 2 fingers up or down. |
|
|
|
||
|
|
|
|
|
|
|
|
||
|
Zoom |
|
|
|
|
|
Use zooming to make |
||
|
(Pinch) |
|
|
|
|
|
an item (a photo for |
||
|
|
|
|
|
|
|
|
example) on the screen |
|
|
|
|
|
|
|
|
|
larger or smaller. The |
|
|
|
|
|
|
|
|
|
gesture works in |
|
|
|
|
|
Move two fingers apart/toward each |
|
applications that |
|||
|
|
|
|
|
support mouse wheel |
||||
|
|
|
|
other. |
|
|
|
||
|
|
|
|
|
|
|
zooming. |
||
|
|
|
|
|
|
|
|
||
|
|
|
|
|
|
|
|
|
|
18
|
Gestures |
|
|
|
Actions |
|
|
|
Descriptions |
|
|
|
|
( |
= finger down; |
= finger up) |
|
|
|
||
|
|
|
|
|
|
|
|
|||
|
Rotate |
|
|
|
|
|
|
Use rotating to move a |
||
|
|
|
|
|
|
|
|
|
picture or other item |
|
|
|
|
|
|
|
|
|
|
on the screen in a |
|
|
|
|
|
|
|
|
|
|
circular direction |
|
|
|
|
|
|
or |
|
|
|
(clockwise or counter- |
|
|
|
|
|
Move two fingers in opposing |
|
clockwise). The gesture |
||||
|
|
|
|
|
works in applications |
|||||
|
|
|
|
directions. |
|
|
|
|||
|
|
|
|
|
|
|
that support the |
|||
|
|
|
|
-or- |
|
|
|
|
||
|
|
|
|
|
|
|
|
specific gesture. |
||
|
|
|
|
Use one finger to pivot around |
|
|||||
|
|
|
|
|
|
|
||||
|
|
|
|
another. |
|
|
|
|
|
|
|
|
|
|
|
|
|
|
|
||
|
Press and |
|
|
|
|
|
|
Use press and tap to |
||
|
Tap |
|
|
|
|
|
|
access the shortcut |
||
|
|
|
|
|
|
|
|
|
menu. |
|
|
|
|
|
Press on target and tap using a |
|
|
|
|||
|
|
|
|
second finger. |
|
|
|
|
|
|
|
|
|
|
|
|
|
|
|||
|
Two- |
|
|
|
|
|
The function is defined |
|||
|
finger Tap |
|
|
|
|
|
by applications that |
|||
|
|
|
|
|
|
|
|
support the specific |
||
|
|
|
|
|
|
|
|
gesture. |
||
|
|
|
Tap two fingers at the same time |
|
|
|
||||
|
|
|
(where the target is in the midpoint |
|
|
|
||||
|
|
|
between the fingers). |
|
|
|
|
|
||
|
|
|
|
|
|
|
|
|
||
|
Flicks |
|
|
|
|
|
|
Flick left or right to |
||
|
|
|
|
|
|
|
|
|
navigate back and |
|
|
|
|
|
|
|
|
|
|
forward in a browser |
|
|
|
|
|
|
|
|
|
|
and other applications. |
|
|
|
|
|
|
|
|
|
|
The gesture works in |
|
|
|
|
|
Make quick drag gestures in the |
|
most applications that |
||||
|
|
|
|
|
support back and |
|||||
|
|
|
|
desired direction. |
|
|
|
forward. |
||
|
|
|
|
|
|
|
|
|
|
|
19

Using the Dual Mode Display (Optional)
Dual mode display (if your model has the feature) incorporates both touchscreen and digitizer functions.
The display is set to Touchscreen mode by default. Touchscreen mode provides all the functionalities that an ordinary touchscreen has. When the Tablet PC receives signals from the digitizer pen, the display automatically switches to Digitizer mode.
You can move the cursor by bringing the digitizer pen close to the screen, without actually touching the screen’s surface.
20
Using Network and Wireless
Connections
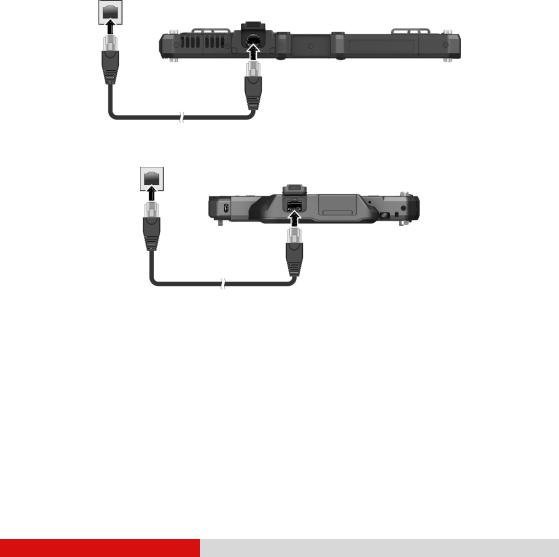
Using the LAN (Optional)
Select models have the LAN module. To connect the network cable to the LAN module, connect one end of the LAN cable to the RJ-45 connector on the Tablet PC and the other end to the network hub.
-or-
NOTE: The location of the connector depends on your model.
21

Using the WLAN
The WLAN (Wireless Local Area Network) module of your Tablet PC supports IEEE 802.11a/b/g/n/ac.
Turning On/Off the WLAN Radio
To turn on the WLAN radio:
Select  Settings Network & Internet Wi-Fi. Slide the Wi-Fi switch to the On position.
To turn off the WLAN radio:
You can turn off the WLAN radio the same way you turn it on.
If you want to quickly turn off all wireless radio, simply switch on Airplane mode. You can control the Airplane mode using one of the below methods.
Select  Settings Network & Internet Airplane mode.
Use the Airplane Mode button in the OSD Control Panel.
Connecting to a WLAN Network
1.Make sure that the WLAN function is enabled (as described above).
2.Select the network icon  in the lower right of the task bar.
3.Select the device you want to connect from the search results.
4.Some networks require a network security key or passphrase. To connect to one of those networks, ask your network administrator or Internet service provider (ISP) for the security key or passphrase.
For more information on setting a wireless network connection, refer to Windows online help.
22

Using the Bluetooth Feature
The Bluetooth technology allows short-range wireless communications between devices without requiring a cable connection. Data can be transmitted through walls, pockets and briefcases as long as two devices are within range.
Turning On/Off the Bluetooth Radio
To turn on the Bluetooth radio:
Select  Settings Devices Bluetooth. Slide the Bluetooth switch to the On position.
To turn off the Bluetooth radio:
You can turn off the Bluetooth radio the same way you turn it on.
If you want to quickly turn off all wireless radio, simply switch on Airplane mode. You can control the Airplane mode using one of the below methods.
Select  Settings Network & Internet Airplane mode.
Use the Airplane Mode button in the OSD Control Panel.
Connecting to another Bluetooth Device
1.Make sure that the Bluetooth function is enabled (as described above).
2.Make sure that the target Bluetooth device is turned on, discoverable and within close range. (See the documentation that came with the Bluetooth device.)
3.Select  Settings Devices Bluetooth.
4.Select the device you want to connect from the search results.
5.Depending on the type of Bluetooth device that you want to connect to, you will need to enter the pertinent information.
For detailed information on using the Bluetooth feature, see Windows’ online Help.
23

Using the WWAN Feature (Optional)
A WWAN (Wireless Wide Area Network) uses mobile telecommunication cellular network technologies to transfer data. The WWAN module of your Tablet PC supports 3G and 4G LTE.
NOTE:
Your model only supports data transmission. Voice transmission is not supported.
For instructions on installing the micro-SIM card, see “Installing the Micro-SIM Card (Optional)” in Chapter 1.
Turning On/Off the WWAN Radio
To turn on the WWAN radio:
Select  Settings Network & Internet Airplane mode. Slide the
Cellular switch to the On position.
To turn off the WWAN radio:
You can turn off the WWAN radio the same way you turn it on.
If you want to quickly turn off all wireless radio, simply switch on Airplane mode. You can control the Airplane mode using one of the below methods.
Select  Settings Network & Internet Airplane mode.
Use the Airplane Mode button in the OSD Control Panel.
Setting up a WWAN Connection
Select  Settings Network & Internet Cellular. (For detailed information on cellular settings in Windows 10, see Microsoft Support website.)
24

Chapter 3
Managing Power
Your Tablet PC operates either on external AC power or on internal battery power.
This chapter tells you how you can effectively manage power. To maintain optimal battery performance, it is important that you use the battery in the proper way.
25
 Loading...