

Page 1
GE
Oil & Gas Moisture
Aurora H2O
User’s Manual
ATTENTION!
This manual is intended for units with S/N 3999
(software v.001.A through v.001.U) or lower only.
[For units with S/N above 3999, use manual 910-317.]
910-284 Rev. J
April 2017
Page 2

Page 3

GE
Oil & Gas
Aurora H2O
Moisture Analyzer for Natural Gas
User’s Manual
910-284 Rev. J
April 2017
ATTENTION!
This manual is intended for units with S/N 3999
(software v.001.A through v.001U) or lower only.
[For units with S/N above 3999, use manual 910-317.]
www.gemeasurement.com
©2017 General Electric Company. All rights reserved.
Technical content subject to change without notice.
Page 4

[no content intended for this page]
ii
Page 5
Preface
Product Registration
Thank you for purchasing a model Aurora H2O from GE. Please register your product at
www.gemeasurement.com/productregistration
product information and special promotions.
for product support such as the latest software/firmware upgrades,
Services
GE provides customers with an experienced staff of customer support personnel ready to respond to technical inquiries,
as well as other remote and on-site support needs. To complement our broad portfolio of industry-leading solutions, we
offer several types of flexible and scalable support services including: Training, Product Repairs, Service Agreements
and more. Please visit www.gemeasurement.com/services
for more details.
Typographical Conventions
Note: These paragraphs provide information that provides a deeper understanding of the situation, but is not
essential to the proper completion of the instructions.
IMPORTANT: These paragraphs provide information that emphasizes instructions that are essential to proper setup of
the equipment. Failure to follow these instructions carefully may cause unreliable performance.
CAUTION! This symbol indicates a risk of potential minor personal injury and/or severe damage to
the equipment, unless these instructions are followed carefully.
WARNING! This symbol indicates a risk of potential serious personal injury, unless these
instructions are followed carefully.
Safety Issues
WARNING! It is the responsibility of the user to make sure all local, county, state and national
codes, regulations, rules and laws related to safety and safe operating conditions are met for each
installation.
Attention European Customers! To meet CE Mark requirements for all units intended for use in the
EU, all electrical cables must be installed as described in this manual.
Aurora H2O User’s Manual iii
Page 6
Preface
Auxiliary Equipment
Local Safety Standards
The user must make sure that he operates all auxiliary equipment in accordance with local codes, standards,
regulations, or laws applicable to safety.
Working Area
WARNING! Auxiliary equipment may have both manual and automatic modes of operation. As
equipment can move suddenly and without warning, do not enter the work cell of this equipment
during automatic operation, and do not enter the work envelope of this equipment during manual
operation. If you do, serious injury can result.
WARNING! Make sure that power to the auxiliary equipment is turned OFF and locked out before
you perform maintenance procedures on this equipment.
Qualification of Personnel
Make sure that all personnel have manufacturer-approved training applicable to the auxiliary equipment.
Personal Safety Equipment
Make sure that operators and maintenance personnel have all safety equipment applicable to the auxiliary equipment.
Examples include safety glasses, protective headgear, safety shoes, etc.
Unauthorized Operation
Make sure that unauthorized personnel cannot gain access to the operation of the equipment.
iv Aurora H2O User’s Manual
Page 7
Preface
Environmental Compliance
RoHS
The Aurora H2O fully complies with RoHS regulations.
Waste Electrical and Electronic Equipment (WEEE) Directive
GE Measurement & Control is an active participant in Europe’s Waste Electrical and Electronic Equipment (WEEE)
take-back initiative, directive 2012/19/EU.
The equipment that you bought has required the extraction and use of natural resources for its production. It may
contain hazardous substances that could impact health and the environment.
In order to avoid the dissemination of those substances in our environment and to diminish the pressure on the natural
resources, we encourage you to use the appropriate take-back systems. Those systems will reuse or recycle most of the
materials of your end of life equipment in a sound way.
The crossed-out wheeled bin symbol invites you to use those systems.
If you need more information on the collection, reuse and recycling systems, please contact your local or regional
waste administration.
Please visit http://www.gemeasurement.com/environmental-health-safety-ehs
information about this initiative.
for take-back instructions and more
Aurora H2O User’s Manual v
Page 8

Preface
[no content intended for this page]
vi Aurora H2O User’s Manual
Page 9

Contents
Product Registration . . . . . . . . . . . . . . . . . . . . . . . . . . . . . . . . . . . . . . . . . . . . . . . . . . . . . . . . . . . . . . . . . . . . . . . . . . . . . . . . . . . . . . . . .iii
Services . . . . . . . . . . . . . . . . . . . . . . . . . . . . . . . . . . . . . . . . . . . . . . . . . . . . . . . . . . . . . . . . . . . . . . . . . . . . . . . . . . . . . . . . . . . . . . . . . . . . .iii
Typographical Conventions . . . . . . . . . . . . . . . . . . . . . . . . . . . . . . . . . . . . . . . . . . . . . . . . . . . . . . . . . . . . . . . . . . . . . . . . . . . . . . . . . .iii
Safety Issues . . . . . . . . . . . . . . . . . . . . . . . . . . . . . . . . . . . . . . . . . . . . . . . . . . . . . . . . . . . . . . . . . . . . . . . . . . . . . . . . . . . . . . . . . . . . . . . .iii
Auxiliary Equipment. . . . . . . . . . . . . . . . . . . . . . . . . . . . . . . . . . . . . . . . . . . . . . . . . . . . . . . . . . . . . . . . . . . . . . . . . . . . . . . . . . . . . . . . . iv
Environmental Compliance. . . . . . . . . . . . . . . . . . . . . . . . . . . . . . . . . . . . . . . . . . . . . . . . . . . . . . . . . . . . . . . . . . . . . . . . . . . . . . . . . . . v
Chapter 1. Features and Capabilities
1.1 Overview. . . . . . . . . . . . . . . . . . . . . . . . . . . . . . . . . . . . . . . . . . . . . . . . . . . . . . . . . . . . . . . . . . . . . . . . . . . . . . . . . . . . . . . . . . . . . . . 1
1.2 Features . . . . . . . . . . . . . . . . . . . . . . . . . . . . . . . . . . . . . . . . . . . . . . . . . . . . . . . . . . . . . . . . . . . . . . . . . . . . . . . . . . . . . . . . . . . . . . .1
1.3 Theory of Operation . . . . . . . . . . . . . . . . . . . . . . . . . . . . . . . . . . . . . . . . . . . . . . . . . . . . . . . . . . . . . . . . . . . . . . . . . . . . . . . . . . . .2
1.4 Specifications . . . . . . . . . . . . . . . . . . . . . . . . . . . . . . . . . . . . . . . . . . . . . . . . . . . . . . . . . . . . . . . . . . . . . . . . . . . . . . . . . . . . . . . . . . 9
1.4.1 Power . . . . . . . . . . . . . . . . . . . . . . . . . . . . . . . . . . . . . . . . . . . . . . . . . . . . . . . . . . . . . . . . . . . . . . . . . . . . . . . . . . . . . . . . . .9
1.4.2 Range . . . . . . . . . . . . . . . . . . . . . . . . . . . . . . . . . . . . . . . . . . . . . . . . . . . . . . . . . . . . . . . . . . . . . . . . . . . . . . . . . . . . . . . . . . 9
1.4.3 Accuracy . . . . . . . . . . . . . . . . . . . . . . . . . . . . . . . . . . . . . . . . . . . . . . . . . . . . . . . . . . . . . . . . . . . . . . . . . . . . . . . . . . . . . . . 9
1.4.4 Response Time . . . . . . . . . . . . . . . . . . . . . . . . . . . . . . . . . . . . . . . . . . . . . . . . . . . . . . . . . . . . . . . . . . . . . . . . . . . . . . . . .9
1.4.5 Operating Pressure . . . . . . . . . . . . . . . . . . . . . . . . . . . . . . . . . . . . . . . . . . . . . . . . . . . . . . . . . . . . . . . . . . . . . . . . . . . . . 9
1.4.6 Temperature . . . . . . . . . . . . . . . . . . . . . . . . . . . . . . . . . . . . . . . . . . . . . . . . . . . . . . . . . . . . . . . . . . . . . . . . . . . . . . . . . .10
1.4.7 Flow Rate. . . . . . . . . . . . . . . . . . . . . . . . . . . . . . . . . . . . . . . . . . . . . . . . . . . . . . . . . . . . . . . . . . . . . . . . . . . . . . . . . . . . . .10
1.4.8 Display . . . . . . . . . . . . . . . . . . . . . . . . . . . . . . . . . . . . . . . . . . . . . . . . . . . . . . . . . . . . . . . . . . . . . . . . . . . . . . . . . . . . . . . .10
1.4.9 Inputs/Outputs . . . . . . . . . . . . . . . . . . . . . . . . . . . . . . . . . . . . . . . . . . . . . . . . . . . . . . . . . . . . . . . . . . . . . . . . . . . . . . . .10
1.4.10 Enclosure. . . . . . . . . . . . . . . . . . . . . . . . . . . . . . . . . . . . . . . . . . . . . . . . . . . . . . . . . . . . . . . . . . . . . . . . . . . . . . . . . . . . . .10
1.4.11 Laser Certification . . . . . . . . . . . . . . . . . . . . . . . . . . . . . . . . . . . . . . . . . . . . . . . . . . . . . . . . . . . . . . . . . . . . . . . . . . . . .10
1.4.12 User Interface . . . . . . . . . . . . . . . . . . . . . . . . . . . . . . . . . . . . . . . . . . . . . . . . . . . . . . . . . . . . . . . . . . . . . . . . . . . . . . . . .11
1.4.13 Weight and Dimensions . . . . . . . . . . . . . . . . . . . . . . . . . . . . . . . . . . . . . . . . . . . . . . . . . . . . . . . . . . . . . . . . . . . . . . . .11
1.4.14 Hazardous Area Certification . . . . . . . . . . . . . . . . . . . . . . . . . . . . . . . . . . . . . . . . . . . . . . . . . . . . . . . . . . . . . . . . . . .11
1.4.15 European Certification . . . . . . . . . . . . . . . . . . . . . . . . . . . . . . . . . . . . . . . . . . . . . . . . . . . . . . . . . . . . . . . . . . . . . . . . .11
1.4.16 Software . . . . . . . . . . . . . . . . . . . . . . . . . . . . . . . . . . . . . . . . . . . . . . . . . . . . . . . . . . . . . . . . . . . . . . . . . . . . . . . . . . . . . .11
1.4.17 Sampling System . . . . . . . . . . . . . . . . . . . . . . . . . . . . . . . . . . . . . . . . . . . . . . . . . . . . . . . . . . . . . . . . . . . . . . . . . . . . . .11
1.4.18 Wetted Components . . . . . . . . . . . . . . . . . . . . . . . . . . . . . . . . . . . . . . . . . . . . . . . . . . . . . . . . . . . . . . . . . . . . . . . . . . .11
Chapter 2. Installation
2.1 Introduction. . . . . . . . . . . . . . . . . . . . . . . . . . . . . . . . . . . . . . . . . . . . . . . . . . . . . . . . . . . . . . . . . . . . . . . . . . . . . . . . . . . . . . . . . . .13
2.2 Bill of Materials . . . . . . . . . . . . . . . . . . . . . . . . . . . . . . . . . . . . . . . . . . . . . . . . . . . . . . . . . . . . . . . . . . . . . . . . . . . . . . . . . . . . . . . .13
2.3 Unpacking . . . . . . . . . . . . . . . . . . . . . . . . . . . . . . . . . . . . . . . . . . . . . . . . . . . . . . . . . . . . . . . . . . . . . . . . . . . . . . . . . . . . . . . . . . . .13
2.4 Choosing A Site for Installation . . . . . . . . . . . . . . . . . . . . . . . . . . . . . . . . . . . . . . . . . . . . . . . . . . . . . . . . . . . . . . . . . . . . . . . . .14
2.5 Low Voltage Directive. . . . . . . . . . . . . . . . . . . . . . . . . . . . . . . . . . . . . . . . . . . . . . . . . . . . . . . . . . . . . . . . . . . . . . . . . . . . . . . . . .16
2.6 Mounting . . . . . . . . . . . . . . . . . . . . . . . . . . . . . . . . . . . . . . . . . . . . . . . . . . . . . . . . . . . . . . . . . . . . . . . . . . . . . . . . . . . . . . . . . . . . .16
Aurora H2O User’s Manual vii
Page 10

Contents
2.7 Optional Insertion Probe/Regulator. . . . . . . . . . . . . . . . . . . . . . . . . . . . . . . . . . . . . . . . . . . . . . . . . . . . . . . . . . . . . . . . . . . . .17
2.7.1 Description . . . . . . . . . . . . . . . . . . . . . . . . . . . . . . . . . . . . . . . . . . . . . . . . . . . . . . . . . . . . . . . . . . . . . . . . . . . . . . . . . . . .17
2.7.2 Installation . . . . . . . . . . . . . . . . . . . . . . . . . . . . . . . . . . . . . . . . . . . . . . . . . . . . . . . . . . . . . . . . . . . . . . . . . . . . . . . . . . . . 17
2.7.3 Setting the Pressure . . . . . . . . . . . . . . . . . . . . . . . . . . . . . . . . . . . . . . . . . . . . . . . . . . . . . . . . . . . . . . . . . . . . . . . . . . .25
2.8 Making Electrical Connections . . . . . . . . . . . . . . . . . . . . . . . . . . . . . . . . . . . . . . . . . . . . . . . . . . . . . . . . . . . . . . . . . . . . . . . . .26
2.9 Specific Conditions of Use . . . . . . . . . . . . . . . . . . . . . . . . . . . . . . . . . . . . . . . . . . . . . . . . . . . . . . . . . . . . . . . . . . . . . . . . . . . . .30
Chapter 3. Operation and General Programming
3.1 Using the Aurora H2O . . . . . . . . . . . . . . . . . . . . . . . . . . . . . . . . . . . . . . . . . . . . . . . . . . . . . . . . . . . . . . . . . . . . . . . . . . . . . . . . .33
3.2 Sample System. . . . . . . . . . . . . . . . . . . . . . . . . . . . . . . . . . . . . . . . . . . . . . . . . . . . . . . . . . . . . . . . . . . . . . . . . . . . . . . . . . . . . . . . 33
3.2.1 Aurora H2O Startup. . . . . . . . . . . . . . . . . . . . . . . . . . . . . . . . . . . . . . . . . . . . . . . . . . . . . . . . . . . . . . . . . . . . . . . . . . . . 33
3.2.2 Aurora H2O Shut Down . . . . . . . . . . . . . . . . . . . . . . . . . . . . . . . . . . . . . . . . . . . . . . . . . . . . . . . . . . . . . . . . . . . . . . . .34
3.2.3 Aurora H2O Purge Gas Connection . . . . . . . . . . . . . . . . . . . . . . . . . . . . . . . . . . . . . . . . . . . . . . . . . . . . . . . . . . . . .34
3.3 Keypad Features . . . . . . . . . . . . . . . . . . . . . . . . . . . . . . . . . . . . . . . . . . . . . . . . . . . . . . . . . . . . . . . . . . . . . . . . . . . . . . . . . . . . . .36
3.3.1 Indicator Lights. . . . . . . . . . . . . . . . . . . . . . . . . . . . . . . . . . . . . . . . . . . . . . . . . . . . . . . . . . . . . . . . . . . . . . . . . . . . . . . .37
3.3.2 The Magnetic Stylus . . . . . . . . . . . . . . . . . . . . . . . . . . . . . . . . . . . . . . . . . . . . . . . . . . . . . . . . . . . . . . . . . . . . . . . . . . . 37
3.3.3 The Default Display . . . . . . . . . . . . . . . . . . . . . . . . . . . . . . . . . . . . . . . . . . . . . . . . . . . . . . . . . . . . . . . . . . . . . . . . . . . .37
3.3.4 Unlocking the Keypad. . . . . . . . . . . . . . . . . . . . . . . . . . . . . . . . . . . . . . . . . . . . . . . . . . . . . . . . . . . . . . . . . . . . . . . . . .38
3.3.5 Keypad Lock-Out Switch . . . . . . . . . . . . . . . . . . . . . . . . . . . . . . . . . . . . . . . . . . . . . . . . . . . . . . . . . . . . . . . . . . . . . . .38
3.3.6 Accessing the Menus . . . . . . . . . . . . . . . . . . . . . . . . . . . . . . . . . . . . . . . . . . . . . . . . . . . . . . . . . . . . . . . . . . . . . . . . . .39
3.3.7 Entering Numeric Values . . . . . . . . . . . . . . . . . . . . . . . . . . . . . . . . . . . . . . . . . . . . . . . . . . . . . . . . . . . . . . . . . . . . . . .39
3.3.8 Starting Up . . . . . . . . . . . . . . . . . . . . . . . . . . . . . . . . . . . . . . . . . . . . . . . . . . . . . . . . . . . . . . . . . . . . . . . . . . . . . . . . . . . . 40
3.4 Setting Up the Display . . . . . . . . . . . . . . . . . . . . . . . . . . . . . . . . . . . . . . . . . . . . . . . . . . . . . . . . . . . . . . . . . . . . . . . . . . . . . . . . .40
3.4.1 Selecting Primary Units . . . . . . . . . . . . . . . . . . . . . . . . . . . . . . . . . . . . . . . . . . . . . . . . . . . . . . . . . . . . . . . . . . . . . . . . 40
3.4.2 Selecting Alt 1 and Alt 2 Units . . . . . . . . . . . . . . . . . . . . . . . . . . . . . . . . . . . . . . . . . . . . . . . . . . . . . . . . . . . . . . . . . .41
3.4.3 Setting Decimal Places. . . . . . . . . . . . . . . . . . . . . . . . . . . . . . . . . . . . . . . . . . . . . . . . . . . . . . . . . . . . . . . . . . . . . . . . .41
3.4.4 Data/Scan. . . . . . . . . . . . . . . . . . . . . . . . . . . . . . . . . . . . . . . . . . . . . . . . . . . . . . . . . . . . . . . . . . . . . . . . . . . . . . . . . . . . .41
3.4.5 Adjust . . . . . . . . . . . . . . . . . . . . . . . . . . . . . . . . . . . . . . . . . . . . . . . . . . . . . . . . . . . . . . . . . . . . . . . . . . . . . . . . . . . . . . . . .42
3.4.6 Reverse . . . . . . . . . . . . . . . . . . . . . . . . . . . . . . . . . . . . . . . . . . . . . . . . . . . . . . . . . . . . . . . . . . . . . . . . . . . . . . . . . . . . . . .42
3.5 Setting Up the Outputs . . . . . . . . . . . . . . . . . . . . . . . . . . . . . . . . . . . . . . . . . . . . . . . . . . . . . . . . . . . . . . . . . . . . . . . . . . . . . . . .42
3.5.1 Selecting an Output for Setup . . . . . . . . . . . . . . . . . . . . . . . . . . . . . . . . . . . . . . . . . . . . . . . . . . . . . . . . . . . . . . . . . .42
3.5.2 Selecting Output Units . . . . . . . . . . . . . . . . . . . . . . . . . . . . . . . . . . . . . . . . . . . . . . . . . . . . . . . . . . . . . . . . . . . . . . . . .43
3.5.3 Selecting an Output Type . . . . . . . . . . . . . . . . . . . . . . . . . . . . . . . . . . . . . . . . . . . . . . . . . . . . . . . . . . . . . . . . . . . . . .43
3.5.4 Changing the Upper Output Span . . . . . . . . . . . . . . . . . . . . . . . . . . . . . . . . . . . . . . . . . . . . . . . . . . . . . . . . . . . . . .43
3.5.5 Changing the Lower Output Span . . . . . . . . . . . . . . . . . . . . . . . . . . . . . . . . . . . . . . . . . . . . . . . . . . . . . . . . . . . . . .44
3.5.6 NAMUR Response . . . . . . . . . . . . . . . . . . . . . . . . . . . . . . . . . . . . . . . . . . . . . . . . . . . . . . . . . . . . . . . . . . . . . . . . . . . . .44
3.5.7 Testing the Output . . . . . . . . . . . . . . . . . . . . . . . . . . . . . . . . . . . . . . . . . . . . . . . . . . . . . . . . . . . . . . . . . . . . . . . . . . . . .45
3.5.8 Trimming the Outputs. . . . . . . . . . . . . . . . . . . . . . . . . . . . . . . . . . . . . . . . . . . . . . . . . . . . . . . . . . . . . . . . . . . . . . . . . .46
viii Aurora H2O User’s Manual
Page 11

Contents
3.6 Setting Up the Alarms . . . . . . . . . . . . . . . . . . . . . . . . . . . . . . . . . . . . . . . . . . . . . . . . . . . . . . . . . . . . . . . . . . . . . . . . . . . . . . . . .47
3.6.1 Selecting an Alarm Output . . . . . . . . . . . . . . . . . . . . . . . . . . . . . . . . . . . . . . . . . . . . . . . . . . . . . . . . . . . . . . . . . . . . .47
3.6.2 Selecting Alarm Status . . . . . . . . . . . . . . . . . . . . . . . . . . . . . . . . . . . . . . . . . . . . . . . . . . . . . . . . . . . . . . . . . . . . . . . . .48
3.6.3 Selecting Alarm Units . . . . . . . . . . . . . . . . . . . . . . . . . . . . . . . . . . . . . . . . . . . . . . . . . . . . . . . . . . . . . . . . . . . . . . . . . .48
3.6.4 Selecting an Alarm Type. . . . . . . . . . . . . . . . . . . . . . . . . . . . . . . . . . . . . . . . . . . . . . . . . . . . . . . . . . . . . . . . . . . . . . . .49
3.6.5 How the Alarm Types Work. . . . . . . . . . . . . . . . . . . . . . . . . . . . . . . . . . . . . . . . . . . . . . . . . . . . . . . . . . . . . . . . . . . . .49
3.6.6 Changing the Upper Alarm Span. . . . . . . . . . . . . . . . . . . . . . . . . . . . . . . . . . . . . . . . . . . . . . . . . . . . . . . . . . . . . . . .50
3.6.7 Changing the Lower Alarm Span. . . . . . . . . . . . . . . . . . . . . . . . . . . . . . . . . . . . . . . . . . . . . . . . . . . . . . . . . . . . . . . .50
Chapter 4. Programming Advanced Features
4.1 Comm Port Settings . . . . . . . . . . . . . . . . . . . . . . . . . . . . . . . . . . . . . . . . . . . . . . . . . . . . . . . . . . . . . . . . . . . . . . . . . . . . . . . . . . .51
4.1.1 Selecting a Comm Port . . . . . . . . . . . . . . . . . . . . . . . . . . . . . . . . . . . . . . . . . . . . . . . . . . . . . . . . . . . . . . . . . . . . . . . . .51
4.1.2 Setting the Baud Rate . . . . . . . . . . . . . . . . . . . . . . . . . . . . . . . . . . . . . . . . . . . . . . . . . . . . . . . . . . . . . . . . . . . . . . . . . .51
4.1.3 Setting Parity . . . . . . . . . . . . . . . . . . . . . . . . . . . . . . . . . . . . . . . . . . . . . . . . . . . . . . . . . . . . . . . . . . . . . . . . . . . . . . . . . .52
4.1.4 Selecting Protocol. . . . . . . . . . . . . . . . . . . . . . . . . . . . . . . . . . . . . . . . . . . . . . . . . . . . . . . . . . . . . . . . . . . . . . . . . . . . . .52
4.1.5 Setting the Network ID . . . . . . . . . . . . . . . . . . . . . . . . . . . . . . . . . . . . . . . . . . . . . . . . . . . . . . . . . . . . . . . . . . . . . . . . .52
4.2 Adjust Offset Values . . . . . . . . . . . . . . . . . . . . . . . . . . . . . . . . . . . . . . . . . . . . . . . . . . . . . . . . . . . . . . . . . . . . . . . . . . . . . . . . . . .53
4.2.1 Adjusting the PPMv Offset . . . . . . . . . . . . . . . . . . . . . . . . . . . . . . . . . . . . . . . . . . . . . . . . . . . . . . . . . . . . . . . . . . . . . .53
4.2.2 Adjusting the Smoothing Filter. . . . . . . . . . . . . . . . . . . . . . . . . . . . . . . . . . . . . . . . . . . . . . . . . . . . . . . . . . . . . . . . . .53
4.2.3 Adjusting the Scan Averaging . . . . . . . . . . . . . . . . . . . . . . . . . . . . . . . . . . . . . . . . . . . . . . . . . . . . . . . . . . . . . . . . . .54
4.2.4 Setting the Dew Point Calculation Method. . . . . . . . . . . . . . . . . . . . . . . . . . . . . . . . . . . . . . . . . . . . . . . . . . . . . . .55
4.3 Set Up the Background Gas . . . . . . . . . . . . . . . . . . . . . . . . . . . . . . . . . . . . . . . . . . . . . . . . . . . . . . . . . . . . . . . . . . . . . . . . . . . .56
4.3.1 Selecting the Type of Gas . . . . . . . . . . . . . . . . . . . . . . . . . . . . . . . . . . . . . . . . . . . . . . . . . . . . . . . . . . . . . . . . . . . . . .56
4.3.2 Setting the Z Factor . . . . . . . . . . . . . . . . . . . . . . . . . . . . . . . . . . . . . . . . . . . . . . . . . . . . . . . . . . . . . . . . . . . . . . . . . . . .57
4.3.3 Entering a Label . . . . . . . . . . . . . . . . . . . . . . . . . . . . . . . . . . . . . . . . . . . . . . . . . . . . . . . . . . . . . . . . . . . . . . . . . . . . . . .58
4.3.4 Adjusting the Gas Offset. . . . . . . . . . . . . . . . . . . . . . . . . . . . . . . . . . . . . . . . . . . . . . . . . . . . . . . . . . . . . . . . . . . . . . . .60
4.4 Clock Settings . . . . . . . . . . . . . . . . . . . . . . . . . . . . . . . . . . . . . . . . . . . . . . . . . . . . . . . . . . . . . . . . . . . . . . . . . . . . . . . . . . . . . . . . .61
4.4.1 Resetting the Hour . . . . . . . . . . . . . . . . . . . . . . . . . . . . . . . . . . . . . . . . . . . . . . . . . . . . . . . . . . . . . . . . . . . . . . . . . . . . .61
4.4.2 Resetting the Minutes . . . . . . . . . . . . . . . . . . . . . . . . . . . . . . . . . . . . . . . . . . . . . . . . . . . . . . . . . . . . . . . . . . . . . . . . . .61
4.4.3 Resetting the Month . . . . . . . . . . . . . . . . . . . . . . . . . . . . . . . . . . . . . . . . . . . . . . . . . . . . . . . . . . . . . . . . . . . . . . . . . . .61
4.4.4 Resetting the Date . . . . . . . . . . . . . . . . . . . . . . . . . . . . . . . . . . . . . . . . . . . . . . . . . . . . . . . . . . . . . . . . . . . . . . . . . . . . .62
4.4.5 Resetting the Year . . . . . . . . . . . . . . . . . . . . . . . . . . . . . . . . . . . . . . . . . . . . . . . . . . . . . . . . . . . . . . . . . . . . . . . . . . . . .62
4.5 Pressure Settings . . . . . . . . . . . . . . . . . . . . . . . . . . . . . . . . . . . . . . . . . . . . . . . . . . . . . . . . . . . . . . . . . . . . . . . . . . . . . . . . . . . . . .63
4.5.1 Setting Pressure Units. . . . . . . . . . . . . . . . . . . . . . . . . . . . . . . . . . . . . . . . . . . . . . . . . . . . . . . . . . . . . . . . . . . . . . . . . .63
4.5.2 Setting the Source . . . . . . . . . . . . . . . . . . . . . . . . . . . . . . . . . . . . . . . . . . . . . . . . . . . . . . . . . . . . . . . . . . . . . . . . . . . . .63
4.5.3 Changing the Constant. . . . . . . . . . . . . . . . . . . . . . . . . . . . . . . . . . . . . . . . . . . . . . . . . . . . . . . . . . . . . . . . . . . . . . . . .63
4.5.4 Editing Pressure Calibration . . . . . . . . . . . . . . . . . . . . . . . . . . . . . . . . . . . . . . . . . . . . . . . . . . . . . . . . . . . . . . . . . . . .64
Aurora H2O User’s Manual ix
Page 12

Contents
4.6 Regional Settings. . . . . . . . . . . . . . . . . . . . . . . . . . . . . . . . . . . . . . . . . . . . . . . . . . . . . . . . . . . . . . . . . . . . . . . . . . . . . . . . . . . . . .65
4.6.1 Setting the Country Code . . . . . . . . . . . . . . . . . . . . . . . . . . . . . . . . . . . . . . . . . . . . . . . . . . . . . . . . . . . . . . . . . . . . . .65
4.6.2 Setting the Decimal Format . . . . . . . . . . . . . . . . . . . . . . . . . . . . . . . . . . . . . . . . . . . . . . . . . . . . . . . . . . . . . . . . . . . . 66
4.6.3 Setting the Date Format . . . . . . . . . . . . . . . . . . . . . . . . . . . . . . . . . . . . . . . . . . . . . . . . . . . . . . . . . . . . . . . . . . . . . . .66
4.6.4 Setting the Unit System . . . . . . . . . . . . . . . . . . . . . . . . . . . . . . . . . . . . . . . . . . . . . . . . . . . . . . . . . . . . . . . . . . . . . . . .66
4.7 User Calibration . . . . . . . . . . . . . . . . . . . . . . . . . . . . . . . . . . . . . . . . . . . . . . . . . . . . . . . . . . . . . . . . . . . . . . . . . . . . . . . . . . . . . . .67
4.8 Service Settings . . . . . . . . . . . . . . . . . . . . . . . . . . . . . . . . . . . . . . . . . . . . . . . . . . . . . . . . . . . . . . . . . . . . . . . . . . . . . . . . . . . . . . . 69
4.9 Aurora H2O Information . . . . . . . . . . . . . . . . . . . . . . . . . . . . . . . . . . . . . . . . . . . . . . . . . . . . . . . . . . . . . . . . . . . . . . . . . . . . . . . 70
4.9.1 Checking the ID. . . . . . . . . . . . . . . . . . . . . . . . . . . . . . . . . . . . . . . . . . . . . . . . . . . . . . . . . . . . . . . . . . . . . . . . . . . . . . . . 70
4.9.2 Checking the System Status. . . . . . . . . . . . . . . . . . . . . . . . . . . . . . . . . . . . . . . . . . . . . . . . . . . . . . . . . . . . . . . . . . . . 70
4.9.3 Checking the Software . . . . . . . . . . . . . . . . . . . . . . . . . . . . . . . . . . . . . . . . . . . . . . . . . . . . . . . . . . . . . . . . . . . . . . . . .71
4.9.4 Checking the Gas Composition . . . . . . . . . . . . . . . . . . . . . . . . . . . . . . . . . . . . . . . . . . . . . . . . . . . . . . . . . . . . . . . . .71
4.9.5 Checking the Alternate Gas Composition . . . . . . . . . . . . . . . . . . . . . . . . . . . . . . . . . . . . . . . . . . . . . . . . . . . . . . .72
4.10 Locking/Unlocking the Display. . . . . . . . . . . . . . . . . . . . . . . . . . . . . . . . . . . . . . . . . . . . . . . . . . . . . . . . . . . . . . . . . . . . . . . . . 73
Chapter 5. AuroraView Interface Software
5.1 Capabilities . . . . . . . . . . . . . . . . . . . . . . . . . . . . . . . . . . . . . . . . . . . . . . . . . . . . . . . . . . . . . . . . . . . . . . . . . . . . . . . . . . . . . . . . . . . 77
5.2 Requirements . . . . . . . . . . . . . . . . . . . . . . . . . . . . . . . . . . . . . . . . . . . . . . . . . . . . . . . . . . . . . . . . . . . . . . . . . . . . . . . . . . . . . . . . .77
5.3 Installing AuroraView. . . . . . . . . . . . . . . . . . . . . . . . . . . . . . . . . . . . . . . . . . . . . . . . . . . . . . . . . . . . . . . . . . . . . . . . . . . . . . . . . .78
5.4 Starting AuroraView . . . . . . . . . . . . . . . . . . . . . . . . . . . . . . . . . . . . . . . . . . . . . . . . . . . . . . . . . . . . . . . . . . . . . . . . . . . . . . . . . . .85
5.5 Using the Main Menus . . . . . . . . . . . . . . . . . . . . . . . . . . . . . . . . . . . . . . . . . . . . . . . . . . . . . . . . . . . . . . . . . . . . . . . . . . . . . . . . .87
5.6 Datalogging with AuroraView . . . . . . . . . . . . . . . . . . . . . . . . . . . . . . . . . . . . . . . . . . . . . . . . . . . . . . . . . . . . . . . . . . . . . . . . . .92
5.7 Working with Trend Plots, Trend Tabular Data and Scan Plots . . . . . . . . . . . . . . . . . . . . . . . . . . . . . . . . . . . . . . . . . . .93
Chapter 6. Maintenance
6.1 Spare Parts . . . . . . . . . . . . . . . . . . . . . . . . . . . . . . . . . . . . . . . . . . . . . . . . . . . . . . . . . . . . . . . . . . . . . . . . . . . . . . . . . . . . . . . . . . .99
6.2 Cleaning the Mirror . . . . . . . . . . . . . . . . . . . . . . . . . . . . . . . . . . . . . . . . . . . . . . . . . . . . . . . . . . . . . . . . . . . . . . . . . . . . . . . . . . . .99
6.2.1 Instructions for Optical Absorption Cell Style 1 . . . . . . . . . . . . . . . . . . . . . . . . . . . . . . . . . . . . . . . . . . . . . . . . 101
6.2.2 Instructions for Optical Absorption Cell Style 2 . . . . . . . . . . . . . . . . . . . . . . . . . . . . . . . . . . . . . . . . . . . . . . . . 106
6.3 Replacing the Filter Element . . . . . . . . . . . . . . . . . . . . . . . . . . . . . . . . . . . . . . . . . . . . . . . . . . . . . . . . . . . . . . . . . . . . . . . . . 110
Chapter 7. Troubleshooting
7.1 Introduction. . . . . . . . . . . . . . . . . . . . . . . . . . . . . . . . . . . . . . . . . . . . . . . . . . . . . . . . . . . . . . . . . . . . . . . . . . . . . . . . . . . . . . . . . 113
7.2 Blank Display . . . . . . . . . . . . . . . . . . . . . . . . . . . . . . . . . . . . . . . . . . . . . . . . . . . . . . . . . . . . . . . . . . . . . . . . . . . . . . . . . . . . . . . 113
7.3 Display Dim or Hard to Read . . . . . . . . . . . . . . . . . . . . . . . . . . . . . . . . . . . . . . . . . . . . . . . . . . . . . . . . . . . . . . . . . . . . . . . . . 113
7.4 Status Messages and Indicators . . . . . . . . . . . . . . . . . . . . . . . . . . . . . . . . . . . . . . . . . . . . . . . . . . . . . . . . . . . . . . . . . . . . . 113
7.5 No Flow Measurement Indicated on Aurora H2O Measurement Cell Outlet . . . . . . . . . . . . . . . . . . . . . . . . . . . . . 115
7.6 Verifying Aurora H2O Performance in the Field. . . . . . . . . . . . . . . . . . . . . . . . . . . . . . . . . . . . . . . . . . . . . . . . . . . . . . . . 115
7.6.1 Using A Portable Hygrometer . . . . . . . . . . . . . . . . . . . . . . . . . . . . . . . . . . . . . . . . . . . . . . . . . . . . . . . . . . . . . . . . 115
7.6.2 Using a Moisture Standard . . . . . . . . . . . . . . . . . . . . . . . . . . . . . . . . . . . . . . . . . . . . . . . . . . . . . . . . . . . . . . . . . . . 116
7.7 Background Selection Lockout . . . . . . . . . . . . . . . . . . . . . . . . . . . . . . . . . . . . . . . . . . . . . . . . . . . . . . . . . . . . . . . . . . . . . . . 117
x Aurora H2O User’s Manual
Page 13

Contents
Appendix A. MODBUS RTU/RS485 Communications
A.1 Introduction . . . . . . . . . . . . . . . . . . . . . . . . . . . . . . . . . . . . . . . . . . . . . . . . . . . . . . . . . . . . . . . . . . . . . . . . . . . . . . . . . . . . . . . . . 119
A.2 Modbus Functions and Data Types . . . . . . . . . . . . . . . . . . . . . . . . . . . . . . . . . . . . . . . . . . . . . . . . . . . . . . . . . . . . . . . . . . . 119
A.3 Modbus Registers . . . . . . . . . . . . . . . . . . . . . . . . . . . . . . . . . . . . . . . . . . . . . . . . . . . . . . . . . . . . . . . . . . . . . . . . . . . . . . . . . . . 120
A.4 Modbus System Status Codes . . . . . . . . . . . . . . . . . . . . . . . . . . . . . . . . . . . . . . . . . . . . . . . . . . . . . . . . . . . . . . . . . . . . . . . . 125
Aurora H2O User’s Manual xi
Page 14

Contents
[no content intended for this page]
xii Aurora H2O User’s Manual
Page 15

Chapter 1. Features and Capabilities
Chapter 1. Features and Capabilities
1.1 Overview
GE’s Aurora H2O Moisture Analyzer for Natural Gas makes it possible for natural gas processing and transportation
facilities to monitor moisture content in real-time with high precision and reliability.
Aurora H2O analyzer uses tunable diode laser absorption spectroscopy (TDLAS) to measure moisture in natural
The
gas at the speed of light. The analyzer is suitable for installation in hazardous areas and operates over a wide range of
environmental conditions.
compliance. Once process upsets are corrected and the gas dries out, the fast response quickly enables natural gas to be
cleared for entry into the “energy grid”.
CLASS 1 LASER PRODUCT
WARNING! Use of controls or adjustments or the performance of procedures other than those
specified herein may result in hazardous laser exposure.
Aurora’s fast response quickly alerts and documents when moisture concentrations are out of
1.2 Features
Optical response: < 2 seconds after flow cell is purged.
•
• No cross sensitivity to glycols or amines.
• Direct readout in lbs/mmscf, mg/m
3
or ppm.
• Reads process pressure dew point (with user programmable constant or live auxiliary input for process
pressure).
• Turnkey sampling system specifically designed for natural gas applications ensures measurement integrity.
• Magnetic Stylus enables through-glass programming – hot permit not required to field program.
• Explosion-proof/Flameproof design
• 4-20 mA signals and RS-232/485 MODBUS RTU for connection to SCADA or plant monitoring system.
• Supplied with AuroraView software for remote configuration, data logging and data retrieval capacity.
• NIST traceable calibration.
• In conformance with IEC 60825-1 Edition 2.0, Safety of Laser Products.
Aurora H2O User’s Manual 1
Page 16

Chapter 1. Features and Capabilities
AIn
I
o
I
---
SLN==
1.3 Theory of Operation
The GE Aurora H2O (Tunable Diode Laser Absorption Spectroscopy) hygrometer for natural gas is a system designed
to continuously monitor the moisture content in natural gas. It fundamentally measures the partial pressure of water
vapor (water in the gas state), and with the simultaneous measurement of pressure and temperature, provides readings
and both analog and digital signal transmission of user-selectable moisture parameters including dew point
temperature, volume ratio and absolute humidity (lbs/MMSCF or mg/m
Aurora H2O is supplied with an integrated sampling system which includes an optional pipe-mounted liquid
The
separator and pressure reducing valve/regulator, and the following components mounted within a stainless steel
enclosure: isolation valve, coalescing filter, coalescer flow control valve, sample cell control valve, second pressure
reducing valve/regulator, and flow indicator (rotameter), as well as an optional electrical heater and thermostat.
The fundamental water vapor pressure measurement is based on the Beer-Lambert Law:
where: A = Absorbance
I = Light intensity transmitted through a sample gas
= Incident light intensity
I
o
S = Absorption coefficient*
L = Absorption path length (a constant)
N = Concentration of the water vapor in the absorption cell
3
) in addition to temperature and pressure.
* The absorption coefficient is a constant for a specific gas composition at a given pressure and temperature.
The concentration of the water is directly related to the partial pressure. At certain specific frequencies, light energy
will be absorbed by water molecules. As the concentration of water increases, the absorption also increases. The
H2O
sweeps the diode laser output across a narrow band in the near infrared spectrum and, by measuring the light
Aurora
intensity with a photo detector, is able to provide a direct indication of the partial pressure of water. The partial
pressure, multiplied by 10
6
and divided by the total pressure, yields the volume ratio in ppmv (parts per million by
volume).
The laser diode is housed in a hermetically sealed and dry housing. The light is transmitted through a window made of
proprietary transparent material. The light travels through a stainless steel cell and is reflected off a gold-plated mirror
and returned to a photo detector, where the light intensity is measured.
2 Aurora H2O User’s Manual
Page 17
Chapter 1. Features and Capabilities
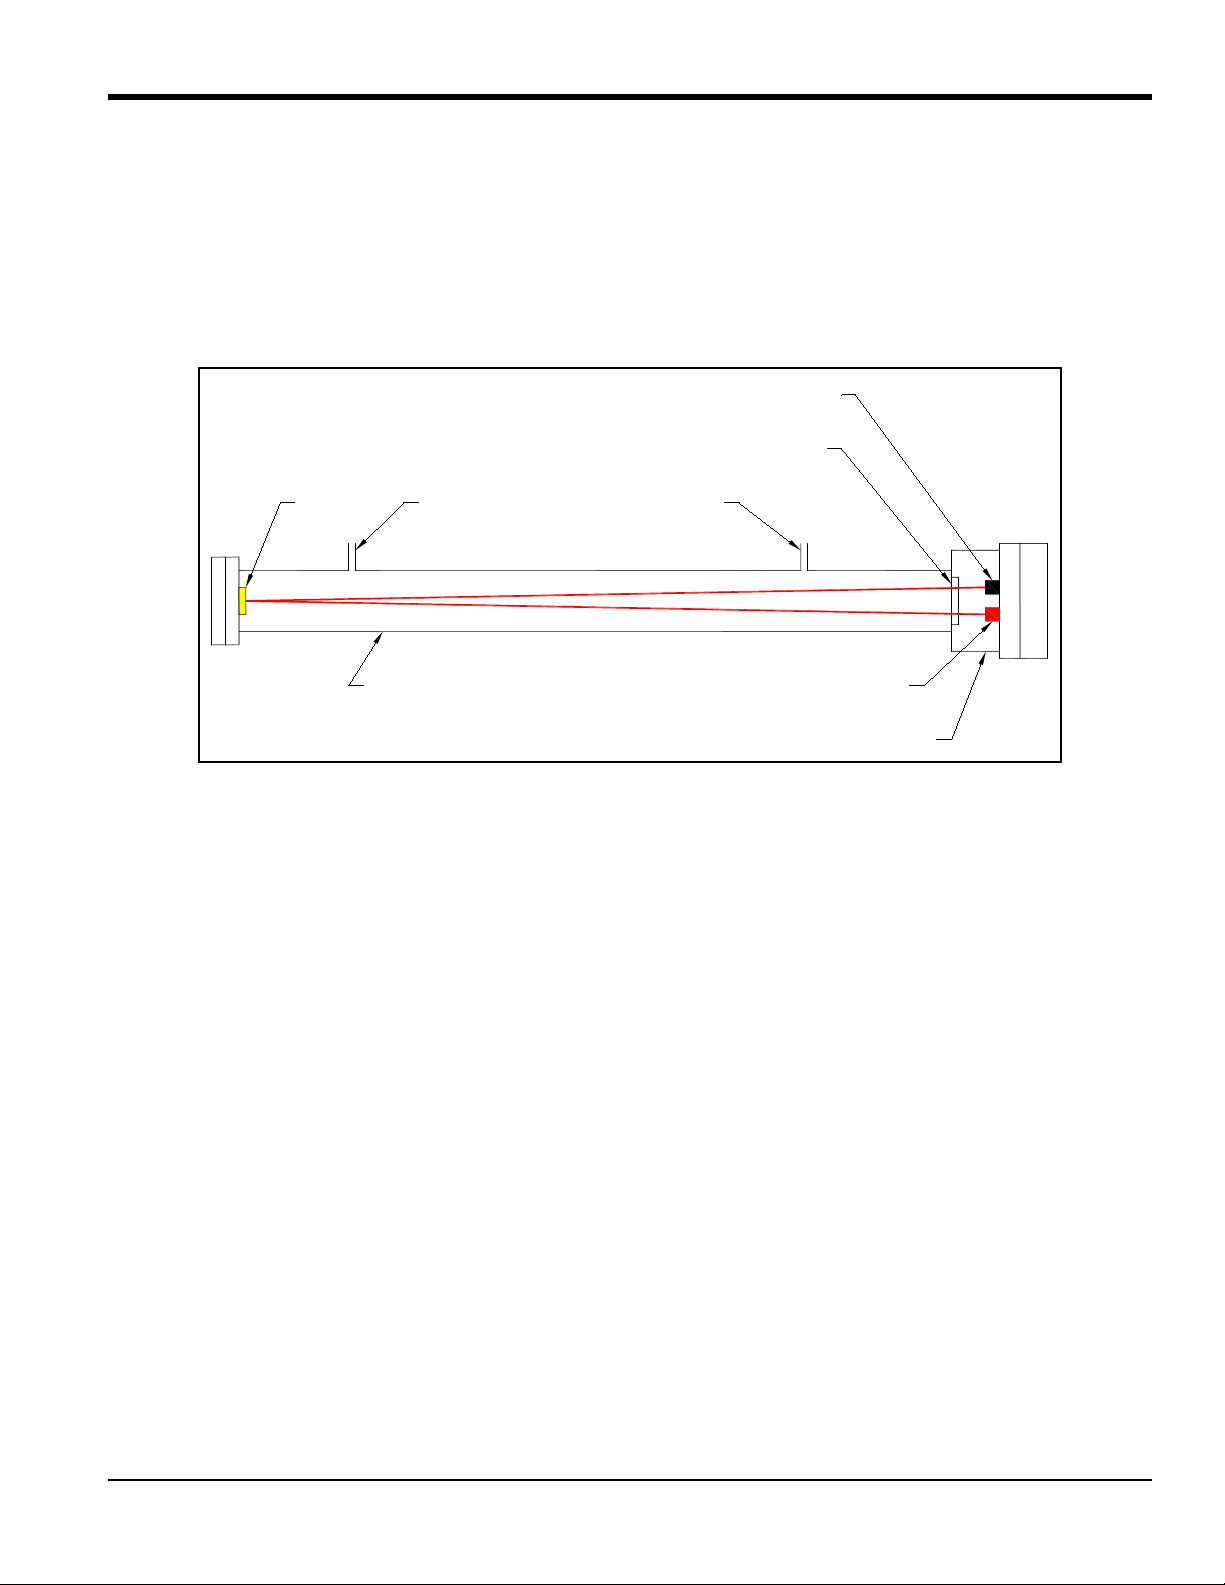
Gas Inlet
Mirror
Stainless Steel Absorption Cell
Gas Outlet
Optical Window
Photodetector
Tunable Diode Laser
Hermetically Sealed Housing
1.3 Theory of Operation (cont.)
Since only light comes in contact with the sample of natural gas, and all of the wetted materials are made of
non-corrosive and inert materials, this technology does not exhibit the drift associated with gas contacting sensor-based
hygrometers. The diode laser emits low energy light, and therefore the system will not ignite the gas. The complete
system is rated explosion-proof, and the
Figure 1 below) is purged, the response time is a matter of a few seconds.
Aurora H2O provides very fast response time. Once the absorption cell (see
Figure 1: Laser Absorption Cell, Basic Elements
The control of the laser, power supply and signal conditioning circuitry are housed in an explosion-proof transmitter
enclosure. A backlit, three-parameter, LCD display provides digital indication of user-programmable parameters. The
Aurora H2O has three user-programmable (4-20 mA) analog outputs and two programmable digital ports that may be
configured as either RS-485 or RS-232 with Modbus protocol. The analyzer has an auxiliary analog input (4-20 mA)
input that is used for connection to an optional process pressure transmitter. Measurement of the process pressure
enables the
Aurora H2O to display and transmit the process dew point. AuroraView software is provided and enables
remote readings, programming data logging and data logging with a personal computer.
Aurora H2O hygrometer is calibrated against an NIST (or other national metrological institute) traceable reference
The
dew/point generator and hygrometer. Each system is supplied with a certificate of calibration with functional test data.
Aurora H2O User’s Manual 3
Page 18
Chapter 1. Features and Capabilities
1
2
3
4
5
6
7
9
10
8
11
12
13
14
15
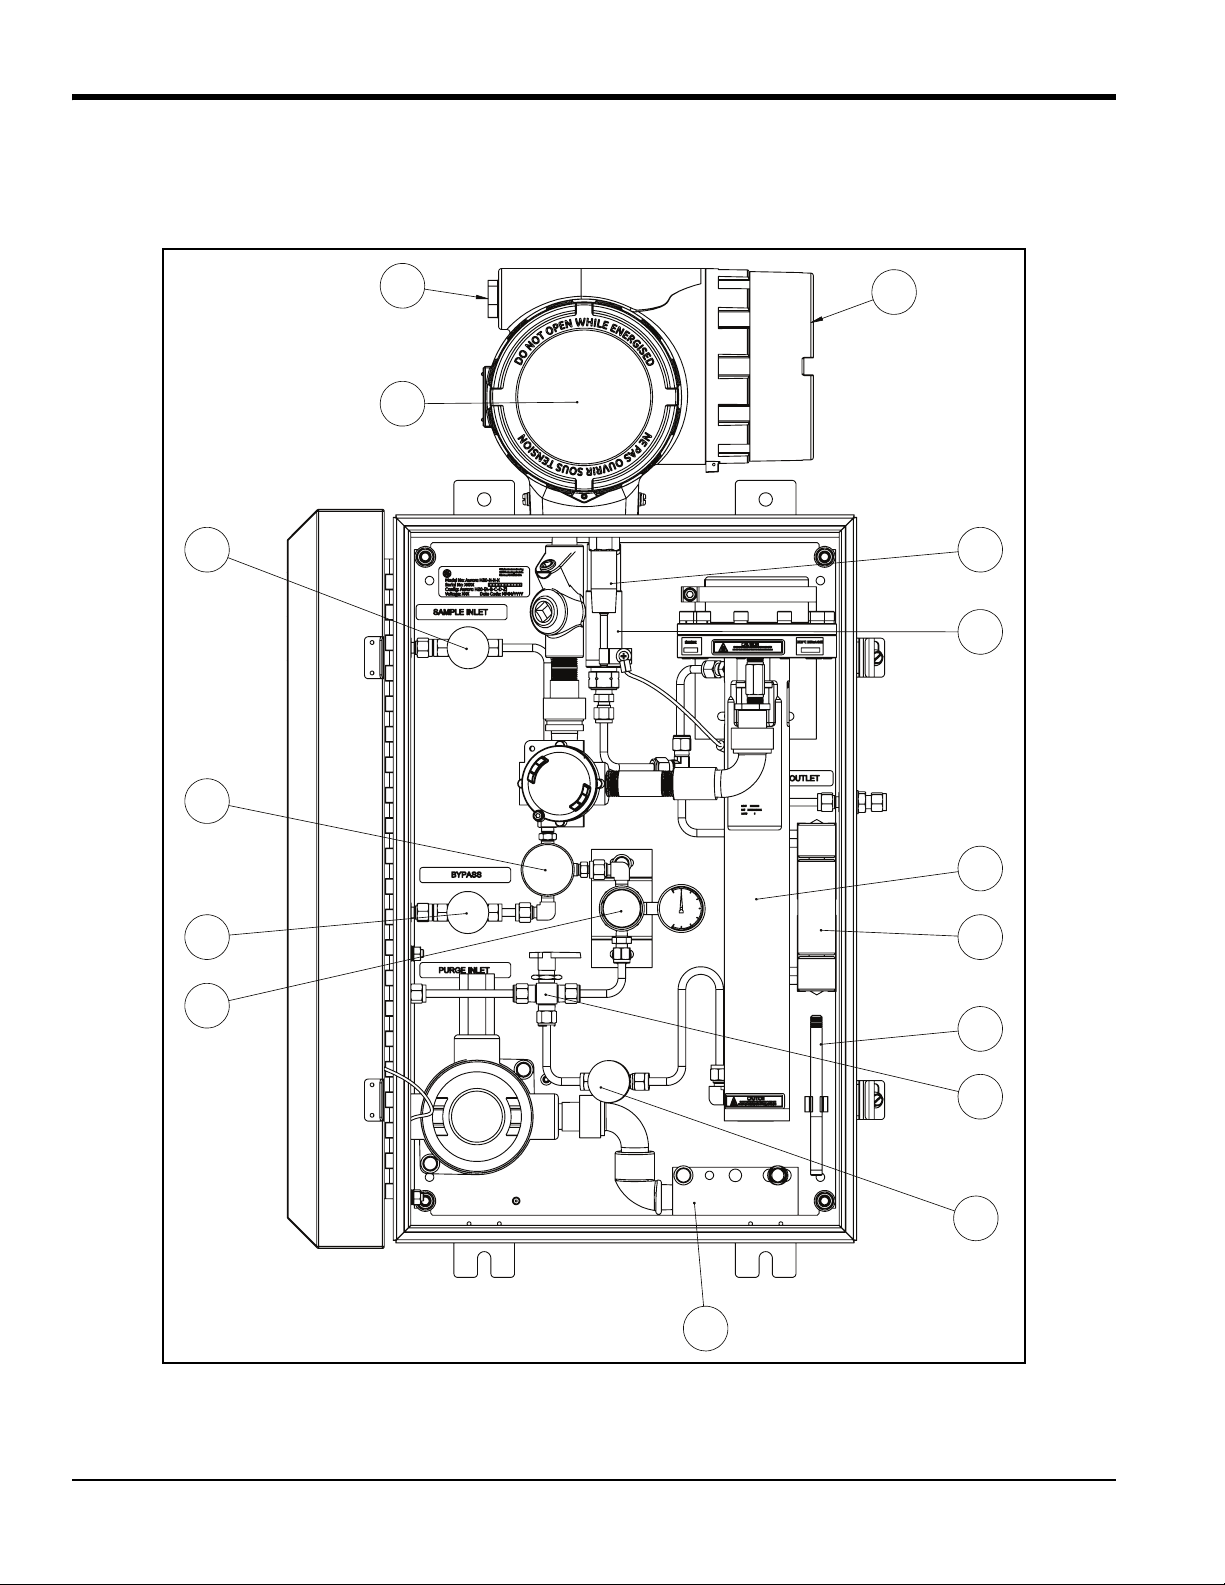
1.3 System Components (cont.)
Note: Refer to Figure 2 below and Table 1 on page 6 to identify your Aurora components.
Figure 2: Aurora H2O System Assembly with Optional USA/CAN Heater
4 Aurora H2O User’s Manual
Page 19
Chapter 1. Features and Capabilities
1
2
3
4
5
6
7
9
10
8
12
13
14
15
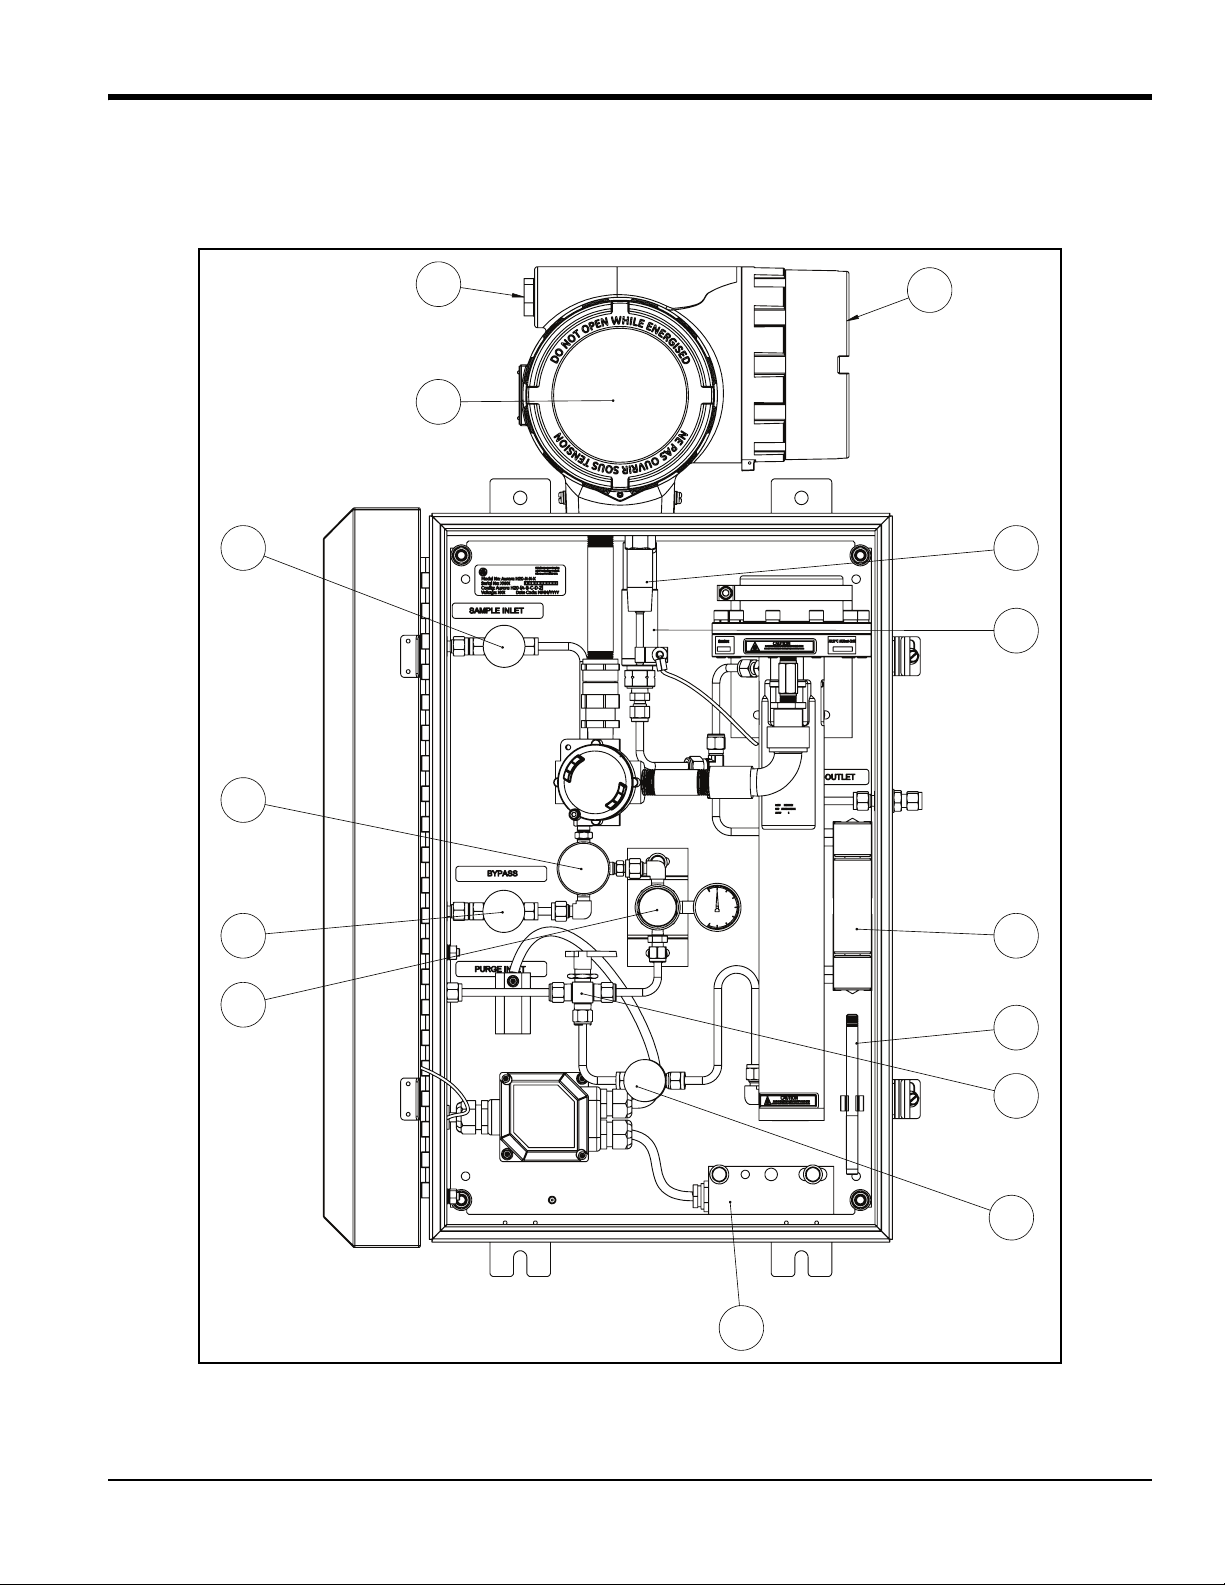
1.3 System Components (cont.)
Note: Refer to Figure 3 below and Table 1 on page 6 to identify your Aurora components.
Figure 3: Aurora H2O System Assembly with Optional EU/ATEX Heater
Aurora H2O User’s Manual 5
Page 20

Chapter 1. Features and Capabilities
1.3 System Components (cont.)
Note: Refer to Tab l e 1 below and either Figure 2 on page 4 or Figure 3 on page 5 to identify your Aurora
components.
Table 1: Aurora H2O System Parts List
No. Description
1 Conduit I/O
2 Display and Magnetic Stylus Keypad
3 Wiring Terminals
4 Isolation Valve (needle valve)
5 Membrane Filter
6 Membrane Filter Drain & Fast Loop Vent
7 Pressure Regulator w/ 0-10 psig outlet pressure gauge
8 Magnetic Stylus
9 Process or Purge Gas Selector
10 Purge Gas Inlet Needle Valve
11 Absorption Cell
12 Temperature Sensor
13 Pressure Sensor
14 Rotameter
15 Optional Heater, thermostat, junction box
6 Aurora H2O User’s Manual
Page 21
Chapter 1. Features and Capabilities
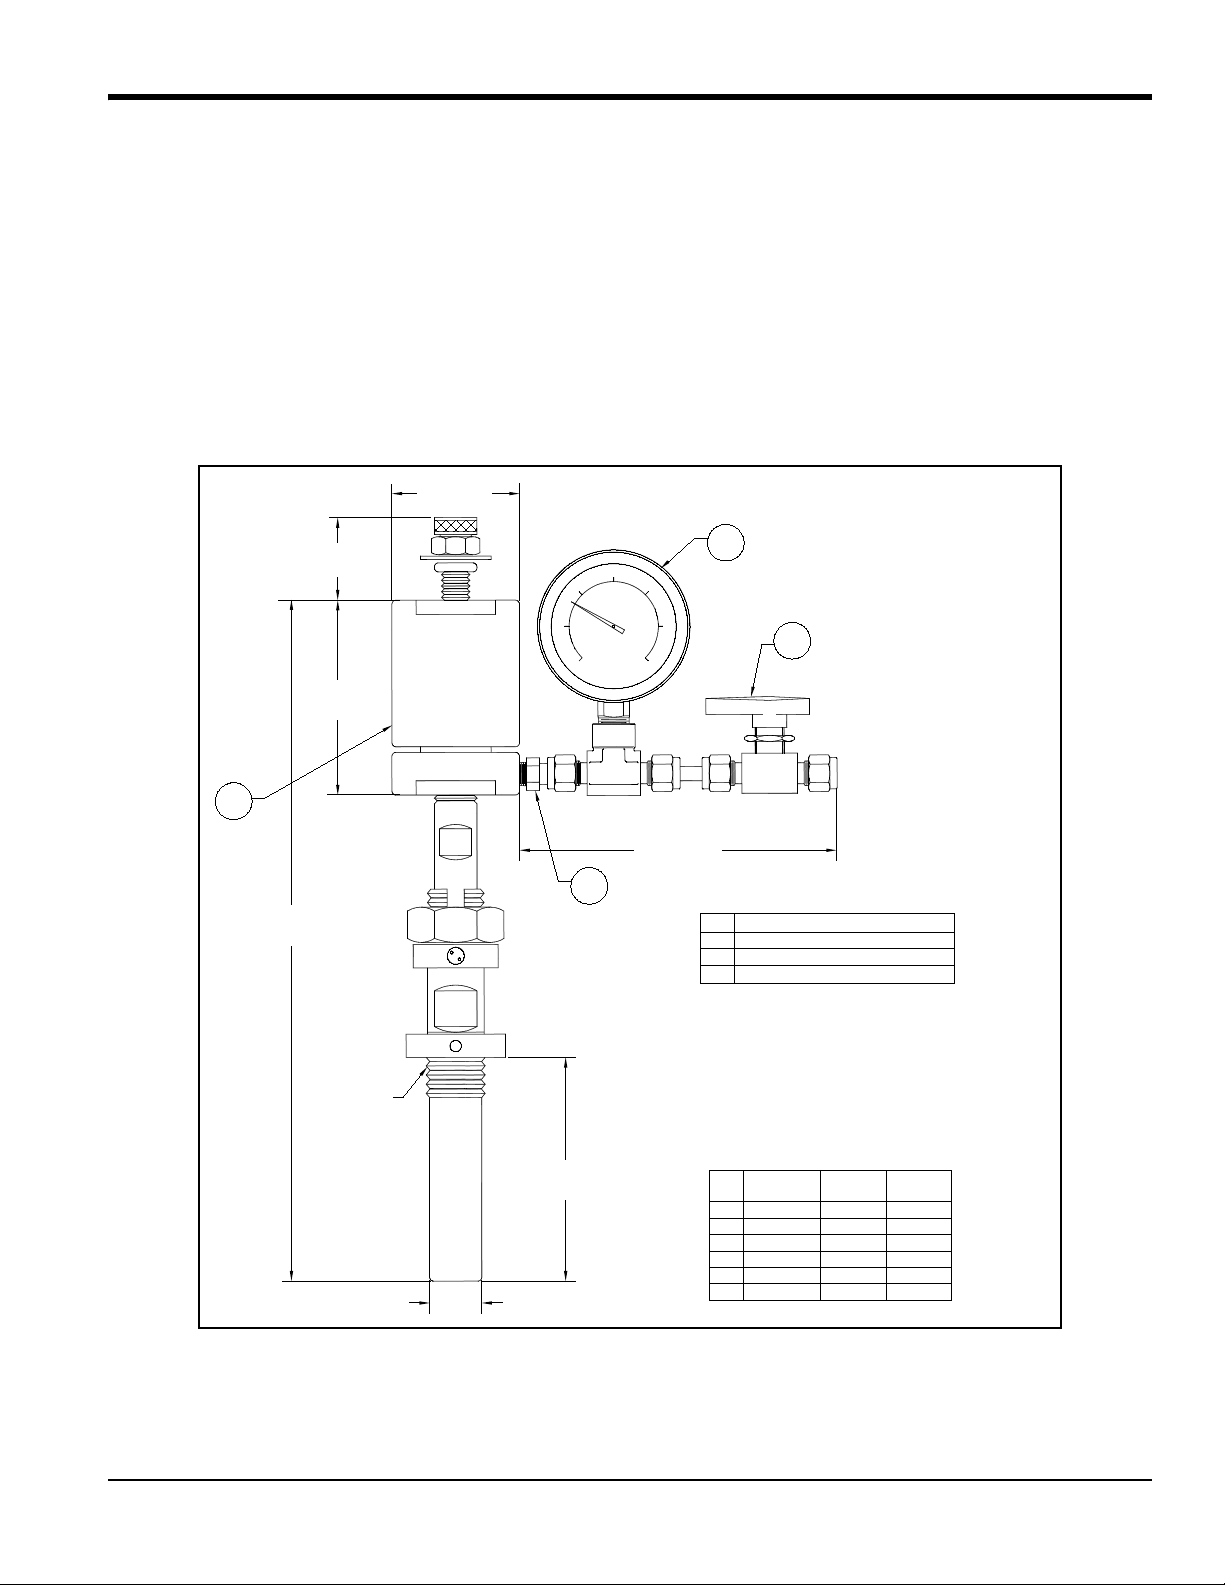
Overall Length
(See Detail A)
3.42
(86.8)
0.92
2.25 (57.1)
5.60 (142.2)
1.20 - 1.75
(30.48 - 44.45)
Probe Length
(See Detail A)
01
02
03
750-633
750-634
750-635
Probe
Length
Overall
Length
4.00"
7.00"
9.00"
11.80"
14.80"
16.80"
1
2
3
4
NOTES:
1. Sample Process Connection: 3/4" NPTM
3. Dimensions are in inches (millimeters).
3/4" NPTM
2. Sample Outlet Connection: 1/4" Compression Fittings
04
05
06
4.00"
7.00"
9.00"
11.80"
14.80"
16.80"
750-633
750-634
750-635
1
2
3
Probe/filter/regulator assembly
Pressure Gauge, 0 to 600 psig
2-way ball valve
4
Tube fitting
Detail A
Part
Number
1.3 System Components (cont.)
IMPORTANT: The filter installed within the Aurora is designed to function as a secondary filter. A primary filter or
filter train should be used upstream of the analyzer. Do not sample directly from the process gas to the
Aurora without the use of a primary filter and pressure reduction. The pressure inlet to the Aurora
sample inlet should not exceed 500 psig.
For natural gas, a pipeline insertion membrane filter is recommended as shown in Figure 4 below. The installation of
the insertion filter is described in this manual. The insertion filter also is equipped with a pressure regulator which
functions to reduce the pressure. If it is not possible to install the insertion filter, consult GE application engineers for
information about a sample conditioning system.
Figure 4: Sample System (ref. dwg #733-737)
Aurora H2O User’s Manual 7
Page 22
Chapter 1. Features and Capabilities
THERMOSTAT
HEATER CONNECTION
CUSTOMER CABLE GLAND
1
2
3
45
6
7
8
BROWN
J1
16 AWG BROWN WIRE (2")
STRIP 1/4"
BLUE
GREEN/YELLOW
LINE
NEUTRAL
GROUND
230 VAC 120 VAC
L1
L2
G
L
N
G
12
34
CUSTOMER CABLE
CABLE TO THERMOSTAT
CABLE TO HEATER
CABLE FUNCTION
CONDUCTOR
COLOR
J-BOX TERMINAL
CUSTOMER POWER
LINE 1
BROWN
3
LINE 2
BLUE
4
GROUND
GREEN/YELLOW
1
THERMOSTAT
LINE 1
BROWN
2
LINE 2
BLUE
3
GROUND
GREEN/YELLOW
1
HEATER
LINE 1
BROWN
2
LINE 2
BLUE
4
GROUND
GREEN/YELLOW
1
1.3 System Components (cont.)
Figure 5: USA/CAN Heater Wiring Diagram
8 Aurora H2O User’s Manual
Figure 6: EU/ATEX Heater Wiring Diagram
Page 23

1.4 Specifications
1.4.1 Power
Analyzer:
100-240 VAC, 50-60Hz, 10W
18-32 VDC (24 VDC nominal), 10W
Optional Electrical Heater:
120VAC, 120W
230VAC, 75W
1.4.2 Range
Part Per Million by Volume
5 to 5000 ppm
v
Chapter 1. Features and Capabilities
Dew/Frost Point
*
–65.5°C to –2.6°C (–85.9°F to 27.3°F)
Process Dew/Frost Point
*
Process or equivalent dew point/frost point by calculation with process pressure signal (4-20 mA) or constant
Absolute Humidity
3.8 to 3803 mg/m3 (0.24 to 237 lbs/MMSCF)
*Readings below 0°C (32°F) are in “frost point” temperature, and above 0°C (32°F) are in “dew point” temperature.
1.4.3 Accuracy
Parts per Million by Volume
±2% of reading in ppmv or 4 ppmv (Accuracy of other parameters derived from ppm
)
v
1.4.4 Response Time
Optical Response
<2 seconds
System Response
The system response is dependent upon the length of sample tubing, sample system components, flowrate and pressure,
as well as the change in moisture concentration.
1.4.5 Operating Pressure
Operating Sample Cell Pressure:
69 to 172 kPa (10 to 25 psia)
Maximum Pressure
1380 kPa (200 psi)
Process Pressure
10,342 kPa (1500 psig) maximum [Higher pressure available using additional sampling system components]
Aurora H2O User’s Manual 9
Page 24

Chapter 1. Features and Capabilities
1.4.6 Temperature
Operating
–20° to +65°C (–4° to 149°F)
Storage
–20° to +70°C (–4° to +158°C)
Optional Heater/Thermostat Setpoint
20°±5°C (68°±9°F) for U.S. and Canada
10°±5°C (50°±9°F) for EU and elsewhere
1.4.7 Flow Rate
Sample Cell Flowrate
10 to 60 SLH (0.4 to 2 SCFH); 30 SLH (1 SCFH) nominal
Coalescer By-pass Fast Loop
5 to 10X of flowrate through sample cell
1.4.8 Display
Backlit LCD, three programmable simultaneous parameters, alphanumeric status and diagnostic display,
LEDs for power, laser temperature stability, keypad lockout
1.4.9 Inputs/Outputs
Analog Outputs
Three programmable 0/4-20 mA, 500 Ω maximum load
Analog Input
Loop-powered 4-20 mA input for remote pressure transmitter (Aurora H2O supplies 24 VDC)
Digital Interface
Two programmable digital communications ports
RS-232 and RS-485 with multi-drop capability and assignable address, Modbus RTU protocol
1.4.10 Enclosure
Ingress Protection
IP-66
1.4.11 Laser Certification
Class 1 product, conforms to IEC 60825-1 Edition 2.0, Safety of Laser Products
WARNING! Use of controls or adjustments or the performance of procedures other than those
specified herein may result in hazardous laser exposure.
10 Aurora H2O User’s Manual
Page 25
Chapter 1. Features and Capabilities
1.4.12 User Interface
Programmable “through-the-glass” via magnetic stylus
1.4.13 Weight and Dimensions
Net Weight
45 kg (100 lb)
Overall Dimensions
34”H x 18”W x 14”D (87 cm x 46 cm x 36 cm) [see drawings]
1.4.14 Hazardous Area Certification
USA/Canada
Explosion-Proof for Class I, Division 1, Groups B, C&D
Dust-Ignitionproof for Class II/III, Division 1, Groups E, F&G (Canada only)
EU and Elsewhere
ATEX and IECEx: Ex d e IIB+H2 T6 Gb IP66; Tamb = –20°C to +65°C. Flameproof with increased safety
compartment
Evaluated against standards EN 60079-0:2012, EN 60079-1:2007, EN 60079-7:2007, IEC 60079-0:2011, IEC
60079-1:2007, IEC 60079-7:2006.
1.4.15 European Certification
CE
Complies with EMC Directive 2004/108/EC, Low Voltage Directive 2006/95/EC and
Pressure Directive 97/23/EC for DN<25
1.4.16 Software
Displays all key parameters. Provides time-base graphing, data logging ability, export data as ASCII text.
Software has lockout/passcode.
1.4.17 Sampling System
Integrated sampling system to filter out physical contaminants, remove glycol carry over, control temperature
condition, regulate pressure and flow rate. Optional thermostatically controlled heater.
1.4.18 Wetted Components
316/316L stainless steel for tubing and fittings. Other wetted components such as the optical window and mirror are
proprietary materials and are compatible with natural gas and typical contaminants found in natural gas. Other sample
system components wetted parts include PTFE, PFA, Inconel, Hastelloy, PVDF, glass, Viton.
Aurora H2O User’s Manual 11
Page 26

Chapter 1. Features and Capabilities
[no content intended for this page]
12 Aurora H2O User’s Manual
Page 27
Chapter 2. Installation
Chapter 2. Installation
2.1 Introduction
The Aurora H2O analyzer provides direct indication of moisture concentration in natural gas. Temperature and pressure
sensors are used to provide high precision enhancement. It may be installed in a wide variety of environmental
conditions, and meets the requirements for operation in hazardous areas.
Be sure that the ambient temperature is at least 10°C higher than the maximum dew/frost point temperature you expect
to measure. This will ensure that you will not have liquid condensation in the sample transport line or the
sampling system components. Heat tracing the sample line will aid in elevating the sample temperature above the dew
point. An optional heater installed within the enclosure is also available.
2.2 Bill of Materials
The following items should have been received with your shipment:
• Aurora H2O Unit • Aurora H2O Calibration Data Sheet
•
Aurora H2O User’s Manual on CD ROM • Maintenance/Accessories Kit
•
AuroraView Software on CD ROM • Optional: Pipeline Insertion Filter/Regulator Assembly
Aurora H2O
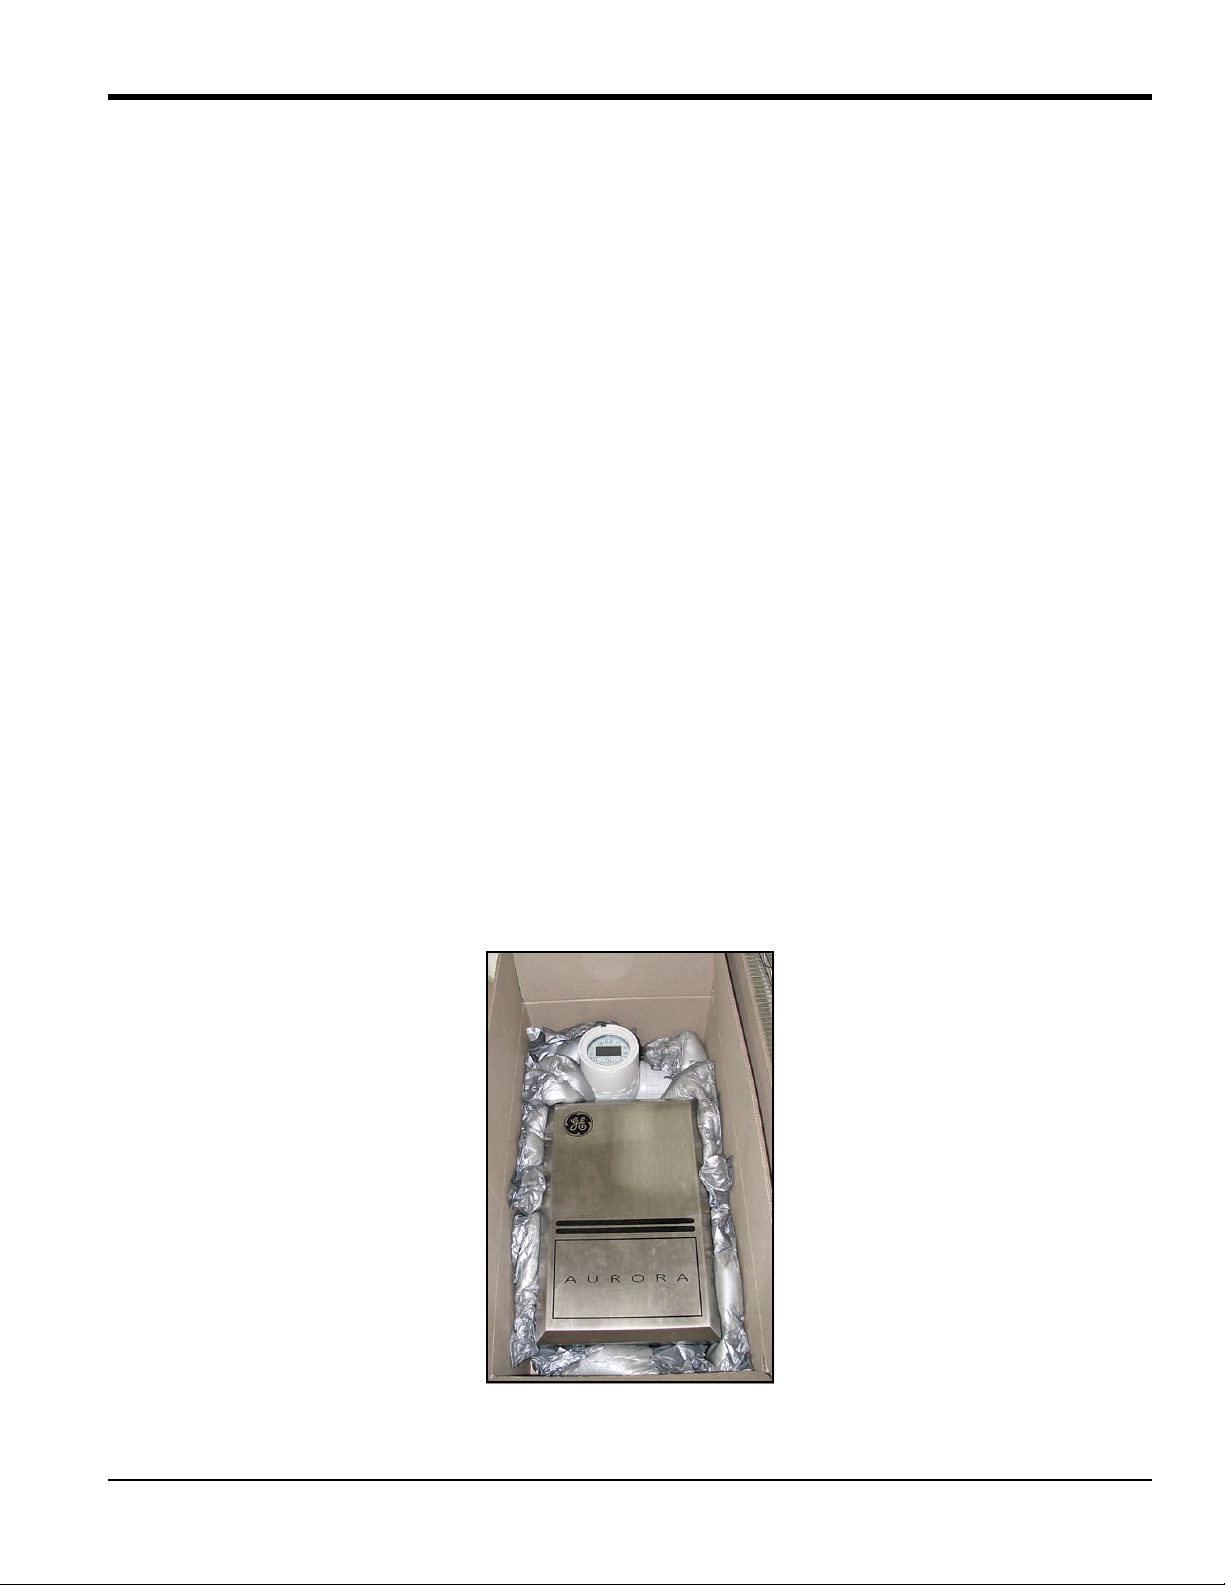
2.3 Unpacking
The Aurora H2O is shipped in a packing box with a plywood base (see Figure 7 below), and the Aurora H2O analyzer is
secured to the plywood base with mounting bolts. Transport the shipping package with the plywood base on the
bottom, and according to the warning labels on the exterior packaging. Open the packing box from the top, and remove
the foam packing material. Collect any separate components such as the
other items contained in the shipment.
AuroraView CD, the User Manual CD, and
Figure 7: Unpacking the
Aurora H2O User’s Manual 13
Aurora H2O
Page 28

Chapter 2. Installation
2.3 Unpacking (cont.)
Remove the mounting studs at the bottom of the enclosure. Using two people, lift the Aurora H2O from the bottom of
the enclosure and from the top of the enclosure where the analyzer electronics is located. A typical
Aurora H2O weighs
approximately 100 pounds (45 kg). Use a proper lifting technique to avoid injury.
Check all the received components and record the model numbers and serial numbers for your records. If anything is
missing, contact GE immediately.
2.4 Choosing A Site for Installation
You should have discussed environmental and installation factors with a GE Sales, Application or Service Engineer by
the time you receive the analyzer.
Before installing the analyzer, read the guidelines below on installation recommendations:
1. Choose an installation site for the
Aurora H2O analyzer as close to the actual sample point (sample take-off
point) as possible, to minimize transport time to the analyzer.
2. Avoid unnecessarily long lengths of sample transport tubing to minimize transport time to the analyzer.
3. Avoid dead-legs in the sample transport tubing to minimize the possibility of liquid build-up.
4. Use stainless steel tubing. Avoid using copper tubing, as the water molecule has greater absorption capabilities
for copper compared to stainless steel. Avoid rubber tubing at all costs, as water molecules interact with the
rubber, and ambient moisture can permeate through the tube wall into the sample gas.
5. Mount the
Aurora H2O analyzer at grade, or at a location that is easily accessible for maintenance (on a
platform or other structure).
6. Be sure that the ambient temperature is at least 10°C higher than the maximum dew/frost point temperature
you expect to measure. This will ensure that you will not have liquid condensation in the sample transport line
nor in the
Aurora H2O. Heat tracing the sample line will aid in elevating the sample temperature above the dew
point. An optional heater installed within the enclosure is also available.
A typical
Aurora H2O system for monitoring moisture off a natural gas pipeline is shown in Figure 8 on page 15.
14 Aurora H2O User’s Manual
Page 29
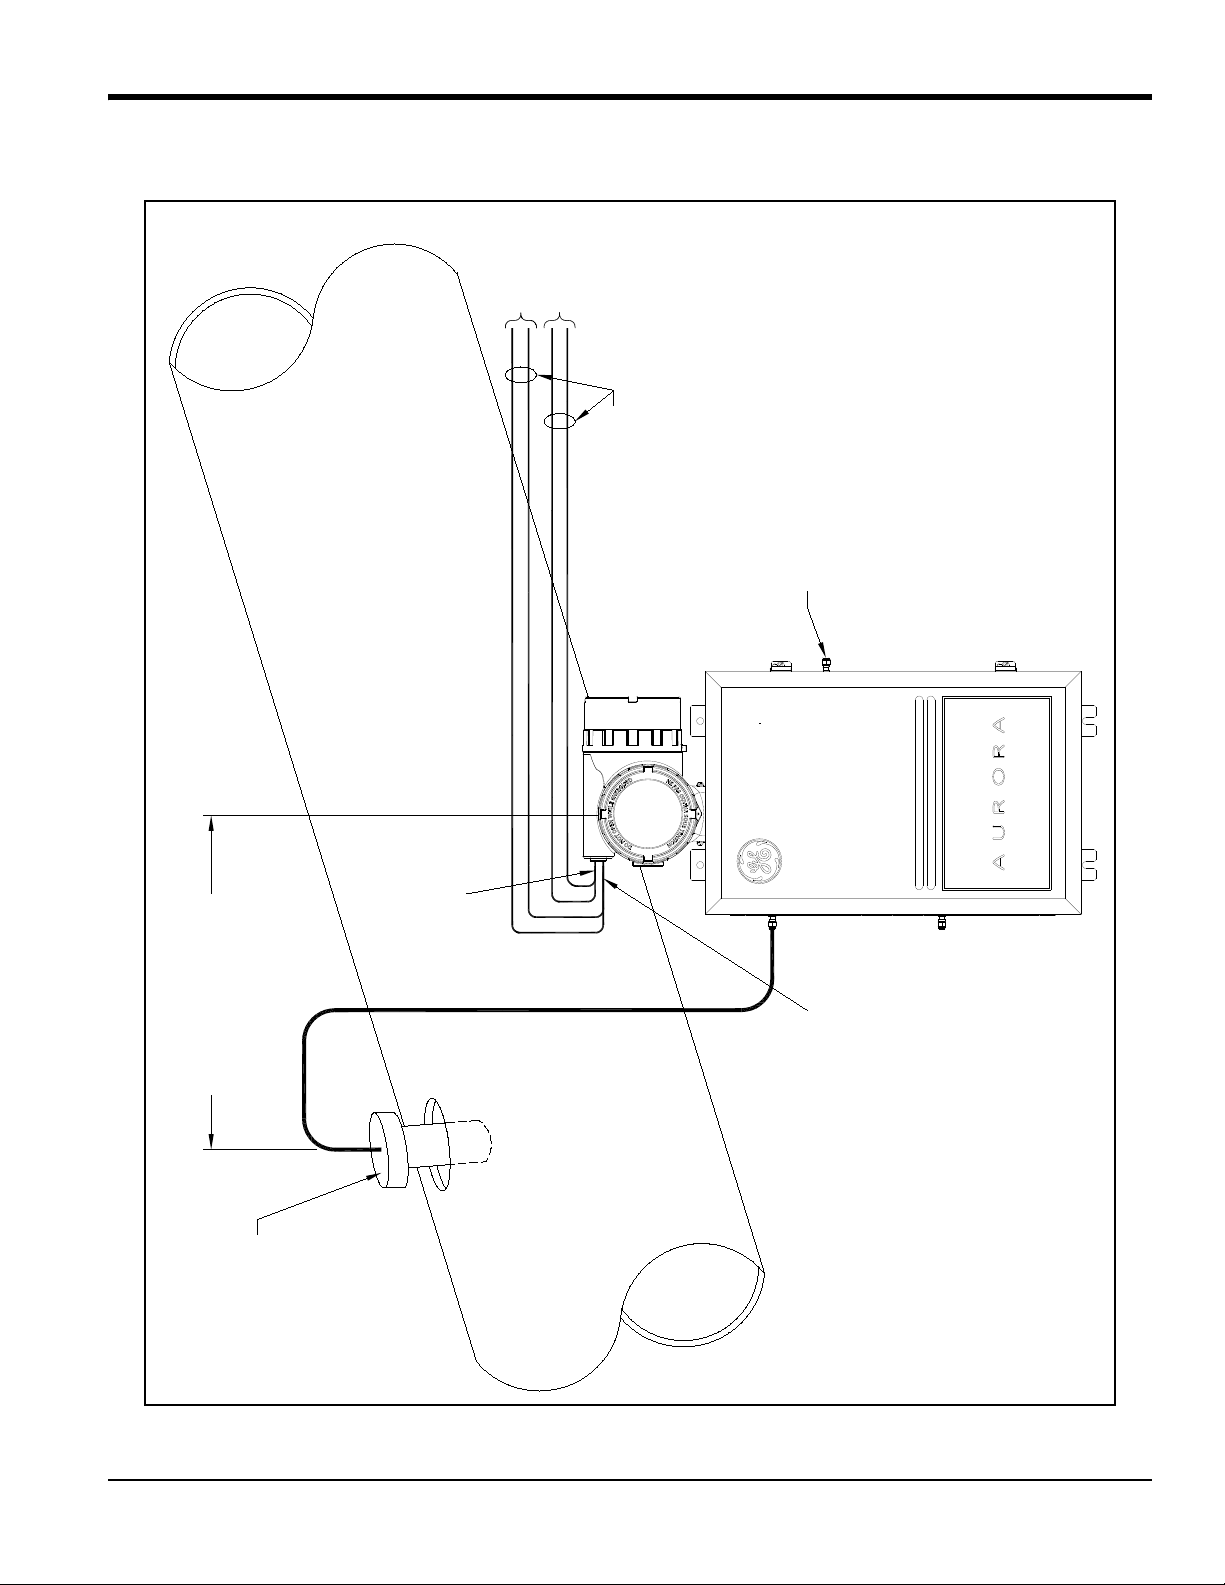
2.4 Choosing A Site for Installation (cont.)
Input/Output
Power
Conduit or Armored Cable
suitable for area rating
Sample Transport Line
Minimize distance.
Tie to Vent/Flare
(Do not restrict.)
Install at a 12 o'clock, or
optionally 3 o'clock or
9 o'clock position, on a
horizontal pipe run.
Note: There is no
orientation preference
on vertical pipe runs.
Optional
Insertion Regulate
Sample Tap
Power Conduit
entering 1 of 3 inlets.
Input/Output Conduit
entering 2nd of 3 inlets.
Chapter 2. Installation
Figure 8: Aurora H2O Analyzer Monitoring Moisture Off a Natural Gas Pipeline
Aurora H2O User’s Manual 15
Page 30

Chapter 2. Installation
2.5 Low Voltage Directive
To comply with the Low Voltage Directive, you must install a switch or circuit breaker on the input power line. For
greatest safety, locate the circuit breaker or power switch near the electronics console.
IMPORTANT: Installation must be done in accordance with the National Electrical Code, the Canadian Electric Code,
and/or any other applicable local codes.
2.6 Mounting
Use the four mounting tabs to mount the Aurora H2O System Assembly in the desired location (see Figure 31 on
page 31).
IMPORTANT: The
Aurora H2O should only be mounted vertically.
16 Aurora H2O User’s Manual
Page 31

Chapter 2. Installation
2.7 Optional Insertion Probe/Regulator
2.7.1 Description
For natural gas applications that may have entrained particulate and liquid contaminants (especially TEG carry-over
from TEG dryers), GE recommends the use of a Insertion Probe/Regulator (see Figure 9 below) to serve as the first
part of particulate and condensate filtration where the gas is sampled off the pipe. The device combines the features of
a sample tap, a membrane filter and an integral pressure regulator (0-500psig outlet), adjustable at the sample take-off
point. The sample tap housing includes a foot-valve so that, once installed, the assembly can be removed from a line
under pressure for membrane filter replacement as needed.
Figure 9: Insertion Probe/Regulator
Note: A 29/32” (0.907 inch, 23.1 mm) minimum bore-through clearance is needed on the customer nozzle for
insertion of a 3/4” NPT insertion membrane liquid separator/pressure regulator.
2.7.2 Installation
Note that the Optional Insertion Probe/Regulator can be installed only on unpressurized lines. There is no hot-tap
installation for this device.
This procedure is broken down into two steps:
• Installing the Housing
• Installing the Insertion Probe/Regulator Assembly
Aurora H2O User’s Manual 17
Page 32

Chapter 2. Installation
Slots
Locking
Mechanism
Foot Valve
Vertical
Set Screws
Horizontal
Set Screw
Horizontal
Set Screw
Locking Mechanism
Thread Sealant
2.7.2a Installing the Housing
The housing, as shown in Figure 10 below, is supplied with a Locking Mechanism to ensure that housing can only be
removed intentionally.
Figure 10: Installing the Housing and Locking Mechanism
1. Turn the locking mechanism counter-clockwise until it is at its extreme upper position. Apply thread sealant to
the threaded area below vertical slots in the threads (see Figure 11 below). Do not allow the thread sealant to
enter the slot, as it may interfere with the mechanism.
Figure 11: Applying Thread Sealant
18 Aurora H2O User’s Manual
Page 33

Chapter 2. Installation
¾” NPTF Thread-O-Let
Housing
Wrench
Flats
180° apart
2.7.2a Installing the Housing (cont.)
2. Confirm that the pipeline has been unpressurized. Refer to Figure 12 below and insert the housing into the
pipeline through a ¾” NPTF thread-o-let (The minimum ID of the thread-o-let is 0.91”).
Figure 12: Inserting Housing into Pipeline
3. Using a wrench on the wrench flats, turn the housing until it is secure and sealed (see Figure 13 below). This
will require between three and five turns.
DO NOT OVERTIGHTEN! The housing may be damaged if it is
over-tightened, causing the housing to deform.
Figure 13: Tightening the Housing
Aurora H2O User’s Manual 19
Page 34

Chapter 2. Installation
2.7.2a Installing the Housing (cont.)
4. Turn the locking mechanism clockwise until it first touches the top of the thread-o-let.
5. Turn the locking mechanism counterclockwise until the Allen screw is aligned with the thread slot (see
Figure 14 below). Using a 1/8” Allen wrench, tighten the Allen screw until its tip is tight against the slot.
NOT OVERTIGHTEN THE ALLEN SCREW
as this will cause the housing wall to be indented.
DO
Figure 14: Aligning and Tightening the Allen Screw
6. Using a 3/32” Allen wrench, tighten the Allen screws on the locking mechanism's surface until their tips are
firmly set into the thread-o-let’s upper surface (see Figure 15 below).
Figure 15: Tightening the Allen Screws
The housing is now installed. The locking mechanism should prevent the housing from becoming unintentionally
unscrewed from the thread-o-let. The pipeline my now be pressurized.
20 Aurora H2O User’s Manual
Page 35

Chapter 2. Installation
Allen Cap Screw
Pressure Adjustment Screw
Pressure Gauge
Isolation Ball Valve
2.7.2b Installing the Insertion Membrane Liquid Separator/Pressure Regulator Assembly
1. Confirm that the Allen cap screw head’s hex cavity is clean and free from foreign material. Confirm that the
Allen cap screw that holds the membrane ferrule is torque-wrench tight (see Figure 16 below). The torque
value should be 10 inch-lbs. If the Allen cap screw is only hand-tight, the screw may protrude excessively,
which could result in foot valve actuation when the probe is installed into the housing.
Figure 16: Checking/Tightening the Allen Cap Screw
2. Rotate the pressure adjustment screw on the pressure regulator fully counterclockwise until it rotates freely.
Close the isolation ball valve (see Figure 17 below).
Aurora H2O User’s Manual 21
Figure 17: Rotating the Pressure Adjustment Screw
Page 36

Chapter 2. Installation
Membrane
Housing
Slot
Membrane
Spring
Guard
Insertion
Nut
Insertion
Washer
Housing
Vertical
First
Second
Vertical
Slot
Insertion
Nut
Insertion
Washer
Pin
Housing
2.7.2b Installing the Insertion Membrane Liquid Separator/Pressure Regulator Assembly (cont.)
3. Refer to Figure 18 below and position the membrane end of the probe above the installed housing. Slowly
lower the probe into the housing. Avoid membrane contact with the upper section of the housing. DO NOT
APPLY DOWNWARD FORCE. The probe should slide easily into the housing. Lower the probe only enough
to thread the insertion nut one complete turn of thread engagement.
Figure 18: Installing the Probe
4. Thread the insertion nut down by hand, lowering the probe until the insertion washer pins slide to the bottom of
the first vertical slot (see Figure 19 below).
Note: The threaded nut on the housing ensures that if all other safety procedures are disregarded, it is mechanically
impossible to remove the probe.
22 Aurora H2O User’s Manual
Figure 19: Threading the Insertion Nut
Page 37

Chapter 2. Installation
2.7.2b Installing the Insertion Membrane Liquid Separator/Pressure Regulator Assembly (cont.)
5. Rotate the probe counterclockwise until the pins are to the far right in the horizontal slot. At this point, the
probe is sealed against the housing interior wall. The pins will be in the middle of the second vertical slot (see
Figure 20 below).
Figure 20: Rotating the Probe
6. Loosen the insertion nut until it is above the top of the second vertical slot (see Figure 21 below). The probe
should not rise to the top of the second vertical slot. If the probe rises in the slot, the foot valve o-ring may have
been damaged or attacked by the process.
Note: The threaded nut on the housing ensures that if all other safety procedures are disregarded, it is mechanically
impossible to remove the probe. Perform the next step regardless of the status of the foot valve o-ring.
Figure 21: Loosening the Insertion Nut
Aurora H2O User’s Manual 23
Page 38

Chapter 2. Installation
2.7.2b Installing the Insertion Membrane Liquid Separator/Pressure Regulator Assembly (cont.)
7. Tighten the insertion nut by hand until it is against the insertion washer again. Using a wrench, tighten the
insertion nut against the insertion washer so that the pins are at the bottom the second vertical slot (see
Figure 22 below). At this point the foot valve opens and the insertion process is complete.
Figure 22: Tightening the Insertion Nut
24 Aurora H2O User’s Manual
Page 39

2.7.3 Setting the Pressure
Pressure
Adjustment
Screw
Lock
Nut
Pressure
Gauge
Note: Perform these steps only after the entire system has been plumbed, including the Aurora H2O.
Chapter 2. Installation
1. Ensure the inlet sample gas isolation valve on the
Aurora H2O sample system is closed. Open the isolation ball
valve at the Optional Pipeline Insertion Membrane Liquid Separator/Pressure Regulator.
2. Turn the pressure adjustment screw clockwise to increase the pressure (see Figure 23 below). The optional
pipeline insertion membrane liquid separator/pressure regulator is the FIRST STAGE pressure reduction of the
system when used. Depending upon your source pressure, you should step down the pressure to a value in the
range listed in Ta bl e 2 below.
3. Tighten the lock nut down to the top of the pressure regulator to avoid future possible changes in pressure
regulator setting, once the pressure is set.
Table 2: Pressure Settings
Source Pressure Outlet Pressure Setting
750 psig < source < 1500 psig 400-500 psig
500 psig < source < 750 psig 300 psig
< 500 psig 50% of the average source pressure
Figure 23: Turning the Pressure Adjustment Screw
Aurora H2O User’s Manual 25
Page 40

Chapter 2. Installation
2.8 Making Electrical Connections
Refer to Figure 32 on page 32 for wiring connections.
Aurora H2O has three ¾” NPT conduit inlet ports for power and I/O (see Figure 24 below). These will
1.
normally be shipped plugged from the factory. Follow the applicable wiring code and requirements for wiring
the unit.
Figure 24: Conduit Inlet Ports
Note: Use one conduit inlet for power. Use the two other conduit inlets for input/output as needed. All unused conduit
inlet ports should be sealed with suitable blanking elements.
2. Select one conduit for inlet power to the
Aurora H2O based on your configuration. The Aurora H2O comes with
a universal power supply, or optionally, as a 24VDC powered unit. Remove the wiring cover to view the wiring
terminal block (see Figure 25 below).
Figure 25: Wiring Terminal Blocks
26 Aurora H2O User’s Manual
Page 41

Chapter 2. Installation
2.8 Making Electrical Connections (cont.)
Note: Supply connection wiring shall be rated at least 10°C above the rate maximum service temperature of 85°C, be
stripped back 5/16 in. (8 mm) and torqued to a minimum of 4.4 in. lb. (0.5 Nm).
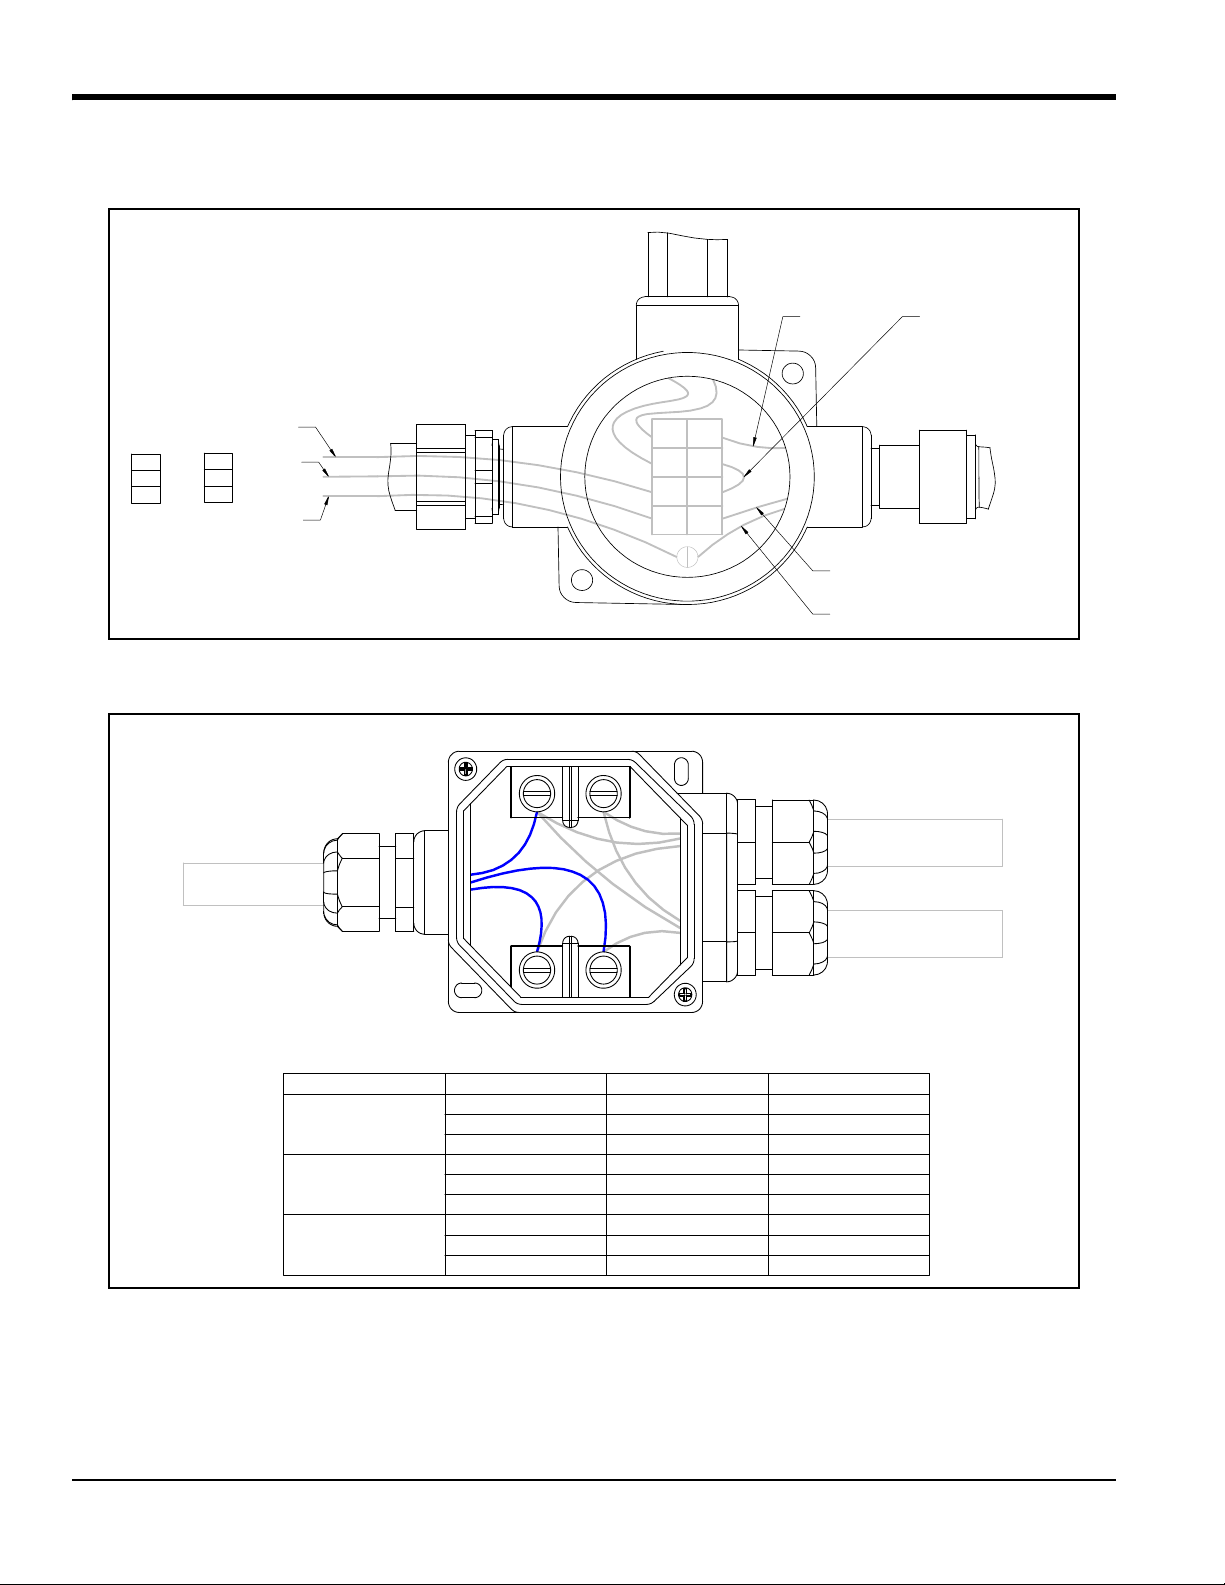
3. Run the AC power connections to the Power Terminal Block shown in Figure 26 below. It is recommended to
use 12-18 AWG (3.3 - 0.82 mm
2
) power wiring.
Figure 26: Power Terminal Block
4. Use wiring conduit runs, separate from the
three 4-20mA outputs to the terminals labeled A, B, and C. The three analog outputs A, B and C (0-20mA or
4-20mA) are internally powered by the
wire, and ground the shield at one end only. Wire up digital communications to Port 1 and/or Port 2 as labeled.
5. Either digital port may be configured for RS-232 or RS-485. Port 1 is designated as “SCADA.” Port 2 is
designated as “SERVICE.” For operation on RS-485, 2-wire, half-duplex bus, attach the RS-485(+) to (+), and
the RS-485(–) to (–). Per Modbus-IDA specifications, a third, common conductor must also interconnect all
the devices of the bus. Attach the common conductor to RTN.
Note: For an RS-485 Multi-drop Network, a terminating resistor must be installed across the
terminals, or an internal terminating resistor can be applied. See below.
Aurora H2O main power, for all I/O (Input/Output) leads. Wire up to
Aurora H2O. Use shielded 18-22 AWG (0.82–0.33 mm
Aurora H2O RS-485
2
) twisted pair
• When using the Aurora H2O in RS-485 mode, and to prevent signal reflections on the high-speed RS-485
connections, it is recommended that the far end of the RS-485 lines be terminated properly. The termination
can be accomplished in one of two ways:
• Connect 120 Ω, 1/4 W leaded resistors across the + and – terminals of ports 1 and 2 (both ports or
whichever one will be in use)
• Using long-nose pliers, move jumpers J15 and J16 from pins 2 and 3 (default setting from factory) to pins
1 and 2 (see Figure 27 on page 28). J16 is the termination for port 1 and J15 is the termination for port 2. It
is also recommended that basic ESD precautions such as grounded wrist straps be used for this procedure.
Aurora H2O User’s Manual 27
Page 42

Chapter 2. Installation
J16
123
J15
1
2
3
2.8 Making Electrical Connections (cont.)
Multi-drop RS-485:
For multiple Aurora H2O units connected in daisy-chain fashion to the RS485 interface, it is important that the farthest
unit away from the transmitting device be the only unit incorporating any termination (see Figure 27 below). All other
units must have jumpers J15 and J16 in positions 2 & 3 (default setting from the factory). For more details on RS-485
wiring or operation, refer to TIA/EIA-485-A Specification.
Figure 27: RS-485 Mode Termination - Install Jumpers at J15 and J16, Pins 1 and 2
Note: The internal terminations MUST be in the default (unterminated) position for operation in RS-232 mode.
• For operation on RS-232, connect RS-232(TXD) to (+), RS-232(RXD) to (–), and RS-232(GND) to RTN (see
Figure 28 below).
Figure 28: Input/Output Connections
28 Aurora H2O User’s Manual
Page 43

Chapter 2. Installation
2.8 Making Electrical Connections (cont.)
6. For connection to a PC to interface with AuroraView software, you may use the supplied 704-688 cable
(RS-232 w/ SUB-D-9 connector to tinned leads). Wire the cable as follows:
Color Code Aurora H2O Terminal
White Tx +
Red Rx –
Green Ground RTN
The as-shipped default configuration is as follows:
BAUD Rate: 115,200
Parity: Even
Network ID: 1 for Port 1, 2 for Port 2
7. Use a separate wiring conduit run for any 4-20mA pressure transmitter input. This input is used when a live
input pressure reading for the main process pressure is desired, to determine an equivalent dew point by the
Aurora H2O analyzer. Wire the 4-20mA pressure transmitter to the Pressure Transmitter terminal block (see
Figure 29 below). The
Aurora H2O supplies 24VDC for use with a loop-powered, 2-wire pressure transmitter.
Figure 29: Pressure Transmitter Connections
IMPORTANT: Use of an external pressure transmitter is not covered by the
Aurora H2O hazardous area certifications.
The external pressure transmitter should be suitably rated for the area classification. Its associated
wiring should be done in accordance with local codes and regulations, and suitably rated for the area
classification.
8. If the
Aurora H2O has been supplied with an optional electrical heater, there are two possible configurations:
USA/CAN or EU. Connect the AC power using a separate conduit from the power for the
Aurora H2O
analyzer. The heater is equipped with a thermostat preset to 25°C (77°F) nominal. Use 12-18 AWG (3.3 - 0.82
2
mm
) wires. The heater terminals are located within a junction box (item 15 in Figure 2 on page 4 or Figure 3
on page 5).
Aurora H2O User’s Manual 29
Page 44

Chapter 2. Installation
2.8 Making Electrical Connections (cont.)
9. Lastly, the Aurora H2O analyzer requires a connection to ground from the electronics
explosion-proof/flame-proof enclosure. As shown in Figure 30 below, there are two external ground
connections available for the user (on the left and right hand sides of the enclosure). Wire this connection to
earth ground, local to the
Aurora H2O analyzer installation site.
Figure 30: Earth Ground Connection
2.9 Specific Conditions of Use
Before operating your Aurora system, be sure the following conditions are met:
• In the event of repair or replacement of any components, the manufacturer, GE Infrastructure Sensing, shall be
contacted for information on the controlled materials and dimensions of the flameproof characteristics of the
Aurora H2O Moisture Analyzer.
• The laser head assembly of the Aurora H2O Moisture Analyzer shall be inside a tool secured enclosure with
IP20 or better to ensure the factory installed laser head assembly bolts are inaccessible from the outside.
• Consult the manufacturer for genuine replacement flange fasteners. 5/16 inch-24 x 1-1/4 inch 18-8 stainless
steel socket head cap bolts or better with a minimum tensile strength of 70,000 psi are acceptable alternatives.
• To reduce the potential of an electrostatic charging hazard, do not rub painted aluminum parts with a dry cloth.
30 Aurora H2O User’s Manual
Page 45

33.12
26.16
24.26
.95
15.66
1.62210.92
18.31
10.24
13.08 .125
9.29 TYP 3.18 TYP
24.91
Chapter 2. Installation
Aurora H2O User’s Manual 31
Figure 31: Aurora H2O Outline and Mounting (ref. dwg #712-1456)
Page 46

CUSTOMER GROUND
AC OPTION SHOWN
DC WIRING + –
SEE NOTE 2
GROUND BAR
I/O CONNECTIONS
SEE NOTE 1
SEE NOTE 1
NOTES:
I/O CONNECTIONS AND PRESSURE TRANSMITTER WIRE GAUGE RANGE 12-24 AWG.
1.
AC AND DC CONNECTION WIRE GAUGE RANGE 12-18 AWG.
2.
[OUTPUT]
4-20mA
A B C PORT 1 PORT 2
RS-485
+
2
4
V
+ –+ –+ –+ – + –
L1 L2/N G
50-60Hz 0.5A
100-240 VAC
Chapter 2. Installation
Figure 32: Aurora H2O Electronic Assembly Wiring Diagram (ref. dwg #702-8976)
Aurora H2O User’s Manual 32
Page 47

Chapter 3. Operation and General Programming
Chapter 3. Operation and General Programming
3.1 Using the Aurora H2O
Follow the information in this chapter to operate the Aurora H2O system.
CLASS 1 LASER PRODUCT
WARNING! Use of controls or adjustments or performance of procedures other than those specified
herein may result in hazardous laser exposure.
3.2 Sample System
See the instructions below and Figure 33 on page 35 to operate the Aurora H2O sample system.
3.2.1 Aurora H2O Startup
1. Supply gas inlet pressure should be <400 psig (2760 kPa).
2. Confirm that there are no flow restrictions downstream of the analyzer sample outlet.
a. Maximum outlet back pressure: 10 psig
3. Start with all valves in fully closed position and the pressure regulator turned fully counter-clockwise.
4. Turn the sample gas selector valve [1] with the handle indicator pointing fully to the right.
5. Open the bypass gas metering valve [2] 1/4 turn.
6. Fully open the sample gas metering valve [3].
7. Slowly open the supply gas isolation valve [4] 1/4 turn.
8. Slowly turn the supply gas pressure regulator [6] clockwise until the sample gas flow meter [7] indicates
mid-scale.
a. If the pressure is increased to rapidly, it will activate the liquid-block feature of the membrane filter [8]
shutting off gas flow.
b. If this occurs, fully close the Supply gas isolation valve [4].
c. Wait 30 seconds, and then go back to Step 7. (A pop sound can be heard when the liquid-block re-opens to
allow gas flow)
9. Slowly adjust the bypass gas needle valve [2] until the desired flow rate is reached (requires optional flow
meter for precise metering).
10. Fully open the Supply gas isolation needle valve [4].
Aurora H2O User’s Manual 33
Page 48

Chapter 3. Operation and General Programming
3.2.2 Aurora H2O Shut Down
1. Fully close the supply gas isolation valve [4].
2. Turn the supply gas pressure regulator [6] fully counter-clockwise.
3. Fully close the bypass and sample gas metering valves [2 & 3].
3.2.3 Aurora H2O Purge Gas Connection
1. Start with all valves in closed position and the pressure regulator turned fully counter-clockwise.
2. Confirm that there are no flow restrictions downstream of the analyzer sample outlet.
a. Maximum outlet back pressure: 10 psig
3. Turn the sample gas selector valve [1] with the handle indicator pointing fully to the left.
4. Connect the regulated and filtered gas supply.
a. Regulated pressure range: 0-10 psig.
b. Outlet filter size: 7 micron
c. Initial pressure setting: 0 psig (minimum)
5. Fully open the sample gas metering valve [3].
6. Increase the regulated pressure until the sample gas flow meter [7] indicates mid-scale.
34 Aurora H2O User’s Manual
Page 49

3.2 Sample System (cont.)
INLET ISOLATION
NEEDLE VALVE
PRESSURE
REGULATOR
BYPASS
NEEDLE VALVE
SAMPLE/PURGE
3-WAY BALL VALVE
PURGE INLET
NEEDLE VALVE
Chapter 3. Operation and General Programming
Aurora H2O User’s Manual 35
Figure 33: Aurora H2O Sample System (ref. dwg #902-004)
Page 50

Chapter 3. Operation and General Programming
3.3 Keypad Features
Menu Power Indicator
Fault Indicator Laser Indicator
Information
Indicator
Cancel
Main Display
Keypad Lock
Indicator
Enter
Up, Left, Right,
Down Arrows
The Aurora H2O has seven keys: a Menu key, four Arrow keys, a Cancel key, and an Enter key.
• Use the Menu key to open the main menu on the display.
• Use the Arrow keys to navigate among menu choices and to increment/decrement numeric entries.
• Use the Cancel key to cancel a numeric entry change, or exit a menu.
• Use the Enter key to accept a numeric entry or select a menu option.
36 Aurora H2O User’s Manual
Page 51

Chapter 3. Operation and General Programming
3.3.1 Indicator Lights
If the Fault Indicator is lit, an instrument fault is detected. A message will be displayed in the Main Display, top/right.
Information Indicator is lit, the instrument is still operating, but a message will appear in the Main Display
If the
top/right, with information about the instrument.
Keypad Lock Indicator will be lit if either: A) the Keypad Lock-Out Switch, internal to the instrument, has been
The
engaged, or B) the instrument keypad has not been used for a period of several minutes, engaging a software feature to
lock-out inadvertent key usage. Type (B) keypad lock-out is overcome by pressing Cancel, Enter, Cancel in sequence.
Laser Indicator is lit, the laser is powered and operating normally. This indicator will be off if there is a
If the
laser-specific fault. This indicator will also be off for a brief period when the instrument is first powered. After initial
power-up, this indicator may blink several times as the laser temperature is stabilized. The laser indicator will be lit
constantly in normal operation.
Power Indicator is normally lit when the instrument is powered on.
The
3.3.2 The Magnetic Stylus
Each of the keys can be selected using a hand-held magnet called a Magnetic Stylus (see Figure 35 below), which is
included with the meter. By touching the clear window at a key location, that key will be selected and will flash a red
light to verify the contact.
Figure 35: Magnetic Stylus
3.3.3 The Default Display
Figure 36 below shows the default display of the Aurora H2O window.
Primary
Figure 36: Default Display
Alt 1
Aurora H2O User’s Manual 37
Alt 2
Page 52

Chapter 3. Operation and General Programming
Keypad Lock Indicator
Keypad
Lock-Out Switch
3.3.4 Unlocking the Keypad
After power-on, the Aurora H2O keypad is locked as indicated by the symbol , lit up with a red backlight. It is
necessary to enter the keypad unlock sequence to make any changes to the
Aurora H2O.
Similar to a mobile phone, the
Aurora H2O will prompt the operator to unlock if any key is pressed. A passcode is
required to use certain factory service features only.
To unlock the keypad, press
Cancel , Enter , Cancel in sequence.
3.3.5 Keypad Lock-Out Switch
Figure 37: Keypad Lock-Out Switch Location
Note: If the Keypad Lock-Out Switch is in the “down” position, the keypad is locked out and the RED LED on the
Keypad Lock Indicator is on all the time.
WARNING! Do not open or remove the cover with the power on, unless the area is non-hazardous.
38 Aurora H2O User’s Manual
Page 53

Chapter 3. Operation and General Programming
3.3.6 Accessing the Menus
After successfully unlocking the keypad, press the Menu key. The Aurora H2O will display the Main Menu (see
Figure 38 below). Use the arrow keys to highlight the menu item desired. Refer to Menu Map, Figure 45 on page 75.
Enter to select the highlighted item. Many menu items will display another menu. Use Cancel to return to
Press
the previous menu page. Pressing
Note: Menu items displayed with an ellipsis (shown as a series of three dots after the menu item) will bring up more
choices, while those without take immediate action.
Cancel from the Main Menu will return the screen to the Measurement Display.
Figure 38: Main Menu
3.3.7 Entering Numeric Values
Since the Aurora H2O has no numeric keypad, numeric values are entered using a “combination lock” style of entry:
Use the
Use the
Note: If incrementing or decrementing a digit would cause the numeric value to exceed its allowable range
Press
value intact.
left and right arrow keys to select the digit to change. The digit selected will be indicated with a .
up and down arrow keys to increment or decrement the digit.
(maximum/minimum value), the digit will not change.
Enter to save the new value and return (see Figure 39 below), or Cancel to return, leaving the original
Figure 39: Numeric Entry
Aurora H2O User’s Manual 39
Page 54

Chapter 3. Operation and General Programming
3.3.8 Starting Up
After proper installation, the Aurora H2O Transmitter can be set up to accommodate the user’s requirements. Typically,
the user may need to configure the analog outputs, trim the analog outputs, and program the digital outputs. Refer to the
Menu Map, Figure 45 on page 75, and complete the following steps. Upon startup, the
several displays until a screen similar to the following appears:
After startup, the screen will need to be unlocked. To unlock the screen, select
Cancel, Enter, Cancel
Note: In most instances; use the Enter key to save an entry and/or move ahead to the following screen; use the Cancel
key to reject an entry and/or return to the previous screen.
Aurora H2O proceeds through
3.4 Setting Up the Display
When the screen is unlocked, touch the Menu key and the Main Menu appears with
several options. To set up the display, select Display... and press
screen appears:
Enter. The following
3.4.1 Selecting Primary Units
To select units for the primary display, select Primary and press Enter. The following
screen appears:
Use the arrow keys to highlight the desired units and press
the Display Menu.
Enter. The screen returns to
40 Aurora H2O User’s Manual
Page 55

3.4.2 Selecting Alt 1 and Alt 2 Units
To set the units for Alt 1 and/or Alt 2, use the arrow keys to highlight the one to be set,
and press
Use the arrow keys to highlight the desired unit type (Hygro, Temperature or Pressure)
and press
Enter. The following screen appears:
Enter. If Temp is selected, the following screen appears.
Chapter 3. Operation and General Programming
Use the arrow keys to highlight the desired unit and press
the Display Menu. Use the same procedure to change other units.
3.4.3 Setting Decimal Places
To set the decimal places for unit values, from the Display Menu use the arrow keys to
highlight Decimal and press
The decimal places setting determines the number of digits displayed for the value to
the right
Use the arrow keys to change the number of decimal places and press
Cancel if no changes are necessary. The screen returns to the Display Menu.
3.4.4 Data/Scan
To toggle the display between showing the numeric values (data), and a graphic plot of
the 2f waveform (scan), from the Display Menu use the arrow keys to highlight
Data/Scan and press
Enter. The screen returns to
Enter. Then select the type of display and press Enter.
of the decimal symbol (“.”), if possible.
Enter, or press
Enter. A screen similar to the following appears.
Note:The scan can be used for diagnostic purposes when a PC with
AuroraView is not
readily available.
Aurora H2O User’s Manual 41
Page 56

Chapter 3. Operation and General Programming
Data/Scan
3.4.5 Adjust
Note: The display brightness is not adjustable in the current Aurora design; the brightness adjustment is not
available.
To modify the display contrast and brightness, from the Display Menu use the arrow
keys to highlight Adjust and press
Enter. The following screen appears.
Use the Up/Down arrow keys to increase/decrease display brightness. Use the
Right/Left arrow keys to increase/decrease display contrast. Press
changes, or press
Cancel to return to the previous setup. The screen returns to the
Enter to save the
Display Menu.
3.4.6 Reverse
To reverse the text and background shades, from the Display Menu use the arrow keys
to highlight Reverse and press
Enter. The following screen appears.
To return to the previous shade setup, select Reverse and press
screen appears.
3.5 Setting Up the Outputs
3.5.1 Selecting an Output for Setup
To set up outputs, from the Main Menu choose Outputs... and press Enter. The
following screen appears.
From the Output Menu choose Select and press
Use the arrow keys to select the output (A, B or C) to be set up, and press
Enter. The previous
Enter. The following screen appears.
Enter.
42 Aurora H2O User’s Manual
Page 57

3.5.2 Selecting Output Units
From the Output Menu, select Units and press Enter. Use the arrow keys to select the
unit type and press
Chapter 3. Operation and General Programming
Enter. A screen similar to the following appears:
Use the arrow keys to select a new unit. Press
previous value), and return to the Output Menu.
3.5.3 Selecting an Output Type
To change the output type, from the Output Menu select Type and press Enter. A screen
similar to the following appears:
Use the arrow keys to select a new output type. Press Enter to save (or Cancel to keep
the previous value), and return to the Output Menu.
Note: If the
ALM option is selected in the above menu, the analog output will function as an alarm indicator. In this
mode, the analog output will remain at 0 mA during normal operating conditions, but the analog output will be
driven to 24 mA whenever there is an alarm condition.
Enter to save (or Cancel to keep the
3.5.4 Changing the Upper Output Span
To adjust the upper output span, from the Output Menu select Upper and press Enter. A
screen similar to the following appears.
Use the left and right arrow keys to select each digit to be changed and the up and down
arrow keys to increase or decrease its value. Press
previous value), and return to Output Menu.
Aurora H2O User’s Manual 43
Enter to save (or Cancel to keep the
Page 58

Chapter 3. Operation and General Programming
Error InformaƟon
Measurement InformaƟon
Error InformaƟon
0 mA
3.6
3.8
4.0 20.0
20.5
21.0
24 mA
3.5.5 Changing the Lower Output Span
To adjust the lower output span, from the Output Menu select Lower and press Enter. A
screen similar to the following appears.
Use the left and right arrow keys to select each digit to be changed and the up and down
arrow keys to increase or decrease its value. Press Enter to save (or Cancel to keep the
previous value), and return to Output Menu.
3.5.6 NAMUR Response
The Aurora H2O can report measurement failure information via the analog outputs. The signal presentation of failure
information is consistent with by the recommendations established by the “User Association of Automation
Technology in Process Industries” (NAMUR) published in NE43, version 03.03.2003. When configured for 4-20mA
operation, faults and errors are indicated by specific output levels shown in Figure 40 below:
Figure 40: NAMUR Output Value Ranges
In normal operation, a valid measurement is indicated with a signal between 3.8 and 20.5 mA. The Lower (Zero) and
Upper (Span) settings determine the measurement value assigned to 4.0 and 20.0 mA, respectively.
For the measurement assigned to an output, the
Aurora H2O continuously checks if an error has occurred. If an error has
occurred, the output will be driven to a current which is within the Error Information bands displayed above. The
Aurora H2O can signal 3.5 mA ('NAMUR Low') or 21.1 mA ('NAMUR High'). These values are well within the Error
Information bands as specified by NAMUR (see Ta bl e 3 below).
Note: The Aurora H2O will never produce a signal between 3.6-3.8 mA or between 20.5-21.0 mA, to allow for
reliable discrimination between a measurement and an error.
Table 3: Signal Messages
Error Description Signal
Under Range The measurement is less than the calibrated range of the analyzer NAMUR Low
Over Range The measurement is greater than the calibrated range of the analyzer NAMUR High
Out of Range Calculation error or associated measurement (Temp/Pressure) invalid NAMUR High
No Data Measurement value has not been calculated yet NAMUR High
No Calibration Moisture calibration table empty/invalid NAMUR High
44 Aurora H2O User’s Manual
Page 59

Chapter 3. Operation and General Programming
3.5.6a NAMUR Filtering
There may be situations where the NAMUR signaling behavior is undesirable (see Table 4 below). For example, a
process operating at or near the
cannot correctly distinguish between a measurement and an error signal. In these cases, the NAMUR reporting
behavior can be suppressed (“inhibited”). From the Output menu, select NAMUR:
Selection Result
NONE No errors are inhibited; NAMUR signaling will occur for any error as shown in the table above.
LoRng Under Range errors are inhibited; NAMUR signaling will NOT occur for Under Range error conditions.
NAMUR signaling will occur for all other errors in the table above.
Aurora H2O calibration limits, or when connected to a SCADA or DCS system that
Then select the error(s) to inhibit:
Table 4: NAMUR Errors
HiRng Over Range errors are inhibited; NAMUR signaling will NOT occur for Over Range error conditions.
NAMUR signaling will occur for all other errors in the table above.
Lo+Hi Under Range AND Over Range errors are inhibited; NAMUR signaling will NOT occur for these error
conditions. NAMUR signaling will occur for all other errors in the table above.
ALL ALL errors are inhibited; NAMUR signaling will NOT occur for any error in the table above.
3.5.7 Testing the Output
The Test Menu causes the Aurora H2O to generate a 0- or 4-20mA output at the percent
of scale selected. For example, in 4-20 operation, 0% = 4mA, 50% = 12mA, 100% =
20mA. This allows the proper function of recording or SCADA equipment to be
verified. In 0-20 operation, 0% = 0mA, 50% = 10mA, 100% = 20mA.
To test system output, from the Output Menu select Test and press
H2O
will proceed to check the settings, and a screen similar to this display will appear.
Use the left and right arrow keys to select each digit to be changed, and the up and down
arrow keys to increase or decrease its value. Press
Enter to save (or Cancel to keep) the
previous value, and return to the Output Menu.
Check your output wiring. If the reading on your SCADA or DCS is off slightly, then
you may use the Trim feature to trim the output zero or span.
Enter. The Aurora
Aurora H2O User’s Manual 45
Page 60

Chapter 3. Operation and General Programming
3.5.8 Trimming the Outputs
The Trim Menu enables the operator to compensate for differences in measurement of the 0/4-20 mA outputs by
connected recorders or SCADA equipment. To trim the output:
Select Trim from the Output Menu and press
Enter. The following screen appears.
Note: The trim applies to whichever output is chosen with the Select menu item, and displayed on the menu title bar.
Use the left and right arrow keys to select an output (A, B or C) and press
Enter. The
screen returns to the previous display.
When performing a Trim operation, the
trim. To reset the trim output, highlight Reset Trim and press
Aurora H2O unit requires you to first reset the
Enter. The following
screen appears.
Use the left or right arrow keys to highlight YES and press
previous trim values, and returns the
Aurora H2O to its factory adjustment. The display
Enter. This cancels any
returns to the previous screen with Trim Zero highlighted.
To trim the zero value, press
This will cause the
Aurora H2O to output 4.000 mA on the output being trimmed. The
Enter. A screen similar to the following appears.
output value should then be read using the connected recorder, SCADA equipment, or
DVM. Enter the value read from the connected equipment as the Zero Trim value, as
follows:
46 Aurora H2O User’s Manual
Page 61

Chapter 3. Operation and General Programming
3.5.8 Trimming the Outputs (cont.)
Note: Since you cannot trim 0 mA for negative offsets, trim for the lower end of the scale is at the 4 mA output level.
Use the left and right arrow keys to select each digit to be changed, and the up and down
arrow keys to increase or decrease its value. Press
previous value).
The Trim Menu returns with Trim Span highlighted. To change the span value, press
Enter. A screen similar to the following appears.
Enter to save (or Cancel to keep the
This will cause the
Aurora H2O to output 20.000 mA on the output being trimmed. The
output value should then be read using the connected recorder, SCADA equipment, or
DVM. Enter the value read from the connected equipment as the Span Trim value.
Use the left and right arrow keys to select each digit to be changed, and the up and down
arrow keys to increase or decrease its value. Press
Enter to save (or Cancel to keep the
previous value).
Trimming is complete. Accuracy can be verified using the Test Menu, above.
Example: Trim is reset, then Trim Zero is selected. The SCADA input reports 3.977 mA.
The operator enters “3.977” as the Zero Trim value.
Trim Span is selected. The SCADA input reports 19.985 mA.
The operator enters “19.985” as the Span Trim value.
Aurora H2O adjusts the output accordingly to true the output as read by the customer recorder, SCADA or DVM.
Using the Test Menu, the operator verifies that a test value of 0% now reads 4.000 mA at the SCADA equipment, and
a test value of 100% now reads 20.000 mA.
3.6 Setting Up the Alarms
Note: The Aurora H2O is not equipped with alarm relays. The Alarm function is useful only when reading the alarm
status via Modbus.
3.6.1 Selecting an Alarm Output
To set up alarm outputs, on the Main Menu choose Alarm and press Enter. From the
Alarm Menu choose Select and press
Use the arrow keys to select the output (A, B or C) to be set up and press
display returns to the Alarm Menu.
Aurora H2O User’s Manual 47
Enter. A screen similar to the following appears.
Enter. The
Page 62

Chapter 3. Operation and General Programming
3.6.2 Selecting Alarm Status
To select the alarm status, from the Alarm Menu select Status and press Enter. The
following screen appears:
Use the arrow keys to select OFF or ON and press
Alarm Menu.
3.6.3 Selecting Alarm Units
To select alarm units, from the Alarm Menu select Units and press Enter. Use the arrow
keys to select the unit type and press
If Hygro was selected, this display appears. Use the arrow keys to select a unit. Press
Enter to save (or Cancel to keep the previous value), and return to the Alarm Menu.
If Temperature was selected, this display appears. Use the arrow keys to select a unit.
Press
Menu.
Enter. The display returns to the
Enter.
Enter to save (or Cancel to keep the previous value), and return to the Alarm
If Pressure was selected, this display appears. Use the arrow keys to select a unit. Press
Enter to save (or Cancel to keep the previous value), and return to the Alarm Menu.
48 Aurora H2O User’s Manual
Page 63

3.6.4 Selecting an Alarm Type
Out Band
Trip
Trip
In Band
Reset
Reset
Upper
Hysteresis
Lower
Setpoint
Trip
Reset
Trip
Reset
Trip
Reset
To change the alarm type, from the Alarm Menu select Type and press Enter. A screen
similar to the following appears:
Chapter 3. Operation and General Programming
Use the arrow keys to select an alarm type. Press
previous value), and return to the Alarm Menu.
Enter to save (or Cancel to keep the
• Setpoint: Alarm activates when parameter exceeds upper limit, and deactivates when parameter is less than
lower limit.
• In Band: Alarm activates when parameter is between upper and lower limits.
• Out Band: Alarm activates when parameter is outside upper and lower limits.
• Fault: Alarm activates when a system fault is detected. The alarm de-activates when the fault condition is
removed. These conditions can be found in Section 7.4, Table 4.
3.6.5 How the Alarm Types Work
See Figure 41 below for descriptions of the various alarm types:
Figure 41: Example of Alarm Types
Aurora H2O User’s Manual 49
Page 64

Chapter 3. Operation and General Programming
3.6.6 Changing the Upper Alarm Span
To adjust the upper alarm span, from the Alarm Menu select Upper and press Enter. A
screen similar to the following appears.
Use the left and right arrow keys to select each digit to be changed and the up and down
arrow keys to increase or decrease its value. Press Enter to save (or Cancel to keep the
previous value), and return to Output Menu.
3.6.7 Changing the Lower Alarm Span
To adjust the lower alarm span, from the Alarm Menu select Lower and press Enter. A
screen similar to the following appears.
Use the left and right arrow keys to select each digit to be changed and the up and down
arrow keys to increase or decrease its value. Press Enter to save (or Cancel to keep the
previous value), and return to Output Menu.
50 Aurora H2O User’s Manual
Page 65

Chapter 4. Programming Advanced Features
Chapter 4. Programming Advanced Features
4.1 Comm Port Settings
To access the communication port settings, from the Main Menu select Settings and
Enter. The following screen appears:
press
To access the communications port settings, select Comms... and press
following screen appears:
4.1.1 Selecting a Comm Port
There are two physical comm ports in the Aurora H2O. Comm Port 1 is aligned to
SCADA in the instrument program and Comm Port 2 is aligned to SERVICE. This setup
enables the user to have Comm Port 1 set up for the primary digital output (for example,
RS-485 to the customer SCADA system), and Comm Port 2 to be used for service (for
example, to enable a service engineer to interface with the
cable connected to a laptop PC in the field, running
To select a communication port, use the arrow keys to highlight Select and press
Select SCADA or SERVICE and press
Enter. The screen returns to the Comm Port Menu.
Enter. The
Aurora H2O using an RS-232
AuroraView software).
Enter. The following screen appears.
4.1.2 Setting the Baud Rate
To set the baud rate, from the Comm Port Menu select Baud Rate and press Enter. The
following screen appears.
Use the arrow keys to highlight the desired baud rate and press
returns to the Comm Port Menu.
Aurora H2O User’s Manual 51
Enter. The screen
Page 66

Chapter 4. Programming Advanced Features
4.1.3 Setting Parity
To set parity, from the Comm Port Menu select Parity and press Enter. The following
screen appears.
4.1.4 Selecting Protocol
Use the arrow keys to highlight the desired parity and press
Enter.
After a parity selection is made, the Aurora prompts for the number of stop bits. Use the
arrow keys to highlight the desired number and press
Enter. The screen returns to the
Comm Port Menu.
To choose the protocol, from the Comm Port Menu select Protocol and press Enter. The
following screen appears.
Use the arrow keys to highlight the desired protocol and press
Enter. The screen returns
to the Comm Port Menu.
4.1.5 Setting the Network ID
To set the network ID, from the Comm Port Menu select Network ID and press Enter.
The following screen appears.
Use the left and right arrow keys to select each digit to be changed. Use the up and
down arrow keys to change the value. When finished, press Enter. The screen returns to
the Comm Port Menu.
52 Aurora H2O User’s Manual
Page 67

4.2 Adjust Offset Values
To adjust offset values, from the Settings Menu select Adjust... and press Enter. The
following screen appears.
4.2.1 Adjusting the PPMv Offset
To adjust the PPMv offset, select PPM Level and press Enter. The following screen
appears.
Use the left and right arrow keys to select each digit to be changed. Use the up and
down arrow keys to change the value. When finished, press Enter. The screen returns to
the User Adjustments Menu.
Chapter 4. Programming Advanced Features
4.2.2 Adjusting the Smoothing Filter
To adjust the smoothing filter, from the User Adjustments Menu select Filter and press
Enter. The following screen appears.
The smoothing filter setting is used to change the system responsiveness. It is a moving
average filter to smooth the moisture readings. 1 sample = 1 scan. The minimum setting
is 10 samples, or ~ 0.6 seconds. The maximum setting is 500 samples, or ~ 31 seconds.
The default value of 40 samples, as set at the factory, is ~2.5 seconds.
Use the left and right arrow keys to select each digit to be changed. Use the up and
down arrow keys to change the value. When finished, press
the User Adjustments Menu.
Enter. The screen returns to
Aurora H2O User’s Manual 53
Page 68

Chapter 4. Programming Advanced Features
4.2.3 Adjusting the Scan Averaging
To adjust the Scan Averaging, from the User Adjustments Menu select Scan Avg and
Enter. The following screen appears:
press
The Scan Average setting is used to change system noise rejection. By averaging entire
scans, the Signal/Noise Ratio (SNR) can be increased. This is particularly useful in the
presence of certain background gases, which can interfere with the moisture absorption
peak, or introduce background noise.
The Scan Average value is set at the factory to a value which is an optimal tradeoff between noise reduction and system
responsiveness, typically between 45-75 scans. Lowering this value provides faster response time in exchange for a
noisier measurement; conversely, increasing the scan average provides a smoother measurement in exchange for
slower transient response.
Please contact a GE application engineer before modifying this setting.
Use the left and right arrow keys to select each digit to be changed. Use the up and down arrow keys to change the
value. When finished, press
Enter. The screen returns to the User Adjustments Menu.
54 Aurora H2O User’s Manual
Page 69

Chapter 4. Programming Advanced Features
4.2.4 Setting the Dew Point Calculation Method
• The dew point is the temperature at which the air is saturated with respect to water vapor over a liquid surface.
• The frost point is the temperature at which the air is saturated with respect to water vapor over an ice surface.
There can be a difference of several degrees C between the dew point and the frost point.
• When set for Dew/Frost, the Aurora H2O will report the Dew Point if the reading is above freezing, and will
report the Frost Point if the reading is below freezing.
• When set for Dew Point, the Aurora H2O will calculate the Dew Point temperature, even if that temperature is
below freezing.
To set the dew point calculation method, from the User Adjustments Menu select Dew
Pt Calc and press
Enter. The following screen appears.
Use the arrow keys to highlight the desired dew point setting and press
screen returns to the User Adjustments Menu.
Enter. The
• The Dew calculation should be used for compatibility with ASTM-1142/IGT-8. The tables and calculations in
those reports require measurements and provide results in dew point, regardless of the actual phase (dew or
frost).
• The Dew/Frost calculation should be used for compatibility with ISO-18453:2004, or when using a chilled
mirror apparatus as a check standard.
Aurora H2O User’s Manual 55
Page 70

Chapter 4. Programming Advanced Features
4.3 Set Up the Background Gas
4.3.1 Selecting the Type of Gas
The Aurora H2O TDLAS is normally calibrated to a standard gas mixture that is representative of “typical” natural gas.
The primary components and concentrations of this gas mixture are:
Component Concentration
Methane (CH4) 90.0%
Nitrogen (N
Carbon Dioxide (CO
The process background gas is selectable from the Settings Menu.
)6.0%
2
)4.0%
2
• For normal operation in natural gas service, STD should be selected as the background gas.
• For verification testing in pure methane, select CH4.
• If verifying in Nitrogen with a known moisture concentration, N2 should be selected as the background gas.
Unless otherwise requested, the
Aurora H2O displays the selected Background Gas an indicator in the upper right
The
corner of the LCD, adjacent to the status message.
Aurora H2O is shipped from the factory configured for Methane operation.
To change the type of background gas, from the Settings Menu select Gas and press
Enter. The following screen appears.
56 Aurora H2O User’s Manual
Page 71

4.3.1 Selecting the Type of Gas (cont.)
Label
Background Gas
Mol. Wt.
Z Factor
N2 STD CH4
CO
2
Gas2
From the Gas Data menu, select Background and press Enter. The following screen
appears.
Chapter 4. Programming Advanced Features
Use the arrow keys to select the desired background gas, and press
background gas selection is now complete. Press
Cancel to return to the display page.
Enter. The
Note:Selecting either Gas1 or Gas2 enables the Label menu item. This menu opens a
keyboard display that allows the user to change the 'Gas1/2' label to one of their own
choosing. Entering the Label menu requires the User passcode (2719).
4.3.2 Setting the Z Factor
The Z factor is a number that accounts for the non-ideal compressibility of natural gas, and is vital for accurate
calculation of mass/volume (lbs/MMSCF, mg/m
To set the
Z factor, from the Gas Data Menu, select Z Factor and press enter. The
following screen appears.
Use the left and right arrow keys to select each digit to be changed. Use the up and
down arrow keys to change the value. When finished, press Enter. The screen returns to
the Settings Menu.
3
).
Aurora H2O User’s Manual 57
Page 72

Chapter 4. Programming Advanced Features
Upper/Lower
Case Select
Highlighted)
Context Menu (Prompts)
Preview
Text Edit
“Keyboard”
4.3.3 Entering a Label
Selecting either Gas1 or Gas2 enables the Label menu item. This menu opens a keyboard display that allows the user to
change the ‘Gas1/2’ label to one of their own choosing. Entering the Label menu requires the User passcode (2719).
To enter/edit a label:
Selecting the Label menu item displays the Alphanumeric Entry control (see Figure 42 below).
Figure 42: Alphanumeric Entry Control
The alpha menu is divided into three sections. The active section will have something highlighted (reverse video). The
Up/Down arrows are used to move between sections.
58 Aurora H2O User’s Manual
Page 73

Chapter 4. Programming Advanced Features
Highlighted
Character
Highlighted
Underlined
Character
Character
4.3.3 Entering a Label (cont.)
The top section is the Context Menu. The ‘Aa’ toggles the keyboard between upper and lower case (shift key). Cancel
abandons any changes to the label.
label will look from the main data display.
Save saves any changes made to the label. There is also a ‘preview’ of how the
• Pressing the Down arrow will move the highlight to the Text Edit section (see Figure 43 below):
Figure 43: Text Edit
Note that the
Context Menu has changed; it displays prompts of available key actions.
• In Text Edit, the Left and Right arrows move the highlight from character to character in the label. Pressing x
erases the highlighted character.
• Pressing the Down arrow will move the highlight to the Keyboard section (see Figure 44 below):
Figure 44: Alphanumeric Menu with Keyboard Highlighted
Note that the
Keyboard, the Left / Right / Up / Down arrows move the highlight from character to character in the keyboard.
Aurora H2O User’s Manual 59
Context Menu has changed again; it displays prompts of available key actions when in the keyboard. In
Page 74

Chapter 4. Programming Advanced Features
4.3.3 Entering a Label (cont.)
Note that the character selected in Text Edit is now underlined.
• Pressing Enter replaces the underlined character with the character highlighted on the keyboard.
• Pressing Cancel erases the underlined character. Any characters after the erased character are shifted to the left.
If there are no characters after the erased character, the underline moves to the last character in the label.
• When in the Keyboard, pressing the Down arrow repeatedly will move the highlight down to the next row of
‘keys’. When the highlight is on the bottom row, pressing
Down will move the highlight to the top row.
• Pressing the Up arrow will move the highlight up to the previous row of keys. When the highlight is on the top
row, pressing
Up will switch to the Text Edit section.
• From the Text Edit section, pressing Up will move the highlight to the Context Menu section.
• Choose Cancel or Save to exit the Label entry.
4.3.4 Adjusting the Gas Offset
The input information for gas molecular weight is not currently used for any moisture
calculations and is reserved for future use.
• lbs/MMSCF is calculated using IGT Research Bulletin #8 and ASTM D-1142-95
referenced at 60°F, 1 ATM.
• mg/cm
To adjust the gas molecular weight offset, from the Settings Menu select Gas and press
menu select Mol. Weight and press
3
is based on ideal gas law derivation referenced at 15°C, 1.01325 kPa.
Enter. The following screen appears.
Use the left and right arrow keys to select each digit to be changed. Use the up and
down arrow keys to change the value. When finished, press
the Settings Menu.
Enter. From the Gas Data
Enter. The screen returns to
60 Aurora H2O User’s Manual
Page 75

4.4 Clock Settings
Chapter 4. Programming Advanced Features
The clock settings are for informational purposes. They are used to keep track of the test
analyzer start time and the laser operational time.
To reset the clock, from the Settings Menu select Clock and press
screen appears.
4.4.1 Resetting the Hour
To reset the hour, from the Clock Menu select Hour and press Enter. The following
screen appears.
Use the left and right arrow keys to select each digit to be changed. Use the up and
down arrow keys to change the value. When finished, press Enter. The screen returns to
the Clock Menu.
4.4.2 Resetting the Minutes
To reset the minutes, from the Clock Menu select Minutes and press Enter. The
following screen appears.
Enter. The following
Use the left and right arrow keys to select each digit to be changed. Use the up and
down arrow keys to change the value. When finished, press Enter. The screen returns to
the Clock Menu.
4.4.3 Resetting the Month
To reset the month, from the Clock Menu select Month and press Enter. The following
screen appears.
Use the left and right arrow keys to select each digit to be changed. Use the up and
down arrow keys to change the value. When finished, press Enter. The screen returns to
the Clock Menu.
Aurora H2O User’s Manual 61
Page 76

Chapter 4. Programming Advanced Features
4.4.4 Resetting the Date
To reset the date, from the Clock Menu select Date and press Enter. The following
screen appears.
Use the left and right arrow keys to select each digit to be changed. Use the up and
down arrow keys to change the value. When finished, press Enter. The screen returns to
the Clock Menu.
4.4.5 Resetting the Year
To reset the year, from the Clock Menu select Year and press Enter. The following
screen appears.
Use the left and right arrow keys to select each digit to be changed. Use the up and
down arrow keys to change the value. When finished, press Enter. The screen returns to
the Clock Menu.
62 Aurora H2O User’s Manual
Page 77

4.5 Pressure Settings
To reset the pressure settings, from the Settings Menu, select Pressure... and press
Enter. The following screen appears.
4.5.1 Setting Pressure Units
To set the pressure units, from the Pressure Menu, select Units and press Enter. You can
then choose from: kPa(a) (Kilopascals Absolute), Bar g- (Bars gauge), or PSI g(Pounds per Square Inch gauge).
4.5.2 Setting the Source
To reset the source, from the Pressure Menu, select Source and press Enter. The
following screen appears.
Chapter 4. Programming Advanced Features
Use the left and right arrow keys to select the line pressure source.
pressure value from a pressure transmitter and
connection. To set a constant value, select Constant and press
to the Pressure Menu.
4.5.3 Changing the Constant
If the pressure source selected is Constant, to reset its value, select Constant from the
Pressure Menu and press
Use the left and right arrow keys to select each digit to be changed. Use the up and
down arrow keys to change the value. When finished, press
the Pressure Menu.
Note: Data entry for this setting is only in kPa.
Live accepts a
Remote accepts a value via a Modbus
Enter. The screen returns
Enter. The following screen appears.
Enter. The screen returns to
Aurora H2O User’s Manual 63
Page 78

Chapter 4. Programming Advanced Features
4.5.4 Editing Pressure Calibration
Pressure input in this section is used only for equivalent dew point calculations. Equivalent dew point is the dew point
of the process gas at the process pressure. Input a “constant” value if the line pressure is at a normal pressure, or use an
external pressure transmitter to input a “live” pressure input into the
To edit the pressure calibration, from the Line Pressure Source Menu, select Live and
Enter. The following screen appears.
press
Aurora H2O analyzer.
To edit the Calibration Data, use the arrow keys to select Cal Data and press
Enter. The
following screen appears.
To select the Calibration Point, use the up and down arrow keys to highlight Select Cal
Point and press Enter. The following screen appears.
Use the left and right arrow keys to select Zero or Span and press
Enter. The screen
returns to the previous menu.
To edit the Pressure Value, use the up and down arrow keys to select Edit Pressure
Value and press Enter. The following screen appears.
Use the left and right arrow keys to select each digit to be changed. Use the up and down
arrow keys to change the value. When finished, press
Enter. The screen returns to the
previous menu.
64 Aurora H2O User’s Manual
Page 79

Chapter 4. Programming Advanced Features
4.5.4 Editing Pressure Calibration (cont.)
To edit the Input Value, use the up and down arrow keys to select Edit Input Value and
Enter. The following screen appears.
press
Use the left and right arrow keys to select each digit to be changed. Use the up and down
arrow keys to change the value. When finished, press
previous menu.
Enter. The screen returns to the
4.6 Regional Settings
This section enables the setting of regional information, depending on the location of the Aurora H2O.
To reset the regional settings, from the Settings Menu, select Locale... and press
The following screen appears.
Note: Locale settings for your order have been set at the factory and are access code
need to access Regional Settings, contact the factory for assistance.
4.6.1 Setting the Country Code
To edit the country code, from the Regional Settings Menu select Country Code and
Enter. The following screen appears. A passcode is required to make changes.
press
Use the left and right arrow keys to select each digit to be changed. Use the up and
down arrow keys to change the value. When finished, press
the Regional Settings Menu.
• Country Codes = international telephone country codes.
Enter.
protected. If you determine a
Enter. The screen returns to
• Default = 1 for U.S.
• Option = 81 for Japan is available to conform to METI requirements.
Aurora H2O User’s Manual 65
Page 80

Chapter 4. Programming Advanced Features
4.6.2 Setting the Decimal Format
The Decimal Format option determines whether a decimal [.] or a comma [,] is used as
the decimal separator. To edit the decimal format, from the Regional Settings Menu
select Decimal Format and press
Use the left and right arrow keys to select a decimal [.] or a comma [,] as the decimal
separator and press
4.6.3 Setting the Date Format
To edit the date format, from the Regional Settings Menu select Date Format and press
Enter. The following screen appears.
Enter. The following screen appears.
Enter. The screen returns to the Display Menu.
Use the left and right arrow keys to select the desired date format and press Enter. The
screen returns to the previous display.
4.6.4 Setting the Unit System
IMPORTANT: If the Country Code (see “Setting the Country Code” on page 65) has been set to 81 (Japan) the
Unit System menu is not available.
To select the unit system to be used for measurements, select Unit System and press
Enter. The following screen appears.
Use the left and right arrow keys to select the Unit System desired [SI = only metric
units are available in the selection menus; SI + US = both metric and English units are
available in the selection menus] and press Enter. The screen returns to the Regional
Settings Menu.
Note: Changing the Unit System setting from
current Display or Outputs units. This is because it is not possible for the
SI+US to SI in the above menu will NOT immediately change the
Aurora H2O to know the SI
measurement units desired by the operator to replace any currently displayed or output English units.
However, the next time the operator selects different Display (see “Selecting Primary Units” on page 40) or
Outputs (see “Selecting Output Units” on page 43) units, only
66 Aurora H2O User’s Manual
SI units will be available in the menu.
Page 81

Chapter 4. Programming Advanced Features
4.7 User Calibration
Beginning with software revision H2O.001.F, the Aurora H2O supports a two-point User Calibration for use in
methane/natural gas. This is provided so that a field calibration can be easily performed to cause the
measurement to correspond to a calibration gas or other moisture device. The User Calibration is independent from,
and does not affect, the Factory Calibration. The
Aurora H2O can be quickly switched between User and Factory
calibration at any time.
When a User Calibration is active, an asterisk (*) will appear in the upper left corner of
the primary display.
Aurora H2O
Before the calibration can be performed, the
methane selected as the Background Gas.
Choose Settings... from the Main Menu. A User Cal... selection is now provided.
Note: If the
Aurora H2O is set for Nitrogen as the background gas, the User Cal selection will be disabled/grayed out.
Aurora H2O will prompt for the User Passcode [2719]
The
By default, the
Calibration Menu is disabled with the exception of the Status selection.
Aurora H2O must be operating correctly in methane or natural gas, with
Aurora H2O is operating with the Factory calibration, so the User
Select Status, and choose User as the Active Calibration.
Aurora H2O User’s Manual 67
Page 82

Chapter 4. Programming Advanced Features
4.7 User Calibration (cont.)
The User Calibration Menu is now enabled.
The selections on the User Calibration Menu include the following functions:
Item Purpose
Zero Gas User specifies the water concentration, in PPMv, of the “Zero”, or dry gas.
Span Gas User specifies the water concentration, in PPMv, of the “Span”, or Cal/Wet gas.
Read Zero The
Aurora H2O will read the signal while exposed to the Zero gas.
Read Span The
Aurora H2O will read the signal while exposed to the Span gas, then determine the
CH4 Offset and Scalar calibration values.
CH4 Offset Permits the user to view/edit the calculated offset term.
CH4 Scalar Permits the user to view/edit the calculated scalar (gain) term.
First select the Zero Gas and Span Gas items, to specify the cal gases to be used. The
zero gas must be in the range of 0.0 to 50.0 PPMv water. It is recommended that the
zero gas be 10.0 PPMv or higher for best results. The Span gas must be in the range of
0.0 to 5000.0 PPMv water. It is recommended that the Span gas be 500.0 PPMv or
lower for best performance.
Apply the Zero gas, and wait for the
Aurora H2O reading to stabilize.
Note:The user can exit to the display and return to the User Cal Menu without affecting
the Calibration procedure.
When the reading is stable, select
Read Zero. The Aurora H2O performs multiple
measurements for approximately 15 seconds, indicating its progress. When the readings
are complete, you will be prompted to apply the span gas, and continue. If there is
doubt about the stability of the zero gas, the reading can be repeated at this point.
68 Aurora H2O User’s Manual
Page 83

4.7 User Calibration (cont.)
Apply the Span gas, and wait for the Aurora H2O reading to stabilize.
Chapter 4. Programming Advanced Features
When the reading is stable, select Read Span. The
calculates the new calibration. If the calculated values are determined to be valid, the
Aurora H2O uses the current measurement, and immediately
Aurora H2O will display
“Calibration OK” and prompt you to Save the results, or Cancel. If the values are not valid, the Aurora will display
“Calibration *FAILED*”, and prompt you to continue. On a cal failure or Cancel, no change is made to the User
Calibration values.
The CH4 Offset and CH4 Scalar items can be used to view or modify the calculated
calibration points, if desired.
Note: The default values for the CH4 Offset is 0.0 and the CH4 Scalar is 1.0. These defaults are NOT the same as the
Factory Calibration! Making the User Cal active without performing the actual calibration will adversely
affect the accuracy of the
Aurora H2O should be returned to the Factory calibration using the Status item.
Aurora H2O. If there is any doubt about the quality/accuracy of the gases used, the
4.8 Service Settings
CAUTION! The Service Settings Menu should be used by factory-trained personnel only.
Aurora H2O User’s Manual 69
Page 84

Chapter 4. Programming Advanced Features
Gas Composition
Gas Composition
4.9 Aurora H2O Information
To check the Aurora H2O information, from the Main Menu select About and press
Enter. The following screen appears.
4.9.1 Checking the ID
To check identification information, select ID and press Enter. A screen similar to the
following appears.
To return to the About Menu, press
4.9.2 Checking the System Status
To view the status of the Aurora H2O system, from the About Menu select System
Status and press
Uptime: is the elapsed time since the Aurora H2O was powered on or reset.
Started: is the date and time that the Aurora H2O was last powered on/reset.
Start Temp: is the laser housing temperature as measured at the last startup/reset.
Laser Hours: indicates the total lifetime that the laser has been energized.
To return to the About Menu, press
Enter.
Enter. A screen similar to the following appears.
Enter.
70 Aurora H2O User’s Manual
Page 85

4.9.3 Checking the Software
Gas Composition
To view the software versions being used, from the About Menu select Software
Versions and press
Chapter 4. Programming Advanced Features
Enter. A screen similar to the following appears.
To return to the About Menu, press
4.9.4 Checking the Gas Composition
To view the gas content, from the About Menu select Gas Composition and press Enter.
A screen similar to the following appears.
To return to the About Menu, press
Enter.
Enter.
Aurora H2O User’s Manual 71
Page 86

Chapter 4. Programming Advanced Features
4.9.5 Checking the Alternate Gas Composition
The Aurora H2O TDLAS is normally calibrated to a standard gas mixture that is representative of “typical” natural gas.
The primary components and concentrations of this gas mixture are as follows:
Component Concentration
Methane (CH4) 90.0%
Nitrogen (N
Carbon Dioxide (CO
For special applications, where the composition of the gas to be measured differs significantly from the standard, GE
can provide an alternate calibration. If this service has been ordered, the
with both the standard and a custom calibration installed.
)6.0%
2
)4.0%
2
Aurora H2O will be shipped from the factory
The calibration in use can be verified at any time using the
From the Main Menu, select About and press
Enter. The following screen appears.
From the About Aurora menu, select Gas Composition and press
Aurora H2O About… menu.
Enter. The following
screen appears.
An identifier label for the gas composition will be displayed above the components:
Gas Composition Identifier
72 Aurora H2O User’s Manual
Page 87

4.10 Locking/Unlocking the Display
To lock the Aurora H2O against any future changes, from the Main Menu select Lock
and press
Note: This menu option is the same as exiting the programming menu and waiting for a
keypad time-out to lock the keypad.
Enter. The screen returns to the standard display.
Chapter 4. Programming Advanced Features
To unlock the A
urora H2O for changes, press Cancel, Enter, Cancel as instructed in
“Unlocking the Keypad” on page 38.
Aurora H2O User’s Manual 73
Page 88

Chapter 4. Programming Advanced Features
[no content intended for this page]
74 Aurora H2O User’s Manual
Page 89

Chapter 4. Programming Advanced Features
Display Outputs Alarm Settings Service About Lock
Alt 2Alt 1Primary Decimal Adjust
ppmv
mg/m
Pw, kPa
Dew Pt °C
3
Hygro
Temp Press
kPa
mPa
bar
kg/cm
mmHg
PSIa
PSIg
Primary
Alt 1
Alt 2
1 decimals
Set Decimal for:
ESC = Cancel
ESC = Cancel
ENT = Save
ESC = Cancel
Select
Units
Type
Upper
Lower
Test
Trim...
A
B
C
Select Output:
ESC = Cancel
Select Unit Type:
Hygro
Temp
Press
Select Output Type:
4-20 mA
0-20 mA
Set Output A, B or C:
Span
Zero
i.e. 00250.0 PPMv
Set Output A, B or C
i.e. ±050.00 %
Reset Trim
Select
Units
A
B
C
Select Output:
ESC = Cancel
Select Unit Type:
Hygro
Temp
Press
Status
Set Alarm Status
OFF
ON
Type
Select Alarm Type:
Setpoint
Out Band
In Band
Test Value
Comms...
Comm Port:
Select
Network ID
Protocol
Select Comm Port
SCADA / Service
Baud Rate
9600
4800
115.2 k
57.6 k
38.4 k
19.2 k
Select
RS-232
RS-485
Set Node ID:
i.e. 001
Adjust
Adjust Offset Values:
ppm Level
Filter
Smoothing Filter:
i.e. 200 Samples
Clock
Date
Year
Hour
Minutes
Month
Set Clock:
Set Hour [0-23]:
Set Minutes [0-59]:
Set Month [1-12]:
Set Date:
Set Year:
Gas
Pressure
Pressure Settings
Source
Constant
Cal Data
Select Pressure Source:
Constant
Live
Enter Line Pressure:
i.e. ± 0101.325 kPa
Edit Pressure Cal:
Select Cal Point
Edit Input Value
Edit Pressure Value
Enter Line Signal:
i.e. 04.000 mA
Select Calibration Point:
Zero
Span
Enter Line Pressure:
i.e. 00000.000 kPa
About Aurora:
ID
System Status
GE Copyright, etc.
Unit SN:
Sensor SN:
Uptime: i.e. 0 d 00 h
Laser Hours: i.e. 85
BOOT:
PROG:
Lock Display
Upper
Lower
Enter A, B or C
i.e. ± 000.0 Td °C
Min/Max
Alarm Value
Main Menu
Parity
EVEN
ODD
NONE
Set
Date Format
Unit System
Locale
Regional Settings
Trim Span
Trim Zero
Set Output A, B or C
Factory-trained
personnel only
Hygro Temp
Pressure
SI
SI+US
DP °C, Eq. DP °C, mg/m,
g/m3, PPMv, Pw kPa
Eq. DP °F, Lbs/MMSF
T °C, DP °C
T °F, DP °F
All SI units plus:
PSIa, PSIg
Bar, kg/cm
Note: The selection of "English" or non-metric
measurements is dependent on the Regional
Settings from the LOCALE menu. The unit
system choices are SI (from the French Le
Systeme International d'Unites), commonly
referred to as the "metric" system, or SI+US.
Measurement Units
Reverse
Dew Pt °F
Eq DP °C
Eq DP °F
ppmv
mg/m
3
Pw, kPa
Dew Pt °C
Dew Pt °F
Eq DP °C
Eq DP °F
Temp °C
Temp °F
Temp K
Dew Pt °C
Dew Pt °F
2
Sample Line
Passcode Protected
Parity
Protocol
Background
STD
N2
Select
Background
Gas
Set
Molecular
Weight
Dew FrostDew
Displays composition
of selected background gas
Label
(Passcode
protected)
User Calibration
Status
Factory
User
g/sm
3
Gas1
CH4
Gas2
Z Factor
Select Pressure Units:
kPa(a)
Barg
PSIg
barg
g/sm
3
ALM
Stop Bits
ONE
TWO
Set
Stop Bits
Remote
mg/m ,
All SI units plus:
Fault
Aurora H2O User’s Manual 75
Figure 45: Programming Menu Map
Page 90

[no content intended for this page]
Chapter 4. Programming Advanced Features
Aurora H2O User’s Manual 76
Page 91

Chapter 5. AuroraView Interface Software
Chapter 5. AuroraView Interface Software
5.1 Capabilities
Yo ur Aurora H2O Analyzer is shipped with a CD which includes a PC-Software Application called AuroraView. With
AuroraView, you can:
• View Aurora H2O Configuration Items such as Alarms & Outputs.
• Use the DataLog function to copy data to a comma delimited .txt file which can be opened by spreadsheet
applications such as Microsoft Excel.
• Plot real-time data for one or more Aurora H2O parameters
• Manipulate plotted data in a variety of ways such as: color, line type, zoom in/out, etc.
• Trend tabular data in real-time.
• Show Scan Plots of the moisture absorption spectra.
• Copy plots from AuroraView to other Window applications like Microsoft Powerpoint or Word.
AuroraView does not provide functionality for the following:
• Aurora H2O software updates.
• Save the Aurora H2O Configuration. The Aurora H2O has a robust design which allows the meter to recover
from fault conditions without the need to upload the configuration of the meter using external software.
5.2 Requirements
AuroraView leverages a National Instruments Run-Time environment. This environment is supported on the following
operating systems with the minimum installation requirements indicated:
• 260 MB of available hard disk space
• 64 MB of RAM or more
• 300 MHz Pentium CPU
• Windows NT 4.0 SP6 or higher, Windows ME, Windows 2000, Windows XP
• Internet Explorer v5.0 or higher
AuroraView supports the following serial interfaces:
• RS232
• RS485 Modbus
Aurora H2O User’s Manual 77
Page 92

Chapter 5. AuroraView Interface Software
5.3 Installing AuroraView
1. Insert the Installation CD into the optical drive on your PC.
2. The installation program should launch automatically (see Figure 46 below). If it does not, select Start → Run
→ Browse.
Figure 46: Initial Screen
78 Aurora H2O User’s Manual
Page 93

Chapter 5. AuroraView Interface Software
5.3 Installing AuroraView (cont.)
3. Browse to the file named “setup.exe” in the root directory of the CD (see Figure 47 below). Double-click the
file to start the installation.
Figure 47: AuroraView Installer
Aurora H2O User’s Manual 79
Page 94

Chapter 5. AuroraView Interface Software
5.3 Installing AuroraView (cont.)
4. Exit all other programs before running the installer (see Figure 48 below).
Figure 48: Installation Recommendation
80 Aurora H2O User’s Manual
Page 95

Chapter 5. AuroraView Interface Software
5.3 Installing AuroraView (cont.)
5. The next screen (see Figure 50 below) provides the opportunity to change installation locations if desired.
When ready, click
Next.
Figure 49: Destination Directory
6. At the next screen, accept the Software License Agreement (see Figure 50 below) and click
Next.
Figure 50: Software License Agreement
Aurora H2O User’s Manual 81
Page 96

Chapter 5. AuroraView Interface Software
5.3 Installing AuroraView (cont.)
7. The next screen (see Figure 51 below) provides instructions for initiating the installation. When ready, click
Next to begin.
Figure 51: Starting the Installation
82 Aurora H2O User’s Manual
Page 97

5.3 Installing AuroraView (cont.)
8. During installation, the screen shown in Figure 52 below appears.
Chapter 5. AuroraView Interface Software
Figure 52: Overall Progress
Aurora H2O User’s Manual 83
Page 98

Chapter 5. AuroraView Interface Software
5.3 Installing AuroraView (cont.)
9. The screen shown in Figure 53 below appears when the installation is complete.
Figure 53: Installation Is Complete
84 Aurora H2O User’s Manual
Page 99

Chapter 5. AuroraView Interface Software
5.4 Starting AuroraView
1. From the Start menu, click Programs → AuroraView → AuroraView (see Figure 54 below).
Figure 54: AuroraView in Programs Menu
Aurora H2O User’s Manual 85
Page 100

Chapter 5. AuroraView Interface Software
Command Line
Alarms Status
Reading
Interval
Datalog
Interval
Current Readings
Pane
Trend Tabular Data Tab
Scan Plots Tab
Trend Plots Tab
5.4 Starting AuroraView (cont.)
2. AuroraView boots up and displays a screen similar to Figure 55 below.
Figure 55: AuroraView Main Screen
86 Aurora H2O User’s Manual
 Loading...