

Page 1

GE
Sensing & Inspection Technologies
AquaTrans™ AT868
Panametrics Liquid Flow Ultrasonic Transmitter
Abridged Manual
Page 2
GE
Sensing & Inspection Technologies
AquaTrans™ AT8688
Panametrics Liquid Flow Ultrasonic Transmitter
Abridged Manual
914-218D
September 2004
The AquaTrans AT868 is a GE Panametrics product. GE Panametrics has joined other GE high-technology
businesses under a new name—GE Sensing & Inspection Technologies.
Page 3

September 2004
Warranty Each instrument manufactured by GE Infrastructure Sensing, Inc. is
warranted to be free from defects in material and workmanship.
Liability under this warranty is limited to restoring the instrument to
normal operation or replacing the instrument, at the sole discretion of
GE Infrastructure Sensing, Inc. Fuses and batteries are specifically
excluded from any liability. This warranty is effective from the date of
delivery to the original purchaser. If GE Infrastructure Sensing, Inc.
determines that the equipment was defective, the warranty period is:
• one year for general electronic failures of the instrument
• one year for mechanical failures of the sensor
If GE Infrastructure Sensing, Inc. determines that the equipment was
damaged by misuse, improper installation, the use of unauthorized
replacement parts, or operating conditions outside the guidelines
specified by GE Infrastructure Sensing, Inc., the repairs are not
covered under this warranty.
The warranties set forth herein are exclusive and are in lieu of
all other warranties whether statutory, express or implied
(including warranties of merchantability and fitness for a
particular purpose, and warranties arising from course of
dealing or usage or trade).
iii
Page 4

September 2004
Return Policy If a GE Infrastructure Sensing, Inc. instrument malfunctions within the
warranty period, the following procedure must be completed:
1. Notify GE Infrastructure Sensing, Inc., giving full details of the
problem, and provide the model number and serial number of the
instrument. If the nature of the problem indicates the need for
factory service, GE Infrastructure Sensing, Inc. will issue a RETURN
AUTHORIZATION number (RA), and shipping instructions for the
return of the instrument to a service center will be provided.
2. If GE Infrastructure Sensing, Inc. instructs you to send your
instrument to a service center, it must be shipped prepaid to the
authorized repair station indicated in the shipping instructions.
3. Upon receipt, GE Infrastructure Sensing, Inc. will evaluate the
instrument to determine the cause of the malfunction.
Then, one of the following courses of action will then be taken:
• If the damage is covered under the terms of the warranty, the
instrument will be repaired at no cost to the owner and returned.
• If GE Infrastructure Sensing, Inc. determines that the damage is not
covered under the terms of the warranty, or if the warranty has
expired, an estimate for the cost of the repairs at standard rates
will be provided. Upon receipt of the owner’s approval to proceed,
the instrument will be repaired and returned.
iv
Page 5

September 2004
Table of Contents
Chapter 1: Installation
Introduction. . . . . . . . . . . . . . . . . . . . . . . . . . . . . . . . . . . . . . . . . . . . . . . . . . . . . . . . . . . . . . . . . . . . . . . . . . . . 1-1
Site Considerations . . . . . . . . . . . . . . . . . . . . . . . . . . . . . . . . . . . . . . . . . . . . . . . . . . . . . . . . . . . . . . . . . . . . . 1-1
Electronics Enclosure Location . . . . . . . . . . . . . . . . . . . . . . . . . . . . . . . . . . . . . . . . . . . . . . . . . . . . . . 1-1
Flowcell Location . . . . . . . . . . . . . . . . . . . . . . . . . . . . . . . . . . . . . . . . . . . . . . . . . . . . . . . . . . . . . . . . . . . 1-2
Transducer Location. . . . . . . . . . . . . . . . . . . . . . . . . . . . . . . . . . . . . . . . . . . . . . . . . . . . . . . . . . . . . . . . 1-2
Cable Lengths . . . . . . . . . . . . . . . . . . . . . . . . . . . . . . . . . . . . . . . . . . . . . . . . . . . . . . . . . . . . . . . . . . . . . . 1-3
Transducer Cables. . . . . . . . . . . . . . . . . . . . . . . . . . . . . . . . . . . . . . . . . . . . . . . . . . . . . . . . . . . . . . . . . . 1-3
Installing a Flowcell. . . . . . . . . . . . . . . . . . . . . . . . . . . . . . . . . . . . . . . . . . . . . . . . . . . . . . . . . . . . . . . . . 1-3
CE Mark Compliance . . . . . . . . . . . . . . . . . . . . . . . . . . . . . . . . . . . . . . . . . . . . . . . . . . . . . . . . . . . . . . . . . . . 1-4
EMC Compliance . . . . . . . . . . . . . . . . . . . . . . . . . . . . . . . . . . . . . . . . . . . . . . . . . . . . . . . . . . . . . . . . . . . 1-4
LVD Compliance . . . . . . . . . . . . . . . . . . . . . . . . . . . . . . . . . . . . . . . . . . . . . . . . . . . . . . . . . . . . . . . . . . . . 1-5
Making Electrical Connections . . . . . . . . . . . . . . . . . . . . . . . . . . . . . . . . . . . . . . . . . . . . . . . . . . . . . . . . . . 1-6
Preliminary Steps . . . . . . . . . . . . . . . . . . . . . . . . . . . . . . . . . . . . . . . . . . . . . . . . . . . . . . . . . . . . . . . . . . . 1-6
Wiring the Line Power . . . . . . . . . . . . . . . . . . . . . . . . . . . . . . . . . . . . . . . . . . . . . . . . . . . . . . . . . . . . . . 1-7
Wiring Transducers . . . . . . . . . . . . . . . . . . . . . . . . . . . . . . . . . . . . . . . . . . . . . . . . . . . . . . . . . . . . . . . . . 1-8
Wiring Standard 0/4-20 mA Analog Outputs . . . . . . . . . . . . . . . . . . . . . . . . . . . . . . . . . . . . . . . . . 1-9
Wiring the Totalizer/Frequency Output . . . . . . . . . . . . . . . . . . . . . . . . . . . . . . . . . . . . . . . . . . . . .1-10
Wiring the Serial Port . . . . . . . . . . . . . . . . . . . . . . . . . . . . . . . . . . . . . . . . . . . . . . . . . . . . . . . . . . . . . . 1-11
Wiring an External Totalizer Reset Switch . . . . . . . . . . . . . . . . . . . . . . . . . . . . . . . . . . . . . . . . . . . 1-14
Programming the AT868 . . . . . . . . . . . . . . . . . . . . . . . . . . . . . . . . . . . . . . . . . . . . . . . . . . . . . . . . . . . . . . . 1-14
Chapter 2: Programming Site Data
Introduction. . . . . . . . . . . . . . . . . . . . . . . . . . . . . . . . . . . . . . . . . . . . . . . . . . . . . . . . . . . . . . . . . . . . . . . . . . . . 2-1
Activating a Channel [CHx-ACTIV Menu] . . . . . . . . . . . . . . . . . . . . . . . . . . . . . . . . . . . . . . . . . . . . . . . . . 2-1
Accessing the ACTIV Submenu . . . . . . . . . . . . . . . . . . . . . . . . . . . . . . . . . . . . . . . . . . . . . . . . . . . . . . 2-2
Entering System Data [CHx-SYSTM Menu] . . . . . . . . . . . . . . . . . . . . . . . . . . . . . . . . . . . . . . . . . . . . . . . 2-2
Accessing the CHx-SYSTM Submenu. . . . . . . . . . . . . . . . . . . . . . . . . . . . . . . . . . . . . . . . . . . . . . . . . 2-2
Selecting the Volumetric Units. . . . . . . . . . . . . . . . . . . . . . . . . . . . . . . . . . . . . . . . . . . . . . . . . . . . . . . 2-3
Selecting the Totalizer Units . . . . . . . . . . . . . . . . . . . . . . . . . . . . . . . . . . . . . . . . . . . . . . . . . . . . . . . . . 2-3
Selecting Mass Flow Units. . . . . . . . . . . . . . . . . . . . . . . . . . . . . . . . . . . . . . . . . . . . . . . . . . . . . . . . . . . 2-3
Entering Transducer and Pipe Parameters [CHx-PIPE Menu] . . . . . . . . . . . . . . . . . . . . . . . . . . . . . . 2-4
Accessing the PIPE Submenu. . . . . . . . . . . . . . . . . . . . . . . . . . . . . . . . . . . . . . . . . . . . . . . . . . . . . . . . 2-4
Special Transducers . . . . . . . . . . . . . . . . . . . . . . . . . . . . . . . . . . . . . . . . . . . . . . . . . . . . . . . . . . . . . . . . 2-5
Special Clamp-On Transducers. . . . . . . . . . . . . . . . . . . . . . . . . . . . . . . . . . . . . . . . . . . . . . . . . . . . . . 2-5
Pipe Material . . . . . . . . . . . . . . . . . . . . . . . . . . . . . . . . . . . . . . . . . . . . . . . . . . . . . . . . . . . . . . . . . . . . . . . 2-6
Pipe Outside Diameter . . . . . . . . . . . . . . . . . . . . . . . . . . . . . . . . . . . . . . . . . . . . . . . . . . . . . . . . . . . . . . 2-7
Path and Axial Length . . . . . . . . . . . . . . . . . . . . . . . . . . . . . . . . . . . . . . . . . . . . . . . . . . . . . . . . . . . . . . 2-7
Lining . . . . . . . . . . . . . . . . . . . . . . . . . . . . . . . . . . . . . . . . . . . . . . . . . . . . . . . . . . . . . . . . . . . . . . . . . . . . . . 2-8
Setting Up a Tracking Window . . . . . . . . . . . . . . . . . . . . . . . . . . . . . . . . . . . . . . . . . . . . . . . . . . . . . . 2-8
Fluid Type . . . . . . . . . . . . . . . . . . . . . . . . . . . . . . . . . . . . . . . . . . . . . . . . . . . . . . . . . . . . . . . . . . . . . . . . . . 2-9
Reynolds Correction . . . . . . . . . . . . . . . . . . . . . . . . . . . . . . . . . . . . . . . . . . . . . . . . . . . . . . . . . . . . . . . . 2-9
KV Input Selection . . . . . . . . . . . . . . . . . . . . . . . . . . . . . . . . . . . . . . . . . . . . . . . . . . . . . . . . . . . . . . . . . 2-10
Number of Traverses and Transducer Spacing . . . . . . . . . . . . . . . . . . . . . . . . . . . . . . . . . . . . . . 2-10
Entering the Zero Cutoff Value [CHx-I/O Menu]. . . . . . . . . . . . . . . . . . . . . . . . . . . . . . . . . . . . . . . . . .2-11
Activating Mass Flow . . . . . . . . . . . . . . . . . . . . . . . . . . . . . . . . . . . . . . . . . . . . . . . . . . . . . . . . . . . . . . . . . .2-11
v
Page 6

September 2004
Table of Contents (cont.)
Entering Global System Data [GLOBL-SYSTM Menu]. . . . . . . . . . . . . . . . . . . . . . . . . . . . . . . . . . . . . 2-12
Selecting the GLOBL-SYSTM Units . . . . . . . . . . . . . . . . . . . . . . . . . . . . . . . . . . . . . . . . . . . . . . . . . . 2-12
Selecting the System Units. . . . . . . . . . . . . . . . . . . . . . . . . . . . . . . . . . . . . . . . . . . . . . . . . . . . . . . . . 2-12
Setting Up the External Totalizer Reset Switch . . . . . . . . . . . . . . . . . . . . . . . . . . . . . . . . . . . . . . 2-13
Selecting Mass Flow Units . . . . . . . . . . . . . . . . . . . . . . . . . . . . . . . . . . . . . . . . . . . . . . . . . . . . . . . . . 2-13
Setting Up the Outputs [GLOBL-I/O Menu] . . . . . . . . . . . . . . . . . . . . . . . . . . . . . . . . . . . . . . . . . . . . . . 2-14
Accessing the Analog Outputs . . . . . . . . . . . . . . . . . . . . . . . . . . . . . . . . . . . . . . . . . . . . . . . . . . . . . 2-14
Setting Up the Analog Output Scale . . . . . . . . . . . . . . . . . . . . . . . . . . . . . . . . . . . . . . . . . . . . . . . . 2-14
Accessing the Totalizer/Frequency Outputs. . . . . . . . . . . . . . . . . . . . . . . . . . . . . . . . . . . . . . . . . 2-15
Setting Up a Frequency Output . . . . . . . . . . . . . . . . . . . . . . . . . . . . . . . . . . . . . . . . . . . . . . . . . . . . 2-16
Setting Up a Totalizer Output . . . . . . . . . . . . . . . . . . . . . . . . . . . . . . . . . . . . . . . . . . . . . . . . . . . . . . 2-17
Configuring the Communications Port [GLOBL-COMM] . . . . . . . . . . . . . . . . . . . . . . . . . . . . . . . . . . 2-18
Taking Measurements . . . . . . . . . . . . . . . . . . . . . . . . . . . . . . . . . . . . . . . . . . . . . . . . . . . . . . . . . . . . . . . . . 2-18
Chapter 3: Displaying Data
Introduction . . . . . . . . . . . . . . . . . . . . . . . . . . . . . . . . . . . . . . . . . . . . . . . . . . . . . . . . . . . . . . . . . . . . . . . . . . . 3-1
Adjusting LCD Contrast and Brightness. . . . . . . . . . . . . . . . . . . . . . . . . . . . . . . . . . . . . . . . . . . . . . . . . . 3-1
Setting Up the Display . . . . . . . . . . . . . . . . . . . . . . . . . . . . . . . . . . . . . . . . . . . . . . . . . . . . . . . . . . . . . . . . . . 3-2
Accessing the Display Submenu. . . . . . . . . . . . . . . . . . . . . . . . . . . . . . . . . . . . . . . . . . . . . . . . . . . . . 3-2
Configuring the Display . . . . . . . . . . . . . . . . . . . . . . . . . . . . . . . . . . . . . . . . . . . . . . . . . . . . . . . . . . . . . 3-2
Resetting the Totalizers. . . . . . . . . . . . . . . . . . . . . . . . . . . . . . . . . . . . . . . . . . . . . . . . . . . . . . . . . . . . . . . . . 3-3
Resetting Totalizers Using the Internal Keypad. . . . . . . . . . . . . . . . . . . . . . . . . . . . . . . . . . . . . . . 3-3
Resetting Totalizers Using an External Switch . . . . . . . . . . . . . . . . . . . . . . . . . . . . . . . . . . . . . . . . 3-3
Chapter 4: Calibration
Introduction . . . . . . . . . . . . . . . . . . . . . . . . . . . . . . . . . . . . . . . . . . . . . . . . . . . . . . . . . . . . . . . . . . . . . . . . . . . 4-1
Calibrating and Testing the Analog Outputs . . . . . . . . . . . . . . . . . . . . . . . . . . . . . . . . . . . . . . . . . . . . . 4-1
Calibration . . . . . . . . . . . . . . . . . . . . . . . . . . . . . . . . . . . . . . . . . . . . . . . . . . . . . . . . . . . . . . . . . . . . . . . . . 4-1
Testing Linearity. . . . . . . . . . . . . . . . . . . . . . . . . . . . . . . . . . . . . . . . . . . . . . . . . . . . . . . . . . . . . . . . . . . . 4-2
Calibrating the Totalizer/Frequency Outputs. . . . . . . . . . . . . . . . . . . . . . . . . . . . . . . . . . . . . . . . . . . . . 4-4
Calibrating the Frequency Outputs . . . . . . . . . . . . . . . . . . . . . . . . . . . . . . . . . . . . . . . . . . . . . . . . . . 4-4
Calibrating the Totalizer Outputs . . . . . . . . . . . . . . . . . . . . . . . . . . . . . . . . . . . . . . . . . . . . . . . . . . . . 4-4
Appendix A: Menu Maps
Appendix B: Measuring P and L Dimensions
Measuring P and L . . . . . . . . . . . . . . . . . . . . . . . . . . . . . . . . . . . . . . . . . . . . . . . . . . . . . . . . . . . . . . . . . . . . . B-1
vi
Page 7

Chapter 1
Page 8

Installation
Introduction. . . . . . . . . . . . . . . . . . . . . . . . . . . . . . . . . . . . . . . . . . . . . . . . . . . . 1-1
Site Considerations . . . . . . . . . . . . . . . . . . . . . . . . . . . . . . . . . . . . . . . . . . . . . 1-1
CE Mark Compliance . . . . . . . . . . . . . . . . . . . . . . . . . . . . . . . . . . . . . . . . . . . . 1-4
Making Electrical Connections . . . . . . . . . . . . . . . . . . . . . . . . . . . . . . . . . . . 1-6
Programming the AT868 . . . . . . . . . . . . . . . . . . . . . . . . . . . . . . . . . . . . . . . . 1-14
Page 9

September 2004
Introduction To ensure safe and reliable operation of the AT868, the system must
be installed and programmed in accordance with the guidelines
established by GE. Those guidelines are explained in detail in this
chapter.
!WARNING!
Be sure to follow all applicable local safety codes and
regulations for installing electrical equipment. Consult
company safety personnel or local safety authorities to
verify the safety of any procedure or practice.
!ATTENTION EUROPEAN CUSTOMERS!
To meet CE Mark requirements, all cables must be installed
as described later in this chapter.
Site Considerations Because the relative location of the flowcell and the electronics
enclosure is important, use the guidelines in this section to plan the
AT868 installation.
Electronics Enclosure Location
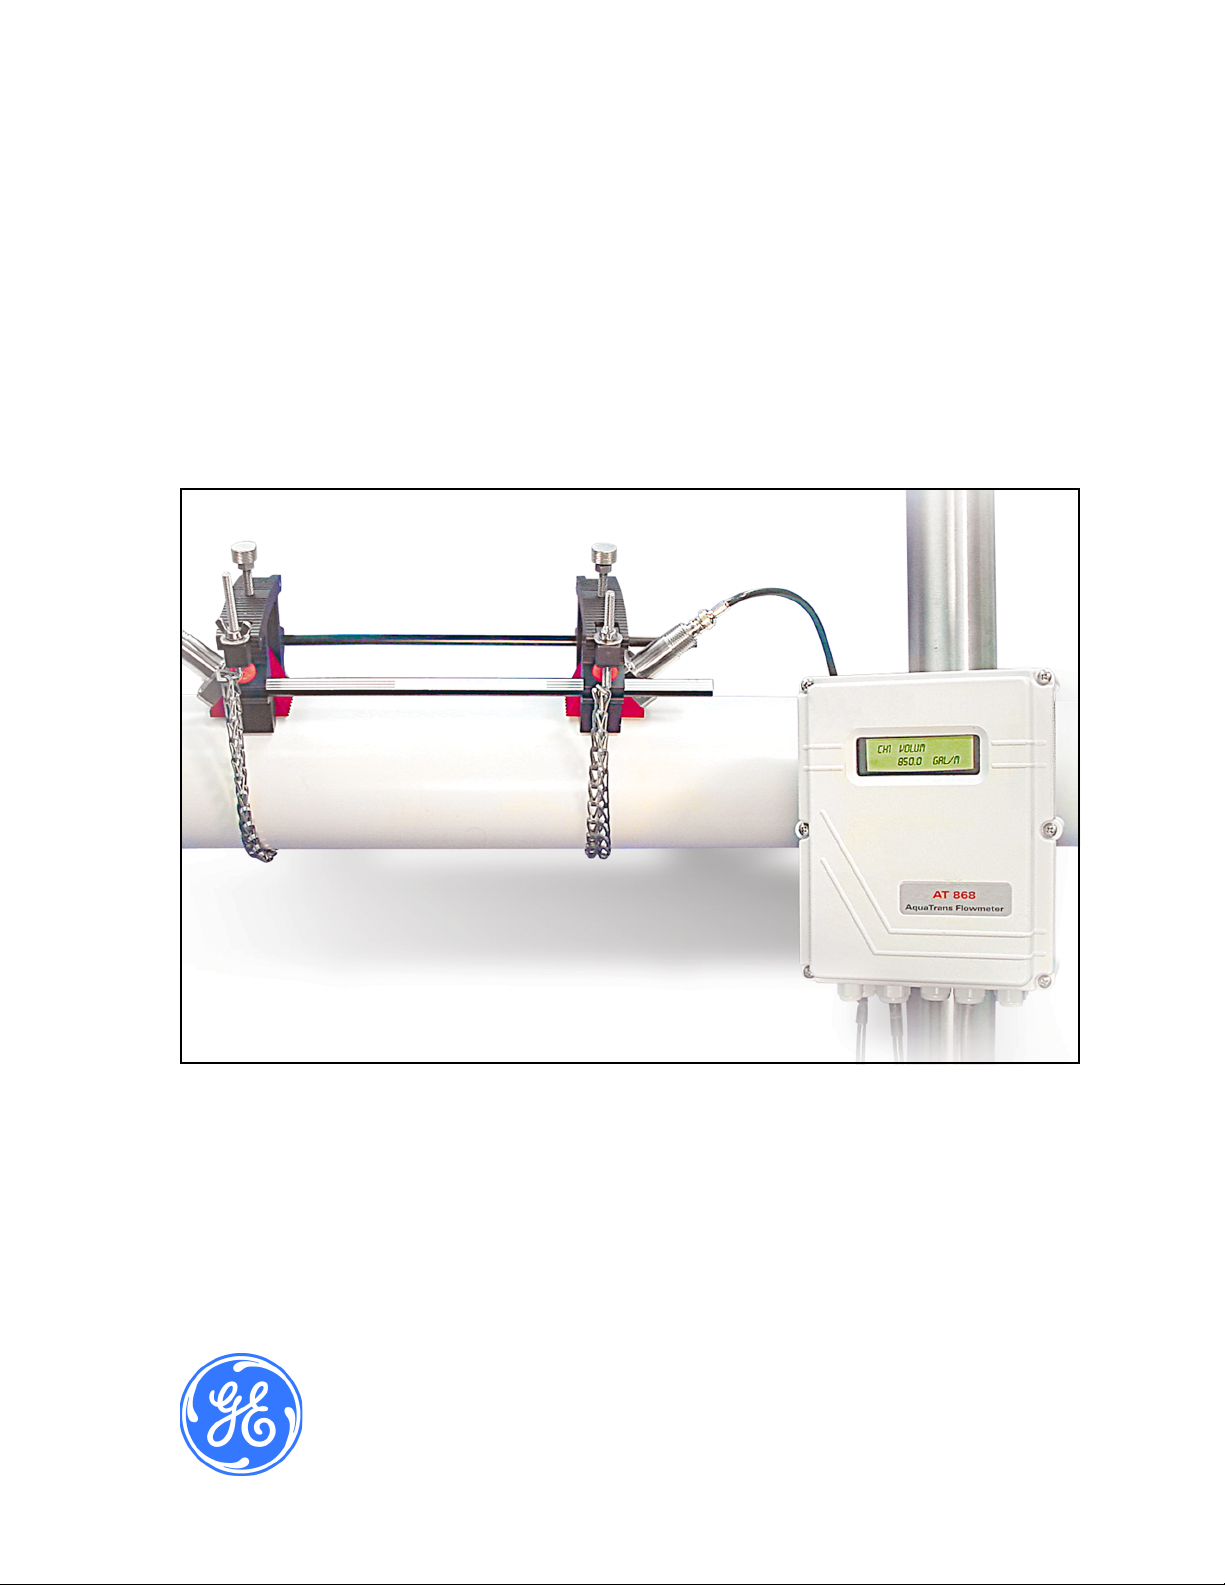
The standard AT868 electronics enclosure is a powder-coated
aluminum NEMA 4X, IP66 weatherproof enclosure (see Figure 1-4
on page 1-15). Typically, the enclosure is mounted as close as
possible to the transducers. When choosing a site, make sure the
location permits easy access to the electronics enclosure for
programming, maintenance and service.
Note: For compliance with the European Union’s Low Voltage
Directive (73/23/EEC), this unit requires an external power
disconnect device such as a switch or circuit breaker. The
disconnect device must be marked as such, clearly visible,
directly accessible, and located within 1.8 m (6 ft) of the unit.
Installation 1-1
Page 10

September 2004
Flowcell Location A flowcell is the section of pipe where the transducers are mounted. It
can be created either by mounting the transducers on the existing
pipeline or by mounting them on a spoolpiece. A spoolpiece is a
separately manufactured pipe section, matched to the existing pipe,
which contains ports for mounting the transducers. A spoolpiece
allows the transducers to be aligned and calibrated before inserting
the flowcell into the pipeline.
Ideally, install the flowcell in a section of pipe with unlimited access,
such as a long section of pipe that is above ground. However, if the
flowcell must be installed in an underground pipe, dig a pit around the
pipe to facilitate installation.
Transducer Location For a given fluid and pipe, the accuracy of the AT868 depends
primarily on the location and alignment of the transducers. In addition
to accessibility, when planning for transducer location, follow these
guidelines:
• Locate the transducers so that there are at least 10 pipe diameters
of straight, undisturbed flow upstream and 5 pipe diameters of
straight, undisturbed flow downstream from the measurement
point. Undisturbed flow means avoiding sources of turbulence in
the fluid such as valves, flanges, expansions, and elbows; avoiding
swirl; and avoiding cavitation.
• Locate the transducers on a common axial plane along the pipe.
Install the transducers on the side of the pipe instead of the top or
bottom, because the top of the pipe accumulates gases and the
bottom of the pipe accumulates sediment. These conditions cause
attenuation of the ultrasonic signal. There is no similar restriction
with vertical pipes. However, vertical pipes with downward flow
should be avoided to ensure a full pipe at the measurement point.
1-2 Installation
Page 11

September 2004
Cable Lengths Locate the electronics enclosure as close as possible to the flowcell,
preferably directly on the flowcell. However, GE can supply
transducer cables up to 1,000 ft (300 m) in length for remote location
of the electronics enclosure. If longer cables are required, consult the
factory for assistance.
Transducer Cables When installing the transducer cables, always observe established
standard practices for the installation of electrical cables. Do not route
transducer cables alongside high amperage AC power lines or any
other cables that could cause electrical interference. Also, protect the
transducer cables and connections from the weather and corrosive
atmospheres.
Note: If you are using your own cables to connect the transducers to
the electronics console, they must have electrical
characteristics identical to the cables supplied by GE. For
transducer frequencies up to 2 MHz, the cables in each pair
must be the same length within ±4 in. (±10 cm). For
transducer frequencies above 2 MHz, the cables in each pair
must be the same length within ±0.5 in. (±1.25 cm).
Installing a Flowcell A flowcell is the section of pipe where the transducers are mounted. It
can be created either by mounting the transducers on the existing
pipeline or by mounting them on a spoolpiece. A spoolpiece is a
separately manufactured pipe section, matched to the existing pipe,
which contains ports for mounting the transducers. A spoolpiece
allows the transducers to be aligned and calibrated before inserting
the flowcell into the pipeline.
Installation 1-3
Page 12

September 2004
CE Mark Compliance For CE Mark compliance, the AT868 must meet both the EMC and
LVD directives.
IMPORTANT: CE Mark compliance is required for all units intended
for use in EEC countries.
EMC Compliance For EMC compliance, the electrical connections must be shielded and
grounded as in Tabl e 1-1 below. Also refer to Figure 1-1 on the next
page an example of acceptable wiring. After all the necessary
electrical connections have been made, seal any unused cable entry
holes with standard conduit plugs or equivalent.
Note: If the instructions in this section are followed, the unit will
comply with the EMC Directive 89/336/EEC.
Table 1-1: Wiring Modifications
Termination
Connection Cable Type
Transducer RG62 a/u Add metallic cable clamp
Modification
from braid to chassis
ground.
Armored RG62 a/u or
conduit
Input/Output 22 AWG Shield
(e.g. Baystate #78-1197)
Armored conduit None - grounded via
Power 14 AWG, 3 conductor,
shielded
(e.g. Belden #19364)
Armored Conduit None - grounded via
Shielding Wires enclosed in a properly-grounded metal
conduit do not require additional shielding.
Terminate RG62 a/u
shield to chassis ground.
Terminate shield to
chassis ground at the
AT868.
cable gland.
Terminate shield to
chassis ground at the
AT868.
cable gland.
1-4 Installation
Page 13

September 2004
LVD C omp li anc e For compliance with the European Union’s Low Voltage Directive
(73/23/EEC). the analyzer requires an external power disconnect
device such as a switch or circuit breaker. The disconnect device must
be marked as such, clearly visible, directly accessible, and located
within 1.8 m (6 ft) of the unit.
Note: If the instructions in this section are followed, the unit will
comply with the Low Voltage Directive (73/23/EEC).
Figure 1-1: Properly Wired AT868
Installation 1-5
Page 14

September 2004
Making Electrical Connections
This section contains instructions for making all the necessary
electrical connections to the AT868 electronics console. Refer to
Figure 1-5 on page 1-16 for a complete wiring diagram.
!ATTENTION EUROPEAN CUSTOMERS!
To meet CE Mark requirements, all cables must be installed
as described in the previous section
!WARNING!
Always disconnect the line power from the AT868 before
removing the front cover.
Preliminary Steps Before making any electrical connections, prepare the AT868 by
completing the following steps:
1. Disconnect any previously wired power line from the unit.
2. Remove the screws on the front cover.
3. Loosen the two screws and remove the plastic shroud that protects
the electrical connections.
Note: For compliance with the European Union’s Low Voltage
Directive (73/23/EEC), a transparent plastic shroud protects
the electrical connections. The shroud must remain in place,
except while wiring the unit. Reinstall the shroud after the
wiring has been completed.
4. Install any required cable clamps in the appropriate conduit holes
on the bottom of the enclosure.
5. Note the labels inside the enclosure to assist in wiring.
Proceed to the appropriate section of this chapter to make the required
wiring connections.
1-6 Installation
Page 15

September 2004
Wiring the Line Power The AT868 may be purchased for operation with power inputs of
85-265 VAC or 12-28 VDC. The label on the side of the electronics
enclosure lists the required line voltage and power rating. The fuse
rating is listed on label located under the fuse.
IMPORTANT: Be sure to connect the meter only to the specified line
voltage.
Note: For compliance with the European Union’s Low Voltage
Directive (73/23/EEC), this unit requires an external power
disconnect device such as a switch or circuit breaker. The
disconnect device must be marked as such, clearly visible,
directly accessible, and located within 1.8 m (6 ft) of the unit.
Refer to Figure 1-5 on page 1-16 to locate the power input terminal
block and connect the line power as follows:
!WARNING!
Improper connection of the line power leads or connecting
the meter to the incorrect line voltage may damage the
unit. It may also result in hazardous voltages at the
flowcell and associated piping as well as within the
electronics enclosure.
1. Prepare the line power leads by trimming the line and neutral AC
power leads (or the positive and negative DC power leads) to a
length 0.5 in. (12 mm) shorter than the ground lead. This ensures
that the ground lead is the last to detach if the power cable is
forcibly disconnected from the meter.
2. Install a suitable cable clamp in the conduit hole where the line
power wires will enter the enclosure. If possible, avoid using a
conduit hole containing any other cables cables, to minimize any
interference in the circuitry from the AC power line.
3. Strip 1/4-in. of insulation from the end of each of the three line
power leads.
4. Route the cable through the conduit hole and connect the line
power leads to the power terminal block as shown in Figure 1-5
on page 1-16.
Installation 1-7
Page 16

September 2004
Wiring the Line Power
5. Leaving a bit of slack, secure the power line with the cable clamp.
(cont.)
Caution!
Do not apply power to the AT868 until after the
transducers have been properly wired.
6. Do one of the following:
• Proceed to another section to continue wiring the AT868.
• Reinstall the plastic shroud, replace the front cover on the
enclosure and tighten the screws.
Wiring Transducers !WARNING!
Before connecting the transducers, discharge any static
buildup by shorting the center conductor of the transducer
cables to the metal shield on the cable connector.
Note: For transducer frequencies below 2 MHz, the cable lengths
must be within ±4 in. (±10 cm) of each other. If the transducer
frequency exceeds 2 MHz, the cable lengths must be within
±0.5 in. (±1.25 cm) of each other.
1. Locate the CH1 transducer cables and connect them to the two
CH1 transducers. Route the free ends of the cables through the
selected conduit hole in the electronics enclosure.
2. If an optional lightening protector is being installed, connect it
between the meter and the transducers.
3. Refer to the wiring diagram in Figure 1-5 on page 1-16 and
connect the transducer cables to the terminal block labeled DN and
UP for Channel 1. Then, secure the cable clamp.
Note: The RED cable leads are the SIG(+) leads and the BLACK
cable leads are the RTN(-) leads.
Note: The AT868 can use two channels or paths to make more
accurate flow measurements by averaging, subtracting or
adding the the two readings.
1-8 Installation
Page 17

September 2004
Wiring Transducers (cont.) 4. For a 2-Channel AT868, repeat steps 1-3 to connect the CH2
transducers to the DN and UP terminal block for Channel 2.
Wiring Standard 0/4-20 mA Analog Outputs
Note: It is not
connected.
5. Do one of the following:
required that both channels of a 2-Channel unit be
• Proceed to another section to continue wiring the AT868.
• Reinstall the plastic shroud, replace the front cover on the
enclosure and tighten the screws.
IMPORTANT: Each channel must be activated before it can begin
taking measurements. See Chapter 2, Programming
Site Data, for instructions.
The AT868 has one isolated 0/4-20 mA analog output per channel
(designated as Output A and Output C). These outputs can be
configured independently. Typically, Output A is used for Channel 1
and Output C is used for Channel 2. However, either analog output
can be configured for use with either channel.
Connections to the analog outputs may be made with standard
twisted-pair wiring, but the current loop impedance for these circuits
must not exceed 600 ohms. To wire the analog outputs, complete the
following steps:
1. Refer to Figure 1-5 on page 1-16 for the locations of the
appropriate terminal blocks and wire the analog outputs as shown.
Then, secure the cable clamp.
IMPORTANT: Outputs 1 and 2 in the wiring diagram correspond to
Outputs A and C in the AT868 software.
2. Do one of the following:
• Proceed to another section to continue wiring the AT868.
• Reinstall the plastic shroud, replace the front cover on the
enclosure and tighten the screws.
IMPORTANT: Prior to use, the analog outputs must be calibrated as
described in Chapter 4, Calibration.
Installation 1-9
Page 18

September 2004
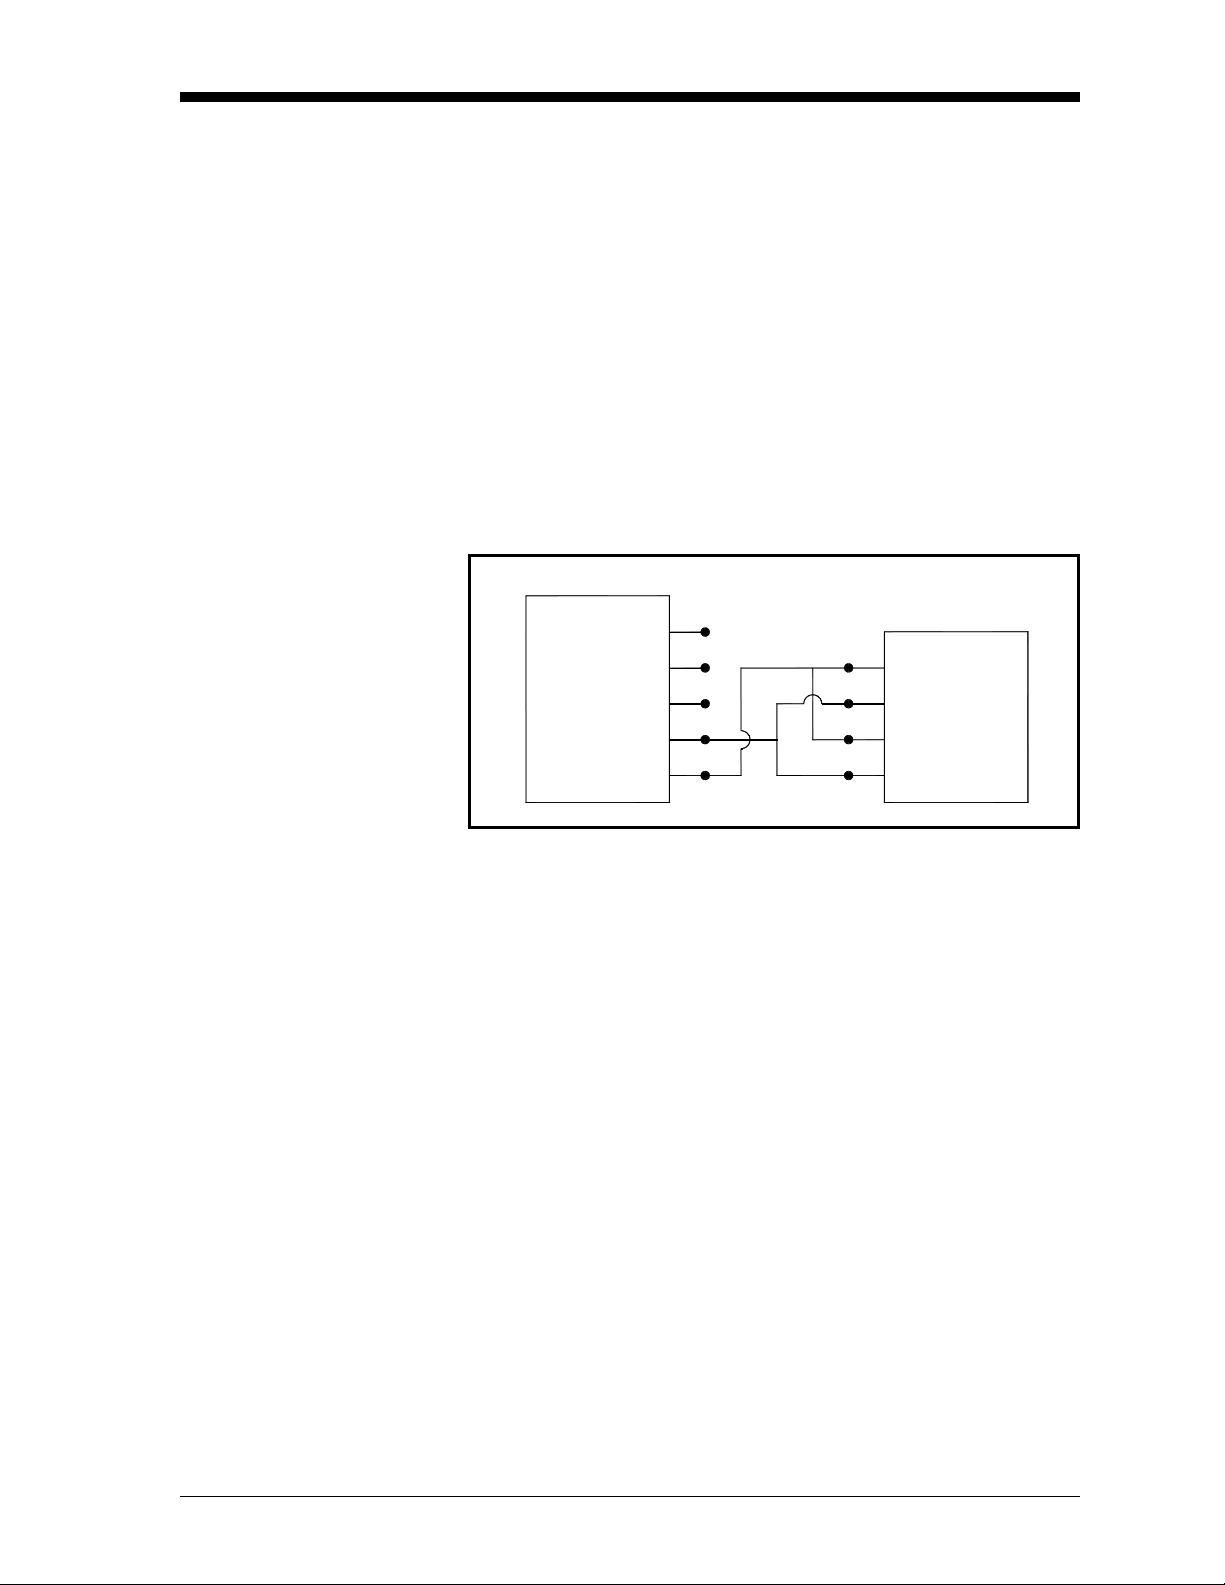
Wiring the Totalizer/Frequency Output
The AT868 also provides a second output for each channel
(designated as Output B and Output D) that can be configured as a
totalizer or frequency output using the Instrument Data Manager
(IDM) software. These outputs can be configured independently.
Typically, Output B is used for Channel 1 and Output D is used for
Channel 2. However, either output can be configured for use with
either channel.
Figure 1-2 below shows a wiring diagram for a typical totalizer or
frequency output circuit.
Model AT868 Pulse/Frequency Counter
+5V
200
OUT
RTN
Figure 1-2: Totalizer/Frequency Output Wiring
IN
Common
!WARNING!
NEVER CONNECT EXTERNAL POWER TO THE
PULSE/FREQUENCY OUTPUT TERMINALS.
To wire the totalizer/frequency outputs, complete the following steps:
1. Refer to Figure 1-5 on page 1-16 for the location of the terminal
blocks and wire the totalizer/frequency outputs as shown. Then,
secure the cable clamp.
Note: Outputs 1 and 2 in the wiring diagram correspond to Outputs
B and D in the AT868 software.
2. Do one of the following:
• Proceed to another section to continue wiring the AT868.
• Reinstall the plastic shroud, replace the front cover on the
enclosure and tighten the screws.
1-10 Installation
Page 19

September 2004
Wiring the Serial Port The AT868 is equipped with a built-in serial communications port.
The standard port is an RS232 interface, but an optional RS485
interface is available upon request. Proceed to the appropriate section
for wiring instructions.
Wiring an RS232 Interface Use the serial port to connect the AT868 to a printer, an ANSI
terminal or a personal computer. The RS232 interface is wired as
Data Terminal Equipment (DTE), and the signals available at the
COMMUNICATION terminal block are shown in Table 1-2 below.
To wire the RS232 output, complete the following steps:
1. Use the information in Tabl e 1-2 below to construct a suitable
cable for connecting the AT868 to the external device. If desired,
an appropriate cable may be purchased from GE.
Table 1-2: RS232 Connection to DCE or DTE Device
COMMUNICATION
TB
5WhiteDTR (Data
Colors for
GE Cable
(flying leads)*
Signal
Description
Terminal Ready)
DCE
DB25
Pin #
20 4 20 4
DCE
DB9
Pin #
DTE
DB25
Pin #
DTE
DB9
Pin #
4 Yellow CTS
(Clear to Send)
3 Green COM (Ground)7575
2 Red RX (Receive)2332
1 Black TX (Transmit)3223
*For standard GE cables 704-659, -660, -661 and -662.
Note: Signal names that imply direction (e.g., transmit and receive)
are named from the point of view of the DTE device (the GE
meter is usually considered the DTE device). When the RS232
standard is strictly followed, these signals are labeled with the
same name and pin # on the DCE device side. Unfortunately,
the convention is not followed because the DTE and DCE side
get confused. Therefore, connections that imply direction are
changed to reflect their direction on the DCE side.
4758
Installation 1-11
Page 20

September 2004
Wiring an RS232 Interface
(cont.)
2. Route the flying leads end of the cable through the conduit hole
and wire the leads to the COMMUNICATION terminal block as
shown in Figure 1-5 on page 1-16. Connect the other end of the
cable to the printer, ANSI terminal or personal computer. Then,
secure the cable clamp.
3. Do one of the following:
• Proceed to another section to continue wiring the AT868.
• Reinstall the plastic shroud, replace the front cover on the
enclosure and tighten the screws.
Note: Consult the User’s Manual for the external device to configure
it for use with the AT868.
Wiring an RS485 Interface Use the optional RS485 serial port to network multiple AT868 flow
transmitters to a single computer terminal. Upon request, the standard
RS232 port on the AT868 may be configured as a two-wire,
half-duplex RS485 interface, through a device such as the INMAC
Model 800052 RS232-RS422/RS485 converter.
Note: If the AT868 is configured at the factory for RS485 operation,
the INMAC converter is not necessary.
Proceed to the appropriate following section to wire the RS485
interface.
1-12 Installation
Page 21
September 2004
Using an INMAC Converter To wire the RS485 serial port using an INMAC converter, refer to
Figure 1-5 on page 1-16 and complete the following steps:
1. Route one end of the cable through the conduit hole and wire the
leads to the COMMUNICATION terminal block as shown in
Figure 1-5 on page 1-16. Then, secure the cable clamp.
2. Connect the other end of the cable to the converter, as shown in
Figure 1-3 below.
3. Do one of the following:
• Proceed to another section to continue wiring the AT868.
• Reinstall the plastic shroud, replace the front cover on the
enclosure and tighten the screws.
Model AT868
Using a Factory Serial
Interface
N.C. 5
N.C. 4 1 TD OUT
N.C. 3 2
RX 2 3
TX 1
Figure 1-3: Typical RS485 Connections
Use the following steps to link the AT868 to the control system using
a factory-installed RS485 serial interface:
1. Route the wires through the conduit hole and connect the TMT+
lead to Pin 2 (RX) on the COMMUNICATION terminal block
(see Figure 1-5 on page 1-16).
2. Connect the TMT- lead to Pin 1 (TX) on the COMMUNICATION
terminal block. Then, secure the cable clamp.
3. Connect the other end of the cable to the control system.
4. Do one of the following:
Converter
4 RD IN
• Proceed to another section to continue wiring the AT868.
• Reinstall the plastic shroud, replace the front cover on the
enclosure and tighten the screws.
Installation 1-13
Page 22

September 2004
Wiring an External Totalizer Reset Switch
The AT868 can be wired with an external switch for resetting the
totalizer values. When properly configured, pressing the switch will
reset the totalizer values to zero for both Channel 1 and Channel 2.
IMPORTANT: The AT868 has the capability to use a reset switch, but
the user must supply all the hardware.
Complete the following steps to connect an external reset switch:
1. Refer to Figure 1-5 on page 1-16 to properly connect the external
reset switch to the AT868.
2. Configure the the external reset switch for use, as described in
Chapter 2, Programming Site Data.
3. Do one of the following:
• Proceed to another section to continue wiring the AT868.
• Reinstall the plastic shroud, replace the front cover on the
enclosure and tighten the screws.
Programming the AT868 After the AT868 has been completely installed and wired, reconnect
line power and proceed to Chapter 2, Programming Site Data, to
program the meter for taking flow rate measurements.
1-14 Installation
Page 23

Note:
1. All dimensions are in inches (millimeters).
September 2004
10.00
(254.0)
9.00
(228.6)
Figure 1-4: Outline and Installation - Wall Mount (Ref. #712-1106C, sht 1)
2.86 (72.6)
.41 (10.40)
Ø
4.11 (104.4)
4 Holes
5.88 (149.3)
Installation 1-15
Page 24

September 2004
NOTE: For compliance with the European
Union's Low Voltage Directive (73/23/EEC),
this unit requires an external power disconnect
device such as a switch or circuit breaker. The
disconnect device must be marked as such,
clearly visible, directly accessible and located
within 1.8 m (6 ft) of the unit.
NOTE: For compliance with the European
Union's Low Voltage Directive (73/23/EEC),
a transparent plastic shroud protects the
electrical connections. The shroud must remain
in place, except while wiring the unit. Reinstall
the shroud after the wiring has been completed.
TB3: 0/4-20 mA Analog Outputs
Pin No.
7 OUT1-
6 OUT1+
TB3: Frequency/Totalizer Outputs
Pin No.
9 FREQ1-
8 FREQ1+
TB1: CH1 Transducer
Pin No.
4 SIGDN
3 RTNDN
1 SIGUP
TB2: CH2 Transducer
Pin No.
4 SIGDN
3 RTNDN
TB4: Frequency/Totalizer Outputs
Pin No.
4 FREQ1-
3 FREQ1+
Description
Output 1 RTN (-)
Output 1 SIG (+)
Description
Output 1 RTN (-)
Output 1 SIG (+)
Description
Downstream SIG (+)
Downstream RTN (-)
Upstream RTN (-)2 RTNUP
Upstream SIG (+)
Description
Downstream SIG (+)
Downstream RTN (-)
Upstream RTN (-)2 RTNUP
Upstream SIG (+)1 SIGUP
Description
Output 1 RTN (-)
Output 1 SIG (+)
Contrast Adjustment
Protective Conductor Terminal
Backlight Adjustment
E5
E9
Grounding Jumper
TB3: RS232/RS485 Serial Port
Pin No.
5 DTR
4 CTS
3 COM
2 RX Black
* for standard factory cables 704-659, 660, 661, 662
External Totalizer Reset Switch*
Test Point
E5
E9
*Switch hardware is user-supplied.
Pin No.
LINE
NEUT
GND
Pin No.
1
2
3
TB4: 0/4-20 mA Analog Outputs
Pin No.
2 OUT2-
Color*
White
Yellow
Green
Red1 TX
Description
Pole 1 of Switch
Pole 2 of Switch
AC Power Input
Description
Line Power
Line Neutral
Earth Ground
DC Power Input
Description
Line Positive
Line Negative
No Connection
Description
Output 2 RTN (-)
Output 2 SIG (+)1 OUT2+
Description
Data Terminal Ready
Clear to Send
Ground
Receive
Transmit
Figure 1-5: Wiring Diagram (Ref. #702-425)
Installation 1-16
Page 25

Chapter 2
Page 26

Programming Site Data
Introduction. . . . . . . . . . . . . . . . . . . . . . . . . . . . . . . . . . . . . . . . . . . . . . . . . . . . 2-1
Activating a Channel [CHx-ACTIV Menu]. . . . . . . . . . . . . . . . . . . . . . . . . . . 2-1
Entering System Data [CHx-SYSTM Menu] . . . . . . . . . . . . . . . . . . . . . . . . . 2-2
Entering Transducer and Pipe Parameters [CHx-PIPE Menu]. . . . . . . . . 2-4
Entering the Zero Cutoff Value [CHx-I/O Menu] . . . . . . . . . . . . . . . . . . . 2-11
Activating Mass Flow. . . . . . . . . . . . . . . . . . . . . . . . . . . . . . . . . . . . . . . . . . . 2-11
Entering Global System Data [GLOBL-SYSTM Menu] . . . . . . . . . . . . . . . 2-12
Setting Up the Outputs [GLOBL-I/O Menu] . . . . . . . . . . . . . . . . . . . . . . . . 2-14
Configuring the Communications Port [GLOBL-COMM] . . . . . . . . . . . . 2-18
Taking Measurements. . . . . . . . . . . . . . . . . . . . . . . . . . . . . . . . . . . . . . . . . . 2-18
Page 27

September 2004
Introduction The AT868 has a user program that provides access to the various
programmable features of the unit. To program the AT868 you can
use either the internal keypad or Panaview™, which is a PC-based,
non-resident software program that communicates with the AT868
through its serial port.
Note: Only the internal keypad programming methods are described
in this manual. See the PanaView manual for instructions on
using that software.
To begin taking measurements with the AT868, you must at least:
• activate the channels
• enter the channel data
• enter the global system data
• enter the pipe parameters
As a programming aid, a complete set of menu maps are included in
Appendix A, Menu Maps. The specific figure numbers are referenced
throughout this chapter.
Activating a Channel [CHx-ACTIV Menu]
Note: Only the programming required for initial setup is described
in this manual, but the menu maps show all available
programming features for the AT868.
The CHx-ACTIV submenu (see Figure A-1 on page A-1) is used to
activate or deactivate the channels. All installed channels should be
activated when you receive your unit. However, you should verify
that the channels are active before you begin programming.
Note: In this manual, only the programming of Channel 1 is
described. To program Channel 2 of a 2-channel meter, simply
repeat the same procedures described for Channel 1.
Programming Site Data 2-1
Page 28

September 2004
Accessing the ACTIV Submenu
Entering System Data [CHx-SYSTM Menu]
1. Press [ESC], [ENTER], [ESC] in sequence to enter the user program.
2. Press [
3. Press [
4. Press [
5. Press [
6. If you have a 2-channel unit, you can also disable a channel.
After completing the above step, the user program returns to the
Channel PROGRAM menu. To continue entering your initial setup
data, proceed to the next section.
The CHx-SYSTM submenu (see Figure A-1 on page A-1) is used to
enter system parameters for the individual channels. In situations
where the channels operate independently, the AT868 uses the system
parameters in this menu. When channels are averaged together, the
AT868 uses the parameters entered in the
X] until PROG appears and press [ENTER].
X] until the desired channel appears. Press [ENTER] at CH1
or CH2.
X] until ACTIV appears and press [ENTER].
X] until TRANS appears and press [ENTER]. Selecting
TRANS activates the channel.
However, if you select
program that channel.
OFF for a channel, you will not be able to
GLOBL-SYSTM submenu.
Accessing the CHx-SYSTM Submenu
1. Press [ESC], [ENTER], [ESC] in sequence to enter the user program.
2. Press [
3. Press [
4. Press [
5. Enter the desired
6. Use the arrow keys to enter the desired
X] until PROG appears and press [ENTER].
X] until the desired channel appears. Press [ENTER] at CH1
CH2.
or
X] until SYSTM appears and press [ENTER].
CHANNEL LABEL (up to 5 characters) by using
the arrow keys. Press [
desired location and press
[ENTER].
press
characters) and press
is called
CHANNEL MESSAGE.)
W] and [X] to move the cursor to the
[S] and [T] to change a letter. Then
SITE MESSAGE (up to 16
[ENTER]. (For a 2-channel meter, this prompt
2-2 Programming Site Data
Page 29

September 2004
Selecting the Volumetric Units
Selecting the Totalizer Units
1. Use the arrow keys to select the desired volumetric units for the
flow rate display and press
2. Use the arrow keys to select the desired number of digits to the
right of the decimal point in the volumetric flow rate display and
[ENTER].
press
1. Use the arrow keys to select the desired units for the totalized flow
rate display and press
2. Use the arrow keys to select the desired number of digits to the
right of the decimal point in the totalized flow rate display and
[ENTER].
press
3. Do one of the following:
[ENTER].
[ENTER].
• If MASS FLOW is ON and both channels are active (for
2-channel units only), proceed to Selecting Mass Flow Units below.
• If MASS FLOW is OFF or only one channel is active, the meter
returns to the Channel PROGRAM menu. Go to Entering
Transducer and Pipe Parameters on the next page.
Selecting Mass Flow Units 1. Press [W] and [X] to select the desired mass flow units for the
flow rate display and press
prompt are determined by the selection made at
2. Press [
3. Press [
4. Press [
5. Press [
W] and [X] to select the desired time units for the mass
flow rate display and press
W] and [X] to select the desired number of digits to the
right of the decimal point in the mass flow rate display and press
[ENTER].
W] and [X] to select the desired units for the totalized mass
flow rate display and press
prompt are determined by the selection made at
W] and [X] to select the desired number of digits to the
right of the decimal point in the totalized mass flow rate display
and press
[ENTER].
[ENTER]. The available units for this
SYSTEM UNITS.
[ENTER].
[ENTER]. The available units for this
SYSTEM UNITS.
Programming Site Data 2-3
Page 30

September 2004
Entering Transducer and Pipe Parameters [CHx-PIPE Menu]
Accessing the PIPE Submenu
Enter the transducer and pipe parameters via the PIPE submenu (see
Figure A-1 on page A-1).
1. Press [ESC], [ENTER], [ESC] in sequence to enter the user program.
2. Press [
3. Press [
4. Press [
5. Do one of the following:
X] until PROG appears and press [ENTER].
X] until the desired channel appears. Press [ENTER] at CH1
or
CH2.
X] until PIPE appears and press [ENTER].
• For standard transducers, use the arrow keys to enter the
transducer number. Press [
the desired location and press
decrease the number. Then press
next step.
W] and [X] to move the cursor to
[S] and [T] to increase or
[ENTER] and proceed to the
• For special transducers, proceed to the next section.
6. Go to one of the following sections:
• Standard clamp-on transducers - proceed to Pipe Material on
page 2-6.
• Standard wetted transducers - proceed to Pipe Outside
Diameter on page 2-7.
2-4 Programming Site Data
Page 31

September 2004
Special Transducers 1. For a special transducer, press [X] to move the cursor to STD and
[S] until SPEC appears and press [ENTER].
press
2. Assign a number between 90 and 99 to the special transducer.
Enter the number by using the arrow keys. Press [
move the cursor to the desired location and press
increase or decrease the number. Then press
W] and [X] to
[S] and [T] to
[ENTER].
Special Clamp-On Transducers
3. Press [
4. Press [
5. Enter the special transducer time delay value (supplied by GE) by
The following two prompts appear only if special clamp-on
transducers are being used. If special wetted transducers are being
used, proceed to Pipe Outside Diameter on page 2-7.
1. Enter the wedge angle (supplied by GE) of the transducer by using
2. Enter the wedge sound speed (supplied by GE) of the transducer
W] and [X] to select the wedge type (supplied by GE) and
press
[ENTER].
W] and [X] to select the transducer frequency (supplied by
GE) and press
using the arrow keys. Press [
desired location and press
the number and press
the arrow keys. Press [
desired location and press
the number. Then press
by using the arrow keys. Press [
the desired location and press
decrease the number. Then press
Material on the next page.
[ENTER].
W] and [X] to move the cursor to
[S] and [T] to increase or decrease
[ENTER].
W] and [X] to move the cursor to the
[S] and [T] to increase or decrease
[ENTER].
W] and [X] to move the cursor to
[S] and [T] to increase or
[ENTER] and proceed to Pipe
Programming Site Data 2-5
Page 32

September 2004
Pipe Material If a standard or special clamp-on transducer is being used, the
programming sequence should be rejoined here.
1. Press [
Al (Aluminum) no additional selection required
(Copper Nickel)
W] and [X] to select the pipe material and press [ENTER].
Some of the pipe materials require additional selections. See a
complete list of choices in Tabl e 2-1 below.
Table 2-1: Pipe Material Choices
Material Types
STEEL Carbon Steel
Stainless Steel
IRON Ductile
Cast
Cu (Copper) no additional selection required
BRASS no additional selection required
CuNi
GLASS Pyrex
Plastic Nylon
70% Cu 30% Ni
90% Cu 10% Ni
Heavy silicate flint
Light borate crown
Polyethylene
Polypropylene
PVC, CPVC
Acrylic
OTHER Enter the sound speed of the pipe material by
using the arrow keys. Press [
move the cursor to desired location and press
W] and [X] to
[S] and [T] to increase or decrease the
number and press
[ENTER].
2-6 Programming Site Data
Page 33

September 2004
Pipe Outside Diameter The programming sequence should be rejoined here for all
transducers.
1. Press [
X] to move the cursor to the outside diameter units. Press
[S] and [T] to select the desired units and press [ENTER].
2. Measure either the pipe outside diameter
the transducer installation site. Enter the measured dimension by
using the arrow keys. Press [
desired location and press
the number. Then press
3. Enter the know thickness of the pipe wall by using the arrow keys.
W] and [X] to move the cursor to the desired location and
Press [
[S] and [T] to increase or decrease the number. Then
press
press
[ENTER]. If the pipe wall thickness cannot be measured
directly, look up the value in a table of standard pipe size data.
4. Do one of the following:
W] and [X] to move the cursor to the
[S] and [T] to increase or decrease
[ENTER].
(OD) or circumference at
• wetted transducers - proceed to Path and Axial Length below.
• clamp-on transducers - proceed to Lining on the next page.
Path and Axial Length Note: If a spoolpiece was ordered with the meter, the transducer
signal path length
are engraved on the flowcell and are included in the
documentation supplied with the meter. For on-site transducer
installations, refer to Appendix B, Measuring P and L
Dimensions, for instructions.
(P) and the transducer signal axial length (L)
1. Enter the path length (P) of the ultrasonic signal.
2. Select the desired units and press
3. Enter the axial length (L) of the ultrasonic signal and press
[ENTER].
4. Select the desired units and press
5. Proceed to Setting Up a Tracking Window on the next page.
Programming Site Data 2-7
[ENTER].
[ENTER].
Page 34

September 2004
Lining 1. Press [W] and [X] to select Yes if your pipe has a lining or No if
your pipe does not have a lining. Then, press
2. Do one of the following:
[ENTER].
• If you selected No, proceed to Setting Up a Tracking Window
below.
• If you selected Yes, continue with the next step.
Setting Up a Tracking Window
3. Press [
4. If you selected
5. Enter the lining thickness by using the arrow keys. Press [
W] and [X] to select the lining material and press [ENTER].
OTHER, enter the lining sound speed by using the
arrow keys. Press [
location and press
number. Then press
W] and [X] to move the cursor to the desired
[S] and [T] to increase or decrease the
[ENTER].
W] and
X] to move the cursor to the desired location and press [S] and
[
[T] to increase or decrease the number. Then press [ENTER].
The Tracking Window feature enables you to make accurate
measurements when the fluid sound speed is unknown or when the
fluid sound speed varies due to changing process conditions.
1. At the
TRACKING WINDOWS prompt select:
• YES - If you do not know the fluid sound speed, proceed to
Step 2.
• NO - If you do know the fluid sound speed, proceed to Fluid
Type on the next page.
2. Do one of the following:
• If the fluid sound speed is variable, the Tracking Window must
remain active. Proceed to Fluid Type on the next page to
complete the programming your meter.
• If the sound speed is constant or if you want to determine if the
sound speed is constant, continue with Step 3.
3. Proceed to Fluid Type on the next page to complete the
programming your meter.
2-8 Programming Site Data
Page 35

September 2004
Fluid Type 1. The selections for fluid type vary depending on whether the
Tracking Window is enabled or disabled. Press [
select the desired fluid and press
below for a list of available fluids.
Table 2-2: Fluid Types
Tracking Window = NO Tracking Window = YES
WATER W100 (Water, 0°-100°C)
OTHER W260 (Water, 0°-260°C)
[ENTER]. Refer to Tabl e 2- 2
W] and [X] to
Oil, Tracking
OTHER
2. If you selected
by using the arrow keys. Press [
the desired location and press
decrease the number. Then press
OTHER, enter the additional information required
W] and [X] to move the cursor to
[S] and [T] to increase or
[ENTER].
Reynolds Correction 1. Using [W] and [X], select Activ to activate the Reynolds
Correction Factor or select
Correction Factor. Then press
Note: usually, Reynolds Correction should be set to
2. Do one of the following:
Off to deactivate the Reynolds
[ENTER].
Activ.
• If you selected OFF, enter the Calibration Factor and press
[ENTER]. Then, proceed to one of the following sections:
• Clamp-on Transducers - proceed to Number of Traverses
and Transducer Spacing on the next page.
• Wetted Transducers - The meter returns to the
Channel PROGRAM window. To complete initial setup of
the AT868, you must enter data in the
submenu on page 2-12.
GLOBL-SYSTM
• If you selected ACTIV, proceed to KV Input Selection on the next
page.
Programming Site Data 2-9
Page 36

September 2004
KV Input Selection 1. Press [W] and [X] to enter a static kinematic viscosity or a table of
values and press
2. Do one of the following:
[ENTER].
• If you selected Table, enter the Calibration Factor by using the
arrow keys. Press [
desired location and press
the number. Then press
W] and [X] to move the cursor to the
[S] and [T] to increase or decrease
[ENTER].
• If you selected STATC, the AT868 will select and automatically
display the Kinematic Viscosity (see note below). If you want
to enter a different number use the [
cursor to the desired location and press
increase or decrease the number. Then press
Calibration Factor in a similar manner and press
W] and [X] to move the
[S] and [T] to
[ENTER]. Enter the
[ENTER].
Number of Traverses and Transducer Spacing
Note: If you select
Kinematic Viscosity. The AT8 6 8 will only approximate the
Kinematic Viscosity if you select one of the specific available
fluid options.
3. Proceed to one of the following sections:
OTHER as the fluid type, you must enter the
• Clamp-on Transducers - proceed to Number of Traverses and
Transducer Spacing below.
• Wetted Transducers - The meter returns to the Channel
PROGRAM
must enter data in the
1. Press [W] and [X] to select the number of traverses and press
[ENTER].
2. Enter the value for the transducer spacing by using the arrow keys.
W] and [X] to move the cursor to the desired location and
Press [
[S] and [T] to increase or decrease the number. Then
press
[ENTER].
press
window. To complete initial setup of the AT868, you
GLOBL-SYSTM submenu on page 2-12.
2-10 Programming Site Data
Page 37

September 2004
Entering the Zero Cutoff Value [CHx-I/O Menu]
Near a zero flow rate, the AT868 readings may fluctuate due to small
offsets caused by thermal drift or similar factors. To force a zero
display reading when there is minimal flow, enter a zero cutoff value
as described below (see Figure A-1 on page A-1):
1. Press
2. Press [
3. Press [
4. Press [
5. Enter a value from 0 to 1 ft/sec (0 to 0.30 m/sec) for the zero
[ESC], [ENTER], [ESC] in sequence to enter the user program.
X] until PROG appears and press [ENTER].
X] until the desired channel appears. Press [ENTER] at CH1
CH2.
or
X] until I/O appears and press [ENTER].
cutoff by using the arrow keys. The recommended setting is 0.1
ft/sec (0.03 m/sec). Press [
desired location and press
the number. Then press
W] and [X] to move the cursor to the
[S] and [T] to increase or decrease
[ENTER].
Activating Mass Flow Use this option to calculate mass flow from a static fluid density.
Complete the following steps (see Figure A-3 on page A-3) to enter
the static density of the fluid:
1. Press
2. Press [
3. Press [
4. Press [
5. Press [
6. Press [
7. Press [
8. If you have activated mass flow, enter the fluid density by using
[ESC], [ENTER], [ESC] in sequence to enter the user program.
X] until PROG appears and press [ENTER].
X] until the desired channel appears. Press [ENTER] at CH1
or
CH2.
X] until SETUP appears and press [ENTER].
X] until ADVAN appears and press [ENTER].
X] until MASS appears and press [ENTER].
X] to activate or deactivate mass flow (mass flow is
calculated from a static density) and press
the arrow keys. Press [
desired location and press
the number. Then press
W] and [X] to move the cursor to the
[S] and [T] to increase or decrease
[ENTER].
[ENTER].
Programming Site Data 2-11
Page 38

September 2004
Entering Global System
Data [GLOBL-SYSTM
Refer to Figure A-2 on page A-2, and complete the steps below to
enter system information in the
GLOBL menu.
Menu]
Selecting the GLOBL-SYSTM Units
1. Press [ESC], [ENTER], [ESC] in sequence to enter the user program.
2. Press [
3. Press [
4. Press [
5. Enter a short message (up to 16 characters) by using the arrow
X] until PROG appears and press [ENTER].
X] until GLOBL appears and press [ENTER].
X] until SYSTM appears and press [ENTER].
keys. Press [
and press
[ENTER].
W] and [X] to move the cursor to the desired location
[S] and [T] to select the desired character. Then press
Selecting the System Units 1. Press [X] to select the system units and press [ENTER].
2. Do one of the following:
• 1-Channel Meters - go to Setting Up the External Totalizer
Reset Switch on the next page.
• 2-Channel Meters - continue with the next step.
3. Press [
4. Press [
5. Press [
6. Press [
X] to select the volumetric units for the flow rate display
and press
[ENTER].
X] to select the number of digits to the right of the decimal
point in the volumetric flow rate display and press
X] to select the desired units for the totalized flow rate
display and press
[ENTER].
X] to select the desired number of digits to the right of the
decimal point in the totalized flow rate display and press
[ENTER].
[ENTER].
2-12 Programming Site Data
Page 39

September 2004
Setting Up the External Totalizer Reset Switch
If you have installed an external totalizer reset switch as described in
Chapter 1, Installation, the
the switch.
1. At the
GATE OPTION prompt, press [X] to select one of the
following and press
GATE OPTION enables you to configure
[ENTER].
• RESET - the meter resets totals to zero for both channels and
then immediately begins to count again.
• HOLD - the meter holds totals at the current point for both
channels. The meter will not count as long as the switch
remains closed. This option is typically used for calibration.
2. Do one of the following:
• If MASS FLOW is ON and both channels are active, proceed to
Selecting Mass Flow Units below.
• If MASS FLOW is OFF or only one channel is active, the meter
returns to the
Outputs on the next page.
Selecting Mass Flow Units 1. Press [W] and [X] to select the desired mass flow units for the
flow rate display and press
prompt are determined by the selection made at
the previous page.
Global PROGRAM menu. Go to Settings Up the
[ENTER]. The available units for this
SYSTEM UNITS on
2. Press [
3. Press [
4. Press [
5. Press [
W] and [X] to select the desired time units for the mass
flow rate display and press
[ENTER].
W] and [X] to select the desired number of digits to the
right of the decimal point in the mass flow rate display and press
[ENTER].
W] and [X] to select the desired units for the totalized mass
flow rate display and press
prompt are determined by the selection made at
the previous page.
[ENTER]. The available units for this
SYSTEM UNITS on
W] and [X] to select the desired number of digits to the
right of the decimal point in the totalized mass flow rate display
and press
[ENTER].
Programming Site Data 2-13
Page 40

September 2004
Setting Up the Outputs [GLOBL-I/O Menu]
Accessing the Analog Outputs
Setting Up the Analog Output Scale
To set up the AT868 analog outputs and totalizer/frequency outputs,
refer to Figure A-2 on page A-2 and follow the instructions in this
section.
Output A and Output C are analog outputs that can be configured
independently. To configure these outputs, complete the following
steps:
1. Press
2. Press [
3. Press [
4. Press [
5. Press [
6. Press [
1. Press [X] to select the desired output scale and press [ENTER].
2. Do one of the following:
[ESC], [ENTER], [ESC] in sequence to enter the user program.
X] until PROG appears and press [ENTER].
X] until GLOBL appears and press [ENTER].
X] until I/O appears and press [ENTER].
X] until OPTN appears and press [ENTER].
X] to select A or C and press [ENTER].
• If you selected OFF, the meter returns to the Global I/O menu.
Go to Accessing the Totalizer/Frequency Outputs on the next
page.
• If you are using a 1-channel meter, go to step 4.
• If you are using a 2-channel/path meter, go to step 3.
Channel, press [X] to select the desired channel and press
3. At
[ENTER].
4. Press [
Note: The measurement units that appear in these prompts are those
5. At
X] to select the desired measurement parameter and press
[ENTER].
selected in the
BASE, enter a flow rate value for the low end of the analog
output range by using the arrow keys. Press [
the cursor to the desired location and press
increase or decrease the number. Then press
GLOBL-SYSTM menu earlier in this chapter.
W] and [X] to move
[S] and [T] to
[ENTER].
2-14 Programming Site Data
Page 41

September 2004
Setting Up the Analog
Output Scale (cont.)
Accessing the Totalizer/Frequency Outputs
6. At FULL, enter a flow rate value for the high end of the analog
output range by using the arrow keys. Press [
the cursor to the desired location and press
increase or decrease the number. Then press
Error Handling, press [X] to select the desired option for
7. At
handling errors (
OTHER is selected, the Forced milliamps display appears. This
8. If
allows the user to impose a set value for this option. Enter the
desired forced milliamps value by using the arrow keys. Press [
and [X] to move the cursor to the desired location and press [S]
HOLD, LOW, HIGH, or OTHER) and press [ENTER].
W] and [X] to move
[S] and [T] to
[ENTER].
W]
and [T] to increase or decrease the number. Then press [ENTER].
A totalizer output issues one pulse per selected volume of flow, and
the meter produces a pulse each time the programmed amount of flow
passes through the pipe. A frequency output issues a frequency that is
proportional to the assigned measurement parameter.
Output B and Output D are totalizer/frequency outputs that can be
configured independently. To configure these outputs, complete the
following steps:
1. Press
2. Press [
3. Press [
4. Press [
5. Press [
6. Press [
7. Do one of the following:
[ESC], [ENTER], [ESC] in sequence to enter the user program.
X] until PROG appears and press [ENTER].
X] until GLOBL appears and press [ENTER].
X] until I/O appears and press [ENTER].
X] until OPTN appears and press [ENTER].
X] to select B or D and press [ENTER].
• Frequency Output - go to Setting Up a Frequency Output on
the next page.
• Totalizer Output - go to Setting Up a Totalizer Output on
page 2-17.
Programming Site Data 2-15
Page 42

September 2004
Setting Up a Frequency Output
1. At Output B or D, select OFF or FREQ and press [ENTER].
2. Do one of the following:
• If you selected OFF, the meter returns to the Global I/O menu.
Go to Setting Up a Totalizer Output on the next page.
• For 1-channel meter, go to step 4.
• For a 2-channel meter, go to step 3.
3. At
Channel, press [X] to select the desired channel and press
[ENTER].
4. Press [
Note: The measurement units that appear in these prompts are those
5. At
6. At
X] to select the desired measurement parameter and press
[ENTER].
selected in the
BASE, enter a value for the low end of the output range
(-2,000,000 to 2,000,000) by using the arrow keys. Press [
[
X] to move the cursor to the desired location and press [S] and
GLOBL-SYSTM menu earlier in this chapter.
W] and
[T] to increase or decrease the number. Then press [ENTER].
FULL, enter a value for the high end of the output range
(-2,000,000 to 2,000,000) by using the arrow keys. Press [
[
X] to move the cursor to the desired location and press [S] and
W] and
[T] to increase or decrease the number. Then press [ENTER].
7. At FULL SCALE FREQ, enter a value for the full scale of the output
(between 10 to 100,000) by using the arrow keys. Press [
[
X] to move the cursor to the desired location and press [S] and
W] and
[T] to increase or decrease the number. Then press [ENTER].
8. At Error handling, press [X] to select the desired option for
handling errors (
OTHER is selected, the Error frequency display appears. This
9. If
allows the user to enter a set value for this option. Enter the
desired error frequency by using the arrow keys. Press [
[
X] to move the cursor to the desired location and press [S] and
HOLD, LOW, HIGH, or OTHER) and press [ENTER].
W] and
[T] to increase or decrease the number. Then press [ENTER].
2-16 Programming Site Data
Page 43

September 2004
Setting Up a Totalizer Output
1. At Output B or D, select OFF or TTLZR and press [ENTER].
2. Do one of the following:
• If you selected OFF, the meter returns to the Global I/O menu.
Go to Configuring the Communications Port on the next page.
• For 1-channel meter, go to step 4.
• For a 2-channel/path meter, go to step 3.
3. At
Channel, press [X] to select the desired channel and press
[ENTER].
4. Press [
5. Enter a value for the minimum pulse on-time (between 50 μsec
Note: A complete pulse consists of equal amounts of
X] to select the desired measurement parameter and press
[ENTER].
and 500,000 μsec) for the frequency of the totalizer pulses and
[ENTER]. Press [W] and [X] to move the cursor to the
press
desired location and press
the number. Then press
times. Choose a value that is compatible with the pulse
counter to be used.
[S] and [T] to increase or decrease
[ENTER].
ON and OFF
UNITS/PULSE enter a value for the number of measurement
6. At
units represented by each pulse and press
[ENTER].
Programming Site Data 2-17
Page 44

September 2004
Configuring the Communications Port [GLOBL-COMM]
The AT868 is equipped with a built-in serial communications port, as
described in Chapter 1, Installation. Refer to Figure A-2 on page A-2
and use the
completing the following steps:
1. Press
2. Press [
3. Press [
4. Press [
5. Enter a meter address (between 1 and 254) by using the arrow
keys. The default number is 1. Press [
cursor to the desired location and press
or decrease the number. Then press
Note: A meter address is only necessary for communication with the
6. Press [
GLOBL-COMM menu to set up the communications port by
[ESC], [ENTER], [ESC] in sequence to enter the user program.
X] until PROG appears and press [ENTER].
X] until GLOBL appears and press [ENTER].
X] until COMM appears and press [ENTER].
W] and [X] to move the
[S] and [T] to increase
[ENTER].
GE Panaview software. See the Panaview User’s Manual for
more information.
X] to select a baud rate and press [ENTER].
Taking Measurements The AT868 has now been totally programmed for taking accurate
flow rate measurements. Proceed to Chapter 3, Displaying Data, for
instructions on configuring the display.
2-18 Programming Site Data
Page 45

Chapter 3
Page 46

Displaying Data
Introduction. . . . . . . . . . . . . . . . . . . . . . . . . . . . . . . . . . . . . . . . . . . . . . . . . . . . 3-1
Adjusting LCD Contrast and Brightness . . . . . . . . . . . . . . . . . . . . . . . . . . . 3-1
Setting Up the Display. . . . . . . . . . . . . . . . . . . . . . . . . . . . . . . . . . . . . . . . . . . 3-2
Resetting the Totalizers . . . . . . . . . . . . . . . . . . . . . . . . . . . . . . . . . . . . . . . . . 3-3
Page 47

September 2004
Introduction The AT868 is equipped with a Liquid Crystal Display (LCD), which
may be programmed to display up to four variables in sequence. Both
the brightness and the contrast of the LCD are easily adjusted by
following the instructions in this chapter. In addition, instructions are
provided for resetting the totalizers and pausing the measurements.
Adjusting LCD Contrast and Brightness
The AT868 has two adjustment potentiometers located on the LCD
circuit board (see Figure 3-1 below). To make contrast and brightness
adjustments, complete the following steps:
1. Loosen the screws and remove the front cover.
2. With power still applied to the meter, carefully use a small
screwdriver to adjust the
the control completely clockwise yields maximum brightness.
3. In a similar manner, adjust the
set the contrast as desired. At either extreme of the
the display is unreadable. To make the adjustment, turn the control
fully counterclockwise and then turn it clockwise very slowly until
the display is clear and sharp.
4. As there is some interaction, readjust the
5. Replace the front cover and secure it in place with the screws.
BKLT (backlight) potentiometer. Turning
CONT (contrast) potentiometer to
CONT control,
BKLT control if necessary.
CONT Potentiometer
BKLT
Potentiometer
Figure 3-1: CONT and BKLT Potentiometers
Displaying Data 3-1
Page 48

September 2004
Setting Up the Display Follow the instructions in this section to display the desired data on
the display screen (see Figure A-2 on page A-2 in Appendix A, Menu
Maps
Accessing the Display Submenu
1. Press [ESC], [ENTER], [ESC] in sequence to enter the user program.
2. Press [
3. Press [
4. Press [
5. Press [
X] until PROG appears and press [ENTER].
X] until GLOBL appears and press [ENTER].
X] until I/O appears and press [ENTER].
X] until LCD appears and press [ENTER].
Configuring the Display 1. At # of LCD PARAMS, press [X] to select the desired number of
parameters to be sequentially displayed and press
2. For a 1-channel AT868, proceed to Step 4. For a 2-channel AT868,
proceed to Step 3.
3. Press [
4. At
5. Repeat the two previous steps until all of the specified
Note: The measurement units that appear in these prompts are those
X] to select the desired channel option and press [ENTER].
Measurement Name, press [X] to select the desired parameter
and press
PARAMS
[ENTER].
have been set up.
selected in the
2, Programming Site Data.
GLOBL-SYSTM menu as described in Chapter
[ENTER].
# of LCD
After leaving the User Program, the AT868 will reset and will begin
to display the parameters specified in this section. If more than one
parameter was set up, each of the parameters will be displayed in
sequence, with a pause of several seconds between display changes.
3-2 Displaying Data
Page 49

September 2004
Resetting the Totalizers To reset the totalizers, you can use either the internal keypad or an
external switch. When resetting the totalizers, the totals for both
channels are reset. Use the appropriate section below to reset the
totalizers.
Resetting Totalizers Using the Internal Keypad
Resetting Totalizers Using an External Switch
See Figure A-4 on page A-4 in Appendix A, Menu Maps. Then,
1. Press
2. Press [
3. Press [
4. To leave the User Program, press [
If you select
you select
While the meter is operating, press and hold the external reset switch
for 1 second. Both totalizers will reset to zero and will then
immediately begin to resume counting.
IMPORTANT: The external totalizer reset switch must be configured
[ESC], [ENTER], [ESC] in sequence to enter the user program.
X] until RESET appears and press [ENTER].
X] to select YES or NO and press [ENTER].
ESC].
YES, the AT868 resets the totalizers for both channels. If
NO, the totalizers continue to count.
as described in Chapter 2, Programming Site Data.
Displaying Data 3-3
Page 50

Chapter 4
Page 51

Calibration
Introduction. . . . . . . . . . . . . . . . . . . . . . . . . . . . . . . . . . . . . . . . . . . . . . . . . . . . 4-1
Calibrating and Testing the Analog Outputs . . . . . . . . . . . . . . . . . . . . . . . 4-1
Calibrating the Totalizer/Frequency Outputs . . . . . . . . . . . . . . . . . . . . . . 4-4
Page 52

September 2004
Introduction Follow the instructions in this chapter to calibrate and test the AT868
analog and totalizer/frequency outputs. Refer to Figure A-4 on page
A-4 in Appendix A, Menu Maps, while following the calibration
instructions.
Calibrating and Testing the Analog Outputs
The AT868 includes one built-in analog output per channel with a
resolution of 5.0 μA (0.03% full scale). Typically, Output A is used
for Channel 1 and Output C is used for Channel 2. However, either
output can be configured for use with either channel. Both the low
and high values for the analog outputs must be calibrated. After the
end points are calibrated, the linearity should be tested.
Note: The zero point of the analog output may be set for either 0 mA
or 4 mA. However, the calibration procedure always uses the 4
mA point, as the meter will extrapolate this value to obtain the
0 mA point.
Calibration Prepare for calibration by connecting an ammeter in series with the
load on analog output 1 or 2 as shown in Figure 4-1 below. DO NOT
connect the ammeter directly across the terminals. Refer to Figure 1-5
on page 1-16 for the locations of the analog outputs terminal blocks.
Note: Analog outputs 1 and 2 in the wiring diagram correspond to
analog outputs A and C in the AT868 software.
FREQ1
AOUT1
Load
Ammeter
Figure 4-1: Ammeter Connection
Calibration 4-1
Page 53

September 2004
Calibration (cont.) To calibrate the analog outputs, complete the following steps:
Accessing the Calibration
Menu
1. Press [ESC], [ENTER], [ESC] in sequence to enter the user program.
2. Press [
3. Press [
4. Press [
X] until CALIB appears and press [ENTER].
X] until SLOT0 appears and press [ENTER].
X] until A or C appears and press [ENTER].
Calibrating the Low Point 1. Press [X] to select 4 mA and press [ENTER].
2. Press [
3. When the desired reading is achieved, select
X] to select UP or DOWN to adjust the reading until the
ammeter reads exactly 4 mA. Press [
ammeter reading cannot be adjusted with ±5.0 μA of the 4 mA
setting, select
assistance.
ABORT to end the calibration and contact GE for
ENTER].
Calibrating the High Point 1. Press [X] to select 20 mA and press [ENTER].
2. Press [
3. When the desired reading is achieved, select
X] to select UP or DOWN to adjust the reading until the
ammeter reads exactly 20 mA. Press [
ammeter reading cannot be adjusted with ±5.0 μA of the 20 mA
setting, select
assistance.
ABORT to end the calibration and contact GE for
ENTER].
STORE. If the
STORE. If the
Testing Linearity To test the linearity of the analog outputs, complete the following
steps:
1. Press
2. Press [
3. Press [
4. Press [
5. Press [
[ESC], [ENTER], [ESC] in sequence to enter the user program.
X] until CALIB appears and press [ENTER].
X] until SLOT0 appears and press [ENTER].
X] until A or C appears and press [ENTER].
X] to select Test and press [ENTER].
4-2 Calibration
Page 54

September 2004
Testing Linearity (cont.) 6. Under % Full Scale use the arrow keys to enter 50.00. Press [W]
and [X] to move the cursor to desired character position and press
[S] and [T] to increase or decrease the number to the desired
value. Then, press
7. Check the ammeter reading. Ta ble 4-1 below lists the expected
ammeter readings at various % Full Scale settings for both
4-20 mA and 0-20 mA scales. Use this table to verify the accuracy
of your ammeter reading.
[ENTER].
Note: If the linearity test readings are not with ±5
listed in Table 4-1, check the accuracy and wiring of the
ammeter. Then, repeat the low and high end calibrations. If
the analog output still does not pass the linearity test, contact
GE for assistance.
8. Repeat Step 2 for a different output percentage (0-100%). Check
the ammeter reading at this setting and press
Table 4-1: Expected Ammeter Readings
% Full Scale 4-20 mA Scale* 0-20 mA Scale*
0 4.000 0.000
10 5.600 2.000
20 7.200 4.000
30 8.800 6.000
40 10.400 8.000
50 12.000 10.000
60 13.600 12.000
70 15.200 14.000
80 16.800 16.000
90 18.400 18.000
100 20.000 20.000
μA of the values
[ENTER] when done.
* all ammeter readings should be ±0.005 mA
Calibration 4-3
Page 55

September 2004
Calibrating the Totalizer/Frequency Outputs
Calibrating the Frequency Outputs
Calibrating the Totalizer Outputs
Prepare for the calibration procedure by connecting a frequency
counter to the appropriate terminal blocks (see Figure 1-5 on page
1-16).
Note: Outputs 1 and 2 in the wiring diagram correspond to Outputs
B and D in the AT868 software.
To calibrate the frequency outputs, complete the following steps:
1. Press
2. Press [
3. Press [
4. Press [
5. Use the arrow keys to enter the desired frequency. Press [
[ESC], [ENTER], [ESC] in sequence to enter the user program.
X] until CALIB appears and press [ENTER].
X] until SLOT0 appears and press [ENTER].
X] until B or D appears and press [ENTER].
W] and
X] to move the cursor to desired character position and press
[
[S] and [T] to increase or decrease the value. Then, press
[ENTER].
To calibrate the totalizer outputs, complete the following steps:
1. Press
[ESC], [ENTER], [ESC] in sequence to enter the user program.
2. Press [
3. Press [
4. Press [
5. Use the arrow keys to enter the desired pulse width in μsec. Press
6. Use the arrow keys to enter the number of pulses. Press [
X] until CALIB appears and press [ENTER].
X] until SLOT0 appears and press [ENTER].
X] until B or D appears and press [ENTER].
W] and [X] to move the cursor to desired character position and
[
press
[S] and [T] to increase or decrease the value. Then, press
[ENTER].
W] and
X] to move the cursor to desired character position and press
[
[S] and [T] to increase or decrease the value. Then, press
[ENTER]. Your counter should display the number of pulses
entered.
7. Repeat Steps 5 and 6 until you achieve the desired result.
4-4 Calibration
Page 56

Appendix A
Page 57

Menu Maps
The CHx ACTIV, SYSTM, PIPE and I/O Menu Map. . . . . . . . . . . . A-1
The GLOBL Menu Map. . . . . . . . . . . . . . . . . . . . . . . . . . . . . . . . . . A-2
The CHx SETUP Menu Map . . . . . . . . . . . . . . . . . . . . . . . . . . . . . . A-3
The RESET and CALIB Menu Map . . . . . . . . . . . . . . . . . . . . . . . . A-4
Page 58

To enter the User Program press
ESC ENTER ESC PROG RESET CALIB
(*for 2-Channel meters only)
CH1
CH2* GLOBL
September 2004
ACTIV SYSTEM
OFF TRANS
AC-IN AC-FT
(English) (Metric)
GAL/S
A-F/H
GAL MG AL Mft^3 BBL MBBL
ft3/h
A-I/S
GAL/M
Mf3/d
A-I/M
A-F/D
LB KLB
GAL/H
BBL/S
A-I/H
f3/d
(English) (Metric)TOTALIZER UNITS
ft^3
(English)
VOLUMETRIC UNITS
MGD
BBL/M
A-I/D
BBL/D
MMLB
ft3/s
BBL/H
A-F/S
VOL. DECIMAL DIGITS
0123
TOTAL DECIMAL DIGITS
0 1 23
MASS FLOW OFF
MASS FLOW UNITS
TONS
MASS FLOW TIME
/SEC
MDOT DECIMAL DIGITS
0 123
MASS TOTALS(English)
TONSMMLBKLBLB
MASS DECIMAL DIGITS
CHANNEL LABEL
SITE/CHANNEL MESSAGE
ft3/m
MBL/D
A-F/M
MASS FLOW ON
/MIN /HR /DAY
L/S
m^3/s
BBL/S
m3/d
L ML m^3 Mm^3
BBL MBBL
L/M
m^3/m
BBL/M
BBL/D
(Metric)
KG
(Metric)
L/H
m^3/h
BBL/H
TONNE
TONNEKG
ML/D
Mm3/d
MBL/D
CARBN SS
PIPE OD
inch ft/PI
feet
PIPE WALL
PATH LENGTH P
inch feet
AXIAL LENGTH L
inch feet
in/PI
PIPE
TRANSDUCER NUMBER
SPECSTD
SPECIAL TRANSDUCER
SHEARRAYL WETTD
(Wetted Type) (Clamp-On Type)
PIPE MATERIAL
IRON Cu BRASSSTEEL
DUCT CAST 10%Ni
PIPE OD
inch ft/PI
TAR PYREX RUBBR TEFLN OTHER
feet
PIPE WALL
LINING
LINING MATERIAL
ASBESNOMORTR
30%Ni
in/PI
YES
LINING THICKNESS
WEDGE TYPE
FREQUENCY
2MHz1MHz500k 5MHz
(RAYL/SHEAR)(WETTD)
WEDGE ANGLE
WEDGE SOUNDSPEED
CuNI GLASS OTHERA1
PYREX
LINING SOUNDSPEED
I/O SETUP
ZERO CUTOFF
PLSTC
FLINT CROWN
NYLON POLYPPOLYE
PVC ACRYL
Water OTHER
(See Figure A-3)
FLUID TYPE
FLUID SOUNDSPEED
(Clamp-On Transd ucers) (Wetted Tra nsducers)
NUMBER OF TRAVERSES
PIPE SOUNDSPEED
NO YES
OFF ACTIV
TABLE STATC
SYSTM COMM
TRACKING WINDOWS?
W100 W260 OIL OTHER
REYNOLDS CORREC TION
CALIBRATION FACTOR
I/O
See Figure A-2
FLUID TYPE
KV INPUT SELECTION
KINEMATIC VISCOSITY
Figure A-1: The CHx ACTIV, SYSTM, PIPE and I/OMenu Map
MINIMUM SOUNDSPEED
MAXIMUM SOUNDSPEED
0 1 23
1(Z) 435
2(V)
TRANSDUCER SPACING
Menu Maps A-1
Page 59

September 2004
A-F/S
GAL/M
BBL/M
A-F/M
GAL/H
BBL/H
A-F/H
To enter the User Program press
ESC ENTER ESC PROG RESET CALIB
SYSTEM
SYSTEM UNITS
GATE OPTION
1 CHANNEL UNITS
(English) (Metric)
MGD
MBL/D
A-F/D
(English) (Metric)
VOLUMETRIC UNITS
ft3/s
A-I/S
ft3/m
A-I/M
f3/d
BBL/D
VOL. DECIMAL DIGITS
0123
METER MESSAGE
ENG METRIC
HOLDRESET
2 CHANNEL UNITS
Mf3/dGAL/S
ft3/h
A-I/H
A-I/DBBL/S
TOTALIZER UNITS
L/S
m^3/m
BBL/H
L/M
m^3/h
MBL/D
L/H
Mm3/d
m3/d
CH1
(See Figure A-1)
ML/D m^3/s
BBL/S
BBL/D
Keypad Program
(*for 2-Channel meters only)
CH2* GLOBL
BBL/M
TOTAL.
1-Channel
NO UPHOLD
2-Channel
NO UPHOLD
2 PATH ERROR HANDLING
NO YES
ERROR-HANDLING D
I/O
300 600 96001200 240 0 4800 19200
OPTNERROR
OFF 1
(appears only for 2-Channel meters)
Measurement Name
VEL
MDOT
CH2CH1
VOLUM
+MASS
LCD
# OF LCD PARAMS
–MASS
COMM
Meter Address
BAUD RATE
32 4
DIFSUM AVE
DIAG*
(until all channels are set up)
TIME+TOTL –TOT L
LB KLB
TOTAL DECIMAL DIGITS
(English)
MMLB
MDOT DECIMAL DIGITS
0 1 23
MASS FLOW OFF
MASS FLOW UNITS
TONS
MASS FLOW TIME
/SEC
0 123
MASS TOTALS(English)
TONSMMLBKLBLB
MASS DECIMAL DIGITS
0 1 23
MASS FLOW ON
/MIN /HR /DAY
L ML m^3 Mm^3 BBL MBBLft^3GAL MGAL Mft^3 BBL MBBL AC-IN AC-FT
(Metric)
KG
(Metric)
TONNE
TONNEKG
A C
Output A or C Output B or D
OFF 0-20m 4-20m
(appears only for a 2-Channel meter)Channel
CH1 AVESUMCH2 DIF
Measurement Name
VEL VOLUM –TOTL+TOTL TIME
+MASSMDOT DIAG*–MASS
BASE
(*all diagnostic parameters appear here)
FULL
Error Handling
HOLD OTHERHIGH
LOW
Forced milliamps
Measurement Name
VOLUM
VEL
MDOT
+MASS
FULL SCALE FREQUENCY
HOLD
CH1 CH2
(Frequency Output) (Totalizer Output)
+TOTL TIME
–MASS
(*all diagnostic parameters appear here)
BASE
FULL
Error Handling
(*all diagnost ic parameters appear here)
B
OFF
–TOTL
DIAG*
OTHERHIGHLOW
D
FREQ TTLZR
Channel
Error frequency
(appears only for a 2 -Channel meter)
Figure A-2: The GLOBL Menu Map
DIFSUM
AVE
–TOTL+TOTL
Measurement Name
+MASS –MASS
Min Pulse ON Ti
UNITS/PULSE
Menu Maps A-2
Page 60

To enter the User Program press
ESC ENTER ESC PROG RESET CALIB
(*for 2-Channel meters only)
September 2004
ACTIV SYSTEM
SIGNL
SIGNAL LOW LIMIT
COR PEAK LIMIT
SOUNDSPEED ± LIMIT
VELOCITY LOW LIMIT
VELOCITY HIGH LIMIT
ACCELLERATION LIMIT
CH1
PIPE I/O SETUP I/OSYSTM COMM
RESPONSE TIME
1
30 60
CH2* GLOBL
AVRG INIT
2
15min
105
STATS
See Figure A-2(See Figure A-1)(See Figure A-1)(See Figure A-1)(See Figure A-1)
ADVAN
Press YES to Default
NO YES
Advanced Feature
AMP. DISCRIM LOW
AMP. DISCRIM HIGH
DELTA T OFFSET
% of Peak
TRANS. VOLTAGE
XMIT SAMPLE SIZE
2
4816
# of Errors
Min. Peak %
Max. Peak %
32
KV/SS
# of KVSS pairs
Sig Strength #*
Kin Viscosity #*
*Repeats for the # of pairs
entered previously.
Enter in ascending order.
*Repeat for the # of K Factors entered previously.
MULTK
Activate Multi K
NO YES
Custom Type
CstRCstV
Edit table?
NO YES
Enter # of K Factors
Velocity #*
K Factor #*
MASS
Mass from Static
YESNO
Fluid Density
CODEL
AUTO SHORT
Xmit Code Length
LONG
Figure A-3: The CHx SETUP Menu Map
Menu Maps A-3
Page 61

To enter the User Program press
ESC ENTER ESC PROG RESET CALIB
RESET TOTALS?
September 2004
Cal
SLOT0
Totals are NOT Reset
YESNO
Totals are Reset
ANALOG OUTPUT
4 mA
UP DOWN
Slot 0 Outputs
A or C B or D
TIME (usec)
PULSES
20 mA
TEST
EXIT
% Full Scale
STORE
ABORT
Figure A-4: The RESET and CALIB MenuMap
Menu Maps A-4
Page 62

Appendix B
Page 63

Measuring P and L Dimensions
Measuring P and L . . . . . . . . . . . . . . . . . . . . . . . . . . . . . . . . . . . . . . . . . . . . . . B-1
Page 64

September 2004
Measuring P and L If you are using wetted transducers, the AT868 requires you to enter
the path length (P) and the axial dimension (L). P is the transducer
face-to-face distance, and L is the axial projection of P in the flow
stream.
To determine L, physically measure the distance between the center
of the transducer ports at the inside wall as shown in Figure B-1
below. If such a measurment is not possible, consult the factory for
assistance.
Pipe Thickness
θ
P
L
Top View
o
Figure B-1: 180
To determine P, you need the following information:
• the pipe inside diameter (ID)
• the pipe wall thickness (WT)
• the installed pipe coupling length (CL)
• the transducer face depth (FD)
Transducer Installations
Pipe OD
• the mounting angle (MA)
Measuring P and L Dimensions B-1
Page 65

September 2004
Measuring P and L (cont.) Use Figure B-2 below to properly measure the pipe coupling length.
Typically, the transducer face is positioned just outside the inside
diameter (ID) of the pipe, or slightly retracted inside the coupling.
FD
MA 45
Figure B-2: Determining the Pipe Coupling Length
Then, use the following formula to determine the P dimension:
ID 2 WT()+[]
P
------------------------ -----------2CLFD–()+=
For example, if:
MA()cos
o
CL
• inside diameter (ID) = 48”
• wall thickness (WT) = 3/8”
• installed coupling length (CL) = 2.0”
• transducer face depth (FD) = 1.75”
• mounting angle (MA) = 45°
Then, the P dimension would be:
48 2 0.375()+[]
-------------------------------------- 2 2 . 0 1 . 7 5–()+69.4″==
P
B-2 Measuring P and L Dimensions
45°()cos
Page 66

GE
Sensing
DECLARATION
OF
CONFORMITY
We, Panametrics Limited
Shannon Industrial Estate
Shannon, County Clare
Ireland
declare under our sole responsibility that the
AquaTrans™ AT868 Liquid Flow Ultrasonic Transmitter
UPT868-P UltraPure Flow™ Measurement System
to which this declaration relates, are in conformity with the following standards:
• EN 61326:1998, Class A, Annex A, Continuous Unmonitored Operation
• EN 61010-1:1993 + A2:1995, Overvoltage Category II, Pollution Degree 2
following the provisions of the 89/336/EEC EMC Directive and the 73/23/EEC Low Voltage Directive.
The units listed above and any transducers supplied with them (spoolpieces are addressed under a separate
declaration of conformity) do not bear CE marking for the Pressure Equipment Directive, as they are supplied in
accordance with Article 3, Section 3 (sound engineering practices and codes of good workmanship) of the Pressure
Equipment Directive 97/23/EC for DN<25.
Shannon - June 1, 2002
Mr. James Gibson
GENERAL MANAGER
TÜV
TÜV ESSEN
ISO 9001
U.S.
CERT-DOC-H4 August 2004
Page 67

USA
1100 Technology Park Drive
Billerica, MA 01821-4111
Web: www.gesensing.com
Ireland
Sensing House
Shannon Free Zone East
Shannon, Co. Clare
 Loading...