

Page 1
OPERATING MANUAL
BEDIENUNGSANLEITUNG
MODE D’EMPLOI
MANUAL DE FUNCIONAMIENTO
MANUALE DI ISTRUZIONI
ΕΓΧΕΙΡΙ∆ΙΟ ΛΕΙΤΟΥΡΓΙΑΣ
РУКОВОДСТВО ПО ЭКСПЛУАТАЦИИ
MANUAL DE INSTRUÇÕES
English
Deutsch
Français
KEEP THIS MANUAL FOR FUTURE REFERENCE
BEWAHREN SIE DIESES HANDBUCH ZUM SPÄTEREN NACHSCHLAGEN AUF
CONSERVEZ CE MANUEL POUR RÉFÉRENCE ULTÉRIEURE
CONSERVE ESTE MANUAL PARA SU FUTURA CONSULTA
CONSERVARE IL PRESENTE MANUALE PER FUTURE CONSULTAZIONI
ΦΥΛΑΞΤΕ ΤΟ ΕΓΧΕΙΡΙ∆ΙΟ ΓΙΑ ΜΕΛΛΟΝΤΙΚΗ ΑΝΑΦΟΡΑ
СОХРАНИТЕ ДАННОЕ РУКОВОДСТВО ДЛЯ СПРАВОК В БУДУЩЕМ
GUARDE ESTE MANUAL PARA REFERÊNCIA FUTURA
Español
Italiano
EλληvIkά
Русский
Português
P/N9373329060
Page 2
CONTENTS
SAFETY PRECAUTIONS................................................ 1
NAME OF PARTS ........................................................... 2
PREPARATORY OPERATION......................................... 3
OPERATION ................................................................... 4
TIMER FUNCTIONS ....................................................... 6
ON/OFF TIMER............................................................... 6
WEEKLY TIMER ............................................................. 7
TEMPERATURE SET BACK TIMER ............................... 9
OPERATING TIPS......................................................... 10
ADJUSTING THE DIRECTION OF AIR CIRCULATION .........
FILTER LAMP RESET ................................................... 11
SELF-DIAGNOSIS ........................................................ 11
TROUBLESHOOTING .................................................. 12
SAFETY PRECAUTIONS
● Before using the appliance, read these “SAFETY PRECAUTIONS” thoroughly and operate in the correct way.
● The instructions in this section all relate to safety; be sure to maintain safe operating conditions.
● “DANGER”, “WARNING” and “CAUTION” have the following meanings in these instructions:
WARNING!
CAUTION!
● Do not attempt to install this controller by yourself.
● This controller contains no user-serviceable parts. Always consult authorized service personnel for repairs.
● When moving, consult authorized service personnel for disconnection and installation of the controller.
● If a problem (burning smell, etc.) occurs, turn off the electrical breaker immediately to stop operation, and
then consult authorized service personnel.
This mark indicates procedures which, if improperly performed, could lead to the death
or serious injury of the user.
This mark indicates procedures which, if improperly performed, might possibly result
in personal harm to the user, or damage to property.
WARNING!
11
CAUTION!
● Do not expose the controller directly to water.
● Do not operate the controller with wet hands.
● Do not touch the switches with sharp objects.
● Always turn off the electrical breaker whenever cleaning the air conditioner or changing the air filter.
● Check the condition of the installation stand for damage.
● Ensure that any electronic equipment is at least one metre away from the controller.
● Avoid installing the controller near a fireplace or other heating apparatus.
● When installing the controller, take precautions to prevent access by infants.
● Do not use inflammable gases near the controller.
En-1
Page 3
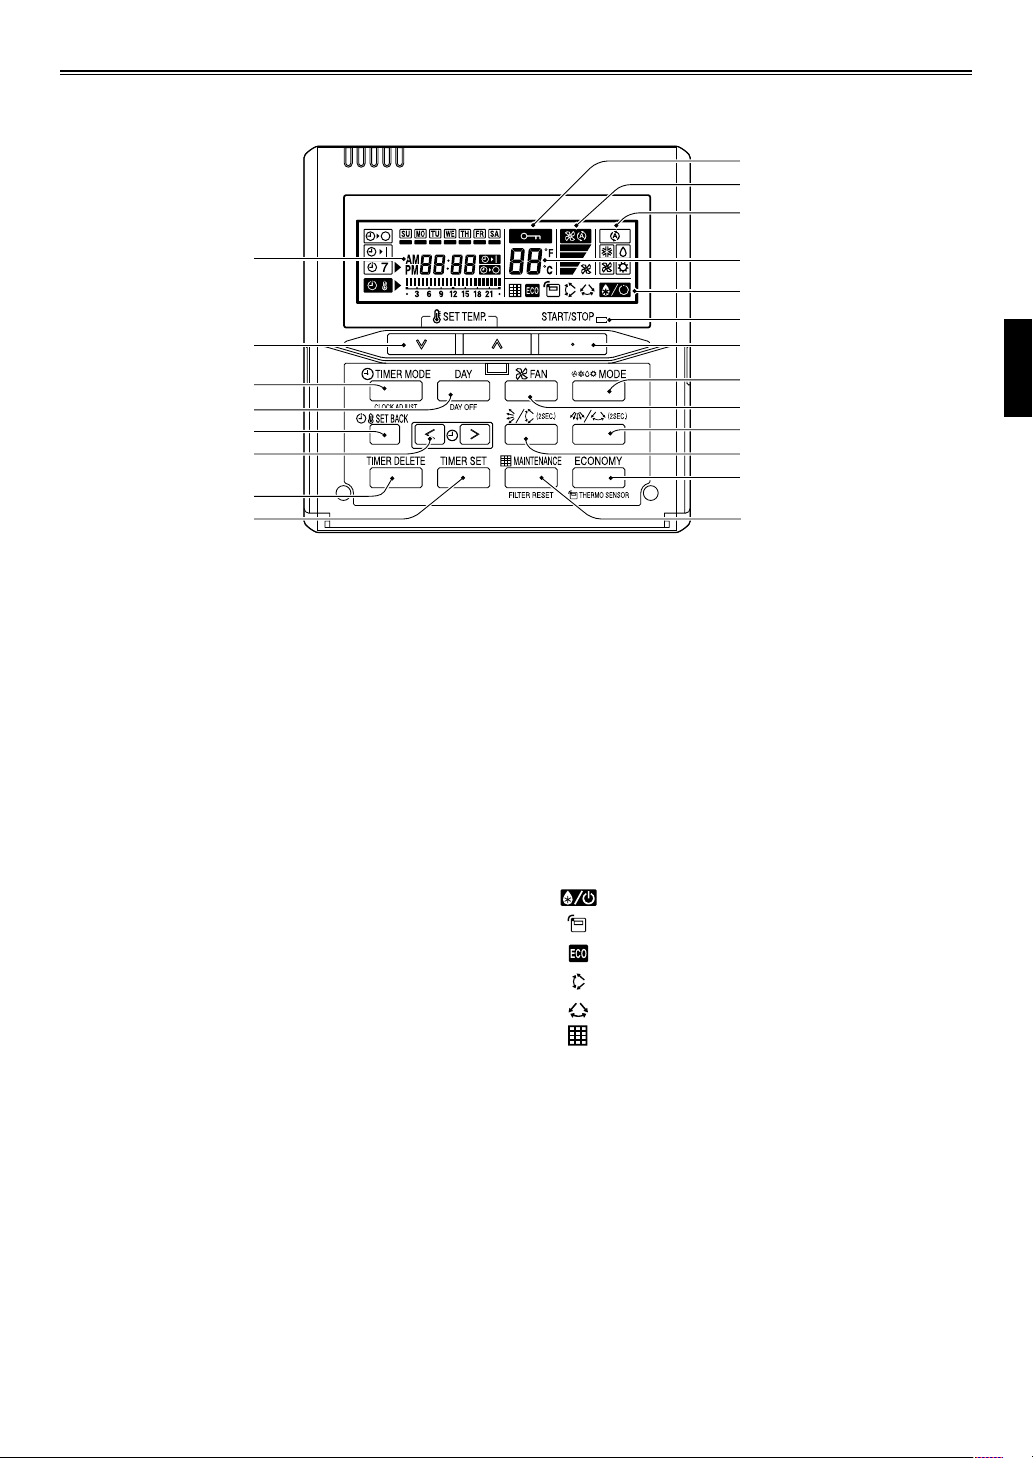
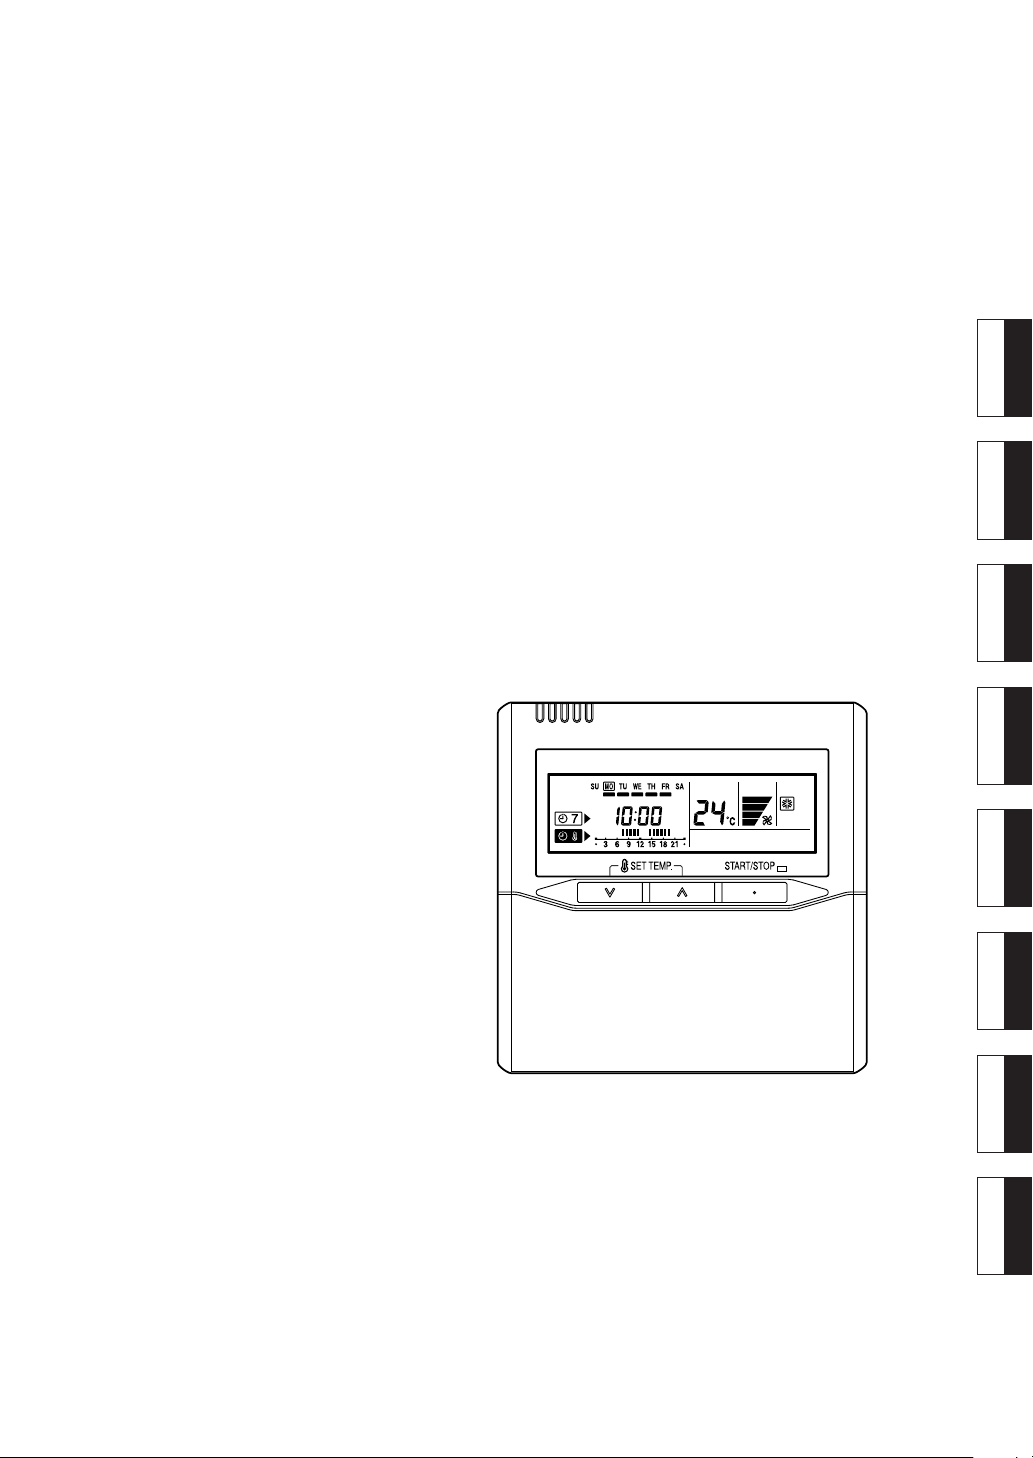
NAME OF PARTS
Remote controller
I
H
G
F
2
6
7
8
9
0
A
1 Start/Stop Button
2 Set Temperature Button
3 Master Control Button
4 Fan Control Button
5 Economy Button
6 Timer Mode (CLOCK ADJUST)
Button
7 DAY (DAY OFF) Button
8 SET BACK Button
9 Set Time Button
0 DELETE Button
A SET Button
B Vertical Airflow Direction and
Swing Button
J
K
E
1
3
4
C
B
5
D
C Horizontal Airflow Direction
and Swing Button
D Filter Button
E Operation Lamp
F Timer and Clock Display
G Operation Mode Display
H Fan Speed Display
I Operation Lock Display
J Temperature Display
K Function Display
Defrost Display
Thermo Sensor Display
Economy Display
Vertical Swing Display
Horizontal Swing Display
Filter Display
En-2
Page 4
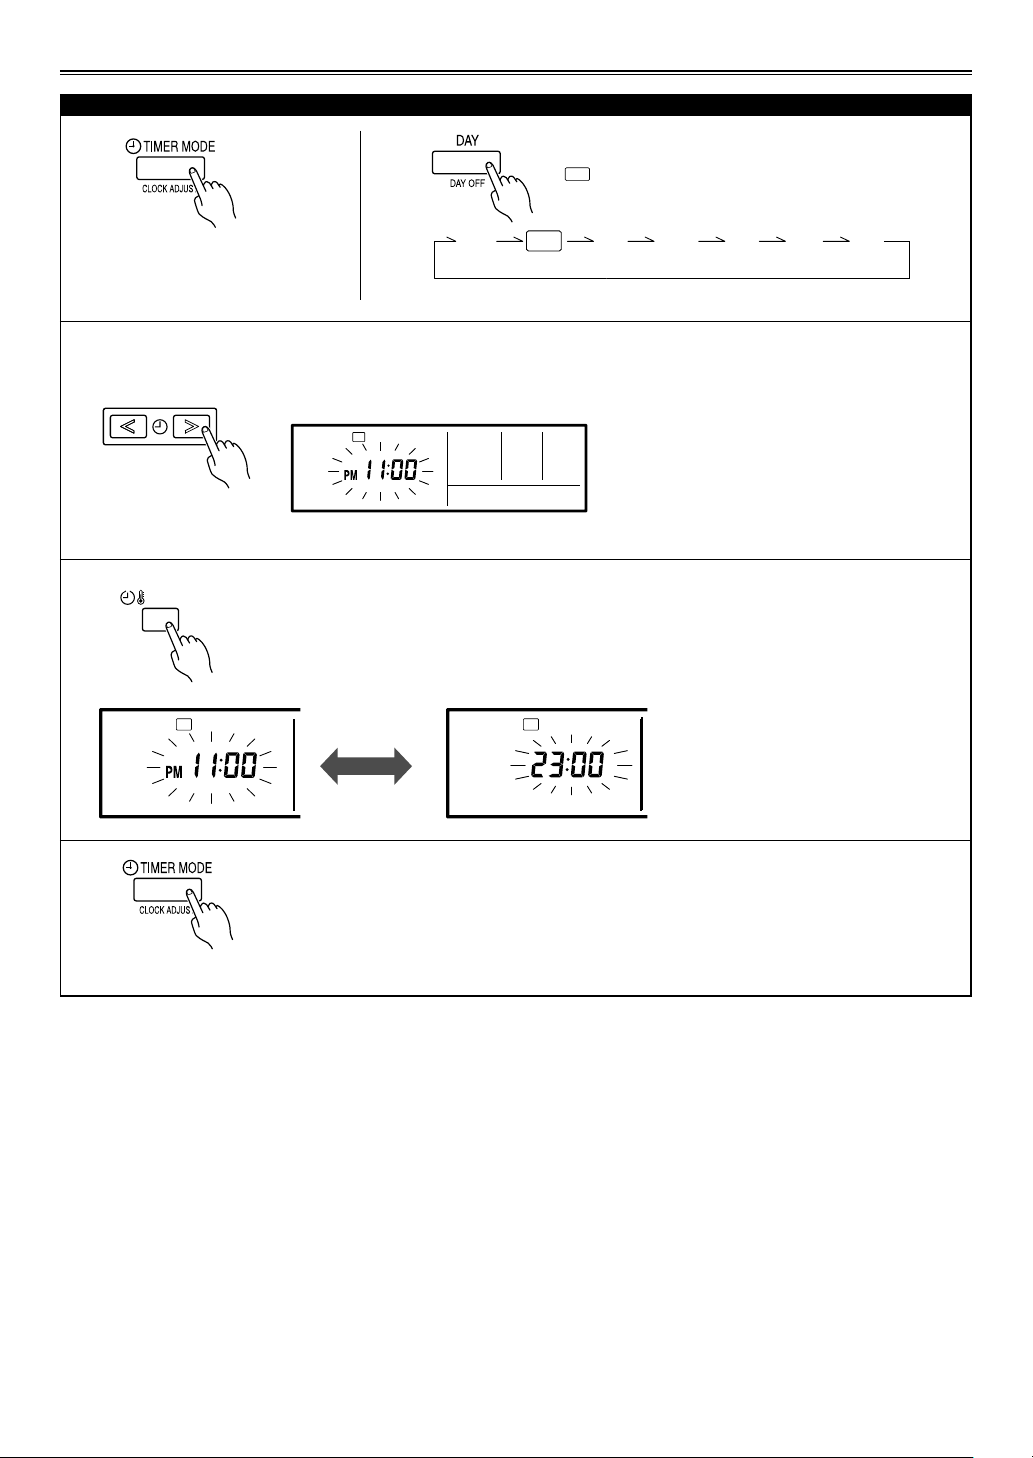
PREPARATORY OPERATION
Set the current day and time
1
Press the timer mode (CLOCK
ADJUST) button for 2 seconds
or more. The time display on
the remote controller will flash.
3
3
SET BACK
4
SUMOTUWETH FR
2
SU MO TU WE TH FR SA
Press the set time buttons to set the current time.
Press repeatedly to adjust the current time in 1minute increments. Press and hold to adjust the
current time in 10-minute increments.
SUMOTUWETH FR
ex. Monday PM11:00
Press the SET BACK button to switch between the
12- and 24-hour time displays.
SA
SA
Press the DAY button and select the current day.
A
appears around the selected day.
SUMOTUWETH FR
SA
5
En-3
Press again to end.
Page 5

OPERATION
AUTO MEDHIGH LOW QUIET
Instructions relating to heating are applicable only to “HEAT & COOL MODEL” (Reverse Cycle).
To start/stop operation
Press the start/stop button.
Operation lamp
Air conditioner ON: Lit brightly
Air conditioner OFF: Not lit
To set the operation mode
● Operation mode setting
Press the master control button to set the operation mode.
If DRY is selected, the fan speed will be set to AUTO.
AUTO COOL DRY HEATFAN
● Room temperature setting
Lower Rise
● Fan speed setting
ECONOMY OPERATION
Press the set temperature buttons to set the room temperature.
Temperature setting range
AUTO ............................................... 18 to 30 °C
COOL/DRY ....................................... 18 to 30 °C
HEAT ................................................ 16 to 30 °C
Press the fan control button to set the fan speed.
Press the ECONOMY button to start or stop ECONOMY OPERATION.
For details on the function, refer to page 10.
En-4
Page 6

OPERATION
Room temperature sensor selection
Press the ECONOMY button for more than 2 seconds to
select whether the room temperature is detected at the indoor unit (remote sensor) or the remote controller.
Indoor unit
When the
temperature is detected at the remote controller.
thermo sensor display appears, the room
NOTES
• This function is locked at the factory. In order to detect the room temperature correctly, consult authorized service
personnel when using this function.
• If this function is locked, the location where the room temperature is detected cannot be changed and the
mark flashes when the ECONOMY button is pushed for 2 seconds or more.
Child lock function
Press the DAY (DAY OFF) button and SET button simultaneously for 2 seconds or more to activate the child lock
function and lock all buttons on the remote controller.
Press the buttons again for 2 seconds or more to deactivate the child lock function.
When the child lock function is activated, the
appears. If any button is pressed during the child lock,
CL
display and flash.
the
mark
En-5
Page 7

TIMER FUNCTIONS
OFF timer (See page 6.)
Use this timer function to stop air conditioner operation. The timer operates and air conditioner operation stops
after the set time has passed. The timer can be set up to 24 hours in advance.
ON timer (See page 6.)
Use this timer function to start air conditioner operation. The timer operates and air condition operation starts
after the set time has passed. The timer can be set up to 24 hours in advance.
WEEKLY timer (See page 7.)
Use this timer function to set operating times for each day of the week.
Use the DAY OFF setting to switch off timed operation for a selected day in the coming week.
Because all days can be set together, the weekly timer can be used to repeat the timer settings for all of the days.
Temperature SET BACK timer (See page 9.)
Use this timer function to change the set temperature in the operation times set for each day of the week.
This can be used together with other timer settings.
ON/OFF TIMER
To set the ON/OFF timer
1
No display
NON
STOP
● To cancel
SUMOTUWETH FR
Press the timer mode button to select the ON timer or OFF timer.
OFF
TIMER
• Press the DELETE button to cancel the timer mode.
• The timer mode can also be canceled by changing the timer mode using the timer mode button.
ON
TIMER
WEEKLY
TIMER
2
From 1 to 24 hours
Press the set time buttons to set the time.
After the time is set, the timer will start automatically.
The amount of time until the OFF timer operates that is displayed on the timer display decreases as time passes.
ex. OFF timer set for 6 hours
SA
En-6
Page 8

WEEKLY TIMER
Weekly timer setting
1
Press the timer mode button to select the weekly timer.
● Day of the week setting
3
1
Press the DAY button to select the day of the week, and then press the
SET button to confirm the setting.
For ALL, all of the days can be set together when a appears around
each day.
● Time setting
2
SUMOTUWETH FR
369
SA
12 15 18 21
ALL SU MO TU WE TH FR SA
4
1
2
2
Press the SET button for 2 seconds or more.
SUMOTUWETH FR
369
When the operating time is set, the
mark appears.
3
SUMOTUWETH FR
SA
12 15 18 21
SA
ON-1 OFF-1 ON-2 OFF-2
Press the set time buttons to set the time, and then press the SET button
to confirm the setting and proceed to the next ON or OFF time setting.
Up to two ON and OFF times can be set per day.
Press the DAY button to complete the time setting and return to the day
of the week setting.
● To delete the operating time
5
Repeat steps 3 and 4.
To complete the weekly timer settings, press the SET
button for 2 seconds or more.
NOTES
• The operating time can be set in 30-minute increments only.
• The OFF time can be carried over to the next day.
• The ON timer and the OFF timer functions cannot be set using the weekly timer. Both an ON and OFF time must be set.
If the DELETE button is pressed during
steps
selected day will be deleted.
If all the days are selected, the operating
times for all of the days will be deleted.
369
12 15 18 21
ex. The timer is set for 7:00-18:00.
3 or 4, the operating time for the
En-7
Page 9

WEEKLY TIMER
WEEKLY timer operation
● To start
SUMOTUWETH FR
369
12 15 18 21
● To cancel
SA
When the weekly timer is selected, the
timer starts automatically.
To set the DAY OFF (for a holiday)
1
During the weekly timer,
press the SET button for 2
seconds or more to set the
day.
SUMOTUWETH FR
369
12 15 18 21
243
Select the day to set the DAY
OFF.
SA
369
ex. Operating time 7:00-18:00
The operating time for the current
day is displayed.
SUMOTUWETH FR
369
ex. The DAY OFF is set for Monday.
12 15 18 21
Press the DAY (DAY OFF)
button for 2 seconds or
more to set the DAY OFF.
SA
The
12 15 18 21
• Press the DELETE button to cancel
the timer mode.
• The timer mode can also be
canceled by changing the timer
mode using the timer mode button.
Press the SET button for 2
seconds or more to complete the DAY OFF setting.
mark flashes under a day of the week.
● To cancel
Follow the same procedures as
those for setup.
NOTES
• The DAY OFF setting is only available for days for which weekly settings already exist.
• If the operating time carries over to the next day (during a next day setting), the effective DAY OFF range will be set as
shown below.
● Normal ● Next day setting
DAY OFF
ON OFF ON OFF
WEEKLY WEEKLY
Setting dayPreceding day Next day Setting dayPreceding day Next day
• The DAY OFF setting can only be set one time. The DAY OFF setting is cancelled automatically after the set day has
passed.
ON
WEEKLY
OFF
DAY OFF
ON
WEEKLY
OFF
En-8
Page 10

TEMPERATURE SET BACK TIMER
1
2
Temperature SET BACK timer setting
SET BACK
SUMOTUWETH FR
1
369
Press the SET BACK button to change to the SET BACK confirmation display.
The SET BACK operating time and the set temperature will
be displayed.
● Day setting ● Operating time setting
3
1
Follow the same procedures to set the operating time as those for the weekly timer. The DELETE button is also used
as described in the procedures for the weekly timer.
● Temperature setting
2
4
SA
12 15 18 21
3
Press the set temperature buttons to set
the temperature. (The temperature setting
range is the same as the range for the
operation mode.)
SUMOTUWETH FR
SA
If there is no existing
SET BACK temperature setting, “- -” will
be displayed for the
temperature.
4
2
Press the SET button for 2
seconds or more.
SUMOTUWETH FR
369
ex. When setting all days together
SA
12 15 18 21
5
369
12 15 18 21
Repeat steps 3 and 4.
Press the SET button for 2 sec-
onds or more to complete the
temperature SET BACK timer
settings.
SET BACK temperature
Normal temperature
ex. Operating time 15:00–22:00
ON
24°C
28°C
OFF
24°C
Temperature SET BACK timer operation
● To start
SET BACK
ex. Display during SET BACK timer operation
(The operating time will not be displayed.)
Press the SET BACK button. The SET BACK confirmation display appears
for 5 seconds, and then the timer starts automatically.
NOTES
• The SET BACK timer only changes the set temperature, it cannot be used to start or stop air conditioner operation.
• The SET BACK timer can be set to operate up to two times per day but only one temperature setting can be used.
• The SET BACK timer can be used together with the ON, OFF, and weekly timer functions.
• The SET BACK operating time is displayed only in the SET BACK confirmation display. (Refer to step 1 for the SET BACK
confirmation display.)
En-9
SUMOTUWETH FR
SA
● To cancel
Press the SET BACK button, and then
press the DELETE button while the
SET BACK confirmation display is displayed. Even if the SET BACK button
is pressed again, the SET BACK timer
will be cancelled.
Page 11

OPERATING TIPS
Instructions relating to heating are applicable only to “HEAT & COOL MODEL” (Reverse Cycle).
About ECONOMY OPERATION
At the maximum output, ECONOMY OPERATION is approximately 70% of normal air conditioner operation for cooling
and heating.
When ECONOMY OPERATION is performed during the cooling mode, dehumidification is improved. This function is especially convenient when you want to remove the humidity
in the room without significantly lowering the room temperature.
During ECONOMY OPERATION, the thermostat setting automatically changes according to the temperature to avoid Unnecessary cooling and heating for the most economical operation.
• If the room is not cooled (or heated) well during economy
operation, select normal operation.
• During the monitor period in the AUTO mode, the air conditioner operation will not change to ECONOMY OPERATION even if ECONOMY OPERATION is selected by pressing the ECONOMY button.
Defrosting (for heating)
When the outdoor temperature is low and the humidity high,
frost will collect on the outdoor unit, reducing heater efficiency.
When this happens, the computer will automatically start the
defrost cycle. During the defrost cycle, the indoor fan will shutdown and
will take anywhere from 4 to 15 minutes before the air conditioner starts up again.
will be displayed on the remote controller. It
Group Control
One remote controller can control up to 16 air conditioners.
All of the air conditioners will be operated with the same settings.
Dual Remote Controllers (optional)
An additional remove controller can be added up to the maximum of two remote controllers. Either remote controller can
control the air conditioner. However, the timer functions cannot be used at the slave unit.
Simultaneous Use of Multiple Units
Instructions relating to inverter (❖) are applicable only to “IN-
VERTER MODEL”.
❖
● Operation cannot be done in the following different oper-
ating modes.
If the indoor unit is instructed to do an operating mode
that it cannot perform,
controller display and the unit will go into the standby
mode.
Heating mode and cooling mode (or dry mode)
Heating mode and fan mode
❖
● The operating mode (heating mode or cooling (dry) mode)
of the outdoor unit will be determined by the operating
mode of the indoor unit that was operated first. If the indoor unit was started in fan mode, the operating mode of
the outdoor unit will not be determined.
For example, if indoor unit (A) was started in fan mode
and then indoor unit (B) was then operated in heating
mode, indoor unit (A) would temporarily start operation
in fan mode but when indoor unit (B) started operating in
heating mode,
troller display and it would go into standby mode. Indoor
unit (B) would continue to operate in heating mode.
will be shown on the remote con-
will be shown on the remote
En-10
Page 12

ADJUSTING THE DIRECTION OF AIR CIRCULATION
Instructions relating to heating are applicable only to “HEAT & COOL MODEL” (Reverse Cycle).
Start air conditioner operation before performing this procedure.
To set the operation mode
●
Vertical air direction adjustment (Swing operation)
* Press the START/STOP button to start the air conditioner, and then
proceed as follows.
Press the VERTICAL AIRFLOW DIRECTION and SWING button to adjust
the direction of the vertical airflow. To set the swing operation, press the
VERTICAL AIRFLOW DIRECTION and SWING button for more than 2 sec-
ex. Vertical swing operation
●
Horizontal air direction adjustment (Swing operation)
ex. Horizontal swing operation
• Each time the button is pressed, the airflow direction setting changes as shown in MANUAL OPERATION which is included
in INDOOR UNIT.
NOTES
• When using the air conditioner in a room with infants, small children, or elderly or sick persons, the airflow direction and
room temperature should be considered carefully when making the settings.
• The swing operation is not available depending on the model. Please refer to the operating manual for the indoor unit.
onds. (Stop the setting by pressing for more than 2 seconds again.)
* Press the START/STOP button to start the air conditioner, and then
proceed as follows.
Press the HORIZONTAL AIRFLOW DIRECTION and SWING button to adjust the direction of the horizontal airflow. To set the swing operation, press
the HORIZONTAL AIRFLOW DIRECTION and SWING button for more than
2 seconds. (Stop the setting by pressing for more than 2 seconds again.)
FILTER LAMP RESET
Some indoor unit models are equipped with a filter lamp in the indoor unit display to indicate when it is time to clean the air
filters.
Press the Filter button for 2 seconds or more. The indoor unit filter lamp will go off and the filter display will disappear.
SELF-DIAGNOSIS
When “EE” in Temperature Display is desplayed, inspection of the air conditioning system is necessary. Please consult authorized service personnel.
Unit number (usually 0)
Error code
SUMOTUWETH FR
ex. Self-diagnosis check
SA
En-11
Page 13

TROUBLESHOOTING
Instructions relating to heating are applicable only to “HEAT & COOL MODEL” (Reverse Cycle).
WARNING!
In the event of a malfunction (burning smell, etc.), immediately stop operation, turn off the electrical breaker,
and consult authorized service personnel.
Merely turning off the unit’s power switch will not completely disconnect the unit from the power source.
Always be sure to turn off the electrical breaker to ensure that power is completely off.
Before requesting service, perform the following checks:
Symptom
NORMAL
FUNCTION
If the problem persists after performing these checks, or if you notice burning smells, stop operation immediately, turn off the
electrical breaker, and consult with authorized service personnel.
Air flow is stopped:
thermo sensor
display on the remote
controller is flashing:
● During Heating operation, the unit will temporarily stop operation (between 4 and 15 minutes) as the Automatic Defrosting mode
operates. During the Automatic Defrosting operation,
be shown on the remote controller display.
● In case of Multi-type unit, if multiple units are operated in
different operation modes as shown below, the units operated
afterward will stop and
controller display of the stopped indoor units.
Heating mode and cooling mode (or dry mode)
Heating mode and fan mode
● The room temperature sensor may be malfunctioning. Please
consult authorized service personnel.
Problem
will be shown on the remote
See Page
10
will
10
—
En-12
Page 14

 Loading...