


DUAL CD MIXING CONSOLE w/GRAPHICS OUTPUT
CDM-3700G
OPERATIONS MANUAL MANUAL DE INSTRUCCIONES MANUEL D’INSTRUCTIONS BEDIENUNGSHANDBUCH
FOR ENGLISH READERS |
Page 2 ~ Page 7 |
PARA LECTORES EN ESPAÑOL |
Página 7~ Página 13 |
UTILISATEURS FRANCAIS |
Page 14 ~ Page 19 |
FÜR DEUTSCHE LESER |
Seite 20~ Seite 26 |
PLEASE READ BEFORE USING APPLIANCE
IMPORTANT WARNING AND SAFETY INSTRUCTIONS!
RISK OF ELECTRIC
CAUTION SHOCK DO NOT
OPEN!
CAUTION: This product satisfies FCC regulations when shielded cables and connectors are used to connect the unit to other equipment. To prevent electromagnetic interference with electric appliances such as radios and televisions, use shielded cables and connectors for connections.
The exclamation point within an equilateral triangle is intended to alert the user to the presence of important operating and maintenance (servicing) instructions in the literature accompanying the appliance.
The lightening flash with arrowhead symbol, within an equilateral triangle, is intended to alert the user to the presence of uninsulated “dangerous voltage” within the product’s enclosure that may be of sufficient magnitude to constitute a risk of electric shock to persons.
READ INSTRUCTIONS: All the safety and operating instructions should be read before the product is operated.
RETAIN INSTRUCTIONS: The safety and operating instructions should be retained for future reference.
HEED WARNINGS: All warnings on the product and in the operating instructions should be adhered to.
FOLLOW INSTRUCTIONS: All operating and use instructions should be followed.
CLEANING: The product should be cleaned only with a polishing cloth or a soft dry cloth. Never clean with furniture wax, benzine, insecticides or other volatile liquids since they may corrode the cabinet.
ATTACHMENTS: Do not use attachments not recommended by the product manufacturer as they may cause hazards.
WATER AND MOISTURE: Do not use this product near water, for example, near a bathtub, wash bowl, kitchen sink, or laundry tub; in a wet basement; or near a swimming pool; and the like.
ACCESSORIES: Do not place this product on an unstable cart, stand, tripod, bracket, or table. The product may fall, causing serious injury to a child or adult, and serious damage to the product. Use only with a cart, stand, tripod, bracket, or table recommended by the manufacturer, or sold with the product. Any mounting of the product should follow the manufacturer’s instructions, and should use a mounting accessory recommended by the manufacturer.
CART: A product and cart combination should be moved with care. Quick stops, excessive force, and uneven surfaces may cause the product and cart combination to overturn. See Figure A.
VENTILATION: Slots and openings in the cabinet are provided for ventilation and to ensure reliable operation of the product and to protect it from overheating, and these openings must not be blocked or covered. The openings should never be blocked by placing the product on a bed, sofa, rug, or other similar surface. This product should not be placed in a built-in installation such as a bookcase or rack unless proper ventilation is provided or the manufacturer’s instructions have been adhered to.
POWER SOURCES: This product should be operated only from the type of power source indicated on the marking label. If you are not sure of the type of power supply to your home, consult your product dealer or local power company.
LOCATION: The appliance should be installed in a stable location.
NON-USE PERIODS: The power cord of the appliance should be unplugged from the outlet when left unused for a long period of time.
GROUNDING OR POLARIZATION:
• If this product is equipped with a polarized alternating current line plug (a plug having one blade wider than the other), it will fit into the out- |
|
|
let only one way. This is a safety feature. If you are unable to insert the plug fully into the outlet, try reversing the plug. If the plug should still |
|
|
fail to fit, contact your electrician to replace your obsolete outlet. Do not defeat the safety purpose of the polarized plug. |
|
|
• If this product is equipped with a three-wire grounding type plug, a plug having a third (grounding) pin, it will only fit into a grounding type |
Fig. A |
|
power outlet. This is a safety feature. If you are unable to insert the plug into the outlet, contact your electrician to replace your obsolete out- |
||
|
||
let. Do not defeat the safety purpose of the grounding type plug. |
|
POWER-CORD PROTECTION: Power-supply cords should be routed so that they are not likely to be walked on or pinched by items placed upon or against them, paying particular attention to cords at plugs, convenience receptacles, and the point where they exit from the product.
OUTDOOR ANTENNA GROUNDING: If an outside antenna or cable system is connected to the product, be sure the antenna or cable system is grounded so as to provide some protection against voltage surges and built-up static charges. Article 810 of the National Electrical Code, ANSI/NFPA 70, provides information with regard to proper grounding of the mast and supporting structure, grounding of the lead-in wire to an antenna discharge unit, size of grounding conductors, location of antenna-discharge unit, connection to grounding electrodes, and requirements for the grounding electrode. See Figure B.
LIGHTNING: For added protection for this product during a lightening storm, or when it is left unattended and unused for long periods of time, unplug it from the wall outlet and disconnect the antenna or cable system. This will prevent damage to the product due to lightening and power-line surges.
POWER LINES: An outside antenna system should not be located in the vicinity of overhead power lines or other electric light or power circuits, or where it can fall into such power lines or circuits. When installing an outside antenna system, extreme care should be taken to keep from touching such power lines or circuits as contact with them might be fatal.
OVERLOADING: Do not overload wall outlets, extension cords, or integral convenience receptacles as this can result in a risk of fire or electric shock.
OBJECT AND LIQUID ENTRY: Never push objects of any kind into this product through openings as they may touch dangerous voltage points or short-out parts that could result in a fire or electric shock. Never spill liquid of any kind on the product.
SERVICING: Do not attempt to service this product yourself as opening or removing covers may expose you to dangerous voltage or other hazards. Refer all servicing to qualified service personnel.
Fig. B
DAMAGE REQUIRING SERVICE: Unplug this product from the wall outlet and refer servicing to qualified service personnel under the following conditions:
•When the power-supply cord or plug is damaged.
•If liquid has been spilled, or objects have fallen into the product.
•If the product has been exposed to rain or water.
•If the product does not operate normally by following the operating instructions. Adjust only those controls that are covered by the operating instructions as an improper adjustment of other controls may result in damage and will often require extensive work by a qualified technician to restore the product to its normal operation.
•If the product has been dropped or damaged in any way.
•When the product exhibits a distinct change in performance, this indicates a need for service.
REPLACEMENT PARTS: When replacement parts are required, be sure the service technician has used replacement parts specified by the manufacturer or have the same characteristics as the original part. Unauthorized substitutions may result in fire, electric shock, or other hazards.
SAFETY CHECK: Upon completion of any service or repairs to this product, ask the service technician to perform safety checks to determine that the product is in proper operating condition.
WALL OR CEILING MOUNTING: The product should not be mounted to a wall or ceiling.
HEAT: The product should be situated away from heat sources such as radiators, heat registers, stoves, or other products (including amplifiers) that produce heat.
2
 CDM-3700G
TOP 28
20
33
|
|
|
|
12 |
|
|
|
|
|
|
|
|
|
|
34 |
|
30 |
|
|
|
|
|
15 |
|
|
|
|
||
26 |
|
|
|
|
|
|
|
|||||||
|
|
|
|
|
|
|
|
|
|
|
|
|
|
|
|
|
|
|
|
|
|
|
|
|
|
|
|
|
|
35 |
|
|
|
|
|
|
|
|
|
|
|
|
|
|
|
|
|
|
16 |
|
|
|
18 |
|
|
|
|||
|
|
|
|
|
|
|
|
|
|
|
|
|
|
|
|
|
|
|
|
|
|
|
|
|
|
|
|
|
|
31
36
27
23
37 14
|
|
|
|
|
|
|
|
|
|
|
|
|
|
|
|
|
32 |
|
|
|
|
|
|
|
|
|
|
|
|
|
|
|
|
|
|
|
|
|
|
38 |
|
|
|
|
|
|
|
|
|
TV OR |
|
|
|
|
|
|
|
|
|
|
|
|
|
MONITOR |
|
|
|
|
|
|
|
|
|
|
|
|
(NOT INCLUDED) |
39 |
|
|
|
|
25 |
|
|
|
|
|
|
|
|
|
|
|
|
|
|
|
|
|
|
|
|
BACK
40
4
6
|
|
|
|
|
|
|
|
|
|
|
|
|
|
|
|
|
|
|
|
|
|
|
|
|
|
|
|
|
|
|
|
|
|
|
|
|
|
|
|
|
|
|
|
|
|
|
|
|
|
|
|
|
|
|
|
|
|
|
|
|
|
|
|
|
|
|
|
|
|
|
|
|
|
|
|
|
|
|
|
|
|
|
|
|
|
|
|
|
|
|
|
|
|
|
|
|
|
|
|
|
|
|
|
|
|
|
|
|
|
|
|
|
|
|
|
|
|
|
|
|
|
|
|
|
|
|
|
|
|
|
|
|
|
|
|
|
|
|
|
|
|
|
|
|
|
|
|
|
|
|
|
|
|
|
|
|
|
|
|
|
|
|
|
|
|
3 |
|
2 |
|
10 |
|
|
|
|
|
|
|
|
|
|
|
|
|
|
|
|
|
|
|
|
|
|
|
|
|||
|
|
|
|
|
|
|
|
|
|
|
|
|
8 |
|
|
|
|
|
|
|
|
|
|
|
|
|
|
|
|
|
|
|
|
|
|
|
|
|
|
|
|
|
|
|
|
|
|
|
|
|
|
|
|||||||||||||
FRONT |
|
|
|
|
|
|
|
|
|
|
|
7 |
|
|
|
|
|
|
5 |
|
|
|
|
|
|
|||||||
|
|
|
|
|
|
|
|
|
|
|
|
|
|
|
|
|
|
|
|
|
|
|
||||||||||
|
|
|
|
|
|
|
|
|
|
|
|
|
|
|
|
|
|
|
|
|
|
|
|
|
|
|
|
|
|
|
|
|
98
11
35
42
41
3

 CDM-3700G
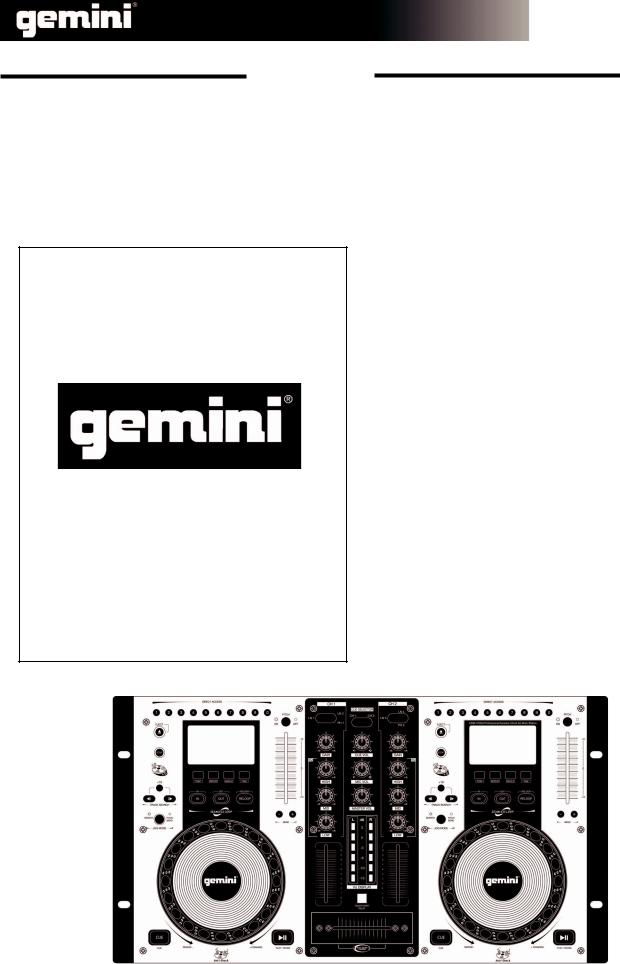
INTRODUCTION:
congratulations on purchasing the GEMINI CDM-3700G DUAL KARAOKE CD MIXING CONSOLE. This state of the art Professional mixing console is backed by a (1) year warranty. Prior to use we suggest that you read all the instructions.
FEATURES:
PLAYER SECTION
1.Audio CD, & CD-R compatible
2.Anti-shock using RAM buffer memory
3.2 Selectable Jog modes Pitch Bend/Search
4.Instant-start & cue with preview
5.Fader-Start capability
6.Single auto-cue/continuous play modes
7.One seamless loop per side with reloop
8.Pitch bend via jog wheel or buttons
9.Three mode time selection
MIXER SECTION:
1.3-band EQ w/ Gain Control
2.1/4” headphone output
3.XLR and 1/4” mic input
4.Auxiliary Inputs for Phono or Line devices
SAFETY SPECIFICATIONS:
Laser Diode Properties
Material: Ga - Al - As
Wavelength: 755 - 815 nm (25° C)
Laser Output: Continuous Wave, max. 0.5 mW
PRECAUTIONS:
1.Do not use this CD player at temperatures below 41°F/5°C or higher than 95°F/35°C.
2.The apparatus should not be exposed to dripping or splashing, and no objects filled with liquids such as vases should be
placed on the apparatus.
3.Place the unit in a clean and dry location.
4.Do not place the unit in an unstable location.
5.When disconnecting the power cord from the AC outlet, always grasp it by the plug. Never pull the power cord.
6.To prevent electric shock, do not remove the cover or the bottom screws.
7.There are NO USER SERVICEABLE PARTS INSIDE. Please refer to a qualified technician.
IN THE USA ~ IF YOU EXPERIENCE PROBLEMS WITH THIS UNIT CALL GEMINI CUSTOMER SERVICE AT: 1 (732) 346-0061. DO NOT ATTEMPT TO RETURN THIS EQUIPMENT
TO YOUR DEALER.
8.Do not use chemical solvents to clean the unit.
9.Keep the laser pickup clean by keeping the tray closed.
10.Keep this manual in a safe place for future reference.
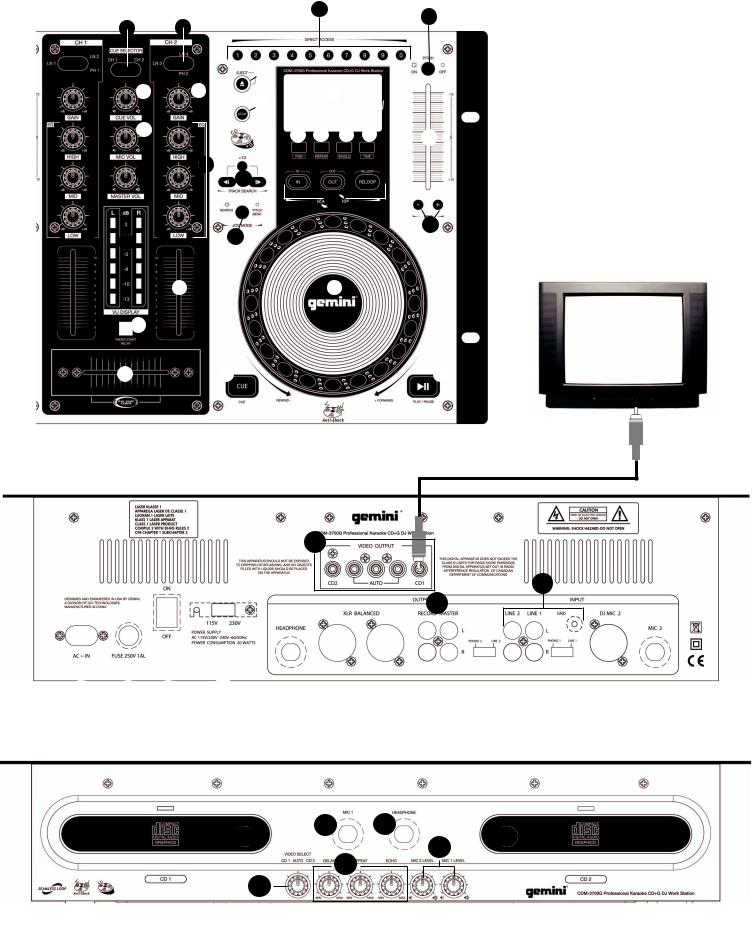
2FUSE: The FUSE if blown should only be replaced with the same 250V 1AL FUSE.
POWER: After you have properly set the VOLTAGE LINE SELECTOR SWITCH: you may plug in the power cord of the CDM-3700G.
AND GROUND PHONO/LINE RCA INPUTS
When switched to the PHONO position (see below) you may use any Turntable with a magnetic cartridge, remember to connect your ground wire (see GROUNDING SCREW) or there may be a system hum.
And when the switch is in the LINE position you may connect any line level device as described before (Mp3, CD, Tape etc).
Now you may plug the RCA’s from your playable medium into each input to be connected to thier respective CHANNELS.
NOTE: CONNECTING A LINE LEVEL DEVICE TO A PH INPUT MAY CAUSE THAT MIXER CHANNEL TO OVERLOAD AND OR DISTORT.
GROUNDING SCREW
When using (a) turntable(s), you will need to ground the RCA cable(s) by screwing in the grounding fork(s) to the GROUNDING SCREW located to the right of the PHONO/LINE INPUTS.
CONVERTIBLE LINE SWITCHES: These small switches allow you
5to choose between a PHONO (Turntable) input or a LINE level (Mp3, CD, Tape player etc..).and require the proper switching.
MASTER /RECORD RCA OUTPUT (UNBALANCED):
6The MASTER RCA output connects the mixer to your main amplifier using standard audio cables with RCA-type connectors.
The RECORD RCA OUTPUT output jacks can be used to connect the mixer to the record input of your recording unit, thus enabling you to record your mix with RCA cables.
MASTER XLR OUTPUT (BALANCED): Allows you to connect bal-
7anced XLR cables to MASTER OUTPUT of the CDM-3700G both the RCA and XLR outputs can be used at the same time but are both controlled via the same MASTER OUTPUT.
HEADPHONE OUTPUTS: The HEADPHONE OUTPUTS located at
8rear center and front center of the CDM-3700G will accept any headphone with a standard 1/4” connector and or adaptor and will allow you to CUE your music program before you play it, you can adjust the volume and PGM mix of the HEADPHONE (see CONTROLS) below.
9MIC (MICROPHONE) INPUTS: There are two microphone (MIC) inputs on the CDM-3700G, MIC (1) is located on the front panel and will accept any UNBALANCED 1/4” connector, MIC(2) is located on the back panel and will accept any balanced and unbalanced XLR as well a standard 1/4” connector. You can control the gain for either MIC separately (See MIXER SECTION ).
PLAYER FUNCTIONS:
10 |
cables and made sure |
|
correctly, you can turn |
||
|
||
|
the CDM-3700G on by pressing the POWER button, pressing the |
|
|
CDM-3700G’s POWER button a second time will turn off the unit. |
1VOLTAGE SELECTION SWITCH Before plugging the CDM-3700G into any wall outlet, make sure that the VOLTAGE SELECTION SWITCH is set
to the proper voltage.
To change this selection unscrew the hard plastic protective top with a Phillips head screw driver. Then use a flat head screw driver to move the switch to the proper selection (115V or 230V) .
Do not force or twist the switch. Excessive force may cause damage, if the switch does not move smoothly, contact a qualified technician.
11DISC TRAY: The DISC TRAY is where the CD is held during loading, unloading and playback, and holds both 12 cm and 8cm CD’s. (
DO NOT FORCE THE CD TRAY TO CLOSE EXCESSIVE FORCE WILL DAMAGE THE CD
MECHANISM, USE THE OPEN AND CLOSE BUTTONS.
4

12
first stop the side you which to eject.
JOG WHEEL : In SEARCH MODE the JOG WHEEL can be used to search forward or backwards in the music track, as well as for fine adjustments to a CUE point in PAUSE mode. In PITCH BEND mode the JOG WHEEL will function the same as the PITCH BEND allowing you to speed up (FORWARD) or slow down (REWIND) the music clockwise (FORWARD) and counter clockwise (REWIND).
not
illuminated it indicates that the JOG WHEEL is in PITCH BEND MODE..
DISPLAY: The DISPLAY shows the track number, pitch value, pitch bend, single, continue (for continuous play), play/pause modes, fast forward/reverse modes, loop mode, reloop mode, PGM, repeat modes, the playback display bar, and three different time displays. These times displays are TIME ELAPSED on the track, TIME REMAINING on the disc and and TIME REMAINING on the track. Time is measured in minutes, seconds and frames.
PGM: Allows you to create a set playlist. To program a set list into the CDM-3700G memory, begin by stopping the unit from play and pressing PGM to begin the set list. Select a track by using the track selection button to scan to the first track to be placed in the set list. When you have selected the proper track press PGM and the CDM-3700G will be ready to set your next selection. Repeat the previous steps until you have completed your playlist, then press play to begin the set list.
REPEAT: Press the repeat button once to engage ( 1) or repeat the selected track. Press REPEAT again to engage ALL setting which will repeat all the tracks on the CD. Press REPEAT again to disengage the repeat function.
SINGLE: Pressing the SINGLE button engages SINGLE mode, in this mode the CDM-3700G will play one song and then stop. Pressing the SINGLE button again will then activate CONTINUOUS mode causing the unit to play continuously (after the last track, the unit will return to the first track of the disc and continue to play).
TIME: The TIME BUTTON switches the time display between three available sources, these three are TIME ELAPSED on the track, TIME REMAINING on the disc and and TIME REMAINING on the track. TIME ELAPSED indicates how much time has currently gone by since the play button was pressed, TIME REMAINING ON DISC will count down the time remaining on the entire disc and TIME REMAINING ON TRACK counts down the time that is left before the end of the track.
PITCH: Pushing the PITCH button (the button will light up blue) activates the PITCH CONTROL SLIDE. The pitch or speed of the CD will change plus or minus 12% depending on the position of the PITCH CONTROL SLIDER. Push the PITCH button again to deactivate this mode.
PITCH CONTROL SLIDE: Moving the PITCH CONTROL SLIDE up or down will lower or raise the pitch percentage + or - 12%.
CDM-3700G
22PITCH BEND: Pushing the PITCH BEND BUTTONS will automatically raise the pitch up to +16% or lower the pitch down to -16% from the
beat when mixing from one song to another.
23LOOP SECTION: A LOOP repeats the section between the entry point (IN) and the exit point (OUT). To set a loop while the unit is playing,
start by pressing the IN BUTTON (it will light up) and when you reach the desired end loop point press the OUT BUTTON (it will also light up). The loop will continue playing until you press the OUT BUTTON again allowing the music to continue from that point on, to re-engage the loop you must press the RELOOP BUTTON. When you have released your loop the OUT BUTTON will turn OFF and the IN BUTTON will remain lit to indicate that your loop is stored in the CDM-3700G memory. Pressing the IN BUTTON again while the unit is playing will erase the previously saved loop while saving your new loop entry point. Press OUT to exit the loop and save a new complete loop.
Press RELOOP to return to the beginning of the previously saved loop from normal play. Press RELOOP repeatedly to cause the loop to stutter.
NOTE: THE FIRST LOOP WILL HAVE A PAUSE AT THE EXIT POINT, WHILE ALL OTHERS WILL BE SEAMLESS.
24PLAY/PAUSE: Each press of the PLAY/PAUSE BUTTON
causes the operation to change from PLAY to PAUSE or from PAUSE back to PLAY. The PLAY/PAUSE BUTTON remains lit when in PLAY mode, while it blinks in PAUSE mode.
25CUE: While the unit is playing and after the cue point has been programmed, pressing CUE will cause the CD player to enter the
PAUSE mode (PLAY/PAUSE BUTTON blinks) at the programmed cue point (the CUE LED is lit). Holding down the CUE button
changes the function to preview , and allows you to stutter start or play from the programmed CUE POINT Releasing the CUE button will return the CD to the preset CUE point.
26STOP BUTTON: When pressed the STOP BUTTON stops the playback of the CD player.
27TRACK SELECTION: The TRACK SELECTION buttons let you select the track to play. +10 allows you to scan through the track selection in in-
crements of 10. TRACK SKIP allows you to scan through each track one at a time.
NOTE : ONCE YOU HAVE SKIPPED TO ANOTHER TRACK, YOU MAY NOT GO BACK TO YOUR PROGRAMMED CUE POINT. YOU MUST BEGIN YOUR CUE SELECTION OVER AGAIN, THE CUE WILL BE PRESET TO THE BEGINNING OF THE CURRENTLY SELECTED TRACK.
28DIRECT ACCESS BUTTONS: The direct access buttons allow you to input a track number directly instead of having to skip through the
tracks individually. Just press the number or combination of numbers up to 99 and the player will jump to that track instantly.
5

CDM-3700G
SECTION: |
VIDEO OUTPUT |
|
|
|
|
29
|
ume FADER. For example CHANNEL (1) INPUT SELECTOR allows you to choose |
|
|
between line (1) (That sides internal CD player), line (2) which is line input RCA |
|
|
(1) and or PHONO (1) (if the CONVERTIBLE LINE SWITCH is switched to |
|
|
PHONO) see above. The same applies for channel 2. |
|
|
CHANNEL ROTARY GAIN: The CHANNEL ROTARY GAIN allows you to boost |
|
30 |
|
|
the signal of each individual channel depending on how low or high its input |
|
|
|
level is. |
|
|
EQUALIZER adjusts the tone of each CHAN- |
|
31 |
|
|
frequencies (BANDS) to adjust , from LOW, |
|
|
|
MIDRANGE (MID) and HIGH’s ,you can use the adjustment knobs to higher or |
|
|
lower the 3 separate frequencies till the sound of the music program is appro- |
|
|
priate for your listening environment. |
|
|
CHANNEL VOLUME FADER: After you have chosen which input you will use with |
|
32 |
|
|
|
the INPUT SELECTOR the corresponding CHANNEL FADER will allow you to ad- |
|
just the volume for that particular CHANNEL.
different video outputs, the CD1 and
CHANNEL 1 or CD CHANNEL 2 individually, and the (3) AUTO video outputs will all display the same video signal and are directly connected to the CROSSFADER, so when you move the CROSSFADER to the left the AUTO VIDEO OUTPUTS will display the video signal from CD CHANNEL (1) and when slide the CROSSFADER to the right the AUTO VIDEO OUTPUTS will display the video signal produced by CD
CHANNEL (2).
NOTE: THETHREEAUTOVIDEOOUTPUTSALLDISPLAYTHESAMEVIDEOSIGNALANDARE ALLCONTROLLEDBYTHECROSSFADER
SELECT SWITCH determines which of the or CD2 mode it will only activate either
one of those outputs individually. In AUTO mode the three AUTO VIDEO OUTPUTS will display either CD1 or CD2 depending on the position of the
CROSSFADER.
33
34
35
36
37
38
39
CHANNEL CUE SELECTOR: The CHANNEL CUE SELECTOR allows you to choose |
MIC EFFECT |
||||
which channel you wish to monitor in your headphones, to the left is CHANNEL |
|
|
|
||
The MIC EFFECT controls will allow you to add an ECHO/DELAY |
|||||
|
|
||||
|
42 |
||||
CUE VOLUME ROTARY KNOB: The CUE VOLUME ROTARY KNOB adjusts your |
effect to both MIC CHANNELS at the same time and have three dif- |
||||
|
ferent settings: |
||||
HEADPHONE MONITOR OUTPUT’S volume. |
|||||
|
|
|
|||
MICROPHONE VOLUME ROTARY KNOBS: Allow you to adjust the |
DELAY: |
||||
Adjusts the timing of the ECHO and will determine how fast |
|||||
volume of the of either of the (2) microphone outputs separately and are lo- |
|||||
cated on the front panel of the CDM-3700G. MIC ROTARY (1) controls MIC |
or how slow the ECHO repeats. |
||||
CHANNEL (1) and MIC ROTARY (2) controls MIC CHANNEL (2). |
|
|
|
||
MASTER OUTPUT ROTARY KNOB: The MASTER OUTPUT rotary knob adjust |
REPEAT: |
||||
Adjusts how many times or “how Long” the ECHO will keep repeating |
|||||
the volume of the MAIN MASTER output. |
|
|
|
||
VU METER: The CDM-3700G has a stereo VU METER that allows you to monitor |
ECHO: |
||||
Will control the level for this effect in relation to the dry signal from |
|||||
the decible levels of the LEFT and RIGHT MASTER output. |
|||||
microphone channel (1) and (2) |
|||||
|
|
||||
FADER START BUTTON: The Fader Start function allows you to start CD play- |
|
|
|
||
back simply by moving the CROSSFADER from side to side. |
|
|
|
||
A. Cue up the CD player you wish to start using the Fader Start function |
|
|
|
||
B. Move the CROSSFADER all the way to the opposite side of the CD |
|
|
|
||
you have just Cued. |
FADER REPLACEMENT: |
||||
C. Press the FADER START SELECTOR button so that the button |
|||||
|
|
|
|||
becomes illuminated. |
|
|
|
||
D. At the point which you wish to start the audio from the Cued CD, simply move the CROSSFADER in the direction of the Cued CD player, and playback will begin.
E. When the CROSSFADER is moved all the way to the opposite side of the currently playing disc, the unit will stop playing that disc and return to the beginning of the track or the set cue point.
CROSS FADER: The CROSS FADER allows you to mix evenly from one source to another. The CROSS FADER on the CDM-3700G is also removable and if the need arises can be replaced.The RG-45 (RAILGLIDE™) DUAL-RAIL CROSS FADER, which has internal dual stainless steel rails that allow the slider to ride smoothly and accurately from end to end can be purchased from your local GEMINI dealer.
1. UNSCREW THE FADER (B) SCREWS. DO NOT TOUCH INSIDE SCREWS (C) CAREFULLY
REMOVE OLD CROSS FADER PLUG CABLE (D)
2.PLUG IN THE NEW CROSS INTO CABLE (D) AND PLACE MIXER.
3.SCREW THE CROSS FADER WITH THE FADER PLATE
4.REPLACE THE FACE OF
SCREW THE FOUR SCREWS BACK IN
PLACE THE FADER KNOBS.
NOTE: WHEN USING THE CROSS FADER LIGHTLY GLIDE THE FADER BACK AND FORTH. PRESSING DOWN ON THE CONTROLS CAN BEND CONTACTS AND CAUSE A LOSS OF SOUND.
6
TROUBLESHOOTING:
-If a disc will not play, check to see if the disc was loaded correctly (label side up). Also check the disc for excessive dirt, scratches, etc.
-If the disc turns but there is no sound, check the cable connections, if they are ok, check your amplifier or reciever.
-If the CD skips, check the CD for dirt or scratches. Do not assume that the CD player is defective. Many cd’s are recorded out of spec and will skip on most or all CD players. Before sending the unit for repair, try playing a CD that you are sure plays properly.
CDM-3700G
SPECIFICATIONS:
GENERAL:
Type................................................................................ |
Compact Disc Player |
Disc Type................................... |
Standard Compact discs (12 cm & 8 cm) |
Time Display...................... |
Track Elapsed, Track Remain, or Total remain |
Variable Pitch....................................... |
± 12% Slider with Resume Switch |
Pitch Bend............................................................................ |
± 16% Maximum |
Instant Start.................................................................... |
Within 0.03 seconds |
Installation........................................................................................... |
19" each |
Dimensions........................... |
19" x 3.5" x 10" (482.6 x 88.9 x 254 mm) |
Weight.......................................................... |
Main unit: 11.35 lbs. (5.14 kg) |
AUDIO SECTION:
Quantization...................................... |
1 Bit Linear/Channel, 3 Beam Laser |
Oversampling Rate.............................................................................. |
8 Times |
Sampling Frequency.......................................................................... |
44.1 kHz |
Frequency Response............................................................ |
20 Hz to 20 kHz |
Total Harmonic Distortion................................................... |
Less Than 0.05% |
Signal to Noise Ratio.............................................................................. |
85 dB |
Dynamic Range........................................................................................ |
85 dB |
Channel Separation................................................................. |
85 dB (1 KHz) |
Output Level................................................................... |
2.0 +/- 0.2V R.M.S. |
Power Supply....................................................... |
AC 115/230V, 60/50 Hz |
INPUTS:
Phono |
.............................................................................3mV,47 KOhm |
Line.......................................................................... |
150 mV, 27 KOhm |
MIC................................................................... |
1.5 mV, 1 KO balanced |
OUTPUTS:
Max.......................................................................... |
20V Peak-to Peak |
Rec............................................................................. |
225 mV, 5 KOhm |
SPECIFICATIONS AND DESIGN ARE SUBJECT TO CHANGE WITH-
OUT NOTICE FOR PURPOSE OF IMPROVEMENT.
7
POR FAVOR LEA ANTES DE UTILIZAR, INSTRUCCIONES
IMPORTANTES DE SEGURIDAD
RIESGO DE SHOCK
CAUTION ELECTRICO - NO
ABRIR!
ATENCIÓN: Este producto cumple con la normativa legal si se utilizan cables y conectores blindados para conectar la unidad a otro equipo. Para evitar interferencias electromagnéticas con otros aparatos eléctricos, como radios y televisores, deben emplearse cables y conectores blindados.
Los signos de exclamación dentro de un triángulo que puedan aparecer en la documentación que acompaña a la unidad pretenden alertar al usuario de instrucciones de operación o mantenimiento importantes.
El signo de un rayo dentro de un triángulo pretende alertar al usuario de la presencia de "voltaje peligroso" no aislado en el inte-rior de la unidad, que podría ser de suficiente intensidad como para constituir riesgo de descarga eléctrica.
LEA LAS INSTRUCCIONES: Deben leerse todas las indicaciones de uso y seguridad antes de usar este producto.
CONSERVE LAS INSTRUCCIONES: Las instrucciones de uso y seguridad deben conservarse para referencias futuras.
ATIENDA A LAS ADVERTENCIAS: Deben seguirse todas las advertencias sobre este producto que figuran en el manual de instrucciones. SIGA LAS INSTRUCCIONES: Deben seguirse todas las instrucciones del manual.
LIMPIEZA: Este producto debe limpiarse con una mopa suave o con un paño seco. Nunca utilice cera para muebles, gasolina, insecticidas u otros líquidos volátiles, ya que podrían corroer la carcasa.
COMPLEMENTOS: No utilice accesorios que no estén recomendados por el fabricante, pues podrían dañar la unidad.
AGUA Y HUMEDAD: No use este producto cerca de medios acuáticos, como una bañera, un cubo de agua, un fregadero o un lavadero; tampoco en un sótano húmedo, ni cerca de una piscina o similar.
ACCESORIOS: No coloque el producto sobre un carrito, soporte, trípode, brazo o mesa. Podría caer y causar graves daños a un niño o adulto, así como a la propia unidad. Úsese sólo con un carrito, soporte, trípode, brazo o mesa recomendado por el fabricante. Al montar la unidad deben seguirse siempre las instrucciones y emplearse accesorios recomendados por el fabricante.
CARRITO: Si el producto va sobre un carrito, debe moverse el conjunto con cuidado. Detenciones bruscas, una fuerza excesiva o superficies inadecuadas pueden provocar la caída de todo el conjunto. Véase Figura A.
VENTILACIÓN: Las aperturas y ranuras de la carcasa están diseñadas para la ventilación, aseguran un manejo fiable y lo protegen de
cualquier sobrecalentamiento, por tanto, nunca deben cubrirse ni bloquearse. Estas aperturas no deben taparse colocando el producto sobre Fig. A
un sofá, una cama, una alfombra o superficies similares. Nunca debe colocarse en una estructura prefabricada, como una caja o un rack, a menos que tengan la ventilación adecuada o lo permitan las instrucciones del fabricante.
FUENTES DE ALIMENTACIÓN: Esta unidad debe utilizarse exclusivamente con el tipo de suministro eléctrico indicado en la etiqueta correspondiente. Consúltelo antes de enchufar el producto si no está seguro del tipo de suministro del lugar donde lo va a usar.
UBICACIÓN: Este aparato debe colocarse en una ubicación estable.
PERIODOS SIN USARLO: Si no se va a usar la unidad durante un tiempo prolongado, desenchúfelo de la corriente eléctrica. TOMA DE TIERRA O POLARIZACIÓN:
-Si este producto lleva una clavija de corriente alterna polarizada (con un pivote más grueso que otro, tipo inglés), sólo entrará en una posición. Es una medida de seguridad. Si no puede introducir la cla-vija en el enchufe, gírela. En ningún caso debe forzarse. Si sigue sin entrar, un electricista debería cambiar el enchufe.
-Si la unidad lleva una clavija con tres pivotes (el tercero corres-ponde a la toma de tierra), sólo entrará en un tipo de enchufe. Se trata de una medida de seguridad. Si el enchufe y la clavija no son compatibles, un electricista deberá cambiar el enchufe. En ningún caso deberá forzarse.
PROTECCIÓN DEL CABLE DE CORRIENTE: Los cables de corriente deben protegerse para que nadie los pise ni corran el riesgo de pinzarse por elementos colocados encima o que los aprisionen. Debe prestarse especial atención al cable, al enchufe, a los extensores de cable
y al punto por donde el cable sale de la unidad. TIERRA DE LA ANTENA EXTERIOR: Si el producto lleva conectada una antena exterior o sistema de cables, asegúrese de que cuenta con
la toma de tierra correspondiente, a fin de proteger la unidad de variaciones de voltaje y cargas de electricidad estática. Existe documentación oficial acerca de la correcta utilización de la toma de tierra y de las medidas de seguridad pertinentes, conexión de los electrodos de descarga y sus requisitos. Véase Figura B.
RAYOS: Como protección adicional del producto durante una tormenta eléctrica, o durante periodos prolongados sin usarlo, desenchúfelo de la corriente y desconecte la antena o sistema de cables. De este modo se protegerá el producto de los daños que pueda producir la caída de un rayo o las fluctuaciones de la red eléctrica.
LÍNEAS ELÉCTRICAS: Nunca debe situarse un sistema de antena cerca de líneas eléctricas u otros circuitos de corriente. Tampoco debe
colocarse en lugares donde pueda caer sobre dichos circuitos eléctricos. Al instalar un sistema de antenización exterior, debe tomarse la extrema precaución de no tocar dichas líneas eléctricas, pues el mas minimo contacto puede ser fatal.
SOBRECARGA: No sobrecargue los enchufes de la pared con ladrones o instalando enchufes múltiples, pues correría el riesgo de electrocución o incendio. ENTRADA DE OBJETOS O LÍQUIDOS: Nunca introduzca objetos de ningún tipo en el interior del producto, pues podrían tocar una parte eléctrica y cortocircuitar el aparato, lo que resultaría en un incendio o descarga eléctrica. No verter nunca ningún líquido sobre el producto.
REPARACIÓN: No intente reparar el producto por cuenta propia, ya que abrir o retirar la carcasa le expondría a un voltaje peligroso u otros peligros. Diríjase siempre a un centro de servicio técnico autorizado.
DAÑOS QUE REQUIEREN REPARACIÓN: Desenchufe el aparato de la corriente y diríjase a un servicio técnico autorizado si se da alguna de las siguientes situaciones:
-El cable de alimentación o la clavija están dañados.
-Se ha vertido líquido o ha caído algún objeto sobre la unidad.
-El aparato se ha expuesto a la lluvia o a salpicaduras.
-La unidad se ha caído al suelo o dañado de algún modo.
-El aparato no funciona con normalidad, ni aun siguiendo las instrucciones. Ajuste sólo los mandos que se indican en las instrucciones, ja que la manipulación inadecuada de otros controles podría dañar la unidad y requeriría un mayor trabajo de un técnico para restablecer su funcionamiento normal.
-Si el producto muestra anomalías en su funcionamiento, necesita revisión por parte de un servicio técnico autorizado.
RECAMBIOS: Cuando se necesite alguna pieza de recambio, asegúrese de que el servicio técnico utilice piezas originales autori-zadas o que tengan las mismas características que las originales. Los reemplazos no autorizados pueden causar descargas eléctricas, incendios u otros daños.
COMPROBACIÓN DE SEGURIDAD: Tras la reparación, solicite al técnico que efectúe las comprobaciones de seguridad necesarias para determinar que el producto se encuentra en las condiciones adecuadas para su funcionamiento.
MONTAJE EN UNA PARED O TECHO: Este producto nunca debe montarse en una pared o en el techo.
CALOR: Este producto debe alejarse de fuentes de calor, como radiadores, estufas u otros aparatos que irradien calor, incluyendo amplificadores.
8

CDM-3700G
Seccion superior |
|
|
|
|
|
|
|
|
||||||||||||||
|
28 |
|
|
|
|
|
|
|||||||||||||||
|
|
|
|
|
20 |
|||||||||||||||||
|
33 |
|
|
|
|
|
|
|
|
|
|
|
|
|
|
|
|
|
|
|||
|
|
|
|
|
|
|
|
|
|
|
|
|
|
|
|
|
|
|
|
|||
|
|
|
|
|
|
|
|
|
|
|
|
|
|
|
|
|
|
|
|
|
|
|
|
|
|
|
|
|
|
|
|
|
|
|
|
|
|
|
|
|
|
|
|
|
|
|
|
|
|
|
|
|
|
|
|
|
|
|
|
|
|
|
|
|
|
|
|
|
|
|
|
|
|
|
|
|
|
|
|
12 |
|
|
|
|
|
|
|
|
|
|
|
|
34 |
|
|
30 |
|
|
|
|
|
|
|
|
|
|
|
|
|
|
||||
26 |
|
|
|
|
|
|
|
|
|
|
|
|||||||||||
|
|
|
|
|
|
|
|
|
|
|
|
|
|
|
|
|
|
|
|
|
|
|
|
|
|
|
|
|
|
|
|
|
|
|
|
|
|
|
|
|
|
||||
|
35 |
|
|
|
|
|
|
|
|
|
|
|
|
|
|
|
|
|
|
|||
|
|
|
|
|
|
|
16 |
|
|
|
|
|
|
|
|
|
||||||
|
|
|
|
|
|
|
|
|
|
|
|
|
|
|
|
|
|
|
|
|
|
|
|
|
|
|
|
|
|
|
|
|
|
|
|
|
|
|
|
|
|
|
|
|
|
31
36
27
23
37 14
32 13
|
|
|
|
|
|
|
TV O |
|
38 |
|
|
|
|
MONITOR |
|
|
|
|
|
|
|
|
(NO INCLUIDO) |
39 |
|
|
25 |
|
|
|
|
|
|
|
|
|
|
|
|
40
4
6
|
|
|
|
|
|
|
|
|
|
|
|
|
|
|
|
|
|
|
|
|
|
|
|
|
|
|
|
|
|
|
|
|
|
|
|
|
|
|
|
|
|
|
|
|
|
|
|
|
|
|
|
|
|
|
|
|
|
|
|
|
|
|
|
|
|
|
|
|
|
|
|
|
|
|
|
|
|
|
|
|
|
|
|
|
|
|
|
|
|
|
|
|
|
|
|
|
|
|
|
|
|
|
|
|
|
|
|
|
|
|
|
|
|
|
|
|
|
|
|
|
|
|
|
|
|
|
|
|
|
|
|
|
|
|
|
|
|
|
|
|
|
|
|
|
|
|
|
|
|
|
|
|
|
|
|
|
|
|
|
|
|
|
|
|
|
3 |
|
2 |
|
10 |
|
|
|
|
|
|
|
|
|
|
|
|
|
|
|
|
|
|
|
|
|
|
|
|
|||
|
|
|
|
|
|
|
|
|
|
|
|
|
8 |
|
|
|
|
|
|
|
|
|
|
|
|
|
|
|
|
|
|
|
Panel delantero |
|
|
|
|
|
|
|
|
||||||||||||||||||||||||
|
|
|
|
|
7 |
|
|
|
|
|
|
5 |
|
|
|
|
|
|
||||||||||||||
|
|
|
|
|
|
|
|
|||||||||||||||||||||||||
|
|
|
|
|
|
|
|
|
|
|
|
|
|
|
|
|
|
|
|
|
||||||||||||
98
11 |
|
|
11 |
|||||||
|
||||||||||
|
|
|
|
|
35 |
|
||||
|
|
42 |
||||||||
|
|
|
|
|
|
|
|
|
|
|
|
|
|
|
|
|
|
|
|
|
|
|
41 |
|
|
|
|
|
|
|
|
|
|
|
|
|
|
|
|
|
|
||
|
|
|
|
|
|
|
|
|
|
|
9
 Loading...