

Page 1
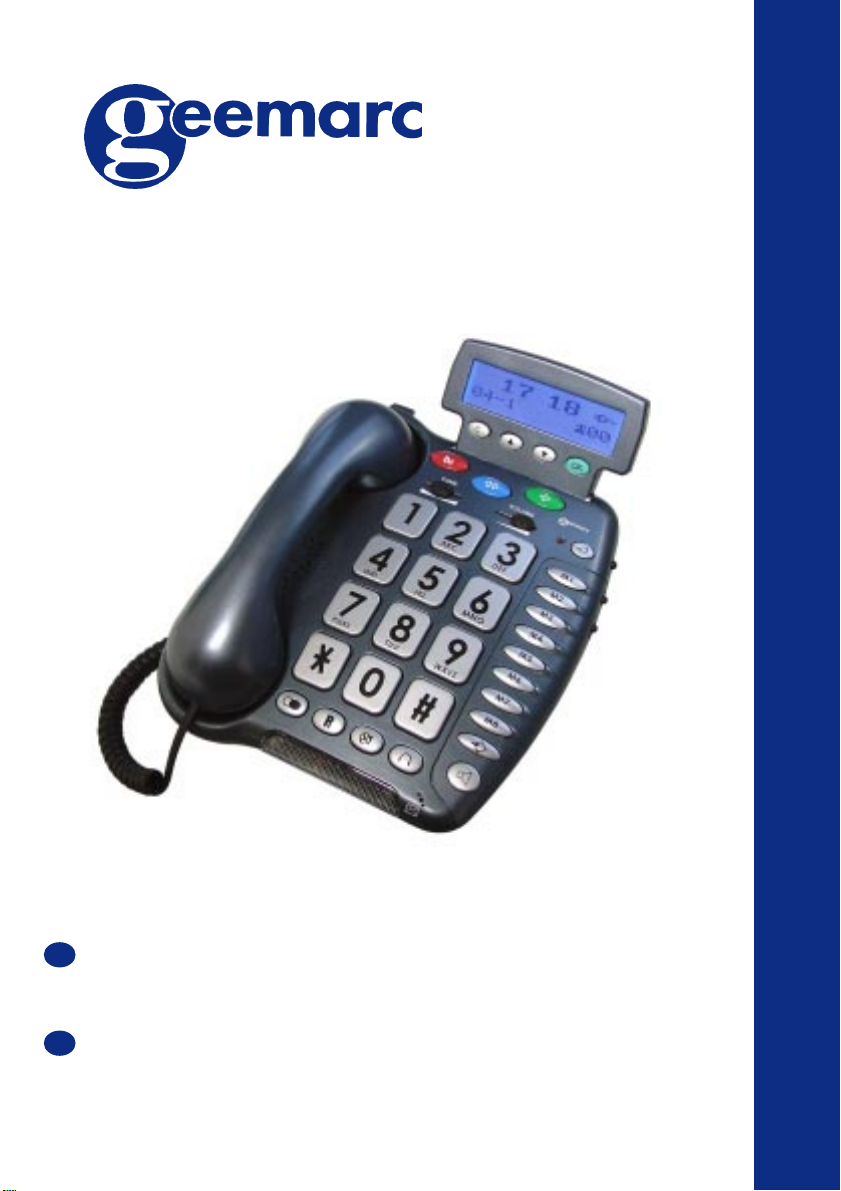
CL400
MULTIFUNCTION TELEPHONE
TELEPHONE MULTIFONCTIONS
User guide :p2
Notice d’utilisation p 48
GB
CAUTION:THIS TELEPHONE PRODUCT IS SPECIFICALLY DESIGNED FOR PEOPLE WITH HEARING DIFFICULTIES
AND IS PROVIDED WITH A HANDSET EARPIECE VOLUME CONTROL FOR INDIVIDUAL REQUIREMENTS. DUE CARE
MUST BE TAKEN BY ALL USERS THA T THE HANDSET EARPIECE VOLUME CONTROL IS SET TO THE LOWEST LEVEL
ACCEPTABLE BY EACH RESPECTIVE USER. CARE SHOULD THEREFORE BE EXERCISED T O ENSURE THA T ANY NEW
USERS ARE FAMILIAR WITH THIS REQUIREMENT.
F
ATTENTION: CE TELEPHONE PEUT ETRE DESTINE AUX PERSONNES A YANT DES PROBLEMES D’AUDITION. IL
POSSEDE UN ECOUTEUR A VOLUME V ARIABLE. A LA PREMIERE UTILISATION, ASSUREZ VOUS QUE LE BOUTON
DE REGLAGE DU VOLUME SOIT POSITIONNE SUR LA POSITION VOLUME MINIMUM. LES PERSONNES
MALENTENDANTES POURRONT PAR LA SUITE AUGMENTER LE VOLUME POUR L ’ADAPTER A LEUR AUDITION.
Telephone
Page 2

INDEX
DESCRIPTION
- General description 5
- LCD screen 7
- Screen display 8
INSTALLATION
- Connecting 9
- Wall mounting 11
SETTINGS
- Ringer settings 1 2
- Alarm and ringer settings 1 3
- Dialling mode (P/T) 1 3
- New call indicator & Hotel message switch 1 4
- Choose the date / hour format 1 4
- Date and hour settings 16
- Set the language 16
- Screen contrast adjustment 1 7
- Auto-on hook 18
- DIM:X---->x 19
- Time break recall setting ”R” function 2 0
USING THE PHONE
- Answer a call 21
- Make a call 22
- Use the amplifier 2 4
2
Page 3

INDEX
- Last number redial 2 4
- Recall one of the last 30 number dialled 2 5
- Delete one of the last 30 numbers dialled 2 5
- Mute button 26
- R, * and # keys 26
- Store a telephone number in memory 2 7
- Dialling stored numbers 2 8
- Use the headset (option) 29
- Use the neckloop (option) 2 9
- Use the shaker (option) 30
SENDING LEVEL SETTINGS 31
RECEIVING TONE AND VOLUME SETTINGS 32
PHONE BOOK
- Create an entry 34
- Create an entry from the incoming call list 36
- Delete a phone book entry 3 7
- Modify a phone book entry 3 7
- Make a call from a phone book entry 38
CID FEATURE
- Use the CID list 3 9
- Recall a number from the CID list 4 1
- Delete a record from the CID list 4 2
3
Page 4

INDEX
- Delete all records from the CID list 4 3
- Call waiting 43
- Message waiting 4 6
GUARANTEE 47
For product support and help visit our website at
www.geemarc.com
telephone 01707 384438
or fax 01707 372529
4
Page 5
DESCRIPTION
1- GENERAL DESCRIPTION
Priority memory
Priority memory
P1
P2
Priority memory
P3
T one reception
adjustment
Last number redial
Key to activate tone and
volume adjustment
function
Volume reception
adjustment
Direct memory
Memory storing key
Hands free dialling
and amplifier.
Hands free
Microphone
Headset button
Time break recall button
Flashing incoming call
indicator (strobe light)
Message waiting /new call
LED
Mute
5
Page 6
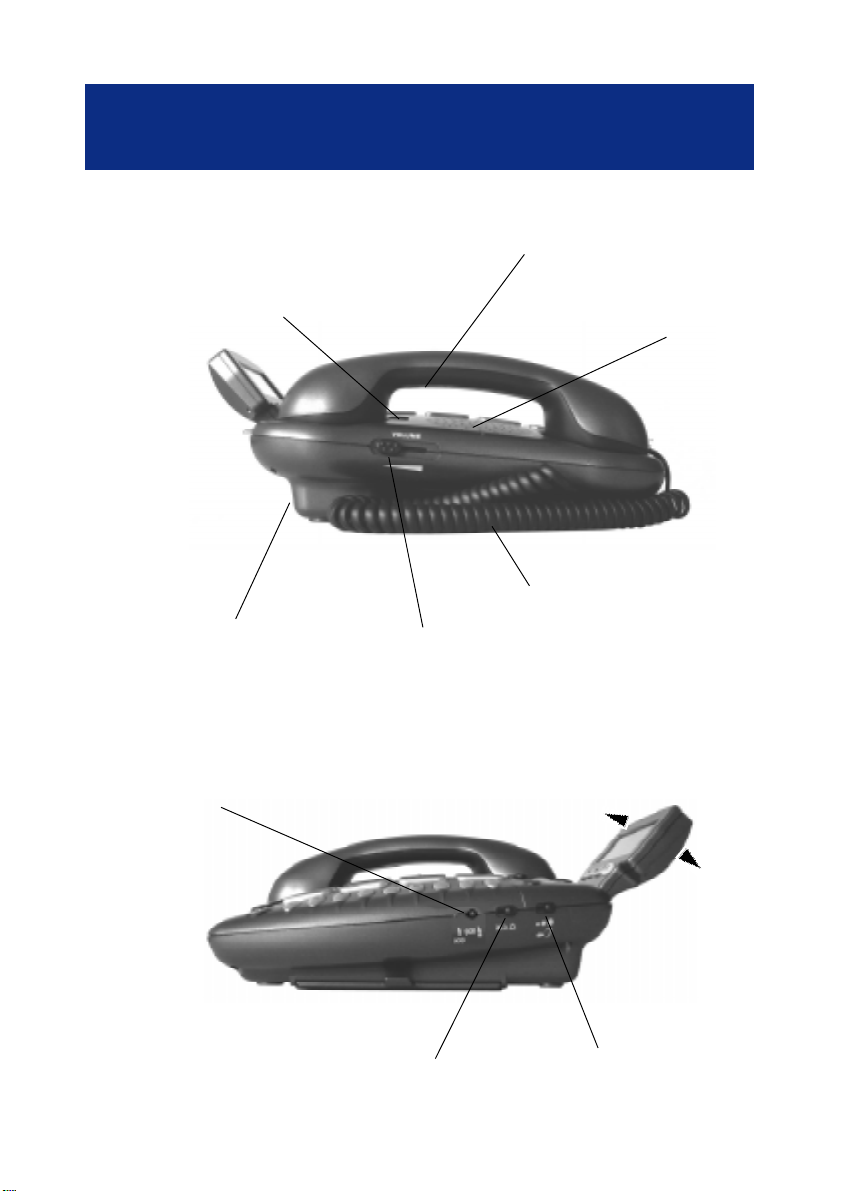
DESCRIPTION
Clip to return
for wall mount
Additional amplifier
button
Speaker
Handset cord
T one and volume adjustment
automatically activated each
time you hang-up the phone
Ringer/shaker /strobe
select mode
Ringer level
adjustment
Speaker volume
adjustment
Screen tilt
Sending volume
adjustment
6
Page 7
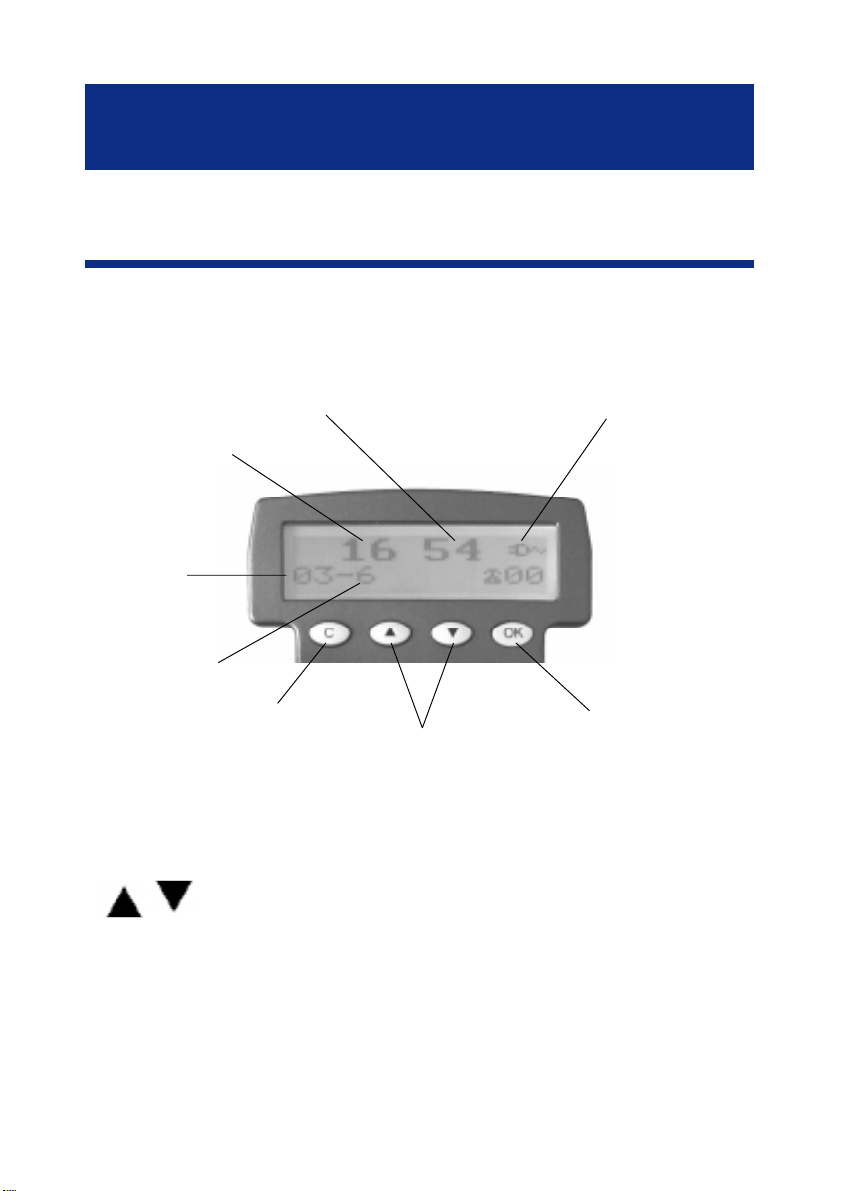
DESCRIPTION
2 - LCD SCREEN
Screen example (On hook position)
Minutes
Hours
Day
Month
Cancel key
Up/down keys
Power network icon
V alidation key
- OK key is used to confirm action or a choice
on the screen.
-
keys are used to scroll through the menu.
- In general, the C key is used to cancel an action/
entry, it can also be used to confirm a choice (for
example to cancel a stored number).
7
Page 8
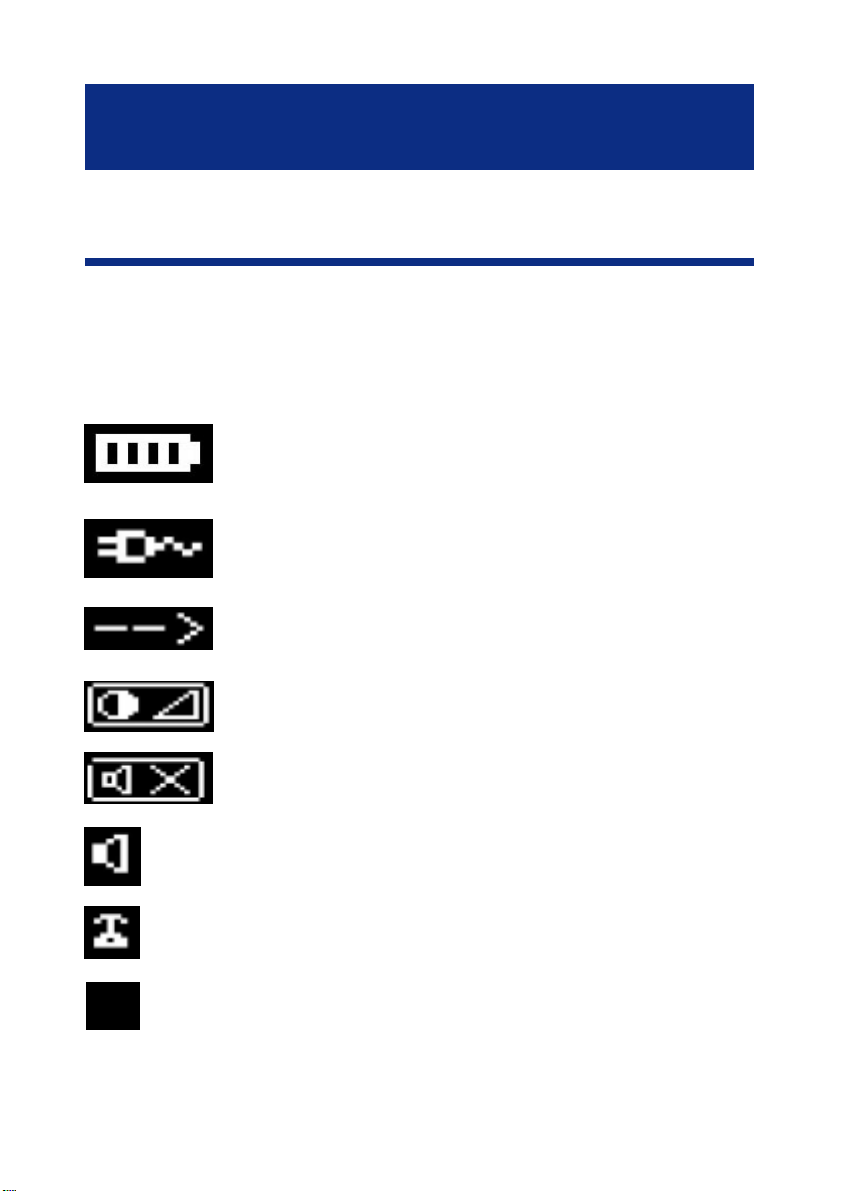
DESCRIPTION
3 - SCREEN DISPLA Y
Your CL400 has a screen with different icons
which help you to use the telephone.
The telephone is supplied by battery
+ battery indicator
The telephone is supplied by adaptor
Memory storing is required.
Screen contrast level.
N
“Mute” is activated.
Speaker is activated.
Precede the CID call record number .
To show new records.
8
Page 9
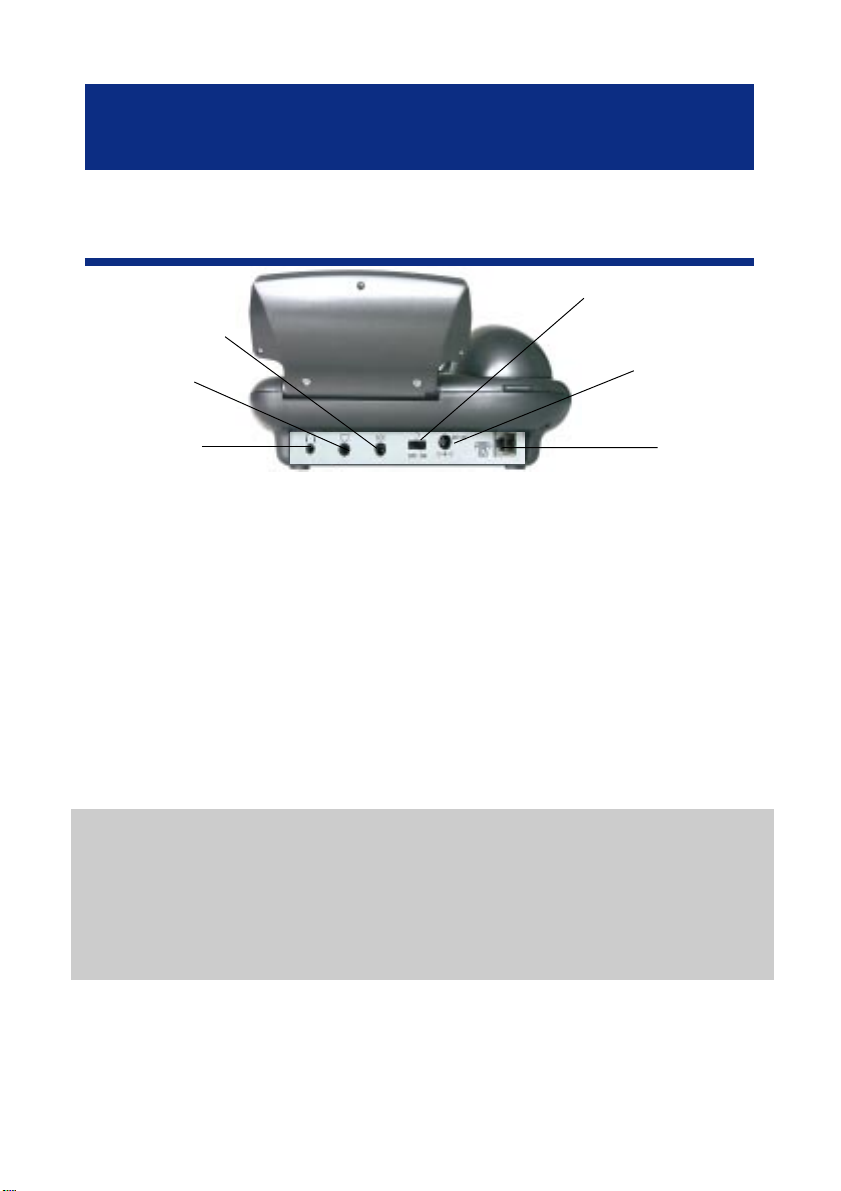
INSTALLA TION
1 - CONNECTING
Shaker socket*
Only Geemarc reference
Neckloop socket*
Only Geemarc
reference
Headset socket*
Only Geemarc reference
(*) Classified TNV-3 according to EN60950 standard.
(**) Classified “hazardous voltage” according to EN60950 standard.
Important: Only Shaker , Neckloop, Headset and Adaptor with Geemarc
reference can be connected to the sockets.
- Connect the handset.
- Open the battery compartment.
- Insert 4 alcaline batteries without mercury (AAA
1.5V type not supplied) with good polarity into the
compartment located on the telephone base.
Note : Do not use a rechargable battery, do not
T one&volume
ON/OFFswitch
Adaptor socket**
Only Geemarc
reference
Line cord
socket*
put the battery into the household rubbish. Pay
attention to the battery regulations regarding
battery disposal.
- Replace the battery cover.
- Connect the line cord to the socket located at
rear of telephone then connect the plug to the wall
socket(*).
9
Page 10

INST ALLATION
- Connect the adaptator plug to the adaptor socket
located on the back of the telephone then connect
it to the wall socket (**). Please choose an adaptor
wall socket near your line plug to enable you to
unplug the adaptor quickly in case of a problem.
Note: The adaptor is required for the telephone to
work correctly . Batteries are necessary in case of
network power failure to save stored number in
memory and are required for phone book use.
If the adaptor is accidentally unpluged (or in case
of power failure) and if the batteries are empty or
not in place, minimal restricted phone features only
will work on the phone (make a call or answer
incoming call).
10
Page 11
INSTALLA TION
8
8
8
8
8
8
8
8
8
8
8
8
8
8
8
8
8
8
8
8
8
8
8
8
8
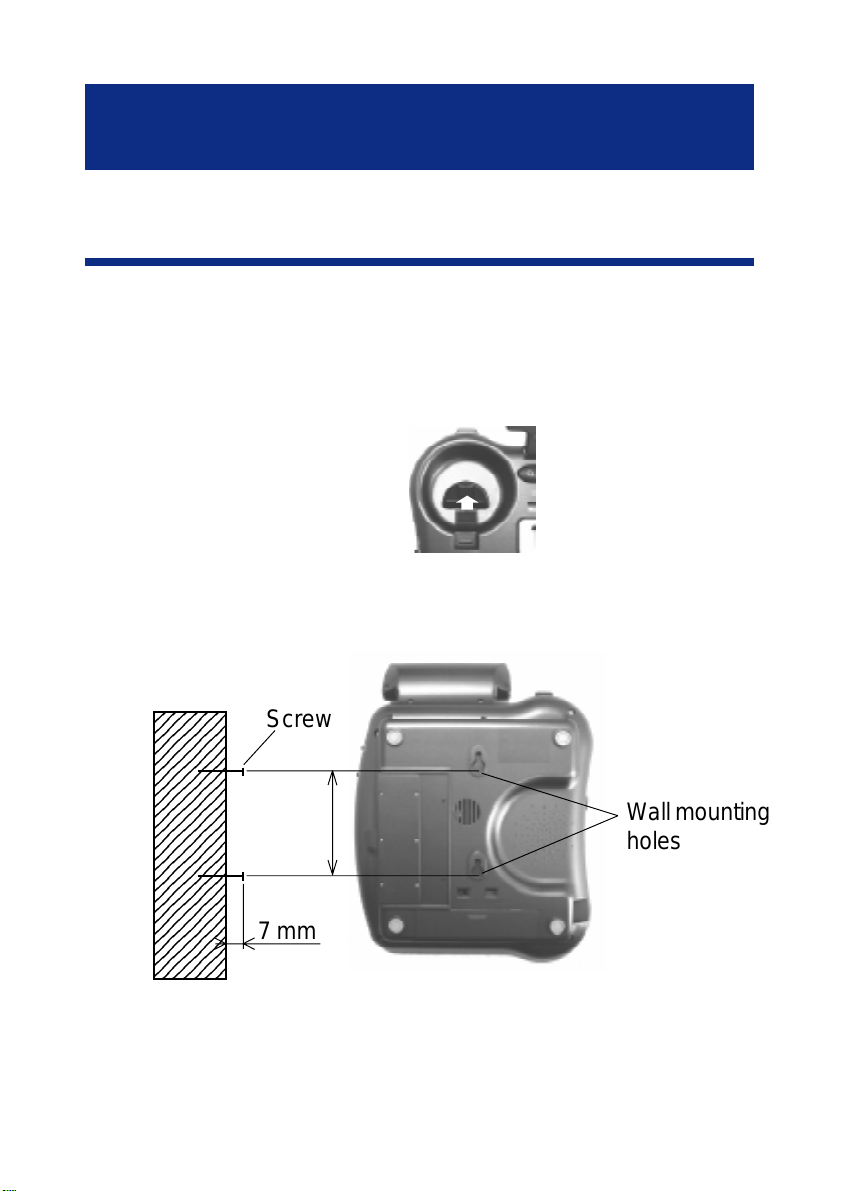
INST ALLA TION
2 - W ALL MOUNTING
T o wall-mount your telephone,slide out the clip, turn
around and slide back into the wall mounting
position.This will ensure that the handset stays
firmly in position.
Make 2 holes in the wall 80mm apart (use the wall
mount template), insert the wall plugs and the wall
mounting screws.
234567
234567
234567
234567
234567
234567
234567
234567
234567
234567
234567
234567
234567
234567
234567
234567
234567
234567
234567
The screws should protrude from the wall by 6-7
mm. Place the phone onto the screw-heads and
slide down to secure.
234567
234567
234567
234567
234567
234567
Screw
7 mm
80 mm
Wall mounting
holes
11
Page 12
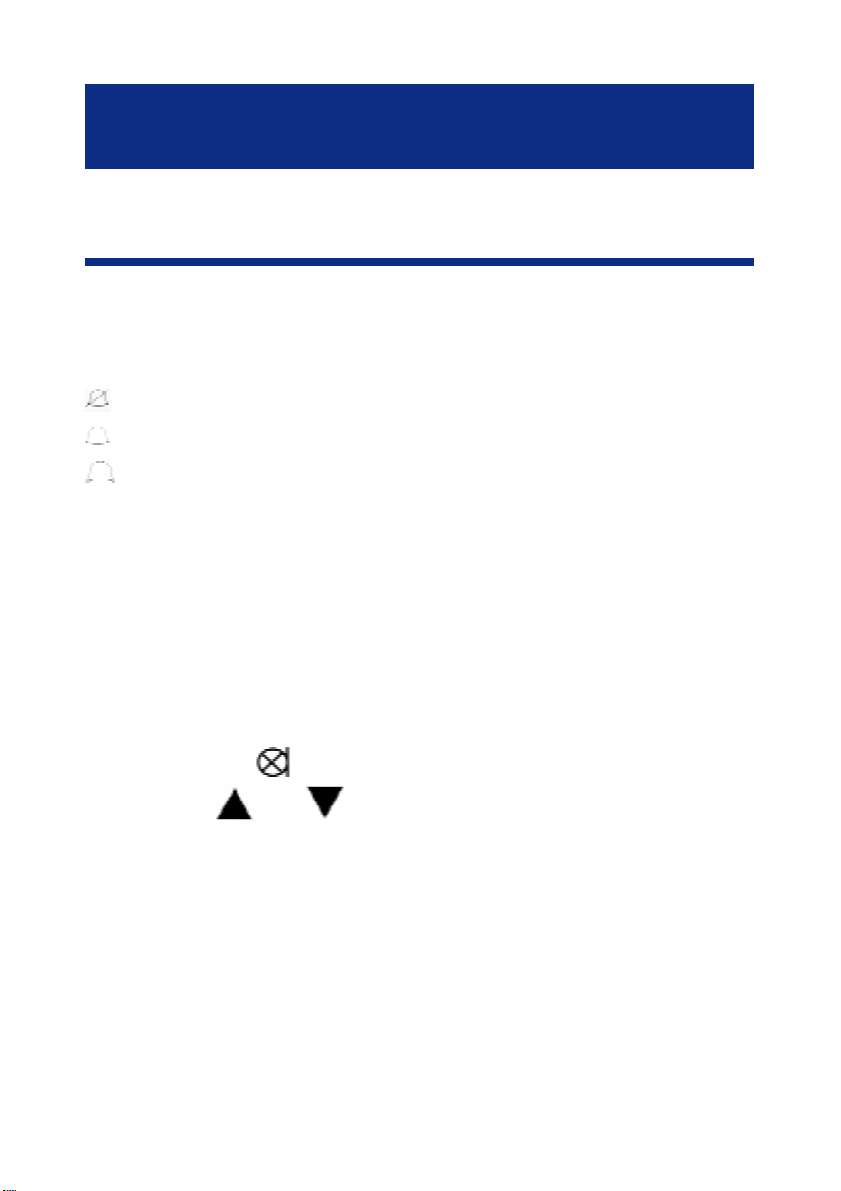
SETTINGS
1 - RINGER SETTINGS
A switch located on right side allows the ringer to
be switched HI,LOW ,OFF:
: Off
: Low
: Hi
Y our phone comes with the ringer switched to
«High».
If you don’t like the ringer melody ,you can choose
a new one by changing the settings between four
settings as follow:
In on hook position,
- Press the
- Use the or keys to select «SET PHONE».
- Press the OK key to confirm.
- Select «SET RING»
- Press the OK key to confirm.
- Select the ring you would like.
- Press the OK key to confirm.
- New ring will be heard.
- Press the C key 3 times to exit.
key.
12
Page 13

SETTINGS
2 - ALARM AND RINGER SETTINGS
A 3 position switch located on the right side of the
phone allows the settings below:
- : Ringer and strobe flash are activated.
- : Ringer and shaker are activated.
- : Ringer , shaker and strobe flash are
activated.
3 - DIALLING MODE (T/P)
The Tone/Pulse switch is factory pre-set to Tone
position (T). In the UK, all telephone exchanges
now use Tone dialling.If your phone does not dial
out, it is probably being used from an older private
switch- board (PBX). In this case,theTone/Pulse
switch must be moved to Pulse (P).
13
Page 14
SETTINGS
4 - NEW CALL INDICA T OR & HOTEL
MESSAGE W AITING SWITCH
Hotel message waiting is used with the new
services provided on hotel network. The New call
indicator is used to indicate a new incoming call.
A switch
allows to set ON/OFF the hotel message waiting
or new call light functions. When the switch is set
to ON, new call light
call is received. When the switch is set to OFF
and when you receive a message, the red light
is lit to inform you that you have a message on
the phone (from hotel for example).
5- CHOOSE THE DA TE / HOUR FORMA T
Date format
You can choose between two formats:
Day - Month or Month - Day .
In on hook position,
- Press the
located on the base of your phone
will flashes when a new
key.
- Use the or keys to select «SET PHONE».
14
Page 15

SETTINGS
- Press the OK key to confirm.
- Select «DA TE FORMAT».
- Press the OK key to confirm.
- Select «DA Y -MONTH» or «MONTH-DA Y».
- Press the OK key to confirm.
- Press the C key twice to exit.
Hour format
You can choose between two formats:
12 hours or 24 hours.
In on hook position,
- Press the key.
Use the
- Press the OK key to confirm.
- Select «HOUR FORMA T».
- Press the OK key to confirm.
- Select «12 HOUR» or «24 HOUR».
- Press the OK key to confirm.
- Press the C key twice to exit.
If you choose «12 HOUR», hours before noon will
be displayed with «AM» and «PM» for the hours
after noon.
or keys to select «SET PHONE».
15
Page 16

SETTINGS
6 - DA TE AND HOUR SETTING
In on hook position,
- Press the key.
- Use the
- Press the OK key to confirm.
- Use the
digit.
- Press the OK key to confirm and pass to the next
digit.
You will set the time like this:
HOURS - MINUTES - MONTH - DA Y
- Press the C key to exit.
Note: When you receive your first call, all these
parameters will be set autoumatically if you have
the CID feature.
7 - SET THE LANGUAGE
or keys to select «SET TIME».
or keys to select the desired
You can choose between 16 different languages
including English and French .
16
Page 17

SETTINGS
To change the language, follow the settings as
below:
In on hook position,
- Press the key.
- Use the
- Press the OK key to confirm.
- Select «SET LANGUAGE».
- Press the OK key to confirm.
- Select «FRENCH» (for example).
- Press the OK key to confirm.
- Press the C key twice to exit.
8 - SCREEN CONTRAST ADJUSTMENT
Your screen has a backlight which automatically
switches off after 15 seconds of inactivity.
Simply follow the settings as follows to decrease
or increase the contrast:
In on hook position,
or keys to select «SET PHONE».
- Press the key.
- Use the or keys to select «SET PHONE».
17
Page 18

SETTINGS
- Press the OK key to confirm.
- Select «LCD CONTRAST».
- Press the OK key to confirm.
- Use the
level.
- Press the C or the OK keys to exit.
9 - AUT O- ON HOOK
This function cancels the line after 8 seconds if
the line is busy .
In on hook position,
- Press the key.
- Use the or keys to select «SET PHONE».
- Press the OK key to confirm.
- Use the
HOOK».
or keys to adjust the contrast
or keys to select «AUTO ON
- Press the OK key to confirm.
- Use the
OFF» to activate or deactivate the function.
- Press the OK key to confirm.
- Press the C key twice to exit.
or keys to select «ON» or «
18
Page 19

SETTINGS
10 - DIM:X---->x
If the auto-screen sizing is activated, the screen
can display up to 18 digits of the number you dial,
otherwise only 8 digits will be displayed on the
screen.
In on hook position,
- Press the key.
- Use the
- Press the OK key to confirm.
- Use the or keys to select «DIM:X---->x».
- Press the OK key to confirm.
- Use the
OFF» to activate or deactivate the function.
- Press the OK key to confirm.
- Press the C key twice to exit.
or keys to select «SET PHONE».
or keys to select «ON» or «
19
Page 20

SETTINGS
1 1 - TIME BREAK RECALL SETTING “R”
FUNCTION
Y our phone works with a time break recall for United Kingdom (R=100ms).
If you wish to change this value, follow instructions below:
In on hook position,
- Press the key.
- Use the or keys to select «SET PHONE».
- Press the OK key to confirm.
- Use the
- Press the OK key to confirm.
- Select a new setting, 300 or 600ms and press
OK to confirm.
- Press the C key twice to exit.
or keys to select «SET FLASH».
20
Page 21

USING THE PHONE
Your CL400 allows you to speak hands free,
surrounding people can also hear the conversation.
1 - ANSWER A CALL
During an incoming call, your phone will ring and
then the Number or/and the Name of the caller is
displayed on the screen, if you have subscribed to
the CID service.
1st solution :
- Lift the handset and speak.
- On completion of the call, carefully replace the
handset in the cradle to release the line.
2nd solution :
You can use the «hands free» function to speak
with your caller .
- Press the
free.
- Press the
key to speak with your caller hands
key to release the line.
21
Page 22

USING THE PHONE
2 - MAKE A CALL
1st solution
- Lift the handset.
- Await the dial tone and dial required number( the
number is displayed on the screen).
- On completion of the call,carefully replace the
handset in the cradle to clear the line.
2nd solution (Pre-dialling)
- Dial the required number in the on hook position.
The C key allows you to come back to delete a
wrong digit when dialling the number .
- Lift the handset, the number will be automatically
dialled .
- On completion of the call,carefully replace the
handset in the cradle to clear the line.
3rd solution (hands free)
Y ou can use the «hands free» function to make a
call.
- Dial the required number in the on hook position.
The C key allows you to come back to delete a
22
Page 23

USING THE PHONE
wrong digit when dialling the number .
- Press the
dialled.
- When the person answers you, simply speak into
the microphone located on the base. Y ou can adjust
the speaker level with the slide button located on
the left side of your telephone.
- On completion of the call, simply press the
to clear the line.
Notes:To deactivate the «hands free» function
during a call, lift the handset.
The symbol
T o activate the «hands free» function during a call,
press and hold the
on the cradle at the same time.
key , the number will be automatically
key
light off. The symbol appears.
key and replace the handset
Call time counter will be displayed a few seconds
after the call is engaged.
- If you wish to stop the time counter , press the C
key .
- If you press C key twice, the time counter will be
reset to 0.
23
Page 24

USING THE PHONE
3 - USE THE AMPLIFIER
During a call, if you wish to use the amplifier
function with the speaker phone:
- Press the
- Adjust the sound level with the VOLUME slide
button located on the left side of your telephone.
During a call, if you wish to use the «hands free»
function:
- Press and hold the key and replace the handset
on the cradle at the same time.
- Then release the
- Hands free function is activated.
4 - LAST NUMBER REDIAL
With this function you can redial the last number
dialled.
- Lift the handset or press the
key.
key .
or .
- Await the dial tone and press
-The previously dialled number will be automatically
redialled (not in use for memory numbers).
- Press OK to confirm.
24
button.
Page 25

USING THE PHONE
5 - RECALL ONE OF THE LAST 30 NUMBERS
DIALLED
Y ou can call back the last 30 numbers dialled.
T o call back one of them, follow instructions below:
In on hook position,
- Press the OK key .
Screen will display “DIALLED”,the last number
dialled, the total of numbers, the date and the hour
of records.
- Use the
menu and select the number you wish to dial.
- Lift the handset or press the , the number will be
automatically dialled.
6 - DELETE ONE OF THE LAST 30 NUMBERS
DIALLED
In on hook position,
- Press the OK key .
Screen will display “DIALLED”.
- Use the
or keys to move into the record
or keys to move into the record
25
Page 26

USING THE PHONE
menu and select the number you wish to delete.
- Press the C key.
The screen will display “DEL ?”.
- Press again the C key to confirm .
- Press the OK key to exit.
7 - MUTE FUNCTION
If you wish, you can speak privately to someone
else in the room without your caller overhearing.
You will still be able to hear the caller but they
cannot hear you during the mute operation.
- During a call press the key .
The screeen will display
Y our caller cannot hear you anymore.
- Press the key to resume the conversation.
8 - R, * and # KEYS
These are used with the new services provided on
digital exchanges.For details please contact your
network operator .
X .
26
Page 27

USING THE PHONE
9 - STORE A TELEPHONE NUMBER IN
MEMORY
Y our phone can store 8 direct memories including
3 priorities numbers (30 digits maximum for each
memory).
For example, the 3 priority P1, P2, P3 memories
allow you to store the 3 numbers below:
- Local,Police station,
- Your doctor
- 1471
T o store a number please follow instructions below:
- Lift the handset.
- Press
- Dial the number .
- Press M1, M2, ..., or M8 or one of 3 priorities
numbers P1, P2, P3 to store your number .
- The screen will display «SAVE OK».
Note: Numbers will be lost after a few hours if you
disconnect your phone. Entering a new number in
memory will automatically erase the previous
number.
button.
It is recommended to
store these numbers
during installation
27
Page 28

USING THE PHONE
10 - DIALLING STORED NUMBERS
- Lift the handset or press or and await the
dial tone.
- Press appropriate button M1, M2, ..., or M8 or
one of the 3 priority P1, P2, P3 numbers, the stored
number will be dialled automatically .T o register your
stored phone numbers,use the index card located
under the base.Use this table below to prepare the
phone book.
1
2
Example :
3
4
5
6
7
8
9
Pierre 01 64 57 .. ..
1
28
Page 29

USING THE PHONE
1 1 - USE THE HEADSET WITH MICROPHONE
(OPTION)
Headset: If you wish to answer or make call by
using a Geemarc headset ref: HEADSCL_BLK,
connect the headset plug in the headset socket
located behind your phone.
- Press the
- Dial the number .
Note: You can adjust the reception volume and
tone level with the VOLUME and TONE slide button
located on the top of the phone (if function is active) and the sending level with the 3 position switch
located on the right side.
12 - USE THE NECKLOOP (OPTION)
Neckloop: If you wish to answer or make call by
using a neckloop, connect the neckloop in the
neckloop plug located behind your phone.The
neckloop is now ready to use.
key to get the dial tone.
29
Page 30

USING THE PHONE
You have three possibilities to use:
1st solution:
Press the
speak into the headset microphone.
2 nd solution:
Press the to activate the neckloop and the
amplifier, speak into the microphone located on
the base.
3 rd solution:
Lift the handset and speak into the handset microphone.
Note: You must connect the adaptor to use the
neckloop. Y ou can also adjust the reception level.
to activate the neckloop and headset,
13 - USE THE SHAKER (OPTION)
The shaker: If you wish to complement your phone
by using a shaker ref: SHAKCL_WH connect the
30
Page 31

SENDING LEVEL
shaker plug in the socket located at the back
of your phone.When an incoming call is received,
the shaker will be activated during ringing.
Note: This option must be set in the ALARM AND
RINGER OPTIONS item (page 12) to be activated.
Important: For your security , only connect the
Geemarc SHAKCL_WH model, any other shaker model can damage your telephone.
1 - SENDING LEVEL ADJUSTMENT
If your voice is quiet or called parties have difficulty
hearing you, you can increase the sending level
volume with the switch located on the right side.
You can also decrease the sending volume if
required.
Min Normal Maxi
31
Page 32

RECEIVING TONE AND VOLUME
1-VOLUME AND TONE RECEIVING
ADJUSTMENT
You can increase the volume and adjust the
receiving tone according to your own hearing
requirements.The button allows extrareceiving and tone functions to be activated during
the conversation.
When the function is activated, the red light of
extra-receiving and tone function located near the
button is lit.
Use the TONE and VOLUME buttons to adjust the
level according to your own hearing requirements.
Note: T one and volume adjustment (15dB to 30dB)
is only activated when the button is set to ON.
When this button is set to OFF only the volume
can be adjusted from 0dB to 15dB.
In both cases you can increase the reception volume with the switch located on the handset to 12
dB (see general description for location).
32
Page 33

RECEIVING TONE AND VOLUME
TONE
Bass
+10db max
Normal
Treble
+10db max
VOLUME
0dB
15dB 30dB
15dB OFF
ON
Note: When the tone (treble), earpiece volume and
sending levels are set to the maximum, whistling
may appear . If whistling occurs the sending level
settings should be decreased (sending level switch
located on the right side). When the switch
located behind the phone is ON, the extra-receiving
and tone functions are automatically activated
each time you use the phone.When the switch
is switched OFF, you will need to activate the
function by pressing the button .
33
Page 34

PHONE BOOK
1 - CREA TE A PHONE BOOK ENTRY
Y ou can store 99 entries into the phone book with
the name and phone numbers of your correspondant.
In on hook position,
- Press the key.
- Use the
- Press the OK key to confirm.
- Select «ADD».
- Press the OK key to confirm.
- Enter the number (30 digits max per memory).
- Use the C key to delete a wrong digit.
- When the number is correct, press the OK key to
confirm and enter the name corresponding to
entered number .
- Select the desired letter by a pressing on the
corresponding key .
Y ou can use the table below or the letters printed
on the keypad to help you.
or keys to select «PHONE BOOK».
34
Page 35

PHONE BOOK
Key Characters Key Characters
1.?-"'<
2ABCabc2EO
3DEFdef3
4GHIghi4
5JKLjkl5
1
6MNOmno6OO
7 PQRSpqrs7
8TUVtuv8U
9WXYZwxyz9
00+&@/$%
- To insert a «space», press on the OK key twice.
- If the next letter is the same as the previous letter
(or located on the same key), press first on the OK
key to move and select the desired letter .
- Use the C key to delete a wrong letter .
- When the number is correct, press the OK key
for 3 seconds to confirm the Number and Name
storage.
- Now you can create a new entry.
- Press the C key to exit.
Note : If you wish to insert a pause in the stored
number , press the key whilst entering (a P will
be displayed on the screen).
35
Page 36

PHONE BOOK
2 - CREA TE AN ENTR Y FROM THE INCOMING
CALL LIST
If you have subscribed to a caller idendification
service (CID feature), you have the possibility to
create an entry from the incoming call list because
each call is stored into the phone book as a CID
entry.
In on hook position,
- Incoming calls will be displayed on the screen.
- Use the
wish to store into the phone book.
- Press and hold the OK key until the last number
digit flashes.
- Press the OK key.
- You can now modify and enter the name of the
caller with the correct number or press and hold
for 3 seconds the OK key to confirm the proposed
CID name.
- Press the C key to exit.
or keys to select the number you
36
Page 37

PHONE BOOK
3 - DELETE A PHONE BOOK ENTRY
In on hook position,
- Press the key.
- Use the
BOOK» then «REVIEW».
- Use the
wish to delete.
- Press the C key , screen display «DEL?»
- Press the C key to confirm.
- Press the OK key to exit.
4 - MODIFY A PHONE BOOK ENTR Y
In on hook position,
- Press the key.
- Use the or keys to select «PHONE
BOOK» then «REVIEW».
- Press the OK key.
or keys to select «PHONE
or keys to select the number you
- Use the
you wish to modify .
- Press and hold the OK key until the last selected
number flashes.
or keys to select the number
37
Page 38

PHONE BOOK
- Press the C key to modify the number and insert
new number .
- Press the OK key .
- You can now modify the name.
- Press the C key to delete a letter .
- For help see the «CREA TE A PHONE BOOK
ENTRY» p.34 to modify the name.
- Press the OK key for 3 seconds to confirm the
new entry .
- Press the C key to exit.
5 - MAKE A CALL FROM A PHONE BOOK
ENTRY
In on hook position,
- Press the key.
- Use the
BOOK» then «REVIEW», then press the OK key .
- Use the or keys to select the number you
wish to dial.You can also get access quickly to a
phone book entry by entering the first letter of the
name.
- Lift the handset or press the or .
- Number will be dialled automatically .
or keys to select «PHONE
38
Page 39

CID FEA TURES
Note : Y ou can review the incoming call list during
a call by pressing the OK key , then use the &
keys to move through the phone book list.
1 - USE THE INCOMING CALL LIST
Associated with the CID feature, the call list allows
you to store the incoming calls. When the call list
memory is full, a new call will take the place of the
oldest call. Each call is stored as an entry with the
date, the hour and in arrival order .
Call hour and
Caller name
date
9:52 9-09 2
123456123456
JAMES
Call number
(arrival order)
Caller number
Note : If the caller does not wish to show his phone
number or his name, the screen will display
PRIVATE.
9:52 9-09 3
PRIV A TE
39
Page 40

CID FEA TURES
If the number is unknown from the telephone center
(international incoming call for example), the screen
will display OUT OF AREA:
9:52 9-09 3
OUT OF AREA
When the same caller calls several times, only the
last call will be stored into the incoming call list and
the screen will display +.
9:52 9-09 N 2+
654321654321
HELEN
Note : During the entries review, the screen will
display N for a new entry which has not been
reviewed.
When a new call or new calls have been received,
the new call LED will flash and the screen displays:
9:52 9-09
28 01
TOTAL NEW
This example shows the
total number of calls in the
incoming call list is 28 with
a new one.
40
Page 41

CID FEA TURES
To review the new calls, use the & keys.
16:53
When all new calls have
been reviewed, the new call
16-6 28
screen will come back to idle state after a few
seconds.The total number of incoming call entries
on the incoming call list will still be displayed on the
screen.
LED will disappear and the
When the incoming call list
12:55
is empty (if records have
18-6 00
2 - RECALL A NUMBER FROM THE CID LIST
been deleted for example)
the screen will display 00.
You have 2 solutions :
In on hook position,
- Use the or keys to move into the list and
select the required number to dial.
41
Page 42

CID FEA TURES
- Lift the handset or press the or the keys.
- The number will be dialled automatically .
Lift the handset,
- Use the or keys to move into the list and
select the required number to dial.
- Press the OK key.
- The number will be dialled automatically .
Note : The call back function from incoming call list
is not availaible for a number which displays
PRIVATE or OUT OF AREA.
3 - DELETE A RECORD FROM THE CID LIST
In on hook position,
- Use the & keys to move into the list and
select the required number to delete.
- Press the C key.
- The screen display «DEL?».
- Press again the C key to confirm.
42
Page 43

CID FEA TURES
- Press the OK key to exit.
4 - DELETE ALL RECORDS FROM THE CID LIST
In on hook position,
- Press the or keys.
- Press and hold the C key until the screen
displays «ALL DEL?».
- Press the C key to confirm.
5 - CALL W AITING
With this service, you are made aware that a new
call is coming through when you are in
conversation. You can take this call and switch
between callers.To be active, you must have
subscribed to this service with your network
provider.
The call waiting function is factory set to “OFF”. To
activate this function, follow instruction below:
43
Page 44

CID FEA TURES
In on hook position,
- Press the key.
- Use the
- Press the OK key .
- Use the or keys to select «CALL
WAITING».
- Press the OK key .
- Use the
- Press the OK key and then C twice to exit.
Note : When the call waiting function is activated
on your telephone and if you wish to deactivate it
simply select «OFF» in the menu «CALL
WAITING».
- When you are in conversation with caller N°1.
CID information will be displayed on the screen
(Name and Number).
or keys to select «SET PHONE».
or keys to select «ON».
9:52 9-09 1
123456123456
CALLER N°1
44
Page 45

CID FEA TURES
A beep tone will be heard when a second call is
incoming. Caller N°2 CID information will be
displayed on the screen (Name and Number).
9:52 9-09 1
654321654321
CALLER N°2
For more information about the «CALL W AITING»
service contact your network provider.
Note : If you don’t answer call N°2, the call will be
recorded into the incoming call list. Then you will
be able to call them later .
For product support and help visit our website at
www.geemarc.com
telephone 01707 384438
or fax 01707 372529
45
Page 46

CID FEA TURES
6 - MESSAGE W AITING
This system provides the capability of the caller to
leave a message.
You will be informed of an incoming call by the
incoming call list that you have a message. This
call is distinguished from other calls and screen
displays «MSG W AITING», the message waiting
LED is activated.
9:52 9-09 N 1
3103
MSG W AITING
Note : «MSG WAITING» will be displayed to
indicate message not read. After review «MSG
WAITING» will be automatically removed from the
screen.
46
Page 47

GUARANTEE
GUARANTEE
From the moment your Geemarc product is purchased, Geemarc
guarantee it for the period of one year. During this time, all repairs or
replacements (at our discretion) are free of charge.Should you
experience a problem then contact our helpline or visit our website at
www.geemarc.com.The guarantee does not cover accidents,
negligence or breakages to any parts. The product must not be
tampered with or taken apart by anyone who is not an authorised
Geemarc representative.The Geemarc guarantee in no way limits your
legal rights.
IMPORT ANT: YOUR RECEIPT IS P ART OF YOUR GUARANTEE AND
MUST BE RETAINED AND PRODUCED IN THE EVENT OF A
WARRANTY CLAIM
Please note: The guarantee applies to the United
Kingdom only .
DECLARA TION: Geemarc T elecom SA hereby declares that this
product is in compliance with the essential requirements and other
relevant provisions of the Radio and Telecommunications Terminal Equipment Directive 1999/5/EEC and in particular article 3 section 1a, 1b and section 3. The telephone does not operate if the
line current is lower than 18 mA.
Electrical connection : The apparatus is designed to operate from a 230V
50Hz supply only. (Classified as «hazardous voltage» according to EN60950
standard).The apparatus does not incorporate an integral power on/off switch. To
disconnect the power, either switch off supply at the mains power socket or unplug
the AC adaptor. When installing the apparatus, ensure that the mains power socket
is readily accessible.
Telephone connection : Voltages present on the telecommunication network
are classified TNV-3 (Telecommunication Network Voltage) according to the
EN60950 standard.
47
 Loading...