

Page 1

00
Multifunction telephone
Téléphone multifonctions
Multifunktionstelefon
CL330
English page 1
Français page 38
Deutsch page 70
Page 2

CONTENTS
CONTENTS 1
INTRODUCTION 3
Unpacking the Telephone 4
DESCRIPTION 5
General Description 5
LCD Screen Description 7
Menu Navigation 7
INSTALLATION 8
Setting Up 8
Wall Mounting 10
SETTINGS 11
Language Setting 11
Screen Contrast Setting 12
Time Setting 13
Voice Function Setting 14
Flash (Recall) Setting 15
Dialling Mode (Tone/Pulse) Setting 15
Ringer Volume Setting 16
Ringer Tone Setting 16
USING THE TELEPHONE 17
Making a Call 17
Receiving a Call 19
Last Number Redial 19
Mute Function 20
Handset Volume Setting 20
Speaker Volume Setting 20
Tone Control Setting 20
Call Timer 21
Hearing Aid Use 21
Headset use 21
1
Page 3

CONTENTS
CALLER DISPLAY 22
View Caller Display List 23
Dial a Number from the Caller Display List 23
Delete an Entry from the Caller Display List 24
Delete all Entries from the Caller Display List 24
Copying a Number to the Phone Book 25
PHONE BOOK 26
Create a Phone Book Entry 26
Store/Change a Name Recording 28
Delete a Name Recording 29
View Phone Book Entries 29
Dialling using a Phone Book Entry 30
Modify a Phone Book Entry 30
Delete a Phone Book Entry 31
Delete all Phone Book Entries 31
QUICK DIAL
Storing a Quick Dial Number 32
Dialling a Quick Dial Number 32
TROUBLE SHOOTING 33
SAFETY INFORMATION 34
GUARANTEE 35
RECYCLING DIRECTIVES 37
2
Page 4

INTRODUCTION
Congratulations on purchasing your Geemarc CL330
telephone. This is a multifunction telephone which offers
features such as hands free use, phone book, caller
display* and voice announcing.
Its is important that you read the instructions below in
order to use your Geemarc telephone to its full potential.
Keep this user guide in a safe place for future reference.
This guide explains how to use the following telephone:
CL330
*To use the caller display facility, you must subscribe to your network
provider’s caller display service.
3
Page 5

INTRODUCTION
Unpacking the Telephone
When unpacking the telephone, you should find the
following in the box:
• 1 CL330 unit
• 1 CL330 handset with curly cord
• 1 Mains power adaptor
• 1 Telephone line cord
• 1 User Guide
For product support and help visit our website at
www.geemarc.com
Telephone 01707 384438
Or fax 01707 832529
4
Page 6
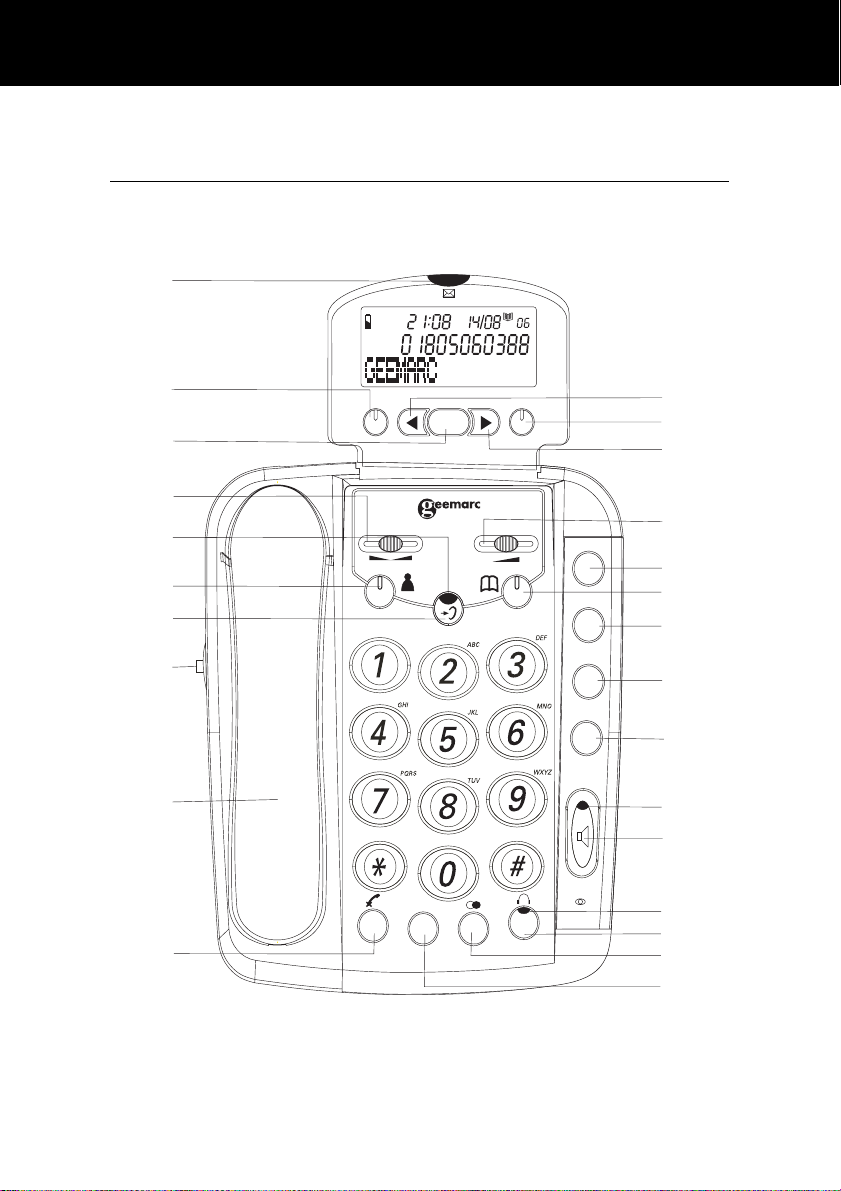
DESCRIPTION
General Description
1
CALL#
CLIP
2
3
C
OK
MENU
11
12
13
4
5
6
TONE VOLUME
?
M1
7
M2
14
15
16
17
8
M3
M4
9
18
19
20
21
R
22
23
10
24
25
5
Page 7

DESCRIPTION
1= LED (flashes when a new call has been received)*
2= Delete
3= Call back, confirm
4= Tone slide control
5= Amplify LED
6= Caller ID mode button
7= Amplify button
8= Speakerphone volume slide control
9= Handset
10= Mute
11= Scroll left
12= Menu
13= Scroll right
14= Earpiece volume control
15= Quick Dial M1 (emergency call number 1)
16= Phone book
17= Quick Dial M2 (emergency call number 2)
18= Quick Dial M3 (emergency call number 3)
19= Quick Dial M4 (emergency call number 4)
20= LED handsfree mode
21= Handsfree
22= LED headset mode
23= Headset
24= Redial, Insert a pause
25= Recall
* : Only If you have subscribed to the "Caller Display" service
from your network provider
6
Page 8
DESCRIPTION
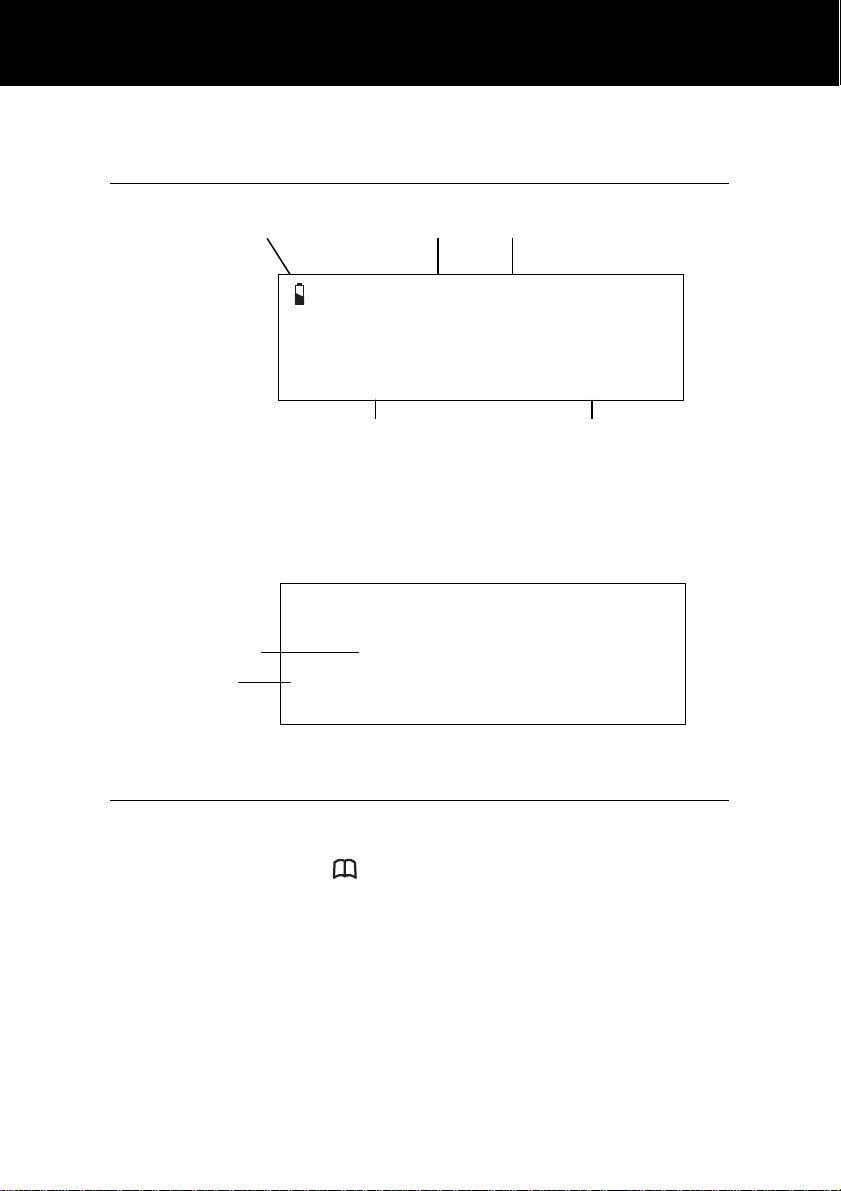
LCD Screen Description
Battery Low Icon level Time and Date
This LCD display shows the total number of calls and the number of
new calls ready to be reviewed. In this example you have a total o f 4
calls which includes two new calls.
Caller’s Number
Caller’s Name
9:52 9/12
TOTAL:04 NEW:02
Calls Received
9:52 9/12 call#
01517222277
New Calls
Received
02
ROBERT JONES
Menu Navigation
To access settings, press MENU.
To exit the menu, press
To skip back a level within the menu, press
The telephone will automatically return to standby mode from any
menu if no button is pressed for 20 seconds.
. or C
C
7
Page 9
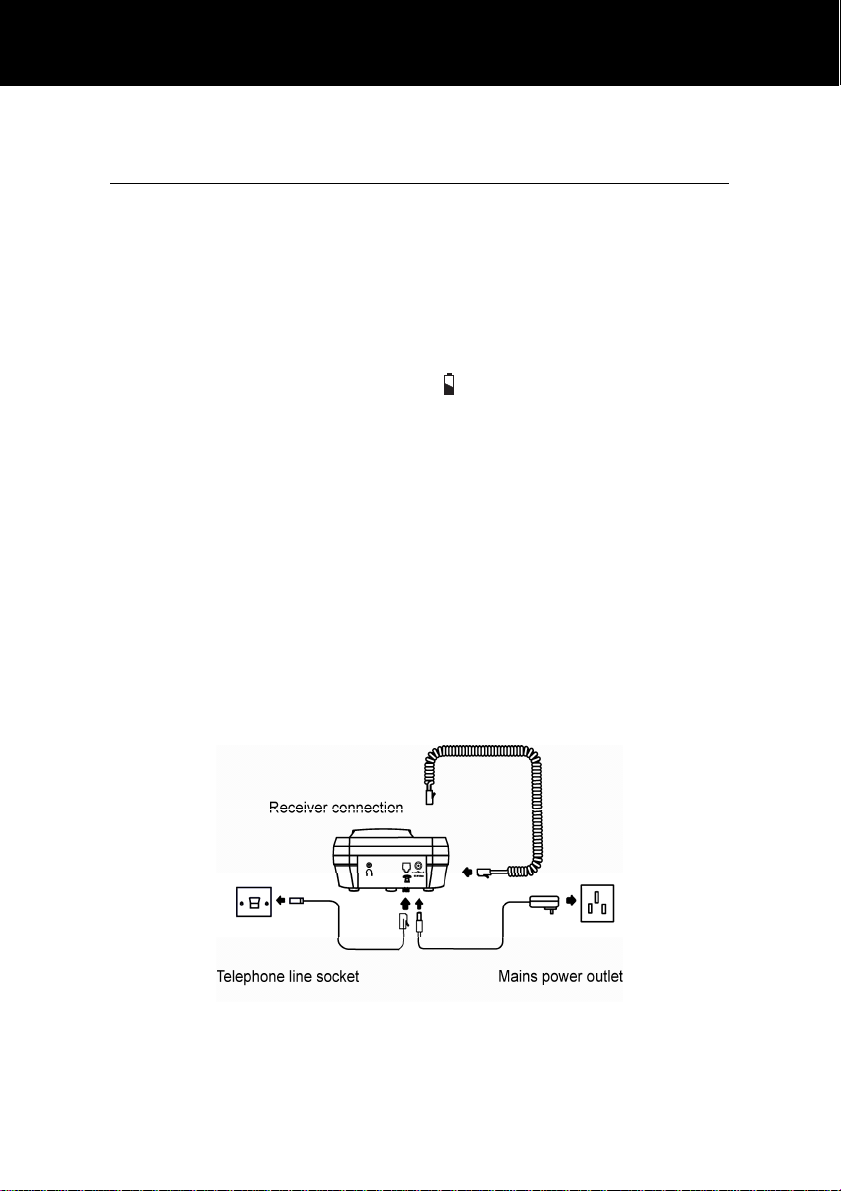
INSTALLATION
Setting Up
Connect the handset to one end of the curly cord. The connector at
the end of the curly cord plugs into the socket on the left hand side of
the CL330 unit.
Open the battery compartment (push the small clip backwards and
then upwards). Insert 4 good quality alkaline batteries (AA size,
1.5V type, not supplied) into the battery compartment located on the
base of the telephone. Replace the battery cover. If the batteries
are running low, the low battery icon
display. Ensure that the telephone is not connected to the telephone
line socket and/or mains power connection when the batteries are
being inserted or replaced.
Note : Do not use rechargeable batteries. Do not put batteries into
the household rubbish, pay attention to battery regulations regarding
battery disposal.
Connect the line cord to the socket located at rear of telephone then
connect the plug into the wall socket *.
Connect the power supply to the socket located at rear of the
telephone then plug into a 13amp wall socket. Please choose a
socket near your telephone to enable you to unplug the mains power
quickly in case of a problem.
will appear on the LCD
(*) Classified “hazardous voltage” according to EN60950 standard
(**) Classified TNV-3 according to EN60950 standard.
8
Page 10

INSTALLATION
Note: Mains power is required to power the multifunction features of
the telephone. Fit 4 x AA sized batteries in order to save and use
stored numbers in case of mains power failure. Without mains or
battery power, the telephone can still be used to answer calls or to
manually dial out calls but all the multifunction features will not be
available. If no batteries are inserted, the low battery icon
be displayed on the LCD display.
will
9
Page 11

INSTALLATION
Wall Mounting
Drill two holes vertically one above the other, 83mm apart, and leave
the screws protruding from the wall by 5mm.
Caution: Ensure there are no electrical lines, water pipes etc. in the
wall where the holes are drilled.
Turn the hook in the receiver cradle so that the receiver can be
placed on-hook.
Then hang up the telephone directly into the screws
Wall mount template
83mm
10
Page 12

SETTINGS
Language Setting
You can choose between 5 different languages. Each language has
voice announcements available in that language.
Use W or X to select LANGUAGE
Use W or X to select the desired language
Press MENU
Press OK to confirm
Press OK to confirm
Press or C to exit
11
Page 13
SETTINGS
Screen Contrast Setting
Your screen has a backlight which automatically switches off after 15
seconds of inactivity. The contrast of the backlight against the text
can be increased or decreased.
Use W or X to select LCD CONTRAST
Use W or X to select the desired contrast setting (3=normal)
Press MENU
Press OK to confirm
Press OK to confirm
Press to exit
12
Page 14
SETTINGS
Time Setting
If you subscribe to a Caller Display service, the date and time will be
set whenever you receive a call. However, if you do not subscribe to
this service, you will need to set the date and time manually.
Use W or X to select TIME/DATE
The HOUR digit will flash. Use W or X to select the correct
The MINUTE digits will flash. Use W or X to select the
The DAY digit will flash. Use W or X to select the correct day
The MONTH digit will flash. Use W or X to select the correct
Press MENU
Press OK to confirm
hour
Press OK to confirm
correct minute
Press OK to confirm
Press OK to confirm
month
Press OK to confirm
Press to exit
13
Page 15

SETTINGS
Voice Function Setting
When the VOICE function is ON, in pre-dial mode numbers 0-9,
numbers held in the call log, numbers held in the phone book and a
caller’s name (if recorded, see Phonebook Chapter – Storing Name
Recording) will be announced in the loudspeaker.
Use W or X to select VOICE
Use W or X to select ON/OFF
Press MENU
Press OK to confirm
Press OK to confirm
Press to exit
14
Page 16
SETTINGS
Flash (Recall) Setting
Your phone works with a time break recall for United Kingdom
(R=100ms). In France, flash time setting should be R=300ms.
This value can be set to 100, 300 or 600.
Use W or X to select FLASH
Use W or X to select 100/300/600
Press MENU
Press OK to confirm
Press OK to confirm
Press to exit
Dialling Mode (Tone/Pulse) Settings
In the UK, all telephone exchanges now use Tone dialing. If your
phone does not dial out, it is probably being used from an older
private switchboard (PBX). In this case, the Tone/Pulse setting must
be changed to Pulse.
Press MENU
Use W or X to select TONE/PULSE
Press OK to confirm
Use W or X to select TONE , PULSE 33/66 or PULSE
40/60
Press OK to confirm
Press to exit
15
Page 17
SETTINGS
Ringer Volume Setting
A switch located on the right side of the CL330 unit allows the ringer
to be switched to LOW, MEDIUM or HIGH.
Ringer Tone Setting
3 choices are available
Press
MENU
Use W or X to select RINGER TONE
Press OK to confirm
Use W or X to select 1 , 2 or 3
Press OK to confirm
16
Page 18
USING THE TELEPHONE
Making a Call
When you hear the dialling tone, dial the number on the keypad.
The number will be displayed on the LCD display
To end the call simply replace the handset in the cradle
Pre-dialling
If VOICE is activated, once you press the number keys 0-9 you will
hear the number being dialled.
Key in the required number without lifting the handset..
Use C if necessary to cancel and correct a wrong digit
Lift the handset OR press OK OR press and the number
To end the call simply replace the handset in the cradle OR
Pick up the handset.
will be automatically dialed
press
17
Page 19

USING THE TELEPHONE
Making a Call – Hands Free
Note: To deactivate the Hands Free function during a call, lift the
handset. To activate the Hands Free function during the call, press
Dial the number on the keypad in the on-hook position
Use C if necessary to cancel and correct a wrong digit
Press and the number will be dialled automatically. The
handsfree function (speaker) is now activated and the LED
indicator next to the button will be illuminated.
When the third party answers the call, you may speak with the
telephone in the hands free mode ( handset in the cradle).
Speak towards the microphone located on the front edge of the
telephone.
To end the call, press
and replace the handset on the cradle at the same time.
Also, when in hands free mode, only one person may talk at a time.
The switch-over between speaker and microphone is automatic.
This is dependent on the sound level of the incoming call and the
microphone respectively. It is therefore essential that there are no
loud noises, e.g. music, in the immediate vicinity of the telephone, as
this will disrupt the hands free function.
18
Page 20

USING THE TELEPHONE
Receiving a Call
When an incoming call is received, the telephone rings. If the caller
can be identified (due to subscription to a Caller Display service), the
caller’s telephone number will be displayed. The caller’s name will
also be displayed provided that the number and name stored are in
the phone book. If the
identified and a voice recording is associated with the incoming call,
the voice recording will be heard three times, followed by the ringer
as standard. (Refer to Phonebook chapter, Create a Phonebook
Entry to find out more about voice recording)
To end the call simply replace the handset in the cradle
Receiving a call – Hands Free
VOICE setting is ON and the caller can be
Lift the handset and speak
Press to speak hands free
To end the call press
Last Number Redial
Lift the handset or press for hands free use
Press to redial the last number dialled.
19
Page 21
USING THE TELEPHONE
Mute Function
If you wish, you can speak privately to someone else in the room
without your caller overhearing. You will still be able to hear the
caller but they cannot hear you during the mute operation.
To switch on the mute mode during a call just press and hold
button. Your caller will not be able to hear you anymore. Release
to resume the conversation with your caller.
Handset Volume Setting
During a call, the handset volume can be adjusted using the control
knob
button
Note: Setting the receiver volume to maximum may under certain
circumstances, cause ear damage. Therefore, it is recommend that
you adjust the volume .
on the front . Then it can be increased using the
Speaker Volume Setting
During a call in handsfree mode, you can adjust the speaker volume
to a desirable level. Simply use the slide control located on the left
side of the CL330 unit
Tone Control Setting
During a call, in handsfree mode, you can adjust the tone to a
desirable level. Simply use the slide control located on the front of
the CL330 unit
Note: Tone adjustment is not possible when the receiver volume is
set to its minimum level, and if the amplify button (5) is not ON ( Led
lit)
20
Page 22

USING THE TELEPHONE
Call Timer
Your handset automatically times the duration of every external call.
The time is shown during the call and for a few seconds after the call
has ended.
Hearing Aid Use
This telephone is hearing aid compatible. Select the T mode on your
hearing aid to enable this feature.
Headset Use
A headset can be connected at the rear side of the base ( jack
2.5mm)
Press the
can be adjusted like described P20.
At the end of the call press again the
button then dial your number , the volume and tone
button to release the line
21
Page 23

CALLER DISPLAY
The features described in this section are only available if you
subscribe to a Caller Display service from your network provider.
Caller Display means you can see who is calling before you answer a
call or see who has called in your absence (provided the number is
not withheld, unavailable or is an international call). If the number is
stored in the phonebook, the caller’s name is also displayed
Whether you take a call or not, the caller’s details are stored in the
Call log. The call log stores the incoming calls. When the call log
memory is full, a new call will take the place of the oldest call. You
can display, scroll through and dial numbers in the log. The
sequence number is shown in the top right-hand side of the LCD
display.
If the caller has exercised the option to prevent his number from
being displayed,
someone is calling from an area where the service provider is not
offering the Caller display services or an area which is not providing
name and number delivery to your area via the long distance n etwork,
OUT OF AREA will be displayed on the LCD display. If a
telephone number has not been seen previously,
displayed on the LCD display. If several calls have been received
from a particular number, " REPEAT NEW" will be displayed.
The red incoming call indicator located on the top of your LCD display
will flash when you have received a new call in your absence. The
indicator will continue to flash until you review all the new calls
displayed on the screen. A total of 64 numbers can be stored in the
call log. If there are calls with names received, the total of numbers
stored in the call log will less than 64.
A call log entry consists of the following information:
PRIVATE will be shown on the LCD display. If
NEW will be
Time and date of the call
9:52 9/12 Clip 01
01517222277
ROBERT JONES
Sequence number
within the log
Caller’s Number
Caller’s Name
22
Page 24
CALLER DISPLAY
View Caller Display List
If you are in "Phone book" mode ( displayed) press first
button
"CLIP" will be displayed ( near the month)
Notes: At the end of the caller display list the LCD display will
display
numbers in the caller display list,
Dial a Number from the Caller Display List
Or
Use W or X to scroll through the caller display list
END OF LIST. If there are no caller display telephone
NO CALLS is displayed
Lift the handset or press to get a dial tone
Use W or X to scroll through the caller display list until you find
the telephone number you wish to dial
Press OK to automatically dial the telephone number
In the on-hook position use W or X to scroll through the caller
display list until you find the telephone number you wish to dial
Press OK to automatically dial the telephone number
23
Page 25
CALLER DISPLAY
Delete an Entry from the Caller Display List
Use W or X to scroll through the caller display list until you find
the telephone number you wish to delete
Press C, DELETE? will be shown on the LCD display
Press and hold C until the telephone number disappears
Delete All Entries from the Caller Display List
Use W or X to scroll through the caller display list until you find
the telephone number you wish to delete
Press and hold C, DELETE ALL? will be shown on the LCD
Press and hold C until the telephone number disappears, the
Press to exit
display
list is erased
24
Page 26

CALLER DISPLAY
Copying a Number to the Phone Book
Use W or X to scroll through the caller display list until you find
the telephone number you wish to copy
Press MENU until the display shows COPY TO MEMORY
Press OK Æ SAVED will displayed
25
Page 27

PHONE BOOK
Telephone numbers and associated names can be stored in the
phone book.
The phone book can contain 30 telephone numbers (maximum of 22
digits) with names (maximum of 16 letters). If you subscribe to a
caller ID service the name in the phone book will be shown for
incoming calls.
Create a Phone Book Entry
Use W or X to select STORE NUMBER
Using the keypad, enter the desired number (up to 22 digits)
Use C if necessary to cancel and correct a wrong digit
When the number is correct, press OK to confirm
Enter the name, select the desired letter by pressing the
corresponding key one or more times (see table below)
When the name is correct, press OK to store the new entry in
SAVED will be displayed, folllowed by NAME
RECORDING. If you wish the name to be read aloud with
its associated number, you must take the following step:
Press and hold OK until a tone is heard
Press MENU
Press OK to confirm
the phone book
26
Page 28
PHONE BOOK
Say the desired name. Speak clearly and at a distance of
15-20cm from the machine. The recording can be up to 3
seconds long
Release OK
Press when you are ready to exit
1.. [Space character] + & - / 1
2.. A B C 2
3.. D E F 3
4.. G H I 4
5.. J K L 5
6.. M N O 6
7.. P Q R S 7
8.. T U V 8
9.. W X Y Z 9
* .. ‘ @ ( ) *
0.. , . : ; ? 0
#.. $ _ % ! #
Some telephone systems require a pause to be inserted when dialling
a number. To insert a dialling pause (of 3 seconds) between digits
when storing a telephone number, press
LCD display.
until P appears in the
27
Page 29

PHONE BOOK
Store/Change a Name Recording
Use W or X to select NAME RECORDING
Use W or X to select the desired telephone number
Press and hold OK until a tone is heard
Say the desired name. Speak clearly and at a distance of
15-20cm from the machine. The recording can be up to 3
Press when you are ready to exit
Press MENU
Press OK to confirm
seconds long
Release OK
28
Page 30

PHONE BOOK
Delete a Name Recording
Use W or X to select NAME RECORDING
Use W or X to select the desired telephone number to be
Press C while the recording is played back
View Phone Book Entries
Use W or X to scroll through the phone book entries. If
names have been recorded and the
the entries will be read aloud
Find the telephone number by pressing the first letter of the
stored name (refer to the table on the previous page)
Press MENU
Press OK to confirm
deleted
Press
when you are ready to exit
Press
VOICE function is ON,
Or
Press to exit
29
Page 31

PHONE BOOK
Dialling using a Phone Book Entry
Locate the required telephone number as shown in one of the
Press OK. The number will be dialled automatically. If names
Modify a Phone Book Entry
Locate the required telephone number as shown in one of the
Press and hold MENU until the LCD display shows EDIT?.
Press C to modify the name and insert the new numbers. Use
Press C to modify the name and insert the new letters. Use
Note: Remember that any name recordings will be deleted and must
be re-recorded after the number/name has been modified.
above methods (see View Phone Book Entries)
have been recorded, they will be read aloud for the chosen
entry.
above methods (see View Phone Book Entries)
Press OK
W or X to move to the required number
Press OK
W or X to move to the required letter
Press OK , SAVED will be displayed
30
Page 32

PHONE BOOK
Delete a Phone Book Entry
Locate the required telephone number as shown in one of the
Delete all Phone Book Entries
Press and hold C, DELETE ALL? will be shown on the LCD
above methods (see View Phone Book Entries)
Press C, DELETE? will be shown on the LCD display
Press and hold C until the telephone number disappears
Locate any telephone number as shown in one of the above
methods (see View Phone Book Entries)
display
Press and hold C until the telephone number disappears
Press to exit
31
Page 33

QUICK DIAL
M1, M2, M3 and M4 can also be used as quick dial locations.
Storing a Quick Dial Number
Press MENU
Use W or X to select STORE NUMBER
Press OK
Enter the telephone number to be stored (maximum of 22
digits)
Press OK
Select the speed dial location (M1, M2, M3 or M4) by
pressing the corresponding button
Dialling a Quick Dial Number
Press the desired quick dial location (M1, M2, M3 or M4)
Lift the handset, or press OK or press for handsfree use
32
Page 34

TROUBELSHOOTING
No display
• Make sure that the power adaptor is plugged in correctly and
is not damaged
CL330 does not ring
• Make sure that the telephone line cord is plugged in correctly
and is not damaged
• Connect another telephone to the telephone PTT socket or
move your telephone to another socket to track if the failure is
coming from your telephone or your PTT socket
• There may be too many communication devices connected to
a single telephone line e.g. another telephone, modem or
facsimile machine. Contact your network provider for help in
calculating the limit for your home or business line
No dial tone
• Make sure that the telephone line cord is plugged in correctly
and is not damaged
• Connect another telephone to the telephone PTT socket or
move your telephone to another socket to track if the failure is
coming from your telephone or your PTT socket
• There may be too many communication devices connected to
a single telephone line e.g. another telephone, modem or
facsimile machine. Contact your network provider for help in
calculating the limit for your home or business line
No number is displayed when the telephone rings:
• Please contact your telephone network provider to obtain the
caller display service or ensure that it has been activated if
you have subscribed already
• Even if you have subscribed to caller display, if the caller
does not want to show their number (private number), the
display will show
• It could be a call from a PBX. Caller display may not work
properly if the telephone is connected to a PBX
No response on LCD display
• If you have experienced a power failure the batteries may
become weak. If the power is restored and the LCD display
still does not
ones.
PRIVATE
respond then replace the batteries with new
33
Page 35

SAFETY INFORMATION
General
Only use the power supply included with the product.
Do not open the unit (except to replace the batteries). Contact the
helpline for all repairs.
Never dispose of batteries in a fire. There is a serious risk of
explosion and/ or the release of toxic chemicals.
Cleaning
Clean the telephone with a soft cloth. Keep the base and handset
charging contacts clean. Never use polishes or cleaning agents - th ey
could damage the finish or the electrics inside.
Environmental
Do not expose to direct sunlight.
Always ensure there is a free flow of air over the surfaces of the
telephone.
Do not place any part of your product in water and do not use it in
damp or humid conditions e.g. bathrooms.
Do not expose your product to fire or other hazardous conditions.
Unplug your phone from the telephone socket during thunderstorms
because it could damage your telephone. Your guarantee does not
cover thunderstorm damage.
The telephone is designed for working within a temperature range of
5°C to 45°C.
34
Page 36

GUARANTEE
From the moment your Geemarc product is purchased, Geemarc
guarantee it for the period of one year. During this time, all repairs or
replacements (at our discretion) are free of charge. Should you
experience a problem then contact our help line or visit our website at
www.geemarc.com
negligence or breakages to any parts. The product must not be
tampered with or taken apart by anyone who is not an authorized
Geemarc representative. The Geemarc guarantee in no way limits
your legal rights.
IMPORTANT: YOUR RECEIPT IS PART OF YOUR GUARANTEE
AND MUST BE RETAINED AND PRODUCED IN THE EVENT OF A
WARRANTY CLAIM.
Please note: The guarantee applies to
DECLARATION: Geemarc Telecom SA hereby decl ares that this
product is in compliance with the essential requirements and other
relevant provisions of the Radio and Telecommunications Terminal
Equipment Directive 1999/5/EEC and in particular article 3 section 1a,
1b and section 2. The telephone does not operate if the line current is
lower than 18 mA.
The declaration of conformity may be consulted at:
www.geemarc.com
. The guarantee does not cover accidents,
the United Kingdom only
35
Page 37

GUARANTEE
Electrical connection: The apparatus is designed to operate from a
230V 50Hz supply only. (Classified as ‘hazardous voltage’ according
to EN60950 standard). The apparatus does not incorporate an
integral power on/off switch. To disconnect the power, either switch
off supply at the mains power socket or unplug the AC adaptor. When
installing the apparatus, ensure that the mains power socket is readily
accessible.
Telephone connection: Voltages present on the telecommunication
network are classified TNV-3 (Telecommunication Network Voltage)
according to the EN60950 standard.
36
Page 38

RECYCLING DIRECTIVES
The WEEE (Waste Electrical and Electronic Equipment) has been put
in place for the products at the end of their useful life are recycled in
the best way.
When this product is finished with, please do not put it in your
domestic waste bin.
Please use one of the following disposal options:
- Remove the batteries and deposit them in an appropriate WEEE
skip. Deposit the product in an appropriate WEEE skip.
- Or, hand the old product to the retailer. If you purchase a new one,
they should accept it.
Thus if you respect these instructions you ensure human health and
environmental protection.
For product support and help visit our website at
www.geemarc.com
Telephone 01707 384438
Or fax 01707 832529
37
Page 39

SOMMAIRE
SOMMAIRE 38
INTRODUCTION 40
Composition 41
DESCRIPTION
Général 42
Afficheur 44
Navigation menu 44
INSTALLATION
Connection 45
Installation murale 46
REGLAGES
Sélection langage 47
Contraste écran 48
Réglage date/heure 49
Guide vocal 50
Temps de coupure (Flash) 51
Mode de numérotation 51
Volume sonnerie 52
Mélodie sonnerie 52
UTILISATION DU TELEPHONE
Appeler 53
Pré-numérotation 53
Mode mains libres 54
Répondre à un appel 55
Répondre en mode mains libres 55
Rappel du dernier numéro composé ( bis ) 55
Fonction secret 56
Volume combiné 56
Volume haut-parleur 56
38
Page 40

SOMMAIRE
Tonalité 56
Chronomètre 57
Appareil auditif 57
Utilisation d'un casque 57
FONCTIONS AVANCEES ( présentation du numéro)
58
Visualiser le journal d'appels 59
Appeler depuis le journal 59
Supprimer une entrée du journal 60
Effacer tous les numéros du journal 60
Copier un numéro du journal dans le répertoire 60
REPERTOIRE
Enregistrer un numéro 61
Enregistrer/Modifier une entrée vocale 62
Effacer une entrée 63
Recherche alphabétique 63
Appeler à partir du répertoire 64
Modifier une fiche 64
Effacer une fiche 65
Supprimer le répertoire 65
MEMOIRES DIRECTES
Enregistrer un numéro 66
Appeler 66
EN CAS DE PROBLEME 67
SECURITE/ENVIRONNEMENT 68
GARANTIE 69
39
Page 41

INTRODUCTION
Merci d'avoir acheté notre modèle "CL330". Ce
téléphone vous offre les avantages d'un téléphone
multifonctions : main-libre, répertoire, affichage du nom et
N° de l'appelant * , annonce vocale
Il est important de bien lire les instructions décrites dans
cette notice afin de profiter d'une utilisation maximale de
votre téléphone.
Vous trouverez dans ce manuel toutes les explications
nécessaires pour utiliser le :
CL330
* : Pour ce service , vous devez avoir souscrit auprès de votre
opérateur
40
Page 42

INTRODUCTION
Composition
Lors du déballage vous devez trouver :
• 1 Combiné
• 1 Base CL330
• 1 Adaptateur secteur
• 1 Cordon de ligne
Si vous avez besoin d'aide ou de soutien technique,
consultez notre site Internet:
www.geemarc.com
Téléphone +33 (0)3 28 58 75 99
Ou Fax +33 (0)3 28 58 75 76
41
Page 43

DESCRIPTION
Description Générale
1
CALL#
CLIP
3
4
7
8
9
10
2
C
OK
MENU
11
12
13
5
6
TONE VOLUME
?
M1
M2
M3
M4
14
15
16
17
18
19
20
21
R
22
23
24
25
42
Page 44

DESCRIPTION
1= LED (clignote lors d'un appel reçu en absence) *
2= Correction, retour
3= Rappel ou confirmation
4= Réglage Tonalité
5= Voyant amplificateur
6= Mode "Présentation nom & numéro"
7= Touche amplificateur
8= Réglage volume "mains libres"
9= Combiné
10= Touche 'secret'
11,13= Touches de navigation dans le menu
12= Menu
14= Réglage volume écouteur
15= Mémoire directe M1
16= Accès répertoire
17= Mémoire directe M2
18= Mémoire directe M3
19= Mémoire directe M4
20= Voyant "mains libres"
21= Bouton "mains libres"
22 = Voyant "casque"
23 = Ecoute par casque
24 = Touche "Bis" , insertion d'une pause
25 = Touche "Flash"
* : Uniquement si vous avez souscrit au service "Présentation
du nom & du numéro" auprès de votre opérateur
43
Page 45

DESCRIPTION
Description de l'afficheur
Niveau usure pile
Date et heure
9:52 9/12
TOTAL:04 NEW:02
Appels reçus
L'affichage : TOTAL 4 inclus les 2 nouveaux appels
N° de l'appelant
Nom de l'appelant
9:52 9/12
ROBERT JONES
01517222277
Dumont Marc
Nouveaux
appels
Navigation dans le Menu
Appuyer sur la touche MENU pour accéder et sur pour en sortir
Utiliser les touches
Sans aucune action sur les touches pendant 20 secondes, le retour
en "standby" se fera automatiquement
La touche OK
menu.
La touche
C permet d'annuler une entrée ou une action.
W et X pour naviguer dans le menu
permet de valider un choix ou une action dans le
44
Page 46

INSTALLATION
Effectuer le branchement comme indiqué ci-dessous
Connexion combiné
Adaptateur 240VPrise téléphonique
- Ouvrez le compartiment à piles (sous la base).
- Insérez 4 piles alcalines sans mercure (type AA 1.5V) en respectant
les
polarités dans le compartiment situé en dessous de l’appareil.
- Refermez le compartiment.
- Branchez le cordon de ligne à l’arrière de votre téléphone puis dans
votre prise murale(*).
- Branchez l’adaptateur secteur (**). Votre prise murale doit être
proche de l’appareil et facilement accessible pour pouvoir
débrancher rapidement l’adaptateur en cas de danger.
Note : n’utilisez pas de batteries rechargeables, ne jetez pas vo s piles
usagées dans les ordures ménagères. Respectez la réglementation
locale concernant l’élimination des piles usagées.
Si l'adaptateur n'est pas branché , ce sont les piles qui alimenteront le
téléphone et s'useront d'autant plus rapidement
(**) Classée TNT-3 selon la norme EN60950
(*)Classé tension dangereuse selon la norme EN60950
45
Page 47

INSTALLATION
Montage mural
1) Percer 2 trous à la verticale espacés de 83mm , mettre 2 vis
laissant dépasser la tête de 5mm
2) Positionner l'arrière de la base ( orifices centraux) sur les 2
têtes de vis , puis faire glisser le téléphone vers le bas afin de le
fixer
3) Pour maintenir votre combiné en position verticale, faire pivoter
d'un demi tour l'ergot situé sur la base sous le combiné
Attention : Avant de percer dans le mur , assurez-vous de
ne pas rencontrer de fils electriques, tuyaux ....etc
GABARIT DE MONTAGE MURAL
83mm
46
Page 48

REGLAGES
Langage
5 langues sont disponibles , avec aide vocale
Utiliser W ou X pour sélectionner LANGUE
Utiliser W ou X pour sélectionner le langage
Appuyer sur MENU
Appuyer sur OK
Appuyer sur OK
Appuyer sur pour sortir
47
Page 49

REGLAGES
Contraste
Vous pouvez faire varier la luminosité de l'écran ( retro-éclairage).
Sans aucune action , l'écran s'éteindra au bout de 15 secondes.
Utiliser W ou X pour sélectionner CONTRASTE ECRAN
Utiliser W ou X pour sélectionner le contraste voulu
Appuyer sur MENU
Appuyer sur OK
(3=normal)
Appuyer sur OK
Appuyer sur pour sortir
48
Page 50

REGLAGES
Date et Heure
Si vous êtes abonné au service "Présentation du nom et du N°" , la
mise à jour et l'heure se fera automatiquement. Sinon suivre les
instructions ci-dessous
Utiliser W ou X pour sélectionner DATE/HEURE
L'heure clignote, utilisez W ou X pour ajuster
Les minutes clignotent, utilisez W ou X pour ajuster
Le "jour" clignote, utilisez W ou X pour ajuster
Le "mois" clignote, utilisez W ou X pour ajuster
Appuyer sur MENU
Appuyer sur OK
Appuyer sur OK
Appuyer sur OK
Appuyer sur OK
Appuyer sur OK
Appuyer sur pour sortir
49
Page 51

REGLAGES
Aide Vocale
Lorsque la fonction "AIDE VOCALE" est activée (Parole Marche)
les chiffres de 0 à 9 , ainsi que tous les N° en mémoire (répertoire,
journal d'appels, mémoires
Utiliser W ou X pour sélectionner GUIDE VOCAL
Utiliser W ou X pour sélectionner Parole Marche ou
M1-M4 ) seront annoncés oralement
Appuyer sur MENU
Appuyer sur OK
Parole Arrêt
Appuyer sur OK
Appuyer sur pour sortir
50
Page 52

REGLAGES
Temps de coupure (Flash)
Pour la France le temps de "Flash" est R=300ms, mais peut être
réglée à 100, 300 ou 600ms pour d'autres pays
Utiliser W ou X pour sélectionner TOUCHE R
Utiliser W ou X pour sélectionner 100/300/600
Mode Numérotation
Tous les centraux téléphoniques acceptent la numérotation en
fréquences vocales. Par contre connecté derrière un central privé
interne , il se peut qu'il faille être en mode décimal ( Impulsions )
Utiliser W ou X pour sélectionner FV/IMPULSION
Utiliser W ou X pour sélectionner FV , Pulsion 33/66 ou
Appuyer sur MENU
Appuyer sur OK
Appuyer sur OK
Appuyer sur pour sortir
Appuyer sur MENU
Appuyer sur OK
Pulsion 40/60
Appuyer sur OK
Appuyer sur pour sortir
51
Page 53

REGLAGES
Volume Sonnerie
Un interrupteur sur le côté droit vous permet d'ajuster le niveau
FAIBLE, MOYEN, ELEVE
Mélodie Sonnerie
3 choix sont possibles
Appuyer sur
Utiliser W ou X pour sélectionner MEL. SONNERIE
Appuyer sur OK
Utiliser W ou X pour sélectionner 1 , 2 ou 3
Appuyer sur OK
MENU
52
Page 54

UTILISATION
Appeler
Lorsque vous entendez la tonalité, vous pouvez numéroter
En fin de conversation , reposer le combiné
Pre-numérotation
Si le mode "Aide vocale" est activé les chiffres numérotés seront
énoncés
Composer le numéro sans décrocher le combiné
La touche C permet de corriger une erreur
Décrocher le combiné OU appuyer sur OK OU appu y er sur
Décrocher le combiné
, votre numéro se compose
En fin de conversation , reposer le combiné OU appuyer sur
53
Page 55

UTILISATION
Appeler en mode mains libres
appuyer sur , votre numéro se compose. La lampe rouge
Note: Pour désactiver ce mode durant une conversation, décrochez
simplement le combiné
Composer le numéro sans décrocher le combiné
La touche C permet de corriger une erreur
sur la touche est allumée.
Vous êtes en conversation mode mains libres sans avoir à
décrocher le combiné
En fin de conversation, appuyer sur
A l'inverse pour l'activer , maintenez appuyé en reposant le
combiné sur la base
Une seule personne ( appelant ou appelé) peut parler à la fois , la
commutation haut-parleur – micro est automatique
Evitez donc d'avoir une source sonore importante près du téléphone
lorsque vous utilisez ce mode
54
Page 56

UTILISATION
Répondre à un appel
Lors d'un appel entrant , le téléphone sonne , lesvoyants rouges du
bas clignotent. Si le mode vocal est validé et que l'appelant
correspond à une personne enregistrée vocalement dans le
répertoire, votre CL330 sonnera et annoncera le nom, et cela 3 fois
Ensuite le CL330 repassera en mode sonnerie standard . ( Pour plus
de détails, voir chapître "Répertoire" , Créer une entrée ).
En fin de conversation , reposer le combiné
Répondre en mode mains libres
En fin de conversation, appuyer à nouveau sur
Décrocher le combiné
Appuyer sur
Rappel du dernier numéro
Décrocher le combiné, ou appuyer sur
Appuyer sur pour recomposer le dernier numéro.
55
Page 57

UTILISATION
Fonction Secret
Cette touche permet de couper ponctuellement le microphone
en cours de communication.
- Maintenez appuyé cette touche, votre correspondant ne vous
entend plus.
- Relâchez-la pour rétablir la conversation.
Volume du combiné
Vous pouvez ajuster le niveau sonore de réception dans le
combiné.Utilisez le bouton
régler le niveau. Pour atteindre le volume maximum appuyer sur le
bouton
Note: Laisser le volume au maximum peut causer des troubles
auditifs, il est conseillé de l'ajuster au cas par cas .
( amplificateur)
situé sur la face avant pour
Volume du haut-parleur
En mode mains libres, vous pouvez ajuster le volume du haut-parleur,
utilisez le bouton situé le côté gauche du CL330.
Tonalité
De même que ci-dessus, vous pouvez aussi ajuster la tonalité
( graves-aigus) utilisez le bouton situé sur la face avant du CL330
Note: Cet ajustement est impossible si le voyant du bouton ampli (5)
est éteint
56
Page 58

UTILISATION
Chronomètre
Dès que vous décrochez le combiné , le chronomètre s'active à
l'écran et s'efface quelques secondes après le raccrochage
Appareil auditif
Le CL330 est compatible avec la plupart des appareils auditifs
Pour cela , passez en mode "T" sur votre appareil
Utilisation d'un casque
Vous pouvez connecter un casque ( prise jack 2.5mm) à l'arrière de
la base.
Appuyez sur la touche
Le volume ( partie combiné) ainsi que la tonalité peuvent réglés
comme décrit P56.
En fin de conversation appuyez de nouveau sur la même touche pour
libérer la ligne
, puis numérotez .
57
Page 59

Présentation du nom et du numéro*
* Ces services sont accessibles seulement par abonnement.
Contactez votre opérateur pour plus de renseignements.
Grâce à ce service, le nom et le numéro de la ligne à partir de
laquelle votre correspondant vous appelle peuvent s’afficher sur votre
écran.
Les numéros de vos correspondants sont mémorisés dans le «journal
des appels reçus», 64 numéros maximums peuvent être mémorisés.
Si des noms ont été affectés aux numéros , moins de 64 fiches
seront mémorisées.
Lorsque la mémoire de votre journal est pleine, tout nouvel appel
prendra la place du plus ancien.
Si votre correspondant ne souhaite pas communiquer son numé ro de
téléphone ou son identité, l’afficheur indique «Privé». Si l'opérateur
de votre correspondant ne peut faire afficher le numéro ( ex : de
l'étranger) ou le nom ( ex : mobile) alors "HORS ZONE" sera affiché
En cas de non réponse à un appel (absence) la lampe rouge à
côté de l'afficheur clignotera. Elle ne s'éteindra que lorsque tous
les appels en absence auront été visualisés ( NOUV: 00 )
Si plusieurs appels en absence proviennent du même numéro ,
"Repeat new" sera affiché .
compteur d'appels ( 64 max)
Affichage du nom et du
numéro
9:52 9/12 Call#
02
01517222277
ROBERT DUNOM
58
Page 60

Présentation du nom et du numéro
Visualiser le journal d'appels
Si vous êtes en mode "Répertoire" ( affiché) , appuyez d'abord sur
la touche
Notes: Après avoir parcouru toute la liste , l'afficheur indiquera "FIN
DE LISTE"
effacé le journal "PAS D'APPEL" sera affiché
Appeler à partir du journal d'appels
Utiliser W ou X pour sélectionner le numéro dans la liste
Appuyer sur OK , le numéro se compose automatiquement
OU
En position raccroché utiliser W ou X pour selectionner le
Appuyer sur OK , le numéro se compose automatiquement
, "CLIP" s'affiche
Utiliser W ou X pour sélectionner l'appel dans la liste
. Si aucun appel n'a été reçu ou que avez précedemment
Décrocher le combiné ou appuyer sur
numéro dans la liste
59
Page 61

Présentation du nom et du numéro
Supprimer une entrée du journal d'appels
Utiliser
Maintenez appuyé C jusquà ce que le numéro s'efface
Effacer le journal d'appels
Maintenez appuyé C, "TOUT EFFACER ?" s'affiche
Maintenez appuyé C, le numéro s'efface, toute la liste est
W ou X pour sélectionner le numéro à effacer
Appuyer sur C, EFFACER? s'affichera
Appuyer sur pour sortir
Utiliser
aussi effacée,
W ou X pour entrer dans la liste
PAS D'APPEL s'affiche
Copier un numéro du journal dans le répertoire
Utiliser
Appuyer sur MENU jusqu'à ce que COPIER EN MEM
W ou X pour sélectionner le numéro à copier
s'affiche
Appuyer sur OK , ENREGISTRE s'affiche
60
Page 62

REPERTOIRE
Vous pouvez mémoriser 30 numéros ( 22 chiffres maximum) et
noms ( 16 lettres maxi) dans le répertoire.
Si vous avez souscrit au service "Présentation du numéro et du nom"
( identification de l'appelant ), les noms et numéros enregistrés
s'afficheront lors d'un appel en provenance de ces personnes.
Enregistrer un numéro
Appuyez sur
Utilisez les touches W ou X pour selectionner
ENREGISTRER NUM
Appuyez sur OK
Entrer votre numéro , utiliser la touche C pour corriger si
necessaire
Appuyez sur OK
Entrer le nom associé en utilisant les touches du clavier
Appuyez sur OK , ENREGISTRE s'affiche puis
ENREGISTRER NOM
A ce stade, vous pouvez enregistrer oralement le nom associé
à ce numéro , suivez les instructions ci-après sinon
Appuyer sur
Maintenez appuyé OK jusqu'à entendre un "BIP". Parlez à
15-20cm du téléphone, puis relachez
été selectionné, le nom sera répété , "Voice" est affiché
Appuyer sur pour sortir
MENU
pour sortir
OK , si le mode vocal a
61
Page 63
REPERTOIRE
Enregistrer/Modifier une entrée vocale
Chaque entrée du répertoire peut être associée à une séquence
vocale ( nom), qui sera annoncée lors de la sélection de cette
entrée si le mode "vocal" a été validé ( ON) .
Appuyez sur MENU
Utilisez les touches W ou X pour selectionner
ENREGISTRER NOM
Appuyez sur OK
Utilisez les touches W ou X pour selectionner le numéro
Maintenez appuyé OK jusqu'à entendre une tonalité. Parlez
à 15-20cm du téléphone, puis relachez
a été selectionné, le nom sera répété
Appuyer sur pour sortir
1.. [Space character] + & - / 1
2.. A B C 2
3.. D E F 3
4.. G H I 4
5.. J K L 5
6.. M N O 6
7.. P Q R S 7
8.. T U V 8
9.. W X Y Z 9
* .. ‘ @ ( ) *
0.. , . : ; ? 0
#.. $ _ % ! #
OK , si le mode vocal
62
Page 64

REPERTOIRE
Effacer une séquence vocale
Appuyez sur
Utilisez les touches W ou X pour selectionner
ENREGISTRER NOM
Appuyez sur OK
Utilisez les touches W ou X pour selectionner le numéro et
effacer la séquence vocale associée
Appuyer sur C pendant l'annonce, le symbole "Voice"
Appuyer sur pour sortir
MENU
disparaît
Rechercher une entrée
Appuyer sur
Utilisez les touches W ou X pour lister les numéros. Si une
séquence vocale a été enregistrée et que le mode "Vocal" est
validé, l'annonce sera émise
(Le numéro peut être retrouvé en entrant la 1ère lettre du
nom )
Appuyer sur pour sortir
63
Page 65

REPERTOIRE
Appeler à partir du répertoire
Selectionner une entrée comme précedemment (§ rechercher
une entrée)
Appuyer sur OK, votre numéro se compose. Si une séquence
vocale a été enregistrée et que le mode "Vocal" est validé,
l'annonce sera émise
Modifier une fiche du répertoire
Selectionner une entrée comme précedemment ( §
rechercher une entrée)
Maintenez appuyé MENU jusqu'à l'affichage EDITER?.
Appuyez sur OK
Appuyer sur C pour effacer ou sur W X pour
selectionner les chiffres à modifier
Press OK
Même principe que ci-dessus pour modifier le nom
Appuyer sur OK , ENREGISTRE s'affiche, puis sortie du
menu
Note : A chaque modification , si une séquence vocale est associée,
Elle sera effacée, il vous faudra la re-enregistrer
64
Page 66

REPERTOIRE
Effacer une fiche du répertoire
Selectionner une entrée comme précedemment ( §
rechercher une entrée
Appuyer sur C, EFFACER? s'affiche
Maintenez appuyé C jusqu'à l'effacement
Appuyer sur pour sortir
Effacer tout le répertoire
Selectionner une entrée comme précedemment (§rechercher
une entrée)
Maintenez appuyé C, EFFACER TOUT? s'affiche
Maintenez appuyé C jusqu'à l'effacement , toutes les fiches
du répertoire sont détruites , VIDE s'affiche
Appuyer sur pour sortir
65
Page 67

MEMOIRES DIRECTES
M1 à M4 peuvent être aussi utilisées comme mémoires simples à
accès direct
Enregistrer un numéro
Appuyez sur
Utilisez W ou X pour selectionner ENREGISTRER
Appuyer sur OK
Entrer votre numéro , utiliser la touche C pour corriger si
necessaire
Appuyer sur OK
Appuyer sur la touche mémoire désirée ( M1 à M4 )
ENREGISTRE s'affiche
MENU
NUM
Effectuer un appel depuis M1- M4
- Appuyer sur une des 4 touches M1, M2, M3 ou M4
- Décrochez le combiné , ou appuyez sur la touche
le numéro se composera automatiquement
66
ou sur OK,
Page 68

EN CAS DE PROBLEME
Pas d'affichage
- Assurez-vous que le cordon et l'adaptateur sont bien
connectés.
Pas de sonnerie, pas de tonalité
- Vérifier votre connexion téléphonique ( cordon + prise)
- Brancher un autre téléphone dans la même prise murale, afin
de vous assurez que cela ne provient pas de votre ligne
Pas d'affichage du nom et du numéro
- Vérifier auprès de votre opérateur que vous avez bien
souscrit à ce service .
- "Privé" s'affiche lors d'un appel : la personne qui appelle ne
désire pas être identifiée ( liste rouge ...)
La lampe rouge ne cesse de clignoter
- Assurez vous d'avoir consulté tous
en absence dans le journal d'appels
Services à boites vocales
- Vous ne pouvez pas répondre aux questions en tapant les
chiffres demandés , verifiez que le mode de numérotation est
bien FV ( p52)
vos appels , messages
67
Page 69

SECURITE / ENVIRONNEMENT
General
Utiliser seulement l'adaptateur secteur fourni
Ne jamais ouvrir le combiné ou la base.
Ne pas jeter les piles dans un feu ou dans une poubelle, ramenez les
à un centre de collecte.
Nettoyage
Nettoyez le téléphone à l’aide d’un linge doux. N’utilisez jamais de
crèmes à polir ou de produits d’entretien car cela pourrait
endommager le plastique ou les circuits électriques intérieurs.
Attention : Débranchez votre téléphone par temps orageux afin
d’éviter tout dommages électriques. Ce phénomène n’est pa s couve rt
par la garantie tout comme une chute de votre appareil
__________________________________________________
Directives de recyclage
La directive DEEE (Déchet d'Equipement Electrique et Electronique)
a été mise en place dans le but d'assurer la collecte sélective en vue
de la valorisation, réutilisation ou recyclage des produits en fin de vie.
Lorsque votre produit ne fonctionne plus, ne le jeter pas dans votre
poubelle ménagère.
Suivez l'une des procédures décrite ci-dessous:
- Déposez les piles et votre ancien appareil dans un lieu de collecte
approprié.
- Rapportez votre ancien appareil chez le distributeur qui vous vendra
le nouveau. Il devra l'accepter.
Ainsi, si vous respectez ces instructions vous faites un geste pour
l'environnement et vous contribuez à la préservation des ressources
naturelles et à la protection de la santé humaine.
.
68
Page 70

GARANTIE
Cet appareil est garanti 1 an pièces et main-d'oeuvre. La date d'achat
figurant sur le ticket de caisse fera foi. Cette garantie s'exerce sous
réserve d'une utilisation normale de l'appareil. Les dommages
occasionnés par les surtensions électriques, la foudre ou par un choc
sur l'appareil ne peuvent en aucun cas être couverts par la garantie.
En cas de problème fonctionnel et avant de nous retourner votre
appareil, contactez notre service après vente de : 8h30 à 12h30 et de
14h00 à 17h00 du Lundi au Jeudi et de 8h30 à 12h30 et de 14h00 à
16h30 le Vendredi.
TEL. SERVICE APRES VENTE :
03 28 58 75 99
Parc de l’Etoile
2, rue Galilée
59760 Grande Synthe
Raccordement électrique
uniquement avec l’adaptateur secteur 230V 50Hz fourni. (Tension classée
“dangereuse” selon les critères de la norme EN60950).Par précaution en cas
de danger, le bloc alimentation secteur sert de dispositif de sectionnement de
l’alimentation 230V. Il doit être installé à proximité du matériel et être
aisément accessible.
Raccordement téléphonique : les tensions présentes sur ce réseau
sont classées TRT-3 (Tension de Réseau de Télécommunication) au sens de
la norme EN60950.
Ce produit respecte les exigences de compatibilité
électromagnétique et de sécurité électrique demandées par la
directive européenne RTTE.Par ailleurs, il est compatible avec les
différents réseaux téléphoniques européens (normes
TBR21/37/38).Le fonctionnement de l’appareil n’est pas garanti si le
courant de ligne est inférieur à 18 mA.
La déclaration de conformité peut être consultée sur le site :
www.geemarc.com
: l’appareil est prévu pour fonctionner
69
Page 71

INHALT
INHALT 70
EINFÜHRUNG 72
Lieferumfang 73
BESCHREIBUNG
Allgemeines 74
LCD-Anzeige 76
Navigation Menü 76
INSTALLATION
Aufbau 77
Wandmontage 78
EINSTELLUNGEN
Sprachauswahl 79
Bildschirmkontrast 80
Datum / Uhr 81
Stimmansage 82
Flash-Zeit 83
Ton (MFV)- oder Impuls (IMV) -Wahlverfahren 83
Lautstärke Klingelton 84
Melodie Klingelton 84
BEDIENUNG DES TELEFONS
Anrufe tätigen 85
Vorwählen 85
Freisprechen 86
Anrufe entgegennehmen 87
Anrufe im Freisprechmodus entgegennehmen 87
Wahlwiederholung 87
Stummschaltung 88
Lautstärke Hörer 88
Lautstärke Lautsprecher 88
Hoch-/Tiefton 88
70
Page 72

INHALT
Anzeige Gesprächsdauer 89
Hörhilfe 89
Kopfhörerverwendung 89
FORTGESCHRITTENE EINSTELLUNGEN
(Nummernanzeige) 91
Anruferliste anzeigen 91
Rufnummer aus der Anruferliste wählen 91
Rufnummer aus der Anruferliste löschen 92
Alle Rufnummern aus der Anruferliste löschen 92
Rufnummer von der Anruferliste ins Telefonbuch kopieren
93
TELEFONBUCH
Rufnummer eingeben 94
Spracheintrag anlegen/ändern 95
Eintrag löschen 96
Alphabetische Suche 96
Anruf aus dem Telefonbuch tätigen 97
Eintrag ändern 97
Eintrag löschen 98
Telefonbuch löschen 98
KURZWAHL
Rufnummer eingeben 99
Anrufe tätigen 99
FEHLERBESEITIGUNG 100
SICHERHEIT / UMWELT 101
GARANTIE 102
71
Page 73

EINFÜHRUNG
Vielen Dank für den Kauf unseres Modells „CL330“.
Dieses Telefon bietet Ihnen alle Vorteile eines
Multifunktionsgerätes: Freisprechen, Telefonbuch,
Rufnummernanzeige bei eingehendem Anruf *,
Stimmansage.
Bitte lesen Sie diese Bedienungsanleitung sorgfältig
durch, um Ihr Telefon maximal nutzen zu können.
In dieser Bedienungsanleitung finden Sie alle
Anweisungen, die Sie zum Gebrauch des folgenden
Telefons benötigen:
CL330
* : Um diesen Service nutzen zu können, müssen Sie diesen Dienst
bei Ihrem Telefonanbieter beantragen.
72
Page 74

EINFÜHRUNG
Lieferumfang
Im Lieferumfang enthalten sind die folgenden Teile:
• 1 Hörer
• 1 Basisstation CL330
• 1 Netzadapter
• 1 Telefonkabel
Siemensstrasse 10,
53121 Bonn
Deutschland
Tel: +49(0)228/ 74 87 09 0
Fax: +49(0)228/ 74 87 09 20
E-Mail: desales@geemarc.com
73
Page 75

BESCHREIBUNG
Allgemeine Beschreibung
1
CALL#
CLIP
3
4
7
8
9
10
2
C
OK
MENU
11
12
13
5
6
TONE VOLUME
?
M1
M2
M3
M4
14
15
16
17
18
19
20
21
R
22
23
24
25
74
Page 76

BESCHREIBUNG
1= LED (leuchtet, wenn ein Anruf in Abwesenheit
eingegangen ist)*
2= Löschen, Zurück
3= Rückruf, Bestätigen
4= Einstellung Hoch-/Tiefton
5= Verstärker-LED
6= Anzeige von Namen und Rufnummern
7= Verstärker-Taste
8= Lautstärkeregler Freisprechen
9= Hörer
10= Taste zur Stummschaltung
11,13= Taste zur Navigation im Menü
12= Menü
14= Lautstärkeregler Hörer
15= Kurzwahl M1
16= Telefonbuch
17= Kurzwahl M2
18= Kurzwahl M3
19= Kurzwahl M4
20= Freisprech-LED
21= Taste zum Freisprechen
22 = Kopfhörer-LED
23 = Kopfhörer
24 = Wahlwiederholung, Wahlpause
25 = Flash-Taste
* Nur möglich, wenn Sie die Anzeige von Namen und
Rufnummer bei Ihrem Telefonanbieter beantragt haben.
75
Page 77

A
BESCHREIBUNG
Beschreibung des Bildschirms
Batterie
Datum und
Uhrzeit
9:52 9/12
GESAMT:04 NEU:02
Anzeige: Gesamtanzahl der Anrufe 4 (TOTAL), darunter 2 neue
Anrufe.
Nummer des
Anrufers
Name des
nrufers
Eingegangene
Anrufe
9:52 9/12
01517222277
PETER MAIER
Neue Anrufe
Navigation im Menü
Mit der Menütaste MENU gelangen Sie ins Menü, mit verlassen
Sie es wieder.
Verwenden Sie die Pfeiltasten
Wenn 20 Sekunden lang keine weitere Taste von Ihnen gedrückt wird,
stellt sich der Standby-Modus automatisch wieder her.
Mit der Taste OK bestätigen Sie eine Auswahl im Menü.
W und X zur Navigation im Menü.
76
Page 78

BESCHREIBUNG
Mit der Taste C löschen Sie einen Eintrag oder machen eine Aktion
rückgängig.
Schließen Sie das Telefon wie folgt an:
Höreranschluss
Adapter 240V Telefonanschluss
- Öffnen Sie das Batteriefach auf der Unterseite.
- Legen Sie 4 quecksilberfreie Alkaline-Batterien (Typ AA 1,5V) in das
Batteriefach auf der Unterseite des Apparates. Achten Sie dabei auf
die Polarität.
- Schließen Sie das Fach wieder.
- Schließen Sie das Telefonkabel auf der Rückseite des Telefons an
und stecken das andere Ende in die Wanddose (*).
- Stecken Sie den Netzadapter ein (**). Es sollte sich eine Steckdose
in der Nähe befinden und leicht zugänglich sein, damit Sie bei
Gefahren die Stromzufuhr zum Telefon unterbrechen können.
Hinweis: Verwenden Sie keine aufladbaren Batterien. Werfen Sie
benutzte Batterien nicht in den Hausmüll. Achten Sie auf die
gesetzlichen Bestimmungen zur Entsorgung von Batterien.
77
Page 79

EINSTELLUNGEN
Wenn der Netzstecker nicht eingesteckt ist, versorgen die Batterien
das Telefon mit Strom und werden dadurch schneller aufgebraucht.
(**) Entspricht der TNV3 Klasse und ist definiert in der EN 60950 Norm
(*) Nach Norm EN60950 als „Gefährliche Spannung“ eingestuft
Wandmontage
4) Bohren Sie zwei Löcher mit einem vertikalen Abstand von
83mm in die Wand und lassen Sie die Köpfe der beiden
Schrauben circa 5mm herausstehen.
5) Setzen Sie nun die Unterseite des Telefons auf die beiden
Schraubenköpfe und lassen das Telefon einrasten.
6) Drehen Sie die Hörersicherung um 180°, damit der Hörer bei
vertikaler Nutzung Halt hat.
Achtung: Bevor Sie die Löcher in die Wand bohren,
versichern Sie sich, dass dort keine Strom- oder
Wasserleitungen verlaufen.
SCHABLONE ZUR WANDMONTIERBAR
83mm
78
Page 80

EINSTELLUNGEN
Sprache
Es stehen 5 Sprachen zur Auswahl, mit akustischer Hilfe.
Verwenden Sie die Pfeiltasten W oder X, um die SPRACHE
Verwenden Sie die Pfeiltasten W oder X, um die gewünschte
Drücken Sie zum Verlassen des Menüs
Drücken Sie auf MENU
einzustellen
Drücken Sie auf OK
Sprache auszuwählen
Drücken Sie auf OK
79
Page 81

EINSTELLUNGEN
Kontrast
Sie können den Kontrast des Bildschirms verändern
(Hintergrundbeleuchtung). Wenn Sie 15 Sekunden lang keine Taste
drücken, schaltet sich der Bildschirm automatisch ab.
Verwenden Sie die Pfeiltasten W oder X, um den
BILDSCHIRMKONTRAST einzustellen
Verwenden Sie die Pfeiltasten W oder X, um den gewünschte
Drücken Sie zum Verlassen des Menüs
Drücken Sie auf MENU
Drücken Sie auf OK
Kontrasten einzustellen (3 = normal)
Drücken Sie auf OK
80
Page 82

EINSTELLUNGEN
Datum und Uhr
Wenn Sie die Rufnummernanzeige beantragt haben, geschieht die
Einstellung von Datum und Uhrzeit automatisch. Andernfalls gehen
Sie wie folgt vor.
Verwenden Sie die Pfeiltasten W oder X, um DATUM /
Die Stundenanzeige blinkt. Verwenden Sie die Pfeiltasten
Die Minutenanzeige blinkt. Verwenden Sie die Pfeiltasten
Die Anzeige des Tages blinkt. Verwenden Sie die Pfeiltasten W
Die Anzeige des Monats blinkt. Verwenden Sie die Pfeiltasten
Drücken Sie zum Verlassen des Menüs
Drücken Sie auf MENU
UHRZEIT einzustellen
Drücken Sie auf OK
W oder X zur Einstellung
Drücken Sie auf OK
W oder X zur Einstellung
Drücken Sie auf OK
oder
X zur Einstellung
Drücken Sie auf OK
W oder X zur Einstellung
Drücken Sie auf OK
81
Page 83

EINSTELLUNGEN
Stimmansage
Wenn die Funktion „STIMMANSAGE“ aktiviert ist (Start), werden die
Zahlen 0 bis 9, sowie alle gespeicherten Nummern (Telefonbuch,
Anruferliste, Kurzwahlspeicher M1-M4) angesagt.
Verwenden Sie die Pfeiltasten W oder X, um STIMMANSAGE
Verwenden Sie die Pfeiltasten W oder X für START oder
Drücken Sie zum Verlassen des Menüs
Drücken Sie auf MENU
einzustellen
Drücken Sie auf OK
PAUSE
Drücken Sie auf OK
82
Page 84

EINSTELLUNGEN
Flash-Zeit
Die Flash-Zeit kann, je nach Land, auf 100, 300 oder 600ms
eingestellt werden.
Verwenden Sie die Pfeiltasten W oder X, um die TASTE R
Verwenden Sie die Pfeiltasten W oder X, um 100/300/600
Drücken Sie zum Verlassen des Menüs
Drücken Sie auf MENU
auszuwählen
Drücken Sie auf OK
auszuwählen
Drücken Sie auf OK
Wahlverfahren
Alle Anschlüsse in Deutschland funktionieren heutzutage mit
Tonwahl. Beim Betrieb einer älteren Telefonanlage kann es jedoch
notwendig sein, auf Pulswahl umzustellen.
Verwenden Sie die Pfeiltasten W oder X, um TON/IMPULS
Drücken Sie auf MENU
auszuwählen
Drücken Sie auf OK
83
Page 85

EINSTELLUNGEN
Verwenden Sie die Pfeiltasten W oder X, um Tonwahl,
Impuls 33/66 oder Impuls 40/60 auszuwählen
Drücken Sie zum Verlassen des Menüs
Lautstärke Klingelton
Auf der rechten Seite befindet sich ein Lautstärkeregler.
Einstellmöglichkeiten: LEISE, MITTEL, LAUT
Drücken Sie auf OK
Melodie Klingelton
Es stehen drei Auswahlmöglichkeiten zur Verfügung.
Drücken Sie auf
Verwenden Sie die Pfeiltasten W oder X, um MEL.
KLINGELTON auszuwählen
Drücken Sie auf OK
Verwenden Sie die Pfeiltasten W oder X, um Melodie 1, 2
oder 3 auszuwählen
Drücken Sie auf OK
MENU
84
Page 86

BEDIENUNG
Anrufe tätigen
Sobald Sie einen Ton hören, können Sie eine Nummer wählen
Zum Beenden des Gespräches legen Sie den Hörer wieder auf
Vorwahl
Wenn der Modus „akustische Hilfe“ aktiviert ist, werden die gewählten
Nummern angesagt.
Wählen Sie eine Rufnummer ohne den Hörer abzunehmen
Nehmen Sie den Hörer ab ODER oder drücken Sie auf OK
Mit C können Sie etwaige Fehler löschen
Nehmen Sie den Hörer ab
ODER oder auf damit Ihre Nummer gewählt wird
Zum Beenden des Gespräches legen Sie den Hörer wieder auf
oder drücken Sie auf
85
Page 87

BEDIENUNG
Anrufe im Freisprechmodus tätigen
Wählen Sie eine Rufnummer ohne den Hörer abzunehmen
Sie können im Freisprechmodus telefonieren, ohne den Hörer
Hinweis: Um diesen Modus während eines Gesprächs zu
deaktivieren, legen Sie einfach den Hörer auf.
Mit C können Sie etwaige Fehler löschen
Drücken Sie auf , damit Ihre Nummer gewählt wird.
Die rote LED leuchtet auf
abnehmen zu müssen
Zum Beenden des Gespräches drücken Sie auf
Um den Modus dagegen zu aktivieren, drücken Sie auf und legen
Sie gleichzeitig den Hörer auf.
Es kann jeweils nur eine Person in diesem Modus sprechen (Anrufer
oder Angerufener). Die Umschaltung zwischen Lautsprecher und
Mikrofon erfolgt automatisch.
Bitte vermeiden Sie beim Telefonieren in diesem Modus eine laute
Lärmquelle in der Nähe des Telefons.
86
Page 88

BEDIENUNG
Anrufe entgegennehmen
Wenn ein Anruf eingeht, ertönt der Klingelton und die roten LEDs der
Basis leuchten. Wenn die akustische Hilfe aktiviert ist und eine
Person anruft, für die im Telefonbuch eine Stimmansage gespeichert
ist, klingelt das CL330 und der Name des Anrufers wird 3 Mal
genannt. Anschließend ertönt der Standard-Klingelton. (Mehr Details
erfahren Sie im Abschnitt „Telefonbuch“, Eintrag anlegen).
Zum Beenden des Gespräches legen Sie den Hörer wieder auf
Anrufe im Freisprechmodus entgegennehmen
Zum Beenden des Gespräches drücken Sie auf
Nehmen Sie den Hörer ab
Drücken Sie auf
Wiederholung der zuletzt gewählten Nummer
Nehmen Sie den Hörer ab oder drücken Sie auf
Drücken Sie auf , um die zuletzt gewählte Nummer zu
wählen
87
Page 89

BEDIENUNG
Stummschaltung
Die Taste ermöglicht die zeitweise Stummschaltung des
Mikrofons während eines Gespräches.
- Wenn Sie die Taste gedrückt halten, hört Ihr Gesprächspartner nicht
mehr was Sie sagen.
- Lassen Sie die Taste los, um das Gespräch wieder aufzunehmen.
Lautstärke Hörer
Sie können die Lautstärke des Hörers während eines Gespräches
verändern. Verwenden Sie dazu den Lautstärkeregler
der Vorderseite des Telefons. Für die maximale Lautstärke drücken
Sie bitte die Taste
Hinweis: Wenn Sie die Lautstärke auf Maximum einstellen, kann
dies zu Hörschäden führen. Es wird deshalb empfohlen, die
Lautstärke für jedes Gespräch neu einzustellen.
(Verstärker).
auf
Lautstärke Lautsprecher
Im Freisprechmodus können Sie die Lautstärke des Lautsprechers
mit dem Knopf auf der linken Seite des CL330 einstellen.
Hoch-/Tiefton
Mit dem Lautstärkeregler auf der Vorderseite des CL330 lässt sich
auch der Hoch-/Tiefton regeln.
Hinweis: Diese Einstellung lässt sich nicht vornehmen, wenn das
Lämpchen für den Verstärker (5) nicht leuchtet.
88
Page 90

BEDIENUNG
Anzeige Gesprächsdauer
Wenn Sie den Hörer abnehmen, beginnt die Zeitmessung im Display
und wird noch einige Sekunden nach Beenden des Gesprächs
angezeigt.
Hörhilfe
Das CL330 ist mit den meisten Hörhilfen kompatibel.
Verwenden Sie bitte das Telefon im entsprechenden Modus, den Sie
mit der Taste T aktivieren können.
Kopfhörerverwendung
Sie können auf der Rückseite des Gerätes einen Kopfhörer (2.5mm
Buchse) anbringen.
Drücken Sie die Taste
gewünschte Rufnummer.
Die Lautstärke des Hörers und der Hoch-/Tiefton lassen sich wie auf
Seite 89 beschrieben einstellen.
und wählen Sie anschließend die
89
Page 91

Anzeige von Name und Rufnummer*
* Dieser Dienst ist nur möglich, wenn Sie ihn bei Ihrem Telefonanbie-
ter beantragt haben. Für weitere Informationen wenden Sie sich bitte
an Ihren Telefonanbieter.
Mit diesem Dienst können Sie sich die Nummer und den Namen der
Anrufer auf dem Display anzeigen lassen.
Die Nummern Ihrer Gesprächspartner werden in der
„Anruferliste“ gespeichert. 64 Nummern werden maximal gespeichert.
Wenn zu den Nummern Namen gespeichert sind, werden weniger als
64 Nummern gespeichert.
Wenn der Speicher voll ist, wird jeweils die älteste Nummer bei ein em
neuen Anruf gelöscht.
Falls Ihr Gesprächspartner seine Nummer nicht anzeigen lassen
möchte, wird „PRIVAT“ angezeigt Falls der Anbieter Ihres
Gesprächspartners die Nummer (z.B. aus dem Ausland) oder den
Namen (z.B. Handy) nicht anzeigen kann, wird Ihnen
„EXTERN“ angezeigt.
Wenn ein Anruf in Abwesenheit eingeht leuchtet das rote Licht
über dem Display bis Sie sich alle Anrufe angesehen haben
(NEU: 00).
Wenn mehrere Anrufe einer Nummer in Abwesenheit eingegangen
sind, wird ‚Repeat new’ angezeigt.
Anzahl der Anrufe (maximal 64)
Anzeige des Namens
und der Nummer
9:52 9/12 Anruf#
02
01517222277
PETER MAIER
90
Page 92

FORTGESCHRITTENE EINSTELLUNGEN
Anruferliste anzeigen
Wenn Sie sich im Modus ‚Telefonbuch’ ( wird angezeigt) befinden,
drücken Sie zuerst auf
Verwenden Sie die Pfeiltasten W oder X zur Auswahl eines
Hinweis: Am Ende der Liste wird ‚ENDE DER LISTE’ angezeigt.
Wenn keine Anrufe eingegangen sind oder Sie die Aufzeichnung en
bereist gelöscht haben, erscheint ‚KEIN ANRUF’.
Anruf aus der Anruferliste tätigen
ODER
Nehmen Sie den Hörer ab oder drücken Sie auf
Verwenden Sie die Pfeiltasten W oder X zur Auswahl einer
Drücken Sie auf OK und die Nummer wird automatisch gewählt
Nehmen Sie den Hörer nicht ab und wählen Sie mit den
Pfeiltasten
Drücken Sie auf OK und die Nummer wird a utomatisch gewählt
. Es wird ‚CLIP’ angezeigt.
Anrufs aus der Liste
Nummer aus der Liste
W oder X eine Nummer aus der Liste
91
Page 93

FORTGESCHRITTENE EINSTELLUNGEN
Rufnummer aus der Anruferliste löschen
Verwenden Sie die Pfeiltasten
Nummer, die gelöscht werden soll
Drücken Sie auf C. Es wird LÖSCHEN? angezeigt
Drücken Sie nun auf C bis die Nummer gelöscht ist
Drücken Sie zum Verlassen des Menüs
Löschen der Anruferliste
Verwenden Sie die Pfeiltasten
auszuwählen
Drücken Sie nun C. Es wird ‚ALLES LÖSCHEN?’
angezeigt
Drücken Sie erneut auf C. Die Nummer und die gesamte Liste
werden gelöscht.
Kein Anruf wird angezeigt.
W oder X zur Auswahl der
W oder X um die Liste
92
Page 94

FORTGESCHRITTENE EINSTELLUNGEN
Eine Rufnummer von der Anruferliste ins
Telefonbuch kopieren
Verwenden Sie die Pfeiltasten
Nummer, die kopiert werden soll
Drücken Sie auf MENÜ bis IN SPEICHER KOPIEREN
angezeigt wird
Drücken Sie auf OK. Es wird GESPEICHERT angezeigt
W oder X zur Auswahl der
93
Page 95
TELEFONBUCH
Sie können 30 Nummern (mit bis zu 22 Ziffern) und Namen (mit bis
zu 16 Stellen) im Telefonbuch speichern.
Wenn Sie die Anzeige der Rufnummer und des Namens beantragt
haben (Anruferidentifizierung) werden die Namen und Nummern der
Anrufer bei einem Anruf angezeigt.
Rufnummern eingeben
Drücken Sie auf
Verwenden Sie die Pfeiltasten W oder X, um NUMMER
SPEICHERN auszuwählen
Drücken Sie auf OK
Geben Sie die gewünschte Rufnummer ein. Verwenden Sie
dabei die Taste
C zur Korrektur, falls notwendig
Drücken Sie auf OK
Geben Sie mit Hilfe der Tastatur einen Namen ein
Drücken Sie auf OK. Es wird GESPEICHERT, dann
NAMEN SPEICHERN angezeigt
Nun können Sie nun den Namen aufsprechen. Halten Sie sich
dazu bitte an die folgenden Anweisungen.
Drücken Sie
zum Verlassen des Menüs
Drücken Sie auf OK, bis sie einen ‚BIEP’ hören Sprechen Sie
in 15 bis 20 cm Entfernung vom Telefon. Drücken Sie auf
OK, der Name wird wiederholt und ‚Stimme’ angezeigt.
Drücken Sie zum Verlassen des Menüs
MENU
94
Page 96

TELEFONBUCH
Spracheintrag anlegen/ändern
Jedem Eintrag im Telefonbuch kann ein aufgesprochener Namen
zugeordnet werden, der dann abgespielt wird, wenn der
entsprechende Name ausgewählt wird und der Modus
„Stimme“ aktiviert ist.
Drücken Sie auf MENU
Verwenden Sie die Pfeiltasten W oder X, um NAME
SPEICHERN auszuwählen
Drücken Sie auf OK
Verwenden Sie die Pfeiltasten W oder X, um eine Nummer
auszuwählen
Drücken Sie auf OK, bis sie einen Ton hören. Sprechen Sie
in 15 bis 20 cm Entfernung vom Telefon. Drücken Sie auf
OK, der Name wird wiederholt
Drücken Sie zum Verlassen des Menüs
1.. [Leerzeichen] + & - / 1
2.. A B C 2
3.. D E F 3
4.. G H I 4
5.. J K L 5
6.. M N O 6
7.. P Q R S 7
8.. T U V 8
9.. W X Y Z 9
* .. ‘ @ ( ) *
0.. , . : ; ? 0
#.. $ _ % ! #
95
Page 97

TELEFONBUCH
Eine Sprachsequenz löschen
Drücken Sie auf
Verwenden Sie die Pfeiltasten W oder X, um NAME
SPEICHERN auszuwählen
Drücken Sie auf OK
Verwenden Sie die Pfeiltasten W oder X, um eine Nummer
auszuwählen und die entsprechende Sequenz zu löschen
Drücken Sie auf C während der Anzeige. Das Symbol
„Stimme“ verschwindet.
Drücken Sie zum Verlassen des Menüs
MENU
Einen Eintrag suchen
Drücken Sie auf
Verwenden Sie die Pfeiltasten W oder X, um alle Nummern
aufzulisten. Wenn eine Sprachsequenz aufgenomm en wurde
und der Modus ‚Sprache’ aktiviert ist, wird der Name
abgespielt. (Die Nummer kann auch durch Eingabe des
ersten Buchstabens des Namens wiedergefunden werden)
Drücken Sie zum Verlassen des Menüs
96
Page 98

TELEFONBUCH
Anruf aus dem Telefonbuch tätigen
Wählen Sie wie zuvor beschrieben einen Eintrag aus (siehe
Eintrag suchen)
Drücken Sie auf OK, damit Ihre Nummer gewählt wird. Wenn
eine Sprachsequenz aufgenommen wurde und der Modus
‚Stimme’ aktiviert ist, wird der Name abgespielt
Einen Eintrag im Telefonbuch ändern
Wählen Sie wie zuvor beschrieben einen Eintrag aus (siehe
Eintrag suchen)
Wählen Sie nun MENÜ bis EDITIEREN? angezeigt wird
Drücken Sie auf OK
Drücken Sie C zum Löschen oder die Pfeiltasten W X zur
Auswahl der Ziffern, die verändert werden sollen
Drücken Sie OK
Fahren Sie so fort, wie es beim Ändern des Namens
beschrieben wurde
Drücken Sie auf OK, GESPEICHERT wird angezeigt,
dann verlassen Sie das Menü
Hinweis: Bei jeder Änderung wird eine eventuell aufgesprochene
Sprachsequenz gelöscht und muss neu aufgenommen werden.
97
Page 99

TELEFONBUCH
Einen Eintrag aus dem Telefonbuch löschen
Wählen Sie wie zuvor beschrieben einen Eintrag aus (siehe
Eintrag suchen)
Drücken Sie auf OK, LÖSCHEN? wird angezeigt
Drücken Sie C bis alles gelöscht ist
Drücken Sie zum Verlassen des Menüs
Das gesamte Telefonbuch löschen
Wählen Sie wie zuvor beschrieben einen Eintrag aus (siehe
Eintrag suchen)
Drücken Sie nun C, ‚ALLES LÖSCHEN?’ wird
angezeigt
Drücken Sie C bis alles gelöscht ist. Alle Einträge des
Telefonbuchs sind nun gelöscht. Es wird
Drücken Sie zum Verlassen des Menüs
Die Speicherplätze M1 bis M4 können als Kurzwahltasten verwendet
werden.
LEER angezeigt
98
Page 100

KURZWAHLSPEICHER
Rufnummern eingeben
Drücken Sie auf
Verwenden Sie die Pfeiltasten W oder X, um NUMMER
SPEICHERN auszuwählen
Drücken Sie auf OK
Geben Sie die gewünschte Rufnummer ein. Verwenden Sie
dabei die Taste
C zur Korrektur, falls notwendig
Drücken Sie auf OK
Drücken Sie die Taste des gewünschten Speicherplatzes (M1
bis M4).
GESPEICHERT wird angezeigt
MENU
Einen Anruf mit M1 bis M4 tätigen
- Drücken Sie auf eine der 4 Tasten M1, M2, M3 oder M4
- Nehmen Sie den Hörer ab oder drücken Sie auf
und die Nummer wird automatisch gewählt
99
oder auf OK
 Loading...