

Page 1
0
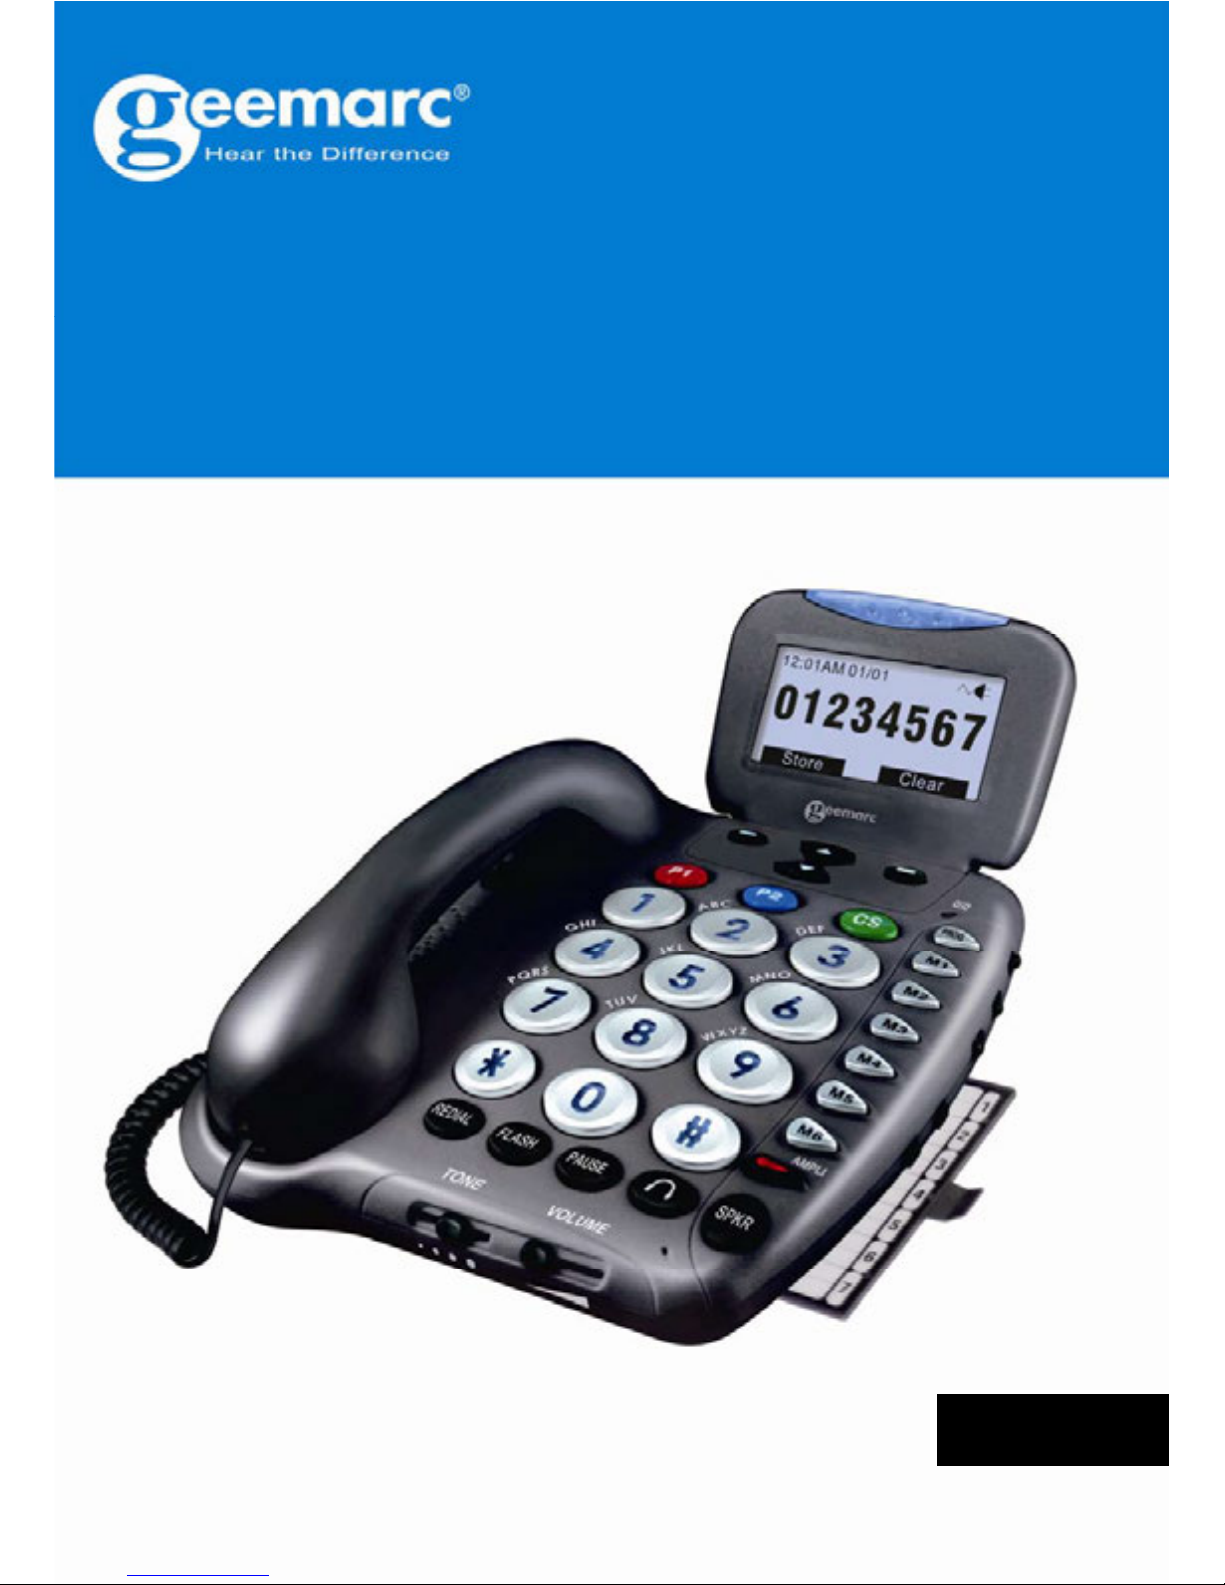
Amplified Big Button Telephone
Ampli550
English
Page 2

1
Contents 1
Introduction 3
Unpacking the Telephone 4
Description 5
General Description 5
Key Description 7
LCD Description 8
Installation 10
Night Light Function 10
Wall Mounting 10
Settings 11
Making a Call 11
Pause 12
Receiving a Call 12
Muting the Microphone 12
Using the Amplification Function 12
Using you Phone with hearing aids 13
Using Audio and Headset jacks 13
Hands-free 14
Hold Function 14
Ringer Setting 15
Speed Dial Setting 15
Flash Signal 18
Shaker 18
Caller ID 19
Phone Book 20
Menu Functions 22
Menu Navigation 22
Menu Map 22
Set Display 23
Set Phone 24
Setting Date & Time 26
Set Talk 27
Caller ID On Call Waiting 29
INTRODUCTION
INTRODUCTION
CONTENTS
CONTENTS
Page 3

2
Feature List 30
Troubleshooting 32
Safety Information 33
Regulatory Compliance 34
Guarantee 37
CONTENTS
Page 4
3
Congratulations on purchasing your Geemarc Ampli550. This is a
multifunction telephone which offers features such as hands free
use, caller ID*, caller announce, talking keypad, a phone book
and quick dial. It offers amplification, helpful for those with hearing
difficulties. It has a large button, easy to see and use keypad, to
help stop any misdialing. This telephone is compatible with
hearing aids.
It is important that you read the instructions below in order to use
your Geemarc telephone to its full potential. Keep this user guide
in a safe place for future reference.
This guide explains how to use the following telephone:
Ampli550
* To use the caller display facility, you must subscribe to your network provider’s caller display
service.
INTRODUCTION
Page 5

4
Unpacking the Telephone
When unpacking the telephone, you should find the following in
the box:
• Wall mount bracket
• 1 Ampli550 unit
• 1 Ampli550 handset with curly cord
• 2 Telephone line cords (one long and one short)
• 1 power adaptor
• 4 AAA rechargeable batteries
• User Guide
IMPORTANT SAFETY INSTRUCTIONS
Read and understand the Installation Guide & User Manual.
When using your telephone equipment, basic safety precautions
should always be followed to reduce the risk of fire, electric shock
and injury to person, including the following.
WARNING: To avoid the possibility of electrical shock, do not use
this product near water (For example, near a bathtub, wash basin,
kitchen sink or laundry tub, in a wet basement or near a swimming
pool);
WARNING: Avoid using the telephone during electrical storms.
There may be a remote risk of electric shock from lightning. If the
electrical storm is present in your immediate area, possibility of
electrical shock exists;
WARNING: Do not use the phone if you suspect a gas leak in the
area. The phone’s electrical contacts could create a spark, which
could ignite any heavy concentration of leaking gas.
Sonic Alert Warranty Center
1081 West Innovation Dr.
Kearney, MO 64060
Sales: 248-577-5400 Fax: 248-577-5433
Customer Service & Warranty: 1-888-864-2446
RMA@sonicalert.info
INTRODUCTION
Page 6

5
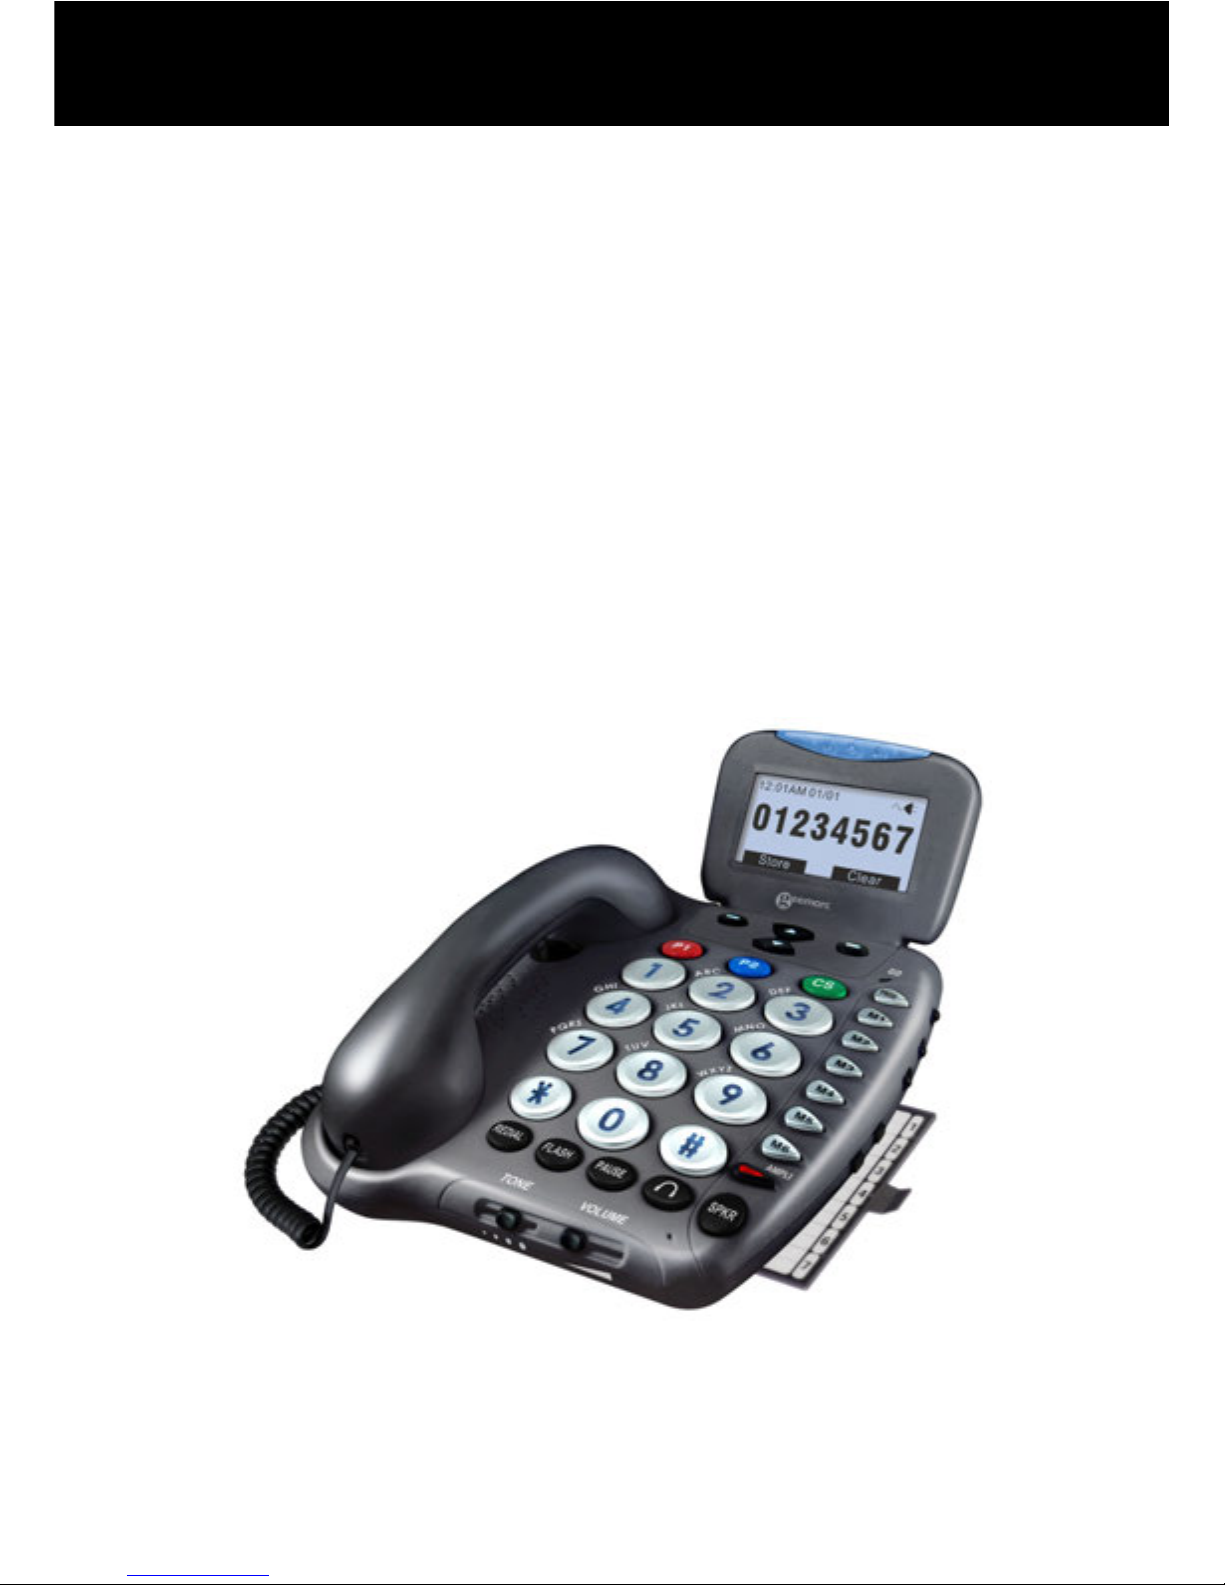
General Description
1. Handset Hanger 11. Amplifier key/indicator
(AMPLI)
2. Hook Switch 12. Speaker Key (SPKR)
3. Large LCD Screen
13. Headset Key (
)
4. Left Soft Key 14. Microphone
5. Up/Down Scroll 15. Pause Key
6. Right Soft Key 16. Volume adjustment
7. Message waiting / new call
LED
17. Tone adjustment
8. Programming Key 18. Flash Key
9. Emergency Speed Dial (P1,
P2, CS)
19. Redial Key
10. Speed Dial Keys (M1-M6) 20. Handset
DESCRIPTION
Page 7
6
1. Headset jack 2.5mm
2. Audio neckloop jack 3.5mm
3. Optional Bed Shaker jack
4. Volume Reset Override Switch (ON/OFF)
5. Power jack
6. Phone Line Cord jack
7. Back Light Switch
8. New Call Indicator Switch
9. Ringer / shaker / strobe select mode
10. Volume controls for ringer and speakerphone
DESCRIPTION
Page 8
7
Key Description
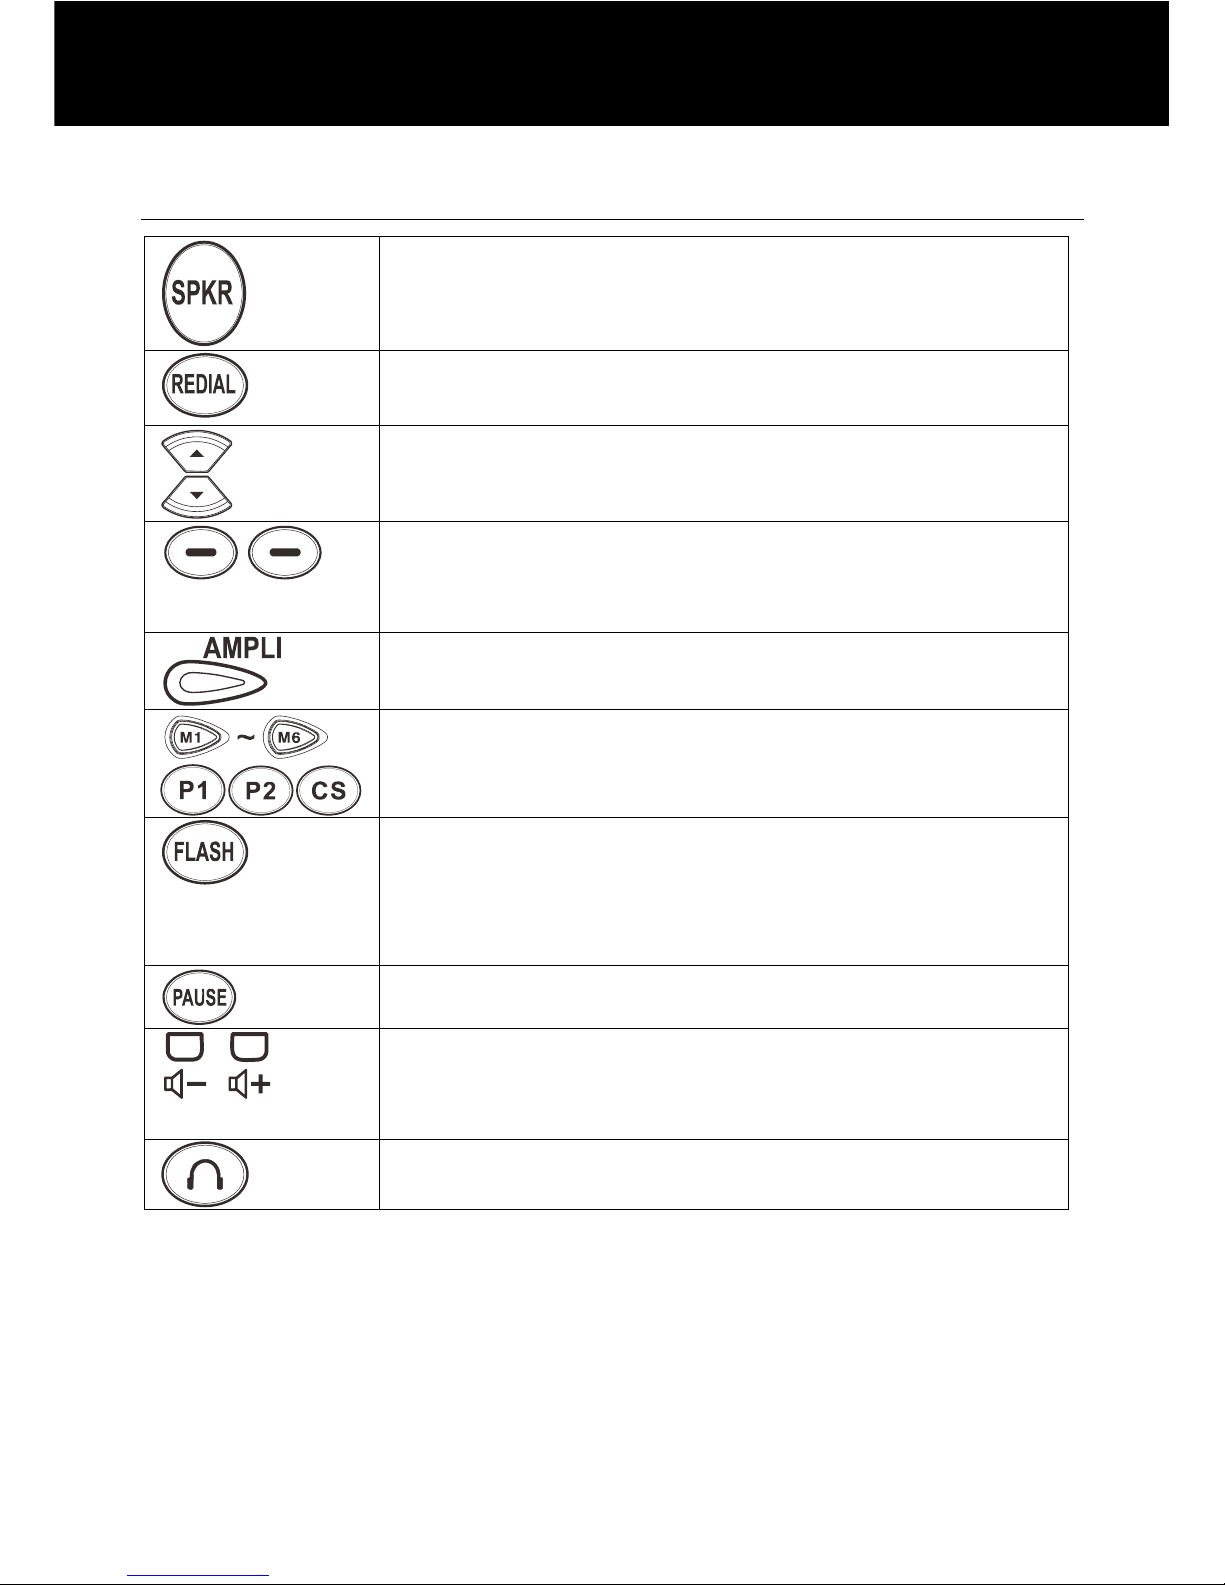
Make/Answer/End a call.
Activates the speakerphone if pressed during
a call, as described in page 14.
Last number redial, as described in page 11.
Insert a pause when pre-dialing a number
Highlight or scroll through the menu options.
Enter the CID list, as described in page 23.
Perform the functions indicated by the text
immediately over it (on the bottom line of the
display) which changes time by time.
Press this button to turn the extra amplification
ON or OFF.
The nine keys are used as one-touch speed
dial keys.
This button is used to disconnect a call and reestablish dial tone or to switch over to another
caller if you use custom calling services such
as call waiting.
Press this key to insert one or more pauses.
Use them to adjust the volume of ringer,
dialing talking and CID talking and
speakerphone volume.
To activate the headset mode.
DESCRIPTION
Page 9
8
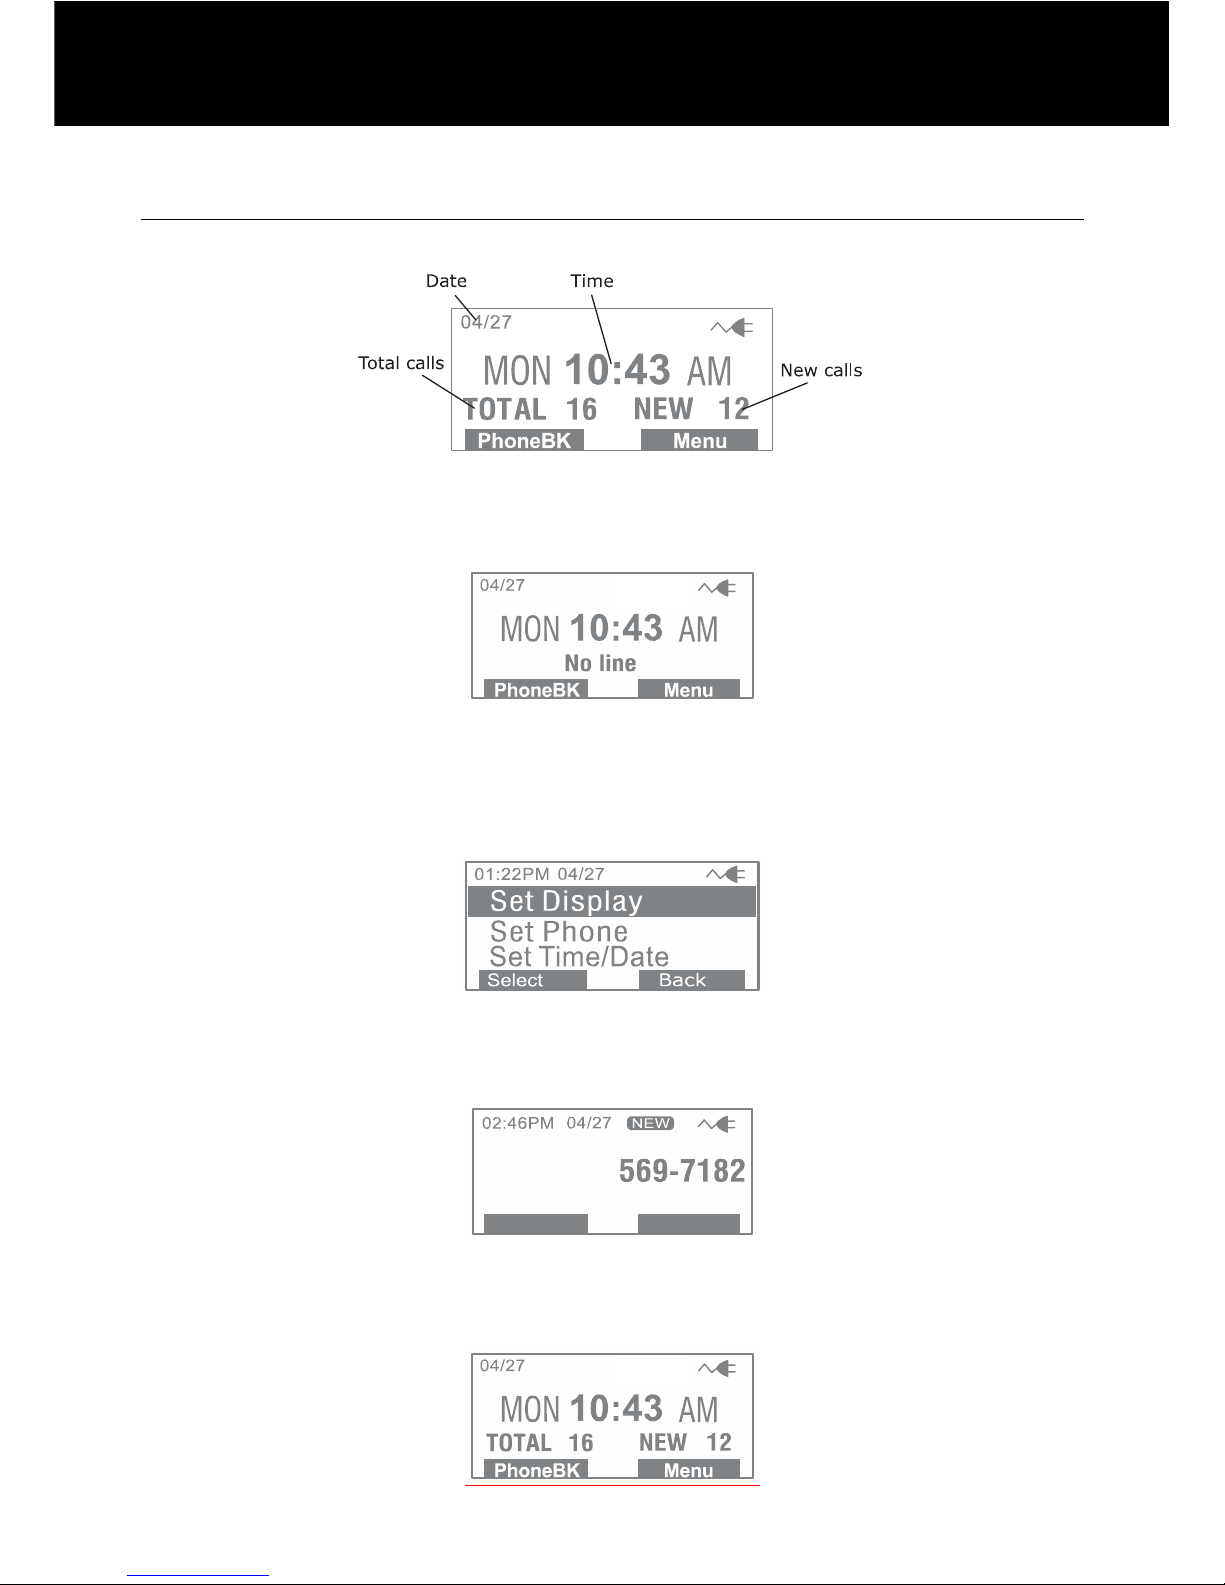
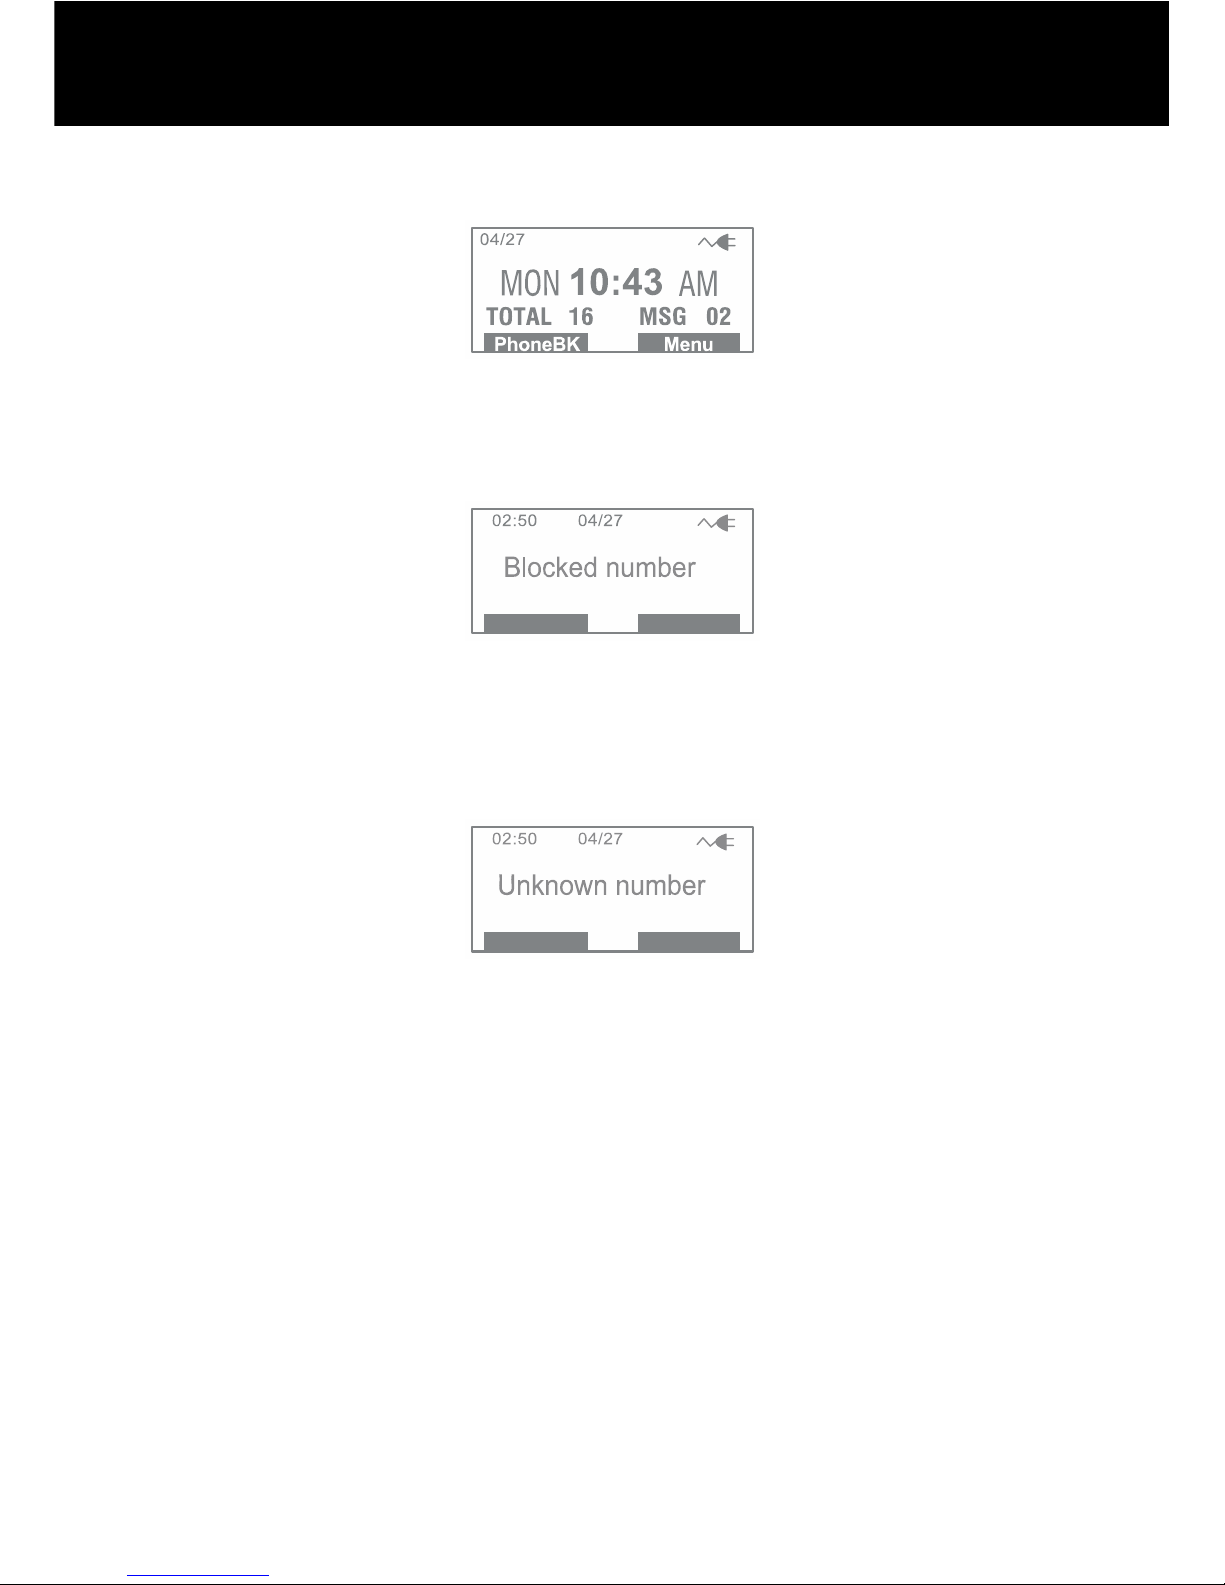
LCD Description
In standby mode, the large LCD display will show as below:
If you forget to connect the phone line cord, "No line" will show on
the screen.
When you press the Menu soft key, the display will show the main
menu. Use S or T key to scroll through the menu and select the
desired one, then press Select soft key to confirm.
When a new call comes in, the screen will display the caller's
phone number and/or name. If you subscribe to cid.
This shows you the total and new calls to be reviewed. In this
example, you have 16 calls in total which includes 12 new calls.
DESCRIPTION
Page 10
9
If the caller has exercised the option to prevent their name and
number from being sent, "Blocked number" will be shown on the
display.
This message will display when someone calls from an area
where the telephone company is not offering the caller
identification services or is not yet providing number delivery to
your area.
DESCRIPTION
Page 11
10
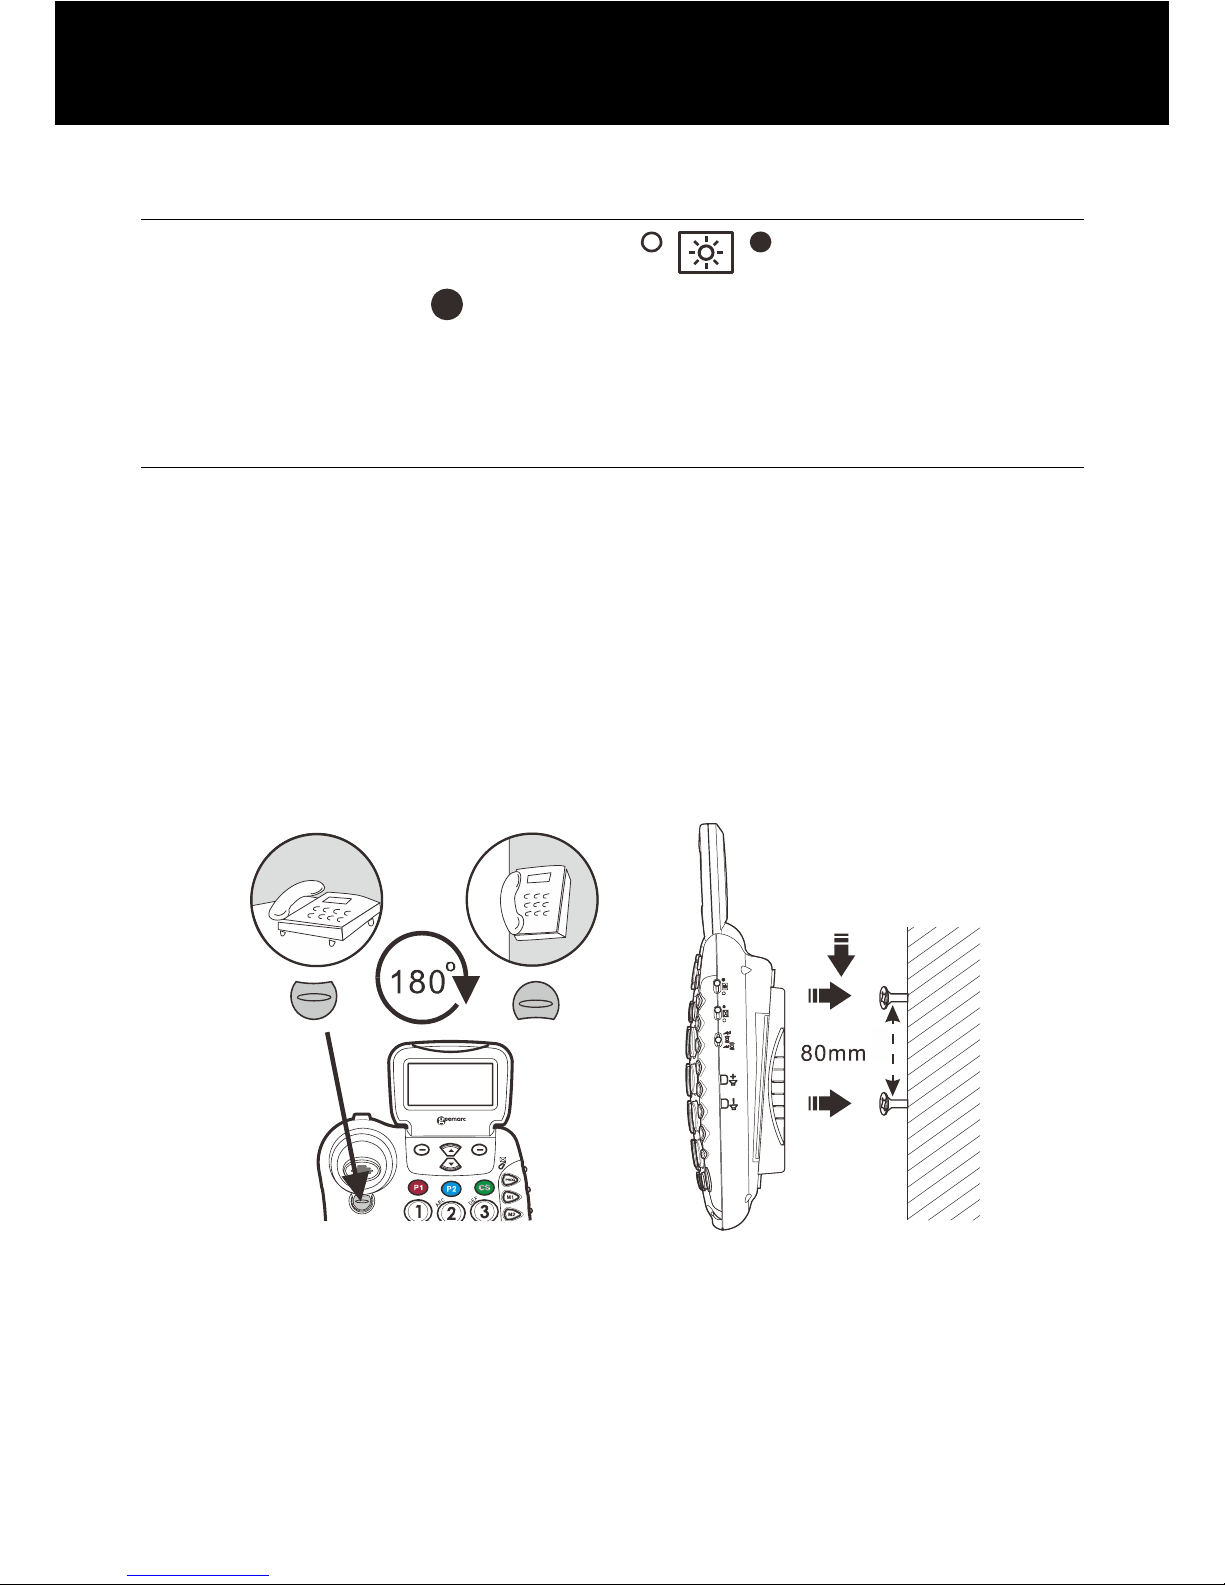
Night Light Function
If you move the back light switch ( ) located on the right
side of the phone to position, the LCD back light will alway be
bright so your phone can also be used as a night light.
Wall Mounting
1. Slide the handset hanger tab out and reverse its position
(rotate it 180 degrees). Slide it back into place so that the hook
points up (see diagram 1). This will keep the handset from
falling out of the cradle when it is mounted on the wall.
2. Install two self-tapping screws (not supplied) at a distance of
80 mm from each other and located on a vertical line.
3. Place the phone onto the screw-heads and slide down to
secure (see diagram 2).
Diagram 2
INSTALLATION
Diagram 1
Page 12

11
Making a Call
1. To make a call, lift the handset, listen for a dial tone and adjust
your volume & tone settings (see page 12).
2. You can dial a number manually or press one of the memory
dial buttons. Please refer to page 16.
3. To end the call, replace the handset on the base.
You can enter the desired phone number in standby mode, which
allows you to make corrections before dialing. Follow these steps:
1. Enter a telephone number (up to 32 digits). Check it. If you
make a mistake while entering a number, press the Clear soft
key to edit it.
2. When the number appears correctly, lift the handset or press
the SPKR key.
Last Number Redial
The REDIAL key is used to quickly redial the last number you
dialed.
1. Lift the handset and listen for the dial tone.
2. Press the REDIAL key. The phone will redial up to 32 digits
automatically.
Dialing a Number from the Redial List
1. Press the REDIAL key in standby mode.
2. Press S or T key repeatedly until you find out the number
you want to dial.
3. Pick up the handset or press the SPKR key to dial out the
number.
Clearing the Redial List
1. Press the REDIAL key in standby mode.
2. Press and hold the key, then the LCD display will show
Empty list to indicate you that the all the entries in redial list
have been deleted.
SETTINGS
Page 13

12
Pause
Pressing the PAUSE key will insert a 3 second pause in the
dialing sequence. This is intended to be used with memory dialing.
Receiving a Call
When a new call is received the phone will ring and the visual ring
indicator will flash. If you have a voice message: New voice mail
will be shown on the LCD.
1. To answer a call, lift the handset and speak.
2. Adjust your volume & tone settings if needed (see page 13).
3. To end the call, replace the handset on the base.
Muting the Microphone
During a conversation, you can temporarily switch your phone's
microphone off, so that the other party cannot hear you.
To mute your microphone
, press the Mute soft key during the
conversation. The "Mute" appears on the LCD.
To unmute your microphone
, press the Unmute soft key. You will
restore the normal condition.
Using the Amplification Function
Your phone is equipped with a specialized amplification function
designed to fit your needs. During a conversation you can adjust
the controls on the front panel of the phone (see diagram 3) and
use the AMPLI key. Adjust the VOLUME control and TONE
control to fit the levels to your hearing requirements.
When you press the AMPLI key, the handset receiver volume
adjustment is 15-40db. The TONE control allows you to either
boost low or high frequency range. If you press the AMPLI key
again, the receiver volume adjustment is 0-15db. The TONE
control cannot be used.
SETTINGS
Page 14

13
CAUTION: This telephone can produce very high (loud) sound
levels. Repeated incremental exposure to amplification levels
greater than 18 dB may be harmful to people without hearing loss.
Always adjust the volume control to the minimum setting after
using the phone.
Volume reset override switch
In standard mode the switch is set to " ", and the phone
will reset to normal sound levels when you hang up. This allows
people who do not require the level of amplification offered on the
phone to use it. If you would like to override the reset, simply turn
the override switch on the rear of the phone to " ".
Important Note: When the
switch is set to " ", you do not
need to press the AMPLI key to turn on the amplification feature,
the volume can be very loud and may damage your hearing.
If the phone works with batteries but without power adapter, in the
handset mode, the Amplify feature will not be activated even if
“Amplify mode” appears on the LCD.
Using your Phone with hearing aids
Your phone can be used with hearing aids equipped with a
telecoil (T-coil). Adjust your hearing aid "T-switch" to the "T"
position. Make sure to hold the handset close to your hearing aid.
Using Audio and Headset Jacks
Your phone is equipped with both an Audio and Headset jack,
providing total flexibility and multi-functionality. Both the jacks are
amplified, allowing you to adjust both the tone and volume.
Diagram 3
SETTINGS
Page 15

14
Audio Neckloop Jack
Using this jack allows you to listen through your neckloop or
headphones while speaking into the handset or speakerphone.
Headset Jack
This jack can accommodate many hands-free headsets. Using
this jack you can listen and speak through your hands-free
headset.
Hands-free
During a call, you may turn on the speakerphone built in the
phone. In this mode you can enjoy the comfort of the handsfree
conversation.
To turn the feature on
, press the SPKR key during a call, then
replace the handset on the base. The
icon appears on the
LCD.
To turn the feature off, and keep on talking in normal mode,
simply pick up the handset. The
icon will disappear.
Adjusting Speaker Volume
In speaker mode you can adjust the speaker volume by using the
Volume Controls or located on the right side of the
phone.
Hold Function
During a call, you can press the Hold soft key to put a call on hold
and the LCD will display "Call on hold". Hanging up the handset
will not disconnect the call.
To continue the conversation, simply pick up the handset or press
the Unhold soft key.
SETTINGS
Page 16

15
Ringer Setting
You can select your own base ringer tone and adjust the ringer
volume. You can also adjust the volume to "Ringer OFF" in order
to turn off the ringer.
1. Press Menu soft key to display the main menu list.
2. Press T key to move to Set Phone and then press Select
soft key.
3. Press Select soft key to choose Set Ring. Press Select soft
key again to choose Ringer volume. You can choose from
volume setting 1 through 5. Every time you press the S or
T
key, the phone rings with the selected volume level.
4. Press the Select soft key to confirm.
5. Press
T key to set the Ringer tone, press the Select soft key.
6. Press the
S or T key repeatedly to select the desired ringer
tone. Each time you press the
S or T key, the phone rings
with the selected ringer tone.
7. Press Select soft key to confirm and return to the previous
menu.
In standby mode You can also adjust the ringer volume by using
the Volume Controls
or on the right side of the base
phone. The display will show the current level. For example:
volume 1.
WARNING: RING VOLUME IS VERY LOUD AND CAN DAMAGE
YOUR HEARING. NEVER PUT YOUR EAR CLOSE TO THE
RINGER.
Speed Dial Setting
One-touch Memory
Your phone allows you to program 9 frequently dialed numbers: 6
speed dials and 2 priority speed dials (p1 and p2) and a customer
service button (cs).. Each memory key can store up to 24 digits.
SETTINGS
Page 17

16
Storing Memory Numbers
1. Use the keypad to enter the number you want to store. You
can use the Clear soft key to edit the number.
2. Press and hold one of the Memory dial keys, then press the
Save soft key. The display shows Name:.
3. Enter the name your want to use with the number. You can
use the Clear soft key to edit it. Press the Save soft key to
confirm.
4. Press the
S or T key repeatedly to select the desired ringer
tone to use with the number.
5. Press Select soft key to confirm.
Note:
Entering a new number in the same location will automatically
erase the previous number.
Viewing and Dialing Two Touch Memory Numbers
In standby mode press one of the memory dial keys or Speed dial
keys, the display will show the corresponding number. Lift the
handset or press the SPKR key to dial it out.
Using the Options
1. In standby mode press one of the memory dial keys or Speed
dial keys.
2. Press Options soft key to choose the desired option:
• Play Voice: allows you to play the voice prompt of this
entry. If you have recorded the name for this entry, the
system will announce the name, otherwise it can only
announce the number.
• Record Voice: allows you to record the name for the
selected entry.
• Erase Voice: allows you to delete the name you have
recorded for the selected entry.
• Edit: allows you to edit the selected entry.
• Erase: allows you to delete the selected entry.
SETTINGS
Page 18

17
Note:
If you record a voice prompt for an entry, an icon will appear
before the name of this entry.
Two-touch Memory
Your phone allows you to program 10 frequently two-touch
memory numbers (0~9). Each memory key can store up to 24
digits.
Storing Memory Numbers
1. Use the keypad to enter the number you want to store. You
can use the Clear soft key to edit the number.
2. Press and hold the PROG key.
3. Press one of the numeric keys (0~9), then press the Save soft
key. The display shows Name:.
4. Enter the name your want to use with the number. You can
use the Clear soft key to edit it. Press the Save soft key to
confirm.
5. Press the
S or T key repeatedly to select the desired ringer
tone to use with the number.
6. Press Select soft key to confirm.
Note:
Entering a new number in the same location will automatically
erase the previous number.
Viewing and Dialing Memory Numbers
In standby mode press and hold one of the numeric keys (0~9),
the display will show the corresponding number. Lift the handset
or press the SPKR key to dial it out.
Using the Options
1. In standby mode press and hold one of the numeric keys
(0~9).
2. Press Options soft key to choose the desired option:
• Play Voice: allows you to play the voice prompt of this
entry. If you have recorded the name for this entry, the
SETTINGS
Page 19

18
system will announce the name, otherwise it can only
announce the number.
• Record Voice: allows you to record the name for the
selected entry.
• Erase Voice: allows you to delete the name you have
recorded for the selected entry.
• Edit: allows you to edit the selected entry.
• Erase: allows you to delete the selected entry.
Note:
If you record a voice prompt for an entry, an icon will appear
before the name of this entry.
Flash Signal
When the line is engaged, pressing the FLASH key sends the
flash signal. This key is used in conjunction with special services
(e.g. call waiting) which can be available in your phone network.
For further details please contact your network telephone
company.
To use the said special services, just press the FLASH key while
the line is engaged.
Note:
This key only operates when your telephone has been installed
for Tone mode (Dialing Mode menu must be set to Tone option).
Shaker
Your telephone incorporates several options to alert you that the
phone is ringing. The loud, adjustable Ringer as well as the bright
Strobe and optional Bed shaker or any combination of these allow
you to customize the phone to fit your needs.
Your phone is equipped with a bright Strobe light, which flashes a
very bright strobe when the phone rings. It's almost impossible to
miss telephone calls when you select the Strobe Ringer. If you
purchased the optional Bed shaker, simply plug into the shaker
jack and place it between your mattress and box spring.
SETTINGS
Page 20

19
Caller ID
This telephone automatically displays an incoming caller's
number/name along with the date and time of the call. It will
record up to 30 calls of up to 15 digits and store the data into
memory.
IMPORTANT: You must subscribe to Caller ID Service from your
local telephone company to utilize this feature.
Viewing the Caller List
Use S or T key to scroll through entries. Records will be listed
in the order they were received.
Dialing a Number from the Caller List
Use S or T key to scroll to the desired number, if the number is
10 or 11 digits, you can add or remove a 1 from in front of the
number. For example if the original number in Caller ID list was
800-965-9043, press the * key repeatedly to change it to 1-800965-9043 or 965-9043. Or if the number is 1-987-654-3210, press
the * key repeatedly to change it to 987-654-3210 or 654-3210.
Then pick up the handset or press the SPKR key to dial it out.
Using the Caller List Options
1. Use S or T key to locate the desired record.
2. Press Options soft key to choose the desired option:
• Erase: allows you to delete the selected entry.
• Erase all: allows you to delete all the entries.
• Store: allows you to add the entry to the phonebook.
Note:
If you select Erase all, a message "Erase all?" will ask you to
confirm or not. Press Yes to confirm or No to cancel.
SETTINGS
Page 21

20
Phone Book
The phonebook built in your phone allows you to store frequently
used numbers so that you can easily make a call without having
to remember or enter the phone number.
Character Map
To enter a specific alphanumeric character, press one or more
times the relevant key for the required character according to the
following table: once for the first character, twice for the second
and so on.
Key Characters in the displayed order
0 0
1 (Spc) _ * , 1
2 Aa Bb Cc ( 2
3 Dd Ee Ff ) 3
4 Gg Hh Ii # 4
5 Jj Kk Ll / 5
6 Mm Nn Oo ‘ 6
7 Pp Qq Rr Ss 7
8 Tt Uu Vv ? 8
9 Ww Xx Yy Zz 9
Notes:
• If you want to shift the case between upper and lower, while
entering letters, press the * key.
• When entering the same letter twice or a different letter with
the same key, wait for a few seconds for the cursor to move
automatically and then select the next letter.
Adding the Phonebook Entries
1. Enter a phone number (up to 24 digits) while in standby mode
and then press Save soft key.
2. Press Save soft key again, the display shows "Name:". Enter
the name you want to use, then press Save soft key to confirm.
3. Press the
S or T key repeatedly to select the desired ringer
tone to use with the number.
4. Press Select soft key to confirm.
SETTINGS SETTINGS
Page 22

21
Notes:
If you make a mistake while entering a name or a number, use the
Clear soft key to correct it. Each time you press this key, the last
digit is deleted.
Viewing the Phonebook Entries
1. Press the PhoneBk soft key in standby mode to enter the
phonebook.
2. Press
S or T key repeatedly until the desired entry is
displayed.
3. Lift the handset or press the SPKR key to dial out this number.
Note:
If you have activated the Review Talking feature in advance,
every time you press
S or T key, the system will announce the
number of the highlighted entry.
Using the Phonebook Options
1. Press PhoneBk soft key to enter the phonebook.
2. Press S or T key repeatedly until the desired entry is
highlighted.
3. Press Options soft key to choose the desired option:
• Play Voice: allows you to play the voice prompt of this
entry. If you have recorded the name for this entry, the
system will announce the name, otherwise it will only
announce the number.
• Record Voice: allows you to record the name for the
selected entry.
• Erase Voice: allows you to delete the name you have
recorded for the selected entry.
• Edit: allows you to edit the selected entry.
• Erase: allows you to delete the selected entry.
Note:
If you record a voice prompt for an entry, an icon
will appear
before the name of this entry.
SETTINGS
Page 23

22
Menu Navigation
To access a menu option:
1. To display menu list, press the Menu soft key.
2. To scroll through menu options, press S or T key
repeatedly.
3. To select a menu, press the Select soft key when the desired
menu appears on the display.
4. Repeat if necessary.
To exit from any menu:
If you press the Back soft key or the Exit soft key, the phone
returns to the previous screen.
Menu Map
Set Display
Set Language (see page 24)
Set Contrast (see page 24)
Font Size (see page 25)
Hour Format (see page 25)
Date Format (see page 25)
Set Phone
Set Ring (see page 15)
Call Waiting (see page 26)
Set Flash (see page 26)
Dialing Mode (see page 26)
AUTO ON HOOK (see page 27)
Set Time/Date (see page 27)
Set Talk
DIALING TALKING (see page 28)
CID TALKING (see page 28)
REVIEW TALKING (see page 28)
Voice Prompt (see page 29)
MENU FUNCTIONS
Page 24

23
Set Display
Using this feature, you can customize the display settings,
according to your requirements (language, contrast, smaller font
and hour format).
Language Setting
The phone supports up to 4 predefined languages: English,
Spanish, French and German. You can change the language
used to display the menu messages.
1. Press Menu soft key to display the main menu list.
2. Press Select soft key to access Set Display.
3. Press Select soft key to select Set Language.
4. Press S or T key repeatedly to scroll through the options.
Each language will be displayed in its own native translation.
5. Press Select soft key to select the required language.
LCD Contrast Setting
1. Press Menu soft key to display the main menu list.
2. Press Select soft key to access Set Display.
3. Press the T key to move to Set Contrast, press Select soft
key.
4. Press S or T key repeatedly to choose among the 8
available contrast levels and then press Select soft key.
Switch to smaller font
1. Press Menu soft key to display the main menu list.
2. Press Select soft key to access Set Display.
3. Press S or T key repeatedly to move to Dim:X--->x, press
Select soft key.
4. Press
S or T key repeatedly to choose ON or OFF and then
press Select soft key.
Note:
If you select ON, when you pre-dial a number, if the number
exceeds 8 digits, the font will be switched to smaller size
automatically.
MENU FUNCTIONS MENU FUNCTIONS
Page 25

24
Hour Format Setting
1. Press Menu soft key to display the main menu list.
2. Press Select soft key to access Set Display.
3. Press S or T key repeatedly to move to Hour Format,
press Select soft key.
4. Press S or T key repeatedly to choose 12 hour clock or 24
hour clock and then press Select soft key.
Note:
If you select 12 hour clock, AM/PM will appear on the right of the
time in standby mode.
Date Format Setting
1. Press Menu soft key to display the main menu list.
2. Press Select soft key to access Set Display.
3. Press S or T key repeatedly to move to Date Format, press
Select soft key.
4. Press
S or T key repeatedly to choose MM/DD or DD/MM
and then press Select soft key.
Set Phone
Keypad Tones Setting
1. Press Menu soft key to display the main menu list.
2. Press the T key to move to Set Phone and then press Select
soft key.
3. Press Select soft key to access Set Ring.
4. Press the S or T key to choose Keypad Tones, then press
Select soft key.
5. You can use S or T key to choose ON or OFF to enable or
disable the function.
6. Press the Select soft key.
Call Waiting
1. Press Menu soft key to display the main menu list.
MENU FUNCTIONS
Page 26

25
2. Press the T key to move to Set Phone and then press Select
soft key.
3. Press the T key to move to Call Waiting and then press
Select soft key. The display shows the current setting.
4. Use S or T key to select ON/OFF to activate/deactivate the
call waiting function, press Select soft key to confirm.
Flash Time Setting
1. Press Menu soft key to display the main menu list.
2. Press the T key to move to Set Phone and then press Select
soft key.
3. Press S or T key repeatedly to move to Set Flash and then
press Select soft key. The display shows the current setting.
4. Press S or T key repeatedly to choose among 100ms,
300ms and 600ms, press Select soft key.
Dialing Mode Setting
1. Press Menu soft key to display the main menu list.
2. Press the T key to move to Set Phone and then press Select
soft key.
3. Press S or T key repeatedly to move to Dialing Mode and
then press Select soft key. The display shows the current
setting.
4. Press S or T key repeatedly to choose between Tone and
Pulse, press Select soft key.
Notes:
• This menu is not used in countries where only Tone dialing is
available.
• If you are not sure which dialing mode to select, please
contact your local service provider.
Auto on hook
When the Auto on hook feature is on, your phone will
automatically disconnect the line after 15 seconds if the phone is
MENU FUNCTIONS
Page 27

26
left off the hook. This will restore your line to be able to receive
another call even if you leave the handset off the base.
1. Press Menu soft key to display the main menu list.
2. Press the T key to move to Set Phone and then press Select
soft key.
3. Press S or T key repeatedly to move to AUTO ON HOOK
and then press Select soft key. The display shows the current
setting.
4. Use S or T key to choose ON or OFF to activate or
deactivate the auto on hook feature.
5. Press the Select soft key to confirm.
Setting Date & Time
In standby mode, the phone displays the current date and time to
help you keep track of your appointments. You need to set the
date and time so that when you receive calls they will appear with
the correct date and time.
1. Press Menu soft key to display the main menu list.
2. Press S or T key repeatedly to move to Set Time /Date,
press Select soft key. The current settings are displayed.
3. Enter the current time using the numeric keypad, press Save
soft key.
4. Enter the current date using the numeric keypad, press Save
soft key.
5. Enter the current year using the numeric keypad, press Save
soft key.
Note:
You can select the hour format and date format. Please refer to
par. Hour Format Setting and Date Format Setting.
MENU FUNCTIONS
Page 28

27
Set Talk
Dialing Talking
This feature allows you to check the number you have entered in
standby mode without looking at the display.
1. Press Menu soft key to display the main menu list.
2. Press S or T key repeatedly to move to Set Talk, press
Select soft key.
3. Press Select soft key to access DIALING TALKING.
4. UseS or T key to select ON/OFF to activate/deactivate the
dialing talking function, press Select soft key to confirm.
CID Talking
The talking CID can announce the number that comes in unless
the caller blocks the number, so this feature allows you to check
the caller ID number or caller’s name when a new call is being
received without looking at the display. Note that if you have
stored a number in phone book and recorded the corresponding
name, when an incoming call with this number comes in, the
system will announce the name associates with this number.
1. Press Menu soft key to display the main menu list.
2. Press S or T key repeatedly to move to Set Talk , press
Select soft key.
3. Press the T key to move to CID TALKING, press Select soft
key.
4. Use S or T key to select ON/OFF to activate / deactivate the
CID talking function, press Select soft key to confirm.
Review Talking
The system can announce the number that stored in phone book
when you are reviewing the phone book, so the feature allows you
to check these numbers when you use
S or T key to scroll
through the phone book entries. Note that if you have recorded
the corresponding name, the system will announce the name
MENU FUNCTIONS
Page 29

28
associates with this number. To activate this feature, do the
following steps:
1. Press Menu soft key to display the main menu list.
2. Press S or T key repeatedly to move to Set Talk, press
Select soft key.
3. Press S or T key repeatedly to move to REVIEW
TALKING, press Select soft key.
4. Use S or T key to select ON/OFF to activate / deactivate
the CID talking function, press Select soft key to confirm.
Note:
You can use and button to adjust the talking
volume, and at the same time, the memo announcement volume
will be adjusted accordingly.
Voice Prompt
You are able to select the language used to play the voice prompt
messages.
1. Press Menu soft key to display the main menu list.
2. Press S or T key repeatedly to move to Set Talk, press
Select soft key.
3. Press S or T key repeatedly to move to Voice Prompt,
press Select soft key.
4. Use S or T key to scroll through the options. Each language
will be displayed in its own native translation.
5. Press the Select soft key to choose the required language.
MENU FUNCTIONS
MENU FUNCTIONS
Page 30

29
When you subscribe to Call Waiting service from your local
telephone company and activate the Call Waiting function via
menu, the telephone will display the name and number of the
second caller while you are having a conversation.
1. When you are on the line, the telephone will automatically
display the name and number of the second caller.
2. Press the FLASH key to answer the second caller.
3. When you have finished, press the FLASH key to continue
with your conversation with the first caller.
CALLER ID ON CALL WAITING
Caller ID info displayed
Caller two's information
is displayed
Page 31

30
• FSK and DTMF dual system Caller ID
• Extra Large Caller ID Screen
• Caller ID list with up to 30 entries
• Caller ID/Call Waiting
• Phonebook with up to 39 entries
• Amplification function
• Amplified Headset jack
• Hearing Aid compatible
• Adjustable volume control
• Adjustable extra-loud ringer
• Big Keypad buttons
• 3.5mm Bed Shaker jack
• Real time clock with date & time
• Flash, Mute, Hold
• 9 one-touch speed dial buttons
• 10 two-touch speed dial buttons (0~9)
• LCD contrast setting
• Hour format setting
• Date format setting
• Dialing talking, CID talking & Reviewing talking
• Hands-free speakerphone
• Auto on-hook
• Dialing mode selection
• Wall mounting
FEATURE LIST
Page 32

31
FEATURE LIST
Volume Amplification
Extra Large Caller ID Screen
Memory
Card
Big Keypad Buttons
Page 33

32
No dial tone
• Check that all phone cord connections are securely
plugged into the telephone & wall jack.
• Check that the phone is in the correct dialing mode, tone or
pulse.
• Plug another phone into the wall jack to make sure your
phone service is working properly.
No audible ringer
• Make sure the ringer is not turned off.
• Check the volume level of the ringer.
• You may have too many extensions on your line. Try
unplugging a few devices.
No amplification
• Check to see if the Amplify key is "On". The red light
should be lit. Also check power supply connections.
Noise, Static, Interference while using the handset
• A filter may be required for homes with a DSL line or near
Radio towers.
Caller ID information does not show
• Make sure you are subscribed to Caller ID through your
local company.
TROUBLESHOOTING
Page 34

33
General
Only use the power supply included with the product.
Do not open the unit. Contact the helpline for all repairs.
The phone is capable of amplifying sounds to a loud volume. It is
important to instruct all potential users of its proper operation. It is
advised to adjust the volume control to its minimum level (Low)
when not in use and alert other users that hearing damage can
potentially result from misuse.
Cleaning
Clean the telephone with a soft cloth. Never use polishes or
cleaning agents - they could damage the finish or the electrics
inside.
Environmental
Do not expose to direct sunlight.
Always ensure there is a free flow of air over the surfaces of the
telephone.
Do not place any part of your product in water and do not use it in
damp or humid conditions e.g. bathrooms.
Do not expose your product to fire or other hazardous conditions.
Unplug your phone from the telephone socket during
thunderstorms because it could damage your telephone. Your
guarantee does not cover thunderstorm damage.
The telephone is designed for working within a temperature range
of 5°C to 45°C.
SAFETY INFORMATION
Page 35

34
- This equipment complies with Part 68 of the FCC rules and the
requirements adopted by the ACTA. On the bottom of this
equipment is a label that contains, among other information, a
product identifier in the format US: AAAEQ##TXXXX. If requested,
this number must be provided to the telephone company.
- All applicable certification jacks Universal Service Order Codes
(USOC) for the equipment is provided (i.e. RJ11C) in the package
with each piece of approved terminal equipment.
- A plug and jack used to connect this equipment to the premises
wiring and telephone network must comply with the applicable
FCC Part 68 rules and requirement adopted by the ACTA. A
compliant telephone cord and modular plug is provided with this
product. It is designed to be connected to a compatible modular
jack that is also compliant. See installation instructions for details.
- The REN is useful to determine the quantity of devices you may
connect to your telephone line and still have all of those devices
ring when your telephone number is called. In most, but not all
areas, the sum of the REN’s of all devices connected to one line
should not exceed five (5.0). To be certain of the number of
devices you may connect to your line, as determined by the REN,
you should contact your local telephone company to determine
the maximum REN for your calling area.
- If this equipment causes harm to the telephone network, the
telephone company will notify you in advance that temporary
discontinuance of service may be required. But if advance notice
isn’t practical, the telephone company will notify the customer as
soon as possible. Also, you will be advised of your rights to file a
complaint with the FCC if you believe it is necessary.
- The telephone company may make changes in its facilities,
equipment, operation or procedures that could affect the operation
of the equipment. If this happens the telephone company will
provide advance notice in order for you to make necessary
modifications to maintain uninterrupted service.
- This equipment may not be used on coin service provided by the
telephone company. Connection to party lines is subject to state
tariffs. This equipment is hearing aid compatible.
REGULATORY COMPLIANCE
Page 36

35
Warning: Changes or modifications to this unit not expressly
approved by the party responsible for compliance could void the
user’s authority to operate the equipment.
NOTE: This equipment has been tested and found to comply with
the limits for a Class B digital device, pursuant to Part 15 of the
FCC Rules. These limits are designed to provide reasonable
protection against harmful interference in a residential installation.
Some cordless telephones operate at frequencies that may cause
interference to nearby TV’s and VCR’s; to minimize or prevent
such interference, the base of the cordless telephone should not
be placed near or on top of a TV or VCR; and, if interference is
experienced, moving the cordless telephone farther away from the
TV or VCR will often reduce or eliminate the interference.
However, there is no guarantee that interference will not occur in
a particular installation. If this equipment does cause harmful
interference to radio or television reception, which can be
determined by turning the equipment off and on, the user is
encouraged to try to correct the interference by one or more
of the following measures:
• Re-orient or relocate the receiving antenna.
• Increase the separation between the equipment and receiver.
• Connect the equipment into an outlet on a circuit different
from that to which the receiver is connected.
• Consult the dealer or an experienced radio TV technician for
help.
- If trouble is experienced with this equipment, for repair or
warranty information, please contact our customer service
staff at: 1-888-864-2446 (RMA@sonicalert.info)
- If the equipment is causing harm to the telephone network,
the telephone company may request that you disconnect
the equipment until the problem is resolved.
- Please follow instructions for repairing if any; otherwise do
not alter or repair any part of device except as specified.
Opening the equipment or any attempt to perform repairs will
REGULATORY COMPLIANCE
Page 37

36
void the warranty. For service or repairs, call 1-888-864-2446
(RMA@sonicalert.info)
- Connection to party line service is subject to state tariffs. Contact
the state public utility commission, public service commission or
corporation for information.
- If your home has specially wired alarm equipment connected to
the telephone line, ensure the installation of this telephone
equipment does not disable your alarm equipment. If you have
questions about what will disable alarm equipment, consult your
telephone company or a qualified installer.
- This equipment is hearing aid compatible.
Sonic Alert warrants the phone against any defect in materials or
REGULATORY COMPLIANCE
GUARANTEE
Page 38

37
workmanship for the period of one (Does not include batteries)
year from the date of purchase.
Should you experience a problem, contact our customer service
department
Be sure to save your sales receipt as proof of purchase date
should you need warranty service.
Within a period of one year from purchase date, Sonic Alert will
repair or replace (our discretion) your phone at no cost, if a defect
in materials or workmanship is found. If we elect to replace your
phone, we may replace it with a new or reconditioned product of
the same or similar design.
Repair or replacement will be warranted for a period of 90 days or
the original time on the original warranty, whichever is longer.
The warranty does not cover accidents, negligence or breakage to
any parts or damage due to installing incorrect batteries. This
includes shipping damage, failure to follow instructions, misuse,
fire, floods, use of incompatible accessories, Acts of God or failure
in your phone service carrier’s line service. The product must not
be tampered with or taken apart by anyone who is not an
authorized
Sonic Alert representative. Tampering with the phone will void any
written or implied warranties
Sonic Alert shall not be responsible for loss of time,
inconvenience, property damage caused by your phone or any
other accidental or consequential damages
Warranty service is available only with proof of purchase.
Simply send the Ampli550 (postpaid) and a copy of your sales slip
GUARANTEE
Page 39

38
as proof of purchase to:
CS Green Customer Service key at top has been pre-
programmed with our USA customer service number. Press the
CS key to direct dial for any Customer Service or technical related
help or questions. Our customer service department is available
from 9Am-5Pm Monday through Friday Central time.
Sonic Alert Warranty Center 1081 West Innovation Dr.
Kearney, MO 64060 (RMA@sonicalert.info)
IMPORTANT: YOUR RECEIPT IS PART OF YOUR WARRANTY
AND MUST BE RETAINED AND PRODUCED IN THE EVENT
OF A WARRANTY CLAIM
Sonic Alert Warranty Center
1081 West Innovation Dr.
Kearney, MO 64060
Sales: 248-577-5400 Fax: 248-577-5433
Customer Service & Warranty: 1-888-864-2446
RMA@sonicalert.info
UGAmpli550 _US_En_v1.4
 Loading...