

Page 1
imagination at work
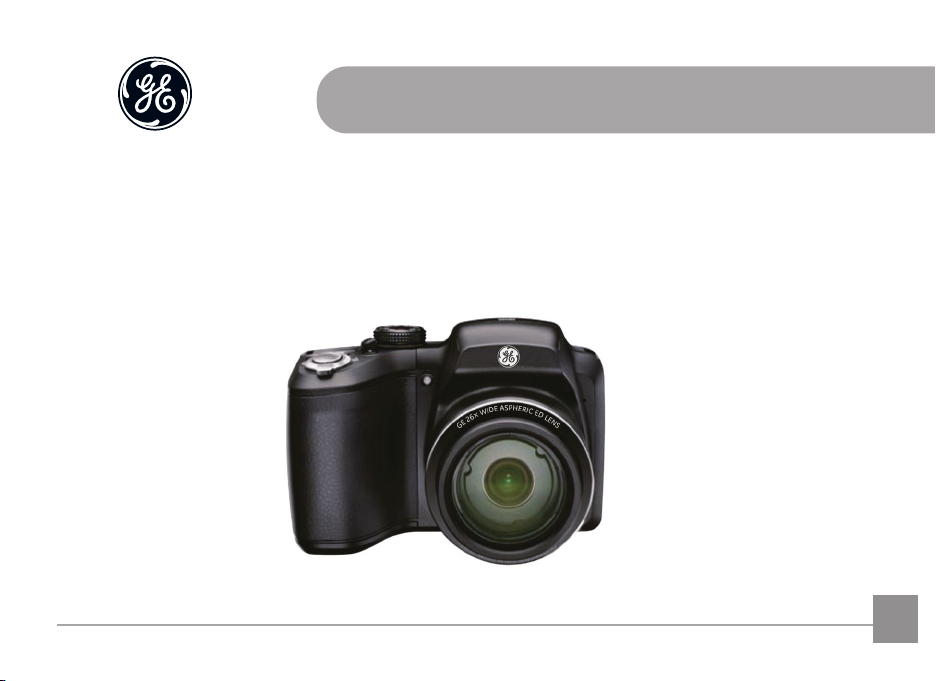
GE Digital Camera
Power PRO Series: X2600
User Manual
EN
Page 2

BEFORE YOU START
Declaration of Conformity
Responsible Party: General Imaging Company
Address: 1411 W. 190th Street, Suite 550, Gardena,
Customer Service Telephone Number:
+1-800-730-6597
CA 90248, U.S.A.
(Outside U.S. & Canada: +1-310-755-6857)
For Customers in the U.S.A.
Tested to Comply with FCC Standards
FOR HOME OR OFFICE USE
This device complies with part 15 of the FCC Rules.
Operation is subject to the following two conditions: (1) This
device may not cause harmful interference, and (2) this device
must accept any interference received, including interference
that may cause undesired operation.
For Customers in Europe
"CE" mark indicates that this product complies with
the European requirements for safety, health,
environment and customer protection. "CE" marked
cameras are intended for sales in Europe.
This symbol [crossed-out wheel bin WEEE Annex IV]
indicates separate collection of electrical waste and
electronic equipment in the European countries. Please
do not throw the equipment into domestic refuse. Please
use the return and collection systems available in your
country for proper, safe disposal of this product.
About this Manual
Thank you for purchasing this GE digital camera. Please read
this manual carefully and keep it in a safe place for future
reference.
General Imaging Company reserves all rights of this
document. No part of this published manual may be
reproduced, transmitted, transcribed, stored in a retrieval
system or translated into any language or computer
language, in any form, by any means, without the prior
written permission of General Imaging Company.
All trademarks mentioned in this manual are used for
identication purposes only and are properties of their
respective owners.
This manual provides you with instructions on how to use
your new GE digital camera. Every eort has been made
to ensure that the contents of this manual are accurate,
however General Imaging Company reserves the right to
make changes without notice.
Throughout this manual, the following symbols are used to
help you locate information quickly and easily:
Indicates useful information.
Indicates precautions are to be taken while operat-
ing the camera.
1
Page 3

SAFETY NOTES
Safety notes for this camera
• Do not drop the camera or allow it to hit solid objects.
• Do not attempt to disassemble the camera.
• To prevent the camera from being damaged by moisture,
do not use or store the camera in very humid environments,
such as in rain or near bodies of water.
• Do not use or store the camera in dusty places or on a
beach to prevent dust or sand from entering the camera,
causing possible damage to it.
• Do not use or store the camera in a hot environment or in
direct sunlight.
• Do not use or store the camera near powerful magnetic
elds, for example near a magnet or transformer.
• Avoid touching the lens of the camera.
• Do not expose the camera to direct sunlight for a long
period time.
• Turn the camera o, remove the battery and the memory
card, and dry it within 24 hours if water accidentally
comes in contact with the camera.
• When you take the camera from a cold place to a warmer
environment, condensation may occur. Please wait for a
reasonable period of time before you power the camera on.
• When you use the camera, remove the battery if it
overheats. Wait until the battery and camera cool down.
2
• Download your photos and remove the memory card when
you are going to store the camera for a long period of time.
• Store the camera in a dry environment and place it on a
at surface when you are going to store the camera for a
long period of time.
• Before you remove the battery and memory card, the
camera should be turned o.
• When you clean the body of the camera, do not use
abrasive, alcohol-based or organic cleaner.
• Use the professional lens wiping cloth and dedicated
cleaner to wipe and clean the lens.
Safety notes for battery
• To prevent the battery from being damaged, do not
drop the battery or allow it to hit solid objects or to be
scratched by other objects.
• Do not let the battery come in contact with metal objects
(including coins) to avoid short circuiting, discharging,
excessive heat or possible leakage.
• Do not attempt to disassemble the battery.
• Do not expose the battery to water. Always keep the
battery contacts dry.
• Do not heat the battery or throw it into a re to avoid a
possible explosion.
Page 4

• Do not store the battery in a hot environment or in direct
sunlight.
• Only use the supplied battery.
• If the rechargeable Li-ion battery supplied with the
camera needs to be replaced, contact the retailer or the
customer service number listed in this manual.
• If the rechargeable Li-ion battery in this camera overheats
during charging, stop charging immediately and wait until
it cools down to resume charging.
• When the camera is stored for a long period of time,
remove the battery and keep it in a dry place that is not
accessible to the infants and children.
• In a colder environment, the performance of the battery
could be noticeably reduced.
• When you install the battery, install it according to the
positive and negative markings on the battery
compartment. Never force the battery into the battery
compartment.
Safety notes for memory card
• Do not drop the memory card or allow it to hit solid objects
to avoid damaging it.
• Do not attempt to disassemble or repair the memory card.
• Do not expose the memory card to water. Always keep it dry.
• Do not remove the memory card when the camera is
turned on. Otherwise, the memory card could be damaged.
• Do not directly edit the data on the memory card. Copy the
data to your computer before you edit them.
• When the camera is stored for a long period of time, be
sure to download your photos and remove the memory
card. Store it in a dry environment.
• Format the memory card using the camera before you use
it for the rst time or insert a new one.
• We suggest buying only well-known, name brand memory
cards to ensure peak performance.
• Do not modify the name of the les or folders of the
memory card using your computer. Modifying the le
names may cause the les to not be recognized on the
camera or a possible error may occur.
• A photo taken with the camera will be stored in the folder
that is automatically generated on the SD card. Do not
store photos that are not taken using this camera in
these folders as the pictures cannot be recognized during
playback.
3
Page 5

• When you insert a memory card, make sure the notch of
the card matches the markings on the top of the card slot.
Other Safety Notes
• Do not disconnect the power or turn the camera o during
the update process. Doing so may cause incorrect data to
be written and the camera may not power on later.
• Do not hang the camera or strap around the neck of small
children.
• If the rechargeable Li-ion battery is used for the camera,
only charge it with the supplied battery charger.
• If battery uid leaks inside the camera, contact our
customer service department immediately.
• If battery uid leaks onto your skin, rinse your skin with
clean water and seek immediate medical attention.
• Disposal of used batteries should be carried out in accordance
with the local (national or regional) regulations.
• When using your camera on an airplane, observe the
relevant rules specied by the airline.
• Due to the limitations of manufacturing technology, the
LCD screen may have a few dead or bright pixels. These
pixels do no eect the quality or performance of the
camera, photos or video.
• Do not expose the LCD screen to water. In a humid
environment, wipe it only with a soft and dry cleaning cloth.
4
• If the LCD screen is damaged and the liquid crystal comes
into contact with your skin, wipe your skin with a dry cloth
immediately and rinse it with clean water. If liquid crystal
comes into contact with your eyes, ush them with clean
water for at least for 15 minutes and seek immediate
medical attention. If you accidentally swallow liquid
crystal, rinse your mouth immediately and seek medical
attention.
Page 6

CONTENTS
BEFORE YOU START ............................................1
SAFETY NOTES .....................................................2
CONTENTS ............................................................5
GETTING READY ..................................................7
Accessories Included ..............................................................7
Setting up your camera ...................................8
Inserting the Batteries ...........................................................8
Storing Pictures on an SD/SDHC Card ................................9
Turning on the Camera ..........................................................10
Setting the Language, Date/Time........................................11
Attaching the Strap .................................................................12
Taking Pictures and Recording Videos ..........13
Taking Pictures in Smart Capture Mode .............................13
Changing between Tools View and Clean View ................14
Monitoring the Battery Level ................................................15
Recording a Video....................................................................15
Using other Picture Modes ....................................................16
Using the Zoom ........................................................................16
Using the Flash Button ...........................................................17
Using the Focus Button ..........................................................17
Using the Self-timer/Burst Button .......................................18
Taking Burst Pictures..............................................................19
Using Scene Mode ...................................................................20
Taking Panoramic Pictures ...................................................21
Turning on the Date Stamp Feature ....................................22
Using Program AE and Manual Exposure Modes .............22
Using Program AE and Manual Exposure Modes .............23
Choosing Focus/Exposure Zone ...................................24
Reviewing Pictures, Videos ..............................25
5
Page 7

Reviewing Pictures/Videos ............................................................25
Understanding the Review Icons .........................................26
Playing a Video .........................................................................27
Deleting Pictures/Videos .......................................................27
Deleting Pictures/Videos .......................................................28
Using the Home Icon...............................................................29
Using Zoom Playback (for still pictures only) ....................30
Displaying Pictures/Videos on a Television .......................31
Running a Slideshow ..............................................................32
Tagging Faces and Keywords ..........................33
Tagging people.........................................................................33
Manually Adding a Face Tag .................................................34
Updating Names/Tags ...........................................................34
Tagging with Keywords ..........................................................35
Marking Pictures/Videos as Favorites ................................35
6
Transferring, Sharing Pictures ..................36
Transferring Pictures/Videos using a USB Cable..............36
Using the Menu Button to Change camera
Settings ................................................................37
Adjusting Camera Settings ...................................................37
APPENDICES ........................................................39
Specications ...........................................................................39
Prompts and Warning Messages .........................................43
Troubleshooting .......................................................................47
Page 8
GETTING READY
User Manual
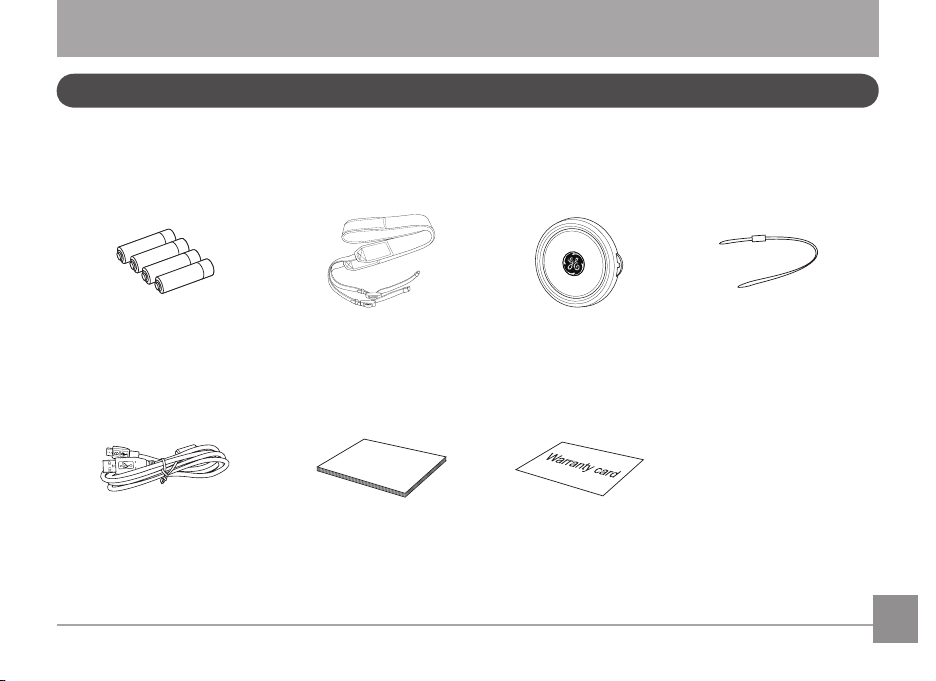
Accessories Included
Your camera box should contain the camera model you purchased along with the following accessories. If anything is missing or
appears to be damaged, please contact your retailer.
Shoulder Strap Lens Cap
USB Cable Warranty Card
User Manual
Lens cap strapAA-Size Alkaline Batteries
7
Page 9
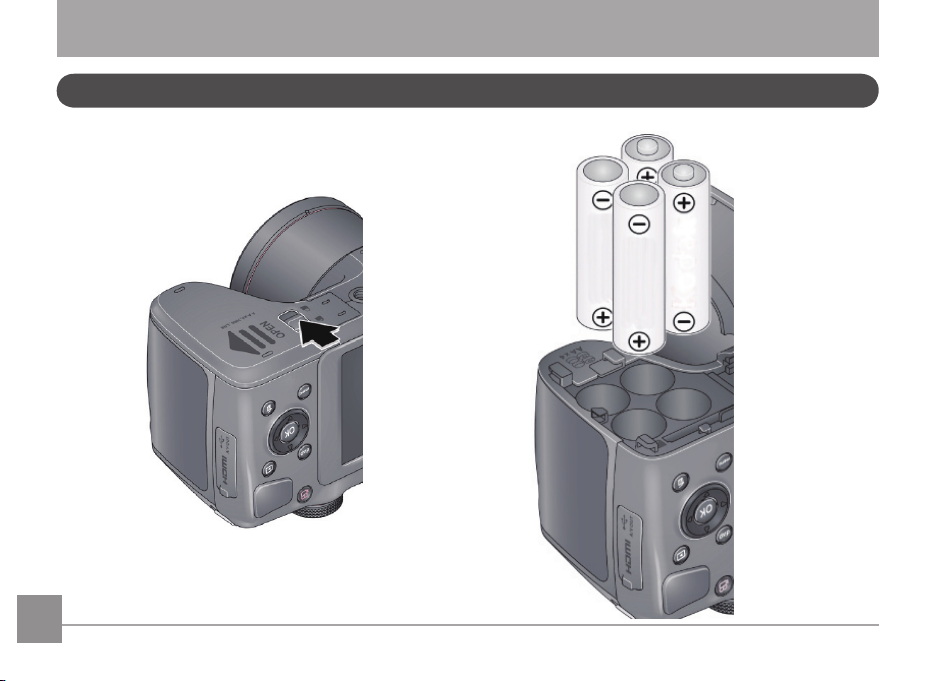
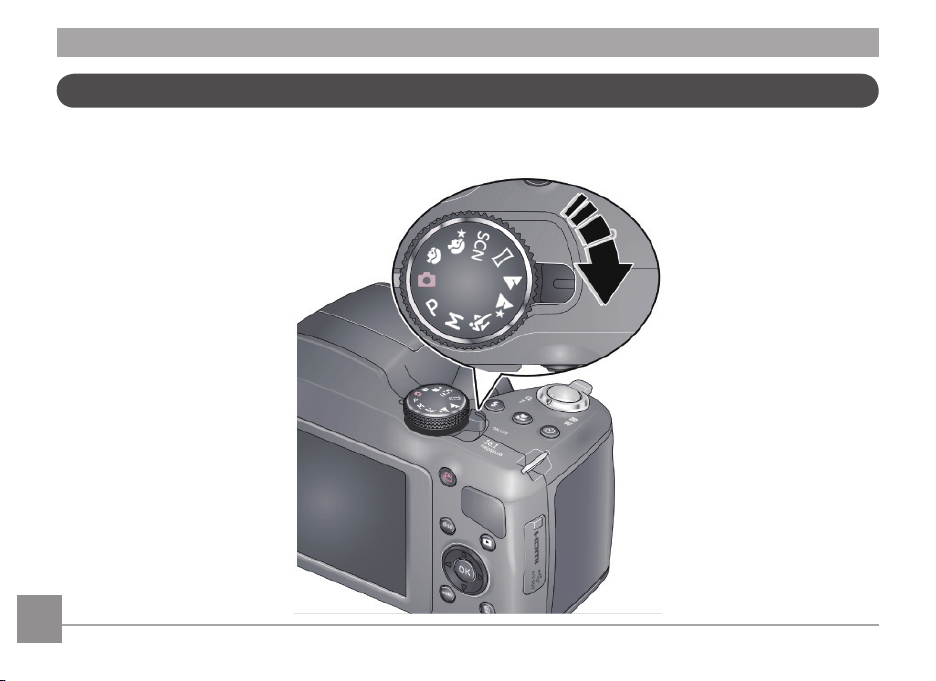
Setting Up Your Camera
Inserting the Batteries
1 Press and hold the door lock while sliding the door open.
8
2
Page 10
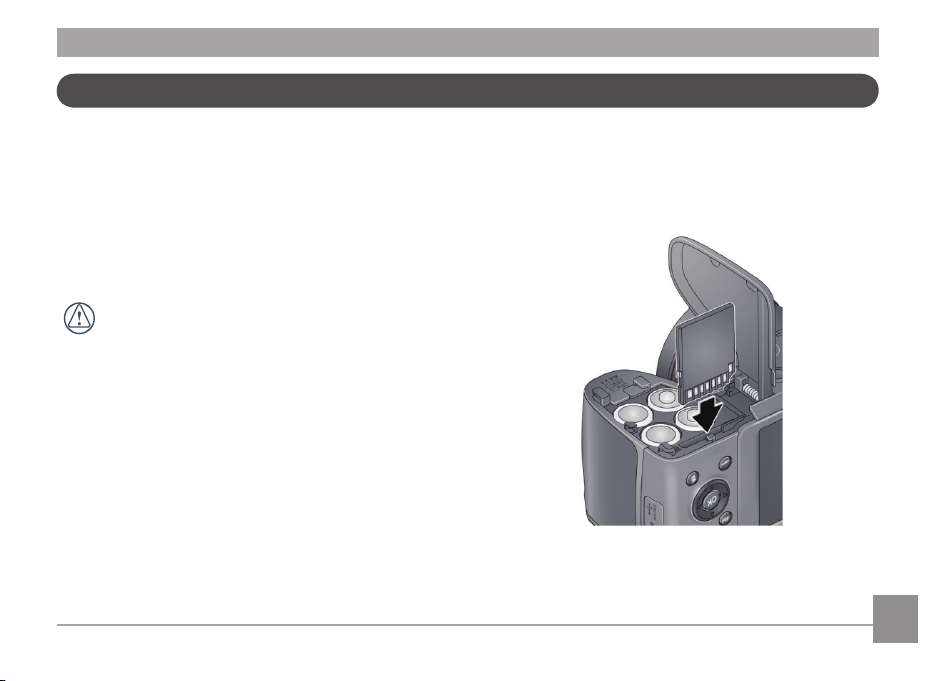
Storing Pictures on an SD/SDHC Card
Your camera has enough internal memory for a couple of
test pictures. We highly recommend purchasing a Class 4 or
higher SD/SDHC Card (up to 32 GB) to conveniently store more
pictures/videos. (Card class is typically shown on the card
and/or packaging)
NOTE: Your camera also accepts EYE-FI Cards (type X2). To
learn more, go to www.eye.
A card can only be inserted one way; forcing it in the
wrong way may cause damage. Inserting or removing a
card while the camera is on may damage the pictures,
card, or the camera.
1 While the camera is turned o, open the battery compart-
ment door.
2 Insert an SD card into the SD card slot and push it in until it
clicks into place. To remove an SD card, press the SD card
to release it, and then remove it from the card slot.
IMPORTANT: When you turn on the camera, it checks to see if a
card is inserted. If pictures/videos are detected on the internal
memory, the camera will prompt you to move them to the SD
card. New pictures/ videos will be stored on the SD card.
9
Page 11
Turning on the Camera
1 If the lens cap is covering the lens, remove it.
2 Pull back on the ON/OFF switch, and then release it.
10
FF
Page 12
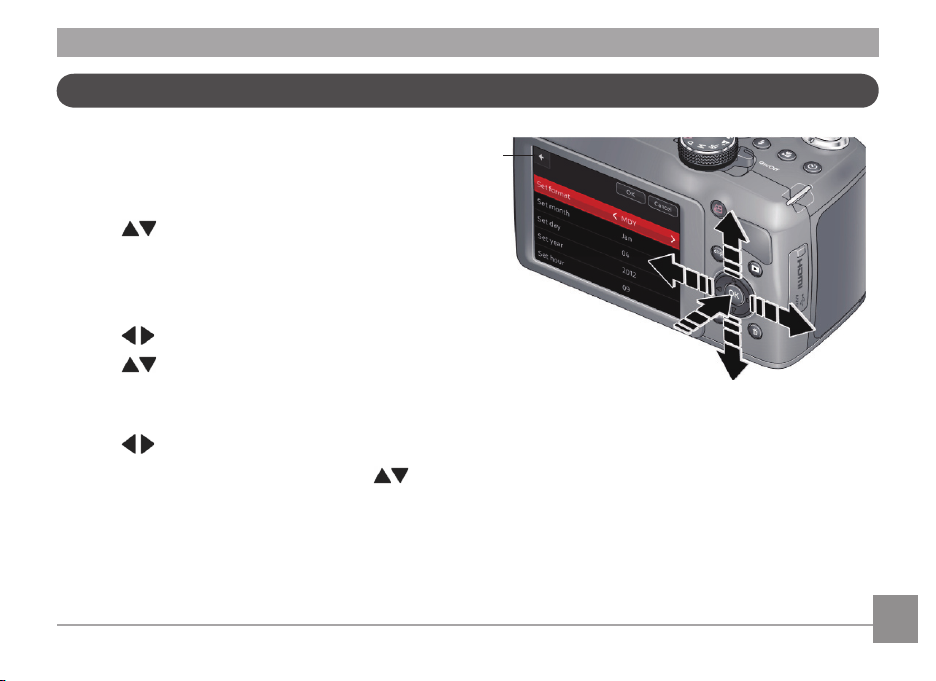
Setting the Language, Date/Time
The rst time you turn on the camera, you will be prompted to
choose your language and set the date/time.
Choose your language:
1 Press to highlight your desired language.
2 Press the OK button.
Set the date and time:
1 Press to change the date format, if desired.
2 Press
minutes.
NOTE: You may need to scroll down to see all elds.
3 Press
4 When nished setting the date and time, press
highlight OK. Then press the camera's OK button.
to highlight the year, month, date, hours, or
to change the value.
to
Back
11
Page 13
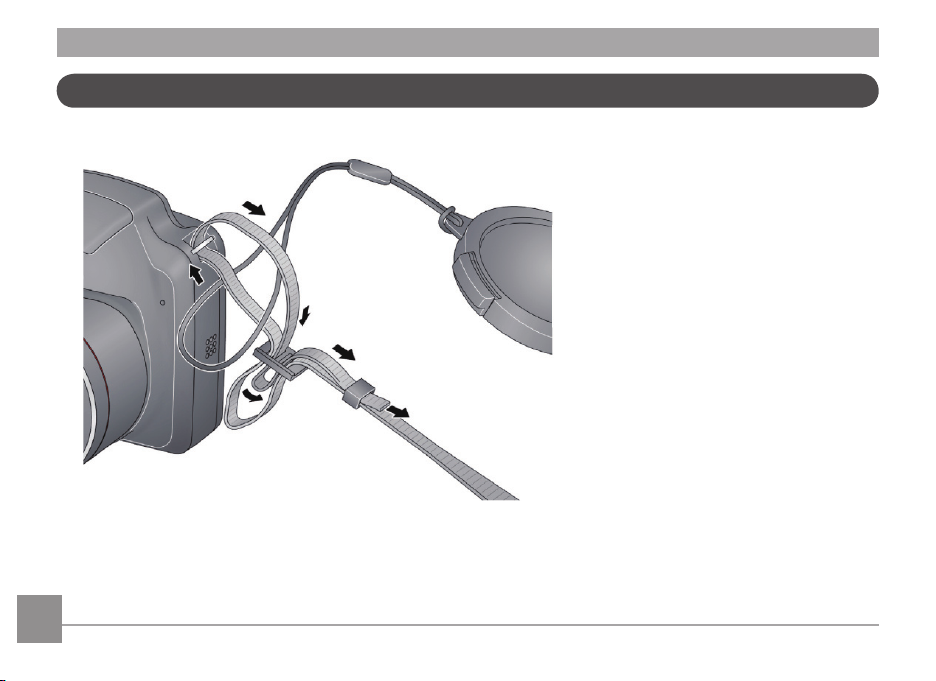
Attaching the Strap
12
Page 14
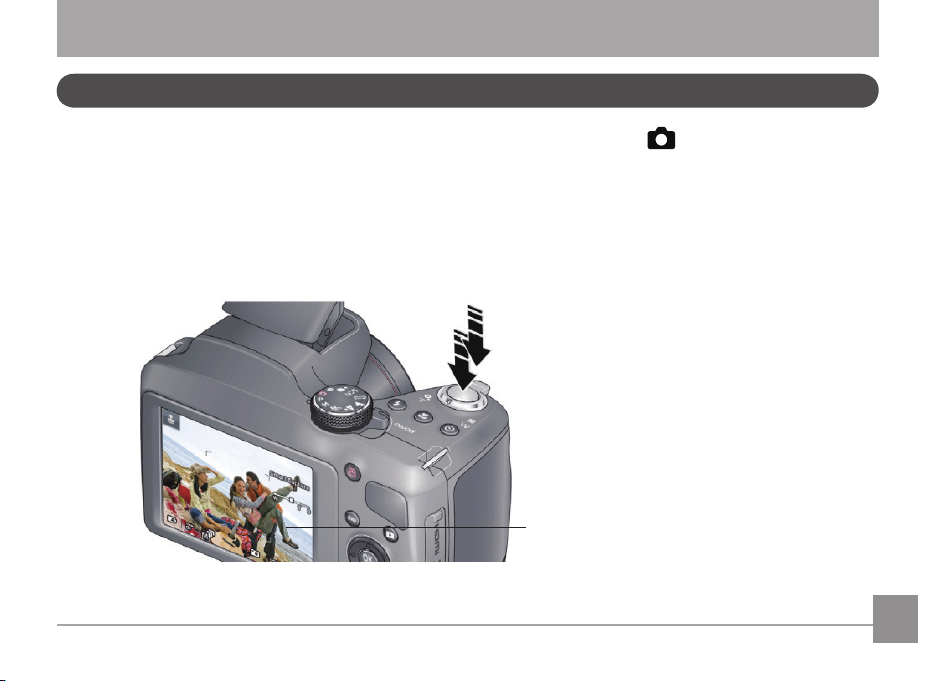
Taking Pictures and Recording Videos
Taking Pictures in Smart Capture Mode
When you turn the camera on for the rst time, the mode dial should be in Smart Capture Mode and ready to take pictures.
1 Use the LCD to preview the picture.
2 Press the Shutter button halfway down to focus and set exposure.
3 When the Focus brackets turn green, press the Shutter button completely down.
Press halfway,
then all the way
down.
Focus
brackets
13
Page 15
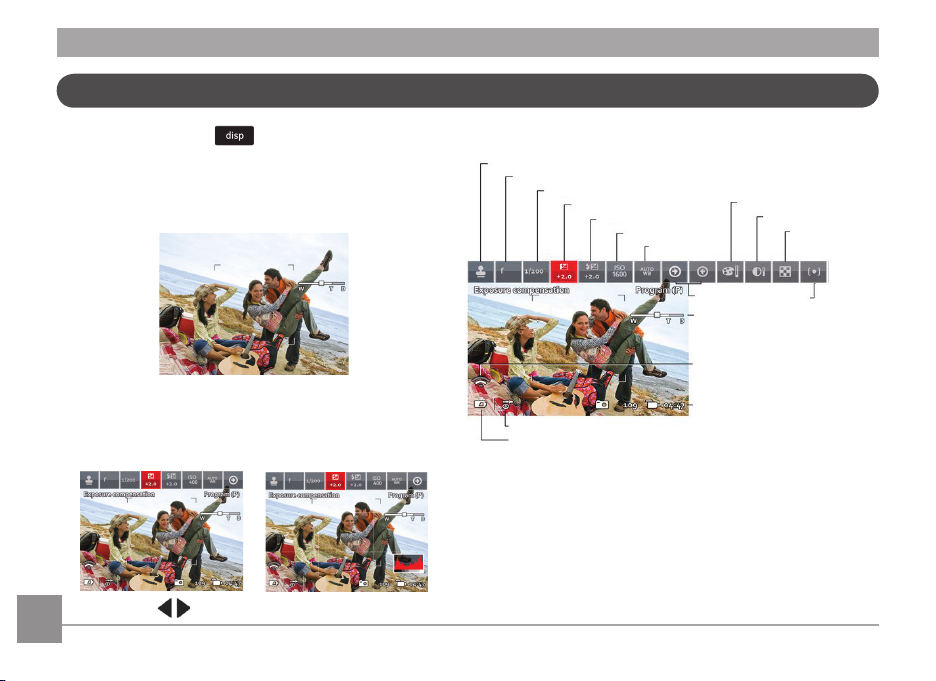
Changing Between Tools View and Clean View
Press the Display button to change between Clean View
and Tools View.
Clean View
In “clean” view; no tools appear. (Press the Menu button to
change settings)
Tools View
Tools appear at the top
of the LCD (Only Available
in P and M Modes).
3.2
14
Press to choose a Tool, then press OK.
Tools View + Histogram
Tools appear at the top of the
LCD. (The LCD can also display
a grid and histogram)
3.2
Tool Descriptions
Date Stamp
Aperture
Shutter Speed
3.2
Flash Setting
Battery Level
Exposure Compensation
Flash Compensation
ISO
White Balance
Color Mode
Contrast
Sharpness
More Tools
Zoom Slider
EYE-FI Card (accessory,
appears only if inserted)
Pictures/Video time remaining
Focus/Exp. Zone
Page 16

Monitoring the Battery Level
Recording a Video
Keep your batteries fully charged or keep fresh batteries on
hand.
Full
Three Quarters
Half
One Quarter/Critical
The camera is always ready to record a video—just press and
release the Record Video button . (Press and release it
again to stop recording)
15
Page 17

Using other Picture Modes
Using the Zoom
Turn the Mode Dial.
Note: If you choose SCN (Scene), press to highlight
a Scene Mode, then press OK.
Capture Modes
Auto Scene Landscape
Program (P) Panorama
P
Manual (M) Scene Modes
M
Sport Night Portrait
Night Landscape Portrait
16
Use optical zoom to get closer to your subject before taking a
picture or video.
1. Use the LCD to frame your subject. (For focus distances,
see Specications.)
2. To zoom in, turn the zoom dial clockwise, aiming the
pointer at T (Telephoto " "). To zoom out, turn the zoom
dial counter-clockwise, aiming the pointer at W (Wide
Angle " ").
3. Take the picture or video.
Zoom
out
Zoom
in
Pointer
Page 18

Using the Flash Button
Use the ash when you take pictures at night, indoors, or
outdoors in heavy shadows.
Press the Flash button
to cycle through ash
modes.The current ash
mode appears at the
bottom of the LCD.
O
N
/
O
F
F
Flash Modes (vary by picture-taking mode)
Auto Red-Eye Reduction
Force Flash O
Using the Focus Button
Press the Focus Button to cycle
through focus modes. The current
focus mode appears at the bottom of the LCD (Only Available in
P, M and Panorama Modes).
Mode Description
Normal AF
(Auto Focus)
Innity AF
Macro
Super Macro
Normal picture taking.
AF
Distant scenery or taking pictures
through a window. (Turn o the ash
when taking pictures through glass)
Subject-to-lens distances from:
• 10–60 cm (3.9–23.6 in.) @ wide
• 2.2–3.0 m (7.2–9.8 ft) @ telephoto
Subject-to-lens distances from:
1–15 cm (0.4–5.9 in.) @ wide
17
Page 19

Using the Self-Timer/Burst Button
Use the self-timer when you want to be included in a picture,
or to ensure a steady Shutter button press. Place the camera
on a tripod or at surface.
Press the Self-Timer/Burst
Button to cycle through
available modes.The current
mode appears at the bottom
of the LCD.
18
1. Choose a Setting:
•10 seconds - A picture is taken after a 10-second
delay (so you have time to get into the
scene).
•2 seconds - A picture is taken after a 2-second delay
(for a steady, shutter release).
•2 shot - The rst picture is taken after a 10-second
delay. A second picture is taken 8 seconds
later.
2. Compose the scene. Press the Shutter Button and press
halfway down (to focus). Continue pressing the Shutter
Button until it's completely down (to start the self-timer).
The Self-Timer light blinks until the picture is taken.
Page 20

Taking Burst Pictures
While the Shutter Button is pressed in Burst Mode, the camera
will take pictures @ approximately 0.8 fps (frames per second)
until there is no more storage space.
Press the Self-Timer/Burst
Button to cycle through
available modes.The Burst
icon appears at the bottom
of the LCD.
1. Press the Self-Timer/Burst Button until the Burst icon
appears at the bottom of the LCD.
2. Compose the scene. Press the Shutter Button halfway
down and pause (to focus). Continue pressing the Shutter
Button until it's completely down and hold it to take the
pictures.
The camera stops taking pictures when you release the Shutter Button or when there is no more storage space.
19
Page 21

Using Scene Mode
Choose a Scene Mode before taking a picture.
1. Turn the Mode Dial to SCN (Scene modes).
2. Press to choose the desired Scene Mode, then press OK.
NOTE: To return to Smart Capture Mode, go back to Step 1 and choose Smart Capture.
3.
Scene Mode Description
Flower Close-ups
Sunset Subjects at dusk
Backlight Subjects that are in shadows or "backlit"
Candlelight Subjects illuminated by candlelight
Children Action pictures of children in bright light
Bright Bright beach or snow scenes
Fireworks Fireworks. For best results, place the camera on a steady surface or tripod
Self-Portrait Close-ups of yourself. Assures proper focus and minimizes red eye
Stage
Photobooth Taking 4 pictures, which the camera combines into 1 strip
High ISO People indoors or in low-light scenes
People in dark scenes, such as on a stage. For best results, place the camera on a steady surface or
tripod
20
Page 22

Taking Panoramic Pictures
Use panorama to "stitch" up to 3 pictures into 1 panoramic
scene.
NOTE: Individual pictures are not saved, even if panorama
capture is cancelled before stitching occurs. (Focus and expo-
sure are set with the rst picture. The ash is set to O.)
1. Turn the Mode Dial to Panorama
The default direction for taking panoramic pictures is left
to right . To take pictures from right to left, press
the Disp button. Select the Panorama tool and press OK.
Choose , then press OK.
2. Take the rst picture.
After a quickview, the LCD displays the Liveview and an
"overlay" from the rst picture.
3. Compose the second picture. Make the overlay from the
rst picture cover the same portion in the new picture.
If you are taking/stitching only 2 pictures, press OK to
choose Stitch. After you take 3 pictures, the pictures are
automatically stitched.
.
Take 2 or 3 pictures.
Get 1 panoramic picture.
21
Page 23

Turning on the Date Stamp Feature
Using Program AE and Manual Exposure Modes ( * )
You can turn on the Date Stamp feature so that new pictures
are stamped with the date on which they were taken.
IMPORTANT: You can only add a date stamp when the camera
is in a picture-taking mode (not in Review mode when a picture has already been taken). When you turn on Date Stamp,
all new pictures that you take, will be stamped until you turn
o the feature. Once a date stamp is applied, it cannot be
removed (unless you use image editing on your computer).
1. If the toolbar is hidden, press
2. Press
3. Press
The Date Stamp On icon appears in the toolbar. The date
will be stamped on any future pictures you take. The feature
stays on until you turn it o.
to highlight Date Stamp O , then press OK.
to highlight Date Stamp On , then press OK.
to display it.
22
Use these modes when you want more control over your
camera and pictures.
1. Turn the Mode Dial to P (Program AE) or M (Manual Expo
sure) Mode.
2. If the toolbar is hidden, press
3. Press
tion, ISO, White Balance, etc. Then press OK. (To learn more
about the icons, Changing between Tools View and Clean
View.)
4. Press
press OK.
NOTE: Settings that you change in Program AE Mode apply
only to pictures taken in Program AE Mode. Use Reset Camera
to reset all settings to their factory default. To return to Smart
Capture Mode, go back to Step 1 and choose Smart Capture.
to highlight an icon like Exposure Compensa-
to highlight a value within that setting, then
to display it.
-
Page 24

Exposure Compensation
Shutter Speed
Aperture
Date Stamp
Flash Compensation
ISO
White Balance
More Tools
Mode When to use
Program AE Mode oers the ease of auto exposure with full access
to all manual controls. The camera automatically sets the shutter
speed and aperture (f-stop) based on the scene lighting.
Manual Exposure Mode oers manual exposure with full access to all
menu options. (To prevent blur, use a tripod for slow shutter speeds.)
Exposure Compensation Adjust the exposure. If the scene is too light, decrease the setting; if it's too dark, increase the setting.
ISO Adjust the camera's sensitivity to light. Higher ISO indicates greater sensitivity.
NOTE: A higher ISO may produce unwanted "noise" in a picture.
Flash Compensation Adjust ash brightness.
Shutter Speed Control how long the shutter stays open. (Use a tripod for slow shutter speeds.)
Aperture Also known as F-Stop. Control the size of the lens opening, which determines the depth of eld.
•
Smaller aperture numbers indicate a larger lens opening; good for low-light.
•
Larger aperture numbers indicate a smaller lens opening; keeps the main subject sharp; good for land-
scapes and well-lit conditions.
Press to control
Exposure compensation (how much light enters
the camera), ash compensation, and ISO speed
Aperture, shutter speed, ash compensation,
and ISO speed
23
Page 25

Choosing a Focus/Exposure Zone ( * )
Choose the Focus/Exposure Zone best suited to your subjects.
1. If the toolbar is hidden, press
2. In a picture-taking mode, press
posure Zone , then press OK.
3. Press
•Face Priority - The camera gives focus priority to
faces.
•Multi-Zone - The camera evaluates the entire frame,
then sets an exposure based on the average. The camera
focuses on the nearest object.
•Center - The camera focuses on a small zone in the
center of a scene.
4. Press OK.
The camera stays in this focus/exposure zone until you
change it.
to highlight a setting:
to reveal it.
to highlight Focus/Ex-
24
Page 26

Reviewing Pictures, Videos
Reviewing Pictures/Videos
1. Press the Review Button
. The most recent
picture/video is displayed.
2. Press
previous or next picture.
to view the
• To play a video, press the OK button.
• To return to picture-taking mode, press the Shutter Button
halfway down.
Turning on the Camera in Review Mode
You can turn on the camera so that it's in Review Mode with
the lens retracted.
While the camera is o, press and hold the Review Button. The
camera turns on and displays the most recent picture. The
lens stays retracted.
25
Page 27

Understanding the Review Icons
26
4 5 6
3
2
1
8
7
1. Camera
2. Home
3. Multi-Up
4. Tags
5. Print
6. Slide Show
7. Rewind/Play/Fast-Forward
8. Battery Level
Page 28

Playing a Video
Deleting Pictures/Videos
1. Press the Review Button .
The most recent picture/video is displayed.
2. Press
3. Press OK to play the video.
To pause, press OK. (While paused, you can press for
•
previous/next frame.)
• To adjust the volume during playback, press
To return to picture-taking mode, press the Shutter Button
halfway down.
to nd a video.
1. Press the Review Button .
The most recent picture/video is displayed.
2. Press
3. Press the Delete Button
prompts.
To return to Picture-Taking Mode, press the Shutter Button
halfway down.
to nd a picture/video.
, then follow the screen
Deleting Multiple Pictures/Videos
When you delete or copy pictures/videos, you can apply the
delete or copy command to more than one picture.
1. Press the Review Button
The most recent picture/video is displayed.
.
2. Press the Delete Button
3. Highlight Select Multiple, then press OK.
to highlight a picture/video, then press OK.
4. Press
.
.
27
Page 29

A check mark appears. Press OK a second time to remove a
check mark.
5. Highlight Delete, then press OK.
The selected pictures/videos are deleted.
To return to Picture-Taking Mode, press the Shutter Button
halfway down.
28
Delete all Pictures/Videos that have been saved
to computer
To save space and stay organized, you can delete from your
camera those pictures that you've already sent to your
computer. When deleting pictures, choose Delete All Saved To
Computer.
To return to Picture-Taking Mode, press the Shutter Button
halfway down.
Page 30

Using the Home Icon
When you rst press the Review Button, you see the most
recent picture or video.
For a dierent view, choose the Home icon and view
pictures organized by:
•Date Taken
•People (only if face tags have been added, Tagging
people)
•Keywords (only if keyword tags have been added, Tagging
with keywords)
•Videos (only if videos have been taken, Taking a video)
1. Press the Review Button
2. If the toolbar is hidden, press
3. Press
4. Highlight Date, People, Videos, or Keywords, then press
and to highlight the Home icon , then
press OK.
OK.
If you chose Date, People, or Keywords, highlight the desired date, person, or keyword, then press OK. If you chose
Videos, thumbnails are displayed.
To return to Picture-Taking Mode, press the Shutter Button
halfway down.
.
to display it.
The paging bar indicates more choices to the right
29
Page 31

Using Zoom Playback (for still pictures only)
You can magnify a picture while in review.
1. Press the Review Button
Select a picture.
2. To zoom in, turn the zoom dial clockwise, aiming the
pointer at T (Telephoto " "). To zoom out, turn the zoom
dial counter-clockwise, aiming the pointer at W (Wide
Angle " ").
3. While magnifying, you can press
portions of the photo viewable.
.
to make other
30
Zoom
out
To return to Picture-Taking Mode, press the Shutter Button
halfway down.
Zoom
in
Pointer
Page 32

Displaying Pictures/Videos on a Television
You can display pictures/videos on a television, computer
monitor, or any device equipped with a composite video or
HDMI input. (Cables may be sold separately) Use the camera
controls to navigate through pictures/videos on the television.
AV Cable
HDMI Cable
HDMI Cable
31
Page 33

Running a Slideshow
Use slideshow to display your pictures/videos on the LCD.
1. Press the Review Button
The most recent picture/video is displayed.
2. If the toolbar is hidden, press
3. Press
To return to Picture-Taking Mode, press the Shutter Button
halfway down.
and to highlight slideshow , then press
OK.
The slideshow starts with the current picture, then shows
each picture/video once. To interrupt the slide show, press
any button.
.
to display it.
32
Page 34

Tagging Faces and Keywords
Tagging People
When you tag faces, you're helping your camera to recognize
people by name. Then it matches names and faces in pictures
you've taken—and those you take in the future!
1. Press the Review Button
The most recent picture/video is displayed.
2. If the toolbar is hidden, press
3. Press
4. Highlight Tag People, then press OK.
and to highlight Tags , then press OK.
If faces are detected, names or question marks appear
under them. To resolve an incorrect name or a question
mark, press to highlight a face, then press OK. Highlight a name or highlight Enter New Name, then press OK.
.
to display it.
5. If prompted to Update People Tags, highlight Yes, then
press OK.
Other pictures are scanned and updated with the name(s)
you applied here. Press to add names to other
pictures. Press OK.
33
Page 35

Manually Add a Face Tag
Updating Names/Tags
If a face is not detected, you can identify and name it.
1. Press the Review Button
The most recent picture/video is displayed.
2. Press
3. If the toolbar is hidden, press
4. Press
5. Highlight Tag People, then press OK.
If no faces are detected, the Manual Tag Menu appears. (If
faces were detected, highlight Manual Tag, then press OK)
6. Follow the prompts to enter a new name, or choose one
from the list.
7. When nished typing, highlight Done, then press OK.
to nd a picture.
and to highlight Tags , then press OK.
.
to display it.
34
1. Press the Review Button .
The most recent picture/video is displayed.
2. If the toolbar is hidden, press
3. Press
4. Highlight Tag People, then press OK.
5. Highlight Edit Names, then highlight a name to modify,
6. When nished typing, highlight Done, then press OK.
NOTE: You can save up to 20 names.
and to highlight Tags , then press OK.
then press OK.
to display it.
Page 36

Tagging with Keywords
Marking Pictures/Videos as Favorites
Tag pictures to make them easy to nd, later.
1. Press the Review Button
The most recent picture/video is displayed.
2. If the toolbar is hidden, press
3. Press
4. Highlight Keyword Tag, then press OK.
5. Highlight a Tag (or choose "+" to add a new keyword).
6. Highlight Done, then press OK.
and to highlight Tags , then press OK.
.
to display it.
Mark pictures as favorites to make them easy to nd, later.
1. Press the Review Button
The most recent picture/video is displayed.
2. If the toolbar is hidden, press
3. Press
4. Highlight Keyword Tag, then press OK.
5. Highlight Favorite, then press OK.
and to highlight Tags , then press OK.
.
to display it.
35
Page 37

Transferring, Sharing Pictures
Transferring Pictures/Videos using a USB Cable
1. Turn the camera o.
2. Using the Camera USB cable, connect the camera to a
computer USB port. (Use only the cable included with this
camera)
3. Turn the camera on.
4. Follow the computer prompts to transfer pictures/videos
to your computer.
Pictures/videos that you tag for sharing could be emailed
or uploaded to social networking sites. (See more about
tagging pictures on Tagging Faces and Keywords)
36
Page 38

Using the Menu Button to Change Camera Settings
Adjusting Camera Settings
You should adjust settings to get the best results from your camera.
NOTE: Some settings remain until you change them; others, until you change modes or turn o the camera. You can also use the
Toolbar to access many of these settings (Changing between Tools View and Clean View).
1. In Picture-Taking Mode, press the Menu Button.
2. Press
3. Highlight an option within that setting, then press OK.
4. To return to Picture-Taking Mode, press the Shutter Button halfway down.
Picture or Video Size
Choose picture or video
resolution.
NOTE: If your card has little space remaining, but you need to take pictures or videos, you can reduce the Picture or Video Size.
This lets you take a greater number of pictures or videos, although they will be captured at a lower resolution.
Language Choose your language
People Tag Settings
Maintain Names and Faces
Capture Framing Grid On / O
Slide Show Settings Choose settings for transitions, looping, and interval
to highlight a setting, then press OK.
See Specications
Update People Tags - Matches recently tagged people with other pictures that may include
these people
Modify Names List - Edit or delete existing names
37
Page 39

AF Control (Still)
Choose an auto-focus setting.
Available in Program AE, Panorama, and Scene modes.
LCD Brightness
Choose LCD brightness during
picture/video capture. (During
Review, the LCD is set to High
Power)
Sound Volume
Choose volume
Date & Time Set Date and Time
Video Out
Choose the regional setting
that lets you connect the
camera to a television or other
external device.
Reset All Camera Settings Reset all settings to their factory default.
Format Memory Card - Deletes everything on the card; formats the card.
CAUTION: Formatting deletes all pictures/videos. Removing a card during formatting may damage the card.
Continuous AF - Because the camera is always focusing, there is no need to press the Shutter
button halfway down to focus.
Single AF - Focuses when the Shutter button is pressed halfway down. (This setting uses less
battery power)
High Power - Brighter LCD; uses more battery power.
Power Save - Dimmer LCD; uses less power.
Auto - LCD brightness is automatically adjusted according to the environment.
High / Medium / Low / Mute
NTSC - Used in North America and Japan; most common format.
PAL - Used in Europe and China.
Cancel - Exits without making a change.
Internal Memory - Deletes everything in internal memory including email addresses and keyword tags; formats the internal memory.
38
Page 40

APPENDICES
Specications
Active Image Sensor Pixels 16.08 Megapixels
Total Image Sensor Pixels 16.44 Megapixels [1/2.3"CCD]
Focal Length 4.7mm (Wide) — 122.2mm (Tele)
[35mm Film Equivalent] [26mm (Wide) — 676mm (Tele)]
F Number F3.2 (Wide) — F5.6 (Tele)
Lens Construction 10 groups 14 elements
Lens
View Finder NO
Anti-Handshake Optical Image Stabilization
Digital Zoom 5x Digital Zoom (Combined Zoom: 130x)
Optical Zoom 26x
0.5 [m] - Innity (@ Wide Standard)
Focusing Range
2.2 [m] - Innity (@ Tele Standard)
0.1 [m] - 0.6 (@ Wide Macro)
2.2 [m] - 3.0 (@ Tele Macro)
1 [cm] - 15 [cm] (@ Wide Super Macro)
39
Page 41

Number of
Recording
Pixels
DCF, DPOF (Ver1.1) Support
File Format
Shooting Modes
Detection Features Face Detection, Face Recognition, Red-Eye Removal
Panorama Capture Yes (Horizontal) [3 Shots]
Still Image
Movie 1280×720 (30fps), 640×480 (30fps)
Still Image Exif 2.3 (JPEG)
Movie Movie Format: H.264 (MP4), Audio: AAC [Monaural]
16MP: 4608×3456, (3:2)14MP: 4608×3072, (16:9)12MP: 4608×2592,
6MP: 2880×2160, 3MP: 2048×1536
Yes
Auto Scene, Program [P], Manual [M], Sport, Night Landscape, Landscape,
Panorama, Night Portrait, Portrait, Scene Modes [Children, Sunset, Backlight,
Self Portrait, High ISO, Photobooth, Bright, Candlelight, Stage, Fireworks,
Flower], Movie Capture Mode
40
Page 42

LCD Display 3.0 inch (230k Pixels)
ISO Sensitivity Auto, 64/100/200/400/800/1600
AF Method Continuous AF, Single AF
Exposure Metering Method Multi-Pattern, Center-Weighted, Face Priority
Exposure Control Method Program AE (AE-Lock Available)
Exposure Compensation ±2.0EV With 1/3 EV Steps
Shutter Speed
Playback Modes
Color Mode
White Balance Control Auto, Daylight , Tungsten, Fluorescent, Open Shade
Smart Capture Mode: Auto (1/2-1/2000 Sec.)
M Mode: 16-1/1000 Sec.
Still Capture: Single-Up, Multi-Up (Thumbnails), Magnify, Slideshow
Video Capture: FF/Rewind, Pause, By Frame, Volume
Control, Multi-up (Thumbnail), Slideshow
Vivid Color, Full Color, Basic Color, Black & White, Sepia
41
Page 43

Flash Method Pop-Up
Auto (With Digital Red-Eye Reduction)
Flash
Recording Media
Other Features PictBridge, ExifPrint Support, Multi-Language Support (21 Languages)
Jacks AV-OUT/USB 2.0 (Micro 5 pin USB), HDMI (Type D)
Power 4AA Battery
Shooting Capability (Battery Performance) Approx. 300 Shots
Operation Environment Temperature: 32 ~ 104oF / 0 ~ 40oC, Humidity: 0 ~ 90%
Dimensions (W×H×D)
Weight
Flash Modes
Shooting Range
Auto + Red-Eye Reduction (With Pre-Flash and Digital Red-Eye Reduction)
Fill (With Digital Red-Eye Reduction)
OFF
Wide: 0.5 – 5.5 m at ISO 400, Smart Capture,
Tele: 2.2 – 3.1 m at ISO 800, Smart Capture,
Internal Memory: Approx. 28MB
SDHC/SD Support (32GB)
116.4 (W) × 78.8 (H) × 73 (D) [mm] /
4.6 × 3.1 × 2.9 in (Based on CIPA Standards)
488 g With In-box Battery (Alkaline) and SD Card
(Based on CIPA Standards) (508g With Ni-MH Battery)
42
Page 44

Prompts and Warning Messages
Message Description Action
Warning! Battery exhausted
Lens obstruction, Re-start Camera
Suggest using tripod
Battery temperature is too high The battery temperature has reached 53.5oC or higher.
Built-in memory error! An error has occurred in interal memory.
Slow shutter is on: may easily
cause overexposure
Improper alignment. Please try
again
The camera battery is used up. It is a warning indicating
that the camera is going to shut down.
The lens is jammed or some foreign object is preventing
the lens from functioning properly.
When continuous exposure is enabled, this message
appears when the photo shooting screen is displayed
for the rst time.
When the B shutter is on, the prompt appears on the
screen after you go back to the photo shooting screen.
The oset and horizontal alignment is too great for
panorama shooting.
Replace new batteries or recharge
Li-ion battery. The camera will shut
down in 2 seconds.
Turn the camera o and restart it
to reset the lens.
The message will disappear after
2 seconds
Remove the battery and let it
cool before attempting to use the
camera again. The message will
disappear after 2 seconds
Try shutting down the camera and
turning it on again. The message
will disappear after 2 seconds
The message will disappear after
2 seconds.
Retry taking the panoramic
picture. The message will
disappear after 2 seconds.
43
Page 45

Message Description Action
Image cannot be saved, improper
alignment. Please try again.
Firmware update failed.
Firmware version mismatch.
Warning! Do not turn o your
camera during update!
Remove USB Cable! Indicates that you can disconnect the USB cable.
Connection Failed! Failure to connect to your PC, printer, TV (with HDMI).
The saved panoramic pictures cannot be stitched.
The camera cannot be updated during the rmware
update process.
The rmware version does not match during the
rmware update process.
The message appears during the rmware update
process.
44
Retry taking the panoramic
picture. The message will
disappear after 2 seconds.
The camera will shut down in 2
seconds.
The message will disappear after
2 seconds.
The message disappears after the
camera update and restart.
The message disappears after you
disconnect the USB cable.
Remove USB cable and retry
connection
Page 46

Message Description Action
Write Protect ! The SD card is locked.
Card Full ! Indicates that the SD card is full.
Memory Full ! Indicates that the camera memory is full. It disappears after 2 seconds.
Card Error !
Card is not formatted.
Slow access
Cannot write to SD
card.
No Red-Eye Detected! Red eyes have not been detected in the image. The message will disappear after 2 seconds.
During power-on, the SD card is not
recognized or a read/write error occurs.
When an error occurs in the SD card, the
message "Not Formatted" appears.
When a SD card lower than Class 4 is used to
record a HD movie, the writting speed will be
slower and recording may be compromised.
The photo shooting or video recording
has been interrupted so recording cannot
continue.
Remove SD card and switch the lever on the side of card
to UNLOCK. The message will disappear after 2 seconds.
Replace SD card with another that has available
memory. The message will disappear after 2 seconds.
Format the SD card. WARNING: Formatting the SD card
will erase all data on the card. Copy the data from
the SD card to another storage, such as a computer.
Otherwise, all data will be erased after the format.
The message will disappear after 2 seconds.
Format the SD card. WARNING: Formatting the SD card
will erase all data on the card. Copy the data from
the SD card to another storage, such as a computer.
Otherwise, all data will be erased after the format.
The message will disappear after 2 seconds.
Replace SD card with a higher Class than 4. The
message will disappear after 2 seconds.
Turn o the camera. Then unload and reload the SD card
and turn on the camera to retry.
Also check to see if the SD card is full or in a locked position.
45
Page 47

Message Description Action
This image cannot be
edited.
Exceeded maximum
folder number.
Too many pictures for
quick processing.
Unable to recognize
les.
No Picture!
No continuous group
le.
Protected! Undeletable!
46
The le format does not support editing or the
edited le cannot be edited again.
This indicates that the SD card exceeded the
maximum number of folders (999). This could
cause a long read time during the camera's
power up.
During the playback by date, the images
exceed specications so that it is not possible
to play by date.
The format of the le to be viewed is not
supported or the le is corrupted so it cannot
be properly read.
When you press the play button, no image les
exist in the camera or memory card.
When you switch from the playback mode
to continuous photo mode, there is no
contiunous group le.
The le is protected. The message appears
when you delete it.
The message will disappear after 2 seconds.
The message will disappear after 2 seconds.
The message disappears after 2 seconds and the
camera returns to the normal playback mode.
This image message disappears only after the le is
deleted.
The message disappears 2 seconds later to return to the
photo shooting screen.
The message disappears after 2 seconds and the
camera returns to the normal playback mode.
Remove SD card and switch the lever on the side of card
to UNLOCK. Place back into the camera and try again.
The message will disappear after 2 seconds.
Page 48

Troubleshooting
Problem Possible Causes Solution
Camera does not turn on • The battery has been depleted.
• The battery is not inserted
correctly.
Camera turns o suddenly during
operation
The picture is blurred • Camera moved or was shaking while
Images and video les cannot be
saved
Images will not print from the
connected printer
• The batteries have been depleted. • Recharge the battery.
taking a picture.
• The SD memory card is full.
• The memory card is locked.
• The camera is not connected to the
printer correctly.
• The printer is not PictBridge
compatible.
• The printer is out of paper or ink.
• The printer paper is jammed.
• Recharge the battery.
• Correctly reinstall the battery.
• Turn on OIS feature.
• Use another memory card or delete
unnecessary les.
• Unlock the memory card.
• Check the connection between the camera
and printer.
• Use a PictBridge compatible printer.
• Load paper into the printer or replace the ink
cartridge in the printer.
• Remove the jammed paper.
47
Page 49

Problem Possible Causes Solution
Saving data to memory card is slow • Using a memory card below Class
4 may result in slower recording
times.
Cannot write to the memory card • The SD memory card has been
locked.
• The camera may experience trouble
recording HD movies to SD cards
with a rating lower than Class 4.
Too many movies to process • The number of pictures or folders
in the SD memory card exceed the
specications, so the playback of
data folder can not be displayed.
(*) Only available in P and M modes.
48
• Use an SD card with write Class higher than 4
to improve performance.
• Release the write lock of the memory card or
replace with another card.
• Use an SD card with write Class higher than 4
to improve performance.
• Delete unwanted les.
Page 50

http://www.ge.com/digitalcameras
imagination at work
Printed in China
© 2012 General Imaging Company
GE-X2600-EN-0
Follow us on
@ GE Cameras
@ GECamera
 Loading...