

Page 1

Quick Guide of Gestures on
Vivid™ iq
JB42541XX
Global CVUS Development team
August 2016
1
Page 2

Layout
Title Bar
Clipboard
Image Area
Shortcut Menu
Tray Menu
Side Menu
Control Menu
Page 3
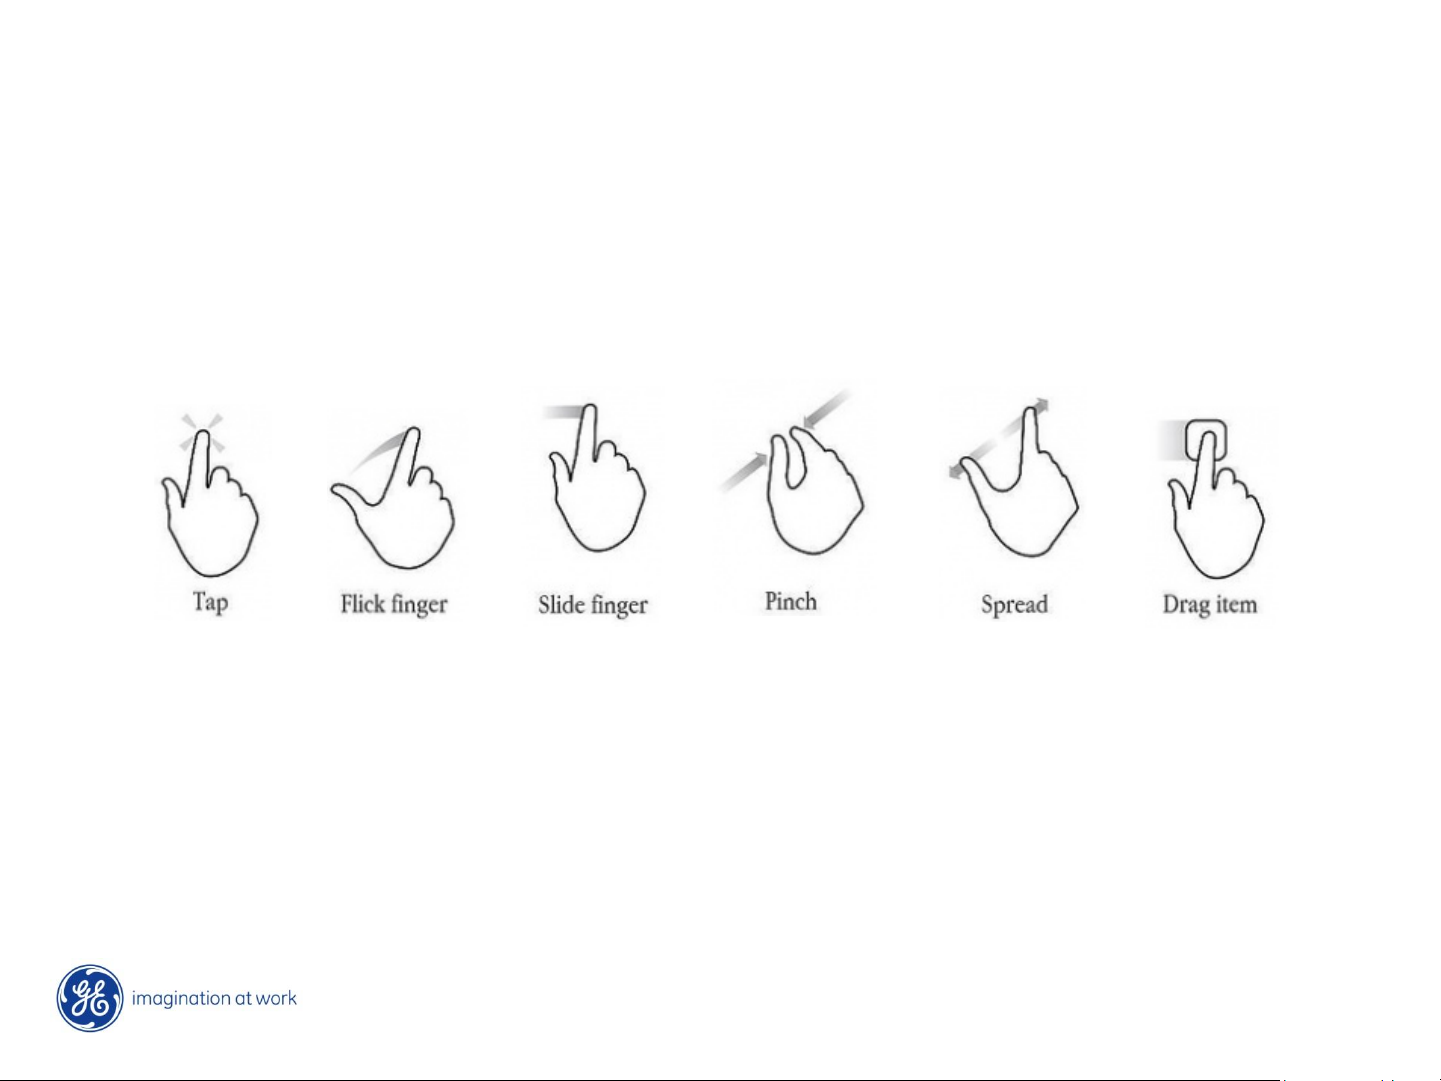
Gesture
Flick:
Quickly brush the touch monitor with your fingertip.
Slide:
Move fingertip over surface without losing contact.
Page 4

Overview – Functions supported by
gestures
User Interface interaction
• Control Menu
• Side Menu
• TGC
• Clipboard
• List scroll (patient / exam list)
• Shortcut menu configuration
Imaging control
• Gain / Depth
• ROI Position
• ROI Size
• Zoom (double tap / pinch / spread)
• Cursor Line
• Image Review
• Base Line / Horizontal Sweep / Scale
• 4D rotate (Live & Recall)
• 2 Click crop
• Multislice
• Flexislice
Page 5

User Interface interaction by Gestures
Page 6
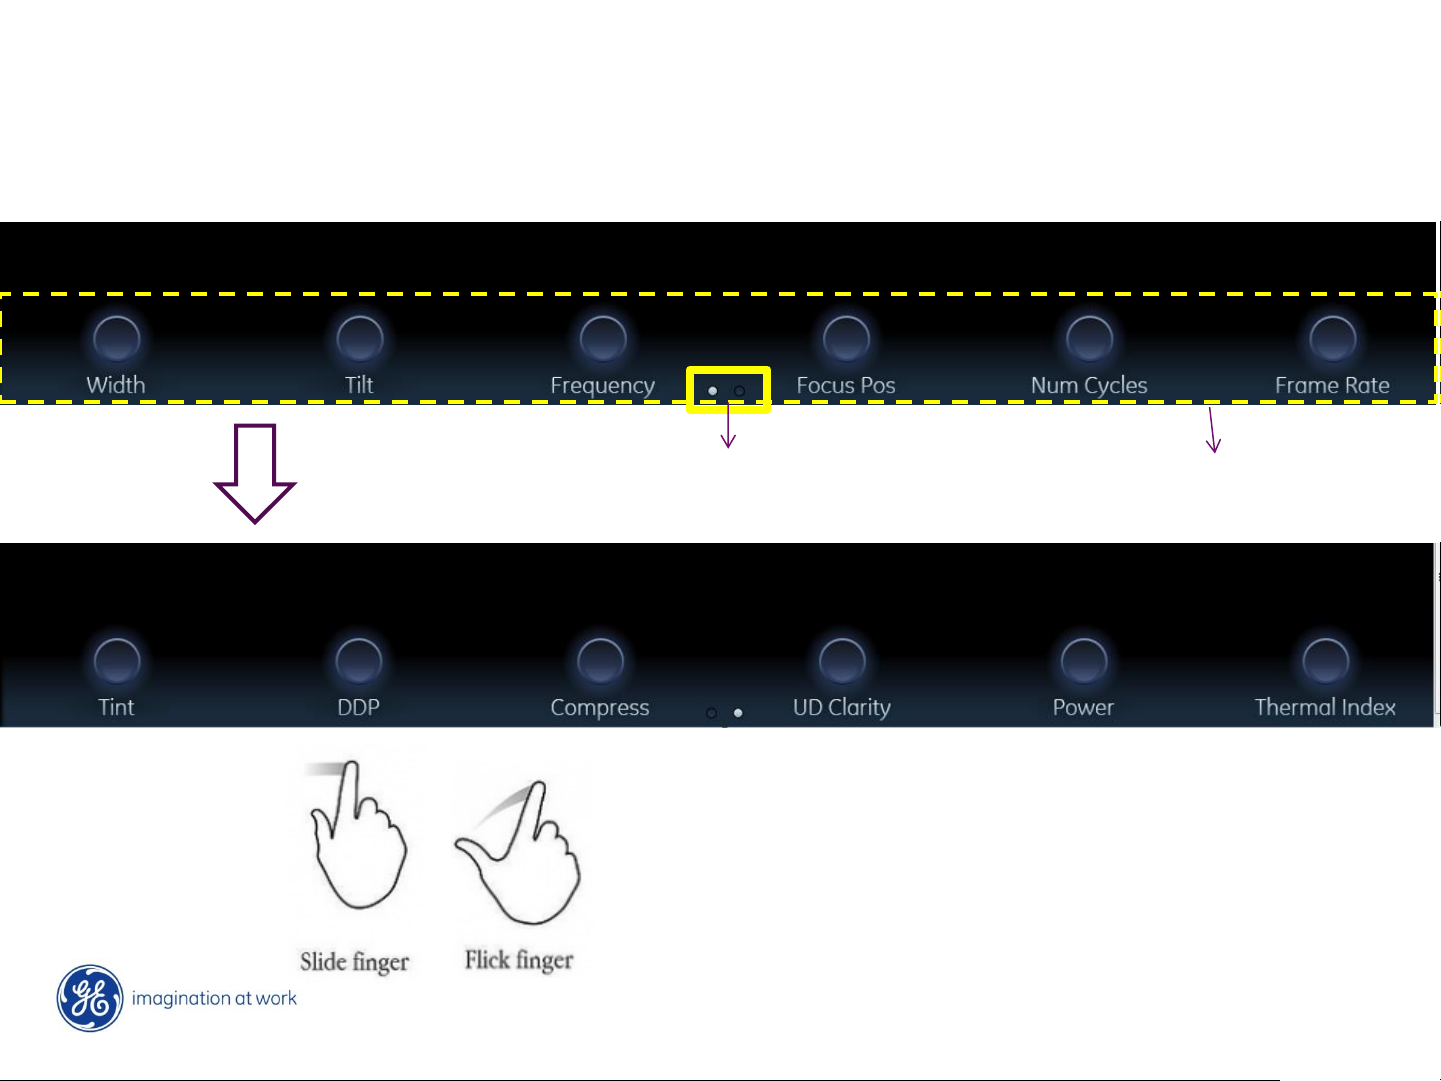
Control Menu – Page Switch
Page 1
Gesture
Page indicator
Active area
Page 2
Notes (this example shows 2D mode menu):
1. Slide or flick finger from RIGHT to LEFT in active area will toggle
to next page.
2. Back to previously page: slide or flick finger from LEFT to RIGHT.
Page 7

Control Menu – Parameter value
selection
Valid area
Active area
Gesture:
Or
Notes (this example shows 2D mode menu):
1. Each single value can be selected by Tap gesture.
2. The parameter value can also be selected by sliding the finger
on the active area until the desired value is reached.
Page 8

Side Menu
Valid area
Gesture:
Notes:
1. To toggle to next page in side menu, flick (swipe) your finger
from bottom to top in active area.
2. To go back to previous page, flick (swipe) your finger from top
to bottom.
Page 9

TGC
Valid area
Gesture:
Notes:
1. Slide your finger from top to bottom (or bottom to top) drawing
your desired TGC curve.
2. It is also possible to change individual sliders position by sliding
each of them left to right (or right to left).
Page 10

Clipboard
Gesture:
Notes:
1. Slide your finger from bottom to top (or top to bottom) to scroll
through the exam images.
2. You can also swipe on the clipboard (flick gesture) to perform
the same operation.
3. Or you can use the arrows below the clipboard to move to
previous/next image.
Page 11

List control – Patient / Exam Lists
Active area
Gesture:
Notes:
1. Flick or swipe your finger from bottom to top
(or top to bottom) to display your desired page
in patient or exam list.
Page 12

Shortcut Menu Configuration
Scenario 1 Scenario 2
Notes:
1. Any shortcut icon can be moved to an empty position by dragging gesture - scenario 1.
2. It is also possible to swap two icons by dragging gesture (as described in next slide) –
scenario 2.
Page 13

Shortcut Menu Configuration: swapping
Step1:
Long press on one of the icons you want to swap.
Step2:
Drag this icon to your desired position.
Gesture:
Step3:
Drop this icon in your desired position – icons will be swapped.
Notes:
1. To reset the position of all icons to default values, press Config
- go to "Admin" tab - press "Restore" and select "System
configuration“ – be aware that this will reset whole system
configuration .
Page 14

Imaging control by gestures
Page 15

Gain
Gain operation areas
increase
decrease
decrease
increase
Gesture:
Notes:
1. Gain can be modified on the Gain bar in the control menu on the bottom
part of the screen - swiping your finger from left to right will increase gain.
2. Gain can also be modified using the gray bar on the upper right side of the
screen – swiping your finger from bottom to top will increase the gain
value.
Page 16

Depth
Option 2
Option 1
Notes:
1. Depth can be changed using the “Depth” control on the Control menu (bottom
part of the touch screen).
2. Or it can be modified on the left side of the image – as described
in next slide.
Page 17

Depth
Gesture: Notes:
1. To modify Depth directly on the depth scale, flick (swipe) your finger on the depth scale on
the left side of the image – by default, swiping your finger from top to bottom will increase
depth.
2. If you wish to change the direction how depth is controlled (swiping your finger from
bottom to top will increase depth) go to Configuration – open “Imaging” tab – go to
“Global” tab and “Gesture” and click “Invert depth control”.
Page 18

Color ROI size
Notes:
1. The four vertices of the ROI can be manipulated to change ROI width and length.
Page 19

Color ROI Size
Step1: Drag
Step2: Release
Gesture:
Page 20

Color ROI position
Step1: Click on
the image area
Step2: move ROI to
a new position
Gesture:
Page 21

Image Review
Prev. image
Next image
Gesture:
Notes:
1. Slide your finger from right to left to display next image on the clipboard
and from left to right to display previous image on the clipboard.
2. The gesture response area is the whole 2D image area.
Page 22

Image Review – M-mode and Doppler
Prev. image
Next image
Gesture:
Notes:
1. If an M-Mode or a Doppler image is displayed, the gesture response
area is the whole 2D image area.
2. If a measurement was performed on the image, please press EXIT first
to be able proceed to previous/next images.
Page 23

Zoom in/out – by Pinch/Spread
Spread to Zoom in
Pinch to Zoom out
Gesture:
Image preview
with zoom ROI
Notes:
1. To activate zoom, pinch on the image and spread in or out to zoom in/out the
image.
Page 24

Zoom in/out– by Tap
Gesture:
Image preview
with zoom ROI
Notes:
1. You can also zoom on the structure of interest by double tapping on it. Double
tap again to deactivate Zoom.
2. The gesture response area is the whole 2D IMAGE AREA.
Page 25

Zoomed image Position
Gesture:
2
Press this area and drag
1
Notes:
1. Move your zoomed area to the
desired position by dragging
the zoomed image with your
finger.
2. The position of the zoomed
area is shown in the “Preview
image” on the bottom of the
clipboard.
2
Image preview
with zoom ROI
Image preview
with zoom ROI
Page 26

Cursor line
Drag cursor to the
desired position
Gesture: Notes:
1. You can drag the cursor line to any desired
position with your finger.
2. Also supported M and Doppler mode.
Page 27

Doppler- Base line (quick adjust)
Top
Central
Bottom
Gesture:
Notes:
1. You can quickly adjust the baseline to three
different positions (up, central, bottom)
by tapping into the desired area.
Page 28

Doppler- Base line / Scale / Horizontal Sweep
Increase
Up
Gestures:
Down
Decrease
Notes:
1. If you wish to manually modify your baseline position, hold and drag it up/down to the
desired position.
2. Adjust the horizontal sweep by swiping your finger left (decrease) or right (increase) on
the ECG signal (also available for M-mode images).
3. Adjust the Doppler scale by swiping your finger up
(increase) or down (decrease) on the Doppler scale.
Decrease
Increase
Page 29

4D Rotate – Live / Recall
Gesture:
Notes:
1. Tap on your 4D image and SLIDE your finger on the 4D image
area to rotate it according to your preferences.
2. 4D rotation on the touch screen is available during live
scanning and when recalling archived 4D images.
Page 30

4D Rotate – 2 click crop
Step1
Step2
Gesture:
Notes:
1. To perform your desired cropping with 2 clicks, first tap in one of the 2D slices at the
point you want to start looking onto the 4D dataset - the first crop plane will be set.
2. Tap a second time on the same 2D slice, to define where to end with the cropped
image.
Page 31

Vivid is a trademark of General Electric Company
 Loading...