

GE P2B918SEM1SS, P2B918DEM1CC, P2B918DEM1BB, P2B918DEM1WW Owner’s Manual
0
ge.com
0
OIEEEEI
U
0
>
0
U
m
0
U..
m
E3
m
U
Safety Instructions ..... 2-S
Operating Instructions
Convection Oven ......... 19-23
Roasting Guide ............. 22
Timed Convection Baking .... 23
Gas Surface Burners ....... 9, 11
Griddle ....................... 10
Lower Oven Drawer .......... 28
Thermostat .................. 27
Upper Oven .............. 12-27
Aluminum Foil .............. 14
Baking or Roasting .......... 14
Broiling Guide ............... 15
Clock and Timer ............ 16
Oven Controls .............. 12
Preheating ................. 14
Probe ................... 18, 21
Sabbath Feature ........ 26, 27
Self-Cleaning ............ 29, 30
Special Features ........ 24, 25
Timed Baking and
Roasting Features .......... 17
Care and Cleaning
Burner Grates ................ 33
Burner Caps and Heads ...... 32
Control Panel and Knobs ..... 37
Cooktop Surface ............. 33
Griddle ....................... 34
Lift-Off Oven Door ............ 35
Lower Oven Drawer .......... 36
Oven Air Vents ............... 37
Oven Heating Elements ...... 35
Oven Light Replacement ..... 38
Oven Shelves ................ 38
Sealed Burner Assemblies .... 31
Self-Cleaning ............. 29, 30
Stainless Steel Surfaces ...... 33
Installation
Instructions ........... 39-52
Anti-Tip Device ............... 52
Check Ignition of
Surface Burners .......... 50, 51
Connect Range
to Electric ................ 44, 46
Connect Range to Gas .... 43, 45
Dimensions and
Clearances ................... 41
Electrical Connections ..... 46-49
Level the Range .............. 51
Location Guidelines .......... 42
LP ........................... 52
Safetg Instructions ........ 39, 40
Accessories ................. 57
Troubleshooting
Tips ..................... s3-s6
Consumer Support
Consumer
Support ............. Back Cover
Product Registration ...... 61, 62
Warrantg .................... 63
P2B918
m
Write the model and serial
numbers here:
Model #
Serial #
You can find them on a label on the
front of the range behind the lower
oven drawer.
183D5580P220 49-85!56 05-07JR
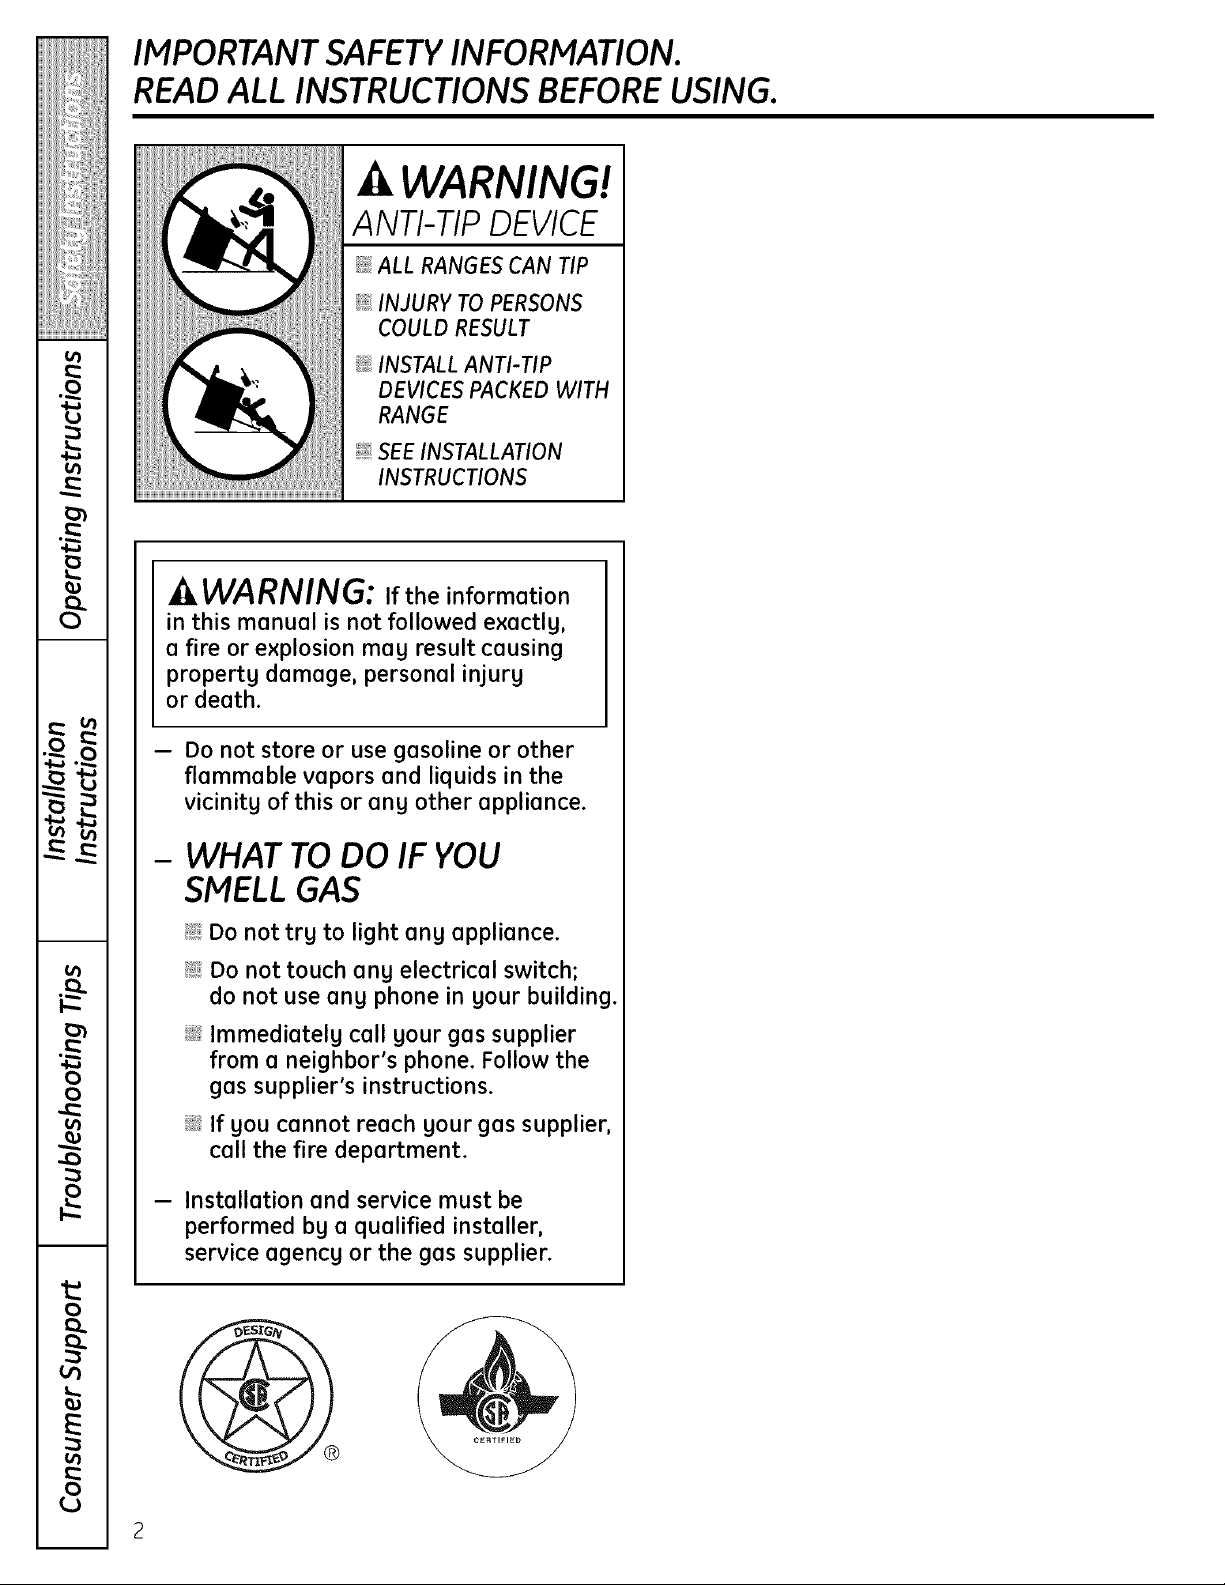
IMPORTANT SAFETY INFORMATION.
READ ALL INSTRUCTIONS BEFORE USING.
WARNING!
ANTI-TIP DEVICE
_! ALL RANGESCAN TIP
@INJURY TO PERSONS
COULD RESULT
_:;INSTALLANTI-TIP
DEVICESPACKED WITH
RANGE
@SEEINSTALLATION
INSTRUCTIONS
_, WARNING: Ifthe information
in this manual is not followed exactly,
a fire or explosion may result causing
property damage, personal injury
or death.
-- Do not store or use gasoline or other
flammable vapors and liquids in the
vicinitg of this or ang other appliance.
- WHAT TO DO IF YOU
SMELL GAS
!ii_Do not trg to light ang appliance.
!ii_Do not touch ang electrical switch;
do not use ang phone in gour building.
i_i:iImmediatelg coil gour gas supplier
from a neighbor's phone. Follow the
gas supplier's instructions.
i_i_iIf gou cannot reach gour gas supplier,
call the fire deportment.
- Installation and service must be
performed bg a qualified installer,
service agencg or the gas supplier.
ge.com
WARNING!
Foryour safety, the information in thismanual must befollowed to minimizethe riskof fire or
explosion,electricshock,or to prevent property damage,personal injury,or lossof life.
ANTI-TIP DEVICE
All ranges can tip and injury could result.
Toprevent accidental tipping of the range, attach it to the wall by installing the Anti-Tip device supplied.
If the Anti-Tip device supplied with the range does not fit this application, use the universal Anti-Tip
device WB2_7909.
To check if the device is installed and engaged properly, carefullg tip the range forward. TheAnti-Tip
device should engage and prevent the range from tipping ove_
If you pull the range out from the wall for anu reason, make sure the device is properly engaged
when you push the range back against the wall. If it is not, there is a possible risk of the range tipping
over and causing injuru if you or a child stand, sit or lean on an open dooE
Please refer to the Anti-Tip device information in this manual. Failure to take this precaution could
result in tipping of the range and injury.
ii//i/i!ii_iiiiiii/
o
_°
}
o
IMPORTANT SAFETY INFORMATION.
READ ALL INSTRUCTIONS BEFORE USING.
WARNING!
IMPORTANTSAFETYNOTICE
The California Safe Drinking Water and Toxic Enforcement Act requires the Governor of California to
publish a list of substances known to the state to cause birth defects or other reproductive harm, and
requires businesses to warn customers of potential exposure to such substances.
Gas appliances can cause minor exposure to four of these substances, namely benzene, carbon
monoxide, formaldehFde and soot, caused primaril 9 by the incomplete combustion of natural gas or
LP fuels. Properl9 adjusted burners, indicated b9 a bluish rather than a yellow flame, will minimize
incomplete combustion. Exposure to these substances can be minimized by venting with an open
window or using a ventilation fan or hood.
SAFETYPRECAUTIONS
When using electrical appliances, basic safety precautions should be followed, including the following:
;_i:,:Use this appliance onlg for its intended
purpose as described in this Owner's Manual.
Be sure gour appliance is properlg installed
and grounded bg o qualified technician in
accordance with the provided installation
instructions.
@
Do not attempt to repair or replace ong
port of gour range unless it is specificollg
recommended in this manual. All other
servicing should be referred to a qualified
technician.
Do not leave children alone---children should
not be left alone or unattended in an area
where an appliance is in use, Theg should
never be allowed to sit or stand on ang part
of the appliance.
Do not allow angone to climb, stand or hang
on the door, storage drawer, or cooktop. Theg
could damage the range and even tip it over,
causing severe personal injurg.
_t_:_Do not store flammable materials in an oven
or near the cooktop.
Before performing ang service, disconnect
the range power supplg at the household
distribution panel bg removing the fuse or
switching off the circuit breaken
CAUTION: Itemsofinteresttochildren
should not be stored in cabinets above a
range or on the backsplash of a range-
children climbing on the range to reach
items could be seriously injured.
SAFETYPRECAUTIONS
Have the installer show you the location of the range gas shut-off valve and how to shut it off if
necessarg.
_t:::Have gour range installed and properlg
grounded bg a qualified installer, in
accordance with the Installation Instructions.
Ang adjustment and service should be
performed onlg bg qualified gas range
installers or service technicians.
_t_:_Do not attempt to repair or replace ang
part of gour range unless it is specificallg
recommended in this manual. All other service
should be referred to a qualified technician.
4
SAFETYPRECAUTIONS
ge,com
'T:j::::£¸¸
ii//i/i!ii_i_iiii/
_i:,:Locate the range out of kitchen traffic path
and out of draftg locations to prevent poor air
circulation.
_?_::Be sure all packaging materials are removed
from the range before operating it to prevent
fire or smoke damage should the packaging
material ignite.
;_i:,:Be sure your range is correctly adjusted by
a qualified service technician or installer for
the type of gas (natural or LP)that is to be
used. Your range can be converted for use
with either type of gas. See the Instollation
of the range section.
A WARNING: Theseadjustments
must be mode bg o qualified service
technician in accordance with the
manufacturer's instructions and all codes
and requirements of the authority having
jurisdiction. Failure to follow these instructions
could result in serious injury or property
damage. The qualified agency performing
this work assumes responsibility for the
conversion.
;_i:,:After prolonged use of a range, high floor
temperatures may result and many floor
coverings will not withstand this kind of use.
Never install the range over vinyl tile or
linoleum that cannot withstand such type
of use. Never install it directly over interior
kitchen carpeting.
_;i:,:Do not leave children alone or unattended
where a range is hot or in operation. They
could be seriously burned.
_::Do not allow anyone to climb, stand or hang
on the oven door, drawer or cooktop. They
could damage the range and even tip it over,
causing severe personal injury.
CAUTION: Itemsofinterestto
children should not be stored in cabinets
above a range or on the backsplash of o
range-children climbing on the range to
reach items could be seriously injured.
_i:,:For your safetg, never use your appliance
for warming or heating the room.
_i:,:Never wear loose-fitting or hanging garments
while using the appliance. Be careful when
reaching for items stored in cabinets over the
range. Flammable material could be ignited if
brought in contact with flame or hot oven
surfaces and may cause severe burns.
_?_::Do not store flammable materials in an oven,
a range drawer or near a cooktop.
_::Do not store or use combustible materials,
gasoline or other flammable vapors and
liquids in the vicinity of this or any other
appliance.
_::Do not let cooking grease or other flammable
materials accumulate in or near the range.
_?_::Do not use water on grease fires. Never
pick up a flaming pan. Turn the controls off.
Smother a flaming pan on a surface burner
by covering the pan completely with a
well-fitting lid, cookie sheet or flat tray.
Use a multi-purpose dry chemical or
foam-type fire extinguishe[
Flaming grease outside a pan can be put
out by covering it with baking soda or,
if available, by using a multi-purpose dry
chemical or foam-tgpe fire extinguishen
Flame in the upper oven or lower oven drawer
can be smothered completelg by closing the
oven door or drawer and turning the control to
off, or by using a multi-purpose dry chemical
or foam-tgpe fire extinguisher.
_t_:_Let the burner grates and other surfaces cool
before touching them or leaving them where
children can reach them.
Never block the vents (air openings)of the
range. They provide the air inlet and outlet
that are necessary for the range to operate
properly with correct combustion. Air openings
are located at the rear of the cooktop, at the
top and bottom of the oven door, and at the
bottom of the range under the lower oven
drawer or kick panel.
Do not lift the cooktop. Lifting the cooktop can
lead to damage and improper operation of the
range.
t_
0
_°
}
o
;_i:,:Large scratches or impacts to glass doors
can lead to broken or shattered glass.
IMPORTANT SAFETY INFORMATION.
READ ALL INSTRUCTIONS BEFORE USING.
WARNING!
SURFACEBURNERS
Use proper pan size-avoid pans that are unstable or easily tipped. Select cool<wore having flat
bottoms large enough to cover burner grates, Toavoid spillovers, mal<esure cool<wore is large enough
to contain the food properly. This will both save cleaning time and prevent hazardous accumulations of
food, since heavy spattering or spillovers left on range can ignite. Use pans with handles that can be
easily grasped and remain cool.
_;):,:Always use the LITE position when igniting the
top burners and make sure the burners have
ignited.
_::Never leave the surface burners unattended at
high flame settings. Boilovers cause smoking
and greasy spillovers that may catch on fire.
_;i:,:Adjust the top burner flame size so it does not
extend beyond the edge of the cookware.
Excessive flame is hazardous.
_t_:_Use only dry pot holders-moist or damp pot
holders on hot surfaces may result in burns
from steam. Do not let pot holders come near
open flames when lifting cookware. Do not use
a towel or other bulky cloth in place of a pot
holde[
_: When using glass cookware, make sure it
is designed for top-of-range cooking,
_::To minimize the possibilitg of burns, ignition
of flammable materials and spillage, turn
cookware handles toward the side or back
of the range without extending over adjacent
burners.
_t_:_Carefully watch foods being fried at a high
flame setting.
;_'Always heat fat slowlg, and watch as it heats.
_: Do not leave any items on the cooktop. The
hot air from the vent may ignite flammable
items and will increase pressure in closed
containers, which may cause them to burst.
If a combination of oils or fats will be used
in frying, stir together before heating or
as fats melt slowlg.
Use a deep fat thermometer whenever
possible to prevent overheating fat beyond
the smoking point.
;_):,:Do not flame foods on the cooktop. If you do
flame foods under the hood, turn the fan on.
;_i:,:Do not use a wok on the cooking surface
ifthe wok has a round metal ring that is placed
over the burner grate to support the wok, This
ring acts as a heat trap, which may damage
the burner grate and burner head. Also, it may
cause the burner to work improperlg. This may
cause a carbon monoxide level above that
allowed by current standards, resulting ina
health hazard.
_t_:_Foods for frying should be as dry as possible.
Frost on frozen foods or moisture on fresh
foods can cause hot fat to bubble up and
over the sides of the pan.
;_i:,:Never try to move a pan of hot fat, especiallg
a deep fat fryer. Wait until the fat is cool.
;_i:,:Do not leave plastic items on the cooktop-
they may melt if left too close to the vent.
;_i:,:Keep all plastics away from the surface
burners.
_t_:_To avoid the possibility of a burn, always be
certain that the controls for all burners are
at the OFF position and all grates are cool
before attempting to remove them.
;_i:,:If range is located near a window, do not hang
long curtains that could blow over the surface
burners and create a fire hazard.
_t::_If you smell gas, turn off the gas to the range
and call a qualified service technician. Never
use an open flame to locate a leak.
;_):,:Always turn the surface burner controls off
before removing cookware.
_t_:_Use the least possible amount of fat for
effective shallow or deep-fat frying. Filling the
pan too full of fat can cause spillovers when
food is added.
6
ge,com
ELECTRICWARMING DRAWER AND LOWEROVEN DRAWER
ii//i/i!ii_iiiiiii/
_t{::The purpose of the warming drawer
and WARM ZONEsetting of the lower oven
drawer is to hold hot cooked foods at serving
temperature. Always start with hot food;
cold food cannot be heated or cooked in the
warming drawer or the WARM ZONEsetting
of the lower oven drawer.
;_i:,:Do not use the lower oven drawer to dry
newspapers. If overheated, they can catch
on fire.
_t{:_Do not leave paper products, plastics, canned
food or combustible materials in the drawee
_):':Never leave jars or cans of fat drippings inor
near your lower oven drawee
_i:,:Do not warm food in the lower oven drawer
for more than two hours.
_ Do not touch the heating element or the
interior surface of the lower oven drawer.
These surfaces may be hot enough to burn.
REMEMBER:The inside surface of the lower
oven drawer may be hot when the drawer
is opened.
_t:::Use care when opening the lower oven
drawer. Open the drawer a crack and let
hot air or steam escape before removing
or replacing food. Hot air or steam which
escapes can cause burns to hands, face
and/or eyes.
_i:,:Do not use aluminum foil to line the lower
oven drawer. Foil is an excellent heat insulator
and will trap heat beneath it. This will upset
the performance of the drawer and it could
damage the interior finish.
;_::,:Never place, use or self-clean the lower oven
drawer pan in the upper oven.
o
_°
}
oo
€.n
¢b
o
IMPORTANT SAFETY INFORMATION.
READ ALL INSTRUCTIONS BEFORE USING.
COOKMEATAND POULTRYTHOROUGHLY...
Cook meat and poultry thoroughly-meat to at least on INTERNALtemperature of ff60°F and poultry
to at least an INTERNAL temperature of lSO°E Cooking to these temperatures usually protects against
foodbome illness.
UPPER OVEN
Standawag from the range when openingthe door of a hot oven.Thehot air and steam that escape
cancausebums to hands,face and eyes.
_::Do not use the oven for a storage area.
Items stored in the oven can ignite.
_i_Keep the oven free from grease buildup.
_:::Place the oven shelves in the desired position
while the oven is cool. If shelves must be
handled when hot, do not let pot holder
contact the heating elements.
Pulling out the shelf to the stop-lock is a
convenience in lifting heavg foods. It is also
a precaution against burns from touching hot
surfaces of the door or oven walls. The lowest
position "R" is not designed to slide.
_):,:Do not heat unopened food containers.
Pressure could build up and the container
could burst, causing an injurg.
SELF-CLEANING UPPER OVEN
_t_:_Be sure to wipe up excess spillage before
self-cleaning operation.
_t_:_Before self-cleaning the oven, remove
the shelves, ang broiler pan, grid and
other cookware.
_:::When using cooking or roasting bags in the
oven, follow the manufacturer's directions.
Do not use gour oven to drg newspapers.
If overheated, theg can catch fire.
Do not leave paper products, cooking utensils
or food inthe oven when not in use.
_i:,:Keep the oven vent unobstructed.
_i:,:Hake sure ang broiler pan is in place correctlg
to reduce the possibilitg of grease fires.
_i:,:If Sou should have a grease fire in a broiler
pan, press the Cleer/Offpad and keep
the oven door closed to contain fire until
it burns out.
_t_:_Never place, use or self-clean the lower oven
drawer pan in the upper oven.
¢i_Clean onlg parts listed in this Owner's Manual.
_t_::If the self-cleaning mode malfunctions,
turn the oven off and disconnect the power
supplg. Have it serviced bg a qualified
technician.
;_::,:Never place, use or self-clean the lower oven
drawer pan in the upper oven.
;;):,:Do not clean the door gasket. The door gasket
is essential for a good seal, Care should be
taken not to rub, damage or move the gasket.
;;):,:Donot useoven cleaners, Nocommercial
oven cleaneror oven liner of ang kindshould
beused in oraround ang part of the oven,
Residuefrom oven cleanerswilldamage the
insideof the oven when the self-cleancgcle
isused.
READAND FOLLOWTHISSAFETYINFORMATION
CAREFULLY.
SAVE THESE INSTRUCTIONS
8

Using the gas surface burners.
Throughout this manual, features and appearance may vary from your model.
ge.com
Push the control knob in and turn
it to the LITEposition.
Before Lighting a Gas Burner
::Ji::Hake sure all burners are in place.
_(:Makesure all grates on the range are
properlg placed before using ang burneE
How to Light a Gas Surface Burner
Hake sure all the surface burners are placed
in their respectivepositions,
Pushthe control knob in and turn it to
the LifE position.
Youwill hear a little clicking noise-
the sound of the electricspark igniting
the burneE
Turn the knob to adjust the flame size.
If the knob stagsat LifE, it will continue
to click.
After Lighting a Gas Burner
::J_::Donot operate the burner for an extended
period of time without cookware on the
grate. Thefinish on the grate mag chip
without cookware to absorb the heat.
5_:Be sure the burners and grates are cool
before gou place gour hand, a pot holder,
cleaning cloths or other materials on them.
When one burner isturned to LITE, allthe
burners spark. Donot attempt to disassemble
or clean around ang burner while another
burner is on.An electric shock mag result,
which could cause you to knock over hot
cookware.
t_
0
iijiiiiiiJiiiijjil
Oval
Medium Small
Large Extra Large
Sealed Gas Burners
Yourgasrangecooktophasfivesealed
gasburners.Thegofferconvenience,
cleanabilitgandflexibilitgtobeusedin
a widerangeofcookingapplications.
The smallestburnerintherightrearpositionis
thesimmerburner.Thisburnercanbeturned
down to LOfor a verg low simmer setting. It
provides precisecooking performance for
delicate foods suchas saucesor foods that
require low heat for a long cooking time.
The medium (leftrear)and the large (leftfront)
burners arethe primarg burners for most
cooking.Thesegeneral-purpose burners can
be turned down from HI to LOto suit awide
range of cooking needs.
How to Select Flame Size
Forsafe handling of cookware, never let the
flames extend up the sides of the cookware.
Watch the flame, not the knob, as gou reduce
heat. When fast heating is desired, the flame
sizeon a gas burner should match the
cookware gou are using.
The extra large burner (rightfront) isthe
maximum output burner. Likethe other four
burners,it can be turned down from HI to LO
for a wide range of cooking applications;
however,this burner is designedto quicklg
bring large amounts of liquid to a boil. Ithas
a special POWERBOIL" setting designedto
be usedwith cookware 10 inchesor larger
in diameter.
o_
Lite
Lo
Extra-large burner ontg
The center oval burner (on some models)is
for large pots/pans or for usewith the griddle.
Flameslarger than the bottom of the
cookware will not result infaster heating
of the cookware and could be hazardous.
:b-
8
rb
o
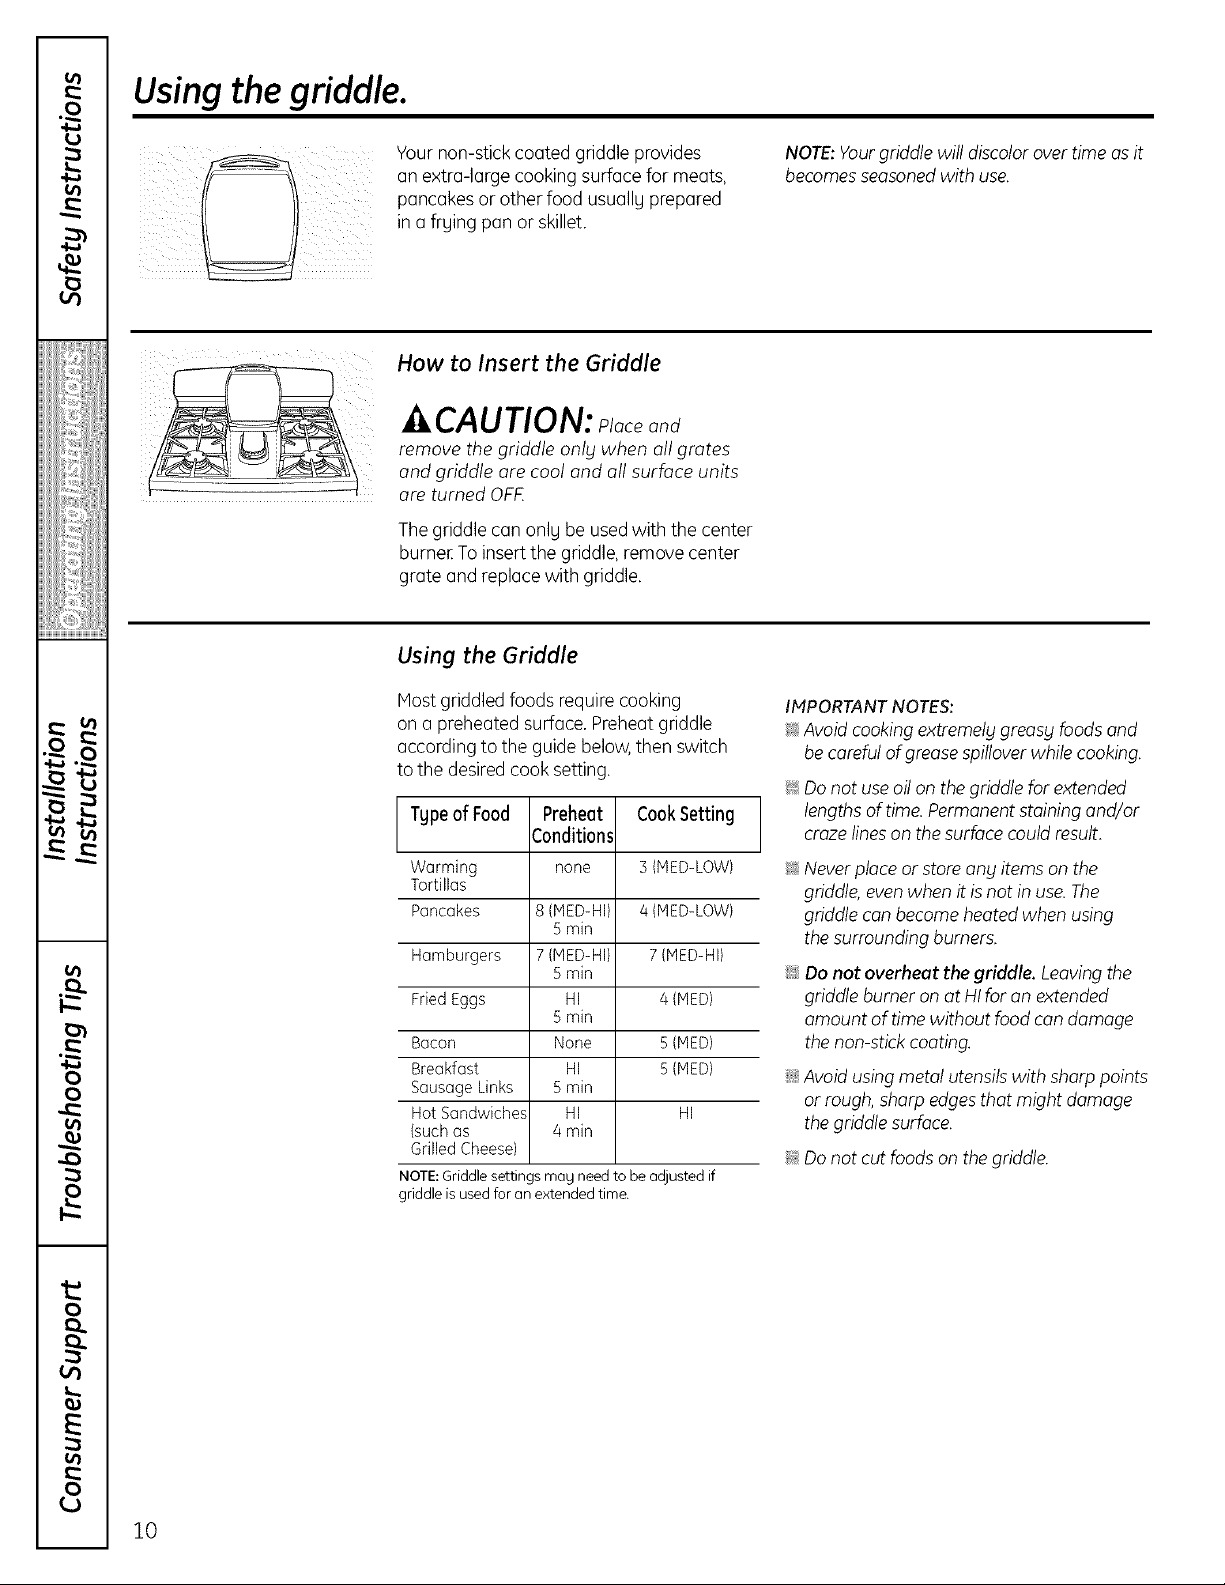
Usingthe griddle.
Your non-stick coated griddle provides
//_'_\ an extra-large cooking surface for meats,
II pancakes or other food usuallg prepared
in a frging pan or skillet.
How to Insert the Griddle
li, CAUTlON: puceand
remove the griddle onlg when all grates
and griddle ore cool and all surface units
ore turned OF!_
Thegriddle can onlg be usedwith the center
burner To insertthe griddle,remove center
grate and replace with griddle.
Using the Griddle
Mostgriddled foods require cooking
on a preheated surface. Preheatgriddle
according to the guide below,then switch
to the desiredcook setting.
L Tgpeof Food Preheat CookSettingConditions
Warming none 3 (MED-LOW)
Tortillas
Pancakes 8 (HED-HI) 4 (MED-LOW)
Hamburgers 7 (NED-HI) 7 (HED-HI)
Fried Eggs HI 4 (MED)
Bacon None 5 (MED)
Breakfast HI 5 (HED)
SausageLinks 5 min
Hot Sandwiches HI HI
(suchas 4 min
GrilledCheese)
NOTE:Griddle settings mag need to be adjusted if
griddle is used for an extended time.
s min
5 mJn
5 mJn
NOTE:Yourgriddle will discolor overtime asit
becomesseasonedwith use.
IMPORTANT NOTES:
_ Avoid cooking extremelg greasg foods and
be careful of grease spillover while cooking.
:_ Do not use oil on the griddle for extended
lengths of time. Permanent staining and/or
craze lines on the surface could result.
_ Neverplaceor storeang itemson the
griddle,even when itis not in use.The
griddle can become heatedwhen using
thesurrounding burners.
iJi::Do not overheat the griddle. Leavingthe
griddle burner onat HIfor on extended
amount of time without food con damage
the non-stickcoating.
ij_::Avoidusing metal utensilswith sharp points
or rough,sharp edgesthat might damage
thegriddle surface.
_ Donot cut foods on the griddle.
10
Using the gas surface burners, ge.com
Top-of-Range Cookware
Aluminum: Hedium-weight cookware is
recommended because it heats quickly
and evenly. Host foodsbrown evenly in an
aluminum skillet. Usesaucepans with tight-
fitting lidswhen cooking with minimum
amounts of water
Cast-Iron: If heated slowly, most skilletswill
give satisfactory results.
Enamelware: Undersome conditions,
the enamel of some cookware meg
melt. Followcookware manufacturer's
recommendations for cooking methods.
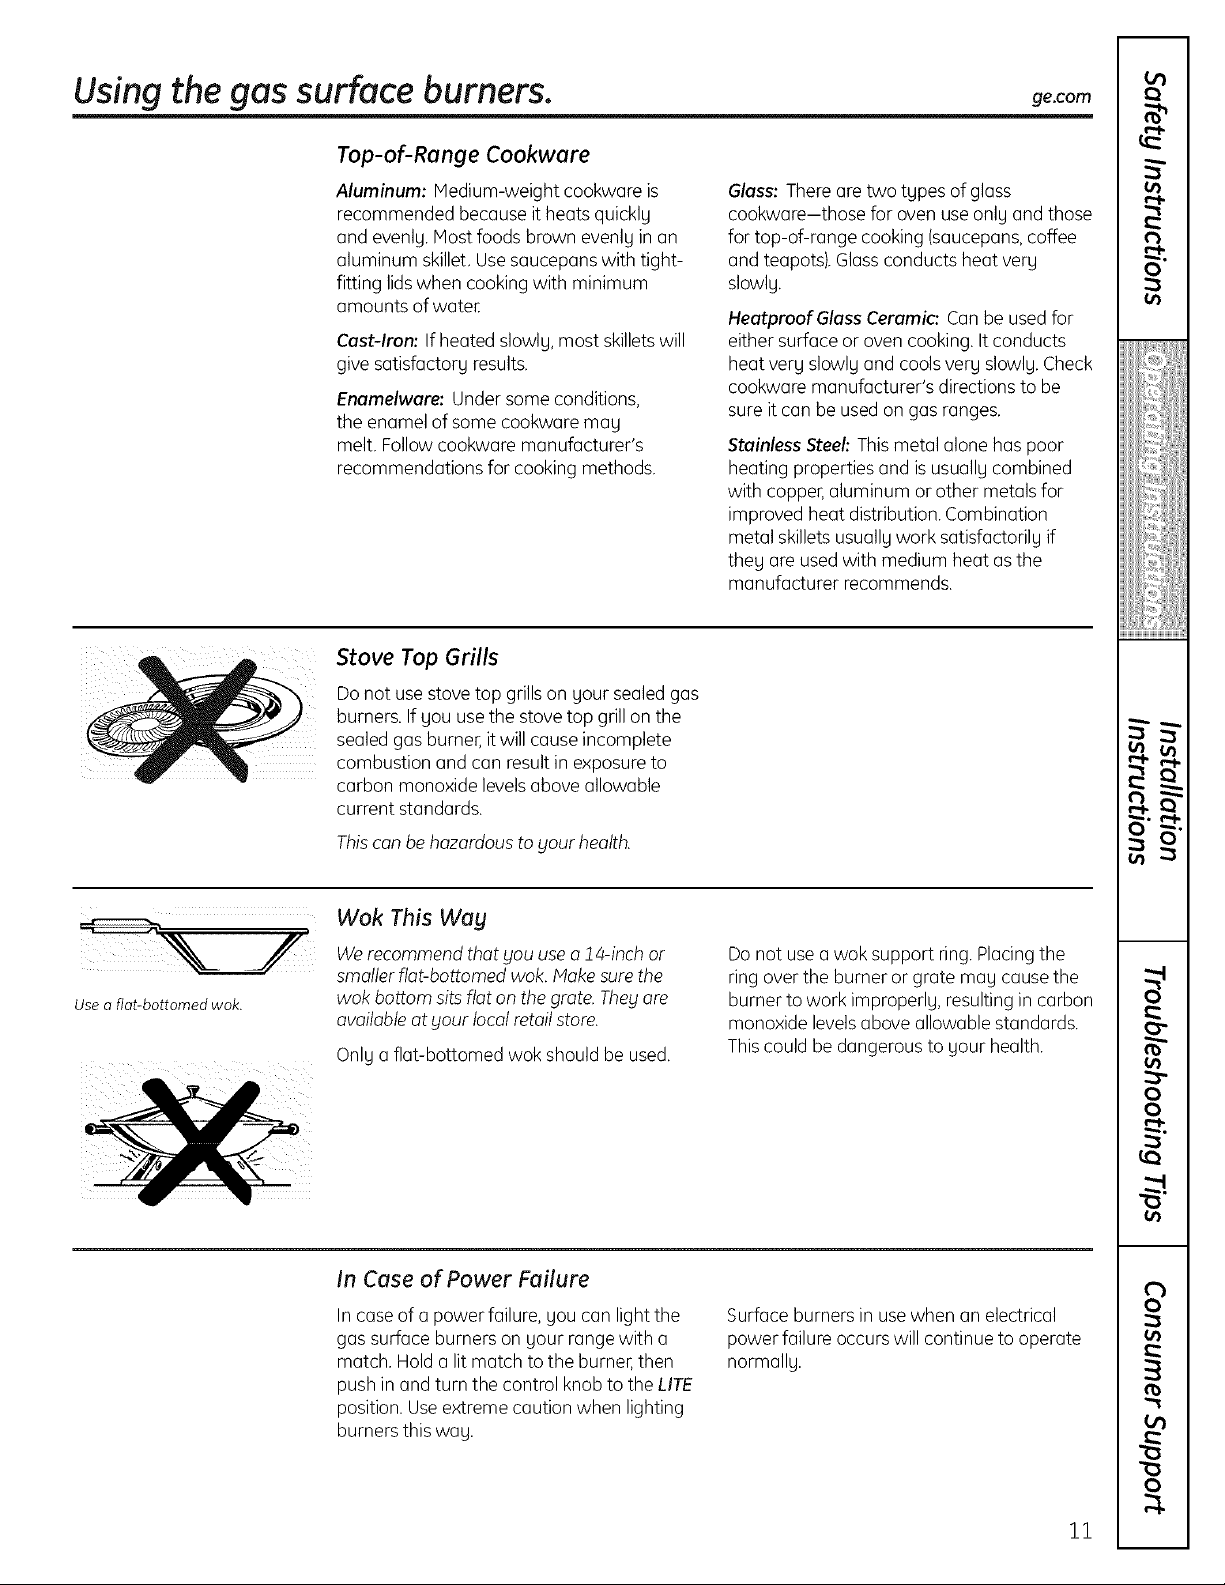
Stove Top Grills
Do not usestove top grillson your sealedgas
burners. If you usethe stove top grill on the
sealedgas burner, it will causeincomplete
combustion and can resultin exposure to
carbon monoxide levelsabove allowable
current standards.
Glass: Thereare two types of glass
cookware-those for oven useonly and those
for top-of-range cooking (saucepans,coffee
and teapots).Glassconducts heat very
slowly,
HeatproofGlass Ceramic: Can be usedfor
either surface or oven cooking. It conducts
heat very slowly and cools very slowly. Check
cookware manufacturer's directionsto be
sureit can be used on gasranges,
Stainless Steel: Thismetal alone haspoor
heating properties and isusually combined
with copper,aluminum or other metals for
improved heat distribution. Combination
metal skilletsusually work satisfactorily if
they are used with medium heat asthe
manufacturer recommends.
t_
0
iijiiiiii]iiiijjil
i_iii_ii,:,:>iiiii
Use a fiat-bottomed wok.
Thiscan behazardous to gout health.
Wok This Wag
We recommend that you use o 14-inch or
smaller fiat-bottomed wok. Hake sure the
wok bottom sits flat on the grote. Theg are
available at Ljourlocal retail store.
Only a flat-bottomed wok should be used.
In Case of Power Failure
In case of a power failure, you can lightthe
gas surface burners on your range with a
match. Hold a lit match to the burner,then
push in and turn the control knob to the LITE
position. Useextreme caution when lighting
burners this wag.
Donot usea wok support ring.Placingthe
ring over the burner or grate may cause the
burner to work improperly, resulting in carbon
monoxide levelsabove allowable standards.
Thiscould be dangerous to your health.
Surface burners in usewhen an electrical
power failure occurswill continue to operate
normally.
to
:b-
oo
¢'b
o
11
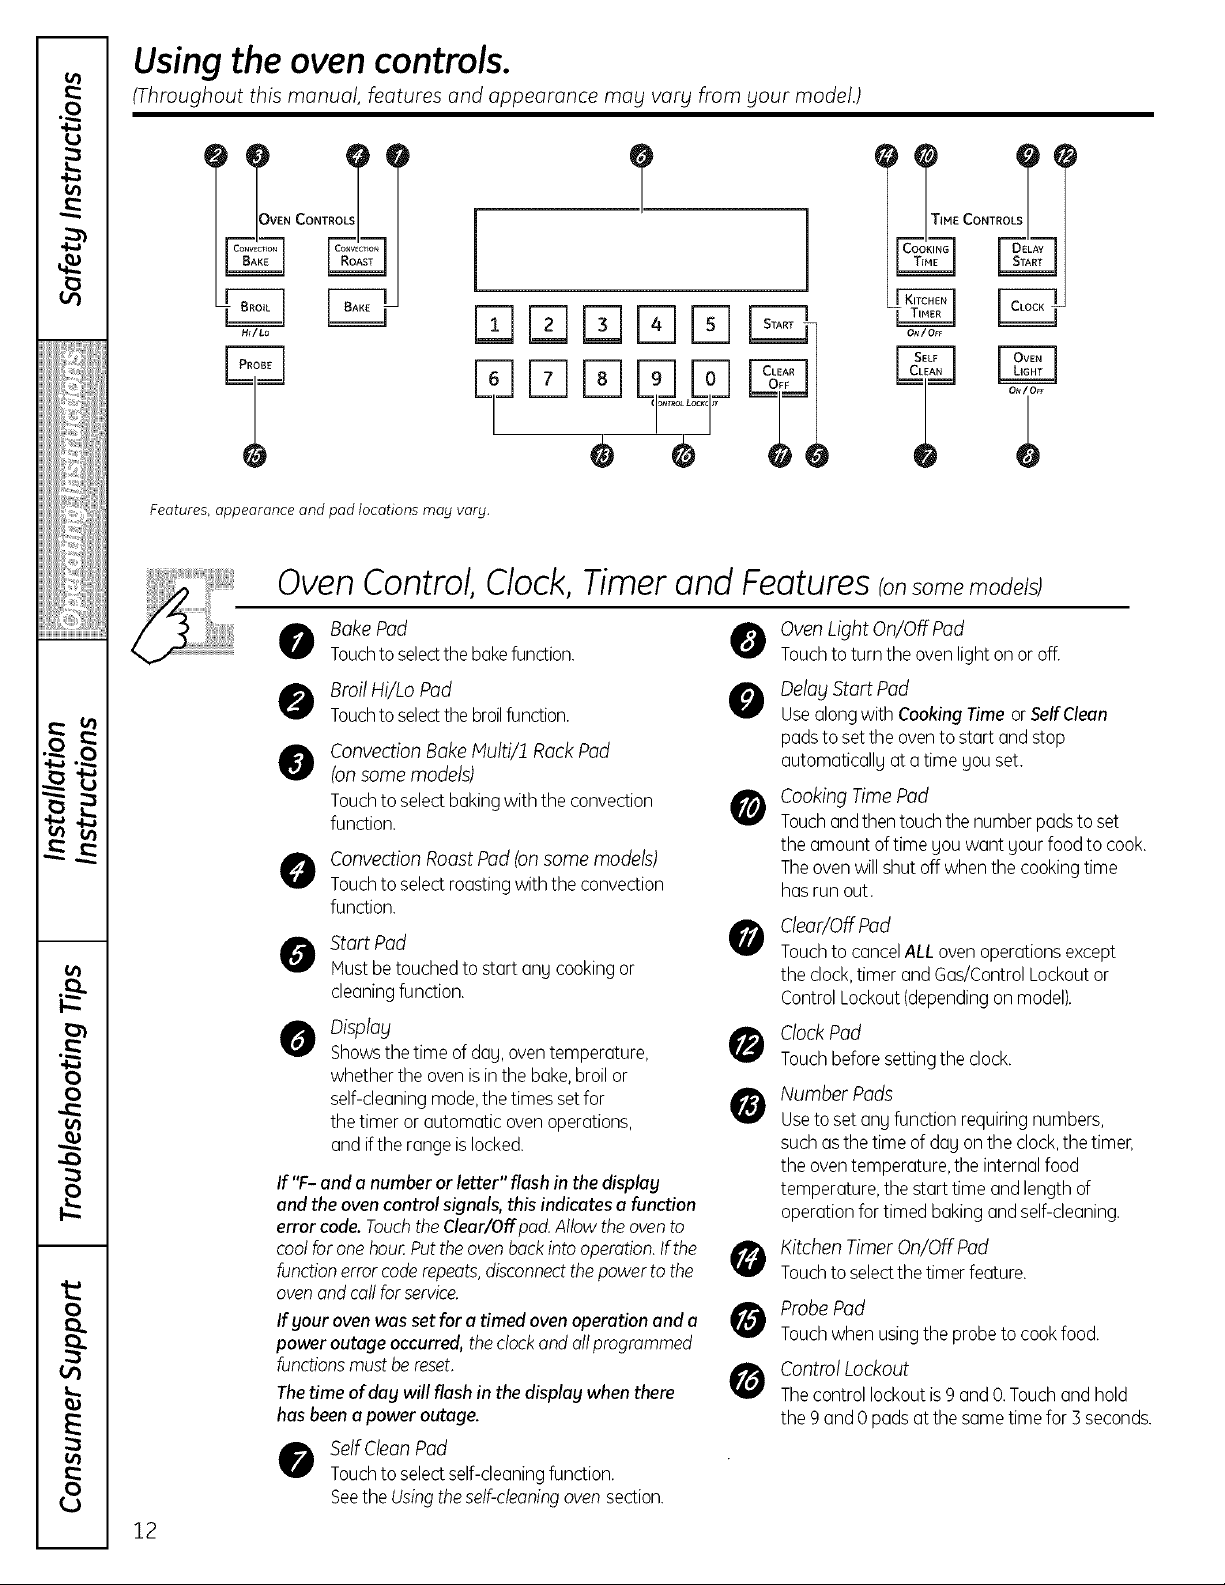
Using the oven controls.
[Throughout this manual, features and appearance may vary from your model.)
i
HI/LO
0 0
Features, appearance and pad locations mag varg.
OvenControl,Clock,Timerand FeaturesIonsome models)
IME CONTROL
Bake Pod
Touchto selectthebakefunction.
Broil Ni/Lo Pod
Touchto selectthe broilfunction.
Convection Bake Multi/1 Rack Pad
@
(on some models)
Touchto selectbakingwith the convection
function.
O Convection Roast Pod (onsome models)
Touchto selectroastingwith the convection
function.
Start Pod
Mustbetouchedto start any cookingor
cleaningfunction.
Display
Showsthetime of dog,oventemperature,
whetherthe ovenisinthe bake,broil or
self-cleaningmode,the timessetfor
thetimer or automatic ovenoperations,
and ifthe rangeislocked.
If "F- and a numberor letter" flashinthe disp/ag
and the ovencontrol signals,this indicates a function
error code.TouchtheClear/Offpad Allowtheovento
cootforonehour.Puttheovenbackinto operation.Ifthe
functionerrorcode repeats,disconnectthepowerto the
ovenand ca!/for service.
If gour ovenwas set for o timed ovenoperation end o
power outageoccurred, theclockandall programmed
functionsmustbe reset.
The time of dog willflash in the displag when there
has been a power outage.
Oven Light On/OffPod
Touch to turn the oven light on or off.
Delay Start Pod
Use along with Cooking Time orSelf Clean
pads to set the oven to start and stop
outom@tic@llgat @time gou set.
Cooking Time Pod
Touch and then touch the number pads to set
the amount of time gou want gour food to cook.
The oven willshut off when the cooking time
hasrun out.
Cleor/OffPod
O
Touchto cancelALL ovenoperationsexcept
the clock,timer and Gas/ControlLockoutor
ControlLockout(dependingonmodel).
ClockPod
0
Touchbeforesettingthe clock.
Number Pads
Useto set @ngfunction requiringnumbers,
suchusthetime of d@gon the clock,the timer,
the oventemperature,the internalfood
temperature,the starttime andlength of
operationfor timed bakingand self-cleaning.
Kitchen Timer On/Off Pod
Touchtoselectthetimer feature.
Probe Pod
Touchwhen usingthe probeto cookfood.
Control Lockout
Thecontrollockout is 9 andO.Touchand hold
the 9 and 0padsatthe sametime for 3 seconds.
12
SelfCleanPad
Touchto selectself-cleaningfunction.
Seethe Usingtheself-cleaningoven section.
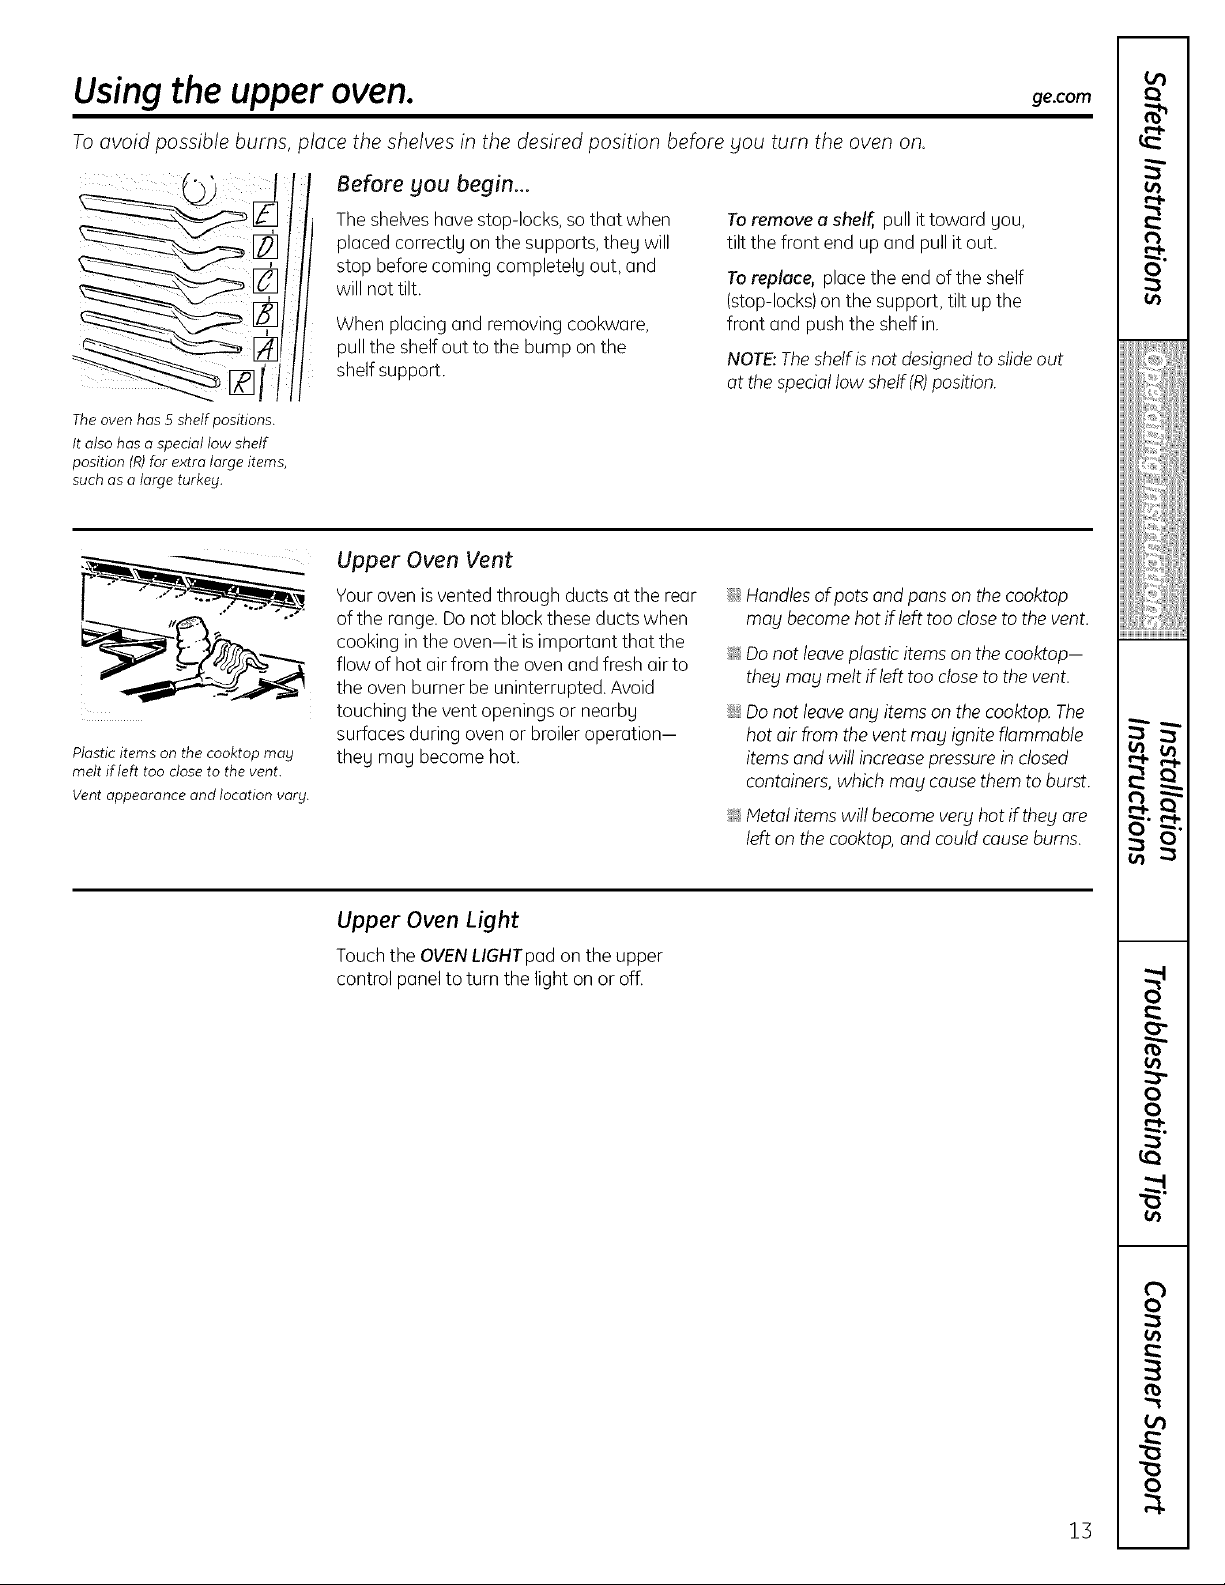
Using the upper oven.
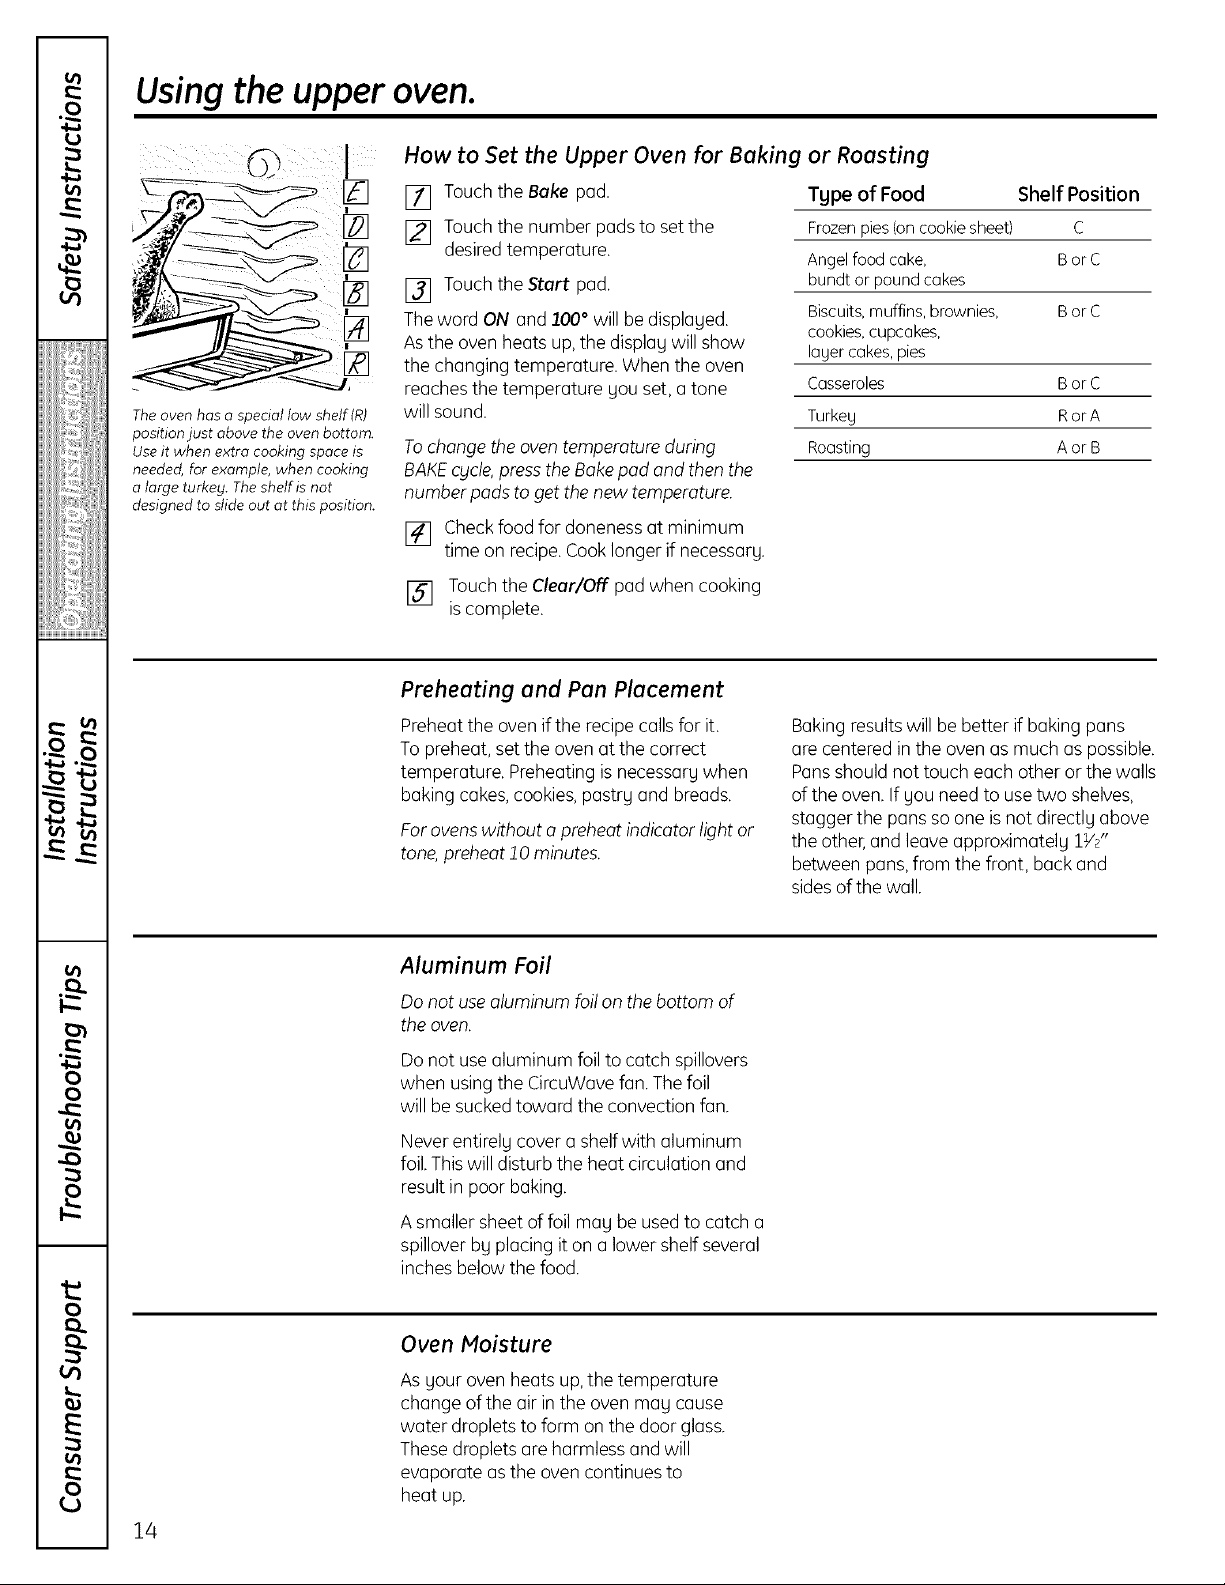
To avoid possible burns, place the shelves in the desired position before you turn the oven on.
Before you begin...
The shelves have stop-locks, so that when
placed correctlg on the supports, theg will
stop before coming completelg out, and
will not tilt.
When placing and removing cookware,
pull the shelfout to the bump on the
shelf support.
The oven has 5 shelf positions.
It also has a special low shelf
position (R)for extra large items,
such as a large turkey].
To remove a shelf, pull it toward gou,
tiltthe front end up and pull it out.
To replace, place the end of the shelf
(stop-locks) on the support, tiltup the
front and push the shelf in.
NOTE:The shelf is not designed to slide out
at the special low shelf (R)position.
ge.com
e,,l.
t_
0
iiiiiiii_Jiiiiiiil
i'_iiiii_iiiiii_j
Plastic items on the cooktop mug
melt if left too close to the vent.
Vent appearance and location varg.
Upper Oven Vent
Your oven is vented through ducts at the rear
of the range. Do not block these ducts when
cooking in the oven-it is important that the
flow of hot air from the oven and fresh airto
the oven burner be uninterrupted. Avoid
touching the vent openings or nearbg
surfaces during oven or broiler operation-
theg mag become hot.
Upper Oven Light
Touch the OVEN LIGHTpad on the upper
control panel to turn the light on or off.
i_iii_ii,biiiii
::Ji::Handles of pots and pans on the cooktop
mag become hot if left too close to the vent.
_ Do not leave plastic items on the cooktop-
theg mag melt if left too close to the vent.
::Ji::Do not leave any items on the cooktop. The
hot air from the vent may ignite flammable
items and will increase pressure in closed
containers, which may cause them to burst.
_ Metal items will become very hot if theg are
left on the cooktop, and could cause bums.
to
g
15
¢b
o
Using the upper oven.
The oven has o special low shelf(R)
position just above the oven bottom.
Use it when extra cooking space is
needed, for example, when cooking
e large turkey. The shelf is not
designed to slide out at this position.
How to Set the Upper Oven for Baking
[] Touch the Bake pad.
[] Touch the number padsto setthe
desiredtemperature.
[] Touch the Start pad.
Theword ON and 100° will be displaued.
Asthe oven heats up, the displau will show
the changing temperature. Whenthe oven
reachesthe temperature gou set, a tone
will sound.
Tochange the oven temperature during
BAKEcgcle,pressthe Bakepod and then the
number padsto get the new temperature.
[] Checkfood for doneness at minimum
time on recipe.Cooklonger if necessarg.
[] Touchthe Clear/Off padwhen cooking
tscomplete.
Preheating and Pan Placement
Preheatthe ovenif the recipe callsfor it.
To preheat, set the oven at the correct
temperature. Preheating is necessary when
baking cakes,cookies,pastrg and breads.
Forovenswithout o preheat indicator light or
tone,preheat 10 minutes.
or Roasting
Tgpe of Food Shelf Position
Frozen pies (on cookie sheet) C
Angel food c(]ke, B or C
bundt or pound cakes
Biscuits, muffins, brownies, B or C
cookies, cupc(]kes,
lager cakes, pies
Casseroles B or C
Turkey Ror A
Roasting A or B
Baking resultswill be better if baking pans
are centered in the oven as much as possible.
Punsshould not touch each other orthe walls
of the oven. If gou need to usetwo shelves,
stagger the pans soone isnot directlg above
the other,and leave approximatelg 1YS'
between pans,from the front, back and
sidesof the wall.
14
Aluminum Foil
Donot usealuminum foil on the bottom of
the oven.
Donot usealuminum foil to catch spillovers
when usingthe CircuWavefun. Thefoil
will be suckedtoward the convection fan.
Never entirelg cover a shelfwith aluminum
foil.Thiswill disturb the heat circulation and
result in poor baking.
A smaller sheetof foil may be usedto catch a
spillover by placing iton a lower shelf several
inches below the food.
Oven Moisture
Asyour oven heats up, the temperature
change of the air inthe oven may cause
water droplets to form on the door glass.
These droplets areharmless and will
evaporate as the oven continuesto
heat up.
i:il
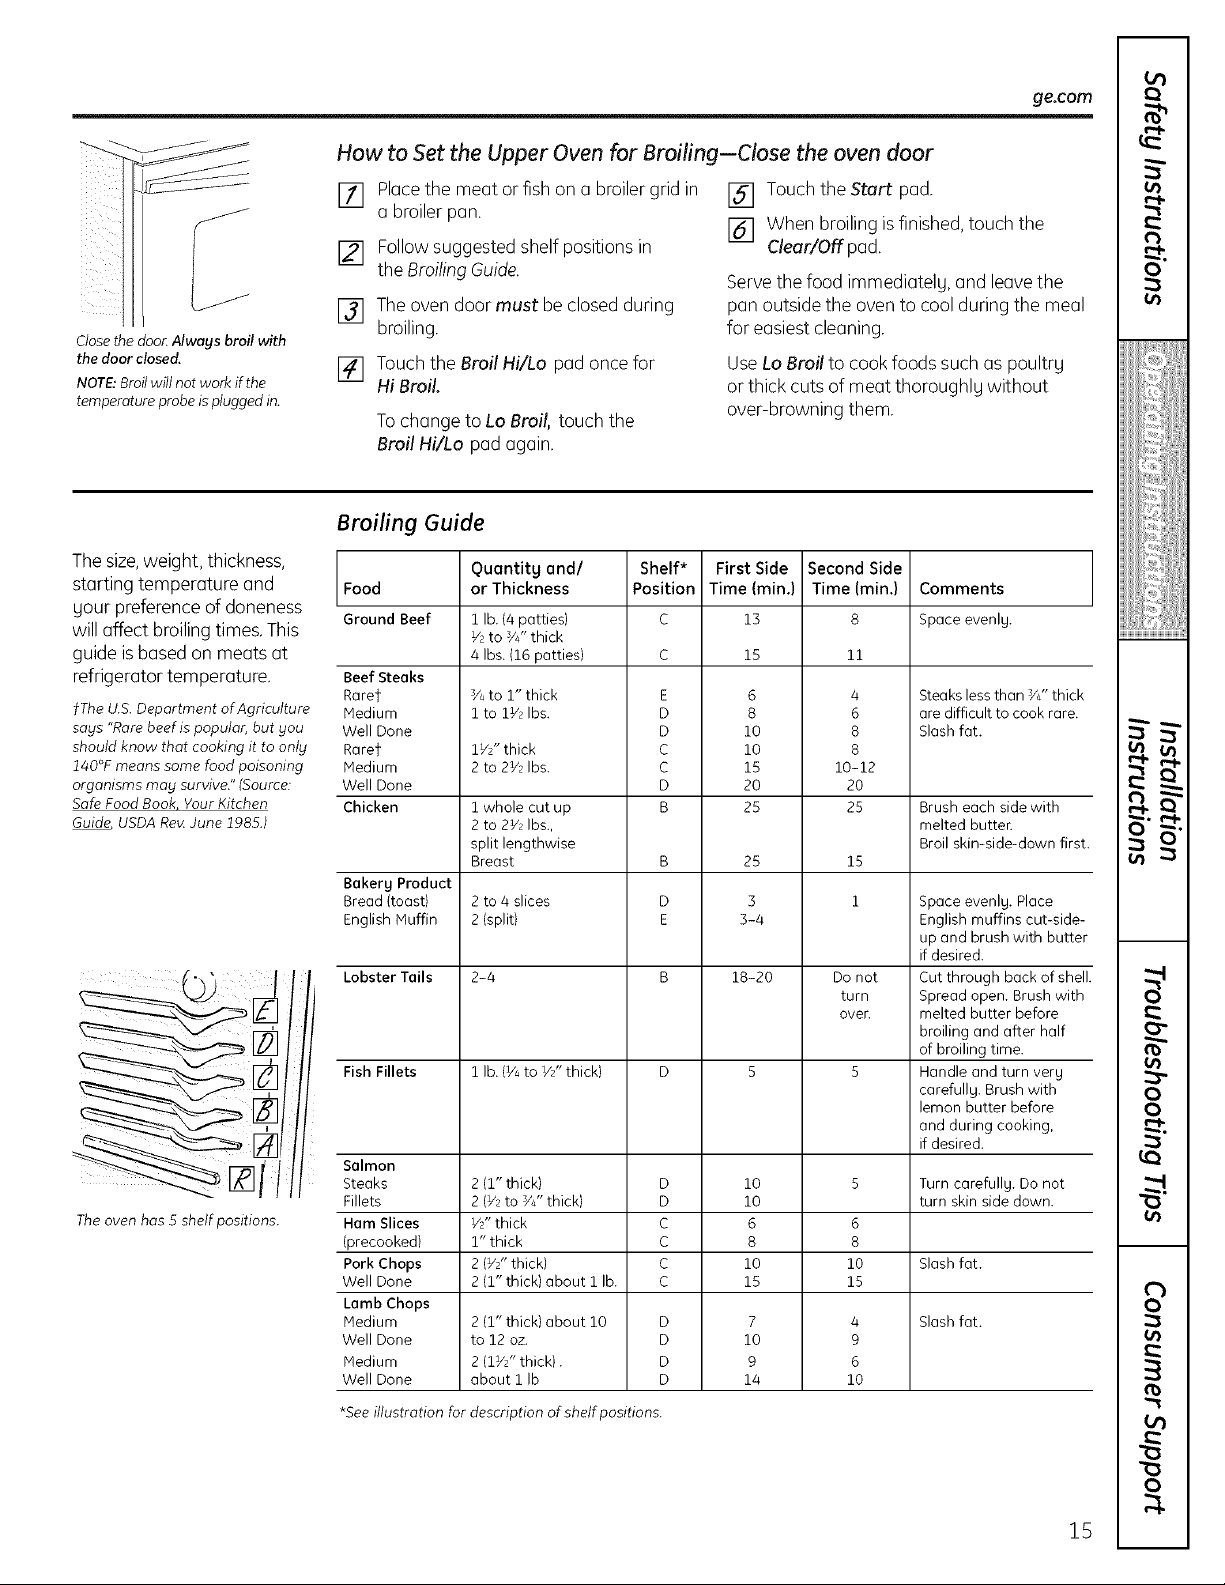
Closethe doon Always broil with
the door closed.
NOTE:Broil w#l not work if the
temperature probe is plugged in.
How to Set the Upper Oven for Broiling--Close the oven door
Placethe meat or fish on a broilergrid in
[] a broiler pan.
[] Followsuggested shelf positions in
the Broiling Guide.
[] Theoven door must be closedduring
broiling.
[] Touchthe Broil Hi/Lo pad once for
Hi Broil.
Tochange to Lo Broil, touch the
Broil Hi/Lo padagain.
[] Touchthe Start pad.
[] When broiling is finished, touch the
Clear/Off pad.
Servethe food immediately, and leavethe
pan outside the oven to coolduring the meal
for easiestcleaning.
Use Lo Broilto cook foods such as poultrg
or thick cuts of meat thoroughlg without
over-browning them.
Broiling Guide
ge.eom
i...1.
O
#iiii_;iiii#
#ii_iiii#l
Thesize,weight, thickness,
starting temperature and Food
gour preference of doneness
will affect broiling times. This
Ground Beef
guide is basedon meats at
refrigerator temperature. BeefSteaks
f The U.S.Department of Agriculture Medium
says "Rare beef is popular, but you Well Done
should know that cooking it to only Raref
140°F means some food poisoning Medium
organisms may survive." (Source: Well Done
Safe Food Book YourKitchen Chicken
Guide, USDARay.June 1985.)
Rarer
Bakerg Product
Bread (toast}
English Muffin
Fis,Fi,,e,s
Quantitg and/
or Thickness
1 lb. (4 patties} C 13
V2 to VJ' thick
4 Ibs. (16 patties) C 15
Va to 1" thick
1 to 1V2 Ibs.
1V/' thick
2 to 2V2Ibs.
1 whole cut up
2 to 2Y2Ibs.,
split lengthwise
Breast
2 to 4 slices D 3
2 (split) E 3-4
2-4 B 18-20
1 lb. (Vato V/' thick} D 5
Shelf* First Side
Position Time (min.)
E
D
D
C
C
D
B
6
8
10
10
15
2O
25
25
Second Side
Time (min.)
11
4
6
8
8
10-12
2O
25
15
1
Do not
turn
over.
5
Comments
Space evenlg.
Steaks less than YJ' thick
are difficult to cook rare.
Slash fat.
Brush each side with
melted butten
Broil skin-side-down first.
Space evenlg. Place
English muffins cut-side-
up and brush with butter
if desired.
Cut through back of shell.
Spread open. Brush with
melted butter before
broiling and after half
of broiling time.
Handle and turn verg
carefullg. Brush with
lemon butter before
and during cooking,
if desired.
° It"
8
_ [_[ I// itaiaetk°n
The oven has S shelf positions. Ham Slices
(precooked)
Pork Chops
Well Done
Lamb Chops
Medium
Well Done
Medium
Well Done
*See illustration for description of shelf positions.
2 (1" thick) D 10
2 (V_ to Y/' thick} D 1O
1/2" thick C 6
1" thick C 8
2 (]/2" thick} C 1O
2 (1" thick) about 1 lb. C 15
2 (1" thick) about 10 D 7
to 12 oz. D 10
2 (1%" thick). D 9
about 1 Ib D 14
5
6
8
10
15
4
9
6
10
Turn carefullg. Do not
turn skin side down.
Slash fat.
Slash fat.
1/1
¢b
o
R
15

Usingthe clock and timer.
Not all features are on all models.
To Set the Clock
_i_!i_#i_i_,_ iIIL _i_i/
Make sure the clock is set to the
correct time of dog.
KITCHENTIMER J
ON/OFF
DDND
The timer is o minute timer only.
The Cleor/Off pod does not affect
the timer.
The clock must be set to the correct time
<ii
of day for the automatic oven timing
functions to work properly. The time of day
cannot be changed during a timed baking or
self-cleaning cycle.
[] Touch the Clock pad.
[] Touch the number pads.
Touch the number pads the same way you
read them. For example, to set 12:38, touch
the number pads 1, 2, 3 and 4 in that ordeE
To Set the Timer
Thetimer doesnot control oven operations.
Themaximum setting on the timer is9 hours
and 59 minutes.
Touch the Kitchen Timer On/OFFpad.
[]
Touch the number pads until the
[]
amount oftime you want shows in
the display.The maximum number
of minutes that can be entered is 59.
Toset additional time, you will need
to set it by hours and minutes.
Forexample, to enter I hour and
30 minutes, touch 1,3andO in
that order
If number pads are not touched within one
minute after you touch the Clock pad, the
display reverts to the original setting. If this
happens, touch the Clock pad and reenter
the time of day.
[] Touch the Start pad until the time
of day shows in the display. This enters
the time and starts the clock.
Tocheckthe time ofday when the display is
showing other information, simply touch the
Clockpad. Thetime of dablshows until
another pad is touched.
tf _loumake a mistake,pressthe Kitchen
Timer On/OFFpad and beginagain.
[] Touch the Start pad.After pressing
the Start pad,SETdisappears;this tells
you the time is counting down, although
the display does not change until one
minute has passed.
[] When the timer reaches :00, the control
will beep 3times followed by one beep
every 6 secondsuntil the Kitchen Timer
On/Off pad istouched.
The6 second tone can be canceledbbl
following the steps in the Specialfeatures
Ofblouroven control sectionunder Tones
at the Endof a TimedCycle.
16
To Reset the Timer
Ifthe display isstill showing the time
remaining, you may change it by touching
the Kitchen Timer On/OFFpad;then touch
the number pads until the time you want
appears in the display.
To Cancel the Timer
Touch the Kitchen Timer On/OFFpad twice.
Power Outage
Ifa flashing time is in the display,you have
experienceda power failure.Resetthe clock.
If the remaining time is not in the display
(clock, delay start or cooking time are in
the display), recall the remaining time by
touching the Kitchen Timer On/OFFpad and
then touching the number pads to enter the
new time you want.
To reset the clock, touch the Clock pad.
Enter the correct time of day by touching
the appropriate number pads. Touch the
Start pad.
Using the timed baking and roasting features. @p_ovenanal ge.com
If gour model has a door latch, do not lock the oven door with the latch during timed cooking. The latch is used for
self-cleaning onlg.
NOTE; Foods that spoil easil£-such as milk, eggs, fish, stuffings, poultrg and pork-should not be allowed to sit for
more than 1 hour before or after cooking. Room temperature promotes the growth of harmful bacteria. Be sure that
the oven light is off becouse heat from the bulb will speed harmful bacteria growth.
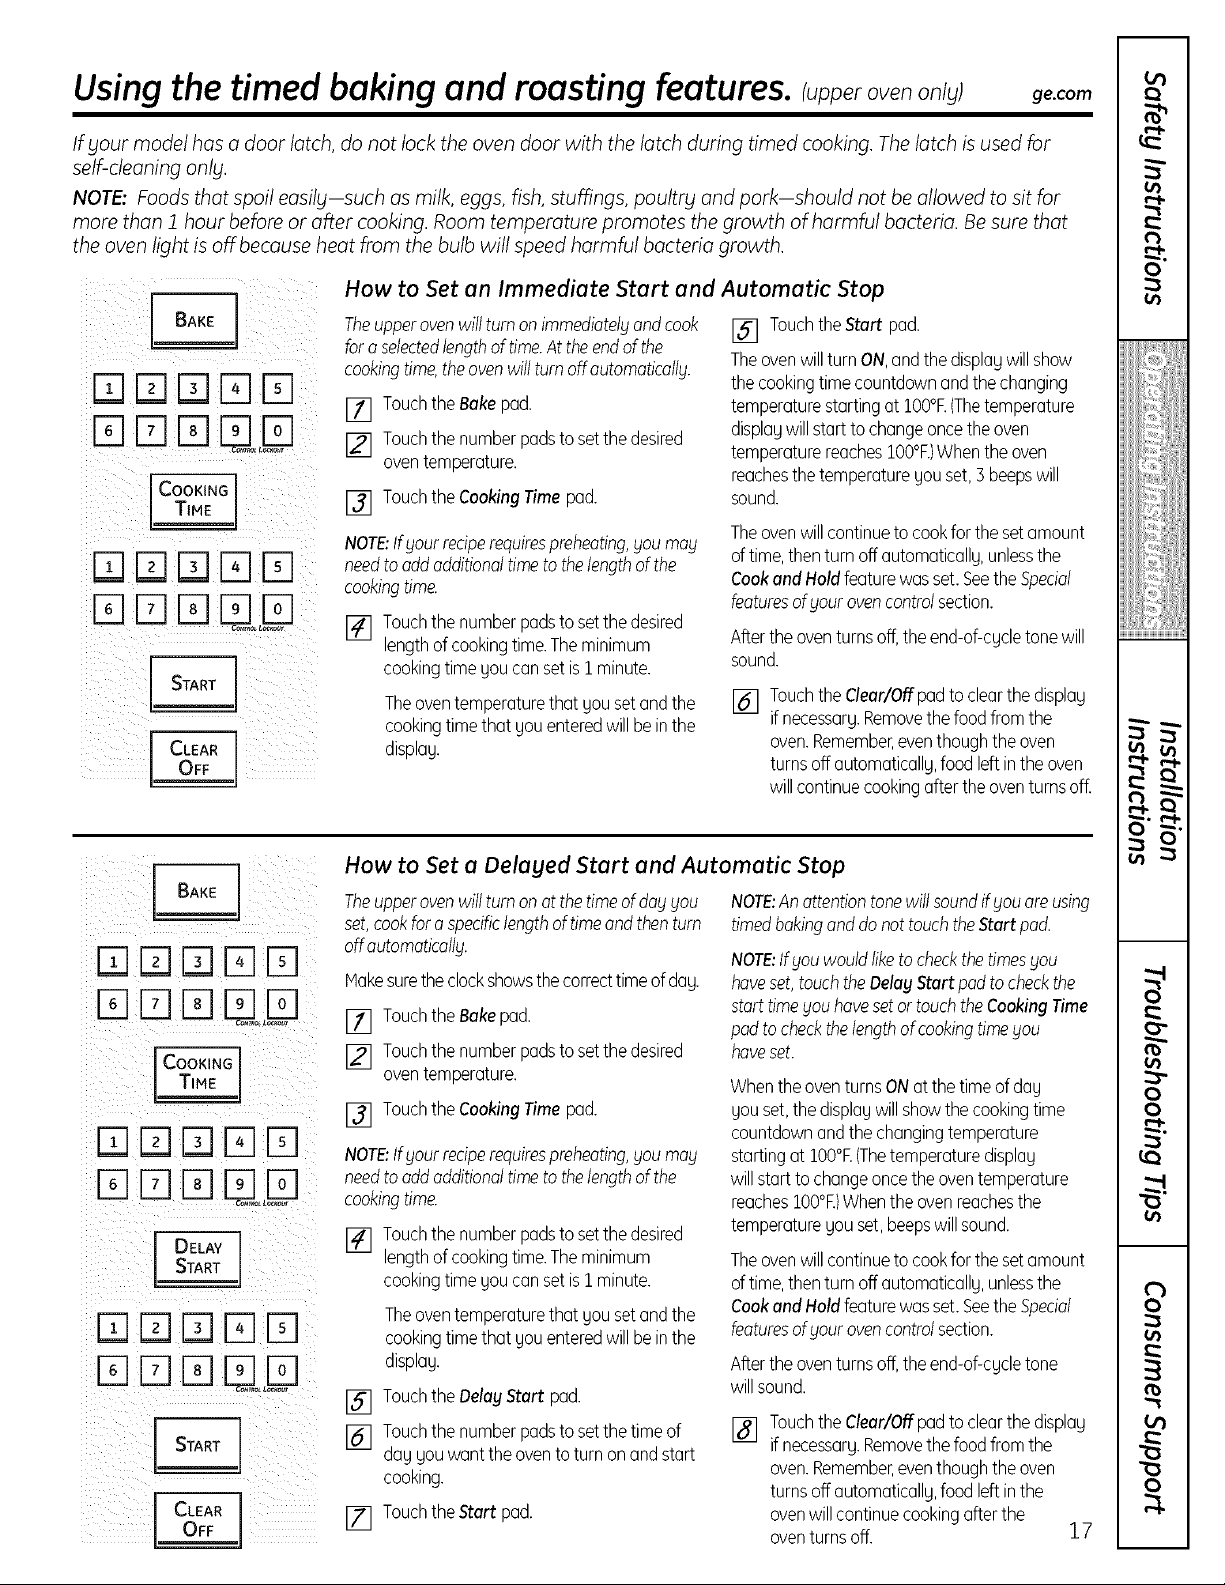
How to Set an Immediate Start and Automatic Stop
t_
0
! i _ i¸ }
ii[i] E]E]fq FI! ;
T_MEJ
E] [3 E]Uo!D
CL_ARo_F
r-qEZ]IZ]FqIT1
COO,_l._l
IME
FTIli][i] D E]
Dr-qmUo D
START
DELAY]
[i][1][Z]Fq[Z]
D rqD
START ]
OFF
CLEAR ]
Theupperovenwillturn onimmediatelgandcook [] Touchthe Start pad.
foraselectedlengthoftime.Attheendofthe
cookingtime,theovenwillturnoffautomaticallg.
[] TouchtheBakepad.
[] Touchthenumberpadstosetthedesired
oventemperature.
[] TouchtheCookingTimepad.
NOTE:Ifgourreciperequirespreheating,goumag
needto addadditionaltimetothelengthofthe
cookingtime.
[] Touchthenumberpadstosetthedesired
lengthofcookingtime.Theminimum
cookingtimeyoucansetis I minute.
Theoventemperaturethatyousetandthe
cookingtimethat youenteredwillbeinthe
display.
Theovenwillturn ON,andthedisplagwillshow
thecookingtime countdownandthechanging
temperaturestartingatlO0°R(Thetemperature
displaywillstartto changeoncetheoven
temperaturereacheslO0°R)Whentheoven
reachesthetemperatureyouset,3 beepswill
sound.
Theovenwillcontinuetocookfor thesetamount
oftime,thenturn offautomatically,unlessthe
Cookand Holdfeaturewasset.SeetheSpecial
featuresofyourovencontrolsection.
Aftertheoventurnsoff,theend-of-cycletonewill
sound.
[] TouchtheClear/Offpadto clearthedisplay
ifnecessary.Removethefoodfromthe
oven.Remember,eventhoughtheoven
turnsoff automatically,foodleftintheoven
willcontinuecookingaftertheoventurnsoff.
How to Set a Delaged Start and Automatic Stop
Theupperovenwillturn onat thetimeofdoggou
set,cookforaspecificlengthoftimeandthenturn
offautomaticallg.
Hakesuretheclockshowsthecorrecttimeof day.
[] TouchtheBakepad.
[] Touchthenumberpadstosetthedesired
oventemperature.
[] TouchtheCookingTimepad.
NOTE:Ifgourreciperequirespreheating,goumag
needto addadditionaltimetothelengthofthe
cookingtime.
[] Touchthenumberpadstosetthedesired
lengthofcookingtime.Theminimum
cookingtimeyoucansetis 1minute.
Theoventemperaturethatyousetandthe
cookingtimethat gouenteredwill beinthe
displag.
[] TouchtheOelagStart pad.
[] Touchthenumberpadstosetthetimeof
dag gouwantthe oventoturn onandstart
cooking.
[] TouchtheStart pad.
NOTE:Anattentiontonewillsoundifgouareusing
timedbakinganddonottouchtheStartpad.
NOTE:Ifgouwouldliketo checkthetimesgou
haveset,touchtheOelagStart padto checkthe
starttimegouhovesetortouchtheCookingTime
padtocheckthelengthofcookingtimegou
haveset.
WhentheoventurnsONatthetimeofdag
gouset,thedisplagwillshowthecookingtime
countdownandthe changingtemperature
startingat IO0°F.(Thetemperaturedisplag
willstart tochangeoncetheoventemperature
reachesIO0°F.)Whentheovenreachesthe
temperaturegouset,beepswillsound.
Theovenwillcontinuetocookfor thesetamount
oftime,thenturn offautomaticallg,unlessthe
CookandHoldfeaturewasset.SeetheSpecial
featuresofgourovencontrolsection.
Aftertheoventurnsoff,theend-of-cgcletone
willsound.
[] TouchtheClear/Offpadtoclearthedisplag
ifnecessarg.Removethefoodfromthe
oven.Remember,eventhoughtheoven
turnsoff automaticallg,foodleftinthe
ovenwillcontinuecookingafterthe
oventurnsoff. 17
iijiiiiiqiijjil
i'_ii[ii_iiiiii@i
i_@:,:>iiiii
<Jr
t_
:b-
oo
rb
o
Using the probe, consomemode s;
If £our model has a door latch, do not lock the oven door with the latch while cooking with the probe. The latch is used
for self-cleaning only.
For many foods, especially roasts and poultry, internal food temperature is the best test for doneness. The
temperature probe takes the guesswork out of cooking foods to the exact doneness you want.
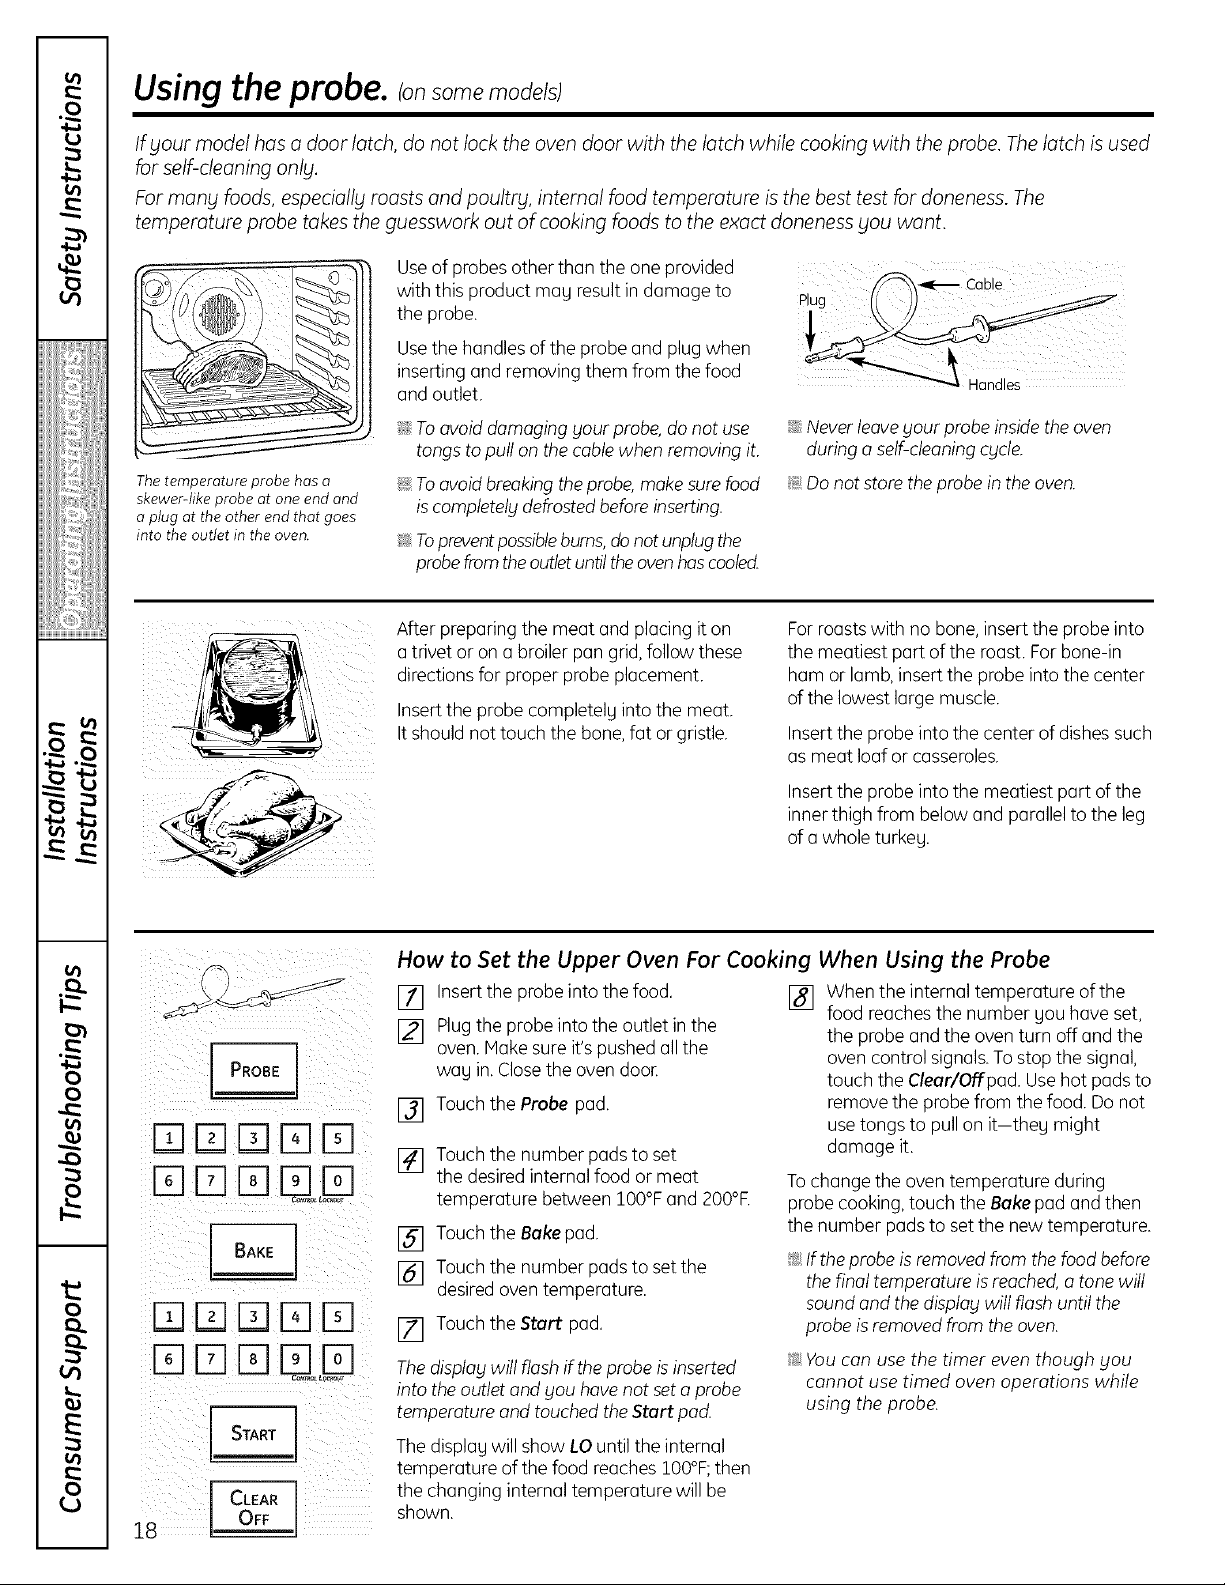
The temperature probe has a
skewer-like probe at one end and
a plug at the other end that goes
into the outlet in the oven.
Useof probesother than the one provided
with this product mag result in damage to
the probe.
Usethe handlesof the probe and plug when
inserting and removing them from the food
and outlet.
i_,To avoiddamaging your probe, do not use
tongs to pull on the cable when removing it.
!i_:Toavoid breaking theprobe,makesurefood
iscompletely defrostedbefore inserting.
5_:Topreventpossiblebums,donotunplugthe
probefrom theoutletuntiltheovenhascooled.
After preparing the meat and placing it on
a trivet or on abroiler pan grid, follow these
directions for proper probe placement.
Insertthe probe completelg into the meat.
Itshould not touch the bone,fat or gristle.
_ Cable
ij_:,Neverleaveyour probe insidethe oven
during a self-cleaningchicle.
!i_:Donot store theprobe in the oven.
Forroasts with no bone,insert the probe into
the meatiest part of the roast. Forbone-in
ham or lamb,insert the probe into the center
of the lowest large muscle.
Insert the probe into the center of dishessuch
as meat loaf or casseroles.
Insert the probe into the meatiest part of the
inner thigh from below andparallel to the leg
of a whole turkeg.
PROBE
F-q[]r-qFqE]
Drsm LLD
I-qE]IZ]E]71
Drs
START J
18 CLEAR
OFF
How to Set the Upper Oven For Cooking When Using the Probe
[] Insert the probe into the food.
[] Plug the probe into the outlet in the
oven. Make sure it's pushed all the
wag in. Close the oven dooE
[] Touch the Probe pad.
[] Touch the number pads to set
the desired internal food or meat
temperature between lO0°F and 200°R
[] Touch the Bake pad.
[] Touch the number pads to set the
desired oven temperature.
[] Touch the Start- pad.
The displabl will flash if the probe is inserted
into the outlet and you hove not set a probe
temperature and touched the Start pad.
The displagwill show LO until the internal
temperature of the food reaches lO0°F;then
the changing internal temperature will be
shown.
[] When the internal temperature of the
food reachesthe number gou have set,
the probe and the oventurn off and the
oven control signals.Tostop the signal,
touch the Clear/Offpad. Usehot pads to
remove the probefrom the food. Do not
usetongs to pull on it-theg might
damage it.
Tochange the oven temperature during
probe cooking, touch the Bakepad and then
the number pads to set the new temperature.
_ If the probe isremoved from the food before
the final temperature isreached,a tone will
sound and the display will flash until the
probe is removedfrom the oven.
!i_:Youcan use the timer even though blou
cannot use timed oven operations while
using the probe.

Usingthe convection oven.
If your model has a door latch, do not lock the oven door with the latch during convection cooking. The latch is used
for self-cleaning only.
The convection oven fan shuts off when the oven door is opened. DONOTleave the door open for long periods of time
while using convection cooking.
In a convection oven, a fan
circulates hot air over, under and
around the food. This circulating
hot air is evenly distributed
throughout the oven cavity. As a
result, foods are evenly cooked and
browned-often in less time than
with regular heat.
Tohelp gou understand the difference
between convection bake and roast and
traditional bakeand roast, here are some
general guidelines.
Convection Bake
::Ji::Preheatthe oven.Seethe Usingthe Oven-
Preheatingand PanPlacement section.
_ Idealfor foods cooked on multiple shelves.
::Ji::Good for large quantitiesof baked foods.
_ Good resultswith cookies,biscuits,
brownies, cupcakes,cream puffs, sweet
rolls, angel food cakeand bread.
Theconvection fan circulates the heated
air evenlg over and around the food.
Roostsor poultry shouldbe cookedon shelf
position (A).
When gou are convection roosting,it is
important that you use a broiler pan and grid
for best convection roosting results.The pan
isused to catch grease spillsand the grid is
usedto prevent grease spotters.
!i_:Placetheshelf in shelf position (A).
ge.com
Convection Roast
_ Good for large tendercuts of meat,
uncovered,
Theconvection fan circulates the heated air
evenlg over and around the food. Meat and
poultrg are browned on all sidesas ifthey
were cooked on a rotisserie.Heated air will
be circulated over,under and around the
food being roosted.The heated air seals in
juices quickly for o moist and tender product
while, at the same time, creating a rich
golden brown exterior.
t_
O
iiiiiiii_Jiiiiiiil
i ¸ co,wc_,oN] i
i!j¸¸¸¸/ BAKEJ
ii/-qFqE]/-q Pq!/
CLEAR ]
I OFEJ
Auto Recipe T"Conversion
You can use gour favorite recipes in the
convection oven.
When using CONVECTIONBAKE,
the oven will automatically convert the
oven temperature from regular baking
to Convection Bake temperatures.
[] Using the number pads, enter
the temperature recommended
in the recipe.
[] Touch the Start pad.
Thedisplag will show the temperature
gou entered from gour recipe.The
oven will automaticallg convert it to
the convection cooking temperature.
[] Touch the Clear/Off pad when baking
tsfinished.
!i_:Use pan size recommended in the recipe.
::Ji::Some package instructions for frozen
casseroles, main dishes or baked goods
hove been developed using commercial
convection ovens. For best results in this
oven, preheat the oven and use the
temperature, for regular baking, on
the package.
19
t_
_n
g
U_
¢b
o
Usingthe convection oven.
Cookware for Convection Cooking
i i _iii/ i
i_i_iiii_ il! _ i ii_ I i
k [ OFFJ
Beforeusing your convection oven,check
to seeif your cookware leavesroom for air
circulation in the oven, If you arebaking with
several pans, leavespace between them,
Also,be sure the pans do not touch each
other orthe walls of the oven,
Paper and Plastic
Heat-resistant paper and plastic containers
that are recommended for usein regular
ovens can be usedin convection ovens.
Plasticcookware that is heat-resistant to
temperatures of400°F can also be used,
when oven isbelow 400°E
Metal and Glass
Any type of cookware willwork in your
convection oven. However,metal pans heat
the fastest and are recommended for
convection baking.
_:Darkened or matte-finished pans will bake
foster than shiny pans.
::Ji::Glossor ceramic panscook more slowl_l.
When baking cookies,you will get the best
resultsif you usea flat cookie sheetinstead
of a pan with low sides.
Forrecipes likeoven-baked chicken, usea
pan with low sides.Hot aircannot circulate
well around food in a pan with high sides.
How to Set the Upper Oven for Convection Baking or Roasting
[] Touchthe Convection Bake
or Convection Roast pad,
[] Touchthe number padsto set the
desiredoven temperature,
[] Touchthe Start-pad,
Tochange the oven temperature, touch the
Convection Bake or Convection Roast pad
and then the number pads to set the new
temperature.
When the ovenstarts to heat, the changing
temperature, starting at 100°F,will be
displaged.When the oven reachesthe
temperature you set, 3 beepswill sound.
[] Touch the Clear/Offpad when finished.
NOTE:Youwill hear o fan while cookingwith
convection.Thefan will stop when the door is
opened,but the heat will not turn off
Thefan will not start until the preheat
temperature is reached.
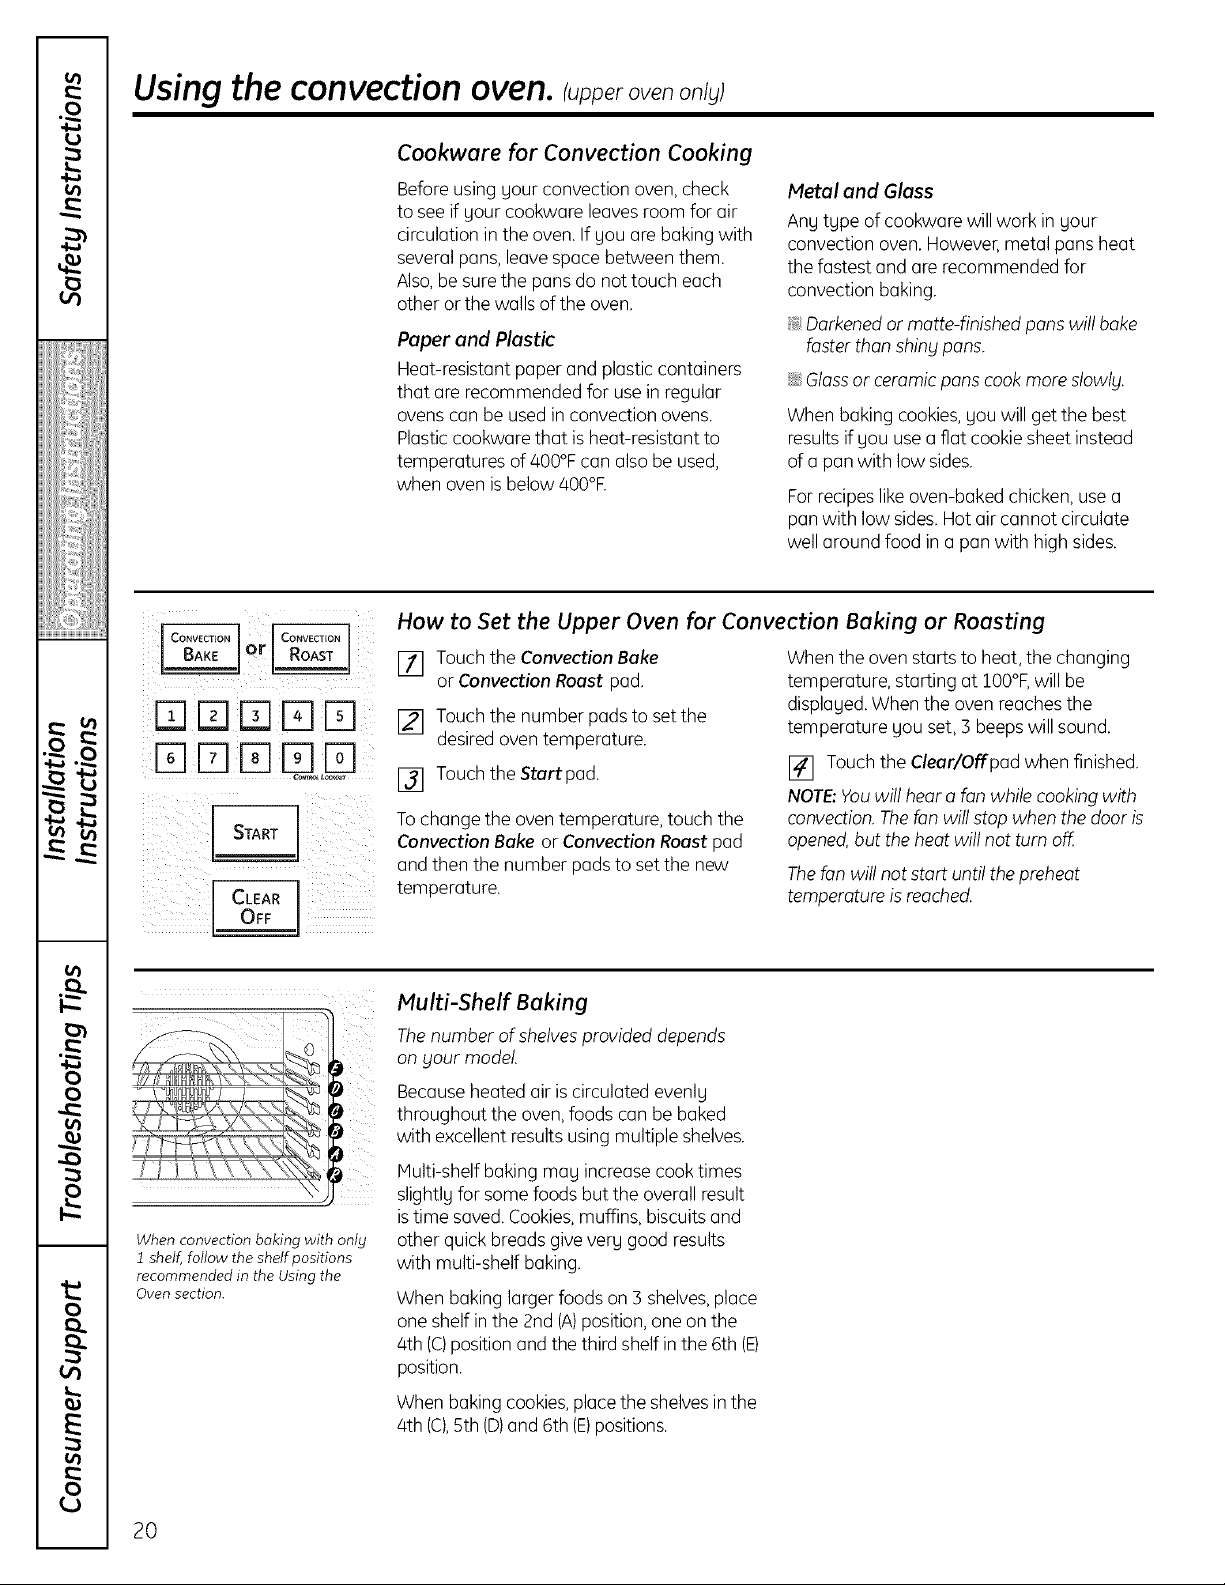
When convection baking with only
1 shelf, follow the shelf positions
recommended in the Using the
Oven section.
20
Multi-Shelf Baking
Thenumber of shelvesprovided depends
on _lourmodel.
Becauseheated air is circulated evenly
throughout the oven, foods can be baked
with excellent results using multiple shelves.
Hulti-shelf baking mag increasecook times
slightly for some foodsbut the overall result
istime saved. Cookies,muffins, biscuits and
other quick breads giveverg good results
with multi-shelf baking.
When baking larger foods on 3 shelves,place
one shelf inthe 2nd (A)position,one on the
4th (C)positionand the third shelf in the 6th (E)
position.
When baking cookies,placethe shelvesin the
4th (C),5th (D)and 6th (E)positions.
 Loading...