

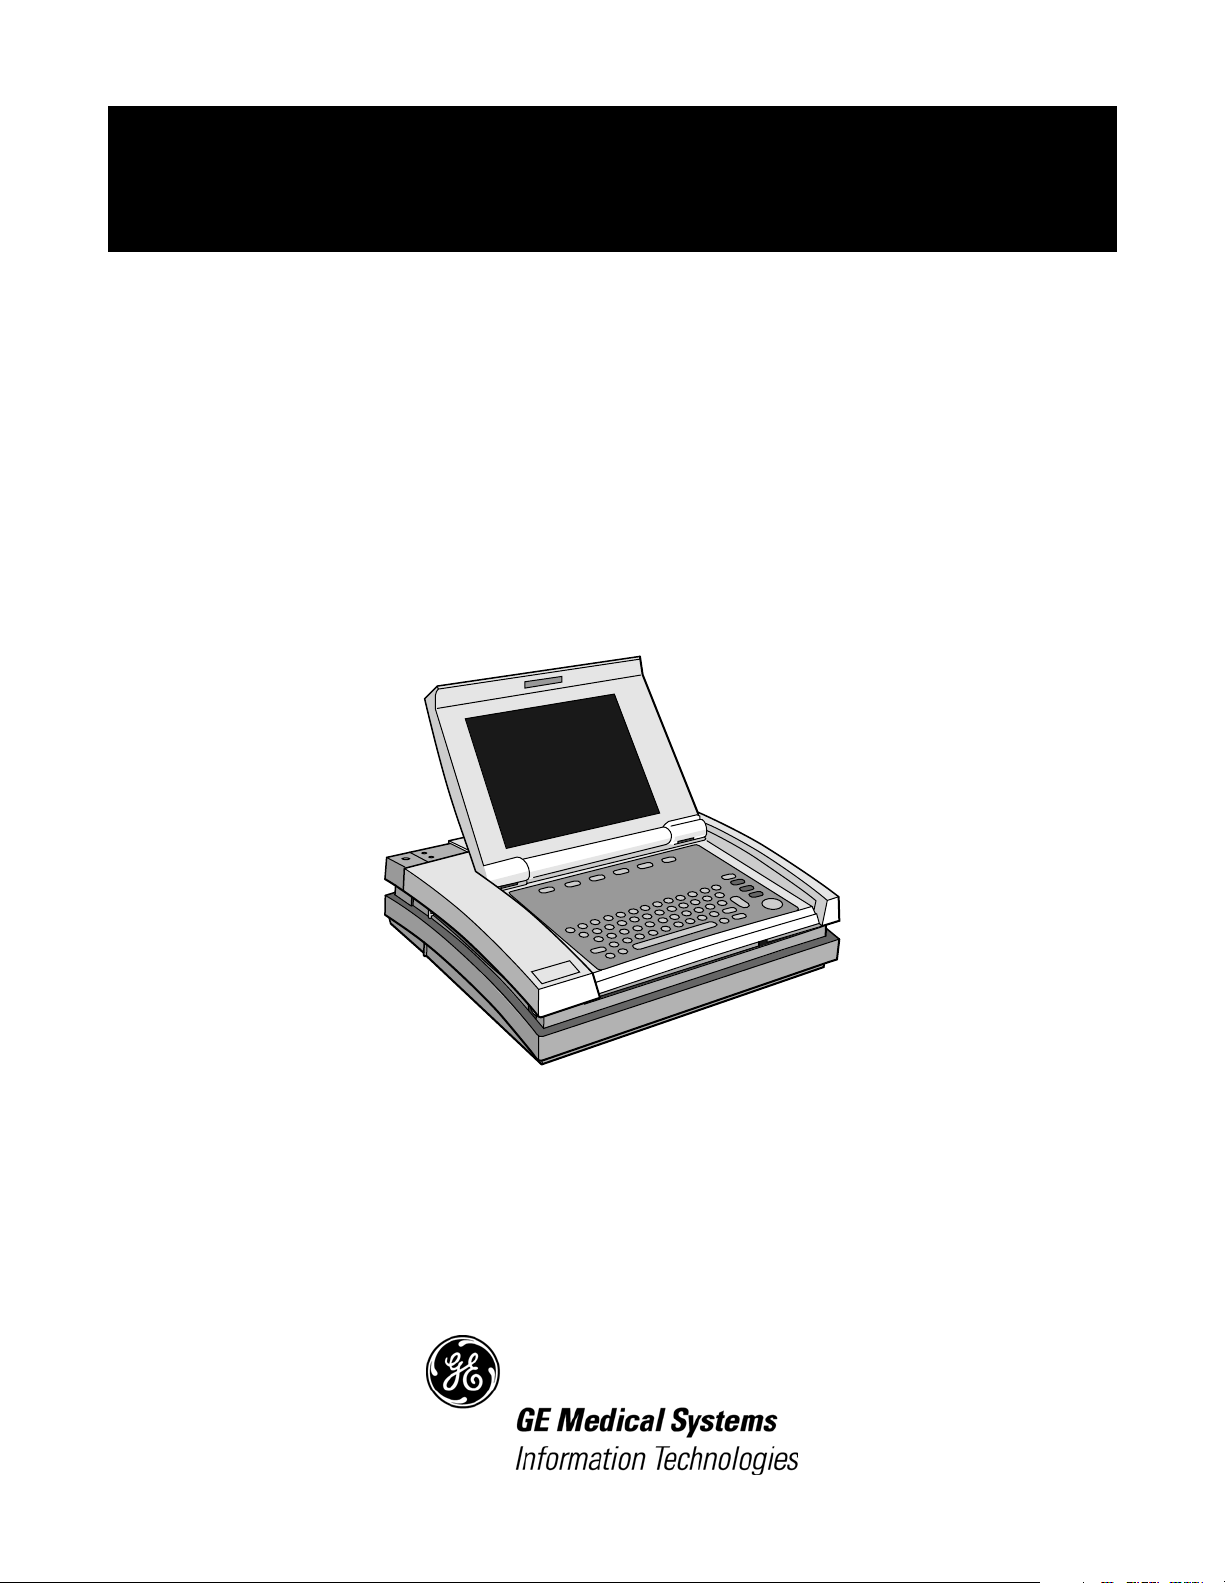
Page 1

MAC 5000 resting ECG
analysis system
field service manual
PN 2000657-074 Revision B
Page 2

T-2
Page 3
MAC 5000 resting ECG analysis system
field service manual
PN 2000657-074 Revision B
Page 4

NOTE
Due to continuing product innovation,
specifications in this manual are subject to
change without notice.
MD1322-018
Listed below are GE Medical Systems Information Technologies trademarks. All other trademarks contained
herein are the property of their respective owners.
900 SC, ACCUSKETCH, AccuVision, APEX, AQUA-KNOT, ARCHIVIST, Autoseq, BABY MAC, C Qwik Connect,
CardioServ, CardioSmart, CardioSys, CardioWindow, CASE, CD TELEMETRY, CENTRA, CHART GUARD, CINE
35, CORO, COROLAN, COROMETRICS, Corometrics Sensor Tip, CRG PLUS, DASH, Digistore, Digital DATAQ, E
for M, EAGLE, Event-Link, FMS 101B, FMS 111, HELLIGE, IMAGE STORE, INTELLIMOTION, IQA, LASER SXP,
MAC, MAC-LAB, MACTRODE, MANAGED USE, MARQUETTE, MARQUETTE MAC, MARQUETTE MEDICAL
SYSTEMS, MARQUETTE UNITY NETWORK, MARS, MAX, MEDITEL, MEI, MEI in the circle logo, MEMOPORT,
MEMOPORT C, MINISTORE, MINNOWS, Monarch 8000, MULTI-LINK, MULTISCRIPTOR, MUSE, MUSE CV,
Neo-Trak, NEUROSCRIPT, OnlineABG, OXYMONITOR, Pres-R-Cuff, PRESSURE-SCRIBE, QMI, QS, Quantitative
Medicine, Quantitative Sentinel, RAC RAMS, RSVP, SAM, SEER, SILVERTRACE, SOLAR, SOLARVIEW, Spectra
400, Spectra-Overview, Spectra-Tel, ST GUARD, TRAM, TRAM-NET, TRAM-RAC, TRAMSCOPE, TRIM KNOB,
Trimline, UNION STATION, UNITY logo, UNITY NETWORK, Vari-X, Vari-X Cardiomatic, VariCath, VARIDEX,
VAS, and Vision Care Filter are trademarks of GE Medical Systems Information Technologies registered in the
United States Patent and Trademark Office.
12SL, 15SL, Access, AccuSpeak, ADVANTAGE, BAM, BODYTRODE, Cardiomatic, CardioSpeak, CD
TELEMETRY
Event-Link Nimbus, HI-RES, ICMMS, IMAGE VAULT, IMPACT.wf, INTER-LEAD, IQA, LIFEWATCH, Managed
Use, MARQUETTE PRISM, MARQUETTE
CardioWindow, NST PRO, NAUTILUS, O
®
-LAN, CENTRALSCOPE, Corolation, EDIC, EK-Pro, Event-Link Cirrus, Event-Link Cumulus,
®
RESPONDER, MENTOR, MicroSmart, MMS, MRT, MUSE
SENSOR, Octanet, OMRS, PHi-Res, Premium, Prism, QUIK CONNECT
2
V, QUICK CONNECT, QT Guard, SMART-PAC, SMARTLOOK, Spiral Lok, Sweetheart, UNITY, Universal,
Waterfall, and Walkmom are trademarks of GE Medical Systems Information Technologies.
© GE Medical Systems Information Technologies, 2002. All rights reserved.
T-2
MAC 5000 resting ECG analysis system
2000657-074
5 December 2002
Revision B
Page 5

Contents
1 Introduction ................................................. 1-1
Manual Information .................................................................. 1-3
Revision History ................................................................................. 1-3
Manual Purpose ................................................................................. 1-3
Intended Audience ............................................................................. 1-3
Safety Information .................................................................... 1-4
Definitions .......................................................................................... 1-4
Messages ........................................................................................... 1-4
Responsibility of the Manufacturer .................................................... 1-5
General .............................................................................................. 1-5
Equipment Symbols ........................................................................... 1-6
Service Information .................................................................. 1-7
Service Requirements ........................................................................ 1-7
Equipment Identification .................................................................... 1-7
2 Overview .................................................... 2-1
General Description .................................................................. 2-3
Front View .......................................................................................... 2-3
Back View .......................................................................................... 2-3
Internal View ...................................................................................... 2-4
Preparation for Use ................................................................... 2-5
Trolley Assembly ............................................................................... 2-5
Type-S Trolley Assembly ................................................................... 2-6
Connector Identification ..................................................................... 2-7
MAC 5000 ST Requirements and Configuration ................................. 2-8
Compatible Blood Pressure Units ......................................... 2-8
Compatible GE Medical Systems IT Treadmills .................... 2-9
Analog Treadmills ................................................................. 2-9
Bicycle Ergometers ............................................................. 2-10
Revision B
MAC 5000 resting ECG analysis system
2000657-074
i
Page 6

3 Maintenance ................................................ 3-1
Introduction ...................................................................... 3-3
Recommended Maintenance .............................................................. 3-3
Preventive Maintenance Inspection Report ........................................ 3-3
Required Tools and Supplies ............................................................. 3-3
Inspection and Cleaning ............................................................. 3-4
Visual Inspection ............................................................................... 3-4
Exterior Cleaning ................................................................................ 3-4
Interior Cleaning ................................................................................ 3-4
General ................................................................................. 3-4
Thermal Printhead ................................................................ 3-5
Battery and Patient Cable Replacement .......................................... 3-6
Battery Replacement .......................................................................... 3-6
Patient Cable Replacement ................................................................ 3-6
Disassembly Guidelines ............................................................. 3-7
Preliminary Steps ............................................................................... 3-7
Trolley Disassembly ........................................................................... 3-7
Type-S Trolley Disassembly ............................................................... 3-8
Power Supply ..................................................................................... 3-9
Top Cover ........................................................................................ 3-10
Display/Keyboard Assembly ............................................................. 3-11
Main PCB ......................................................................................... 3-13
Printhead Replacement .................................................................... 3-13
Diskette Drive Removal/Replacement .............................................. 3-14
Writer Roller/Carriage Assembly ...................................................... 3-14
Domestic Electrical Safety Tests .................................................. 3-15
AC Line Voltage Test ........................................................................ 3-15
Leakage Tests .................................................................................. 3-16
Leakage Test Diagrams .................................................................... 3-16
Test #1 ............................................................................................. 3-17
Test #2 ............................................................................................. 3-17
Test #3 ............................................................................................. 3-18
Test #4 ............................................................................................. 3-18
Ground Continuity ............................................................................ 3-19
ii
MAC 5000 resting ECG analysis system
2000657-074
Revision B
Page 7

4 Troubleshooting ............................................ 4-1
Assembly Descriptions ............................................................... 4-3
Introduction ....................................................................................... 4-3
Assembly Block Diagram ................................................................... 4-3
General Fault Isolation .............................................................. 4-4
Visual Inspection ............................................................................... 4-4
Power-up Self-test ............................................................................. 4-4
Power-up Flow Chart ......................................................................... 4-5
Poor Quality ECGs .............................................................................. 4-5
Diagnostic Tests ...................................................................... 4-6
Introduction ....................................................................................... 4-6
Loading the System Diagnostics ........................................................ 4-6
System Diagnostics Main Menu ......................................................... 4-7
Display Tests ..................................................................................... 4-7
Speaker Test ...................................................................................... 4-8
Keyboard Test .................................................................................... 4-8
PS2 Port Test ..................................................................................... 4-8
Writer Tests ....................................................................................... 4-9
Battery Tests .................................................................................... 4-10
Communication Tests ...................................................................... 4-11
Acq. Module Tests ........................................................................... 4-12
Analog I/O Tests .............................................................................. 4-12
Floppy Drive Tests ........................................................................... 4-12
Revision B
Input and Output Connectors ....................................................... 4-14
A Pins (J1) ....................................................................................... 4-14
COM1 (COM3/4) Pins (J3) ............................................................... 4-14
COM2 Pins (J5) ............................................................................... 4-14
ANALOG Pins (J6) ........................................................................... 4-15
EXT. VID. Pins (J7) .......................................................................... 4-15
CPU PCB Input/Output Signals ..................................................... 4-16
Battery Pack/Monitor (J2) ................................................................ 4-16
LCD Backlight (J4) ........................................................................... 4-16
Keyboard (J8) .................................................................................. 4-17
LCD (J10) ........................................................................................ 4-18
Power Supply/Motor (J11) .............................................................. 4-19
MAC 5000 resting ECG analysis system
2000657-074
iii
Page 8

Thermal Printer (J12) ...................................................................... 4-20
Floppy Disk Drive (J13) ................................................................... 4-21
Acquisition Module (J14) ................................................................. 4-21
5 CPU Theory of Operation ................................. 5-1
General Description .................................................................. 5-3
Block Diagram ................................................................................... 5-6
Theory of Operation .................................................................. 5-8
Power Supplies .................................................................................. 5-8
Clocks .............................................................................................. 5-10
CPU .................................................................................................. 5-10
FPGA Internal Logic ......................................................................... 5-10
SDRAM ............................................................................................ 5-17
SmartMedia Card ............................................................................. 5-17
Serial EEPROM ................................................................................ 5-17
VGA LCD/CRT Interface ................................................................... 5-18
Acquisition Module Transceiver / Power Switch .............................. 5-18
COMM Port Power Switch / Current Limiter .................................... 5-19
Thermal Printhead Power / Pixel Test Hardware .............................. 5-20
Super I/O Peripheral Controller ........................................................ 5-20
The Four Stooges ............................................................................. 5-21
Untested "Nominal" Operating Time Specs ....................................... 5-28
6 FRU Parts Lists ............................................. 6-1
Ordering Parts ...................................................................... 6-3
Field Replaceable Units ............................................................. 6-4
Appendix A: Abbreviations ............................... A-1
Standard Abbreviations .............................................................. A-3
Appendix B: Technical Specifications .................. B-1
Technical Specifications ............................................................ B-3
iv
MAC 5000 resting ECG analysis system
2000657-074
Revision B
Page 9

1 Introduction
Revision B
MAC 5000 resting ECG analysis system
2000657-074
1-1
Page 10

1-2
MAC 5000 resting ECG analysis system
2000657-074
Revision B
Page 11
Manual Information
Introduction: Manual Information
Revision History
Revision Date Comment
A 12 November 2002 Initial release of this document.
B 5 December 2002 Updated FRU list. Removed BOM, schematics and exploded views per directive.
Manual Purpose
Each page of the document has the document part number and revision
letter at the bottom of the page. The revision letter identifies the
document’s update level.
The revision history of this document is summarized in the table below.
Table 1-1. Revision History PN 2000657-074
This manual supplies technical information for service representative
and technical personnel so they can maintain the equipment to the
assembly level. Use it as a guide for maintenance and electrical repairs
considered field repairable. Where necessary the manual identifies
additional sources of relevant information and or technical assistance.
See the operator’s manual for the instructions necessary to operate the
equipment safely in accordance with its function and intended use.
Intended Audience
This manual is intended for the person who uses, maintains, or
troubleshoots this equipment.
Revision B 1-3
MAC 5000 resting ECG analysis system
2000657-074
Page 12
Introduction: Safety Information
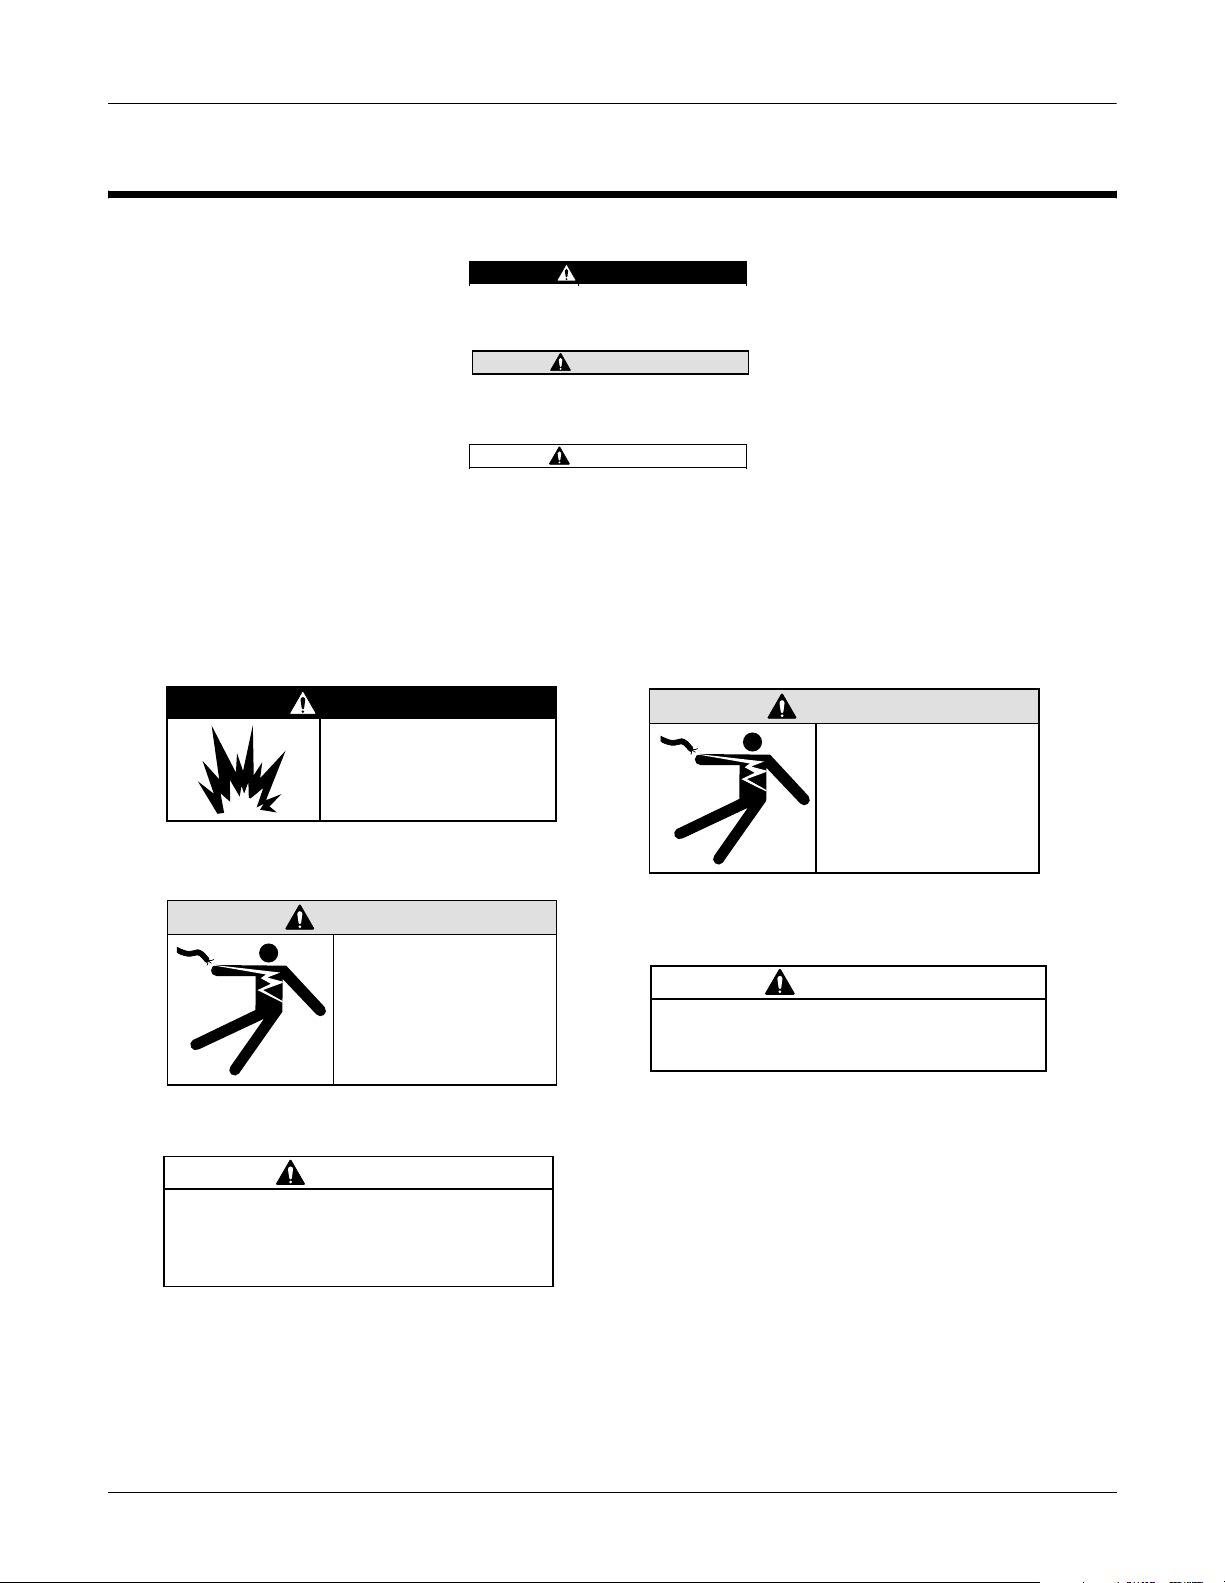
r
Safety Information
Definitions
Messages
DANGER
Do NOT use in the
presence of flammable
anesthetics.
DANGER
Indicates an imminently hazardous
situation which, if not avoided, WILL
result in death or serious injury.
WARNING
Indicates a potentially hazardous
situation which, if not avoided, COULD
result in death or serious injury.
CAUTION
Indicates a potentially hazardous
situation which, if not avoided may result
in minor or moderate injury.
Additional safety messages may be found throughout this manual that
provide appropriate safe operation information.
WARNING
Operate the unit
from its battery
if the integrity of
M15287-1B
the protective
earth conductor is
in doubt.
M15287-14C
WARNING
This is Class I
equipment. The mains
plug must be connected
to an appropriate powe
supply.
CAUTION
This equipment contains no user
serviceable parts. Refer servicing to
qualified service personnel.
MAC 5000 resting ECG analysis system
M15287-5C
M15287-38A
2000657-074
CAUTION
U.S. Federal law restricts this device to
sale by or on the order of a physician.
M15287-17B
Revision B1-4
Page 13

Introduction: Safety Information
Responsibility of the
Manufacturer
General
GE Medical Systems Information Technologies is responsible for the
effects of safety, reliability, and performance only if:
■ Assembly operations, extensions, readjustments, modifications,
or repairs are carried out by persons authorized by us.
■ The electrical installation of the relevant room complies with
the requirements of the appropriate regulations.
■ The equipment is used in accordance with the instructions for
use.
The intended use of this device is to record ECG signals from surface
ECG electrodes. This device can analyze, record, and store
electrocardiographic information from adult and pediatric populations.
This data can then be computer analyzed with various algorithms such
as interpretive ECG and signal averaging for presentation to the user.
This device is intended for use under the direct supervision of a licensed
health care practitioner.
Failure on the part of the responsible individual, hospital, or institution
using this equipment to implement a satisfactory maintenance
schedule may cause undue equipment failure and possible health
hazards.
To ensure patient safety, use only parts and accessories manufactured
or recommended by GE Medical Systems Information Technologies.
Contact GE Medical Systems Information Technologies for information
before connecting any devices to this equipment that are not
recommended in this manual.
If the installation of this equipment, in the USA, will use 240 V rather
than 120 V, the source must be a center-tapped, 240 V, single-phase
circuit.
Parts and accessories used must meet the requirements of the
applicable IEC 60601 series safety standards, and/or the system
configuration must meet the requirements of the IEC 60601-1-1 medical
electrical systems standard.
The use of ACCESSORY equipment not complying with the equivalent
safety requirements of this equipment may lead to a reduced level of
safety of the resulting system. Consideration relating to the choice shall
include:
■ use of the accessory in the PATIENT VICINITY; and
■ evidence that the safety certification of the ACCESSORY has
been performed in accordance to the appropriate IEC 60601-1
and/or IEC 60601-1-1 harmonized national standard.
Revision B 1-5
MAC 5000 resting ECG analysis system
2000657-074
Page 14
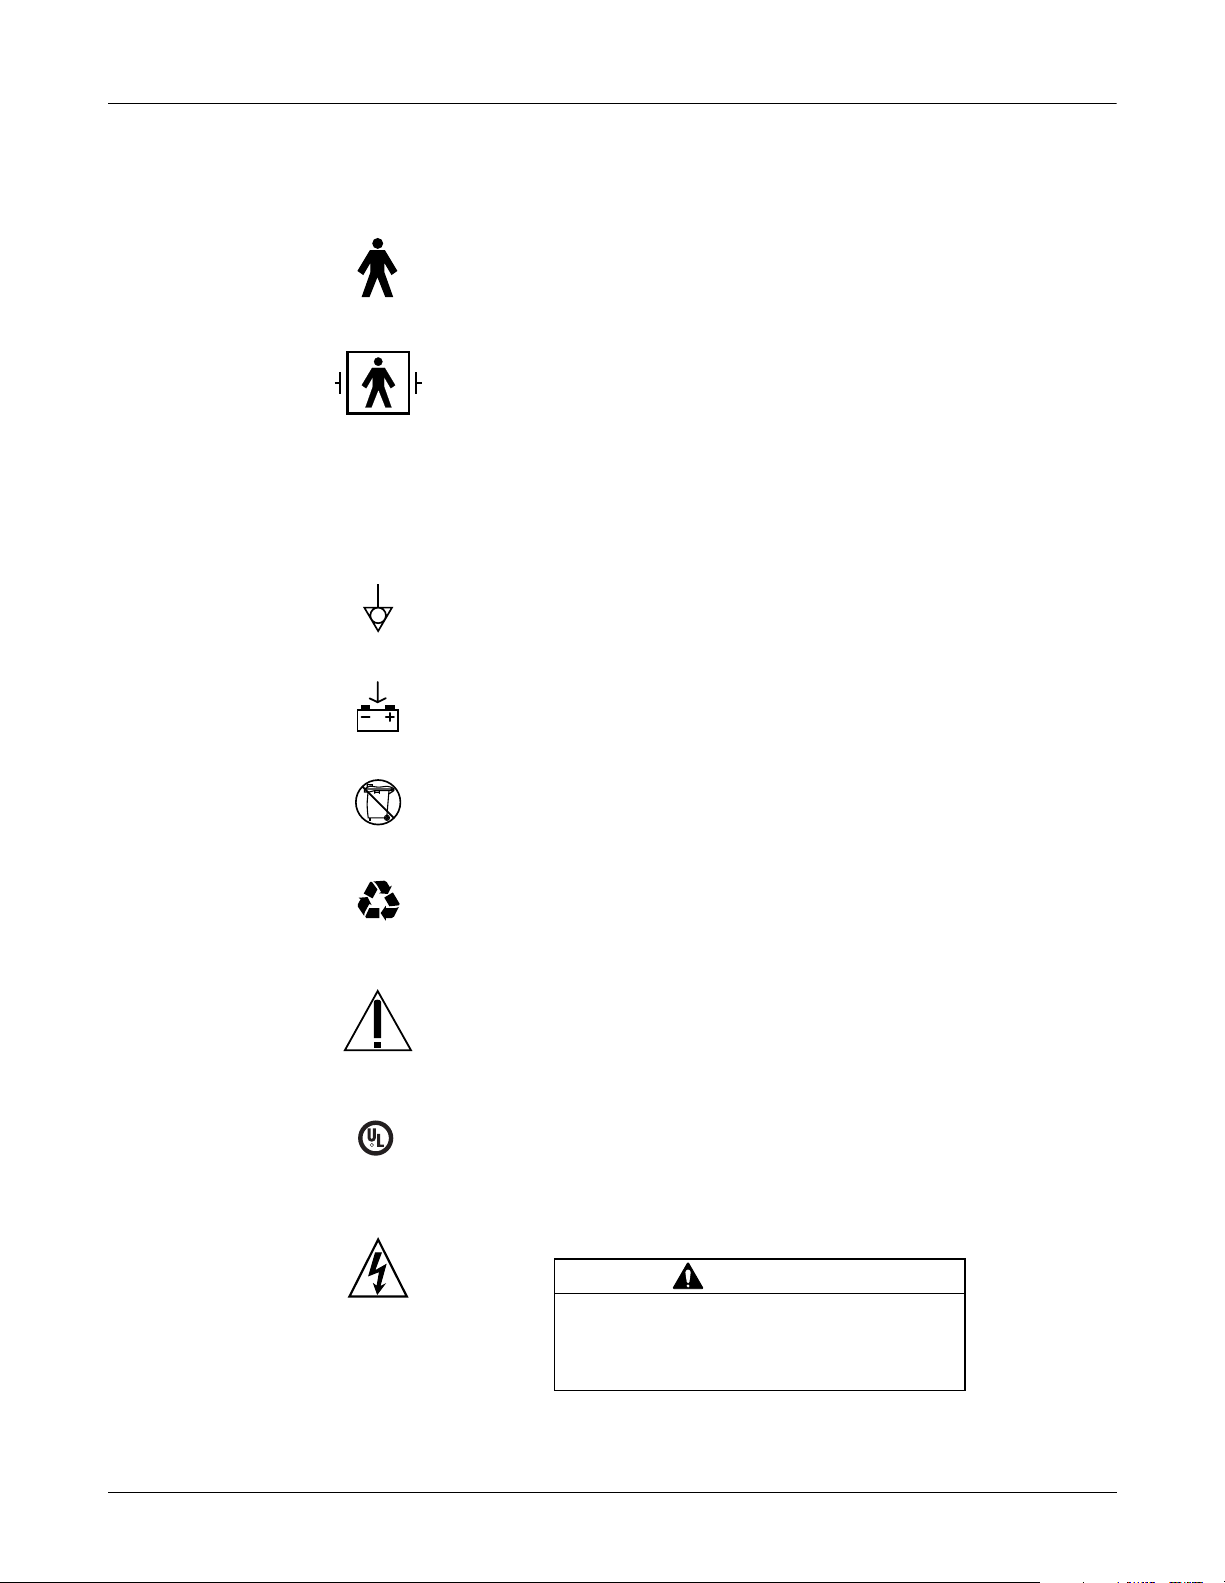
Introduction: Safety Information
U
1
4P41
Equipment Symbols
~
The following symbols appear on the equipment.
Type B equipment.
Type BF equipment, external defibrillator protected.
Alternating current. When illuminated, the green LED next to this symbol indicates
AC power is connected.
Equipotential.
Charge the battery. The flashing amber LED next to this symbol indicates you must
connect the system to AC power to re-charge the battery.
I
S
F
S
I
E
A
D
L
C
R
C
US
MEDICAL EQUIPMENT
L 2601-1 CAN/CSA 601.
DO NOT throw the battery into the garbage.
Recycle the battery.
Consult accompanying documents.
Classified with respect to electric shock, fire, mechanical, and other specified
hazards only in accordance with UL 2601-1, CAN/CSA C22.2 No. 601-1, CAN/CSA
C22.2 601-2-25, EN 60601-2-25, EN 60601-1-1.
In Europe, this symbol means dangerous or high voltage. In the United States, this
symbol represents the caution notice below:
CAUTION
To reduce the risk of electric shock, do
NOT remove cover (or back). Refer
servicing to qualified personnel.
M15287-16A
MD1325-097A, -098A, -096A, -108A, -101A, -102A, -103A, -100A, -181A, -099A
MAC 5000 resting ECG analysis system
Revision B1-6
2000657-074
Page 15
Service Information
Introduction: Service Information
Service Requirements
Equipment Identification
Refer equipment servicing to GE’s authorized service personnel only.
Any unauthorized attempt to repair equipment under warranty voids
that warranty.
It is the user’s responsibility to report the need for service to GE or to
one of their authorized agents.
Every GE Medical Systems Information Technologies device has a
unique serial number for identification. The serial number appears on
the product label on the base of each unit.
XXXXXXXXX
XXXXXXXX XXXXXXX XXXXXXX XXX
XXXXXXXXX XX XXXX XX XXXXX
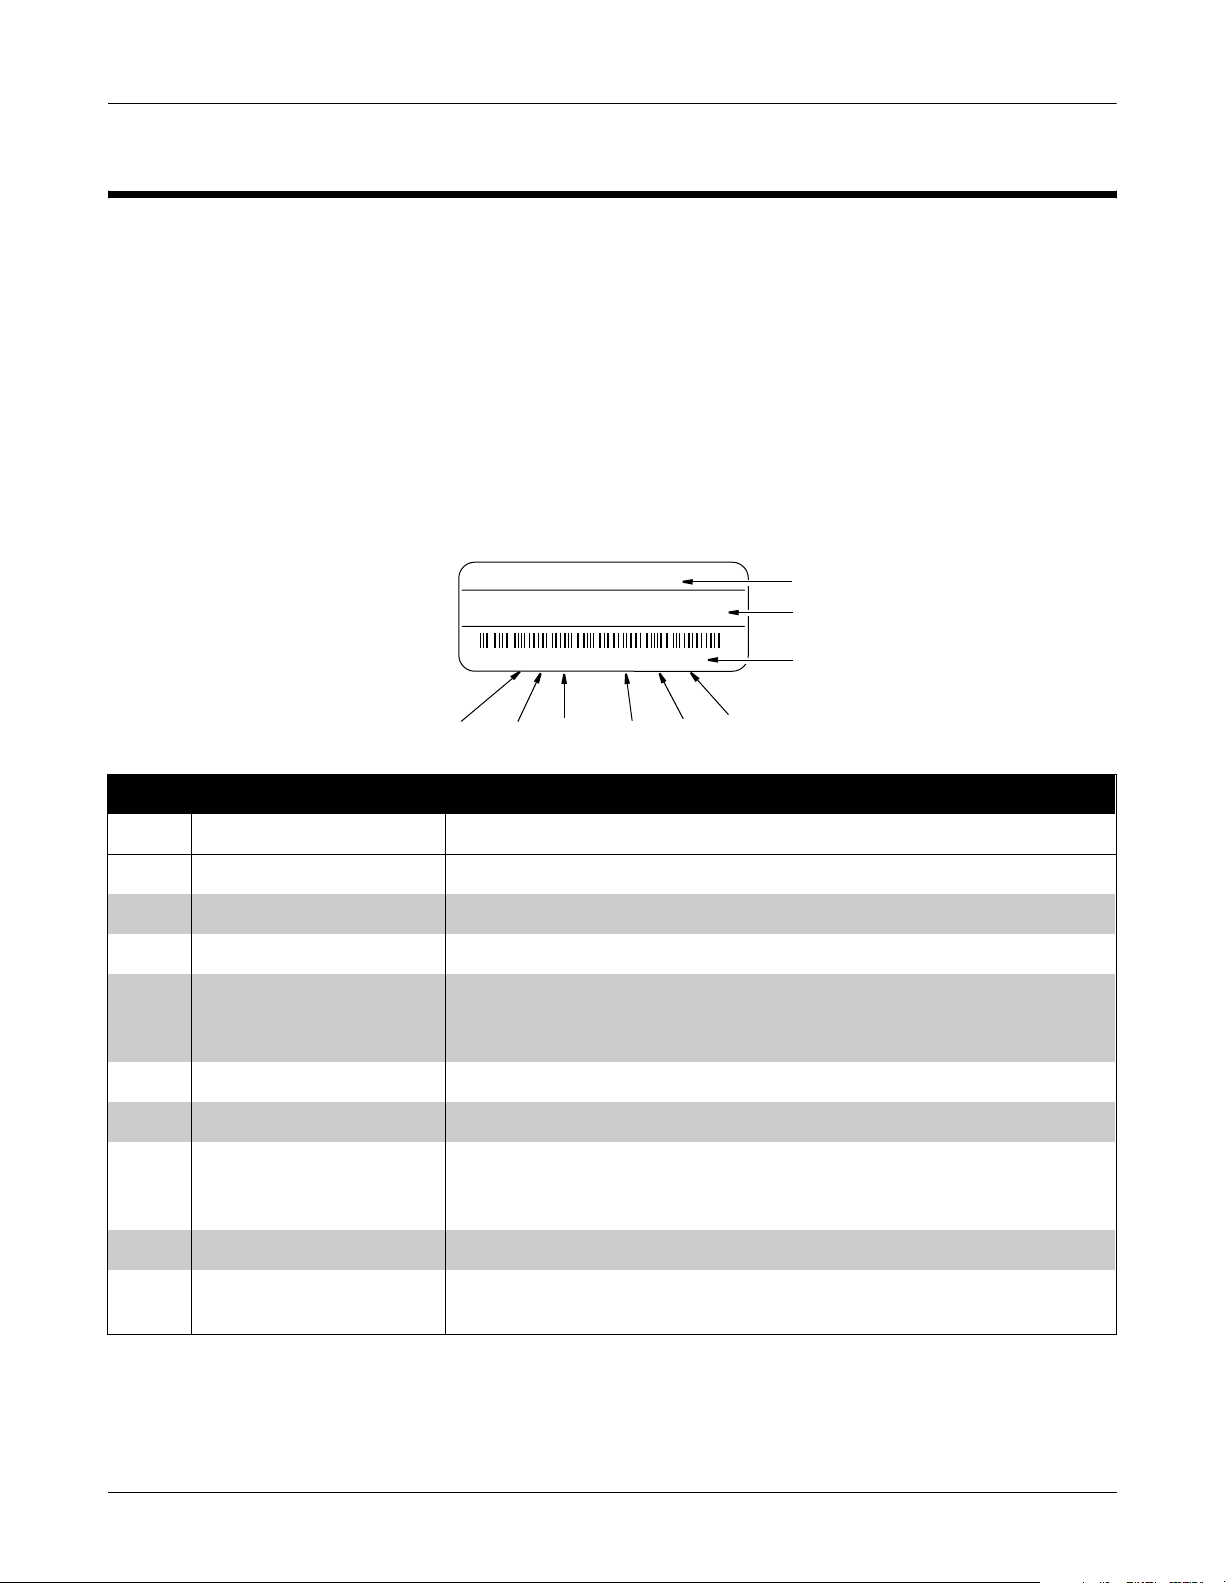
J6XX0415FXX
I
Table 1-2. Equipment Identifications
G
H
F
E
D
A
B
C
MD1113-022C
Item Name Description
A name of device MAC 5000 resting ECG analysis system
B manufacturer GEMS-IT
C serial number Unique identifier
D device characteristics One or two letters that further describe the unit, for example: P = prototype not
conforming to marketing specification; R = refurbished equipment; S = special
product documented under Specials part numbers; U = upgraded unit
E division Division where device was manufactured.
F product sequence number Manufacturing number (of total units manufactured)
G product code Two-character product descriptor WT = MAC 5000 resting ECG analysis system.
NOTE: Earlier versions used MP and MH, see the serial tag on your device for the
product code.
H year manufactured 9 = 1999, 0 = 2000, 1 = 2001, (and so on)
I month manufactured A = January, B = February, C = March, D = April, E = May, F = June, G = July,
H = August, J = September, K = October, L = November, M = December
Revision B 1-7
MAC 5000 resting ECG analysis system
2000657-074
Page 16

Introduction: Service Information
For Your Notes
MAC 5000 resting ECG analysis system
2000657-074
Revision B1-8
Page 17

2 Overview
Revision B
MAC 5000 resting ECG analysis system
2000657-074
2-1
Page 18

2-2
MAC 5000 resting ECG analysis system
2000657-074
Revision B
Page 19
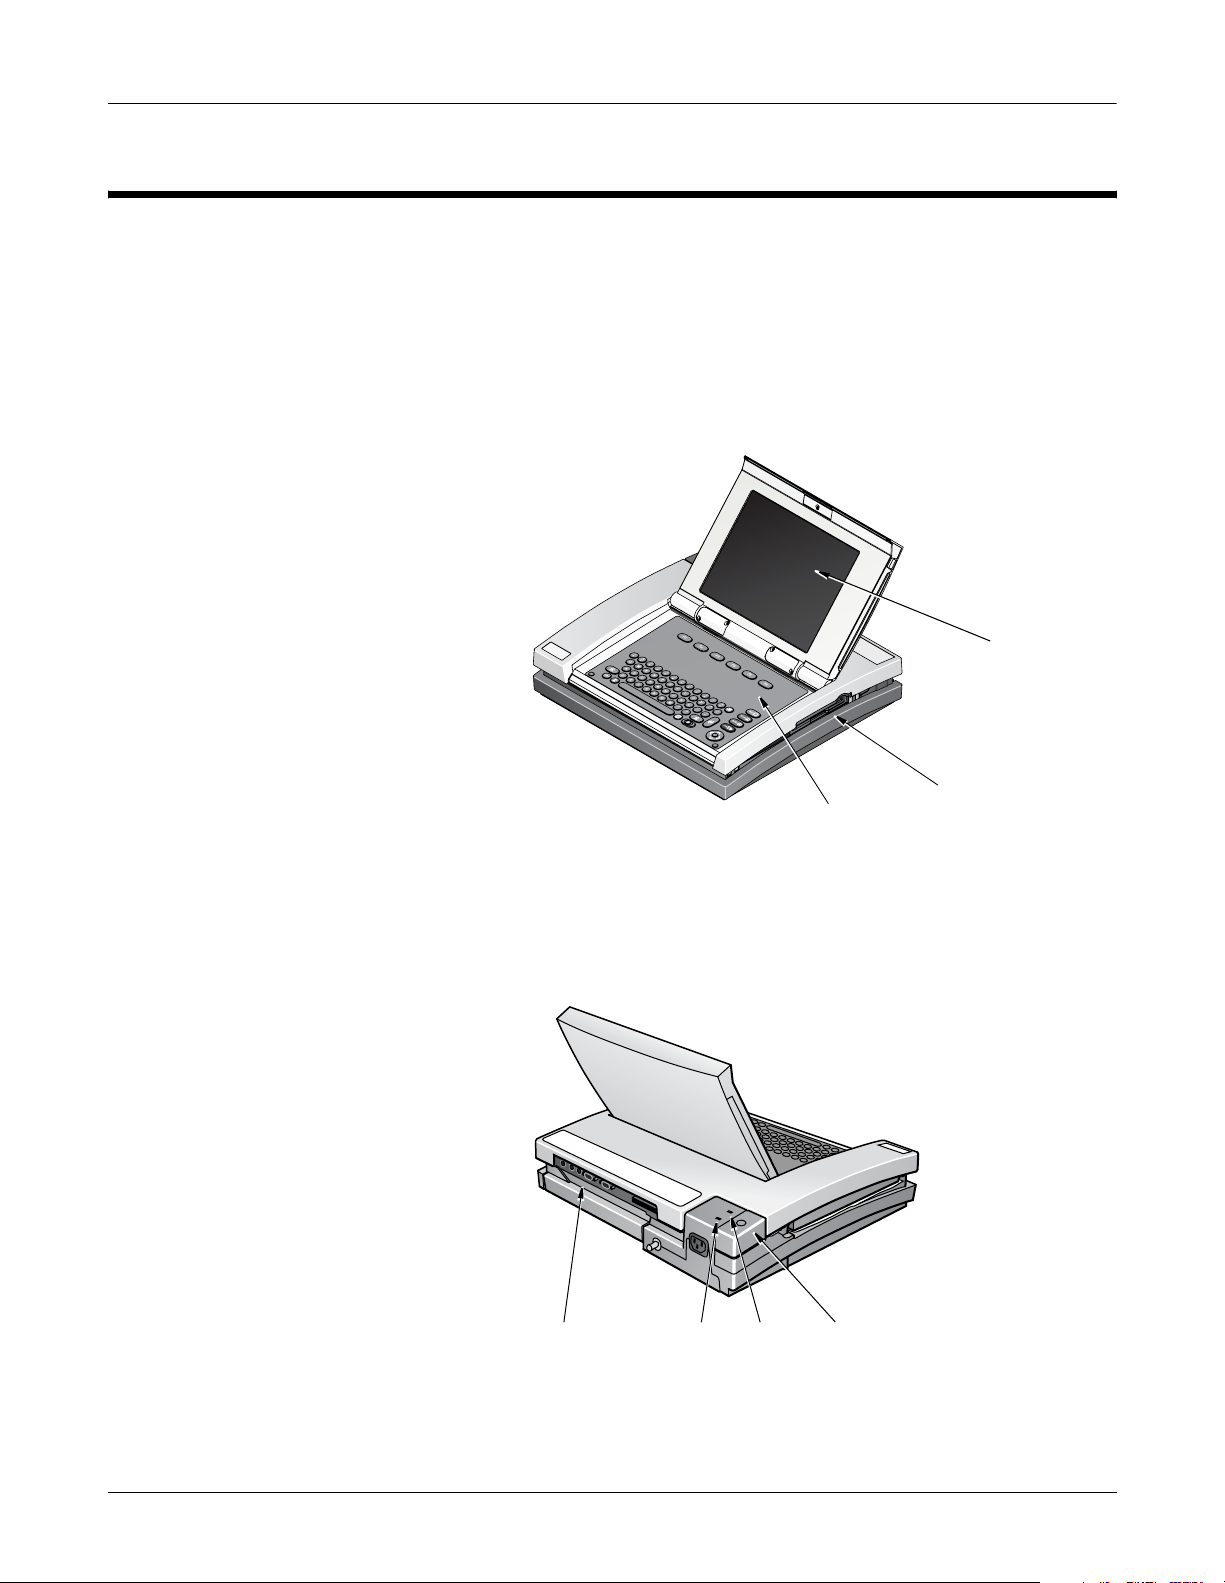
General Description
Front View
Overview: General Description
The MAC 5000 resting ECG analysis system is a 15 lead, 12 channel
system with a 10.4 inch (264 mm) diagonal display, active patient cable,
battery operation, and late potential electrocardiography. There are also
options for communication capabilities.
Display
Back View
Back panel
connectors
AC power
light
Battery
light
Keyboard
Internal
access
button
Disk drive slot
MD1325-115A
MD1325-117A
Revision B 2-3
MAC 5000 resting ECG analysis system
2000657-074
Page 20
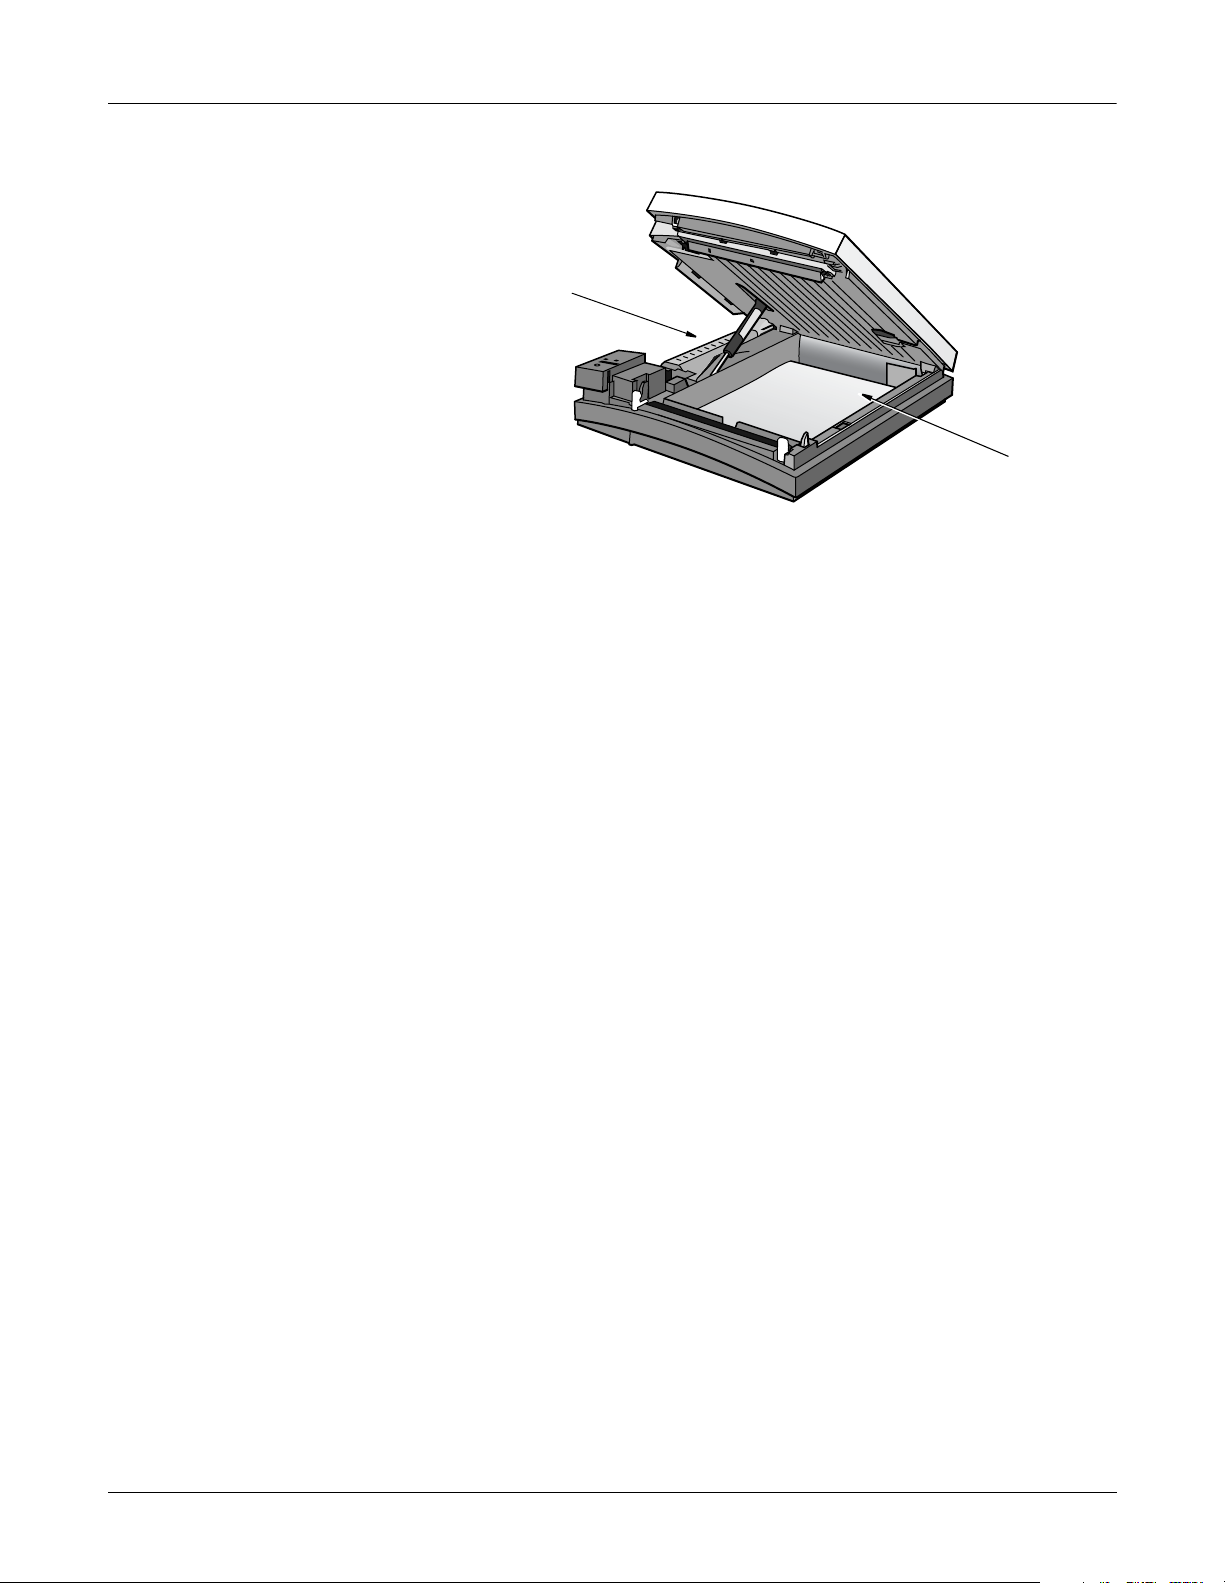
Overview: General Description
Internal View
Battery
Paper tray
MD1325-116A
MAC 5000 resting ECG analysis system
2000657-074
Revision B2-4
Page 21
Preparation for Use
2
3
Overview: Preparation for Use
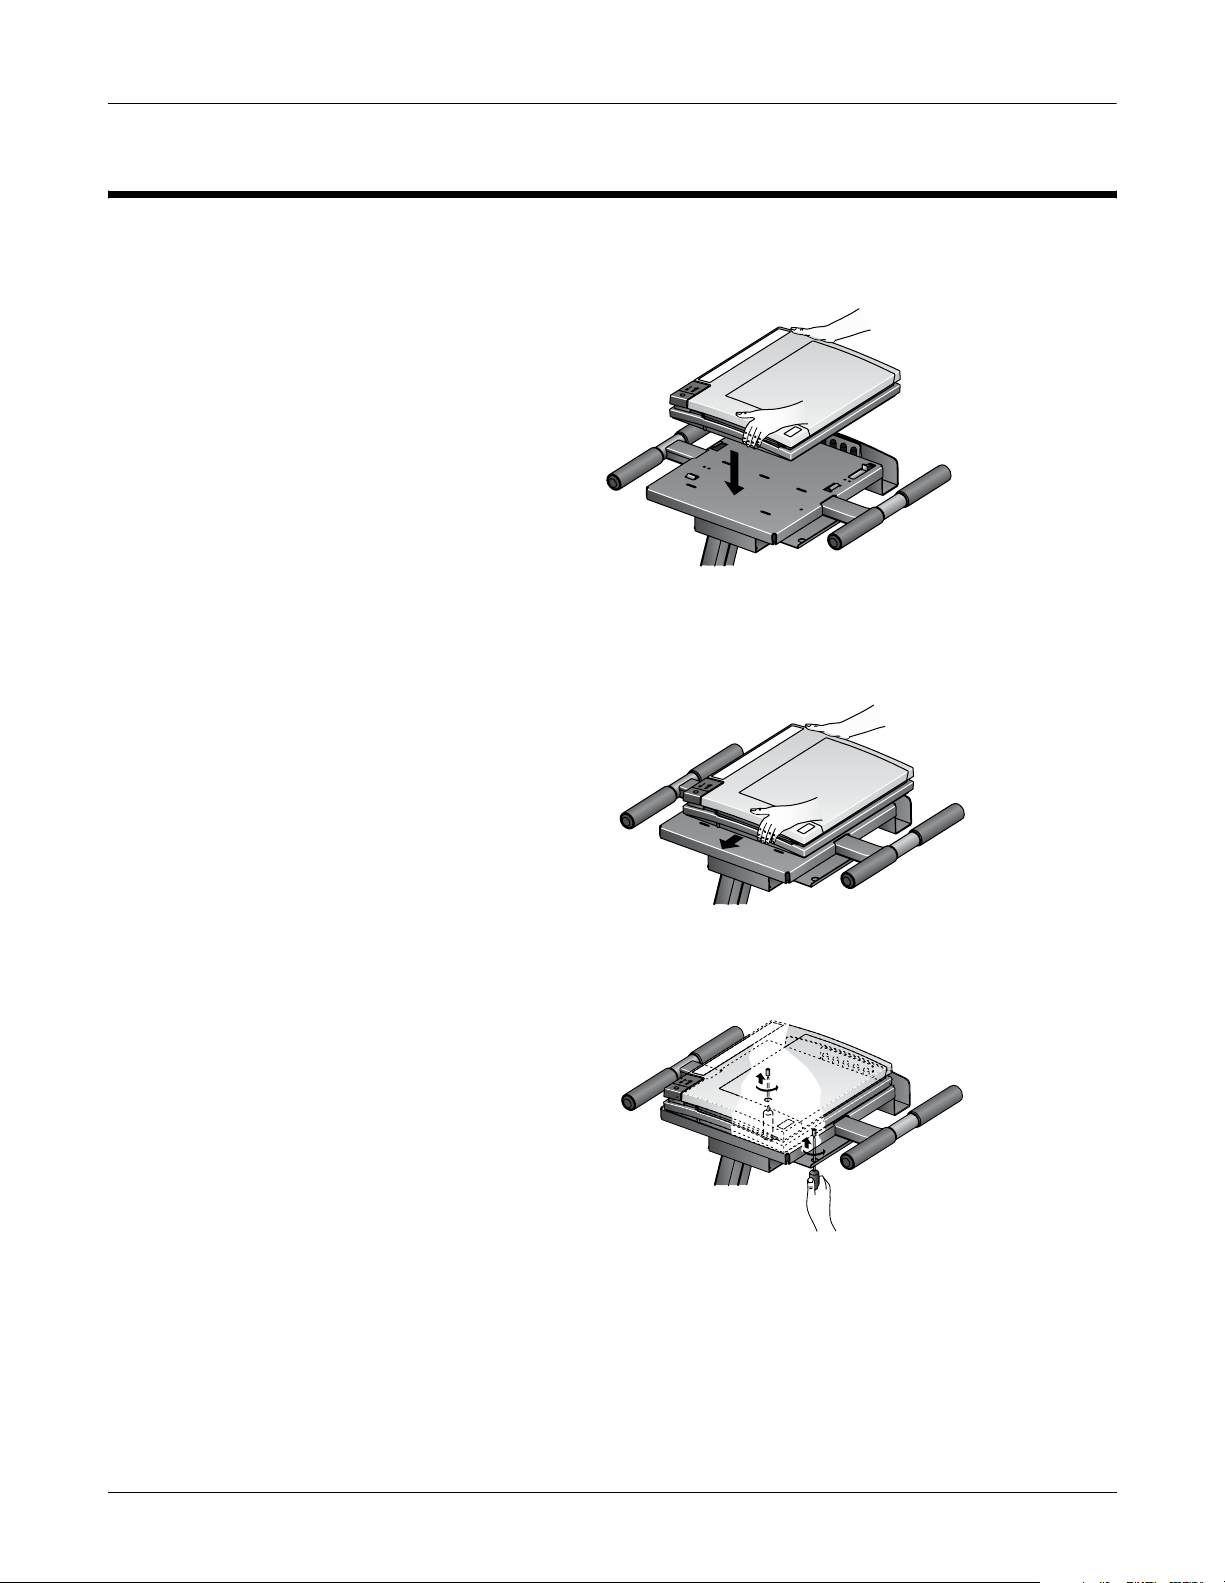
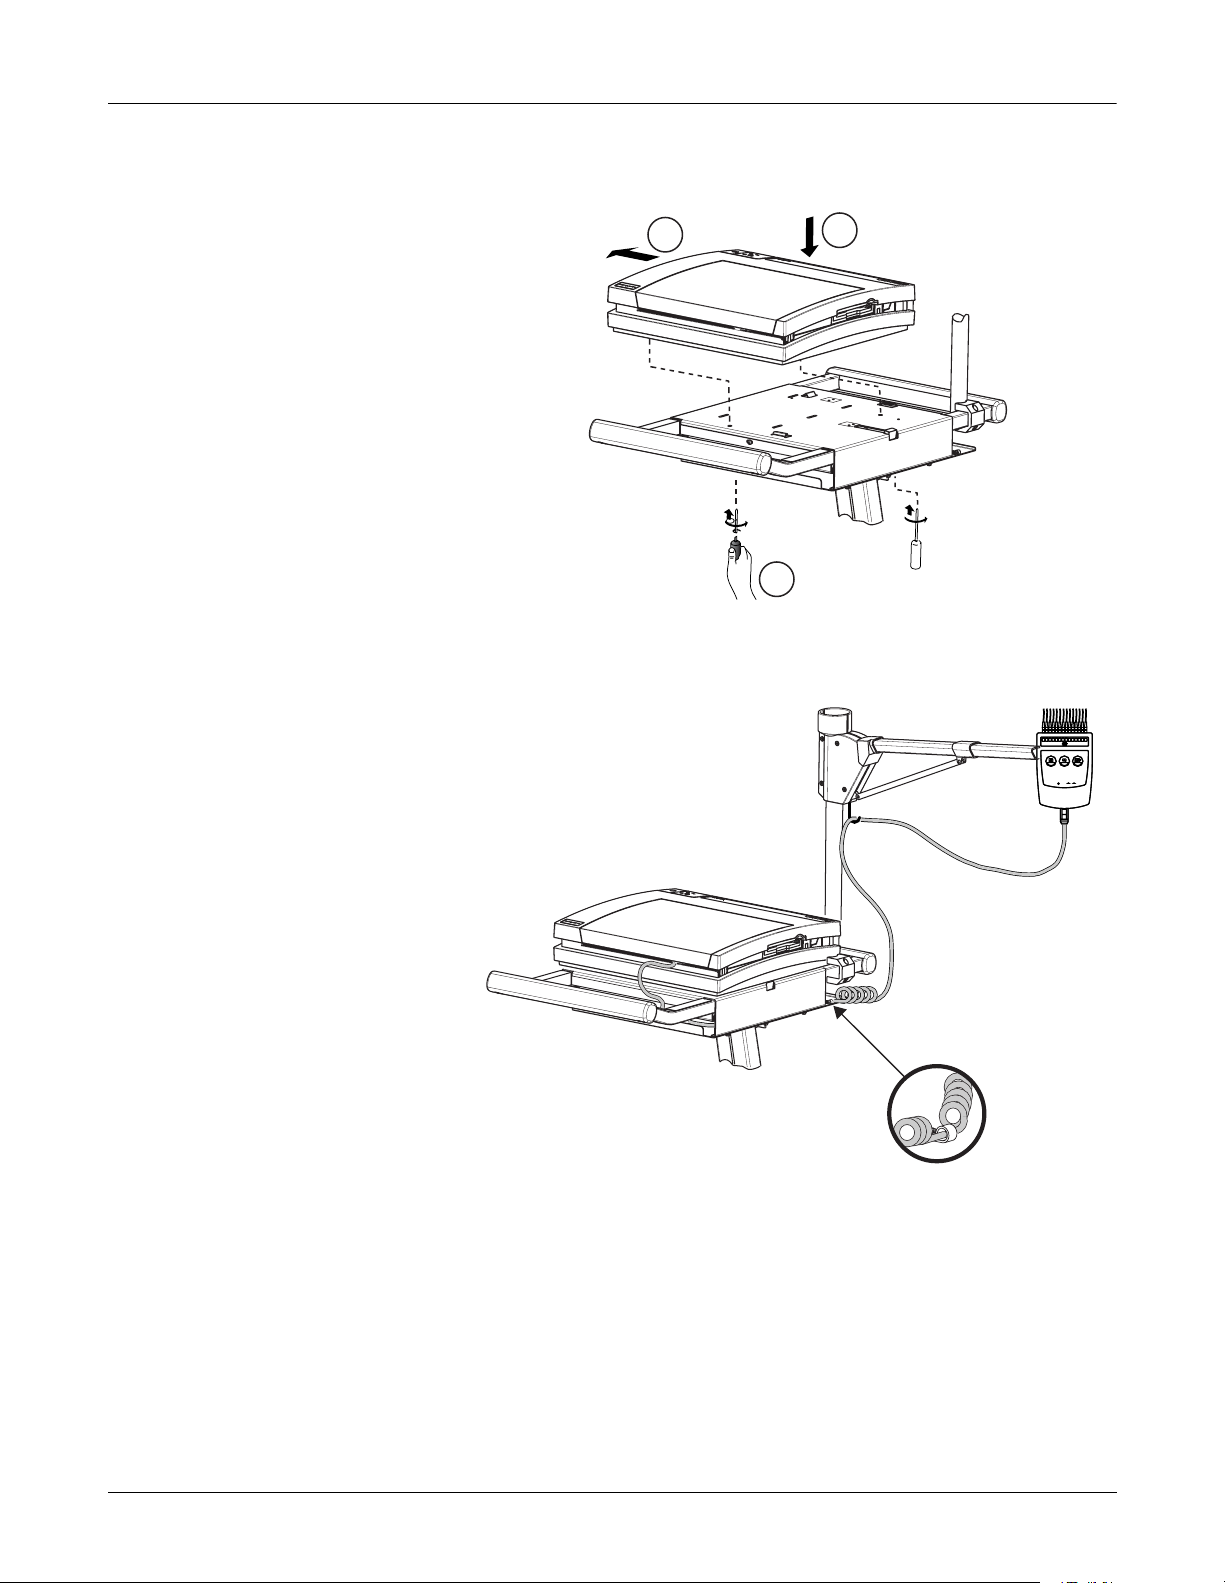
Trolley Assembly
1. Mount the unit to the optional trolley by lining up the left edge
of the unit to the two slots at the left edge of the trolley.
1
MD1325-171A
2. Place the unit on the trolley surface, then slide it to the left until
the tabs click and the unit is firmly in place on the trolley.
MD1325-172A
3. Tighten the two captive screws located under the trolley.
MD1325-211A
Revision B 2-5
MAC 5000 resting ECG analysis system
2000657-074
Page 22
Overview: Preparation for Use
231
N R C1 C2C3 A1A2 A3 A4 C4 C5 C6 L F
Type-S Trolley Assembly
1. To mount the MAC 5000 to the Type-S trolley, follow the steps in
the illustration below.
2
3
1
2. Route patient cable through trolley and fasten with cable clamp
as shown below.
MAC 5000 resting ECG analysis system
2000657-074
Revision B2-6
Page 23
Overview: Preparation for Use
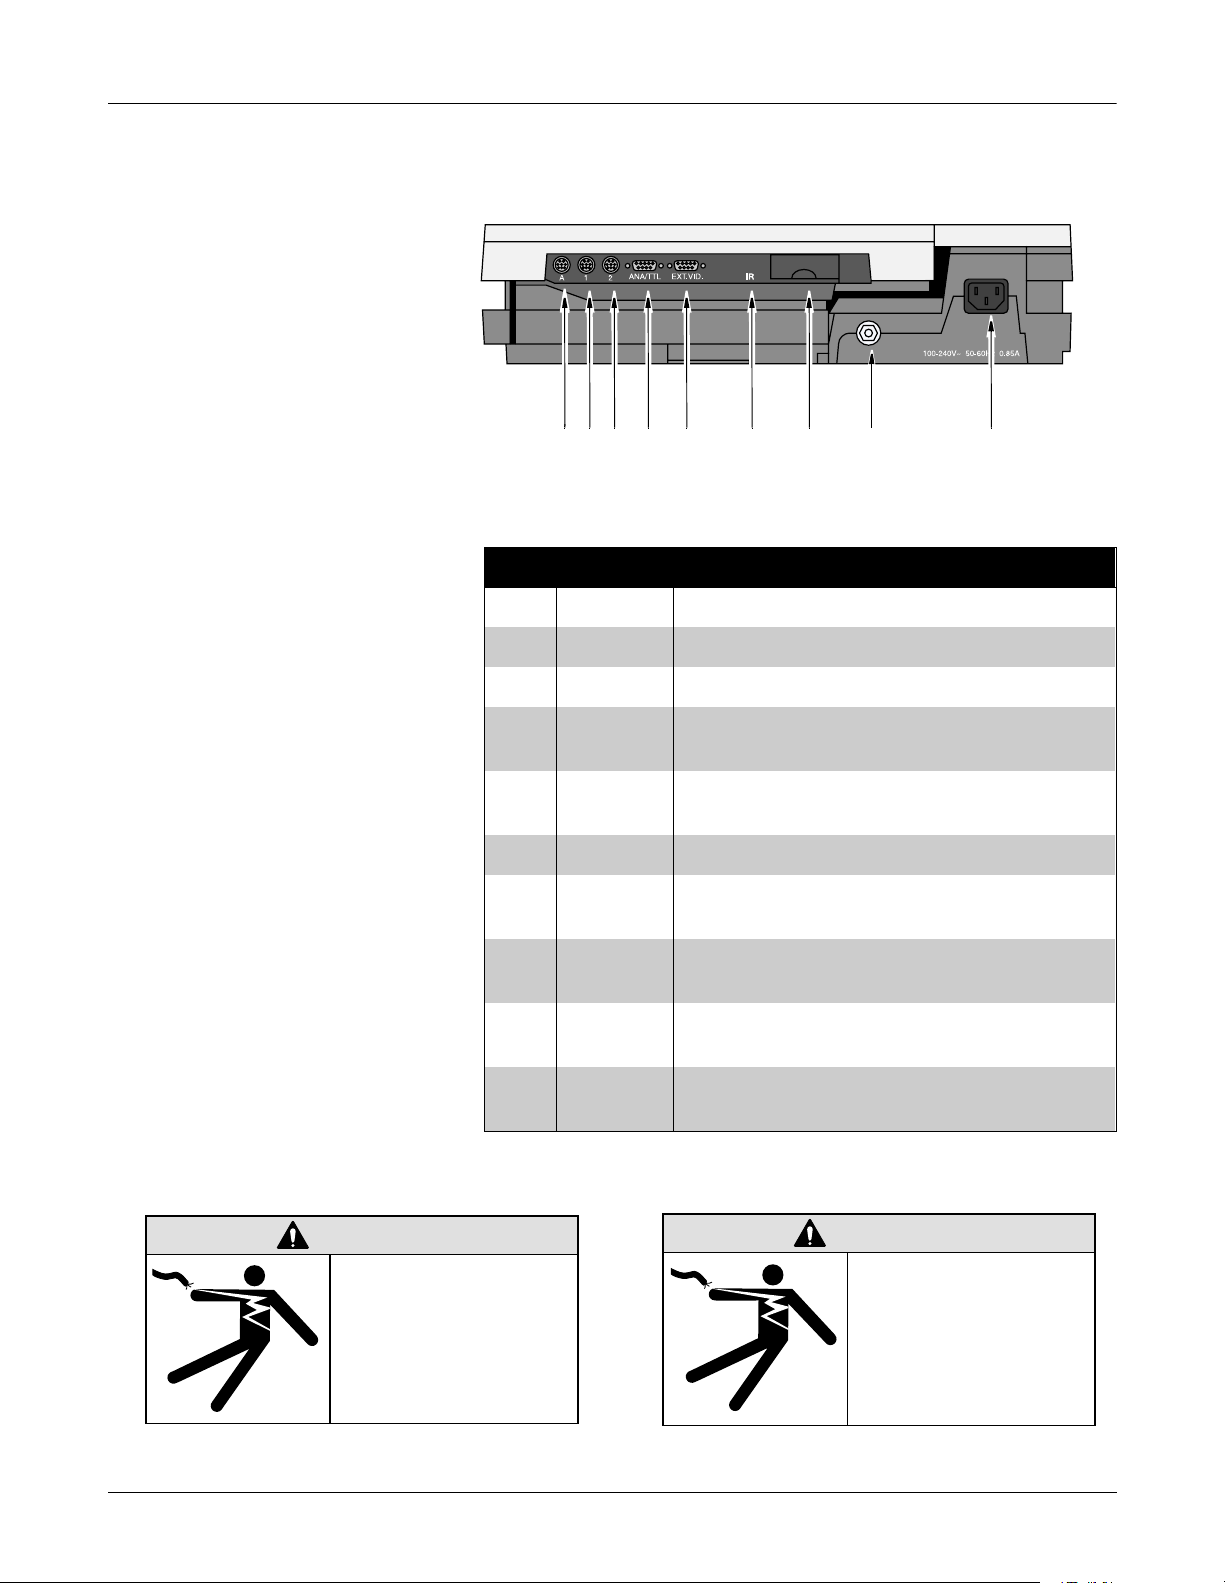
Connector Identification
ABC D E F HGI
MD1325-118B
Table 2-1. Back Panel Connectors
Item Name Description
A A Card Reader (Japan only) / PS2 Style Keyboard
B 1 Treadmills or GE KISS pump (optional).
C 2 Connect a local transmission cable, serial line, or
external modem (optional).
WARNING
Keep leakage current
within acceptable limits
when connecting
auxiliary equipment to
this device.
D ANA/TTL Connect a device requiring analog data or TTL
trigger.
E EXT.VID. Connect an external video display.
F IR Point at a MAC 5000 or MUSE CV system’s IR
transceiver to transmit or receive ECG data.
G card slot
door
H ground lug Connect non-grounded peripheral devices to ensure
I mains AC
power
Lift to open the door and insert the software card into
this slot to run the system.
equipotential.
Insert the mains AC power cable.
WARNING
Total system leakage
current must not
exceed 100
microamperes.
M15287-7C
M15287-9D
Revision B 2-7
MAC 5000 resting ECG analysis system
2000657-074
Page 24

Overview: Preparation for Use
MAC 5000 ST
Requirements and
Configuration
Compatible Blood Pressure Units
Following is a list of interface requirements and setup configurations
required for the devices listed when used with the MAC 5000 ST option.
Colin - Model ST-780
Connection Requirements - Use cable PN 2008112-001 to connect from
the MAC5000 port 1 to the Colin serial port. Use cable PN 2008111-001
to connect from the MAC5000 ANA/TTL port to the Colin QRS trigger
input.
Device Configuration Requirements - None
MAC5000 Configuration Requirements - At the Main Menu complete
the following in the order shown below:
■ Select System Setup,
■ Enter System password,
■ Exercise Test,
■ Inputs/Outputs,
■ Change Blood Pressure to Nipon-Colin.
Sun Tech - Model Tango
Connection Requirements - Use cable PN 2008113-001 to connect from
the MAC5000 port 1 to the Sun Tech serial port. Use cable PN 2008111001 to connect from the MAC5000 ANA/TTL port to the Sun Tech QRS
trigger input.
Device Configuration Requirements - At the Tango Main Menu
complete the following in the order shown below:
■ Select Utilities,
■ Select Device,
■ Scroll to ECG Trigger and press enter,
■ Scroll to DIGITAL↑ and press enter,
■ Scroll to EXIT and press enter,
■ Scroll to Test Parameters and press enter,
■ With Technique highlighted, press enter,
■ Scroll to DKA and press enter,
■ Scroll to EXIT and press enter,
■ Scroll to EXIT and press enter to return to the display screen.
MAC5000 Configuration Requirements - At the Main Menu complete
the following in the order shown below:
■ Select System Setup,
■ Enter System password,
■ Exercise Test,
■ Inputs/Outputs,
■ Change Blood Pressure to Suntech.
MAC 5000 resting ECG analysis system
2000657-074
Revision B2-8
Page 25

Overview: Preparation for Use
Ergoline - Model Ergoline 900
Connection Requirements - Use cable PN 2008110-001 to connect from
the MAC5000 port 1 to the Ergoline serial port. Use cable PN 2008115001 to connect from the MAC5000 ANA/TTL port to the Ergoline QRS
trigger input.
Device Configuration Requirements - See Ergoline 900 Operator’s
Manual.
MAC5000 Configuration Requirements - At the Main Menu complete
the following in the order shown below:
■ Select System Setup,
■ Enter System password,
■ Exercise Test,
■ Inputs/Outputs,
■ Change Blood Pressure to Ergoline Ergometer.
Compatible GE Medical Systems
Information Technologies
Treadmills
Analog Treadmills
Model T2000
Connection Requirements - Use cable PN 2007918-001 (T2000) to
connect from the MAC5000 port 1 to the treadmill serial port.
Device Configuration Requirements - None.
MAC5000 Configuration Requirements - Use the Edit Protocol
application to set the protocol Test Type to Treadmill in MPH or
Treadmill in Km/H for protocols that will be used with this treadmill.
Connection Requirements - There are no cables available from GE
Medical Systems Information Technologies to interface to analog
treadmills. The customer is responsible for making the appropriate
cable. Speed and grade signals for controlling analog treadmills are
available on pins 2 (Slow Analog Output) and 8 (Fast Analog Output) of
the ANA/TTL port. Pins 1, 4 and 5 are tied to ground.
Device Configuration Requirements - None.
MAC5000 Configuration Requirements - Use the Edit Protocol
application to set the protocol Test Type to Analog Treadmill in MPH or
Analog Treadmill in Km/H for protocols that will be used with this
treadmill.
Configure pin 2 on the ANA/TTL port by selecting the following:
■ System Setup,
■ Exercise Test,
■ Inputs/Outputs, and
■ set Slow Analog Output to Workload.
Revision B 2-9
MAC 5000 resting ECG analysis system
2000657-074
Page 26

Overview: Preparation for Use
Configure pin 8 on the ANA/TTL port by selecting the following:
■ System Setup,
■ Exercise Test,
■ Inputs/Outputs, and
■ set Fast Analog Output to Workload.
Bicycle Ergometers
Ergoline 800/900, Lode Ergometer
Connection Requirements - Use cable PN 2008109-001 (Ergoline 800),
PN 2008114-001 (Ergoline 900), or PN 2007981-001 (Lode Ergometer), to
connect from the MAC5000 ANA/TTL port to the ergometer analog
control port.
NOTE: For any other ergometer, the customer is responsible for
making the appropriate cable.
Device Configuration Requirements - Refer to ergometer Operator’s
Manual.
MAC5000 Configuration Requirements - Use the Edit Protocol
application to set the protocol Test Type to Ergometer in Watts or
Ergometer in KPM for protocols that will be used with this Ergometer.
Configure pin 2 on the
■ System Setup,
■ Exercise Test,
■ Inputs/Outputs, and
■ Slow Analog Output to Workload, or
ANA/TTL
port by selecting the following:
configure pin 8 by selecting
■ System Setup,
■ Exercise Test,
■ Inputs/Outputs, and
■ Fast Analog Output to Workload.
MAC 5000 resting ECG analysis system
2000657-074
Revision B2-10
Page 27

3 Maintenance
Revision B
MAC 5000 resting ECG analysis system
2000657-074
3-1
Page 28

3-2
MAC 5000 resting ECG analysis system
2000657-074
Revision B
Page 29
Introduction
Maintenance: Introduction
Recommended
Maintenance
Preventive Maintenance
Inspection Report
Regular maintenance, irrespective of usage, is essential to ensure that
the equipment will always be functional when required.
WARNING
Failure on the part of all responsible
individuals, hospitals or institutions,
employing the use of this device, to
implement the recommended
maintenance schedule may cause
equipment failure and possible health
hazards. The manufacturer does not
in any manner, assume the responsibility
for performing the recommended
maintenance schedule, unless an
Equipment Maintenance Agreement
exists. The sole responsibility rests with
the individuals, hospitals, or institutions
utilizing the device.
M15287-5E
To help you establish a systematic maintenance routine, we
recommend that, every six months, you perform the maintenance
checks and test procedures on the “Preventive Maintenance Inspection
Report,” included at the end of this chapter.
Required Tools and
In addition to a standard set of hand tools, you will need the items listed
below.
Supplies
Table 3-1. Tools and Supplies
Item Part Number
#10 TORX driver
Leakage current tester MT-1216-02AAMI (for 220V)
MT-1216-01AAMI (for 110V)
Multifunction micro-simulator MARQ 1
Precision dust remover
Lint-free soft cloth TX609
PS2 style keyboard (Japan only)
Revision B 3-3
MAC 5000 resting ECG analysis system
2000657-074
Page 30

Maintenance: Inspection and Cleaning
Inspection and Cleaning
Visual Inspection
Exterior Cleaning
Perform a visual inspection of all equipment and peripheral devices
daily. Turn off the unit and remove power before making an inspection
or cleaning the unit.
■ Check the case and display screen for cracks or other damage.
■ Regularly inspect all cords and cables for fraying or other
damage.
■ Verify that all cords and connectors are securely seated.
■ Inspect keys and controls for proper operation.
◆ Toggle keys should not stick in one position.
◆ Knobs should rotate fully in both directions.
Clean the exterior surfaces monthly, or more frequently if needed.
1. Use a clean, soft cloth and a mild dishwashing detergent diluted
in water.
2. Wring the excess water from the cloth. Do not drip water or any
liquid on the equipment, and avoid contact with open vents,
plugs, or connectors.
3. Dry the surfaces with a clean cloth or paper towel.
Interior Cleaning
General
Check for dust buildup on the surfaces of the interior circuit boards,
components, and power supply. Use commercially available
compressed air to blow away the accumulated dust. Follow the
manufacturers directions.
MAC 5000 resting ECG analysis system
2000657-074
Revision B3-4
Page 31

Maintenance: Inspection and Cleaning
Thermal Printhead
Clean the thermal printhead every three months or more often with
heavy use. A build-up of thermal paper coating on the printhead can
cause light or uneven printing.
Use a solution containing alcohol on a nonwoven, nonabrasive cloth
such as Techni-Cloth to wipe off the printhead. Do not use paper
toweling, as it can scratch the printhead.
Thermal
Printhead
MD1322-004A
Revision B 3-5
MAC 5000 resting ECG analysis system
2000657-074
Page 32

Maintenance: Battery and Patient Cable Replacement
Battery and Patient Cable Replacement
Battery Replacement
Patient Cable
Replacement
1. Press the internal access button to open the unit.
2. Slide the battery release button in the direction of the arrow and
lift the battery out.
MD1325-112B
3. Install a new battery and close the unit.
1. Press the internal access button to open the unit.
2. Press connector release tabs and pull the connector loose.
3. Pull the cable from the retaining tabs.
4. Reassemble the cable by reversing the above steps.
MAC 5000 resting ECG analysis system
2000657-074
MD1322-006
Revision B3-6
Page 33

Disassembly Guidelines
Maintenance: Disassembly Guidelines
Preliminary Steps
Trolley Disassembly
Prior to disassembly, perform the following:
■ If possible, process any ECGs remaining in storage.
■ If possible, print out set-up for future reference.
■ Disconnect the unit from the AC wall outlet and remove the
power cord from the unit.
■ Remove the battery.
■ Remove the chart paper.
■ Take strict precautions against electrostatic discharge damage.
1. Loosen the two captive screws located under the trolley.
2. Pull release tab then slide the MAC 5000 to the right.
MD1325-212A
MD1325-173A
Revision B 3-7
MAC 5000 resting ECG analysis system
2000657-074
Page 34

Maintenance: Disassembly Guidelines
3. Slide the MAC 5000 to the right.
MD1325-174A
4. Lift the unit from the trolley.
Type-S Trolley
Disassembly
MD1325-175A
To dismount the MAC 5000 from the Type-S trolley, follow the steps
shown in the illustration below.
3
4
2
1
MAC 5000 resting ECG analysis system
2000657-074
Revision B3-8
Page 35

Maintenance: Disassembly Guidelines
Power Supply
Removal
NOTE
A #10 TORX driver is required for
disassembly and assembly.
1. Turn the unit over so the bottom side is up.
2. Using a #10 TORX driver, remove the three screws holding the
power supply in place.
3. Lift the power supply to expose the wiring harness and ground
wire.
4. Remove P2 from J2 on the power supply assembly and the
ground wire connection from the power supply chassis.
Three Screws
Ground Wire
Reassembly
Wiring Harness
MD1322-001
Reassemble the power supply reversing the steps for removal. Before
replacing the screws, ensure that the ground wire is routed through the
notch in the plastic and not pinched.
Revision B 3-9
MAC 5000 resting ECG analysis system
2000657-074
Page 36

Maintenance: Disassembly Guidelines
Top Cover
Removal
NOTE
It is not necessary to remove the power
supply prior to removing the top cover.
1. Turn the unit over so the bottom side is up and remove the
TORX screw through the hole on the right rear corner of the
unit. (This screw is only visible and accessible with the battery
removed.)
TORX
Screw
MD1322-002
2. Turn the unit right side up and press the internal access button
and raise the top of the unit.
3. Remove three TORX screws.
Three TORX
Screws
MD1322-004A
4. Lower the top of the unit and lock in place.
5. Raise the display to the vertical position.
6. Gently lift the rear of the top cover free from the unit.
NOTE
The top cover holds the bezel that surr ou nds
the rear panel connecto rs, so the bezel may
fall free at this time.
MAC 5000 resting ECG analysis system
2000657-074
Revision B3-10
Page 37

Maintenance: Disassembly Guidelines
7. At the front of the top cover, gently pull the thin strip of plastic
free from under the keyboard. The entire top assembly is now
loose.
NOTE
It may be helpful to rotate the top cover 45
degrees to provide a large r opening to clear
the display.
8. Carefully lift the top assembly up and clear of the raised display.
Reassembly
Display/Keyboard
Assembly
Removal
1. Raise the display to the vertical position.
2. Make sure the bezel surrounding the rear panel connectors is in
place. Make sure the release mechanism for the Smartmedia
card functions properly.
3. Lower the top cover down around the display and set in
position.
4. Snap the rear of the top cover in place and then, gently pulling
on the thin plastic strip at the front of the top cover, position it
in place under the keyboard assembly.
5. Replace the screws removed in disassembly.
1. Remove the top cover following the procedures above.
2. Label the three cables connecting the display/keyboard
assembly to the main PCB. Disconnect these cables from the
main PCB.
NOTE
Two of these cable s have lock ed con necto rs
that must be lifted up to release the cables.
Revision B 3-11
MAC 5000 resting ECG analysis system
2000657-074
Page 38

Maintenance: Disassembly Guidelines
3. Press the internal access button and raise the top of the unit.
Remove one screw on the inside, near the front edge of the top.
Screw
MD1322-004B
4. Working from the outside of the top, remove the two TORX
mounting screws located on the right side of the assembly.
5. Slide the display hinge (metal rod) to the left to release it from
the mounting detent.
Tabs
Hinge
Two TORX
Mounting
Screws
MD1322-005
6. Slightly lift up on the right hand side of the display/keyboard
assembly, and pull the assembly to the right to free the tabs
from their mounting slots. Do not lift the right side of the display
too high or the plastic tabs may be damaged.
7. When free from the main unit, the display/keyboard assembly
can be separated in to two pieces allowing replacement of either
the keyboard or display assembly.
NOTE
Further disassem bly of the LCD assembl y is
not recommended. Replace as a complete
assembly.
MAC 5000 resting ECG analysis system
2000657-074
Revision B3-12
Page 39

Maintenance: Disassembly Guidelines
Reassembly
Main PCB
Removal
1. Slide tabs into their mounting slots and set the display/
keyboard assembly in place.
2. Replace the two TORX mounting screws on the right side of
assembly.
3. Slide the display hinge (metal rod) to the right until it snaps into
the mounting detent.
4. Connect the three cables from the display/keyboard assembly
to the main PCB. Be sure to lift the locks up prior to attempting
to insert the cables into the connectors.
1. Remove the top cover and display/keyboard assemblies
following the procedures above.
2. Disconnect all remaining cable connections to the main PCB.
These include cables to the
◆ power supply
◆ printhead
◆ battery connect PCB
◆ diskette drive
Reassembly
Printhead Replacement
Removal
Reassembly
3. Remove the mounting screws holding the main PCB in place.
They are located around the outside edges of the main PCB.
4. Lift the main PCB from the unit.
1. Reassemble the main PCB, top cover and display/keyboard
assemblies by reversing the steps for removal.
2. Install the battery and paper, then power on the unit and verify
that the
◆ serial number and printhead resistance (label on printhead)
is correct
◆ setup parameters meet user’s requirements.
1. Remove the top cover following the procedure above.
2. Using a Phillips head screw driver, remove the two screws that
hold the printhead to the printhead mounting plate.
3. Open the writer assembly, disconnect and remove the
printhead.
1. Record the resistance value of the new printhead.
2. Connect the new printhead to the ribbon cable.
3. Hold the new printhead FIRMLY in place against the two metal
tabs on the printhead mounting plate, then tighten the two
screws.
Revision B 3-13
MAC 5000 resting ECG analysis system
2000657-074
Page 40

Maintenance: Disassembly Guidelines
4. replace the top cover and power up the unit.
5. Go to the Setup menu and enter the new printhead resistance
value.
6. Do a Writer Diagnostics test (See 4-19).
Diskette Drive Removal/
Replacement
Writer Roller/Carriage
1. Remove the top cover and display/keyboard assembly following
the procedures above.
2. Remove the cable from the diskette drive to the main PCB.
3. Remove two screws holding the diskette drive in place. Loosen,
but do not remove two TORX mounting screws holding the
mounting bracket.
4. Detach the diskette drive and lift from the unit.
5. Apply the adhesive pad to the replacement diskette drive and
position the drive in the unit. Insert and loosely attach the two
screws.
6. The mounting screws MUST be tightened in the following order:
◆ Tighten the two TORX mounting screws,
◆ then tighten the two screws holding the drive to the
mounting bracket.
7. Connect cable to the main PCB.
8. Replace the display/keyboard assembly and the top cover
following procedures above.
Assembly
Removal
Reassembly
1. Remove the power supply assembly following procedures
above.
2. Inside the power supply compartment, disconnect the cable
that connects to the writer assembly.
3. Open the unit to access the paper compartment. Move the
paper size bracket to the A4 position to expose one of the writer
assembly mounting screws.
4. Remove the screw and return the paper size bracket to the
8.5 x 11 position.
5. Close the unit and turn it over so the bottom side is up.
6. Remove the four screws located on the underside of the writer
roller/carriage assembly and lift the writer from the bottom of
the unit.
Reassemble the writer roller/carriage assembly by reversing the above
procedures.
MAC 5000 resting ECG analysis system
2000657-074
Revision B3-14
Page 41

Domestic Electrical Safety Tests
N
E
H
T
Maintenance: Domestic Electrical Safety Tests
AC Line Voltage Test
120 VAC, 50/60 Hz
This test verifies that the domestic wall outlet supplying power to the
equipment is properly wired. For international wiring tests, refer to the
internal standards agencies of that particular country.
Use a digital voltmeter to check the voltages of the 120-volt AC wall
outlet (dedicated circuit recommended). If the measurements are
significantly out of range, have a qualified electrician repair the outlet.
The voltage measurements should be as follows:
1. 120 VAC (
between the line contact and ground.
2. Less than 3 VAC between neutral and ground.
EUTRAL
± 10 VAC) between the line contact and neutral and
❶
LIN
❶❷
GROUND
MD1128-011A
240 VAC, 50/60 Hz
Use a digital voltmeter, set to measure at least 300 VAC, to check the
voltages of the NEMA 6-20R, AC wall outlet (dedicated circuit
recommended). If the measurements are significantly out of range, have
a qualified electrician repair the outlet. The voltage measurements
should be as follows:
1. 120 VAC (
2. 210 to 230 VAC between the two “hot” contacts.
± 10 VAC) between either “hot” contact and ground.
OT
❶
❷
GROUND
❶
MD1128-012A
HO
Revision B 3-15
MAC 5000 resting ECG analysis system
2000657-074
Page 42

Maintenance: Domestic Electrical Safety Tests
Leakage Tests
The leakage tests are safety tests to ensure that the equipment poses no
electrical health hazards. Use the table below to determine which tests
apply to the unit under test and the maximum allowable leakage
currents. For international leakage limits, refer to the internal standards
agencies of that particular country.
If the unit under test fails the leakage tests, do not allow the customer to
use the equipment. Call Tech Support for assistance. (See the “How to
Reach Us” page in the front of the manual.)
We recommend that you perform these tests:
■ Before applying power for the first time
■ Every 6 months as part of routine maintenance
■ Whenever internal assemblies are serviced
NOTE
The accuracy of the leakage tests depends
on a properly-wired wall outlet. Do not
proceed until you verify the integrity of the
power source.
WARNING
Total system leakage
current must not
exceed 300
microamperes.
M15287-76A
Table 3-2. Leakage Tests and Maximum Allowable Leakage Currents
Test Maximum Current (
1 Ground-wire-leakage-to-ground 300
2 Chassis-leakage-to-ground 300
3 Patient-cable-leakage-to-ground 10
4 Patient-cable-leakage-into-patient-leads-from-120 V ac 20
µA)
Leakage Test Diagrams
These diagrams show only a representation of how a typical leakage
current tester functions. Follow the instructions provided with the
leakage current tester that you use.
MAC 5000 resting ECG analysis system
2000657-074
Revision B3-16
Page 43

Maintenance: Domestic Electrical Safety Tests
N
).
N
).
Line
eutral
Gnd
Test #1
Tester
power
cord
Test #2
Ground-wire-leakage-to-ground
“To be tested” power connector on back of
tester (may not be labeled on some testers
Tester
connectors
Meter
Polarity
Norm
Rvs
Neutral
1K
V
Line
Gnd
UUT
power
cord
Chassis-leakage-to-ground
Apply line voltage to the UUT chassis for this test.
Unit
under
test
(UUT)
M13052-01E
“To be tested” power connector on back of
tester (may not be labeled on some testers
Tester
power
Line
eutral
Gnd
cord
Tester
Meter
connectors
Polarity
Norm
Rvs
Neutral
1K
V
Line
Gnd
UUT
power
cord
Probe to
exposed chassis
Unit
under
test
(UUT)
M13052-02E
Revision B 3-17
MAC 5000 resting ECG analysis system
2000657-074
Page 44

Maintenance: Domestic Electrical Safety Tests
N
).
N
).
Line
eutral
Gnd
Test #3
Tester
power
cord
Test #4
Patient-cable-leakage-to-ground
“To be tested” power connector on back of
tester (may not be labeled on some testers
Tester
connectors
Meter
Polarity
Norm
Rvs
Line
Neutral
Gnd
1K
V
Patient
cable connectors
UUT
power
cord
Patient cable
Unit
under
test
(UUT)
Patient-cable-leakage-into-patient Leads-from 120 VAC
During this test, line voltage is applied to the patient cable connectors.
To prevent erroneous readings, do not allow the leadwires to contact
conductive materials such as metal handles, and do not place the
leadwires on the floor.
M13052-03E
“To be tested” power connector on back of
tester (may not be labeled on some testers
Tester
power
Line
eutral
Gnd
cord
Tester
Meter
connectors
Polarity
Norm
Rvs
Line
Neutral
Gnd
1K
V
Patient
cable connectors
UUT
power
cord
Patient cable
Unit
under
test
(UUT)
M13052-04E
MAC 5000 resting ECG analysis system
2000657-074
Revision B3-18
Page 45

Maintenance: Domestic Electrical Safety Tests
Ground Continuity
This test verifies that there is continuity (less than 100 mΩ resistance)
between all the exposed metal surfaces, which have the potential to
become energized, and the ground prong on the mains AC power cord.
If the metal surfaces are anodized or painted, scrape off a small area in
an inconspicuous area for the probe to make contact with the metal.
■ Use a digital multimeter to check ground continuity from the AC
line cord ground pin to exposed metal surfaces. (i.e. rear panel
ground lug, ANA/TTL, and EXT. VID.)
■ If the measurements are significantly out of range, check for
breaks in the power cord or in the internal connections within
the unit.
Revision B 3-19
MAC 5000 resting ECG analysis system
2000657-074
Page 46

Maintenance: Domestic Electrical Safety Tests
For your notes.
MAC 5000 resting ECG analysis system
2000657-074
Revision B3-20
Page 47

4 Troubleshooting
Revision B
MAC 5000 resting ECG analysis system
2000657-074
4-1
Page 48

4-2
MAC 5000 resting ECG analysis system
2000657-074
Revision B
Page 49

Assembly Descriptions
Backlight
Troubleshooting: Assembly Descriptions
Introduction
Assembly Block Diagram
The troubleshooting information in this chapter helps you narrow
service problems to one of the replaceable assemblies. These
assemblies, illustrated in the block diagram, are discussed in more
detail in the individual assembly chapters along with replacement
procedures.
Isolation B ar rier
Patient
.
.
Acquisition
.
Module
Display
A (PS2)
Keyboard
Floppy
CPU Board
ROM
Analog I/O
com1
com2
Video Out
IR
Power
Supply
Equipotential
AC
inlet
Battery Pack
Speaker
Writer
Thermal Printhead
Motor
Cue Sensor
MD1322-014
Revision B 4-3
MAC 5000 resting ECG analysis system
2000657-074
Page 50

Troubleshooting: General Fault Isolation
General Fault Isolation
Visual Inspection
A thorough visual inspection of the equipment can save time. Small
things—disconnected cables, foreign debris on circuit boards, missing
hardware, loose components—can frequently cause symptoms and
equipment failures that may appear to be unrelated and difficult to
track.
Take the time to make all the recommended visual checks before
starting any detailed troubleshooting procedures
Table 4-3. Visual Inspection List
Area Look for the following problems
I/O Connectors and Cables
■ Fraying or other damage
■ Bent prongs or pins
■ Cracked housing
■ Loose screws in plugs
Fuses ■ Type and rating. Replace as necessary.
Interface Cables
■ Excessive tension or wear
■ Loose connection
■ Strain reliefs out of place
Circuit Boards ■ Moisture, dust, or debris (top and bottom)
■ Loose or missing components
■ Burn damage or smell of over-heated components
■ Socketed components not firmly seated
■ PCB not seated properly in edge connectors
■ Solder problems: cracks, splashes on board, incomplete feedthrough, prior modifications
or repairs
7
Ground Wires/Wiring
■ Loose wires or ground strap connections
■ Faulty wiring
■ Wires pinched or in vulnerable position
MD1322-007
Mounting Hardware ■ Loose or missing screws or other hardware, especially fasteners used as connections to
ground panes on PCBs
Power Source
■ Faulty wiring, especially AC outlet
■ Circuit not dedicated to system
(Power source problems can cause static discharge, resetting problems, and noise.)
Power-up Self-test
On power-up, the system automatically runs an internal self-test. If all
7
circuits test good, the start up screen displays.
MD1322-007
MAC 5000 resting ECG analysis system
Revision B4-4
2000657-074
Page 51

Power-up Flow Chart
Troubleshooting: General Fault Isolation
MD1322-010
Poor Quality ECGs
MD1322-009
MD1322-017B
Poor quality ECGs can be caused by factors in the environment,
inadequate patient preparation, hardware failures related to the
acquisition module, leadwires, cables, or problems in the unit.
Use a simulator to obtain an ECG report. If the report is good, the
problem is external to the unit.
Revision B 4-5
MAC 5000 resting ECG analysis system
2000657-074
Page 52

Troubleshooting: Diagnostic Tests
Diagnostic Tests
Introduction
Loading the System
Diagnostics
Verify that the MAC 5000 resting ECG analysis system operates properly
by running the diagnostic tests. These tests check the operation of the
display screen, speaker, keyboard, thermal writer, battery, and
communication. Detailed information displays on screen.
1. Select Main Menu on the Resting screen.
2. Select More.
3. Select System Setup.
4. At the prompt type the word “system”, the password set at the
factory, then press the enter key. If the password was not
changed, the System Setup menu appears. If the menu does not
appear, use the master password. If the system’s unique
password is inaccessible, create one following the instructions
in “Substitute Master Password” later in this section.
5. When the System Setup menu displays, hold down shift and
press F5 (shift + F5).
6. Type “prod” at the service password prompt.
7. The System Diagnostics menu appears.
Substitute Master Password
If you do not have access to the system’s password, you can create a
master password as follows.
1. At the prompt for the system password, enter meimac. A
random 6-digit number displays on the screen. For example,
876743.
2. Write the number down and create a new 6-digit number by
adding alternating digits from the random number as follows.
Add:
◆ first and third digits,
◆ second and fourth digits,
◆ third and fifth digits,
◆ fourth and sixth digits,
◆ fifth and first digits, and
◆ sixth and second digits.
Disregard the 10s column when adding the digits. The new
number from the example above would be 440020.
3. Enter the new number, then press the enter key. The System
Setup menu displays.
MAC 5000 resting ECG analysis system
2000657-074
Revision B4-6
Page 53

Troubleshooting: Diagnostic Tests
This process only works once, so you should reprogram the
password permanently.
4. Go to the Basic System menu.
5. Select Miscellaneous Setup.
6. Select the System password line and type the new password in
the space.
7. Press the enter key.
8. Select Save Setup from the System Setup menu.
9. Select To system.
System Diagnostics
Main Menu
Display Tests
Use the arrow pad control to highlight a menu item, then press the enter
key to select it. The tests and test menus contain on-line prompts and/
or instructions.
■ Display Tests
■ Speaker Test
■ Keyboard Test
■ Writer Tests
■ Battery Tests
■ Communication Tests
■ Acq. Module Tests
■ Analog I/O Tests
■ Floppy Drive Tests
■ Exit System Diagnostics (reboots the system)
Run the screen display tests to verify that all the screen pixels are
working and that the brightness and contrast samples appear to be
within normal range. There are no screen display adjustments. The
screen display tests are as follows.
Pixel Verification Test
Grey Scale Test Patterns
Revision B 4-7
Use the arrow pad control to move the bar across the screen and look for
any missing pixels on the display.
Press the F1 key to turn on all of the pixels simultaneously.
Press the enter key to exit the test.
The first test pattern (used in manufacturing to verify the screen
intensity) shows two squares, one bright and one dim. Press any key to
activate the next display.
The second test pattern shows 32 color levels. Check for problems with
the overall pattern. (If the system does not have the color option, various
grey scale patterns display.)
Press the enter key to exit the test.
MAC 5000 resting ECG analysis system
2000657-074
Page 54

Troubleshooting: Diagnostic Tests
Anti-Aliasing Test Pattern
Speaker Test
Keyboard Test
This test pattern consists of a large square with a series of lines
projecting from the center of the square to the perimeter of the square.
Specifications not currently defined.
Press the enter key to exit the test. Highlight Return and press the enter
key to return to the System Diagnostics menu.
Use the arrow pad to select Loud or Soft. Press the enter key to produce a
loud or soft tone. (The tone level difference is minimal.)
Highlight Return and press the enter key to return to the System
Diagnostics menu.
Press each key and verify that the key is highlighted on the screen and
also displayed at the top of the screen. (It is normal for a dim
background image to remain on the screen when you select the next
key.) The numeric value that displays at the top of the screen is the scan
code representation of the pressed key.
NOTE
PS2 Port Test
The display shows keys in the upper part of
the screen that are not presently available on
the keyboard.
■ Check both of the shift keys by pressing each in combination
with a letter to display a capital letter.
■ Press the center of arrow pad control and verify that the word IN
displays on screen. Press arrows to change the displayed arrow
position. A beep sounds with each arrow press.
■ Press the shift key and the F6 key to exit the test.
Use the following steps to complete the PS2 Port Test:
1. Turn OFF the mains power switch on the MAC 5000.
2. Connect a PS2 style keyboard to the PS2 port.
(See Table 2-1.)
3. Turn ON the Mains power switch on the MAC 5000.
4. Follow the required Diagnostic Test procedure.
(Characters typed on the PS2 keyboard will be displayed on the
MAC 5000 Keyboard Test screen if the PS2 port is working.)
MAC 5000 resting ECG analysis system
2000657-074
Revision B4-8
Page 55

Troubleshooting: Diagnostic Tests
Writer Tests
C-Scan Test 1 C-Scan Test 2 C-Scan Test 3
50 mm/s Test Pattern I
25 mm/s Test Pattern I
5 mm/s Test Pattern I
Run the writer tests to check the motor speed control, paper speed,
paper tracking, paper cueing, and print head quality. During the tests,
make the following general checks.
■ The first character printed should not be distorted. This checks
start-up speed.
■ The writer should not skew or crush either edge of the paper.
■ The large triangles and diagonal lines printed across the pages
should be straight and uniform, without curves or wavering.
■ The perfs should align with the tear bar on the door after cueing.
■ Paper travel should be smooth.
These tests are combinations of test pattern I and the roller test. They
are used by the vendor.
These test patterns check the motor speed control and the paper speed.
Verify that the length of the printout from start to finish is 250 mm ±
5 mm. Use the grids located on the top and bottom of the page for
reference. Do this for each of the three tests.
MD1322-012
Revision B 4-9
MAC 5000 resting ECG analysis system
2000657-074
Page 56

Troubleshooting: Diagnostic Tests
Roller Test
(Uneven darkness can appear if AC power is on during this test.)
■ After cueing, printing should start at approximately 13–14 mm
on the page.
■ The pattern appears as diagonal light and dark wavy bands.
Test Pattern II
Test Pattern II Continuous
Continuously Run Out Paper
Battery Tests
Battery Status
MD1322-013
◆ Isolated light spots indicate a flat spot on the roller.
◆ A white line across the length of the page indicates a missing
print head dot.
◆ Dark lines across the width of the page indicate gear
tolerance problems.
◆ Lines too close together at the start of the test indicate an
incorrect start-up speed.
A combination of Test Pattern I and Roller tests. The first three pages
consist of a series of triangular waveforms and various hashmarks. The
fourth page is a partial roller test.
Test Pattern II runs continuously until stop is pressed.
This test is used in manufacturing to test how well the unit self-corrects
tracking problems.
Displays, and constantly updates, the following information:
■ Percent of charge remaining
■ Battery voltage
MAC 5000 resting ECG analysis system
2000657-074
Revision B4-10
Page 57

Troubleshooting: Diagnostic Tests
■ Battery current
■ Battery temperature
■ Maximum and minimum battery temperature
■ Ambient temperature
■ Maximum and minimum ambient temperature
■ Current battery charging status
Battery Discharge Test
Battery Charge Test
Print Discharge Test Results
Print Charge Test Results
This test charges the battery to full capacity, if necessary, then monitors
a discharge cycle. Monitored information, written to the floppy disk,
includes:
■ Discharge rate (in mAH)
■ Battery temperature
■ Battery charge status
■ Percent of charge remaining
This test completely discharges the battery, if necessary, then monitors
a charge cycle. Monitored information, written to the floppy disk,
includes:
■ Charge rate (in mAH)
■ Battery temperature
■ Battery charge status
■ Percent of charge
Writes the results of the last discharge or charge test to a floppy disk for
later printing to the writer.
Communication Tests
COM Port Loopback Test
Revision B 4-11
The Communications Port Loopback Test sends various ASCII characters
out the COM port’s transmit lines and expects the same character to
return in it’s receive lines.
While the test is in process, the word Testing appears in the upper right
corner of the screen. Upon completion, the word Passed or Failed
appears, depending on the results.
For each of the options listed (COM1, COM2, COM3, and COM4)
perform the following steps,
1. Select an option and press the enter key.
2. Follow the instructions on screen and install loopback jumpers
in the selected serial port.
3. Remove the loopback jumpers when the test is complete.
MAC 5000 resting ECG analysis system
2000657-074
Page 58

Troubleshooting: Diagnostic Tests
Modem Test
Acq. Module Tests
Analog I/O Tests
Analog Output Test
Connect a modem to COM 2 and select the test. The test returns the
modem ID number, firmware rev, and current parameter settings. If
communication with the modem is unsuccessful, the ID and firmware
rev display N/A.
Follow the instructions on screen.
■ Tests if the front end is powered
■ Tests if the front end is communicating
■ Displays the front end noise floor
■ Indicates when one of the three front end buttons is pressed
Follow the instructions on screen to monitor the analog outputs using
an oscilloscope. The outputs monitored are:
◆ +12V
◆ DC Output 1
◆ DC Output 2
◆ ECG Output
Analog Input Test
DCOut Loopback Test
ECGOut/QRSTrigger Loopback
Test
Floppy Drive Tests
◆ TTL Trigger Output
Four sets of outputs are possible. Select the output sets using the arrow
pad.
Follow the instructions on screen to connect a DC voltage to the DC
input pins of the ANA/TTL connector. The voltage of the DC input
displays.
Follow the instructions on screen to connect the DC Outputs to the DC
Inputs. The test sends all possible values out the DC Outputs and
confirms that the correct values are read from the DC Inputs. A pass/fail
result displays.
Follow the instructions on screen to connect the ECG Output and TTL
Trigger Output to the DC Inputs. The test sends all possible values out
the ECG Output and a square wave out the TTL Trigger Output. It
confirms that the correct values are read from the DC Inputs. A pass/fail
result displays.
Follow the instructions on screen. A read/write test is performed on a
formatted floppy disk. A pass/fail test result displays.
A head radial alignment and Azimuth alignment test is performed using
an Accurite test disk (pn displayed on screen). Alignment test values will
be displayed. This test and the resultant values are for manufacturing
use only.
MAC 5000 resting ECG analysis system
2000657-074
Revision B4-12
Page 59

Troubleshooting: Diagnostic Tests
Diskette Format Failure
Unformatted diskettes may cause the message “Please insert a data
diskette” to appear and not allow the MAC 5000 to force a format.
Remove the diskette from the MAC 5000 and format the diskette on a pc.
After formatting, try it on the MAC 5000 again. If it fails again, replace
the diskette and repeat the procedure.
Revision B 4-13
MAC 5000 resting ECG analysis system
2000657-074
Page 60

Troubleshooting: Input and Output Connectors
Input and Output Connectors
The following pages detail the input/output signals for those
connectors. The pin-by-pin descriptions identify the signal names and
pin outs for each connector on the unit.
A Pins (J1)
COM1 (COM3/4) Pins
(J3)
Table 4-1. A (J1)
Pin Name
1Data
2 NC
3Ground
4 +5V
5Clock
6 NC
Table 4-2. COM1 (J3)
Pin COM1 Signal COM3/4 Signal
1RTS COM3 TxD
2 CTS COM3 RxD
3TxD
4 Ground
5RxD
6 DTR COM4 TxD
7+12V
8 DSR COM4 RxD
1
5
3
MD1322-008
6
4
3
1
6
4
2
8
5
2
COM2 Pins (J5)
Table 4-3. COM2 (J5)
Pin Name
1RTS
2 CTS
3TxD
4 Ground
5RxD
6 DTR
7+12V
8 DSR
MAC 5000 resting ECG analysis system
2000657-074
8
5
2
6
4
3
1
Revision B4-14
Page 61

Troubleshooting: Input and Output Connectors
ANALOG Pins (J6)
EXT. VID. Pins (J7)
Table 4-4. Acquisition Module Connector (J6)
Pin Name
1+12V
2 DC Output 1
3 TTL Trigger Output
4 Ground
5Ground
6 DC Output 2
7 DC Input 1
8 ECG Output
9 DC Input 2
Table 4-5. External VGA Video (J7)
Pin Name
1Red Video
2 Green Video
3Blue Video
4 Ground
5Ground
6 Ground
7Ground
8 Ground
9NC
10 Ground
11 Ground
12 NC
13 Horizontal Sync
14 Vertical Sync
15 NC
5
9
5
10
15
1
6
1
6
11
Revision B 4-15
MAC 5000 resting ECG analysis system
2000657-074
Page 62

Troubleshooting: CPU PCB Input/Output Signals
CPU PCB Input/Output Signals
Battery Pack/Monitor
(J2)
LCD Backlight (J4)
Pin No. Signal
1 18V Battery Power
2 18V Battery Power
3 Battery Temperature Sense
4 3V Temperature Sense Power
5 Battery Ground
6 Battery Ground
Pin No. Signal
1 12V Power
212V Power
3 12V Power
4Ground
5 Ground
6 Brightness Select
7 Backlight Enable
8NC
9 Ground
10 Ground
MAC 5000 resting ECG analysis system
2000657-074
Revision B4-16
Page 63

Keyboard (J8)
Troubleshooting: CPU PCB Input/Output Signals
Pin No. Signal
1 NC
2NC
3 NC
4NC
5 NC
6 Sense4
7 Sense2
8 Sense1
9 Sense0
10 Sense3
11 Sense5
12 Sense6
13 Sense7
14 Drive0
15 Drive1
16 Drive2
17 Drive3
18 Drive4
19 Ground
20 Power Key
21 Drive5
22 Drive6
23 Drive7
24 Drive8
25 Drive9
26 Drive10
Revision B 4-17
MAC 5000 resting ECG analysis system
2000657-074
Page 64

Troubleshooting: CPU PCB Input/Output Signals
LCD (J10)
Pin No. Signal
1 Ground
2 Pixel Clock
3 Hsync
4 Vsync
5 Ground
6R0 (LSB)
7 R1
8R2
9 R3
10 R4
11 R5 (MSB)
12 Ground
13 G0 (LSB)
14 G1
15 G2
16 G3
17 G4
18 G5 (MSB)
19 Ground
20 B0 (LSB)
21 B1
22 B2
23 B3
24 B4
25 B5 (MSB)
26 Ground
27 Data Enable
28 3V Power
29 3V Power
30 NC
31 NC
MAC 5000 resting ECG analysis system
2000657-074
Revision B4-18
Page 65

Troubleshooting: CPU PCB Input/Output Signals
Power Supply/Motor
(J11)
Pin No. Signal
1 Motor Encoder B
2 5V Power
3 Motor A
4 Motor Encoder A
5 Ground
6Motor B
7 NC
828V Power
9 Ground
10 Battery Charge LED
11 28V Power
12 Ground
13 Door Open Detect
14 Ground
Revision B 4-19
MAC 5000 resting ECG analysis system
2000657-074
Page 66

Troubleshooting: CPU PCB Input/Output Signals
Thermal Printer (J12)
Pin No. Signal
1 Thermal Printer Power
2 Thermal Printer Power
3 Thermal Printer Power
4 Thermal Printer Power
5 Thermal Printer Power
6 Thermal Printer Power
7 Thermal Printer Power
8Ground
9 Ground
10 Ground
11 Ground
12 Ground
13 Ground
14 Ground
15 Cue Sense
16 NC
17 5V Main Power
18 Ground
19 Data Strobe
20 Data Strobe
21 Data Strobe
22 Data Strobe
23 Data Load
24 Data Clock
25 Print Head Temperature
26 Pixel Data
MAC 5000 resting ECG analysis system
2000657-074
Revision B4-20
Page 67

Floppy Disk Drive (J13)
Troubleshooting: CPU PCB Input/Output Signals
Pin No. Signal
1 5V Power
2Index
3 5V Power
4 Drive Select 0
5 5V Power
6 Disk Change
7 NC
8 Media Sense 0
9 Media Sense 1
10 Motor Select 0
11 NC
12 Direction
13 NC
14 Step
15 Ground
16 Write Data
17 Ground
18 Write Gate
19 Ground
20 Track 0
21 Ground
22 Write Protect
23 Ground
24 Read Data
25 Ground
26 Head Select
Acquisition Module (J14)
Pin No. Signal
1 Power
2Ground
3 TX+ (RS485)
4TX- (RS485)
5 RX+ (RS485)
6 RX- (RS485)
7 NC
8NC
9 NC
10 NC
Revision B 4-21
MAC 5000 resting ECG analysis system
2000657-074
Page 68

Troubleshooting: CPU PCB Input/Output Signals
For your notes.
MAC 5000 resting ECG analysis system
2000657-074
Revision B4-22
Page 69

5 CPU Theory of Operation
Revision B
MAC 5000 resting ECG analysis system
2000657-074
5-1
Page 70

5-2
MAC 5000 resting ECG analysis system
2000657-074
Revision B
Page 71

General Description
CPU Theory of Operation: General Description
The MAC 5000 CPU PCB contains all of the circuitry for the MAC 5000
resting ECG analysis system except for the power supply, acquisition
module, keyboard and display.
The board contains the following:
■ Clock 24 Mhz for FPGA
■ SDRAM (holds both code and data) also acts as video frame
memory
■ SmartMedia Flash (holds FPGA configuration and system code)
■ CRT video DACs
■ External 12 Volt Power Switch
■ Acquisition Module Transceiver / Power Switch
■ Printhead Power Switches and Pixel Test Circuit
■ Switch Mode Power Supplies
◆ 3.3 Volt for Logic, LCD
◆ 5 Volt for Logic, Printer, Floppy Drive
◆ 12 Volt for LCD backlight, External Com Port Power
◆ Battery Charger
◆ -12 Charge Pump for Analog Circuits
■ Linear Power Supplies
◆ 1.8 Volt (SA-1110 Core)
◆ 2.5 Volt (FPGA Core)
◆ 2.5 Volt Reference
◆ 3.3 Volt for System Supervisor (Moe Stooge)
◆ 12 Volt for Analog Circuits
■ Crystals
◆ 32 Khz Real Time Clock
◆ 32 Khz (SA-1110)
◆ 3.6864 Mhz (SA-1110)
◆ 4 Mhz (4 devices, 1 for each Stooge)
Revision B 5-3
MAC 5000 resting ECG analysis system
2000657-074
Page 72

CPU Theory of Operation: General Description
■ StrongARM CPU (SA-1110) Containing:
◆ 32 bit StrongARM RISC processor core 2.1 MIPS
◆ SDRAM Controller
◆ MMU (Memory Management Unit)
◆ LCD Controller
◆ Parallel I/O Ports
◆ UARTs
■ FPGA Containing:
◆ StrongARM Boot ROM emulation
◆ XBus Controller
◆ Video Waveform Scroller
◆ Interrupt Controller
◆ System Interrupt Generator
◆ Acquisition Module Interface
◆ Thermal Printhead Interface
◆ Serial EEPROM Interface
◆ BBus Controller
◆ Four PWM Analog Outputs
◆ Beep Generator
■ A PC Super I/O controller containing:
◆ A Floppy Disc Drive Controller
◆ Two Serial Ports (one dual mode RS-232 / IrDA)
◆ Clock/Calendar (Y2K compliant)
◆ PS-2 Keyboard Port (for card and bar-code readers)
■ Four Peripheral Microcontrollers (The Four Stooges):
◆ Bootstrap Control (Curly)
◆ System Supervisor / Battery Charger-Gauge (Moe)
◆ Printer Motor Controller / Analog Input (Larry)
◆ Keyboard Interface (Shemp)
MAC 5000 resting ECG analysis system
2000657-074
Revision B5-4
Page 73

For your notes.
CPU Theory of Operation: General Description
Revision B 5-5
MAC 5000 resting ECG analysis system
2000657-074
Page 74

CPU Theory of Operation: General Description
Block Diagram
SA-1110
S
TRONGARM
CPU
TRONGARM Address Bus
S
FPGA
(Sh1)
SDRAM
Controller
LCD
Controller
10
12
16 MEG
SDRAM
(Sh1)
Boot
Memory
BBUS
I/F
Analog
Audio
Acq Module
I/F
TPH I/F
EEPROM I/F
VLB Bus I/F
Serial
Ports
S
TRONGARM Data Bus
MAC 5000 resting ECG analysis system
2000657-074
XBus
Controller
"Curly"
68HC705
(Sh2)
MD1322-011L
14
Revision B5-6
Page 75

CPU Theory of Operation: General Description
To Super I/O
3
4
D/A
(Sh6)
Speaker
Driver
(Sh9)
MNX490
(Sh9)
Controllers
68HC705
1
1
1
"Larry"
(Sh7)
"Shemp"
(Sh16)
"Moe"
System
Supervisor
(Sh12)
Analog I/O
AM-110/114
Sh7
Drive
Sense
Motor
Keyboard
Top Up
Power Suppy Enable
On/Off Key
System Reset
AC Power
Ambient T emper ature
Change Control
Battery E Sense
Battery I Sense
Battery T emperature
16K
Serial/Memory
(Sh15)
4
QP2,3,4,5
(Sh4)
X Bus
SmartMedia
Card
(Sh2)
22
Printhead
LCD
Remote
Video
From
S
TRONGARM Address Bus
CPU/IDE
FDC
COM 1
COM 2
GP I/O
RTC
Super I/O
Peripheral Controller
14
TX,RX
MAX213
(Sh14)
TX,RX
Floppy
Drive
COM
Also contains
COM 3 & 4
MAX213
(Sh14)
1
COM
2
MD1322-011R
Revision B 5-7
MAC 5000 resting ECG analysis system
2000657-074
Page 76

CPU Theory of Operation: Theory of Operation
Theory of Operation
Power Supplies
+3V-C
+3V-M
+3V-EMI
The MAC-5000 requires several regulated voltages for operation of its
various components. The Main Regulator provides most of the supply
rails. The supply rails are:
MAC-5000 is never truly "off". The system supervisor microcontroller
(MOE) must constantly monitor the power key and perform battery
charging/gauging. The clock/calendar in the Super I/O chip must also
maintain time/date when the machine is off. These functions are
powered from the +3V-C rail, which provides power continuously from
the battery pack regardless of the state of the rest of the system. The
Main Regulator produces +3V-C directly from the battery rail via an
internal low current linear regulator. Only 5mA are available from +3VC, so it must be used sparingly.
NOTE: The MAX782’s low current regulator is dreadfully inefficient.
Regulator Q current appears to be about 3x the load current. This makes
conservation of load on +3V-C crucial.
Most of the MAC-5000 hardware runs from +3V-M. The MAX782
provides this rail from the battery via a PWM synchronous switching
regulator. Moe controls +3V-M in tandem with +5V-M.
This is simply an RF blocked feed from +3V-M. +3V-M load is contained
within the CPU board. Power for devices for external functions is
supplied by +3V-EMI. The isolation of +3V-EMI from +3V-M may be
unnecessary as the concept has never been tested for its effect.
+5V-M
+5V-EMI
+18V
The MAC-5000 is not fully in the 3V age. The Super I/O, floppy diskette
drive and thermal printhead all require 5V power. The MAX782 provides
this rail via another PWM synchronous switching regulator. Moe
controls +5V-M in tandem with +3V-M.
Similar to +3V-EMI, this rail is an RF blocked feed from +5V-M, used to
power devices for external functions. The isolation of +5V-EMI from
+5V-M may be unnecessary as the concept has never been tested for its
effect.
The Main Regulator’s 5V switching output also supports generation of a
non-regulated 18V rail, which is used to provide power for the
acquisition module. By providing the acquisition module with 11.5V
linearly regulated power from the +18V rail of the main regulator rather
than the main 12V regulator (U13), acquisition is not affected by
excessive current draw from the printer motor or external loads on the
COM ports (esp. KISS pump). The acquisition module’s power
requirements are modest, so efficiency is not a pressing concern and the
lower efficiency of this approach is acceptable.
MAC 5000 resting ECG analysis system
2000657-074
Revision B5-8
Page 77

CPU Theory of Operation: Theory of Operation
VCore
+2.5V
+12V
REF2V5
The StrongARM CPU operates its internal core logic at 1.8V, while its I/O
ring runs at the system standard 3.3V. The Core Regulator, a low
dropout linear regulator, drops +3V-M to 1.8V for use by the StrongARM.
The FPGA (Xilinx Spartan 2) operates its internal core logic at 2.5V, while
its I/O ring runs at the system standard 3.3V. The +2.5V Regulator, a low
dropout linear regulator, drops +3V-M to 2.5V for use by the FPGA.
The paper motor drive circuit, LCD backlight and external COM ports all
require 12V. The Main Regulator’s 18V output cannot provide sufficient
current for all of the systems 12V loads, so a secondary 12V regulator is
required. The Main 12V Regulator (U13), a switching buck regulator,
provides the higher currents needed by these loads. A P-channel
MOSFET (Q4) switch precedes the regulator to provide on/off control.
Gate capacitor C54 slows the turn on/off time of the MOSFET switch to
eliminate switching transients. The voltage divider created by R33,34
prevents the full supply rail from being impressed across Q4’s gate when
on. This protection is necessary, as the maximum Vgs of the MOSFET is
less than the peak supply voltage.
The high power rails are neither precise nor quiet enough to be used as
the reference for analog input/output or internal measurement circuits.
The Analog Reference Regulator (U35), a 2.5V shunt regulator provides a
quiet and stable reference voltage for such purposes. VREF is derived
from +5V-EMI rather than +3V-EMI to minimize the change in reference
current with changes in input rail voltage. The difference between 5V
and 2.5V is three times greater than the difference between 3.3V and
2.5V. If the absolute ripple on both supplies is the same, the modulation
of reference current will be 3 times less if power is derived from +5V.
VAna+, VAna-
The analog output circuitry is powered by a low current switched 12V
rail, provided by the Main Regulator. VAna+ provides the positive
supply for the output op-amps. A charge pump voltage inverter is
provided to produce an approximate -11V rail for the op-amps.
Although only the ECG output is bipolar, all output amplifiers are driven
from VAna-. A short circuit on either of the unipolar DC outputs could
load VAna- sufficiently to affect the negative peak swing of the ECG
output. The ECG and DC outputs are not required to operate correctly
in the presence of abnormal loads.
Revision B 5-9
MAC 5000 resting ECG analysis system
2000657-074
Page 78

CPU Theory of Operation: Theory of Operation
Clocks
Super I/O and FPGA
CPU (StrongARM) / LCD
Controller
CPU (Stooges)
RTC
Both of these devices uses the 24 Mhz clock oscillator Y3 to drive their
internal requirements for various clock frequencies. The main function
of the Super I/O IC is the floppy drive interface and all the needed
timing comes from this oscillator. The FPGA provides many functions
including the acquisition interface, the printer interface, and the
Stooges interface (Bbus) to name a few. The FPGA uses a built-in
frequency doubler to raise this 24 Mhz clock to 48 Mhz for internal use,
all other needed clock frequencies are derived from this clock.
The StrongARM processor provides its own clock and runs at 206.4 Mhz.
The processor also generates many other clocks for other functions
housed in the same IC. All of these clocks are derived from a built-in
clock synthesizer which uses an external 3.6864 Mhz crystal. The
SDRAM clock runs at 103.2 Mhz. The LCD controller runs at 25.8 Mhz.
And all baud rates required by the internal serial ports are also derived
from the clock synthesizer.
Each of the four Stooges has its own 4 Mhz ceramic resonator for use in
generating their respective clocks.
The Real Time Clock of the system is provided as a part of the Super I/O
controller. The timing for this function is derived from its own 32.768
Khz crystal.
CPU
FPGA Internal Logic
The Intel StrongARM SA-1110 CPU, chosen for its high performance,
low power consumption and high code density, is at the heart of MAC-
5000. The SA-1110 is an advanced processor with many integrated
peripherals (MMU, various caches, SDRAM controller, LCD controller,
serial I/O, parallel I/O to name most but not all).
All of the MAC-5000’s proprietary hardware is contained in a single
Xilinx FPGA that contains:
■ StrongARM Boot ROM emulation
■ XBus Controller
■ Video Waveform Scroller
■ Interrupt Controller
■ System Interrupt Generator
■ Acquisition Module Interface
■ Thermal Printhead Interface
■ Serial EEPROM Interface
■ BBus Interface
■ Four PWM Analog Outputs
■ Beep Generator
MAC 5000 resting ECG analysis system
2000657-074
Revision B5-10
Page 79

CPU Theory of Operation: Theory of Operation
The following descriptions give an overview of the FPGA’s functionality.
For detailed information on the internal circuitry, refer to the
schematic. For a programmer’s eye view of the FPGA, see the source file
"hardware.h". Where appropriate, circuitry external to the FPGA is also
described.
StrongARM Boot ROM Emulation
To improve performance and reduce cost, the MAC-5000 does not
provide Flash execution memory. This makes it necessary to find
another method to start the CPU. Just after the StrongARM SA-1110
processor is released from reset, it starts to fetch instructions from
address 0 of memory enabled by Static Bank Select 0. Normally Bank 0
would be some ROM device that would contain StrongARM code. In this
design, the FPGA provides RAM blocks that are used to emulate the boot
ROM at bank 0. Early in system start-up after the bootstrap
microcontroller (Curly) has configured the FPGA, Curly extracts
instruction bytes from the SmartMedia card and presents them to the
FPGA. Each instruction byte is loaded into the FPGA via the signal
FRDY/BRDY. Curly asserts the SmartMedia FRE* signal while
simultaneously driving the FRDY/BRDY signal to improve the transfer
rate. Curly does not examine the instruction bytes, they are loaded from
the SmartMedia card into the FPGA in a "flyby fashion". This process
continues until all of the Boot Code (tag B2) is loaded into the Boot
emulation RAM (Boot RAM) of the FPGA. A more complete explanation
of the bootstrap process is presented in Curly’s source code.
Although the Boot Code is written into the Boot RAM as byte wide data,
the data as read by the SA-1110 will be as words 32 bits wide. The Boot
RAM is far too small and Curly’s read rate is far too slow to load all
operating code from the card, so only the simple bootstrap program B2
is copied. This program contains code that allows the StrongARM to
access the SmartMedia card directly through the FPGA. Once that initial
bootstrap is loaded, Curly disconnects from the circuit (tri states all
SmartMedia control lines) and releases the StrongARM processor from
reset by removing the ARMRESET* signal. StrongARM execution begins
and the remaining system code is read from the card at high speed.
Curly then lies dormant until the next system start-up.
Board ID Register
Revision B 5-11
It is necessary to identify versions/revisions of the CPU board
automatically in the field. Curly provides a mechanism for identifying
variations of CPU boards that require different start-up code.
Depending on the board code read by Curly, any of up to eight different
FPGA images and start-up code sets may be loaded. The board ID
register contains a hardwired three bit code that tracks the FPGA image
number, indicating to the StrongARM just which FPGA image has been
loaded. Three additional FPGA inputs are reflected in this register to
allow further refinement of the board identity. Resistors (R162 and R178
through R182) are used to program the board ID.
Board ID Code Versions of the 801212 CPU Board assembly
000h -001, -002, and -003
001h -004 (not used) and -005 (this board)
MAC 5000 resting ECG analysis system
2000657-074
Page 80

CPU Theory of Operation: Theory of Operation
XBus Controller
Video Interface
To reduce loading on the high speed processor address and data busses,
a slow speed byte bus is provided for peripheral interface. The Super I/O
controller and SmartMedia card are both located on this bus. Unlike the
3.3V only main data/address busses, XBus is compatible with both 5V
and 3.3V logic. To maintain software compatibility with previous board
versions, the low order address byte is not used by XBus. Starting XBus
addressing with A8 also produces Super I/O addresses that easily map to
their standard PC equivalents (simply append 0x00 to a datasheet Super
I/O address offset to get a MAC-5000 Super I/O address offset).
Video Waveform Scroller
There are numerous ways of achieving a scrolling waveform, none of
which is supported by standard LCD controllers. The MAC-5000
provides scrolling through FPGA hardware placed between the LCD
controller output and the LCD panel input.
To produce the scrolling effect it is necessary to maintain two virtual
image planes, one atop the other. Static (stationary) objects are drawn
in the static plane, which appears nearest the viewer and may be either
opaque or transparent. Dynamic (scrolling) objects are drawn in the
dynamic plane, which appears behind the static plane and is always
opaque, though not necessarily visible. The appearance of motion is
achieved by continuously changing the start point for display of the
dynamic plane from one video frame to the next.
Since the LCD controller does not support multiple image planes, it is
necessary to pack two planes of image data into a single frame buffer.
On the software side (during drawing) this is done by bit masking
operations that allow separate manipulation of two virtual pixels in each
byte of frame buffer memory. Each 8-bit byte holds a pair of pixels, one
from the static plane and one from the dynamic plane.
On the hardware side, part of each frame buffer byte (the static plane) is
played directly into the LCD after suitable color mapping. The
remainder of the byte (the dynamic plane) is stored in a 1 line temporal
buffer before being displayed. The amount of delay applied to the line
buffer before merging it with the static image data determines its
placement on the screen. By gradually changing the delay, the dynamic
image can be made to scroll.
Color Lookup Table (CLUT)
Generally the dynamic plane is filled with waveforms and perhaps a few
characters of text. The static plane often contains text messages, icons,
buttons and graphics. The greater variety of object types displayed in
the static plane demands a wider range of colors. For this reason, each
video data byte is split asymmetrically into five bits of static pixel data
and three bits of dynamic pixel data. This has come to be known as 5.3
format.
The 5.3 format provides a palette of 2^3=8 colors for dynamic objects
and (2^5)-1=31 colors for static objects (1 of the colors is transparent,
MAC 5000 resting ECG analysis system
2000657-074
Revision B5-12
Page 81

CPU Theory of Operation: Theory of Operation
leaving 31 real colors). In practice, to "freeze" dynamic objects in the
static plane requires that the 8 dynamic colors be replicated in the static
color map, leaving only 31-8=23 new colors available for static objects.
The FPGA implements a writable color lookup table (CLUT) to map the
pixel values to sensible colors on the LCD. The CLUT provides 32 - 24bit entries, providing access to the complete color space offered by the
LCD panel. The color mapped LCD data is also fed to three external
discrete 6-bit DAC’s to create analog video for an external CRT.
Blank/Sync
External VGA monitors are supported with two styles of video sync
signal as well as retrace blanking.
Video Sync
The horizontal and vertical sync pulses from the LCD controller are
combined to produce a composite sync signal that is added to the video
signal. The video sync signal may be disabled under software control to
accommodate monitors that do not accept sync on green. The sync
signal is applied to all three video guns to eliminate color shifting in
systems that do not perform blank level video clamping.
Interrupt Controller
TTL Sync
For monitors that do not accept sync on green, TTL logic level
horizontal and vertical sync signals are provided. These may be
enabled/disabled to implement a rudimentary "sleep" operation on
Energy Star compliant monitors.
Blank
Unlike LC displays, CRT’s emit light from more than just their active
display surface. The electron beam is visible even during retrace and
precautions must be taken to ensure that the guns are off in non-active
areas of the display. To ensure black borders on external monitors (and
reset the DC restore clamps in the video output buffers). The CLUT
video passes through a gating register before leaving the FPGA. This
allows the LCD DE (display enable) signal to force the guns to a blanking
level during inactive portions of the display frame.
On previous versions of the CPU board, the StrongARM processor SA110 supported two external interrupts, FIQ (Fast Interrupt Request) and
IRQ (Interrupt ReQuest). The FPGA expanded those inputs to service
numerous sources of interrupts in the FPGA internal logic and Super I/
O. Each interrupt source was routed to either the FIQ or IRQ pin and the
FPGA provided each a writable enable bit and a readable status bit.
The StrongARM processor used in this design, the SA-1110, provides
access to the FIQ and IRQ inputs of the interrupt controller via the GPIO
lines. Although any of the GPIO lines can be used to generate an
interrupt, GPIO lines GP0 and GP1 are reserved for FIQ and IRQ
respectively. These two inputs are attached to the FPGA as in previous
designs and the FPGA interrupt controller function is similar to that of
previous board versions to minimize the impact on software design. For
Revision B 5-13
MAC 5000 resting ECG analysis system
2000657-074
Page 82

CPU Theory of Operation: Theory of Operation
more detail on the operation of the interrupt mask/status registers, see
the source file "hardware.h".
System Interrupt Timer
Acquisition Module Interface
A 1KHz timer generates system interrupts (which may be routed to FIQ
or IRQ) once every millisecond. This interrupt provides the foundation
for all operating system timers.
Overview
The MAC-5000 acquisition module communication protocol is different
from previous generations in several key respects:
1. Acquisition module timing is synchronized to the system
There is no longer a need to play synchronizing games to get the
system (especially the display and printer) operating at the
same sampling rate as the acquisition module.
2. Data is framed and has checksum
Previous acquisition modules offered rudimentary error
detection. This has finally been done nearly right. Each ECG
data packet contains a checksum.
3. Commands do not interrupt the data stream
Previous generation acquisition modules required a cessation of
sampling to transmit commands to the module. This cessation
of sampling had the undesirable effect of breaking the
acquisition stream for operations as simple as changing the line
filter frequency or enabling or disabling the pace pulse detector.
With the MAC-5000 this restriction is removed.
4. Buttons are supported
Button state is communicated to the system in each ECG data
packet. This allows limited operator interaction with the
machine via the acquisition module.
Details
A constant reference clock frequency of 1MHz must be provided to the
acquisition module for generation of its internal sampling clocks. To
eliminate the need for data lines, command information is encoded on
this reference clock by altering its duty cycle. The FPGA provides a
serializer for the command bytes and clock generator/modulator to
transmit both the clock and command bits from the serializer. The
reference clock duty cycle is nominally 50%. By altering the duty cycle,
the DC content of the clock is changed. The acquisition module detects
this change in DC level. The timing of these shifts in DC offset encode
command data bits. A zero is encoded as a single shift in duty cycle from
50% to 25% lasting 31.25µs, followed by a refractory period of 468.8µs. A
one is encoded as a pair of 31.25µs periods of 25% duty cycle separated
by 93.75µs, followed by a 343.8µs refractory period. In either case the
transmission of a single bit takes 500µs. A higher level protocol
organizes commands as groups of 8 bits.
MAC 5000 resting ECG analysis system
2000657-074
Revision B5-14
Page 83

CPU Theory of Operation: Theory of Operation
Data from the acquisition module is packed into 257 bit NRZ frames.
The receive line idle state is high. The first bit of each packet is a zero
and serves as the packet start bit. As with a UART, the start bit is
discarded. The following 256 bits are received into a 16-word x 16-bit
buffer for use by the StrongARM. The receive logic then looks for an idle
period (analogous to a UART stop bit) of at least 125µs in length as an
indicator that the link is again idle. Special marker words are inserted
into the ECG data packet (words 5, 10 and 15) to guarantee there will
never be a run of more than 80 bits of one's (or zeros for that matter), so
there is no possibility of satisfying the idle period requirement in the
middle of a data packet.
Because the acquisition module clock is supplied by the FPGA, receive
timing errors are limited to phase uncertainty. By searching for the
beginning of the start bit in a fashion similar to that used by a UART, the
phase uncertainty is eliminated and the remainder of the packet may be
received without further synchronization. In practice, the FPGA uses
every edge in the receive data stream to re-sync its bit sampling circuit.
It is possible for the ECG data to be all zeros or ones, so runs of as many
as 80 zeros or ones could occur before a marker word is encountered in
the data stream (which contains at least one "1" and one "0" to break
any runs in the data).
Thermal Printhead Interface
The acquisition module supports a special "code update" mode for
rapid reprogramming of its on-board code memory. To increase the
update speed, the acquisition module echoes each uploaded code byte
with a single reply word rather than the usual 16-word data packet. The
FPGA receive logic provides a special 1 word reception mode to
accommodate this.
The StrongARM sends print data to the thermal print head through a
buffered serial interface. The FPGA implements the data buffer,
serializer, strobe/latch pulse generator and power switch gate drive
pump. Special interlocks are implemented to prevent stuck strobe
signals or printing when the battery voltage is critically low.
Each print line requires 1728 bits of data. To conserve FPGA resources,
each line is divided into three chunks of 512 bits each, with one leftover
chunk of 192 bits. The FPGA provides a single 16 word x 32 bit buffer
(512 bits) to hold the print line data. After writing a chunk of data to the
buffer, the StrongARM enables serialization of the data by reading one
of two registers (to support the serialization of either a full 512 bit or
partial 192-bit buffer). When the entire print line has been loaded, the
StrongARM cues a print strobe by writing the required strobe width
value to the strobe/latch pulse generator.
When the strobe register contains a non-zero value, the power switch
gate pump produces a differential clock signal to drive an external diode
voltage doubler (CR21-22, C171-173, R134). The output of the voltage
doubler drives the gate of a power MOSFET (Q9) that provides power to
the print head. R133 provides gate bleed off to ensure that Q9 turns off
when the pump stops. C186 filters the doubler output to DC.
Revision B 5-15
MAC 5000 resting ECG analysis system
2000657-074
Page 84

CPU Theory of Operation: Theory of Operation
A special test mode is provided to allow testing of the thermal print
head. In test mode, print head power is disabled and the strobe signal is
driven continuously. This allows individual print dots to be driven with
a small test current via a current source (Q10, R173, Z2) enabled by a
level shifter (Q11, R174) driven from a StrongARM GPIO line. Half of the
resulting printhead voltage drop (divider R154/155) may be measured to
either determine the dot’s resistance or at least determine if the dot is
open.
Serial EEPROM Interface
BBus Interface
PWM Analog Outputs
A standard four-wire SPI interface is provided for connection to a serial
EEPROM memory (CFGMEM). The StrongARM exchanges a byte of data
with the EEPROM by writing a value to the interface register. Data is
clocked at 4MHz; quickly enough that no interrupt support is required.
The StrongARM polls a ready bit to determine when the transfer is
complete.
There are several I/O functions poorly suited to direct control by the
StrongARM, whether for reasons of software complexity or power
consumption. These I/O functions are provided by three 68HC705
microcontrollers placed strategically around the board (Moe, Larry and
Shemp). Each of these three microcontrollers must communicate with
the StrongARM. BBus is a simple 1-wire point-to-point interface
designed specifically for this purpose. The FPGA provides a single BBus
transceiver and a 3-way bi-directional multiplexer to attach the three
BBus microcontrollers. For more Bbus information see the
microcontroller firmware source files. From the programmer’s
standpoint, BBus operates like SPI, where each transaction exchanges a
single byte between the host and peripheral.
Four PWM channels are provided for the generation of analog outputs.
Three of the outputs are available on the Analog I/O connector; the
fourth is available internally for future use (if any). One of the PWM
channels provides 12-bit resolution at 6KHz cycle rate; the other three
provide 8-bit resolution at 96KHz cycle rate. The StrongARM simply
writes the desired value into a PWM data register and the output duty
cycle changes on the next PWM cycle. External analog circuitry converts
the PWM logic signals to smooth analog voltages. The 12-bit PWM
channel is intended for ECG output and produces a swing of +10 to 10V. The two 8-bit channels provide a unipolar 10V output. Regardless
of the resolution or swing range of each PWM channel, the FPGA treats
the data value as a signed 16-bit number representing a voltage from
+10V (0x7fff) to -10V(0x8000). Logic in each PWM channel ensures that
the closest possible voltage is generated for each data value (ex. 0x8000
on an 8-bit channel produces zero volts output).
The FPGA PWM output signals contain a substantial amount of noise
from +3V-M supply fluctuations. To reduce noise and establish an
accurate reference level, the PWM signals are buffered by CMOS
inverters (U16) that are powered from REF2V5. Although the CMOS
inverters are powered by 2.5 Volts but are driven by 3.3 Volt logic, no
problem exists as this is allowed with VHC logic. The PWM output
signals are then low pass filtered (R79,C104, etc.) before being passed to
the output amplifiers. The ECG output channel amplifier injects an
MAC 5000 resting ECG analysis system
2000657-074
Revision B5-16
Page 85

CPU Theory of Operation: Theory of Operation
offset current derived from REF2V5 to achieve bipolar operation. The
DC outputs operate in unipolar fashion, eliminating the vexing MAX-1
offset problems. No zero calibration is required for the DC outputs.
Since the ECG output is an AC signal, no offset adjust is required there
either.
The output amplifiers provide additional low pass filtering (R71,C89,
etc.). ESD protection and additional PWM carrier filtering is provided by
0.1µF filter capacitors. To prevent amplifier oscillation, blocking
resistors are placed between the amplifier outputs and the filter
capacitors.
Beep Generator
SDRAM
SmartMedia Card
A simple tone generator with two volume levels provides system beeps
and key clicks. Frequencies of 250Hz, 500Hz and 1KHz are provided at
both low and high volume. The logic level output signal drives LS1
through an open collector transistor driver Q1. Full volume is achieved
by driving the fundamental beep tone directly to the speaker. Half
volume is achieved by gating the speaker signal with a 24MHz square
wave, reducing the amplitude by 50%.
Program code and working data is stored in a single 4MWord bank of
32-bit wide memory (16MBytes). This memory is made up of 2 64Mbit
SDRAMs each 16 bits wide. Although the present design uses 64Mbit
devices, 128Mbit and 256Mbit devices may also be used (i.e. the extra
address line has been routed to the devices). All bus timing and refresh
control is performed by the StrongARM processor. The SDRAM clock
rate is ½ that of the StrongARM's CPU clock or 103.2 Mhz. Since the
clock rate is technically higher than 100 Mhz the memory needs to be
PC133 compliant. Although re-programmable via software, the present
design uses memory with CAS3 data timing.
FPGA configuration data and system software are stored on a
SmartMedia card. The system can accommodate sizes from 2MBytes to
16MBytes (probably larger too as those sizes are announced). To reduce
loading on the processor address/data busses, the SmartMedia card is
accessed by the StrongARM via the isolated XBus. Special gating is
provided in the FPGA for the SmartMedia CS pin to reduce susceptibility
to accidental writes.
Serial EEPROM
Revision B 5-17
System setup information, option enables and other machine specific
data is stored in a 16KByte serial EEPROM. The SPI interface to the
EEPROM is provided by the FPGA.
MAC 5000 resting ECG analysis system
2000657-074
Page 86

CPU Theory of Operation: Theory of Operation
VGA LCD/CRT Interface
LCD Panel EMI Reduction
Components
CRT Video DAC / Sync / Buffers
An internal backlit LCD is home for the MAC-5000’s graphical interface.
In addition, external VGA monitors are supported for stress
applications. Control for a standard VGA format (640 x 480 pixels) LC
display is provided by the FPGA. A connector is provided for an external
CCFL backlight inverter as well as two digital controls for On/Off and
brightness. While the FPGA is capable of directly driving the LCD,
external hardware is required to generate the analog video levels
expected by external VGA monitors.
To reduce EMI, 47pF capacitors have been added to all LCD digital lines.
In addition, 49.9
Sync lines.
A triple 6-bit video DAC supports external analog VGA monitors. Only
one DAC/Level Shifter/Buffer will be described, as they are all identical
in function. The video output is referenced to a filtered tap (FB25, C219)
off the +3V-M supply rail and then level shifted back to ground.
Each DAC is comprised of six binary weighted resistors and a seventh
blank/sync signal resistor. The FPGA LCD data outputs sink current
through the 75
resistors. The voltage across the 75
all drive currents. Minor non-linearity is introduced in the DAC transfer
function by the fact that the summing junction varies in voltage with
DAC current.
Ω resistors have been added to the video clock and
Ω load resistor in proportion to their respective DAC
Ω load resistor represents the sum of
Acquisition Module
Transceiver / Power
Switch
The 3.3V referred video is shifted back to ground by a blocking
capacitor. The shifted video signal is buffered (and further shifted) by
emitter followers. Transistors clamp the negative excursions of the
bases of the emitter followers to one diode drop above ground, so the
most negative level at the emitter of the emitter followers is ground.
Nominal full-scale swing is 1VP-P (blank to white).
Bias for the base of the clamp transistors is provided by a 1.4V bias
supply consisting of a stack of two diode connected transistors (QP2).
This 2Vbe bias exactly cancels the 2Vbe shift produced by the level
clamp and output buffer. Since all transistors are of the same type their
Vbe’s track well enough to provide acceptable output offset.
Diode clamps to ground and +3V-EMI provide ESD protection for the
VGA video and sync signals. The +3V-EMI rail is isolated from ESD
transients by FB13.
MAC-5000 acquires ECG data with a new generation CAM acquisition
module. The FPGA provides the interface logic. Clocks and commands
are transmitted to the acquisition module on a balanced RS485 line.
Data is received similarly. Power to the acquisition module is provided
by a software controlled linear regulator.
Transceiver
To reduce EMI and susceptibility to noise, the acquisition module link is
implemented using RS-485 differential signaling. An RS485 interface
MAC 5000 resting ECG analysis system
2000657-074
Revision B5-18
Page 87

CPU Theory of Operation: Theory of Operation
device provides the single ended to differential conversion in both
directions. Ferrite beads, capacitors and resistors are used to reduce
EMI on both sides of the transceiver.
Acquisition Power Regulator /
Switch
COMM Port Power
Switch / Current Limiter
To reduce standby power consumption, acquisition module power is
switchable. To protect the acquisition module from temporary
brownouts on the main 12V supply, power is obtained from a parasitic
winding on the main 5V regulator. This voltage is not well regulated, so a
linear regulator (U14) is used to provide regulation. This regulator also
sports an enable input which is used to disable power to the acquisition
module when not in use. The regulator also has build in current limit
and over temperature shutdown for protection.
Power for external peripherals such as a modem or the KISS vacuum
electrode pump is available on the COMM connectors. Power may be
turned on/off under software control and current limiting is employed
to protect internal operations from excessive external loads. The current
requirements and start-up conditions of the KISS pump require very
high currents. U.L. limits power to external devices to 15 Watts for
reducing the likelihood of fire during overload. The KISS and U.L.
requirements conflict to a degree that a simple current limiter will not
satisfy both needs therefore a special current limiter circuit had to be
devised. Six Sigma project #27118 Mac3000 Com Port Power Circuit
project addressed this issue and is implemented in this design.
Since currents exceed 1 Ampere and the supply is 12 Volts a linear
current regulator is impractical since the pass element would need a
heatsink. The method chosen here was to use a FET (Q5) as a switch (a
switch is either on or off and in both cases dissipates little power). In
normal operation the ENIOPWR signal is driven high by software to
activate the power switch. This signal saturates transistor Q3 which
provides the gate drive for the dual FET Q5. Both P channel FETs of Q5
are used and therefore are connected in parallel. Return current from
the load is sensed by shunt resistor R31 (0.1
opamp U4 is used as a differential amplifier to boost this current sensed
signal. Another stage of U4 is used as an integrator which integrates the
amplifier current limit signal before entering comparator U5. When the
current exceeds the comparator threshold the open drain output of the
comparator is used to remove the gate drive from Q3 which will in turn
switch off the com port power. The function of the integrator is two fold.
First it allows high surge currents to exist for a short time for starting the
KISS pump. Secondly the integrator has a much longer recovery time
due to diode CR6 which effectively changes the integration resistor from
Ω to 1Meg Ω. This long recovery time results in a low duty cycle
100K
when the load is a short circuit. The low duty cycle prevents FET Q5
from overheating when driving a short circuit.
Ω). One stage of the quad
Revision B 5-19
MAC 5000 resting ECG analysis system
2000657-074
Page 88

CPU Theory of Operation: Theory of Operation
Thermal Printhead
Power / Pixel Test
Hardware
Super I/O Peripheral
Controller
The FPGA provides all the interface logic for the thermal print head. A
MOSFET switch controls power. A charge pump voltage doubler driven
by the FPGA provides that switch’s gate drive.
Additional circuitry (currently unsupported) is supplied to allow the
measurement of individual dot resistance for automatic strobe width
compensation and blown dot detection. A switchable constant current
source (6mA) applies a test current to the TPH power bus. Larry then
measures the TPH power bus voltage (one of the four analog inputs he
continuously monitors). By loading a single black dot into the print
head it is possible to measure its resistance. A typical TPH has an
average dot resistance of 65
current, a single enabled dot would drop 3.9V. While there are
mitigating influences (off-pixel driver leakage current and on-pixel
driver saturation voltage) that might make accurate pixel resistance
measurements difficult, it is certainly possible to differentiate pixels of
nominal resistance from those that are blown open.
A PC standard Super I/O peripheral controller provides floppy drive
support, two serial channels (one IrDA compatible), and a clock/
calendar.
0 Ω. Presuming negligible driver leakage
Floppy Drive Support
RS-232 Serial Ports (one dual
mode RS-232 / IrDA)
Clock/Calendar
The Super I/O provides support for a 3.5" 1.44MByte IBM format floppy
diskette drive. The FPGA provides DMA like interrupt support for the
floppy controller. A special chip select supplies the DMA acknowledge
signal that gates data to/from the Super I/O floppy controller via the
XBus. To ensure no data is lost, the floppy DMA request is routed to the
StrongARM’s FIQ input.
Four serial ports are provided on two back panel Mini-DIN 8 pin
connectors. The Super I/O device provides two serial ports (COM1 and
COM2) and two more (COM3 and COM4) are provided by the SA-1110
StrongARM processor. The COM2 serial port and modem handshake
lines are found in the COM2 connector. COM1, COM3, and COM4 serial
ports use pins in the COM1 connector. The COM2 serial port of the
Super I/O device also supports the IrDA interface.
RS-232 level shifting is provided by two transceivers. Each produces the
necessary drive voltages with internal charge pumps. The devices are
rated to withstand ESD onslaught, so no external ESD protection is
provided. The transceivers may be shut down under software control to
conserve power.
The Super I/O device provides a clock /calendar function. Backup
battery power is provided by a "super" capacitor (C98) with sufficient
storage capacity to power the clock for hours after main battery
removal. This backup source provides sufficient time to exchange
battery packs when necessary. Diode CR14 charges C98 when the main
system power is up. R83 limits the charging current to a safe level.
MAC 5000 resting ECG analysis system
2000657-074
Revision B5-20
Page 89

CPU Theory of Operation: Theory of Operation
PS2 Keyboard Port
The Four Stooges
Start-up Self Identification
External card / bar code readers may be connected to the MAC-5000 via
a PS-2 compatible keyboard port. A small amount of 5V power is
available at the connector to power the external device. Power faults are
detectable. EMI and ESD protection are provided.
System management and some low level I/O functions are
implemented in preprogrammed 68HC05 microcontrollers. Moving
some I/O functions out into small processors relieves the StrongARM of
burdensome real-time chores and moves the control hardware closer to
the controlled devices, potentially reducing EMI. Localizing control also
promotes reuse in future designs as the functions are self contained and
reasonably portable.
Although there are four of these little fellows in the MAC-5000, each
performing a different function, there is only one firmware image. By
merging the code from each of the four functions into a single ROM
image, cost and confusion are reduced. It is impossible to place a
processor in the wrong spot on the board and a single pile of paperwork
supports all of the MAC-5000’s 68HC05 production volume. More
detailed information may be found in the source code.
As each controller is released from reset, it executes a common
"WhoAmI" routine to determine its identity on the board. Each
controller’s environment is uniquely and easily identified with a few
port pin tests. Once the identity is discovered, the code jumps to the
appropriate entry point in the unified image and microcontroller
assumes the desired personality.
The flow for the "WhoAmI" routine is as follows:
■ Run ChkMoe: Basically if the BBus (PD5) is low we are Moe.
Since Moe controls the power supply for +3V-M which is off at
the moment, the BBus pull-up resistors will actually pull the
BBus lines low. This can only occur with Moe since all other
Stooges are powered by +3V-M, Moe is powered by +3V-C
instead.
■ Run ChkCurly: First drive the BBus (PD5) low, if the IRQ line
stays high we are Curly. Curly is the only Stooge that does not
use the BBus and the connection from BBus (PD5) to the IRQ
line is not necessary. Curly’s IRQ pin is tied to +3V-M and is
therefore always high.
■ Run ChkShemp: If bit 4 of Port A is high, we are Shemp. At this
point we are either Shemp or Larry. Shemp has pull-up resistors
on Port A so bit 4 should be high. Larry on the other hand has
uses Port A to drive a makeshift DAC. Since Port A is not being
driven at the moment, bit 4 will be pulled to low via the
common DAC resistor R136 which is grounded.
■ We must be Larry. At this point we have eliminated all other
Stooges.
Revision B 5-21
MAC 5000 resting ECG analysis system
2000657-074
Page 90

CPU Theory of Operation: Theory of Operation
BBus
Curly
Three of the four stooges (Moe, Larry and Shemp) communicate with
the StrongARM via BBus connections. BBus is a single wire, half-duplex
serial connection that places minimal hardware requirements on the
microcontroller while yielding respectable bit transfer rates (~50KBps).
A common set of BBus commands allow the StrongARM to access 128
bytes of RAM in each microcontroller. This dual port access allows the
StrongARM to examine and modify internal variables in each controller
while code is executing. This ability is used to allow the unalterable
HC05 code to handle modest changes in hardware, such as changes in
paper drive gearing or battery pack capacity.
Curly is responsible for configuring the FPGA and loading the first level
bootstrap program into the Boot ROM emulated by the FPGA (see
previous section titled ’StrongARM Boot ROM Emulation’). When Reset
is released, Curly reads the PCB ID code from three port pins and then
searches the SmartMedia card via the XBus data bus for a matching
FPGA configuration image (pages with ID "Xn" where n is the 3-bit PCB
ID code 1-8). Once located, the configuration image is loaded into the
FPGA. The boot code is stored in the SmartMedia card in a special
format that Curly understands and contains a small program that
enables the StrongARM to read the SmartMedia card by itself. Once this
first stage bootstrap program is loaded (SmartMedia ID of "Bn", where n
is the PCB ID), Curly will release the StrongARM from reset and Curly
shuts off (effectively disappearing from the circuit) until the next system
start-up. In this version of the CPU board the ID codes are X2 and B2.
Shemp
Larry
Similar in function to the ABus keyboard controller in Max-1
architecture machines, Shemp scans the keyboard and queues key
presses for the StrongARM. Unlike previous designs, key presses are
reported both on press and release, allowing system software to
implement auto-repeat as well as the continuous operation of treadmill
control keys (up/down, faster/slower). A special key code indicates
when all keys are up as a safeguard against stuck keys in the application
software.
Unlike previous keyboard encoder designs, Shemp does not provide
dedicated scan hardware for the shift and / or option keys. These keys
are now located in the scan matrix. Careful placement of keys in the
scan matrix allows simultaneous depression of the shift, option and
other keys without interference.
Larry controls the paper drive motor and digitizes the analog inputs.
The motor control functions are virtually identical to those offered by
the 78310 processor in Max-1 architecture machines, with an expanded
speed control range (down to zero). Since Larry’s code is not fieldalterable, every motor control parameter is alterable via BBus.
Hopefully this renders the code immune to minor changes in the printer
drive train.
Motor Speed Control
Larry controls the motor speed by delivering a DAC controlled drive
voltage to the motor windings. The 6-bit DAC is implemented using
discrete, binary-weighted resistors directly driven by Larry’s port pins.
MAC 5000 resting ECG analysis system
2000657-074
Revision B5-22
Page 91

CPU Theory of Operation: Theory of Operation
The DAC output voltage (approx. 300mV full scale) is compared to a
filtered fraction of the applied DC motor voltage by comparator U29. If
the motor feedback voltage is below the DAC voltage, the comparator
turns on the motor via an H-Bridge driver. One motor terminal (which
one is a function of motor direction) is always grounded. The other is
alternately driven to either 12V or ground. The duty cycle of the drive
signal determines the average applied voltage and therefore the average
motor speed. The feedback voltage signal is the average of both motor
terminals (R125 and R148 driving R123), with a 50:1 ratio, 15Vin =
300mV out, hence 15V full scale). Since one terminal is always zero
(grounded) and the other is driven with a variable duty cycle between
zero and 12V, the feedback signal is positive regardless of motor
direction. C178 filters the switching noise from feedback voltage.
Note that the frequency and duty cycle of the motor drive signal are
random. This serves to reduce EMI by spreading any emitted noise
across a wide frequency spectrum. An RC snubber (R161 and C198)
suppresses ringing on the motor lines.
Larry maintains precise motor speed control by comparing the
frequency of the tachometer pulse train emitted by the motor’s integral
encoder to an internally generated reference frequency derived from
Larry’s resonator. Larry processes motor position information on both
edges of both encoder signals for a total of 64 loop correction cycles per
rotation of the motor shaft. This high angular sampling rate allows Larry
to achieve accurate and smooth speed regulation down to zero speed.
Paper Jam / Pull Detection
Larry monitors the servo error variable to determine whether the servo
loop is closed. If the error variable saturates "on" for more than a
predetermined time it is assumed that the paper drive torque has
become excessive, or the motor has stalled. This condition is reported as
a Paper Jam Error.
Similarly, if the servo error variable saturates at "off" for more than a
predetermined time, it is assumed that the someone is pulling on the
paper with a force that exceeds the paper drive system torque, and as a
result paper speed has been pulled out of regulation. This condition is
reported as a Paper Pull Error.
Cue Hole Sensor
Cue and out-of-paper conditions are sensed via the thermal print head’s
integral optical cue sensor. Larry monitors the cue sensor’s logic
output.
Cue Hole Detection
Larry monitors the output of the cue sensor to detect the presence or
absence of paper under the sensor, and hence the absence or presence
of cue holes.
Revision B 5-23
MAC 5000 resting ECG analysis system
2000657-074
Page 92

CPU Theory of Operation: Theory of Operation
Paper Tracking Fault Detection
Larry monitors the cue sensor for abnormally long paper travel without
encountering a cue hole. This condition is reported as a Paper Fault.
Paper Out Detection
Larry reports excessive paper travel without sensing paper as a paper
out condition.
Analog Inputs
Larry digitizes four analog inputs at eight bits resolution each. Two
inputs handle external analog signals, such as those produced by
ergometers or analog output blood pressure monitors. Thermal
printhead temperature is measured for use in compensating strobe
pulse width to maintain constant print density over a wide range of
thermal printhead temperatures. The output of the thermal printhead
pixel test hardware is also digitized to allow the resistance
measurements on individual print elements.
Moe
Moe is responsible for controlling and monitoring the battery, power
supplies, on/off key, system reset and related functions. Moe runs
continuously from +3V-C, even in the absence of AC power. This
continuous operation is necessary for Moe to accurately monitor the
battery state of charge and detect power key presses.
System Startup
When the system is off and the user presses the power key, Moe begins
the startup sequence. If the battery contains sufficient charge, or if AC
power is applied, the main CPU board power supplies (+3V-M and +5VM) are enabled and after a suitable stabilization period SYSRESET* is
released. Moe then keeps tabs on the system via a software watchdog
that must be serviced by specific BBus activity from the StrongARM.
Moe himself is monitored by a self contained MAX823 watchdog timer /
brownout detector. Moe must constantly toggle the MAX823 watchdog
input pin or suffer the consequences.
Note: Moe presumes that the main power rails, which it controls, are off
when it powers up. If Moe should malfunction while the system is
already powered it is likely that the HC05 will incorrectly identify itself
as Larry. Larry’s default power-up state results in its port pins assuming
a state that disables +3V-M. Since Larry does not service the watchdog
chip (WDOG), another reset will follow within 2 seconds. As +3V-M is
now down, Moe will be selected at the next restart.
When SYSRESET* is released, Curly configures the FPGA and starts the
StrongARM from information stored in the SmartMedia card. Moe
expects the StrongARM to request status via the BBus interface within a
few seconds of startup. If that request doesn’t arrive in time, Moe places
the system back in reset and removes power.
In the event of main CPU failure that causes loss of function yet
maintains Moe’s watchdog function, a manual forced power-down
MAC 5000 resting ECG analysis system
2000657-074
Revision B5-24
Page 93

CPU Theory of Operation: Theory of Operation
function is provided. A continuous press of the power key for a period
greater than 5 seconds will force the system to shutdown.
AC Power/Battery/Charger
Battery and system power management is entirely Moe’s responsibility.
An off-the-shelf 28V 1A universal input power supply provides
operating/charging power for the MAC-5000. Located in the bottom of
the chassis, the power supply is disconnected from the CPU board when
the lid is open. The battery connection is maintained through the hinge
so the CPU board is capable of operating for a limited time with the door
open.
An LT1511 switchmode charge controller (Battery Charger) provides
battery charge current. This device monitors both battery and power
supply current draw and maintains both at safe levels. As system current
draw increases, the Battery Charger automatically decreases battery
charging current to maintain total power supply current below the
design level (nominally 1A). Nominal charge current is also 1A, which is
achievable only when the system is off.
Moe enables / disables the charger via CR7. When Moe pulls the
CHRGTRL line low, CR7 sinks current from the Battery Charger’s VC pin
shutting down the error amplifier and disabling switching. R21 ensures
that the charger remains off when Moe is starting up.
Lid Open Detection
A self-aligning connector routes power and motor signals from the
power supply compartment to the CPU board. When the lid is closed the
DOOROPEN signal is shorted to ground. When the lid is open a pull-up
resistor ensures a high level on DOOROPEN. Moe monitors this line to
detect lid open conditions that are reported to the system software to
avoid misinterpretation of motor fault indications. When the door is
open, the motor connections are lost and Larry receives no tachometer
feedback from the motor. Without knowing the cause of the lost
tachometer info, Larry can only respond with a paper jam condition.
Moe’s knowledge of the lid state is used to suppress this error message
as well as prevent further print operations.
AC Power Monitor
Moe senses the presence of AC power through a voltage divider (R1, 8)
which drives the under-voltage detection comparator in the Battery
Charger (Vtrip = approx. 7V). The battery charger will not be enabled
unless the DC power supply voltage is above approximately 21V.
Battery Pack
The MAC-5000 uses a 15-cell nickel metal hydride (NiMH) battery pack
with integral thermal sensor for charge termination detection and selfresetting thermal fuse for short circuit protection. Charge current and
normal system operating power are obtained from the AC power supply.
The charger circuitry monitors both battery charge current and power
supply output current. The battery is always charged at the maximum
Revision B 5-25
MAC 5000 resting ECG analysis system
2000657-074
Page 94

CPU Theory of Operation: Theory of Operation
rate possible but system power demands take precedence over charger
demands. The charger automatically reduces charge current as required
to keep the AC power supply output current within specified limits. In
the extreme (during printing) charging ceases and energy is taken from
the battery to meet peak system demands. When system power draw
declines, all excess power supply capacity is once again delivered to the
battery.
Battery Temperature Sensor
Moe uses a thermal sensor inside the battery pack to determine when to
terminate charge. During normal charge, the electrical energy obtained
from the power supply is stored in chemical reactions in the battery.
When the battery reaches full charge there are no more reactants
available in which to store chemical energy and the supplied charge
power is converted directly to heat. The sudden rise in pack
temperature caused by this release of heat is an indicator of full charge.
When the rate of pack temperature rise exceeds a certain threshold,
charge is terminated. This is the only normal charge termination
mechanism. Abnormal conditions such as battery or ambient
temperatures beyond spec, or excessive pack voltage, may also
terminate charge. Once fully charged, the battery is maintained by low
duty cycle charge current pulses.
Absurdly low voltage readings from the battery temperature sensor
indicate an open thermistor. This is used as an indication that no
battery pack is present.
The sole purpose for resistor R18 is to protect Moe’s ADC (AN3) pin in
the case where the temperature signal TBATTERY becomes
inadvertently tied to VBATT+. This can easily occur since the two pins
are adjacent. Should the short occur, resistor R18 will limit the current
and Moe’s internal protection diodes will clamp the voltage to +3V-C.
Battery Voltage Sensing
Moe continuously monitors battery voltage during operation.
Excessively high pack voltages during charge will cause charge
termination. If battery pack voltage falls below a predetermined
threshold during operation, the battery gauge is immediately cleared to
zero and the main CPU is notified of the critically low voltage. System
software then initiates an orderly shutdown to protect the battery pack
and prevent loss of date/time.
Ambient Temperature Sensor
Extreme ambient temperatures are not favorable for battery charging.
Rapid changes in ambient temperature can cause premature or delayed
charge termination by altering the pack’s temperature. Moe monitors
ambient temperature via the thermistor TEMP to ensure that charging
occurs only within the "safe" temperature range as well as to minimize
the effects of changing ambient temperature on charge termination
(particularly to avoid premature termination, which would give a false
"full" reading on the gas gauge).
MAC 5000 resting ECG analysis system
2000657-074
Revision B5-26
Page 95

CPU Theory of Operation: Theory of Operation
The battery and ambient thermistors are the same type and value to
ensure reasonable tracking. Capacitors C15 and C55 filter noise from the
temperature sense lines.
Thermistor Bias Switch
To reduce quiescent power consumption when the system is turned off,
a switch disables bias current to the battery and ambient thermistors.
Q8, under control of MOE, switches the low side of the thermistor bias
networks.
Charge Light
Moe provides power to the amber charge light in the power supply
compartment. Moe communicates the current battery/charger state via
this light.
Four conditions may be indicated:
■ Battery charged (light is off)
■ Battery needs charge (light blinks twice per second)
■ Battery is critically low (light blinks once per second)
■ Battery is charging (light on continuously)
Note that f the battery is completely discharged so that the MAX783 VL
output (+5V) falls out of regulation, the charge light will remain off.
The charge LED is contained in the power supply compartment and is
disconnected from the CPU board when the cover is open. When the
cover is closed electrical connections are re-established through the
self-aligning connector. As the connections are made in random order,
there is a possibility that the VPS and XChargeLED drive lines can
connect before the power supply ground. This places a high potential
across the LED drive circuit as the power supply attempts to return its
output current through the LED. To prevent damage to the LED and
driver, it is implemented as a constant current source with a large
compliance voltage. Q7 provides the constant current drive, and derives
LED operating power from the MAX782 (U26) VL output rather than
from +3V-C. Q6 level shifts Moe’s output to the level required to turn off
Q7 during off periods.
Battery Gauge
Current flow into and out of the battery pack is monitored by Moe via a
MAX472 Battery Current Monitor. By integrating the current flow, Moe
is able to maintain a reasonable estimate of the battery pack’s state of
charge. Moe’s A/D converter hasn’t sufficient dynamic range to cover
the full range of system currents at high resolution so some
compromises must be made. The current monitor’s full-scale range is
set to a value that is likely to encompass normal operating currents.
Peaks above this level (6Amps) are clipped. The effects of this clipping
are minimal as such high density printing occurs for short periods of
time and represents only a small portion of system energy
consumption. Quantization error limits the ability to measure the small
Revision B 5-27
MAC 5000 resting ECG analysis system
2000657-074
Page 96

CPU Theory of Operation: Theory of Operation
current that flows when the system is off. To compensate for this, Moe
presumes a small constant quiescent current flow from the battery. This
flow serves to drain the gauge at a rate estimated to mimic the selfdischarge and system quiescent current draws.
Current monitor gain is set by R6 and is nominally 1.8A/V for a full-scale
(3.3V) current of 6Amps. A low pass filter (R7 and C1) provides filtering
to remove switching noise from the signal.
Untested "Nominal"
Operating Time Specs
These specifications are affected by battery pack characteristics. While
they are of interest, it is not possible to test them in production. These
are "nominal specs" and are only guaranteed for a new battery pack of
3.5A capacity. As the following specs are for a system that is turned off,
they are deliverable by the CPU regardless of other system components.
Nominal charge time:
5 Hours
Max off time from gauge full till loss of clock: 1 Month
Max off time from gauge just empty till loss of clock: 3 Days
Max off time from panic shutdown till loss of clock: 1 Day
Maximum time from removal of live battery to loss of clock: 6 Hours
MAC 5000 resting ECG analysis system
2000657-074
Revision B5-28
Page 97

6 FRU Parts Lists
Revision B
MAC 5000 resting ECG analysis system
2000657-074
6-1
Page 98

6-2
MAC 5000 resting ECG analysis system
2000657-074
Revision B
Page 99

Ordering Parts
FRU Parts Lists: Ordering Parts
General Information
The FRU parts lists in this chapter supply enough detail for you to order
parts for the assemblies considered field serviceable. To order parts,
contact Service Parts at the address or telephone number on the, “How
to Reach Us...,” page provided at the beginning of this manual.
Revision B 6-3
MAC 5000 resting ECG analysis system
2000657-074
Page 100

FRU Parts Lists: Field Replaceable Units
Field Replaceable Units
The following items may not be assigned separate manufacturing part
numbers because they are normally part of a larger assembly. Since they
are considered field replaceable units (FRUs), they have specific service
part numbers so they can be ordered and replaced by service
technicians. Contact Tech Support for FRU information for assemblies
used on previous configurations.
NOTE
Verify part numbers bef ore ordering service
parts (field replac eable units). See the tech
memo series for this product for changes or
additions to this list.
Table 6-1. Field Replaceable Units
Item Part Number
Battery Assembly 900770-001
Power Supply Assembly 421117-001
PCB, MAC 5000 CPU 801212-005
Keyboard Assembly 421115-XXX
Disk Drive, 3.5 inch Laptop Floppy 2001377-001
Display Assembly 421114-003
Printhead 422397-001
Writer Assembly 421108-003
Roller Assembly 422396-002
Writer Release Button 416406-001
Leaf Spring CS-12032
Gas Cylinder CS-12055
Battery/LED Circuit Board 801222-001
MAC 5000 COUNTRY MODEM PTO OPTION CLASS MAC5000_MODEM
COUNTRY SPECIFIC 2005264-0XX
MAC 5000 CAM14 PTO OPTION CLASS MAC5000_CAM14
KIT CAM14 REST W/AHA ADAPT 901142-001
MAC 5000 resting ECG analysis system
2000657-074
Revision B6-4
 Loading...