

Page 1
gO. COrn
Safety Instruotions ........ 2-7
Operating Instruc_tions
Care and Cleaning ........ 37-40
Cooking Features ......... 12-18
Defiosting Features ....... 21-27
Easy Guide _'_Menu System ..... 9
Help Features .............. 34
Home Screen ............... 10
Microwaxe O_en Features ...... 8
Microwave Terms ............ 36
Options ................ 28-32
Other Features ........... 33, 35
Power Le_ els ............... 11
Reheating Features ....... 19-20
Troubleshooting Tips ....... 41
Consumer Support
Consmner Support . . . Back Cover
Warranty .................. 42
CVM2072
©
Write the model and serial
numbers here:
Model #
Serial #
Find these numbers on a label
on the left front when the door
is open.
DE68-O3409A 49-40557 04-07JR
Page 2
IMPORTANT SAFETY INSTRUCTIONS
PRECAUTIONS TO AVOID POSSIBLE EXPOSURE
TO EXCESSIVE MICROWAVE ENERGY
(a) Do Not Attempt to operate this oven with tile
door open since open-door operation C_lil res/llt
in harmfld exposure to microwave energy. It is
important not to defeat or tamper with tile satetv
interlocks.
(b) Do Not Place any object between tile o_en front thce
and tile door or allow soil or cleaner residue to
_lCC/lIIltll_lte on sealin(, S/lI'][_lCeS.
(c) Do Not Operate tile oven if it is damaged. It is
pa_Xicularly important that tile oven door close
properly and that there is no damage to tile:
(1) door (bent),
(2) hinges and latches (broken or loosened),
(3) door seals and sealing sm'thces.
(d) The Oven Should Not be a(!iusted or repaired bx
anyone except properly qualified serxice personnel.
Page 3
IMPORTANT SAFETY INSTRUCTIONS
WARNING! Foryoursafe ,,theinfo.nationinthismanua must be followed to minimizetherishof fire
or explosion, eleetrie shoek, or to prevent property damage, personal injury, or loss of life.
SAFETY PRECAUTIONS
Use this appliance only fi_r its intended pmiOose as described in this" Owner k Manual When using
eleetrieal applianees, bas4e safeO_preeautiom shouM befidlowed, including the fidlowing:
" This microwave oven is UL listed for
installation over electric and gas ranges.
" This microwave oven is not approved or
tested ii)r marine use.
, P,ead and ti_llow the specific precautions
in the Precautions to A_ old Possible Exposure
to Excessive Microwave Energy section on
page 2.
, This appliance m ust be grotmded. Connect
only to proi)edy gromlded outlet. See the
Grounding Instructions section on page 7.
Install or locate this appliance only in
accordance with the provided Installation
Instructions.
Do not mount this appliance over a sink.
This ove>the-range oven was designed for
use over ranges no wider than 36F It may be
installed over both gas and electric cooking
equipment.
, Do not operate this appliance if it has a
damaged power cord or plug, if it is not
working properly or if it has bee** damaged
or dropped. If the power cord is damaged,
it InUSt be replaced bv General Electric
SeiMce or an authorized seixice agent using
a power cord available fl'om General Electric.
" Do not covet" or block any openings on
the appliance.
, lJse this appliance only [i)r its intended use
as described in this manual. Do not use
corrosive chemicals or vapors in this
appliance. This microwave oven is specifically
designed to heat, dry or cook tood, and is not
intended ior laboratory or industrial use.
, Do not store this appliance outdoors.
Do not use this product near water--
fi)r example, in a wet basement, near
a swimming pool, near a sink, or in similar
locations.
" Kee I) power cord away from heated sm'thces.
o Do llot in/n/erse power cord or l)hlg ill water.
, To reduce the risk of fire in the oven cavity:
-- Do not overcook li)od. Carefully attend
appliance when paper, plastic or other
combustible materials are placed inside
the oven while cooking.
-- Remove wire twist-ties and metal handles
fl'om paper or plastic containers before
placing them in the oven.
-- Do not use the oven tier storage purposes.
Do not leave paper products, cooking
utensils or ti)od in the oven when not
ill {lse.
-- If materials inside oven ignite, kee I) the
oven door closed, turn the oven off and
disconnect the power cord, or shut off
power at the fuse or circuit breaker panel.
If the door is opened, the fire may spread.
-- Do not use the Sensor Featm'es twice
ill StlCCessioll Oll the saIne ti)od portioll.
If %od is undercooked atter the fi_t
cotmtdown, use TIME COOK %r
additional cooking time.
See door surihce cleaning instructions in
the Care and Cl_a_dng" o/ the mi( rowav(_ ov(,_
section of this manual.
" This appliance should be serviced only bv
qualified service personnel. Contact nearest
authorized setwice fiicility lbr examination,
repair or a({justFa ent.
. As with any appliance, close supervision is
necessary when used bv children.
Do not store anything directly on top of the
I//icrow_lve ovell sHrJ_lce when tile l/]icrowave
oven is in operation.
Page 4
WARNING !
IMPORTANT SAFETY INSTRUCTIONS
ARCING
VENT
FAN
If you see arcing, press the OFF pad and correct the problem.
Arcing is tile microwave term fl)r sparks in
tile oven. Arcing is caused by:
• The metal shelf not installed correctly so
it touches the microwave wall.
• Metal or flfil touching tile side of tile oxen.
Tile ihn will operate automatically under •
certain conditions (see Automatic Fall feature).
Take care to prevent tile starting and spreading •
of accidental cooking fires while the vent iim
is ill rise.
• Clean tlle underside of the microwave
often. Do not allow grease to build up on
tile microwave or tile fhn filte_.
• In tile event of a grease fire on tlle surthce
units below the microwave oven, smother a
flaming pan on tile surfitce unit by covering
the pan completely with a lid, cookie sheet
or flat tray.
• Foil not molded to food (upturned edges act
like antennas).
• Metal, such as twist-ties, poultI T pins or
goldrimmed dishes, in tile microwave.
• Recycled paper towels containing small metal
pieces being used in tile inicrowave.
_hen I)reI)arin°,_ flaming, foods under tile
n/icro_,#ave, ttlrll tile fall (sit,
Never leave surfilce units beneath your
microwave oven unattended at high heat
settings. Boilovers cause smoking and greasy
spillovers that may ignite and spread if the
microwave vent tim is operating. To minimize
automatic fhn operation, use adequate-sized
cookware and use high heat on surihce units
only when necessary.
• Use care when cleaning tile vent lhn filters.
Corrosive cleaning agents, such as lye-based
oven cleaners, may damage the filters.
Page 5
A WARNING!
IMPORTANT SAFETY INSTRUCTIONS
FOODS
Do not pop popcorn in your microwave
oven unless in a special microwave popcorn
accessory or tlnless vo/i rise i)oi)coi'n labeled
_'or rise in i/licrowave ovens.
• Some products such as whole eggs and sealed
containers--fin" example, closed jars--are
able to explode and should not be heated
in this microwave oven. Such use of tile
inicrowave oven could result in iI_jm T.
• Do not boil eggs in a microwave oven.
Pressm'e will build up inside egg yolk and will
cause it to burst, possibly resulting in iI_jm>
• Operating the microwave with no tood inside
tor IllOYe than a Illintlte or two may Catlse
damage to the oven and could start a fire.
It increases tile heat arotmd tile magnetron
and can shorten the life of the oven.
• Foods with tmbroken outer "skin" such as
potatoes, hot dogs, sausages, tomatoes,
apples, chicken livers and other giblets and
egg yolks should be pierced to allow steam
to escape during cooking.
• Hot fi_ods and steali/ C_lil Catlse b/iYns.
Be careful when opening anv containers of
hot tood, including popcorn bags, cooking
pouches and boxes. To prevent possible
iI_jm'y; direct steam away fl'om hands
and tace.
Avoid heating baby food in glass jars,
even with the lid off. Make sm'e all infimt
tood is thoroughly cooked. Stir tood to
distribute the heat evenlw Be carefifl to
prevent scalding when warming tormula or
breast milk. The container may ti_el cooler
than the milk really is. Always test the milk
before fl_eding tile baby.
SUPERMEAT_D WATER
I,iquids, such as water; coffee or tea are able
to be overheated bewmd tile boiling point
without appearing to be boiling. Visible
bubbling or boiling when tile container is
reli/oved froli/ tile iilicrowave oven is not
alwavs present. THIS COUI,D RESUI,T IN
VERY HOT I,IQUIDS SUDDENLY BOII,ING
(-)VEIl WHEN THE CONTAINER IS
DISTURBED OP, A SPOON OR OTHER
UTENSIl, IS INSERTED INTO THE I,IQUID.
To reduce tile risk of ii_jury to persons:
-- Do not overheat the liquid,
-- Stir tile liquid both befl_re and halt\\'av
through heating it.
-- Do not use straight-sided containers with
n_l ITOW necks.
--After heating, allow tile container to stand
in tile microwave oven fin" a short time
betore removing tile container.
-- Use extreme care when inserting a spoon
or other utensil into tile container.
• Don't defl'ost fl'ozen beverages in narro\_=
necked bottles (especially carbonated
beverages). Even if tile container is opened,
pressure can build up. This can cause tile
container to bm'st, possibly resulting in ii_jur>
• Do not overcook potatoes. They could
dehvdrate and catch fire, causing damage
tO VO/IY oven.
Cook meat and poultry thoroughl)_meat to
at least an INTERNAl, temperature of 160°F
and poultry to at least an INTERNAl,
temperatm'e of 180°K Cooking to these
temperatures usually protects against
toodborne illness.
Page 6
IMPORTANT SAFETY INSTRUCTIONS
A WARNING!
MICR 0 WA VE-SAt';q COOKWAt 2
Make s/ire all cookware tlsed in FOlly II/icI'owave
()veil is suitable t0r nlicrowaving. Most glass
casseroles, cooking dishes, n/easuring cups,
custard cups, pottery or china dinnerware
which does not have nlemllic trinl or glaze with
a nletallic sheen can be used. Sonle cookware
is labeled "suitable fin" nlicrowaving."
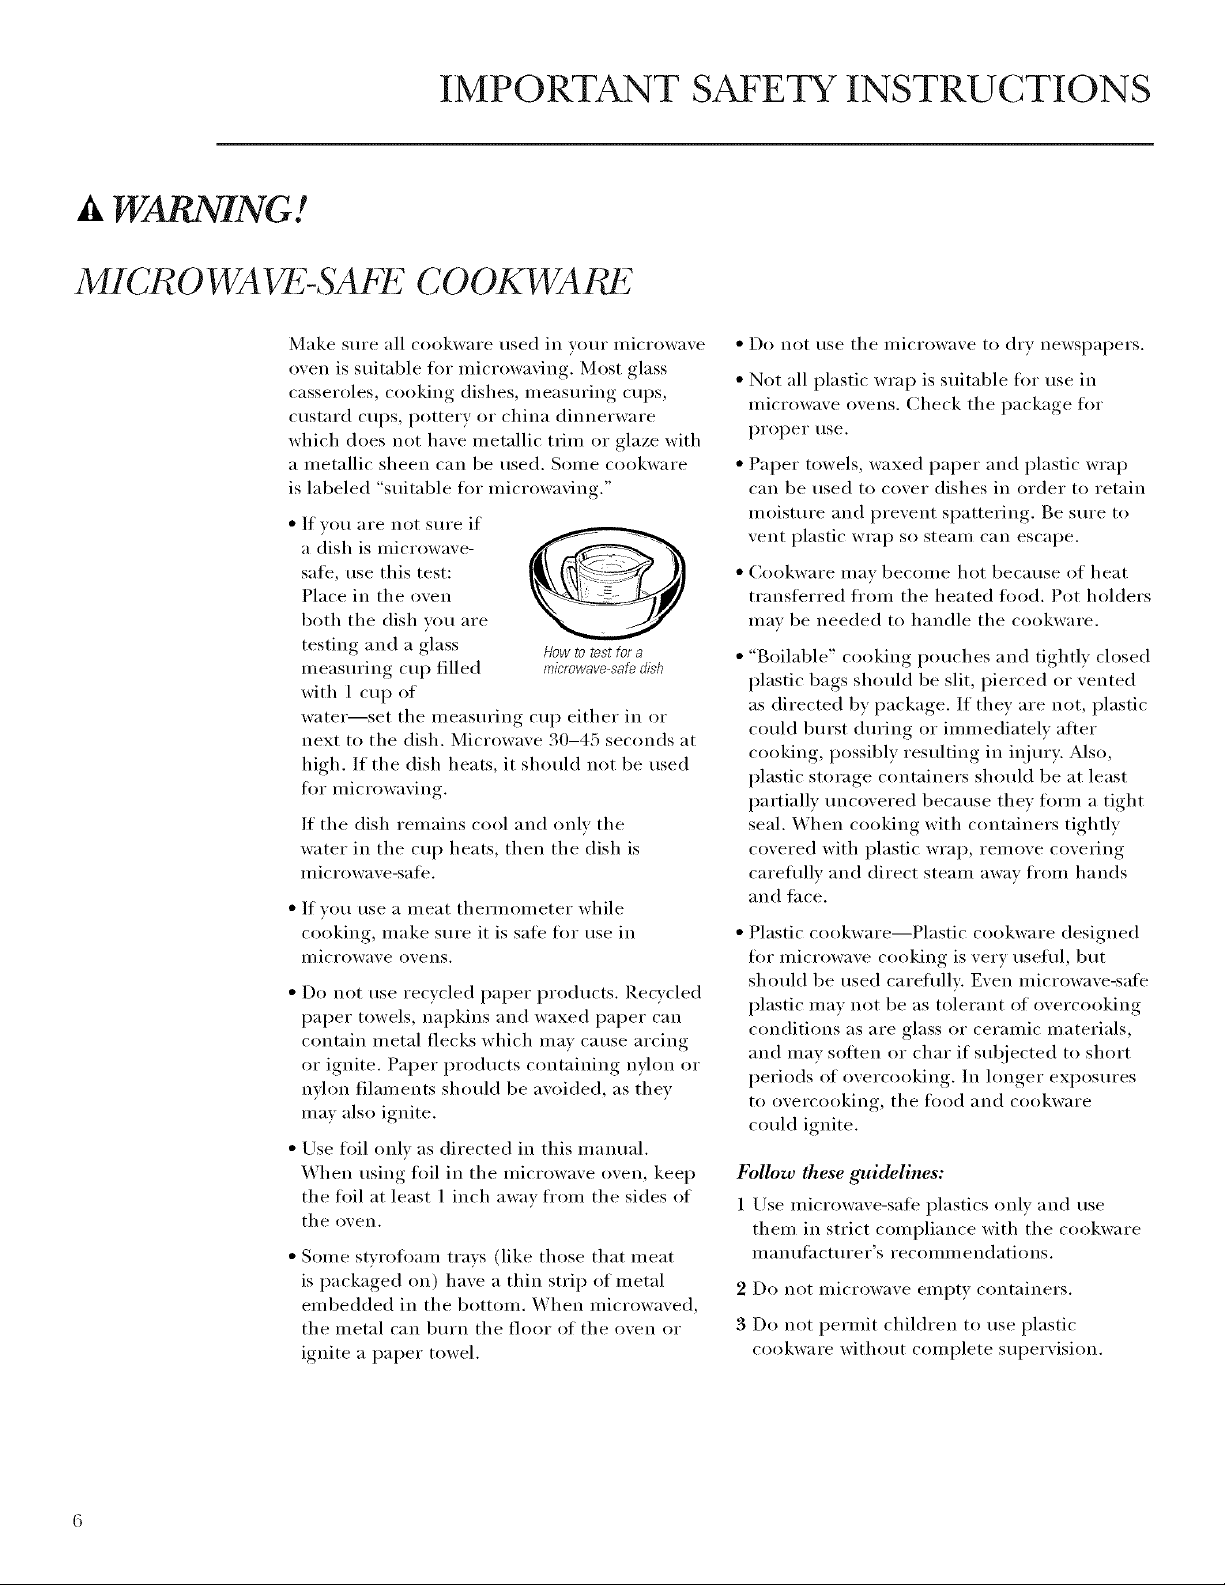
• If vou are not sure if
a dish is nlicrowave-
safe, use this test:
Place in the ()veil
both the dish vou are
testing and a glass Howtorestfora
nleasuring cup filled mic'rowave-saf_dish
with 1 cup of
watei_set tile nleasuring cup either in or
next to tile dish. Microwave 30-45 seconds at
high. If tile dish heats, it should not be used
fl)r nlicrowaving.
If tile dish renlains cool and only tile
water in tile cup heats, then tile dish is
I/licI'owave-saJ[e.
• If you use a nleat thernlon/eter while
cooking, nlake sure it is sate fl)r use in
ii/icrowave ()veils.
• Do not use recycled paper products. Recycled
paper towels, napkins and waxed paper can
contain n/etal flecks which nlav cause arcing
or ignite. Paper products containing nylon or
nylon filan/ents should be avoided, as they
nlay also ignite.
• Use fl)il only as directed in this inanual.
When using fl)il in tile nlicrowave ()veil, keep
tile flfil at least 1 inch away fronl tile sides of
tile ()veil.
• Sonle sWI'Ofl)aIn trays (like those that nleat
is packaged on) have a thin strip of nletal
en/bedded in tile bottonl. When n/icrowaved,
tile nletal can burn tile floor of tile oven or
ignite a paper towel.
• Do not use tile nlicrowave to dry newspapers.
• Not all plastic wrap is suitable fin" use in
n/icrowave ()veils. Check the package fin.
proper tlse.
• Paper towels, waxed paper and plastic wrap
can be used to cover dishes in order to retain
n/oisture and prevent spattering. Be sure to
vent plastic wrap so stean/ can escape.
• Cookware nlav beconle hot because of heat
transti_rred fl'oin tile heated fl)od. Pot holders
nlav be needed to handle tile cookware.
"goilable" cooking pouches and tightly closed
plastic bags should be slit, pierced or vented
as directed by package. If they are not, plastic
could burst during or innnediatelv after
cooking, possibly resulting in ii_jury. Also,
plastic storage containers should be at least
partially uncovered because they flwin a tight
seal. When cooking with containers tightly
covered with plastic wrap, renlove coveting
careflilly and direct steanl away ti'oin hands
and tace.
Plastic cookware--Plastic cookware designed
fl)r nlicrowave cooking is very usefld, but
should be used careflillv: Even nlicrowave-safe
plastic n/ay not be as tolerant of overcooking
conditions as are glass or ceranlic n/aterials,
and nlav soften or char if subjected to short
periods of overcooking. In hmger exposures
to overcooking, tile fl)od and cookware
could ignite.
Follow these guidelines:
1 Lrse n/icrowave-safl _ plastics only and use
then/in strict con/pliance with tile cookware
Illan/l[;I ctuI'eI"S I'eCOIllI//e ndatio ns.
2 Do not nlicrowave enlpty containers.
3 Do not pernlit children to use plastic
cookware without con/plete supervision.
Page 7
IMPORTANT SAFETY INSTRUCTIONS
It WARNING! Xmprop useofthe grounding plug can result in a risk of electric shoeh.
(;ROUNDING INSTRUCTIONS
This appliance inust
be gi'(mnded. In tile
event of an electrical
short circuit,
gi'oui_dii_g reduces
Ensureproperground
existsbeforeuse
an escape wire for the electric current.
This appliance is equipped with a power cord
having a grotmding wire with a grotmding plug.
The plug must be plugged into an outlet that
is properly installed and grounded.
Consult a qualified electrician or selwice
technician if the groui_ding insti uctions
are not COlnpletely understood, or if doubt
exists as to whether the appliance is properly
grounded.
the risk of electric
shock by providing
SAVE THESE INSTRUCTIONS
If the outlet is a standard 2-prong wall outlet,
it is vom" personal responsibility and obligation
to have it replaced with a properly grounded
S-prong wall outlet.
[)o not tinder _liiV cii'c/lii/st_lnces C/l[ oi" i'eillove
the third (ground) pr(mg ti'Oln the power cord.
Do not rise an adapter plug with this appliance.
Do not use an extension cord with this
appliance. If the power cord is too short,
have a qualified electrician or service
technician install an outlet near the appliance.
For best operation, plug this appliance into its
own electrical outlet to prevent flickering of
lights, blowing of fllse or tripping of circuit
breaker.
OP77ONAL
KITS
I_7ller Panel Kits
JX40WH--X_'hite
JX41--glack
When replacing a 36" range hood, filler panel
kits fill in the additional width to provide a
custoln built-in appearance.
For installation bet\_een cabinets only; not tbr
end-of cabinet installation, Each kit contains
two 3"-wide filler panels.
I_ilter Kits
JX81H--Recirculating Charcoal Filter Kit
Filter kits are used when tile inicrowa_e oxen
cannot be xented to tile outside.
Available at extra cost fl'om your GE supplier,
See the back cover fin" ordering by phone or
at ge.coln. JXSIH
JX40,JX41
Page 8

Microwave Oven Features
77._,.#,o,,t thi._,,_..,,.d .p_.t.,,<,...1 .pl,c.,..,. ,,_.y_,.,:v./io._yo., ,,_odd.
@
|
c_
©©©
]_(itlgH¢s
o/the
microwave
OUgfl
Door Hm_dle. Pull to open tile dooI:
Tile door must be se(urel_ latched fl)r
tile microwaxe to operate.
2
Door Latches.
Whadow with Metal Shield. Screen alh)ws
3
looking to be xiewed while keel)in(,•
illicrowaxes COllt]iled ill tile oxell.
Active Vent. Tile vent door swings open
when tile tan operates and ('loses when tile
tan shuts ott.
Shelf. I,ets you microwave several fl)ods ;at
once. Food microwaxes best when placed
directly on tile tm'ntable.
()nix use tile shelf when reheating on inore
than one lexel, Do not store the shelf inside
tile o_,ell caxitv.
6 Touchscreen Display, Press tile graphics
on tile interactixe display to use tile oxen
fea ttu'es,
If tile Touchscreei_ is dark, press HOME or
tile To/lchscreeil, or opell tile door to access
tile n_enu.
7 Cooktop Light.
8 Grease Filters.
9 Removable Turntable. Ttu'ntable aim
support must be in place when using the
oven. Tile turntable inav be relnoved for
cleaning.
lO Side Stirrer. Helps cir(ulate nficrowaves
throughout tile oven cavity for consistent
heating aim defrosting. Do not remove
the cover from the side stirrer.
NOTE: Rating plate is h)cated on tile left front
when tile door is ()pen. Oxen xent(s) and oxen
light are h)cated on tile inside walls of tile
Illicrowax e (ix,ei1.
Page 9
EasyGuide F_'Menu System
;_'g, (70111
Using the
Easy Guide '_'
Menu System
The easx_to-use [o//chscYeeIl S_,steII/
autonmticallv leads xou throuoh each
step of tile cooking process.
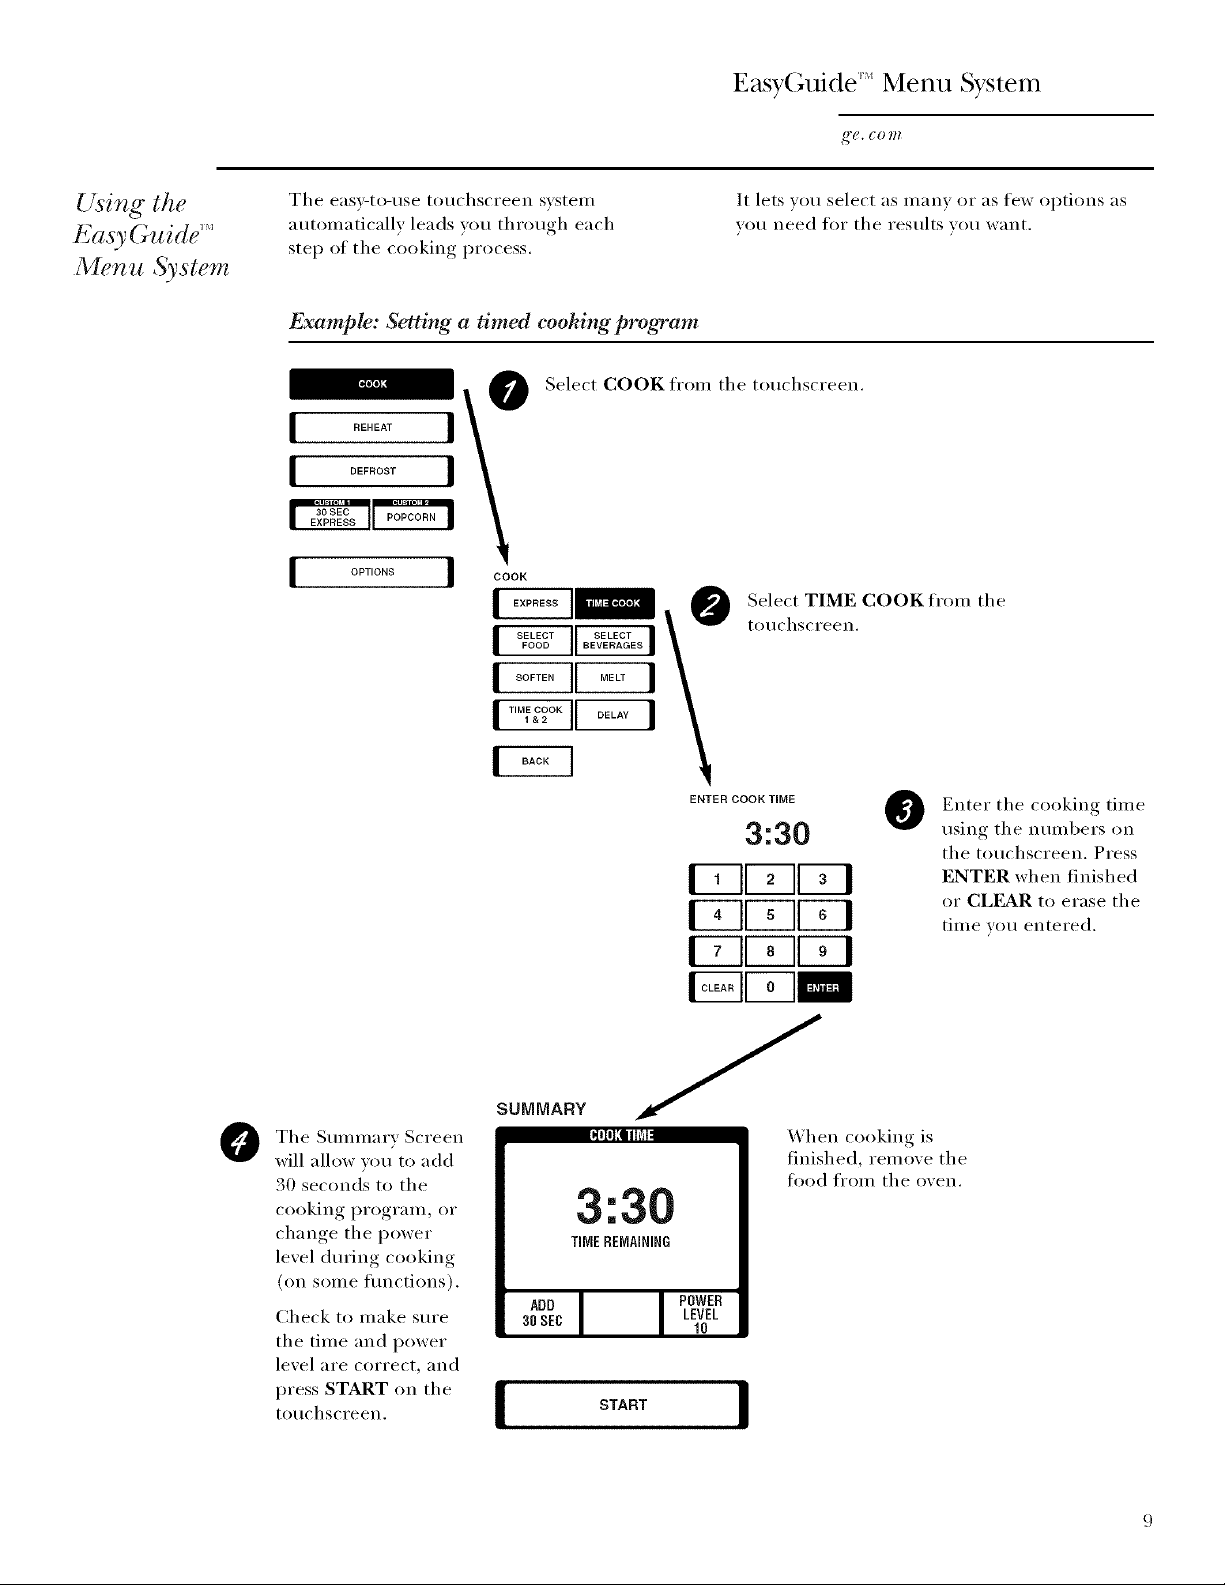
Example: Setting a timed coohing program
_ !_ Select COOK from tile touchscreen.
It lets you select as ii/_liiV oi" _lS few Ol)tioils as
VO/i need for tile res/llts _o// V(_IIIt.
Select TIME COOK from tile
to/ichscYeeil,
I _' lloa_l\
I_°_'_"II°_'I
I"°_°°_II°_ I
Tile Smmnarv Screen
@
will allow wm to add
30 seconds to tile
cooking program, or
change the power
level during cooking
(on some flmctions).
Check to make sm'e
tile time and power
level are correct, and
press START on tile
to/lchsci'eell.
SUMMARY
START
ENTER COOK TIME
3:30
l-_K77KT1
I-_g77U-1
I-_KTTq
X'_lien cooking is
finished, remoxe tile
food frolI/ tile o'_eil.
Enter tile cooking time
@
using tile numbers on
tile touchscreen. Press
ENTER when finished
or CLEAR to erase the
tinle you entered.
Page 10
Honle Screen
,_'1_, (70 IIZ
b_atures of the
Home Screen
If the touchscreen
is dark, press
HO:VIE or the
touchscreen
to (I€€€SS
the menu.
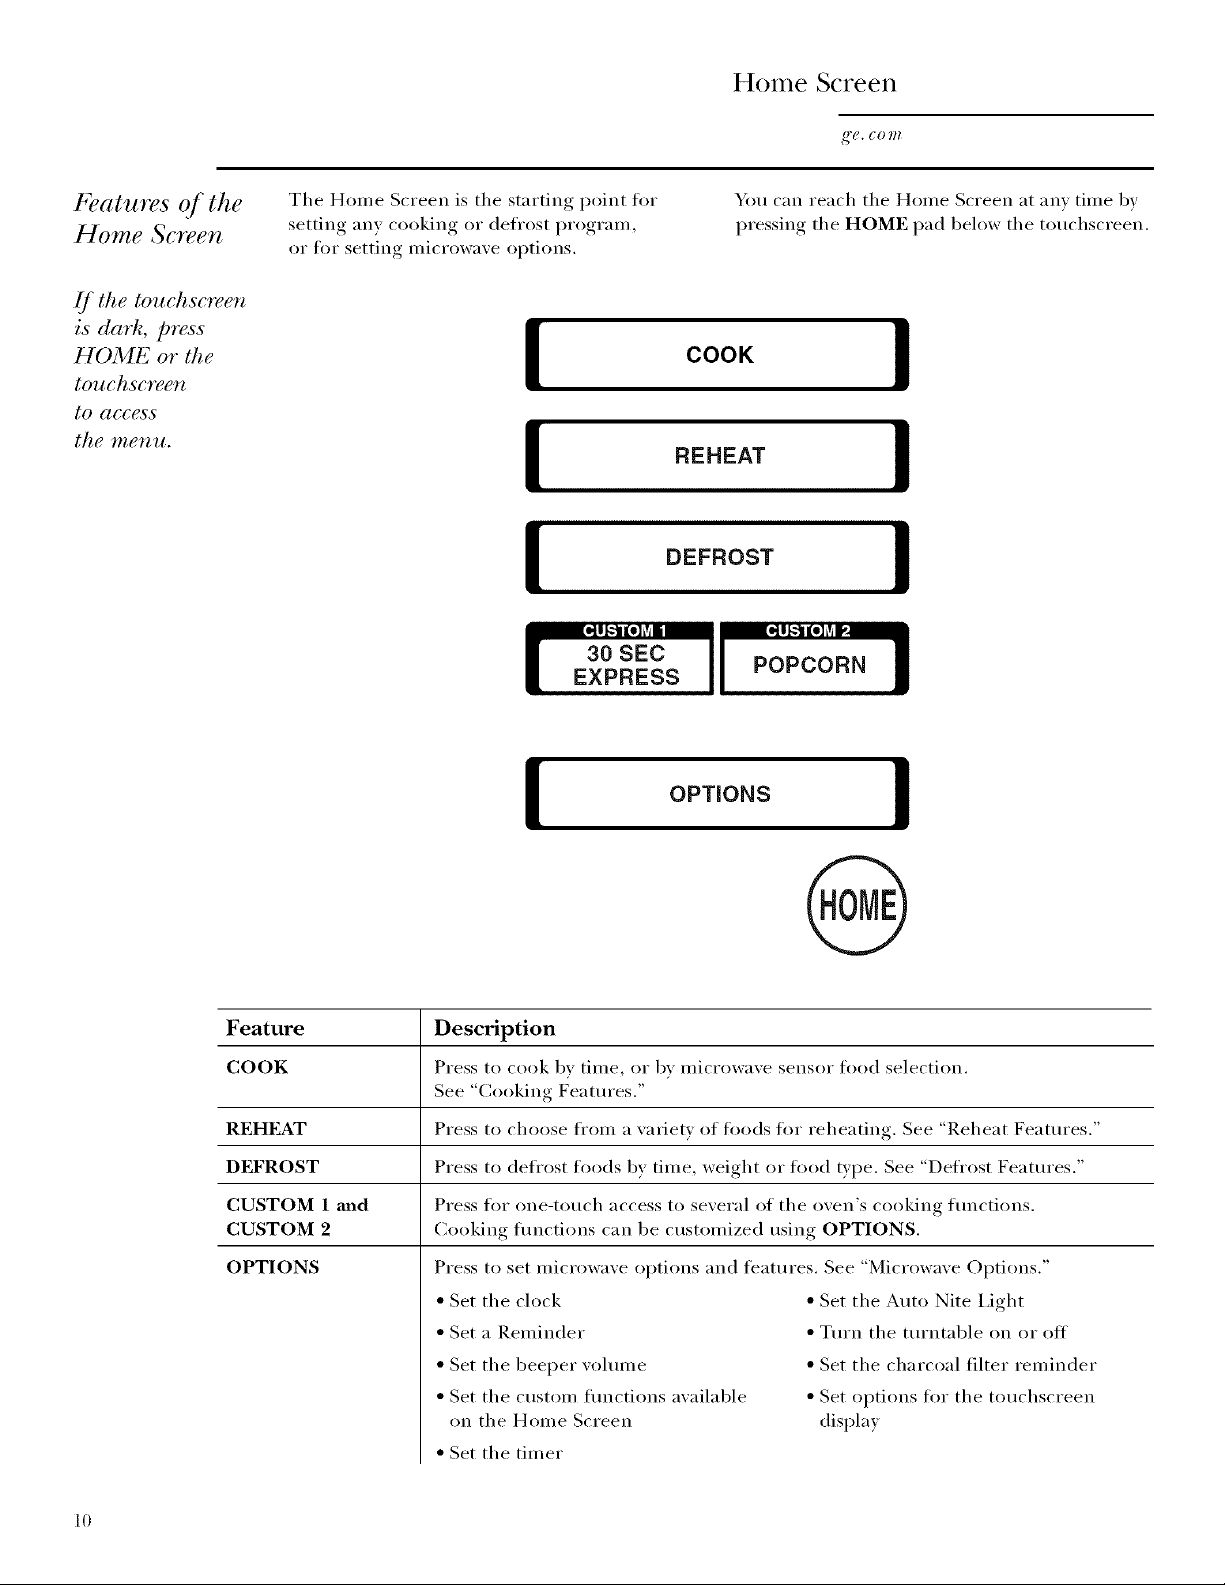
The Home Screen is the starting point fin _
setting any cooking or defl'ost program,
or fl)r setting microwave options.
EXPRESS
You can reach the Home Screen at anv time bv
pressing the HOME pad below the touchscreen,
COOK !
REHEAT
Feature
COOK
REHFL_T
DEFROST
CUSTOM 1 mad
CUSTOM 2
OPTIONS
OPTIONS !
Description
Press to cook bv time, or by illici'owave seiisoF f()od selection.
See "Cooking Features."
Press to choose fl'om a w_riew of foods for reheating. See "Reheat Features."
Press to defl'ost foods by time, weight or tood type. See "Defl'ost Features."
Press fin" one-touch access to several of the oven's cooking flmctions.
Cooking flmctions can be customized using OPTIONS.
Press to set microwave options and teatures. See "Microwave Options."
• Set the clock
• Set a Reminder
• Set the beeper volmne
• Set the custom flmctions available
on the Home Screen
• Set the timer
• Set the Auto Nite I,ight
• Tm'n the tm'ntable on or off
• Set the charcoal filter reminder
• Set options fin" the touchscreen
display
10
Page 11
(;hanging the Power I,evel
Variable Power
Levels l- l 0
The power level may be entered or changed
immediately atter entering the feature time fin':
" Time Cook
" Time Deti'ost
" Express Cook
* Reheating Pizza, Casserole or Rice
Tile power level may also be changed dm'ing
tilne co{/lltdowll.
1 From tile Home Screen, select COOK,
DEFROST or RIp,HEAT.
From the (;ook Screen, select TIME COOK
or EXPRESS. From tile Deti'ost Screen,
select BY TIME. From the Reheat Screen,
select PIZZA, CASSEROLE or RICE.
3 Enter tile cooking or defl'osting time and
press ENTER, or select a reheat tood t}pe.
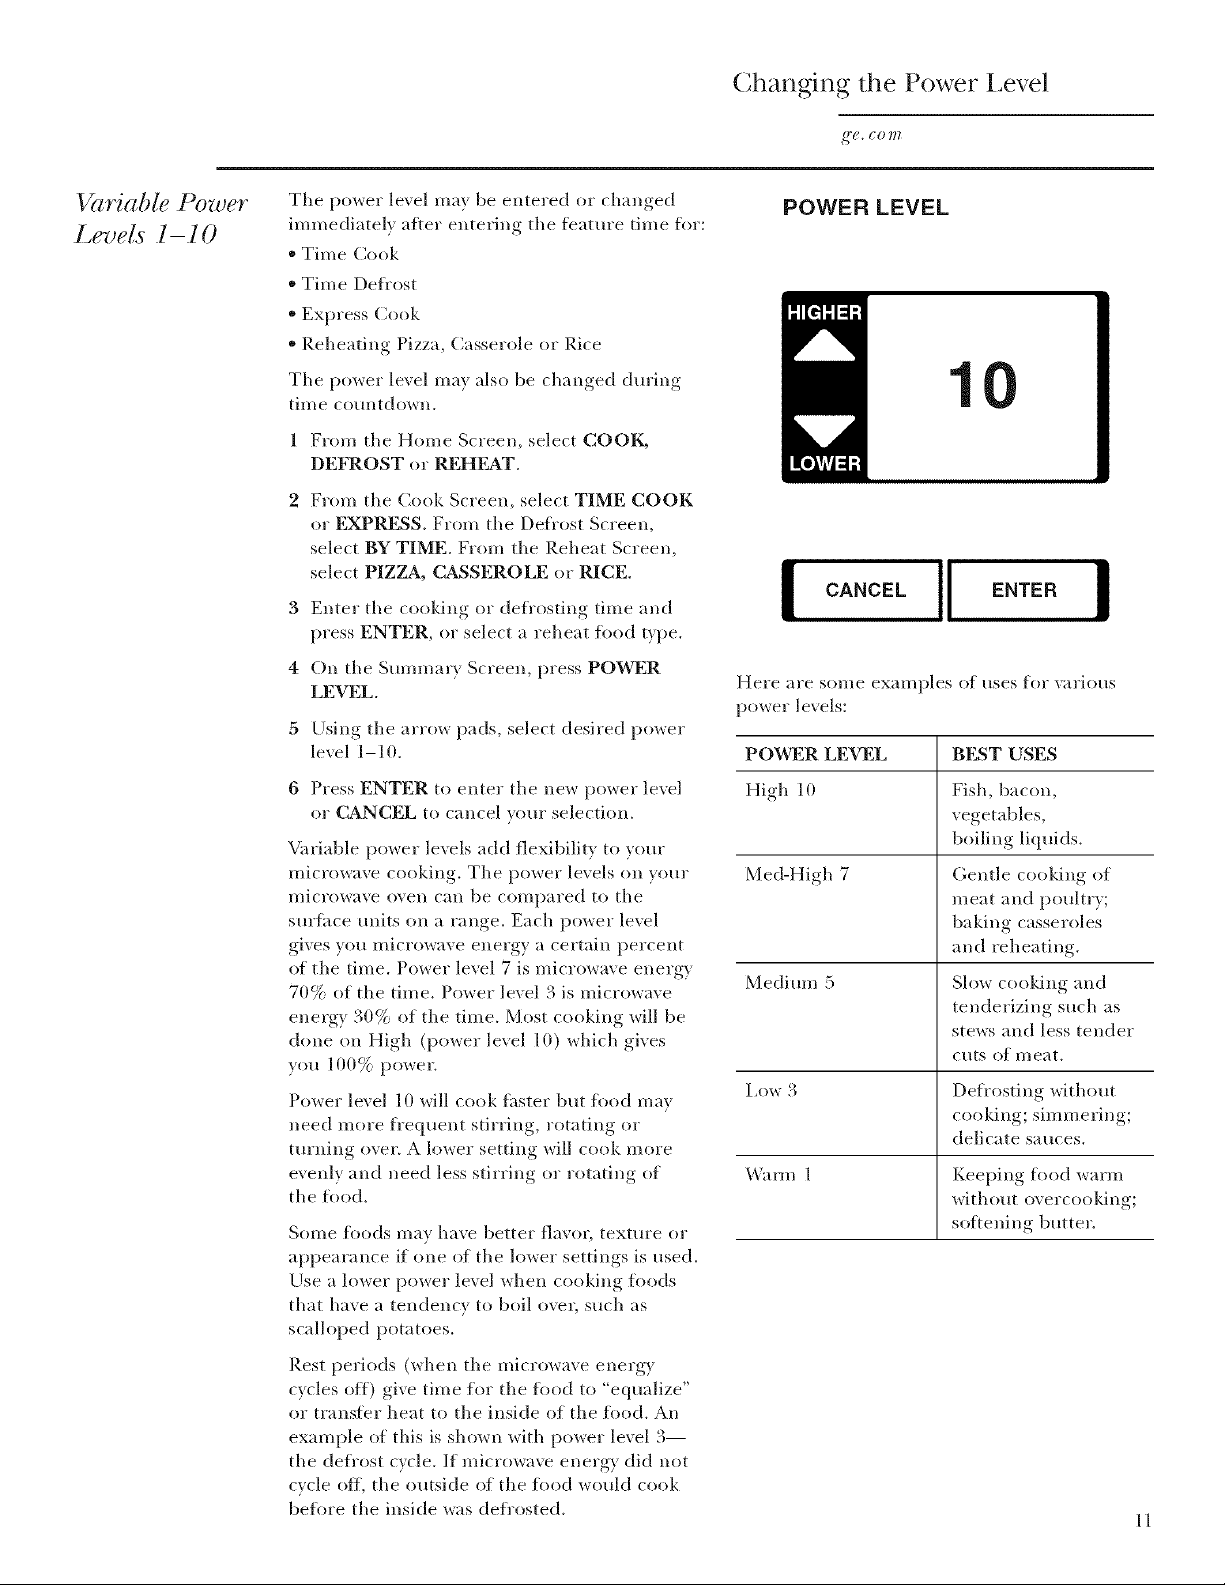
4 On tile Summa_ T Screen, press POWER
LEVEL.
5 Using tile arrow pads, select desired power
level 1-10.
POWER LEVEL
1
CANCEL ENTER
Here are SOl//e exaI//ples of rises for '_;iriotls
power levels:
POWER LEVEL BEST USES
6 Press ENTER to enter the new power level
or CANCEL to cancel your selection.
Variable power levels add flexibility to your
microwave cooking. The power levels on your
l//icrow;lve ()veil CHII be coi//p;lred to tile
surthce units on a range. Each power level
gives you miciowave energy a certain percent
of the time. Power level 7 is microwave energy
70% of the time. Power level 3 is microwave
energy 30% of the time. Most cooking will be
done on High (power level 10) which gives
you 100% power.
Power level 10 will cook thster but tood may
need more h'equent stirring, rotating or
turning over. A lower setting will cook m ore
evenly and need less stirring or rotating of
tile ti)od.
Sollle [()ods lllav have better flavor, texture or
appearance if one of tile lower settings is used.
Use a lower power level when cooking toods
that have a tendency to boil ovec such as
scalloped potatoes.
Rest periods (when tile microwave energy
cycles off) give time for the tood to "equalize"
or transfer heat to tile inside of the ti_od. An
example of this is shown with power level 3--
tile det/"ost cycle. If microwave energy did not
cycle oil tile outside of the/i)od would cook
be%re tile inside was defl'osted.
High 10 Fish, bacon,
vegetables,
boiling liquids.
Meal-High 7 Gentle cooking of
meat and poultry;
baking casseroles
and reheating.
Medium 5 Slow cooking and
tenderizing such as
stews and less tender
cuts of meat.
Low 3 Defi'osting without
cooking; simmering;
delicate sauces.
_'\.um 1 Keeping fi)od warm
without o\ ercooking;
sottening butter.
11
Page 12
Cooking Features
k_atures o/ the
COOK Screen
NOTE." Do not use
the metal shelf
when using the
featm_s found in
Select bbod or
Select Beverage.
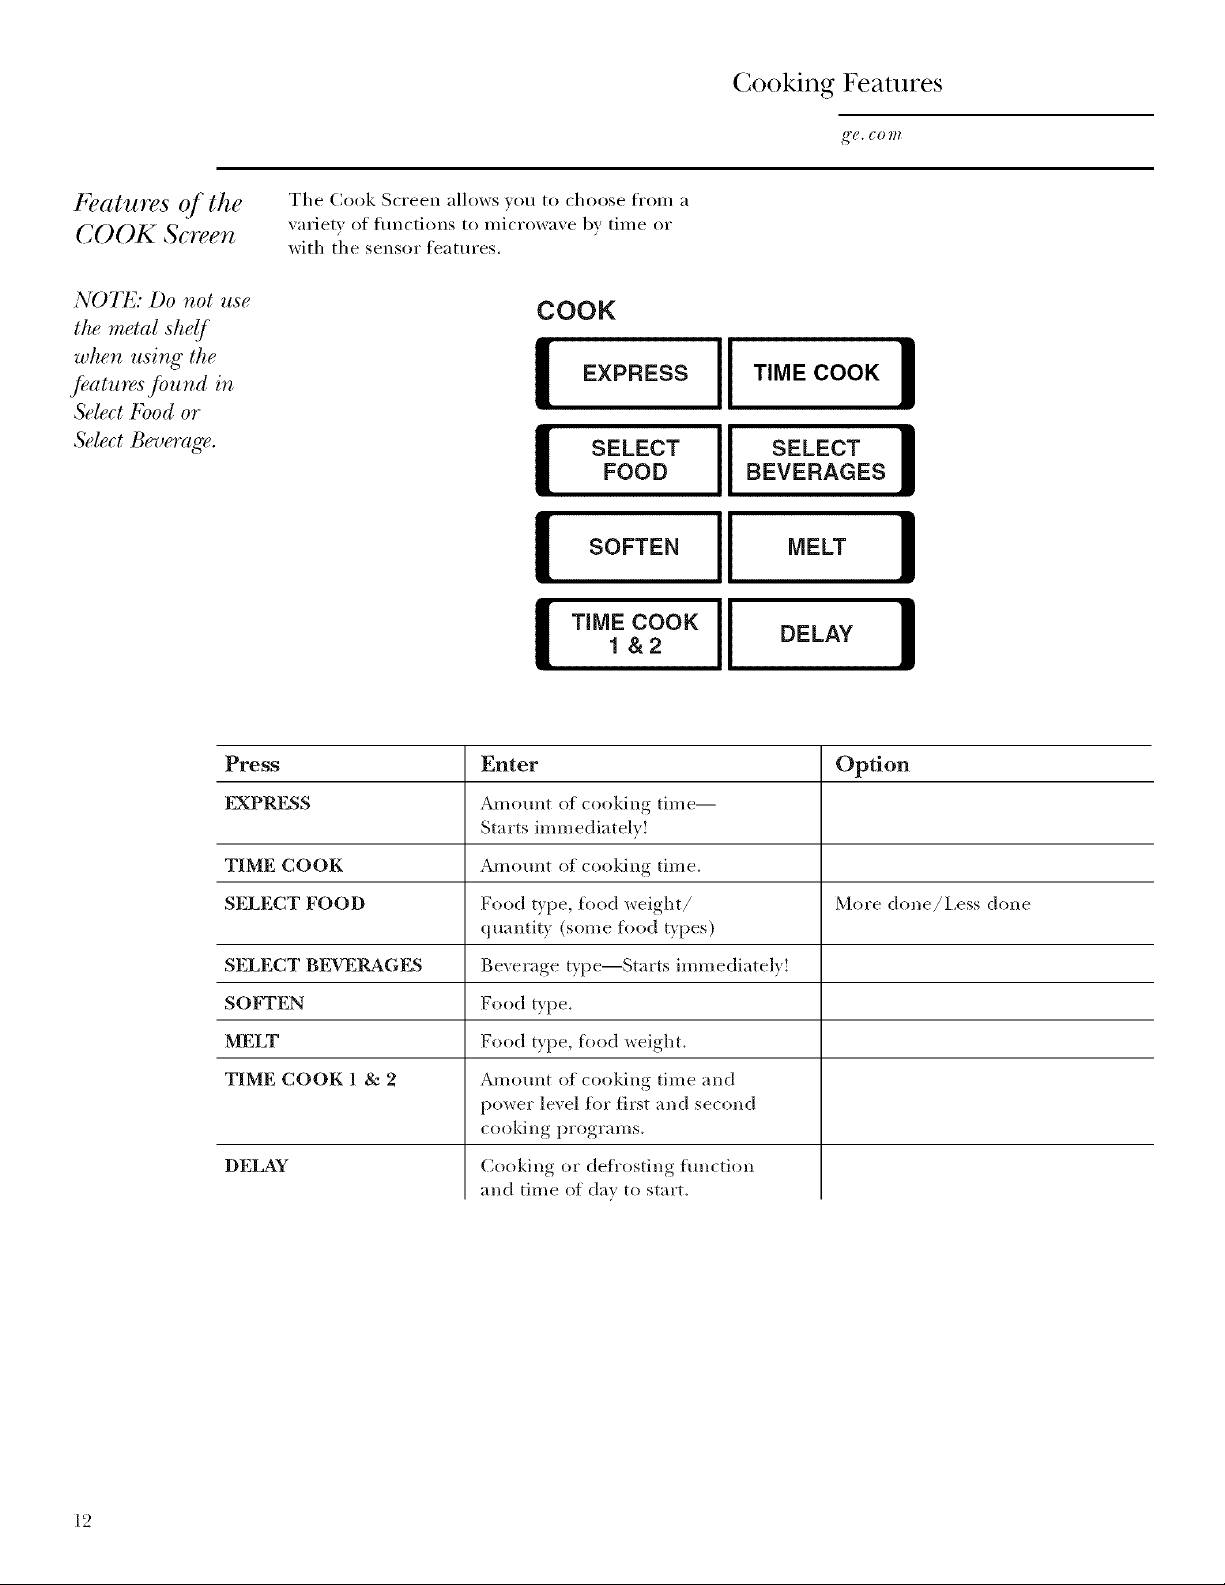
The Cook Screen allows xou to choose fron/a
xarietx of flmctions to microwaxe by time or
with the sensor features.
COOK
! SELECT II SELECT !FOOD BEVERAGES
TiME COOK ll DELAY !1&2
Press Option
EXPRESS
Enter
Amount of rooking time--
Starts immediately!
TIME COOK
SELECT FOOD More done/Less done
SELECT BEVERAGES
SOFTEN
MELT
TIME COOK 1 & 2
DELAY
Amount of cooking time.
Food type, fl)od weight/
quantity (some fl)od types)
Beverage type--Starts immediately!
Food type.
Food type, fl)od weight.
Amomlt of cooking time and
power level flw first and second
cooking programs.
Cooking or deti'osting _unction
and time of day to start.
12
Page 13
Cooking Features
,_'(_, ( 0 I?l
7_me Cook
Tinle Cook allows wm to i/licrowave for [lliV
time up to 99 minutes and 99 seconds.
I TIME COOK I
Power level 10 (High) is autonmticallv set,
but you may change it ti)r more flexibiliw.
1 From the Home Screen, select COOK.
2 From tile Cook Screen, select TIME COOK.
Enter tile cooking time using tile nmnbers
on the touchscreen. Press ENTER when
finished or CLEAR to erase the time wm
entered.
4 From tile Summary Screen, select ADD 30
SEC if you wish to add 30 seconds to the
cook time, or select POWER LEVEL if vou
don't want flfll power.
5 Check to make sure tile time and power
level are correct, and press START on tile
touchscreen.
You may open tile door dm'ing Time Cook
to check the food. Close the door and press
START to resmne cooking.
7 me Cook
l&2
Time Cook 1 & 2 lets you change power levels
automatically dm'ing cooking.
I
1 From the Home Screen, select COOK.
2 From tile Cook Screen, select
TIME COOK 1 & 2.
Enter tile first cooking time using tile
nmnbers on tile touchscreen. Press ENTER
when finished or CLEAR to erase the time
vou entered.
Using tile arrow pads, select desired power
level 1-10 fin" the first cooking time. Press
ENTER to enter the new power level or
CANCEL to cancel your selection.
Enter tile second cooking time using tile
nmnbers on tile touchscreen. Press ENTER
when finished or CLFTa_R to erase tile time
you entered.
Using tile arrow pads, select desired power
level 1-10 fin" the second cooking time.
Press ENTER to enter the new power level
or CANCEL to cancel yore" selection.
7 Check to make sure tile time and power
level are correct, and press START on the
touchscreen,
At tile end of Time Cook 1, Time Cook 2
co/Ints down.
13
Page 14
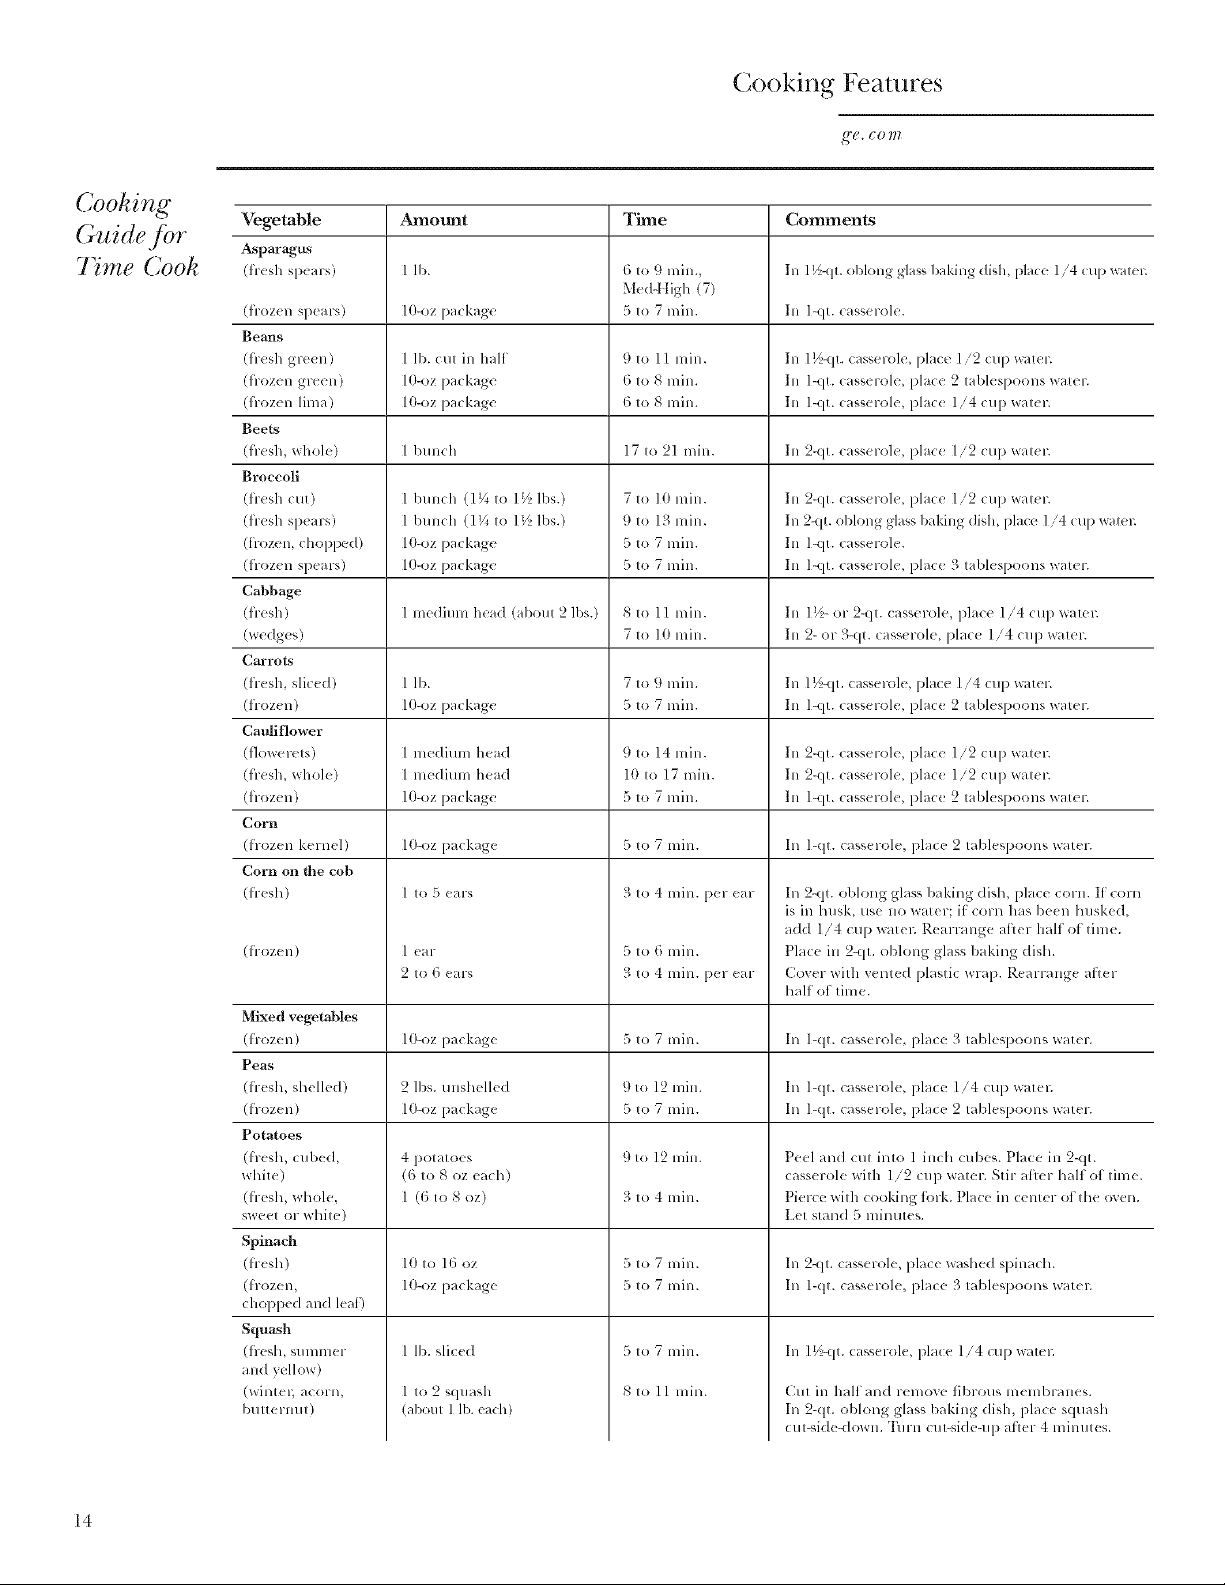
(;()()king Features
Cooking
Guide./br
7 rne Cook
Vegetable Amotmt Time Comments
Asparagus
(fl-esh spea l-S') 1 lb. 6 to 9 rain., In 1½-qt. oblong glass haking dish, pla_e 1/4 tup '_atel.
Med-t tigh (7)
(flozen spears) 10-oz package 5 to 7 rain. In l-qt. casserole.
Bearls
(fresh green) 1 lb. cut ill half 9 to 11 lnin. In 1V_,-qt.casserole, place 1/9 cup watel:
(frozen gl>en) 10-oz pm kage 6 to 8 rain. In l-qt. casserole, place 2 tablespoons watel:
(frozen lima) 10-oz pm kage 6 to 8 lnin. In l-qt. t asserole, place 1/4 cup watm:
Beets
(fresh, whole) 1 bunth 17 to 21 rain. In 2-<it. t asserole, plate 1'2 _up water.
Broccoli
(flesh <ut) 1 /)unt h (1_/_ to l _ lbs.) 7 to l0 lnin. hi 2-qt. t asserole, plate 1:2 _up water.
(fl-esh spears) 1 /)llllth (11A to 1½ lbs.) 9 to 13 lllill. In 2-qt. oblong glass baking dish, place 1/4 tup watch
(frozen, chopped) 10-oz pm kage .5to 7 rain. In l-qt. t assel-ole.
(frozen spears) 10-oz pm kage 5 to 7 rain. In l-qt. t asserole, place 5;tablespoons wateL
Cahbage
(fl-esh) 1lneditlln head (a/)otlt 2 lbs.) 8 to 11 lnill, hi 1½- or 2-qt. casserole, place 1/4 cup watch
(wedges) 7 to 10 lnill, hi 2- ov 3-qt. t asserole, place 1/4 cup watel:
Carrots
(fl-esh, sliced) 1 lb. 7 to 9 rain. In 1V_,-qt.casserole, place 1/4 cup watel:
(frozen) 10-oz package 5 to 7 rain. hi l-qt. casserole, plate 2 tablespoons wateL
Catfliflower
(flowevcts) 1 llledit/ln head 9 to 14 lllill, hi 2-qt. t assel-ole, place 1/2 cup watel:
(fresh, whole) 1 llledit/ln head 10 to 17 mill. hi 2-qt. t asserole, place 1/2 cup watel:
(t]-ozen) 10-oz pm kage 5 to "7lllin. 111l-qt. t asserole, place 2 tablespoons watel:
Corn
(h-ozen kernel) 10-oz l)a_ bge 5 to 7 rain. Ill l-qt. _ssel-ole, l)l_t e 2 tablespoons w_ltel-.
Corn on the col)
(hcsh) 1 to ._)('_lS _lto 4 rain. per car
(h-ozen)
1 ear
2 to 6 ears
5 to 6 rain.
3 to 4 rain. per ear
In 2-qt. oblong glass baking dish, place COl-ll. If: COrll
is ill husk, use no water: it COrll has been husked,
add 1/4 cup watel; Rearrange afler half of time.
Place ill 2-qt. oblong glass baking dish.
Co'_er with "_ented plastic wrap. Rearrange ariel-
half of tilne.
Mixed vegetahles
(frozen/
10-oz package 5 to 7 rain. In l-qt. casserole, place 3 tablespoons water.
Peas
(hesh, shelled)
(hozen)
2 lbs. mlshelled 9 to 12 lnin. Ill l-qt. cassel-ole, place 1/4 cup watel.
10-oz package 5 to 7 rain. Ill l-qt. cassel-ole, place 2 tablespoons water.
Potatoes
(fvesh, cubed,
white)
(fi-esh, whole,
sweet Ol-white)
4 potatoes 9 to 12 nlin. Peel and ct/t into 1 inch cubes. Place ill 2-qt.
(6 to 80Z each) casserole with 1/2 cup uatel-. Stir Mler half of tinle.
1 (6 to S oz) 3 to 4 rain. Pierce with cooking tol-k. Place ill center of the oxen.
Let stand 5 minutes.
Spinach
(h-esh)
([ l-ozell,
10 to 16 oz 5 to "7rain. hi 2-qt. casselole, place washed spinach.
10-oz package 5 tO 7 mill. Ill 1-qt. casserole, place 3 tablespoons watel.
chopped and leaf')
Squash
(flesh, Sllllllllel
1 lb. sliced
5 to 7 min.
hi 1½-qt. casserole, place 1/4 cup wateL
and yellow)
(wint el; {lCOl-ll,
buttenmt)
1 to 2 squash
(a/xmt 1 lb. each)
8 to 11 lnill.
Cut ill half and remove tibl-OUSnlelnbl-anes.
In 2-qt. oblong glass baking dish, place squash
cut-side-down. Tlll-ll cut-side-up afler 4 lnilltltes.
14
Page 15

(;()()king Features
Express Cook
Humidi_
Sensor
This is a quick way to set cooking time fi'om
30 seconds to 6 minutes.
1 From the Home Screen, select COOK.
2 From the Cook Screen, select EXPRESS.
3 Select the cooking time fi'om the
touchscreen. Tile oven sta_s immediately.
Soiile i/licrowave leattlFes are Sensoi" {Hnctions
that detect tile increasii_g humidiw released
during cooking. Tile oven autolnatically a@,sts
tile cooking tilne to various types and an_ounts
of food.
When using Sensor {eatures, do not open tile
oven door until tilne is coui_ting down. If the
door is opened, close it and press START
immediately.
EXPRESS
I 0 SEC 1 MIN I
2 MIN I 3 MIN
I 4 MIN 5 MIN !
6 MIN
=
Covered
Do not use tile Sensor Features twice in
StlCCession oix tile S_lllle ][0od portion--it Ill_ly
result in severely overcooked or burnt food.
If ti)od is tmdercooked alter tile countdown,
use TIME COOK ti)r additional cooking tilne.
If you wish to a(!iust tile cooking tilne, press
LESS DONE or MORE DONE within tile first
30 seconds to reduce or add tilne.
• Tile i)roper contaii_ers and covers are
essential lot best sensor cooking.
• Always rise Illicrowave-safe containei's and
cover theln with lids or vented plastic wrap.
Never use tight-sealing plastic covers--they
can i)revent stealn ti'om escaping and cause
food to overcook.
• Be sure tile outside of tile cooking container
and tile inside of tile inicrowave oven are dry
beli)re placing food in tile oven. Beads of
inoisture turning into stealn can inislead
tile sensor.
Microwave Sensor Features
• Popcorn • Fresh vegetables
• Potato • Frozen vegetables
• Chicken pieces • Canned vegetables
Vented
Dryoff(lishesso they
don'tmisleadt/7esensor
• Ground meat
• Fish
• Rice
15
Page 16

Microwavirzg
by l'bod Type
NZ)TE: Do not use
the metal shelf with
jkatures found in
S(@ct b_od.
NOTE: Do not use
this fi_ature twice in
succession on the
same jbod /)ortion--
it may result in
severely overcooked
or bmwt jbod.
The Select Food feature gives you easy,
automatic resuhs with a variety of foods
(see the Cooking Guide below).
1 Place covered food in the oven.
2 From the Home Screen, select COOK.
3 From tile Cook Screen, choose SELECT
FOOD,
Select the food type fl'om the touchscreen,
You can find additional fi>od types by
pressing MORE at the bottom of the
touchscreen,
5
For Sensor features, the oven starts
immediately atter selecting the fi)od type,
6
For non-sensor features, enter the
description, weight or quantity. Press
ENTER after each entry or CLEAR to
erase the entry. Press START to begin
cooking.
Food Type Amount Comments
SELECT FOOD
I POPCORN1[ POTATOCHICKEN ll" FRESH
PIECESIIVEGETABLES
iFROZEN II CANNED
VEGETABLES II VEGETABLES
I GROUND ][ FiSH
MEAT
PIZZA 1[ RICE
BACON EGGS
If food is undercooked after the cotmtdox_n,
use TIME COOK for additional cooking time,
1[
Popcorn 3.0 to 3.5 ounce bag Follow package instructions, using Time Cook if the
package is less than 3.0 ounces or larger than 3.5 ounces.
Potato 8-32 oz. Pierce sldn with fork. Place potatoes on the turntable.
Chicken Pieces 2-8 pieces (]_>ver with vented plastic wrap.
Fresh Vegetable 4-16 oz. Add 1/4 cup water per serving. Cover with lid or vented
plastic wrap.
Frozen Vegetable 4-16 oz, Follow package instructions tin" adding water. Cover with
lid or vented plastic wrap.
Cmmed Vegetable 4-16 oz. Cover with lid or vented plastic wrap.
Ground Meat 1/2 to 2 lbs. Do not cover dish; drain and stir at signal,
Fish 4-16 oz, Cover with vented plastic wrap.
Frozen Pizza 4-16 oz.
Rice 1/2 to 2 cups For long-cooking rice (not instant rice), fhllow package
instructions for addition of water. Use lalge dish; cover
with lid or vented plastic wrap.
Bacon 1 to 10 slices laver slices in paper towels on a plate, 4 slices per layer
with paper towel between and one on top,
Eggs 1 to 12 eggs Place eggs in measuring cup o* bowl. Stir after 1/2 time.
1{5
Page 17

Microwaving
P@corn
NZ)TE: Do not use
the metal shdf
when microwaving
popcorr,.
NOTE: Do not use
this fi<ature twice in
succession on the
same jbod portior_--
it may result in
severely overcooked
or bmwt jbod.
Use only with prepackaged microwave popcorn
weighing 3.0 to 3.5 ounces.
1 Follow package instructions, using Time
Cook if the package is less than 3.0 ounces
or larger than 3.5 otmces. Place the package
of popcorn in the center of the microwave.
2 From the Home Screen, select COOK.
3 From the Cook Screen, choose SELECT
FOOD,
4 Select POPCORN fl'om the touchscreen.
The oven starts immediately.
Do not open the oven door until time is
counting down. If the door is opened, close
it and press START immediately.
If food is undercooked after the cotmtdown,
use TIME COOK tor additional cooking time.
If v(m find that the brand of popcorn you use
underpops or overpops consistentl> you can
add or subtract 20-30 seconds to the automatic
popping time.
To add time:
Alter pressing POPCORN, press MORE DONE
within the first 30 seconds alter the oven starts
for an extra 20 seconds of cooking time. Press
MORE DONE again to add another 10 seconds
(total of 30 seconds additional time).
To subtract time:
Alter pressing POPCORN, press LESS DONE
within the first 30 seconds after the oven starts
for 20 seconds less cooking time. Press LESS
DONE again to reduce cooking time another
10 seconds (total of 30 seconds less time).
Microwaving by
Beverage 75,;!)e
NOTE: Do not use
the metal shdf
when microwavir4g
beveraws.
NOTE: Do not use
this fi<ature twice in
succession on the
same jbod portion--
it may result in
severely overcooked
or burnt jbod.
The Select Bever'we feature allows _ou t(> heat
a cup of coftee or other bex eraoe
Drinks heated with the Beverage feature may
be very hot. Remove the container with care.
1 From the Home Screen, select COOK.
2 From the Cook Screen, press SELECT
BEVERAGE.
3 Select the beverage type fl'om the
touchscreen. The oven starts immediately.
Do not (>pen the oven door. If the door is
opened, close it and press START immediately.
If %od is undercooked after the cotmtdown,
use TIME COOK fi>r additional cooking time,
SELECT BEVERAGE
WATER
TEA
CHOCOLATE
I HOT
COFFEE
MILK
17
Page 18

Cooking Features
?_'(_, ( 0111
Using the
Soften k ature
Using the
Melt P)?ature
The Soften feature allows you to soften without
melting fl'ozen or refl'igerated toods.
Unwrap butter or cream cheese and place
on plate.
Make sure that ti)il covers are removed fl'om
fl'osting or ice cream and place the container
in the oven.
1 From the Home Screen, select COOK.
2 From the Cook Screen, press SOl,TEN.
3 Select the food type fl'om the touchscreen.
4 Check to make sm'e the time is correct, and
press START on the touchscreen.
The Melt teatm'e allows wm to melt fi>ods
fl>r cooking.
1 Place the unwrapped item into bowl.
The Chocolate melting feature is tor III)
to 16 oz. of chocolate morsels (chips).
2 From the Home Screen, select COOK.
3 From the Cook Screen, press MELT.
SOFTEN
1/2 STICK ]l 1 STICK
it BUTTER BUTTER _
2 STICKS 1 CAN
BUTTER ] I FROSTING
CHEESE 30Z ]1 CHEESE 80Z
I CREAM CREAM I
1 PINT 1 QUART
MELT
I BUTTER BUTTER I
2 STICKS CHOCOLATE
1[
How to Delay
the Start of
Coohing
18
4 Select the food type ti'om the touchscreen.
5 For all tood types except gutte_; enter the
tood weight and press ENTER. Press CLEAR
if you want to clear your previous entry, or
press BACK to return to the previous screen.
6 Check to make sure the time is correct, and
press START on the touchscreen.
7 Afier removing fl>od fl'om the oven, stir well
to complete the melting process.
The Delay feature allows wm to set the
microwave to delay the start times tot Time
Cook, Time Cook 1 & 9 and Time Defrost,
ti)r up to 24 hours.
1 From the Home Screen, select COOK.
2 From the Cook Screen, press DELAY.
3 Enter the time you want the oven to start.
(Be sm'e the microwave clock shows the
correct time of day:) Press ENTER when
finished or CLF&R to erase the time wm
entered.
4 Select AM or PM. Press ENTER when
finished or BACK to enter a new time.
MALLOW CARAMEL !
CHEESE
DELAY
5 Select the cooking or defl'osting teature
you wish to delay, then set the cooking or
deli'osting program.
6 Check to make sure the Delay time is correct,
and press START on the touchscreen.
The start time will be displayed and will
remain until the oven automatically starts
at the delayed time.
Page 19

Reheating Features
]'_(it_Tes 4
the I_2HEA T
SCY(¢eTI
NOTE." Do not use
the metal shelf
when _heating
pasta, vegetables,
beverages, soup
or a plate of
lej¢{OT}Ul_.
NOTE." Do not use
Sensor Reheating
featm_s twice in
succession on the
same food po_ion--
it may _sult in
severely ove_oohed
or burnt food.
The Reheat Screen allows you to reheat sim,le
servinos_ of prexiousl) cooked foods or a plate
of leflox ers.
REHEAT
iv ,,llc ,,!
Some Foods Not Recommended For Use
With Reheat:
It is best to use Time Cook for these toods:
• Bread products.
• Foods that Inust be reheated uncovered.
• Foods that need to be stirred or rotated.
• Foods calling lot a dry look or crisp surthce
atter reheating.
RICE SOUP
Press Enter Option Comments
PLATE Starts immediately! More done/ Cover with lid or vented
I,ess done plastic wrap.
BEVERAGE Beverage type-- Use wide inouth mug.
Starts ilmnediatelv!
PIZZA, l_t slices Type of ClUSt and Do not cover.
immber of slices
PASTA, 8-12 oz. Starts immediately! More done/
I,ess done
VFGETABLE, 1/2-2 cups Starts iululediatelv'. More done/
I,ess done
CASSEROLE, 1-4 cups Food amotmt
RICE, 1/2-5 cups Food amouI_t
SOUP, 8-24 oz. Starts iu_mediatelv! More done/
I,ess done
Cover with lid or vented
plastic wrap.
Cover with lid or vented
plastic wrap.
Cover with lid or vented
plastic wrap.
Cover with lid or vented
plastic wrap.
Cover with lid or vented
plastic wrap.
19
Page 20

(]oT:zT)gT:zdgfzcg
P eheatirzg
Features
Convenience reheating tbatures microwave
according to ti_od type, quantity and weight.
Use the convenience reheating teatures
to reheat:
, Pizza
, Casserole
, Rice
Reheating Features
,_'g, (70 7!2
1
From the Home Screen, select REHF2_T.
2
From the Reheat Screen, select the fl)od type.
3
Depending on fl)od type, enter the fl)od
description, weight or quantity. Press
ENTER aiter each ent W or CLILAR to erase
the entry.
Check to make sm'e the time and power
level are correct, and press START on the
touchscreen.
After removing food from the oven, stir, if
possible, to even out the temperature. If food
is not hot enough, use Time Cook to reheat
for more time. Reheated foods may have wide
variations in temperature. Some areas may
be extremely hot.
Se;vgSO)"
Reheating
Features
NOTE: Do not use
the metal shelf whe,_
Sens or reheating.
NOTE: Do not use
this fbature twice in
succession oft the
same fbod portior_--
it may _vsult in
severely overcooked
or burnt jbod.
Sensor reheating teatures detect the increasing
hmnidity released during cooking and
automatically at!just the cooking time to
various types and aI/lOtllltS of f()o(l.
Use the sensor reheating leatures to reheat:
, Plate of leftovers
" Beverages
" Soup
" Pasta
" Vegetable
1
From the Home Screen, select REHEAT.
2
From the Reheat Screen, select PLATE,
PASTA, VEGETABLE, BENERAGE or SOUP.
For PASTA, VEGETABLE, PLATE and
SOUP, the oven starts immediately after
selecting the fi_od t}pe. If wm wish to at!just
the cooking time, press LESS DONE or
MORE DONE within the first 30 seconds
to reduce or add time.
4 For BEVERAGE, select the beverage type.
The oven starts immediately.
The oven signals when steam is sensed and the
time remaining begins cotmting down. Turn or
stir the food if necessar>
Do not open the oven door until time is
counting down. If the door is opened, close
it and press START immediatel>
After removing food from the oven, stir,
if possible, to even out the temperature.
Reheated foods may have wide variations in
temperature. Some areas may be extremely hot.
2O
If food is not hot enough after the countdown
time, use Time Cook to reheat for more time.
Page 21

Deflosting Features
P_(lt!lres o[
the DEFROST
_('T(?eTI
Press
Tile Defrost Sci'eell allows xou to choose
froln a xariety of flulctions to defrost bx time,
by weight or b) food type.
DEFROST
! o oooII,'ooo,c,
DELAY ]
Enter
BY TIME
BY WEIGHT
BY FOOD
1 LB. QUICK DEFROST
SOFTEN
MELT
DELAY
Alnount of cooking time
Food weight
Food type, tood weight
Starts inlnlediatelv!
Food type
Food type, tood weight
Cooking or defl'osting flmction and tilne of day to start.
21
Page 22

Allows you to defrost ti)r a selected length
of time. See the Det/"osting Guide for
suggested times.
1 From the Home Screen, select DEFROST.
2 From the Deli'ost Screen, select BY TIME.
3 Enter the defl'osting time using the numbers
on the touchscreen. Press ENTER when
finished or CLEAR to erase the time you
entered.
4 Check to make sure the time and power
level are correct, and press START on the
totlchscreen,
For best results, turn ti)od over after half tile
time and break apart or rearrange pieces tor
more even det/"osting. Shield ally warm areas
with small pieces of foil.
Power level is auton/atically set at 3, but can be
changed. You can defrost small items quickly by
raising the power level atter entering the time.
Power level 7 cuts the total deti'osting time in
about half; power level 10 cuts the total time
to approximately 1/3. Howevec ti}od will need
more frequent attention than usual.
A dull thumping noise may be beard during
defrosting. This is normal when oven is not
operating at High power.
Detrosting Features
I BY TiME I
Defrosting Tips
" Foods fi'ozen ill paper or plastic can be
deti'osted in the package. Closed packages
should be slit, pierced or vented AFTER
tood has partially deti'osted. Plastic storage
containers should be partially uncovered.
" Family-size, prepackaged ti'ozen dinners can
be defi'osted and microwave& If the tood is
in a tbil containe_, transter it to a microwave-
sate dish.
" For more even defl'osting of larger toods,
such as roasts, use Auto Deti'ost. Be sure
large meats are c()mpletely det/"osted betore
cooking.
. Foods that spoil easily should not be allowed
to sit out tor more than one hour Mter
deii'osting. I_o()m temperature promotes
the growth of lmrmful bacteria.
. When defrosted, ti)od should be cool but
sottened in all areas. If still slightly icy, return
to the microwave very briefly, or let it stand
a few minutes.
22
Page 23

Detrosting Features
Dql%sting
Guide
./or 7 me
Defivst
Food Time Comments
Breads, Cakes
Bread, buns or rolls (1 piece) 1 rain.
Sweet rolls (approx. 12 oz) 3 to 5 rain.
Nsh and Seafood
]billets, frozen (1 lb.) 6 to 8 rain.
Shellfish, small pieces (1 lb.) 5 to 7 rain. Plzice bh)rk in casserole. Turn o;vr
and break up after half the time.
Fruit
Plastic pouch - 1 to 2
(1 0-oz package)
Meat
Bacon (1 lb.)
Franks (1 lb.)
Ground meat (1 lb.)
Roast: beef, lmnb, veal, pork
Steaks, chops and cutlets
Poultry
Chicken, broiler-fryer
cut up (2½ to 3 lbs.)
Chicken, whole
(2½ to3 lbs.)
Cornish hen
Turkey breast (4 to 6 lbs.)
24to 6 rain.
2 to 5 rain.
2 to 5 rain.
5 to 7 rain.
12 to 16 min.
per lb.
5 to 7 rain.
per lb.
15 to 19 rain.
17 to 21 min.
7 to 13 min.
per lb.
5 to 9 min.
per lb.
Place mlopened package in o;vn.
Let stand 5 minutes after deti'osting.
Place unopened package in oven.
Microwave just tmtil ti'anks can be
separated. Let stand 5 minutes, if
necessary, to complete det/"osting.
Turn meat over after half the time.
Use power level 1.
Place mlwmpped meat in cooldng
dish. Tm'n o;vr a/ter half the fii-ne
and shiekl wzmn areas with fi)il.
When finished, separate pieces and
let stand to complete deti'osting.
Place wrapped chicken in dish.
IJnwrap and turn over ariel"
half the time. When finished,
separate pieces and microwave
2 to 4 minutes more, if necessary.
Let stand to finish de/i'osting.
Place wIapped chicken in dish.
_Mter half the time, tmwrap and
tm'n chicken o;vx_Shield wam_
areas with %il. Finish det_'osting.
If necessary, run rokl w_lter in the
cavity mlfil giblets can be removed.
Place mlwrapped hen in the o;en
breast-side-up. Ttml over after half
the time. Rtm cool water in the
cavit} tmtil giblets can be removed.
Place unwrapped breast ill dish
breast-side-down. _Mter halt the
time, ttlI'lx ();:el"alld shiekl warm
areas with toil. Finish de/i'osfing.
Let stnnd 1 to 2 bom_ in refl'igemtor
to complete dei/"osting.
23
Page 24

Defi'osting by Weight automatically sets the
defrosting times and power levels to give even
defrosting results tor meats, poultry and fish
weighing up to six pounds.
1 From the Home Screen, select DEFROST.
2 From the Defrost Screen, select
BY WEIGHT.
3 Using the Conversion Guide at right, enter
the fl)od weight using the numbers on the
touchscreen. For example, press 1 and 2
for 1.2 pounds (1 pound, 3 ounces). Press
ENTER when finished or CLEAR to erase
the weight you entered.
4 Check to make sm'e the time is correct, and
press START on the touchscreen.
" Remo\ e meat fl'om package and place on
microwave-satb dish.
, If the oven signals "TURN FOOD OVER,"
turn the _bod over and break apart or
rearrange pieces tin" more even defl'osting.
Shiekl any warm areas with small pieces of
fi)il. The oven will continue to defi'ost if you
don't open the door and turn the food.
Detrosting Features
,_'g, (70 7!7
I BY WEIGHT
Conversion Guide
If tile _eight of food is stated in pounds and
ollnces, the ollnces I/ltlst be COllverted to
tenths (0.1) of a pound.
Weight of Food
in Ounces
1-2
3
4-5
6-7
8
9-10
11
12-13
14-15
Enter Food Weight
(tenths of a pound)
11.1
(1.2
(/.3
(/.4
0.5
().6
0.7
0.8
0.9
1 Lb. Quick
DCmst
" After defrosting, most meats need to stand
5 minutes to complete deti'osting. I,arge
roasts should stand for about 30 minutes.
1 I,b. Quick Defrost autonmticallv sets the
defl'osting tilnes and power levels for foods
weighing one poulad.
• Renlove ineat ti'oln package and place on
a Inicrowave-safe dish.
1 Froln the Holne Screen, select DEFROST.
2 Froln the Defrost Screen, select 1 LB
QUICK DEFROST. The oxen starts
inunediatelx.
DEFROST
I 1 LBQUICK
24
Page 25

Deirosting Features
_'g, (70 7!7
Defl'osting by Food allows you to speciI}' tile
fl)od you are defrosting and automatically sets
tile defl'osting times and power levels to give
even deti'osting results tor that type of fl)od.
1 From tile Home Screen, select DEFROST.
2 From tile Defrost Screen, select BY FOOD.
3 Select tile food type fl'om tile touchscreen.
4 Using tile Conversion Guide at right, enter
tile tood weight using tile numbers on tile
tonchscreen. For example, press 1 and 2 for
1.2 pounds (1 ptmnd, 3 ounces). Press
ENTER when finished. Press CLEAR to
erase the weight you entered or BACK to
select a diHerent fl)od type.
5 Check to make sure the fl)od type and time
are correct, and press START on the
to/lchscreell.
" Retool e meat from package and place on
n/icro_</ve-safe dish.
" If tile oven signals "TUI_N F()OD OVER,"
turn tile fl)od over and break apart or
rearrange pieces fl)r more even deti'osting.
Shield any warm areas with small pieces of
hill. Tile {wen will continue to del/"ost if yon
don't open tile door and turn tile food.
" After defrosting, most meats need to stand
5 minutes to complete deti'osting. I,arge
roasts should stand for about 30 minutes.
DEFROST BY FOOD
BREAD II MEAT
! GROUND _
ROAST CHOPS
II STEAKS OR
II SEAFOOD
Ii POULTRY FISH°R Ii
SAUSAGE
HOTDOG°R II BACON
Conversion Guide
If tile weight of food is stated in pounds and
ounces, tile otlnces I/l[Ist be COllverted to
tenths (0.1) of a pound.
Weight of Food
in Ounces
1-2
3
4-5
6-7
8
9-10
Enter Food Weight
(tenths of a pound)
0 1
0.2
03
0.4
0.5
0.6
11
12-13
14-15
0.7
0.8
0.9
25
Page 26

Detrosting Features
,_'g, (70 7!7
Using the
So/>r_
f),ature
Using the
Melt P)?ature
Tile Soften feature allows you to soften without
melting fi'ozen or refi'igerated fl_ods.
Unwrap butter or cream cheese and place
on plate.
Make sure that flfil covers are removed fl'om
fl'osting or ice cream and place the container
ill OVell.
1 From the Home Screen, select DEFROST.
2 From tile Cook Screen, press SOFTEN.
3 Select tile food type fl'om tile touchscreen.
4 Check to make sure tile time is correct, and
press START on the touchscreen.
Tile Melt feature allows vou to Inelt fl_ods
tot cooking.
1 Place the ui_wrapped iteln into bowl.
Tile Chocolate n_elting ligature is for up
to 16 oz. of chocolate inorsels (chips).
2 Froln the Home Screen, select DEFROST
3 Froln tile Defl'ost Screen, press MELT.
SOFTEN
1/2 STICK II 1 STICK
! BUTTER II FROSTING
BUTTERII BUTTER!!
! _ST,CKSII _CAH
! CREAMII CREAM!
! CREESE_OZIICREESE,,O,
II. I PINTJl 10UART
MELT
I BUTTER BUTTER I
2 STICKS
4 Select tile food type froln tile touchscreen.
5 For all food types except gutteI; enter tile
tood weight and press ENTER. Press CLFAR
if you want to clear your previous eimy; or
press BACK to return to tile previous screen.
6 Check to inake sure tile tilne is correct, and
press START on tile touchscreen.
7 After ren_oving food froln tile oven, stir well
to complete the n/elting process,
MALLOW CARAMEL
CHEESE
26
Page 27

Detrosting Features
_'g, (70 7!7
How to Delay
the Start of
DefYvsting
The Delay fbature allows you to set tile
microwave to delay tile start time flw Time
Cook, Time Cook 1 & 2, and Time Defi'ost,
fl)r up to 24 horn's.
1
From the Home Screen, select DEFROST.
2
From tile Defrost Screen, select DELAY.
Enter tile time you want tile oven to starL
3
(Be sure the microwave clock shows tile
correct time of da>) Press ENTER when
finished or CLFAR to erase the time you
entered.
4 Select AM or PM, Press ENTER when
finished or BACK to enter a ne_,_ time.
5 Select tile cooking or defl'osting tbature
you wish to delay, then set the cooking or
defl'osting program.
6 Check to make sure the Delay time
is correct, and press START on the
[O/lchscreell.
Tile start time will be displa) ed and _ill
remain until the oven automaticall)sta*_s
at tile dela}ed time.
!
DELAY
I
27
Page 28

Microwave Options
k_atures
(the
OPTIONS
S(*F(?efg
The Options Screen allows you to:
• Set the dock
• Set a countdown timer
• Set a Renfinder time
• Set the time for the Auto Nite I,ight
to COllle oi1 aIld go o_
• Change the Beeper volmne
OPTIONS
NITE LITE II
v II 0L !
• Turn the turntable on or off
• Change the microwave features controlled
bv the Custom 1 and Custom 2 features
• Set a reminder to change the charcoal filter
• Change display options
REMINDER OPTIONS
CUSTOM 1 CUSTOM 2 11
I oo° !]
Press Enter Option
SET CLOCK Time of day; AM/PM
TIMER Com_tdown time
REMINDER Reminder time, _dVI/PM
AUTO NITE LITE ON time, AM/PM
OFF time, AM/PM
BEEPER VOLUME I,O_,\\ NORMAl. I,OUD, MUTE
TURNTABLE ON, OFF
EDIT CUSTOM 1, Microwave program
EDIT CUSTOM 2
FILTER REMINDER
Reset reminder time
DISPLAY OPTIONS
28
• Clock display ON/OFF
• Display contrast 1-5
Page 29

Microwave Options
Setting the
(;lock
Setting the
7 mer
Select SET CLOCK Dora the Options Screen
to set the time of day.
1 From the Home Screen, select OPTIONS.
2 From the Options Screen, select
SET CLOCK.
3 Using the numbers on the touchscreen,
enter the time of day. Press ENTER when
finished or CLEAR to erase the time you
entered.
4 Select AM or PM ti'om the touchscreen.
Press ENTER when finished or BACK to
enter a new time.
Timer operates as a minute timer and can
be used at any time, even when the oven
is operating.
1 From the Home Screen, select OPTIONS.
2 From the Options Screen, select TIMER.
3 Using the numbers on the touchscreen,
enter tillle VO/l want to coHn[ down. Press
ENTER when finished or CLF&R to erase
the time you entered.
4 Press START.
I SET CLOCK I
I TIMER I
To cancel the timer, press TIMER OFF.
When time is up, the oven will signal. To turn
ott the timer signal, press TIMER OFF.
NOTE: If tile timer is operating while
microwaving, press DISPLAY TIMER or
DISPLAY COOK TIME to view the time
remaining on the timer or cooking program.
Setting the
Pu?minder
The Relninder feature can be used like an
alarln clock, and can be used at any tilne, even
when the oven is operating. The ]/en/inder
tilne can be set up to 24 hours later.
1
Froln the Holne Screen, select OPTIONS.
2
Froln the Options Screen, select
REMINDER.
Using the immbers on the touchscreen,
enter the tilne you want the oven to ren/ind
you (be sure the inicrowave clock shows
the correct tilne of day). Press ENTER
when finished or CLEAR to erase the tilne
you entered.
4 Select AM or PM fl'Oln the touchscreen.
Press ENTER when finished or BACK to
enter a new tillle.
I REMINDER I
5 If the tilne shown is correct, press ENTER.
When I_enfinder signal occurs, press OK to
turI_ it of.
NOTE: The REM indicator will remain lit to
show that the I/endnder is set.
29
Page 30

Microwave Options
;_'(¢, CO 7!7
Setting the
Auto Nite
Light
The Auto Nite Light can be set to come on
and oo off at desired times.
To set the timer:
1
From tile Home Screen, select OPTIONS.
2
From tile Options Screen, select AUTO
NITE LITE.
3 Tlle display will show tlle previous time tbr
which the Auto Nite Light was set. If you
wish to use that time, press ENTER. To set
a new time, press CHANGE TIME.
4 If entering a new time, using the numbers
on tile touchscreen, enter the time of day
fi)r tile light to come on. (Be sm'e tlle
microwave clock shows the correct time
of clay). Press ENTER when finished or
CLEAR to erase the time you entered.
5 Select AM or PM from tile touchscreen.
Press ENTER when finished or BACK to
enter a new time.
NITE LifE
I AUTO I
6 Using tlle nmnbers on the touchscreen,
enter the time of day {or tile light to go off.
Press ENTER when finished or CLEAR to
erase tile time you entered.
7 Select AM or PM Kom tile touchscieen.
Press ENTER when finished or BACK to
enter a new ti///e.
8 The display will show the time for which the
Auto Nite Light was set. If you wish to use
that time, press ENTER. To set a new time,
press CHANGE TIME and repeat the
previous steps.
Press AUTO NITE LITE to turlx the light on
or off and press ENTER. ]if set to ON, tlle light
will come on and go off at tlle times set.
NOTE: The NITE indicator will remain lit
to show that the Auto Nite Light is set.
Changing
the Beeper
Volume
Turntable
On/Oil
Tlle beeper sound level can be ac!justed.
1 From the Home Screen, select OPTIONS.
2 From the Options Screen, select
BEEPER VOLUME.
3 Using tile arrows on tile touchscreen,
select a vo]itlI//e _]'oI// l//tlte to lotld
4 Press ENTER when done or CANCEL
to kee I) tile current volume.
For best cooking results, leave the turntable
on. ]it can be turned off for lar_*e dishes.
1 From the Home Screen, select OPTIONS.
2 From the Options Screen, select
TURNTABLE.
3 Press TURNTABLE to tm'n the tm'ntable
OIX or ()ill
4 Press ENTER to save or CANCEL to cancel
VO/lr selection.
VOLUME
I BEEPER I
I TURNTABLE I
Sollletillles the turntable Call become too hot
to touch.
Be careful touching the turntable (hu'ing and
alier cooking.
3O
Page 31

Microwave Options
Chancing
the Custom
a m s
Setting the
Chareoal
FiRer
Reminder
The CUSTOM 1 and CUSTOM 2 pads on
the Home Screen can be changed to activate
several diflbrent microwave programs for
one touch recall.
1 From the Home Screen, select OPTIONS.
From the Options Screen, select EDIT
CUSTOM 1 if you want to change the
selection fl)r CUSTOM 1. Select EDIT
CUSTOM 2 if you want to change the
selection fiw CUSTOM 2.
Select a cooking or time feature ti'om the
touchscreen. You can find additional
fl_atures by pressing MORE at the bottom
of the touchscreen.
The Charcoal Filter Reminder is a 180-day
timer to remind you when to change the
charcoal filter.
1 From the Home Screen, select OPTIONS.
2 From the Options Screen, select FILTER
REMINDER.
The display will show the immber of days
remaildlXg until the remilxder signals.
To set the remilxder back to 180 days,
press RESET, then press ENTER.
To tm'n the relninder on or off without
chalxging the COUlxtdown tilne, simI_ly
press ENTER.
CUSTOM 1 CUSTOM 2
I=ll
The CUSTOM 1 and CUSTOM 2 pads on
the Home Screen will show the programs
you selected Ii}r one-touch recall.
REMINDER
I FILTER l
4 To turn the remilxder on or oil press
the FILTER REMINDER button (six the
toilchscreeix,
5 Press ENTER to save or press BACK to
retllrix to the l)revio/Is screen,
If the Filter Relnilxder is turned ON, the
microwave will signal at the end of the
countdown to change the charcoal filter.
To cancel your entry and rett]rlx to the
Options Screen, press CANCEL.
31
Page 32

Microwave Options
Changing
the Di@lay
Options
Changing tile Display Options allows you to
turn the clock display on or off, change tlle
color contrast of the touchscreen display or
change fl'om standard to metric measurements
on the display.
1 From the Home Screen, select OPTIONS.
2 From tile Options Screen, select DISPLAY
OPTIONS.
3 To turn the clock display on or off, press
CLOCK on the touchscreen.
To change the color contrast of the display,
press CONTRAST until tile screen shows
tile contI'ast vo/I want,
4 Press ENTER to save yore" settings or
CANCEL to cancel xour settin ,s
OPTIONS
I DISPLAY
32
Page 33

Other Features
,_'(?, C01!_
Automatic
Fan
An automatic fan feature protects tile
microwave fi'om too much heat rising fl'om
the cooktop below it. It automatically turns
on if it senses too much heat.
Nmt Fan The vent [_|ll rellloves steaI// and other x:q)Ol_
fl'om surfi_ce cooking.
Press VENT once flw high iim speed, twice fin.
medium tim speed, a third time tor low tim
speed or a flmrth time to turn tile fhn off.
Press tlle BOOST pad flw extra ihn speed.
Press LIGHT once fin" bright light, twice fin.
the night light or three times to turn the
light off.
If vou have tin'ned tile tim on, you mav find
that yon cannot turn it off. Tile tim will
automatically turn off when tile internal parts
are cool, It IIIAV stay Oil ]_()r _40 IllinHtes or I/lore
after tile cooktop and microwave controls are
turned off.
O Q
VENT BOOST
Q
off
Child
Lochout
LIGHT
Pressing OFF while on tile Home Screen will
put tile touchscreen display into standby
mode, and the display will be dark. Press the
touchscreen or HOME, or open the door to
"wake up" the display:
Pressing OFF while cooking will cancel the
current program and returns tile display to
the Home Screen.
NOTE: Pressing OFF does not disconnect
the appliance from the power supply.
You may lock tile control panel to prevent tile
microwave fl'om being accidentally started or
used by children.
To lock or tmlock tile controls, press and
hold OFF fl)r about three seconds. When
the control panel is locked, CONTROL IS
LOCKED will be displayed.
33
Page 34

Help Features
;_'(¢, (0 7!7
About
the Hel t)
f),ature
Pressing HELP fl'om the Home Screen allows
you to locate tbatm'e infl)rmation and helpiul
hints. _¢f*el"pressing HELP:
, Press PRODUCT DETAILS to find
infln'mation concerning yore" model and
serial nmnber.
" Press FEATURE HELP to find help locating
illtOrI/l_ltiOll Oll micro,#ave featllres.
" Press SAFETY GUIDE to find help locating
nlicrovvave satet* illforlllatioll,
" Press TROUBLESHOOTER to find
troubleshooting tips flw common microwave
problems.
, Press SPACEMAKER 2,0 OVERVIEW to
find an overview of the features of your
microwave.
Pressing tile HELP pad while on any screen
other than the Home Screen allows wm to find
additional inflwmation on/eatures flmnd on
that screen.
SELECT HELP FUNCTION
DETAILS HELP
1 PRODUCT H FEATURE !
GUIDE SHOOTER
SAFETY 1[ TROUBLE !
OVERVIEW
SPACEMAKER 2,0 !
Using the
Trouble s hooto
Press HELP, then touch any pad on the Touch
Screen fl)r an explanation of that teature.
To locate Troubleshooting Tips for common
i/licrowa', e problelllS:
1 Press the HELP button fl'om the Home
Screen,
2 Select TROUBLESHOOTER fl'om the
to/ichscreen,
3 Select the problem description fl'om the list
on the touchscreen. You can find additional
problems by pressing MORE at the bottom
of the touchscreen, or press BACK to return
to the i)revio/is screen.
.4
Page 35

Other Features
g'(?, (70//Z
Shelf
Food microwaves best when placed on tile
turntable or on the shelf in the lower position.
Only use tile shelf when reheating on more
than one level. Do not store the shelf inside
the oven cavity.
, Make sure the shelf is positioned properly
inside the microwave to prevent damage to
the oven ,q'om arcing.
, Do Ilot rise a microwave browning dish
on the shelf. Tile shelf could overheat.
" Do not use tile oven with tile shelf on tile
microwave floor. This could damage tile
l//icl'owave.
" Llse pot holders when handling tile shell _
it may be hot.
, Do slot rise tile shelf when cooking popcorn.
" Do not use the shelf with Sensor Cooking
or Reheat.
Forbestresa/ts
Ul?evel? rese/ts
Shelf and
Pu?heating
To reheat on 2 levels OR
To reheat 2 dishes on the lower level:
1 Multiply reheat tilne bv 1-1/2.
2 Switch places after 1/2 the tilne.
Switch places after1/2time
Switcl7placesafter1/2time
24evelreheating
To reheat on 3 levels:
1 TuI'n tile turntable ott.
2 Double tile reheating tilne.
3 Switch places twice and give the dishes a
1/2 turn during reheating. (Place dense
toods, or those that require a longer cook
tilne, on the upper shelf first.)
Switchplacestwice
35
Page 36

Microwave Terms
WelPm
Arcing
Covering
Shielding
Standing Time
Definition
Arcing is tile microwave tel'm fl)r sparks ill tile ()veil. Arcing is caused by:
" tile metal shelf being installed incorrectly and touching tile
microwave walls.
" metal or fl)il touching tile side of tile oven.
, fl)il that is not molded to fl)od (upturned edges act like antennas).
" metal such as twist-ties, poultry pins, gold-rimmed dishes.
" recycled paper towels containing small metal pieces.
Covers hokl in moisture, allow for more even heating and reduce cooking
time. Venting plastic wrap or covering with wax paper allows excess steam
to escape.
Ill a regular oven, you shield chicken breasts or baked fl)ods to prevent
ove>browning. When microwaving, you use small strips of flfil to shield
thin parts, such as tile tips of wings and legs on poultry, which would cook
beflwe larger parts.
When you cook with regular 55\ells, fl/ods such as *'(lasts or cakes are
allowed to stand to finish cooking or to set. Standing time is especially
important ill microwave cooking. Note that a microwaved cake is slot
placed on a cooling rack.
Venting
After covering a dish with plastic wrap, you vent tile plastic wrap by
tHrlling back one corner so excess steilI// Cilll escnpe.
36
Page 37

re and (;leaning
Hell)/ul
Hints
Hozo to
Clean the
Inside
An occasional thorough, wilring, with a solution
of baking soda and water keeps the inside fl'esh.
Be certain the oven control is turned off
before clemfing may part of this oven.
m
Walls, Floor, Inside Window, Metal and
Plastic Parts on the Door
Some spatte_ can be removed with a paper
towel; othe_ may require a damp cloth.
Remove greasy spatters with a sudsy cloth, then
rinse with a damp cloth. Do not use abrasive
cleaners or sharp utensils on oven walls.
Never use a commercial oven cleaner on
any part of your microwave.
Removable Turntable and
Turntable Support
To prevent breakage, do not place the
turntable into water just after cooking. Wash
it careflflly in warm, sudsy water or in the
dishwasher. The turntable and support can
be broken if dropped. Remember, do not
operate the oven without the turntable and
support in place.
She/f
Clean with mild soap and water or in the
dishwasher.
Do not clean in a self-cleaning oxen.
. [
Page 38

re and (;leaning
g'(_, (70 771
Hell)/ul
Hints
We recommend against using" cleaners with
ammonia or alcohol, as the), can damage the
appearance of the microwave oven. If you choose
to use a common household eleaneg first apply
the cleaner dire¢qly to a clean cloth, then wipe
the soiled area.
Case
Clean the outside of the microwave with a
sudsy cloth. Rinse and then dry. Wipe the
window clean with a damp cloth.
Control Panel
X_]pe with a damp cloth. Dry thoroughly. Do
not use cleaning sprays, large amounts of soap
and water; abrasives or sharp objects on the
panel--they can damage it. Some paper towels
can also scratch the control panel.
Door Panel
Before cleaning the fl'ont door panel, make
sure you know what t)'pe of panel you have.
Reter to the eighth digit of the model number.
"S" is stainless steel, "I," is CleanSteel and "B",
"W" or "(7' are plastic colors.
Stainless Steel
The stainless steel panel can be cleaned
with Stainless Steel Magic or a similar product
using a clean, sott cloth. Apply stainless cleaner
careflfllv to avoid the surrounding plastic parts.
Do not use appliance wax, polish, bleach or
products containing chlorine on Stainless
Steel finishes.
CleanSteel
Use a clean, soft, light and lightly dampened
cloth, then dry thoroughly. Do not use
appliance wax, polish, bleach or products
containing any chemical agent on the
CleanSteel surtaces.
Plastic Color Panels
Use a clean, soil lightly dampened cloth, then
dry thoroughly.
Door Seal
It's important to kee I) the area clean where
the door seals against the microwave. Lrse only
mild, non-abrasive detergents applied with a
clean sponge or soft cloth. Rinse well.
Bottom
Clean off the grease and dust on the bottom
otten. Use a solution of warm water and
detergent.
Vent l')zn The vent tan has 2 metal reusable grease filters.
Models that redrculate air back into the room
also use a charcoal filter,
38
gharcoa/Filter behind
ActiveVent[onsomemodels)
_]iO00
t t
Reusable Grease Filters
(onallmodels)
Page 39

re and (;leaning
Pu?usable
Grease
Filters
Pu?moving
and Cleaning
the lqlto
Cha" rcoal
Filter (on
some models)
The metal filters trap grease released bv foods
on the cooktop. Thev also prevent flames fl'om
toods oil the cooktop fl'om danmging the
inside of the microwave.
To remove, slide it to the outside using
the tab. Pull it down and out.
To clean the grease filter, soak it and then
swish it around in hot water and detergent.
[)OIl't /ISe aIllI//OIlia or aIllIllOIlia prodtlcts
because they will darken the metal.
i,ight brushing can be used to remove
embedded dirt.
Rinse, shake and let it dry before replacing.
To replace, slide the filter in the ti'ame slot
at the outside of the opening. Pull up and in
to lock into place.
The charcoal filter cammt be cleaned. It must
be replaced. Order Part No. WB2X10956 from
your GE supplier.
If the model is not vented to the outside,
the air will be recirculated through
a disposable charcoal filter that helps
remove smoke and odors.
For this reason, the filters must AI,X,\'AYS be in
place when the hood is used. The grease filters
should be cleaned once a month, or as needed.
The charcoal filter should be replaced when it
is noticeably dirty or discolored (usually atter
6 to 12 months, depending on hood usage).
See "Optional I_dts", page 7, ti)r more
inlormation.
Puqalacing
the Charcoal
Filter
To remove the charcoal filter:
1 Discmmect power at the main fuse or circuit
breaker panel or pull the plug.
2 Remove tile top grille by removing the screws
on top of the grille that hold it in place and
sliding the grille to the leR (opening the
door makes grille remo\;d easier).
3 Slide the filter toward the ti'ont of the oven
alld relnove it.
To install a new filter:
1 Remove plastic and other outer wrapping
from the new filter.
2 Insert the flter into the top opening of the
oven as shown. It will rest at an angle on
2 side support tabs and in fl'ont of the right
rear tab.
3 Replace the grille and screws,
Remove grille screws to remove the grille
@
000
39
Page 40

re and Cleaning
Cooktop Light/
Night Light
Oven Light
Replace the burned-out bulb with a 120 volt,
20-watt halogen bulb (WB36X10213), available
from your GE supplier.
1 To replace the bulb(s), first disconnect the
power at the main fltse or circuit breaker
panel or pull the plug.
2 Remove the screw at the right edge of the
light covet" and push on the left edge of
the covet" to open,
3 Be sm'e the bulb(s) to be replaced are
cool betm'e removing. After breaking the
adhesive seal, remove the bulb by pulling
straight out. Replace with the same size
and type bulb.
4 Raise the light shield and replace the screw,
Connect electrical power to the oven,
Replace the burned-out bulb with a 120 volt,
20-watt halogen bulb (WB36X10213), available
from your GE supplier.
" _4_- /
ReHToge screw
Remove grille screws to renlove the grille
1 To replace the oven light, first disconnect
the power at the main fuse or circuit breaker
panel or pull the plug.
2 Remove the top grille by taking out the
screws on top of the grille that hold it in
place and sliding the grille to the left
(opening the door makes grille remox_d
easier).
3 Lift off the light cover at the left of the top
opening.
4 Pinch the clips that hold the light socket in
place and lift the socket otlt.
5 Remove the bulb fl'om the light socket by
pulling straight out. Replace with the same
size and type bulb, then replace the light
socket and coveL
6 Replace the grille and scre*_s. Connect
electrical power to the o_en.
@
tc
½ ooc
LightCover
r _
c_
l,d ooo
44)
Page 41

Problem Solver
For a complete list of solutions to common microwaving problems, use the
Troubleshooting Tips feature located by pressing the HELP button while
on the microwave Home Screen (see Using the Troubleshooter).
If your microwave will not operate, check the Problem Solver below:
Problem
Oven will not start
"CONTROL IS
LOCKED" appears
on the display
Possible Cause
Control panel is asleep
A ftlse in goilr bol//e I/lay
be blown or the circuit
breaker tripped
Power surge
Controls are not set properly
Plug not tully inserted into
Door is not closed
START was not pressed
The control has bee** locked
What To Do
" This is normal. Press HOME or the
touchscreen to acti_lte the control panel.
" Replace fuse or reset circuit breaker.
, Unplug the microwave oven, then plug it
back in.
, Check controls.
, Make sure the 3-prong phlg on the oven is
hilly wall outlet inserted into wall outlet.
, Open and close the door secm'el>
, Press START.
" Press and hokl OFF ti)r about 3 seconds to
mfiock the control.
Things That
Are Normal
With Your
Microwave
O'ueTt
Steam or x;ipor escaping t/'on* arotlnd
the door.
" Light reflection around door or outer case.
, Dimming oven light and change in the
blower sound at power levels other
than high.
, Moisture on the oven door and walls while
cooking. Wipe the moisture oil with a paper
towel or sott ch)th,
" Moisture between tile oven door panels when
cooking certain fl)ods. Moisture shoukl
dissipate shortly aiter cooking is finished.
, Dull thmnping sound while oven is operating.
TV/radio interibrence might be noticed
while using the microwave. Similar to
the interierence caused by other small
appliances, it does not indicate a problem
with the microwave. Ph/g the microwave into
a different electrical circuit, move the radio
or TV as Jthr away fl'om the microwave as
possible, or check the position and signal
of the TV/radio antenna.
The Active Vent door (oil some models)
will open during operation, and remain
open while the microwave is rulming,
to keep the electronics cool. It is also
normal to hear a clicking noise as the
vent door ()}bells alld closes.
41
Page 42

Microwave Oven Warranty
All warranty se_wice provided @ our b_tcto U Se_wice Centers
or an authorized Customer Card _ technician. To schedu# service, on-line,
24 hours a day, visit us at fie. corn or call 800. GE. CARES (800. 432.2 737).
Please have serial and modal numbers availab# when calling'jbr service.
Staph, your **,eeipt h(,re.
I'*o_( o[ the oriqinal pmr:hase
date is needed to obt_lin sez'vi_ e
under the warranty.
For The Period Of: GE Will Replace:
One Year ArO,part of the microwave (wen which flfils due to a defbct in materials or workmanship. During
From the date o/the this limited one-year warranty_ GE will also provide, free ofcha_e, all labor and related service costs to
orig'inalpu*_ha,se replace the de,betide pal-{.
Five Years The mau_etron tube, tf the magnetron tube fidls due to a defect in materials or workmanship. During
From the date o/the thisfive-year limited warranty_ }on *_i]l be responsible fiw an} labor or related service costs.
orig'inalpm_ha,se
What Is Not Covered:
[] Service trips to your home to teach you how to use
the product,
[] Improper installation, delivery or maintenance.
[] Product not accessible to provide required service. []
[] FMlure of the product or damage to the product if it is
abused, misused (for exmnple, cavity arcing from wire []
rack or metal/foil), or used for other tha_a the intended
purpose or used commercially. []
[] Replacement of the cooktop light bulb.
[] Replacement of house fuses or resetting of circuit
breakers.
Damage to the product caused by accident, fire, floods
or acts of God.
Incidental or consequential dmnage caused by possible
defects with this appliance.
Damage caused after delivery.
EXCLUSION OF IMPLIED WARRANTIES--Your sole and exclusive remedy is product repair as provided in this
Limited Warranty. Any implied warranties, including the implied warranties of merchantability or fitness for a
particular purpose, are limited to one year or the shortest period allowed by law.
Thi.s warranl_, i.sextended to the origSnal pu_rha._er and a_t3,.su(eeeding_ ownerjbr produet._ pu_rha._ed,/br home u.se
within the USA. (/the p,vduet i.s located in an area where .service hy a (;E Authorized Servi(_,r i.s not availabl6 you ,mty
be _spo_t.siblejbr a trip eha_g_"or you *reLybe _Wub_'d to bring the p_duct to an Autho*Jz_'d (;E Service Loeation jbr .service.
[_t kbl.d:< the wa_v'a_tly excludes the .service cal£ to 3,our home.
&me .states do _ot alh_w the exclusio_ or limitatio_ (j'ineide*_tal or co_seque*_tial damages. This warra_ly gives you .sJ)egif!e
h'gml rig_t._, arid you ,m_y a£o have other rights which va U ,f!om ._tate to .state. 7b I:_ow what your hwd rig&ts am co_sult
your local or .state (vm._umer c{//hi'_:sqffiee or your state{_ Attor*_U General.
Warrantor: General Electric Company. Louisville, KY 40225
42
Page 43

Notes
43
Page 44

Consumer Support
GE Appliances Website
Have a question or need assistance with your appliance? %) the (;E Appliances "_b site 24 hom_ a day,
an} da} of tile }ear! For gieater cam enience and ii(ster service, }ou can now download Owner's Manuals,
order p;u_s or even schedule service on-line.
Schedule Service
Expel_ (;E repair service is onl} one step awa} h'om _our dam: (;et on-line and schedule _our service at
}o_.lr con'_enience 24 hom_ an? da} of tile ?ear! ()l call 800.GE.(_ARES 800.432.2737) during natural
bt tSilleSS he/tiN,
g& €On/
ge. cam
Real Life Desl gn Studio ge.com
(;E suppoI_s tile [)nixel_al Desion,,_ concept--products, services, and ellvironlllellts that can be used b'_
people of all ages, sizes, and capabilities. We recognize the need to design tbr a wide range of physical and
mental abilities and impaim_ents. For details (ff GE's [)nive_al Design applications, including ldtchen
design ideas fin" people with disabilities, check out our _,_'eb site toda> For tile hearing impaired, please
call 800.TDD.GEAC (800.833.4322).
Extended Warranties ge.com
Pro'chase a (;E extended _<m_mt\ and learn about special discotmts that are mailable while _our warrant}
is still in effect. You can pmchase it on-line an) time or call 800.626.2224 during natural business hom_.
(;E (kmsumer Home Ser;Jces will still be there atter }our warrant} expires.
Parts and Accessories
Individuals qualified to service their own appliances can have parts or accessories sent direct.Iv to their
homes (VISA, MasteK_aid, and Discover cards a_e accepted). Order on-line today, 24 houl_ e\ ery day, or
by phone at 800.626.2002 during normal business hom_.
Instructions contained in thNmanual cover procedures to be performed by any user. Other servicing generally
should be referred to qualified service personnel. Caution must he exercised, since impreper servicing may cause
unsafe operation.
g& €orn
Contact Us ge.com
If you are not satisfied with tile service you receive fl'om (;E, contact us on our Web site with all tile details,
including your phone number; or write to: General Managel; Customer Relations
GE Appliances, Appliance Park
Louisville, KY 40225
Register Your Appliance
Register yore" new appliance on-line--at yore" comenience! Timel) product registration will allow for
enhanced communication and prompt service trader the temps of)our warrant_, should the need arise.
You may also mail in the prepfinted registration card included in the packing material.
ge. COm
tari)m_d i)_ Mala) _ia
 Loading...