

Page 1
Page 2

Page 3

Contents
1Getting Help. . . . . . . . . . . . . . . . . . . . . . . . . . . . . . . . . . . . . . . . . . . . . . . 1
Gateway Web site . . . . . . . . . . . . . . . . . . . . . . . . . . . . . . . . . . . . . . . . . . . . 3
Using Support . . . . . . . . . . . . . . . . . . . . . . . . . . . . . . . . . . . . . . . . . . . . 3
Help and Support . . . . . . . . . . . . . . . . . . . . . . . . . . . . . . . . . . . . . . . . . . . . . 5
Searching for a topic . . . . . . . . . . . . . . . . . . . . . . . . . . . . . . . . . . . . . . . 6
BigFix . . . . . . . . . . . . . . . . . . . . . . . . . . . . . . . . . . . . . . . . . . . . . . . . . . . . . . 6
Using Your Computer guide . . . . . . . . . . . . . . . . . . . . . . . . . . . . . . . . . . . . . 7
Online help . . . . . . . . . . . . . . . . . . . . . . . . . . . . . . . . . . . . . . . . . . . . . . . . . . 7
2 Checking Out Your Gateway Convertible Notebook . . . . . . . 9
Front . . . . . . . . . . . . . . . . . . . . . . . . . . . . . . . . . . . . . . . . . . . . . . . . . . . . . . 10
Left . . . . . . . . . . . . . . . . . . . . . . . . . . . . . . . . . . . . . . . . . . . . . . . . . . . . . . . 11
Right . . . . . . . . . . . . . . . . . . . . . . . . . . . . . . . . . . . . . . . . . . . . . . . . . . . . . . 12
Bottom . . . . . . . . . . . . . . . . . . . . . . . . . . . . . . . . . . . . . . . . . . . . . . . . . . . . 13
Keyboard area . . . . . . . . . . . . . . . . . . . . . . . . . . . . . . . . . . . . . . . . . . . . . . 15
Identifying your model . . . . . . . . . . . . . . . . . . . . . . . . . . . . . . . . . . . . . . . . 16
Gateway model and serial number . . . . . . . . . . . . . . . . . . . . . . . . . . . 16
Microsoft Certificate of Authenticity . . . . . . . . . . . . . . . . . . . . . . . . . . . 17
Finding your specifications . . . . . . . . . . . . . . . . . . . . . . . . . . . . . . . . . . . . . 17
Accessories . . . . . . . . . . . . . . . . . . . . . . . . . . . . . . . . . . . . . . . . . . . . . . . . 17
3Getting Started . . . . . . . . . . . . . . . . . . . . . . . . . . . . . . . . . . . . . . . . . . . 19
Installing the main battery . . . . . . . . . . . . . . . . . . . . . . . . . . . . . . . . . . . . . 20
Connecting the AC adapter . . . . . . . . . . . . . . . . . . . . . . . . . . . . . . . . . . . . 21
Protecting from power source problems . . . . . . . . . . . . . . . . . . . . . . . 23
Connecting the dial-up modem . . . . . . . . . . . . . . . . . . . . . . . . . . . . . . . . . 24
Connecting to a cable or DSL modem or to an Ethernet ne twork . . . . . . 25
Starting your convertible notebook . . . . . . . . . . . . . . . . . . . . . . . . . . . . . . 26
Waking up your convertible notebook . . . . . . . . . . . . . . . . . . . . . . . . . 27
Turning off your convertible notebook . . . . . . . . . . . . . . . . . . . . . . . . . . . . 28
Restarting (rebooting) your convertible notebook . . . . . . . . . . . . . . . . . . . 28
Status indicators . . . . . . . . . . . . . . . . . . . . . . . . . . . . . . . . . . . . . . . . . . . . . 30
Using the keyboard . . . . . . . . . . . . . . . . . . . . . . . . . . . . . . . . . . . . . . . . . . 32
Key types . . . . . . . . . . . . . . . . . . . . . . . . . . . . . . . . . . . . . . . . . . . . . . . 33
System key combinations . . . . . . . . . . . . . . . . . . . . . . . . . . . . . . . . . . 34
Tablet Control Buttons . . . . . . . . . . . . . . . . . . . . . . . . . . . . . . . . . . . . . . . . 36
Programming the Windows Journal button . . . . . . . . . . . . . . . . . . . . . 37
Using the EZ Pad touchpad . . . . . . . . . . . . . . . . . . . . . . . . . . . . . . . . . . . . 39
www.gateway.com
i
Page 4

Using the display . . . . . . . . . . . . . . . . . . . . . . . . . . . . . . . . . . . . . . . . . . . . .42
Converting the display from notebook to tablet mode . . . . . . . . . . . . .42
Changing display orientation . . . . . . . . . . . . . . . . . . . . . . . . . . . . . . . . .44
Adjusting brightness . . . . . . . . . . . . . . . . . . . . . . . . . . . . . . . . . . . . . . .45
Using the pen . . . . . . . . . . . . . . . . . . . . . . . . . . . . . . . . . . . . . . . . . . . . . . .45
Storing and removing the pen . . . . . . . . . . . . . . . . . . . . . . . . . . . . . . .46
Pen lost alarm . . . . . . . . . . . . . . . . . . . . . . . . . . . . . . . . . . . . . . . . . . . .47
Adjusting the volume . . . . . . . . . . . . . . . . . . . . . . . . . . . . . . . . . . . . . . . . . .48
Turning your wireless radio on or off . . . . . . . . . . . . . . . . . . . . . . . . . . . . .49
4 Using Windows XP Tablet PC 2005 . . . . . . . . . . . . . . . . . . . . . . .51
Using Windows XP Tablet PC 2005 . . . . . . . . . . . . . . . . . . . . . . . . . . . . . .52
Using Tablet PC extensions . . . . . . . . . . . . . . . . . . . . . . . . . . . . . . . . . . . .53
Calibration . . . . . . . . . . . . . . . . . . . . . . . . . . . . . . . . . . . . . . . . . . . . . . .53
Gestures . . . . . . . . . . . . . . . . . . . . . . . . . . . . . . . . . . . . . . . . . . . . . . . .53
Pen button . . . . . . . . . . . . . . . . . . . . . . . . . . . . . . . . . . . . . . . . . . . . . . .54
Tips . . . . . . . . . . . . . . . . . . . . . . . . . . . . . . . . . . . . . . . . . . . . . . . . . . . .54
Tablet Input Panel (TIP) . . . . . . . . . . . . . . . . . . . . . . . . . . . . . . . . . . . .55
Using speech recognition . . . . . . . . . . . . . . . . . . . . . . . . . . . . . . . . . . .56
Adjusting tablet and pen settings . . . . . . . . . . . . . . . . . . . . . . . . . . . . . . . .57
Programming the buttons . . . . . . . . . . . . . . . . . . . . . . . . . . . . . . . . . . .57
Adjusting the Tablet PC Input Panel Settings . . . . . . . . . . . . . . . . . . .58
5 Using Drives and Ports . . . . . . . . . . . . . . . . . . . . . . . . . . . . . . . . . . .59
Changing modules . . . . . . . . . . . . . . . . . . . . . . . . . . . . . . . . . . . . . . . . . . . .60
Using the CD or DVD drive . . . . . . . . . . . . . . . . . . . . . . . . . . . . . . . . . . . . .62
Identifying drive types . . . . . . . . . . . . . . . . . . . . . . . . . . . . . . . . . . . . . .63
Inserting a CD or DVD . . . . . . . . . . . . . . . . . . . . . . . . . . . . . . . . . . . . .64
Playing a CD . . . . . . . . . . . . . . . . . . . . . . . . . . . . . . . . . . . . . . . . . . . . .64
Playing a DVD . . . . . . . . . . . . . . . . . . . . . . . . . . . . . . . . . . . . . . . . . . . .65
Creating CDs and DVDs . . . . . . . . . . . . . . . . . . . . . . . . . . . . . . . . . . . .65
Using the memory card reader . . . . . . . . . . . . . . . . . . . . . . . . . . . . . . . . . .66
Memory card types . . . . . . . . . . . . . . . . . . . . . . . . . . . . . . . . . . . . . . . .66
Inserting a memory card . . . . . . . . . . . . . . . . . . . . . . . . . . . . . . . . . . . .66
Using a memory card . . . . . . . . . . . . . . . . . . . . . . . . . . . . . . . . . . . . . .67
Removing a memory card . . . . . . . . . . . . . . . . . . . . . . . . . . . . . . . . . . .67
Adding and removing a PC Card . . . . . . . . . . . . . . . . . . . . . . . . . . . . . . . .67
Viewing the display on a projector or monitor . . . . . . . . . . . . . . . . . . . . . .69
Connecting a video camera to your convertible notebook . . . . . . . . . . . . .71
ii
www.gateway.com
Page 5

6 Managing Power . . . . . . . . . . . . . . . . . . . . . . . . . . . . . . . . . . . . . . . . . 73
Monitoring the battery charge . . . . . . . . . . . . . . . . . . . . . . . . . . . . . . . . . . 74
Recharging the batteries . . . . . . . . . . . . . . . . . . . . . . . . . . . . . . . . . . . . . . 75
Recalibrating the batteries . . . . . . . . . . . . . . . . . . . . . . . . . . . . . . . . . . . . . 75
Changing batteries . . . . . . . . . . . . . . . . . . . . . . . . . . . . . . . . . . . . . . . . . . . 76
Replacing the main battery . . . . . . . . . . . . . . . . . . . . . . . . . . . . . . . . . 77
Installing a multibay battery . . . . . . . . . . . . . . . . . . . . . . . . . . . . . . . . . 78
Extending battery life . . . . . . . . . . . . . . . . . . . . . . . . . . . . . . . . . . . . . . . . . 79
Conserving battery power . . . . . . . . . . . . . . . . . . . . . . . . . . . . . . . . . . 79
Using alternate power sources . . . . . . . . . . . . . . . . . . . . . . . . . . . . . . 80
Changing power modes . . . . . . . . . . . . . . . . . . . . . . . . . . . . . . . . . . . . 81
7 Upgrading Your Convertible Notebook . . . . . . . . . . . . . . . . . . . 83
Preventing static electricity discharge . . . . . . . . . . . . . . . . . . . . . . . . . . . . 84
Adding or replacing memory . . . . . . . . . . . . . . . . . . . . . . . . . . . . . . . . . . . 85
Adding or replacing memory . . . . . . . . . . . . . . . . . . . . . . . . . . . . . . . . 85
Replacing the hard drive kit . . . . . . . . . . . . . . . . . . . . . . . . . . . . . . . . . . . . 89
8 Using the Optional Port Replicator . . . . . . . . . . . . . . . . . . . . . . . 95
Top . . . . . . . . . . . . . . . . . . . . . . . . . . . . . . . . . . . . . . . . . . . . . . . . . . . . . . . 96
Right . . . . . . . . . . . . . . . . . . . . . . . . . . . . . . . . . . . . . . . . . . . . . . . . . . . . . . 97
Back . . . . . . . . . . . . . . . . . . . . . . . . . . . . . . . . . . . . . . . . . . . . . . . . . . . . . . 98
Connecting to the port replicator . . . . . . . . . . . . . . . . . . . . . . . . . . . . . . . . 99
Attaching to the port replicator . . . . . . . . . . . . . . . . . . . . . . . . . . . . . . 99
Disconnecting from the port replicator . . . . . . . . . . . . . . . . . . . . . . . . 102
9 Maintaining Your Convertible Notebook . . . . . . . . . . . . . . . . . 103
Caring for your convertible notebook . . . . . . . . . . . . . . . . . . . . . . . . . . . . 104
Display screen . . . . . . . . . . . . . . . . . . . . . . . . . . . . . . . . . . . . . . . . . . 105
Using the Pen . . . . . . . . . . . . . . . . . . . . . . . . . . . . . . . . . . . . . . . . . . 105
Cleaning your convertible notebook . . . . . . . . . . . . . . . . . . . . . . . . . . . . . 106
Cleaning the exterior . . . . . . . . . . . . . . . . . . . . . . . . . . . . . . . . . . . . . 106
Cleaning the keyboard . . . . . . . . . . . . . . . . . . . . . . . . . . . . . . . . . . . . 107
Cleaning the convertible notebook screen . . . . . . . . . . . . . . . . . . . . 107
Cleaning CDs or DVDs . . . . . . . . . . . . . . . . . . . . . . . . . . . . . . . . . . . 107
Protecting your convertible notebook from viruses . . . . . . . . . . . . . . . . . 108
Updating Windows . . . . . . . . . . . . . . . . . . . . . . . . . . . . . . . . . . . . . . . . . . 111
Restoring your system . . . . . . . . . . . . . . . . . . . . . . . . . . . . . . . . . . . . . . . 112
Microsoft System Restore . . . . . . . . . . . . . . . . . . . . . . . . . . . . . . . . . 112
Reinstalling programs and drivers . . . . . . . . . . . . . . . . . . . . . . . . . . . 113
Restoring your converti ble notebook to the origi nal configuration . . 113
www.gateway.com
iii
Page 6

10 Troubleshooting . . . . . . . . . . . . . . . . . . . . . . . . . . . . . . . . . . . . . . . . .115
Safety guidelines . . . . . . . . . . . . . . . . . . . . . . . . . . . . . . . . . . . . . . . . . . . .116
First steps . . . . . . . . . . . . . . . . . . . . . . . . . . . . . . . . . . . . . . . . . . . . . . . . .117
Troubleshooting . . . . . . . . . . . . . . . . . . . . . . . . . . . . . . . . . . . . . . . . . . . . .118
Audio . . . . . . . . . . . . . . . . . . . . . . . . . . . . . . . . . . . . . . . . . . . . . . . . . .118
Battery . . . . . . . . . . . . . . . . . . . . . . . . . . . . . . . . . . . . . . . . . . . . . . . . .118
CD drives . . . . . . . . . . . . . . . . . . . . . . . . . . . . . . . . . . . . . . . . . . . . . . .118
Device installation . . . . . . . . . . . . . . . . . . . . . . . . . . . . . . . . . . . . . . . .118
Display . . . . . . . . . . . . . . . . . . . . . . . . . . . . . . . . . . . . . . . . . . . . . . . . .119
DVD drives . . . . . . . . . . . . . . . . . . . . . . . . . . . . . . . . . . . . . . . . . . . . .120
File management . . . . . . . . . . . . . . . . . . . . . . . . . . . . . . . . . . . . . . . . .123
Hard drive . . . . . . . . . . . . . . . . . . . . . . . . . . . . . . . . . . . . . . . . . . . . . .124
Internet . . . . . . . . . . . . . . . . . . . . . . . . . . . . . . . . . . . . . . . . . . . . . . . .125
Keyboard . . . . . . . . . . . . . . . . . . . . . . . . . . . . . . . . . . . . . . . . . . . . . . .126
Memory . . . . . . . . . . . . . . . . . . . . . . . . . . . . . . . . . . . . . . . . . . . . . . . .127
Memory card reader . . . . . . . . . . . . . . . . . . . . . . . . . . . . . . . . . . . . . .127
Modem (cable or DSL) . . . . . . . . . . . . . . . . . . . . . . . . . . . . . . . . . . . .128
Modem (dial-up) . . . . . . . . . . . . . . . . . . . . . . . . . . . . . . . . . . . . . . . . .128
Mouse . . . . . . . . . . . . . . . . . . . . . . . . . . . . . . . . . . . . . . . . . . . . . . . . .132
Networks . . . . . . . . . . . . . . . . . . . . . . . . . . . . . . . . . . . . . . . . . . . . . . .132
Passwords . . . . . . . . . . . . . . . . . . . . . . . . . . . . . . . . . . . . . . . . . . . . . .134
PC Cards . . . . . . . . . . . . . . . . . . . . . . . . . . . . . . . . . . . . . . . . . . . . . . .134
Pen . . . . . . . . . . . . . . . . . . . . . . . . . . . . . . . . . . . . . . . . . . . . . . . . . . .134
Power . . . . . . . . . . . . . . . . . . . . . . . . . . . . . . . . . . . . . . . . . . . . . . . . .135
Printer . . . . . . . . . . . . . . . . . . . . . . . . . . . . . . . . . . . . . . . . . . . . . . . . .136
Sound . . . . . . . . . . . . . . . . . . . . . . . . . . . . . . . . . . . . . . . . . . . . . . . . .137
Touchpad . . . . . . . . . . . . . . . . . . . . . . . . . . . . . . . . . . . . . . . . . . . . . . .138
Video . . . . . . . . . . . . . . . . . . . . . . . . . . . . . . . . . . . . . . . . . . . . . . . . . .139
Telephone support . . . . . . . . . . . . . . . . . . . . . . . . . . . . . . . . . . . . . . . . . . .140
Before calling Gateway Customer Care . . . . . . . . . . . . . . . . . . . . . . .140
Telephone numbers . . . . . . . . . . . . . . . . . . . . . . . . . . . . . . . . . . . . . .141
Self-help . . . . . . . . . . . . . . . . . . . . . . . . . . . . . . . . . . . . . . . . . . . . . . .142
Tutoring . . . . . . . . . . . . . . . . . . . . . . . . . . . . . . . . . . . . . . . . . . . . . . . .142
Training . . . . . . . . . . . . . . . . . . . . . . . . . . . . . . . . . . . . . . . . . . . . . . . .142
A Safety, Regulatory, and Legal Information . . . . . . . . . . . . . . .143
Index . . . . . . . . . . . . . . . . . . . . . . . . . . . . . . . . . . . . . . . . . . . . . . . . . . . . . . . 155
iv
www.gateway.com
Page 7

Chapter 1
Getting Help
• Using the Gatewa y We b site
• Using Help and Support
•Using BigFix
• Using Your Co mputer guide
• Using online help
1
Page 8

Chapter 1: Getting Help
Thank y ou for purchasing our
con vertible notebook!
Y ou have made an excellent decision choosing Gateway. We are sure that
you will be pleased with the outstanding quality, reliability, and
performance of your new convertible notebook. Each and every Gateway
convertible notebook uses the latest technology and passes through the
most stringent quality control tests to ensure that you are pr ovided with
the best product possible.
Your new Gateway convertible notebook is designed to provide an
exceptional balance of performance and portability. Your convertible
notebook uses the latest chipset and mobile processor technologies to
manage the processor speed and power consumption for a greater battery
life experience. This design provides you with maximum performance
when plugged into AC power balanced wi th op timized ba ttery life when
on battery power.
Please read this guide carefully to familiarize yourself with our range of
services and support. We have highlighted some basic care and safety
information to help you keep your convertible notebook in good
operating condition.
Gateway stands behind our value propo sition to our customers — to
provide best-of-class service and support in addition to high-quality,
brand-name components at affordable prices. If you ever have a problem,
our knowledgeable, dedicated customer service department will provide
you with fast, considerate service.
We sincerely hope that you will receive the utmost satisfaction and
enjoyment from your new Gateway convertible notebook for years to
come.
Thank you again, from all of us at Gateway.
2
www.gateway.com
Page 9
Gateway Web site
Gatewa y W eb site
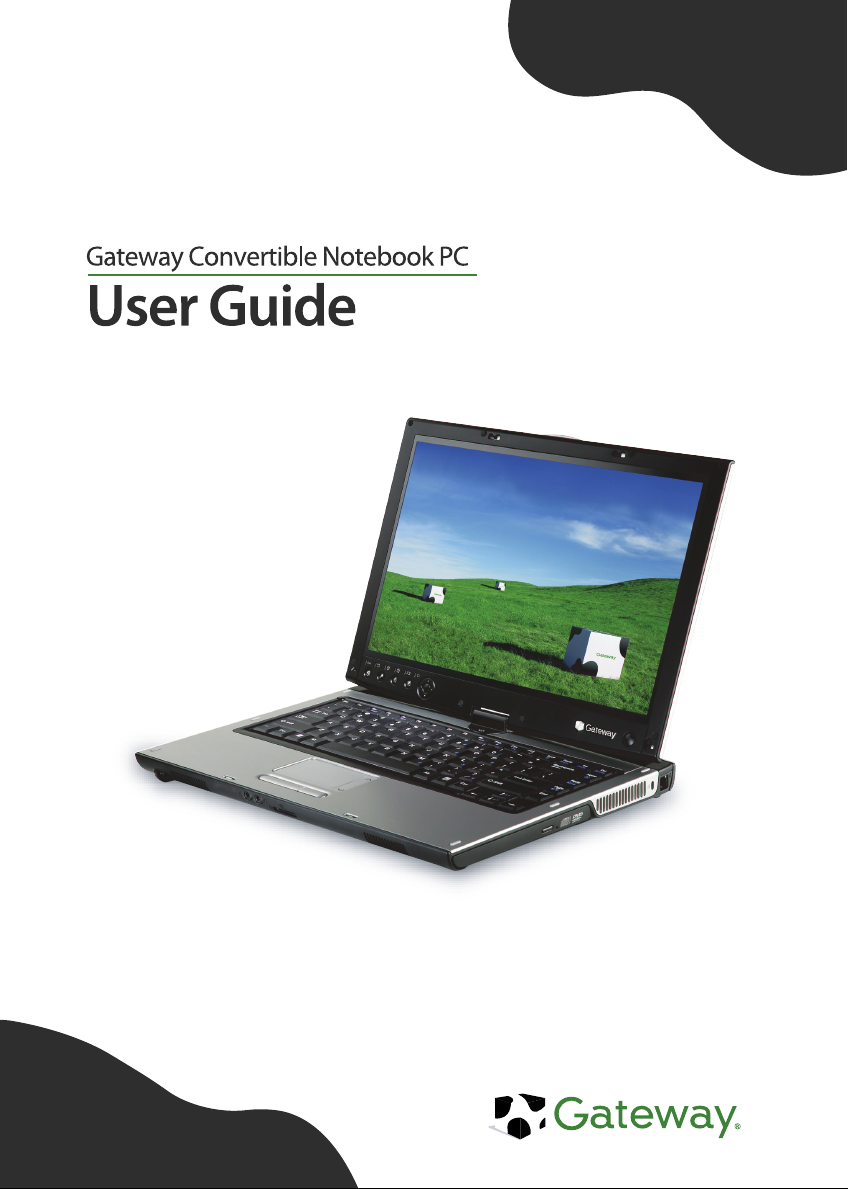
Gateway's online support is available 24 hours per day, 7 days per week
and provides the most current drivers, product specifications, tutorials,
and personalized information about your convertible notebook. Vi sit the
Gateway Support Web site at support.gateway.com
.
Using Support
The Support site is divided into seven major areas:
■ Support Home
■ Product Support
■ Downloads
■ Customer Ser vice
■ Upgrade Center
■ Resources
■ Contact Us
www.gateway.com
3
Page 10

Chapter 1: Getting Help
Support Home
Tap or click Support Home. To view support documents for your
convertible notebook, type your serial number in the
then tap or click
Submit.
Serial Number box,
Tap or click the arrow button to open the
box, then tap or click
documentation, specifications, and guides for all Gateway convertible
notebooks.
Notebook Computers to access product
Select Your Computer Product
Product Support
T ap or click Product Support to view a list of all the products that Gateway
supports.
Downloads
Tap or click Downloads to get the latest software updates for BIOS and
driver upgrades. By entering your serial number you get drivers specific
to your convertible notebook. Tap or click
through a step-by-step wizard to locate your drivers.
Browse All Downloads to walk
Customer Service
Tap or click Customer Service to view information about your account and
general information about warranties and special offers.
Upgrade Cent er
Tap or click Upgrade Center to view and purchase upgrades for your
convertible notebook.
Resources
Tap or click Resources to access utilities to help you manage your
convertible notebook.
Contact Us
Tap or click Contact Us to access links to customer care with a live
technician, including chat and e-mail. Tap or click
Gateway telephone numbers for both sales and support. For more
information, see “Telephone support” on page 140.
4
www.gateway.com
Call Us to get a list of
Page 11
Help and Support
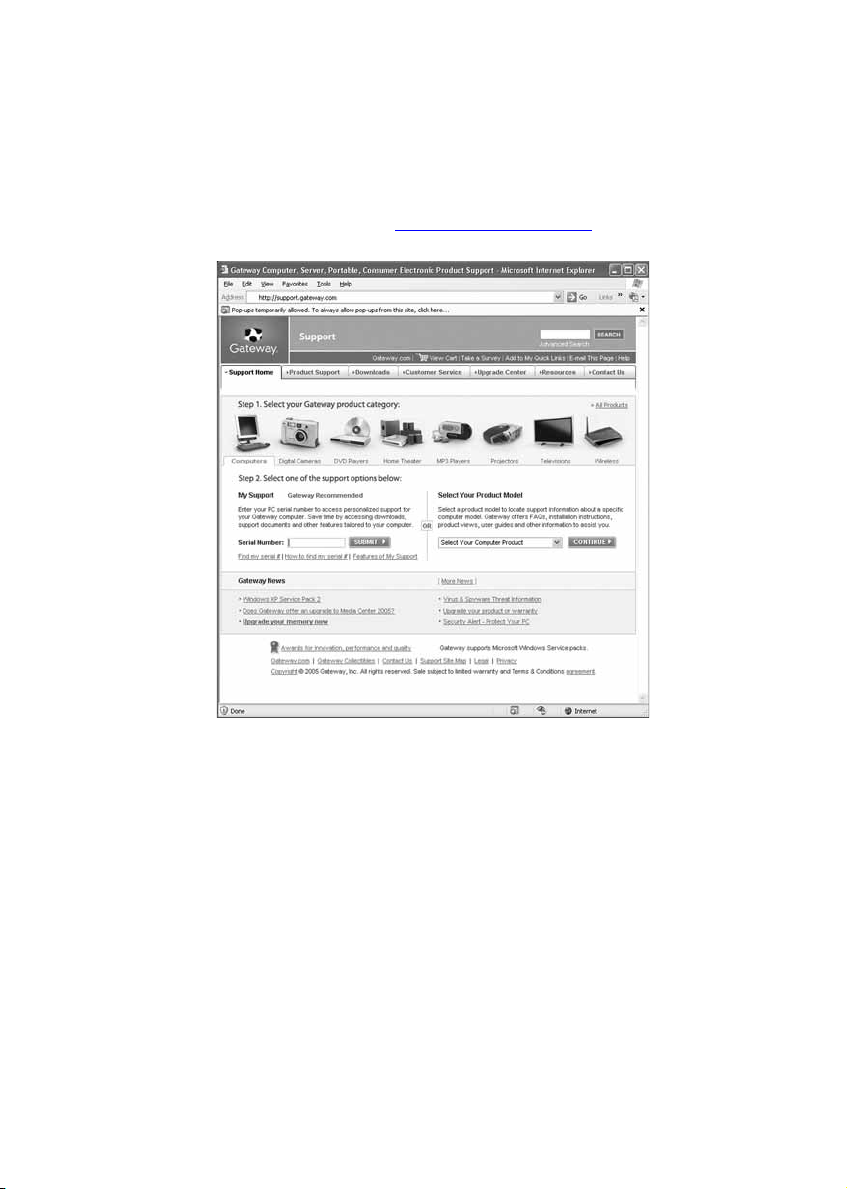
Help and Support
Your convertible notebook includes Help and Support, an easily accessible
collection of help information, troubleshooters, and automated support.
Use Help and Support to answer questions about Windows and to help
you quickly discover and use the many features of your Gateway
convert ible n oteboo k.
To start Help and Support:
■ Tap or click Start, then tap or click Help and Support. Help and Suppor t
opens.
You can find help information by tapping or clicking a link, performing
a search, or browsing the index.
www.gateway.com
5
Page 12

Chapter 1: Getting Help
Searching for a topic
To search for a topic in Help and Support, type a word or phrase (keyword)
in the
Search box located at the top of any Help and Support screen, then
tap or click the arrow button.
For each search, you receive the following search result types:
■ Suggested Topics - These topics are located in Help and Support and
are relevant to your search to pic.
■ Full-text Search Matches - These topics are located in Help and
Support and contain the words you entered in the
■ Microsoft Knowledge Base - These topics are located on the Microsoft
We b site and contain the words you entered in the
must be connected to the Internet to search for and access these
topics.
To view a list of your search results, tap or click the results header for
the type of results you want to view.
Search box.
Search box. You
To view a topic, tap or click the topic name in the
Search Result s list.
BigFix
Your convertible notebook may include BigFix. BigFix monitors your
convertible notebook for problems and conflicts. It automatically gathers
information about the latest bugs, security alerts, and updates from BigFix
sites on the Internet. Whenever BigFix detects a problem, it alerts you
by flashing the blue taskbar icon. To fix the problem, tap or click on that
icon to open BigFix.
To start BigFix:
■ Tap or click Start, All Programs, Accessories, System Tools, then tap
or click
BigFix.
6
www.gateway.com
Page 13
Using Your Computer gu ide
To learn more about using BigFix:
■ From the BigFix program, tap or click Help, then tap or click Tutorial.
Using Your Comput er guide
In addition to this guide, the Using Y our Comp uter guide has been included
on your hard drive. The Using Your Computer guide includes information
on using Windows, using the Internet, sending a fax, and changing
power-saving settings as well as other topics.
To acces s the Using Your Computer guide:
■ Tap or click Start, All Programs, then tap or click Gateway
Documentation
.
Online help
Many programs provide information online so you can research a topic
or learn how to perform a task while you are using the program. You can
access most online help information by selecting a topic from a
menu or by tapping or clicking a
www.gateway.com
Help button.
Help
7
Page 14
Chapter 1: Getting Help
You can search for information by viewing the help contents, checking
the index, searching for a topic or keyword, or browsing through the
online help.
8
www.gateway.com
Page 15

Chapter 2
Checking Out Your Gateway Convertible Notebook
• Identifying f eatures
• Locating your convertible notebook’s model
and serial number
• Locating the Microsoft Certificate of
Authenticity
• Locating the specifications f or yo ur
convertible notebook
• Purchasing accessories
9
Page 16
Chapter 2: Checking Ou t Your Gateway Convertib le Notebook
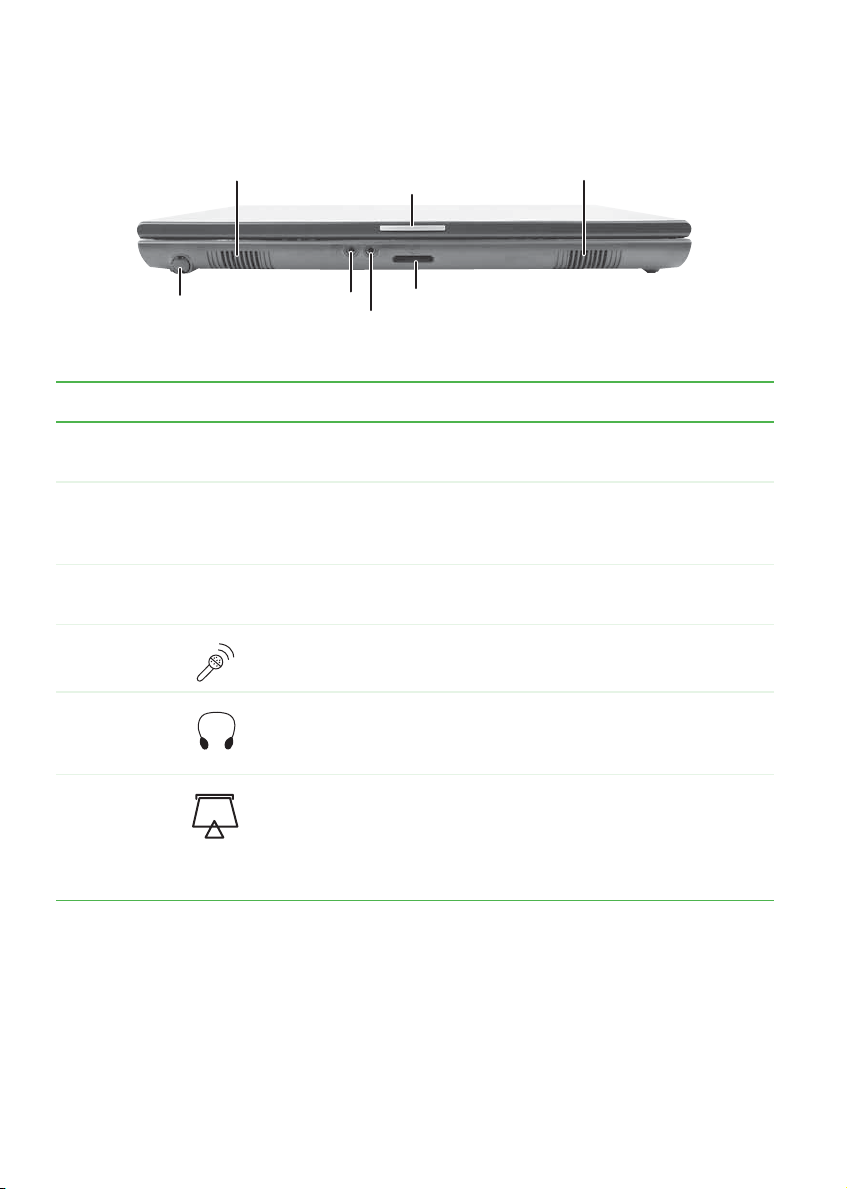
Front
Pen
Speaker
LCD panel r elease la tch
Microphone jack
Headphone jack
Memory card reader
Speaker
Component Icon Description
Speaker Provides audio outp ut when headphones or amplified speak ers
are not plugged in.
LCD panel
release
latch
Pen Write, tap, and input directly on your convertible notebook’s
Microphone
jack
Headphone
jack
Open the LCD panel by pressing the release latch.
display using the cordless pen.
Plug a microphone into this jack.
Plug ampli fied spea kers or headp hones int o this jack . The
built-in speakers are turned off when speakers or headphones
are plugged into this jack.
Memory
card reader
10
Insert a memory card from a digital camera, MP3 play e r, PDA,
or cellular telephone into the memory card reader. For more
information, see “Using the memory card reader” on page 66.
The memory card reader supports Memory Stick
Stick Pro
®
, MultiMediaCard™, and Secure Digital™.
www.gateway.com
®
, Memory
Page 17
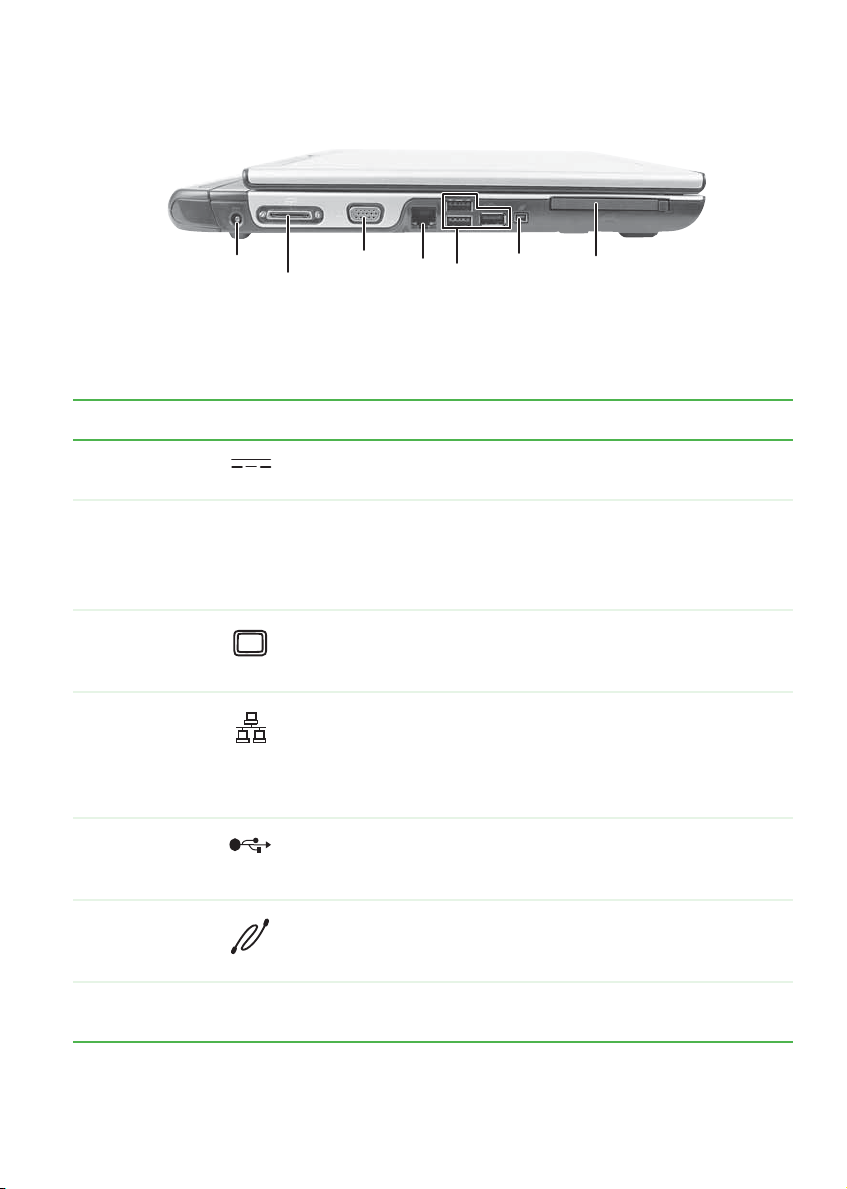
Left
Left
Power
connector
Monitor port
Docking
port
Ethernet
jack
USB
ports
IEEE
1394
port
PC Card
slot
Component Icon Description
Power
connector
Docking port Connect the optional port replicator to this port.
Monitor port Plug an analog VGA monitor or projector into this port. For
Ethernet jack Plug an Ethernet network cable into this jack. The other end
USB ports Plug USB devices (such as a diskette drive, flash drive,
IEEE 1394 por t Plug an IEEE 1394 (also known as Firewire
Plug the AC adapter cable into this connector.
Warning: Power is passed through this port. This docking
connection is certified to UL 1950 for use only with port
replicators designed for your Gateway convertible notebook.
more information, see “Viewing the display on a projector or
monitor” on page 69.
of the cable c an be plugged into a cable mode m, DSL modem,
or an Ethernet network jack. For more information, see
“Connecting to a cable or DSL modem or to an Ethernet
network” on page 25.
printer, scann er, camera, keyboard, or mouse) int o these
ports.
®
or i.Link®)
device (s uch as a dig ital camc order) into th is 4-pin IE EE 1394
port.
PC Card slot Insert one T ype II PC Card into this slot. For m ore information,
see “Adding and removing a PC Card” on page 67.
www.gateway.com
11
Page 18
Chapter 2: Checking Ou t Your Gateway Convertib le Notebook
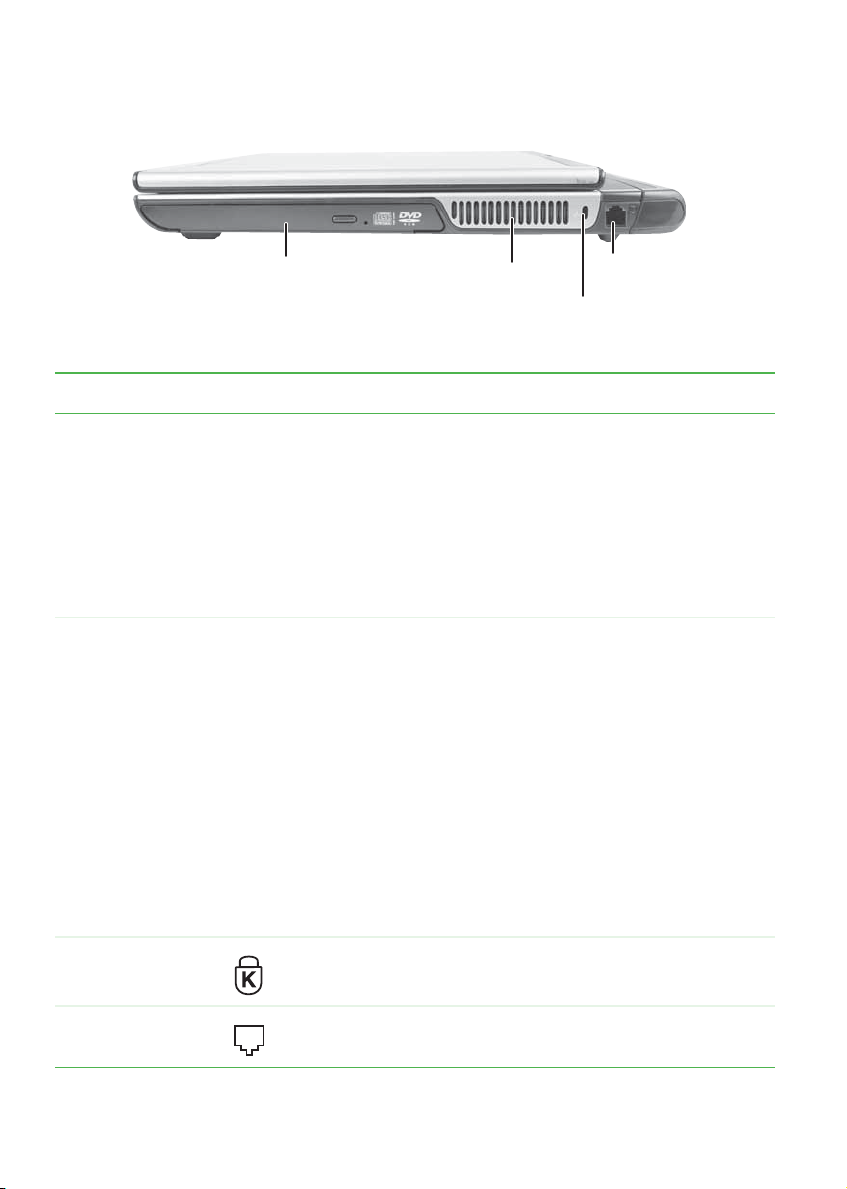
Right
Modular bay
Ventilation fan
Modem jack
Kensington
lock slot
Component Icon Description
Modular bay Use this bay for a CD drive, co mbination D VD/CD-R W drive ,
multi-format DVD±RW drive, or mult ibay ba ttery. For more
information, see “Changing modules” on page 60.
To determine the type of drive in the modular bay, examine
the drive tra y ’s plastic cover and comp are the l ogo to those
listed in “Identifying drive types” on page 63.
Important: T o ord er a module other than the one that cam e
with your conver tible not ebook, co ntact Gateway.
Ventilation fan Helps cool internal components.
Warning: Do not work for long periods with the co n v ertible
notebook resting on your lap. If the air vents are blocked,
the conv e rtible not ebook may bec om e ho t eno ug h to h arm
your s kin.
Caution: Do not block or insert objects into these slots. If
these slots are blocked, your convertible notebook may
overheat resulti ng in unexpec ted shutdown o r per manent
damage to the conver tible notebook.
Caution: Provi de adeq ua te sp ac e aro und your convertible
notebook so air vents are not obstructed. Do not use the
convertible notebook on a bed, sofa, rug, or other similar
surface.
Kensington™
lock slot
Modem jack Plug a modem cable into this jack. For more information,
12
Secure your c onvertible notebook to an obj ect by
connecting a Kensington cable lock to this slot.
see “Connecting the dial-up modem” on page 24.
www.gateway.com
Page 19
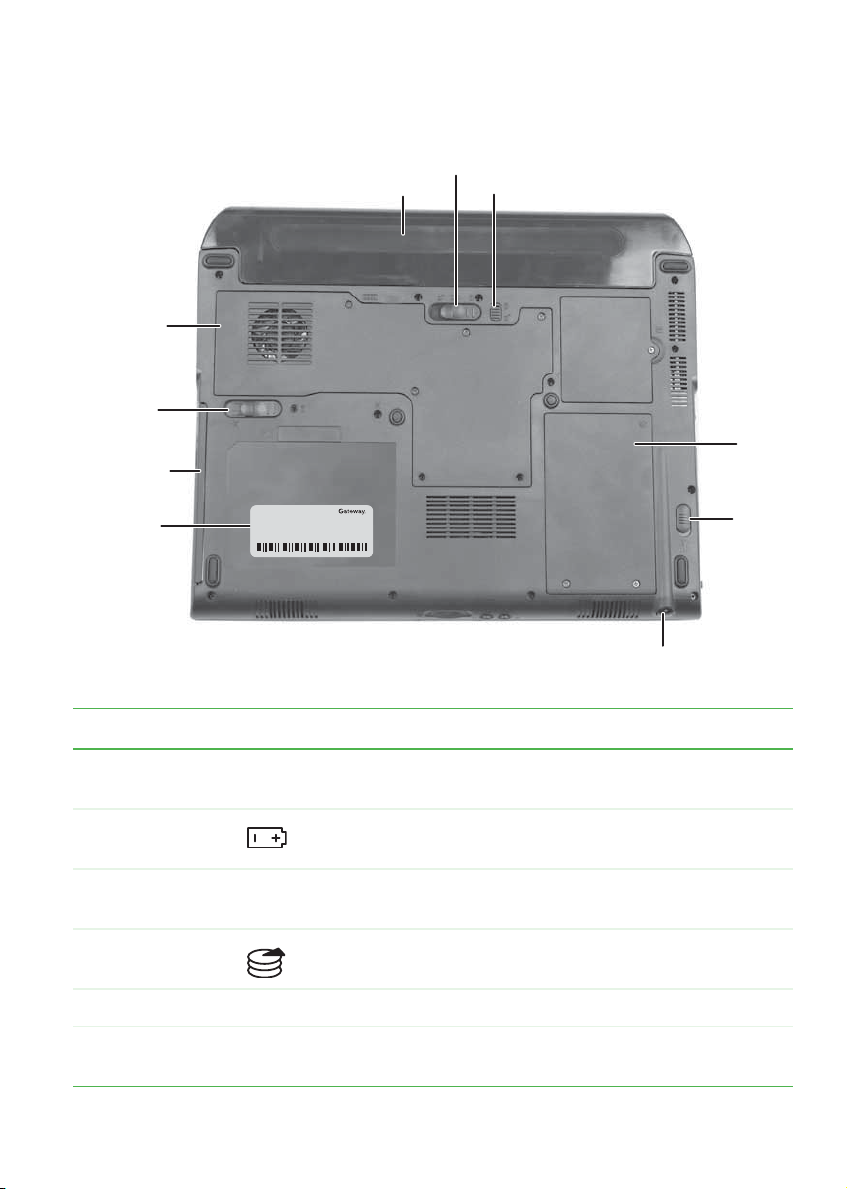
Bottom
Memory
bay
Modular
bay latch
Modular
bay
Battery latch
Battery
Bottom
Battery lock
Hard
drive
bay
System
label
Online Support:
Tech Support Phone:
Hours:
Model:
S/No:
Pen
latch
Pen
Component Icon Description
Battery Provides power when the conver tible notebook is not
plugged into AC power.
Battery latch Slide to release the battery. For more infor mation, see
“Changing batteries” on page 76.
Battery lock Slide to unlock the battery. For more information, see
“Changing batteries” on page 76.
Hard drive bay The hard drive is located in this ba y. For more inf ormation,
see “Replacing the hard drive kit” on page 89.
Pen latch Slide to release the pen.
Pen Write, tap, and input directly on your convertible
notebook’s display using the cordless pen.
www.gateway.com
13
Page 20

Chapter 2: Checking Ou t Your Gateway Convertib le Notebook
Component Icon Description
System label Includes the product mo del number . For more information,
see “Identifying your model” on page 16.
Modular bay Use this bay for a CD d rive, combina tion DVD/CD-RW
drive, multi-format DVD±RW drive, or multibay battery. F or
more information, see “Changing modules” on page 60.
T o determine the type of driv e in the modular ba y , examin e
the drive tra y’ s plastic cov er and comp are the logo to thos e
listed in “Identifying drive types” on page 63.
Important: To order a module other than the one that
came with your convertible notebook, contact Gateway.
Modular bay
latch
Memory bay Install a memory module into this bay. For more
Slide to release the module. For more information, see
“Changing modules” on page 60.
information, see “Adding or replacing memory” on
page 85.
14
www.gateway.com
Page 21
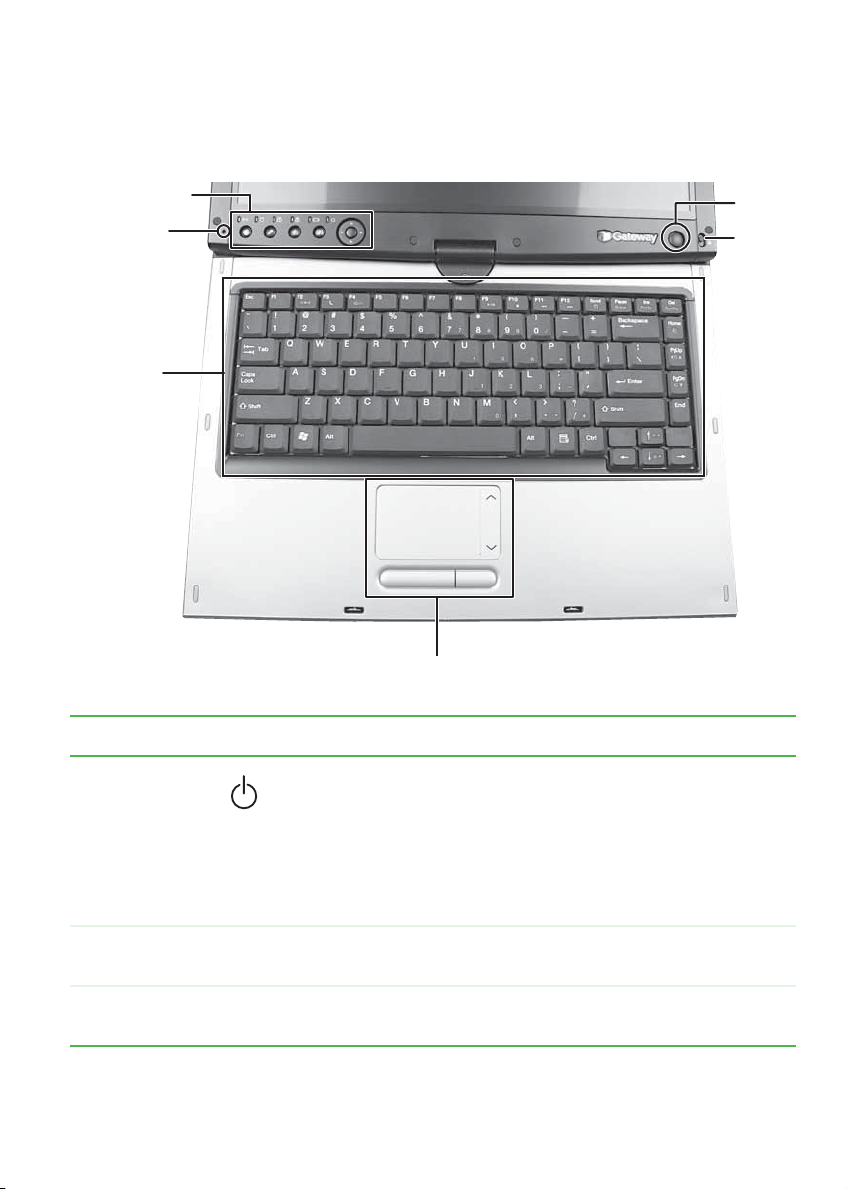
Ke yboard area
Ta b le t c on tro l
buttons/Status
indicators
Microphone
Keyboard
Keyboard area
Power
button
Power
button
lock
Touchpad
Component Icon Description
Power button Press to turn the power on or off. You can also configure the
power button for Standby/Resume mode. For more
information on configuring the power button mode, see
“Changing Power-Saving Settings” in
which has been included on your hard drive. To access this
guide, tap or c lick Start, All Programs, then tap or click
Gateway Documentation.
Power button
lock
T ouchp ad Provides all the functionality of a mouse. For more i nformation,
Locks the power button so the convertible notebook cannot
be accidently turned off when using it in tablet mode.
see “Using the EZ Pad touchpad” on page 39.
www.gateway.com
Using Your Computer
15
Page 22
Chapter 2: Checking Ou t Your Gateway Convertib le Notebook
Component Icon Description
Keyboard Provides all the features of a full-sized computer keyboard. For
more information, see “Using the keyboard” on page 32.
Microphone Record audio through this microphone. The built-in
microphone is turned off while an external microphone is
connected. For the location of your microphone jack, see
“Front” on page 10.
Tablet control
buttons
Status
indicators
See “Tablet Control Buttons” on page 36 for a descr ipt ion of
each button.
Inform you of the power status or when a drive is in use. For
more information, see “Status indicators” on page 30.
Identifying your model
Important The label s shown in t his sectio n are for infor mationa l
purposes only. Label information v aries by model, f eatures
ordered, and location.
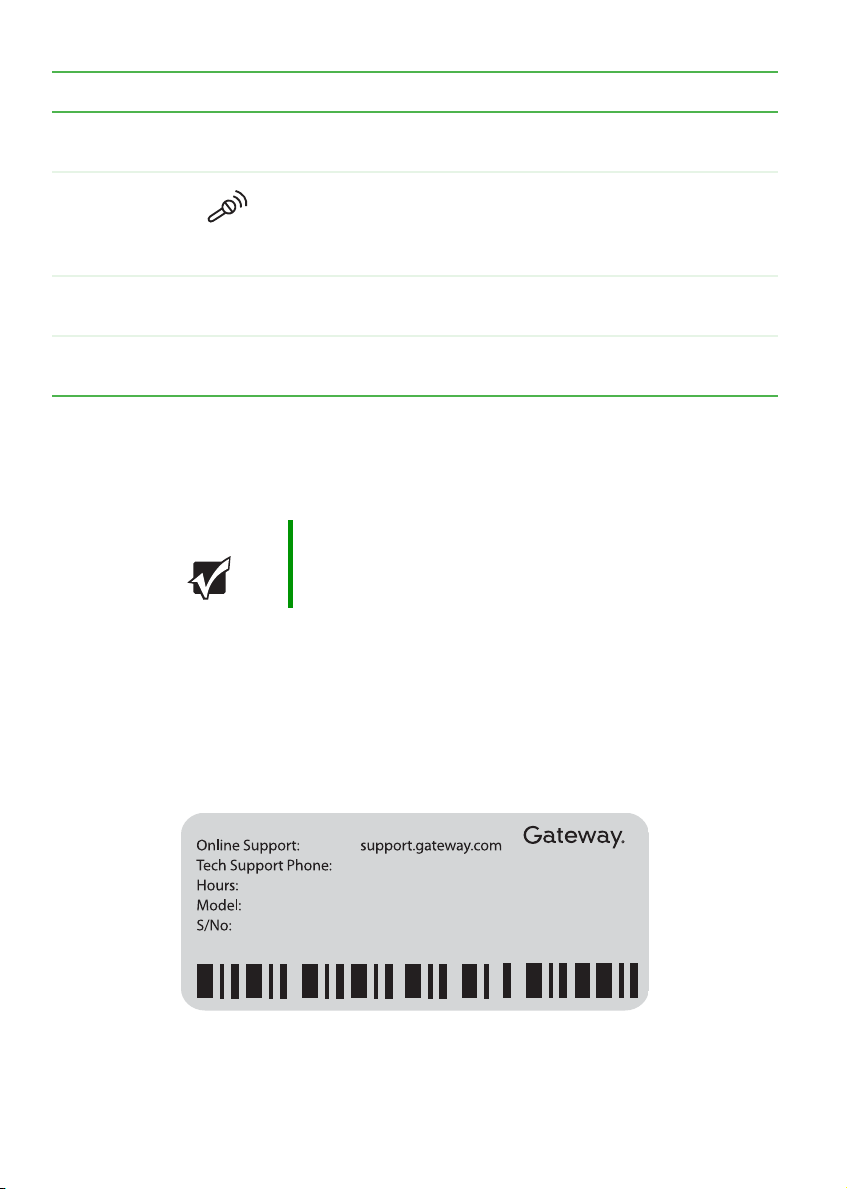
Gatewa y model and serial number
The label on the bottom of your convertible notebook contains
information that identifies your convertible notebook model and its
features. Gateway Customer Care will need this information if you call
for assistance.
16
www.gateway.com
Page 23

Finding your specif ications
Microsoft Certificate of Authenticity
The Microsoft Certificate of Authenticity label found on the bottom of
your convertible notebook includes the product key code for your
operating system.
Finding y our specifications
For more information about your convertible notebo ok, such as memory
size, memory type, and hard drive size, visit Gateway’s Support site at
support.gateway.com
Gateway documentation and detailed specifications. For more
information, see “Gateway Web site” on page 3.
. The Support site also has links to additional
Accessories
T o order accessories, visit the Accessory Store at accessories.gateway.com.
Batteries
If you run your convertible notebook on battery power for extended
periods, you may want to buy an additional battery or a multibay battery
so you can swap batteries when necessary. See “Changing batteries” on
page 76 for more information about using an additional battery.
Carrying cases
Gateway has large-capacity c arrying cases if you need ad ditional space
for accessories or supplies.
www.gateway.com
17
Page 24

Chapter 2: Checking Ou t Your Gateway Convertib le Notebook
Memory
Large programs, such as multimedia games or graphic s programs, use a
lot of memory . If your programs are running more slowly than you think
they should, try adding more memory. See “Adding or replacing
memory” on page 85 for more information.
Port replicators
Although you can attach devices directly to your convertible notebook,
a port replicator lets you make all of those connections at one time. When
you travel with your convertible notebook, you merely disconnect from
the port replicator instead of unplugging all the devices.
A port replicator also provides addition al ports and other expansion
features not included with your convertible notebook. See “Using the
Optional Port Replicator” on page 95 for more information about using
a port replicator with your convertible notebook.
Printers
You can attach almost any type of printer to your convertible notebook.
The most common types are inkjet and laser printers, which print in color
or black and white.
Inkjet printers and cartridges are relatively inexpensive, but they are
slower than laser printers. Using an inkjet color printer, you can print
pictures, banners, and greeting cards, as well as documents.
Laser printers and cartridges are more expensive, but they print much
faster than inkjet printers. Laser printers are better than inkjet printers
when you are printing large documents.
USB flash drive
Use a USB flash drive for storing files or transferring files to another
computer.
18
www.gateway.com
Page 25

Chapter 3
Getting Started
• Installing the main batte ry
• Connecting the AC adapter
• Connecting the dial- up modem
• Connecting to a cable or DSL modem or to
an Ethernet network
• T urning your convertible notebook on and
off
• Using the status indicators
• Using the ke yboard, button s, and the EZ
Pad touchpad
• Using the display and pen
• Adjusting the v olume
• Connecting to a wirel ess network
19
Page 26
Chapter 3: Getting St arted
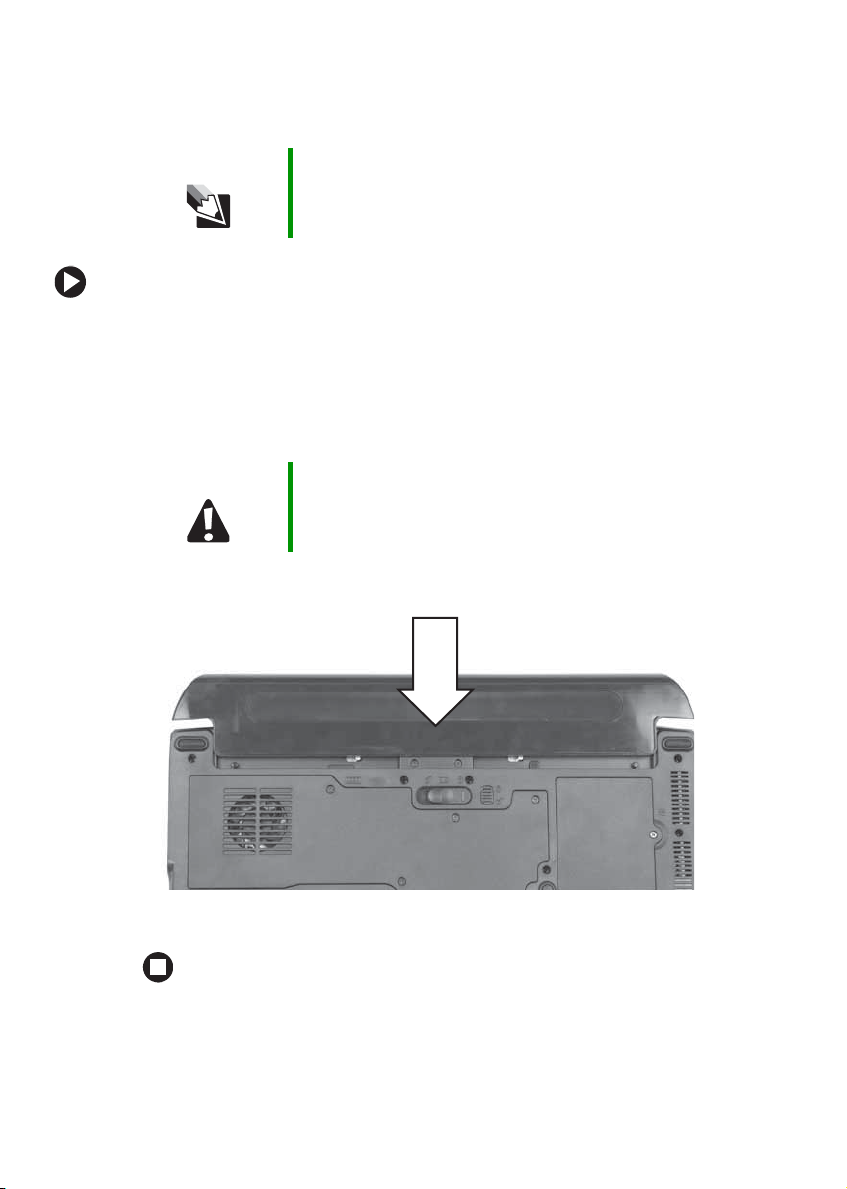
Installing the main battery
Tips & Tricks To install a multibay battery instead of, or in addition to,
the main battery, see “Changing modules” on page 60.
To install the main battery:
1 Close the LCD panel.
2 Turn your convertible notebook over so the bottom is facing up.
3 Hold the battery label-side down and lower it into the open battery
bay until the battery clicks into place.
Caution If you are using a multibay battery instead of a main
battery , insert the weight sa ver tha t was include d with your
multibay battery into the main battery bay.
4 Slide the battery lock to the locked position.
20
www.gateway.com
Page 27
Connecting the AC a dapter
Connecting the A Cadapter
You can run your convertible notebook using an AC adapter or your
convertible notebook’s battery. The battery was shipped to you partially
charged. You should use the AC adapter right away to fully charge the
battery. Allow three hours for the battery to fully charge.
Important If the battery is not fully charged before you use your
convertible note book on battery pow er for t he first time , the
battery life may be much shorter than you expect. If the
battery life seems short even after being charged for
three hours, the bat ter y may need to be reca librat ed. For
information on recalibrating the battery, see “Recalibrating
the batteries” on page 75.
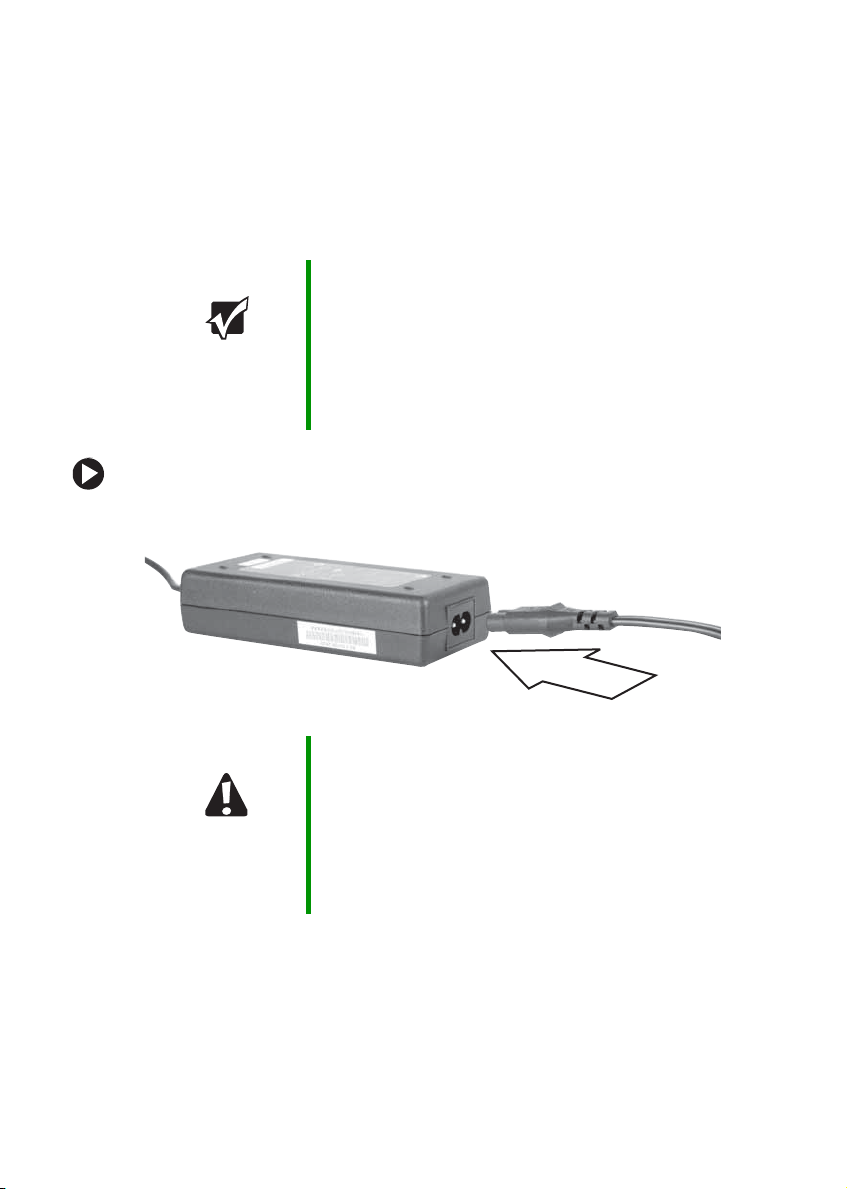
To connect the AC adapter:
1 Connect the power cord to the AC adapter.
Caution Make sure that you us e the AC adapter tha t came with your
convertible notebook or one of the same type purchased
from Gateway.
Replace the power cord if it becomes damaged. The
replacement cord must be of the same type and voltage
rating as the original cord or y our conv ertible notebook may
be damaged.
www.gateway.com
21
Page 28

Chapter 3: Getting St arted
2 Connect the AC adapter to your convertible notebook’s power
connector.
3 Plug the power cord into a wall outlet. The battery charge indicator
turns on (see “Status indicators” on page 30 for the location of the
battery charge indicator). If the battery charge indicator does not
turn on, unplug the adapter from your convertible notebook, then
plug it bac k in.
4 When you finish using your convertible notebook for the first time,
turn off your convertible notebook and leave your convertible
notebook connected to AC power until the battery charge indicator
turns blue.
22
Warning Do not attempt to disassemble the AC adapter. The
AC adapter has no user-replaceable or user-serviceable
parts inside. The ACadapter has dangerous v olta ges th at
can cause serious inju ry or death. Contact Gate wa y abo ut
returning defective AC adapters.
Important If the battery charge indicator does not turn blue after
three hours, contact Gateway Customer Care at
support.gateway.com
www.gateway.com
.
Page 29

Connecting the AC a dapter
Protecting from pow er source pr oblems
During a power surge, the voltage level of electricity coming into your
convertible notebook can increase to levels far above normal levels and
cause data loss or system damage. Protect your convertible notebook and
peripheral devices by connecting them to a surge protector, which absorbs
voltage surges and prevents them from reaching your con vertible
notebook.
Warning H igh voltages c an enter your c onvertible notebook through
both the power cord a nd the modem connection . T o prote ct
your convertible notebook and avoid electrical shock, use
a surge protector. If you have a telephone modem, use a
surge protector that has a m odem jack . If you ha ve a ca ble
modem, use a surge protector that has an antenna/cable
TV jack. During an electrical st orm, unplug bo th the surge
protector and the modem.
www.gateway.com
23
Page 30

Chapter 3: Getting St arted
Connecting the dial-up modem
Your convertible notebook has a built-in 56K modem that you can use
to connect to a standard telephone line.
Warning To reduce the risk of fire, use only No. 26 AWG or larger
telecommunications line cord.
To connect the modem:
1 Insert one end of the modem cable into the modem jack on the
right side of your convertible notebook.
2 Insert the other end of the modem cable into a telephone wall jack.
The modem will not work with digital or PBX telephone lines.
3 Start your convertible notebook, then start your communications
program.
24
www.gateway.com
Page 31

Connecting to a cable or DS L modem or to an Ethernet networ k
Connecting to a cable or DSL
modem or to an Ethernet network
Y our convertible notebook has a network jack that you can use to connect
to a cable or DSL modem or to an Ethernet network.
To connect to a c able or DSL modem or to an Ethernet network:
1 Insert one end of the network cable into the network ja ck on
the left side of your convertible notebook.
2 Insert the other end of the network cable into a cable modem, DSL
modem, or Ethernet network jack.
3 Start your convertible notebook.
www.gateway.com
25
Page 32

Chapter 3: Getting St arted
Starting your con vertible notebook
To start your convertible notebook:
1 Press the latch on the front of your convertible notebook, then lift
the LCD panel.
2 Press the power switch button on the LCD panel.
The power button is preset to On/Off mode. However, you can also
set it to function in Standby/Resume mode.
Tips & Tricks For more information about changing the power switch
mode, see “Changing Power-Saving Settings” in
Your Computer
drive. To access this guide, tap or click Start,
All Programs, th en tap or clic k Gate way Doc umentation.
which has been included on your hard
3 If you are starting your convertible notebook for the first time, follow
the on-screen instructions to set up your convertible notebook.
26
www.gateway.com
Using
Page 33

Starting your co nvertible notebook
Warning D o not work f or lon g periods wi th the con v ertible noteboo k
resting on your lap. If the air vents are blocked, the
convertible notebook may become hot enough to harm
your skin.
Caution Provide adequa te space arou nd your c onv ertible notebook
so air vents are not o bstructed. Do not use the con v ertible
notebook on a bed, s ofa, rug, or other simi lar surface.
Important If your conver tible notebook does not turn on, make sure
the Po wer Button Loc k is in the unloc ked position . For more
information, see “Keyboard area” on page 15.
W aking up your co nv ertible notebook
When you have not used your convertible notebook for several minutes
or if you close the LCD panel without turning off your convertible
notebook, it may enter a power-saving mode called Standby. While in
Standby, the power indicator flashes.
If your convertible notebook is in Standby mode, press the power button
to “wake” it up.
Tips & Tricks For more information about changing the power button
mode, see “Changing Power-Saving Settings” in
Your Computer
drive. To access this guide, tap or click Start,
All Programs, th en tap or clic k Gate way Doc umentation.
www.gateway.com
which has been included on your hard
Using
27
Page 34

Chapter 3: Getting St arted
T urning off your c onvertible notebook
To turn off your convertible notebook:
1 Tap or click Start, then tap or click Turn Off Computer. The Tur n O f f
Computer dialog box open s.
2 Tap or click Tu r n Off. Windows shuts down and turns off your
convertible notebook.
Important If for some reason you cannot use the Turn Off Computer
option in Windows to turn off your conver tible notebook,
press and hold the power button for about fiveseconds,
then release it.
Important If the Pen Lost Alarm is turned on, and you turn off the
convertible notebook without returning the pen to the pen
holder, you will hear three beeps. This is to remind you to
replace the pen. For more information about the Pen Lost
Alarm, see “Pen lost alarm” on page 47.
Restarting (rebooting) your con vertible notebook
If your convertible notebook does not respond to keyboard, touchpad,
or mouse input, you may have to close pr ograms that are not responding.
If closing unresponsive programs does not restore your con vertible
notebook to normal operation, you may have to restart (reboot) your
convertible notebook.
28
www.gateway.com
Page 35

Restarting (reboo ting) your conve rtible notebook
To close unresponsive programs and restart your convertible
notebook:
1 Press the Windows Security button . The Windows Security dialog
box opens. For more information, see “Tablet Control Buttons” on
page 36.
-ORPress C
TRL+ALT+DEL. The Windows Security dialog box opens.
2 Tap or click Task Manager. The Windows Task Manager dialog box
opens.
3 Tap or click the program that is not responding.
4 Tap or click End Task.
5 Tap or click X in the top-right corner of the Windows Task Manager
dialog box.
6 If your convertible notebook does not respond, turn it off, wait ten
seconds, then turn it on again.
Important If your con v ertible note book does n ot turn off imm ediatel y,
complete t he following st eps until your converti ble
notebook turns off:
1 Slide and hold the power switch for about five seconds,
then release it.
2 Unplug the power cord and remove the batteries for
more than 10 seco nds.
As a part of the regular startup process, a program to check the disk
status runs automatically. When the checks are finished, Windows
starts.
www.gateway.com
29
Page 36

Chapter 3: Getting St arted
1
A
Status indicato rs
Status indicators inform you when a drive is being used or when a button
has been pressed that affects how the keyboard is used.
Wireless network
Num lock
Drive
Caps lock
Indicator Icon Description
Wireless network
(optional)
Drive
Num lock
Caps lock
30
■
LED on - Wir eless netwo rk is tur ned o n.
■
LED off - Wireless network is turned off.
■
LED blinking - The hard drive or DVD drive is in use.
■
LED off - The hard dr ive or DVD drive is not in use.
■
LED on - Numeric keypad is turned on.
■
LED off - Numeric keypad is turned off.
■
LED on - Caps lo ck is turn ed on.
■
LED off - Ca ps lock is turn ed off.
www.gateway.com
Power
Battery charge
Page 37

Status indicators
Indicator Icon Description
Battery charge The LED shows the battery activity and status.
■
LED blue - battery is fully charged.
■
LED purple - battery is charging.
■
LED blinking r ed - batte ry char ge is ver y low.
■
LED solid re d - batter y is ma lfunction ing.
This LED only lights up whe n your convertible no tebook
is connected to A C po w er or the batte ry charge is v ery
low.
Power The LED shows your convertible notebook’s power
status.
■
LED on - convertible notebook is on.
■
LED blinking - co nvertible n otebook is i n Standby
mode.
■
LED off - convertible notebook is off.
www.gateway.com
31
Page 38

Chapter 3: Getting St arted
Using the ke yboard
Y our convertible notebook features a full-size keyboard that functions the
same as a desktop computer keyboard. Many of the keys have been
assigned alternate functions, including shortcut keys for Windows,
function keys for specific system operations, and the Num Lock keys for
the numeric keypad.
Function
keys/
System
keys
Numeric
keypad
Navigation
keys/
Volume
keys
FN key
Windows
key
Tips & Tricks You can attach an external keyboard to the
convertible n otebook or port replicator using a USB
port. You do not need to shut down the conv ertible
notebook to connect a USB keyboard.
Application
key
Arrow
keys/LCD
brightness
keys
32
www.gateway.com
Page 39

Using the keyboard
Key types
The keyboard has several different types of keys. Some keys perform
specific actions when pressed alone and other actions when pressed in
combination with another key.
Key type Icon Description
Function keys P ress these keys labe led F1 to F12 to perform actions
in programs. For example, pressing
Each program uses different function keys for different
purposes. See the program documentation to find out
more about the function key actions.
F1 may open help.
System keys Press these colored keys in c ombination with the
to perform specific actions. For more information, see
“System key combinations” on page34.
Navigation keys Press thes e keys to move the curs or to the b eginning
of a line, to t he end of a line , up the page , down the page ,
to the beginning of a document, or to the end of a
document.
V olume keys Press these colored k eys in combin ation with the
to increase or decrease the volume or to turn off all
sound.
FN key
FN key
FN key Press the FN key in combination with a colored system
key to perform a specific action.
Windows key Press this key to open the Windows Start menu. This
key can also be used in combination with other keys to
open utilities like
F (Search utilit y), R (Run utility), and
E (Explorer utility).
Numeric keypad Use these keys to type numbers when the numeric
keypad is turned on. Press
the numeric keypad.
Application key Press this key for quick access to shortcut menus and
help assist ants in Wi ndows.
FN+PAD LOCK to turn on
Arrow keys Press these keys to move the cursor up, down, right, or
left.
LCD brig htness
keys
Press these colored k eys in combinati on with the
to control the screen brightness.
www.gateway.com
FN key
33
Page 40

Chapter 3: Getting St arted
System k ey combinations
When you press the FN key and a system key at the same time, your
convert ible note book perf orm s the acti on id enti fied by th e te xt or icon
on the key.
Press and hold F
N, then
press this system key...
To...
Tur n the op tional wir eless net work on o r off. For more
information, see the printed network guide that came
with your convertible notebook.
Warning: R adio fr equenc y wireles s comm uni catio n can
interfere with equip ment on com mercial aircra ft. Current
aviation regulations require wireless devices to be turned
off while traveling in an airplane. 802.11g (also known
as wireless Ethernet or Wifi) co mmuni cation devices are
examples of devices that provide wireless
communication.
Enter Stand by mode. Press t he power button t o leave
Standby mode. For more infor mation, see “Changing
Power-Saving Settings” in
has been included on your hard drive. To access this
guide, tap or click Start, All Programs, then tap or clic k
Gateway Documentation.
Togg le t he c onver tible not ebook disp lay in t he followi ng
order:
■
The LCD
■
An external monitor or projector (a monitor or proje ctor
must be plugged into the monitor port on your
convertible notebook)
■
Both displays at the same time
For more infor mation, see “Viewing the display on a
projector or monitor” on page 69.
Using Your Computer
which
34
Play or Pause the CD or DVD.
Stop playing the CD or DVD.
www.gateway.com
Page 41

Using the keyboard
Press and hold FN, then
press this system key...
To...
Skip back one CD song or DVD track.
Skip ahead one CD song or DVD track.
Turn on Num Lock so you can use the numeric keypad.
Press this key combination again to turn off Num Lock.
The Num Lock status indicator appears when this
function is turned on.
Increase the brightness of the display.
Decrease the brightness of the display.
Mute the sound. Press the key combination again to
restore the sound. For more information, see “Adjusting
the volume” on page 48.
Increase volume. For more infor mation, see “Adjusting
the volume” on page 48.
Decrease volume. For more information, see “Adjusting
the volume” on page 48.
www.gateway.com
35
Page 42

Chapter 3: Getting St arted
T ablet C ontrol Buttons
Press the tablet control buttons to control the convertible notebook while
it is in tablet mode.
Screen
rotation
Button Icon Press to...
Screen rotation Rotate the display orientation. For more information,
Windows security Open the Windows Task Manager. Also is used for
Windows Jour nal Opens Windows Jour nal.
Mode Select the mode for the five-way switch.
36
Windows
security
Windows Journal
see “Changing display orientation” on page 44.
domain authentication or logon screen.
www.gateway.com
Mode
Five-way
switch
Page 43

Button Icon Press to...
Tablet Control Buttons
Five-way switch
■
Mode 1 (Default mode) - controls scrolling in
documents and in your Internet browser as follows:
■
Up/Down - scrolling
■
Right/Left - Forward/Back (browser)
■
Center - Enter
■
Mode 2 - controls audio and video as follows:
■
Up/Down - br ightnes s contro ls
■
Right/Left - volume up and down
■
Center - mute volume.
Programming the W indows Journal button
Y ou can prog ram the Windows Journa l button to perform an action other
than opening Windows Journal.
To program the Windows J ournal button:
1 Tap or click Start, then tap or click Control Panel. The Control Panel
window opens. If your Control Panel is in Category View , tap or cl ick
Printers and Other Hardware.
2 Tap/Double-tap or click/double-click Tablet and Pen Settings . The
Tablet and Pen Settings dialog box opens.
www.gateway.com
37
Page 44

Chapter 3: Getting St arted
3 Tap or click the Tablet Buttons tab.
4 Tap or click Journal Button, then tap or click Change. The Change
Tablet Button Actions dialog box opens.
5 Select an action, t hen, if ap plicable , select a program.
38
www.gateway.com
Page 45

Using the EZ Pad to uchpad
Using the EZP ad touchpad
The EZ Pad™ consists of a touchpad, two buttons, and a scroll zone.
Touchpad
Scroll
zone
Left button
When you move your finger on the touchpad, the pointer (arrow) on the
screen moves in the same direction. You can use the scroll zone to scroll
through documents. Use of the scroll zone may vary from program to
program.
www.gateway.com
Right button
39
Page 46

Chapter 3: Getting St arted
Y ou can use the EZ -Pad left and right buttons below the touchpad to select
objects.
Tips & Tricks For instructions on how to adjust the double-click speed,
pointer speed, right-hand or left-hand configuration, and
other touchpad settings, see “Changing the mouse or
touchpad settings” in
been included on you r hard drive . To access this guide, tap
or click Start, All Programs, then tap or click Gateway
Documentation.
Using Your Computer
which has
To... Do this...
Move the pointer on
the screen.
Select an object on
the screen.
Start a program or
open a file or folder.
Move your finger
around on the
touchpad. If you run
out of space and
need to move the
pointer farther, lift
your finger , move i t to
the middle of the
touchpad, then
continue moving your
finger.
Position the pointer
over the object.
Quickly press and
release th e left
button once. This
action is called
clicking
.
Position the pointer
over the object.
Press the left button
twice in ra pid
succession. T his
action is called
double-clicking
.
40
www.gateway.com
Page 47

To... Do this...
Using the EZ Pad to uchpad
Access a shortcut
menu or find more
information about
an object on the
screen.
Move an object on
the screen.
Tips & Tricks You received your convertible notebook with the EZ Pad
Position the pointer
over the object.
Quickly press and
release th e right
button once. This
action is called
right-clicking
Position the pointer
over the object.
Press the left button
and hold it down,
then use the
touchpad to move
(drag) the object to
the appropriate part
of the scre en.
Release the button to
drop the object
where you want it.
touchpad set to on ly acce pt clic king by u sing the tou chpad
buttons. You can change this feature to allow tapping on
the touchpad to simulate clicking the left button. For more
information, see “Changing the mouse or touchpad
settings” in
on your hard drive . To access this guide, tap or click Start,
All Programs, th en tap or clic k Gate way Doc umentation.
Using Your Computer
which has been included
.
www.gateway.com
41
Page 48

Chapter 3: Getting St arted
Using the displa y
Y our convertible notebook’s screen combin es the eye-soothing readability
of a liquid-crystal display with the responsiveness of a pen controller. The
screen provides a hard, smooth writing surface, minimizes glare, and
increases readability.
■ Unlike other touchscreens and PDAs, your convertible notebook’s
display responds only to your convertible notebook ’s pen. Your
convertible notebook will not respond to a PDA pen or the touch
of a fingertip.
■ Steady your hand on the display surface while writing. The pressure
of your hand or fingers will not affect any open programs.
■ Switching from AC to battery power dims the display slightly to save
battery power.
Con verting the display from notebook to tablet mode
You can convert the display from notebook to tablet mode with the
convertible notebook turned on or off.
42
Important Although you can use the pen to write on the screen when
the convertible notebook is in notebook mode, for best
results and maximum stability, only write on the screen
while the notebook is in tablet mode.
www.gateway.com
Page 49

Using the display
To conver t the display from notebook mode to tablet mode:
1 Open the LCD panel to the normal viewing position.
2 Locate the rotation direction arrow on the LCD panel hinge.
Rotational arrow
3 Rotate the LCD panel in the direction of the rotational arrow until
the back of the panel is facing you. The panel soft-locks into the final
position.
www.gateway.com
43
Page 50

Chapter 3: Getting St arted
4 Close the LCD panel onto the keyboard. There is a click when the
LCD panel latch locks.
5 Slide the power button lock into the locked position to prevent the
convertible notebook from being accidently turned of f.
Changing display orienta tion
You can change the display orientation from the default, landscape
(horizontal), to portrait (vertical) or secondary landscape (180 degrees
from the default) using the Screen Rotation button.
To change display orientation:
■ Press the Screen Rotation button to step through display
orientations. For more information, see “T ablet Control Buttons” on
page 36.
44
www.gateway.com
Page 51

Using the pen
To change orientation properties:
■ Double-tap or double-click the Table t and P en Settings icon in the
taskbar, then tap or click the
Display tab.
Adjusting brightness
To adjust screen brightness:
■ Use the increase brightness and decrease brightness keys on the
keyboard. For more information, see “System key combinations” on
page 34.
Using the pen
Your convertible notebook’s pen is the only device that can write, tap,
and input directly on your convertible not ebook’s display.
Caution A finger-tap or PD A stylus h as no eff ect on y our conv ertible
notebook’ s displa y, and ink pens and ot her pointed objects
could damage the surface. Always use the pen that came
with your convertible notebook. You can order extra pens
from Gateway.
Caution Do not strike the display too sharply. Although the display
is durable, it c an break.
www.gateway.com
45
Page 52

Chapter 3: Getting St arted
The pen can do everything a mouse does. Just think “tap” instead of
“click”.
With a mouse: With a pen:
Point and click Point and tap
Double-click Double-tap
Click-and-drag Tap-and-drag
Right-click Button-tap
(press the pen b utton wh ile tapping or press a nd hold wit h
the pen)
Storing and removing the pen
To store the pen in y our convertible notebook:
1 Locate the pen holder on the bottom of your convertible notebook.
For more information, see “Bottom” on pag e 13.
2 Slide the pen into the holder until the pen clicks into place.
46
www.gateway.com
Page 53

Using the pen
To remove the pen from our convertible notebook:
1 Locate the pen latch on the bottom of your convertible notebook.
For more information, see “Bottom” on pag e 13.
2 Slide the pen latch until the pen is released from the pen holder.
Pen lost alarm
Your convertible notebook can sound a series of three beeps if the pen
is not in the pen holder when you turn the convertible notebook off or
place it in either Standby or Hibernate mode. This feature is shipped from
the factory turned off.
www.gateway.com
47
Page 54

Chapter 3: Getting St arted
To turn on the pen lost alarm:
1 As soon as your convertible notebook starts and you see a startup
screen, press F2. The BIOS Setup utility opens.
2 Open the Advanced menu.
3 Highlight Pen Los t Alarm, then select Enabled by pressing the
spacebar.
4 Open the Exit menu, then highlight Exit Saving Changes and press
E
NTER.
Adjusting the v olume
You can use the volume control to adjust the overall volume of your
convertible notebook.
To adjust the overall volume level using hardware controls:
■ If you are using external speakers, turn the knob on the front of the
speakers.
-ORUse the five-way switch. For more informa tion, see “Tablet Control
Buttons” on page 36.
-ORUse the mute and volume control buttons on the keyboard. For more
information, see “System key combinations” on page 34.
Tips & Tricks For instructions on how to adjust the volume in Windows,
Using Your Computer
48
see “Adjusting the Volume” in
has been included on your hard d rive. To access this guide,
tap or click Start, All Programs, then tap or click Gateway
Documentation.
www.gateway.com
which
Page 55

Turning your wireles s radio on or off
T urning y our wireless radio on or
off
Warning Radio frequency wireless communication can interfere
with equipment on commercial aircraft. Current aviation
regulations require wire les s devices to be turned off while
travel ing in an airplane. IEEE 802.11a, IEEE 802.11b , and
IEEE 802.11g communication devices are examples of
devices that provide wireless communication.
Warning In environments where the risk of interference to other
devices or services is harmful or perceived as harmful, the
option to use a wireless device may be restricted or
eliminated. Airports, hospitals, and oxygen or flammable
gas laden atmospheres are limited examples where use
of wireless de v ic es m ay be restricted or eliminated. When
in environments where you are uncertain of the sanction
to use wireless devices, ask the applicable authority for
authorization prior to use or turning on the wireless dev ice.
Y our Gateway convertible notebook may have a factory-installed wireless
networking mini-PCI card.
To turn the wireless radio on or off:
■ Press FN+F2. The wireless status indicator turns on or off. For the
location of the wireless status indicator, see “Status indicators” on
page 30.
Tips & Tricks For more information about using your convertible
notebook on a wireless network, see
Networking Guide,
convertible notebook.
www.gateway.com
which has been included with your
Gateway Notebook
49
Page 56

Chapter 3: Getting St arted
50
www.gateway.com
Page 57

Chapter 4
Using Windows XP
Tablet PC 2005
• Using T ablet PC extensions
• Adjusting tab let and pen settin gs
51
Page 58

Chapter 4: Using Windows X P Tablet PC 2005
Using Wi ndows XP TabletPC 2005
The Microsoft Windows XP Tablet PC 2005 operating system is a fully
functioning version of Windows XP Professional with added pen-based
computing features:
■ Tablet and Pen Settings — set properties for the pen, tablet buttons,
and display screen
■ Tablet PC Input Panel (TIP) — use its writing pad, soft keyboard, and
voice recognition for entering data
■ Windows® Journal — hand-write documents, then turn them into
text or image files
■ Sticky Notes — make a quick note with your pen or voice and drop
it into another program
■ Document annotation — insert handwritten notes into Word
documents and other programs
■ Enhanced speech and voice recognition — say what you are thinking,
and your convertible notebook will understand
■ Inkball — practice and master pen input with this game of strategy
■ MicroSoft On eNote — capture, organize, and reuse your notes on
notebook computers, desktop computers, or tablet PCs.
The
What’s New in Windows X P link in the Help and Support Center and
the Windows XP Start Here booklet that shipped with your convertible
notebook can help you learn more about using Windows XP Ta blet PC
2005.
52
www.gateway.com
Page 59

Using Tablet P C extensions
Using TabletPC extensions
Calibration
The first time you use your convertible notebook, you should calibrate
your pen for both portrait and landscape orientations. Calibration
ensures the accuracy of the pen and adjusts the screen’s performance for
different users.
If the on-screen pointer does not seem to line up with the tip of the
pen—for example, because someone else has used your conver tible
notebook and adjusted it for their own use—recalibrate it to your tappi ng
patterns.
Recalibrate if you write with the opposite hand from the previous
user—right-handed writer to left-handed writer.
To open the calibration program:
■ Double-tap or double-click (T able t and Pen Setti ngs) in the taskbar.
Tap or click
on-screen instructions.
Properties, then tap or click Calibrate. Follow the
Gestures
A gesture is a shape you draw with your pen to send a command to your
convertible notebook. In Input Panel, you can also use gestures to control
the insertion point in the active program. When you use these gestures,
you get the same result as pressing the corresponding key on a standard
keyboard.
■ Open the Tablet Input Panel by waving the pen back and forth over
the screen.
■ Backspace by drawing a right-to-left line on the display surface.
■ In most text input programs, you can erase text by scratching it out.
Windows interprets a scratchout as a delete command.
www.gateway.com
53
Page 60

Chapter 4: Using Windows X P Tablet PC 2005
■ To erase, draw a short, wide “Z.”
■ You will find more information about gestures and gesture symbols,
as well as handwriting tips, in the TIP help. For more information,
see “Tablet Input Panel (TIP)” on page 55.
Pen button
The pen button serves the same function as the right bu tton on a mouse.
Press it and tap (button-tap) to open right-click menus when they are
available.
Tips
■ Hold the pen the same way you hold a writing pen, and steady your
writing hand by resting it on the display surface.
■ Line up the pointer before you tap, in cases where the pointer and
pen point are out of alignment. The s creen reads the po siti on of t he
pointer, not the tap.
■ Store the pen in the convertible notebook’s pen holder. Store extra
pens in a drawer to avoid prolonged p ressure on the pen tip.
■ The pen has internal electronics, so keep it dry and avoid contact
with liquids.
54
www.gateway.com
Page 61

Using Tablet P C extensions
T ablet Input P anel (TIP)
Tap the Keyboard icon near the Start button to open the Tablet Input
Panel (TIP). Use the TIP to enter data by hand, soft keyboard, or voice
into a word processing program or a text-entr y form.
■ Access the TIP keyboard and writing pad by tapping or clicking the
tabs near the bottom of the window.
Tools and Options
Help
■ T o set up speech options, tap or click the T o ols and Options icon ,
then tap or click
TIP tips
■ Open a program for your input (for example, a word processing
program or a Web form) before using the writing pad or soft
keyboard.
■ To adjust writing pad and keyboard settings, tap or click the Tools
and Options
Speech.
icon , then tap or click Options.
www.gateway.com
55
Page 62

Chapter 4: Using Windows X P Tablet PC 2005
■ For security and accuracy when entering masked text (s uch as
passwords), use your convertible notebook Input Panel’s soft
keyboard instead of the writing pad.
Using speech recognition
The convertible notebook is designed to accept and interpret the human
voice, both for dictation (speech recognition) and for
keyboar d-equival ent voic e command s.
■ Set up speech recognition through your convertible no tebook Input
Panel’s
■ Learn more about voice commands in the Accessibility section of
the Help and Support Center.
■ Use the built-in microphone or an external microphone.
■ To modify the speech recognition function, see “Adjusting the
Tablet PC Input Panel Settings” on page 58.
Tools menu.
Adjusting tablet and pen settings
Windows XP Tablet PC 2005 includes a control panel for adjusting pen,
display, and button preferences such as:
■ Right-handed or left-handed use
■ Pen calibration in portrait and landscape modes
■ Button functions
■ Pen actions such as do uble-tapping
56
www.gateway.com
Page 63

Adjusting tablet an d pen settings
To change tablet and pen settings:
1 Tap or click the Tablet and Pen Settings icon in the taskbar, then
tap or click
Properties. The Tablet and Pen Properties dialog box opens.
2 Tap or click the Pen Options tab.
3 Change the pen options settings, then tap or click OK.
Programming the buttons
Most of the tablet control buttons on your convertible notebook can be
reprogrammed with new functions.
To reprogram button functions:
1 Tap or click the Tablet and Pen Settings icon in the taskbar, then
tap or click
2 Tap or click the Tablet Buttons tab.
3 Change the button settings, then tap or click OK.
Properties. The Tablet and Pen Properties dialog box opens.
www.gateway.com
57
Page 64

Chapter 4: Using Windows X P Tablet PC 2005
Adjusting the Tablet PC Input Panel Settings
To adjust writing pad, writing tools, and speech settings:
1 Tap or click the Keyboard icon .
2 T ap or click the T o ols and Options icon , then tap or click Options.
3 Tap or click a tab, then change the input panel settings.
58
www.gateway.com
Page 65

Chapter 5
Using Drives and Ports
• Changing modules
• Using the CD or DVD drive
• Using the media card reader
•Using a PC Card
• Viewing the dis play on a moni tor or
projector
• Connecting a video camer a to your
convertible notebook
59
Page 66

Chapter 5: Using Drives and P orts
Changing modules
Your convertible notebook’s modular bay supports different bay module s,
such as a CD, combination DVD/CD-RW, or multi-format DVD±RW
drive, or multibay battery.
To change bay modules:
1 If you are removing a drive, make sure that there is no disc in it.
2 Turn off your convertible notebook (do not place it in Standby or
Hibernate mode).
3 Make sure the LCD panel is in notebook mode, t hen close the LCD
panel.
4 Disconnect your convertible notebook from the optional port
replicator (see “Disconnecting from the port replicator” on
page 102).
5 Turn your convertible notebook over so the bottom is facing up.
60
www.gateway.com
Page 67

Changing modules
6 Remove the modular bay lock screw (if one is present), then slide
and hold the module bay latch. The module may move out slightly.
Modular bay lock screw
Screw
www.gateway.com
61
Page 68

Chapter 5: Using Drives and P orts
7 Slide the module out.
8 Firmly push the new module straight into the bay until the latch
clicks into place.
9 Replace the module bay lock screw.
Using the CD or D VD drive
You can use your convertible notebook to enjoy a wide variety of
multimedia features.
Important Some music CDs have copy protection software. You may
not be able to play these CDs on your convertible
notebook.
62
www.gateway.com
Page 69

Using the CD or DVD drive
Identifying drive types
Your Gateway convertible notebook may contain one of the following
drive types. Look on the front of the drive for one or more o f the
following logos:
If your drive has this logo... This is your drive type... Use your drive for...
ROM/R/RW
CD drive
Combination
DVD/CD-RW drive
Multi-format double
layer DVD
±RW/CD-RW
drive
Installing programs,
playing audio CDs, and
accessing da ta. You
cannot use this drive to
create CDs or DVDs or
play DVDs.
Installing programs,
playing audio CDs,
playing DVDs, accessing
data, and recording music
and data to recordable
CDs. You cannot use this
drive to create DVDs.
Installing programs,
playing audio CDs,
playing DVDs, accessing
data, recording music and
data to CD-R or CD-RW
discs, and recording video
and data to DVD-R,
DVD + R , DV D - R W,
DV D+RW, or double layer
DVD + R d i s c s .
Note: To us e the double
layer capability of the
double layer recordable
DVD dri ve, the bla nk
DVDs you purchase must
state Double Layer, Dual
Layer, or DL. Using other
types of blank media will
result in le ss capacity.
www.gateway.com
63
Page 70

Chapter 5: Using Drives and P orts
Inserting a CD or DVD
Manual eject hole
Eject button
To insert a CD or DVD:
1 Press the eject button on the CD or DVD drive. After the tray opens
slightly, pull the disc tray completely open.
2 Place the disc in the tray with the label facing up, then press down
carefully on the disc until it snaps into place.
Important When you place a single-sided disc in the tray, make sure
that the label s id e is facing up. If the disc has two p layable
sides, place the disc so the name of the side you want to
play is facing up.
3 Push the tray in until it is closed.
Playing a CD
Use a music program or Windows Media Player on your con vertible
notebook to:
■ Play music CDs
■ Create MP3 and WMA music files from your music CDs
■ Edit music track information
■ Use your music files to build a music library
64
www.gateway.com
Page 71

Using the CD or DVD drive
Tips & Tricks For more information about playing CDs, see “Using
Windows Media Player” in
been included on you r hard drive . To access this guide, tap
or click Start, All Programs, then tap or click Gateway
Documentation.
Using Your Computer
Playing a DVD
A Digital V ersa tile Disc (DVD) is similar to a standard CD but has greater
data capacity. Because of this increased capa city, full-length movies,
several albums of music, or several gigabytes of data can fit on a single
disc. You can play DVDs with a DVD program or Windows Media Player.
Tips & Tricks For more information about playing DVDs, see “Using
Windows Media Player” and “Using CyberLink PowerD VD”
Using Your Computer
in
hard dri ve. To acc ess this guide, tap or click Start,
All Programs, th en tap or clic k Gate way Doc umentation.
which has been included on your
Creating CDs and DVDs
which has
You ca n use a CD and DVD burning pr ogram, Windows XP,
Windows Media Player, or Windows Movie Maker to copy or create data
CDs and DVDs, create music CDs, create v ideo DVDs, and more.
Tips & Tricks For more infor mation about creating CDs and DVDs, see
“Using Windows Med ia Player”, “Usi ng Nero Express”, and
“Editing videos” in
included on your hard drive. To access this guide, tap or
click Start, All Programs, then tap or click Gateway
Documentation.
www.gateway.com
Using Yo ur Comp uter
which has been
65
Page 72

Chapter 5: Using Drives and P orts
Using the memory card reader
You can use memor y cards to transfer pictures from a digital camera to
your convertible notebook. You can also use the memory card reader to
transfer data between your convertible notebook and a device that uses
memory cards, such as a PDA, MP3 player, or cellular telephone.
Memory card types
The memory card reader supports Memory Stick®, Memory Stick Pro®,
MultiMediaCard™, and Secure Digital™.
Inserting a memory card
To insert a memor y card:
■ Insert the memory card into the memory card slot with the label
facing up and the arrow on the label pointing towards the
convertible notebook.
66
www.gateway.com
Page 73

Adding and removi ng a PC Card
Using a memory card
To access a file on a memory card:
1 Tap or click Start, then tap or click My Computer.
2 Double-tap or double-click the drive letter (for example, the E: drive),
then double-tap or double-click the file name.
Removing a memory card
Important Do not use the remove hardware icon in the taskbar
to remove the memory card. If you use the remove
hardware icon, your convertible notebook may not
recognize your memory card reader until you restart your
convertible notebook.
To remove a memor y card:
1 Push the memory card into the convertible notebook. The memory
card pops out s lightly.
2 Pull the memory card out of the convertible notebook.
3 Insert the protector into the memory card slot.
Adding and remo ving a PCCard
Your convertible notebook has a PC Card slot (also known as a PCMCIA
card slot). This slot accepts one Type II card. You do not need to restart
your convertible notebook when changing most cards because your
converti ble no tebook support s hot-swapping. Hot-swapping means that
you can insert a PC Card while your convertible notebook is running. If
your PC Card does not work after hot-swapping, see the PC Card
manufacturer’s documentation for further information.
www.gateway.com
67
Page 74

Chapter 5: Using Drives and P orts
To insert a PC Card:
■ Push the card firmly into the PC Card slot label-side up until the
outer edge of the card is flush with the side of your convertible
notebook.
To remove a PC Card:
1 T ap or click the remove hardware icon in the taskbar , the PC Card
name, then tap or click
Stop.
-ORTurn off your convertible notebook.
Important If the remove hardware icon does not appear on the
taskbar, tap or click the show hidden icons button.
2 Release the eject button by pressing the PC Card eject button once.
68
www.gateway.com
Page 75

Viewing the display on a projector or monitor
3 Eject the PC Card by pressing the eject button again.
Viewing the display on a
projector or monitor
You can use your convertible notebook for giving presentations by
connecting an external monitor or projector to your monitor (VGA) port.
Your convertible notebook supports simultaneous LCD and CRT display.
Simultaneous display lets you control the presentation from your
convertible notebook and at the same time face your audience.
To use a pr ojector or external monitor:
1 Turn off your convertible notebook.
2 Plug the projector or monitor cable into the VGA port on your
convertible notebook or optional port replicator. For the location of
the VGA port, see “Left” on page 11 and “Back” o n page 98.
3 Turn on your convertible notebook.
4 Plug the projector’s or monitor’ s power cord into an AC power source
and turn it on. Windows recogni z es the new hardware and searches
for its driver. You may need to install the driver from the disc
supplied by the manufacturer or download the driver from the
manufacturer’s Web site.
www.gateway.com
69
Page 76

Chapter 5: Using Drives and P orts
5 After the driver is installed, button-tap or right-click any empty space
on the desktop, then tap or click
dialog box opens.
Properties. The Display Properties
6 Tap or click the Settings tab.
7 Button-tap or right-click the second monitor icon (labeled 2), then
tap or click
Attached.
8 Tap or click Apply.
9 Adjust properties such as Scre en Resolu tion or Color Quality if
necessary.
10 Tap or click OK.
Important Press FN+F3 to s witch betw een view ing the dis play o n the
LCD panel and viewing the display on the projector or
monitor.
Important If an external monitor or projector is connected and you
close the LCD panel, your convertible notebook may turn
off the LCD panel, but will not enter Standby mode.
70
www.gateway.com
Page 77

Connecting a video camera to your conve rtible notebook
Connecting a video camera to
your co nv ertible notebook
Your convertible notebook has a 4-pin IEEE 1394 port (also known as a
Firewire
®
or i.Link® port) for connecting devi ce s such as a vide o cam e ra.
To connect y our video camera to your convertible notebook:
1 Connect one end of the IEEE 1394 cable to your video camera.
Important For more infor mation about using the IEEE 1394 port on
your video camera, see your camera’s documentation.
2 Connect the other end of the cable to the IEEE 1394 port on
the side of your convertible notebook. For the location of the
IEEE 1394 port, see “Left” on page 11.
Tips & Tricks For more infor mation about editing video, see “Editing
videos” in
on your hard drive . To access this guide, tap or click Start,
All Programs, th en tap or clic k Gate way Doc umentation.
Using Your Computer
www.gateway.com
which has been included
71
Page 78

Chapter 5: Using Drives and P orts
72
www.gateway.com
Page 79

Chapter 6
Managing Power
• Checking an d recharging the batt ery
• Recalibrating th e battery
• Changing batteries
• Extending the lif e of the battery
73
Page 80

Chapter 6: Managing Power
Monitoring the battery charge
Your new Gateway convertible notebook is designed to provide an
exceptional balance of performance and portability. Your convertible
notebook uses the latest chipset and mobile processor technologies to
manage the processor speed and power consumption for a greater battery
life experience. This design provides you with maximum performance
when plugged into AC power balanced wi th op timized ba ttery life when
on battery power.
Closely monitor the battery charge. When the batter y charge gets low,
change the battery or connect to AC power immediately to prevent losing
any unsaved work. To monitor the battery charge:
■ Double-tap or double-click the power cord icon or battery icon
in the taskbar. The Powe r Meter dialog box opens.
Important If the power cord or battery icon does not appear on the
taskbar, tap or click the show hidden icons button. If
the icon still does not appear, make sure that Always
show icon on the taskbar i s chec k ed on t he Adv ance tab
Power Options Proper ties
in the
For more infor mation, see “Changing advanced settings”
in
Using Your Computer
hard dri ve. To acc ess this guide, tap or click Start,
All Programs, th en tap or clic k Gate way Doc umentation.
which has been included on your
dialog box.
■ Look at the battery charge indicator (see “Status indicators” on
page 30):
■ LED blue - battery is fully charged.
■ LED purple - battery is charging.
■ LED blinking red - battery charge is very low.
■ LED solid red - battery is malfunctioning.
■ Wait for a Low Battery warning message to appear.
If your battery charge indicator displays what looks like an inaccurate
charge, you may need to recalibrate the batteries. For more information,
see “Recalibrating the batteries” on page 75.
74
www.gateway.com
Page 81

Recharging the batteries
Recharging the batteries
The batteries recharge while they are installed and your convertible
notebook is connected to AC power. While the batteries recharge, the
battery charge indicator turns on and the power cord i con i n t he taskbar
has a lightning bolt .
Important If the power cord or battery icon does not appear on the
taskbar, tap or click the show hidden icons button. If
the icon still does not appear, make sure that Always
show icon on the taskbar i s chec k ed on t he Adv ance tab
Power Options Proper ties
in the
For more infor mation, see “Changing notebook power
settings” in
on your hard drive . To access this guide, tap or click Start,
All Programs, th en tap or clic k Gate way Doc umentation.
Using Your Computer
dialog box.
which has been included
Recalibrating the ba tteries
If your convertible notebook unexpectedly goes into Standby mode while
you are using it but the battery charge is not low, you may need to
recalibrate your main and optional multibay battery. You should also
recalibrate the batteries periodically to maintain the accuracy of the
battery gauges.
To recalibrate the batteries:
1 Connect the AC adapter, then turn on your convertible notebook.
2 As soon as your convertible notebook starts and you see a startup
screen, press F2. The BIOS Setup utility opens.
3 Open the Advanced menu.
4 Highlight Battery Auto Learning, then select Enabled by pressing the
spacebar.
5 Open the Exit menu, then highlight Exit Saving Changes and press
E
NTER.
www.gateway.com
75
Page 82

Chapter 6: Managing Power
6 Select Yes, then press ENTER.
The battery recalibration process begins and a screen opens showing
you the progress. The entire process will take several hours.
Important Do not interrupt the battery recalibration process. If
recalibration is interrupt ed, you must start the process o ver
again.
When the recalibration has finished, the message “Press [Esc] key to
exit” appears.
7 Press ESC. The battery charge indicator now displays an accurate
battery charge. If the battery charge indicator does not show an
accurate charge, contact Gateway Customer Care.
Changing batter ies
If your convertible notebook is connected to AC power, or if it has a
charged multibay battery installed, you can change the main battery
while the convertible notebook is turned on. If your convertible
notebook has only one battery and it is not plugged into an AC outlet,
you must turn the convertible notebook off whi le changing the battery.
76
Warning Danger of explosion if battery is incorrectly replaced.
Replace only with a battery specifically manufactured for
your Gateway convertible notebook. Discard used
batteries according to local hazardous material
regulations.
The battery used in this device may present a fire or
chemical burn hazard if mishandled. Do not disassemble,
heat above 212°F (100°C), or incinerate. Dispose of used
battery promptly. Keep away from children.
www.gateway.com
Page 83

Changing batteries
Replacing the main battery
To change the main batter y:
1 Disconnect your convertible notebook from the optional port
replicator (see “Disconnecting from the port replicator” on
page 102).
2 If your convertible notebook is on and is connected to AC power or
has a charged multibay battery installed, go to Step 3.
-ORIf your convertible notebook is on, is not plugged into an AC outlet,
and does not have a charged multibay battery installed, save your
work and turn off the convertible notebook.
3 Close the LCD panel.
4 Turn your convertible notebook over so the bottom is facing up.
5 Slide the battery lock to the unlocked position, then slide the battery
release latch.
www.gateway.com
77
Page 84

Chapter 6: Managing Power
6 Slide the battery out of the bay.
7 Slide a recharged battery into the bay until it snaps into place.
8 Slide the battery lock to the locked position.
9 Turn your convertible notebook over.
10 Open the LCD panel and press the power button.
Installing a multibay battery
Your convertible notebook’s modular bay accepts a multibay battery.
The multibay battery charges when the convertible notebook is
connected to AC power.
Warning Danger of explosion if battery is incorrectly replaced.
Replace only with a battery specifically manufactured for
your Gateway convertible notebook. Discard used
batteries according to local hazardous material
regulations.
The battery used in this device may present a fire or
chemical burn hazard if mishandled. Do not disassemble,
heat above 212°F (100°C), or incinerate. Dispose of used
battery promptly. Keep away from children.
78
www.gateway.com
Page 85

Extending battery lif e
Caution If you are using a multibay battery instead of a main
battery , insert the weight sa ver tha t was include d with your
multibay battery into the main battery bay.
To install a multibay battery:
■ Swap the multibay battery for a bay module by following the
instructions in “Changing modules” on page 6 0.
Extending battery life
Conserving battery pow er
To conserve power while using the batteries to power your convertible
notebook:
■ Dim the display as low as is comfortable.
■ Remove PC Cards when you do not need them. Many PC Cards use
a small amount of power while inserted, even if they a re not being
used.
■ Modify the power management settings for maximum power
savings.
Tips & Tricks For more infor mation about using power management
settings, se e “Changi ng Power-Saving Setti ngs” in
Your Computer
drive. To access this guide, tap or click Start,
All Programs, th en tap or clic k Gate way Doc umentation.
■ Close the LCD panel to turn off the display while you are not using
your convertible notebook. The display stays off until you open the
panel again.
■ Use Hibernate mode for maximum power savings while your
convertible notebook is not in use.
www.gateway.com
which has been included on your hard
Using
79
Page 86

Chapter 6: Managing Power
Tips & Tricks For more infor mation about using Hibernate mode, see
“Changing notebook power settings” in
Computer
access this guide, tap or click Start, All Programs, then
tap or click Gateway Documentation.
■ Use the CD or DVD drive only when necessary . This drive uses a large
which has been included on your hard drive. To
Using Your
amount of power.
■ Recharge the batteries often, take an extra battery , and fully recharge
the batteries before traveling. For more information, see “Recharging
the batteries” on page 75 and “Changing batteries” on page 76.
Tips & Tricks For more inf ormatio n abou t traveling with your convertible
notebook, see “Trav eling with y our notebook” in
Computer
access this guide, tap or click Start, All Programs, then
tap or click Gateway Documentation.
which has been included on your hard drive. To
Using alternate po wer sources
To extend battery life, use alternate power sources whenever possible.
Using Y our
■ If traveling internationally , take electrical adapters. S ave the batteries
for times when you cannot use a power adapter . If you plan on taking
your AC power adapter, also take a single-plug surge protector.
■ If you will have access to an EmPower™ in-flight power receptacle,
an automobile power outlet, or an automobile cigarette lighter, use
a power inverter. Save the batteries for times whe n you ca nnot use
a power adapter.
■ To find AC power outlets in airports, look for them next to support
pillars, in large areas such as boarding gates, and under banks of
telephones.
80
www.gateway.com
Page 87

Extending battery lif e
Changing power modes
You can use the following power modes to lengthen the life of your
convert ible n oteboo k’s batterie s:
■ Standby - while your convertible notebook is in Standby, it switches
to a low power state where devices, such as the display and drives,
turn off.
■ Hibernate - (also called s ave to disk) writes all current memory (RAM)
information to the hard drive, then turns your convertible notebook
completely off. The next time you turn on your convertible
notebook, it reads the memory information from the hard drive and
opens the programs and documen ts that were open when you
activated Hibernate mode.
Using power saving modes
Always save your work before using Standby mode. In Standby mode,
your convertible notebook reduces or turns off the power to most devices
except memory . However , the informa tion in memory is not saved to the
hard drive. If power is interrupted, the information is lost.
When in Hibernate mode, your convertible notebook saves all memory
information to the hard drive, then turns the power completely off.
If your convertible
...and you want to... ...then
notebook is...
On Enter Standby mode Press FN+F3.
On Enter Hibernate
mode (must be
activated)
In Standby or
Hibernate mode
Important If the Pen Lost Alarm is turned on, and you turn off the
Exit Standby or
Hibernate mode
convertible notebook without returning the pen to the pen
holder, you will hear three beeps. This is to remind you to
replace the pen. For more information about the Pen Lost
Alarm, see “Pen lost alarm” on page 47.
www.gateway.com
Tap or click Start, then tap or click
Turn Off Computer. Press and hold
SHIFT, then tap or click Hibernate.
Press the powe r button.
81
Page 88

Chapter 6: Managing Power
82
www.gateway.com
Page 89

Chapter 7
Upgrading Your Convertible Notebook
• Adding and repl acing memory
• Replacing the ha rd drive
83
Page 90

Chapter 7: Upgrading You r Convertible Notebook
Pre venting static electricity discharge
Important Before installing memory or replacing the hard drive, you
should read and u nderstand the inf ormatio n in this section.
The components inside your convertible notebook are extremely
sensitive to static electricity, also known as electrostatic discharge (ESD).
Warning To avoid exposure to dangerous electrical voltages and
moving parts, turn off your convertible notebook and
unplug the power cord, modem cable, and network cable
before opening the case.
Warning To prevent risk of electr ic shock, do not i nser t any obj ect
into the vent holes of the conver tible notebook.
Before installing memory or replacing the hard drive, follow these
guidelines:
■ Avoid static-causing surfaces such as carpeted floors, plastic, and
packing foam .
■ Remove components from their antistatic bags only when you are
ready to use them. Do not lay components on the outside of
antistatic bags because only the inside of the bags provide
electrostatic protection.
■ Always hold components by their edges. Avoid touching the edge
connectors. Never slide components over any surface.
■ We ar a grounding wrist strap (available at most electronics stores)
and attach it to a bare metal part of your workbench or other
grounded connection.
■ Touch a bare metal surface on yo ur workbench or other grounded
object.
84
www.gateway.com
Page 91

Adding or replacing m emory
Adding or replacing memory
Your convertible notebook uses memory modules called SO-DIMMs
(Small Outline Dual Inline Memory Modules). The modules are available
in various capacities and any module can be placed in the slot. Use only
memory modules designed for your Gateway convertible notebook for
upgrading your memory.
Adding or replacing memory
Important Use only memo ry mo dules desig ned for your Gateway
convertible notebook.
Memory
bay
To add or replac e memory modules:
1 Follow the guidelines under “Preventing static electricity discharge”
on page 84.
2 Turn off your convertible notebook.
www.gateway.com
85
Page 92

Chapter 7: Upgrading You r Convertible Notebook
3 Disconne ct the AC adapter, mode m cable, a nd netwo rk cable.
4 Disconnect all peripheral devices and remove any PC cards.
5 Make sure the LCD panel is in notebook mode, t hen close the LCD
panel.
6 Disconnect your convertible notebook from the optional port
replicator (see “Disconnecting from the port replicator” on
page 102).
7 Turn your convertible notebook over so the bottom is facing up.
8 Remove the main battery and optional multibay battery (see
“Changing batteries” on page 76).
9 Loosen the six memory bay cover screws (they cannot be removed),
then remove the memory bay cover.
Screw
Screw
Screw Screw
86
Screw
www.gateway.com
Screw
Page 93

Adding or replacing m emory
10 If you are removing a module, gently press outwa rd on the clip at
each end of the memory module until the module tilts upward.
Clip
11 Pull the memory module out of the slot.
Clip
www.gateway.com
87
Page 94

Chapter 7: Upgrading You r Convertible Notebook
12 Hold the new or replacement module at a 30-degree angle and press
it into the empty memory slot. This module is keyed so it can only
be inserted in one direction. If the module does not fit, make sure
that the notch in the module lines up with the tab in the memory
bay.
Important Use only memo ry mo dules desig ned for your Gateway
convertible notebook.
13 Gently push the module down until it clicks in place.
14 Replace the memory bay cover and tighten the cover screws.
15 Insert the batteries, then turn your convertible notebook over.
16 Reattach the optional port replicator.
17 Connect the power adapter, modem cable, and network cable, then
turn on your convertible notebook.
88
www.gateway.com
Page 95

Replacing the hard drive kit
Replacing the hard drive kit
If you would like more hard drive capacity, you can replace your original
drive with a higher -capacity drive.
Hard
drive
To replace the hard drive kit:
1 Create a Drivers and Applications Recovery disc using the procedure
found in the Using Gateway System Recovery online guide. To access
this guide, tap or click
or click
Recovery Help Manual.
Start, All Programs, System Recovery, then tap
2 Print the Using Gateway System Recovery online guide for use in
Step 23.
3 Back up any data you want to transfer to the new hard drive. For
more information, see “Backing up files” in Using Your Comp uter
which has been included on your hard drive. To access this guide,
tap or click
Documentation
Start, All Programs, then tap or click Gateway
.
4 Follow the guidelines under “Preventing static electricity discharge”
on page 84.
www.gateway.com
89
Page 96

Chapter 7: Upgrading You r Convertible Notebook
5 Turn off your convertible notebook.
6 Disconne ct the AC adapte r, modem cable, and netw ork cable .
7 Disconnect all peripheral devices and remove any PC cards.
8 Make sure the LCD panel is in notebook mode, t hen close the LCD
panel.
9 Disconnect your convertible notebook from the optional port
replicator (see “Disconnecting from the port replicator” on
page 102).
10 Turn your convertible notebook over so the bottom is facing up.
11 Remove the main battery and optional multibay battery (see
“Changing batteries” on page 76).
12 Loosen the two hard drive bay cov er screws (they cannot be
removed), then remove the hard drive bay cover.
90
www.gateway.com
Page 97

13 Remove the hard drive scre w.
Replacing the hard drive kit
Screw
www.gateway.com
91
Page 98

Chapter 7: Upgrading You r Convertible Notebook
14 Slide the old hard drive kit out of your convertible notebook.
15 If your new hard drive already includes the hard drive kit bracket,
go to Step 20.
-ORIf you need to move the hard drive kit bracket from your old hard
drive kit to your new hard drive, go to Step 16.
92
www.gateway.com
Page 99

Replacing the hard drive kit
16 Remove the four screws that secure the hard drive to the hard drive
kit bracket.
Screw
Screw
Screw
Screw
17 Remove the bracket from the old drive.
18 Insert the new drive into the bracket, label side up, so the screw holes
line up.
19 Replace the two screws that secure the bracket to the drive.
20 Place the new hard drive kit into the bay and slide it into the
connector.
21 Replace the screws that secure the hard drive kit to your convertible
notebook.
22 Insert the batteries, then turn your convertible notebook ove r.
23 For instructions on installing Windows, your drivers, and your
applications, see the Using Gateway System Recovery online guide you
printed in Step 2.
www.gateway.com
93
Page 100

Chapter 7: Upgrading You r Convertible Notebook
94
www.gateway.com
 Loading...