

Page 1

MANUAL DEL USUARIO
USER MANUAL
MANUEL D’ENTRETIEN
LIBRETTO D’USO
BETRIEBSANLEITUNG
Page 2

Page 3

USER MANUAL
USER MANUAL
ENGLISH
Page 4

Page 5
-3-
USER MANUAL
GAS GAS thanks you for the trust you have placed in us.
We are delighted that you have selected the MC 65 motorcycle and we would like to welcome you to the GAS GAS
family.
Get to know your new machine well. This bike incorporates our accumulated competition experience and that which
we have gained from the achievement of many important titles.
You now possess a motorcycle with which, as well as feeling comfortable, you are offered infinite possibilities of
driving at the highest level of your skill while maintaining a maximum of security.
Thank you for your confidence and welcome to GAS GAS motos SA.
GAS GAS MOTOS, S.A.
Page 6

-4-
Introduction
You are now the owner of a modern motorcycle which will give you and your children much pleasure with maximum safety, provided
you look after and maintain the bike in good order. The manual supplied with your new motorcycle provides important information
concerning the handling and maintenance of the bike. At the time of publishing, it included the latest technical details for this series.
However, there may be minor differences due to constant developments in the construction of the motorcycles. The instructions
for use are an important element of the motorcycle and, in the event of resale, should be handed over to the new owner.
We would stress that all maintenance work to the chassis and engine should be carried out by specialised GAS GAS workshops.
In the event that such maintenance is required while competing with the bike, the work should be carried out by a qualified
mechanic.
Please follow the recommended running-in times as well as the inspection and maintenance intervals given. Strict adherence to
these time periods will have a direct affect on the working life of the motorcycle. In all cases maintenance services should be
carried out by a specialised GAS GAS workshop to ensure the bike remains under guarantee.
For your child’s safety, only use GAS GAS approved spare parts and accessories. GAS GAS will not accept responsibility for any
demage caused by the use of other parts.
Please note that as parents you should be aware that the safety of your children depends upon you finding a safe location for
the use of the motorcycle which should also be maintained in perfect technical order. Naturally, the motorcycle entails the possibility
of risk, as with all vehicles, and therefore you should ensure that all basic precautionary measures are observed. To do so, follow
the important instructions given to parents to ensure safe driving of the motorcycle.
Riding your motorcycle off-road is a marvellous sport which we hope you and your children will enjoy to the full. Nevertheless, it
can be a source of problems for the environment and of conflict with other people. Responsible behaviour when using your
motorcycle helps to prevent these problems and conflicts. To guarantee the future of motorcycling, please ensure that you and
your children use your motorcycle in accordance with the law, behave responsibly towards the environment and respect the rights
of others.
In conclusion we trust you and your children enjoy your motorcycle and always have a good journey.
The right to modifications in the production and design is reserved
Page 7
-5-
Important warning
Read this Manual carefully. You will find it contains all the necessary information for your safety, and that of others,
as well as guaranteeing the correct conservation and maintenance of the GAS GAS motorcycle you have just bought.
All the instructions required in order to correctly drive and handle the motorcycle are listed below. Each message is
preceded by a sign, the meanings of which are as follows:
Caution! This symbol indicates all of the rules and precautionary measures that must be taken in order to
avoid any physical injury, serious or slight, including death of the user; to ignore these represents a serious
danger.
Warning! This symbol introduces special warnings to avoid damaging your motorbike.
If these warnings are ignored the vehicle guarantee may be automatically declared invalid.
Miscellaneous notes. These are the instructions necessary for an optimum use of the control and adjustment
operations, as well as the conservation and maintenance work on the motorcycle, in order that you may
benefit from a maximum of driving satisfaction.
The aim of this Manual is to help the user minimise or avoid possible damage to people, property, the environment,
and naturally to your new motorcycle. Therefore all the information included in the manual is based on data obtained
on the latest range of ptoducts made available by the manufacturer immediately before going to printing. Nevertheless,
GAS GAS Motos, S.A. reserves the right to make modifications without prior warning to the consumer and without
being held responsible in any way.
Your nearest dealer is also available to provide any information you may require.
Page 8

-6-
Contents
Introduction...................................................................................... 4
Important warning............................................................................ 5
Identification..................................................................................... 7
Important instructions to parents to ensure the safe driving of the
motorcycle ....................................................................................... 8
Instructions for starting the cycle the first time.................................10
Running-in period ............................................................................10
INSTRUCTIONS FOR DRIVING......................................................11
Items to check each time you start the motorcycle..........................11
Fuel tap ...........................................................................................12
Starting when the engine is cold .....................................................12
Starting when the engine is warm .................................................. 14
What to do when the engine is “flooded”......................................... 14
Setting off........................................................................................ 15
Changing gears, driving ................................................................. 15
Fuel – Petrol/oil mixture ................................................................. 16
Fuel tank ........................................................................................ 16
Fuel................................................................................................. 17
INSTRUCTIONS FOR MAINTENANCE..........................................17
Transmission oil – Checking the level............................................. 17
Transmission oil – Topping up........................................................ 18
Transmission oil – Changing........................................................... 19
MC 65 Cooling system– Checking / topping up ............................. 20
Carburettor – Adjusting throttle cable............................................. 21
Carburettor – Adjusting idle speed ................................................ 21
Spark plugs – Inspecting................................................................ 22
Air filter – Cleaning......................................................................... 22
Rear brake fluid – Checking ........................................................... 23
Front brake lever - Adjusting........................................................... 23
Rear wheel – Centre alignment ..................................................... 24
Chain slack – Checking................................................................... 24
Master link – Checking ................................................................... 25
Tyre pressure – Checking ..............................................................25
Brake pads – Checking .................................................................. 25
Brake circuit – Bleeding ................................................................. 26
Front fork – Oil level........................................................................ 26
Lubrication of levers........................................................................ 27
Lubrication of foot pegs................................................................... 27
Lubrication of kick-start pedal......................................................... 28
Lubrication of throttle control .......................................................... 28
Lubrication of chain......................................................................... 28
CLEANING AND STORAGE .......................................................... 29
Cleaning.......................................................................................... 29
Storage ........................................................................................... 30
Starting after storage....................................................................... 30
TECHNICAL DATA ........................................................................ 31
Technical data – MC 65 2006 Engine ............................................ 31
Technical data – MC 65 2006 Chassis .......................................... 32
MAINTENANCE CHART – FAULT DIAGNOSIS ........................... 33
Maintenance chart .......................................................................... 33
Fault diagnosis ............................................................................... 35
GUARANTEE MANUAL ................................................................. 39
Page 9
-7-
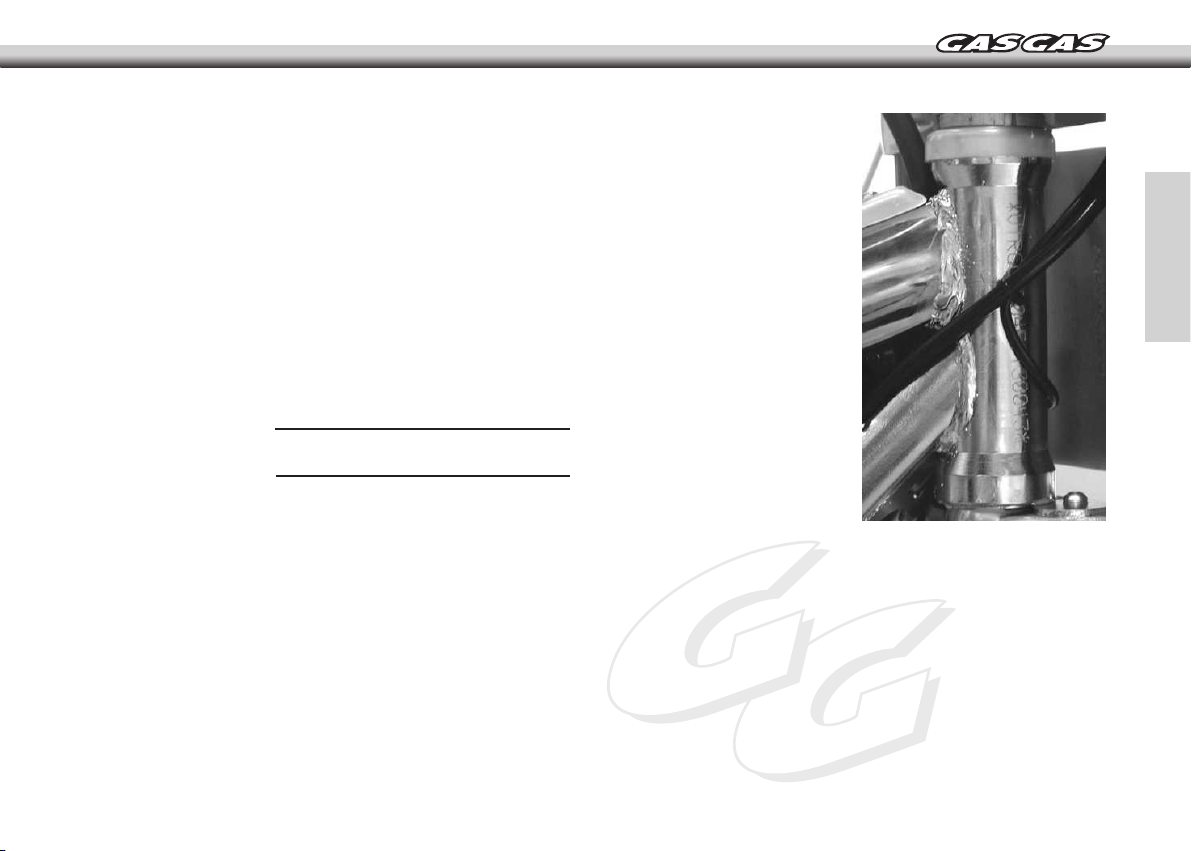
Identification
The motorcycle identification code is engraved on the
steering stem.
This code should match the documentation provided
with the motorcycle.
Please note the following codes:
Chassis number:
Engine number:
Stamp and signature of dealer
Gas Gas motor S.A. reserves the right to modify the
equipment, technical instructions, colours, materials,
services provided or similar without prior warning or
reason, in addition to the right to withdraw any of the
above without offering a replacement or to end the
production of a particular model without prior warning.
Page 10

-8-
Caution!
The MC 65 motorcycle is designed for use Off-Road and
by only one person at a time. The use of this motorcycle
on public highways is prohibited.
The motorcycle is designed for use by children between
8 and 12 years of age with a maximum body weight of
50 kg and a maximum height of 160 cm.
- Before using the motorcycle ensure the child is equipped
with suitable protective clothing. Protective clothing
includes the helmet, goggles, protective gear for the trunk,
arms and legs, gloves and boots.
- Adjust the clutch and brake levers to the size of the
child's hand (with gloves).
- Adjust the basic position of the brake pedal to the child’s
position when seated.
- Before starting the cycle for the first time explain all the
manoeuvres to your child and ensure that he/she has
fully understood these. Go over the user manual step by
step with your child, carefully explaining the instructions
concerning dangers, and in particular, those which are
shown as warning of the risk of accident.
- Explain to your child about: driving techniques, falls,
and the effect of the movement of body weight on the
behaviour of the vehicle, etc.
- Before starting the cycle for the first time, check whether
the basic adjustment of the fork and shock absorber has
been adjusted to the body weight of the child.
- Each time you start the cycle, first check the working of
all the components (see section – Checks each time you
start the motorcycle) and teach the child how to make
these checks him/herself.
- If you are also riding a motorcycle adjust your speed to
that of your child and not vice-versa.
- The child should understand that the instructions or
signs given by you, or other person in charge, must be
followed to the letter.
- The child should be physically able to ride a motorcycle.
He/she should at least know how to ride a bicycle. The child
should be strong enough to lift the motorcycle after a fall.
- Do not expect too much of the child. Give him/her
sufficient time to become familiar with the motorcycle and
to improve his/her driving technique. The child should not
take part in competitions until his/her physical condition,
driving technique and motivation meet requirements.
Important instructions to parents to ensure the safe driving of the motorcycle
Page 11

-9-
- Explain to the child that he/she should only drive at a
speed appropriate to the general conditions; otherwise,
he/she may fall and be seriously injured. Children are
often not aware of or do not recognise dangers. In
particular, speed should be reduced on unknown tracks.
- Never allow the child to use the motorcycle unsupervised.
An adult should always be present.
If you are out riding together, always tell someone where
and for how long you are going. This will allow help to be
obtained more quickly in the event of problems.
Page 12

-10-
Instructions for starting the cycle the first time
- Check that the work detailed in “Checks each time you
start the motorcycle” has been carried out by your
representative.
- Carry out the preliminary driving trials with your child,
preferably in a field or garden to prevent injury in the
event that the child falls. The available area should, of
course, be large enough to allow different driving
manoeuvres. Take care to avoid collisions with other
drivers.
- To allow your child to become accustomed to the brake
lever action, the motorcycle should be pushed during the
preliminary trials. Do not start the engine until the child
is correctly able to control the brake lever.
- Initially, the child should be between two people who
help him/her to stop the motorcycle. Explain the procedure
for stopping alone to your child.
- To improve driving techniques, the child should also try
to walk as slowly as possible while straddling the
motorcycle. Position obstacles which the child should try
to avoid, etc.
- Follow the instructions for running-in.
Running-in period
Care of the engine during the first hours of use is vital for
obtaining the best from your motorcycle.
Therefore, we recommend:
- Keeping strictly to the ratios of oil and petrol shown,
using 100% synthetic oil – see the section “Fuel – Petrol/oil
mixture”, page 16.
- In the first hour of use, keep the engine at a moderate
turnover speed (never go to maximum turnover).
- Constantly change the speed, by opening and closing
the throttle alternately.
Caution!
- Only GAS GAS approved accessories should be used.
- The front and rear wheels should be fitted with tyres of
the same profile. Only approved tyres should be used.
- Replace the helmet visor or the goggle lenses if
scratched.
- Never leave the motorcycle with the engine running.
Remember that excessive noise may bother other people.
Page 13
-11-
Checks each time you start the motorcycle
The motorcycle should be in excellent
technical condition while driving. For safety reasons,
a general check of the motorcycle should be made
each time you start the motorcycle. The following
checks should be carried out:
1 Gearbox oil
Low levels of gearbox oil result in premature wear
and the consequent damage to gears and gearbox
parts.
2 Petrol
Check the level of petrol in the tank. When the petrol
cap is closed, check that the tank vent hose is not
blocked.
3 Chain
A loose chain may come off the sprockets; a very
tight chain may break. A chain which has not been
adequately greased will result in excess wear of the
chain and sprocket.
4 Brakes
Check the level of brake fluid and that the brakes
work correctly. The tanks have been designed so
that the fluid does not require topping up even when
the brake pads are worn. If the level falls below the
minimum level, this indicates a fault in the brake
system or that the brake pads are totally worn. Have
the brakes checked at a specialised GAS GAS
workshop as the brakes may be faulty. Check the
condition of the brake line. Check the play of the
brake lever and brake pedal.
5 Tyres
Check that the tyres are in good condition. Tyres
with cuts or bulges should be replaced. Check the
tyre pressures. Incorrect air pressure affects driving
and may damage the tyres.
Caution!
If the resistance of the hand or foot brake lever
appears spongy, there is a fault in the brake system.
Have the brake system checked by a GAS GAS
dealer before using the motorcycle.
INSTRUCTIONS FOR DRIVING
Page 14

-12-
Checks each time you start the
motorcycle (Cont.)
6 Cables
Check the adjustment and working of the accelerator
cable.
7 Coolant fluid
When the engine is cold, check the level of the coolant
fluid.
Page 15
-13-
A
Starting when the engine is cold
1- Open the fuel tap.
2- Place the gear in neutral.
3- Pull out the choke (A).
- Pull the choke control upwards (A)
4- Kick the starter pedal vigorously without opening the
accelerator.
INSTRUCTIONS FOR MAINTENANCE
Fuel tap
This has three positions:
1- Reserve
2- Open
3- Closed
The diagrams below show the position
of the fuel tap (A) for each case.
1 2 3
A
A
Page 16

-14-
What to do when the engine is “flooded”
1- Close the fuel tap.
2- Start the engine with the accelerator fully open. If
necessary, remove and dry the spark plug.
3- When the engine starts again, re-open the fuel tap.
Starting when the engine is cold (Cont.)
Caution!
To prevent injury when starting the motorcycle, boots
should be worn. Your foot may slip off the starter pedal
or the engine may kickback if the kick was not hard
enough.
Do not start or leave the engine idling in closed spaces.
Exhaust fumes are highly toxic and may result in loss
of consciousness or even loss of life. When the engine
is running, ensure that there is always adequate
ventilation.
Warning!
Driving the motorcycle while the engine is cold is not
recommended as the piston heats up more quickly
than the water cooled cylinder. Allow the engine to
warm up while idling or driving at low speeds.
Starting when the engine is warm
1- Open the fuel tap.
2- Place the gear in neutral.
3- Kick the starter pedal vigorously without opening
the accelerator.
Page 17

-15-
Setting off
Pull on the clutch lever, engage first gear
and slowly release the clutch lever while
also accelerating.
Caution!
Always remove the stand before your child starts to
ride the motorcycle.
Changing gears, driving
First gear is the gear used to set off.
Conditions permitting (traffic, slope, etc), a higher
gear may be engaged. For this, close the throttle, pull
on the clutch lever, engage the next gear, release the
clutch lever and accelerate. When the choke is used,
make sure that it is pushed back once the engine is
warm.
When reducing gear, use the brake if necessary and
close the throttle grip at the same time. Pull on the
clutch lever and drop down to the next gear. Slowly
release the clutch lever and accelerate or reduce gear
again.
Caution!
After a fall with the motorcycle, all the functions should
be checked before starting the bike again.
A damaged lever should always be replaced. Never
repair the lever as this will result in loss of stability.
Warning!
A high engine speed when the engine is cold will have
a negative effect on the engine life. It is better to warm
the engine at medium speed for several kilometres,
and never reduce gear with the throttle fully open, if
the engine races, this may cause damage. In addition,
this may cause the rear wheel to lock, with the resultant
loss of control of the motorcycle.
If, during long descents, the engine is working without
accelerating, open and shut the throttle quickly from
time to time to ensure that the lubricant-petrol mixture
reaches the engine.
In the event of an unusual noise or vibration while
driving the motorcycle, stop immediately, switch off
the engine and contact a GAS GAS dealer.
Page 18

-16-
Fuel – Petrol/oil mixture
The motorcycle is fitted with a two-stroke
internal combustion engine. This type of engine requires
a mixture of petrol and oil.
To ensure the correct working of the engine, the following
are recommended:
- Use high quality petrol, with an octane rating equal to
or above 90 (RON +MON)/2 or 98 (RON).
- Use 100% synthetic oil.
Warning!
- If the recommended oil is not available, use semisynthetic oil.
- Do not mix different oil-types.
Mixture ratio: oil, 2,5% of petrol volume (40 parts petrol
to every 1 part oil).
Note: we recommend first preparing the mixture in a
suitable container and then filling the fuel tank.
Fuel tank
This has a rapid access cap (A) and a vent
hose (B) to allow gases produced in the tank to
escape.
- Turn the cap to the left to open.
Warning!
Regularly check the cap seal and vent hose to ensure
they are leak proof. Risk of spillage.
A
B
Page 19

-17-
Fuel
Unleaded Super, 95 octane, mixed with two-
stroke oils. Mixture ration 1:40.
Caution!
Petrol is highly inflammable and toxic. Employ extreme
caution when handling petrol. Do not refuel in the
vicinity of naked flames or lit cigarettes. Always switch
off the engine before refuelling. Take care not to spill
petrol on the engine or exhaust pipe while these are
hot. In the event of spillage, quickly wipe off with a
cloth. In the event of contact with eyes or if swallowed,
seek specialist advice immediately.
Warning!
Only use super (95 octane) petrol mixed with high
quality two-stroke engine oil. Other types of petrol
may damage the engine.
Only use recognised brands of oil.
Lack of oil may result in the premature wear of the
piston. Too much oil causes excess fumes and
greasing of the spark plug. Petrol increases in volume
with temperature. Do not fill the tank to the limit.
Transmission oil – Checking the level
If the motorcycle has been used recently,
wait a few minutes before checking the level.
Note: the motorcycle should be perpendicular to the
ground.
Warning!
Place a suitable recipient under the engine to collect
possible oil spillage. - Remove the oil level screw (A).
The level is correct if it reaches the lower edge of the
oil level hole (A).
If the level is lower then more oil must be added.
A
INSTRUCTIONS FOR MAINTENANCE
Page 20

-18-
Transmission oil – Topping up
If necessary, top up with oil:
- Remove the oil filler cap (A).
Warning!
Use the recommended oil.
- Add oil until it begins to pour out of the hole (B).
Warning: Do not overfill! Risk of damage to engine.
- Fit and tighten the oil level screw (B).
- Replace filler cap and tighten (A).
A
B
Page 21

-19-
Transmission oil – Changing
- Start the engine and keep it running until it
warms up, then stop the engine.
- To drain used oil, remove the oil release plug (B) located
underneath the engine.
- Replace the drain plug using a new seal washer. Tighten
to 20 Nm.
- Remove thes filler cap (A) and fill with oil (750 cc).
Warning!
Use the recommended oil.
- Tighten the filler cap.
Warning: Do not pour used oil down the drain.
A
B
Page 22

-20-
MC 65 Cooling system– Checking / topping up
The MC 65 model has a liquid cooled system.
Warning: If the motorcycle has just been used, wait a few
minutes before opening the radiator cap. Risk of burns!
- Rotate the cap (A) anti-clockwise and remove it.
- The level of coolant should be at the lower edge of the filler
neck of the radiator, below the position of the cap seal. If this
is not the case, top up with coolant fluid.
Warning!
Only use coolant fluid suitable for light alloy engines, with
antifreeze protection to -25 ºC.
A
Page 23

-21-
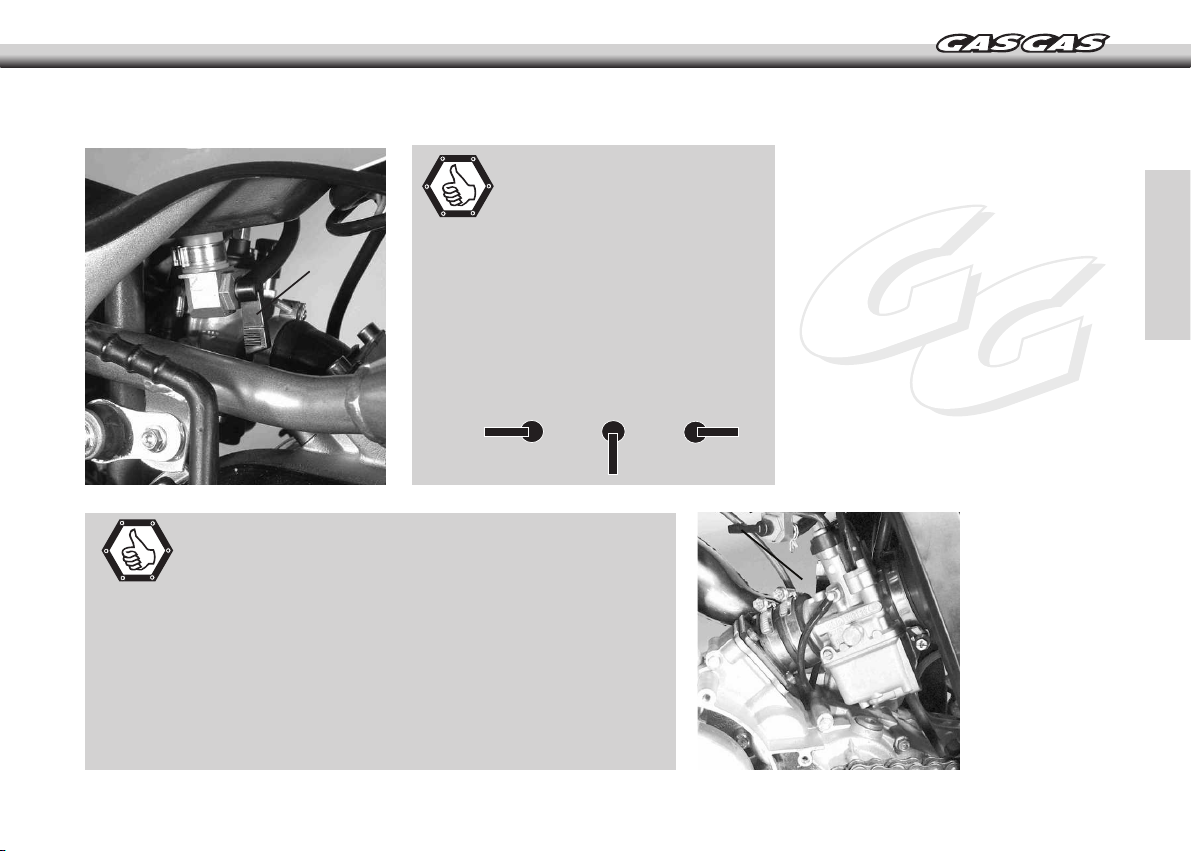
Carburettor - Adjusting throttle cable
The throttle lever cable should have a free
play of between 2 to 3 mm.
If necessary, adjust as described below:
- Raise the dust guard (A) on the throttle lever cable.
- Turning the threaded terminal (B) to the right increases
the play of the cable, and turning it to the left reduces
the play.
Carburettor – Adjusting the idle speed
The carburettor has an idle adjusting screw
(A), which acts on the opening of the carburettor throttle
curtain, and a screw (B), which controls the supply of
the air/fuel mixture.
B
A
B
A
Page 24

-22-
Spark plug – Inspecting
The gap between the electrodes is: a = 0.6 mm.
a
Air Filter - Cleaning
A clean air filter not only improves engine
performance but also prolongs its useful life. It should
therefore be cleaned regularly.
To reach the air filter, proceed as follows:
- Turn the screw (A) anticlockwise.
- Dismount the seat by pulling it backwards until it
detaches from the front fastening.
- Unscrew the filter bolt (A).
- Remove filter.
- Wash the filter in warm water and soap and, once
dry, grease with special filter oil.
Refit the elements in reverse order, noting that the
seat must be pressed downwards and forwards to
insert it into its forward attachment, in the front part of
the padding.
A
A
Page 25

-23-
a
A
B
Front brake lever - Adjusting
The front brake lever should have a maximum play of:
a = 3 mm.
To adjust, proceed as follows:
- Adjust the maximum turn of the lever using bolt (A), to suit the
driver.
- Adjust the play of the lever using bolt (B).
Rear brake fluid – Checking
The level is correct if it falls within the upper
half of the transparent window (A).
If not, top up with a recommended brake fluid.
A
Page 26

-24-
Rear wheel – Centre alignment
The rear axle can be calibrated for this
operation.
To ensure perfect wheel alignment, make sure that
the marks are in the same position on both sides.
Chain slack - Checking
Adjust the tension of the chain so that the
slack in the shoe area is:
a = 25 mm
a
Page 27

-25-
Master link – Checking
The master link of the chain has an elastic
locking clip.
As shown in the photo, place the closed part of the
clip in the direction of the chain rotation.
Tyre pressure – Checking
Check tyre pressures regularly in order to
obtain the best road holding possible.
INFLATION PRESSURES:
Front wheel: 1.0 BAR
Rear wheel: 1.0 BAR
Brake pads - Checking
The brake pads, both front and rear, should
be checked for wear periodically, in order to enable
you to brake effectively in any situation.
Replace if the thickness of the friction material of the
pads reaches 1 mm.
Page 28

-26-
Brake circuit - Bleeding
If the system has been dismantled for repair, or if faults are
detected in the brake system, the air in the hydraulic circuit can be removed
using the bleeders (A).
Once the air has been removed from the system, replace the rubber cap
on the bleeder to prevent dirt from entering the system.
Front fork – Oil level
Each of the suspension struts is filled with
SAE 7,5 oil. The oil level should be at 120mm +/-2.5
measured from the upper edge of the suspension strut.
A
A
Page 29

-27-
Lubrication of levers
Clean and lubricate frequently with oil:
- The joints of the clutch and front brake levers.
Lubrication of foot pegs
Clean and lubricate frequently with oil:
The joint and spring of the foot pegs.
Page 30

-28-
Lubrication of the kick-start pedal
Clean and lubricate frequently with oil:
- The joint of the kick-start pedal
Chain lubrication
Clean and lubricate it frequently with oil, after
every training session:
- The secondary chain.
Lubrication of throttle control
Clean and lubricate frequently with oil:
- The throttle lever, especially after washing the
motorcycle with high pressure hoses.
Page 31

-29-
Cleaning
Clean the motorcycle regularly.
We recommend using warm water with ordinary
detergent and a sponge. More resistant dirt may be
removed with a gentle jet of water.
Warning!
Never clean the motorcycle with a high pressure
cleaner or strong jet of water. The water may enter
electrical components, bearings, carburettor, etc.
resulting in their premature wear.
- Use ordinary household detergent for cleaning the
motorcycle. For more resistant dirt remove with a
brush.
- To prevent water penetration, cover the exhaust pipe
before washing the cycle.
- After rinsing, dry the motorcycle with compressed air
and a cloth. Then go for a short ride on the motorcycle
to allow the engine to reach its normal operating
temperature and also activate the brakes. This ensures
total evaporation of any water from the more
inaccessible points.
- Remove the protective rubber covers on the
controls to allow any water to evaporate from within.
- When the motorcycle has cooled, moving parts and
bearings should be greased. Lubricate the chain with
special spray.
- To prevent faults in the electrical system use a
moisture-displacing spray on the short-circuit switch.
CLEANING AND STORAGE
Page 32

-30-
Storage
If the motorcycle is not going to be used for
a long period of time, the following should be observed:
- Thoroughly clean the motorcycle (see chapter:
CLEANING).
- The gearbox oil should be changed (the used oil
contains rusty particles).
- Check the antifreeze and the coolant level.
- Allow the engine to warm up again, close the fuel tap
and leave the engine to stop on its own. This prevents
rust on the carburettor jets due to old fuel.
- Remove the spark plug and pour approx. 5 cc of
engine oil through the cylinder opening. Activate the
starter pedal approx. 10 times to allow the oil to cover
the walls of the cylinder and reassemble the spark
plug.
- Drain the fuel tank into a suitable container.
- Check the tyre pressures.
- Lubricate the bearings of levers, foot rests etc. and
the chain.
- Adjust the rear suspension.
- The storage area should be dry and not
subject to large temperature fluctuations.
- Cover the motorcycle with breathable canvas or
canopy. Do not use impermeable fabric as this will
trap the damp and cause rust.
Warning!
The engine of a motorbike can be damaged if used for
short periods when cold. Because the engine does
not reach its optimum operating temperature, steam
generated during combustion condenses, leading to
rusting of the exhaust.
Starting after storage
- Fill the tank with new petrol.
- Carry out the checks for each time you start the
motorcycle (see instructions for driving)
- Make a short trial ride.
Warning!
Before storing the motorcycle at the end of the season,
check the working and wear of all the parts. If technical
service, repair or modification work is required, these
should be carried out now during the off-season). This
avoids long waiting times at the workshops at the start
of the season.
Page 33

-31-
Engine Cross 65 cc 2T
Type Otto two-stroke, single-cylinder, liquid-cooled engine
Displacement in cubic centimetres 64.89 cc
Bore/stroke 45 / 40.8 mm
Compression ratio 13: 1
Fuel 95 octane petrol, mixed with 100% synthetic oil - Ratio 1: 40
Primary transmission Straight-cut gears, Z 22: 77
Gearbox 6 speed
Gearbox ratios 1st gear 12: 33
2nd gear 15: 29
3rd gear 18: 27
4th gear 20: 25
5th gear 25: 27
6th gear 23: 22
Engine lubrication SAE 10 Engine oil
Ignition Ducati Energía 310810GE
Spark plug Make / Code NGK / B10ES
Electrode spacing 0.60 mm
Carburettor Dell'Orto* PHBL26BS.
Coolant fluid 0.55 litres, (40 % antifreeze, 60 % water) Protec. to -25° C
Air filter Foam air filter.
TECHNICAL DATA
TECHNICAL DATA - MC 65 2006 ENGINE
Page 34

-32-
Frame Deltabox type manufactured in chrome-moly steel
Fork Marzocchi inverted telescopic fork 35 mm
Front/rear susp. travel. 250 / 210 mm
Rear suspension Progressive tie-rod system with Sachs hydraulic single shock absorber
Front brake : 180 mm
Rear brake : 180 mm
Tyres Front: 60/100-14 Rear: 80/100-12
Tyre pressure Front and rear: 1.0 bar
Fuel tank capacity 3.5 litres
Secondary transmission Gear ratio 12:48
Chain 1/2 x 3/16"
Wheel base 1115 mm
Seat height 760 mm
Minimum height 285 mm
Dry weight, without petrol 55 kg
Maximum height 160 cm
Maximum weight 50 kg
For children 8-12 years of age
TECHNICAL DATA - MC 65 2006 FRAME
Page 35

-33-
A clean vehicle helps to make quick checks and saves money
Check gearbox oil level
Change gearbox oil
Check spark plug, replace if necessary, adjusting electrode spacing
Check carburettor is securely fastened to intake pipe
The intake pipe and carburettor hose should be leak free
Check idling setting when engine is warm
Check for possible leaks in coolant system and check condition of anti-freeze
Check for possible leaks and the bracket in the exhaust system
Check cables for wear, movement and buckling
and adjust and lubricate
Check oil level of hydraulic clutch master cylinder
Clean air filter and air filter casing
Check brake fluid level, thickness of brake cover and brake discs
Check brake lines for wear and seal
Inspect movement and free play of hand brake lever and brake pedal,
inspect working of brakes
Check the adjustment of brake system screws
MAINTENANCE CHART – FAULT DIAGNOSIS
Maintenance chart
ENGINE
CARBUR-
ETTOR
FITTED PARTSBRAKES
Minimum
once
a year
Service
every 20
hours
Page 36

-34-
Check the seal and working of shock absorber and fork
Bleed fork bottle
Check swing arm support
Check and adjust steering stem bearing
Check all frame screws
(bridge, shaft nuts, swing arm support, shock absorber)
Check wheel spoke tension and attachment to rims
Check pressure and condition of tyres
Check wear, fastening and tension of chain, connection seal, sprockets and chain guide
Grease chain
Check play of wheel bearings
Minimum
once
a year
Service
every 20
hours
CHASSISWHEELS
Page 37

-35-
Fault diagnosis
FAULT CAUSE SOLUTION
Engine does not start. Handling error.
Break in fuel supply.
Electrode spacing too big.
Spark plug greasy, damp or gap
bridged.
Faulty spark plug cap or spark plug.
Earth cable cut.
Short-circuit button faulty
Open fuel tap, add petrol, close choke.
Remove end of carburettor fuel pipe, insert in container and
open fuel tap.
If petrol comes out, the carburettor needs cleaning.
If no petrol comes out, check the bleeding of air from the
tank or clean the fuel tap.
Reduce the electrode spacing (0.60 mm).
Clean or change spark plug.
Remove spark plug, connect it to plug cable, earth with plug
(bare point on engine) and start engine: a good spark should
come off plug.
If there is no spark, take cable off cap, place it at 5 mm from
earth and operate kick-start pedal.
If there is a spark, the plug cap needs replacing.
If there is no spark, check the ignition.
Disconnect the black cable from the ignition coil terminal and
check the ignition spark. If the ignition spark is OK, repair the
fault in the cable, ignition lock or button.
Page 38

-36-
Engine does not start.
Engine does not run at
idle speed.
Engine has little power.
Ignition plug connection is loose or
rusty.
Ignition spark too weak.
Water in carburettor or jets are
blocked.
Idling Adjustment screw set
incorrectly
Damaged ignition.
Signs of wear.
Fibre glass thread in silencer
carbonised.
Air filter blocked.
Fuel supply partially broken or
blocked.
Loss in compression due to loose
spark plug.
Exhaust system bent or faulty.
Check connections.
Check ignition spark.
Remove and clean carburettor.
Readjust idle speed or change idle speed adjustment screw.
Check ignition system.
Overhaul engine.
Refill.
Clean or change filter.
Drain petrol hose and clean carburettor.
Tighten spark plug.
Check for damage in exhaust system.
FAULT CAUSE SOLUTION
Page 39

-37-
Forward ignition of engine
inadequate.
Membrane reeds loose or seal
surface of reed valve or reeds are
worn.
Wear.
Carburettor floods because level is
set too high, casing of float needle is
dirty or worn.
Loose Jets.
Inappropriate heat value or poor
quality spark plug fitted.
Ignition system connection pin loose
or rusty.
Lack of fuel.
Inappropriate heat value spark plug
fitted (auto ignition).
Check ignition point or adjust.
Change reeds
Overhaul engine.
Clean carburettor, change float needle, if necessary and
adjust level.
Tighten jets.
Use spark plug type shown in "Technical data".
Check connection pin and insulate with silicone.
Clean carburettor pipes, check bleeding of air from tank and
clean carburettor.
Use spark plug type shown in "Technical data".
Engine does not
accelerate and runs in
four stroke.
Engine fails at high
engine speeds.
Engine backfires in
carburettor.
Engine has little power.
FAULT CAUSE SOLUTION
Page 40

-38-
Insufficient air suction.
Insufficient coolant fluid in radiator.
Radiator reeds dirty.
Foam forms in cooling system.
Water hose bent.
Cylinder head or cylinder head gasket
faulty.
Too much oil added.
Check cylinder and carburettor screws are correctly tightened;
check intake pipe for cracks
Add coolant fluid and bleed coolant system. Check for
absence of leaks in the coolant system.
Clean reeds with a gentle jet of water.
Change coolant fluid; use recommended antirust and anti
freeze products.
Check hoses for kinks.
Check cylinder head or change gasket.
Correct oil level
Engine backfires in
carburettor.
Engine overheats.
White smoke formed
(vapour in exhaust
fumes).
Oil leaks from gearbox
through air vent hose.
FAULT CAUSE SOLUTION
Page 41

-39-
WARRANTY TERMS AND CONDITIONS
(According to Law decree 23/2003 on the 10th of July, covering Warranties on Consumer Item Sales)
Warranty terms of the manufacturer GASGAS Motos, S.A.
The company GAS GAS MOTOS, S.A. (hereafter referred to as “GG”), with this present document guarantees the
consumer, the purchaser of a vehicle manufactured by GG, that both the materials and the manufacturing are free
of defects in accordance with the highest standards of quality. Consequently, GG with this document guarantees
the consumer (hereafter referred to as the “purchaser”), in accordance with the conditions set out below, the repair,
free of charge, of any defect in materials or that might result from faulty manufacture that is detected in a new
motorcycle within the period covered by this Warranty and with no limit on the number of kilometres covered or hours
of use.
Warranty Period
The period covered by this Warranty will begin on the day of delivery of the vehicle to the purchaser by a GG
authorised dealer, or in the case of demonstration models, on the date in which the vehicle is used for the first time.
The seller will be responsible for any unwarranted faults that become apparent within the period established in the
Law decree 23/2003 on the 10th of July covering Warranties on Consumer Goods Sold from the time of delivery and
in accordance with the Directive 1999/44/EC for other members of the European Community. For countries outside
the European Community, the Warranty Period will be determined by the existing regulations in those countries.
Nevertheless, should the fault appear during the first six months after the delivery of the motorcycle, it will be presumed
that the said fault existed at the time of delivery; from the end of the sixth month onwards, the purchaser must
demonstrate that the unwarranted fault existed at the moment of delivery. During the first six months subsequent
to the delivery of the repaired vehicle, the seller will be responsible for any unwarranted faults arising out of the
repair.
Any defects detected in the product must be brought to the attention of a GG authorised dealer within the Warranty
Period. If the last day of this period is a Sunday or an official holiday, the Warranty period will be extended such that
the last day of the period covered will be the first working day after the Sunday or official holiday.
Those claims under Warranty for defects not brought to the attention of a GG authorised dealer before the
end of the Warranty Period will be excluded.
Page 42

-40-
Obligation of the purchaser
GG will have the right to reject any claims under Warranty in the event that:
a) The purchaser has failed to submit the vehicle to any of the inspections and/or maintenance work required in the Users’
Manual, or has exceeded the date set for such inspections or maintenance work. Also excluded from guarantee are those
faults that appeared prior to the dates established for an inspection or maintenance work where the latter was not carried
out, or was carried out later than the date established.
b) An inspection, maintenance or repair has been performed on the vehicle by third parties not recognised or authorised
by GG.
c) Any maintenance or repair has been carried out on the vehicle that violates the technical requirements, specifications
and/or instructions indicated by the manufacturer.
d) Spare parts whose use has not been authorised by GG have been used during the course of maintenance work or repairs
to the vehicle, or in the event that the vehicle has been used with fuels, lubricants or other liquids (including, amongst others,
cleaning products) that have not been expressly mentioned in the specifications set out in the User’s Manual.
e) The vehicle has been altered or modified in any way or fitted with components other than those expressly authorised
by GG as accepted components of the vehicle.
f) The vehicle has been stored or transported in a way that is not in accordance to the corresponding technical requirements.
g) The vehicle has been used for special purposes other than ordinary use, such as competition, races or record breaking
attempts.
h) The vehicle has been directly or indirectly damaged as a result of a fall or an accident.
Warranty exclusions
The following items are not covered by this Warranty:
a) Worn parts, including, without any limitation, spark plugs, batteries, petrol filters, oil filter elements, (secondary) chains,
engine output pinions, rear sprockets, air filters, brake discs, brake pads, clutch plates and discs, bulbs, fuses, carbon
brushes, footrest rubbers, tyres, inner tubes, cables and other rubber components
b) Lubricants (for example, oil, grease, etc.) and working fluids (for example, battery liquid, coolant, etc.)
c) Inspection, adjustments and other maintenance tasks, as well as all kinds of cleaning work
d) Damage to the paint-work and consequent corrosion due to external causes, such as stones, salt, industrial fumes and
other environmental impact, or inadequate cleaning with inappropriate products
Page 43

-41-
e) Any damages caused as a result of the defects, as well as any expenses incurred either directly or indirectly as a
consequence of the defects (for example, communication costs, accommodation expenses, car hire costs, public transport
costs, breakdown truck fees,, courier costs, etc.), as well as other financial losses (for example, those caused by the loss
of the use of the vehicle, loss of income, time lost, etc.)
f) Any acoustic or aesthetic phenomenon that does not significantly affect the condition or use of the motorcycle (for example,
small or hidden imperfections, noise or vibrations that are normal in use, etc.)
g) Phenomena that are the result of the ageing of the vehicle (for example, discolouring of painted or metallic coated
surfaces).
Various
1.- GG shall have the prerogative to decide, at its own discretion, whether to repair or replace defective parts. Where parts
are replaced, ownership of the parts removed shall pass to GG without any other consideration. The GG authorised dealer,
to whom the making good of the defects has been entrusted, is not authorised to make any declarations that are binding
on GG.
2.- In case of doubt regarding the existence of a defect, or a visual or material inspection is required, GG reserves the right
to demand the return of the parts which are the object of a claim under Warranty, or to arrange an inspection of the defect
by an expert from GG. Any additional obligations arising out of guarantees on parts replaced free of charge, or any other
service rendered free of charge, are excluded from the effects of this present warranty. The Warranty on parts replaced
within the Warranty Period will end at the expiry date for the Warranty Period of the product concerned.
3.- Should it prove to be the case that a defect can not be repaired, the purchaser guaranteed shall have the right to the
cancellation of the contract (payment of compensation) or a partial refund of the purchase price (discount), instead of
repairing the motorcycle.
4.- Any claims against Warranty by the purchaser under the terms of the sale contract with the corresponding authorised
dealer shall not be affected by the terms of this present Warranty. Neither will this present Warranty affect those additional
contractual rights acquired by the purchaser under the general commercial terms and conditions of the authorised dealer.
However, such additional rights may only be exercised through claims against the authorised dealer.
5.- Should the purchaser resell the product within the Warranty Period, the duration and conditions of the present Warranty
will remain unaltered, in such a way as that the rights to make claims under the present Warranty in accordance with the
terms and conditions set out in this present document shall be transferred to the new owner of the motorcycle.
Page 44

-42-
Notes
Notes
Page 45

-43-
Notes
Notes
Page 46

Page 47

Page 48

PUO10638017
RECOMIENDA EL USO DE ACEITE:
RECOMMENDS THE USE OF OIL:
RECOMMANDE L’USAGE DE L’HUILE:
CONSIGLIA L’USO D’OLIO:
EMPFIEHLT DEN GEBRAUCH VON ÖL:
C/ UNICEF nº 17 · Poligon Industrial Torremirona · 17190 Salt (Girona) SPAIN · Tel: +34 902 47 62 54 Fax: +34 902 47 61 60
E-mail: officegg@gasgasmotos.es / partsgg@gasgasmotos.es
OCTUBRE / OCTOBER / OCTOBRE / OTTOBRE / OKTOBER 2005
 Loading...