

Page 1

MANUAL DEL USUARIO
USER MANUAL
MANUEL D’ENTRETIEN
LIBRETTO D´USO
BETRIEBSANLEITUNG
4 STROKE
50
Page 2

Page 3

SERVICE MANUAL
SERVICE MANUAL
50
ENGLISH
4 STROKE
Page 4

Page 5

INTRODUCTION
Congratulations on your purchase of QUAD 50 - 4 STROKE it represents the result of many years of our experience
in the production of fine machines. You can now appreciate our craftsmanship and reliability of the master piece.
This manual will provide you with a good basic understanding of the features and operation of this machine. This
manual includes important safety information. Failure to follow the warnings contained in this manual can result in
serious injury or death. It provides information about special techniques and skills necessary to your machine.
AN IMPORTANT SAFETY MESSAGE:
– READ THIS MANUAL CAREFULLY AND COMPLETELY BEFORE OPERATING YOUR MACNINE. MAKE SURE
YOU UNDERSTAND ALL INSTRUCTIONS.
– PAY CLOSE ATTENTION TO THE WARNING AND CAUTION LABELS ON THE MACHINE.
– NEVER OPERATE A QUAD WITHOUT PROPER TRAINING OR INSTRUCTION.
– THIS QUAD SHOULD NOT BE RIDDEN BY ANYONE UNDER 6 YEARS OF AGE FOR 50 cc DISPLACEMENT.
-1-
Page 6

-2-
Page 7

-3-
1. LOCATION OF THE “WARNING AND
SPECIFICATION LABELS”.................................... 5
2. NOTES FOR SAFEY.......................................... 7
3. DESCRIPTION .................................................. 9
Parts location......................................................... 9
Identification number record ................................ 10
Parts function ...................................................... 11
Fuel...................................................................... 13
Engine oil............................................................. 14
Tires..................................................................... 15
Inspection ............................................................ 15
Starting procedure ............................................... 17
Run-in ................................................................. 17
Riding .................................................................. 17
Parking ................................................................ 18
Turning .................................................................... 18
Climbing uphill ........................................................ 19
Crossing through shallow water.............................. 19
4. MAINTENANCE.................................................. 20
Maintenance schedule ........................................... 20
Spark plug .............................................................. 21
Air cleaner............................................................... 21
Carburetor and idle speed adjustment.................... 22
Brakes..................................................................... 22
Drive chain.............................................................. 23
Throttle cable.......................................................... 23
Battery .................................................................... 24
5. SPECIFICATIONS .............................................. 25
6. WARRANTY TERMS AND CONDITIONS............. 26
7. WIRING DIAGRAM ............................................. 29
CONTENTS
Page 8

-4-
Page 9
-5-
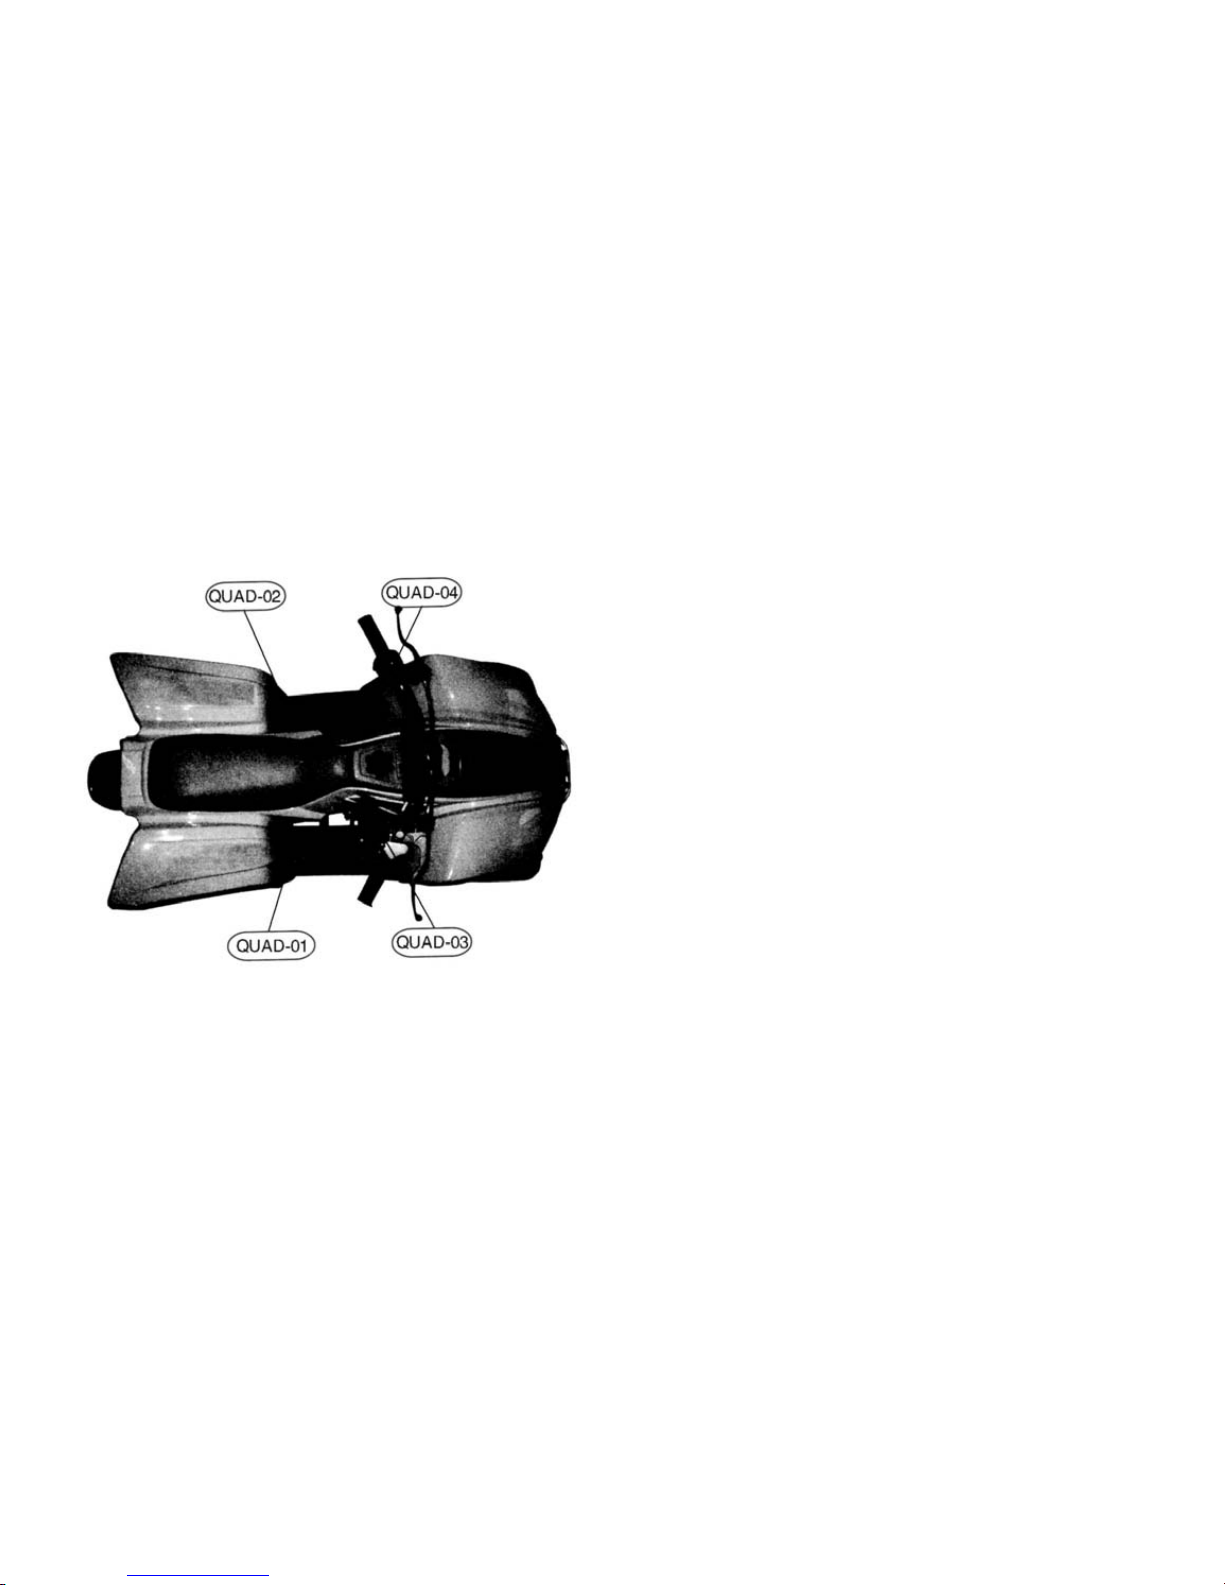
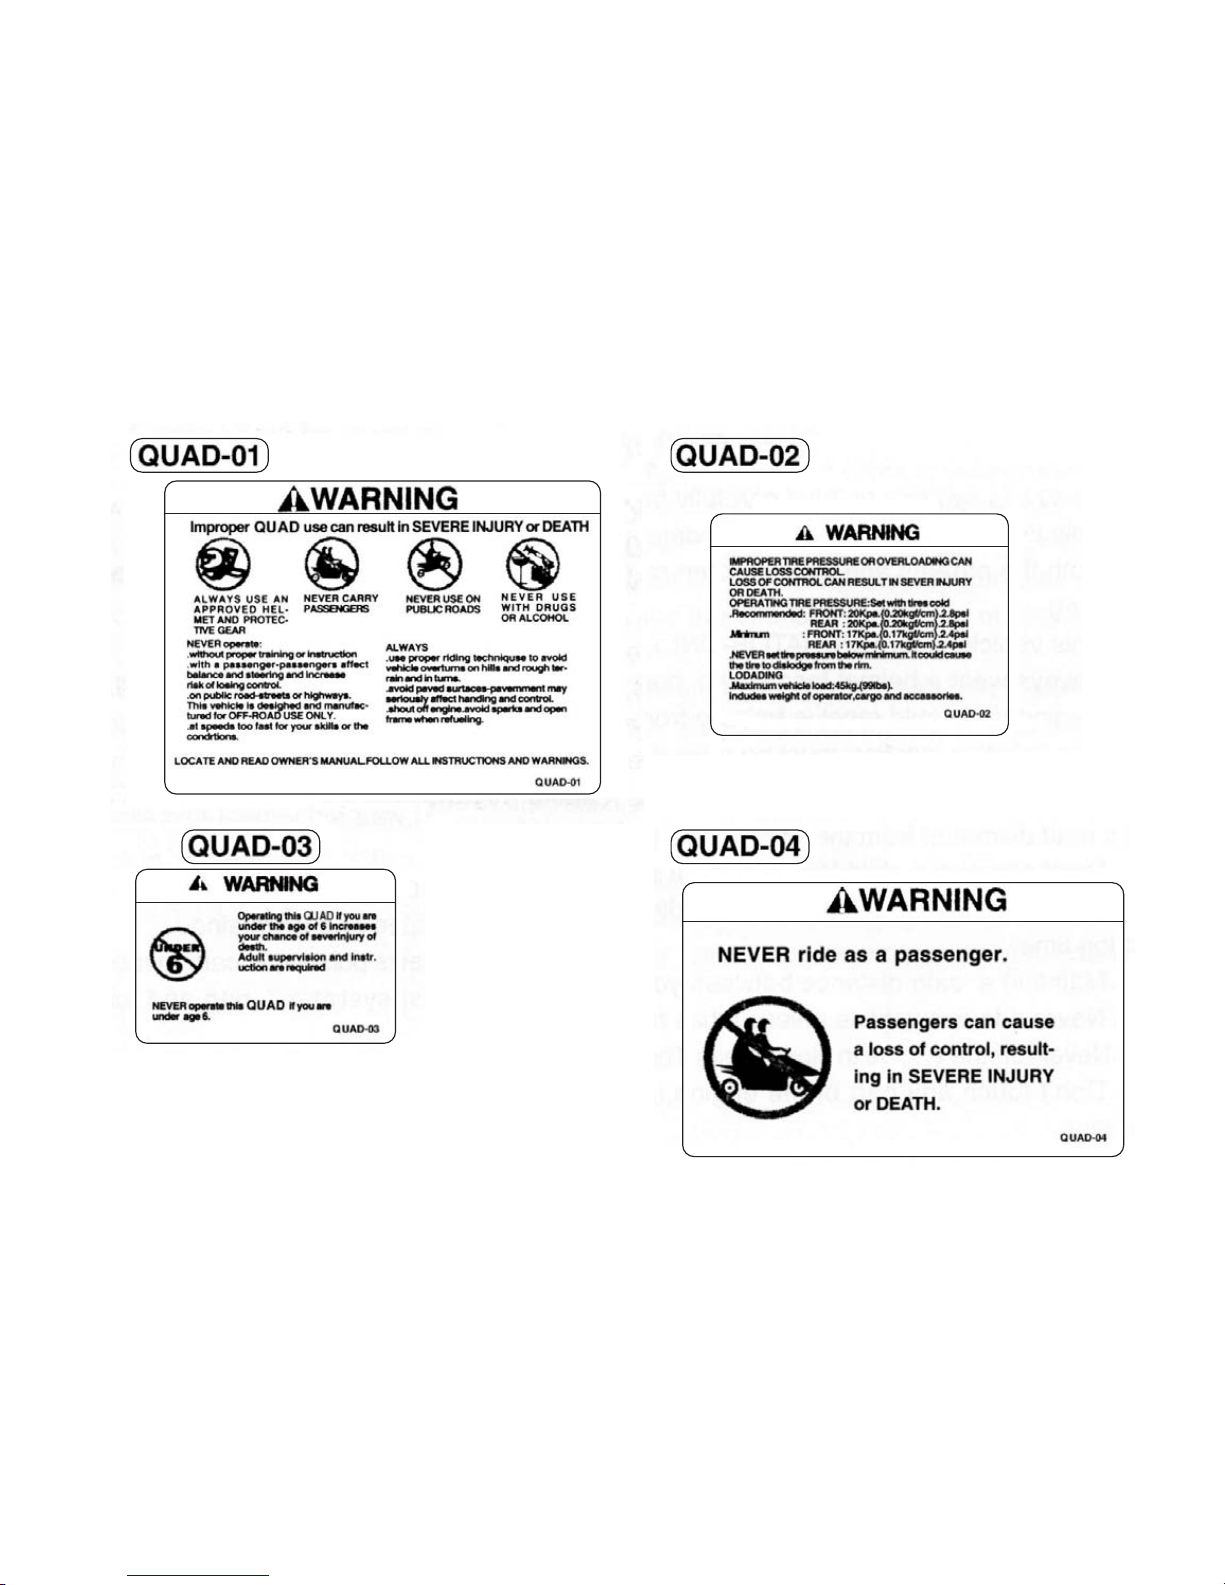
1. LOCATION OF THE WARNING AND SPECIFICATION LABELS
Read and understand all of the labels on your machine.
They contain important information for safe and proper
operation.
Never remove any labels from your machine.
If a label becomes difficult to read or comes off, a
replacement lable is available from your dealer.
Page 10
-6-
Page 11

-7-
– Read this owner's manual carefully before riding.
– This v ehicle is designed f or the riders age 6 and older
for 50cc displacement.
– Both the parents and their children must fully
understand everything in this manual be fore riding.
– This vehicle is for OPERATOR-ONLY. Never carry
passenger on an QUAD.
– Always wear a helmet, face shield ,boots,glov es and
protective clothing when riding.
– Beginners should receive training from a cretified
instructor.
– The practice location m ust be a lev el. free of obstacles ,
off-road area.
– It is illegal to ride this vehicle on public roads or
highways. lf it is necessar y to cross a public road,
dismount from the vehicle and push it across.
– Don't allow your child to ride without supervision.
– Don't take alcohol or drugs when riding.They can
affect your judgement and slow down reaction time.
– Maintain a safe distance between your vehicle and
other off-road vehicle.
– Never ride this vehicle unless it has been properly
adjusted and maintained.
– Never run the engine in close areas.The exhaust
gas contains poisonous carbon monoxide.
– Don't touch any part of the engine or exhaust system
during and following operation.
– Always chec k f or obstacles bef ore operating in a ne w
area.
– Never attempt to oper ate over large obstacles, such
as large rocks or fallen trees. Always follow proper
procedures when operating over obstacles as described
in this manual.
2. N0TES FOR SAFETY
Page 12

-8-
– Always be careful when skidding or sliding. Learn to
safely control skidding or sliding by practicing at low
speeds and on level,smooth terrain.On extremely
slippery surfaces such as ice,go slow and be very
cautious in order to reduce the chance of skidding or
sliding out of control.
Never oper ate a QU AD in f ast flowing water. Remember
that wet brakes ma y ha v e reduced stopping ability.Test
your brakes after lea ving water.lf necessary. apply them
several times to let friction dry out the linings.
– Always use the size and type of tires specified in this
manual. Always maintain proper tire pressure as
described in this manual.
– Never modify a QUAD through improper installation
or use of accessories.
When transporting the machine in another vehicle.be
sure it is kept upright and that the fuel cock is in the
"OFF"position. Otherwise,fuel may leak out of the
carburetor or fuel tank.
Page 13

-9-
3. DESCRIPTION
PARTS LOCATIONS
1. Fuel tank. 2. Fuel valve. 3. Throttle lever. 4. Rear
brake lever. 5. Engine stop switch. 6. Starter. 7. Lights
switch.
a
c
e
f
b
d
g
Page 14

-10-
IDENTIFICATION NUMBER RECORD
For ordering spare parts from our dealer or for reference
in case the vehicle is stolen, record vehicle identification
number and engine number in the spaces provided f or
assistance.
(1) vehicle identification number.
The vehicle identification number is stamped on
vehicle frame. Use for identificating your vehicle.
Vehicle number
(2) Engine number
Engine number
Page 15

-11-
PARTS FUNCTION
a. Engine stop switch
The engine stop switch is on the left handlebar. When
the switch is in the “OFF” position, the engine will not
operate. This switch can be used as a safety or emergency switch. Be sure to push the switch to the “ON”
position when you start and operate the machine.
b. Throttle lever
The throttle lever is beside the right handlebar grip to
be activated by the right hand thumb . To accelerate the
vehicle, simply press lever forw ard. To decelerate, just
release the lever and the throttle will close automaticaly.
Page 16

-12-
c. Parking brake
When parking, squeeze the left hand brake lever. And
at this moment press the parking brake button on the
left handlebar brake set. Mak e sure that the br ake lever
is locked for more safety. Only squeeze the left hand
brake lever once again the parking brake will be released in free motion.
d. Mechanical disc rear brake
The mechanical disc rear brake is operated with the
lever on the left handlebar. When braking, grasp this
lever which applies the brake to the rear wheels.
Always k eep the disc plate clean, refrain from grease.
Page 17

-13-
OFF Switch mark “•”
If the lever is in this position. fuel will not flow, Alaw ays
turn the lever to this position when the engine is not
runing.
ON Switch mark “ ”
If the lever is in this position, fuel flo ws to the carburetor.
Normal riding is done with the lever on this position.
e. Safety switch
There is a rider safety device with this vehicle. The
safety switch is located behind the body. The cap of the
switch tied to a rope is normally connected to the safety
switch when riding the vehicle. This rope should nev er
be attached to the rider. The supervisor should hold the
safety switch behind the vehicle and pull the rope to
activate the safety switch if necessary. The engine will
stop automatically when the switch cap is off from the
switch.
FUEL
a. Fuel valve
The three way fuel v alve is on the left side of the vehicle.
Page 18

-14-
Res Switch mark “ ”
After refueling return the fuel cock lever to the "ON"
position.
when your QUAD run out of fuel while riding, Turn the
fuel cock from “ON” to “Res”, y ou can run y our QUAD
for a few minutes.
b. Fuel tank
Fuel tank capacity is 3.2liter (0.87gal). gasoline with
octane number of 91 or higher may be used.
After refueling,be sure to tighten the tank cap firmly.
Do not refuel-right after the engine has been running
and still very hot.
ENGINE OIL
Four-stroke engine oil must be added to the Cr amkoorp
periodically. check oil indicator every time before
operating this vehicle.
If oil supply to engine is not enough,the machine will
be out of order.it can not work again.you can refill the
oil into the cramkcase behind the engine.
Page 19

-15-
Light switch
The light swith is on the left handbar. when the switch
is on the mark “•”, it means to turn off light. Be sure
to push the switch to the mark “HL” position. the light
is turned on.
TIRES
Check tire pressure frequently with the air pressure
gauge.
Tire should be inflated to the recommended pressure.
Recommended:
FRONT: 20kpa, (0.2 kgf/ cm2), 2.8 psi
REAR: 20kPA, (0.2 KGF/CM2), 2.8 psi
Minimum:
FRONT:17Kpa, (0.17 kgf/cm2), 2.4 psi
REAR: 17Kpa, (0.17 kgf/cm2), 2.4 psi
The pressure should be checked when the tires are
"cold" before running the vehicle.
Tire wear limit
When the tire groove decreases to 3mm (0.1" ) due to
wear. replace the tire.
OPERATION INSPECTION
Inspect your vehicle e v ery day before you run it. It only
takes a fe w minutes to chec k and might sa ve your live .
Check oil level in crankcase The oil level should be
between the maximum and mini mum marks.
Oil hole
Page 20

-16-
Check brake operation. If any problem cannot be
corrected by the adjustment, hav e the QU AD inspected
by leader.
Check tires condition and pressure as recommended.
Check throttle for smooth opening and closing. lt must
return back to idle position when released.
Check engine stop switch for good function.
Check steering for proper wheels turning.
Check nuts,bolts and other fastners.
Page 21

-17-
STARTING PROCEDURE
1. Par king the vehicle on a level surface and lock the
parking brake.
2. Turn the fuel valve to “ON”.
3. Move the engine stop switch to “ON”.
4. Grasp the lever on the right handbar or left.
5. Push the start button on the left handlebar.
6. Push the throttle lever slightly.
RIDING
Begin by finding a safe area free of obstacles with a
level surface. Always keep your feet on the footrest
during operation.
Under normal riding conditions it is not necessar y to
touch the ground for balance.
Then:
1.Start the engine.
2. After the engine has been warmed up, release the
parking brake The vehicle is ready for riding.
3. Increase engine speed by opening the throttle gradually.
RUN-IN
During the first two weeks of riding.run your new vehicle
tenderly. Don't run as fast as to approach maximum
rpm.
This run-in process will greatly enhance the long term
power and the life of the engine.
Page 22

-18-
PARKING
1. Parking at a level surface.
2. After stopping the v ehicle ,turn the engine stop switch
to OFF position.
3. Lock the parking brake at the left handlebar.
TURNING
It is essential that this skill shall be learned at first at
low speed. The rider must learn to move his weight
and control the throttle to allow the rear tires to get the
turn. When turning, the wheel on the outside of the
turn must travel a wider radius and thus a greater
distance than the inside wheel. As the rear axle does
not permit a differing rate of wheel rotation. It is not
enough to merely steer this vehicle into a turn. To turn
steer in the direction of the turn, leaning your body to
the inside of the trun. While supporting your weight on
the outer footrest. Use the throttle to maintain power
throughout the turn. Incorrect turning may cause the
front wheels to slide straight ahead. If this should
occur.close the throttle and stop. Avoid braking or
accelerating until you hav e regained directional control.
Be careful to avoid skids while traveling on slippery
terrain.
Page 23

-19-
Climbing uphill
Practice riding at first on gentle slopes. Try more difficult
climbs only after you have developed your skill. Avoid
excessive steep hills or slopes. With slippery or loose
surface in rough terrain. Keep both feet on the footrests.
When climbing a hill, shift your weight forw ard, proceed
at a steady rate of speed and throttle opening. If you
are unable to continue up the hill, dismount vehicle on
the uphill side Phypsically turn the vehicle around and
then descend the hill.
Crossing through shallow water.
QUAD 50 can be used to cross slow moving, shallow
water of up to a maximum of 16 cm (6.3") in depth.
Entering the water where there is no sharp drop off,
rocks or other. Remember that wet brakes may have
reduced stopping ability. Test your brak es after leaving
water until you have regained proper braking ability.
Page 24

-20-
4. MAINTENANCE
MAINTENANCE SCHEDULE
The maintenance intervals in the following table are based upon average riding and conditions. Riding in unusual
dusty areas require more frequent servicing.
Item INITIAL SERVICE REGULAR SERVICE EVERY YEAR
(First week) (every 30 operating days)
Fuel line H
Throttle opertion H H
Air cleaner C
Spark plup H
Carburetor adjustment H H
Idle speed adjustment H H
Drive chain H, L H, L H
Throttle cable H H H
Brake shoe wear
Brake system H H
Nut, Bolt, Fastener H H
Wheel H H
Steering system H
Suspension system H
Buttery H H
Air filter C
Note: H: Hinspect and clean. Adjust. Lubricate or replace, if necessary. C: Clean. L: Lubricate.
Page 25

-21-
SPARK PLUG
Standard spark plug; TORCH LDE6T
1. Disconnect the spark plug cap.
2. Clean up dirt from around the spark plug base.
3. Remove the spark plug.
4. Inspect the plug electrodes for wear .lf the electrodes
and insulator tip appear unusually fouled or burned.
change a new one. Discard the spar k plug if there is
apparent wear or if the insulator is cracked or chipped.
5. The spark plug gap shall be kept in 0.6-0.7mm (0.24"-
0.28"). lf adjustment is necessary,bend the side electrode
carefully.
6. Install the spark plug, scre w it in finger tight and then
tighten with the plug wrench another 1/2 turn to compress the washer.
AIR CLEANER
The air cleaner will accumulate dust and must be cleaned periodically. lf riding in very dusty area. The filter
must be cleaned more frequently.
To clean the filter:
1. Remove the air cleaner cover.
2.Take out the filter from the air cleaner case.
3. Wash the filter element in a non-flammable or high
flash-point solvent.Soak the element in clean oil until
saturated, then squeeze out the excess oil.
Page 26

-22-
4. Let the filter element dry and reinstall it.
Air cleaner
CARBURETOR AND IDLE SPEED ADJUSTMENT
The carburetor is a vital part of the engine and requires
very sophisticated adjustment. Most adjustments should
be left to the leader who has the professional knowledge and experience to do so.
BRAKE
Check the brake cable for kinks or signs of wear that
could cause sticking or failure. Lubricate the brake
cable with a available cable lubricant to prevent premature wear or corrosion.
Make sure that the brake arm, spring , rod and fasteners
are in good condition.
Ask your leader to replace the pads when they are
almost in contact with the disc plate.
Page 27

-23-
Rear axle housing
DRIVE CHAIN
Sometimes,it needs to lubricate the chain. The SAE
80 or 90 gear oil is recommended.
The chain will loosen with use, how to adjust chain.
1) Release two rear axle housings nuts and bolts (total
six nuts and six bolts).
2) Release two Rear axle housings simultaneously,
make sure equal degrees rotation of those and keep
the chain vertical suitable distance.
3) Tighten those bolts and nuts.
THROTTLE CABLE
Inspect throttle cable condition and operation. Replace
the cable if it has become worn or kinked.
Lubricate the cable with oil to prevent premature w ear
or corrosion. Adjustment can be made with the adjuster
beside the throttle lever.
Loosen the lock nut and turn the adjuster.
Page 28

-24-
The free play should be maintained at 5-10mm (0.197-
0.254).
BATTERY
When reinstalling the battery, be sure to connect the
red cable to the positive (+) lead and the black cable
to the negative (-) lead.
When the battery no longer can hold a charge, replace
it. The battery should be replaced every three years as
a normal service.
Check the lev el of battery fluid and see if the terminals
are tight.
Add distilled water if the fluid level is low. The level
should be between the upper and lower level marks.
Page 29

-25-
Power max 3.8KW/8000 rpm
Fuel RON 90 # Unlead
Torque max 4.5N-m/6000 rpm
Engine oil SAE20 Dimension
Gear oil API GL-5
Wheelbase 828 mm
Length 1335 mm
SPECIFICATIONS
Seat Height 542 mm
Engine Quad 50 Width 730 mm
Displacement 49CC Height 780 mm
Cylinder 1 Dry weight 74 ± 2kg
Cooling Air-cooled Seat height 542 mm
Type 4-stroke-horizontal Overall Dimension 1335 x 730 x 780
Bore and stroke 47 mm x 41.4 mm Tires front AT16 x 8-7
Lubrication oil injection Tires,rear AT16 x 8-7
Fuel capacity 3.2 liter Max, Load 45 kg
Oil capacity 0.65liter Max.Spead 35 km/h
Transmission Single speed
Drive Train Chain
Starting Electric
Compression ratio 8.8:1
Page 30

-26-
WARRANTY TERMS AND CONDITIONS
(According to Law decree 23/2003 on the 10th of July, covering Warranties on Consumer Item Sales)
Warranty terms of the manufacturer GASGAS Motos, S.A.
The company GAS GAS MOTOS, S.A. (hereafter referred to as “GG”), with this present document guarantees the consumer,
the purchaser of a vehicle manufactured by GG, that both the materials and the manufacturing are free of defects in
accordance with the highest standards of quality. Consequently, GG with this document guarantees the consumer (hereafter
referred to as the “purchaser”), in accordance with the conditions set out below, the repair, free of charge, of any defect
in materials or that might result from faulty manufacture that is detected in a new motorcycle within the period covered by
this Warranty and with no limit on the number of kilometres covered or hours of use.
Warranty Period
The period covered by this Warranty will begin on the day of delivery of the vehicle to the purchaser by a GG authorised
dealer, or in the case of demonstration models, on the date in which the vehicle is used for the first time.
The seller will be responsible for any unwarranted faults that become apparent within the period established in the Law
decree 23/2003 on the 10th of July covering Warranties on Consumer Goods Sold from the time of delivery and in accordance
with the Directive 1999/44/EC for other members of the European Community. For countries outside the European
Community, the Warranty Period will be determined by the existing regulations in those countries. Nevertheless, should
the fault appear during the first six months after the delivery of the motorcycle, it will be presumed that the said fault existed
at the time of delivery; from the end of the sixth month onwards, the purchaser must demonstrate that the unwarranted
fault existed at the moment of delivery. During the first six months subsequent to the delivery of the repaired vehicle, the
seller will be responsible for any unwarranted faults arising out of the repair.
Any defects detected in the product must be brought to the attention of a GG authorised dealer within the Warranty Period.
If the last day of this period is a Sunday or an official holiday, the Warranty period will be extended such that the last day
of the period covered will be the first working day after the Sunday or official holiday.
Those claims under Warranty for defects not brought to the attention of a GG authorised dealer before the end
of the Warranty Period will be excluded.
Page 31

-27-
Obligation of the purchaser
GG will have the right to reject any claims under Warranty in the event that:
a) The purchaser has failed to submit the vehicle to any of the inspections and/or maintenance work required in the Users’
Manual, or has exceeded the date set for such inspections or maintenance work. Also excluded from guarantee are those
faults that appeared prior to the dates established for an inspection or maintenance work where the latter was not carried
out, or was carried out later than the date established.
b) An inspection, maintenance or repair has been performed on the vehicle by third parties not recognised or authorised
by GG.
c) Any maintenance or repair has been carried out on the vehicle that violates the technical requirements, specifications
and/or instructions indicated by the manufacturer.
d) Spare parts whose use has not been authorised by GG have been used during the course of maintenance work or repairs
to the vehicle, or in the event that the vehicle has been used with fuels, lubricants or other liquids (including, amongst others,
cleaning products) that have not been expressly mentioned in the specifications set out in the User’s Manual.
e) The vehicle has been altered or modified in any way or fitted with components other than those expressly authorised
by GG as accepted components of the vehicle.
f) The vehicle has been stored or transported in a way that is not in accordance to the corresponding technical requirements.
g) The vehicle has been used for special purposes other than ordinary use, such as competition, races or record breaking
attempts.
h) The vehicle has been directly or indirectly damaged as a result of a fall or an accident.
Warranty exclusions
The following items are not covered by this Warranty:
a) Worn parts, including, without any limitation, spark plugs, batteries, petrol filters, oil filter elements, (secondary) chains,
engine output pinions, rear sprockets, air filters, brake discs, brake pads, clutch plates and discs, bulbs, fuses, carbon
brushes, footrest rubbers, tyres, inner tubes, cables and other rubber components
b) Lubricants (for example, oil, grease, etc.) and working fluids (for example, battery liquid, coolant, etc.)
c) Inspection, adjustments and other maintenance tasks, as well as all kinds of cleaning work
d) Damage to the paint-work and consequent corrosion due to external causes, such as stones, salt, industrial fumes and
other environmental impact, or inadequate cleaning with inappropriate products
Page 32

-28-
e) Any damages caused as a result of the defects, as well as any expenses incurred either directly or indirectly as a
consequence of the defects (for example, communication costs, accommodation expenses, car hire costs, public transport
costs, breakdown truck fees,, courier costs, etc.), as well as other financial losses (for example, those caused by the loss
of the use of the vehicle, loss of income, time lost, etc.)
f) Any acoustic or aesthetic phenomenon that does not significantly affect the condition or use of the motorcycle (for example,
small or hidden imperfections, noise or vibrations that are normal in use, etc.)
g) Phenomena that are the result of the ageing of the vehicle (for example, discolouring of painted or metallic coated
surfaces).
Various
1.- GG shall have the prerogative to decide, at its own discretion, whether to repair or replace defective parts. Where parts
are replaced, ownership of the parts removed shall pass to GG without any other consideration. The GG authorised dealer,
to whom the making good of the defects has been entrusted, is not authorised to make any declarations that are binding
on GG.
2.- In case of doubt regarding the existence of a defect, or a visual or material inspection is required, GG reserves the right
to demand the return of the parts which are the object of a claim under Warranty, or to arrange an inspection of the defect
by an expert from GG. Any additional obligations arising out of guarantees on parts replaced free of charge, or any other
service rendered free of charge, are excluded from the effects of this present warranty. The Warranty on parts replaced
within the Warranty Period will end at the expiry date for the Warranty Period of the product concerned.
3.- Should it prove to be the case that a defect can not be repaired, the purchaser guaranteed shall have the right to the
cancellation of the contract (payment of compensation) or a partial refund of the purchase price (discount), instead of
repairing the motorcycle.
4.- Any claims against Warranty by the purchaser under the terms of the sale contract with the corresponding authorised
dealer shall not be affected by the terms of this present Warranty. Neither will this present Warranty affect those additional
contractual rights acquired by the purchaser under the general commercial terms and conditions of the authorised dealer.
However, such additional rights may only be exercised through claims against the authorised dealer.
5.- Should the purchaser resell the product within the Warranty Period, the duration and conditions of the present Warranty
will remain unaltered, in such a way as that the rights to make claims under the present Warranty in accordance with the
terms and conditions set out in this present document shall be transferred to the new owner of the motorcycle.
Page 33

-29-
Page 34

Page 35

Page 36

RECOMIENDA EL USO DE ACEITE:
RECOMMENDS THE USE OF OIL:
RECOMMANDE L’USAGE DE L’HUILE:
CONSIGLIA L’USO D’OLIO:
EMPFIEHLT DEN GEBRAUCH VON ÖL:
C/ UNICEF nº 17 · Poligon Industrial Torremirona · 17190 Salt (Girona) SPAIN · Tel: +34 902 47 62 54 Fax: +34 902 47 61 60
E-mail: officegg@gasgasmotos.es / partsgg@gasgasmotos.es
JUNIO / JUNE / JUIN / GIUGNO / JUNI 2006
PU010538048
 Loading...