

Garmin VIRB Ultra 30 Owners Manual

VIRB® ULTRA 30
Owner’s Manual
August 2016 190-02069-00_0A

All rights reserved. Under the copyright laws, this manual may not be copied, in whole or in part, without the written consent of Garmin. Garmin reserves the
right to change or improve its products and to make changes in the content of this manual without obligation to notify any person or organization of such
changes or improvements. Go to www.garmin.com for current updates and supplemental information concerning the use of this product.
Garmin®, the Garmin logo, ANT+®, fēnix®, and VIRB® are trademarks of Garmin Ltd. or its subsidiaries, registered in the USA and other countries. G-Metrix™ is a
trademark of Garmin Ltd. or its subsidiaries. These trademarks may not be used without the express permission of Garmin.
The Bluetooth® word mark and logos are owned by the Bluetooth SIG, Inc. and any use of such marks by Garmin is under license. Mac® is a trademark of
Apple Inc., registered in the U.S. and other countries. microSD™ and the microSDXC logo are trademarks of SD-3C, LLC. Wi‑Fi® is a registered mark of Wi-Fi
Alliance Corporation. Windows® is a registered trademark of Microsoft Corporation in the United States and other countries. Other trademarks and trade names
are those of their respective owners.
This product is ANT+® certified. Visit www.thisisant.com/directory for a list of compatible products and apps.

Table of Contents
Introduction.....................................................................1
Camera Overview....................................................................... 1
Status LEDs........................................................................... 1
Installing the Memory Card and Battery..................................... 1
Charging the Battery................................................................... 1
Turning On the Camera.............................................................. 2
Turning Off the Camera......................................................... 2
Turning the Camera On and Off Using the Recording
Switch
.................................................................................... 2
Viewfinder Overview................................................................... 2
Status Bar Icons.....................................................................2
Opening the Camera Case......................................................... 2
Camera Case......................................................................... 3
Installing an Anti-Fog Desiccant Pack................................... 3
Attaching the Device to the Mount.............................................. 4
Voice Control.................................................................. 4
Turning Voice Control On or Off................................................. 4
Controlling the Camera Using Voice Commands....................... 4
Voice Control Tips...................................................................... 4
Video................................................................................ 4
Recording a Video...................................................................... 4
Video Settings.............................................................................4
Video Modes.......................................................................... 5
Field of View Settings............................................................ 5
Setting the Video Format....................................................... 5
Pro Settings........................................................................... 5
Video Mode Specifications.....................................................6
Pausing Video Recording Automatically..................................... 6
Recording a Video Loop............................................................. 6
Connecting a Cabled External Microphone or Audio Source..... 6
Photos............................................................................. 7
Taking a Photo............................................................................7
Photo Settings............................................................................ 7
Photo Modes.......................................................................... 7
Photo Exposure Types...........................................................7
Taking a Delayed Photo............................................................. 7
Time-Lapse Photos and Video...................................... 7
Recording a Time-Lapse Video.................................................. 8
Taking Time-Lapse Photos......................................................... 8
Taking Extended Time-Lapse Photos........................................ 8
Taking Time-Lapse Photos at Night........................................... 8
Capturing a Road Trip Using the Travelapse Feature................ 8
Presets............................................................................ 9
Saving a Preset.......................................................................... 9
Applying a Preset........................................................................9
Copying Presets to Another Camera.......................................... 9
Managing Presets....................................................................... 9
Playback.......................................................................... 9
Viewing Videos and Photos........................................................ 9
Filtering Videos and Photos................................................... 9
Marking Favorite Photos and Videos.......................................... 9
Deleting Videos or Photos.......................................................... 9
Wirelessly Playing Video on Another Device............................ 10
External Displays...................................................................... 10
Connecting to an HDMI® Display........................................ 10
Connecting to a Composite Video Display.......................... 10
G-Metrix......................................................................... 10
G-Metrix Data........................................................................... 10
Remote Operation and Garmin VIRB Mobile App..... 10
Operating the Camera Using the Garmin VIRB App................ 10
Wi‑Fi Networks and Devices.....................................................11
Setting Up a Wi
Connecting to a Wi‑Fi Network............................................ 11
ANT+ Devices and VIRB Remote............................................. 11
Controlling a VIRB Camera Using ANT+ Wireless
Technology
Enabling the Remote Wake Up Feature.............................. 11
Controlling Multiple VIRB Cameras Using ANT+ Wireless
Technology.......................................................................... 12
‑Fi Access Point
.......................................................................... 11
.......................................... 11
ANT+ Sensors............................................................... 12
Pairing ANT+ Sensors.............................................................. 12
Removing Paired ANT+ Sensors......................................... 12
Bluetooth Devices........................................................ 12
Connecting a Wireless External Microphone............................ 12
Connecting an OBD-II Device...................................................12
Removing Paired Bluetooth Devices........................................ 12
VIRB Edit....................................................................... 12
Device Information....................................................... 13
Camera Setup...........................................................................13
Inverting the Camera Orientation......................................... 13
System Settings........................................................................ 13
Date and Time Settings....................................................... 13
Erasing Your Memory Card................................................. 13
Viewing Regulatory and Compliance Information................ 13
Display Settings........................................................................ 13
Viewfinder Modes................................................................ 13
Device Care.............................................................................. 13
Cleaning the Device............................................................. 14
Caring for the Removable Camera Case............................. 14
Support and Updates................................................................ 14
Connecting the Device to Your Computer................................ 14
File Types............................................................................ 14
Specifications............................................................................14
Troubleshooting........................................................... 14
My camera does not turn on..................................................... 14
My camera feels warm while it is operating.............................. 15
There is fog, mist, or water inside the camera case................. 15
Some G-Metrix data is missing................................................. 15
My video recordings do not look smooth.................................. 15
My device turns off when I stop recording video...................... 15
Extending the Battery Life........................................................ 15
Appendix....................................................................... 15
Software License Agreement................................................... 15
Symbol Definitions.................................................................... 15
Index.............................................................................. 16
Table of Contents i

Introduction
WARNING
See the Important Safety and Product Information guide in the
product box for product warnings and other important
information.
It is your responsibility to use the device in a safe manner.
Garmin® will not be responsible for any property damage, injuries
or deaths resulting from any use of this device in any activities.
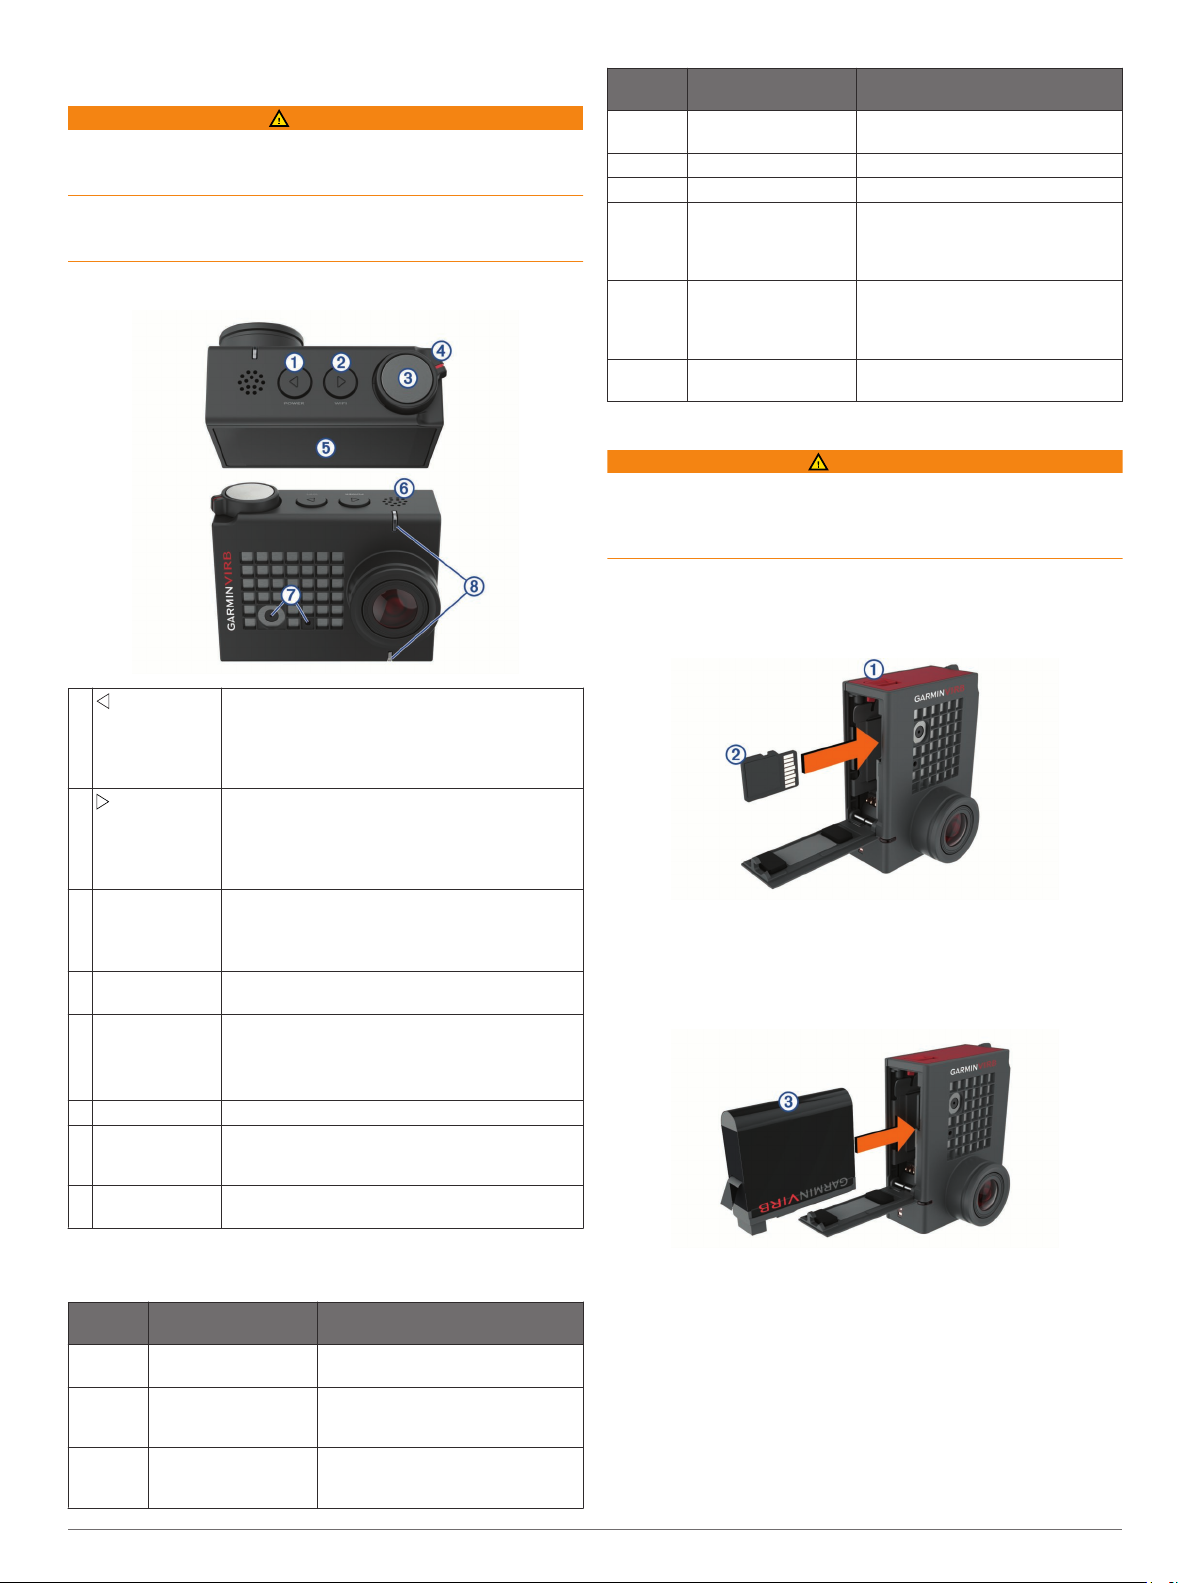
Camera Overview
LED
Color
Off Off (while connected
Red Solid (top LED only) The battery is charging.
Red Flashing The camera is recording video.
Red One or more short
Green or
red
Blue Flashing intermittently The Wi‑Fi radio is turned on, or the
LED Action Status
to external power)
flashes, and then solid
for up to several
seconds
Flashing rapidly The battery is below a 10% charge
The camera is turned off, and the
battery is fully charged.
The camera has captured one or
more photos. The LEDs remain
solid red until the camera has saved
all photos to the memory card.
level, or the memory card has less
than 10 minutes of recording time
remaining.
remote wake-up feature is enabled.
Installing the Memory Card and Battery
WARNING
This product contains a lithium-ion battery. To prevent the
possibility of personal injury or product damage caused by
battery exposure to extreme heat, store the device out of direct
sunlight.
You must install a compatible microSD™ memory card to use
your device. For more information about compatible memory
cards, go to garmin.com/VIRBcards.
Slide the latch À to open the battery compartment door.
1
À
POWER
Á
WI-FI
Photo and action
Â
key
Recording
Ã
switch
Touchscreen Touch to select on-screen items.
Ä
Speaker Plays audio during on-device playback.
Å
Microphones For the best audio quality, do not touch or cover
Æ
Status LEDs Indicate status information about the camera and
Ç
Hold to turn the device on or off.
From the viewfinder, select to open the main
menu.
Select to scroll through sensor status screens,
data screens, and menu items.
Hold to turn the Wi‑Fi® radio on or off.
From the viewfinder, select to open the main
menu.
Select to scroll through sensor status screens,
data screens, and menu items.
From the viewfinder, select to take a photo.
From the viewfinder, hold take a series of photos
in burst mode.
From the menus, select to choose a menu item.
Move the switch to start or stop recording video
(Recording a Video, page 4).
TIP: You can use the touchscreen even while the
camera is installed in the included camera case,
but the touchscreen sensitivity may be reduced.
the microphone area, except with an approved
case.
features (Status LEDs, page 1).
Status LEDs
The LEDs on the front of the camera indicate the camera status.
LED
Color
Green Flashing The camera is turned on, but not
Green Solid The camera is connected to a
Off Off (while not
LED Action Status
recording.
computer in USB mass storage
mode.
The camera is turned off.
connected to external
power)
Insert the memory card Á into the slot, and press it in until it
2
clicks.
TIP: The memory card label must face the inside of the
compartment.
Insert the battery  into the compartment.
3
Close the battery compartment door and press it until it
4
clicks.
Charging the Battery
The status LEDs flash rapidly when the battery charge level is
low. You can charge the battery using a standard wall outlet or a
USB port on your computer. The camera is powered by a
removable lithium-ion battery.
You can also charge the battery using a battery charger
accessory. Go to www.garmin.com/VIRB to purchase
accessories.
Introduction 1
NOTE: The battery will not charge when outside the approved
charging temperature range (Specifications, page 14).
Turn off the camera.
1
Most power sources do not provide enough power to charge
the camera while it is on.
Plug the small end of the USB cable into the USB port À on
2
the camera.
Plug the large end of the USB cable into an AC adapter or a
3
computer USB port.
When you connect the device to a power source, the top
status LED turns solid red.
NOTE: The battery may charge slowly when using a
computer USB port. Some portable computers may not
provide enough power to charge the battery.
Charge the camera completely.
4
When the camera is fully charged, the status LED turns off.
Turning On the Camera
Hold POWER.
The status LEDs flash green when the camera is on.
Turning Off the Camera
NOTICE
To prevent loss of data, always turn off the camera before
removing the battery.
NOTE: You cannot turn off the camera while recording video.
If necessary, move the recording switch backward to stop
1
recording video.
Hold POWER.
2
The camera saves your data and turns off.
If you need to remove the battery, wait until the screen and
status LEDs turn off before removing the battery.
Turning the Camera On and Off Using the Recording Switch
You can use the recording switch to turn the camera on and
immediately start recording video. If you turn the camera on
using the recording switch, it turns off automatically when you
stop the recording using the recording switch. This feature
allows you to start and stop recording quickly, while
automatically turning off the camera to conserve battery power
when you are not recording.
NOTE: The camera does not turn off using the recording switch
unless you use the recording switch to turn it on.
With the device turned off, move the recording switch
1
forward.
The device turns on and starts recording video.
When you are finished recording, move the recording switch
2
backward.
The device stops recording and turns off.
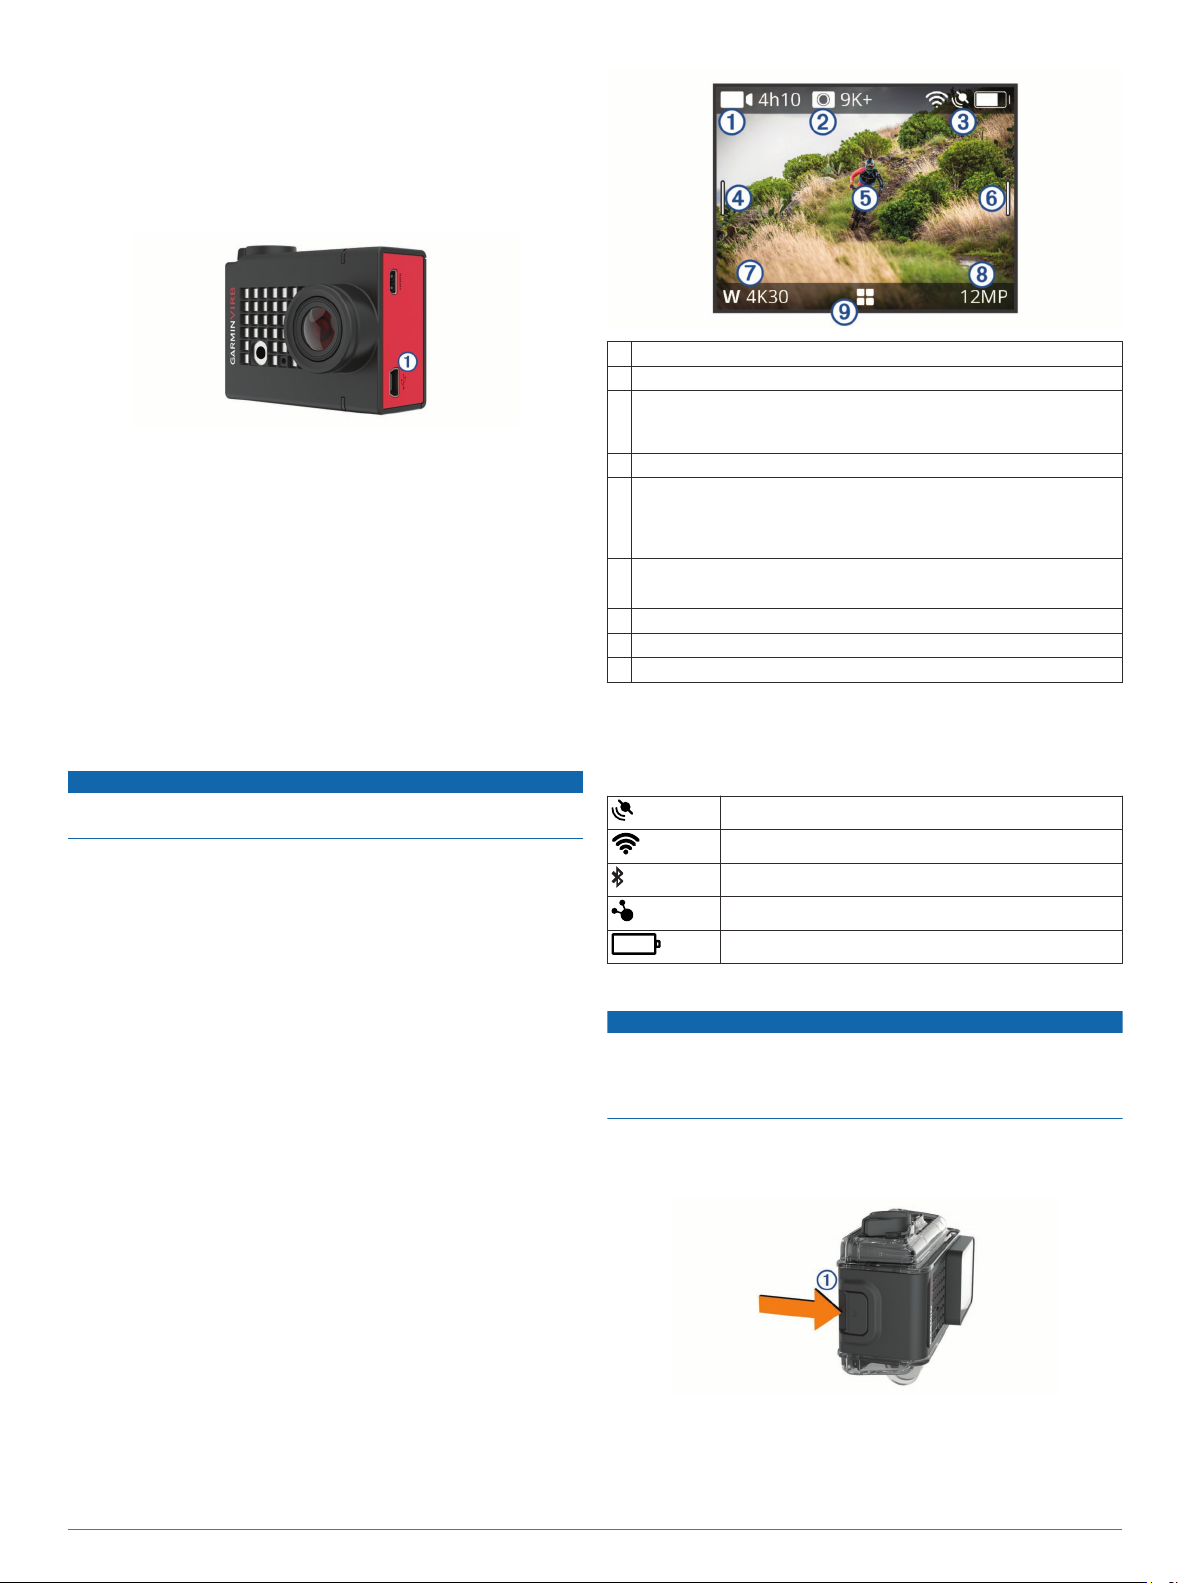
Viewfinder Overview
The viewfinder provides at-a-glance details about the remaining
memory card space and current settings of your device.
Displays the remaining memory card space for video recording.
À
Displays the remaining memory card space for photos.
Á
Displays the status for sensors, GPS, Wi‑Fi, Bluetooth®, and battery
Â
capacity.
Swipe down to pair sensors and enable or disable wireless features.
Swipe right to change the photo and video modes.
Ã
While using the preview viewfinder mode, touch the background to
Ä
zoom.
While using a G-Metrix™ viewfinder mode, touch the background to
change the viewfinder settings.
Swipe left to change the pro settings (Pro Settings, page 5).
Å
NOTE: This menu is available only when pro settings are enabled.
Displays the active video mode.
Æ
Displays the active photo mode.
Ç
Select to open the main menu.
È
Status Bar Icons
Status icons appear at the top of the viewfinder. A flashing icon
means the device is searching for a signal. A solid icon means
the signal was found or the sensor is connected.
GPS status
Wi‑Fi technology status
Bluetooth technology status
ANT+® sensor status
Battery level
Opening the Camera Case
NOTICE
The camera is not water resistant when it is not installed in a
water resistant case. Not all VIRB ULTRA cases or case doors
provide water resistance. Do not immerse or expose the camera
or battery to water or other liquids.
You must open the camera case to remove the camera or install
the anti-fog desiccant pack.
Press the latch release À.
1
While pressing the release latch, pull open the front of the
2
latch Á.
2 Introduction
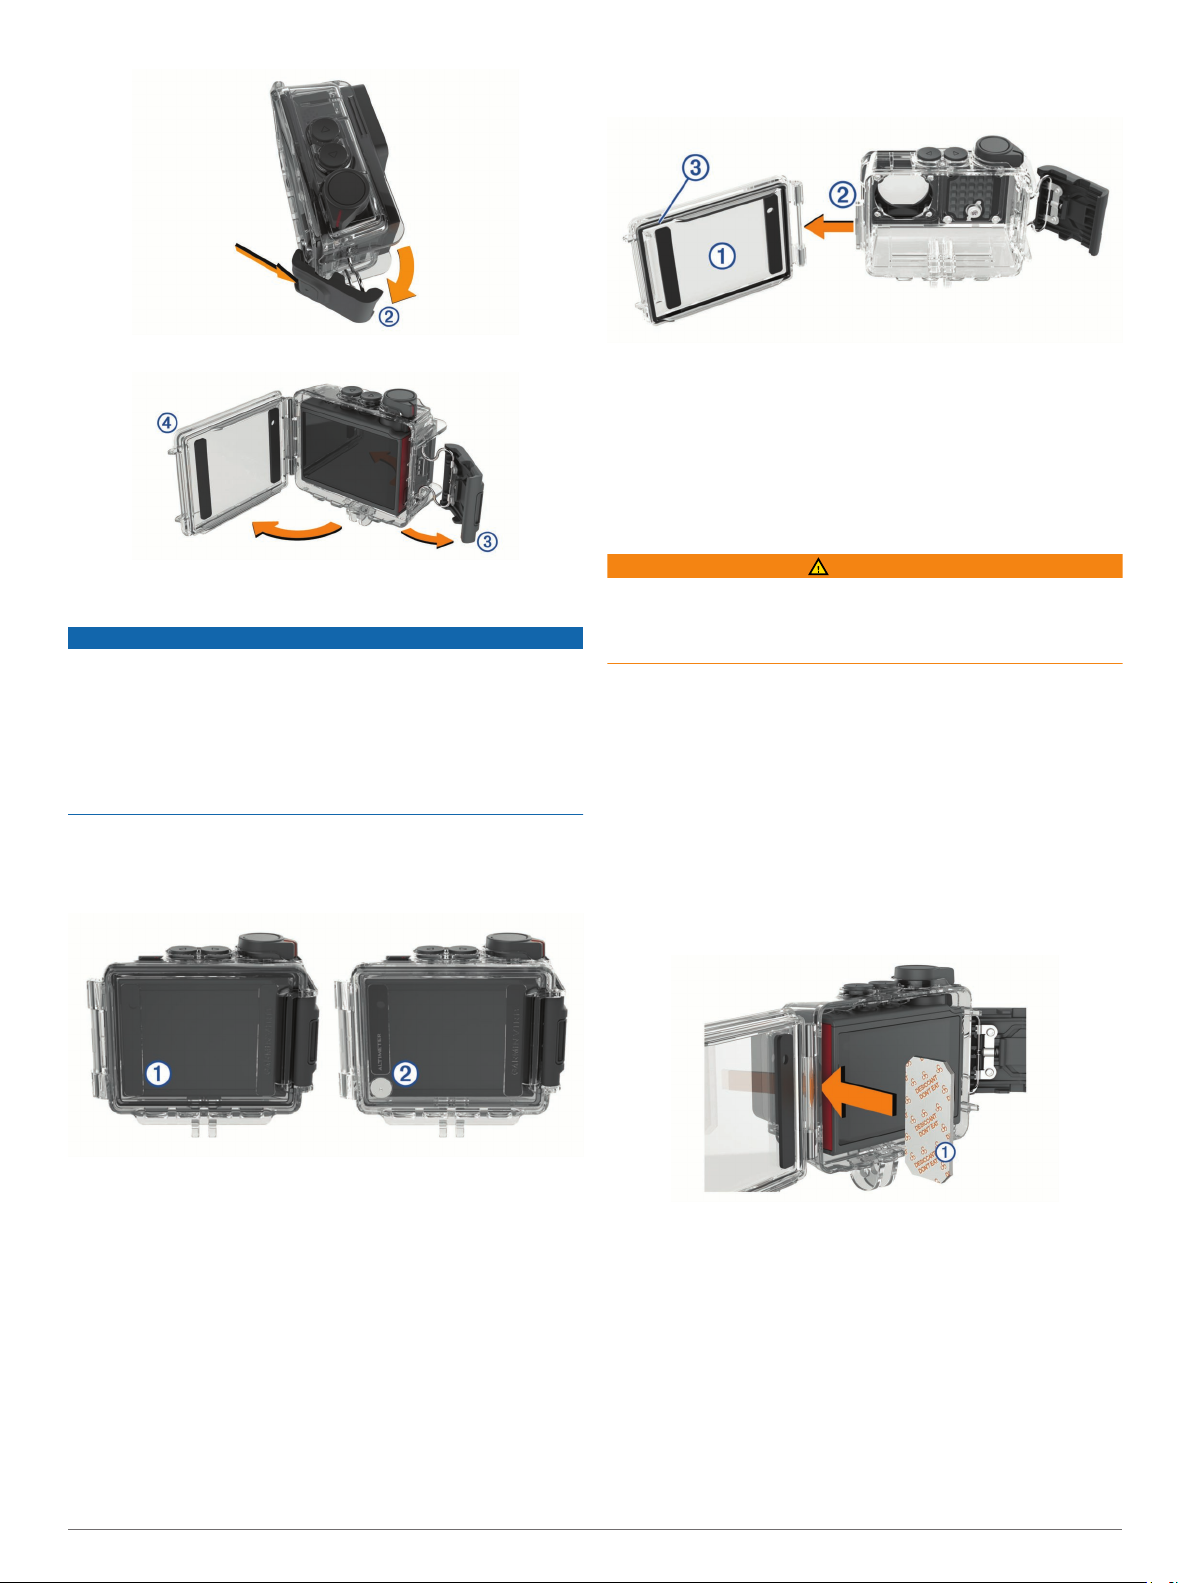
Unhook the back of the latch Â.
3
Open the camera case door Ã.
4
Camera Case
NOTICE
You must perform proper care and maintenance for the camera
case (Caring for the Removable Camera Case, page 14).
Failure to perform proper care and maintenance may cause
damage to the removable camera case or gasket and allow
water to leak into the case during use. Exposing the camera to
water will cause permanent damage to the camera and battery,
which may present a risk of fire, chemical burn, electrolyte leak,
and/or injury.
The included camera case provides rugged protection for your
camera, and it provides water protection when used with the
watersports camera case door.
Two camera case doors are included in the package.
Changing the Camera Case Door
Open the camera case door À completely.
1
Pull the camera case door away from the camera.
2
The door releases from the quick-release hinge Á.
Align the other camera case door with the quick-release
3
hinge, and press it toward the camera until it snaps into
place.
Verify the gasket  is fully seated in the groove.
4
Close and latch the camera case door.
5
Installing an Anti-Fog Desiccant Pack
WARNING
Do not eat desiccant packs. Desiccant packs contain silica,
which may cause irritation in your digestive system. Desiccant
packs are harmful if swallowed by an infant or pet and pose a
choking hazard.
For the best clarity and image quality, you should install an antifog desiccant pack to reduce fogging inside the camera case or
on the camera lens. A desiccant pack kit is included in the
product box. Go to www.garmin.com/VIRB to purchase
additional desiccant packs.
NOTE: When using the camera case in water or in humid
environments, it is normal for some fog to form inside the case,
especially after the camera has been in use for an extended
time. In very cold or humid environments, some fog may appear
even while the desiccant pack is installed.
Open the camera case.
1
Insert the desiccant pack À between the camera and the
2
case.
The watersports door À is installed on your camera case by
default. The altimeter door Á is included in the box. You can
quickly change the camera case door based on your activity.
While the watersports door is installed, the case is waterresistant up to 40 m and is suitable for many water activities,
including swimming, snorkeling, and high-speed watersports.
The altimeter sensor does not function while the watersports
door is installed.
While the altimeter door is installed, your device records more
accurate elevation and grade data, and additional G-Metrix data,
including jump height and vertical speed. The altimeter door
provides an IEC 60529 IPX7 water rating suitable for rain and
light splashes. The altimeter door is not suitable for watersports,
immersion, or other exposure to water or other liquids.
Go to garmin.com/waterrating for more information about water
ratings and suitable water activities.
Introduction 3
Close and latch the camera case.
3
Anti-fog Desiccant Pack Storage and Maintenance
• To preserve the effectiveness of the desiccant packs, you
should seal them in the included foil bag when they are not in
use. You should store the included humidity indicator card in
the bag with the desiccant packs.
• If the dots on the humidity indicator card turn green while
stored with the desiccant packs, the desiccant packs are
saturated. When saturated, the desiccant packs lose their
effectiveness, and you should dry them before using them
again.
• If the desiccant packs become saturated, you can heat them
at 85°C (185°F) for 60 minutes to dry them for reuse.
 Loading...