

Garmin VHF 315 Owner’s Manual

VHF 315 SERIES
Owner’s Manual

© 2018 Garmin Ltd. or its subsidiaries
All rights reserved. Under the copyright laws, this manual may not be copied, in whole or in part, without the written consent of Garmin. Garmin reserves the right to change or
improve its products and to make changes in the content of this manual without obligation to notify any person or organization of such changes or improvements. Go to
www.garmin.com for current updates and supplemental information concerning the use of this product.
Garmin® and the Garmin logo are trademarks of Garmin Ltd. or its subsidiaries, registered in the USA and other countries. GHS™ is a trademark of Garmin Ltd. or its subsidiaries.
These trademarks may not be used without the express permission of Garmin.
NMEA® and NMEA 2000® are registered trademarks of the National Marine Electronics Association. NOAA® is a registered service mark of the National Oceanic and Atmospheric
Administration. BoatU.S.® is a registered trademark of the Boat Owners Association of the United States. Sea Tow® is a registered trademark of Sea Tow Services International, Inc.
United States Power Squadrons® is a registered trademark of the United States Power Squadrons. Other trademarks and trade names are those of their respective owners.

Table of Contents
Introduction..................................... 1
Handset Overview................................... 2
Home Screen...........................................3
System Status Icons........................... 4
Basic Operation................................4
Turning On and Off the Device............... 4
Adjusting the Volume............................. 4
Adjusting the Squelch Level................... 5
Selecting the Frequency Band............... 5
Selecting a Channel................................ 5
Transmitting with the Radio................... 5
Scanning and Saving Channels..............5
Scanning All Channels........................ 5
Saving a Channel................................ 6
Removing a Saved Channel................ 6
Scanning Saved Channels.................. 6
Monitoring Multiple Channels............ 6
Selecting a Different Second-Priority
Channel....................................................7
Switching to Priority Channels............... 7
Setting the Receiving Sensitivity............ 7
Switching Between 1 W and 25 W
Transmitting Modes............................... 7
Bypassing the Low Transmission
Power Setting...................................... 8
Using the Hailer Function....................... 8
Foghorn................................................... 8
Sounding the Foghorn
Automatically...................................... 8
Sounding the Foghorn Manually........ 8
Adjusting the Sound Frequency of the
Foghorn............................................... 9
Entering Text........................................... 9
NOAA® Weather Broadcasts and
Alerts............................................... 9
Tuning Weather Broadcasts.................. 9
Enabling and Disabling Weather
Alerts....................................................... 9
Digital Selective Calling..................10
Digital Selective Calling........................ 10
Entering Your MMSI Number............... 10
Viewing Your MMSI Number................ 10
Distress Calls........................................ 10
Sending an Undesignated Distress
Call..................................................... 11
Sending a Designated Distress
Call..................................................... 11
Waiting For and Receiving and
Acknowledgment for a Distress
Call..................................................... 11
Stopping Automatic Retransmission
of Distress Calls................................ 12
Revoking a Distress Call................... 12
Placing Calls......................................... 12
Placing Individual Calls.................... 12
Placing Group Calls.......................... 13
Placing All-Ships Calls...................... 13
Individual Call or Group Call
Channels............................................ 13
Requesting a Vessel's Position........ 13
Receiving Calls......................................14
Receiving Distress Calls and Distress
Relay Calls......................................... 14
Receiving All-Ships Urgency and
Safety Calls....................................... 14
Receiving Individual Routine Calls... 14
Receiving Position Requests............15
Receiving Position Calls................... 15
Receiving Group Calls.......................15
Position Tracking.................................. 15
Selecting Vessels and Activating
Position Tracking.............................. 15
Viewing and Deactivating Vessels on
the Position Tracking List................ 16
Deleting a Vessel From the Position
Tracking List......................................16
Call Log..................................................17
Viewing the Calls in the Call Log......17
Placing a Call from a Call Log.......... 17
Saving a Vessel or Station to the
Directory from the Call Log.............. 18
Deleting a Call Log Entry.................. 18
Directory................................................ 18
Viewing Saved Vessels and Stations
in the Directory.................................. 18
Adding an Entry to the Directory...... 18
Editing an Entry in the Directory....... 18
Deleting an Entry from the
Directory............................................ 18
Adding a Group................................. 18
Table of Contents i

Editing a Group..................................19
Deleting a Group............................... 19
DSC Settings......................................... 19
Manual Position Information........... 19
Changing the Channel to 16
Automatically.................................... 19
Sending Automatic Replies.............. 19
Automatic Transmitter Identification
System...........................................20
Entering Your ATIS Identification
Number..................................................20
Turning On and Off ATIS...................... 20
Viewing Your ATIS Identification
Number..................................................20
NMEA 0183 and NMEA 2000®....... 21
Additional Functionality with Other
Garmin Devices..................................... 21
Communicating Over NMEA 0183 or
NMEA 2000........................................... 21
Configuring DSC NMEA
Transmissions...................................... 21
System Settings............................. 22
Number Settings................................... 22
Units Settings........................................ 22
Configuring the Time Offset.............22
Selecting the Frequency Band............. 22
Changing a Channel Name.................. 23
Restoring Factory Settings...................23
Appendix........................................23
Alarms and Messages..........................23
Channel Lists........................................ 23
Channel Prefixes............................... 23
VHF 315 Series Specifications............ 24
NMEA.....................................................24
NMEA 0183 IN Sentences
Supported.......................................... 24
NMEA 0183 OUT Sentences
Supported.......................................... 24
NMEA 2000 PGN Information.......... 25
Cleaning the Outer Casing................... 25
Index..............................................26
ii Table of Contents

Introduction
WARNING
See the Important Safety and Product Information guide in the product box for product warnings and other
important information.
Introduction 1
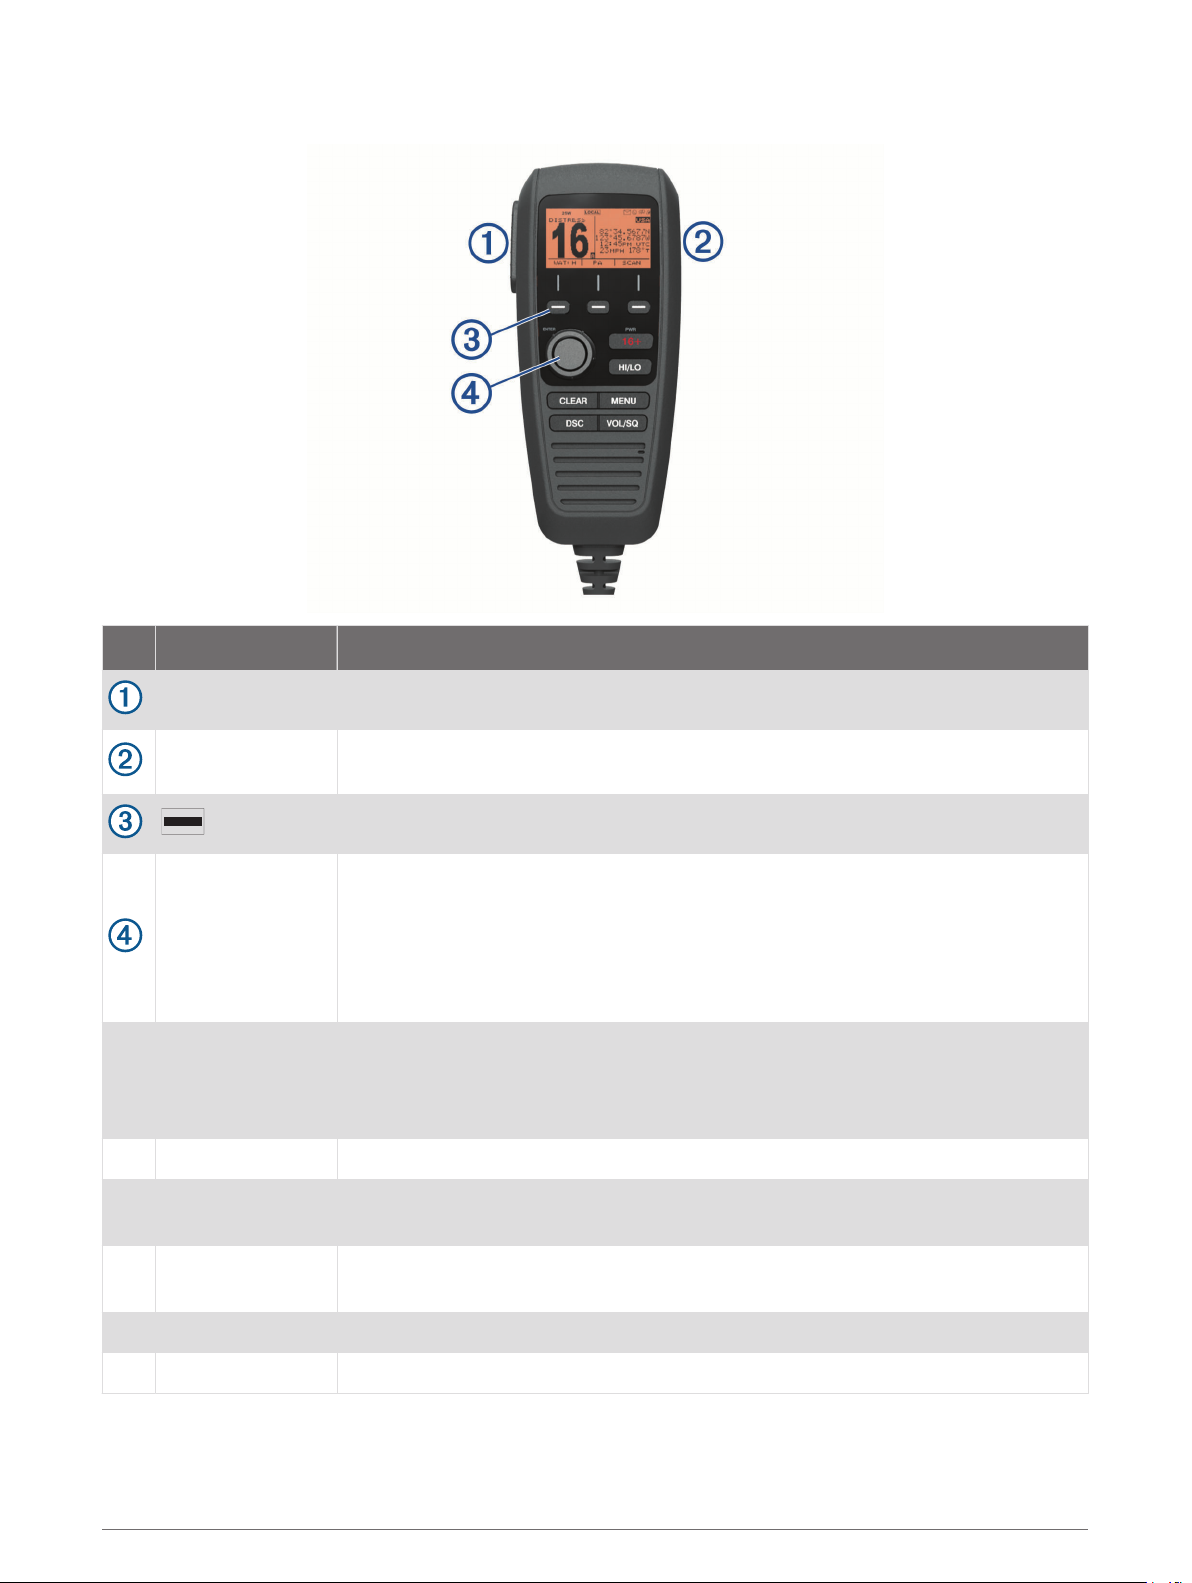
Handset Overview
Item Key Description
PTT Hold to broadcast.
DISTRESS
ENTER
PWR
North America:
16/9
International: 16+
HI/LO Press to change the transmission mode and power settings.
CLEAR
MENU
Lift the door and press to send a DSC distress call with a programmed MMSI
number (Entering Your MMSI Number, page 10).
Press the key that corresponds to the on-screen item to select the item.
On the home screen, rotate to change the channel.
On the home screen, press to toggle weather channels (NOAA® Weather Broadcasts
and Alerts, page 9).
Rotate to change the volume or squelch level after pressing the VOL/SQ key.
Rotate to highlight an item in a list.
Press to select an item.
Hold to turn the radio on and off.
Press to toggle between preset channels.
Press to return to the previous menu option.
Press to cancel or mute an incoming DSC call.
From the home screen, press to view configuration options.
From a menu, press to return to the home screen.
DSC Press to view a menu of DSC options.
VOL/SQ Press to switch between volume or squelch.
2 Introduction
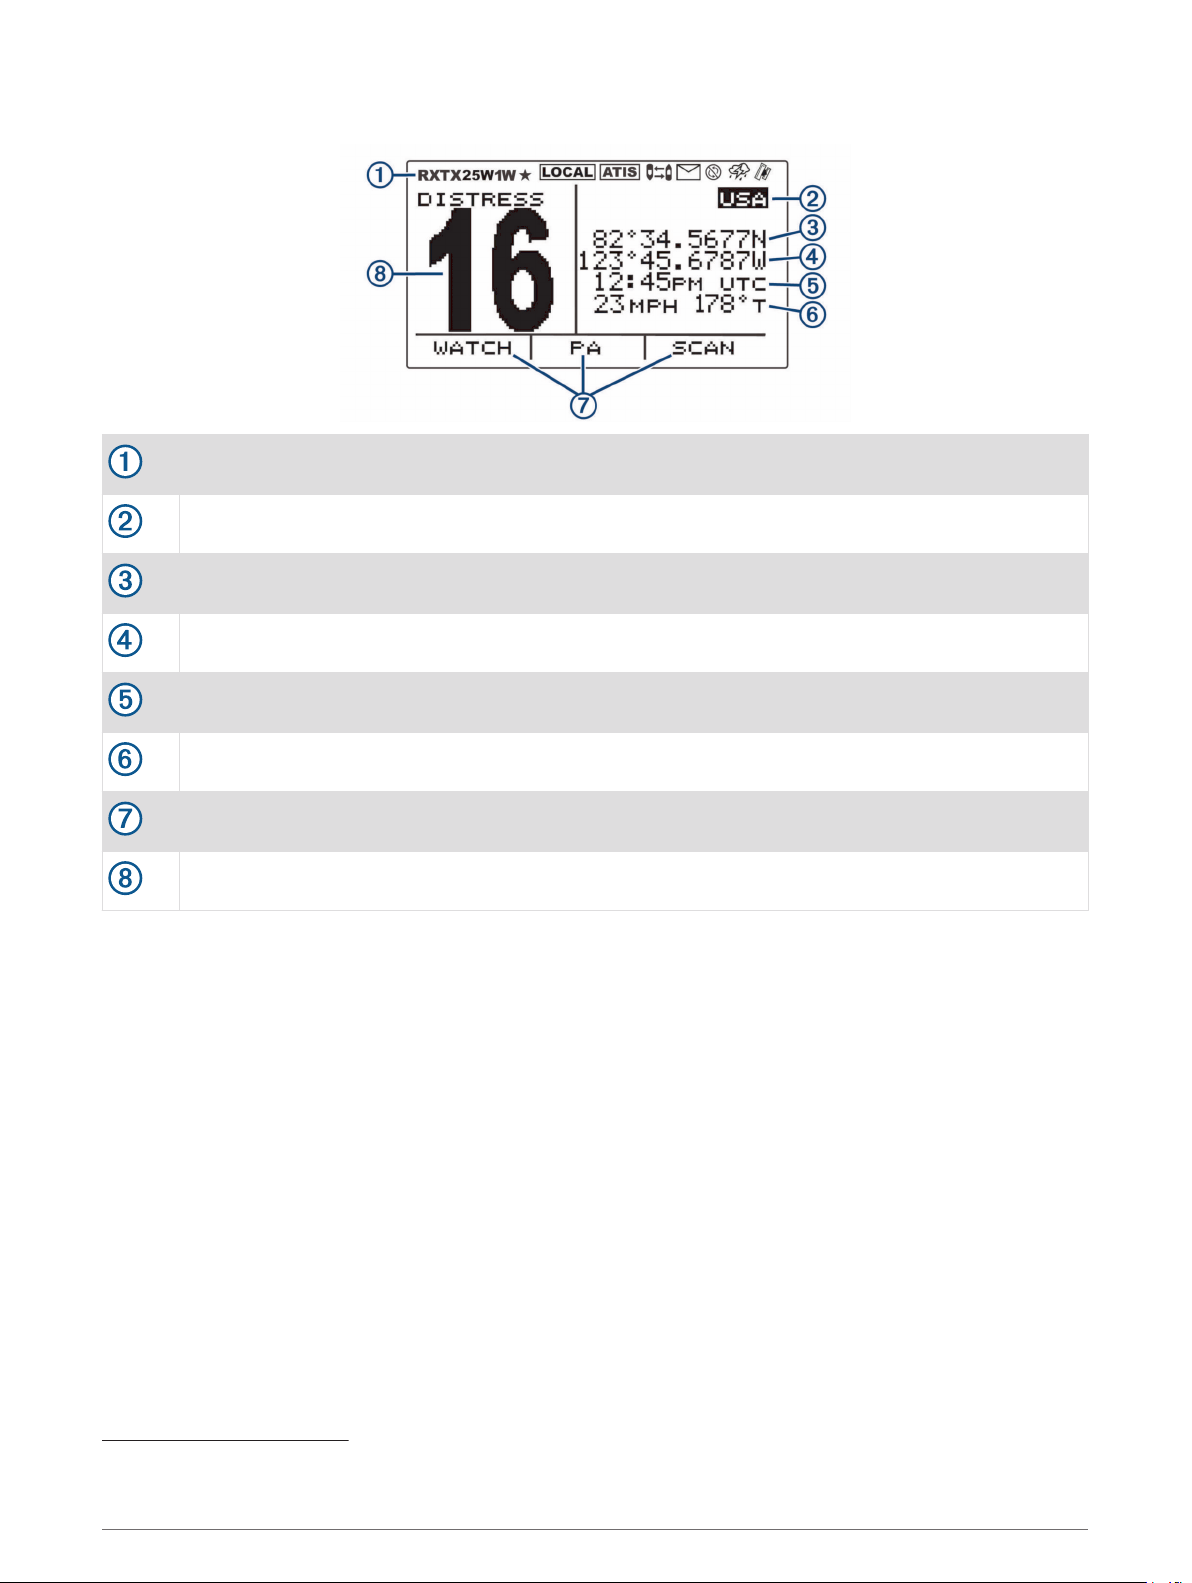
Home Screen
Radio system status, settings, and alerts
International, Canadian, or USA frequency band
Latitude
Longitude
Time
Speed over ground (SOG) or course over ground (COG)
1
1
1
2
Soft-key functions change depending on your current activity
Working channel
1
The latitude, longitude, and time appear when the radio has a GPS signal acquired. You can enter data manually when the radio does not have a GPS signal.
2
The SOG and COG appear when the radio has a GPS signal acquired, and the option is enabled in the menu (Number Settings, page 22).
Introduction 3
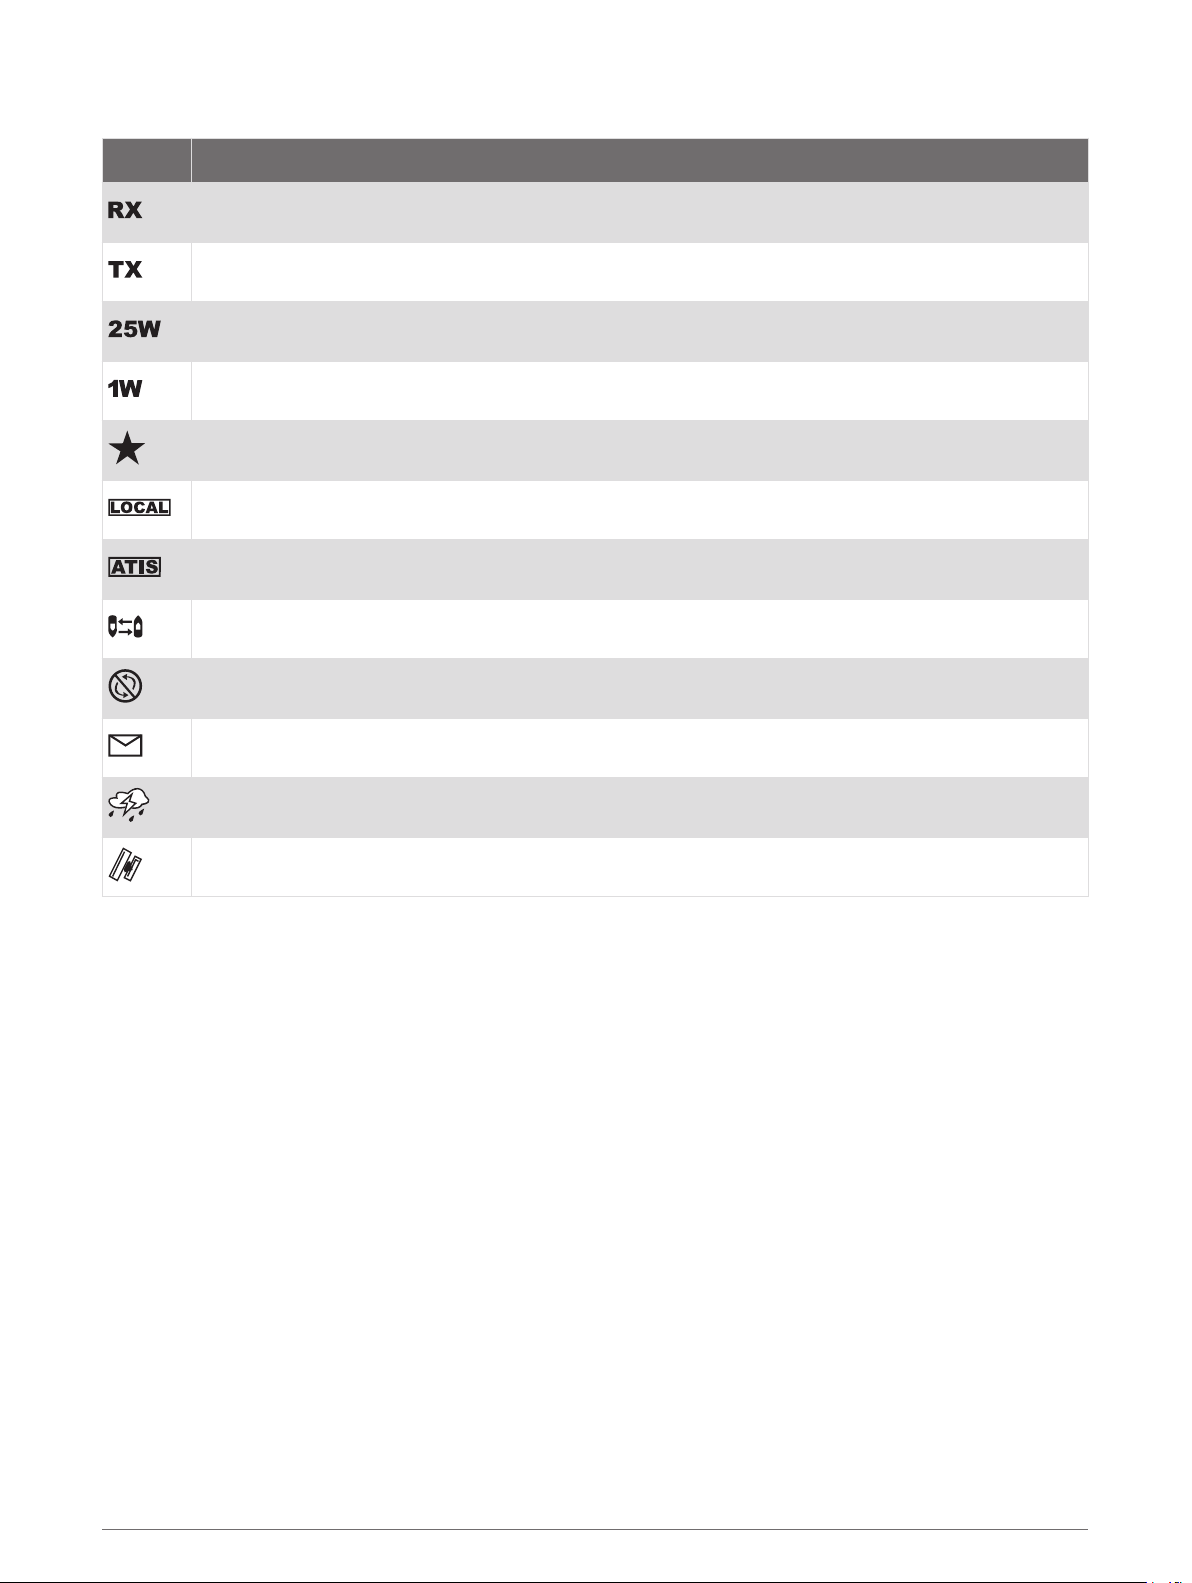
System Status Icons
Icon Status
Receiving an incoming signal
Transmitting
Transmitting at 25 W
Transmitting at 1 W
Saved channel
Local receiver mode, often used in areas with radio frequency interference (harbors)
ATIS enabled
Position tracking enabled
Auto channel changing disabled
Incoming or missed DSC call
Weather alerts enabled
GPS signal acquired
Basic Operation
Turning On and Off the Device
Hold PWR.
TIP: You can set the device to turn on automatically (System Settings, page 22).
Adjusting the Volume
1 Set the squelch level to MIN before you adjust the volume (optional).
2 Select VOL/SQ twice.
VOLUME appears on the screen.
3 Turn the dial to increase or decrease the volume.
4 Basic Operation

Adjusting the Squelch Level
You can adjust the sensitivity level of the squelch to filter out background noise. When you increase the
squelch level, you hear fewer weak background signals when you are receiving.
1 Select VOL/SQ.
SQUELCH appears on the screen.
2 Turn the dial counter-clockwise until you hear audio.
3 Turn the dial clockwise until there is no background noise.
Selecting the Frequency Band
You can switch between the USA, International, or Canadian frequency bands (Channel Lists, page 23).
NOTE: Not all frequency bands are available on all device models.
1 Select MENU > CHANNEL > FREQUENCY BAND.
2 Select a frequency band.
Selecting a Channel
You can select an International, Canadian, or USA channel (Selecting the Frequency Band, page 5).
Turn the dial.
Transmitting with the Radio
1 Select an appropriate channel.
2 Verify that the channel is clear.
NOTE: You cannot obstruct the communications of other people due to Federal Communications
Commission (FCC) and international guidelines.
3 Select PTT on the handset.
appears at the top of the screen.
4 Speak into the handset.
NOTE: Five minutes is the maximum time allowed for transmission. After five minutes of transmitting, PTT
is disabled until you release PTT.
5 Release PTT.
Scanning and Saving Channels
Scanning All Channels
When you scan channels, the radio searches for channels that are broadcasting. When a channel is
broadcasting, the radio pauses on that channel until the broadcast stops. After four seconds of inactivity on a
channel, the radio resumes scanning.
NOTE: When you turn on ATIS (Automatic Transmitter Identification System, page 20), the radio does not scan
or save channels.
1 Select SCAN > ALL.
2 Select an option:
• To exclude the currently active channel from subsequent passes and resume scanning, select SKIP.
• To scan channel 16 each time another channel is scanned, select +CH16.
For example, the radio scans channel 21, channel 16, channel 22, channel 16, and so on.
+CH16 appears on the device screen.
• To scan channel 16 in its usual order, select -CH16.
For example, the radio scans channel 14, channel 15, channel 16, channel 17, and so on.
• To end the scan, select EXIT.
The radio stops scanning and tunes to the last used, active channel.
Basic Operation 5

Saving a Channel
You can save any channel except the weather (WX) channels. You can save an unlimited number of channels.
1 Select SCAN.
2 Turn the ENTER dial until you find a channel you want to save.
3 Select SAV CH.
appears above a saved channel.
Removing a Saved Channel
1 Select SCAN.
2 Turn the ENTER dial until you find a saved channel.
NOTE: A saved channel has above it.
3 Select SAV CH.
Scanning Saved Channels
You can scan only the channels you have saved. When a saved channel is broadcasting, the radio pauses on
that channel until the broadcast stops. After four seconds of inactivity on a channel, the radio resumes
scanning.
NOTE: When you turn on ATIS (Automatic Transmitter Identification System, page 20), the radio does not scan
or save channels.
1 Select SCAN > SAVED.
2 Select an option:
• To exclude the currently active channel from subsequent passes and resume scanning, select SKIP.
• To scan channel 16 each time another saved channel is scanned, select +CH16.
For example, the radio scans saved channel 21, channel 16, saved channel 25, channel 16, and so on.
+CH16 appears on the device screen.
• To stop scanning channel 16, select -CH16.
For example, the radio scans saved channel 21, saved channel 25, and so on.
• To end the scan, select EXIT.
The radio stops scanning and tunes to the last used active channel.
Monitoring Multiple Channels
Before you can monitor multiple channels, you must turn off ATIS (Automatic Transmitter Identification System,
page 20).
You can monitor priority channels and the currently selected channel for broadcasting activity. Channel 16 is
the first-priority channel on your radio. Channel 9 is the default second-priority channel. You can program a
different channel as your second-priority channel (Selecting a Different Second-Priority Channel, page 7).
Select WATCH.
Monitoring Two Channels
You can monitor your current channel and channel 16 at the same time.
Select WATCH > DUAL.
DUAL WATCH and the channels you are monitoring appear on the screen. For example, DUAL WATCH CH:,
and 16 + 9.
Monitoring Three Channels
You can monitor your current channel, channel 16, and your second-priority channel at the same time.
Select WATCH > TRI.
TRI WATCH, your current channel, channel 16, and your second-priority channel appear on the screen. For
example, TRI WATCH CH:, and 75 + 16 + 9.
6 Basic Operation
 Loading...