

Page 1
Varia™ Rearview Bike Radar
Owner’s Manual
November 2015 190-01918-00_0B
Page 2

All rights reserved. Under the copyright laws, this manual may not be copied, in whole or in part, without the written consent of Garmin. Garmin reserves the
right to change or improve its products and to make changes in the content of this manual without obligation to notify any person or organization of such
changes or improvements. Go to www.garmin.com for current updates and supplemental information concerning the use of this product.
Garmin®, the Garmin logo,
Garmin Express™, and
Varia
This product is ANT+ certified. Visit www.thisisant.com/directory
®
, and Edge® are trademarks of Garmin Ltd. or its subsidiaries, registered in the USA and other countries. Garmin Connect™,
ANT+
™
are trademarks of Garmin Ltd. or its subsidiaries. These trademarks may not be used without the express permission of Garmin.
for a list of compatible products and apps.
M/N: A02806, A02807
Country restrictions may apply. 010-01509-01 and 010-01509-11 are approved for operation in France and the United Kingdom.
Page 3

Table of Contents
Introduction.....................................................................1
Getting Started............................................................................1
Tips for Installing the Taillight..................................................... 1
Installing the Universal Mount................................................ 1
Installing the Seat-Post Mount............................................... 1
Turning On the Taillight..........................................................1
Taillight Battery Status LED................................................... 2
Turning Off the Taillight..........................................................2
Installing the Varia RDU Device................................................. 2
Varia RDU Device Overview.................................................. 2
Turning On the Varia RDU Device......................................... 2
Turning Off the Varia RDU Device and Taillight.................... 2
The Varia Taillight and Your Edge 1000....................... 2
Pairing the Taillight with Your Edge 1000................................... 2
Viewing Radar on Your Edge Device.................................... 3
Customizing the Radar Alert Settings with Your Edge
1000....................................................................................... 3
Tone Alerts for Approaching Vehicles................................... 3
Device Information......................................................... 3
Varia RTL and RDU Specifications.............................................3
Radar Detection.......................................................................... 3
Taillight Modes and Intensity...................................................... 3
Charging the Device................................................................... 3
Device Care................................................................................ 3
Cleaning the Device............................................................... 4
Troubleshooting............................................................. 4
Support and Updates.................................................................. 4
Updating the Software Using the Garmin Express
Application............................................................................. 4
Taillight Status LED for Software Updates.............................4
The taillight disconnects from the Edge device.......................... 4
The taillight disconnects from the Varia RDU Device................. 4
The taillight is not responding..................................................... 4
The status LED turns red while charging.................................... 4
Thermal Safety Shutdown.......................................................... 4
Pairing the Taillight with the RDU Device................................... 4
Resetting the Device...................................................................5
Replacement O-rings.................................................................. 5
Getting More Information............................................................ 5
Appendix......................................................................... 5
Software License Agreement......................................................5
Index................................................................................ 6
Table of Contents i
Page 4

Page 5
Introduction
WARNING
See the
product box for product warnings and other important
information.
The device can improve situational awareness. It is not a
replacement for cyclist attentiveness and good judgement.
Always use your best judgment, and operate the bicycle in a
safe manner.
Getting Started
You can use the Varia
(radar display unit) or with your compatible Edge® device. This
list provides an overview of the installation and setup tasks.
• Charge the device (Charging the Device, page 3)
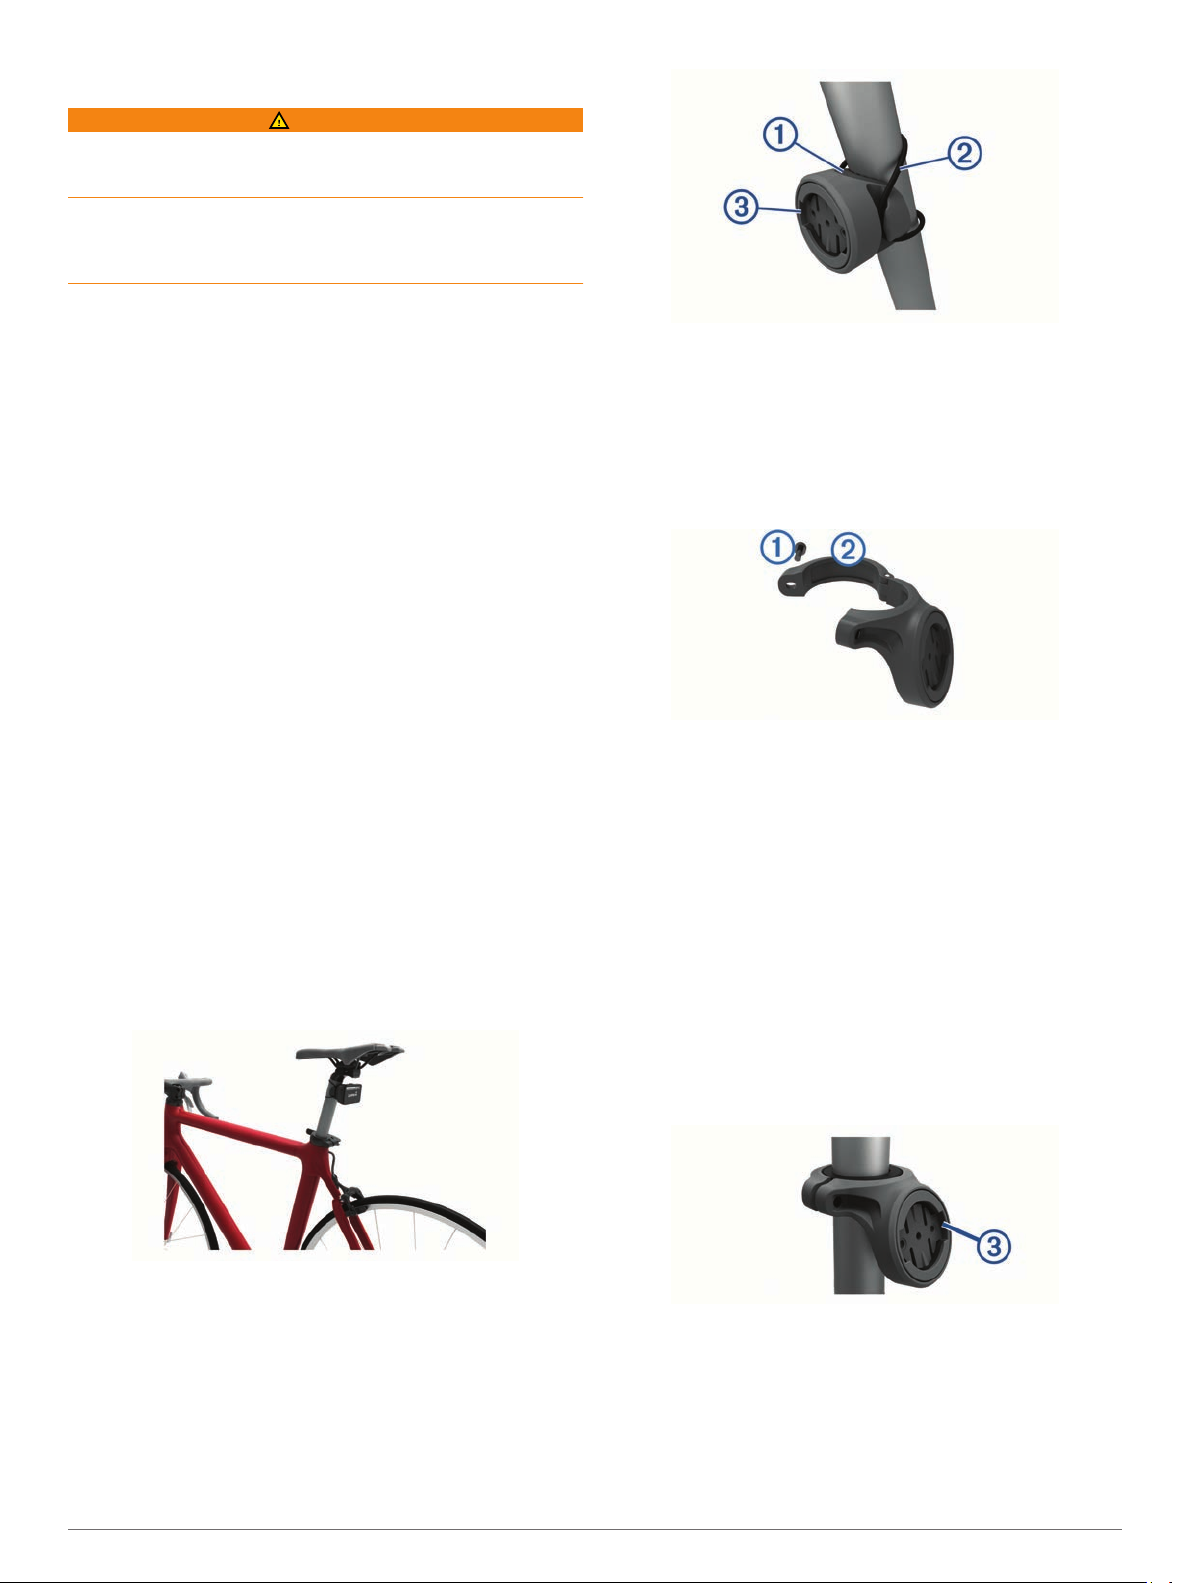
• Install the taillight on your bike seat post using one of the
• If you are using the Varia RDU, install it on your bike stem or
• If you are using a compatible Edge
Important Safety and Product Information guide in the
RTL
(radar taillight) with the Varia RDU
.
included mounts:
◦ Install the universal mount (Installing the Universal Mount,
◦ Install the seat-post mount (Installing the Seat-Post
handlebar (Installing the Varia
NOTE:
together, they are already paired.
(
Pairing the Taillight with Your Edge
.
page 1)
Mount, page 1)
When you purchase the
.
RDU
Device,
Varia
device, pair the devices
1000, page 2).
page 2).
RTL
and RDU devices
Attach the universal mount securely using one band Á.
3
Align the tabs on the back of the device with the universal
4
mount notches Â.
Press down slightly and turn the device clockwise until it
5
locks into place.
Installing the Seat-Post Mount
Use the hex key to remove the screw À from the seat-post
1
connector Á.
Tips for Installing the Taillight
The Varia
can detect approaching vehicles up to 140 meters away.
• Select a secure location to mount the device where it does
• Select a mount that best fits your bike.
• Mount the device as high on the seat post as possible for
• Install the device correctly.
• Go for a test ride during the day in a safe environment.
Installing the Universal Mount
1
2
RTL
device includes a taillight and micro radar that
not interfere with the safe operation of your bike.
optimal light visibility and radar detection.
NOTE:
The device faces backward and is parallel to the road. The
Garmin® logo is right-side up.
Select a rubber pad À based on your seat post shape, and
place the rubber pad on the back of the universal mount.
Place the universal mount on the seat post.
The mount surface should be vertical.
Place a rubber pad around the seat post, if necessary:
2
• If the seat post diameter is from 27 to 28.6 mm, use the
thicker pad.
• If the seat post diameter is from 30.4 to 31 mm, use the
thinner pad.
• If the seat post diameter is from 31 to 31.8 mm, do not use
a rubber pad.
Place the seat-post connector around the rubber pad.
3
NOTE:
the grooves on the inside of the seat-post connector.
Replace and tighten the screw.
4
NOTE: Tighten the seat-post clamp until the mount does not
slide on the seat post, or to a maximum torque specification
of 3 lbf-in. (0.3 N-m). You should check the tightness of the
screw periodically.
Align the tabs on the back of the device with the seat-post
5
mount notches Â.
Press down slightly and turn the device clockwise until it
6
locks into place.
You should align the contours on the rubber pad with
Turning On the Taillight
Hold the device key À for 2 seconds.
Introduction 1
Page 6
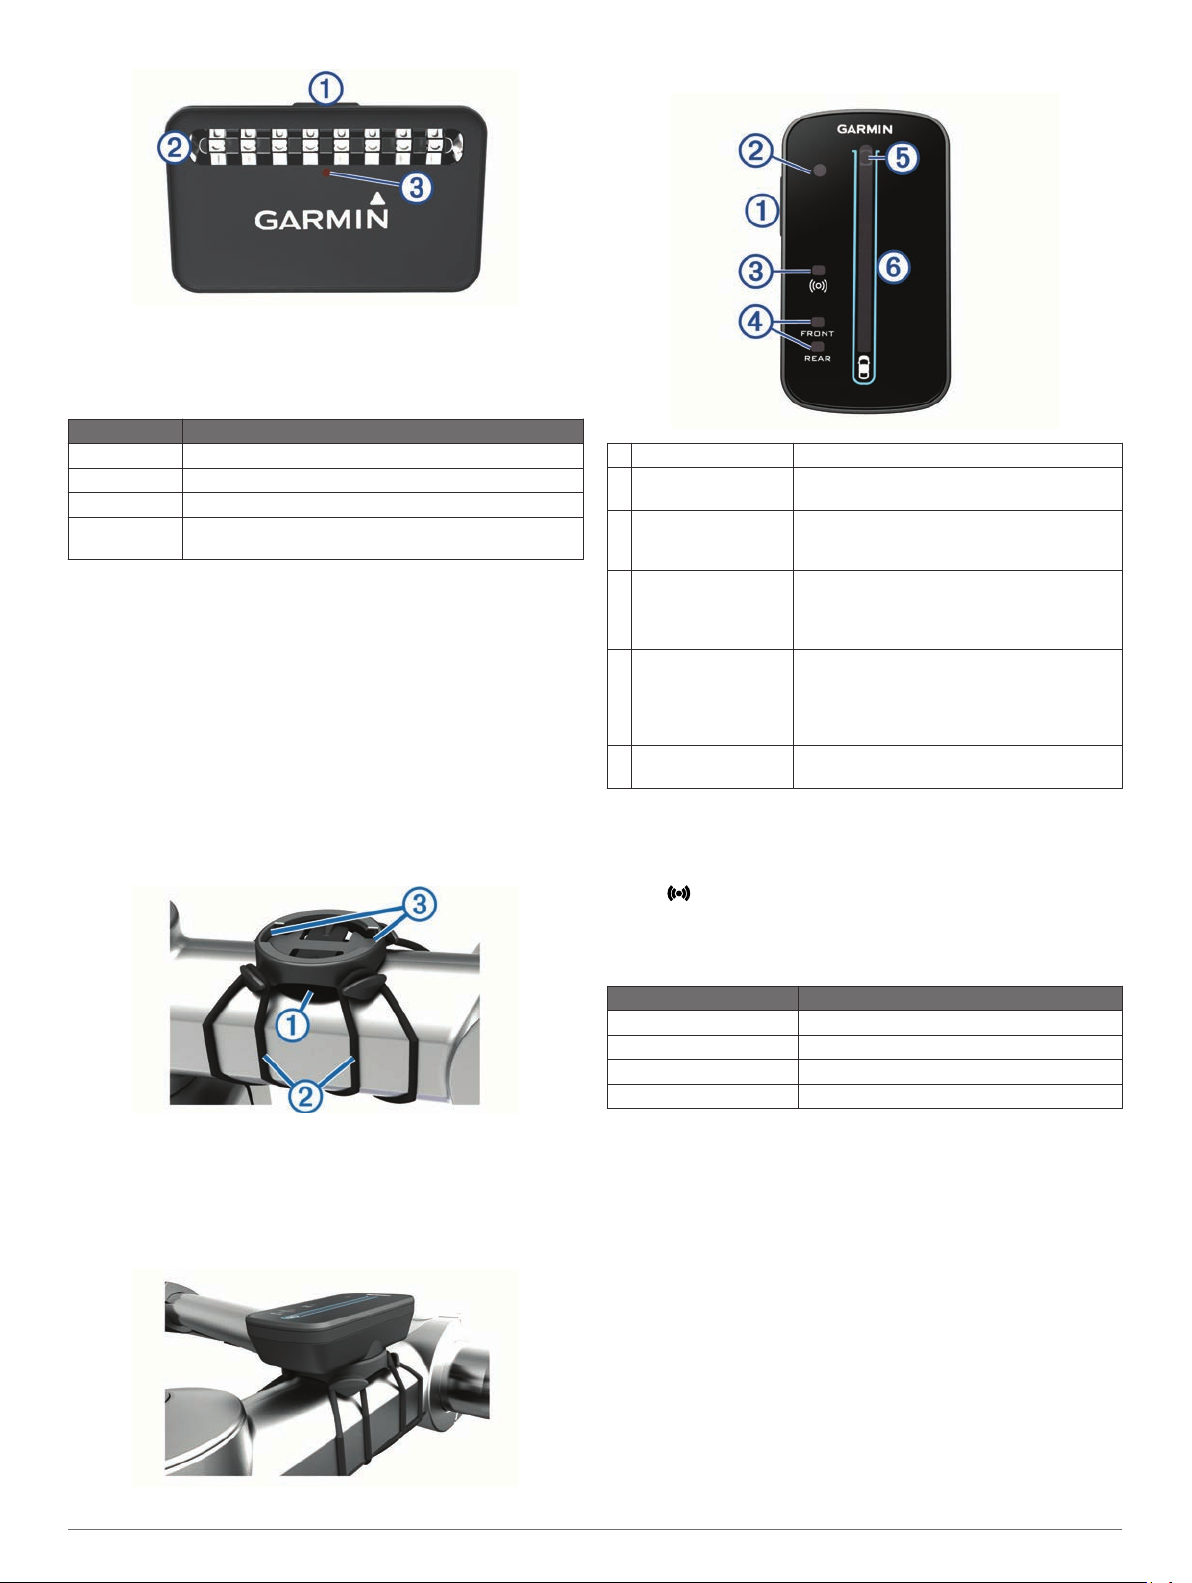
The taillight LEDs Á fill horizontally to indicate the battery
level. The status LED Â indicates additional device
information.
Taillight Battery Status LED
LED Activity Status
Flashing green The device is charging.
Solid green Charging is complete.
Solid yellow The battery is low.
Solid red The battery is critically low. An error occurred while
charging.
Turning Off the Taillight
Hold the device key for 2 seconds.
Installing the Varia
NOTE: If you do not have a Varia
task and use a compatible Edge device (Pairing the Taillight with
Edge 1000, page 2).
Your
You can install the device on the stem or the handlebars.
Select a secure location to mount the device where it does
1
not interfere with the safe operation of your bike.
Place the rubber disk À on the back of the bike mount.
2
The rubber tabs align with the back of the bike mount so it
stays in place.
RDU
Device
RDU
device, you can skip this
Varia
Device key Turns the device on and off.
À
Ambient light sensor Detects available light and automatically
Á
Connection status
Â
LED
FRONT
Ã
device status LEDs
Threat level LED
Ä
Charging status LED
(Charging the
Device, page 3)
Vehicle position
Å
LEDs
Device Overview
RDU
and REAR
adjusts the brightness of the display.
Appears solid blue when the device is paired
with the taillight. Flashes blue when the
device is searching for the taillight.
Appears solid white when the device battery
is charged and the device is operating
normally. Flashes white when the battery is
low.
Changes color based on the potential level of
threat. Green indicates no vehicle is
detected. Amber indicates a vehicle is
approaching. Red indicates a vehicle is
advancing at a high rate of speed.
Moves up the column as the vehicle gets
closer to your bike.
Turning On the Varia RDU Device
Hold the device key for 1 second to turn on the device.
The LEDs fill the column to indicate the battery level.
The LED flashes blue while it is searching for the taillight.
RDU
Varia
When you turn on the device, the LED at the top of the column
briefly indicates the battery status.
LED Activity Status
Flashing green The device is charging.
Solid green Charging is complete.
Flashing yellow The battery is low.
Flashing red The battery is critically low.
Battery Status LED
Place the bike mount on the bike stem.
3
Attach the bike mount securely using the two bands Á.
4
Align the tabs on the back of the device with the bike mount
5
notches Â.
Press down slightly and turn the device clockwise until it
6
locks into place.
Turning Off the Varia
If the Varia
devices at the same time.
Hold the device key on the Varia
RDU
is paired with the taillight, you can turn off both
The Varia Taillight and Your Edge
RDU
Device and Taillight
RDU
1000
You can remotely control your taillight and customize settings
using your compatible Edge device. This section contains
instructions for the Edge 1000 device. Other compatible Edge
devices contain similar settings and controls.
Pairing the Taillight with Your Edge 1000
Before you can pair the devices, you must update the Edge
software.
Bring the
1
2 The Varia
Edge device within range (3 m) of the sensor.
device for 1 second.
Taillight and Your Edge 1000
Page 7
NOTE:
pairing.
Turn on the
2
From the home screen, select > Sensors > Add Sensor >
3
Search All.
Turn on the taillight.
4
Select your sensor, and select Add.
5
When the sensor is paired with your Edge
icon appears solid on the connections page.
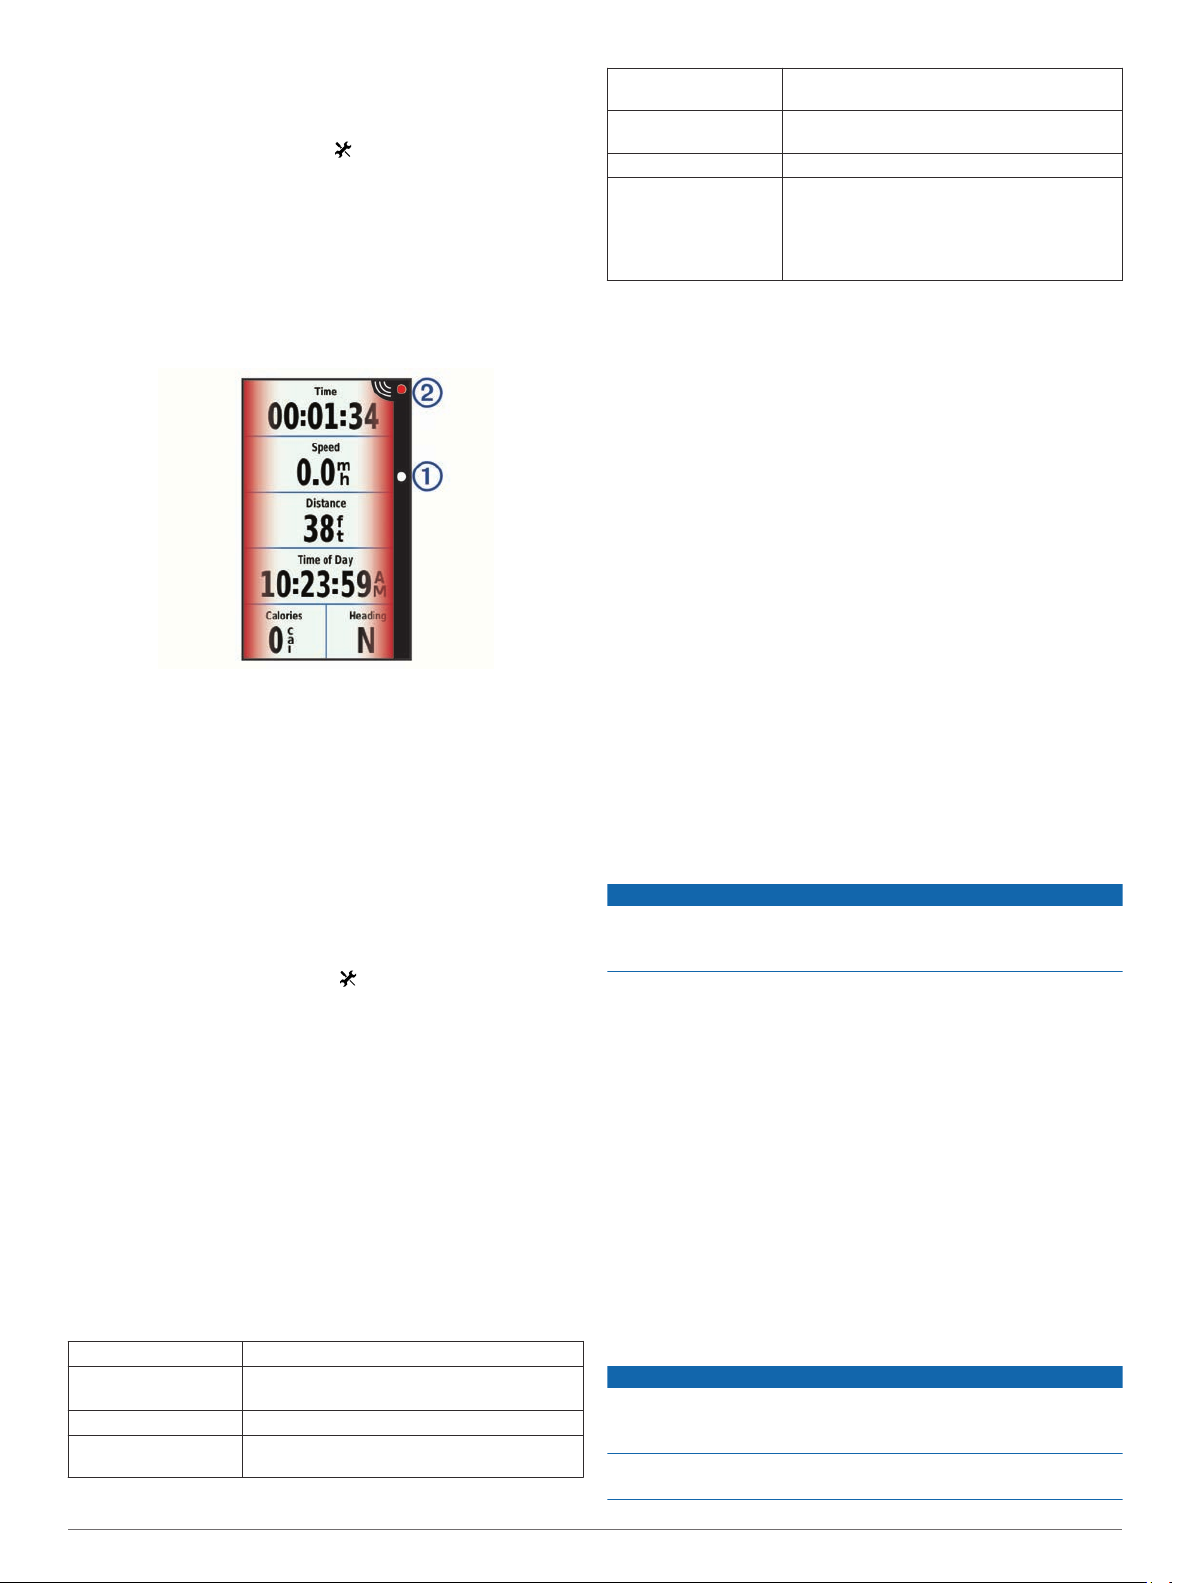
Viewing Radar on Your Edge
Go for a ride.
The radar information appears on the active data screen.
The vehicle position LED À moves up the column as a
vehicle gets closer to your bike. The threat level LED
changes color based on the potential level of threat. Green
indicates no vehicle is detected. Amber indicates a vehicle is
approaching. Red indicates a vehicle is advancing at a high
rate of speed.
Stay 10 m away from other ANT+
Edge device.
Device
®
sensors while
device, the status
Á
Customizing the Radar Alert Settings with Your Edge 1000
Before you can customize the radar alert settings with your
Edge device, you must pair the devices (Pairing the Taillight with
Your Edge 1000, page 2).
You can customize how the radar alerts sound and display on
your Edge device.
From your Edge device, select > Sensors.
1
Select your taillight.
2
Select Sensor Details > Alert Settings.
3
Select an option.
4
Tone Alerts for Approaching Vehicles
The Edge device beeps if audible tones are turned on in the
settings. Your device has alert tones for several features. The
alert tone for approaching vehicles has a unique sound. The
device beeps one time when the first vehicle is detected. After
the threat is cleared, the device beeps again when another
vehicle is detected.
Device Information
Varia RTL and
Battery type Rechargeable, built-in lithium-ion battery
Varia RTL Battery life Up to 5 hr. in constant illumination mode
Varia RDU Battery life Up to 10 hr., typical usage
Operating temperature
range
RDU Specifications
Up to 8 hr. in flash mode
From -20º to 60ºC (from -4º to 140ºF)
Charging temperature
range
Radio frequency/
protocol
Water rating IEC 60529 IPX7*
LED luminous flux 5 lm (no threat detected)
*The device withstands incidental exposure to water of up to 1 m
for up to 30 min. For more information, go to www.garmin.com
/waterrating.
From 0º to 45ºC (from 32º to 113ºF)
2.4 GHz
protocol
13 lm (maximum threat level)
16 lm (maximum threat level, flash mode)
Flash mode is available on the
only.
ANT+ wireless communications
Varia RTL 500
Radar Detection
• The radar detects approaching vehicles up to 140 m away.
• The approaching vehicle speed must be from 10 to 160 km/h
(from 6 to 99 mph).
NOTE:
same speed as your bike.
• The radar beam width is 40 degrees. It provides radar
coverage for typical bends in the road.
• The radar can detect up to eight approaching vehicles.
The radar does not detect vehicles traveling at the
Taillight Modes and Intensity
Varia
The
middle LEDs flash at all times. When a vehicle is detected,
additional LEDs progressively turn on and the flashing increases
frequency as the vehicle gets closer to your bike. You can
switch the device to solid mode by pressing the device key.
The Varia
LEDs are solid at all times. When a vehicle is detected,
additional LEDs progressively turn on as the vehicle gets closer
to your bike.
500 default light mode is flash mode. The four
RTL
501 has the solid mode only. The two middle
RTL
Charging the Device
NOTICE
To prevent corrosion, thoroughly dry the USB port, the weather
cap, and the surrounding area before charging or connecting to
a computer.
The device is powered by a built-in lithium-ion battery that you
can charge using a standard wall outlet or a USB port on your
computer.
NOTE: The device does not charge when outside the approved
temperature range (Varia
Pull up the weather cap from the USB port.
1
Plug the small end of the USB cable into the USB port on the
2
device.
Plug the large end of the USB cable into an AC adapter or a
3
computer USB port.
Plug the AC adapter into a standard wall outlet.
4
Charge the device completely.
5
The status LED flashes green while charging. The status LED is
solid green when charging is complete.
RTL
and
RDU Specifications, page
3).
Device Care
NOTICE
Do not store the device where prolonged exposure to extreme
temperatures can occur, because it can cause permanent
damage.
Avoid chemical cleaners, solvents, and insect repellents that can
damage plastic components and finishes.
Device Information 3
Page 8
Secure the weather cap tightly to prevent damage to the USB
port.
Cleaning the Device
Wipe the device using a cloth dampened with a mild
1
detergent solution.
Wipe it dry.
2
Troubleshooting
Support and Updates
Garmin Express™ (www.garmin.com/express) provides easy
access to these services for
• Product registration
• Product manuals
• Software updates
Updating the Software Using the Garmin Express Application
Before you can update your device software, you must
download the Garmin Express application.
You can update the taillight software using the Garmin Express
application. If you have the optional Varia
the taillight, software updates are sent wirelessly from the
taillight.
Connect the taillight to your computer using the USB cable.
1
Garmin Express
sends them to your device.
Follow the on-screen instructions.
2
Disconnect the device, and turn it on.
3
The red LEDs progressively turn on to indicate the device is
updating.
When updating the paired Varia
4
range (3 m) and turn it on.
The status LED on both devices turns purple to indicate the
devices are updating. The update may take a couple
minutes. When the update is complete, the taillight status
LED turns green, and both devices turn off.
NOTE:
hold the device key on the taillight for 2 seconds. You must
pair the devices again to receive a software update.
If you want to cancel the
looks for software updates automatically and
Taillight Status LED for Software Updates
LED Activity Status
Solid green The software update is complete and successful.
Solid red The software update failed.
Flashing purple The device is searching for the paired Varia
Solid purple The device is uploading a software update from
device.
Garmin Express
taillight also sends a software update to both devices.
The taillight disconnects from the Edge device
If the taillight is not connected or sending data to the Edge
device,
devices in a safe location.
The Edge displays Radar Disconnected when it is not connected
to the taillight.
• Turn both devices off, and turn them back on.
Garmin recommends that you stop riding and check the
Garmin devices.
RDU
device, bring it within
RDU
Varia
RDU
Varia RDU device is paired, the
. If the
WARNING
device paired to
software update,
RDU
You can check the battery level when you turn the devices
back on. The taillight LEDs fill horizontally to indicate the
battery level.
• Pair the devices (Pairing the Taillight with Your Edge 1000,
page 2)
.
The taillight disconnects from the Varia RDU Device
WARNING
If the taillight is not connected or sending data to the Varia
device,
devices in a safe location.
If the threat level LED is solid red and the REAR
taillight is not connected to the
• Turn both devices off, and turn them back on.
• Pair the devices (Pairing the Taillight with the RDU Device
Garmin recommends that you stop riding and check the
LED is off, the
RDU
Varia
You can check the battery level when you turn the devices
back on. The taillight LEDs fill horizontally to indicate the
battery level.
page 4).
device.
RDU
,
The taillight is not responding
During a ride, if the taillight status LED is flashing or solid red,
the device is in an error state.
• Make sure the device is within the approved operating
temperature range (Varia
page 3)
• Turn the device off, and turn it back on.
You can check the battery level when you turn the device
back on. The taillight LEDs fill horizontally to indicate the
battery level.
• Avoid multiple sources of radar interference.
.
RTL
and RDU Specifications,
The status LED turns red while charging
• Check the USB cable, connectors, and ports for damage.
• Make sure the power source is generating power.
You can check this several ways. For example, you can
check whether other devices powered by the source are
functioning.
• Make sure the device is within the approved charging
temperature range (Varia
page 3).
RTL
and RDU Specifications,
Thermal Safety Shutdown
To prevent overheating, the
operated at a high intensity in warm, stagnant air. The status
LED is red until the device cools down. You should use the
device outdoors.
Varia device may turn off when
Pairing the Taillight with the RDU Device
The Varia
NOTE:
are already paired.
1
2
3
RDU
device can be paired with one taillight at a time.
If your taillight was packaged with an RDU device, they
Hold the Varia
The LED turns solid blue.
Turn on the taillight.
Bring the devices within 1 cm of each other, and wait while
the devices connect.
When the devices are connected, the taillight LEDs move
from side to side. The Varia RDU and REAR
solid.
RDU
device key for 5 seconds.
LEDs are
4 Troubleshooting
Page 9

Resetting the Device
You can reset the device if it stops responding.
Hold the device key for 8 seconds until all LEDs turn off.
Replacement O-rings
Replacement bands (O-rings) are available for the mounts.
NOTE:
replacement bands only. Go to
your
Use Ethylene Propylene Diene Monomer (EPDM)
http://buy.garmin.com, or contact
Garmin dealer.
Getting More Information
• Go to www.garmin.com/intosports.
• Go to www.garmin.com/learningcenter.
• Go to http://buy.garmin.com, or contact your Garmin dealer
for information about optional accessories and replacement
parts.
Appendix
Software License Agreement
BY USING THE DEVICE, YOU AGREE TO BE BOUND BY THE
TERMS AND CONDITIONS OF THE FOLLOWING SOFTWARE
LICENSE AGREEMENT. PLEASE READ THIS AGREEMENT
CAREFULLY.
Garmin Ltd. and its subsidiaries (“Garmin”) grant you a limited
license to use the software embedded in this device (the
“Software”) in binary executable form in the normal operation of
the product. Title, ownership rights, and intellectual property
rights in and to the Software remain in Garmin and/or its thirdparty providers.
You acknowledge that the Software is the property of Garmin
and/or its third-party providers and is protected under the United
States of America copyright laws and international copyright
treaties. You further acknowledge that the structure,
organization, and code of the Software, for which source code is
not provided, are valuable trade secrets of Garmin and/or its
third-party providers and that the Software in source code form
remains a valuable trade secret of Garmin and/or its third-party
providers. You agree not to decompile, disassemble, modify,
reverse assemble, reverse engineer, or reduce to human
readable form the Software or any part thereof or create any
derivative works based on the Software. You agree not to export
or re-export the Software to any country in violation of the export
control laws of the United States of America or the export control
laws of any other applicable country.
Appendix 5
Page 10

Index
A
accessories
B
bands
battery 1, 2
charging 3, 4
C
cleaning the device
customizing the device
D
device, care
E
Edge 2, 3
G
Garmin Express
registering the device
updating software
I
installing 1, 2
M
maps, updating
mounting the device 1, 2
O
O-rings. See bands
P
pairing 2, 4
product registration
R
registering the device
resetting, device
S
settings
software, updating
software license agreement
specifications
T
tones
troubleshooting 4, 5
U
updates, software
USB 4
5
5
4
2
3
4
4
4
4
4
4
5
3
4
3
3
4
5
6 Index
Page 11

Page 12
www.garmin.com/support
1800 235 822 +43 (0) 820 220230
+ 32 2 672 52 54 0800 770 4960
1-866-429-9296
+420 221 985466
+420 221 985465
+ 358 9 6937 9758 + 331 55 69 33 99
+ 39 02 36 699699 (+52) 001-855-792-7671
0800 427 652 0800 0233937
+47 815 69 555
+35 1214 447 460 +386 4 27 92 500
0861 GARMIN (427 646)
+27 (0)11 251 9800
+385 1 5508 272
+385 1 5508 271
+ 45 4810 5050
00800 4412 454
+44 2380 662 915
+34 93 275 44 97
+ 46 7744 52020 +886 2 2642-9199 ext 2
0808 238 0000
+44 870 850 1242
913-397-8200
1-800-800-1020
+49 (0) 89 858364880
zum Ortstarif - Mobilfunk
kann abweichen
© 2015 Garmin Ltd. or its subsidiaries
 Loading...