

Page 1
Vector™ and Vector S
Owner’s Manual
September 2014 Printed in Taiwan 190-01450-00_0D
Page 2

All rights reserved. Under the copyright laws, this manual may not be copied, in whole or in part, without the written consent of Garmin. Garmin reserves the
right to change or improve its products and to make changes in the content of this manual without obligation to notify any person or organization of such
changes or improvements. Go to www.garmin.com for current updates and supplemental information concerning the use of this product.
Garmin®, Edge®, and the Garmin logo are trademarks of Garmin Ltd. or its subsidiaries, registered in the USA and other countries. ANT+™, ANT Agent™,
Garmin Connect™, USB ANT Stick™, and Vector™ are trademarks of Garmin Ltd. or its subsidiaries. These trademarks may not be used without the express
permission of Garmin.
Exustar™ is a trademark of Exustar Enterprise Co. Ltd. Windows® is a registered trademark of Microsoft Corporation in the United States and other countries.
Mac® is a registered trademark of Apple Computer, Inc. Other trademarks and trade names are those of their respective owners. Shimano® is a registered
trademark of Shimano, Inc. Training Stress Score™ (TSS), Intensity Factor™ (IF), and Normalized Power™ (NP) are trademarks of Peaksware, LLC.
This product is ANT+™ certified. Visit www.thisisant.com/directory for a list of compatible products and apps.
Page 3

Table of Contents
Introduction.................................................................... 1
Thank You.................................................................................. 1
Getting Started........................................................................... 1
Tools Needed............................................................................. 1
Installing the Vector Components.............................................. 1
Preparing the Crank Arms..................................................... 1
Determining Pedal Pod Clearance........................................ 1
Determining the Bicycle Chain Clearance............................. 1
Installing the Pedal Pod and Pedal....................................... 1
Installing the Left Pedal and Pedal Pod................................ 2
Installing the Right Pedal...................................................... 2
Installing the Shoe Cleats.......................................................... 2
Adjusting the Release Tension............................................. 2
Paring Vector with Your Edge 1000........................................... 2
Your First Ride........................................................................... 3
Entering the Crank Length.................................................... 3
Setting the Installation Angle................................................. 3
Performing a Static Zero Calibration..................................... 3
Calibrating Vector Before Each Ride.................................... 3
Customizing the Data Fields................................................. 3
Training........................................................................... 3
Pedal-Based Power................................................................... 3
Maintenance Tips....................................................................... 3
Vector Data..................................................................... 3
Sending Your Ride to Garmin Connect...................................... 3
Garmin Connect.................................................................... 3
Disconnecting the USB Cable............................................... 4
Device Information.........................................................4
Vector Device Care.................................................................... 4
Removing the Pedal Pod and Pedal.......................................... 4
Replacing the Pedals and Cartridges........................................ 4
Vector Storage........................................................................... 5
Vector Specifications................................................................. 5
USB ANT Stick™ Specifications................................................ 5
Battery Information..................................................................... 5
Replacing the Pedal Pod Battery.......................................... 5
Appendix.........................................................................5
Registering Vector..................................................................... 5
Edge 810 and 510 Device Instructions...................................... 5
Pairing Vector with Your Edge 810 or 510 Device................ 5
Entering the Crank Length.................................................... 6
Performing a Static Zero Calibration..................................... 6
Edge 800 Device Instructions.................................................... 6
Pairing Vector with the Edge 800 Device.............................. 6
Calibrating Vector with the Edge 800 Device........................ 6
Edge 500 Device Instructions.................................................... 6
Pairing Vector with the Edge 500 Device.............................. 6
Calibrating Vector with the Edge 500 Device........................ 6
Customizing the Data Fields................................................. 6
Power Data Fields...................................................................... 6
Troubleshooting......................................................................... 7
Updating the Software Using Vector Updater....................... 7
Performing a Static Torque Test........................................... 7
Upgrading Vector S to a Dual Sensor System...................... 7
Third-Party Devices............................................................... 7
Index................................................................................8
Table of Contents i
Page 4

Page 5
Introduction
WARNING
Read all instructions carefully before installing and using the
Vector system. Improper use could result in serious injury.
See the Important Safety and Product Information guide in the
product box for product warnings and other important
information.
NOTICE
Go to www.garmin.com/vectorowner for the latest information
including bike compatibility, software updates, and video
tutorials.
Thank You
Thank you for your Vector or Vector S purchase. This manual
covers both Vector systems.
Vector was designed for cyclists, by cyclists, to provide an
outstanding experience of owning a precision power
measurement system for your bike.
Vector is simple, accurate, and easy to use.
For software updates, video tutorials, and everything you need
to get years of service out of your Vector, go to
www.garmin.com/vectorowner.
Now it's time to put the power under your feet and get out there
and ride.
Getting Started
Install the Vector components (Installing the Vector
1
Components).
Install the shoe cleats (Installing the Shoe Cleats).
2
Pair Vector with your Edge® (Paring Vector with Your Edge
3
1000).
Go for a ride (Your First Ride).
4
View your history (Vector Data).
5
Send your history to your computer (Sending Your Ride to
6
Garmin Connect).
NOTE: Do not use more than two washers.
• Make sure the pedal pod mounting face  contacts the crank
arm only at its mounting face (or the washer used to fill the
recess).
If it touches anywhere else, you can use another washer to
provide the necessary clearance.
• If it is close, you can confirm proper clearance by sliding a
piece of paper between the metal bracket and the crank arm
face.
• If the mounting face of the crank arm is protruding, do not
use washers.
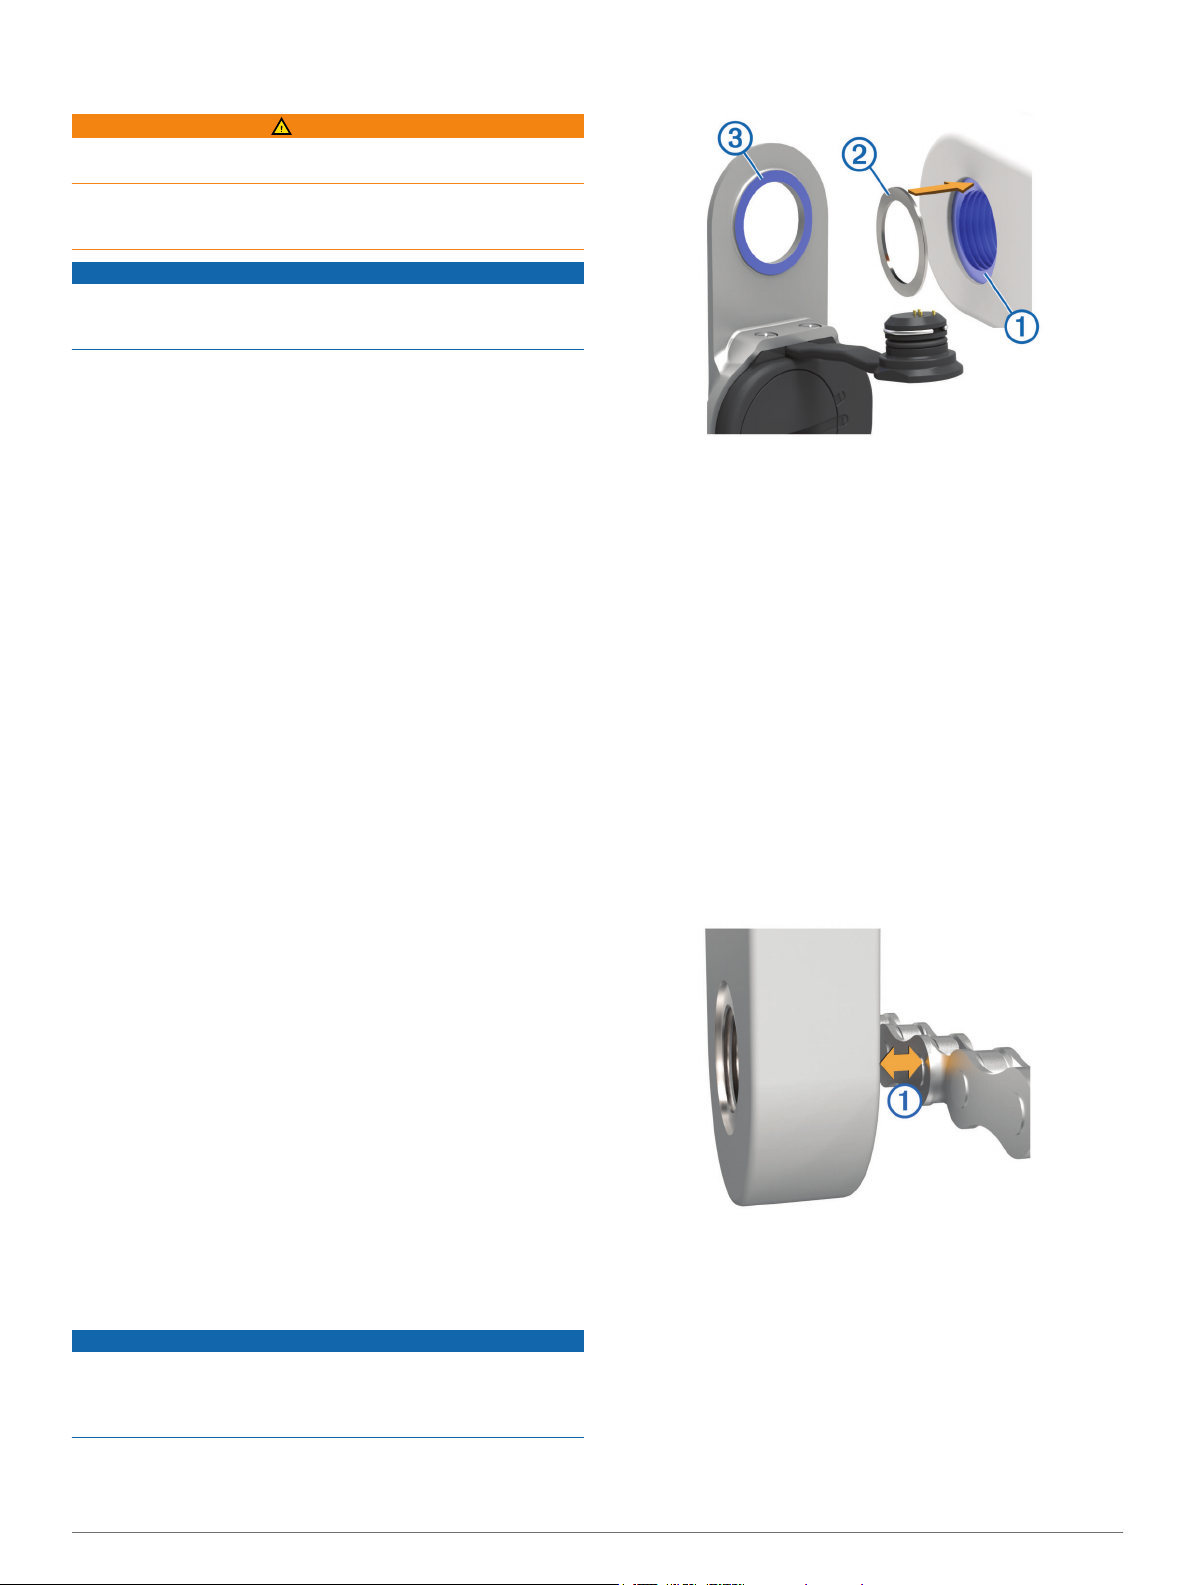
Determining the Bicycle Chain Clearance
Before you can install the right pedal, you must determine
bicycle chain clearance.
Move your bike chain to the largest chain ring and the
smallest cassette gear.
The bike chain should be in the outermost position to
determine proper clearance between the pedal pod cable
and the chain.
NOTE: There must be at least 5 mm clearance À between
the chain and the crank arm.
Tools Needed
• 15 mm pedal wrench
• Bike grease
• 3 mm hex key
• 4 mm hex key
Installing the Vector Components
The installation steps for the Vector and Vector S systems are
very similar. Procedures that are specific to the Vector S system
are noted.
Preparing the Crank Arms
Confirm the compatibility of your bike at www.garmin.com
1
/vectorowner.
Remove the existing pedals.
2
Clean the threads, and remove old grease.
3
Determining Pedal Pod Clearance
NOTICE
The pedal pod should contact the crank arm only at its mounting
face, because this is the load-bearing connection. If the pedal
pod contacts the crank arm anywhere else, the pedal pod may
fracture when the pedal is tightened.
• If the mounting face À surrounding the threaded hole in the
crank arm is recessed, use one or two washers Á to fill the
recess.
Installing the Pedal Pod and Pedal
This procedure is for the Vector system. For the Vector S
system, see Installing the Left Pedal and Pedal Pod.
NOTE: The left and right pedal pods are the same.
Install the left pedal first.
1
Apply a thin layer of grease on the pedal spindle À and the
2
pedal pod Á where it contacts the pedal spindle.
Introduction 1
Page 6

On the pedal spindle, stack the pedal pod and any required
3
washers Â.
TIP: You must carefully bend the cable à out of the way.
Insert the spindle into the crank arm Ä.
4
Hand tighten the spindle.
5
NOTE: The left pedal spindle has a left-handed (reverse)
thread.
TIP: Power and cadence calculations are not impacted by
the orientation of the pedal pod. Garmin® recommends
placement of the pedal pod on the leading edge of the crank.
When the crank is in the forward position, the pedal pod
should be pointing downward.
Rotate the crank arm to check for clearance.
6
The pedal pod should not interfere with any part of the bike.
Use the pedal wrench to tighten the spindle.
7
NOTE: Garmin recommends torque of 25 to 30 lbf-ft. (34 to
40 N-m).
Firmly plug the cable into the spindle.
8
Rotate the crank arm to check for clearance.
9
Repeat steps 2–9 to install the right pedal.
10
NOTE: If the pedal pod cable rubs the chain, you can add
one or two washers between the pedal pod and the crank
arm to increase clearance.
Installing the Left Pedal and Pedal Pod
This procedure is for the Vector S system.
Apply a thin layer of grease on the pedal spindle À and the
1
pedal pod Á where it contacts the pedal spindle.
NOTE: Garmin recommends torque of 25 to 30 lbf-ft. (34 to
40 N-m).
Firmly plug the cable into the spindle.
7
Rotate the crank arm to check for clearance.
8
Installing the Right Pedal
This procedure is for the Vector S system.
Apply a thin layer of grease on the pedal spindle.
1
Insert the spindle into the crank arm.
2
NOTE: If you used one or two washers on the left pedal, use
the same amount on the right pedal.
Hand tighten the spindle.
3
Use the pedal wrench to tighten the spindle.
4
NOTE: Garmin recommends torque of 25 to 30 lbf-ft. (34 to
40 N-m).
Installing the Shoe Cleats
NOTE: The left and right cleats are the same.
Apply a thin layer of grease on the cleat bolt threads.
1
Align the cleat À, washers Á, and bolts Â.
2
Use a 4 mm hex key to loosely attach each bolt to the sole of
3
the shoe.
Adjust the cleat to the shoe in your preferred position.
4
This can be adjusted after a trial ride.
Tighten the cleat firmly to the shoe.
5
NOTE: Garmin recommends torque of 4 to 6 lbf-ft. (5 to 8 N-
m).
Adjusting the Release Tension
NOTICE
Do not overtighten the release tension screw on the bottom of
the pedal. The release tension should be adjusted equally for
On the pedal spindle, stack the pedal pod and any required
2
washers Â.
NOTE: You must carefully bend the cable à out of the way.
NOTE: Do not use more than two washers.
Insert the spindle into the crank arm Ä.
3
Hand tighten the spindle.
4
NOTE: The left pedal spindle has a left-handed (reverse)
thread.
TIP: Power and cadence calculations are not impacted by
the orientation of the pedal pod. Garmin recommends
placement of the pedal pod on the leading edge of the crank.
When the crank is in the forward position, the pedal pod
should be pointing downward.
Rotate the crank arm to check for clearance.
5
The pedal pod should not interfere with any part of the bike.
Use the pedal wrench to tighten the spindle.
6
2 Introduction
both pedals.
Use a 3 mm hex key to adjust the release tension of each
pedal.
There is a window on the back of the pedal binding that
shows the allowable range.
Paring Vector with Your Edge 1000
Before you can view Vector data on the Edge device, you must
pair the devices.
Pairing is the connecting of ANT+™ wireless sensors. This
procedure contains instructions for the Edge 1000. If you have
another compatible device, see Edge 810 and 510 Device
Instructions, or go to www.garmin.com/vectorowner.
Bring the Edge device within range (3 m) of the sensor.
1
NOTE: Stay 10 m away from other ANT+ sensors while
pairing.
Turn on the Edge device.
2
Page 7

From the home screen, select > Sensors > Add Sensor >
3
Power.
Rotate the crank arm a few times.
4
When the sensor is paired with your Edge device, the sensor
status is Connected. You can customize a data field to display
Vector data.
Your First Ride
Before you ride with Vector for the first time, you must enter the
crank length, set the installation angle of the sensors inside the
pedals, and calibrate the static zero reference. You must also
calibrate the system if you move Vector to another bike.
These procedures contain instructions for the Edge 1000. If you
have another compatible device, see Edge 810 and 510 Device
Instructions, or go to www.garmin.com/vectorowner.
Entering the Crank Length
The crank length is often printed on the crank arm.
Rotate the pedals a few times in order to activate Vector.
1
From the home screen, select > Sensors > > Sensor
2
Details > Crank Length.
Enter the crank length, and select .
3
Setting the Installation Angle
Before you set the installation angles, you must set the Edge
data fields to display power and cadence.
Go for a short ride on a trainer or on the road.
1
Ride until the cadence is nearly 70 rpm.
2
Accelerate smoothly to approximately 90 rpm.
3
When the installation angles are successfully set, a message
appears and data fields display power data on the Edge
device (1000, 810, and 510 only).
Performing a Static Zero Calibration
NOTE: During this task, the bike must be in an upright position,
and nothing can be touching the pedals.
From the home screen, select the status bar or swipe down
1
from the top of the screen.
The connections page appears.
Select > Calibrate.
2
When the zero reference is determined, a message appears
on the Edge device.
Calibrating Vector Before Each Ride
For best results, Garmin recommends calibrating Vector at the
start of every ride.
Perform a static zero calibration.
1
Go for a ride.
2
Customizing the Data Fields
This procedure contains instructions for the Edge 1000, 810,
800, and 510 devices. If you have another compatible device,
see Edge 500 Device Instructions.
Hold a data field to change it.
1
Select a category.
2
Select a data field.
3
Training
Pedal-Based Power
Vector measures pedal-based power.
Vector measures the force you apply a few hundred times every
second. Vector also measures your cadence or rotational
pedaling speed. By measuring the force, the direction of force,
the rotation of the crank arm, and time, Vector can determine
power (watts). Because Vector independently measures left and
right leg power, it reports your left-right power balance.
NOTE: The Vector S system does not provide left-right power
balance.
Maintenance Tips
NOTICE
Some bike tools may scratch the finish of Vector components.
• Use wax paper or a towel between the tool and the
hardware.
• After any bike adjustments, rotate the crank arm to check for
clearance.
• Calibrate Vector at the start of every ride (Calibrating Vector
Before Each Ride).
• Keep Vector components clean.
• When moving Vector to another bike, clean the threads and
surfaces thoroughly.
• Go to www.garmin.com/vectorowner for the latest updates
and information.
Vector Data
Your ride data or history is recorded to your Edge.
NOTE: History is not recorded while the timer is stopped or
paused.
When the device memory is full, a message appears. The
device does not automatically delete or overwrite your history.
Upload your history to Garmin Connect™ periodically to keep
track of all your ride data.
Sending Your Ride to Garmin Connect
NOTICE
To prevent corrosion, thoroughly dry the USB port, the weather
cap, and the surrounding area before charging or connecting to
a computer.
Pull up the weather cap À from the USB port Á.
1
Plug the small end of the USB cable into the USB port on the
2
device.
Plug the large end of the USB cable into a computer USB
3
port.
Go to www.garminconnect.com/start.
4
Follow the on-screen instructions.
5
Garmin Connect
You can connect with your friends on Garmin Connect. Garmin
Connect gives you the tools to track, analyze, share, and
encourage each other. Record the events of your active lifestyle
including runs, walks, rides, swims, hikes, triathlons, and more.
To sign up for a free account, go to www.garminconnect.com
/start.
Store your activities: After you complete and save an activity
with your device, you can upload that activity to Garmin
Connect and keep it as long as you want.
Training 3
Page 8

Analyze your data: You can view more detailed information
about your activity, including time, distance, elevation, heart
rate, calories burned, cadence, an overhead map view, pace
and speed charts, and customizable reports.
NOTE: Some data requires an optional accessory such as a
heart rate monitor.
Plan your training: You can choose a fitness goal and load
one of the day-by-day training plans.
Share your activities: You can connect with friends to follow
each other's activities or post links to your activities on your
favorite social networking sites.
Disconnecting the USB Cable
If your device is connected to your computer as a removable
drive or volume, you must safely disconnect your device from
your computer to avoid data loss. If your device is connected to
your Windows® computer as a portable device, it is not
necessary to safely disconnect.
Complete an action:
1
• For Windows computers, select the Safely Remove
Hardware icon in the system tray, and select your device.
• For Mac® computers, drag the volume icon to the trash.
Disconnect the cable from your computer.
2
Device Information
Vector Device Care
NOTICE
Keep the components clean and free of debris.
Do not use a sharp object to clean the device.
Avoid chemical cleaners, solvents, and insect repellents that
can damage plastic components and finishes.
Do not submerge or pressure wash the components.
Do not store the device where prolonged exposure to extreme
temperatures can occur, because it can cause permanent
damage.
Replace components with Garmin parts only. See your Garmin
dealer or the Garmin website.
NOTE:
handed (reverse) thread.
As you unscrew the pedal, the pedal pod cable disengages
from the spindle.
When you install Vector again, you must recalibrate the system.
The spindle and crank for the left pedal has a left-
Replacing the Pedals and Cartridges
Before you can start this task, you must obtain a cartridge axle
tool (available from Exustar™ or Shimano®), 8 mm hex nut
driver, 15 mm pedal wrench, and bike grease.
NOTICE
Other compatible tools can be used. Use care not to damage
any of the Vector components.
If your pedals are damaged or show significant wear, you can
replace the pedals, cartridges, and related hardware
components.
NOTE: Pedal and cartridge replacement is the same for the
Vector and Vector S systems. You should keep the left pedal
parts separate from the right pedal parts.
Remove the pedals and pedal pods from your bike
1
(Removing the Pedal Pod and Pedal).
Unscrew the pedal body À from the cartridge Á using the
2
cartridge axle tool.
NOTE: The right pedal has a left-handed (reverse) thread.
Remove the pedal body.
Removing the Pedal Pod and Pedal
NOTICE
Do not attempt to pry the cable from the spindle.
Use the pedal wrench À to slowly loosen the pedal Á.
4 Device Information
3
While securely holding the spindle  with a pedal wrench,
4
use the hex nut driver to remove the nut à and washer Ä.
Separate the cartridge from the spindle.
5
Remove the brass spacer ring Å and dust seal Æ.
6
NOTE: The Vector S right pedal does not include brass
spacer, and the dust seal is reversed.
Remove old grease from the spindle.
7
Slide the new dust seal and brass spacer ring over the
8
spindle.
The tapered side of the dust seal and brass spacer ring must
face the base of the spindle.
Page 9

Apply a layer of bike grease to the spindle.
9
Insert the spindle into the cartridge.
10
Wipe away any excess grease.
11
Install the new washer and nut on the end of the spindle.
12
NOTE: The nut for the right spindle has a left-handed
(reverse) thread.
Use the hex nut driver to tighten the nut.
13
WARNING
Garmin recommends torque of 7 lbf-ft. (10 N-m). Failure to
properly tighten the nut could cause the pedal to fall off
during a ride, which could result in property damage or
serious bodily injury or death.
Install the new pedal by screwing it onto the cartridge until
14
there is no gap.
NOTE: The right pedal has a left-handed (reverse) thread.
Replace the pedal pods and pedals according to the
15
installation instructions (Installing the Pedal Pod and Pedal).
Rotate the crank arm to check for clearance and smooth
16
pedal rotation.
After you replace the pedals and cartridges, you must
recalibrate the system.
Vector Storage
If you are transporting your bicycle or not using Vector for an
extended period of time, Garmin recommends removing Vector
and storing it in the product box.
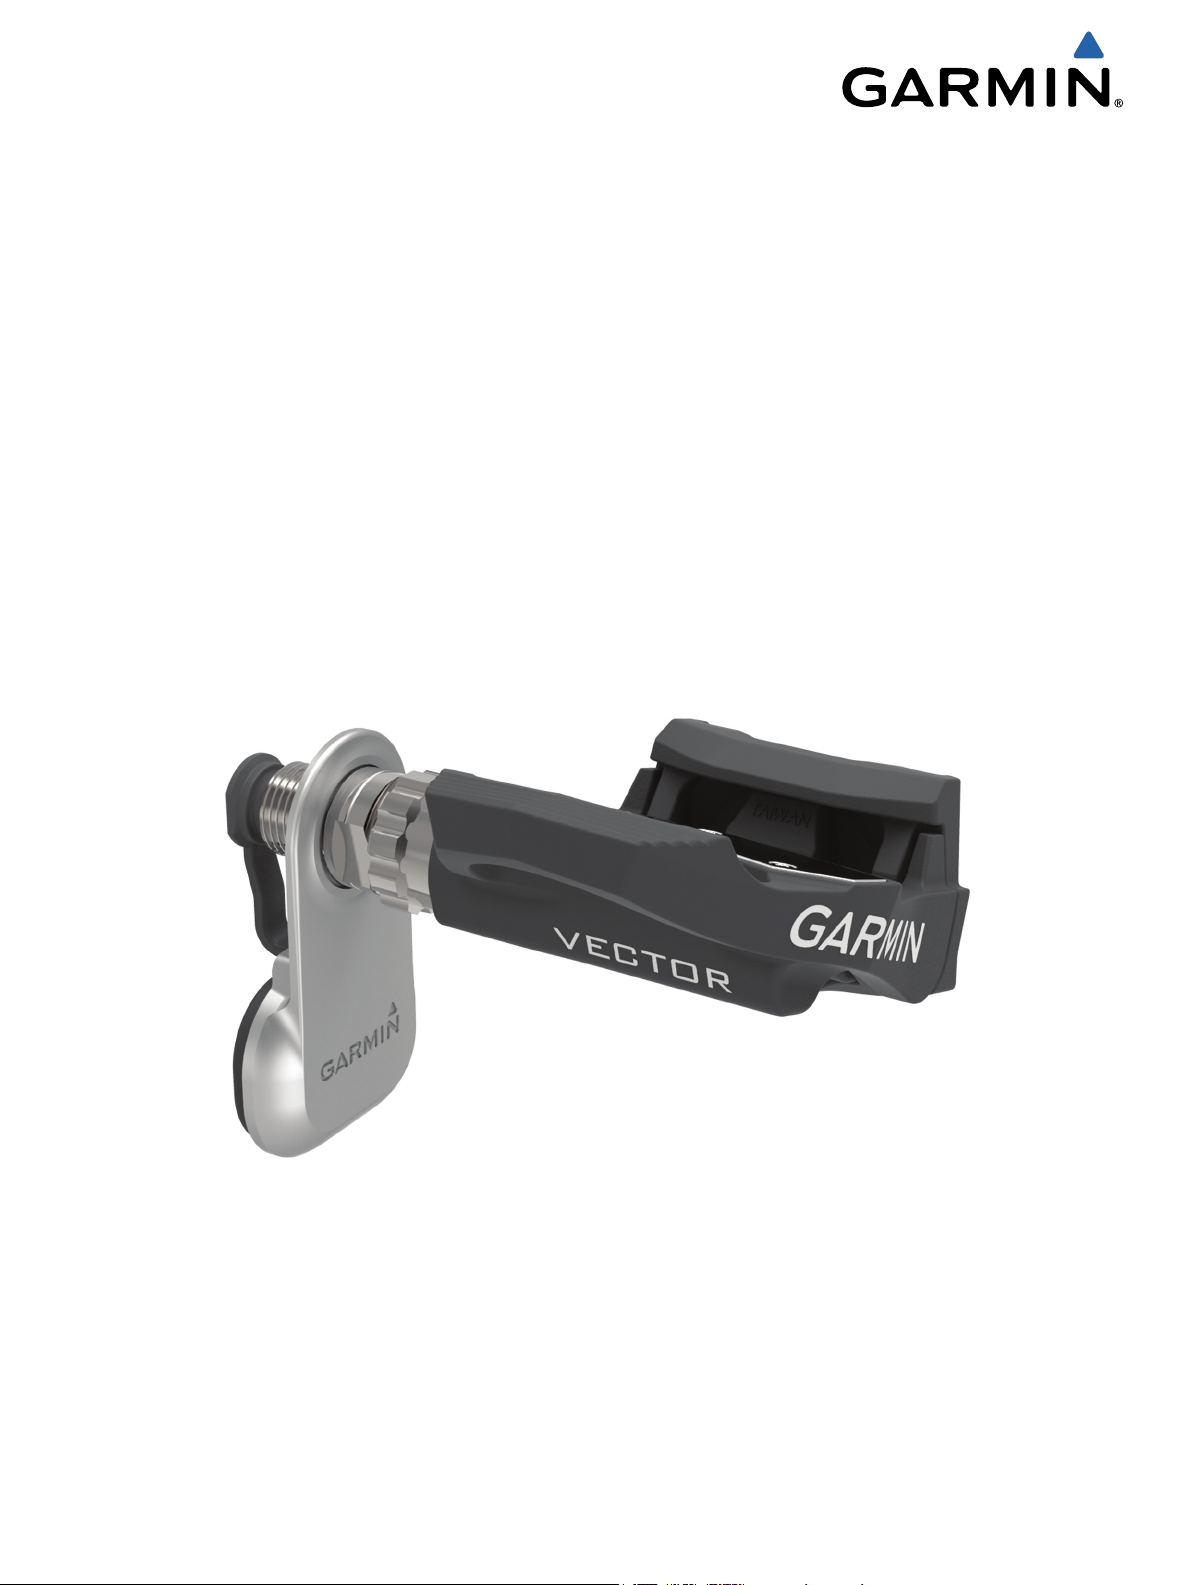
NOTE: Always replace both batteries at the same time.
Locate the circular battery cover À on the back of the pedal
1
pod.
Use a coin Á to twist the cover counter-clockwise, moving
2
the arrow from the locked  to unlocked Ã.
Remove the cover.
3
You can use a piece of tape Ä or a magnet to remove the
battery from the cover.
Vector Specifications
Battery type User-replaceable CR2032, 3 volts
Battery life Minimum 175 hours of riding time
NOTE: The pedal pod used on the right crank will
drain the battery faster than the left crank.
Operating
temperature range
Water resistance IPX7
Radio frequency/
protocol
From -4° to 122°F (from -20° to 50°C)
NOTICE
Do not submerge or pressure wash the
components.
2.4 GHz ANT+ wireless communications protocol
USB ANT Stick™ Specifications
Power source USB
Operating temperature
range
Radio frequency/protocol 2.4 GHz ANT+ wireless communications
Transmission range Approximately 16.4 ft. (5 m)
From 14° to 122°F (from -10° to 50°C)
protocol
Battery Information
Vector monitors the battery level of both pedal pods and sends
status information to your Edge device. When you receive a low
battery warning, you have approximately 10–20 hours of
operation time remaining.
Replacing the Pedal Pod Battery
WARNING
Do not use a sharp object to remove user-replaceable batteries.
Contact your local waste disposal department to properly
recycle the batteries. Perchlorate Material – special handling
may apply. Go to www.dtsc.ca.gov/hazardouswaste
/perchlorate.
Wait 30 seconds.
4
Insert the new battery into the cover, observing polarity.
5
Replace the cover, making sure the arrow points to
6
unlocked.
Use a coin to twist the cover clockwise back into place,
7
making sure the arrow points to locked.
Wait 10 seconds.
8
After you replace the pedal pod battery, you must set the
installation angle on your Edge (Setting the Installation Angle).
Appendix
Registering Vector
Help us better support you by completing our online registration
today.
• Go to www.garmin.com/vectorowner.
• Keep the original sales receipt, or a photocopy, in a safe
place.
Edge 810 and 510 Device Instructions
Pairing Vector with Your Edge 810 or 510 Device
Bring the Edge device within range (3 m) of the sensor.
1
NOTE: Stay 10 m away from other ANT+ sensors while
pairing.
Turn on the Edge device.
2
From the home screen, select > Bike Profiles.
3
Select a profile.
4
Select .
5
Enable the sensor, and select Search.
6
Rotate the crank arm a few times.
7
Appendix 5
Page 10

When the sensor is paired with your Edge device, the sensor
status is Connected. You can customize a data field to display
Vector data.
Entering the Crank Length
The crank length is often printed on the crank arm.
Rotate the pedals a few times in order to activate Vector.
1
From the home screen, select > Bike Profiles.
2
Select a profile.
3
Select Crank Length > Manual.
4
Enter the crank length, and select .
5
Performing a Static Zero Calibration
NOTE: During this task, the bike must be in an upright position,
and nothing can be touching the pedals.
From the home screen, select > Bike Profiles.
1
Select a profile.
2
Select > Calibrate.
3
When the zero reference is determined, a message appears
on the Edge device.
Edge 800 Device Instructions
Pairing Vector with the Edge 800 Device
Bring the Edge device within range (3 m) of the sensor.
1
NOTE: Stay 10 m away from other ANT+ sensors while
pairing.
Turn on the Edge device.
2
Select MENU > > Bike Settings > Bike Profiles.
3
Select a bike.
4
Select ANT + Power > Power Meter > Yes.
5
Rotate the crank arm a few times.
6
Select .
7
When the sensor is paired with your Edge device, a message
appears, and appears solid on the status page. You can
customize a data field to display Vector data.
Calibrating Vector with the Edge 800 Device
Enter the crank length (Entering the Crank Length).
1
Set the install angle of the sensors inside the pedals (Setting
2
the Installation Angle).
Calibrate the static zero reference (Performing a Static Zero
3
Calibration).
Calibrate Vector before each ride (Calibrating Vector Before
4
Each Ride).
Entering the Crank Length
The crank length is often printed on the crank arm.
Rotate the pedals a few times in order to activate Vector.
1
Select MENU > > Bike Settings > Bike Profiles.
2
Select a profile.
3
Select Bike Details > Crank Length > Custom.
4
Enter the crank length, and select .
5
Performing a Static Zero Calibration
NOTE: During this task, the bike must be in an upright position,
and nothing can be touching the pedals.
Select MENU > > Bike Settings > Bike Profiles.
1
Select a profile.
2
Select ANT + Power > Calibrate.
3
When the zero reference is determined, a message appears
on the Edge device.
Edge 500 Device Instructions
Pairing Vector with the Edge 500 Device
Bring the Edge device within range (3 m) of the sensor.
1
NOTE: Stay 10 m away from other ANT+ sensors while
pairing.
Turn on the Edge device.
2
Hold MENU.
3
Select Settings > Bike Settings.
4
Select a bike.
5
Select ANT + Power.
6
Enable the sensor, and select Search.
7
Rotate the crank arm a few times.
8
When the sensor is paired with your Edge device, a message
appears, and appears solid on the main menu. You can
customize a data field to display Vector data.
Calibrating Vector with the Edge 500 Device
Enter the crank length (Entering the Crank Length).
1
Set the install angle of the sensors inside the pedals (Setting
2
the Installation Angle).
Calibrate the static zero reference (Performing a Static Zero
3
Calibration).
Calibrate Vector before each ride (Calibrating Vector Before
4
Each Ride).
Entering the Crank Length
The crank length is often printed on the crank arm.
Rotate the pedals a few times in order to activate Vector.
1
Hold MENU.
2
Select Settings > Bike Settings.
3
Select a bike.
4
Select Bike Details > More > Crank Length > Manual.
5
Enter the crank length.
6
Performing a Static Zero Calibration
NOTE: During this task, the bike must be in an upright position,
and nothing can be touching the pedals.
Hold MENU.
1
Select Settings > Bike Settings.
2
Select a bike.
3
Select ANT + Power > Calibrate.
4
When the zero reference is determined, a message appears
on the Edge device.
Customizing the Data Fields
This procedure contains instructions for the Edge 500 device.
Hold MENU.
1
Select Settings > Bike Settings > Data Fields.
2
Select a page.
3
Select the number of data fields to appear on the page.
4
Select a data field.
5
Power Data Fields
NOTE: This list contains power data fields for the Edge 1000
device. If you have another compatible device, see your device
owner's manual.
NOTE: Data fields that display pedal smoothness, torque
effectiveness, and balance data are not supported by the Vector
S system.
Balance: The current left/right power balance.
6 Appendix
Page 11

Balance - 10s Avg.: The 10-second moving average of the left/
right power balance.
Balance - 30s Avg.: The 30-second moving average of the left/
right power balance.
Balance - 3s Avg.: The three-second moving average of the
left/right power balance.
Balance - Avg.: The average left/right power balance for the
current activity.
Balance - Lap: The average left/right power balance for the
current lap.
Cadence: The number of revolutions of the crank arm or
number of strides per minute. Your device must be
connected to a cadence accessory for this data to appear.
Cadence - Avg.: The average cadence for the current activity.
Cadence - Lap: The average cadence for the current lap.
Pedal Smoothness: The measurement of how evenly a rider is
applying force to the pedals throughout each pedal stroke.
Power: The current power output in watts.
Power - %FTP: The current power output as a percentage of
functional threshold power.
Power - 10s Avg.: The 10-second moving average of power
output.
Power - 30s Avg.: The 30-second moving average of power
output.
Power - 3s Avg.: The three-second moving average of power
output.
Power - Avg.: The average power output for the current activity.
Power - IF: The Intensity Factor™ for the current activity.
Power - kJ: The accumulated work performed (power output) in
kilojoules.
Power - Lap: The average power output for the current lap.
Power - Lap Max.: The top power output for the current lap.
Power - Last Lap: The average power output for the last
completed lap.
Power - Max.: The top power output for the current activity.
Power - NP: The Normalized Power™ for the current activity.
Power - NP Lap: The average Normalized Power for the
current lap.
Power - NP Last Lap: The average Normalized Power for the
last completed lap.
Power - TSS: The Training Stress Score™ for the current
activity.
Power - watts/kg: The amount of power output in watts per
kilogram.
Power Zone: The current range of power output (1 to 7) based
on your FTP or custom settings.
Torque Effectiveness: The measurement of how efficiently a
rider is pedaling.
Troubleshooting
Tips for Using Vector Updater
If Vector Updater is not functioning properly, you can try these
tips.
• Insert the USB ANT Stick directly into a USB port on your
computer. USB hubs are not recommended.
• If you are also running the ANT Agent™ application on your
computer, you can either insert another USB ANT Stick or
close the ANT Agent application.
• If Vector Updater cannot find your device after more than two
minutes, remove the batteries from each pedal pod, wait 20
seconds, and replace the batteries.
If Vector Updater still cannot find your device, you should
install new batteries into each pedal pod.
Performing a Static Torque Test
NOTICE
The static torque test is intended for advanced cyclists and
installation experts. This test is not required under normal
circumstances to achieve good results with the Vector system.
This test is available for the Edge 1000, 810, and 510 devices.
Garmin recommends performing the static torque test a
minimum of three times and averaging the reported torque
values.
Go to www.garmin.com/vectorowner, and click on the FAQs
link for detailed instructions.
Following repeated static torque tests, if the reported torque
value is consistently different than the expected value, you can
enter a scale factor for one or both pedals. The scale factor is
stored in the pedal and adjusts the power value that is
calculated on the pedal. The scale factor is sent to the Edge
device and stored on Edge device.
Upgrading Vector S to a Dual Sensor System
You can upgrade your Vector S system to a dual sensor
system.
Go to http://buy.garmin.com, or contact your Garmin dealer
1
to purchase the upgrade pedal.
Remove the existing right pedal.
2
Determine the bicycle chain clearance (Determining the
3
Bicycle Chain Clearance).
Install the Vector components for the right pedal and pedal
4
pod (Installing the Pedal Pod and Pedal).
Pair the Vector system with your Edge device (Paring Vector
5
with Your Edge 1000).
Follow the setup and calibrations instructions for your device
6
(Your First Ride).
Check for software updates (Updating the Software Using
7
Vector Updater).
Third-Party Devices
For a list of devices that are compatible with Vector, go to
www.garmin.com/vectorowner.
Updating the Software Using Vector Updater
Before you can run the Vector Updater application, you must
have a USB ANT Stick (included), an internet connection, and
the pedal pods must have functioning batteries installed.
Go to www.garmin.com/vectorowner, and download the
1
Vector Updater application.
Bring Vector within range (3 m) of your computer.
2
Open the Vector Updater application, and follow the on-
3
screen instructions.
Appendix 7
Page 12

Index
B
battery
life 5
replacing 5
type 5
C
calibrating 3, 6
cleaning the device 4
cleats 2
compatibility 7
customizing the device 3, 6
D
data
storing 3
transferring 3
data fields 3, 6
E
Edge 2, 5, 6
G
Garmin Connect 3
H
history 3
sending to computer 3
I
installing 1, 2
M
memory 3
P
pairing 2, 5, 6
pedal pods 1, 2, 4, 5
pedals 1–4
power 3
product registration 5
R
registering the device 5
replacement parts 4
S
software, updating 7
specifications 5
storing data 3
storing the device 4, 5
T
tools 1
training 3
troubleshooting 7
U
updates, software 7
USB, disconnecting 4
USB ANT Stick 5, 7
W
water resistance 5
8 Index
Page 13

Page 14

www.garmin.com/support
TA-2013/403
+43 (0) 820 220230 + 32 2 672 52 54
0800 770 4960 1-866-429-9296
+385 1 5508 272
+385 1 5508 271
+ 45 4810 5050 + 358 9 6937 9758
+ 331 55 69 33 99 + 39 02 36 699699
(+52) 001-855-792-7671 0800 0233937
+47 815 69 555
(+35) 1214 447 460 +386 4 27 92 500
0861 GARMIN (427 646)
+27 (0)11 251 9999
+ 46 7744 52020 +886 2 2642-9199 ext 2
+420 221 985466
+420 221 985465
00800 4412 454
+44 2380 662 915
+34 93 275 44 97
0808 238 0000
+44 (0) 870 8501242
913-397-8200
1-800-800-1020
+49 (0)180 6 427646
20 ct./Anruf. a. d.
deutschen Festnetz,
Mobilfunk max. 60 ct./Anruf
© 2013 Garmin Ltd. or its subsidiaries
 Loading...