

Page 1
Running Dynamics Pod
Installation Instructions......................................................... 3
Instructions d'installation.......................................................6
Istruzioni di installazione....................................................... 8
Installationsanweisungen....................................................10
Instrucciones de instalación................................................12
Instruções de instalação..................................................... 14
Installatie-instructies........................................................... 16
Installationsvejledning.........................................................18
Asennusohjeet.................................................................... 20
Installeringsinstruksjoner.................................................... 22
Installationsinstruktioner..................................................... 24
Instrukcja instalacji..............................................................26
Pokyny pro instalaci............................................................ 28
Navodila za namestitev.......................................................30
Upute za instalaciju.............................................................32
January 2017 190-02152-91_0APrinted in Taiwan
Page 2

© 2017 Garmin Ltd. or its subsidiaries
All rights reserved. Under the copyright laws, this manual may not be copied, in whole or in part, without the written consent of Garmin. Garmin reserves the right to change or improve its products and
to make changes in the content of this manual without obligation to notify any person or organization of such changes or improvements. Go to www.garmin.com for current updates and supplemental
information concerning the use of this product.
Garmin®, the Garmin logo, Forerunner®, and ANT+® are trademarks of Garmin Ltd. or its subsidiaries, registered in the USA and other countries. These trademarks may not be used without the express
permission of Garmin.
This product is ANT+® certified. Visi
M/N: RDP
El número de registro COFETEL/IFETEL puede ser revisado en el manual a través de la siguiente página de internet.
t www.thisisant.com/directory for a list of compatible products and apps.
Page 3
RUNNING DYNAMICS POD
Installation Instructions
Introduction
WARNING
See the Important Safety and Product Information guide in the
product box for product warnings and other important
information.
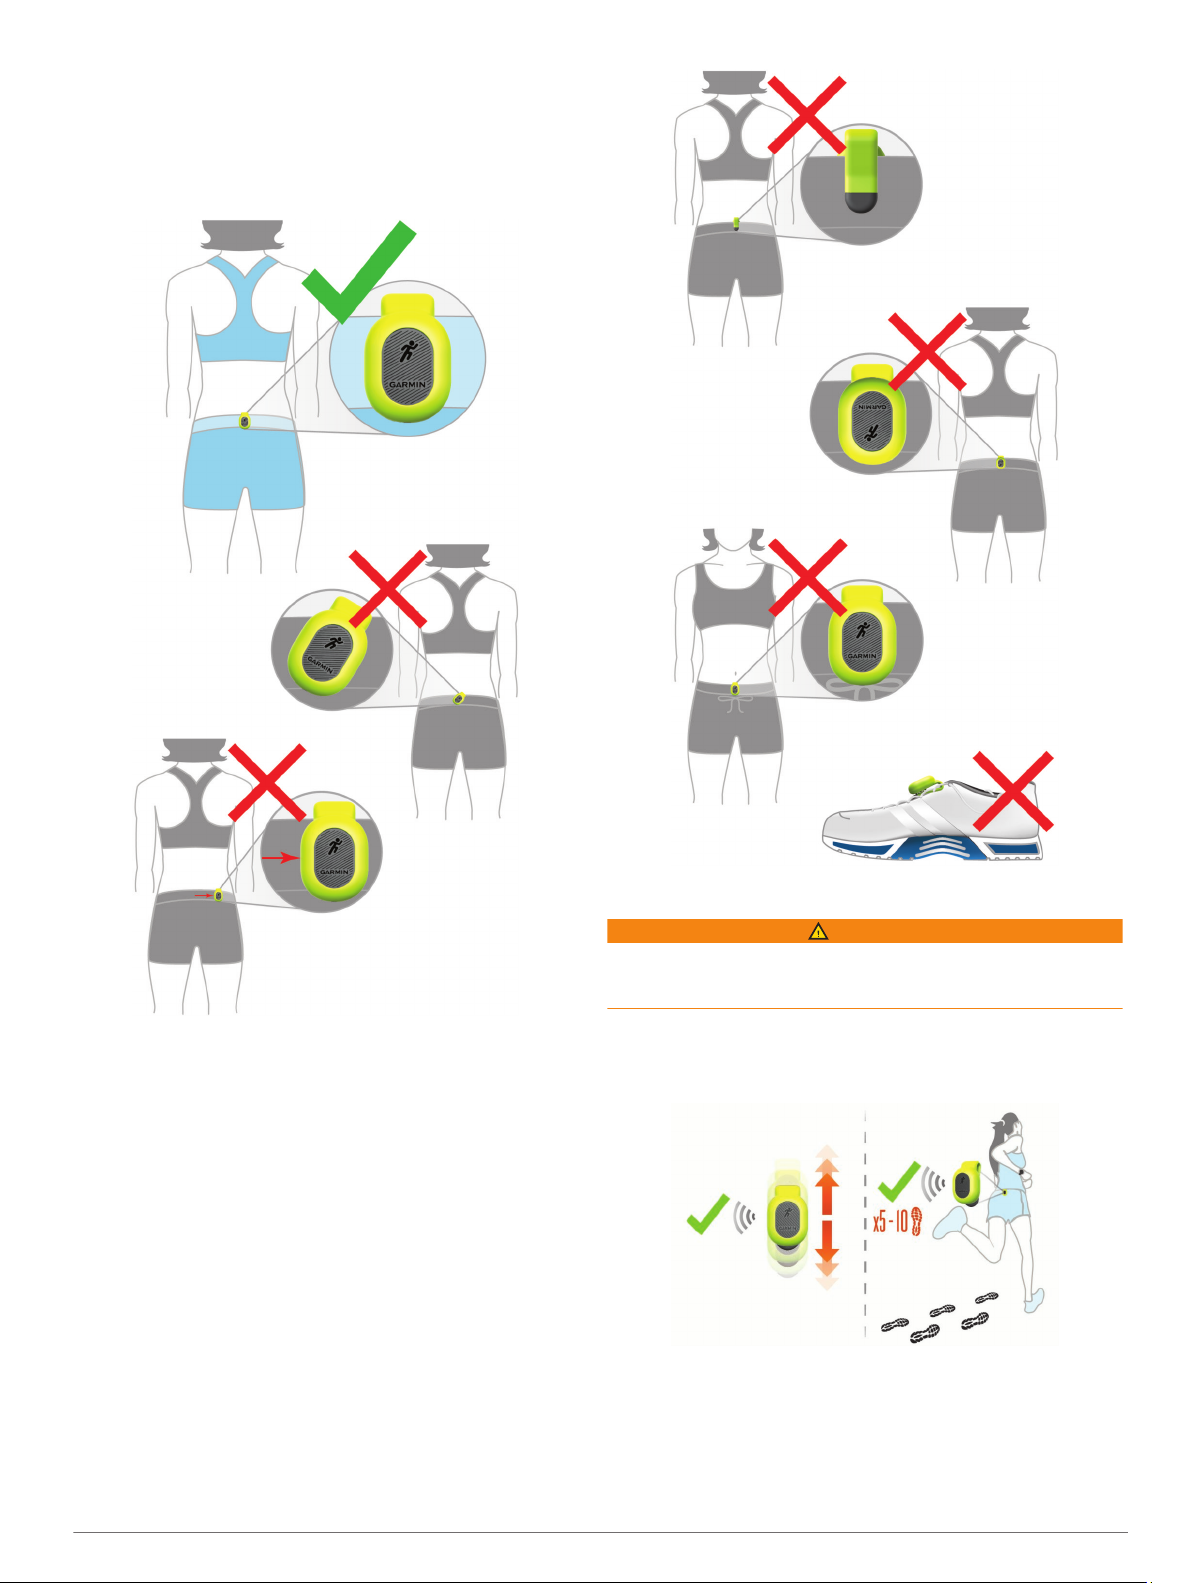
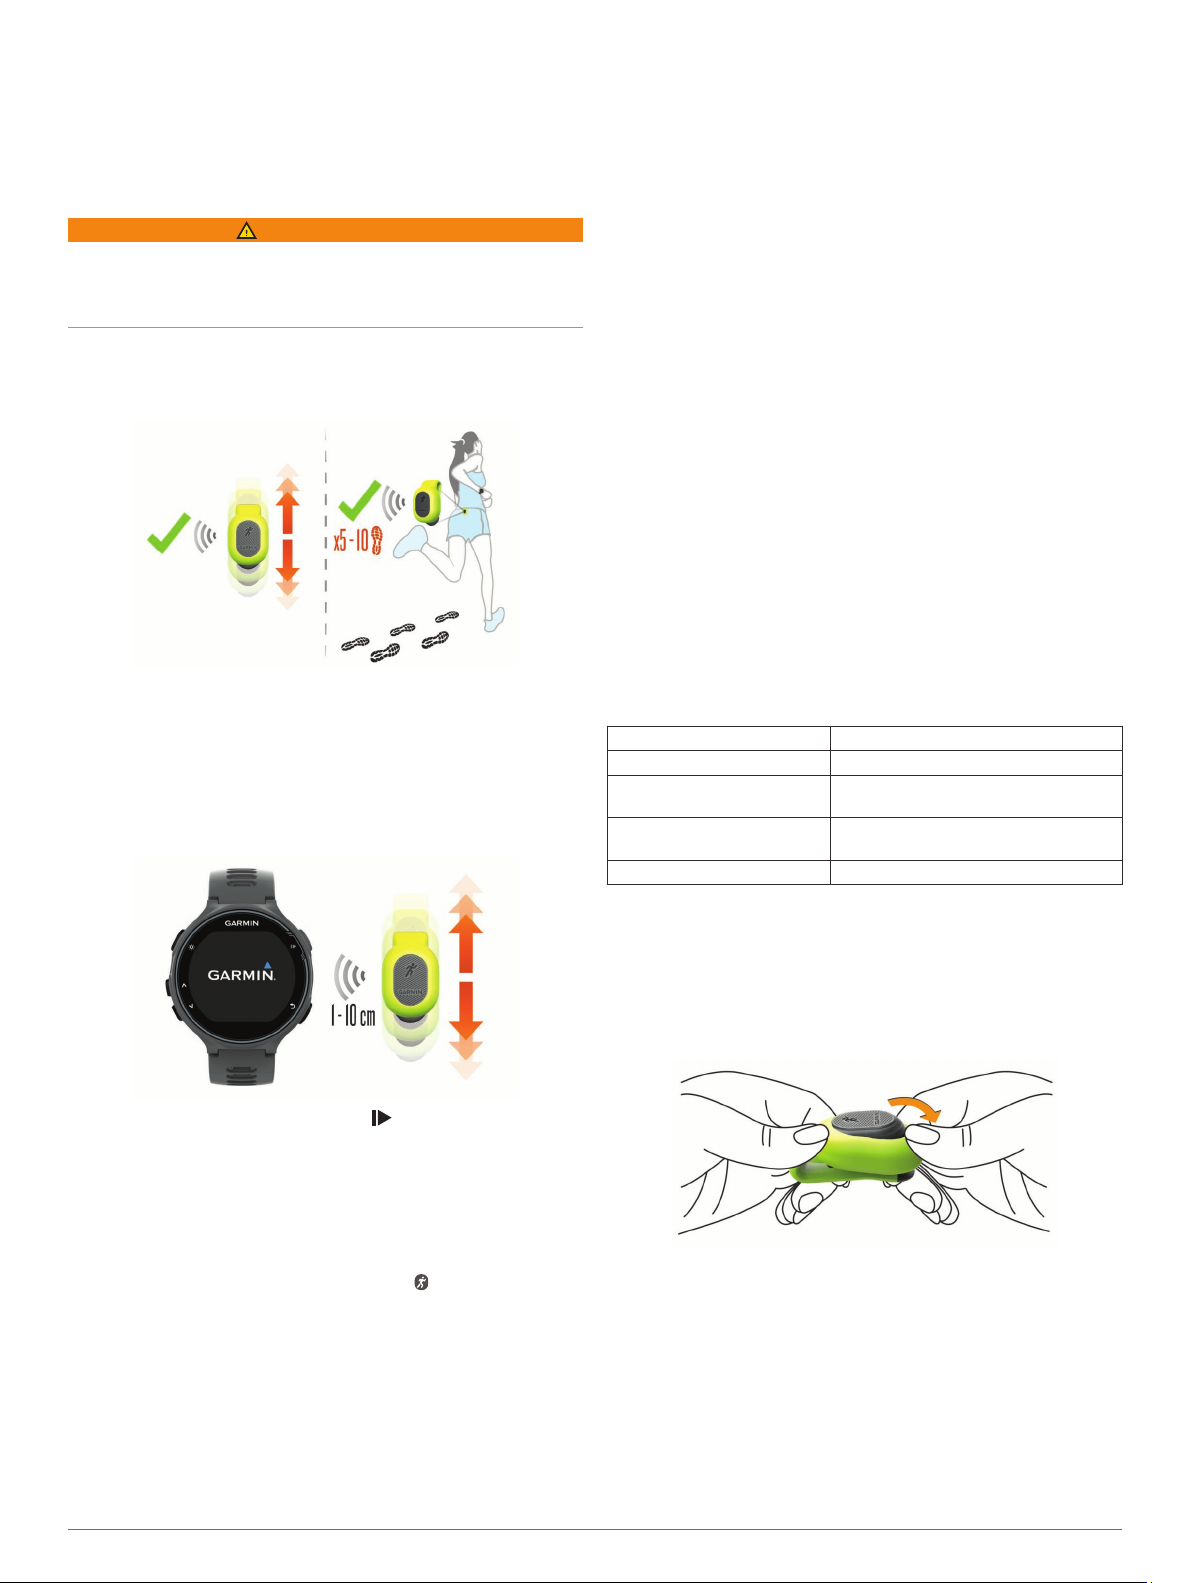
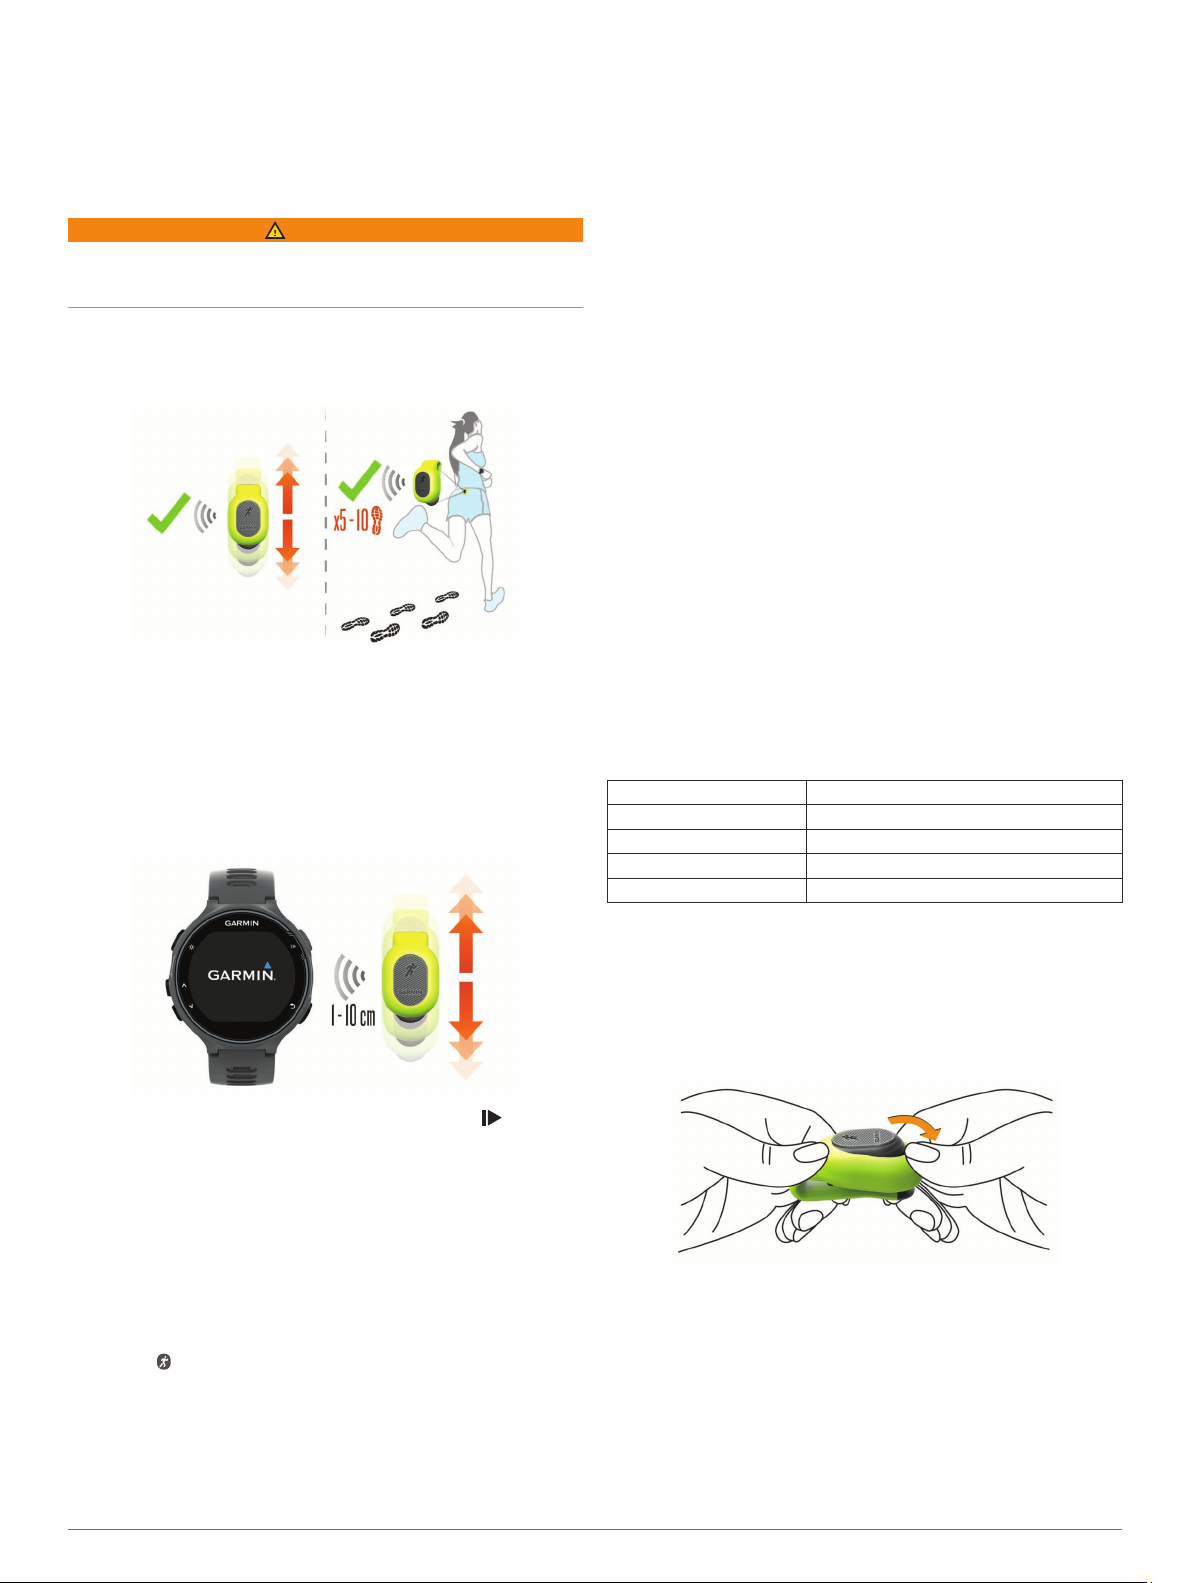
Waking Up the Pod
Wake up the pod by shaking it vertically or running a few
steps.
Pairing the Pod with Your Compatible Device
Pairing is the connecting of ANT+® wireless sensors with a
compatible device. This procedure contains instructions for the
Forerunner® 735XT. If you have another compatible device, see
your owner's manual.
Wake up the pod.
1
Installation Instructions 3
Page 4
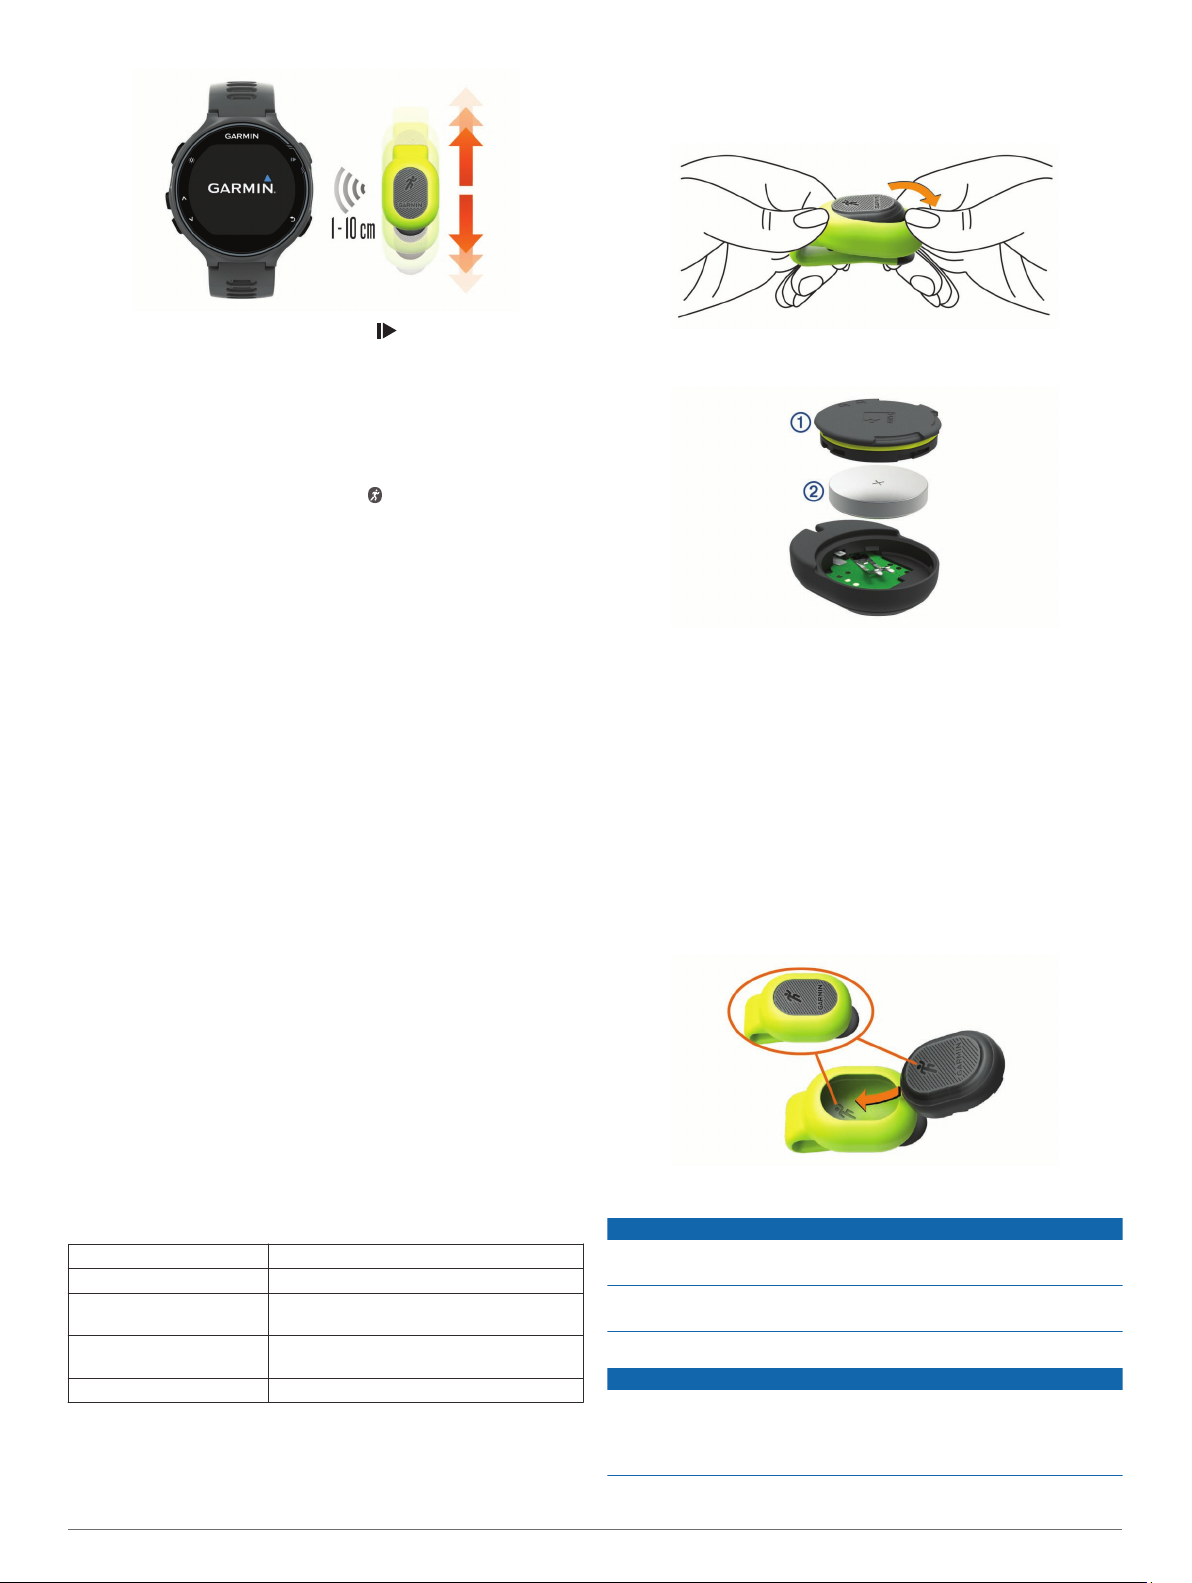
From the Forerunner device, select , and select a run
2
profile.
Bring the devices close to each other.
3
Wait while the device connects to the pod.
4
If necessary, you can select Menu > Settings > Sensors
and Accessories > Add New
manage ANT+
A message appears. In run mode,
connected.
After the initial pairing, the device automatically connects to the
pod when you go for a run and the pod is active and within
range.
wireless sensors.
> Search All
to pair and
indicates that the pod is
Running Dynamics
You can use the pod with your compatible device to provide
real-time feedback about your running form. The pod has an
accelerometer that measures torso movement in order to
calculate six running metrics.
NOTE: The running dynamics features are available on only
some
Cadence
displays the total steps (right and left combined).
Vertical oscillation: Vertical oscillation is your bounce while
running. It displays the vertical motion of your torso,
measured in centimeters for each step.
Ground contact time: Ground contact time is the amount of
time in each step that you spend on the ground while
running. It is measured in milliseconds.
NOTE:
while walking.
Ground contact time balance: Ground contact time balance
displays the left/right balance of your ground contact time
while running. It displays a percentage. For example, 53.2
with an arrow pointing left or right.
Stride length: Stride length is the length of your stride from one
footfall to the next. It is measured in meters.
Vertical ratio
stride length. It displays a percentage. A lower number
typically indicates better running form.
®
Garmin
devices.
: Cadence is the number of steps per minute. It
Ground contact time and balance are not available
: Vertical ratio is the ratio of vertical oscillation to
Specifications
Battery type User-replaceable CR1632
Battery life 1 yr. (approximately 1 hr./day)
Operating temperature
range
Radio frequency/protocol 2.4 GHz
Water rating 1 ATM*
The device withstands pressure equivalent to a depth of 10 m.
*
For more information, go to
From -10° to 50°C (from 14° to 122°F)
ANT+ wireless communications
protocol
www.garmin.com/waterrating.
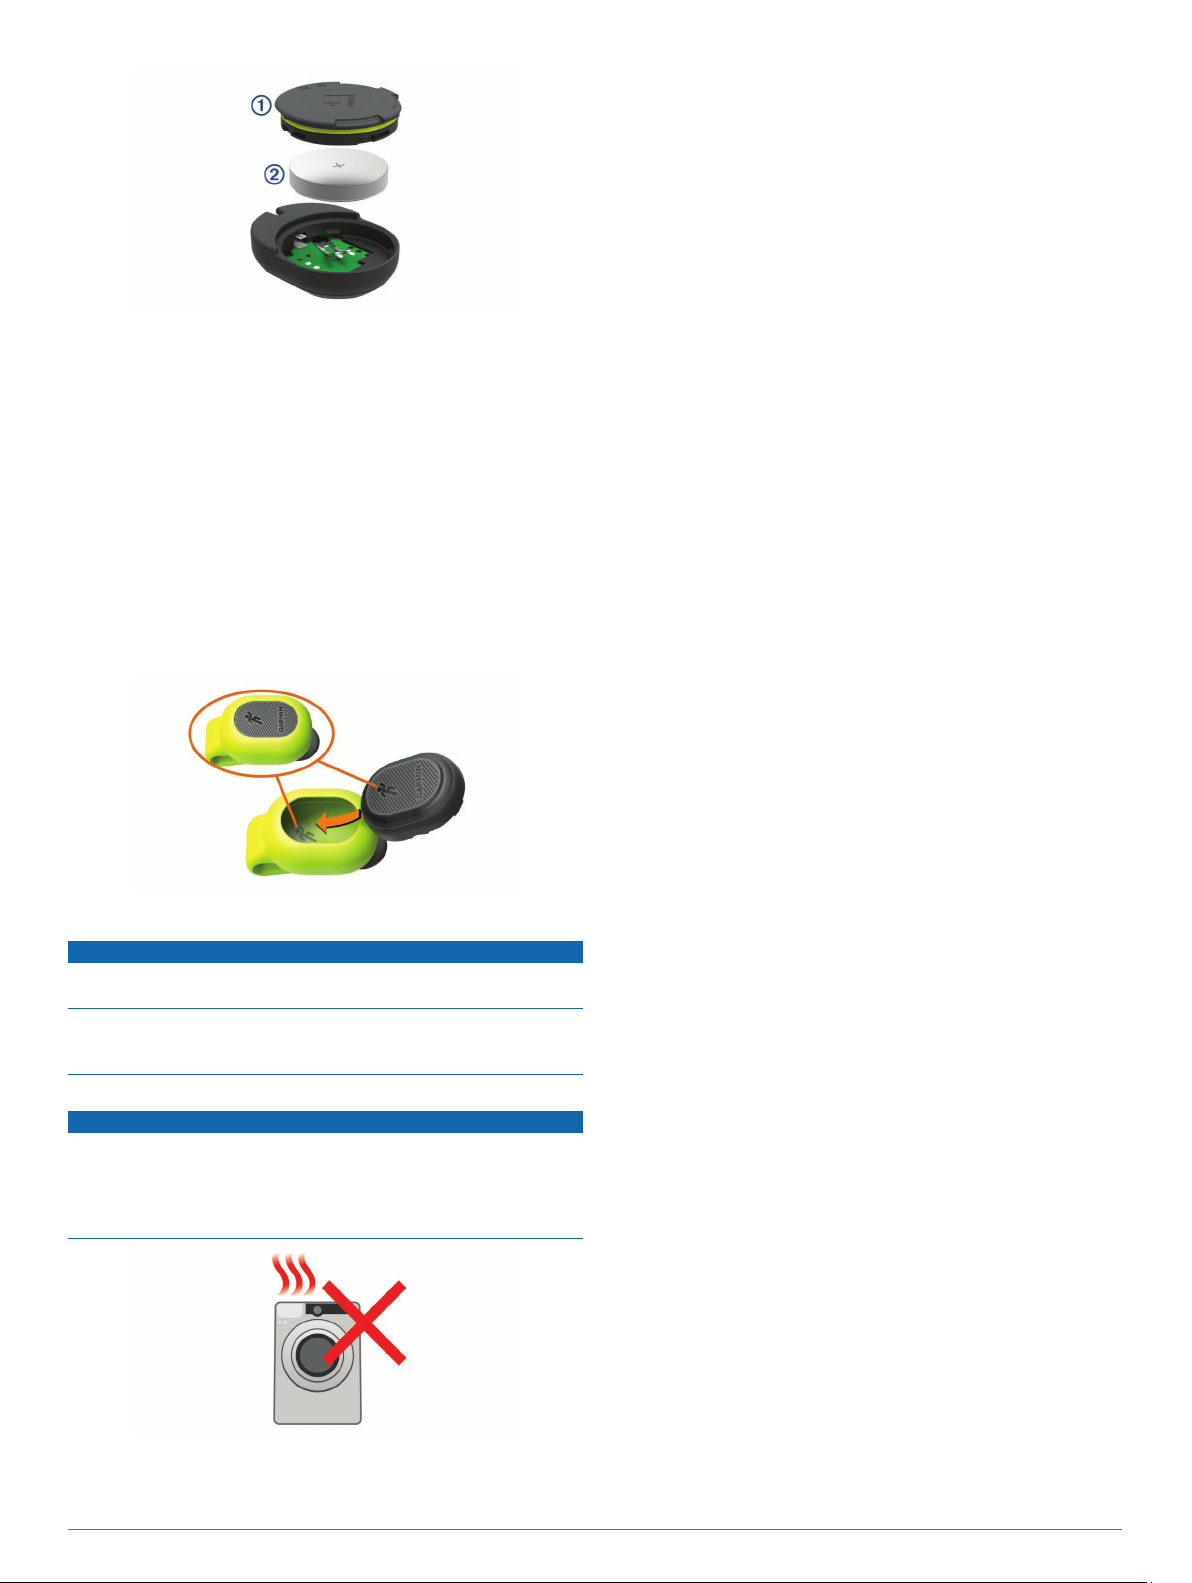
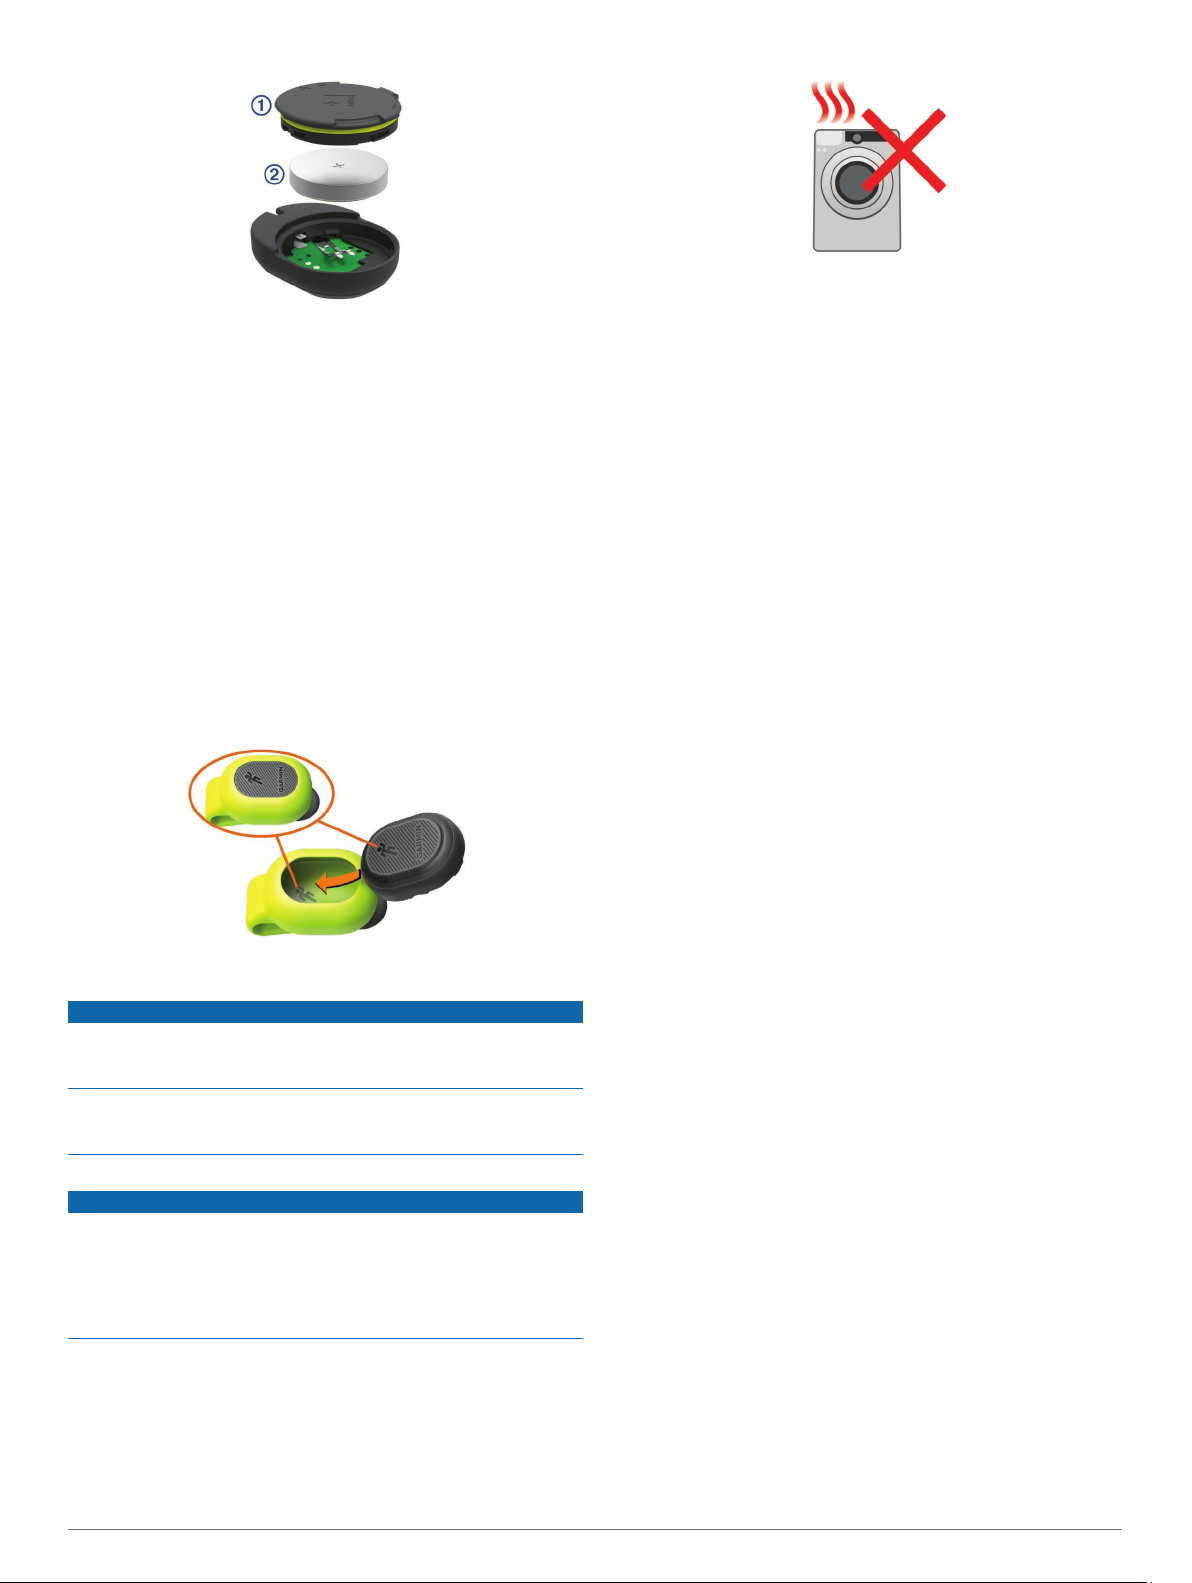
Replacing the Battery
Remove the pod from the flexible silicone clip by stretching
1
the material around the pod.
On the back of the pod, twist the cover À counter-clockwise
2
to unlock it.
Remove the cover and the battery Á.
3
You can use a piece of tape or a magnet to remove the
TIP:
battery from the cover.
Wait 30 seconds.
4
Insert the new battery into the cover, observing polarity.
5
NOTE: Do not damage or lose the O-ring gasket.
Replace the cover, and rotate clockwise to lock it.
6
NOTE:
should not be visible when the cover is locked.
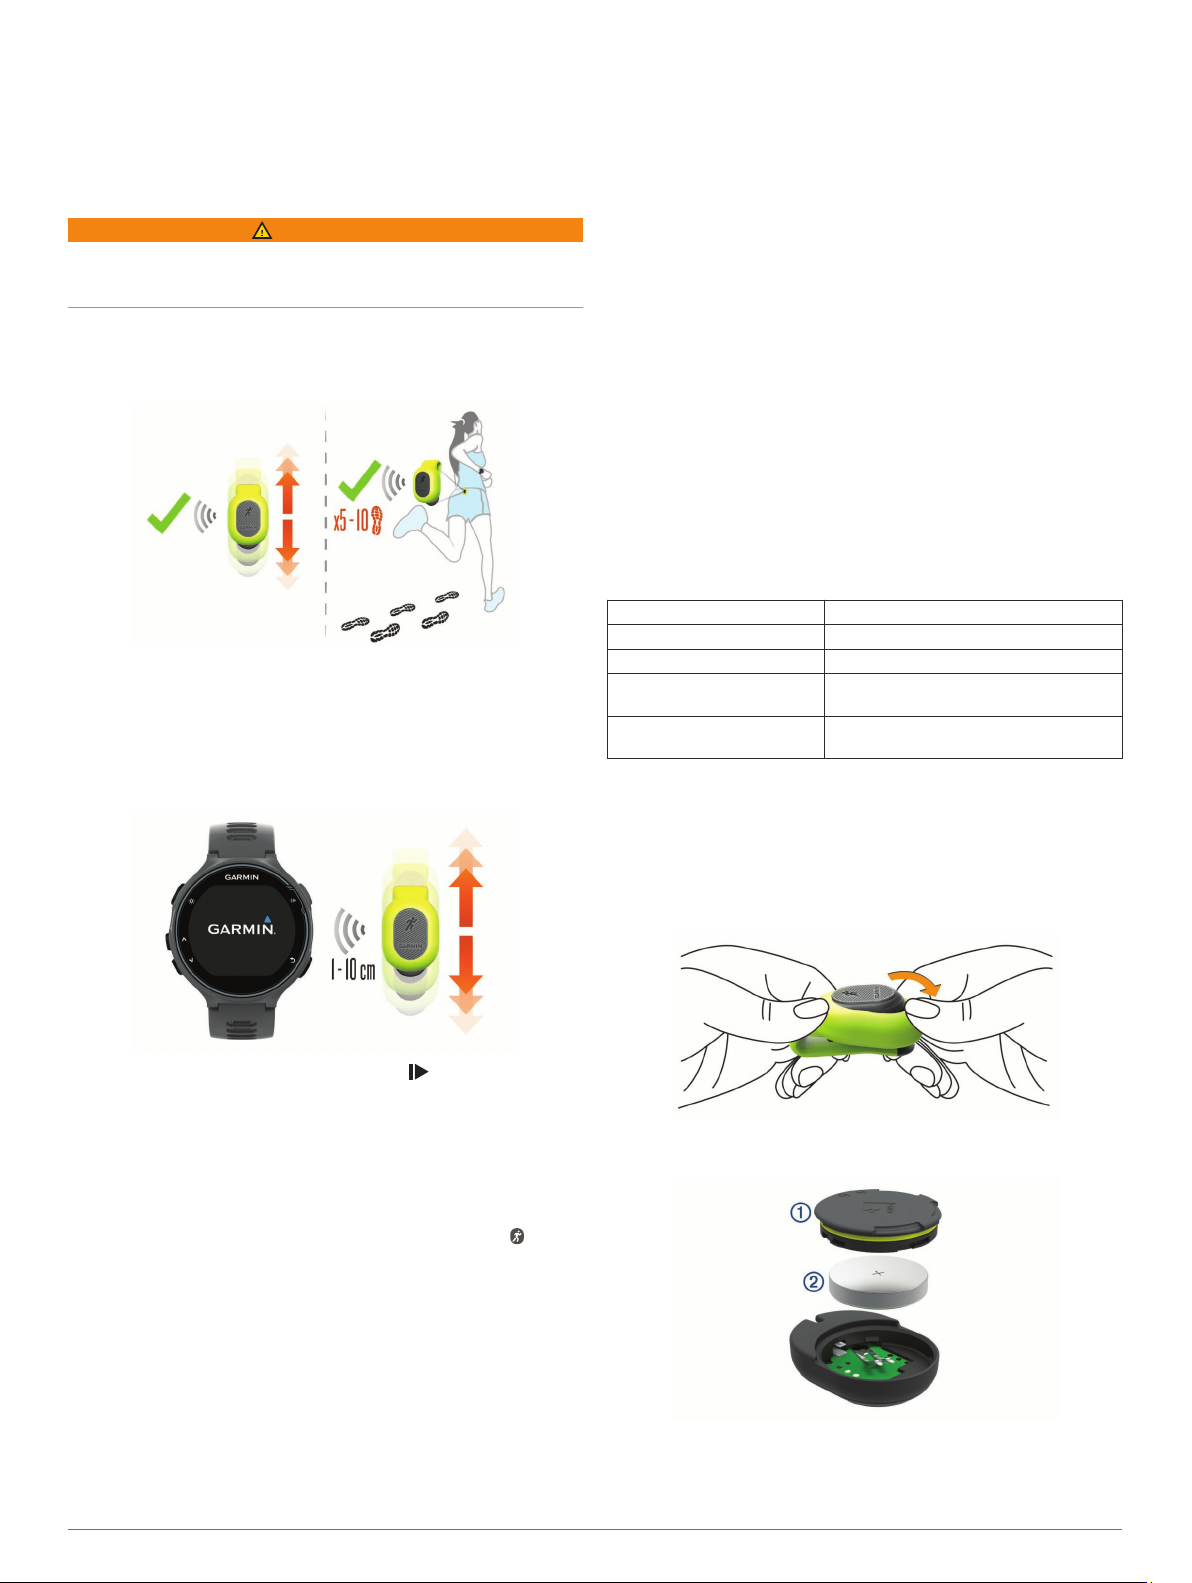
Insert the pod into the flexible silicone clip by stretching the
7
material around the pod.
The running icon on the pod must be aligned with the running
icon inside the clip.
Do not pinch the O-ring gasket. The O-ring gasket
Device Care
NOTICE
Avoid extreme shock and harsh treatment, because it can
degrade the life of the product.
Avoid chemical cleaners, solvents, and insect repellents that can
damage plastic components and finishes.
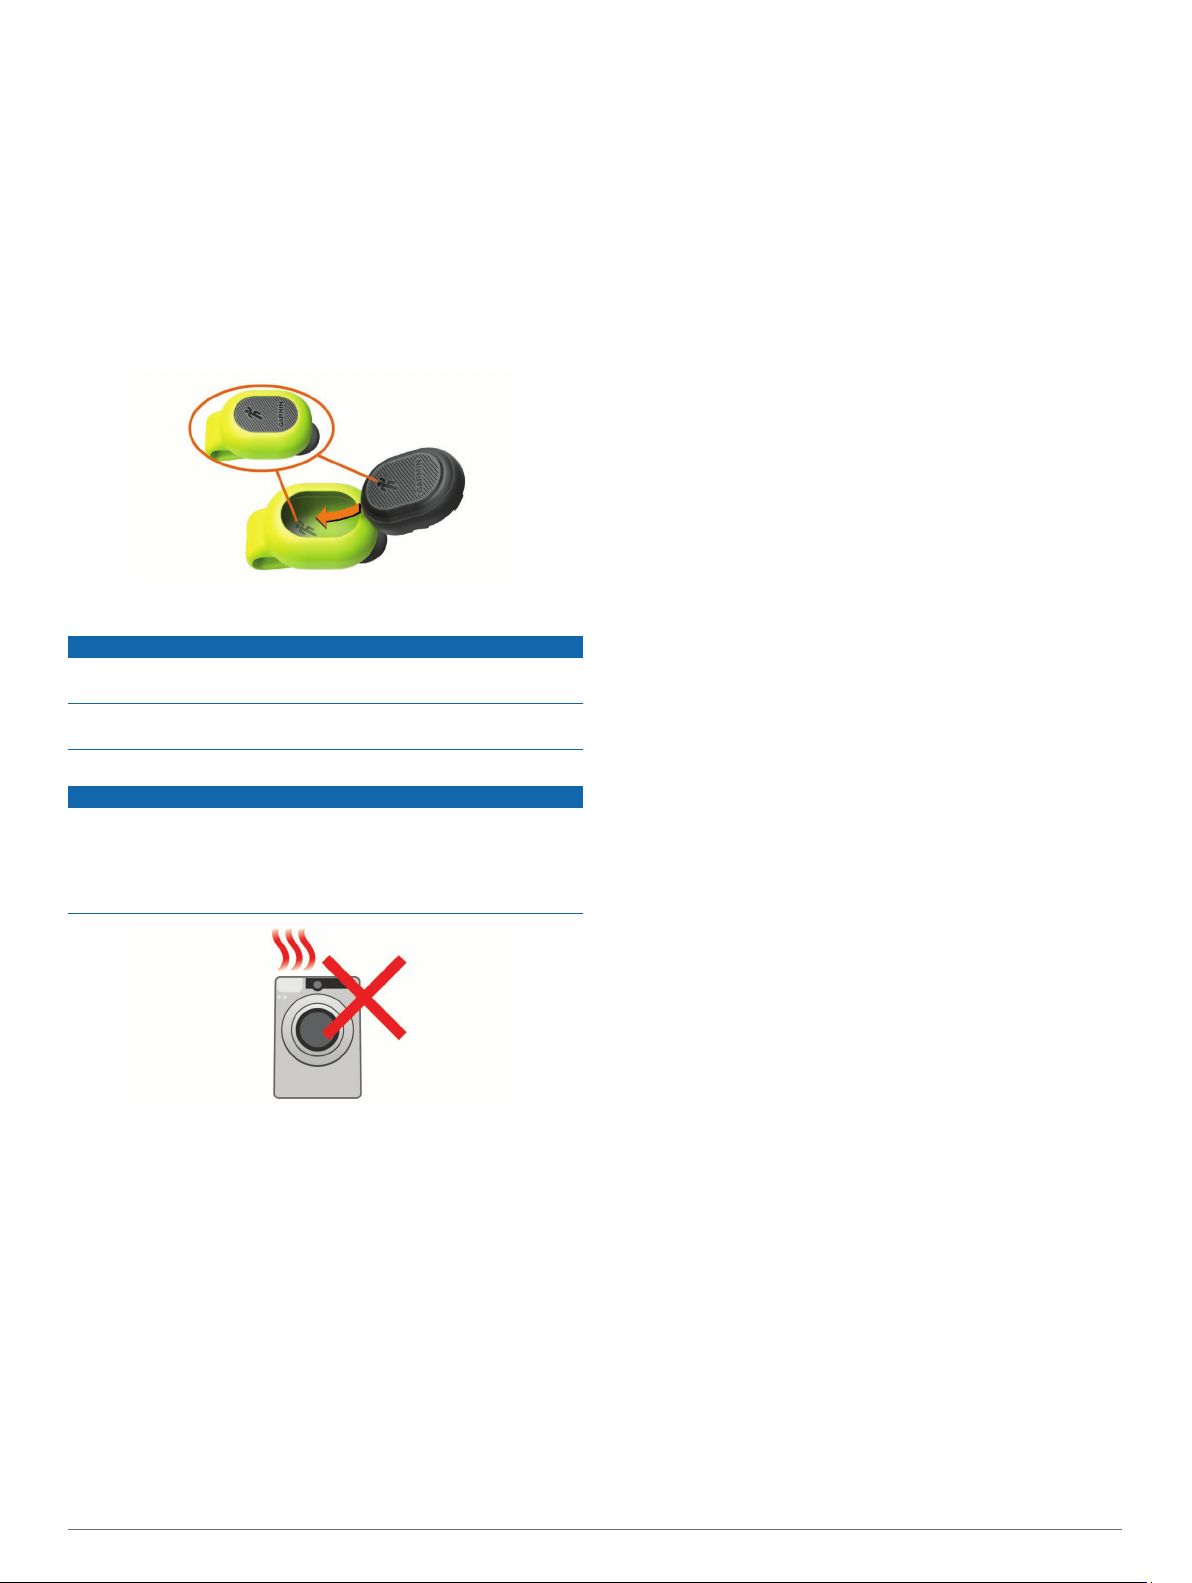
Cleaning the Device
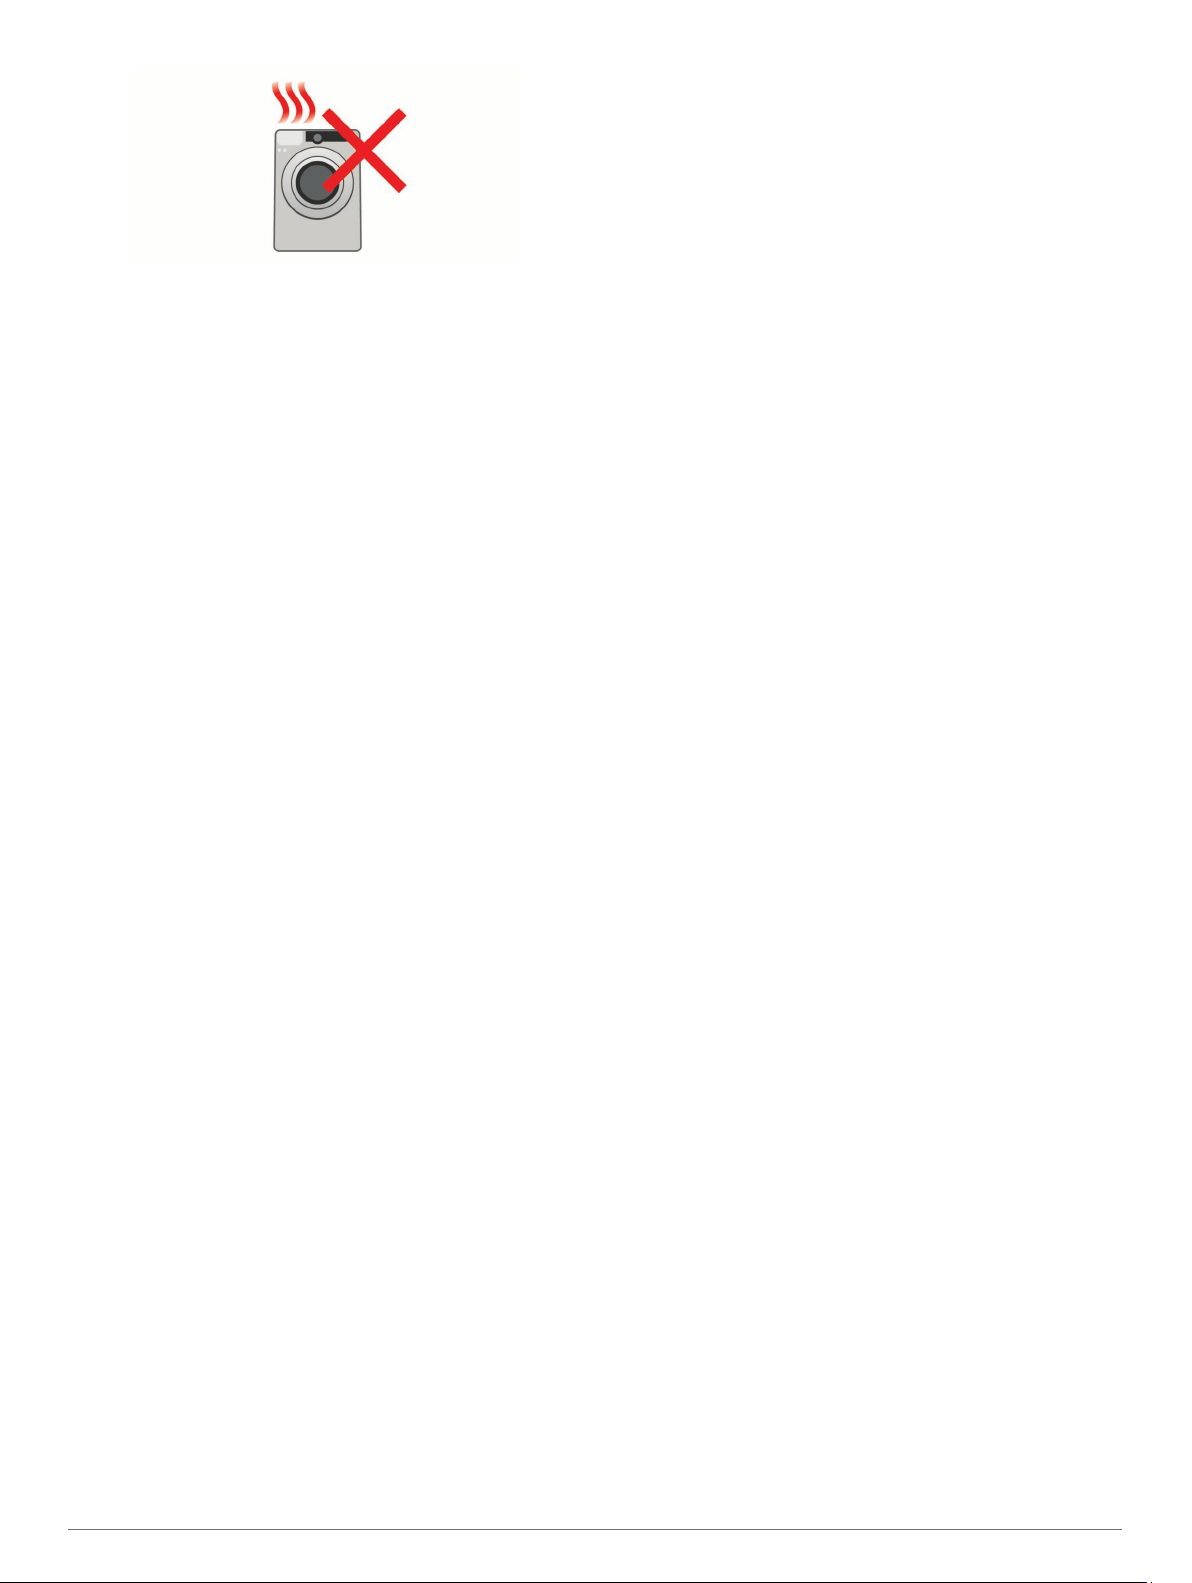
NOTICE
Avoid washing the pod in the washing machine. The pod is
designed to withstand occasional, accidental machine washing
at a medium or cool temperature. Frequent machine washing,
hot washing temperatures, or the dryer may damage the pod.
4 Installation Instructions
Page 5
Wipe the device using a cloth dampened with a mild
1
detergent solution.
Wipe it dry.
2
Installation Instructions 5
Page 6
RUNNING DYNAMICS POD
Instructions d'installation
Introduction
AVERTISSEMENT
Consultez le guide Informations importantes sur le produit et la
sécurité inclus dans l'emballage du produit pour prendre
connaissance des avertissements et autres informations sur le
produit.
Allumage du boîtier
Activez le boîtier en le secouant à la verticale ou en courant
quelques mètres.
REMARQUE : les fonctions de dynamiques de course sont
uniquement disponibles sur certains appareils Garmin.
Cadence : la cadence correspond au nombre de pas par
minute. Elle indique le nombre total de pas (pied gauche et
pied droit regroupés).
Oscillation verticale : l'oscillation verticale correspond au
rebond lorsque vous courez. Elle montre le mouvement
vertical de votre buste, exprimé en centimètres pour chaque
pas.
Temps de contact au sol : le temps de contact au sol
correspond au temps passé le pied posé au sol à chaque pas
lors de votre course à pied. Il est exprimé en millisecondes.
REMARQUE : le temps de contact avec le sol et l'équilibre
au temps de contact au sol ne sont pas calculés lorsque vous
marchez.
Equilibre du temps de contact au sol : l'équilibre du temps de
contact au sol affiche l'équilibre gauche/droite de votre temps
de contact au sol lorsque vous courez. Il s'affiche sous forme
de pourcentage. Par exemple, 53,2 avec une flèche pointant
vers la gauche ou vers la droite.
Longueur de foulée : la longueur de foulée correspond à la
longueur de votre foulée d'un pas à un autre. Elle est
exprimée en mètres.
Rapport vertical : le rapport vertical est le ratio de votre
oscillation verticale par rapport à votre longueur de foulée. Il
s'affiche sous forme de pourcentage. Si ce rapport est faible,
cela indique généralement que votre condition physique de
coureur est bonne.
Couplage du boîtier avec votre appareil compatible
Le couplage consiste à connecter des capteurs sans fil ANT+
avec un appareil compatible. Cette procédure contient des
instructions pour la Forerunner 735XT. Si vous disposez d'un
autre appareil compatible, consultez votre manuel d'utilisation.
Allumez le boîtier.
1
Sur votre Forerunner, appuyez sur , puis sélectionnez un
2
profil de course.
Rapprochez les appareils.
3
Patientez pendant que l'appareil se connecte à votre boîtier.
4
Si besoin, vous pouvez sélectionner Menu > Paramètres >
Capteurs et accessoires > Ajouter nouveau > Tout
rechercher pour coupler et gérer des capteurs sans fil ANT+.
Un message s'affiche. En mode course, indique que le
boîtier est connecté.
Une fois ce couplage initial effectué, l'appareil se connecte
automatiquement au boîtier quand vous allez courir et que le
boîtier est actif et à portée.
Caractéristiques techniques
Type de batterie CR1632, remplaçable par l'utilisateur
Autonomie de la batterie 1 an (à raison d'1 h par jour environ)
Plage de températures de
fonctionnement
Fréquences radio/protocole Protocole de communications sans fil
Résistance à l'eau 1 ATM*
*L'appareil résiste à une pression équivalant à 10 m de
profondeur. Pour plus d'informations, rendez-vous sur
www.garmin.com/waterrating.
De -10 à 50 °C (de 14 à 122 °F)
ANT+ à 2,4 GHz
Remplacement de la pile
Retirez le boîtier du clip en silicone souple en étirant le clip
1
autour du boîtier.
Au dos du boîtier, tournez le cache À dans le sens inverse
2
des aiguilles d'une montre pour le déverrouiller.
Dynamiques de course à pied
Vous pouvez utiliser le boîtier avec un appareil compatible pour
recevoir un retour en temps réel sur votre profil de coureur. Le
boîtier intègre un accéléromètre qui mesure les mouvements de
votre torse et calcule six métriques de course.
6 Instructions d'installation
Page 7
Retirez le cache et la pile Á.
3
ASTUCE : vous pouvez utiliser un morceau d'adhésif ou un
aimant pour retirer la pile de son compartiment.
Patientez pendant 30 secondes.
4
Insérez la nouvelle pile en respectant la polarité.
5
REMARQUE : veillez à ne pas endommager ni perdre le joint
torique.
Replacez le cache et tournez-le dans le sens des aiguilles
6
d'une montre pour le verrouiller.
REMARQUE : veillez à ne pas pincer le joint torique. Le joint
torique ne doit pas être visible quand le cache est verrouillé.
Introduisez le boîtier dans le clip en silicone souple en étirant
7
le clip autour du boîtier.
L'icône du coureur sur le boîtier doit être alignée avec l'icône
à l'intérieur du clip.
Entretien du
AVIS
Evitez les chocs et les manipulations brusques qui risquent
d'endommager l'appareil.
Evitez d'utiliser des nettoyants chimiques, des solvants ou des
répulsifs contre les insectes pouvant endommager les parties en
plastique et les finitions.
Nettoyage de l'appareil
AVIS
Evitez de passer le boîtier dans le lave-linge. Le boîtier est
conçu pour supporter quelques passages accidentels en
machine à température moyenne ou basse. Des passages en
machine répétés, à haute température ou un passage au sèchelinge risquent d'endommager le boîtier.
Nettoyez l'appareil à l'aide d'un chiffon humecté d'un
1
détergent non abrasif.
Essuyez l'appareil.
2
Instructions d'installation 7
Page 8
RUNNING DYNAMICS POD
Istruzioni di installazione
Introduzione
AVVERTENZA
Per avvisi sul prodotto e altre informazioni importanti, vedere la
guida Informazioni importanti sulla sicurezza e sul prodotto
inclusa nella confezione.
Riattivare il pod
Riattivare il pod scuotendolo in verticale o percorrere alcuni
passi di corsa.
Associare il pod al dispositivo compatibile
L'associazione è la connessione di sensori wireless ANT+ con
un dispositivo compatibile. Questa procedura include le
istruzioni per l'unità Forerunner 735XT. Se si dispone di un altro
dispositivo compatibile, consultare il manuale utente.
Riattivare il pod.
1
Cadenza: la cadenza consiste nel numero di passi al minuto.
Visualizza il totale dei passi (destro e sinistro combinati).
Oscillazione verticale: l'oscillazione verticale consiste nel
rimbalzo della fase aerea nel movimento della corsa.
Visualizza il movimento verticale del busto, misurato in
centimetri per ogni passo.
Tempo di contatto con il suolo: il tempo di contatto con il
suolo consiste nel tempo di contatto di ogni passo con il
suolo durante la corsa. È misurato in millisecondi.
NOTA: il tempo di contatto con il suolo e il bilanciamento non
sono disponibili durante la camminata.
Tempo medio di contatto con il suolo: il tempo medio di
contatto con il suolo mostra la media di contatto del piede
destro e sinistro con il suolo durante la corsa. Il valore è
mostrato in percentuale. Ad esempio, 53,2 con una freccia
rivolta verso sinistra o destra.
Lunghezza passo: la lunghezza dei passi è la distanza tra un
passo e l'altro. È misurata in metri.
Rapporto verticale: il rapporto verticale è il rapporto tra
l'oscillazione verticale e la lunghezza dei passi. Il valore è
mostrato in percentuale. Un valore basso indica un migliore
stile di corsa.
Caratteristiche tecniche
Tipo di batteria CR1632 sostituibile dall'utente
Durata della batteria 1 anno (circa1 hr al giorno)
Temperatura operativa Da -10 a 50 °C (da 14 a 122 °F)
Frequenza radio/protocollo Protocollo di comunicazione wireless
Classificazione di impermeabilità
*Il dispositivo resiste a una pressione equivalente a un
profondità di 10 m. Per ulteriori informazioni, visitare il sito Web
www.garmin.com/waterrating.
ANT+ a 2,4 GHz
1 ATM*
Nel dispositivo Forerunner, selezionare e selezionare un
2
profilo corsa.
Avvicinare i dispositivi l'uno all'altro.
3
Attendere che il dispositivo si connetta al pod.
4
Se necessario, selezionare Menu > Impostazioni > Sensori
e accessori > Aggiungi nuovo > Ricerca tutto per
associare e gestire i sensori wireless ANT+.
Viene visualizzato un messaggio. In modalità corsa,
indicate che il pod è connesso.
Una volta associati, il dispositivo si collega automaticamente al
pod quando si avvia una corsa e il pod è attivo e nell'area di
copertura.
Dinamiche di corsa
È possibile utilizzare il pod con il dispositivo compatibile per
fornire feedback in tempo reale sull'andatura della corsa. Il pod
è dotato di un accelerometro che misura i movimenti del torace
per calcolare le sei metriche di corsa.
NOTA: le funzioni relative alle dinamiche di corsa sono
disponibili esclusivamente su alcuni dispositivi Garmin.
Sostituzione della batteria
Rimuovere il pod dalla clip di silicone flessibile allungando il
1
materiale intorno al pod.
Sul retro del pod, ruotare il coperchio À in senso antiorario
2
per sbloccarlo.
Rimuovere il coperchio e la batteria Á.
3
SUGGERIMENTO: è possibile utilizzare del nastro adesivo o
un magnete per rimuovere la batteria dal coperchio.
8 Istruzioni di installazione
Page 9
Attendere 30 secondi.
4
Inserire la nuova batteria nel coperchio rispettando la
5
polarità.
NOTA: non danneggiare o perdere la guarnizione ad anello.
Reinserire il coperchio e ruotarlo in senso orario per
6
bloccarlo.
NOTA: non piegare la guarnizione ad anello. La guarnizione
ad anello non deve essere visibile quando il coperchio è
bloccato.
Inserire il pod nella clip di silicone flessibile allungando il
7
materiale intorno al pod.
L'icona della corsa sul pod deve essere allineata all'icona
della corsa all'interno della clip.
Manutenzione del dispositivo
AVVISO
Evitare urti eccessivi e utilizzare il prodotto con cura per non
ridurne la durata.
Evitare l'uso di detergenti chimici, solventi e insettifughi che
possono danneggiare i componenti e le rifiniture in plastica.
Pulizia del dispositivo
AVVISO
Non lavare il pod in lavatrice. Il pod è progettato per resistere al
lavaggio in lavatrice accidentale e occasionale, a temperature
medie o in acqua fredda. Lavaggi in lavatrice frequenti, ad alte
temperature o il passaggio nell'asciugatrice potrebbero
danneggiare il pod.
Pulire il dispositivo con un panno imbevuto di una soluzione
1
detergente non aggressiva.
Asciugarlo.
2
Istruzioni di installazione 9
Page 10
RUNNING DYNAMICS POD
Installationsanweisungen
Einführung
WARNUNG
Lesen Sie alle Produktwarnungen und sonstigen wichtigen
Informationen der Anleitung "Wichtige Sicherheits- und
Produktinformationen", die dem Produkt beiliegt.
Aktivieren des Sensors
Aktivieren Sie den Sensor, indem Sie ihn leicht nach oben
und unten hin- und herbewegen oder ein paar Schritte laufen.
Koppeln des Sensors mit einem kompatiblen Gerät
Unter Koppeln wird das Verbinden von ANT+ Funksensoren mit
einem kompatiblen Gerät verstanden. Im Folgenden sind
Anweisungen für das Forerunner 735XT-Gerät aufgeführt. Wenn
Sie über ein anderes kompatibles Gerät verfügen, finden Sie
entsprechende Informationen im Benutzerhandbuch des Geräts.
Aktivieren Sie den Sensor.
1
Laufeffizienz
Sie können den Sensor mit einem kompatiblen Gerät
verwenden, um Echtzeit-Informationen zu Ihrer Laufform zu
erhalten. Der Beschleunigungsmesser des Sensors misst die
Körperbewegungen, um sechs Parameter für die Laufeffizienz
zu berechnen.
HINWEIS: Die Laufeffizienz-Funktionen sind nur auf einigen
Garmin Geräten verfügbar.
Schrittfrequenz: Die Schrittfrequenz ist die Anzahl der Schritte
pro Minute. Sie zeigt die Anzahl an Gesamtschritten an
(kombiniert für rechts und links).
Vertikale Bewegung: Die vertikale Bewegung ist die Hoch-
Tiefbewegung beim Laufen. Sie zeigt die vertikale Bewegung
des Rumpfes in Zentimetern für jeden Schritt an.
Bodenkontaktzeit: Die Bodenkontaktzeit ist die Zeit jedes
Schrittes, die man beim Laufen am Boden verbringt. Sie wird
in Millisekunden gemessen.
HINWEIS: Die Bodenkontaktzeit und die Balance sind beim
Gehen nicht verfügbar.
Balance der Bodenkontaktzeit: Die Balance der
Bodenkontaktzeit zeigt das Verhältnis von links und rechts
Ihrer Bodenkontaktzeit beim Laufen an. Sie wird in Prozent
angegeben. Beispielsweise wird sie als 53,2 angezeigt
zusammen mit einem Pfeil, der nach links oder rechts zeigt.
Schrittlänge: Die Schrittlänge ist die Länge Ihres Schritts von
einem Auftritt zum nächsten. Sie wird in Metern gemessen.
Vertikales Verhältnis: Das vertikale Verhältnis ist das
Verhältnis der vertikalen Bewegung zur Schrittlänge. Sie wird
in Prozent angegeben. Ein niedrigerer Wert weist in der
Regel auf eine bessere Laufform hin.
Technische Daten
Batterietyp Auswechselbare CR1632-Batterie
Batterie-Laufzeit 1 Jahr (ca. 1 Stunde/Tag)
Betriebstemperaturbereich -10 °C bis 50 °C (14 °F bis 122 °F)
Funkfrequenz/Protokoll ANT+ Funkübertragungsprotokoll, 2,4 GHz
Wasserdichtigkeit 1 ATM*
Wählen Sie auf dem Forerunner Gerät die Taste und
2
anschließend ein Laufprofil.
Achten Sie darauf, dass sich die Geräte nahe beeinander
3
befinden.
Warten Sie, während das Gerät eine Verbindung mit dem
4
Sensor herstellt.
Bei Bedarf können Sie die Option Menü > Einstellungen >
Sensoren und Zubehör > Neu hinzufügen > Alle
durchsuchen wählen, um ANT+ Funksensoren zu koppeln
und zu verwalten.
Eine Meldung wird angezeigt. Im Laufmodus zeigt das
Symbol an, dass der Sensor verbunden ist.
Nach der ersten Kopplung stellt das Gerät automatisch eine
Verbindung mit dem Sensor her, wenn Sie mit dem Training
beginnen und der Sensor aktiv und in Reichweite ist.
* Das Gerät widersteht einem Druck wie in 10 Metern
Wassertiefe. Weitere Informationen finden Sie unter
www.garmin.com/waterrating.
Auswechseln der Batterie
Nehmen Sie den Sensor aus dem flexiblen Silikonclip. Dabei
1
müssen Sie den Clip ein wenig ziehen und formen.
Drehen Sie die Abdeckung À auf der Rückseite des Sensors
2
gegen den Uhrzeigersinn, um sie zu entsperren.
10 Installationsanweisungen
Page 11
Entfernen Sie die Abdeckung und die Batterie Á.
3
TIPP: Verwenden Sie ein Stück Klebeband oder einen
Magneten, um die Batterie aus der Abdeckung zu entfernen.
Warten Sie 30 Sekunden.
4
Legen Sie die neue Batterie in die Abdeckung ein. Achten
5
Sie dabei auf die korrekte Ausrichtung der Pole.
HINWEIS: Beschädigen oder verlieren Sie den Dichtungsring
nicht.
Setzen Sie die Abdeckung wieder auf, und drehen Sie sie im
6
Uhrzeigersinn, um sie zu sperren.
HINWEIS: Klemmen Sie den Dichtungsring nicht ein. Der
Dichtungsring darf nicht zu sehen sein, wenn die Abdeckung
gesperrt ist.
Setzen Sie den Sensor in den flexiblen Silikonclip ein. Dabei
7
müssen Sie den Clip ein wenig ziehen und formen, bis er um
den Sensor passt.
Das Laufsymbol auf dem Sensor muss auf das Laufsymbol
am Clip ausgerichtet sein.
Wischen Sie das Gerät mit einem Tuch ab, das mit einer
1
milden Reinigungslösung befeuchtet ist.
Wischen Sie das Gerät trocken.
2
Pflege des Geräts
HINWEIS
Setzen Sie das Gerät keinen starken Erschütterungen aus, und
verwenden Sie es sorgsam. Andernfalls kann die Lebensdauer
des Produkts eingeschränkt sein.
Verwenden Sie keine chemischen Reinigungsmittel,
Lösungsmittel oder Insektenschutzmittel, die die Kunststoffteile
oder die Oberfläche beschädigen könnten.
Reinigen des Geräts
HINWEIS
Waschen Sie den Sensor nicht in der Waschmaschine. Der
Sensor kann einen gelegentlichen, versehentlichen Waschgang
mit warmem oder kaltem Wasser überstehen. Ein häufiges
Waschen in der Waschmaschine, heiße Temperaturen bzw. das
Trocknen im Trockner können jedoch zu Schäden am Sensor
führen.
Installationsanweisungen 11
Page 12

RUNNING DYNAMICS POD
Instrucciones de instalación
Introducción
ADVERTENCIA
Consulta la guía Información importante sobre el producto y tu
seguridad que se incluye en la caja del producto y en la que
encontrarás advertencias e información importante sobre el
producto.
Activar el podómetro
Puedes activar el podómetro agitándolo verticalmente o
corriendo unos pasos.
Vincular el podómetro con tu dispositivo compatible
La vinculación consiste en conectar los sensores inalámbricos
ANT+con un dispositivo compatible. Este procedimiento
contiene instrucciones para el reloj Forerunner 735XT. Si tienes
otro dispositivo compatible, consulta el manual del usuario.
Activa el podómetro.
1
carrera. El podómetro tiene un acelerómetro que mide el
movimiento del torso para calcular seis métricas de carrera.
NOTA: las funciones de dinámica de carrera solo están
disponibles en algunos dispositivos Garmin.
Cadencia: la cadencia es el número de pasos por minuto.
Muestra el número total de pasos (los de la pierna derecha y
la izquierda en conjunto).
Oscilación vertical: la oscilación vertical es la fase de
suspensión durante el movimiento que realizas al correr.
Muestra el movimiento vertical del torso en cada paso,
medido en centímetros.
Tiempo de contacto con el suelo: el tiempo de contacto con el
suelo es la cantidad de tiempo que pasas en el suelo en
cada paso que das al correr. Se mide en milisegundos.
NOTA: el tiempo de contacto con el suelo y el equilibrio no
se proporcionarán al caminar.
Equilibrio de tiempo de contacto con el suelo: el equilibrio de
tiempo de contacto con el suelo muestra el equilibrio de la
pierna izquierda y la derecha del tiempo de contacto con el
suelo durante la carrera. Muestra un porcentaje. Por ejemplo,
53,2 con una flecha apuntando hacia la derecha o la
izquierda.
Longitud de zancada: la longitud de la zancada es la longitud
de tu zancada de una pisada a la siguiente. Se mide en
metros.
Relación vertical: la relación vertical es la relación de
oscilación vertical a la longitud de zancada. Muestra un
porcentaje. Un número inferior indica normalmente una mejor
forma de correr.
Especificaciones
Tipo de pila/batería CR1632 sustituible por el usuario
Autonomía de la pila/batería 1 año (aproximadamente 1 hora/día)
Rango de temperatura de
funcionamiento
Radiofrecuencia/protocolo Protocolo de comunicación
Clasificación de resistencia al
agua
De -10 °C a 50 °C (de 14 °F a 122 °F)
inalámbrica ANT+ de 2,4 GHz
1 ATM*
Desde el dispositivo Forerunner, selecciona y elige un
2
perfil de carrera.
Acerca los dispositivos entre sí.
3
Espera a que el dispositivo se conecte al podómetro.
4
Si fuera necesario, puedes seleccionar Menú > Configuración > Sensores y accesorios > Añadir nueva > Buscar
todo para vincular y gestionar los ANT+ sensores
inalámbricos.
Aparece un mensaje. En el modo de carrera, indica que el
podómetro está conectado.
Después de la vinculación inicial, el dispositivo se conecta
automáticamente al podómetro cuando salgas a correr, siempre
que el podómetro esté activo y dentro del alcance.
Dinámica de carrera
Puedes utilizar el podómetro con tu dispositivo compatible para
proporcionar información en tiempo real acerca de tu técnica de
*El dispositivo soporta niveles de presión equivalentes a una
profundidad de 10 metros. Para obtener más información, visita
www.garmin.com/waterrating.
Sustituir la pila
Retira el podómetro del clip de silicona flexible ajustando el
1
material del clip alrededor del podómetro.
En la parte posterior del podómetro, gira la tapa À en sentido
2
contrario a las agujas del reloj para desbloquearla.
12 Instrucciones de instalación
Page 13

Retira la tapa y la pila Á.
3
SUGERENCIA: puedes utilizar un trozo de cinta adhesiva o
un imán para extraer la pila de la tapa.
Espera 30 segundos.
4
Introduce la nueva pila en la tapa, teniendo en cuenta la
5
polaridad.
NOTA: no deteriores ni pierdas la junta circular.
Vuelve a colocar la tapa y gírala en sentido de las agujas del
6
reloj para bloquearla.
NOTA: no aprietes la junta circular. La junta circular no
debería verse cuando la tapa está bloqueada.
Inserta el podómetro en el clip de silicona flexible ajustando
7
el material del clip alrededor del podómetro.
El icono de carrera del podómetro debe estar alineado con el
icono de carrera del interior del clip.
Realizar el cuidado del dispositivo
AVISO
Evita el uso inadecuado y los golpes, ya que esto podría reducir
la vida útil del producto.
No utilices disolventes, productos químicos ni insecticidas que
puedan dañar los componentes plásticos y acabados.
Limpiar el dispositivo
AVISO
Evite lavar el podómetro en la lavadora. El podómetro está
diseñado para soportar lavados ocasionales y accidentales a
máquina a una temperatura media o fría. El podómetro puede
sufrir daños si se lava con frecuencia en la lavadora, a
temperaturas altas o si se mete en la secadora.
Limpia el dispositivo con un paño humedecido en una
1
solución suave de detergente.
Seca el dispositivo.
2
Instrucciones de instalación 13
Page 14

RUNNING DYNAMICS POD
Instruções de instalação
Introdução
ATENÇÃO
Consulte o guia Informações importantes sobre segurança e
sobre o produto na caixa do produto para obter mais detalhes
sobre avisos e outras informações importantes.
Ligando o contador
Ligue o contador agitando-o para cima e para baixo ou
correndo alguns passos.
Emparelhando o contador com seu dispositivo compatível
Emparelhamento é a conexão de sensores ANT+ sem fio com o
dispositivo compatível. Esse procedimento contém instruções
para o Forerunner 735XT. Se você tiver outro dispositivo
compatível, consulte o manual do proprietário.
Ligue o contador.
1
OBSERVAÇÃO: os recursos de dinâmica de corrida estão
disponíveis apenas em alguns dispositivos Garmin.
Cadência: cadência é o número de passos por minuto. Exibe o
número total de passos (direitos e esquerdos combinados).
Oscilação vertical: oscilação vertical é o movimento durante a
corrida. Ela exibe o movimento vertical do torso, medido em
centímetros para cada passo.
Tempo de contato com o solo: tempo de contato com o solo é
o tempo de cada passo no chão durante a corrida. Ele é
medido em milisegundos.
OBSERVAÇÃO: o tempo de contato com o solo e o
equilíbrio não estão disponíveis durante caminhadas.
Equilíbrio de tempo de contato com o solo: o equilíbrio do
tempo de contato com o solo exibe o equilíbrio para
esquerda/direita do tempo de contato com solo durante a
execução. Uma porcentagem é exibida. Por exemplo, 53,2
com uma seta apontando para a esquerda ou para a direita.
Comprimento de passo: o comprimento de passos é o
comprimento de seus passos de um passo para o próximo.
Ele é medido em metros.
Proporção vertical: a proporção vertical é a razão entre a
oscilação vertical e o comprimento de passo. Uma
porcentagem é exibida. Um número mais baixo geralmente
indica uma melhor forma de corrida.
Especificações
Tipo de bateria CR1632 substituível pelo usuário
Duração da bateria 1 ano (aproximadamente 1 hora/dia)
Intervalo de temperatura de
funcionamento
Frequência/protocolo de rádio Protocolo de comunicações sem fio
Classificação de impermeabilidade
*O dispositivo suporta pressão equivalente a uma profundidade
de 10 m. Para obter mais informações, acesse www.garmin.com
/waterrating.
-10° a 50 °C (14° a 122 °F)
ANT+ de 2,4 GHz
1 ATM*
No dispositivo Forerunner, selecione e selecione um perfil
2
de corrida.
Aproxime os dispositivos.
3
Aguarde enquanto o dispositivo se conecta ao contador.
4
Se necessário, você pode selecionar Menu >
Configurações > Sensores e acessórios > Adicionar
novo > Buscar todos para emparelhar e gerenciar sensores
ANT+ sem fio.
Uma mensagem é exibida. No modo de corrida, indica que
o contador está conectado.
Após o emparelhamento inicial, o dispositivo se conectará
automaticamente ao contador quando você for fazer uma
corrida e o contador estiver ligado e dentro do alcance.
Dinâmica de corrida
Você pode usar o contador com seu dispositivo compatível para
ver feedback em tempo real sobre o seu tipo de corrida. O
contador possui um acelerômetro que mede o movimento do
torso, a fim de calcular seis métricas de corrida.
Substituindo a bateria
Remova o contador do prendedor de silicone flexível,
1
esticando o material em torno do contador.
Na parte de trás do contador, gire a tampa À no sentido anti-
2
horário para destravar.
Remova a tampa e a pilha Á.
3
14 Instruções de instalação
Page 15

DICA: você pode usar um pedaço de fita ou um imã para
remover a pilha do compartimento.
Aguarde 30 segundos.
4
Insira uma nova pilha no compartimento, observando a
5
polaridade.
OBSERVAÇÃO: não danifique nem perca a junta do O-ring.
Recoloque a tampa e gire no sentido horário para travar.
6
OBSERVAÇÃO: não pressione a junta do anel O-ring. A
gaxeta do anel O-ring não deve ficar visível quando a tampa
estiver travada.
Insira o contador no prendedor de silicone flexível, esticando
7
o material em torno do contador.
O ícone de corrida no contador deve estar alinhado com o
ícone de corrida dentro do prendedor.
Cuidados com o dispositivo
AVISO
Evite grandes impactos e tratamento severo, pois pode
prejudicar a vida útil do produto.
Evite produtos químicos, solventes, e repelentes de insetos que
possam danificar os componentes de plástico e acabamentos.
Limpando o dispositivo
AVISO
Evite lavar o contador em máquina de lavar. O contador é
projetado para suportar lavagens eventuais e acidentais em
máquina, em temperaturas baixas ou médias. Lavar em
máquina com frequência, em temperatura alta ou em secadoras
podem danificar o contador.
Limpe o dispositivo usando um pano umedecido com
1
solução de detergente neutro.
Seque-o com um pano.
2
Instruções de instalação 15
Page 16

RUNNING DYNAMICS POD
Installatie-instructies
Inleiding
WAARSCHUWING
Lees de gids Belangrijke veiligheids- en productinformatie in de
verpakking voor productwaarschuwingen en andere belangrijke
informatie.
De sensor activeren
Activeer de sensor door deze verticaal te schudden of een
paar stappen te lopen.
De sensor aan uw compatibele toestel koppelen
Koppelen is het verbinden van ANT+ draadloze sensors met
een compatibel toestel. Deze procedure bevat instructies voor
de Forerunner 735XT. Als u een ander compatibel toestel hebt,
raadpleegt u de gebruikershandleiding bij uw toestel.
Activeer de sensor.
1
OPMERKING: De functies voor hardloopdynamiek zijn alleen
beschikbaar op bepaalde Garmin toestellen.
Cadans: Cadans is het aantal stappen per minuut. Het totale
aantal stappen wordt weergegeven (links en rechts samen).
Verticale oscillatie: Verticale oscillatie is de op-en-
neerbeweging tijdens het hardlopen. Hiermee wordt de
verticale beweging van uw bovenlichaam weergegeven,
gemeten in centimeters voor iedere stap.
Grondcontacttijd: Grondcontacttijd is de hoeveelheid tijd voor
iedere stap tijdens het hardlopen waarbij er contact is met de
grond. De tijd wordt gemeten in milliseconden.
OPMERKING: Grondcontacttijd en balans zijn niet
beschikbaar wanneer u wandelt.
Grondcontacttijd-balans: Grondcontacttijd-balans geeft de
links/rechts-balans van uw grondcontacttijd weer tijdens het
hardlopen. Deze balans wordt weergegeven als percentage.
Bijvoorbeeld 53,2 met een pijl naar links of naar rechts.
Staplengte: Staplengte is de afstand tussen de plekken waar u
uw ene voet en uw andere voet neerzet. Deze lengte wordt
gemeten in meters.
Verticale ratio: Verticale ratio is de verhouding tussen verticale
oscillatie en staplengte. Deze balans wordt weergegeven als
percentage. Een lagere ratio duidt meestal op een betere
hardloopconditie.
Specificaties
Batterijtype Door gebruiker te vervangen CR1632
batterij
Levensduur van batterij 1 jaar (bij circa 1 uur per dag)
Bedrijfstemperatuurbereik Van -10° tot 50°C (van 14° tot 122°F)
Radiofrequentie/-protocol 2,4 GHz ANT+ protocol voor draadloze
communicatie
Waterbestendigheid 1 ATM*
*Het toestel is bestand tegen druk tot een diepte van maximaal
10 meter. Ga voor meer informatie naar www.garmin.com
/waterrating.
Selecteer op het Forerunner toestel en selecteer een
2
hardloopprofiel.
Breng de toestellen dicht bij elkaar.
3
Wacht totdat het toestel verbinding maakt met de sensor.
4
U kunt zo nodig Menu > Instellingen > Sensors en
accessoires > Voeg nieuw toe > Zoek alles selecteren om
ANT+ draadloze sensors te koppelen en beheren.
Er wordt een bericht weergegeven. geeft in de
hardloopmodus aan dat de sensor is verbonden.
Hierna maakt het toestel automatisch verbinding met de sensor
wanneer u gaat hardlopen en de sensor actief en binnen bereik
is.
Hardloopdynamiek
U kunt de sensor gebruiken met uw compatibele toestel om realtime feedback te ontvangen over uw hardloopvorm. De sensor
heeft een versnellingsmeter die rompbewegingen meet om zes
hardloopgegevens te berekenen.
De batterij vervangen
Verwijder de sensor van de flexibele siliconenclip door het
1
flexibele materiaal uit te rekken en over de sensor heen te
trekken.
Draai het klepje achterop de sensor À naar links om het te
2
ontgrendelen.
16 Installatie-instructies
Page 17

Verwijder het klepje en de batterij Á.
3
TIP: U kunt een stuk tape of een magneet gebruiken om de
batterij uit het klepje te verwijderen.
Wacht 30 seconden.
4
Plaats de nieuwe batterij in het klepje met de polen in de
5
juiste richting.
OPMERKING: Zorg dat u de afdichtring niet beschadigt of
verliest.
Vervang het klepje en draai het naar rechts om het te
6
vergrendelen.
OPMERKING: Zorg dat u niet in de afdichtring knijpt. De
afdichtring mag niet zichtbaar zijn als het klepje is
vergrendeld.
Plaats de sensor in de flexibele siliconenclip door het
7
flexibele materiaal uit te rekken en over de sensor heen te
trekken.
Het hardlooppictogram op de sensor moet zijn uitgelijnd met
het hardlooppictogram in de clip.
Toestelonderhoud
LET OP
Vermijd schokken en ruwe behandeling omdat hierdoor het
product korter meegaat.
Gebruik geen chemische reinigingsmiddelen, oplosmiddelen en
insectenwerende middelen die plastic onderdelen en
oppervlakken kunnen beschadigen.
Het toestel schoonmaken
LET OP
Was de sensor niet in de wasmachine. De sensor is ontwikkeld
om incidenteel een onbedoelde wasmachinebeurt op
gemiddelde of koele temperaturen te weerstaan. Als u de
sensor vaker wast, op hete temperaturen wast of in de droger
stopt, kan deze beschadigd raken.
Veeg het toestel schoon met een doek die is bevochtigd met
1
een mild schoonmaakmiddel.
Veeg de behuizing vervolgens droog.
2
Installatie-instructies 17
Page 18

RUNNING DYNAMICS POD
Installationsvejledning
Introduktion
ADVARSEL
Se guiden Vigtige produkt- og sikkerhedsinformationer i æsken
med produktet for at se produktadvarsler og andre vigtige
oplysninger.
Vækning af sensoren
Væk sensoren ved at ryste den lodret eller løbe et par skridt.
Parring af sensoren med en kompatibel enhed
Parring er tilslutning af ANT+ trådløse sensorer til en kompatibel
enhed. Denne procedure indeholder vejledning til Forerunner
735XT. Hvis du har en anden kompatibel enhed, skal du kigge i
brugervejledningen.
Væk sensoren.
1
Kadence: Kadence er antallet af skridt pr. minut. Den viser det
samlede antal skridt (højre og venstre kombineret).
Vertikale udsving: Vertikale udsving er dine hop, mens du
løber. Det viser den lodrette bevægelse i din overkrop, målt i
centimeter for hvert trin.
Tid i kontakt med jorden: Tid i kontakt med jorden er den tid i
hvert skridt, du bruger på jorden, mens du løber. Den måles i
millisekunder.
BEMÆRK: Tid i kontakt med jorden og balance er ikke
tilgængelig ved gang.
Balance for den tid, du er i kontakt med jorden: Balance for
den tid, du er i kontakt med jorden, viser venstre/højrebalancen i den tid, du er i kontakt med jorden, mens du løber.
Den vises i procent. For eksempel 53,2 med en pil, der peger
til venstre eller højre.
Skridtlængde: Skridtlængde er længden på dine skridt fra et
fodnedslag til det næste. Den måles i meter.
Vertikalt forhold: Det vertikale forhold er forholdet mellem
vertikale svingninger og skridtlængden. Den vises i procent.
Et lavere tal indikerer typisk en bedre løbeform.
Specifikationer
Batteritype Udskifteligt CR1632
Batterilevetid 1 år (ca. 1 time/dag)
Driftstemperaturområde Fra -10 til 50º C (fra 14 til 122º F)
Radiofrekvens/protokol 2,4 GHz ANT+ trådløs kommunikationspro-
Vandtæthedsklasse 1 ATM*
*Enheden tåler tryk svarende til en dybde på 10 m. Du kan finde
flere oplysninger på www.garmin.com/waterrating.
tokol
Udskiftning af batteriet
Fjern sensoren fra den fleksible silikoneclips ved at strække
1
materialet rundt om sensoren.
På bagsiden af sensoren skal du dreje dækslet À mod urets
Fra Forerunner enheden, skal du vælge og derefter vælge
2
en løbeprofil.
Placer enhederne tæt ved hinanden.
3
Vent, mens enheden opretter forbindelse til sensoren.
4
Om nødvendigt skal du vælge Menu > Indstillinger >
Sensorer og tilbehør > Tilføj ny > Søg i alle for at parre og
administrere ANT+ trådløse sensorer.
Der vises en meddelelse. I løbetilstand angiver , at
sensoren er tilsluttet.
Efter den indledende parring forbindes enheden automatisk til
sensoren, når du løber en tur, og sensoren er aktiv og inden for
rækkevidde.
Løbedynamik
Du kan bruge sensoren med din kompatible enhed for at levere
feedback i realtid om din løbeform. Sensoren har et
accelerometer, som måler overkroppens bevægelser for at
beregne seks løbemålinger.
BEMÆRK: Løbedynamikegenskaberne er kun tilgængelige på
bestemte Garmin enheder.
18 Installationsvejledning
2
retning for at åbne det.
Fjern dækslet og batteriet Á.
3
TIP: Du kan bruge et stykke tape eller en magnet til at fjerne
batteriet fra dækslet.
Vent 30 sekunder.
4
Sæt det nye batteri ind i dækslet, så det vender rigtigt.
5
BEMÆRK: Pas på ikke at beskadige tætningsringen.
Page 19

Sæt dækslet tilbage på plads, og drej det i urets retning for at
6
låse det.
BEMÆRK: Pas på, at tætningsringen ikke kommer i klemme.
Tætningsringen må ikke være synlig, når dækslet er lukket.
Sæt sensoren i den fleksible silikoneclips ved at strække
7
materialet rundt om sensoren.
Løbeikonet på sensoren skal være ud for løbeikonet på
clipsens inderside.
Vedligeholdelse af enheden
BEMÆRK
Undgå hårde stød og hårdhændet behandling, da det kan
reducere produktets levetid.
Undgå kemiske rengøringsmidler, opløsnings- og insektmidler,
der kan beskadige plastikkomponenterne og
overfladebehandlingen.
Rengøring af enheden
BEMÆRK
Kom ikke sensoren i vaskemaskinen. Sensoren er designet til at
modstå lejlighedsvis, utilsigtet maskinvask ved medium eller
kølig temperatur. Hyppig maskinvask, varme vasketemperaturer
eller tørretumbling kan beskadige sensoren.
Rengør enheden med en klud fugtet med en mild
1
rengøringsmiddelopløsning.
Tør den af.
2
Installationsvejledning 19
Page 20

RUNNING DYNAMICS POD
Asennusohjeet
Johdanto
VAROITUS
Lue lisätietoja varoituksista ja muista tärkeistä seikoista laitteen
mukana toimitetusta Tärkeitä turvallisuus- ja tuotetietoja oppaasta.
Anturin herättäminen
Herätä anturi ravistamalla sitä pystysuunnassa tai
juoksemalla muutama askel.
Anturin pariliitos yhteensopivaan laitteeseen
Pariliitos tarkoittaa langattomien ANT+ anturien yhdistämistä
yhteensopivaan laitteeseen. Nämä ohjeet on tarkoitettu
Forerunner 735XT anturille. Jos sinulla on jokin muu
yhteensopiva laite, katso sen käyttöopasta.
Herätä anturi.
1
Askeltiheys: askeltiheys tarkoittaa askelten määrää minuutissa.
Se näyttää askelten kokonaismäärää (oikea ja vasen
yhteenlaskettuna).
Pystysuuntainen liikehdintä: pystysuuntainen liikehdintä
tarkoittaa juoksun joustavuutta. Se näyttää ylävartalon
pystysuuntaisen liikkeen kullakin askeleella senttimetreinä.
Maakosketuksen kesto: maakosketuksen kesto tarkoittaa
aikaa, jonka olet maassa juostessasi kunkin askeleen
kohdalla. Se mitataan millisekunteina.
HUOMAUTUS: maakosketuksen kesto ja tasapaino eivät ole
käytettävissä kävelyn aikana.
Maakosketuksen keston tasapaino: maakosketuksen keston
tasapaino näyttää juoksun aikaisen maakosketuksen keston
vasemman ja oikean jalan tasapainon. Se mitataan
prosentteina. Arvo voi olla esimerkiksi 53,2, ja sen vierellä on
nuoli vasemmalle tai oikealle.
Askeleen pituus: askeleen pituus on kahden maakosketuksen
väli. Se mitataan metreinä.
Pystysuhde: pystysuhde on pystysuuntaisen liikehdinnän
suhde askeleen pituuteen. Se mitataan prosentteina.
Juoksukunto on tavallisesti sitä parempi, mitä pienempi luku
on.
Tekniset tiedot
Akun tyyppi Käyttäjän vaihdettavissa oleva CR1632
Akunkesto 1 vuosi (noin 1 h/päivä)
Käyttölämpötila -10 - 50 °C (14 - 122 °F)
Radiotaajuus/yhteyskäy-
täntö
Vesitiiviys 1 ATM*
*Laite kestää painetta, joka vastaa 10 metrin syvyyttä.
Lisätietoja on osoitteessa www.garmin.com/waterrating.
2,4 GHz:n langaton ANT+ yhteyskäytäntö
Valitse Forerunner laitteessa ja valitse juoksuprofiili.
2
Tuo laitteet lähekkäin.
3
Odota, kun laite muodostaa yhteyden anturiin.
4
Tarvittaessa voit pariliittää ja hallita langattomia ANT+
antureita valitsemalla Valikko > Asetukset > Anturit ja
lisälaitteet > Lisää uusi > Etsi kaikki.
Näyttöön tulee ilmoitus. Juoksutilassa osoittaa, että anturi
on yhdistetty.
Ensimmäisen pariliitoksen muodostamisen jälkeen laite yhdistää
automaattisesti anturiin, kun lähdet juoksulenkille ja anturi on
aktiivinen ja alueella.
Juoksun dynamiikka
Käyttämällä anturia yhteensopivan laitteen kanssa saat
reaaliaikaista palautetta juoksukunnostasi. Anturin
kiihtyvyysmittari mittaa ylävartalon liikkeitä ja laskee niiden
perusteella kuusi juoksun metriikkaa.
HUOMAUTUS: juoksun dynamiikkaominaisuudet ovat
käytettävissä ainoastaan tietyissä Garmin laitteissa.
Pariston vaihtaminen
Irrota anturi joustavasta silikonipidikkeestä venyttämällä
1
pidikettä anturin ympärillä.
Avaa anturin takakannen lukitus kääntämällä kantta
2
vastapäivään.
Irrota kansi ja paristo Á.
3
VIHJE: voit irrottaa pariston kannesta teipinpalalla tai
magneetilla.
Odota 30 sekuntia.
4
Aseta uusi paristo kanteen navat oikeinpäin.
5
À
20 Asennusohjeet
Page 21

HUOMAUTUS: älä vahingoita tai hukkaa O-rengastiivistettä.
Sulje kansi ja lukitse se kääntämällä sitä myötäpäivään.
6
HUOMAUTUS: älä purista O-rengastiivistettä. O-
rengastiiviste ei näy, kun kansi on lukittu.
Aseta anturi joustavaan silikonipidikkeeseen venyttämällä
7
pidike anturin ympärille.
Anturissa olevan juoksukuvakkeen on oltava pidikkeen
juoksukuvakkeen suuntainen.
Laitteen huoltaminen
HUOMAUTUS
Vältä kovia iskuja ja kovaa käsittelyä, koska se voi lyhentää
laitteen käyttöikää.
Vältä kemiallisia puhdistusaineita, liuottimia ja hyönteismyrkkyjä,
jotka voivat vahingoittaa muoviosia ja pintoja.
Laitteen puhdistaminen
HUOMAUTUS
Älä pese anturia pyykinpesukoneessa. Jos anturi joutuu
vahingossa pyykinpesukoneeseen, se kestää satunnaisen
pesuohjelman matalassa lämpötilassa. Tiheät konepesut,
kuumat pesulämpötilat tai käsittely kuivaajassa saattaa vioittaa
anturia.
Käytä miedolla pesuaineliuoksella kostutettua liinaa.
1
Pyyhi laite kuivaksi.
2
Asennusohjeet 21
Page 22

RUNNING DYNAMICS POD
Installeringsinstruksjoner
Innledning
ADVARSEL
Se veiledningen Viktig sikkerhets- og produktinformasjon i
produktesken for å lese advarsler angående produktet og annen
viktig informasjon.
Vekke sensoren
Vekk sensoren ved å riste den opp og ned eller ved å ta et
par skritt.
Parkoble sensoren med en kompatibel enhet
Parkobling vil si å koble en ANT+ trådløs sensor til en
kompatibel enhet. Denne fremgangsmåten gjelder Forerunner
735XT. Se i brukerveiledningen hvis du har en annen
kompatibel enhet.
Vekk sensoren.
1
Pedalfrekvens: Pedalfrekvens er antall skritt per minutt.
Funksjonen viser totalt antall skritt (høyre og venstre fot
kombinert).
Vertikal oscillasjon: Vertikal oscillasjon vil si sprett i
løpsbevegelsen. Det viser vertikal bevegelse for torso, målt i
centimeter for hvert skritt.
Tid med bakkekontakt: Tid med bakkekontakt er tiden hvert
skritt berører bakken mens du løper. Dette måles i
millisekunder.
MERK: Tid med bakkekontakt og balanse for tid med
bakkekontakt kan ikke beregnes mens du går.
Balanse for tid med bakkekontakt: Balanse for tid med
bakkekontakt viser balansen mellom venstre og høyre for din
tid med bakkekontakt mens du løper. Dette vises som et
prosenttall. For eksempel 53,2 med en pil som peker mot
venstre eller høyre.
Skrittlengde: Skrittlengde er lengden mellom føttene fra den
ene foten treffer bakken til neste fot treffer bakken. Dette
måles i meter.
Vertikalt forholdstall: Vertikalt forholdstall er forholdet mellom
vertikal oscillasjon og skrittlengde. Dette vises som et
prosenttall. Et lavere tall betyr vanligvis en bedre løpestil.
Spesifikasjoner
Batteritype CR1632 (kan byttes av brukeren)
Batterilevetid 1 år (ved ca. 1 time per dag)
Driftstemperaturområde Fra –10 til 50 °C (fra 14 til 122 °F)
Radiofrekvens/protokoll ANT+ trådløs kommunikasjonsprotokoll på
2,4 GHz
Vanntetthetsvurdering 1 ATM*
*Enheten tåler trykk tilsvarende en dybde på 10 meter. Du finner
mer informasjon på www.garmin.com/waterrating.
På Forerunner enheten velger du og deretter en løpeprofil.
2
Ha enhetene i nærheten av hverandre.
3
Vent mens enheten kobler til sensoren.
4
Hvis det skulle bli nødvendig, kan du velge Meny >
Innstillinger > Sensorer og tilbehør > Legg til ny > Søk på
alle for å parkoble og administrere ANT+ trådløse sensorer.
Det vises en melding. I løpemodus indikerer at sensoren er
tilkoblet.
Når du først har parkoblet dem, kobles enheten automatisk til
sensoren når du drar ut på løpetur og sensoren er aktiv og
innenfor rekkevidde.
Løpsdynamikk
Du kan bruke sensoren sammen med en kompatibel enhet for å
få tilbakemelding i sanntid om formen din. Sensoren har en
akselerasjonsmåler som måler torsobevegelser for å beregne
seks ulike målinger av løpedata.
MERK: Funksjonene for løpsdynamikk er bare tilgjengelige på
enkelte Garmin enheter.
Bytte batteriet
Fjern sensoren fra den fleksible silikonklemmen ved å
1
strekke materialet som ligger rundt sensoren.
Vri dekselet mot klokken på baksiden av sensoren À for å
2
låse det opp.
Ta av dekselet, og ta ut batteriet Á.
3
TIPS: Du kan bruke en teipbit eller en magnet til å fjerne
batteriet fra dekselet.
Vent i 30 sekunder.
4
22 Installeringsinstruksjoner
Page 23

Sett inn det nye batteriet i dekselet. Pass på at du setter det
5
inn riktig vei.
MERK: Pass på at du ikke skader eller mister tetningsringen.
Sett på dekselet igjen, og vri det mot klokken for å låse det.
6
MERK: Ikke klem på tetningsringen. Tetningsringen skal ikke
synes når dekselet er satt på.
Sett sensoren inn i den fleksible silikonklemmen ved å
7
strekke materialet rundt sensoren.
Løpeikonet på sensoren må være på linje med løpeikonet
inne i klemmen.
Ta vare på enheten
LES DETTE
Unngå kraftige slag og hard behandling. Dette kan redusere
produktets levetid.
Unngå kjemiske rengjøringsmidler, løsemidler og insektsmidler
som kan skade plastdeler og finish.
Rengjøre enheten
LES DETTE
Ikke vask sensoren i en vaskemaskin. Sensoren er utformet for
å tåle sporadisk, utilsiktet maskinvask ved middels eller lav
temperatur. Flere maskinvasker, høye vasketemperaturer eller
tørking i tørketrommel kan skade sensoren.
Tørk av enheten med en klut som er fuktet med et mildt
1
vaskemiddel.
Tørk av.
2
Installeringsinstruksjoner 23
Page 24

RUNNING DYNAMICS POD
Installationsinstruktioner
Introduktion
VARNING
Guiden Viktig säkerhets- och produktinformation, som medföljer
i produktförpackningen, innehåller viktig information och
produktvarningar.
Aktivera enheten
Aktivera enheten genom att skaka den vertikalt eller springa
några steg.
Kadens: Kadensen är antalet steg per minut. Den visar det
totala antalet steg (höger och vänster sammanlagt).
Vertikal rörelse: Vertikal rörelse är studsen i din
löpningsrörelse. Den visar överkroppens vertikala rörelse,
mätt i centimeter för varje steg.
Markkontakttid: Markkontakttid är den tid i varje steg som du
befinner dig på marken när du springer. Det mäts i
millisekunder.
Obs! Markkontakttid och balans är inte tillgängligt när du går.
Balans för markkontakttid: Balans för markkontakttid visar din
vänstra/högra balans för markkontakttid när den är igång. En
procentsats visas. Till exempel 53,2 med en pil som pekar åt
vänster eller höger.
Steglängd: Steglängden är längden på ditt steg från ett
nedtramp till nästa. Den mäts i meter.
Kvot vertikal rörelse/steglängd: Kvot vertikal rörelse/steglängd
är förhållandet mellan vertikal rörelse och steglängd. En
procentsats visas. Ett lägre tal anger vanligtvis en bättre
löpstil.
Specifikationer
Batterityp CR1632, kan bytas av användaren
Batteriets livslängd 1 år (ca 1 tim/dag)
Drifttemperaturområde Från -10 till 50 °C (från 14 till 122 °F)
Radiofrekvens/protokoll 2,4 GHz ANT+ trådlös kommunikation
Vattenklassning 1 ATM*
Para ihop enheten med en kompatibel enhet
Att para ihop innebär att koppla ihop trådlösa ANT+ sensorer
med en kompatibel enhet. Den här proceduren innehåller
instruktioner för Forerunner 735XT. Läs i användarhandboken
om du har en annan kompatibel enhet.
Aktivera enheten.
1
Från Forerunner enheten väljer du och sedan en profil för
2
löpning.
Placera enheterna nära varandra.
3
Vänta medan enheterna kopplas ihop med varandra.
4
Om det behövs kan du välja Meny > Inställningar >
Sensorer och tillbehör > Lägg till ny > Söka alla för att
para ihop och hantera trådlösa ANT+ sensorer.
Ett meddelande visas. I löpningsläge visar att enheten är
ansluten.
Efter den första ihopparningen ansluter enheterna automatiskt
till varandra när du går på ett löppass och enheten är aktiv och
inom avstånd.
Löpdynamik
Du kan använda enheten med din kompatibla enhet för att få
återkoppling i realtid om din löpform. Enheten har en
accelerationsmätare som mäter bålens rörelser för att beräkna
sex typer av löpningsdata.
Obs! Funktionerna för löpdynamik är bara tillgängliga på vissa
Garmin enheter.
*Enheten klarar tryck som motsvarar ett djup på 10 m. Mer
information hittar du på www.garmin.com/waterrating.
Byta batteri
Ta bort enheten från det flexibla silikonclipset genom att
1
sträcka ut clipsets material runt enheten.
Vrid locket À på baksidan av enheten moturs för att låsa upp
2
den.
Ta bort locket och batteriet Á.
3
TIPS: Du kan använda en tejpbit eller en magnet för att ta
bort batteriet från locket.
Vänta i 30 sekunder.
4
Sätt i det nya batteriet i locket i rätt polriktning.
5
Obs! Se till att du inte skadar eller tappar bort O-
ringspackningen.
Sätt tillbaka locket och vrid medurs för att låsa fast den.
6
24 Installationsinstruktioner
Page 25

Obs! Se till att du inte nyper O-ringspackningen. Oringspackningen ska inte synas när luckan är låst.
Sätt i enheten i det flexibla silikonclipset genom att sträcka ut
7
clipsets material runt enheten.
Löparsymbolen på enheten ska passas ihop med
löparsymbolen inuti klämman.
Skötsel av enheten
OBS!
Undvik kraftiga stötar och ovarsam hantering eftersom det kan
förkorta produktens livslängd.
Använd inte kemiska rengöringsmedel, lösningsmedel eller
insektsmedel som kan skada plastkomponenter och ytor.
Rengöra enheten
OBS!
Undvik att tvätta enheten i tvättmaskinen. Enheten är
konstruerad för att tåla enstaka, oavsiktliga maskintvättar på
medelhög eller sval temperatur. Återkommande maskintvätt,
varma tvättemperaturer eller torktumling kan skada enheten.
Torka av enheten med en fuktad trasa med milt
1
rengöringsmedel.
Torka enheten torr.
2
Installationsinstruktioner 25
Page 26

RUNNING DYNAMICS POD
Instrukcja instalacji
Wstęp
OSTRZEŻENIE
Należy zapoznać się z zamieszczonym w opakowaniu produktu
przewodnikiem Ważne informacje dotyczące bezpieczeństwa
i produktu zawierającym ostrzeżenia i wiele istotnych
wskazówek.
Włączanie czujnika
Czujnik można włączyć, potrząsając nim w pionie lub biegnąc
z nim przez chwilę.
jest wyposażony w akcelerometr, który mierzy ruch tułowia
w celu obliczania sześciu parametrów biegu.
UWAGA: Funkcje dynamiki biegu są dostępne tylko
w określonych urządzeniach Garmin.
Rytm: Rytm to liczba kroków na minutę. Wyświetla całkowitą
liczbę kroków (lewej i prawej nogi łącznie).
Odchylenie pionowe: Odchylenie pionowe oznacza wysokość
odbicia podczas biegu. Wyświetla pionowy ruch tułowia dla
każdego kroku, mierzony w centymetrach.
Czas kontaktu z podłożem: Czas kontaktu z podłożem to czas,
przez jaki stopa ma kontakt z powierzchnią ziemi podczas
biegu. Wartość jest mierzona w milisekundach.
UWAGA: Funkcja czasu kontaktu z podłożem i bilansu są
niedostępne podczas chodu.
Bilans czasu kontaktu z podłożem: Bilans czasu kontaktu
z podłożem wyświetla bilans czasu kontaktu lewej/prawej
nogi z podłożem podczas biegu. Wartość jest mierzona
w procentach. Na przykład 53,2 ze strzałką skierowaną
w lewo lub prawo.
Długość kroku: Długość kroku mierzona od jednego zetknięcia
nogi z podłożem do następnego. Wartość jest mierzona
w metrach.
Odchylenie do długości: Odchylenie do długości to stosunek
wartości odchylenia pionowego do długości kroku. Wartość
jest mierzona w procentach. Niższa wartość zazwyczaj
oznacza lepszą formę.
Parowanie czujnika z posiadanym zgodnym urządzeniem
Parowanie polega na powiązaniu czujników bezprzewodowych
ANT+ ze zgodnym urządzeniem. Opis procedury zawarty w tej
instrukcji dotyczy modelu Forerunner 735XT. W przypadku
innych zgodnych urządzeń należy zapoznać się z dołączonym
do nich podręcznikiem użytkownika.
Włącz czujnik.
1
Po włączeniu urządzenia Forerunner wybierz , a następnie
2
profil biegu.
Umieść urządzenia blisko siebie.
3
Poczekaj, aż urządzenie połączy się z czujnikiem.
4
W razie potrzeby wybierz kolejno Menu > Ustawienia >
Czujniki i akcesoria > Dodaj nowy > Szukaj wszystko, aby
sparować czujniki bezprzewodowe ANT+ i nimi zarządzać.
Zostanie wyświetlony komunikat. W trybie biegu ikona
oznacza, że czujnik jest podłączony.
Po wstępnym sparowaniu urządzenie będzie automatycznie
łączyć się z czujnikiem po rozpoczęciu biegu, jeśli czujnik
będzie aktywny i będzie znajdował się w jego zasięgu.
Dane techniczne
Typ baterii Wymieniana przez użytkownika bateria
Czas działania baterii 1 rok (ok. 1 godz. dziennie)
Zakres temperatury roboczej Od -10°C do 50°C (od 14°F do 122°F)
Częstotliwość radiowa/
protokół
Klasa wodoszczelności 1 atm*
* Urządzenie jest odporne na ciśnienie odpowiadające
zanurzeniu na głębokość 10 metrów. Więcej informacji można
znaleźć na stronie www.garmin.com/waterrating.
CR1632
Protokół komunikacji bezprzewodowej
2,4 GHz ANT+
Wymienianie baterii
Wyjmij czujnik z elastycznego zaczepu silikonowego,
1
naciągając jego materiał wokół urządzenia.
Przekręć w lewo pokrywkę À na tylnej części czujnika, aby ją
2
otworzyć.
Dynamika biegu
Czujnika można używać razem ze zgodnym urządzeniem w celu
przekazywania bieżących danych o kondycji biegowej. Czujnik
26 Instrukcja instalacji
Page 27

Zdejmij pokrywę i wyjmij baterię Á.
3
PORADA: Możesz użyć kawałka taśmy lub magnesu, aby
zdjąć baterię z pokrywki.
Poczekaj 30 sekund.
4
Włóż nową baterię do pokrywki, uwzględniając bieguny.
5
UWAGA: Nie należy dopuścić do uszkodzenia lub zgubienia
okrągłej uszczelki.
Nałóż pokrywkę i przekręć w prawo, aby ją zamknąć.
6
UWAGA: Nie należy ściskać okrągłej uszczelki. Po
zamknięciu pokrywki okrągła uszczelka nie powinna być
widoczna.
Umieść czujnik w elastycznym zaczepie silikonowym,
7
naciągając jego materiał wokół czujnika.
Ikona biegu na czujniku musi być dopasowana do ikony
biegu na zaczepie.
Wskazówki dotyczące bezpieczeństwa urządzenia
NOTYFIKACJA
Unikać mocnych wstrząsów i niewłaściwego korzystania,
ponieważ może ono skrócić okres eksploatacji urządzenia.
Nie należy używać chemicznych środków czyszczących,
rozpuszczalników ani środków odstraszających owady,
ponieważ mogą one uszkodzić elementy plastikowe.
Czyszczenie urządzenia
NOTYFIKACJA
Nie należy myć czujnika w pralce. Czujnik został
zaprojektowany w taki sposób, aby wytrzymać ewentualne
przypadkowe umycie w pralce w średniej lub niskiej
temperaturze. Częste mycie w pralce, mycie w wysokiej
temperaturze lub w suszarce mogą uszkodzić czujnik.
Przetrzyj urządzenie ściereczką zwilżoną łagodnym
1
roztworem czyszczącym.
Wytrzyj do sucha.
2
Instrukcja instalacji 27
Page 28

RUNNING DYNAMICS POD
Pokyny pro instalaci
Úvod
VAROVÁNÍ
Přečtěte si leták Důležité bezpečnostní informace a informace
o produktu vložený v obalu s výrobkem. Obsahuje varování a
další důležité informace.
Probuzení snímače
Snímač probudíte potřesením ve svislém směru nebo
uběhnutím několika kroků.
Párování snímače s kompatibilním zařízením
Párováním označujeme propojení bezdrátového snímače ANT+
s kompatibilním zařízením. Tento postup obsahuje pokyny pro
zařízení 735XT Forerunner. Pokud máte jiné kompatibilní
zařízení, podívejte se do uživatelské příručky.
Probuďte snímač.
1
Kadence: Kadence je počet kroků za minutu. Zobrazuje celkový
počet kroků (pravou a levou nohou dohromady).
Vertikální oscilace: Vertikální oscilace je odraz při běhu.
Zobrazuje vertikální pohyb vašeho trupu měřený
v centimetrech na každý krok.
Doba kontaktu se zemí: Doba kontaktu se zemí představuje
dobu, kterou při běhu strávíte během každém kroku na zemi.
Měří se v milisekundách.
POZNÁMKA: Během chůze není doba kontaktu se zemí a
vyvážení k dispozici.
Vyváženost doby kontaktu se zemí: Vyváženost doby
kontaktu se zemí zobrazuje poměr kontaktu se zemí u levé a
pravé nohy. Zobrazuje se hodnota v procentech. Na displeji
je například hodnota 53,2 se šipkou doleva nebo doprava.
Délka kroku: Délka kroku je vzdálenost od jednoho došlápnutí
ke druhému. Měří se v metrech.
Vertikální poměr: Vertikální poměr je poměr výšky kroku k jeho
délce. Zobrazuje se hodnota v procentech. Nižší hodnota
obvykle označuje lepší běžeckou formu.
Technické údaje
Typ baterie Vyměnitelná baterie CR1632
Výdrž baterie 1 rok (přibližně 1 hodina denně)
Rozsah provozních teplot -10 až 50 °C (14 až 122 °F)
Rádiová frekvence/protokol Protokol pro bezdrátovou komunikaci
Stupeň vodotěsnosti 1 atmosféra*
*Zařízení vydrží tlak odpovídající hloubce 10 m. Další informace
najdete na webové stránce www.garmin.com/waterrating.
ANT+ 2,4 GHz
Výměna baterie
Roztáhněte silikonový klip kolem snímače a snímač vyjměte.
1
Uvolněte kryt À na zadní straně snímače otočením proti
2
směru hodinových ručiček.
V zařízení Forerunner vyberte možnost a zvolte profil
2
běhu.
Umístěte obě zařízení do vzájemné blízkosti.
3
Počkejte, až se zařízení připojí ke snímači.
4
V případě potřeby můžete bezdrátové snímače ANT+ párovat
a spravovat v nabídce Menu > Nastavení > Snímače
a příslušenství > Přidat novou položku > Vyhledat vše.
Zobrazí se zpráva. Ikona v režimu běhu označuje, že je
snímač připojen.
Po provedení prvního spárování se zařízení automaticky připojí
k aktivnímu snímači v dosahu, když jdete běhat.
Dynamika běhu
V kombinaci s kompatibilním zařízením poskytuje snímač údaje
o vaší běžecké formě v reálném čase. Snímač je vybaven
akcelerometrem, který sleduje pohyby těla a vypočítává z nich
šest metrik běhu.
POZNÁMKA: Funkce dynamiky běhu jsou dostupné pouze na
některých zařízeních Garmin.
28 Pokyny pro instalaci
Vyjměte kryt a baterii. Á.
3
TIP: Baterii můžete z pouzdra vyjmout pomocí lepicí pásky
nebo magnetu.
Počkejte 30 sekund.
4
Vložte do pouzdra novou baterii a dbejte na polaritu.
5
POZNÁMKA: Dejte pozor, abyste nepoškodili nebo neztratili
těsnící O-kroužek.
Vraťte kryt na místo a otočením po směru hodinových ručiček
6
jej uzavřete.
Page 29

POZNÁMKA: Dejte pozor, abyste neporušili těsnění. Když je
kryt správně uzavřen, těsnění nesmí být vidět.
Roztáhněte silikonový klip kolem snímače a snímač vložte
7
zpět.
Ikona běhu na snímači musí být na stejném místě jako ikona
běhu uvnitř klipu.
Péče o zařízení
OZNÁMENÍ
Nevystavujte zařízení působení extrémních otřesů a hrubému
zacházení, protože by mohlo dojít ke snížení životnosti
produktu.
Nepoužívejte chemické čističe, rozpouštědla a odpuzovače
hmyzu, protože by mohly poškodit plastové součásti a
koncovky.
Čištění zařízení
OZNÁMENÍ
Neperte snímač v pračce. Snímač je vyroben tak, aby nedošlo
k jeho poškození při občasném vyprání na nízkou nebo
studenou teplotu. Při častém praní, při vysokých teplotách nebo
při sušení v sušičce by mohlo dojít k jeho poškození.
Otřete zařízení pomocí tkaniny namočené v roztoku jemného
1
čisticího prostředku.
Otřete zařízení do sucha.
2
Pokyny pro instalaci 29
Page 30

RUNNING DYNAMICS POD
Navodila za namestitev
Uvod
OPOZORILO
Za opozorila in pomembne informacije o izdelku si oglejte
navodila Pomembne informacije o varnosti in izdelku v škatli
izdelka.
Bujenje senzorja
Senzor prebudite tako, da ga stresete v navpični smeri ali
pretečete nekaj korakov.
Združevanje senzorja z združljivo napravo
Združevanje je povezovanje brezžičnih senzorjev ANT+ z
združljivo napravo. Ta postopek zajema navodila za napravo
Forerunner 735XT. Če imate drugo združljivo napravo, si oglejte
priročnik za njeno uporabo.
Prebudite senzor.
1
Navpično nihanje: navpično nihanje je poskakovanje med
tekom. Prikazuje navpično premikanje telesa, izmerjeno v
centimetrih za posamezen korak.
Čas stika s tlemi: čas stika s tlemi je obdobje, ki ga med tekom
pri vsakem koraku porabite na tleh. Izmerjen je v
milisekundah.
OPOMBA: med hojo čas stika s tlemi in njegova
uravnoteženost nista na voljo.
Uravnoteženost časa stika s tlemi: uravnoteženost časa stika
s tlemi prikazuje uravnoteženost časa stika s tlemi med levo
in desno nogo pri teku. Prikazuje odstotni delež. Na primer
53,2 s puščico v levo ali desno.
Dolžina koraka: dolžina koraka je dolžina od enega stika s tlemi
do drugega. Meri se v metrih.
Navpično razmerje: navpično razmerje je razmerje med
navpičnim nihanjem in dolžino koraka. Prikazuje odstotni
delež. Nižje število običajno pomeni boljši način teka.
Specifikacije
Vrsta baterije Baterija CR1632, ki jo lahko zamenja
Avtonomija baterije 1 leto (približno 1 ura/dan)
Temperaturni obseg
delovanja
Radijska frekvenca/
protokol
Nazivna vodotesnost 1 ATM*
*Naprava zdrži pritisk, enakovreden tistemu na globini 10 m. Za
več informacij obiščite www.garmin.com/waterrating.
uporabnik
Od –10 do 50 °C (od 14 do 122 °F)
2,4 GHz protokol brezžične komunikacije
ANT+
Zamenjava baterije
Senzor odstranite iz prožne silikonske zaponke, in sicer tako,
1
da raztegnete material okoli njega.
Zavrtite pokrovček À na hrbtni strani senzorja v nasprotni
2
smeri urinega kazalca.
V napravi Forerunner izberite , nato pa izberite profil teka.
2
Približajte napravi.
3
Počakajte, da naprava vzpostavi povezavo s senzorjem.
4
Po potrebi lahko izberete Meni > Nastavitve > Senzorji in
dodatna oprema > Dodaj novo > Preišči vse za
združevanje in upravljanje brezžičnih senzorjev ANT+.
Prikaže se sporočilo. V načinu teka ikona označuje, da je
vzpostavljena povezava s senzorjem.
Po prvem združevanju se naprava samodejno poveže s
senzorjem, ko začnete teči, senzor pa je aktiven in v dosegu.
Dinamika teka
Če senzor uporabite skupaj z združljivo napravo, lahko prikažete
povratne informacije o načinu teka v realnem času. Senzor je
opremljen z merilnikom pospeškov, ki z merjenjem gibanja trupa
izračuna šest parametrov teka.
OPOMBA: funkcije dinamike teka so na voljo samo v nekaterih
napravah Garmin.
Kadenca: kadenca je število korakov v minuti. Prikazuje skupno
število korakov (desne in leve noge).
30 Navodila za namestitev
Odstranite pokrovček in baterijo Á.
3
NAMIG: baterijo lahko iz pokrova odstranite s koščkom
lepilnega traku ali magnetom.
Počakajte 30 sekund.
4
Vstavite novo baterijo v pokrovček, pri čemer upoštevajte
5
usmerjenost polov.
OPOMBA: ne poškodujte ali razrahljajte tesnilnega obročka.
Page 31

Pokrovček namestite nazaj in ga zavrtite v smeri urinega
6
kazalca, da se zapre.
OPOMBA: ne priprite tesnilnega obročka. Ko je pokrovček
zaprt, tesnilni obroček ne sme biti viden.
Senzor vstavite v prožno silikonsko zaponko, in sicer tako, da
7
raztegnete material okoli njega.
Ikona teka na senzorju mora biti poravnana z ikono teka na
notranjem delu zaponke.
Nega naprave
OBVESTILO
Naprave ne izpostavljajte ekstremnim šokom in grobim
ravnanjem, saj ti lahko skrajšajo njeno življenjsko dobo.
Ne uporabljajte kemičnih čistil, topil in zaščitnih sredstev proti
mrčesu, ki lahko poškodujejo plastične dele in barvo.
Čiščenje naprave
OBVESTILO
Senzorja ne operite v pralnem stroju. Senzor je izdelan tako, da
je odporen na občasno, nenamerno pranje v pralnem stroju pri
srednji ali nizki temperaturi. Pri pogostem pranju v pralnem
stroju, visokih temperaturah pranja ali sušenju v sušilniku se
senzor lahko poškoduje.
Napravo obrišite s krpo, navlaženo z raztopino blagega mila.
1
Obrišite jo do suhega.
2
Navodila za namestitev 31
Page 32

RUNNING DYNAMICS POD
Upute za instalaciju
Uvod
UPOZORENJE
U kutiji proizvoda potražite list Važni podaci o sigurnosti i
proizvodu koji sadrži upozorenja i druge važne informacije o
proizvodu.
Uključivanje senzora
Senzor uključite tako što ćete ga protresti gore-dolje ili otrčati
nekoliko koraka.
Uparivanje senzora i kompatibilnog uređaja
Uparivanje je povezivanje ANT+ bežičnih senzora s
kompatibilnim uređajem. U ovom se postupku nalaze upute za
uređaj Forerunner 735XT. Ako imate neki drugi kompatibilni
uređaj, proučite svoj korisnički priručnik.
Uključite senzor.
1
Kadenca: Kadenca je broj koraka u minuti. Prikazuje ukupan
broj koraka (lijevom i desnom nogom).
Vertikalna oscilacija: Vertikalna oscilacija je odskakivanje dok
trčite. Prikazuje okomito kretanje vašeg trupa, mjereno u
centimetrima za svaki korak.
Vrijeme dodira s tlom: Vrijeme dodira s tlom je količina
vremena u svakom koraku koju provedete na tlu tijekom
trčanja. Mjeri se u milisekundama.
NAPOMENA: Vrijeme dodira s tlom i balans vremena dodira
s tlom nisu dostupni tijekom hodanja.
Balans vremena dodira s tlom: Balans vremena dodira s tlom
pokazuje balans dodira s tlom lijeve i desne noge za vrijeme
trčanja. Prikazuje se kao postotak. Primjerice, 53,2 i strelica
koja pokazuje lijevo ili desno.
Duljina koraka: Duljina koraka je duljina izmjerena od jednog
mjesta dodira s tlom do drugog. Mjeri se u metrima.
Omjer vertikalne oscilacije: Omjer vertikalne oscilacije je
vertikalna oscilacija u odnosu na duljinu koraka. Prikazuje se
kao postotak. Manji broj obično ukazuje na bolju trkačku
formu.
Specifikacije
Vrsta baterije Zamjenjiva CR1632
Trajanje baterije 1 godina (otprilike 1 h dnevno)
Raspon radne
temperature
Radijska frekvencija/
protokol
Vodootpornost 1 ATM*
*Uređaj može podnijeti tlak istovjetan onome na dubini od 10 m.
Dodatne informacije potražite na web-mjestu www.garmin.com
/waterrating.
Od -10 ° do 50 °C (od 14 ° do 122 °F)
ANT+ bežični komunikacijski protokol od
2,4 GHz
Na Forerunner uređaju odaberite , a zatim odaberite profil
2
za trčanje.
Uređaje stavite blizu jedan drugome.
3
Pričekajte da se uređaj poveže sa senzorom.
4
Ako je to potrebno, možete odabrati Izbornik > Postavke >
Senzori i dodaci > Dodaj novo > Pretraži sve kako biste
uparili ANT+ bežične senzore i upravljali njima.
Pojavljuje se poruka. U načinu trčanja označuje da je
senzor povezan.
Nakon početnog uparivanja uređaj se automatski povezuje sa
senzorom kada trčite, a senzor je aktivan i unutar dometa.
Dinamika trčanja
Senzor možete upotrebljavati s kompatibilnim uređajem kako bi
vam davao povratne informacije o vašoj trkačkoj kondiciji u
stvarnom vremenu. Senzor ima brzinomjer koji mjeri pokrete
prsnog koša kako bi izračunao šest parametara trčanja.
NAPOMENA: Značajke dinamike trčanja dostupne su samo na
određenim Garmin uređajima.
Zamjena baterije
Senzor izvadite iz savitljive silikonske spojnice rastezanjem
1
materijala oko senzora.
Zakrenite poklopac À sa stražnje strane senzora u smjeru
2
suprotnom od kazaljke na satu kako biste ga otključali.
Skinite poklopac i izvadite bateriju Á.
3
SAVJET: Bateriju iz poklopca možete izvaditi pomoću
ljepljive trake ili magneta.
Pričekajte 30 sekundi.
4
U poklopac umetnite novu bateriju pazeći pritom na polaritet.
5
32 Upute za instalaciju
Page 33

NAPOMENA: Nemojte oštetiti ili izgubiti brtvu o-prsten.
Vratite poklopac i zakrenite ga u smjeru kazaljke na satu
6
kako biste ga zaključali.
NAPOMENA: Nemojte pritiskati brtvu O-prsten. Brtva O-
prsten ne smije biti vidljiva kad je poklopac zaključan.
Senzor umetnite u savitljivu silikonsku spojnicu rastezanjem
7
materijala oko senzora.
Ikona trčanja na senzoru mora biti u ravnini s ikonom trčanja
unutar spojnice.
Postupanje s uređajem
OBAVIJEST
Izbjegavajte snažne udarce i grubo rukovanje jer to može skratiti
vijek trajanja proizvoda.
Izbjegavajte kemijska sredstva za čišćenje, otapala i sredstva za
tjeranje kukaca koja mogu oštetiti plastične komponente i
površine.
Čišćenje uređaja
OBAVIJEST
Senzor nemojte prati u perilici rublja. Senzor je izrađen kako bi
izdržao povremeno slučajno pranje u perilici rublja na srednjoj ili
niskoj temperaturi. Često pranje u perilici rublja, pranje na
visokoj temperaturi ili sušenje u sušilici mogu oštetiti senzor.
Obrišite uređaj krpom navlaženom blagom otopinom
1
deterdženta.
Brišite ga dok ne bude suh.
2
Upute za instalaciju 33
Page 34

© 2017 Garmin Ltd. or its subsidiaries support.garmin.com
 Loading...