

Garmin iQue M5 Application Guide
iQue® M5
integrated handheld
Que™ applications guide

© Copyright 2004 Garmin Ltd. or its subsidiaries
Garmin International, Inc.
1200 East 151st Street
Olathe, Kansas 66062, U.S.A.
Tel. 913/397.8200 or 800/800.1020
Fax 913/397.8282
Garmin (Europe) Ltd.
Unit 5, The Quadrangle
Abbey Park Industrial Estate
Romsey, SO51 9DL, U.K.
Tel. 44/0870.8501241
Garmin Corporation
No. 68, Jangshu 2nd Road
Shijr, Taipei County, Taiwan
Tel. 886/2.2642.9199
Fax 886/2.2642.9099
Fax 44/0870.8501251
All rights reserved. Except as expressly provided herein, no part of this manual may be reproduced, copied, transmitted,
disseminated, downloaded or stored in any storage medium, for any purpose without the express prior written consent of Garmin.
Garmin hereby grants permission to download a single copy of this manual onto a hard drive or other electronic storage medium to
be viewed and to print one copy of this manual or of any revision hereto, provided that such electronic or printed copy of this manual
must contain the complete text of this copyright notice and provided further that any unauthorized commercial distribution of this
manual or any revision hereto is strictly prohibited.
Information in this document is subject to change without notice. Garmin reserves the right to change or improve its products and
to make changes in the content without obligation to notify any person or organization of such changes or improvements. Visit the
Garmin Web site (www.garmin.com) for current updates and supplemental information concerning the use and operation of this and
other Garmin products.
Garmin®, iQue®, MapSource®, City Select®, and BlueChart® are registered trademarks and Que™, QueGPS™, QueMap™, QueFind™,
and AutoLocate
™
are trademarks of Garmin Ltd. or its subsidiaries and may not be used without the express permission of Garmin.
Microsoft®, ActiveSync®, and Outlook® are registered trademarks and Windows Mobile™ is a trademark of Microsoft Corporation in
the United States and/or other countries.
This [language] version of the iQue M5 English manual (Garmin part number 190-00427-03, revision A) is provided as a
convenience. If necessary, please consult the most recent revision of the English manual regarding the operation and use of the
iQue M5.

INTRODUCTION
INTRODUCTION
Thank you for choosing the Garmin® iQue® M5,
which combines Windows Mobile™ technology with
the proven performance of Garmin GPS navigation!
To learn to navigate with your new iQue, refer to the
following sections of this Que Applications Guide:
Getting Started—Open the GPS antenna, acquire
satellite signals, and follow the Getting Started Tutorial
in this section to start navigating immediately.
Basic Operation—Learn to use your iQue M5 to find
places, create routes, and save Locations.
Detailed Operation—Explore the powerful features of
the iQue M5 and enhance your navigating experience
by learning to use advanced features.
Customizing—Customize the iQue M5 to suit your
needs and preferences.
Appendix—Be sure to read the Warnings and
Safety Information to learn how to install and use
your iQue M5 safely and responsibly.
Refer to the Setup Guide, Operating Instructions, and
Quick Reference Guide for more help:
Setup Guide
Follow the instructions in the Setup Guide to charge the
battery, set up your iQue M5, connect to your personal
computer, and install necessary software. You must
follow the instructions given in the Setup Guide
before you can use your iQue M5!
Operating Instructions
The Operating Instructions, located on the Companion
CD, describe how to use the Windows Mobile™
software on your iQue M5.
Quick Reference Guide
Use the compact Quick Reference Guide as a handy
reference and a summary of important and useful iQue
M5 functions.
Index—Use the index to find information quickly.
iQue M5 Que Applications Guide i

INTRODUCTION > TABLE OF CONTENTS
Introduction ............................. i
Getting Started ....................... 1
Opening the GPS Antenna .......... 1
Acquiring Satellite Signals .......... 2
Troubleshooting ....................... 3
Getting Started Tutorial .............. 4
Basic Operation ..................... 6
Main Pages ................................... 6
Using QueMap ............................. 7
Using the Pan Toolbar ................. 8
Finding Points & Creating
Routes ..................................... 9
Finding Cities ........................10
Finding Addresses .................. 10
Finding Intersections .............12
Finding Points of Interest ......12
Recently-Found Places .......... 14
Routing to a Map Point .............15
Saving Routes ............................. 16
Tips for Navigating .................... 17
Saving Locations ........................18
Saving a Home Location .......19
Detailed Operation .............. 20
Building Complex Routes ......... 20
Adding Extra Stops ................20
Taking Detours ...................... 22
Avoiding Roads and Areas ..... 22
My Locations .............................26
Editing Locations ...................26
Organizing Locations ............. 28
Routing to Contacts ...................29
Routing to Appointments .......... 31
Using Additional Features ........32
Measuring Distances .............. 32
Using Track Logs ................... 33
Viewing Trip Data .................34
Viewing the Almanac ............. 35
Customizing ......................... 36
Customizing System Settings .... 36
Changing Language ............... 36
Changing GPS Mode ............. 36
Changing Units ...................... 36
Customizing the Map ................ 37
Changing Orientation ............ 37
Changing Color ...................... 38
Changing Map Detail ............. 38
Off-Road Navigation ............. 38
Viewing Map Information ..... 38
Changing Data Fields ............39
Changing Zoom Options .......40
Customizing QueFind ............... 41
Customizing for Navigation ...... 42
Changing Guidance ...............42
Changing Route Calculation ..42
Off-Route Recalculation ........ 42
Changing Vehicle Type ..........42
Customizing Routes ................... 43
Customizing the Que Button .... 44
Restoring Default Settings ........ 45
Appendix .............................. 46
About QueGPS ..........................46
What is GPS? ............................. 47
Loading Detailed Maps ............. 48
iQue M5 Messages ..................... 49
Vehicle Installation .................... 50
Specifications .............................. 52
Product Registration ................. 54
Software License Agreement .... 55
Warnings and Precautions ........56
CE Compliance .......................... 58
FCC Compliance ....................... 59
Limited Warranty ..................... 60
Index ..................................... 63
ii iQue M5 Que Applications Guide
GETTING STARTED > OPENING THE GPS ANTENNA
GETTING STARTED
To begin using your iQue M5, open the GPS antenna
and acquire satellite signals. After that, follow the
Getting Started Tutorial on page 4 to start navigating
immediately.
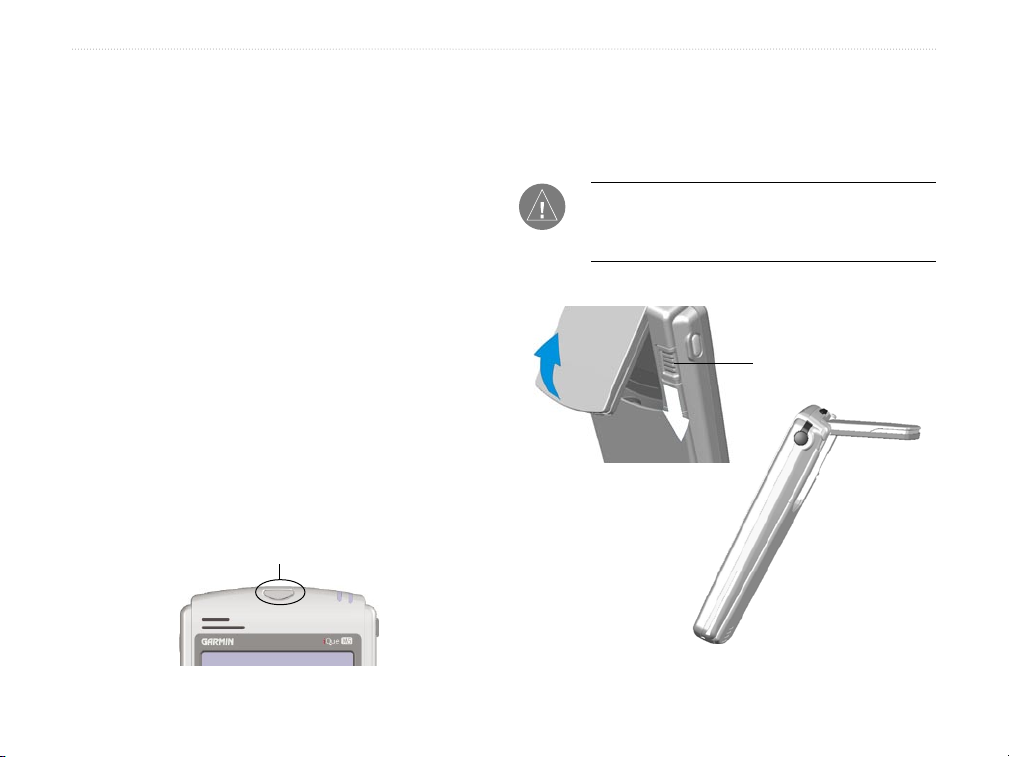
Opening the GPS Antenna
The GPS antenna opens from the back of the iQue M5
and clicks into four different positions (each position is
called a detent). For best results, position the antenna
so that it is parallel to the horizon and so that it clicks
into place. Do not try to position the antenna “between”
detents.
To open the GPS antenna:
1. Turn on the iQue M5 by pressing the Power
button, located above the screen.
Power button
2. Press down on the antenna release, located on
the back of the iQue M5.
3. Gently pull the antenna up until it is parallel to
the horizon and until it clicks into place.
NOTE: The antenna works best when positioned
at an angle to the iQue M5 (second or third
“click” of the antenna).
Antenna release
iQue M5 Que Applications Guide 1
GETTING STARTED > ACQUIRING SATELLITE SIGNALS
Acquiring Satellite Signals
The process of acquiring satellite signals for the first
time is called initialization. Initializing allows the
iQue M5 to receive and store satellite information.
The process happens automatically when you open the
GPS antenna and may take several minutes. After you
initialize, the iQue M5 should acquire satellite signals
quickly each time you open the GPS antenna.
To acquire satellite signals, you must be outdoors
where you have a clear view of the sky. Avoid standing
near tall buildings or trees, as they may block satellite
signal reception.
To initialize your iQue M5:
1. Go outdoors where you have a clear view of
the sky.
2. Turn on the iQue M5 and open the GPS
antenna as explained on the previous page.
Use the stylus to tap OK on the screen when
the warning appears.
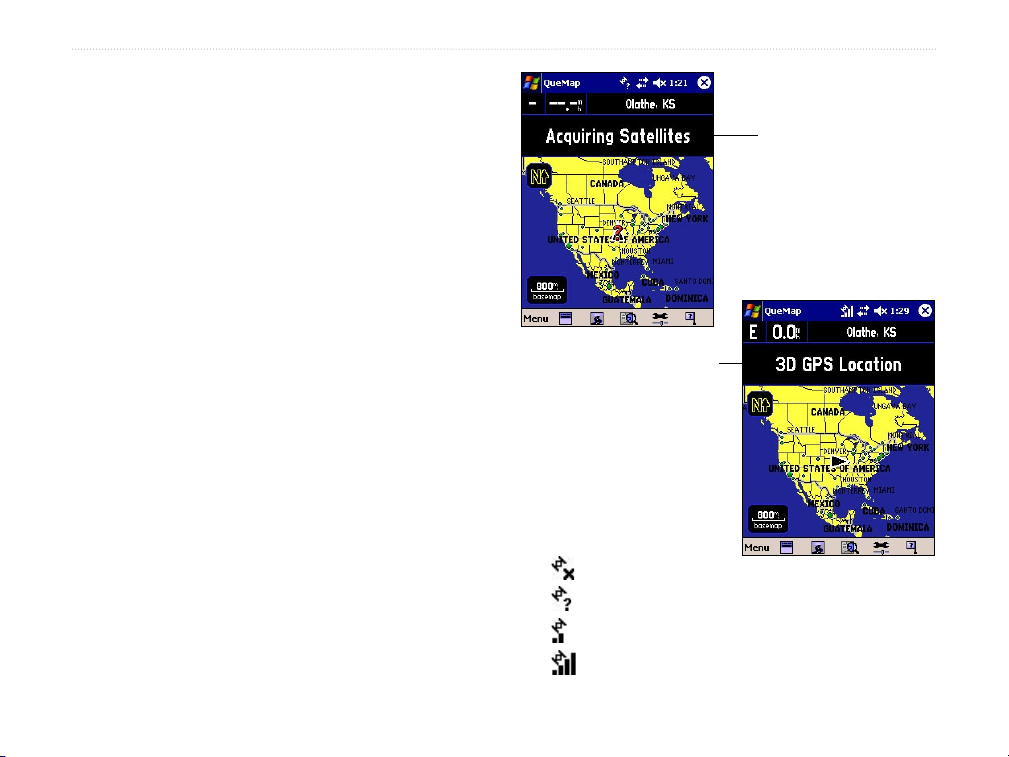
3. Wait while the iQue M5 searches for satellite
signals.
When the iQue M5 acquires
enough satellite signals, the
or “3D GPS Location.”
The System Status icon at
the top of the page also
While the iQue M5 is
searching, an “Acquiring
Satellites” message appears
at the top of QueMap.
message changes to
“2D GPS Location”
changes:
GPS off
GPS on, searching
GPS on, location known
GPS on, location known, strong signal
2 iQue M5 Que Applications Guide
GETTING STARTED > ACQUIRING SATELLITE SIGNALS
Troubleshooting
4. Use the Pan Toolbar at the top of the page to
If you have trouble initializing your iQue M5, try these
tips and suggestions:
• Make sure the GPS antenna is raised and is
5. Tap the map to place the map pointer at your
parallel to the horizon.
• Make sure you are in an open area that is
unobstructed by tall buildings or trees.
• Make sure you have given the iQue M5 enough
time to initialize: it may take several minutes.
• Try turning the iQue M5 off and then back on.
• If you have moved a long distance since you last
used the iQue M5, or if initializing takes a long
time, use the QueGPS™ page to change your
location, as described below.
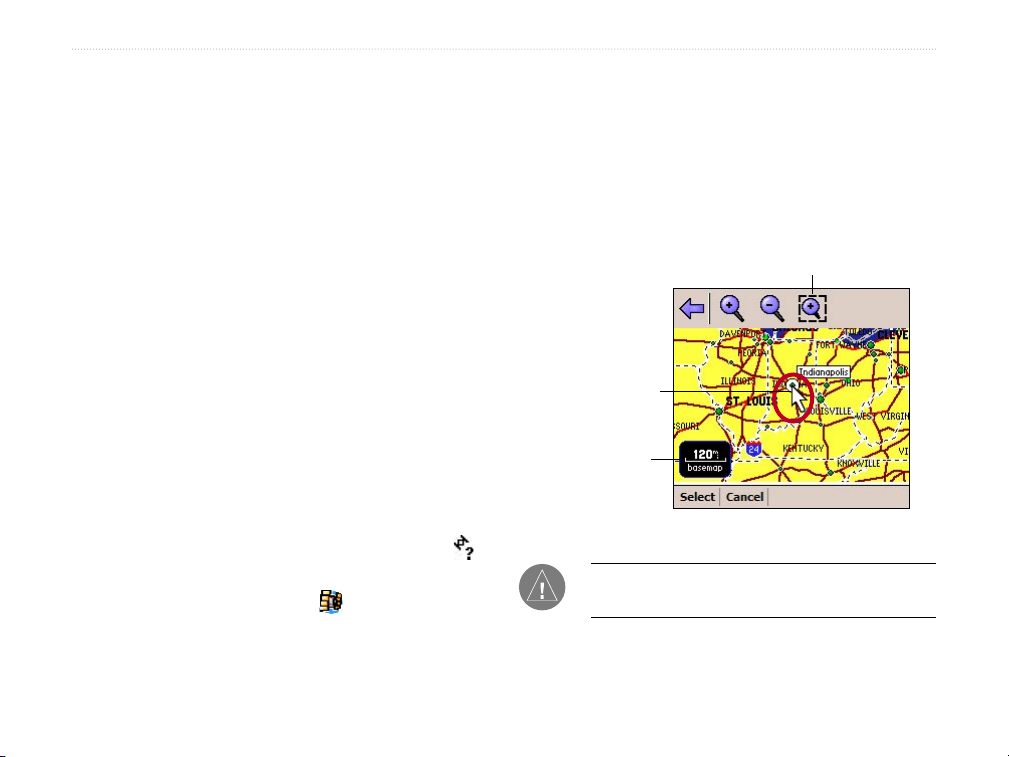
To
change your location:
1. With the iQue M5 turned on and the GPS
antenna open, tap the System Status icon
at the top of the page.
2. Tap the GPS Status icon (“Acquiring
Satellites”) to open QueGPS.
3. Tap Menu. Then tap New Location.
Tap to choose a
6. Tap
find your approximate position on the map.
See “Using the Pan Toolbar,” page 8, for more
information.
approximate position.
Tap to draw zoom area. Tap
again to pan map.
Tap to place the
map pointer
zoom scale
Select.
NOTE: For more information about QueGPS,
refer to page 46.
iQue M5 Que Applications Guide 3
GETTING STARTED > TUTORIAL
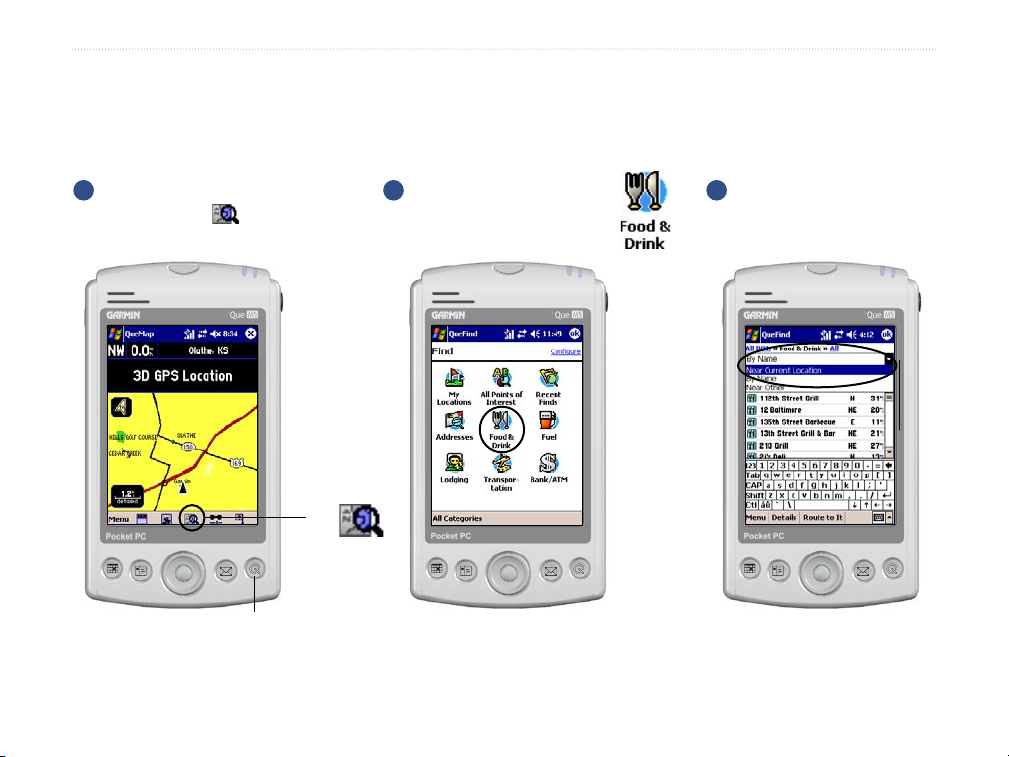
Getting Started Tutorial
Search for a restaurant and navigate to it in four simple steps! Be sure to follow the instructions in the Setup Guide
to load detailed maps and on pages 1–3 to acquire satellites before you begin the tutorial.
2
1
Remove the stylus. Then tap the
QueFind icon on QueMap.
Tap
Tap the Food & Drink icon.
3
Tap the drop-down menu and
select Near Current Location.
Press the Que button
to open the QueMap
page, if necessary
4 iQue M5 Que Applications Guide

GETTING STARTED > TUTORIAL
4
Scroll down the list of restaurants. When you see
one you like, tap to select it. Then tap
Your route appears on the QueMap page,
highlighted in purple.
at the bottom of the page.
Tap to
scroll.
Your destination
is here.
You are here.
Tap a restaurant in
the list. Then tap
Press and hold the Que
button to hear directions.
iQue M5 Que Applications Guide 5
BASIC OPERATION > MAIN PAGES
BASIC OPERATION
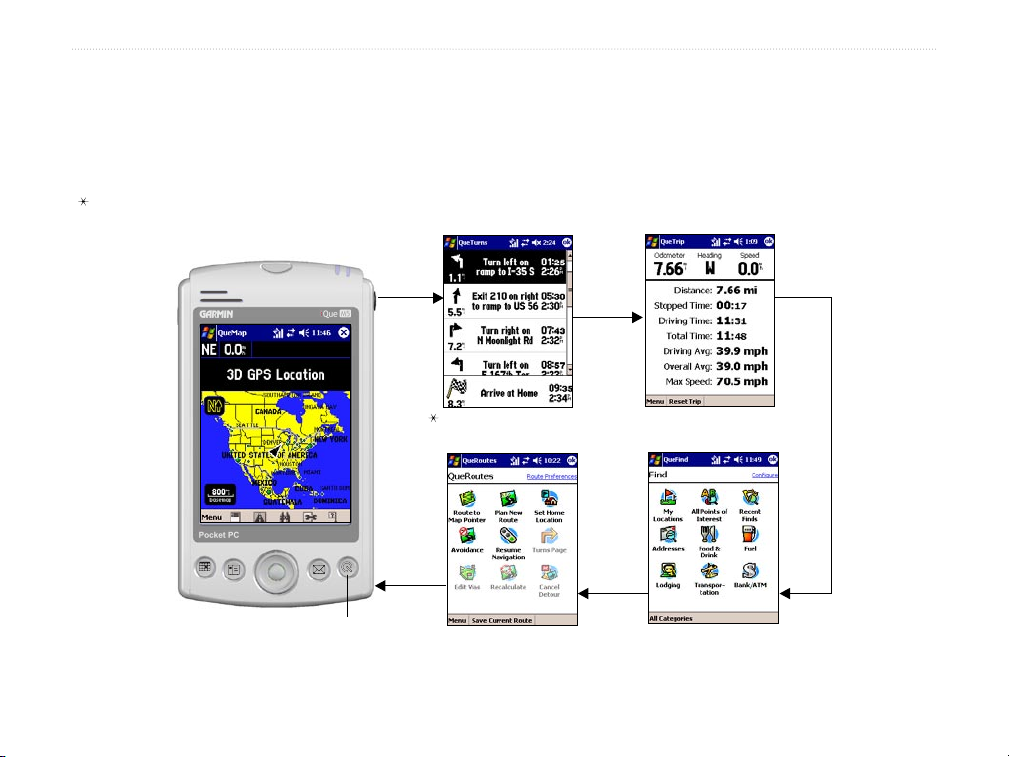
Main Pages
The iQue M5 has five main pages to help you navigate. Press the Que button to open each page in the order shown.
( The QueTurns page appears when you have an active route.)
QueMap™ Page
QueTurns Page
Press the Que button to
scroll through the pages.
6 iQue M5 Que Applications Guide
QueRoutes Page
QueTrip Page
QueFind™ Page
BASIC OPERATION > USING QUEMAP
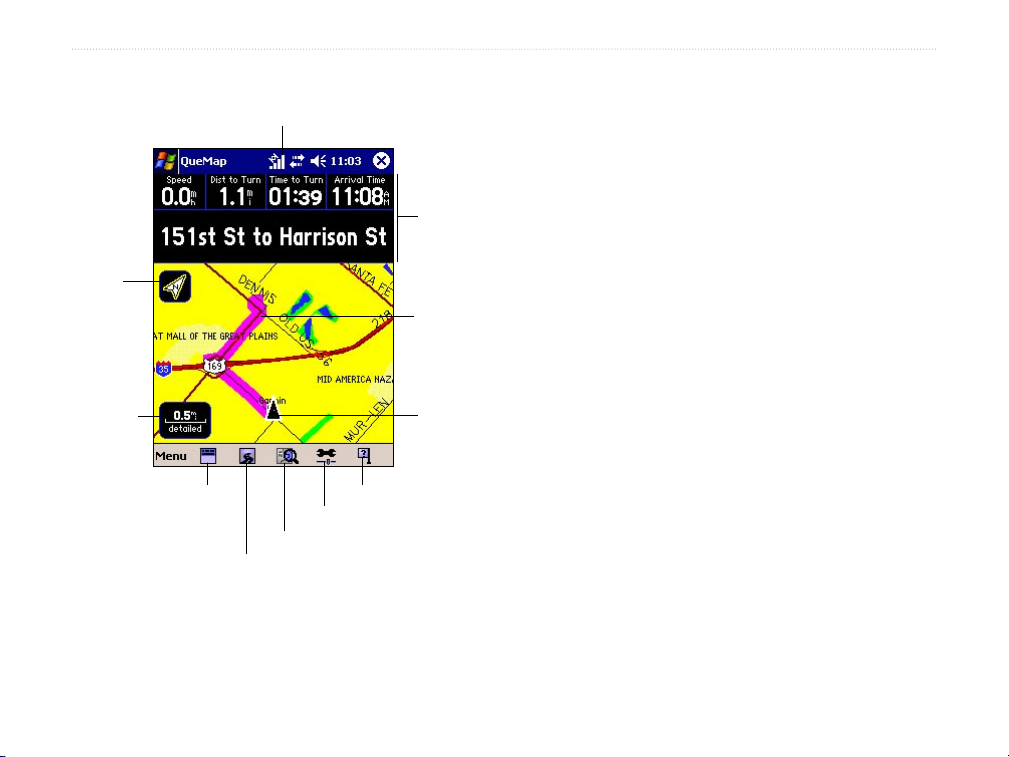
Using QueMap
Map
Orientation
(Track Up)
Zoom Scale
Show/Hide
Data Fields
System Status icon
Map Detail
QueFind icon
QueRoutes icon
Data Fields
Active Route
Position icon
Where Am I?
System Status Icon—shows current satellite
status.
Data Fields—show navigation information.
Map Orientation—tap to change between Track
Up and North Up orientation. Track Up means
your direction of travel is at the top of the map.
North Up means North is at the top of the map.
Active Route—highlighted in purple.
Zoom Scale—tap to open the Zoom Scale menu.
Position Icon—shows your current position.
Points in the direction you are traveling.
Show/Hide Data Fields—tap to show or hide
data fields.
QueRoutes Icon—tap to open QueRoutes.
QueFind Icon—tap to open QueFind.
Map Detail—tap to change amount of detail that
appears on QueMap.
Where Am I?—tap to view information about
your current position (see page 17).
iQue M5 Que Applications Guide 7
BASIC OPERATION > USING THE PAN TOOLBAR
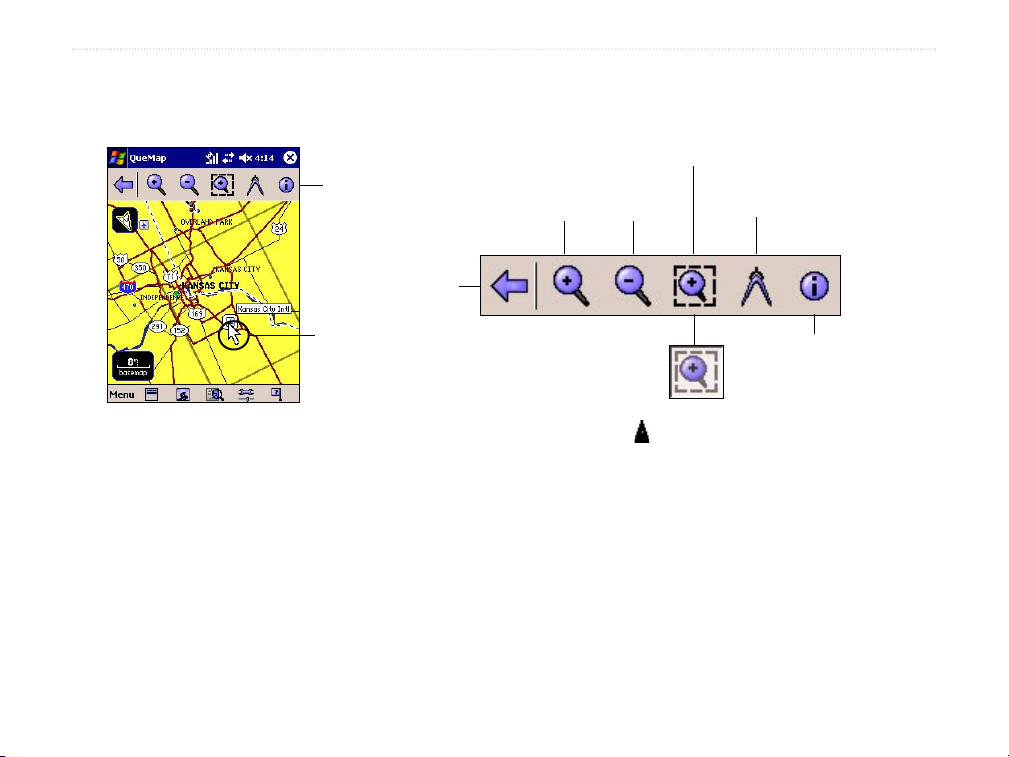
Using the Pan Toolbar
In QueMap, tap anywhere on the map to open the Pan Toolbar.
Pan Toolbar
Zoom In/Zoom Out
Exit
When deselected, pan the Map.
Measure Distance
Map Pointer
Zoom Tool selected
Information
Exit—tap to close the toolbar and re-center on your current position .
Zoom In/Zoom Out—tap to zoom in or out on the map pointer.
Zoom Tool—when selected, tap and drag to zoom in on an area. When deselected, tap and drag to
pan the map. Tap any point on the map to place the map pointer there.
Measure Distance—tap to measure straight-line distances between two points (see page 32).
Information—tap to view info about the position of the map pointer (Kansas City International in the
example above).
8 iQue M5 Que Applications Guide
BASIC OPERATION > FINDING POINTS & CREATING ROUTES
Finding Points & Creating Routes
After you load detailed maps (see “Loading Detailed
Maps,” page 48), your iQue M5 contains a large
database of addresses, intersections, cities, and Points
of Interest, which include restaurants, hotels, stores,
and other services. To create routes quickly, search for
one of these points using the QueFind page and then
create a route to it.
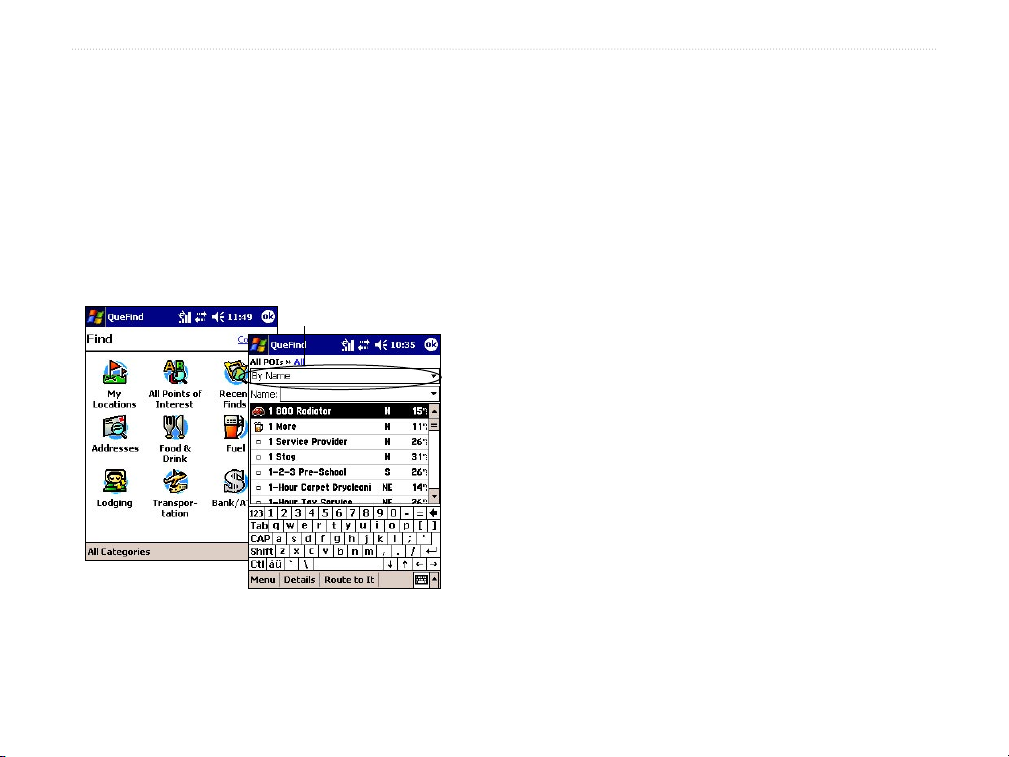
Search By drop-down menu
Tap the QueFind icon to open the QueFind page. The
database of places is organized here by category. Tap an
icon on the QueFind page to search for that type of place.
On any detailed search page, tap the Search By dropdown menu and choose one of the following options to
narrow your search:
• Near Current Location—lists points near your
current location, from nearest to farthest.
• By Name—lists all points in alphabetical order.
• Near Route Destination— lists points near your
route destination (appears only when you have
an active route).
• Near Other—lists points near a place that
you specify.
• Near Current Route—lists points near the
current active route (appears only when you have
an active route).
• Near Map Pointer—lists points near the map
pointer on QueMap (appears only if map pointer
is active on QueMap).
iQue M5 Que Applications Guide 9
BASIC OPERATION > FINDING POINTS & CREATING ROUTES
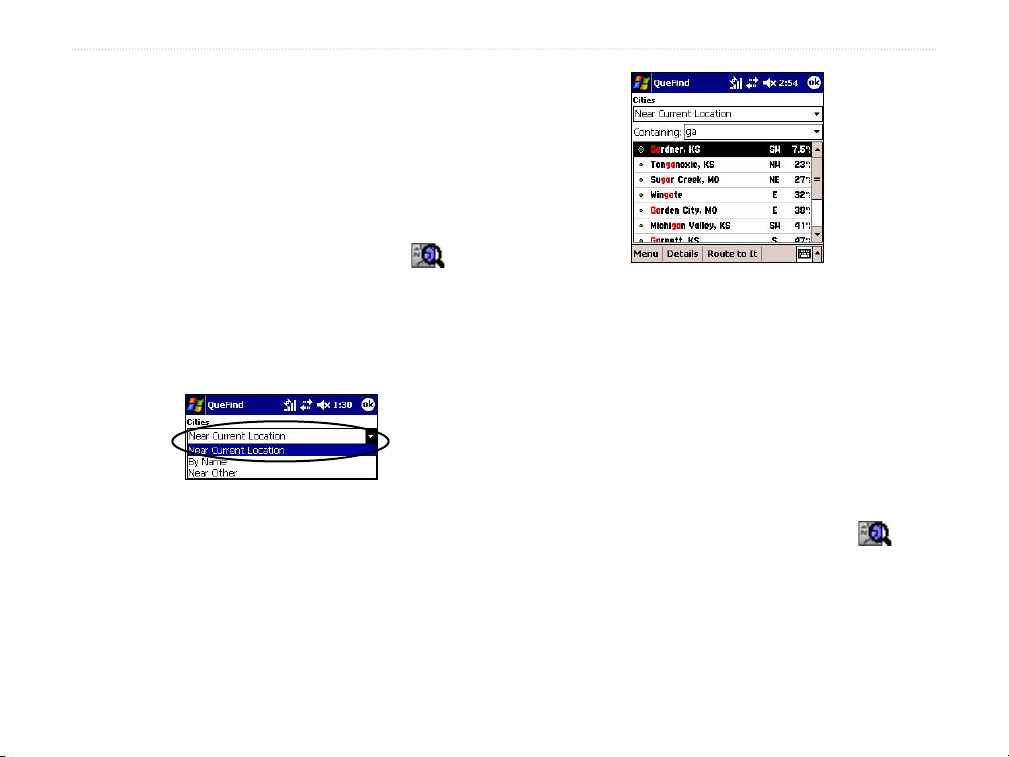
Finding Cities
You can search for cities in any area, whether you have
detailed maps or not. For the most detailed results, load
detailed maps. (See “Loading Detailed Maps,” page
48).
To find and route to a city:
1. From QueMap, tap the QueFind icon .
QueFind opens.
2. Tap All Categories and select Cities.
3. Tap the Search By drop-down menu and select
an option to narrow your search.
5. Tap a city in the list and then tap Route to It, or
Finding Addresses
You can search for specific street addresses in any area
where your iQue M5 contains detailed map data. To
load or change detailed maps on your iQue M5, see
“Loading Detailed Maps,” page 48.
tap Details to view information about the city.
4. To narrow your search by name, tap the Name/
Containing field and begin entering the name
of the city you are searching for.
10 iQue M5 Que Applications Guide
To find and route to an address:
1. From QueMap, tap the QueFind icon .
QueFind opens.
2. Tap the Addresses icon.
3. Tap the Region field. Tap to highlight the region
where you want to search. Then tap Select.

Tap each field and enter address
information. Then tap Search.
BASIC OPERATION > FINDING POINTS & CREATING ROUTES
4. Tap the
name with the Input Panel. Tap to highlight a
city in the list and tap Select. You can also tap
Use All to search in all cities.
5. Tap the Number field and enter the number of
the street address.
6. Tap the Street field and begin entering the
name of the street. Tap to highlight a street in
City field and begin entering the city
8. Tap the Postal Code field and enter the postal
code or tap Use All to search all postal codes.
9. Tap Search.
NOTE: If the address you are searching for
does not appear, broaden your search criteria by
removing the number from the Number field or by
searching all postal codes or all cities.
the list.
7. To enter a prefix or suffix for the street name,
tap Prefix/Suffix. Then tap a prefix and a suffix
10. Tap to select an address from the list and then
tap Route to It.
for the street name and tap Select.
iQue M5 Que Applications Guide 11
BASIC OPERATION > FINDING POINTS & CREATING ROUTES
Finding Intersections
Finding intersections is very similar to finding
addresses. Refer to the previous procedure, “Finding
Addresses” for instructions.
Finding Points of Interest
Points of Interest (POIs) are organized by category and
by subcategory. To find a specific POI, tap a category
on the QueFind page to narrow your search. You can
also narrow your search by using the links at the top of
each detailed search page.
Keep in mind that you must load detailed maps for an
area to search for Points of Interest in that area. See
“Loading Detailed Maps,” page 48.
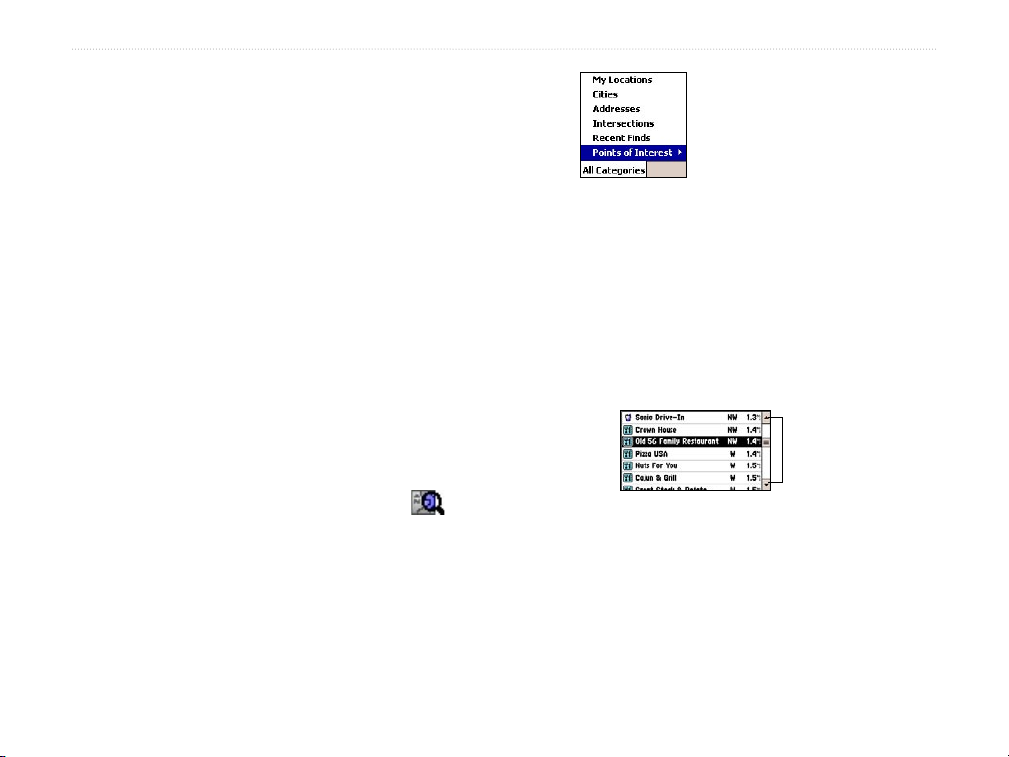
To find a POI:
1. From QueMap, tap the QueFind icon .
2. From QueFind, tap any icon to search for that
type of point. For additional categories, tap All
Categories > Points of Interest. Then select
a category and sub-category from the menu, if
desired. A detailed search page appears.
3. Tap the Search By drop-down menu and select
4. Scroll through the list of points that appears.
Tap Points of Interest
and then tap a category
and sub-category from
the menu.
an option to narrow your search. To narrow your
search by name, tap the Name/Containing field
and begin entering letters in the name of the
point you are searching for.
Tap a POI to select it. Then tap Route to It, or
tap Details to view information about the point.
Tap to
scroll.
12 iQue M5 Que Applications Guide
BASIC OPERATION > FINDING POINTS & CREATING ROUTES
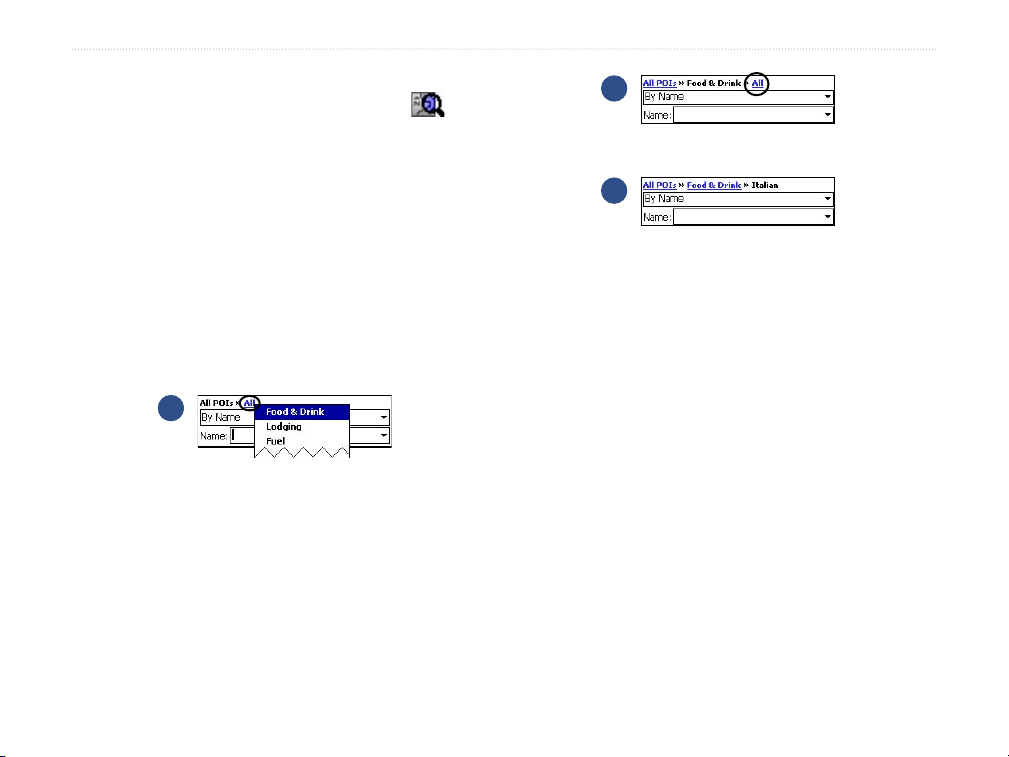
To find a POI using category links:
1. From QueMap, tap the QueFind icon .
2. Tap All Points of Interest. A list of points
appears, organized by name.
3. Tap the Search By drop-down menu and
choose an option to narrow your search. To
narrow your search by name, tap the Name/
Containing field and begin entering letters in
the name of the point you are searching for.
4. Use the category links at the top of the page to
narrow your search further.
Using Category Links
1
Tap All and choose a category
to narrow your search.
2
Tap All again to choose a
sub-category.
3
Tap the Category name or tap All
POIs to broaden your search.
5. Tap a POI to select it. Then tap Route to It, or
tap Details to view information about the point.
iQue M5 Que Applications Guide 13
BASIC OPERATION > FINDING POINTS & CREATING ROUTES
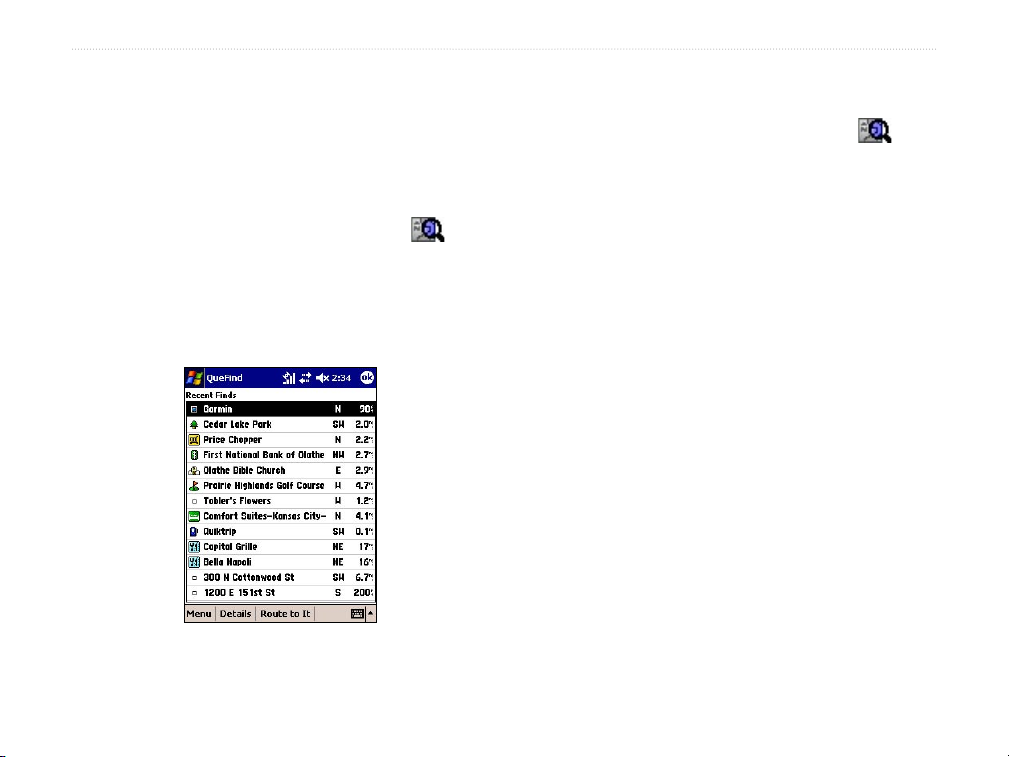
Recently-Found Places
The Recent Finds page stores a list of the last forty
points or places you have recently searched for, from
most recent to least recent.
To search for recently-found places:
1. From QueMap, tap the QueFind icon .
2. Tap the Recent Finds icon.
3. Tap a point in the list to select it. Then tap
Route to It, or tap Details to view information
about the point.
To delete points from the Recent Finds
page:
1. From QueMap, tap the QueFind icon .
2. Tap the Recent Finds icon.
3. Tap a point in the list to select it. Tap Menu and
then tap Delete Selected Item.
4. To delete all entries on the Recent Finds page,
tap Menu and then tap Delete All Items. A
message appears. Tap Yes to confirm.
14 iQue M5 Que Applications Guide
BASIC OPERATION > ROUTING TO A MAP POINT
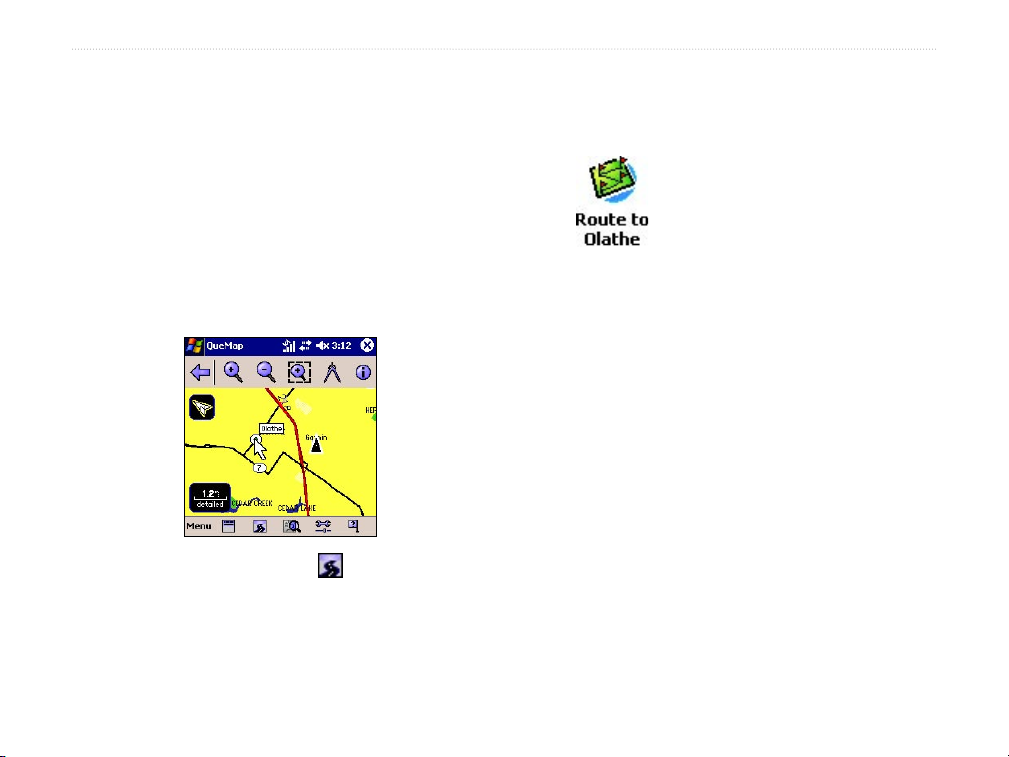
Routing to a Map Point
3. Tap the
One way to create a route quickly is to route to a point
directly from QueMap. This type of route is useful
when you can easily locate the place you want to travel
to on the map.
To route to a point on the map:
1. From QueMap, tap anywhere on the map to
activate the Pan Toolbar. Then tap to place the
map pointer on the point you want to route to.
If you want to travel off-road to a map point, you can
customize your iQue M5 for off-road travel. See page
38 for information.
2. Tap the QueRoutes icon .
Route to [Map Pointer] icon. (If the
point you selected has a name, it appears in the
icon name.)
The Route to Map Pointer icon
changes to reflect the name of
the point you are routing to.
iQue M5 Que Applications Guide 15

BASIC OPERATION > SAVING ROUTES
Saving Routes
If you use a route frequently, you can save the route in
memory and activate it at any time. You can store up to
fifty routes in memory. To save a route, the route must
be active.
To save an active route:
1. From QueMap, tap the QueRoutes icon .
2. Tap Save Current Route.
3. Enter a new name in the Route Name field if
you wish. Then tap Save.
To activate a saved route:
1. From QueMap, tap the QueRoutes icon .
2. Tap Menu and then Saved Routes.
3. Tap the route you want to activate in the list of
routes. Then tap Activate.
To change the name of a saved route:
1. From QueMap, tap the QueRoutes icon .
2. Tap Menu and then Saved Routes.
3. Tap and hold on the route you want to change
and select Edit.
4. Enter a new name in the Route Name field and
tap Save.
To delete a saved route:
1. From QueMap, tap the QueRoutes icon .
2. Tap Menu and then Saved Routes.
3. Tap to highlight the route you want to delete and
then tap Menu and Delete. When the message
appears, tap Yes to confirm.
4. To delete all saved routes, tap Menu and select
Delete All. When the message appears, tap
Yes to confirm.
16 iQue M5 Que Applications Guide
BASIC OPERATION > TIPS FOR NAVIGATING
Tips for Navigating
Use these handy tips and suggestions to help you
navigate!
Where Am I? Icon
Tap the Where Am I? icon on QueMap to figure
out where you are, especially when you are travelling
in unfamiliar areas. From the window that appears, you
To view upcoming turns:
With an active route, press the Que button to
view the QueTurns page. Each upcoming turn
of your route appears in the list on this page.
To hear directions:
Press and hold the Que button. A Turn Preview
page also appears. Tap to close this page.
To stop navigating/resume navigating
a route:
1. From QueMap, tap the QueRoutes icon .
2. Tap Stop Navigation or Resume Navigation.
To route to nearby intersections:
1. From QueMap, tap the Where Am I? icon .
2. Tap and hold on an intersection in the list and
select Route to It.
can view your current address, city, state, and postal
code, and you can view the closest ten intersections
nearby.
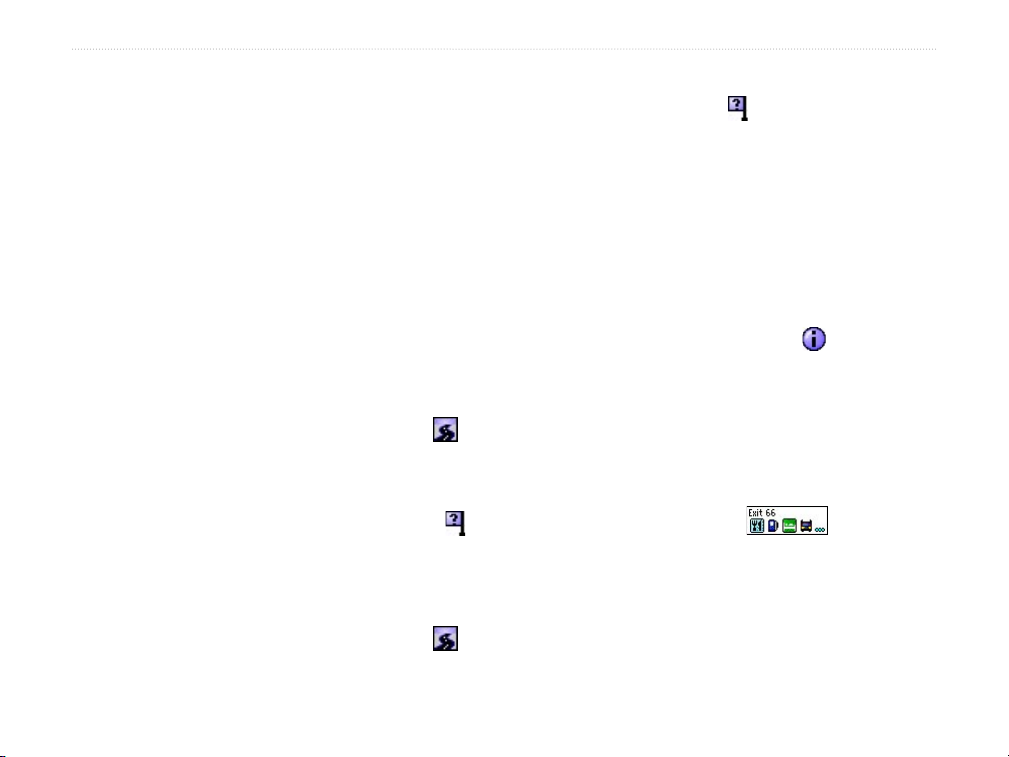
Information Icon
Tap anywhere on the map to place the map pointer
there. Then tap the Information icon in the Pan
Toolbar to view information about that point.
Exit Information
If you are ever driving in an area where you don’t have
detailed maps loaded, you can still view information
about services at Interstate exits. Just tap the exit
on QueMap, and a pop-up tag appears
containing icons of available services.
To recalculate your route:
1. From QueMap, tap the QueRoutes icon .
2. Tap Recalculate.
iQue M5 Que Applications Guide 17
 Loading...