

Garmin iQue M5 User Manual
iQue® M5
integrated handheld
operating instructions

© Copyright 2004 Garmin Ltd. or its subsidiaries. All Rights Reserved.
Microsoft®, ActiveSync®, MSN®, the MSN logo, and Outlook® are registered trademarks and Jawbreaker™ and Windows Mobile™ are
trademarks of Microsoft Corporation in the United States and/or other countries.
Garmin® and iQue® are registered trademarks and Que™ is a trademark of Garmin Ltd. or its subsidiaries and may not be used without the
express permission of Garmin.
License Agreement
THIS END-USER LICENSE AGREEMENT (“LICENSE”) IS A LEGAL AGREEMENT BETWEEN YOU AND GARMIN LTD.
(“GARMIN”). ALL GARMIN SOFTWARE AND THIRD PARTY SOFTWARE THAT IS (i) INSTALLED IN THE PRODUCT AND/OR (ii)
RECORDED IN MEDIA ATTACHED TO THE PACKAGE OR INCLUDED IN THE PACKAGE OF THE PRODUCT (EXCEPT AS MAY
BE PROVIDED PURSUANT TO OTHER THIRD PARTY END-USER LICENSE AGREEMENTS) SHALL BE REFERRED TO HEREIN
AS THE “SOFTWARE.” THE SOFTWARE IS OWNED BY, OR LICENSED TO, GARMIN CORPORATION (“GARMIN”) AND IS
PROTECTED UNDER COPYRIGHT LAWS AND INTERNATIONAL COPYRIGHT TREATIES. THE SOFTWARE IS LICENSED, NOT
SOLD. THIS SOFTWARE IS PROVIDED UNDER THE FOLLOWING LICENSE WHICH DEFINES WHAT YOU MAY DO WITH THE
PRODUCT AND CONTAINS LIMITATIONS ON WARRANTIES AND/OR REMEDIES.
IMPORTANT: CAREFULLY READ THIS LICENSE BEFORE USING THIS PRODUCT. INSTALLING, COPYING, OR OTHERWISE
USING THIS PRODUCT INDICATES YOUR ACKNOWLEDGMENT THAT YOU HAVE READ THIS LICENSE AND AGREE TO
ITS TERMS. IF YOU DO NOT AGREE, RETURN THE COMPLETE PRODUCT TO: GARMIN INTERNATIONAL, INC. CUSTOMER
SERVICE, 1200 EAST 151st STREET, OLATHE, KS 66062; OR GARMIN (EUROPE) LTD., UNIT 5, THE QUADRANGLE, ABBEY PARK
INDUSTRIAL ESTATE, ROMSEY, SO51, 9DL, U.K.; OR GARMIN CORPORATION, NO. 68, JANGSHU 2ND ROAD, SHIJR, TAIPEI
COUNTY, TAIWAN; WITHIN 10 DAYS OF THE DATE YOU ACQUIRED IT FOR A FULL REFUND.
1. LICENSE: Garmin (“we” or “us”) provides you with storage media containing the Software which may also include digital cartographic
data, “online” or electronic documentation and printed materials (together called the “Product”) and grants you a limited non-exclusive license
to use the Product in accordance with the terms of this License Agreement. The copyright and all other rights to the Product shall remain with
us (and our licensors, as applicable). You must reproduce any copyright or other notice marked on the Product on all copies you make.
2. YOU MAY:
a) install and use one copy of the Product on a single computer or network. This copy is to be used by only a single user at a time. If you wish to
use the Product for more users, you will need an additional license for each user.
b) make one copy of the Product for archive or backup purposes.
c) use a copy of the Product on a home or portable computer if that copy is never loaded at the same time it is loaded on your primary computer.
d) transfer the Product to someone else only if you assign all of your rights under this License, cease all use of the Product, erase or destroy any
copy (including the hard disk copy) made in support of your use of the Product, and ensure that the other person agrees IN WRITING to the
terms of this License.
3. YOU MUST NOT:
a) make copies of, or provide access to, the Product except as expressly permitted in Section 2 of this License.
b) translate, reverse engineer, decompile, or disassemble the Product except to the extent the foregoing restriction is expressly prohibited by
applicable law.
c) rent, lease, loan, sub-license, distribute, assign, or transfer the Product or any unlock code for the Product except as set out in Section 2 (d)
above.
d) modify the Product or merge all or any part of the Product with another program.
e) use the Product for any unlawful purpose or in any illegal manner.
4. TERM: This License shall continue for as long as you use the Product. However, this License will terminate automatically without notice
from Garmin if you fail to comply with any of its terms or conditions. You must agree, upon termination, to destroy all copies of the Product.
The Limitations of Warranties and Liability set out below shall continue in force even after any termination.

5. LIMITATION OF WARRANTIES AND LIABILITY: THE PRODUCT IS PROVIDED ON AN “AS IS” BASIS, WITHOUT ANY
WARRANTIES OR CONDITIONS, EXPRESS OR IMPLIED, INCLUDING, BUT NOT LIMITED TO, ANY IMPLIED WARRANTY OF
MERCHANTABILITY OR FITNESS FOR A PARTICULAR PURPOSE, OR ANY WARRANTY ARISING BY LAW, STATUTE, USAGE
OF TRADE, OR COURSE OF DEALING. YOU ASSUME ALL RESPONSIBILITY AND RISK FOR THE USE OF THIS PRODUCT
AND GARMIN DISCLAIMS ALL LIABILITY FOR ANY LOSS, INJURY OR DAMAGE RESULTING FROM USE OF THIS PRODUCT,
WHETHER DIRECT OR INDIRECT, AND WHETHER OR NOT GARMIN HAS BEEN ADVISED OF OR HAS KNOWLEDGE OF
THE POSSIBILITY OF SUCH LOSS, INJURY OR DAMAGE. IN NO EVENT SHALL GARMIN HAVE ANY LIABILITY TO YOU
OR ANY OTHER PERSON OR ENTITY FOR ANY COMPENSATORY, INDIRECT, INCIDENTAL, SPECIAL, CONSEQUENTIAL,
OR EXEMPLARY DAMAGES WHATSOEVER, INCLUDING, BUT NOT LIMITED TO, LOSS OF REVENUE OR PROFIT, LOST OR
DAMAGED DATA, OR OTHER COMMERCIAL OR ECONOMIC LOSS, EVEN IF WE HAVE BEEN ADVISED OF THE
POSSIBILITY OF SUCH DAMAGES, OR THEY ARE FORESEEABLE. WE ARE ALSO NOT RESPONSIBLE FOR CLAIMS BY A
THIRD PARTY. OUR MAXIMUM AGGREGATE LIABILITY TO YOU SHALL NOT EXCEED THE AMOUNT PAID BY YOU FOR THE
PRODUCT. THE LIMITATIONS IN THIS SECTION SHALL APPLY WHETHER OR NOT THE ALLEGED BREACH OR
DEFAULT IS A BREACH OF A FUNDAMENTAL CONDITION OR TERM OR A FUNDAMENTAL BREACH. Some states do not allow
the exclusion of incidental or consequential damages or the limitation of duration of an implied warranty so the above limitations may not apply
to you.
IT IS YOUR RESPONSIBILITY TO USE THIS PRODUCT PRUDENTLY AND TO VISUALLY VERIFY STREETS, ROADS, ROAD
SIGNS, AND DIRECTIONS. THIS PRODUCT IS INTENDED TO BE USED ONLY AS A TRAVEL AID AND SHOULD NOT BE USED
FOR ANY PURPOSE REQUIRING PRECISE MEASUREMENT OF DIRECTION, DISTANCE, OR LOCATION. DO NOT
ATTEMPT TO ENTER INFORMATION INTO THE PRODUCT, OR CONTROL THE PRODUCT, WHILE OPERATING A VEHICLE.
6. U.S. GOVERNMENT RESTRICTED RIGHTS. (I) THE PRODUCT and documentation are provided with RESTRICTED RIGHTS.
Use, duplication, or disclosure by the United States Government is subject to restrictions as set forth in subparagraph (c)(1) and (2) of the
Commercial Computer Software - Restricted Rights at 48 CFR 52.227-19, as applicable. Manufacture/Contractor is Garmin International, Inc.,
1200 East 151st Street, Olathe, KS 66062. (II) All Garmin technical data and computer software is commercial in nature and developed solely at
private expense. Software is delivered as Commercial Computer Software as defined in DFARS 252.227-7014 (June 1995) or as a commercial
item as defined in FAR 2.101(a) and as such is provided with only such rights as are provided in Garmin’s standard commercial license for such
software. Technical data is provided with limited rights only as provided in DFARS 252.227-7015 (Nov. 1995) or FAR 52.227-15 (June 1987),
whichever is applicable.
7. EXPORT CONTROLS: You agree not to export or re-export the Product to any country in violation of the export control laws of the United
States of America.
8. GARMIN LICENSORS: With respect to Third Party Software contained in the Product, the provisions of this License shall inure to the
benefit of the licensors to Garmin of third party software contained in the Product. Such licensors shall be third party beneficiaries hereof, and
shall have the right to enforce any and all rights and claims arising hereunder with respect to such third party software, including the right to
bring an action directly against you, in the event of a breach by you of your obligations hereunder.
9. GENERAL: This License is the entire agreement between us, superseding any other agreement or discussions, oral or written, and may
not be changed except by a signed agreement. This License shall be governed by and construed in accordance with the laws of the State of
Kansas, United States of America. If any provision of this License is declared by a court of competent jurisdiction to be invalid, illegal, or
unenforceable, such a provision shall be severed from the License and the other provisions shall remain in full force and effect.
November 2004 Garmin Part Number 190-00427-00 Rev. A

Limited Warranty
Limited Warranty
The iQue® M5 is warranted to be free from defects in materials or workmanship for one year from the date of purchase. Within this period,
Garmin will, at its sole option, repair or replace any components that fail in normal use. Such repairs or replacement will be made at no charge
to the customer for parts or labor, provided that the customer shall be responsible for any transportation cost. This warranty does not cover
failures due to abuse, misuse, accident, or unauthorized alteration or repairs.
THE WARRANTIES AND REMEDIES CONTAINED HEREIN ARE EXCLUSIVE AND IN LIEU OF ALL OTHER WARRANTIES
EXPRESS OR IMPLIED OR STATUTORY, INCLUDING ANY LIABILITY ARISING UNDER ANY WARRANTY OF MERCHANTABILITY OR FITNESS FOR A PARTICULAR PURPOSE, STATUTORY OR OTHERWISE. THIS WARRANTY GIVES YOU SPECIFIC
LEGAL RIGHTS, WHICH MAY VARY FROM STATE TO STATE.
IN NO EVENT SHALL GARMIN BE LIABLE FOR ANY INCIDENTAL, SPECIAL, INDIRECT, OR CONSEQUENTIAL DAMAGES,
WHETHER RESULTING FROM THE USE, MISUSE, OR INABILITY TO USE THIS PRODUCT OR FROM DEFECTS IN THE
PRODUCT. Some states do not allow the exclusion of incidental or consequential damages, so the above limitations may not apply to you.
Garmin retains the exclusive right to repair or replace the unit or software or offer a full refund of the purchase price at its sole discretion.
SUCH REMEDY SHALL BE YOUR SOLE AND EXCLUSIVE REMEDY FOR ANY BREACH OF WARRANTY.
To obtain warranty service, call your local Garmin authorized dealer. Or call Garmin Product Support at one of the numbers listed below for
shipping instructions and an RMA tracking number. The unit should be securely packed with the tracking number clearly written on the outside
of the package. The unit should be sent, freight charges prepaid, to any Garmin warranty service station. A copy of the original sales receipt is
required as the proof of purchase for warranty repairs.
Products sold through online auctions are not eligible for rebates or other special offers from Garmin. Online auction confirmations are not
accepted for warranty verification. To obtain warranty service, an original or copy of the sales receipt from the original retailer is required.
Garmin will not replace missing components from any package purchased through an online auction.
Garmin International, Inc. Garmin Europe, Ltd.
1200 E. 151st Street Unit 5, The Quadrangle, Abbey Park Industrial Estate
Olathe, KS 66062, U.S.A. Romsey, SO51, 9DL, U.K.
Phone: 800/800.1020 Phone: 44/0870.8501241
Fax: 913/397.0836 Fax: 44/0870.8501251
Chapter 1: Getting Started
ii

Lithium-Ion Polymer Battery Information
Lithium-Ion Polymer Battery Information
Your iQue M5 contains a replaceable lithium-ion polymer battery. Please observe the following cautions:
• Do not store at or use the unit or battery in temperatures above 60° C (140° F). Do not store or use the unit or battery near a heat source,
such as a radiator, stove, fireplace, or other heat-generating source. If the unit or battery are exposed to temperatures above 60° C
(140° F), the battery in the unit could explode or vent, posing a risk of fire.
• Do not use any chargers not specified by Garmin. Do not charge the battery under conditions not specified by Garmin, as it may leak
electrolytes, become hot, or explode.
• Do not put the unit and battery into a fire, as it may swell or explode. Do not use near any type of heat source. If the battery leaks
electrolytes or emits a strange smell, discontinue use and move the unit or battery away from the heat source.
• Do not submerge the unit or battery in water or any type of liquid. Do not expose the unit or battery to any type of water, such as rain or
moisture, as it might corrode, become hot, or occasionally not function.
• Keep the unit and battery out of reach of babies and children to avoid any accidents.
• Do not put the unit or battery in a microwave oven or pressure cooker.
• Although rechargeable, the battery has a limited life-span. Replace when usage time between charges become short.
• If there are any problems with the battery, keep the battery in a safe place and immediately contact Garmin.
• If the battery must be disposed of, contact your local waste disposal department for information on properly disposing of
lithium-ion polymer batteries.
• Do not store the battery in a pocket or bag together with metallic objects such as keys, necklaces, hairpins, coins, or screws.
• Do not pierce the battery with a sharp object, such as a needle or screwdriver.
• Do not disassemble the battery or modify the battery design, including the electric circuit.
• Do not hit the battery with a heavy object. Do not step on the battery, throw it, or drop it on a hard surface.
• Do not heat any area of the battery with a heated object, such as a soldering iron.
Warnings
WARNING: This product, its packaging, and its components contain chemicals known to the State of California to cause cancer, birth defects,
or reproductive harm. This Notice is being provided in accordance with California’s Proposition 65. If you have any questions or would like
additional information, please refer to our Web site at http://www.garmin.com/prop65.
The iQue M5 has no user-serviceable parts. Should you ever encounter a problem with your unit, please take it to an authorized Garmin dealer
for repairs.
The iQue M5 is fastened shut with screws. Any attempt to open the case to change or modify the unit in any way will void your warranty and
may result in permanent damage to the equipment.
Chapter 1: Getting Started
iii

Getting Started: Chapter 1 Table of Contents
CHAPTER 1: GETTING STARTED
Introduction ................................................... 1
Get to Know Your iQue M5 ...........................
Using the Stylus .......................................................... 3
The Today Screen .......................................................3
Opening Programs ...................................................... 4
Navigation Bar and Command Bar ............................ 5
Pop-up Menus ............................................................. 5
Notifications ...............................................................
2
5
Entering Information on Your iQue M5 ....... 6
Entering Text Using the Input Panel ........................... 6
Editing Text ................................................................
Entering Dates ............................................................ 8
Writing on the Screen .................................................
Drawing on the Screen ............................................... 9
Recording a Message .................................................. 9
7
8
Finding Information .................................... 10
Organizing Information .............................. 10
Chapter 1: Getting Started
iv

Getting Started: Introduction
CHAPTER 1: GETTING STARTED
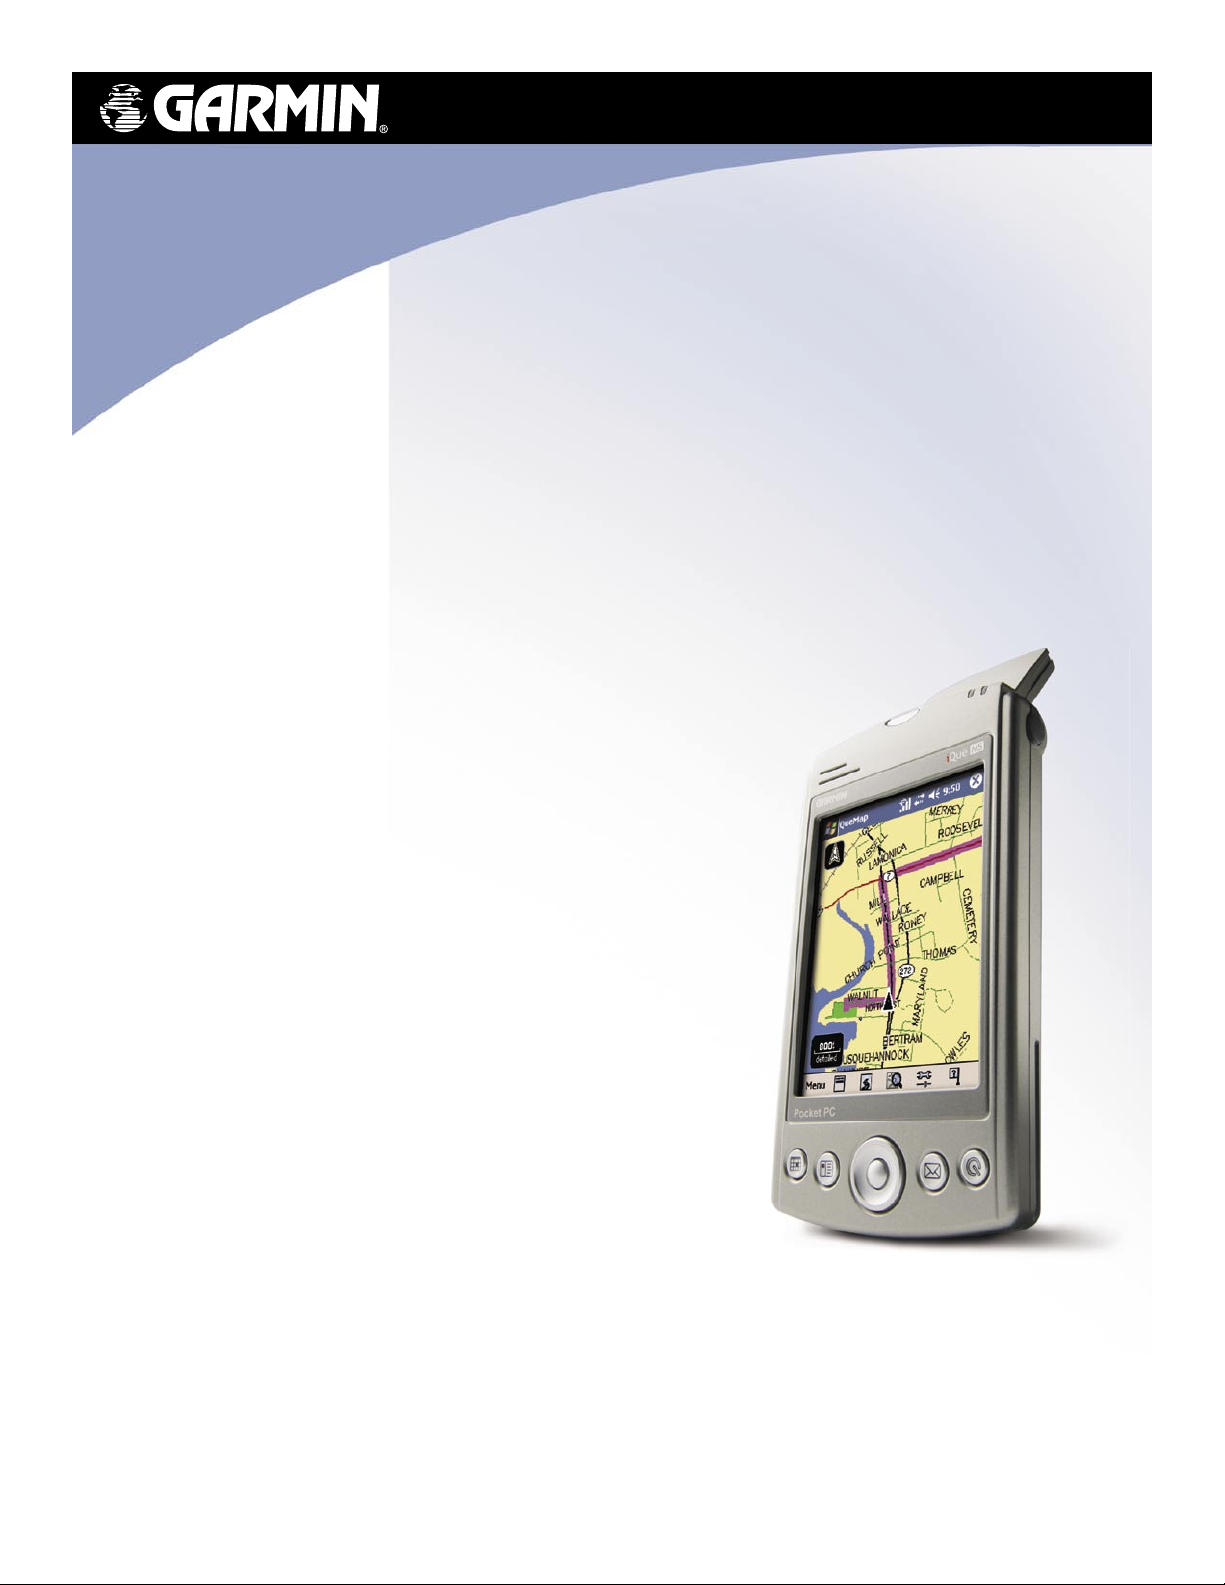
Introduction
Congratulations on purchasing an iQue
information up-to-date and close at hand. Microsoft
synchronize the information on your desktop or laptop computer with your device. Picture yourself in the following situations:
• While you are walking with a colleague, your cell phone rings, and your manager asks if you two are free this afternoon for
an emergency meeting. While your colleague fumbles through his paper organizer, you press a button on your device and
instantly see a list of today’s appointments and meetings. You are quickly able to tell your manager your available times. For
more information on scheduling appointments and meetings, see Chapter 3.
• You are meeting your friends tonight for dinner and a movie. You download the latest movie information from the Internet
to your desktop computer and then synchronize it with your device. At dinner, you pull out your iQue M5 and review your
movie options with your friends. For more information on downloading Web pages to your device, see Chapter 7.
• A Calendar reminder alerts you that it is time to catch the bus. You grab your iQue M5 and catch the bus just in time. Because
ActiveSync keeps the information on your device up-to-date, you leisurely review your task list, make notes about the new
books and CDs you want to buy, and read and respond to e-mail messages. When you get back to the office, ActiveSync
transfers any task changes you made, your notes, and your e-mail message responses to your desktop computer. For more
information on ActiveSync, see Chapter 2.
®
M5! Using your new iQue M5, you can keep your most important business and personal
®
ActiveSync® increases the power of your device by allowing you to
Chapter 1: Getting Started
1
Getting Started: Get to Know Your iQue M5
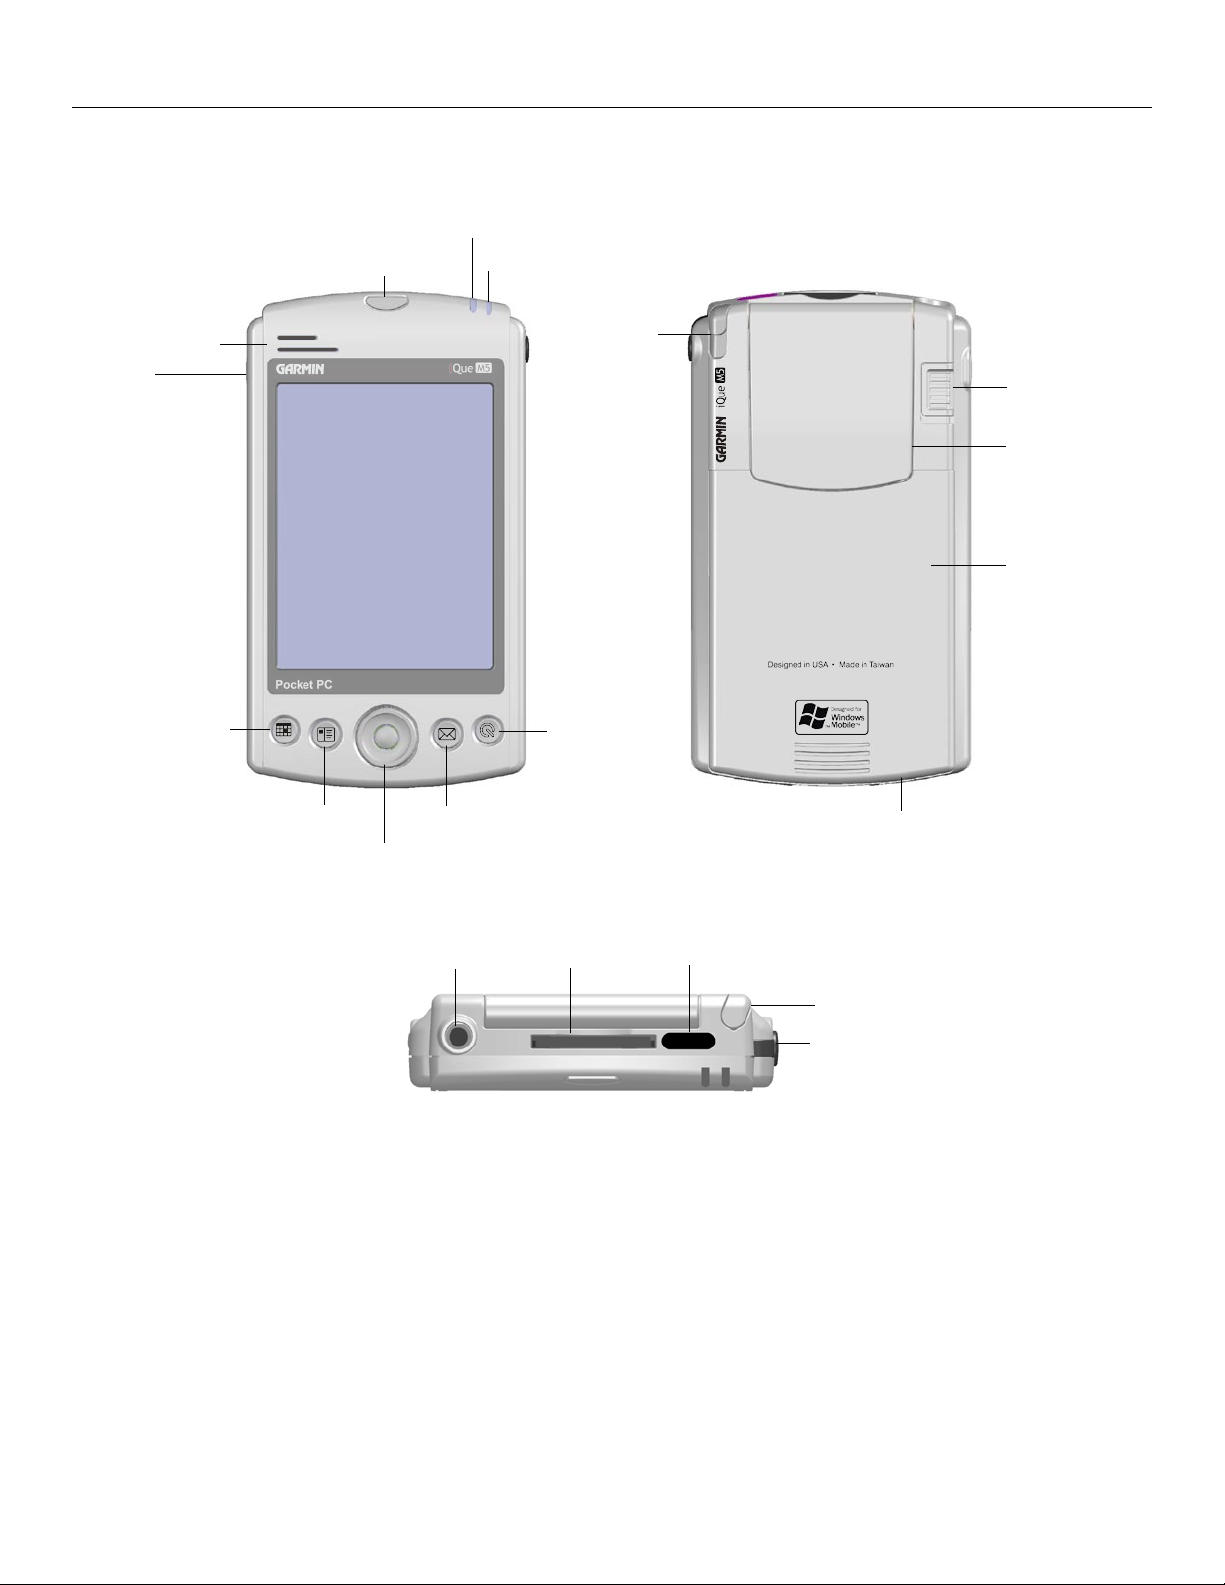
Get to Know Your iQue M5
Your iQue M5 has easy-to-use buttons that open programs and a stylus for selecting items and entering information.
Battery Status LED
Power button
Bluetooth Status LED
Microphone/Speaker
REC button
(on side of unit)
Calendar button
Contacts button
Messaging button
Scroll button
Stylus
GPS Antenna Release
GPS Antenna
Removable battery door
Que button
Reset button (on bottom of unit)
Chapter 1: Getting Started
SD Card SlotAudio Jack
Infrared (IR) Window
Stylus
External Antenna
Connector (covered by
weather cap)
2
Getting Started: Get to Know Your iQue M5
Using the Stylus
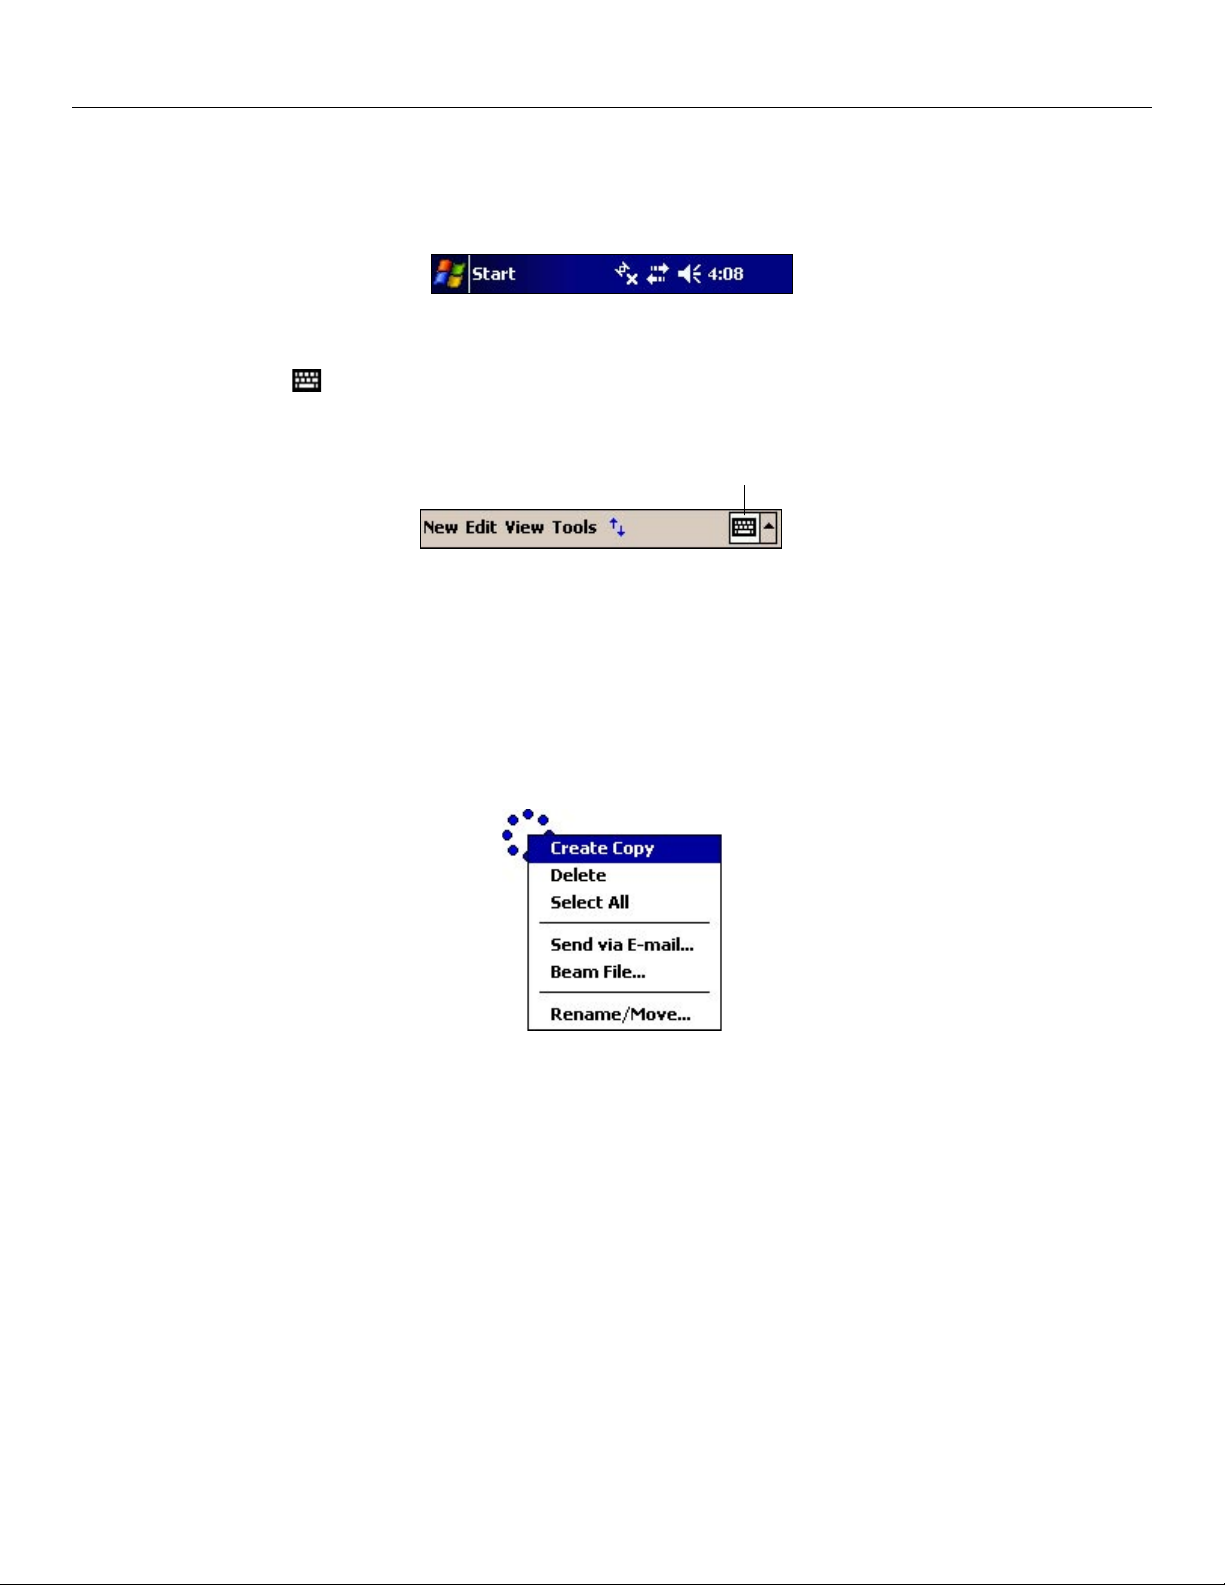
On your device, use the stylus to select items just as you would use a mouse on your personal computer.
• Tap—Touch the screen once with the stylus to open items and select options.
• Drag—Hold the stylus on the screen and drag across the screen to select text and images. Drag the stylus in a list to select
multiple items. If you select an item by accident, drag the stylus away from the item to deselect.
• Tap and Hold—Tap and hold the stylus on an item to see a pop-up menu for that item. Before the menu appears, you
will see a blue circle of dots that indicates you are opening a menu. On the pop-up menu that appears, tap the action you
want to perform.
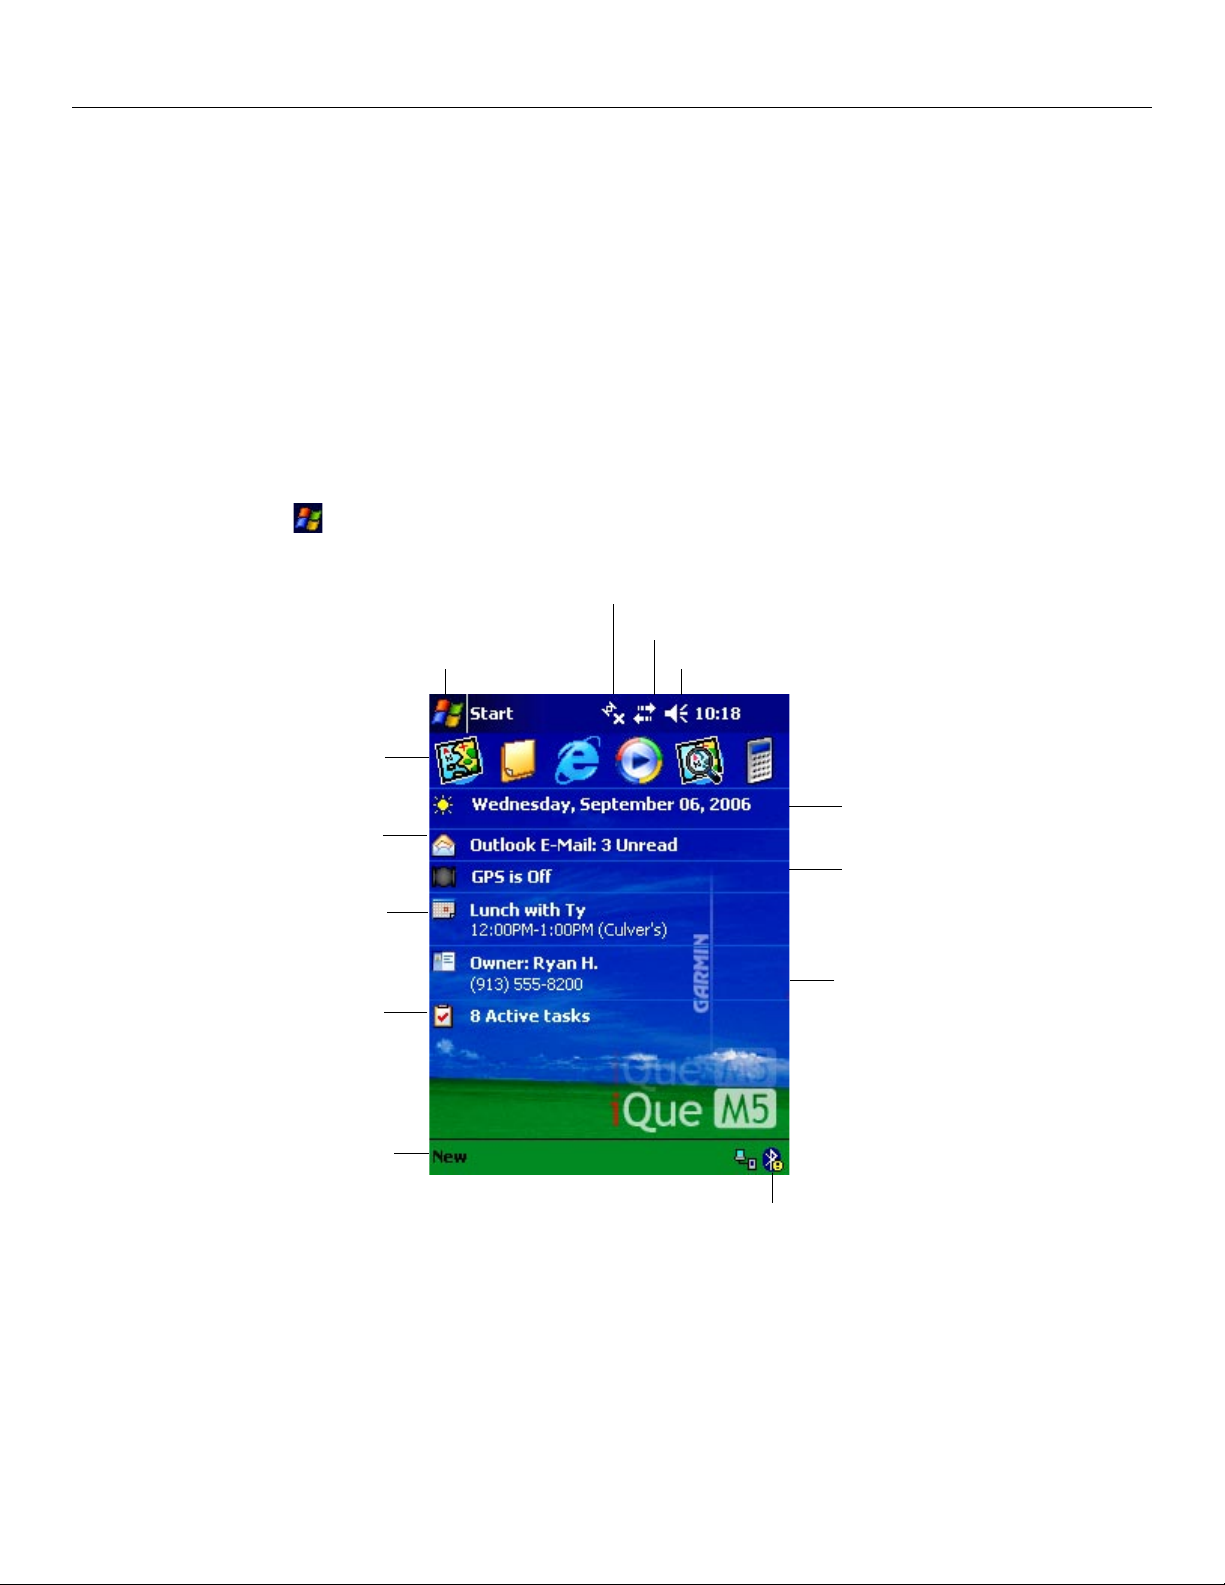
The Today Screen
When you turn on your device for the first time each day (or after 4 hours of inactivity), you will see the Today screen. You can also
display it by tapping Start and then Today. On the Today screen, you can see important information for the day at a glance.
Tap to open System Status window.
Tap to view connection status.
Tap to open a program.
Tap to change volume of sounds
Tap each shortcut to open a
program.
Tap to view your messages.
Shows your next
upcoming
appointment.
Tap to view your
active tasks.
Tap to create a
new item.
Tap to change date and time.
Shows current GPS status.
Tap to change
owner information.
Tap to enable Bluetooth or
open Bluetooth software.
Chapter 1: Getting Started
3
Getting Started: Get to Know Your iQue M5
Opening Programs
You can switch from one program to another by selecting it from the Start menu. (You can customize which programs you see
on this menu. For information, see “To place programs in the Start Menu,” Chapter 10.) To access some programs, you need to tap
Start , Programs, and then the program name.
You can also switch to some programs by pressing the program buttons on your device or by tapping the program icon in the
Shortcut bar on the Today screen.
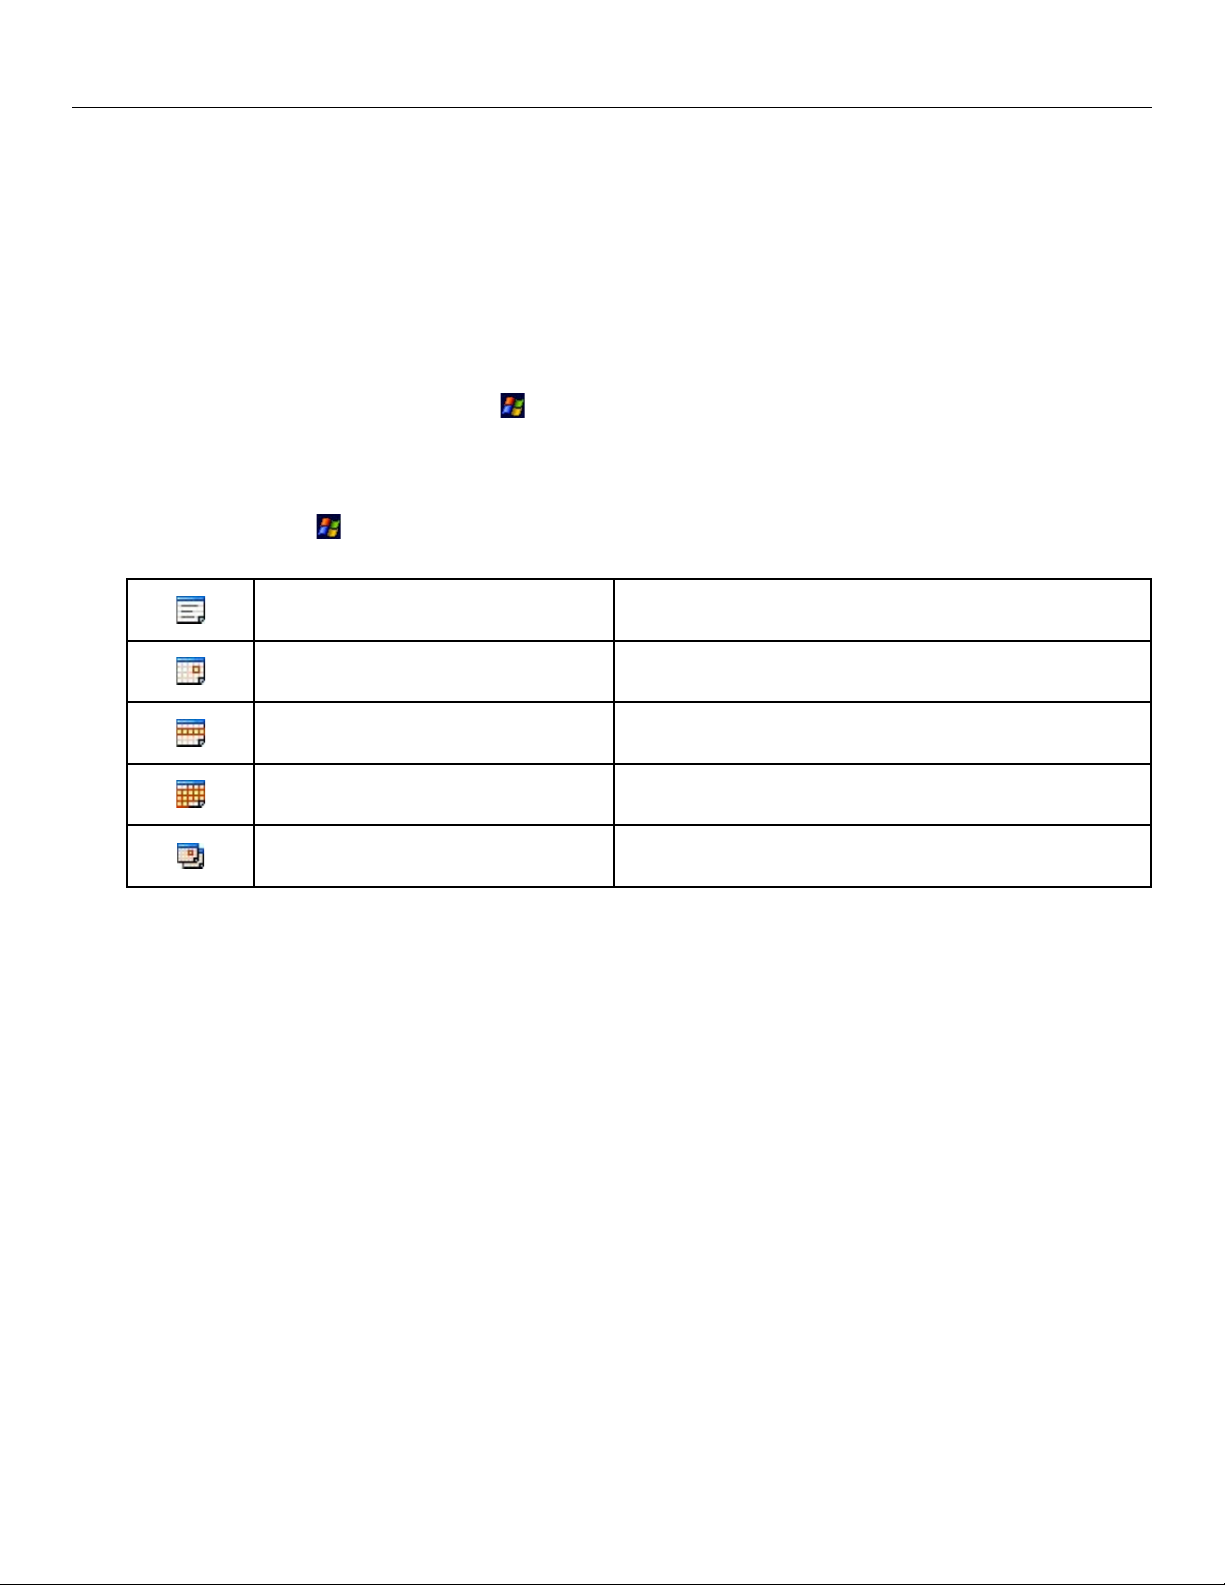
The following table contains a partial list of programs installed on your iQue M5. You can install additional applications at
http://www.microsoft.com/windowsmobile or from the Companion CD.
Icon Program What You Can Do
ActiveSync
Synchronize information between your iQue M5 and
desktop computer.
Calculator Perform basic arithmetic and computations.
Calendar
Keep track of your appointments and create
meeting requests.
Contacts Keep track of your friends and colleagues.
Messaging Send and receive e-mail messages.
MSN Messenger
Send and receive instant messages with your MSN
Messenger contacts.
Notes Create handwritten or typed notes, drawings, and recordings.
Pictures Manage and manipulate image files.
Pocket Excel
Pocket MSN
Pocket Word
Que™
Tasks Keep track of your tasks.
Terminal Services Client
Windows Media Player 10 Play multimedia content (videos and sound files).
Chapter 1: Getting Started
Create new workbooks or view and edit Excel workbooks
created on your desktop computer.
Browse Web and WAP sites and download new programs
and files from the Internet.
Create new documents or view and edit Word documents
created on your desktop computer.
View your current position on the map, create and save
Locations in memory, and navigate routes.
Remotely access files and information on a Windows
NT/2000/XP Server.
4
Getting Started: Get to Know Your iQue M5
Navigation Bar and Command Bar
The navigation bar is located at the top of the screen. It displays the active program and current time and allows you to switch
between programs and close screens.
The Navigation Bar
Use the command bar at the bottom of the screen to perform tasks in programs. The command bar includes menu names, buttons,
and the Input Panel button . To create a new item in the current program, tap New. To open a menu or see what action a button
performs, tap and hold the stylus on the button. If you do not want to activate the button, simply tap anywhere outside the menu or
drag the stylus away from the button.
Input Panel button
The Command Bar
Pop-up Menus
Pop-up menus allow you to perform actions quickly and easily. For example, you can open a pop-up menu in the Contact list and
quickly delete a contact, make a copy of a contact, or send an e-mail message to a contact. The actions in pop-up menus vary from
program to program. To access a pop-up menu, tap and hold the stylus on any item in a list. A blue circle of dots appears to show
you where you are pressing on the screen. When the menu appears, lift the stylus and tap the action you want to perform. Tap
anywhere outside the menu to close the menu without selecting any of the options.
An example of a pop-up menu.
Notifications
Your iQue M5 helps you remember appointments, tasks, and alarms in a variety of ways. You may see or hear any of the following
notifications:
• A message box that appears on the screen.
• A sound (which you can specify). You can also set the unit to vibrate instead of playing a sound.
• A flashing light on the upper right-hand corner of the iQue M5.
See “To change notifications” in Chapter 10 to change the way your iQue M5 notifies you of upcoming events.
Chapter 1: Getting Started
5
Getting Started: Entering Information on Your iQue M5
Entering Information on Your iQue M5
You have several options for entering new information:
• Use the input panel to enter typed text, either by using the soft keyboard or another input method.
• Write directly on the screen.
• Draw pictures on the screen.
• Speak into your device microphone to record a message.
• Use ActiveSync to synchronize or copy information from your desktop computer to your device. For more information on
ActiveSync, see Chapter 2.
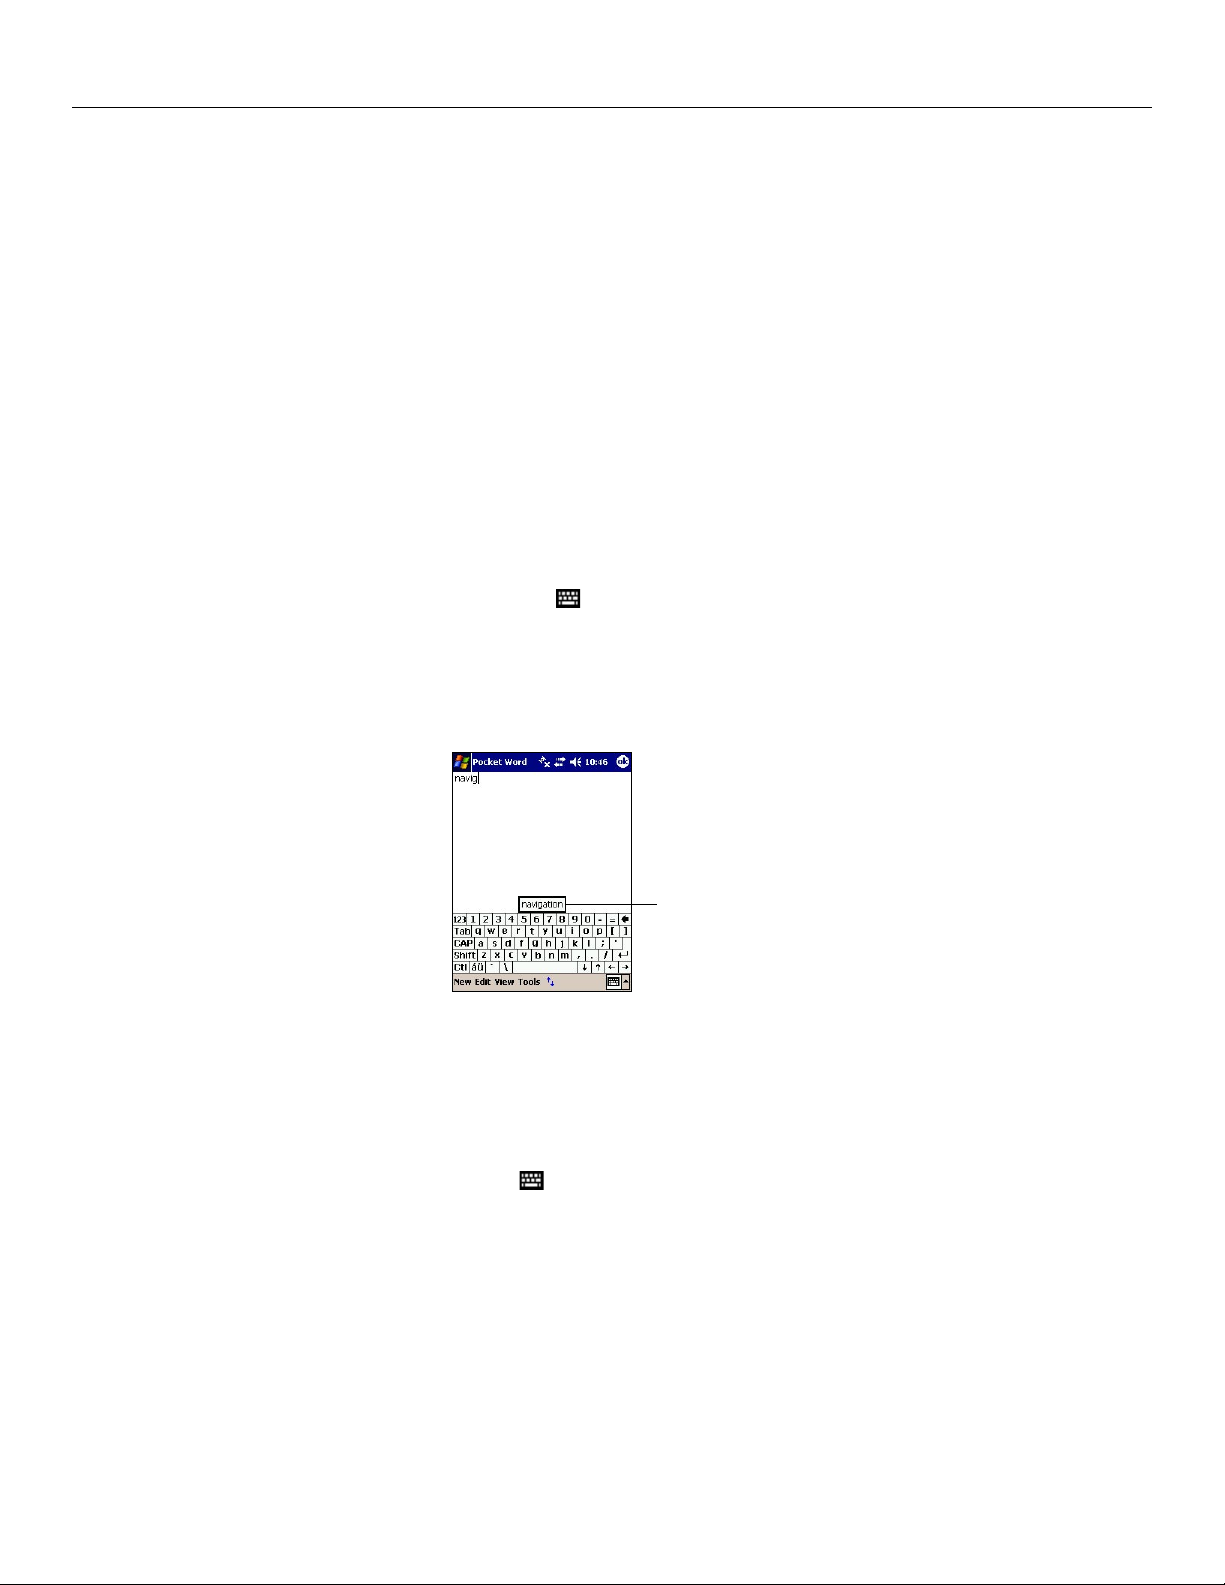
Entering Text Using the Input Panel
Use the input panel to enter information in any program on your device. You can type using the soft keyboard or write using
Letter Recognizer, Block Recognizer, or Transcriber. When using each input panel method, the characters appear as typed text on
the screen.
To show or hide the input panel, tap the Input Panel button
. Tap the arrow next to the Input Panel button to choose a method for
typing or writing.
When you use the input panel, your device anticipates the word you are typing or writing and displays it above the input panel.
When you tap the displayed word, it is inserted into your text at the blinking cursor. As you continue to use your device, it learns to
anticipate more and more words.
Tap here if this is
the right word.
With the soft keyboard, you can tap letters to enter information. Letter Recognizer allows you to write letters using the stylus just as
you would on paper. With Block Recognizer you can input character strokes with the stylus that are similar to those used on other
devices. Using Transcriber you can write anywhere on the screen with the stylus, just as you would on paper. Write a sentence or
more of information, then pause and let Transcriber change the written characters to typed characters.
To type with the soft keyboard:
1. Tap the arrow next to the Input Panel button and then tap Keyboard.
2. On the soft keyboard that is displayed, tap the keyboard keys with your stylus.
Chapter 1: Getting Started
6
Getting Started: Entering Information on Your iQue M5
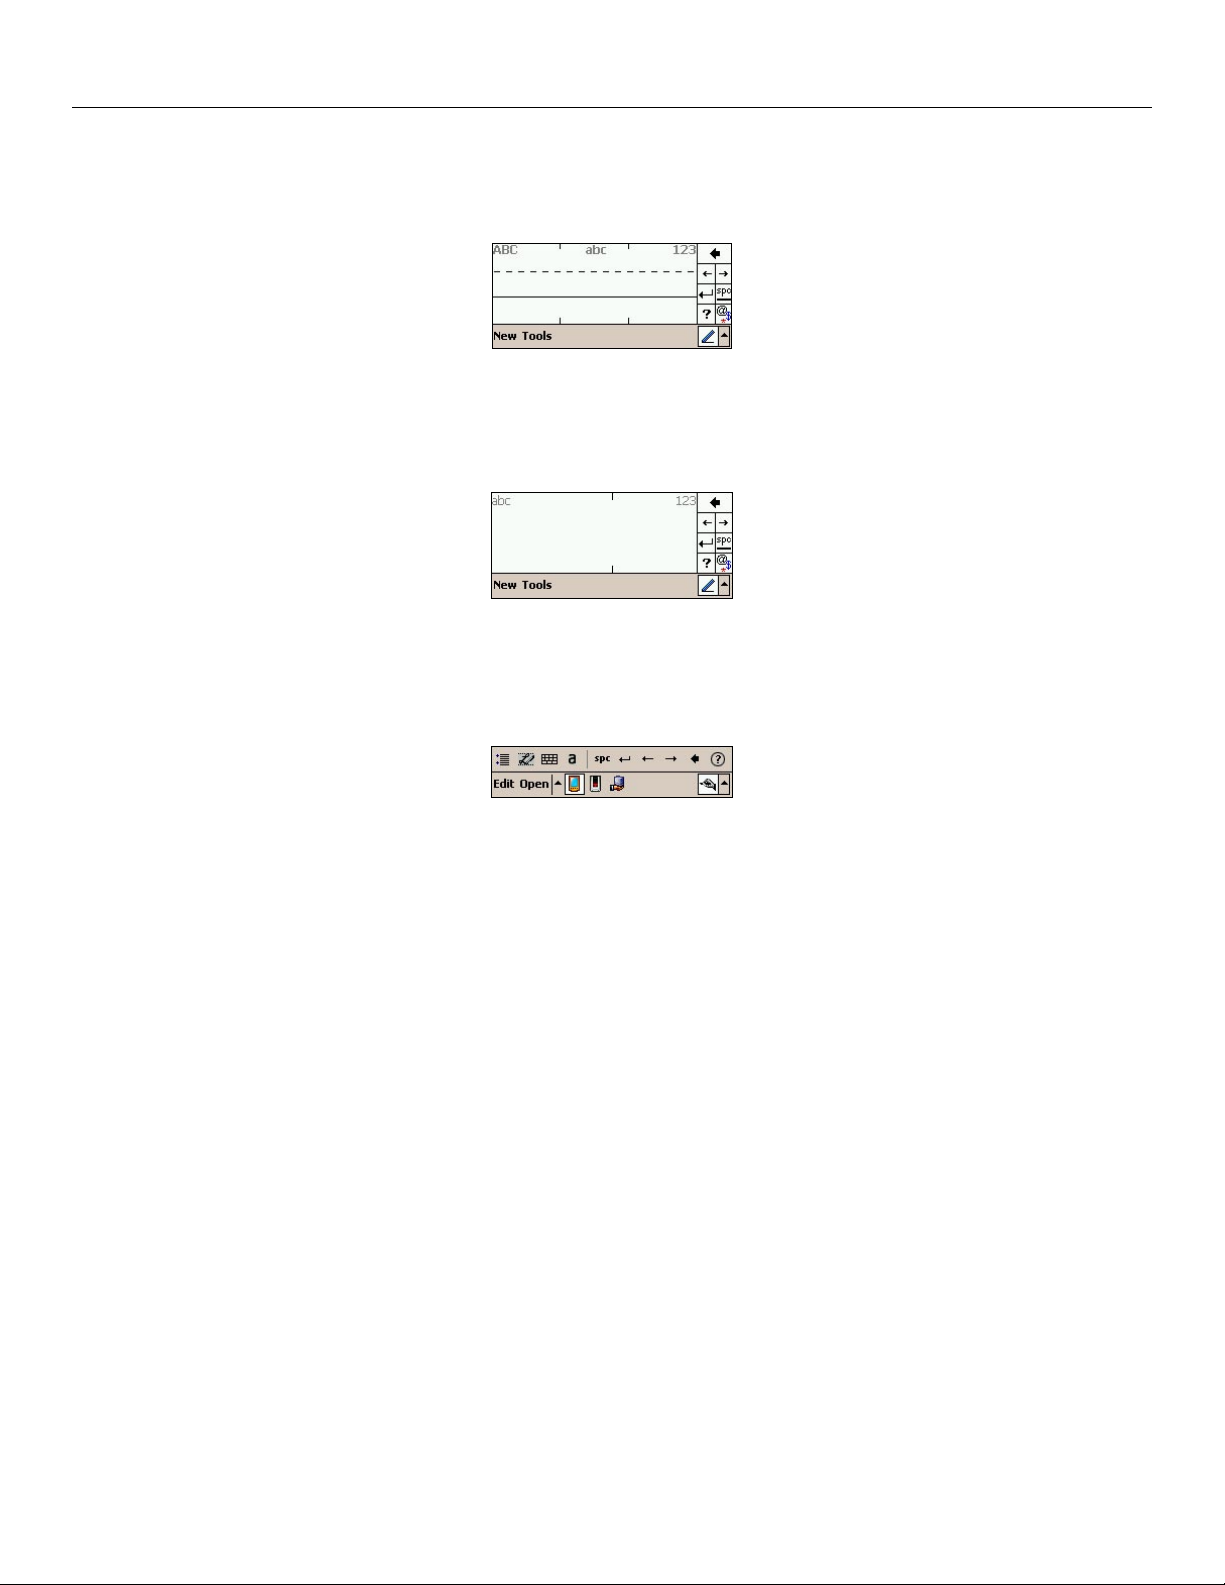
To write with Letter Recognizer:
1. Tap the arrow next to the Input Panel button and then tap Letter Recognizer.
2. Write letters in the box just as you would write on paper.
Letter Recognizer
To write with Block Recognizer:
1. Tap the arrow next to the Input Panel button and then tap Block Recognizer.
2. Write a letter in the box.
Block Recognizer
To write with Transcriber:
1. Tap the arrow next to the Input Panel button and then tap Transcriber.
2. Write anywhere on the screen.
Transcriber
Editing Text
If you want to edit or format typed text, you must select it first. Simply drag the stylus across the text you want to select. You can
cut, copy, and paste text by tapping and holding the selected words and then tapping the appropriate command on the pop-up menu.
You can also use the
Edit menu.
Chapter 1: Getting Started
7

Getting Started: Entering Information on Your iQue M5
Entering Dates
Many applications ask you for a date as input, such as “June 18, 2006.” All standard Windows Mobile™-based applications use the
same form to assist in this process.
Entering a date on the calendar.
To enter dates:
1. Tap the date field you want to change.
2. Tap the left or right arrows at the top of the calendar to move between months. You can also tap the month and
choose a specific month from a menu.
3. Tap the year, and then tap the up and down arrows to change the year. You can also use the Input Panel to
enter a year.
4. Tap the day on the calendar to select the date you want. Tap Today to choose today’s date.
Writing on the Screen
In the Notes program and in the Notes tab in Calendar, Contacts, and Tasks, you can use your stylus to write directly on the screen.
Write the way you do on paper. You can edit and format what you have written and convert the information to text at a later time.
To write on the screen:
1. Tap the Pen icon to switch to writing mode.
2. Write anywhere on the screen.
To select writing:
1. Tap and hold the stylus next to the text you want to select until the cursor appears.
2. Without lifting, drag the stylus across the text you want to select.
To convert writing to text:
1. Select the writing you want to convert to text. (This is necessary only if you wish to convert part of your writing rather
than all of it.)
2. Tap Tools
If the conversion is incorrect, you can select different words from a list of alternates or return to the original writing.
To select alternate words:
1. Tap and hold the incorrect word (tap one word at a time).
2. From the pop-up menu, tap Alternates. A menu with a list of alternate words appears.
3. Tap the word you want to use or tap the writing at the top of the menu to return to the original writing.
and then tap Recognize.
Chapter 1: Getting Started
8
Getting Started: Entering Information on Your iQue M5
Try these tips for good recognition:
• Write neatly.
• Write on the lines and draw descenders below the line. Write the cross of the “t” and apostrophes below the top line so that
they are not confused with the word above. Write periods and commas above the line.
• For better recognition, try increasing the zoom level to 300% using the Tools
menu.
• Write the letters of a word closely and leave big gaps between words so the device can easily tell where words begin and end.
• Note that hyphenated words, foreign words that use special characters such as accents, and some punctuation cannot
be converted.
• Note that you cannot change words that have already been recognized by writing over them with the stylus.
Drawing on the Screen
You can draw on the screen in the same way that you write on the screen. The difference between writing and drawing on the screen
is how you select items and how they can be edited. For example, selected drawings can be resized, whereas writing cannot.
To create a drawing, select the Pen icon
Subsequent strokes inside or touching the drawing box become part of the drawing. Drawings that do not cross three ruled lines will
be treated as writing.
To edit a drawing:
1. Tap and hold the stylus on the drawing until the selection handle (looks like a “+”) appears.
2. Drag the selection handle to select the drawing.
3. Tap and drag to move the drawing.
4. Tap the Edit menu or tap and hold on the drawing to cut, copy, or paste the drawing.
and simply cross three ruled lines on your first stroke. A drawing box appears.
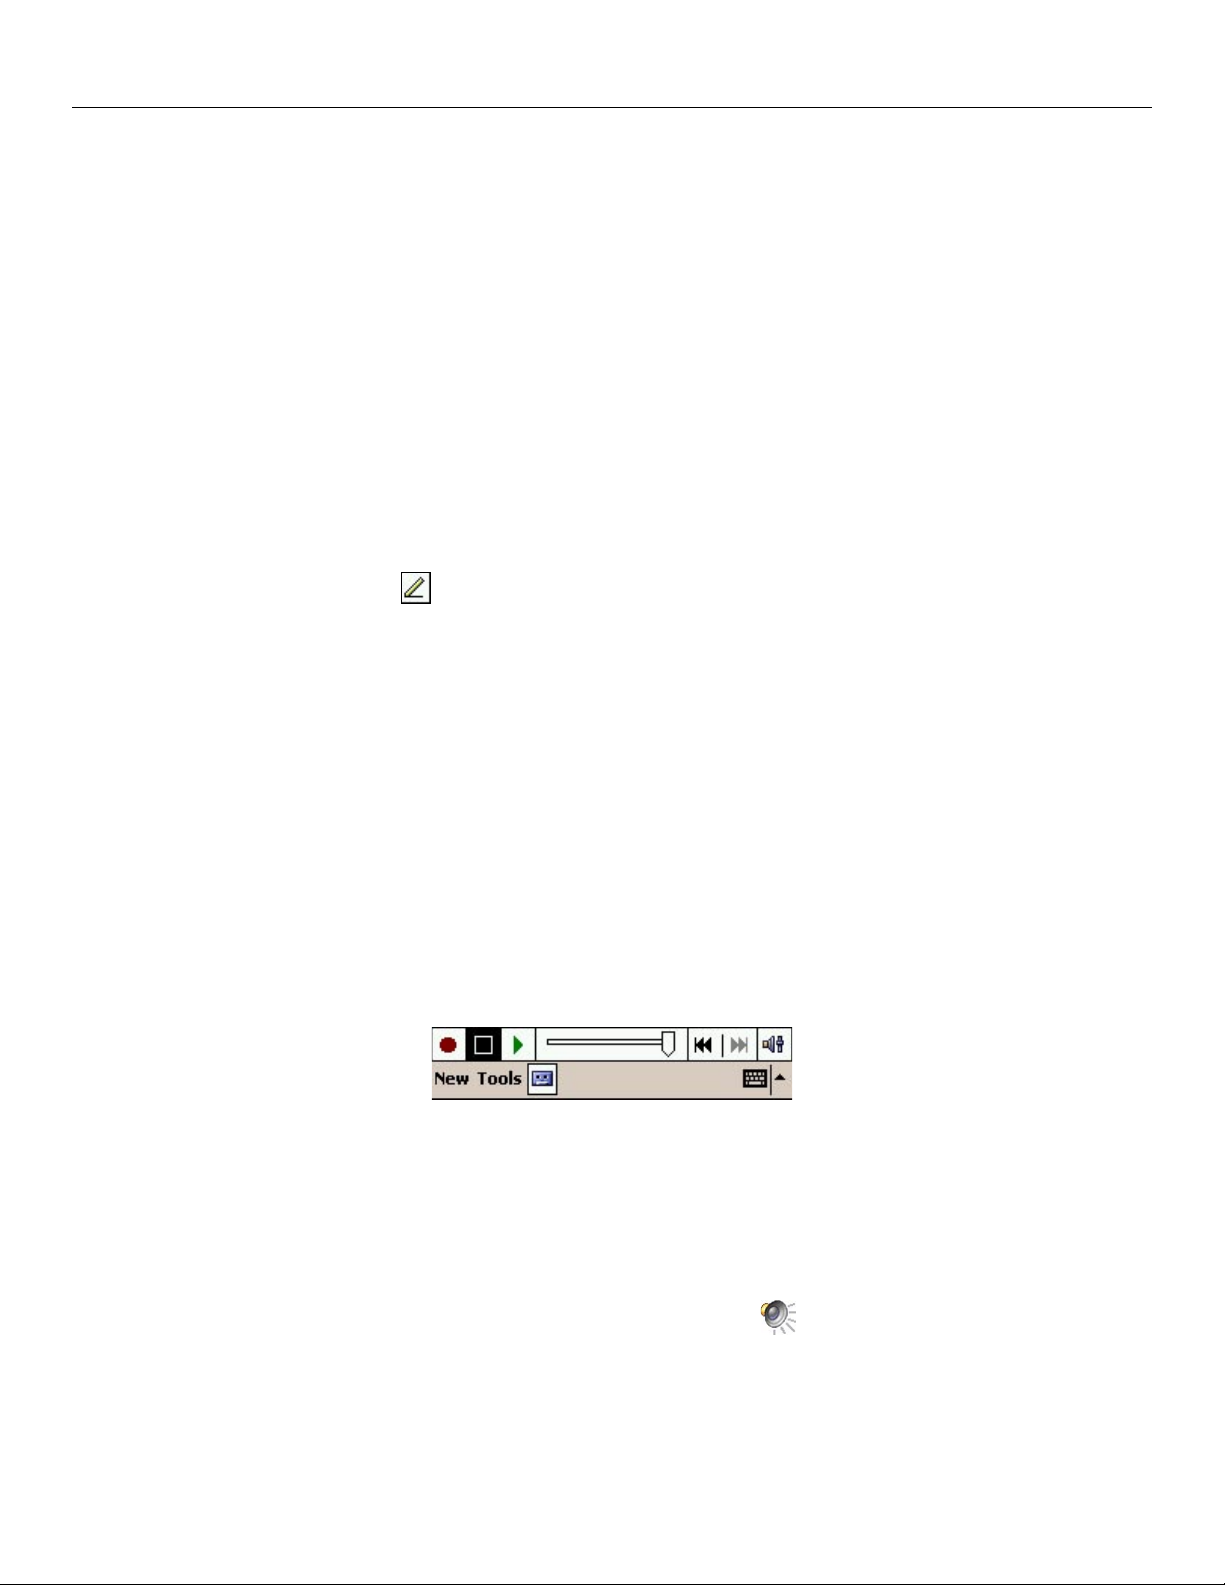
Recording a Message
In any program where you can write or draw on the screen, you can also quickly capture thoughts, reminders, and phone numbers
by recording a message. In Calendar, Contacts, and Tasks, you can include a recording in the Notes tab. In the Notes program, you
can either create a stand-alone recording or include a recording in a written note. If you want to include the recording in a note,
open the note first. In Messaging, you can add a recording to an e-mail message.
Recording in Notes.
To create a recording:
1. Hold the microphone on your iQue M5 near your mouth or other source of sound.
2. Press and hold the Record hardware button on your device until you hear a beep.
3. While holding down the Record button, make your recording.
4. To stop recording, release the Record button. The new recording appears in the note list or as an embedded icon.
5. To play a recording, tap it in the list or tap the embedded recording icon
in the note.
Chapter 1: Getting Started
9

Getting Started: Finding and Organizing Information
Finding Information
The Find feature on your device helps you quickly locate information. Use it to find files or folders, especially large files that may
be taking up needed space.
To find files, folders, or text:
1. Tap , Programs, and then Find.
2. Tap the
3. Tap the Type drop-down menu and select what type of file you are searching for.
Find field and enter the name of the file, folder, or text you want to find.
NOTE: If you are trying to find files or folders that are taking up storage space, choose “Larger than 64 KB” from the
Type menu.
4. Tap Go.
Tap here and enter the
name of the file or folder
you are looking for.
Tap here to specify
the type of data you
are searching for.
Organizing Information
Tap to begin
searching for
files or folders.
The results of your
search appear here.
You can easily move and organize files and folders with File Explorer. To open, tap , Programs, and then File Explorer. Tap
and hold to cut, copy, paste, rename, or delete files and folders.
Tap to show hierarchy.
The dot represents your
current location. Tap to
move up in the hierarchy.
Tap to move, copy,
delete, rename, or
beam files or folders.
Tap for network sharing.
Tap to view storage card files.
Tap to open a path.
Chapter 1: Getting Started
Shows all files and folders in
My Documents.
10

ActiveSync: Chapter 2 Table of Contents
CHAPTER 2: ACTIVESYNC
Introduction ...................................................................................12
Choosing What Data to Synchronize ..........................................12
Choosing When to Synchronize .................................................13
Moving Files between Your Desktop Computer and iQue M5 ..
13
Adding and Removing Programs ................................................14
Backing Up Files and Settings ....................................................16
Synchronizing with an Exchange Server ...................................17
Synchronizing Remotely with Infrared .......................................17
Chapter 2: ActiveSync
11
ActiveSync: Choosing What Data to Synchronize
CHAPTER 2: ACTIVESYNC
Introduction
Using Microsoft® ActiveSync®, you can synchronize the information on your desktop computer with the information on your iQue
M5. Synchronization compares the data on your iQue M5 with your desktop computer and updates both computers with the most
recent information.
With ActiveSync, you can manage what information is stored on your iQue M5:
• Select which information types are synchronized and control how much data is synchronized.
• Control when synchronization happens.
• Copy (rather than synchronize) files between your device and desktop computer.
• Add or remove programs.
• Back up and restore data.
• Synchronize remotely or with an Exchange server.
You should have already installed ActiveSync on your desktop computer and synchronized for the first time. If you have not done
this, please refer to the Setup Guide included with the Setup CD for instructions.
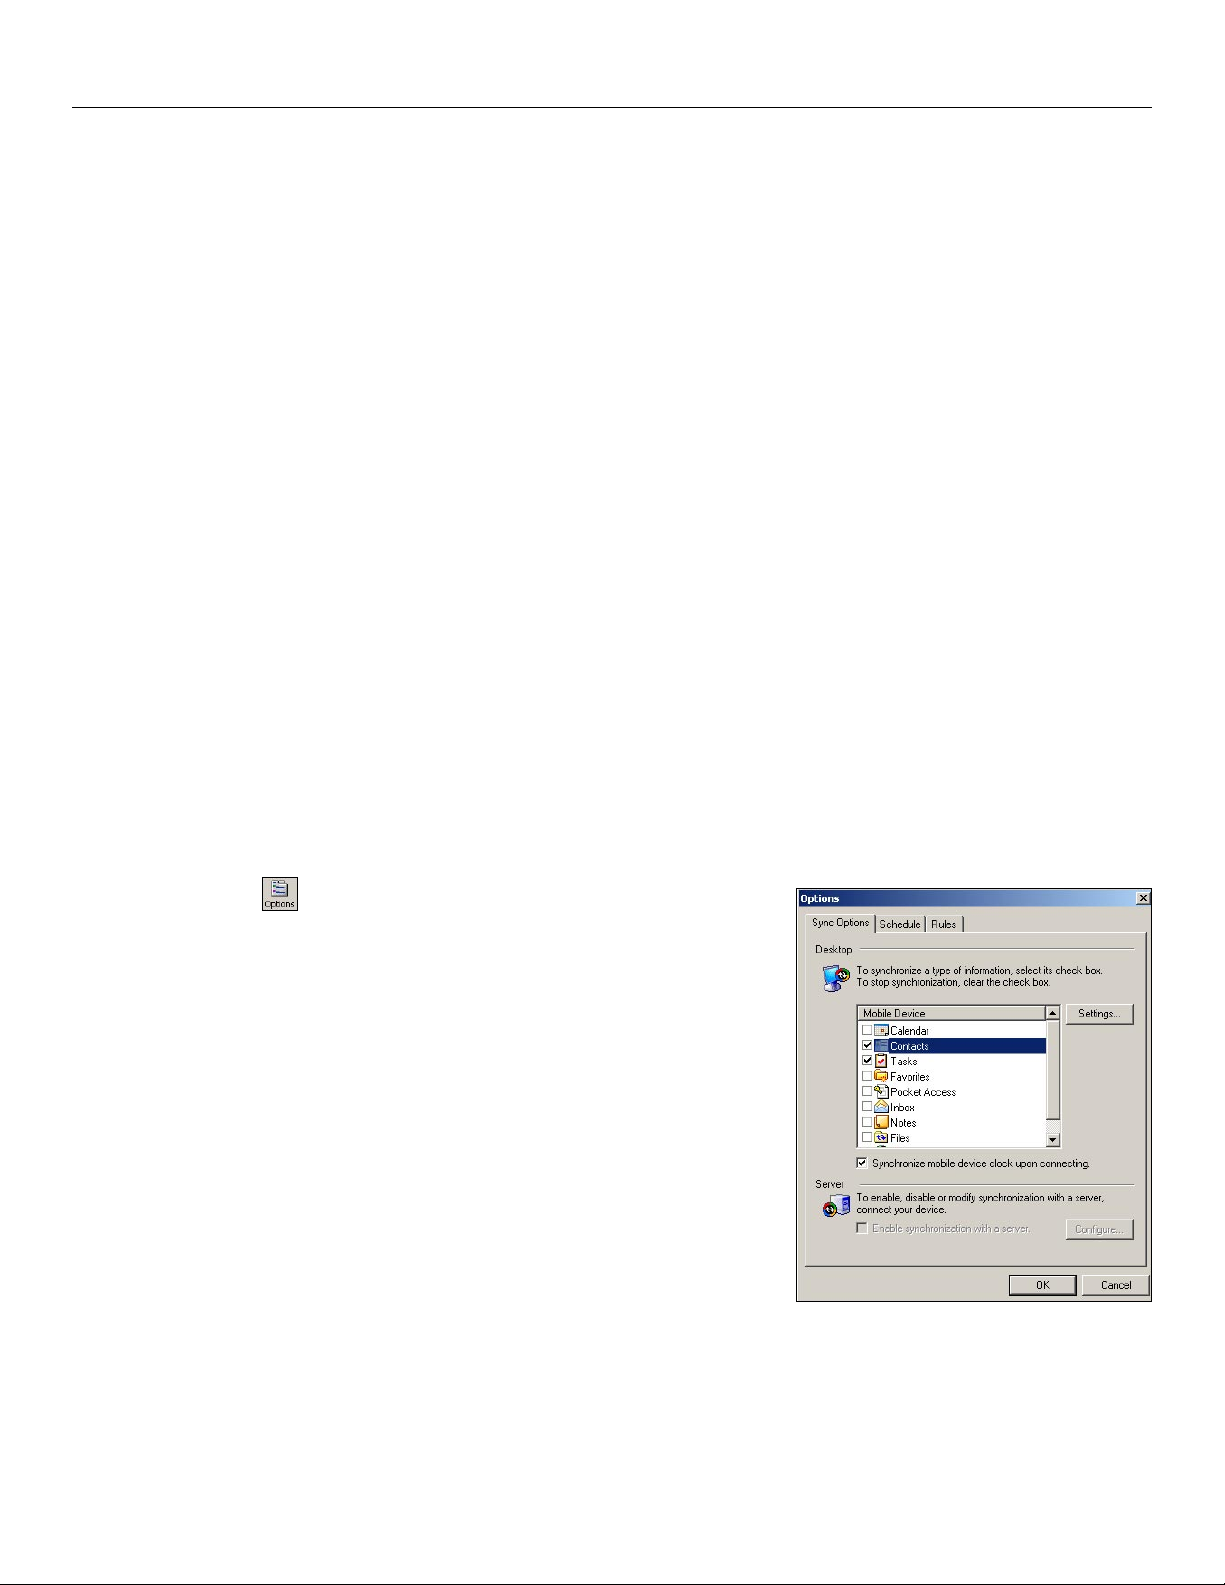
Choosing What Data to Synchronize
Because your iQue M5 has a limited amount of storage space (64 MB RAM), we recommend that you limit the amount of
information you synchronize or store. For example, you can limit the number of Calendar appointments you synchronize between
your desktop and your iQue M5 to save storage space. You can change these settings on your desktop computer.
To change what types of information to synchronize:
1. Open Microsoft ActiveSync on your desktop computer.
2. Click
3. Click to check the box next to each type of information you want to
4. Click OK.
To limit how much information is synchronized:
1. From ActiveSync on your desktop computer, click Options.
2. Click to highlight
3. Click
4. Check options to limit how many appointments you want to
5. Repeat for each type of information you synchronize.
6. Click
Options.
share between your desktop computer and your iQue M5.
Calendar from the list of programs.
Settings.
synchronize. Click OK.
OK.
Chapter 2: ActiveSync
Customize your ActiveSync settings by clicking Options.
12
ActiveSync: Choosing When to Synchronize
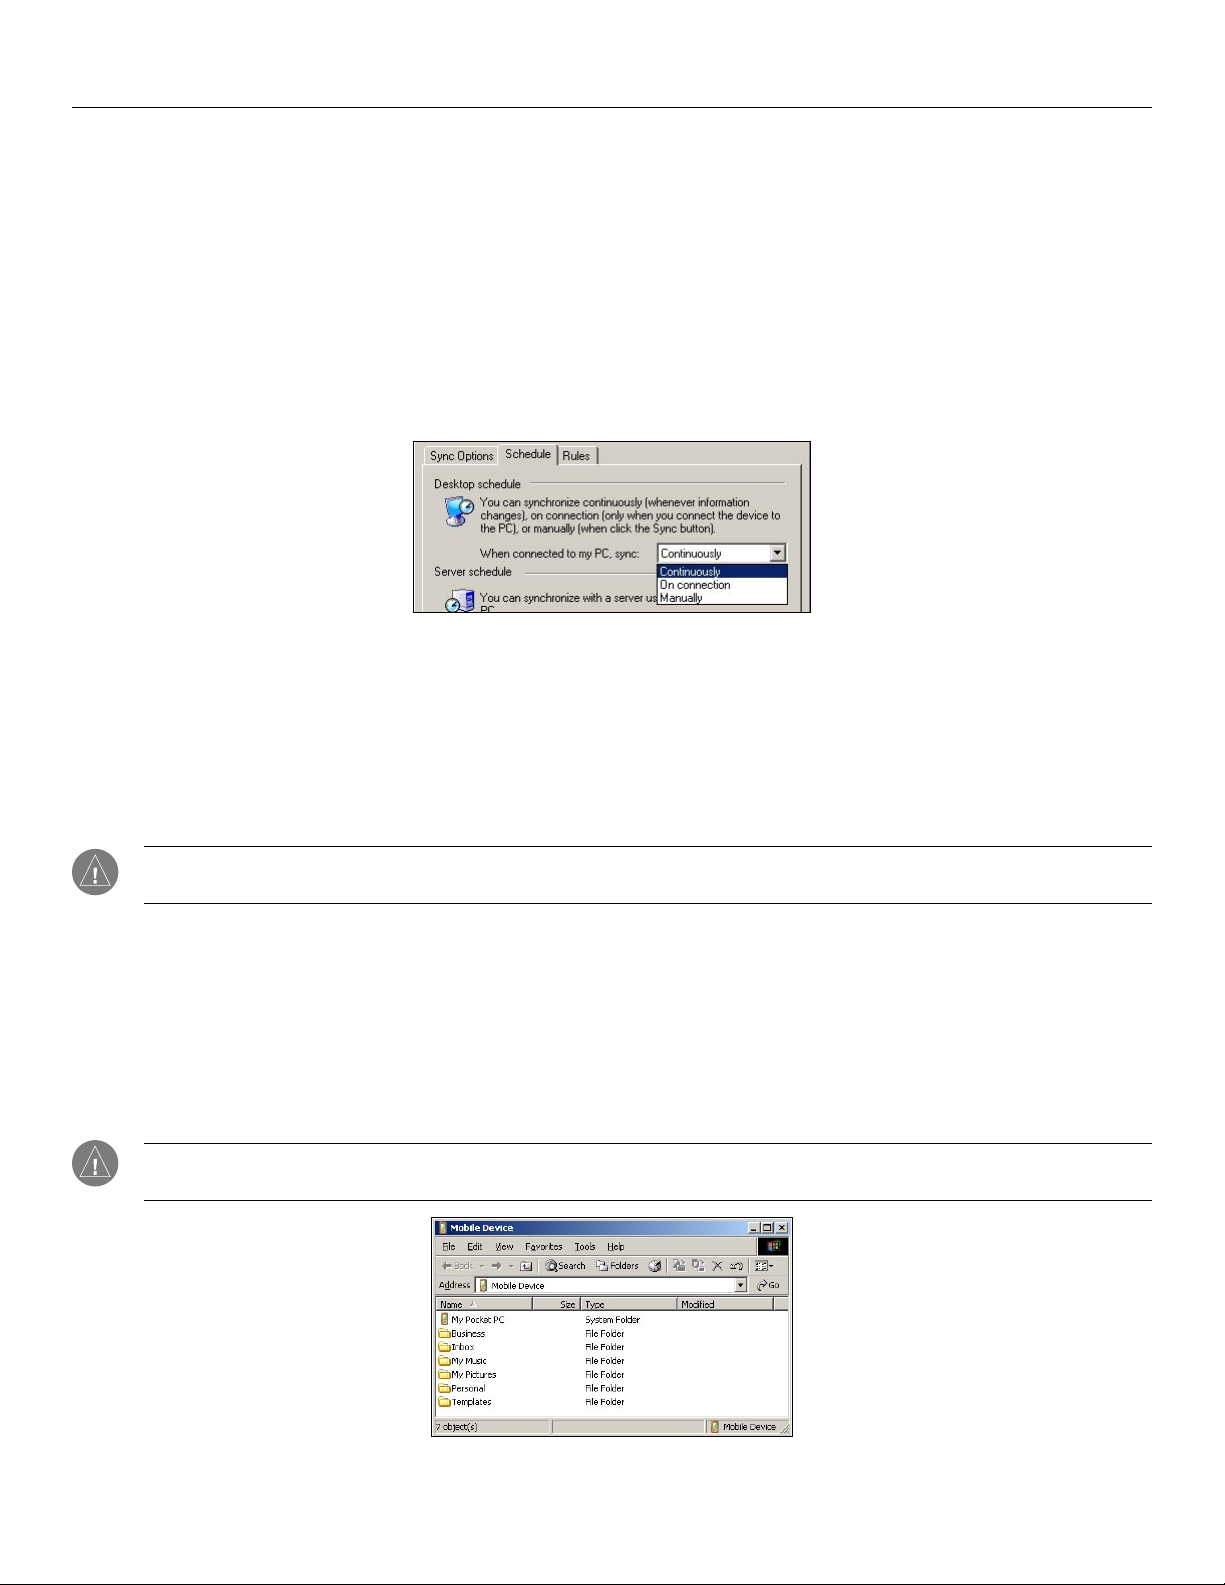
Choosing When to Synchronize
You may find that you want to synchronize less frequently or only at certain times. You can control how often you would like to
synchronize information by changing settings in ActiveSync on your desktop computer.
To change when synchronization happens:
1. Open Microsoft ActiveSync on your desktop computer.
2. Click
3. Click to choose how often you would like to synchronize information. If you choose “Synchronize manually,” you
4. Click
Options and then the Schedule tab.
must open ActiveSync and click Sync each time you want to synchronize data.
OK.
Changing when synchronization happens
Moving Files between Your Desktop Computer and iQue M5
You may want to move files or folders between your desktop and your iQue M5 without having to synchronize that information.
This works well for files you do not need to update or for files that you cannot synchronize, like pictures. Moving files and folders
onto your iQue M5 is just like moving them from one location to another on your personal computer. For more help, refer to your
desktop computer help files.
NOTE: You may have trouble transferring large files (> 50 MB) to your SD card. This is best done with a separate data
card reader, rather than transferring them directly to the card in your iQue M5.
To move files or folders:
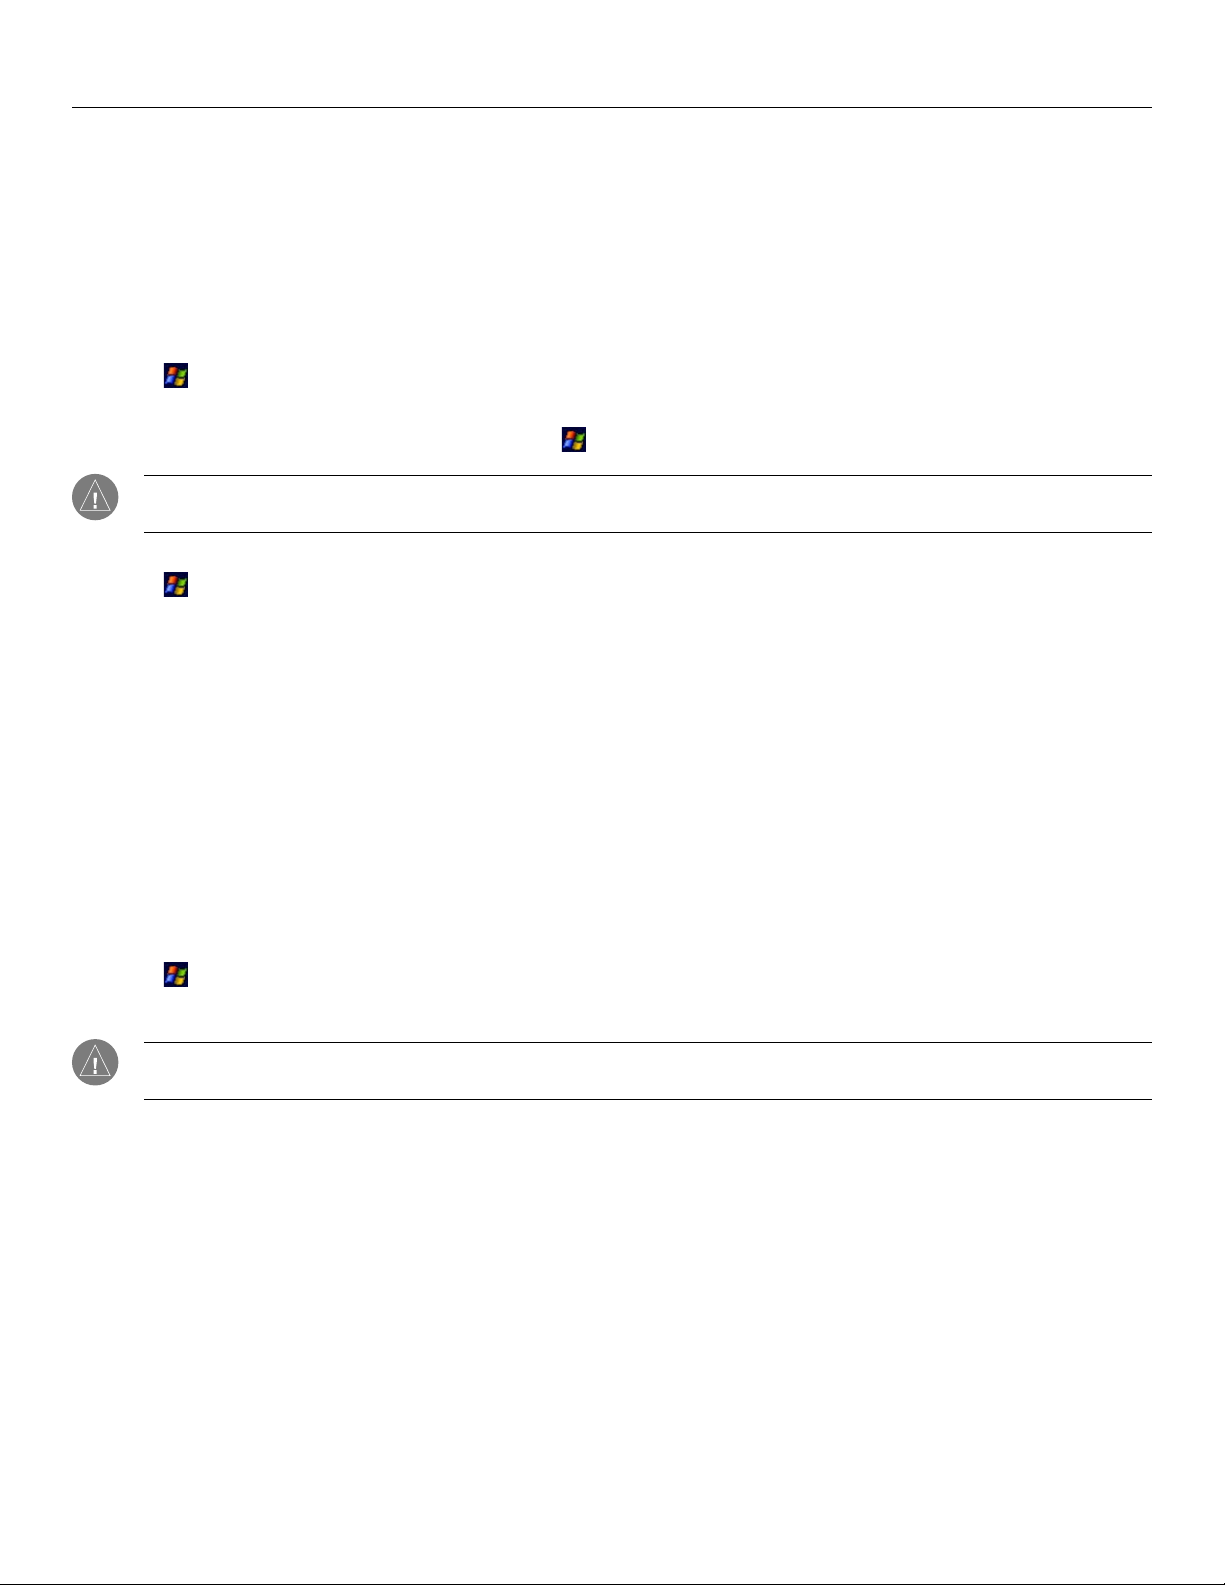
1. Open ActiveSync on your desktop computer.
2. Click Explore. This window shows all files and folders stored on your iQue M5.
3. To move files to your iQue M5, click and drag files or folders from your desktop computer to this window. You can
also Cut, Copy, and Paste to move files.
4. To move files to your desktop computer, click and drag files or folders from this window to your desktop computer.
You can also Cut, Copy, and Paste.
NOTE: ActiveSync may ned to convert files when synchronizing between your mobile device and the desktop computer. A
converted file may not contain all the information found in the original file.
Chapter 2: ActiveSync
Exploring your iQue M5 on your computer
13

ActiveSync: Adding and Removing Programs
Adding and Removing Programs
Programs added to your iQue M5 at the factory are stored in ROM (read-only memory). You cannot remove this software, and you
will never accidentally lose ROM contents. All other programs and data files added to your device after factory installation are
stored in RAM (random access memory), including any software you load from your iQue M5 setup CD.
You can install any program created for your iQue M5, as long as it has enough memory. The program must be compatible with an
ARM processor, or it will not work on your iQue M5. Look for programs online at
To add programs:
1. Be sure this program is compatible with your iQue M5 (ARM processor).
2. Download the program to your desktop computer (or insert the CD or disk that contains the program into your desk
top computer). You may see a single *.cab, *.xip, *.exe, or *.zip file, a Setup.exe file, or several versions of files for
different device types and processors. Be sure to select the program designed for ARM devices.
3. Read any installation instructions, Read Me files, or documentation that comes with the program. Many programs
provide special installation instructions.
4. Connect your device to your desktop computer.
5. Double-click the *.exe file.
NOTE: If the file is an installer, the installation wizard will begin. Follow the directions on the screen. Once the software
has been installed on your desktop computer, the installer will automatically transfer the software to your device.
http://www.microsoft.com/windowsmobile.
-
NOTE: If the file is not an installer, you will see an error message stating that the program is valid but it is designed for a
different type of computer. You will need to move this file to your device. See “Moving Files between your Desktop Com-
puter and your iQue M5.”
6. Once installation is complete, tap Programs, and then the program icon to open.
To add programs directly from the Internet:
1. Open Pocket Internet Explorer on your iQue M5 and connect to the Internet to search for programs you want
to download.
2. Once you find a program, download it to your iQue M5. You may see a single *.xip, *.exe or *.zip file, a Setup.exe
file, or several versions of files for different device types and processors. Be sure to select the program designed for
ARM processors.
3. Read any installation instructions, Read Me files, or documentation that comes with the program. Many programs
provide special installation instructions.
4. Tap the file, such as a *.cab, *.xip or *.exe file. The installation wizard will begin. Follow the directions on the screen.
Chapter 2: ActiveSync
14
ActiveSync: Adding and Removing Programs
To add programs to your Start menu from ActiveSync:
1. Open ActiveSync on your desktop computer.
2. Click Explore.
3. Locate the program file. Right click on the program file name and click Create Shortcut.
4. Right-click the shortcut and choose Cut. Open My Pocket PC, Windows, and the Start Menu folder. Right-click
and choose Paste.
To add programs to your Start menu from your iQue M5:
1. Tap and then Settings.
2. Tap the System tab. Then tap Menus.
3. Tap to check the items you want to include in the
Start menu. Unchecked items appear in the Programs menu.
NOTE: This method of adding programs only works if a shortcut to the program already appears in the Programs folder.
To add programs to the Start menu that do not appear in the list, follow the instructions below.
OR
1. Tap
2. From the pull-down menu, select My Device to view all files and folders on your iQue M5. Locate the program file.
3. Tap and hold on the program file and choose Cut from the pop-up menu.
4. From
folder and choose Paste from the pop-up menu.
, Programs, and then File Explorer.
My Device, tap the Windows folder and then the Start Menu folder. Tap and hold on a blank area inside this
To remove programs with ActiveSync:
1. Launch ActiveSync on your desktop computer.
2. From the Tools menu, select Add/Remove Programs.
2. Highlight the name of the program you want to remove from your iQue M5.
3. Click Remove.
4. Follow the on-screen instructions.
To remove programs on your iQue M5:
1. Tap , Settings, the System tab, and then Remove Programs.
2. Tap to highlight the program you want to remove; then tap Remove.
NOTE: If the program does not appear in the list of installed programs, use File Explorer on your device to locate the
program, tap and hold the program, and then tap Delete on the pop-up menu.
Chapter 2: ActiveSync
15
ActiveSync: Backing Up Files and Settings
Backing Up Files and Settings
It is important to back up your iQue M5 files and settings periodically. When you back up files with ActiveSync, you will store an
“image” of what files, folders, and settings are like on your iQue M5. Then, if you lose data for some reason, you can
iQue to the last “image” you saved.
restore your
You can also back up files and settings on an SD card or in safe storage on your iQue M5. To do so, use
Sprite Backup software as
described in Chapter 9.
Backing up files from your iQue M5 to your computer
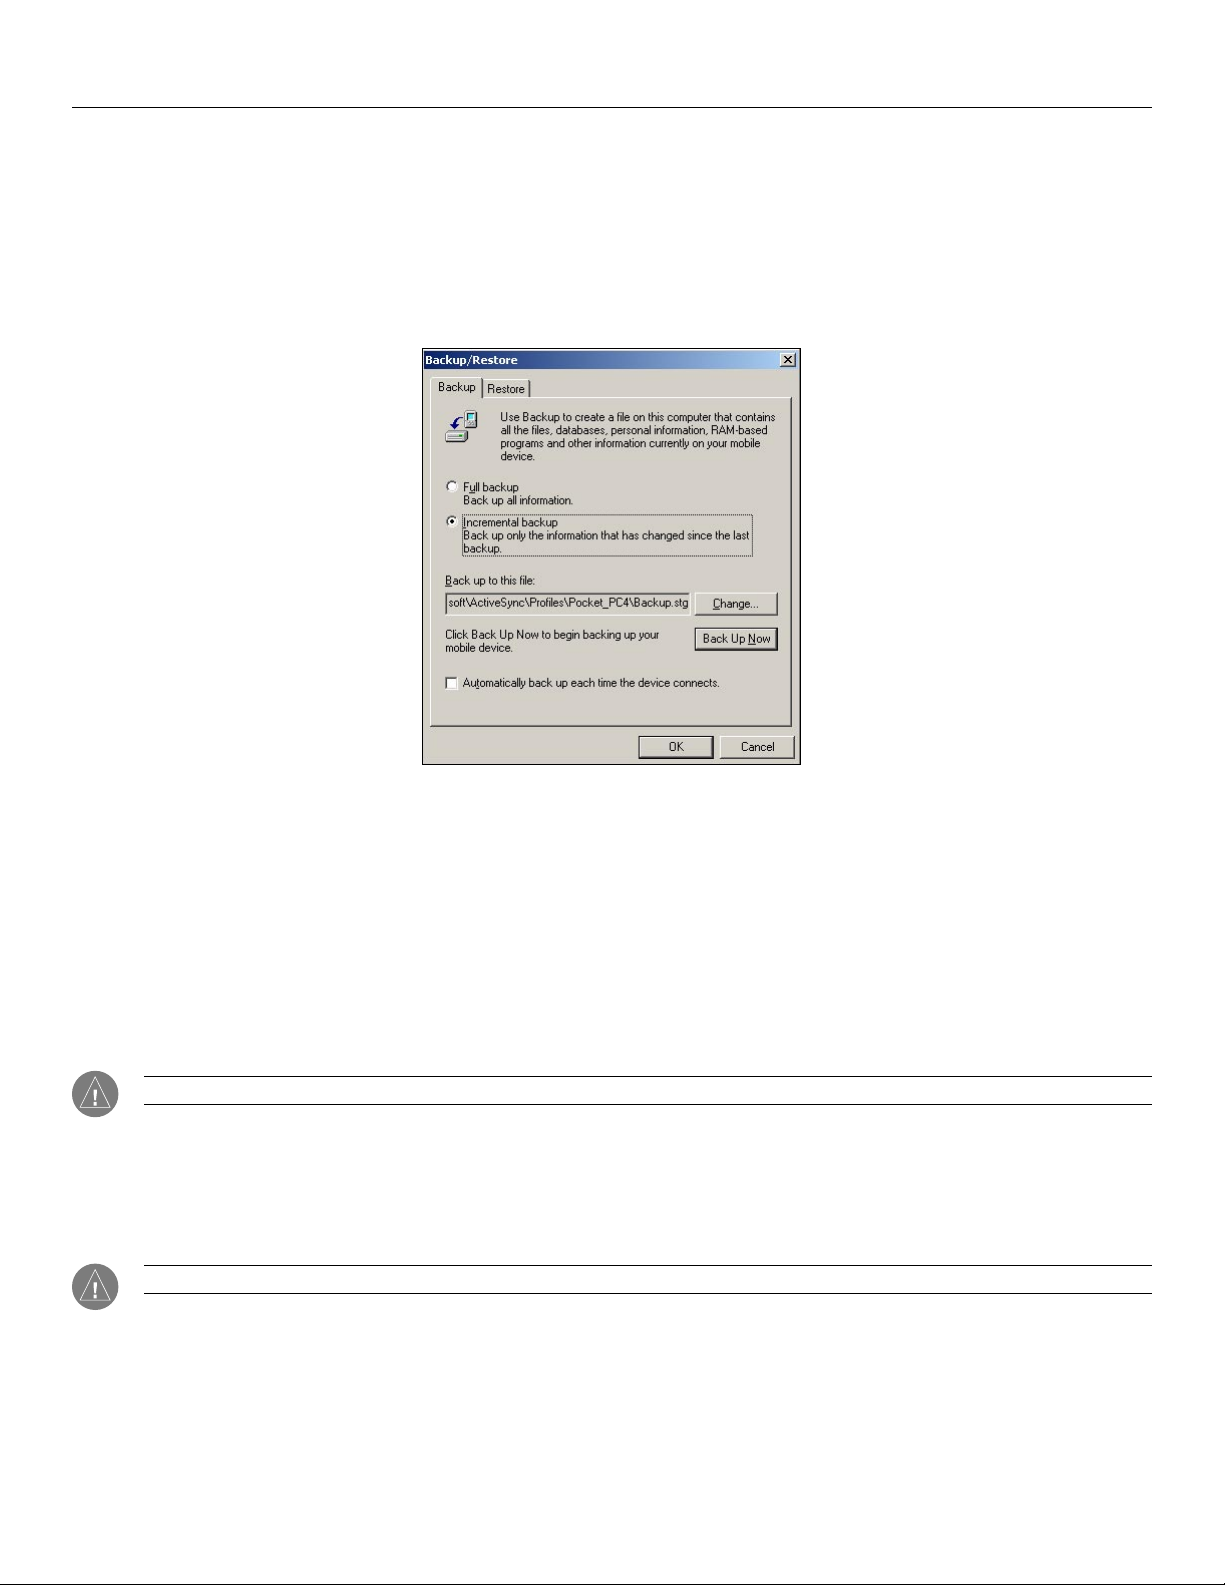
To back up files and settings:
1. Open ActiveSync on your desktop computer.
2. From the Tools menu, choose Backup/Restore.
3. Choose whether you want to do a full backup (saves all information) or an incremental backup (saves any information that has changed since last backup).
4. Choose where you want to save the back up file. If you want to back up your iQue M5 each time you synchronize,
check the box next to “Automatically back up each time the device connects.”
5. Click Back Up Now.
NOTE: Do not use your iQue M5 before you are finished backing up files. If you do, the back up process may fail.
To restore your iQue M5 to the last backup state:
1. Open ActiveSync on your desktop computer.
2. From the Tools menu, choose Backup/Restore. Click the Restore tab.
3. Click
Restore Now.
NOTE: Any information that has changed on your iQue M5 since your last backup will be erased by the restore process.
Chapter 2: ActiveSync
16

ActiveSync: Synchronizing with an Exchange Server
Synchronizing with an Exchange Server
If your company has installed Microsoft Exchange Server with Exchange Server ActiveSync, you can synchronize between your
iQue M5 and a server. Note that you can only synchronize with a server or with your desktop computer, not both.
For more information on setting up and synchronizing with an Exchange server, refer to the ActiveSync help files on your desktop
(with ActiveSync open, press F1 on your keyboard or choose Microsoft ActiveSync Help from the Help menu).
Synchronizing Remotely with Infrared
If you have a desktop or laptop with an Infrared (IR) port, you can synchronize remotely with IR. Make sure IR ports on your
computer and your iQue M5 are lined up with no objects between them.
To synchronize remotely with IR:
1. Tap and then ActiveSync on your iQue M5.
2. Tap Tools and then Connect via IR. ActiveSync will automatically make the IR connection.
Synchronizing after Restoring from Sprite Backup
When you try to synchronize your iQue M5 with your personal computer after restoring data from a Sprite Backup operation, you
may receive a message like this: “The following information type on your mobile device has items that have not been synchronized
with this computer before.” This message is expected and unavoidable, even though you have already synchronized data with
your computer in the past. Choose Combine to add the information on your PC to that on your iQue M5. Replace removes all
entries from your iQue M5 and resynchronizes everything. In most cases, we recommend that you choose Combine; if you choose
Replace, you may important delete information that you just restored from Sprite Backup.
Chapter 2: ActiveSync
17

Pocket Outlook: Chapter 3 Table of Contents
CHAPTER 3: POCKET OUTLOOK
Calendar: Scheduling Appointments and Meetings ........... 19
Using the Summary Screen ...................................................................... 21
Creating Meeting Requests ....................................................................... 21
Contacts: Tracking Friends and Colleagues .......................22
Using the Summary Screen ...................................................................... 22
Tasks: Keeping a To Do List .................................................23
Using the Summary Screen ...................................................................... 23
Notes: Capturing Thoughts and Ideas ................................24
Messaging: Sending and Receiving E-mail .......................25
Using Messaging ...................................................................................... 25
Using Signatures ....................................................................................... 25
Saving vCard (.VCF) Attachments ...........................................................
Synchronizing E-mail Messages .............................................................. 26
Connecting Directly to an E-mail Server ................................................. 26
26
Chapter 3: Pocket Outlook
18
Pocket Outlook: Calendar
CHAPTER 3: POCKET OUTLOOK
Microsoft Pocket Outlook includes Calendar, Contacts, Tasks, Messaging, and Notes. You can use these programs individually or
together. For example, e-mail addresses stored in Contacts can be used to address e-mail messages in Inbox.
Using ActiveSync
, you can synchronize information in Microsoft Outlook
or Microsoft Exchange on your desktop computer
with your device. You can also synchronize this information directly with a Microsoft Exchange server. Each time you synchronize,
ActiveSync compares the changes you made on your device and desktop computer or server and updates both computers with the
latest information. For information on using ActiveSync, see
You can switch to any of these programs by tapping
Chapter 2.
and then Programs (if necessary).
Calendar: Scheduling Appointments and Meetings
Use Calendar to schedule appointments, including meetings and other events. To open Calendar, press the Calendar button on the
front of your iQue M5, or tap
Month, and Year) and easily switch views by pressing the buttons below:
Agenda View
Day View View your day’s schedule in one-hour blocks.
Week View View your week’s schedule in one-hour blocks.
Month View
and then Calendar. You can check your appointments in one of several views (Agenda, Day, Week,
Upcoming appointments appear in bold; past
appointments are not.
View which days of the month contain scheduled
apppointments.
Year View View a year calendar.
Chapter 3: Pocket Outlook
19
Pocket Outlook: Calendar
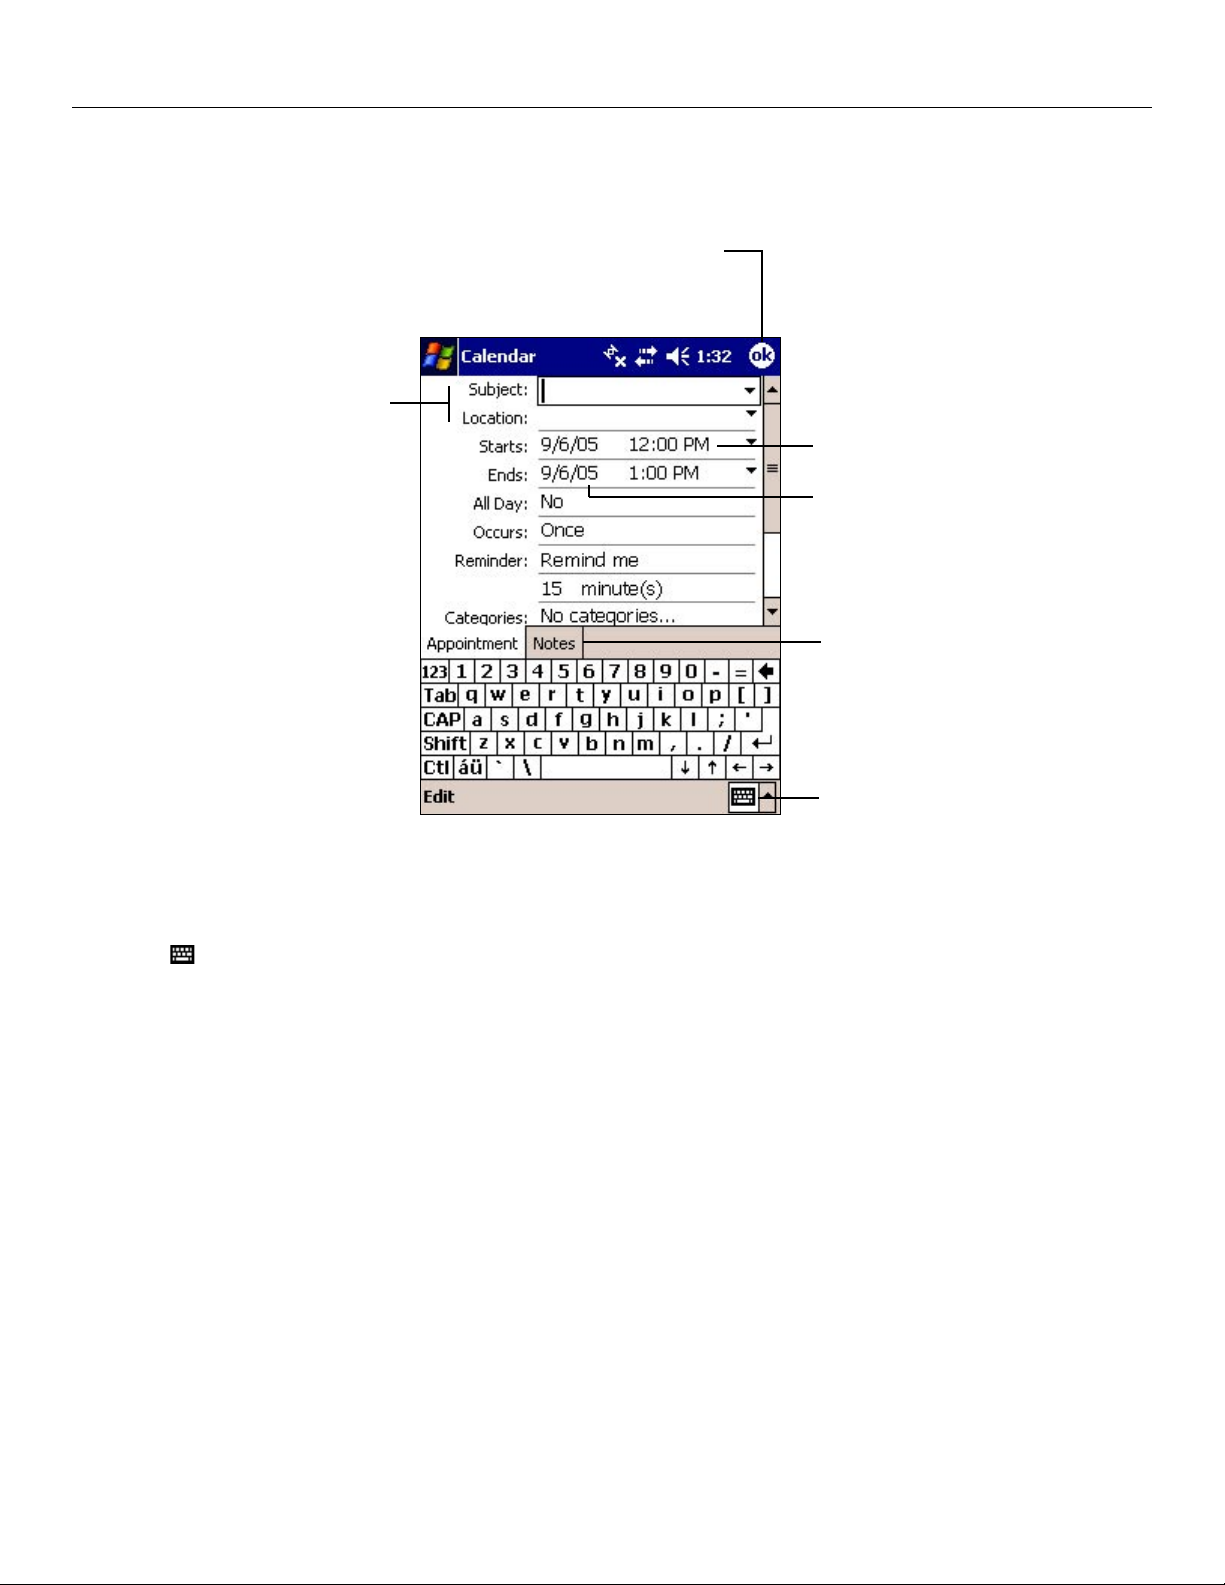
To create an appointment:
1. If you are in Day or Week view, tap the desired date and time for the appointment.
2. Tap New.
Tap to return to the
calendar (appointment is
saved automatically).
Enter a Subject, and
then tap to enter a
Location.
Tap to set a time.
Tap to select a date.
Tap to add notes or
reminders for this
appointment.
Tap to hide input panel.
3. Tap to select a field. Then enter a description and a location using the input panel.
4. If needed, tap the date and time to change them.
5. Enter other desired information. You will need to hide the input panel or use the scroll bar to see all available fields.
(Tap
to hide the input panel.)
6. If this appointment occurs more than once, tap the Occurs field and select among the drop-down options.
7. To add notes, tap the Notes tab from the Edit Appointment screen. See “Notes: Capturing Thoughts and Ideas” for
more information.
8. Tap “Remind Me” to turn on/off the appointment Reminder. Tap to change the time when the reminder will appear.
9. When finished, tap OK to return to the calendar.
Chapter 3: Pocket Outlook
20
Pocket Outlook: Calendar
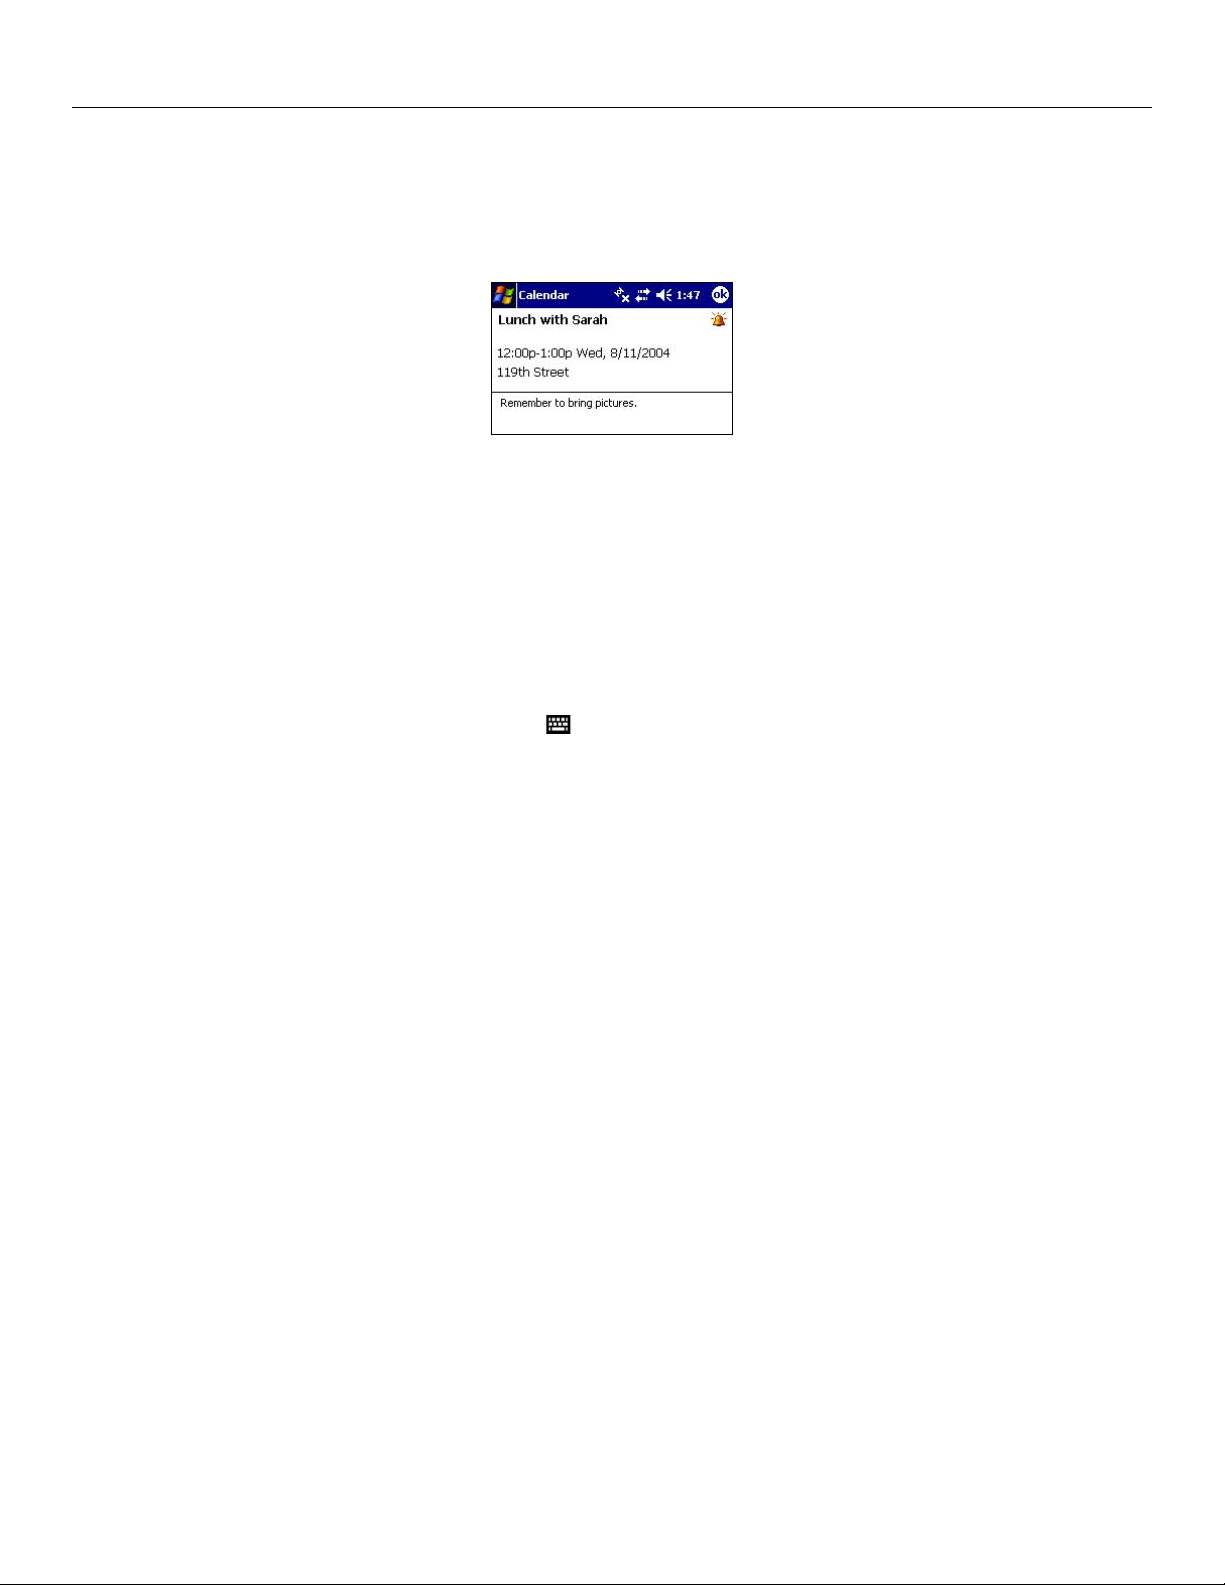
Using the Summary Screen
When you tap an appointment in Calendar, a summary screen appears. To change the appointment, tap Edit. To beam an
appointment, tap and hold on the appointment and then select Beam Appointment. You can also tap the appointment and then tap
and Beam Appointment.
Tools
Appointment Summary Screen
Creating Meeting Requests
You can use Calendar to set up meetings with users of Outlook or Pocket Outlook. The meeting request is created automatically and
sent either when you synchronize your Inbox or when you connect to your e-mail server. Indicate how you want to send meeting
requests by tapping Tools and then Options.
To schedule a meeting:
1. Create an appointment.
2. In the appointment details, hide the input panel
3. From the list of e-mail addresses you have entered in Contacts, select the meeting attendees. Then tap ok. The
meeting notice is created automatically and placed in the Outbox folder of your Inbox. See “Messaging: Sending
and Receiving E-mail” for more information.
or use the scrollbar and then tap the Attendees field.
Chapter 3: Pocket Outlook
21
 Loading...