

Garmin iQue 3600 Guide

Que
integrated handheld
™
applications guide

© Copyright 2004 Garmin Ltd. or its subsidiaries
Garmin International, Inc.
1200 East 151st Street, Olathe, Kansas 66062, U.S.A.
Tel. 913/397.8200 or 800/800.1020
Fax 913/397.8282
Garmin (Europe) Ltd.
Unit 5, The Quadrangle, Abbey Park Industrial Estate, Romsey, SO51 9DL, U.K.
Tel. 44/0870.8501241
Fax 44/0870.8501251
Garmin Corporation
No. 68, Jangshu 2nd Road, Shijr, Taipei County, Taiwan
Tel. 886/2.2642.9199
Fax 886/2.2642.9099
All rights reserved. Except as expressly provided herein, no part of this manual may be reproduced, copied, transmitted, disseminated, downloaded or stored in any storage medium, for any purpose without the express prior written consent of Garmin. Garmin hereby grants permission
to download a single copy of this manual onto a hard drive or other electronic storage medium to be viewed and to print one copy of this manual
or of any revision hereto, provided that such electronic or printed copy of this manual must contain the complete text of this copyright notice and
provided further that any unauthorized commercial distribution of this manual or any revision hereto is strictly prohibited.
Information in this document is subject to change without notice. Garmin reserves the right to change or improve its products and to make
changes in the content without obligation to notify any person or organization of such changes or improvements. Visit the Garmin web site
(www.garmin.com) for current updates and supplemental information concerning the use and operation of this and other Garmin products.
The Palm OS, HotSync, Palm Powered logo are
registered trademarks and Palm Powered is a
trademark of Palm Trademark Holding Company,
LLC. Other brands may be trademarks of their
respective owners.
Garmin® is a registered trademark and MapSource ™, iQue™and Que™ are trademarks of Garmin Ltd. or its subsidiaries and may not be
used without the express permission of Garmin.
February 2004 Part Number 190-00270-03 Rev. B Printed in Taiwan

Software License Agreement
BY USING THE iQue™ 3600, YOU AGREE TO BE BOUND BY
THE TERMS AND CONDITIONS OF THE FOLLOWING SOFTWARE
LICENSE AGREEMENT. PLEASE READ THIS AGREEMENT CAREFULLY.
Garmin Ltd. or its subsidiaries (hereinafter collectively referred to
as “Garmin”) grants you a limited license to use the software embedded
in this device (the “Software”) in binary executable form in the normal
operation of the product. Title, ownership rights and intellectual property rights in and to the Software remain in Garmin.
You acknowledge that the Software is the property of Garmin and
is protected under the United States of America copyright laws and
international copyright treaties. You further acknowledge that the structure, organization and code of the Software are valuable trade secrets of
Garmin and that the Software in source code form remains a valuable
trade secret of Garmin. You agree not to decompile, disassemble, modify,
reverse assemble, reverse engineer or reduce to human readable form
the Software or any part thereof or create any derivative works based on
the Software. You agree not to export or re-export the Software to any
country in violation of the export control laws of the United States of
America.
iQue 3600
Introduction
Software Agreement
i

iQue 3600
Introduction
for Class B digital devices FOR HOME OR OFFICE USE. These limits
FCC Compliance Information
The iQue 3600 does not contain any
user-serviceable parts. Repairs should only be
made by an authorized Garmin service center.
Unauthorized repairs or modifications could
result in permanent damage to the equipment,
and void your warranty and your authority to
operate this device under Part 15 regulations.
are designed to provide more reasonable protection against harmful
interference in a residential installation, and are more stringent than
“outdoor” requirements.
This device may not cause harmful interference, and (2) this device must
accept any interference received, including interference that may cause
undesired operation.
energy and, if not installed and used in accordance with the instructions,
may cause harmful interference to radio communications. However,
there is no guarantee that interference will not occur in a particular
installation. If this equipment does cause harmful interference to radio
or television reception, which can be determined by turning the equipment off and on, the user is encouraged to try to correct the interference
by one of the following measures:
The iQue 3600 complies with Part 15 of the FCC interference limits
Operation of this device is subject to the following conditions: (1)
This equipment generates, uses and can radiate radio frequency
• Reorient or relocate the receiving antenna.
• Increase the separation between the equipment and the receiver.
• Connect the equipment into an outlet on a circuit different from that
to which the receiver is connected.
• Consult the dealer or an experienced radio/TV technician for help.
ii

CAUTION: Use the iQue 3600 at your own risk. To reduce the risk of
unsafe operation, carefully review and understand all aspects of this Owner’s
Manual—and thoroughly practice operation using the simulator mode prior
to actual use. When in actual use, carefully compare indications from the
iQue™ 3600 to all available navigation sources, including the information
from other NAVAIDs, visual sightings, charts, etc. For safety, always resolve
any discrepancies before continuing navigation.
CAUTION: It is the user’s responsibility to use this product prudently.
This product is intended to be used only as a navigational aid and must
not be used for any purpose requiring precise measurement of direction,
distance, location or topography. This product should not be used as an aid
to determine ground proximity for aircraft navigation.
CAUTION: The electronic chart is an aid to navigation and is designed
to facilitate the use of authorized government charts, not replace them.
Only official government charts and notices to mariners contain all information needed for safe navigation – and, as always, the user is responsible for
their prudent use.
MAP DATA INFORMATION: One of the goals of Garmin is to
provide customers with the most complete and accurate cartography that
is available to us at a reasonable cost. We use a combination of governmental and private data sources, which we identify as required in product
literature and copyright messages displayed to the consumer. Virtually all
data sources contain inaccurate or incomplete data to some degree. This
is particularly true outside the United States, where complete and accurate
digital data is either not available or prohibitively expensive.
(GPS) is operated by the United States government, which is solely responsible for its accuracy
and maintenance. The system is subject to
changes which could affect the accuracy and
performance of all GPS equipment. Although
the Garmin iQue 3600 is a precision electronic
NAVigation AID (NAVAID), any NAVAID can
be misused or misinterpreted and, therefore,
become unsafe.
and its components contain chemicals known
to the State of California to cause cancer, birth
defects, or reproductive harm. This Notice is
being provided in accordance with California’s
Proposition 65. If you have any questions or
would like additional information, please refer to
our web site at http://www.garmin.com/prop65.
iQue 3600
Introduction
Warnings and Precautions
WARNING: The Global Positioning System
WARNING: This product, its packaging,
iii

iQue 3600
Introduction
Warnings and Precautions
Important
Because the Garmin iQue 3600 handheld
can be used for vehicular navigation, important safety considerations must be observed.
Please read and observe the instructions on
this page.
Do Not Mount Where
Driver’s Field of Vision is
Blocked
Do Not Mount in
Front of Airbag
Panels
Do Not Place Unsecured on
the Vehicle Dash
Do Not Mount in Front of an
Airbag Field of Deployment
WARNING: For use in vehicles, it is the sole responsibility of the
owner/operator of the iQue 3600 handheld to place and secure the
unit so that it will not interfere with the vehicle operating controls and
safety devices, obstruct the driver’s view of driving conditions, or cause
damage or personal injury in the event of an accident.
Do not mount the iQue handheld over airbag panels or in the field
of airbag deployment. Airbags expand with a rapid force that can propel
objects in their path towards the vehicle driver or passengers causing possible injury. Refer to airbag safety precautions contained in the
vehicle owner’s manual.
Do not mount the iQue handheld in a place where the driver or
passengers are likely to impact it in a collision. The mounting hardware
provided by Garmin is not warranted against collision damage or the
consequences thereof.
WARNING: When used in vehicles, it is the sole responsibility
of the driver of the vehicle to operate the vehicle in a safe manner,
maintain full surveillance of all driving conditions at all times, and not
become distracted by the iQue handheld to the exclusion of safe driving
practices. It is unsafe to operate the controls of the iQue handheld while
you are driving. Failure by the driver of a vehicle equipped with an
iQue handheld to pay full attention to operation of the vehicle and road
conditions while the vehicle is in motion could result in an accident
with property damage and personal injury.
iv

Introduction
The Garmin iQue 3600 handheld is designed to use Garmin GPS
technology integrated with the Palm OS
®
(Operating System) to not
only manage your personal data but to provide you with navigational
guidance, voice recording and an audio player. Your iQue handheld
comes with three manuals.
“Read This First” - Setup Guide
you how to:
The Setup Guide gives you computer connection and software
installation instructions, and other important details. Before reading the
other manuals, read the SetUp Guide which is printed on the Installation CD case.
Que Applications Guide
This Applications Guide describes how to use the installed Que™
add-on applications used for:
• Navigation
• Voice Recording (.WAV format)
• Playing .MP3 and .WAV format Audio Files
Operating Instructions
The Operating Instructions manual describes all you need to know
about how to use your iQue handheld and the applications that come
with it. (Available only on the Installation CD.)
iQue 3600
Introduction
About the Manuals
The Operating Instructions manual shows
• Turn On and Off your iQue handheld,
reset the iQue handheld, and to enter
data in greater detail.
• Use the HotSync
computer.
• Exchange data with another handheld
using ifr beaming or Data Card media.
• Personalize your iQue handheld with
your own setting preferences.
• Back-up data or transfer data into a different iQue handheld, maintain your iQue
handheld and other technical information.
®
operation with your
v

iQue 3600
Introduction
Table of Contents
Introduction........................................................ i
Software License Agreement..........................................i
FCC Compliance Information ......................................ii
Warnings and Precautions ...........................................iii
Important ..............................................................iv
About the Manuals ....................................................... v
Introduction ...........................................................v
“Read This First” - SetUp Guide.............................. v
Que Applications Guide.......................................... v
Operating Instructions............................................ v
Table of Contents ........................................................vi
vi
GPS Applications ............................................... 1
The Que “Hard” Button................................................1
Initializing the GPS Receiver.........................................2
Using QueGPS .............................................................2
GPS Receiver Status......................................................4
QueGPS Options..........................................................5
New Location..........................................................6
New Elevation.........................................................6
Using QueMap .............................................................7
Viewing the Map Page.............................................7
Using the QueMap Application Selector Icons ........9
Using Preferences for QueMap..............................11
Location Formats and Map Datums ......................12
Measure Distance..................................................13
Delete Map Data ...................................................14
Using QueFind...........................................................15
Searching for Find Items.......................................16
Finding Cities .......................................................17
Finding an Address...............................................18
Finding an Intersection.........................................20
Finding a Point of Interest.....................................21
Finding Waypoints................................................22
Using Waypoints ........................................................23

iQue 3600
Introduction
Table of Contents
Using a Waypoint as a Route Destination ..............25
Editing Waypoints ................................................25
Setting a Location.......................................................28
Creating a Waypoint using an Existing Address Book
Entry.....................................................................28
Using QueTracks ........................................................29
Using QueRoutes........................................................31
Creating Routes ....................................................33
Using QueMap to Select a Destination ..................34
Using the Address Book to Select a Destination.....34
Using the Date Book to Select a Destination..........35
Recalculating a Route............................................35
Using a Detour......................................................35
Stopping and Resuming Route Navigation ............36
Customizing a Route.............................................36
Saving a Route ......................................................37
Route and Guidance Preferences...........................37
Using Routing Voice Prompts................................39
Using QueTurns .........................................................40
Using QueTrip............................................................41
Audio Applications .......................................... 42
Using QueVoice..........................................................42
Managing Voice Files.............................................43
Using Options to customize QueVoice ..................44
Attaching and Removing a Location to Voice Files 45
Importing and Exporting QueVoice Files .............46
Using QueAudio.........................................................48
Time Applications............................................ 50
Using QueClock.........................................................50
Using QueSun and Moon ...........................................52
Using QueHunt and Fish............................................52
Downloading Map Data .................................. 53
Using MapInstall ........................................................53
Using MapSource™ ...................................................54
vii

iQue 3600
Introduction
Table of Contents
Additional Information.................................... 55
Specifi cations .............................................................55
Internal System.....................................................55
Standard Applications...........................................55
Navigation features ...............................................56
Physical ................................................................56
GPS performance ..................................................56
Power ...................................................................56
What is WAAS?..........................................................57
What is Differential GPS (DGPS)?...............................57
What is a datum, and which should I use? .................58
Location Coordinates, how to edit or assign them .....59
Index................................................................ 60
viii
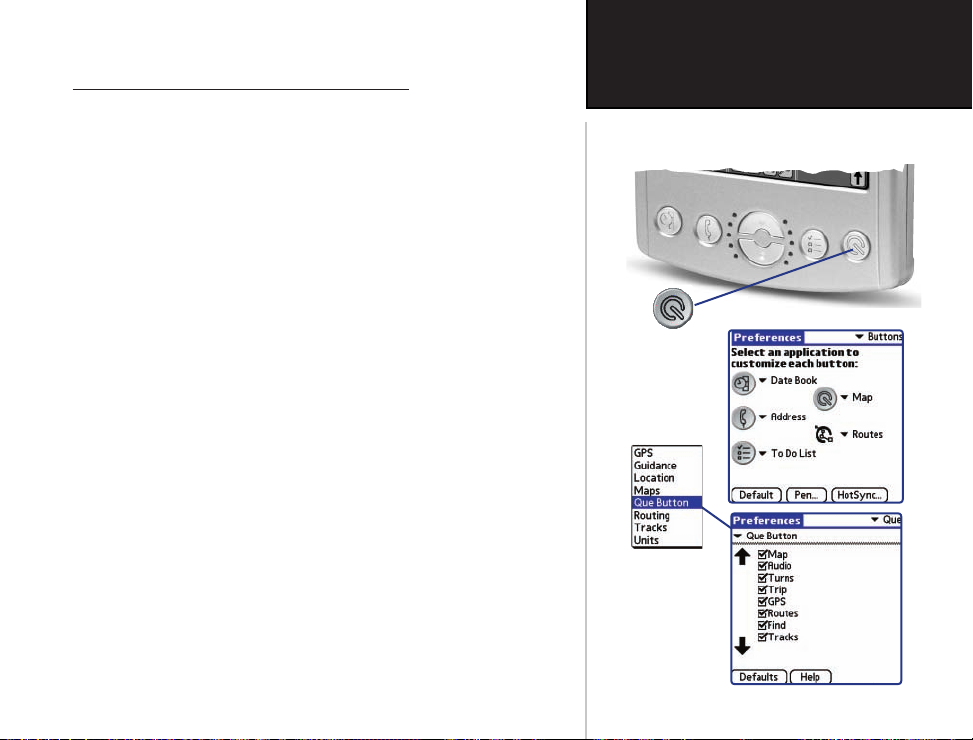
Using the Que Applications Hard Button
Pressing the Que “Hard” Button on the front of your iQue handheld allows
you to quickly access selected applications. Use the Que Hard Button to:
• Quickly access and display Applications
• Re-activate the iQue when in the “Auto-Off” mode.
• Press and hold to hear GPS status or next navigation prompt.
To display Que applications using the Que button:
1. Tap the Prefs application icon to display the Preferences page.
2. Tap the ▼ symbol in the Menu bar at the top of the page to
display the pick list of preferences and select Que.
3. Tap the ▼ symbol next to the option below the “Preferences”
title block to display a list of Que preferences and then tap Que
Button to display the Que Button options check list.
4. Use the stylus to check boxes for the Que applications you desire.
5. Use the arrows to change the order of the Que Applications. The
application at the top of the list displays fi rst.
To display other applications using the Que button:
While designed for quick access to navigation applications, the Que button
can be used to display any application on the list.
1. Tap the Prefs application to display the Preferences page.
2. Tap the ▼ symbol preceding the text at the top of the page to
display the pick list of options. Then tap the Buttons option to
display the button customizing page.
3. Tap the ▼ symbol next to the Que Button to display the list of
Applications to choose from.
iQue 3600
GPS Applications
The Que “Hard” Button
Que (Q) Hard Button
Buttons
Page
Que
Button
Page
Display
Options
1
iQue 3600
GPS Applications
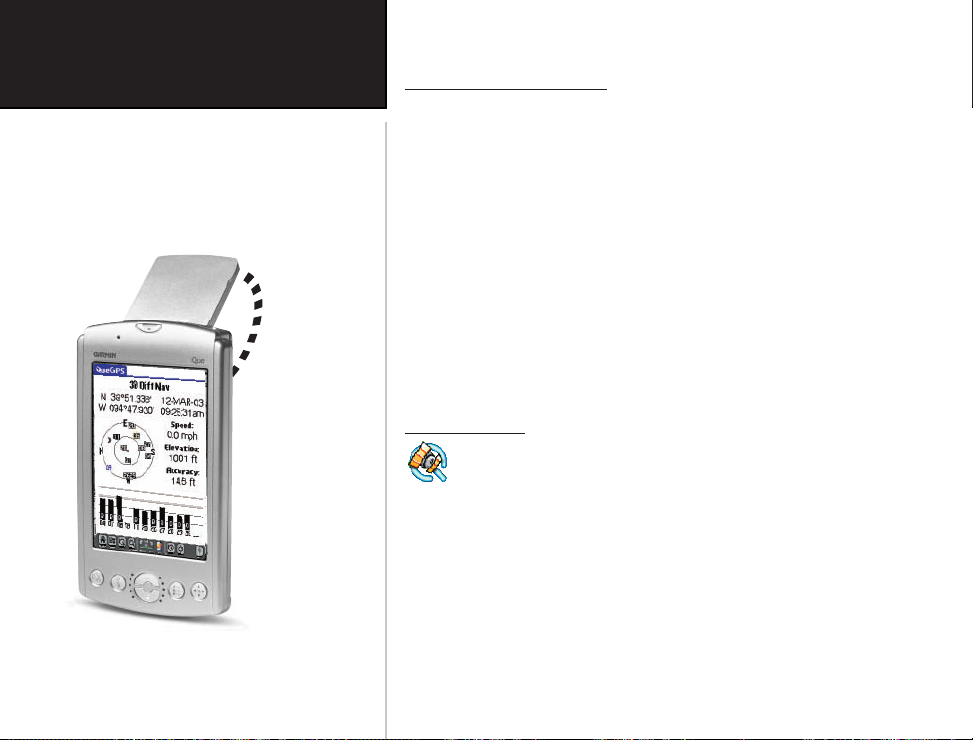
Initializing the GPS Receiver
GPS Antenna in the On Position
Pull out and rotate up
to the On Position
Best signal reception
can be attained when
positioning the antenna
horizontally (parallel with
the horizon).
2
Initializing the Receiver
The GPS Receiver must be initialized (given an opportunity to determine its location) before you can begin using it for navigation. Before it can
receive signals from GPS satellites overhead, you must turn the receiver
on. This can be accomplished by deploying the antenna on the back of the
iQue handheld by rotating it up to a horizontal position (parallel with the
horizon). In order to receive satellite signals, you must have a clear view of
the sky. Satellite signals cannot pass through solid materials (except glass)
or dense overhead tree cover. When the unit initializes for the first time it
may take as long as 15 minutes. This time can be shortened by using the
map to point to the general area in which you are currently located (see
page 6). Anytime you have traveled more than 600 miles with the GPS
receiver turned off, the iQue handheld must again find its location by reinitializing.
Using QueGPS
QueGPS is an information type application that displays the cur-
rent status of satellite reception by showing the location and numbers of the satellites in the sky overhead. A signal strength bar at the bottom
of the page shows the signal strength of each satellite being received. Use
QueGPS to:
• Observe the status of GPS satellite signal reception.
• View the current date and time.
• Determine your current location coordinates and their accuracy.
• Determine your current speed.
•
Determine your approximate elevation (altitude above mean sea level).
To view the QueGPS Satellite Status Page:
1. Tap the HOME icon to display the applications launcher, then tap
the QueGPS icon.
2. Or, simply tap the GPS Status Area in the center of the Applications Status Bar.
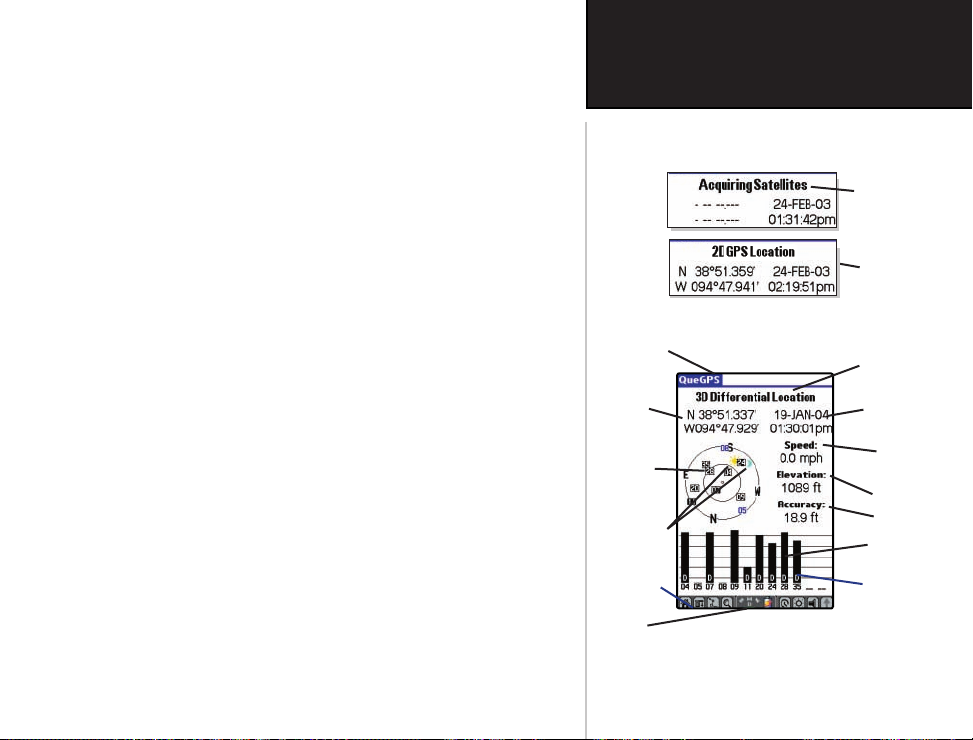
At the top of the Satellite Status Page is a message containing the
status of the GPS receiver and a sky view array on the left side representing the position of satellites in the sky overhead with your position in
the center of the two circles. The outer circle indicates the horizon while
the inner circle a position 45o from the horizon. The numbers displayed
indicate the number assigned to those satellites.
A bar graph at the bottom of the page displays the strength of signals
being received from each satellite. An “Acquiring Satellites” message is
displayed until at least three satellites with sufficient signal strength have
been received. When the GPS receiver has determined its location, a
“2D” message appears and your location coordinates display at the top
Current
Location
GPS Satellite
Location
of the left hand column.
On the right, the date and time displays, and if you are moving, your
Sun and Moon
current speed displays as well.
When you have sufficient signals from four or more satellites, a “ 3D
GPS Location” message appears (“3D Differential Location” with WAAS
enabled) and the approximate elevation and accuracy of your current
Applications
Status Bar
GPS Status
position displays at the bottom of the right hand column. All of this
information continues to update as you
navigate.
iQue 3600
GPS Applications
Using QueGPS
Acquiring Satellites
Message
2D GPS
Location
Message
At least three satellite signals of suffi cient strength
are required to generate a 2D location fi x
Menu Bar
Position
Area
Four or more satellite signals of suffi cient strength
are required to generate a 3D location fi x
3D Differential
Location (with
WAAS enabled)
Date and Time
Speed
Approximate
Elevation
Accuracy
GPS Signal
Strength
Differential
Navigation (D)
(with WAAS
enabled)
3

iQue 3600
GPS Applications
GPS Receiver Status
Acquiring Satellites
Receiving Satellites
(Ready to Navigate)
GPS turned Off
(Conserves Battery Power)
GPS Receiver Status: On, Off or Acquiring Satellites
The GPS Receiver can be in three states, On, Off, or Acquiring
(searching for enough satellite signals to determine its location).
To determine the GPS status at a glance:
1. Observe the small color window at the center of your handheld
status bar.
2. When GPS is On and searching for satellite signals, the window will
appear as shown in the top left illustration.
3. When enough satellite signals are being received to establish a
location fi x, the window will appear as shown in the middle left
illustration.
4. When the Antenna is closed and the GPS is Off, the window will
display a sky with no satellites.
It is IMPORTANT to remember that whenever the antenna is not in
the fully closed position, that the GPS receiver is operating.
The GPS receiver can, from time to time, lose satellite signals due
to interference from tree cover, buildings, etc., so monitoring the GPS
Status Window from time to time is recommended. If you don’t want
the GPS Receiver On, and particularly when indoors, keep the antenna
closed!
You can tap the Satellite Status window at any time to display the
QueGPS application and view satellite status in detail.
4
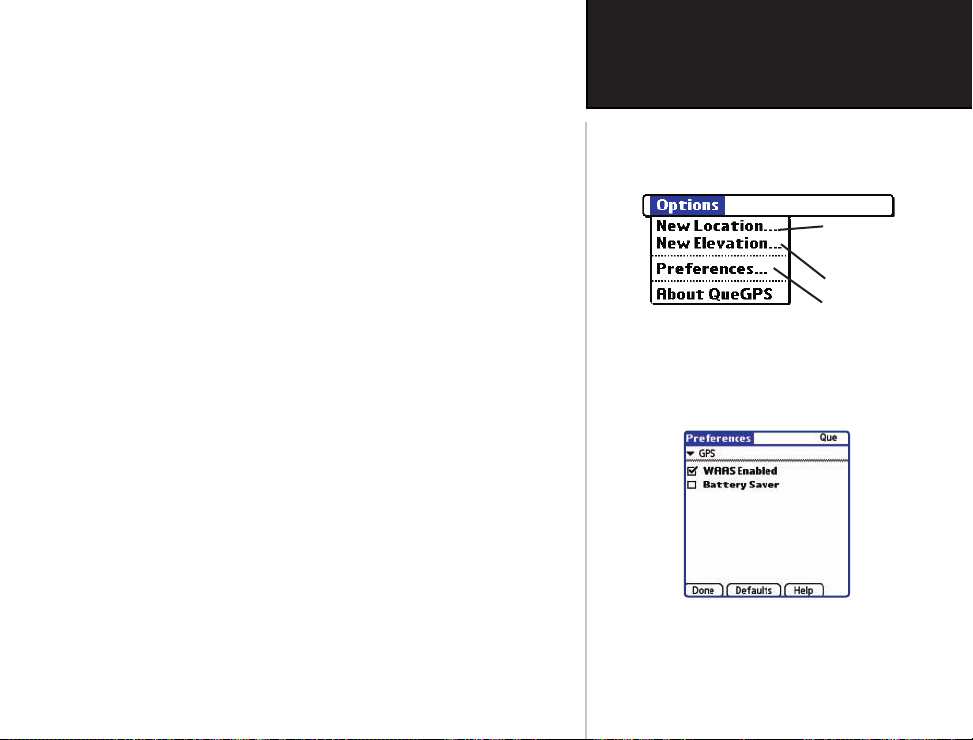
To use QueGPS options:
1. Tap the QueGPS application tab or the Menu icon to display the
Options Menu.
2. Observe the list of options:
• Tap Preferences to display the GPS preference options.
• When in 2D mode, tap New Elevation to reset the elevation.
• Tap New Location when initializing the GPS Receiver if you
have moved over 600 miles from your last use location or if you
have not powered up the unit in over thirty days.
To use QueGPS preferences:
1. Tap the Preferences option to display the GPS Preferences Menu.
2. Observe the list of options with check boxes:
• Tap WAAS Enabled to enable the Wide Area Augmentation
System operating mode. (See Additional Information about
WAAS on page 57.)
• Tap Battery Saver to change the rate at which the GPS receive
updates your position data to conserve battery power. The GPS
receiver slows the frequency at which it calculates your location
and therefore requires less battery power with the result being a
slight loss in position accuracy. The GPS is turned completely Off
when the antenna is fully closed.
You cannot operate in the WAAS and Battery Saver modes at the
same time. If you attempt to check both boxes, a message will display
and the last option checked will remain on after you tap the OK button.
iQue 3600
GPS Applications
QueGPS Options
Select New
Location for
Initialization
Set New Elevation
Preference Settings
QueGPS Options
QueGPS Preferences Menu
5
iQue 3600
GPS Applications
QueGPS Options
New Location Options Window
New Location on Map Page
New Elevation Window
6
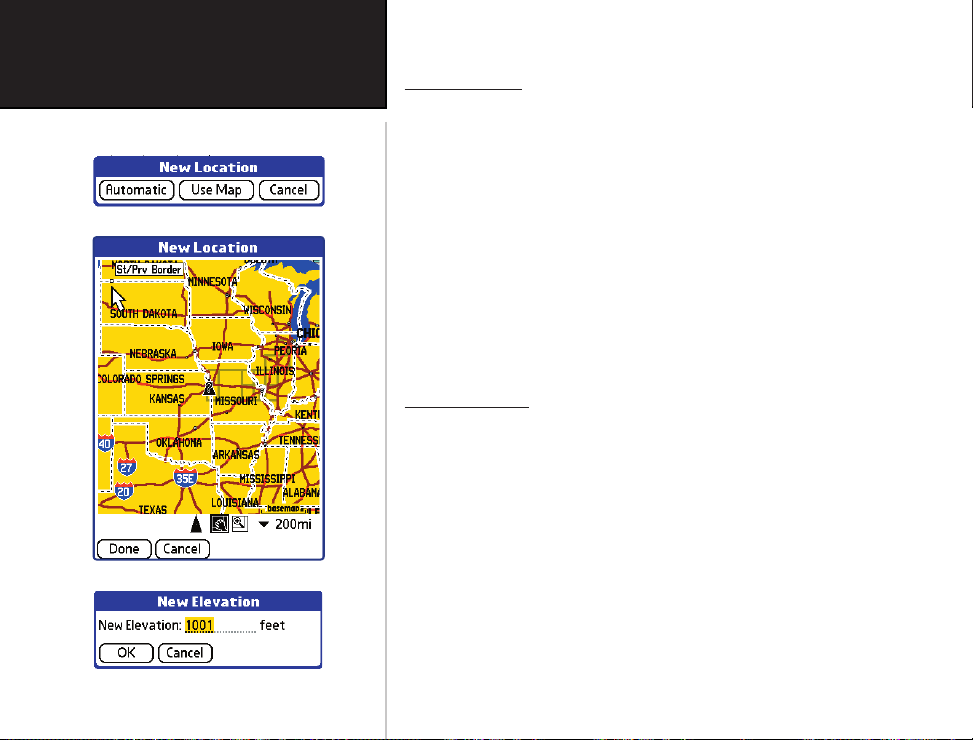
New Location
The GPS Receiver must be re-initialized (given an opportunity to
determine its location) if you have moved more than 600 miles from
your original location. To speed up this process, you can use the map
to mark your approximate location. This must be selected before the
iQue handheld has determined your location on its own.
To establish a new location:
1. Tap the New Location option to display the “New Location“
window. Tap either Automatic or Use Map.
2. If you choose Use Map, use the stylus to pan the map to your
current general location and tap it to place a new location arrow
there.
New Elevation
The GPS Receiver can determine your approximate elevation, but
it isn’t as accurate as your horizontal location. If you have a reliable
alternate source for determining your elevation, you can enter that
information in the “New Elevation” dialog window, but only before the
receiver determines your location.
To enter a new elevation:
1. Tap the New Elevation option to display the “New Elevation”
page.
2. Use the Graffi ti® 2 input area to enter the new elevation.
3. Tap the OK button to return to the QueGPS application.
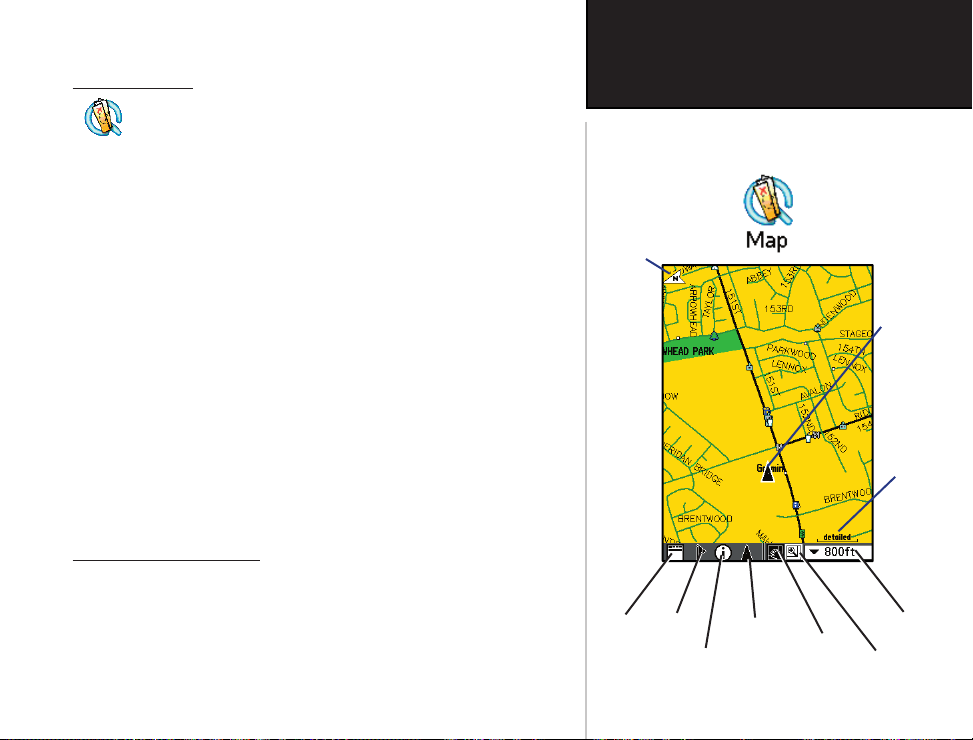
Using QueMap
The QueMap application displays a detailed map of the area
surrounding your current location. It allows you pan the map
with the stylus as well as view your progress when navigating. Your
current location is shown as a solid black arrow. When in the “Track Up”
mode, a north reference arrow appears at the top left corner to orient the
map. When the Track Log feature is active, your path of movement is
indicated by a dotted Track line.
Use QueMap to:
• Determine your current location
• View your progress while moving
• Locate and navigate to nearby map items
• Follow a route line when navigating
• Highlight and view information about locations on the map
To launch the QueMap application:
1. Press the Que applications button on the front of the handheld to
display QueMap, or use the Applications Launcher and tap the
QueMap icon to display the Map Page.
Viewing the Map Page
The Map Page is the primary feature of the QueMap application.
From this page you can observe a triangular arrow that indicates your
current location and direction of travel. As you move, the arrow moves
with you, turning when you turn and stopping when you stop.
Map Orientation
(Track Up)
Mark
Display
Location
Format
Selector
iQue 3600
GPS Applications
Using QueMap
Center Location
on Map
Information
Button
Pan Map
with Stylus
Current
location
icon
Type of
map data
displayed
Map Scale
Selector
View Area
Selector
7
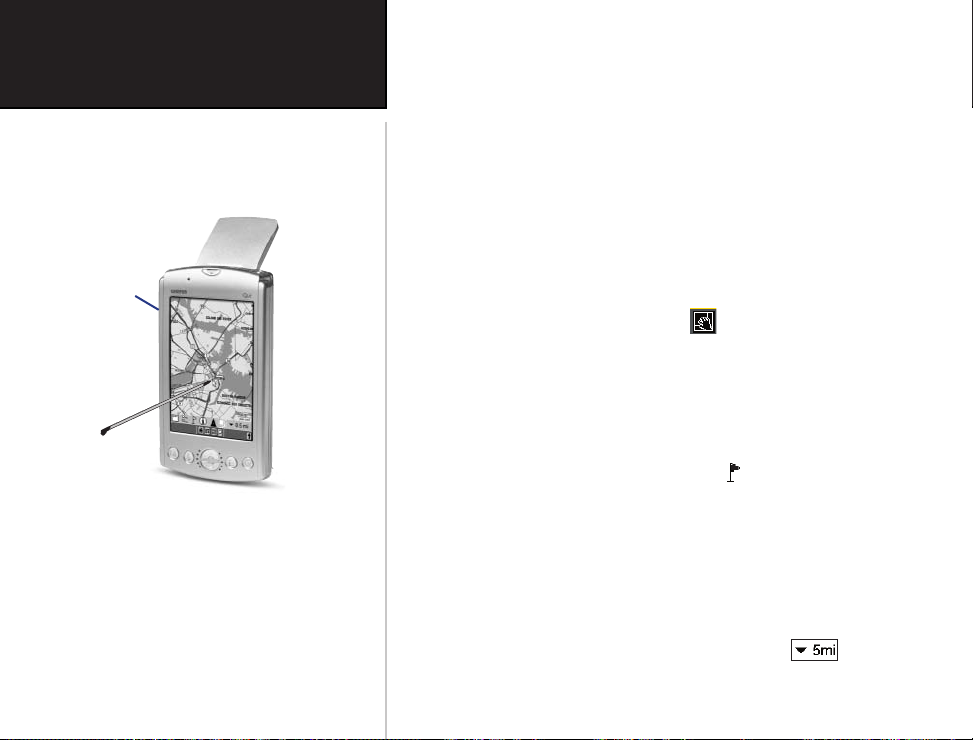
iQue 3600
GPS Applications
Using QueMap
Rotate the Thumb
Wheel up or
down to change
the map scale.
Panning the Map
and Marking Map
Items with the
Stylus
The Map also displays detailed geographic information such as highways
and roads, lakes and rivers, cities, waypoints and residential streets, depending on the detail of map data being used. Detailed maps can be loaded from
map data CD’s using the MapInstall feature as explained on page 51 of this
guide.
There are two options: North Up and Track Up. North Up orients the
map like a paper map, while Track Up orients the map in the direction of
travel. As you travel to the edge of the display, the map moves (redraws) to
constantly show your current location. When using “Track Up”, the North
arrow indicates the map orientation.
When the “Pan Map with Stylus” mode is selected, dragging the
stylus across the screen causes the map to pan with the movement of the
stylus.
Tapping the stylus on the map places a map pointer on any selected
location on the map. If that location is supported by detailed mapping data
a description will display, briefly. Any point on the map can be saved as a
waypoint by tapping the Waypoint Marker Flag in the map toolbar.
The map color can automatically compensate for the difference in day
and night lighting conditions. See QueMap preferences on page 11.
The map scale can be changed to show more map area with less detail
or more map detail with less area. Rotating the Thumb Wheel on the side
of the iQue handheld up or down or pressing the Up and Down keys on
the front of the unit increases or decreases the scale in single increments. To
move to a specific scale, use the Map Scale Selector mode.
.
8

Using the QueMap Application Selector Icons
With QueMap displayed tap the desired selector to activate the
feature as described below:
Tap the Display Format icon on the map tool bar to toggle
between displaying and hiding the navigation data fields. Tapping the
icon toggles through three format options (see below).
Display Format Selection
1 Navigation Message
& Data Fields Shown
2 Data Fields Only
3 Full Map Navigation
Message & Data Fields
Hidden
12
3
iQue 3600
GPS Applications
Using QueMap
Position Arrow
centered on
Map
Tap the Waypoint Marker Flag on the map tool bar to display
the “Mark Waypoint” entry window for your current location (Position
Arrow) or a “New Waypoint” entry window for the Map Pointer. The
Map Point
Information
window will display with a name describing the location if identified as
an item in the map data or as Waypoint 1, 2, 3 etc.
Tap the Information icon to display information about a location
identified by the Map Pointer on the Map Page. When tapped, an information window displays describing the location and distance if identified as an item in the map data or a position coordinates (i.e. lat/lon).
Tap the Position Arrow icon to center the map on your current
location. Pressing the Escape (ESC) key also centers the map.
Waypoint
Marker and
Information
Dialog
9
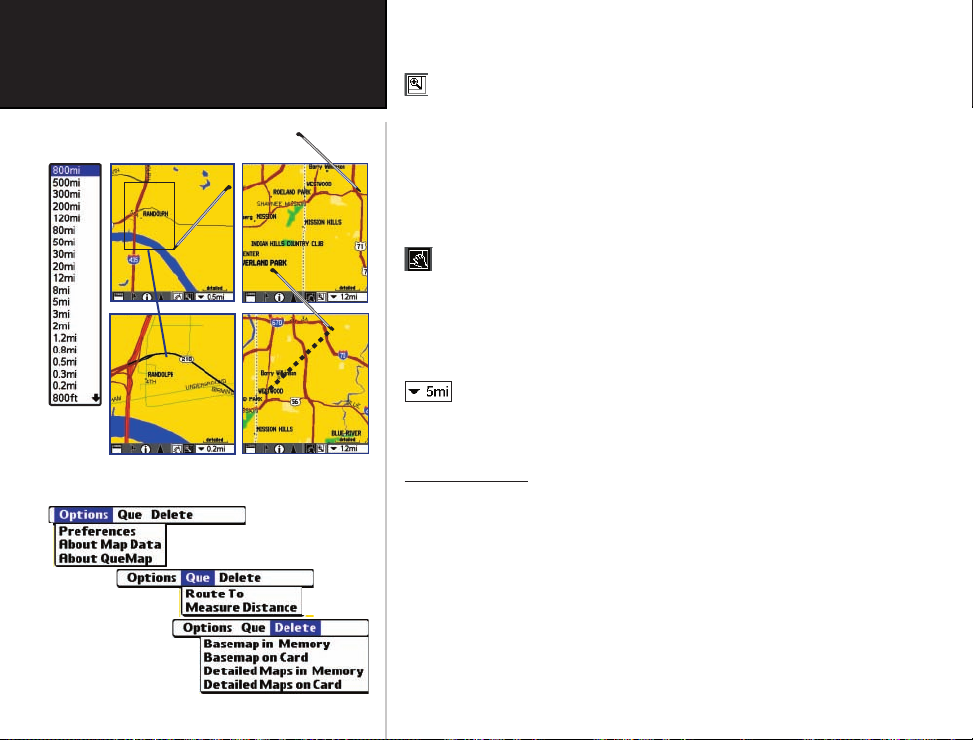
Map Scale
Selector
10
iQue 3600
GPS Applications
Using QueMap
View Area Selector
QueMap Menu
Pan Map Selector
Tap the View Area icon to allow you to define an area on the map
with the stylus that will be enlarged when you lift the stylus from the
screen. Select a point adjacent to the area you want to enlarge and then
drag the stylus to create a box around the area. Lift the stylus to complete, allowing the map to redraw.
Note that when the View Area Selector is active the Pan Map feature
is not usable.
Tap the Pan Map icon to allow the stylus to drag the map and to
mark map items with the map pointer ( Panning Arrow).
Place the stylus anywhere on the map and then move the stylus. The
map moves with the stylus and exposes the part of the map previously
out of view. Lift the stylus to stop panning.
Tap the Map Scale icon to display the list of map scales. Drag
the arrow to scroll through the entire list of scales. Tap the scale you
want and the map will display at that scale.
QueMap Menu
Tapping the Menu icon, with QueMap displayed, opens the QueMap
Menu at the top of the page with the following options:
Options - Set map display Preferences (page 11) and view informa-
tion about Map Data and QueMap.
Que - Create a Route To a map point (page 33) and Measure Dis-
tance on the map (page 13).
Delete - Remove basemaps and detailed maps from either the unit
memory or SD storage card (page 14).
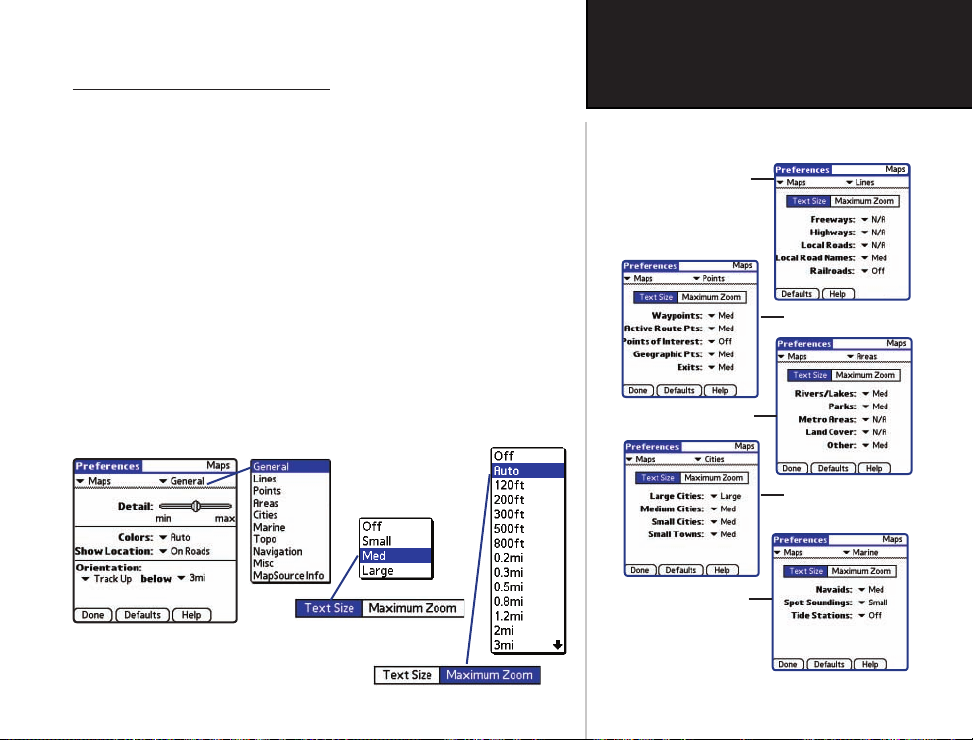
Using Preferences for QueMap
Use Maps Preferences to:
• Reduce “Map Clutter” by controlling how items are displayed.
• Set the maximum Zoom scale at which map items display.
• Control the display of multiple map features.
The factory (default) settings for these preferences allow you to
operate the QueMap application with confidence. As you become more
familiar with its operation, you may desire to customize the application
to fit your needs.
Each preference window is provided with a “Help” button to explain
preference settings in detail. These pages provide an overview of the
preferences available.
iQue 3600
GPS Applications
Using QueMap
Lines
Points
Most Map Preferences offer
a “ Text Size” option selector
and a ‘Maximum Zoom”
Selector option.
Map Preferences Pages are accessed by tapping the ▼
symbol to the right of the Maps option to display the
list of map preferences.
Areas
Cities
Marine
11
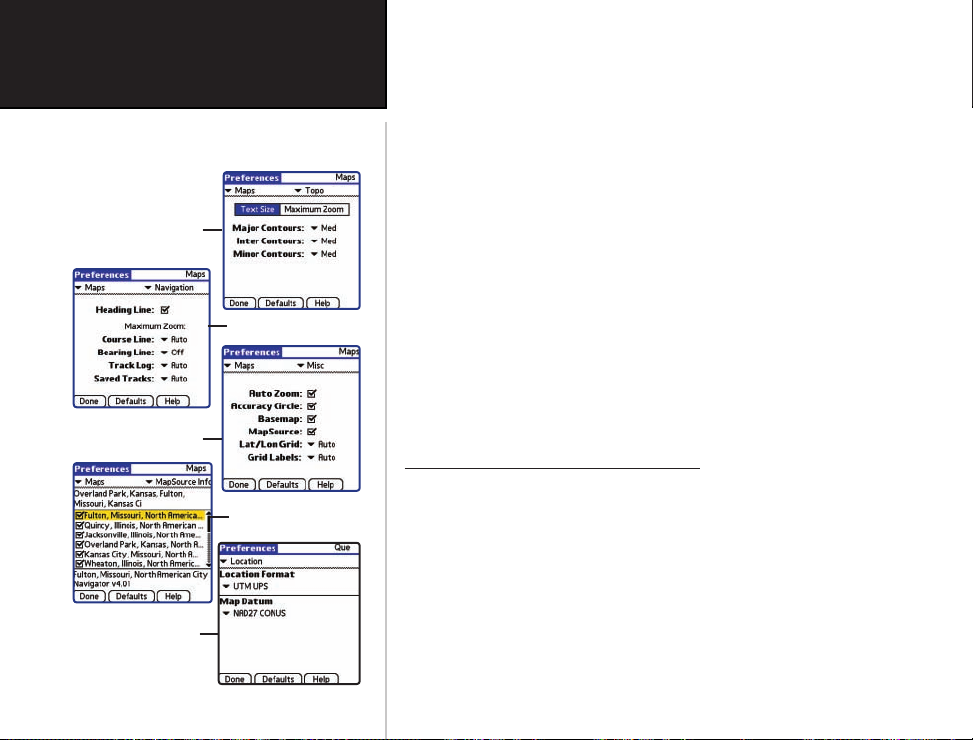
iQue 3600
GPS Applications
Using QueMap
Topographic
Information
Navigation
Miscellaneous
Detailed Maps
Location
In all preferences, tapping the Help button will provide detailed
information about those preferences.
For more information about Heading, Course and Bearing lines,
consult the Garmin web site at www.garmin.com/aboutGPS/.
Detailed map information preferences can be set to display selected
detailed maps stored in the iQue or on a Secure Digital Card. See page
53 for more information on detailed map MapInstall procedures.
The Miscellaneous preference options provide check boxes to allow
you to turn on or off some features as you prefer.
You may want to experiment with such features as AutoZoom (sets
the maximum scale for display of map items in conjunction with the
map detail setting), Accuracy Circle (Defines your location within the
confines of the circle. Circle size is determined by map resolution and
GPS receiver accuracy), and Basemap to determine your preferences.
Location Formats and Map Datums
While Location preferences are not a part of Map Preferences, you
may want to reset them to match those on paper maps that you plan to
use in conjunction with GPS navigation.
You can display position coordinates using specific formats and
datums selected from the Que Preferences, Location options. Detailed
information about how to use formats and datums can be found on page 58.
12

Using Measure Distance
Use Measure Distance to:
• Measure the distance from your current location to a point on the
map.
• Determine the distance between two selected points on the map.
To measure distance on the map:
1. Tap Measure Distance from the QueMap Menu Que options
list to display the Measure Distance Page. The map displays at a
scale of 30 miles. Use the Map Scale Selector, the Pan Map or View
Area tool to adjust the map to include the map points you want to
measure.
2. To measure the distance from your current location to a map point,
tap the point with the stylus to mark the point. Read the distance
in the fi eld below the map. If you want to create a route to the
map point, tap the QueRoutes icon on the tool bar and follow
instructions on page 33. Note that the route distance may be
somewhat greater because the distance was measured in a direct
line and routes typically follow roads.
3. To measure the distance between two points on the map, fi rst, tap
the desired point on the map, then tap the Map Pin icon on
the tool bar to move the Map Pin to that point. Next, tap the map
point you want to measure to and observe the measurement in the
fi eld below the map. Tapping the QueRoutes icon will not create a
route between the two points.
4. When fi nished measuring distance, tap the Done button to close.
iQue 3600
GPS Applications
Using QueMap
Measure Distance Page
Map Pin
Distance
Measured
Measuring between two map points
13
 Loading...