

Page 1
GTX 320 ATC TRANSPONDER
MAINTENANCE MANUAL
190-00133-02 (Rev B)
®
GARMIN
1200 E. 151st Street
Olathe, KS 66062 USA
16 March 1999
Page 2

®
This publication is the property of GARMIN. It may not be reproduced or transmitted in any form whether printed
or electronic, without the expressed written consent of GARMIN International.
GARMIN
1200 E. 151st Street
Olathe, KS 66062 USA
Telephone: 913-397-8200 or 1-800-800-1020
www.garmin.com
REVISION RECORD
NOISIVERETADNOITPIRCSEDOCE
A89/42/40ESAELERLAITINI------
B99/61/30ETIRWERDNAESIVER04601
©Copyright 1999, by GARMIN Corporation. All rights reserved.
190-00133-02 Rev B A
Page 3

TABLE OF CONTENTS
SECTION 1
DESCRIPTION AND OPERATION
P ARAGRAPH PAGE
1.1 INTRODUCTION ............................................................................................................... 1-1
1.2 GENERAL DESCRIPTION ................................................................................................ 1-1
1.3 TECHNICAL SPECIFICA TIONS........................................................................................ 1-1
1-4 EQUIPMENT DESCRIPTION............................................................................................ 1-2
1-5 SCOPE OF MAINTENANCE............................................................................................. 1-3
SECTION 2
SPECIAL TEST EQUIPMENT
2.1 INTRODUCTION ............................................................................................................... 2-1
2.2 SPECIAL TOOLS AND TEST EQUIPMENT...................................................................... 2-1
SECTION 3
ALIGNMENT AND TESTING
3.1 INTRODUCTION ............................................................................................................... 3-1
3.2 ALIGNMENT...................................................................................................................... 3-1
3.3 TESTING ........................................................................................................................... 3-5
SECTION 4
DISASSEMBL Y AND REASSEMBL Y
4.1 INTRODUCTION ............................................................................................................... 4-1
4.2 INSPECTION..................................................................................................................... 4-1
4.3 FRONT SUBASSEMBL Y................................................................................................... 4-1
4.4 CLEANING ........................................................................................................................ 4-2
190-00133-02 Rev B i
Page 4

SECTION 1
DESCRIPTION AND OPERATION
1.1 INTRODUCTION
This manual provides all of the procedures, principles of operation, and information necessary to repair and
maintain the GARMIN GTX 320 ATC Transponder. Refer to GARMIN Installation Manual P/N 190-00133-01
for installation and operating information.
1.2 GENERAL DESCRIPTION
The GARMIN GTX 320 Transponder is an integral part of the Air Traffic Secondary Radar Beacon System
(ATCRBS, Figure 1-1), which consists of the following components:
INTERROGATORIn the ATCRBS, the interrogator, a ground-based radar beacon transmitter/receiver, scans
in synchronization with the primary surveillance radar (PSR) and transmits ground radar interrogation signals on a
carrier frequency of 1030 ± 2 MHz, which repeatedly requests all transponders on the mode being used, to reply.
The replies that are received are mixed with the primary surveillance radar returns and both are displayed on the
same radarscope.
TRANSPONDERThe GTX 320 Transponder is an airborne radar transceiver. It automatically receives
interrogations from the ATCRBS and selectively replies with a specific pulse group (code) only to those interrogations being received on the mode to which it is set, Mode A (no altitude information) or Mode C (automatic
altitude information).
These replies are independent of, and much stronger than a primary radar return. The GTX 320 replies to both
Mode A and Mode C interrogations on a carrier frequency of 1090 ± 3 MHz, with a rated power of 176 watts
minimum at the antenna port. The GTX 320 is also equipped with IDENT capability which activates the Special
Position Identification Pulse (SPI) for approximately 20 seconds, identifying that transponder return from other
aircraft on the ATC scope.
RADARSCOPEThe radarscope used by the controller displays returns from both the primary surveillance
radar system and the ATCRBS. These returns, called targets, are what the controller refers to in the control and
separation of traffic.
1.3 TECHNICAL SPECIFICATIONS
Refer to the GTX 320 Installation and Operation Manual (P/N 190-00133-01) for technical specifications.
190-00133-02 Rev B 1-1
Page 5

Figure 1-1. ATCRBS System
1.4 EQUIPMENT DESCRIPTION
The GTX 320 consists of two major assemblies, the Main PCB Assembly and the Front Subassembly.
1.4.1 Main PCB Assembly (Not Field Repairable)
The Main PCB Assembly contains the following circuits:
IF Amplifier and Pulse Discriminator
Local Oscillator and Mixer
Power Supply
Programmable Logic Device
Light Dimming Circuitry
Modulator and Transmitter
1.4.2 Front Subassembly (Field Replaceable)
The Front Subassembly consists of the following:
Reply Code Switches and Mode Function Selector
Front Display and Knobs
Backlighting Circuitry
Front PCB Assembly
190-00133-02 Rev B 1-2
Page 6

1.5 SCOPE OF MAINTENANCE
Due to the overall complexity of the unit, GARMIN recommends limiting field maintenance to the following:
Removal and Replacement of the Front Subassembly
Transmitter Frequency Adjustment
Transmitter Power Output Peaking Adjustment
190-00133-02 Rev B 1-3
Page 7

SECTION 2
SPECIAL TEST EQUIPMENT
2.1 INTRODUCTION
This section identifies the special tools and test equipment essential to repair the GTX 320. Standard equipment is
not listed. For any questions regarding special tools and test equipment contact the GARMIN Customer Service
Department at the address listed on Page A.
2.2 SPECIAL TOOLS AND TEST EQUIPMENT
Test HarnessLocally Fabricated
Test PanelLocally Fabricated
Alignment ToolLocally Fabricated
Antenna Test Cable ConnectorLocally Fabricated
2.3.1 Test Panel and T est Harness
A Test Panel must be fabricated by the shop which meets the typical test setup criteria given Figure 2-3. Additionally, a corresponding test harness must be fabricated which allows for the necessary connections between J102 and
the Test Panel. Use Figure 2-3 as an aid in fabricating the test harness.
2.3.2 Alignment Tool
The alignment tool is used to adjust the transmitter frequency (C620) and the transmitter power output (C635).
Figure 2-1. Alignment Tool
190-00133-02 Rev B 2-1
Page 8
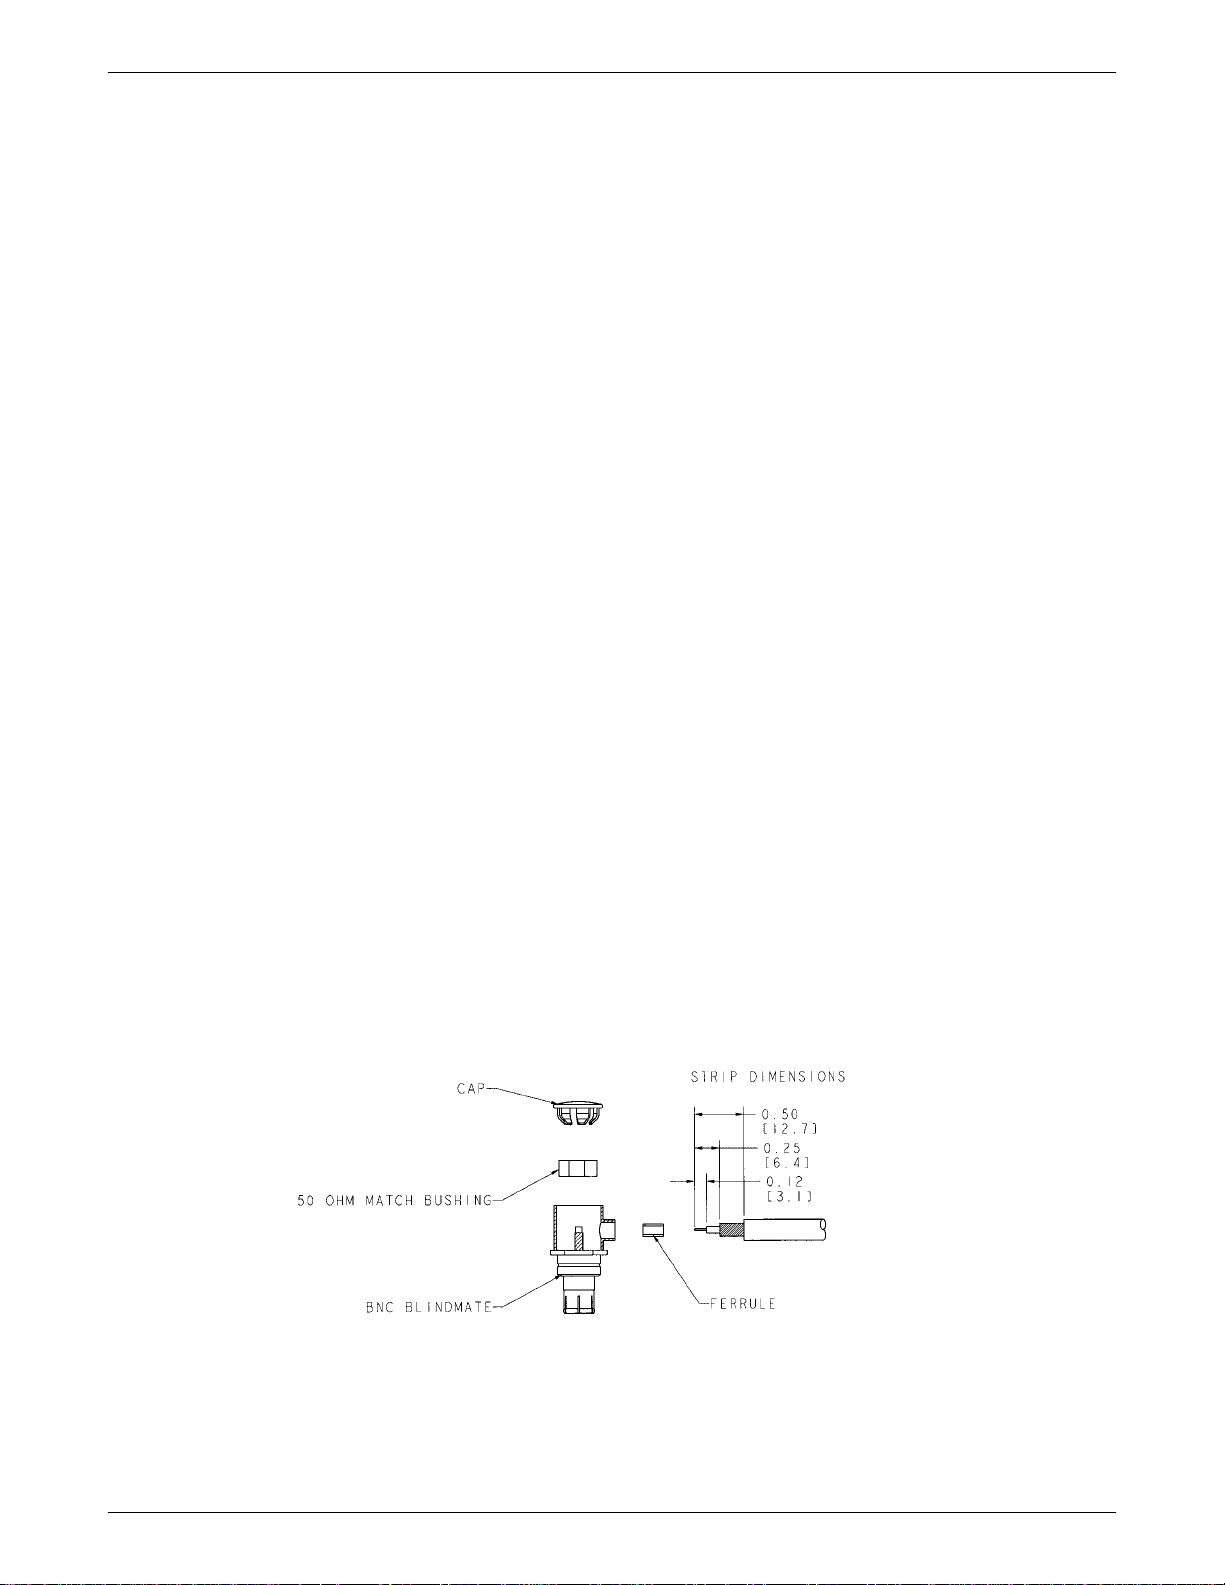
2.3.3 Antenna Test Cable Connector
The antenna test cable incorporates a BNC connector at the test fixture antenna and a male BNC blindmate connector (GARMIN P/N 330-00198-00) at the transponder. Figure 2-2 shows the connector. Follow accepted industry
practices when installing the BNC connector. Use the following instructions when installing the blindmate BNC.
1. Trim coax outer insulation back ½ inch.
2. Trim braid (not center conductor or insulation) back ¼ inch.
3. Strip insulation back 0.120.
NOTE
If the outside diameter of the coax braid is smaller than the inside diameter of the
center connector sidewall opening, place the ferrule over the coax braid, flush against
the coax outer insulation before performing the next step.
4. Insert cable (center conductor, dielectric and shield braid) through the sidewall of the connector and solder the
center conductor to the center pin of the connector.
NOTE
When using low-loss cable, it may be necessary to flatten the solid wire center
conductor slightly so it can fit the slot on the RF connector center pin. When soldering, avoid applying excess heat to the connector body, and center conductor insulator.
5. Heat the outside of the connector sleeve and, at the same time, apply solder between the braid and the sleeve.
6. Continue to apply heat until the solder flows evenly.
7. Install 50 ohm match.
8. Insert connector cap and tack solder in two places.
Figure 2-2. Blindmate Antenna Connector
190-00133-02 Rev B 2-2
Page 9

Figure 2-3. Test Setup/Test Harness—J102
190-00133-02 Rev B 2-3
Page 10

SECTION 3
ALIGNMENT AND TESTING
3.1 INTRODUCTION
This section of the manual consists of alignment and test procedures. Perform the following procedures to identify failed units (troubleshooting) and after completing any repairs. The procedures assume familiarity with the
setup and operation of the special test equipment listed in Section 2. Units failing any part of alignment or testing
must be returned to GARMIN for repair except for the front subassembly which may be field replaced.
3.2 ALIGNMENT
Field alignment of the GTX 320 is limited to adjusting the transmitter frequency. No other attempt at alignment
should be made. Adjust the transmitter frequency before testing the unit.
3.2.1 Alignment Equipment
The following equipment (or suitable substitute) is used to adjust the transmitter frequency:
1. Transponder/DME Test Set IFR Systems ATC-1400A
2. Power Supply Topward 2000
3. Digital Oscilloscope Tek TDS-320 or suitable equivalent
4. Voltmeter Fluke 79
5. 50 Ohm Load ITT Pomona Model 3840-50
6. Transmitter Adjustment Tool Locally Made (see Figure 2-1)
7. Rack-Mount BNC to BNC Cable (RG-58/U having a total cable loss of 1.5 dB at 1090 MHz)
3.2.2 Alignment Setup
Figure 2-3 shows a typical alignment and test setup based on the I/O of the 25 pin connector (J102) and the rear
antenna connector (J103). Use the +28 VDC input during alignment.
3.2.3 Alignment Procedure
CAUTION
Use extreme care when adjusting C620, so that the transmitter is NOT allowed to
oscillate at frequencies below 1080 MHz, and risk damaging the mixer. A failed
mixer cannot be replaced in the field, the unit must be returned to GARMIN for
repair. A failed mixer will degrade MTL by several dB.
190-00133-02 Rev B 3-1
Page 11

1. Carefully dislodge the thin metal piece that covers the access holes to the transmitter section (figure 3-1) by
prying one end with a small, thin screwdriver.
2. Set the ATC1400A front panel controls to the following:
PARAMETER SET POINT
XPDR MODE MODE C
PRF 500 Hz
RF LEVEL -50 dBm
SLS / ECHO OFF
FREQUENCY/POWER TOGGLE SWITCH F1/P
1
______ OK
3. Set the GTX320 transponder mode select control knob to the ON position.
______ OK
NOTE
Allow the unit to warm up for approximately ten minutes before setting frequency.
4. Rotate the frequency-adjust slug C620 (figure 3-1) with the screw driver portion of the transmit adjustment tool
to a frequency of 1089.5 ± 0.5 MHz. Observe the frequency display on the test set. Tighten the lock nut when
finished.
________(1089.5 ± 0.5 MHz)
190-00133-02 Rev B 3-2
Page 12

Figure 3-1. C620 and C635 Location
190-00133-02 Rev B 3-3
Page 13

CAUTION
Do not allow the transmitter to oscillate below 1080 MHz as indicated on the
ATC-1400A Test Set or else damage may occur to the mixer.
PARAMETER SPECIFICATION
Frequency 1089.0 to 1090.0 MHz
XMTR PWR 125 Watts Minimum through a –1.5dB coax
Pulse Rise Time 50 nS to 100 nS
Pulse Fall Time 50 nS to 200 nS
Pulse Width 350 nS to 550 nS
5. Adjust C635 for maximum power output as read from the ATC1400A test set. The power must be greater than
125 watts.
______ > 125 Watts
6. Verify that the frequency is still 1089.5 ± 0.5 MHz. If the frequency is out of tolerance, then loosen the locknut
on C620, set the frequency within specification, and then tighten the locknut while maintaining the frequency
specification.
______ (1089.5 ± 0.5 MHz)
7. Reinstall the cover over the transmitter adjustment holes.
______ OK
190-00133-02 Rev B 3-4
Page 14

3.3 TESTING
Perform testing after completing transmitter frequency adjustment.
3.3.1 Test Equipment
See paragraph 3.2.1.
3.3.2 Test Setup
See figure 2-3.
3.3.3 Test Procedure
3.3.3.1 Turn-On Delay
NOTE
The test setup will not work if any toggle switch on the ATC-1400A is placed in the incorrect position.
1. Configure the ATC-1400A as shown in Figure 3-6.
2. Turn the transponder mode select switch to the OFF position. ______ OK
3. Adjust the ATC-1400A Transponder Test Set to an RF level -69 dBm. ______ OK
4. Turn the GTX320 mode switch from the OFF to the ON position. There shall be an approximate 5 second delay
before the unit transmits. ______ OK
5. Rotate the mode select switch on the GTX320 to the ALT position. The GTX320 shall continue to reply to valid
interrogations. ______ OK
6. Rotate and hold the mode select switch on the GTX320 in the TST position. The GTX320 shall continue to reply
to valid interrogations. ______ OK
3.3.3.2 Reply Transmission Frequency
1. Set the transponder mode select switch to the ON position.
2. Rotate the RF level control on the ATC-1400A to -69 dBm. The XMTR FREQ display on the ATC-1400A shall
read from 1087 MHz to 1093 MHz.
________(1087 to 1093 MHz)
3.3.3.3 Transmitter Power Output
1. Set the PRF thumb wheel switches to 1200 Hz. The XMTR PWR display on the ATC-1400A shall read greater
than 125 watts through the calibrated -1.5dB coax.
________ > 125 Watts
190-00133-02 Rev B 3-5
Page 15

3.3.3.4 Minimum Trigger Level Adjustment (MTL)
1. Set the PRF thumb wheel switches to 500 Hz.
2. Set the ATC-1400A XPDR MODE switch to position A.
3. Reduce the RF level on the ATC-1400A test set until the nominal reply rate is 90%. The RF level (MTL) shall
be -69 dBm or less.
4. Set the ATC-1400A XPDR MODE switch to position C. The nominal reply rate should remain at 90%.
5. If the nominal reply rate is less than 90%, then increase the RF level until the nominal reply rate is 90%. The
RF level shall be less than -69 dBm and shall not deviate greater than 1dB from the MTL in Mode A.
6. Increase the RF level to 50 dB above MTL. The reply rate displayed on the ATC-1400A shall be at least 90%.
________ > 90% Reply Rate
3.3.3.5 Reply Pulse Characteristics
1. Set the oscilloscope to the following settings:
PARAMETER SET POINT
EXT TRIG CH 2 (XMTR Detected Video)
CH 2 VERTICAL SENS 20mV/Div
HORIZONTAL SWEEP 100ns
DELAYED SWEEP CENTER ON FIRST PULSE
2. Configure the ATC-1400A front panel controls to the following settings:
PARAMETER SET POINT
XPDR MODE MODE C
PRF 500 Hz
RF LEVEL -50 dBm
SLS / ECHO OFF
FREQUENCY/POWER TOGGLE SWITCH F1/P
1
3. Set the GTX 320 mode control select knob to the ON position. The reply pulse will be visible on the oscilloscope as shown in Figure 3-2. The pulse shape must possess the qualities listed in the table below.
190-00133-02 Rev B 3-6
Page 16

PARAMETER SPECIFICATION
Rise Time: 50-100 nS
Fall Time: 50-200 nS
Pulse Width: 350-550 nS
Figure 3-2. Example Of Acceptable Reply Pulse
3.3.3.6 Dynamic Range
1. Set the GTX 320 mode select switch to the ON position.
2. Set the ATC 1400A SLS/ECHO thumb wheel switch to -9.
3. Flip the SLS/ECHO toggle switch to the ON position.
4. Increase the RF level to 50 dB above MTL (a value of -21 dBm assuming an MTL of -71 dBm). The percent
reply shall be at least 90% as indicated on the ATC-1400A.
______ % Reply
3.3.3.7 Automatic Overload Control (AOC)
1. Set the SLS / ECHO toggle switch back to the OFF position.
2. Increase the RF level to 3 dB above the MTL.
3. Set the PRF thumb wheel switches to 1200 Hz on the ATC-1400A test set. The reply rate shall be 90% to 98%.
Note: In order to obtain an accurate reading, the unit must be warmed up before performing this test.
______ 90 % to 98% Reply Rate
4. Reset the PRF thumb wheel switches to 500 Hz on the ATC-1400A test set.
190-00133-02 Rev B 3-7
Page 17

3.3.3.8 Side Lobe Suppression
1. Set the SLS / ECHO toggle switch to the OFF position.
2. Adjust the RF level on ATC-1400A to MTL so that the XPDR%REPLY is 90%.
3. Raise the RF level to 3 dB above the MTL.
4. Set the SLS / ECHO thumb wheel switch to 0dB.
5. Flip the SLS / ECHO toggle switch to the ON position. The GTX 320 % Reply shall have an average reading
of 1% or less.
6. Raise the RF level on the ATC-1400A to MTL +50 dB. The GTX 320 % Reply shall have an average reading of
1% or less.
______ < 1% Reply (Average Reading)
3.3.3.9 External Suppression
With the unit replying to interrogations, apply a positive external suppression pulse of up to 100 microseconds
and with a voltage amplitude of greater than 8.0 volts. The unit must suppress the replies to any interrogations
received during the time of the suppression pulse.
______ OK
3.3.3.10 External Altittude Encoder Inputs
1. Set the digital oscilloscope to the following settings:
PARAMETER SET POINT
EXT TRIG CH 2 (XMTR Detected Video)
CH 2 VERTICAL SENS 20MV/DIV
HORIZONTAL SWEEP 5µS
DELAYED SWEEP CENTER ON FIRST PULSE
2. Set the XPDR MODE switch on the ATC-1400A to position C. The oscilloscope shall display the P1 and P3
pulses similar to Figure 3-3. ______ OK
3. Rotate each of the four rotary switches on the GTX320 under test through at least one complete turn, stopping
on zero. The unit shall not transmit any code information as evidenced by a change in the P1 and P3 pulse
patterns. The XPDR CODE digital display on the ATC-1400A test set shall indicate 0000. ______ OK
4. Rotate the mode select switch on the GTX320 under test to the ALT position. ______ OK
190-00133-02 Rev B 3-8
Page 18

5. Successively turn-on each altitude toggle switch on the test panel. ______ OK
6. Altitude coded pulses shall appear between the P1 and P3 pulses as viewed on the oscilloscope and shown in
Figure 3-4. ______ OK
7. Verify that the unit is correctly encoding the altitude by observing the XPDR CODE digital display on the
ATC-1400A when each set of altitude switches, A through D are toggled. ______ OK
Figure 3-3. P1 and P3 Pulses
Figure 3-4. Altitude-Coded Pulses
190-00133-02 Rev B 3-9
Page 19

3.3.3.11 IDENT Test
1. Set the ATC-1400A to Mode A.
2. Turn the GTX 320 mode select knob to the ON position.
3. Set the RF level on the ATC-1400A for a 100% reply rate.
4. Press the IDENT button on the transponder. The unit shall cause the ATC-1400A XPDR Code display to read
1d0000 for approximately 20 seconds. The SPI pulse shall appear next to the P3 pulse on the oscilloscope. See
Figure 3-5.
5. Rotate the mode select switch to the SBY position.
6. Press the IDENT button on the transponder. The reply light shall turn on for approximately 25 seconds, but
the unit shall not transmit.
______ OK
Figure 3-5. P1, P3, and SPI Pulses
3.3.3.12 Front Panel Test - OFF
Set the transponder mode select switch to the OFF position. Only the OFF nomenclature shall be illuminated,
and all other panel lighting shall not be illuminated. The units internal power supplies shall all be off.
______ OK
190-00133-02 Rev B 3-10
Page 20

3.3.3.13 SBY (Stand By)
Set the transponder mode select switch to the SBY position. The “SBY” nomenclature and the four
reply code digits shall be illuminated with a higher intensity than the “OFF”, “ON”, “ALT” and “TST”
nomenclature. All internal power supplies shall be on but the unit shall not reply to any interrogations.
______ OK
3.3.3.14 ON
Set the transponder mode select switch to the ON position. The “ON” nomenclature and the four reply
code digits shall be illuminated with a higher intensity than the “OFF”, “SBY”, “ALT” and “TST”
nomenclature.
______ OK
3.3.3.15 ALT (Altitude)
Set the transponder mode select switch to the ALT position. The “ALT” nomenclature and the four
reply code digits shall be illuminated with a higher intensity than the “OFF”, “SBY”, “ON” and “TST”
nomenclature.
______ OK
3.3.3.16 TST (Test)
1. Decrease the RF level control on the ATC-1400A so that the transponder has a 00% reply rate.
2. Rotate and hold the transponder mode select switch in the TST position. “TST”, “OFF”, “SBY”,
“ON” and “ALT” nomenclature shall all be illuminated at the reduced level. The four reply code digits
shall remain illuminated with no change in intensity. The triangle-shaped reply light must turn on and
remain on while the switch is held in the TST position.
______ OK
3. Release the mode select switch from the TST position. It shall freely snap back to the ALT position
and the triangle-shaped Reply Light shall turn off.
______ OK
190-00133-02 Rev B 3-11
Page 21

3.3.3.17 Front Panel Test - Reply Light
1. Rotate the Mode Select Switch from TST to ALT and with the unit not replying.
Increase the RF level on the ATC-1400A above MTL so that the transponder has a reply rate above 90%.
The triangle-shaped reply light shall turn on.
______ OK
2. Rotate and hold the mode select switch in the TST position. The reply light shall remain on while in
the TST position.
______ OK
3. Release the switch so that it returns to the ALT position. The reply light shall remain on.
______ OK
3.3.3.18 Numerical Reply Code Switches
1. Rotate the XPDR MODE switch on the ATC-1400A to position A.
2. With the transponder mode switch in the ON position, incrementally rotate the four reply code
switches through each position. Verify that the unit causes the ATC-1400A to display the same number
on the XPDR CODE digital display.
______ OK
3. While the code switches are in a numbered detent position, apply a light force against the knob from
all directions. Verify that the digit displayed on the ATC-1400A test set does not include any intermittent numbers.
______ OK
190-00133-02 Rev B 3-12
Page 22

Figure 3-6. ATC 1400A Test Settings
190-00133-02 Rev B 3-13
Page 23

SECTION 4
DISASSEMBLY AND REASSEMBLY
4.1 INTRODUCTION
This section covers only the disassembly that is necessary to remove a faulty Front Subassembly. Reverse the steps
for assembly.
4.2 INSPECTION
Perform the following inspection and cleaning before disassembly:
1. Verify that all screws are secure and in place.
2. Verify that the transponder external surfaces have no dents, etc.
3. Inspect for bent or broken pins on the 25 pin connector.
4. Inspect for damage to the BNC connector.
4.3 FRONT SUBASSEMBLY (P/N 011-00263-00)
1. Remove power to the unit.
2. Remove the bottom cover (5 screws) to expose internal circuitry.
3. Remove the four black screws holding the front bezel to the frame.
4. Carefully remove the Flex Strip from the Main Board.
Install according to Figure 4-1 to prevent incorrect installation (crystal Y501 is included in the figure for reference
purposes.)
CAUTION
When reinstalling the bottom cover, ensure the proper screws are used to prevent
the possible shorting out of Main Board Components.
190-00133-02 Rev B 4-1
Page 24

Figure 4-1. Front Subassembly Installation
4.4 CLEANING
After reassembly, clean the external surface of the transponder when inspection shows dirt, smudges, etc. Wipe with
a damp, lint free, static free cloth.
190-00133-02 Rev B 4-2
 Loading...