

Garmin eTrex Mariner Owner's Manual And Reference Manual
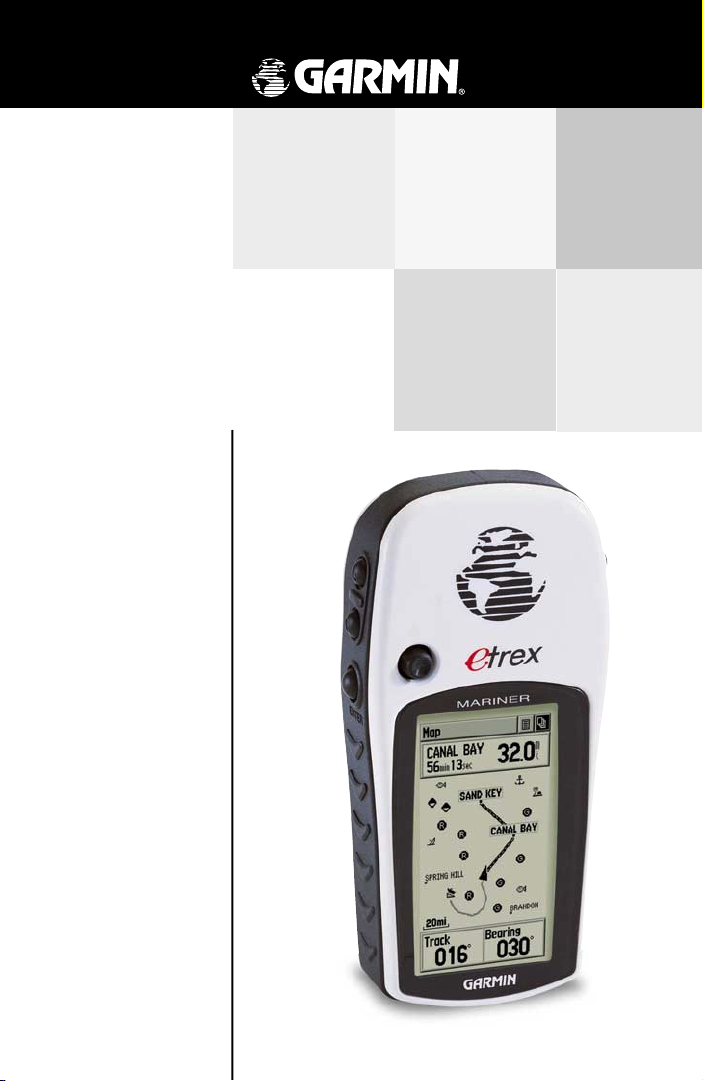
eTrex
personal navigator
owner’s
manual
and
reference
guide
MarinerTM
®

© 2001 GARMIN Corporation
GARMIN International, Inc.
1200 E 151st Street, Olathe, Kansas 66062 U.S.A.
Tel. 913/397.8200
Fax. 913/397.8282
GARMIN (Europe) Ltd.
Unit 5, The Quadrangle, Abbey Park Industrial Estate, Romsey, SO51 9AQ U.K.
Tel. 44/1794.519944
Fax.44/1794.519222
GARMIN Corporation
No. 68, Jangshu 2nd Road, Shijr, Taipei County, Taiwan
Tel. 886/2.2642.9199
Fax. 886/2.2642.9099
All rights reserved. Except as expressly provided herein, no part of this manual may
be reproduced, copied, transmitted, disseminated, downloaded or stored in any storage
medium, for any purpose without prior written consent of GARMIN Corporation.
GARMIN Corporation hereby grants permission to download a single copy of this
manual onto a hard drive or other electronic storage medium to be viewed for personal
use, provided that such electronic or printed copy of this manual contains the complete
text of this copyright notice and provided further that any unauthorized commercial
distribution of this manual is strictly prohibited.
Information in this manual is subject to change without notice. GARMIN Corporation
reserves the right to change or improve its products and to make changes in the
content without obligation to notify any person or organization of such changes.
Visit the GARMIN website (www.garmin.com) for current updates and supplemental
information concerning the use and operation of this and other GARMIN products.
GARMIN,
Personal Navigator,
Click Stick, MapSource, and
and may not be used
without the express permission of GARMIN Corporation.
AutoLocate, and TracBack are registered trademarks,
eTrex
Mariner are trademarks of GARMIN Corporation
July 2001 Part Number 190-00203-02 Rev. C Printed in Taiwan

SECTION 1
Thank you for choosing the GARMIN eTrex Mariner.
To get the most from your new eTrex Mariner, take time to
read through this owner’s manual in order to understand
all of the operating features. This manual is organized into
four sections.
The Introduction section provides FCC and safety
information and the Table of Contents.
The Getting Started section introduces you to the
eTrex Mariner features, main operating pages and basic
navigation methods.
The Reference section provides details about using
the features of the eTrex Mariner according to topic. The
explanations for each feature are divided into: (1) An
overview that discusses the feature and (2) A detailed
Step-by-Step instruction for using the feature.
Reading the overview may be all that you require to
operate features. However, the Step-by-Step instructions
are available, if needed.
Introduction
Introduction
About This
Manual
The Appendices contain information on items such
as Accessories, Specifi cations, a Troubleshooting Guide,
and an Index by Subject.
Standard Package Contents:
1 eTrex Mariner Unit
1 Carry Lanyard
1 Owner’s Manual
1 Quick Start Guide
1 PC Interface Cable
i

Introduction
FCC Compliance
Statement
Warnings
and
Precautions
NOTE: This device complies with Part 15 of the FCC
interference limits for Class B digital devices FOR HOME
OR OFFICE USE (“home or offi ce” interference requirements are more stringent than “outdoor” requirements) .
Operation of this device is subject to the following conditions: (1) This device may not cause harmful interference,
and (2) this device must accept any interference received,
including interference that may cause undesired operation.
The eTrex Mariner does not contain any user-serviceable
parts. Repairs should only be made by an authorized
GARMIN service center. Unauthorized repairs or modifi cations could result in permanent damage to the equipment and void your warranty and your authority to
operate this device under Part 15 regulations.
CAUTION: The Global Positioning System (GPS) is operated by the government of the United States, which is
solely responsible for its accuracy and maintenance. The
system is subject to changes which could affect the accuracy and performance of all GPS equipment. Although the
eTrex Mariner is a precision electronic NAVigation AID
(NAVAID), any NAVAID can be misused or misinterpreted
and, therefore, become unsafe.
CAUTION: IT IS THE USER’S RESPONSIBILITY TO
USE THIS PRODUCT PRUDENTLY. THIS PRODUCT
IS INTENDED TO BE USED ONLY AS A TRAVEL
AID AND MUST NOT BE USED FOR ANY PURPOSE
REQUIRING PRECISE MEASUREMENT OF DIRECTION, DISTANCE, LOCATION, OR TOPOGRAPHY.
THIS PRODUCT SHOULD NOT BE USED AS AN AID
TO DETERMINE GROUND PROXIMITY FOR AIRCRAFT
NAVIGATION.
ii

Introduction
MAP DATA INFORMATION: One of the goals of
GARMIN is to provide customers with the most complete
and accurate cartography that is available to us at a reasonable cost. We use a combination of governmental and
private data sources, which we identify as required in
product literature and copyright messages displayed to
the consumer. Virtually all data sources contain inaccurate
or incomplete data to some degree. This is particularly
true outside the United States, where complete and accurate digital data is either not available or prohibitively
expensive.
WARNING: For use in vehicles, it is the sole responsibility of the owner/operator of the eTrex Mariner to secure
the GPS unit so that it will not interfere with the vehicle’s
operating controls, obstruct the driver’s view of driving
conditions, or cause damage or personal injury in the
event of an accident. Do not mount the eTrex Mariner
over air bag panels or in the fi eld of air bag deployment.
Air bags expand with a rapid force that can propel objects
in their path toward the driver or passengers causing
possible injury. Refer to air bag safety precautions contained in the vehicle owner’s manual. Do not mount
the eTrex Mariner in a place where the driver or passengers are likely to impact it in an accident or collision.
The mounting hardware provided by GARMIN is not
warranted against collision damage or the consequences
thereof.
Warnings
and
Precautions
Do Not Place Unsecured
on the Vehicle Dash
Do Not Mount Where
Driver’s Field of Vision
is Blocked
Do Not Mount
Over Air Bag Panels
Do Not Mount in Front of an Air
Bag Field of
Deployment
WARNING: When used in vehicles, it is the sole responsibility of the driver of the vehicle to operate the vehicle
in a safe manner, maintain full surveillance of all driving
conditions at all times, and not become distracted by the
eTrex Mariner to the exclusion of safe driving practices.
It is unsafe to operate the controls of the eTrex Mariner
while you are driving. Failure by the driver of a vehicle
equipped with an eTrex to pay full attention to operation
of the vehicle and road conditions while the vehicle is
in motion could result in an accident or collision with
property damage and personal injury.
iii

Introduction
Table of Contents
Section One - Introduction
About This Manual.............................................i
FCC Compliance Statement...............................ii
Warnings and Precautions.............................ii-iii
Table of Contents..............................................iv
Section Two - Getting Started
Setup, Features, & Basic Navigation.....................1
Features and Button Function.............................2
Battery Installation...............................................3
Starting-Up...................................................................3
Backlighting and Contrast...................................4
Map Data Setup...................................................4
Page Basics: The Main Pages.............................5-9
Setting The Correct Time.....................................9
Basic Navigation...........................................10-12
Section Three - Reference
The Satellite Page..........................................13-14
Navigation Methods..........................................15
The Map Page..............................................16-22
Map Page Options..................................17-22
Panning the Ma
Stop Navigation.
Navigation Status..................................19
Data Fields.......................................19-20
Map Page Setup..............................21-22
Zooming In/Out....................................22
The Navigation Page....................................23-24
Navigation Page Options...
Bearing/Course Pointer........................23
Data Fields......................................23-24
The Trip Computer Page....................................25
The Main Menu................................................26
Marking Your Location.........................27-28
Creating a Waypoint......
p .................................18
.....
..............................19
................
....23-24
..........
.................28
iv
..........
Moving a Waypoint........
Projecting a Waypoint........
Editing Waypoints...............
Saving as a Waypoint..................................29
The Find Menu......................................30-35
Finding a Waypoint..............................31
Finding a Favorite................................32
Finding a City..........
Finding a Point of Interest.
Using a Goto..
Routes...
Creating and Using a Route..................37
Editing a Route..................
Navigating a Route.............................41
Data Fields..............
Tracks......
The Setup Pages.........
Time Page.............................................45
Units Page.............................................46
Display Page...........
Heading Page...........
Interface Page.................
System Page..........................................49
The Accessory Pages..............................50-52
Sun and Moon Page...............................50
Calendar Page..........
Hunt and Fish Page...............................52
..............
...............
..................................37-42
Adding or Editing from the Route Map
Page.................................................40-41
............
...................................43-44
..................28
........
.................29
...........
............29
..............
...............33
.......
..34-35
................................36
..............
......38
...............
..............42
..................
...........45-49
....................
................
..........
............47
.................
...................
...........47
.....48
51
Section Four - Appendices
Appendix A: Specifi cations...............................53
Appendix B: Time Offset Chart........................54
Appendix C: Accessories..................................55
Appendix D: Wiring Diagram...........................56
Appendix E: Troubleshooting...........................57
Appendix F: Index......................................58-59
Appendix G: W arranty.......................................60

SECTION 2
Getting Started
Before you begin to explore the eTrex Mariner’s
operating features, you will want to follow these “Getting
Started” instructions to prepare it for operation by
installing batteries, adjusting the screen contrast, loading
optional GARMIN “Points of Interest” data, and setting
Basic Navigation
the correct time for your current location.
The operating features of the unit are structured to
be accessed and activated by pressing buttons on the unit
* Points of Interest data (other
which is explained on the following page.
GARMIN MapSource “Points of
The fi ve Main Pages are your primary access to
Interest” CD-ROM. See pages 4
operating the eTrex Mariner. Each page provides either
a basic navigation function or access to features which
enhance navigation or customize the unit’s operation to
meet your requirements.
This “Getting Started” section will introduce you to
the Main Pages and how they are structured. You will also
be shown how to perform basic navigation techniques to
help you start using your eTrex Mariner immediately.
Detailed instructions on using the eTrex Mariner’s features
and their options are contained in the “Reference” section.
Features include:
Storage for 500 Waypoints with name and graphic symbol.
An automatic Track Log with storage capability for 10
Currently, WAAS satellite signal
Tracks with 250 points each.
Route building capability, with storage for 20 Routes with
50 Waypoints each.
mountains, etc. In fact, you may
A Trip Computer for displaying a variety of navigation
data such as speed, ETA, ETE, heading, odometer, etc.
maintain a WAAS satellite signal
until full satellite support for this
A Find Feature for locating Waypoints, Cities, and Points
of Interest*.
Point of Interest data storage, allowing transfer from a
GARMIN MapSource CD-ROM.
Pre-loaded MapSource Major Cites and Maritime Navigation Aids mapping data.
See page 49 for enabling WAAS
Wide Area Augmentation System (WAAS) capability.**
Setup,
Features,
and
than navigation aids) must be
transferred to the unit using a
and 55 for more information.
Because the Wide Area Augmentation System (WAAS) is
currently under development
and is not fully supported by
geo-stationary satellites, effec-
tive use of the WAAS feature
may be limited by your geo-
graphic location in relation to
those satellites now in service.
There are two WAAS satellites
in service in geo-stationary
orbit above the Equator, one
over the Atlantic Ocean and
one over the Pacifi c Ocean.
reception requires an absolute
clear view of the sky and works
best when there are no nearby
obstructions such as buildings,
not be able to receive or easily
Not enabling WAAS when you
cannot receive a signal will
speed unit map drawing and
and its satellite reception
** About WAAS
program is complete.
conserve battery power.
techniques.
1
Getting Started
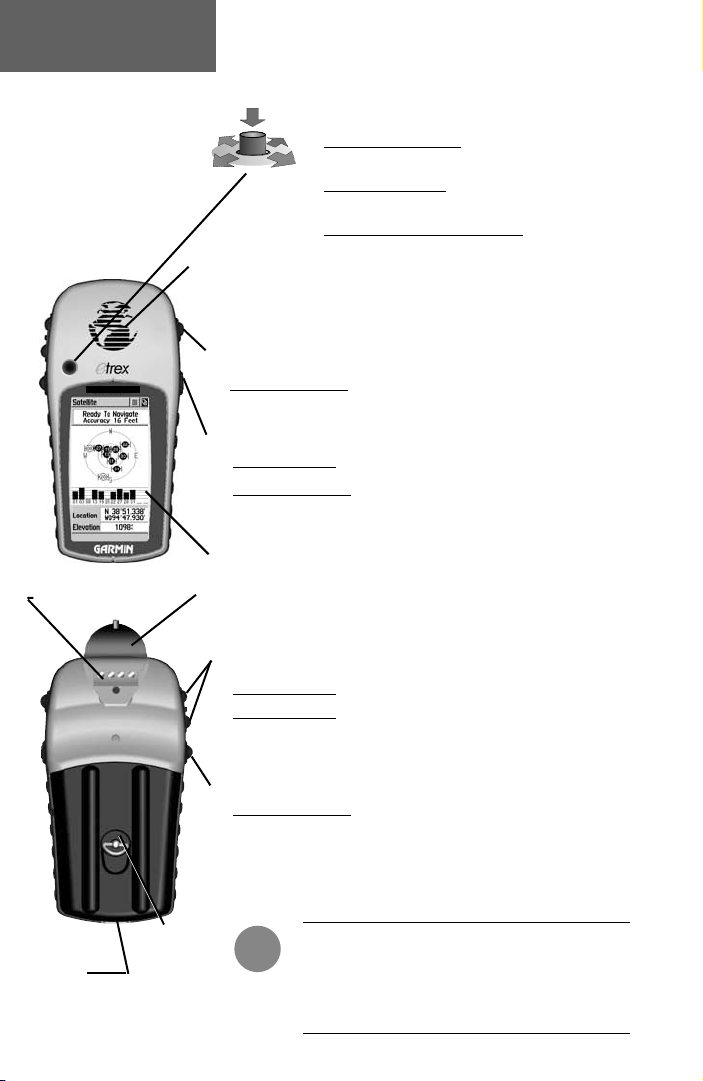
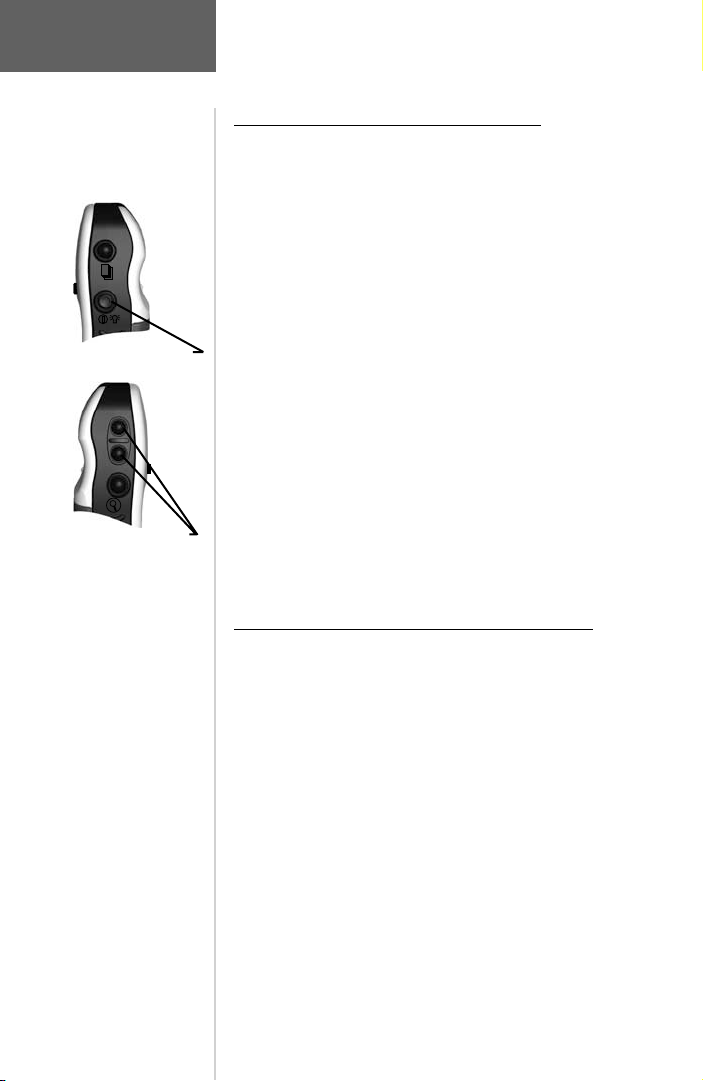
Features and
Button
Function
LEGEND
MARINER
External Power
and
Data Connector
The CLICK STICKTM (Five Position Switch)
• Press In and Release to enter highlighted
options and to confi rm messages
• Press In and Hold to mark your current
location as a waypoint
• Move Up/Down or Right/Left to move
Internal Antenna
through lists, highlight fi elds, on-screen
buttons, icons, enter data or move the map
panning arrow
The PAG E button:
• Press and Release to cycle through main pages
The POWER button:
• Press and Hold to turn the unit On/Off
• Press and Release to toggle display backlighting On/Off
LCD
Display
Power/Data
Connector Cover
The ZOOM IN/OUT buttons:
• Press and Hold to Zoom in and out on the Map Page
• Press and Hold when on the Satellite Page to adjust the
screen contrast
Slot for Carry
Lanyard
Installation
2
Battery
Compartment
Cover
The FIND button:
• Press and Release to access the Find Menu
F
NOTE: The eTrex Mariner is designed to be
held and operated in the left hand, but it
can be held and operated using the right
hand as well to suit your preference.
Getting Started
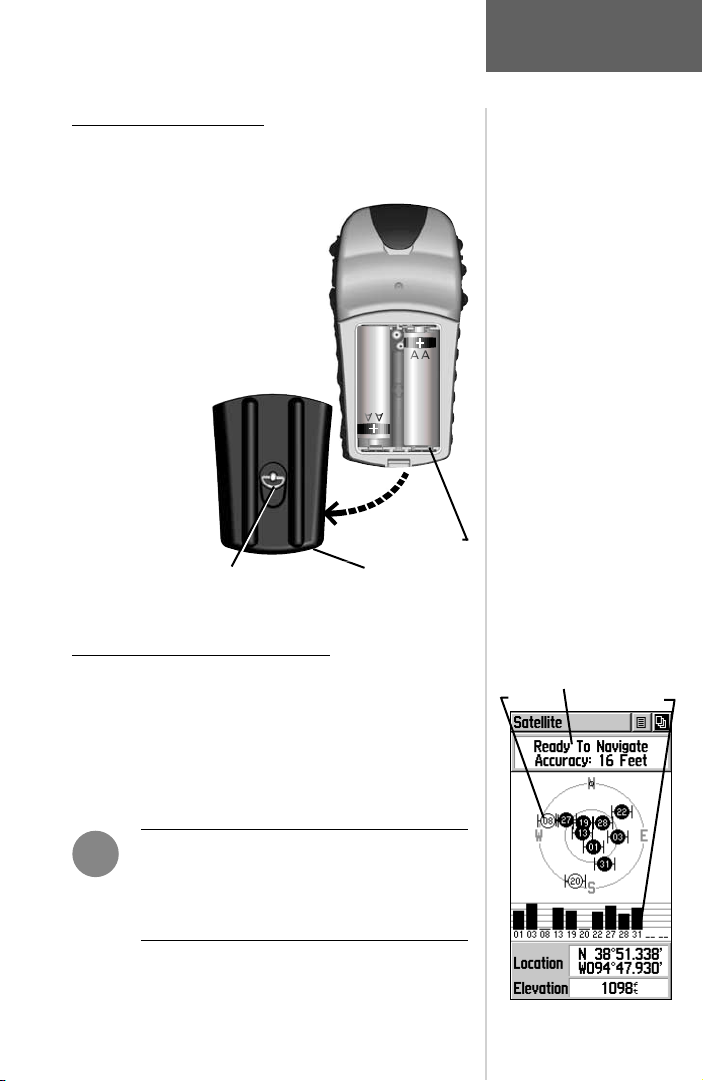
Installing the Batteries
The eTrex Mariner operates on two “AA” batteries
(not included), which are placed in the back of the unit.
Rechargeable Alkaline, NiMH, NiCad or
Lithium batteries may also be used.
Stored data will not be lost when
the batteries are removed.
To install batteries:
1. Remove the battery cover on the
back of the unit. Turn the D-ring
1/4 turn counter-clockwise & pull away.
2. Insert the batteries
observing proper
polarity as shown
at the right.
3. Reinstall the battery
cover by turning the
D-ring 1/4 turn
clockwise.
Battery Compartment
Battery CoverD-ring
4. Battery capacity is displayed on the Status Bar at the bottom
of the Main Menu. (see Pages 9 and 26)
Starting Up Your eTrex Mariner
To start up the eTrex Mariner, take the unit outside
and fi nd an open area where the built-in antenna has a
clear view of the sky. Hold the unit at a comfortable height
with the antenna pointing up. Press and hold the POWER
button to turn the unit on. You will see the Welcome Page.
Press the PAGE button to acknowledge the copyright and
warning messages and move to the Satellite Page.
Battery
Installation
Important Note:
When replacing batteries, use only
new or fully recharged batteries.
Do not mix Alkaline, NiMH,
NiCad or Lithium batteries.
Rechargeable batteries may typ-
ically display less capacity than
disposable Alkaline batteries.
Remove the batteries from the
unit if you don’t plan to use it
for several months.
Follow the battery manufacturer’s instructions for proper care
and disposal of batteries.
Extensive use of backlighting
will reduce battery life.
When using ‘Battery Saver’ or
‘Use With GPS Off’ mode when
not navigating, Alkaline batter-
ies can last up to 20 hours.
Starting Up
GPS Receiver Status Message
Satellites Signal Strength
F
NOTE: When you use the unit for the fi rst
time, it may take up to fi ve minutes to fi nd
your location. After that, it will take about
15 to 45 seconds to locate your position.
When a suffi cient number of satellites have been
located the window at the top of the page will display a
“Ready to Navigate” message. If you experience diffi culty
in tracking satellites, refer to page 13 for information
about satellite reception and remedies.
Satellite Page
3
Getting Started
Backlighting
and
Contrast
Press & Release POWER Button
to turn Backlighting
Use ZOOM IN & OUT Buttons
to Adjust Contrast
On/Off
Map Data
Setup
Display Backlighting and Contrast Set Up
If lighting conditions make it hard for you to see
the display screen, you can adjust the contrast or turn on
the backlight.
To turn on the backlighting:
1. Press and release the POWER button to turn on
the backlight feature from any page on the unit. The
backlight will remain on until the set timeout period is
completed or the POWER button is pressed again.
The unit is factory set to timeout 15 seconds after
the last button press. (To reset the backlight timeout, see
page 47.)
To adjust the screen contrast:
1. Use the ZOOM IN or OUT buttons to adjust the
contrast with the Satellite Page displayed.
Transferring MapSource “Points of Interest” Data
If you have purchased a GARMIN MapSourceTM “Points
of Interest” CD-ROM, you may want to load data for restaurants, lodging, attractions, entertainment, landmarks, transportation, etc. before beginning use. The eTrex Mariner will
currently accept only the “Points of Interest” CD-ROM.
Data transfer requires the use of a PC, a GARMIN
MapSource “Points of Interest” CD-ROM, and the PC Interface Cable with RS232 serial port connector supplied with
this unit. Follow detailed i
MapSource User’s Manual.
For detailed information concerning GARMIN MapSource
CD-ROM products contact yout GARMIN Dealer or use the
GARMIN website (www.garmin.com).
4
nstructions for data transfer in the
Getting Started
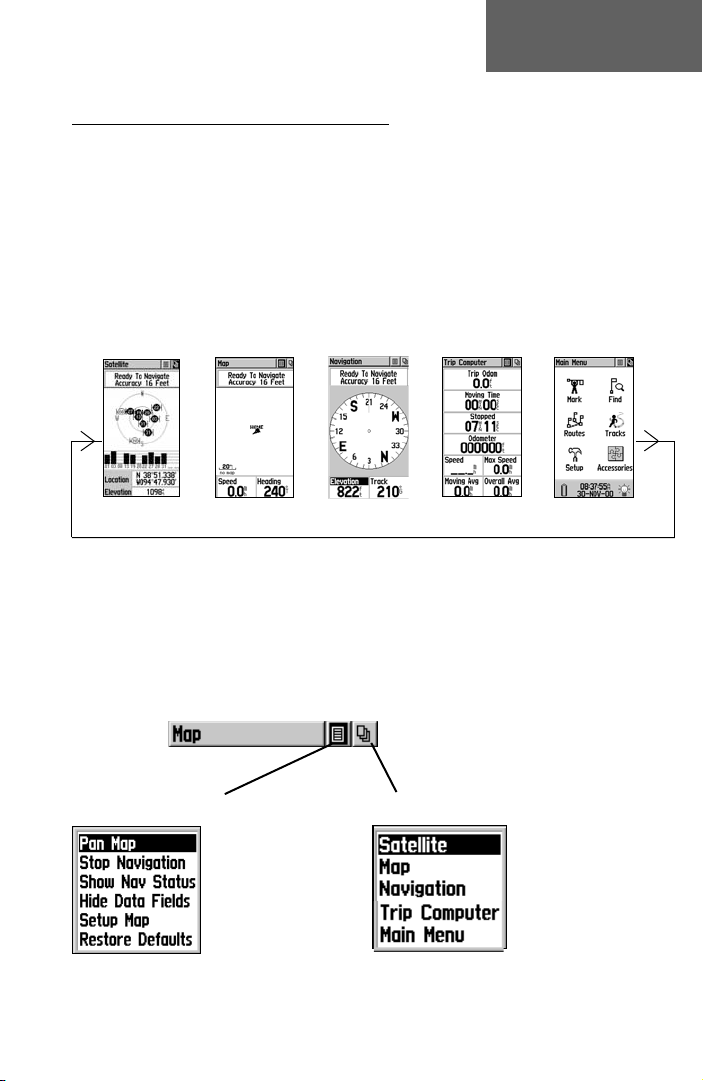
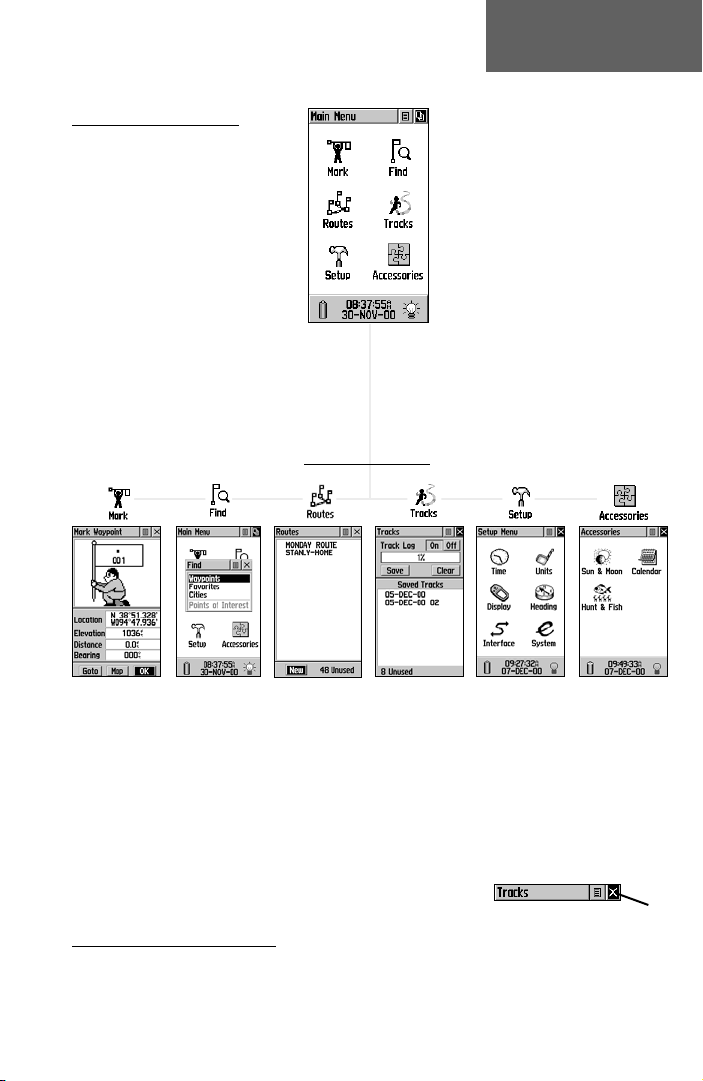
Moving from main page to main page
All of the information you need to operate the eTrex
Mariner can be found on fi ve main pages (or display screens).
You can simply press and release the PAGE button to cycle
through the Satellite Page, Map Page, Navigation Page, Trip
Computer and Main Menu Page.
Satellite Page Map Page Navigation Page
Trip Computer
While these fi ve pages provide you with different types
of navigation information, they all share common features like
Option Menus and a Main Page Menu, both of which are
accessed by on-screen buttons. To display these menus, simply
highlight the on-screen button and press in on the CLICK
STICK.
Page Basics:
The Main Pages
Main Menu
Option Menu Button
An Option Menu
These menus allow you to
access options that provide
additional features or
customize the unit to your
preferences. To exit these
and other pop-up type
menus, move the CLICK
STICK to the left or right.
Main Page Menu Button
Main Page Menu
Use to go directly to a Main
Page and as an alternate to
cycling through the Main Pages.
Double click on the on-screen
button to toggle between two
pages.
5
Getting Started
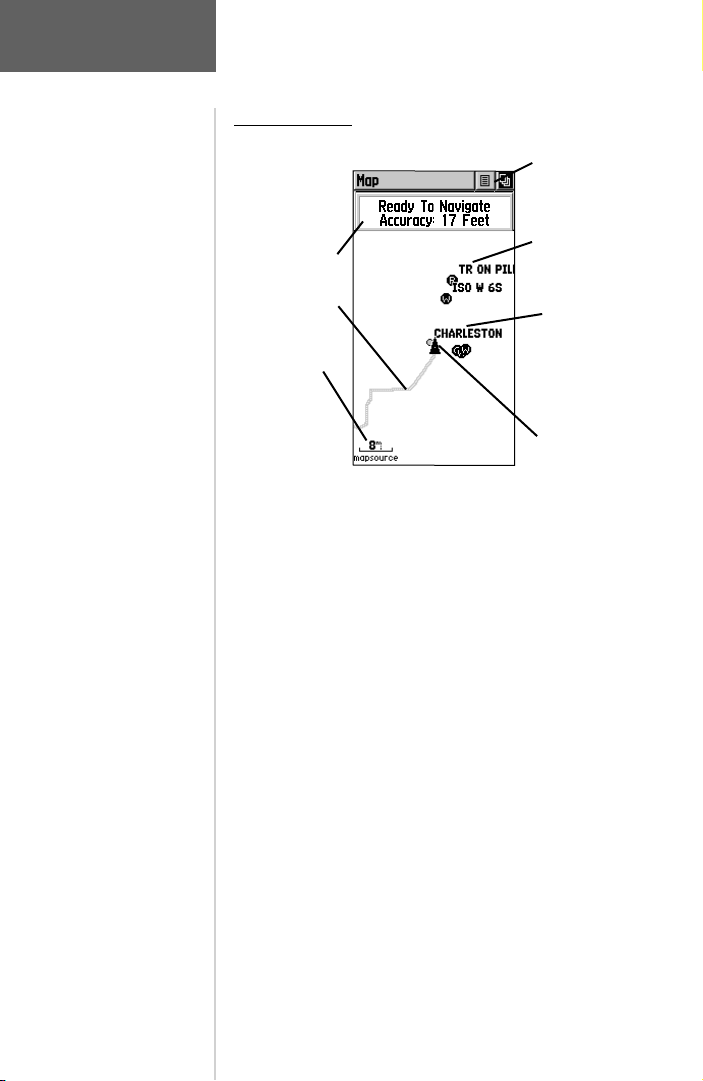
Page Basics:
The Main Pages
Map Page Basics
Status Window
Track Log
Map Scale
On-Screen
Page and Option
Menu Buttons
Navigation Aids
on Map
Major Cities
on Map
Position Icon
The Map Page displays your present position and
direction of movement using a triangular ‘Position Icon’
that is centered on the map. As you travel, the map
display leaves a “trail” (track log) of your movements.
The map also displays geographic details such as
major cities. Navigation aids (Points of Interest) are also
displayed. The map can display even more map item
details when GARMIN MapSource “Points of Interest”
data has been downloaded to the unit using a CD-ROM
program.
To allow you to view the map from different perspectives, the scale can be changed from 20 feet to 500 miles.
The ZOOM IN and OUT buttons on the side of the unit
allow you to zoom In or Out on the map. Pressing and
holding these buttons causes the scale to change rapidly
instead of changing in increments. The IN button will
show you less area, but more map details while the OUT
button displays a larger area with less map details.
A Status Window at the top of the page provides
you with current satellite tracking and position accuracy
information.
6
Getting Started
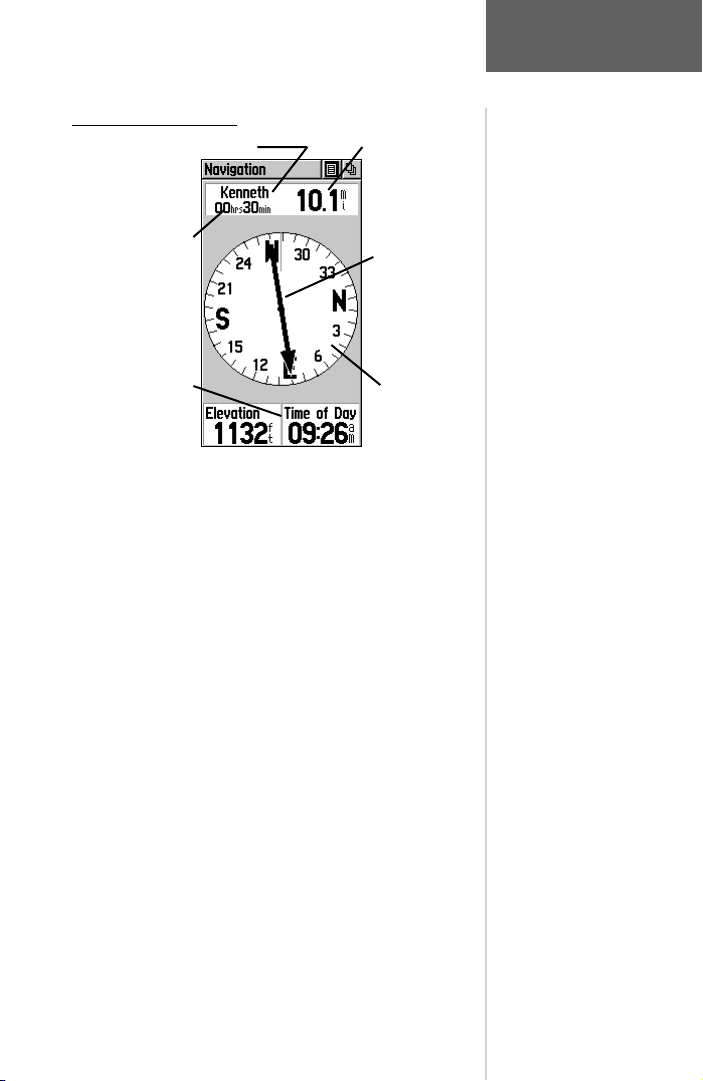
Navigation Page Basics
Destination (Waypoint) Name
Time to Destination
Selectable Data Fields
The Navigation Page displays directional information
to guide you to a destination. The Status Window at
the top of the page shows you the name of your destination, the distance, and the time to go. A Bearing Pointer
and Compass Ring are displayed to provide you with
Straight Line Distance
to the Destination
Bearing Pointer
Compass Ring
The Main Pages
designed for both marine and
illustrations shown throughout
this manual depict examples of
For example: the Track shown
in the getting started section is
based on foot travel when learn-
section depicts a route consisting
of seaports and maritime navigation aids. Yet, these features
applications, they work for both
land and maritime navigation.
navigational guidance. Two Data Fields are provided, and
can be programmed to display a variety of navigation
data.
To navigate to a destination, simply follow the Bearing
Pointer. The Bearing Pointer will always point directly
to the destination, no matter what your current location
might be.
When you are not on an active Goto, Track or Route
(in other words: not traveling to a recorded destination),
the window at the top of the page will display the status
Elevation (Altitude) is deter-
measurement of a mathematical
model of the earth, and because
satellite signals can be distorted
by the atmosphere, there will be
some error. Altitude accuracy is
generally less accurate than the
The Horizontal accuracy is displayed in the Status Window on
the Map and Navigation Pages.
of the GPS Receiver and the approximate accuracy of your
current position. The Compass Ring will be displayed,
indicating your heading while you are moving, but the
data fi elds at the bottom of the page will not display
any destination related data, such as Estimated Time of
Example: If you are at (Mean)
sea level and the elevation read-
ing is greater or less than 0, it
may be the result of the margin
Arrival, etc.
Page Basics:
Important Note:
Because the eTrex Mariner is
land based navigation, the
either application.
ing to use the unit, while the
Route shown in the reference
are not restricted to just these
mined by the GPS satellite’s
Horizontal accuracy.
error.
7
Getting Started
Page Basics:
The Main Pages
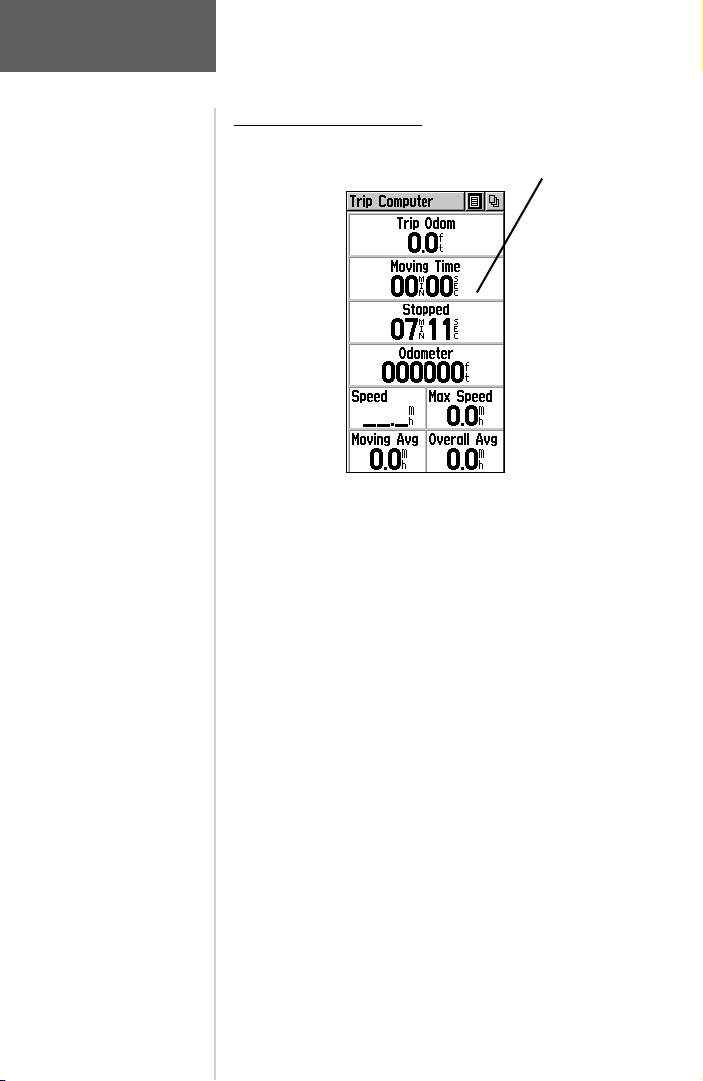
Trip Computer Page Basics
Selectable Data Fields
The Trip Computer Page displays up to eight different
types of navigation data. Each data fi eld is selectable and
can contain one of many data information options.
By selecting the information options that you prefer
and arranging them in a desired order on the page, you
can customize the Trip Computer Page to meet your
navigation needs.
The Page Options Menu allows you to reset the Trip
Computer data when you are ready to start a new trip.
8
Getting Started
Main Menu Page Basics
Page Basics:
The Main Pages
The Main Menu Page with
Feature Icons
Battery Capacity, Time/Date,
and Backlighting Status Bar.
The Main Menu provides you with a directory of the eTrex Mariner’s advanced
features. From the Main Menu page you can mark and create new waypoints, fi nd map
items such as cities, points of interest, etc., create routes, save track logs, setup system
operating features, access and use unit accessories.
&
Main Menu Pages
Mark Waypoint Page - Allows you to mark and record your current location.
Find Menu - Allows you to Find and Goto a map item location or a waypoint.
Routes Page Tracks Page Setup Pages - Allow you to set the time, select units of measure, set display backlight-
Allows you to create a route to a destination, with waypoints along the way.
Allows you to save a Track Log and navigate a previous path of travel.
ing and contrast, select from heading options, select interfaces to compatible external
devices, and select system operating modes.
Accessories Page - Provides Sun & Moon position data, a Calendar with date and note
capability, and best times for Hunting and Fishing.
To exit these pages, highlight the on-screen ‘X’
Setting the Correct Time
If the time displayed in the fi eld at the bottom of the Main Menu does not match
button and press in on the CLICK STICK.
the time for your current location (time zone), you may need to set the time. Use the
Main Menu to access the Setup Pages, select the Time Icon and then follow instructions
for setting the time on page 45.
9
Getting Started
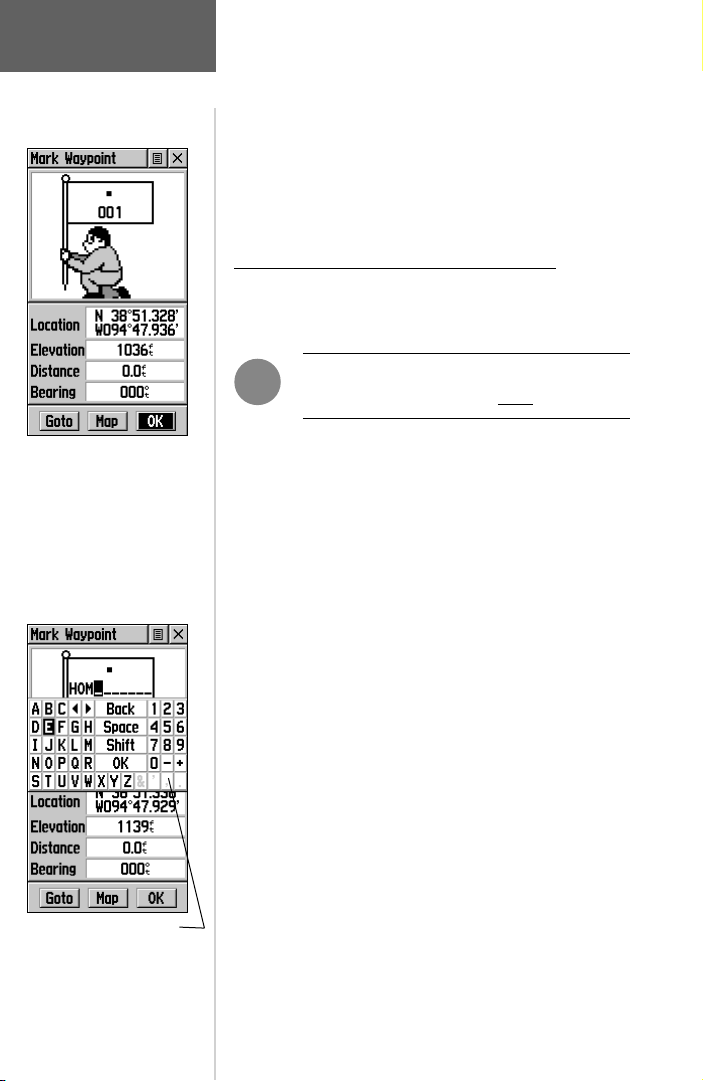
Basic Navigation
The Mark Waypoint Page displaying your Marked Waypoint,
along with the latitude and lon-
gitude and approx. elevation.
On-screen buttons can create
a Direct path (Goto) to the
waypoint, show it on the map
(Map), and confi rm your selec-
tion as a waypoint (OK).
To begin learning how to use your eTrex Mariner,
begin by using some basic navigation techniques such as
marking your current location as a waypoint, then travel
a short distance and allow yourself to be guided back to
where you started.
Marking your Current Location as a Waypoint
The fi rst step in most navigation exercises is to mark
your current location as a waypoint so you can return
to it later.
F
NOTE: The eTrex Mariner must be “READY TO
NAVIGATE” before you can Mark a waypoint.
To Mark a Waypoint:
1. Press in and hold the CLICK STICK until the ‘Mark
Waypoint’ Page is displayed. Whenever you hold in on the
CLICK STICK, your current location will be marked as a
new waypoint with a three-digit number assigned.
Before saving it, you can personalize the newly marked
waypoint by changing the numeric designation to a more
meaningful name. You can also give it a map symbol to make it
more recognizable when viewed on the map.
The Data Entry Keyboard
10
To change the waypoint name:
1. Use the CLICK STICK to highlight the waypoint
name fi eld (001) and then press it in to display
the data entry keyboard.
2. Use the CLICK STICK to highlight the desired charac ters for your new name and then press it in to
place a character in the data fi eld. The fi eld will automati cally move to the next character position.
3. Repeat the process until you have completed the new
name or have reached the character limit for the fi eld.
Then highlight ‘OK’ on the keyboard and then press in on
the CLICK STICK to complete the name entry and close
the keyboard.

Getting Started
To change the waypoint symbol:
Basic Navigation
1. Use the CLICK STICK to highlight the waypoint
symbol fi eld on the Mark Waypoint Page and then press it
in to display the list of symbols.
2. Use the CLICK STICK to move up and down the list
to highlight the desired symbol and then press it in to
place the symbol in the fi eld on the page.
3. Use the CLICK STICK to highlight the on-screen
‘OK’ button at the bottom of the page and then press it
in to save your new waypoint. The waypoint can be
retrieved later using the Find Menu.
Now that you’ve marked your location, you can begin
to practice some basic navigation techniques.
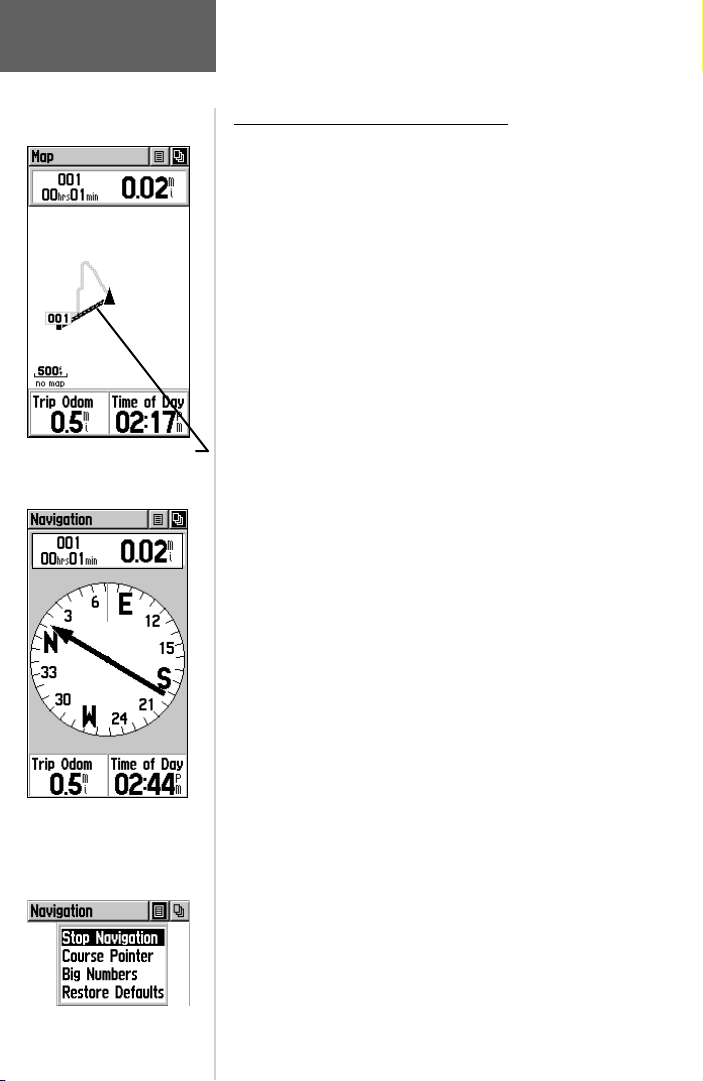
There are two main pages that help you navigate; the
The Mark Waypoint Page with
Map Page and the Navigation Page.
Press the PAGE button repeatedly until the Map Page
is displayed. You will see the new waypoint in the center
of the map. If you renamed it, it will display the new
name and a map symbol.
Adjust the map scale to 300 feet by pressing the
ZOOM IN or OUT button on the side of the unit until
the scale in the lower left corner of the map reads 300 ft.
the list of
Map Symbols displayed
To Use the Map Page:
1. Observe that the new waypoint is displayed in the center
of the map.
2. Begin walking or driving around for a few minutes and
then stop.
view of the sky through the windshield in order to receive
satellite signals.)
3. Observe that your location and movement are shown by the
(If in a car, make certain the unit has a clear
The Map Page displaying your
Marked Waypoint and a Track
defi ning your path of travel.
‘Pointer Icon’ and that your path of travel (a Track) is shown
by a dotted line.
4. You can follow the Track back to the waypoint, but instead we’ll
save time and take a direct route to it using another navigation
tool, called a Goto, as explained on the following page.
11
Getting Started
Basic Navigation
The Map Page with a Goto line
connecting your location to your
original Marked Waypoint
Navigating Back to Your Starting Point
Now we will navigate back to the waypoint you
marked at the beginning of this exercise using the Goto
function.
Going To (Goto) the Marked Waypoint:
1. Press and release the FIND key to display the Find Menu.
2. Use the CLICK STICK to highlight and select ‘Way-
points’ from the list of categories.
3. You will be prompted to select fi nd ‘Nearest’ or fi nd ‘By
Name’. Select ‘Nearest’ and press in on the CLICK STICK
to display the Nearest List.
4. The waypoint you had previously marked and saved
will be on the list.
Use the CLICK STICK to highlight the
waypoint and then press in to display the Information
Page for the waypoint.
5. Use the CLICK STICK to highlight the ‘Goto’ on screen button and then press it in to activate a Goto.
Press the PAGE button until the Navigation Page is
displayed.
Walk in the direction of the bearing pointer until it
points to the top of the compass ring. If it points to the
right, you need to move to the right, if it points left, you
need to move to the left. When it points straight up, you
are on course to your destination. The Goto will provide
you with a direct route back to the waypoint and will not
necessarily follow the track you created.
The Navigation Page with the
Bearing Pointer showing you
the direction to go. The
Compass Ring provides you
with orientation information.
The ‘Stop Navigation’ Option.
12
The destination name, distance to the destination, and
time to reach it are displayed in the window at the top
of the screen. Two additional data fi elds are provided at
the bottom of the page and can be programmed to display
a variety of navigation data such as speed, heading, etc.
When you begin to approach the waypoint, an “Arriving
At Destination” message will appear. You can view your
progress by toggling between the Map and Navigation
Page.
To stop navigation, select ‘Stop Navigation’ from either
the Map or Navigation page’s options menus.
You have now completed a basic exercise in GPS navigation. As you learn more about the unit’s operation, you will
be able to apply more features to your navigation skills.
SECTION 3
Reference
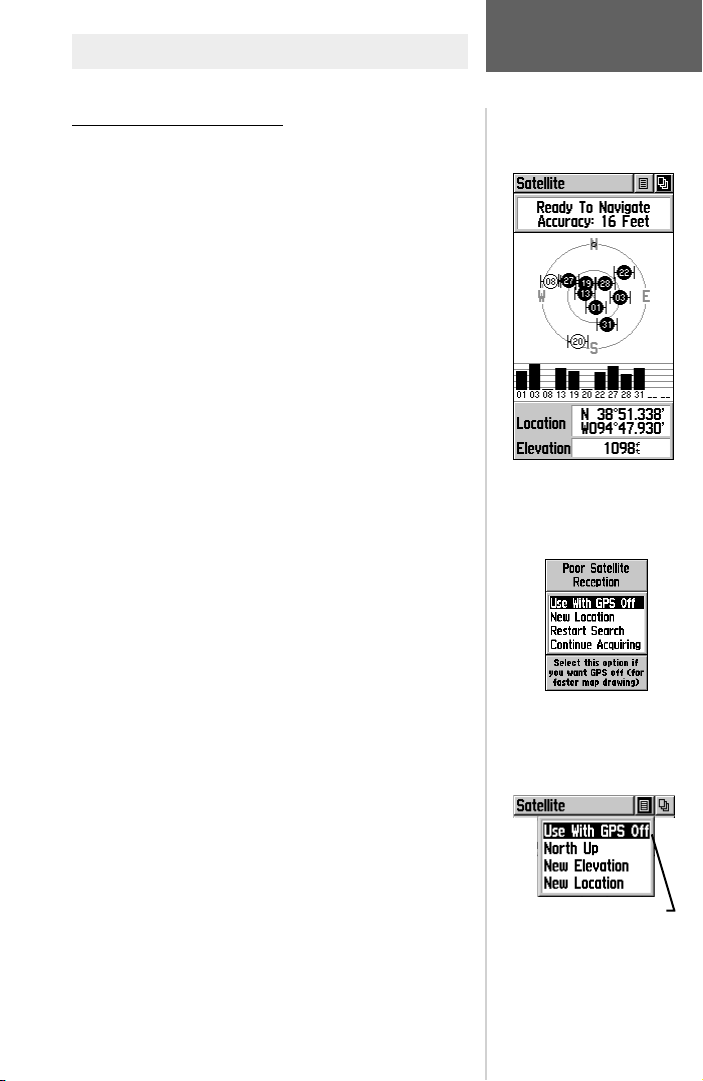
Satellite Page - Overview
Because the eTrex Mariner relies on satellite signals to
provide you with navigational guidance, the unit’s view of
the sky will determine how fast you achieve navigational
status. GPS signals do not travel through rocks, buildings, people, metal, or heavy tree cover...so keep the unit
in clear view of the sky for best results.
The Satellite Page provides a picture of satellite signal
tracking and tells you when the unit is ready for navigation.
At least three satellite signals are needed to fi nd your location.
The Skyview graphic represents a view looking up
at the sky from your current location showing satellites
and their assigned number. The outer ring represents the
horizon around you and the inner circle an overhead view
of the sky at a 45o angle from vertical. Signal Strength
Bars for each satellite are shown just below the Skyview.
Satellites and their signals appear as hollow shapes until a
with 8 Satellites Being Tracked
signal is received and then they appear darkened in. The
stronger the signal, the taller the signal bar.
If the unit cannot initially (when fi rst turned on)
determine its location, it will display a “Poor Satellite
Reception” message with four options. Each offers a brief
explanation when highlighted to guide your decision.
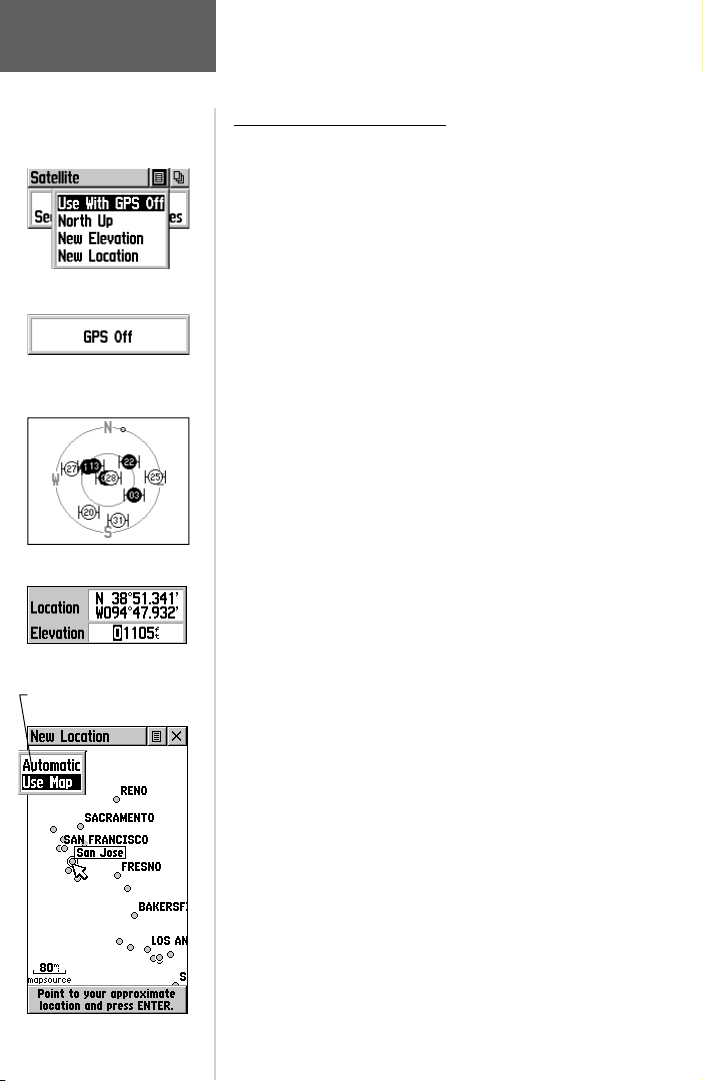
Select the
‘Use With GPS Off’ option from the Satellite
Page Option Menu when indoors or where a clear view of
the sky is obstructed, or you want to save battery power.
options for the “Poor Satellite
You can enter data, create routes, etc., but cannot navigate
in this mode. You can orient the satellite skyview by
selecting optional ‘Track Up’ (your direction of travel) or
‘North Up’ with the satellite skyview oriented to the north.
You can manually enter a new, more accurate elevation, if
known, to increase position accuracy. If you have moved
more than 600 miles since you last used the unit you may
require use of the ‘New Location’ option which helps the
unit to fi nd itself and speeds acquisition.
Once satellite tracking has been achieved, your
Satellite Page Options Menu
Highlight the on-screen button
at the top of the page & press
location coordinates and the elevation are shown at the
bottom of the Satellite Page.
The Satellite
Page
Satellite Page
There are four initialization
Reception” message.
in on the CLICK STICK.
13
Reference
The Satellite
Page
The Satellite Page
Options Menu
“GPS Off”
Message
‘North Up’ Skyview Orientation
Enter new elevation data
‘Use Map’ option for determin-
ing your current location.
Step-by-Step Instructions
How to select the ‘Use With GPS Off’ option:
1. Use the CLICK STICK to highlight the Option Menu
button at the top of the page and then press it in to
display the Options Menu.
2. Use the CLICK STICK to highlight the ‘Use With GPS Off’
option and then press it in to activate.
3. Observe that the Satellite Page title block now states
“GPS Off”.
4. The eTrex Mariner will now stop tracking satellites
and should not be used for navigation. Whenever the unit
is turned On it returns to Normal GPS operation.
How to select ‘Track Up’ or ‘North Up’:
1. Follow procedures for displaying the Options Menu.
2. Highlight either the ‘Track Up’ or ‘North Up’ option
(depending on which is currently in use), and press
in on the CLICK STICK to activate.
How to enter a new elevation:
1. Use the CLICK STICK to display the Options Menu.
2. Highlight ‘New Elevation’ and then press in
on the CLICK STICK. Observe the highlighted
fi rst character in the elevation fi eld and the numerical
keyboard at the bottom of the Satellite Page.
3. Enter the desired elevation by using the CLICK STICK
to highlight the desired numerals and then pressing it
in. Highlight ‘OK’ and press in to complete entry.
14
How to enter a new location:
1. Follow procedures for displaying the Options Menu.
2. Highlight ‘New Location’ and press in on the CLICK
STICK to display choices of ‘Auto’ or ‘Use Map’.
3. If you choose ‘Auto’ the eTrex Mariner will determine
your new location automatically.
4. If you choose ‘Use Map’ a map page will appear with
instructions stating, “Point to your approximate location
and press ENTER”. Use the
map pointer to your location on the map and press it in.
CLICK STICK
to move the
This option reduces the time required to search for location.
Reference
Navigation Methods- Overview
Active Navigation is supported by three of the fi ve
Main Pages:
The Map Page graphically shows you map details,
your current location, your elevation, marks your route to
a destination with a route line, and leaves a trail (track
log) of where you’ve been.
The Navigation Page tells you what direction to go
and the direction you are traveling.
The Trip Computer Page records and displays travel
data, like your speed, the distance you have traveled, or
the distance to travel, and the time of day or the time
remaining before reaching a destination and more.
Methods of Navigating using the eTrex Mariner
There are four methods of navigating when using the
eTrex Mariner and each is graphically displayed on the
Map Page.
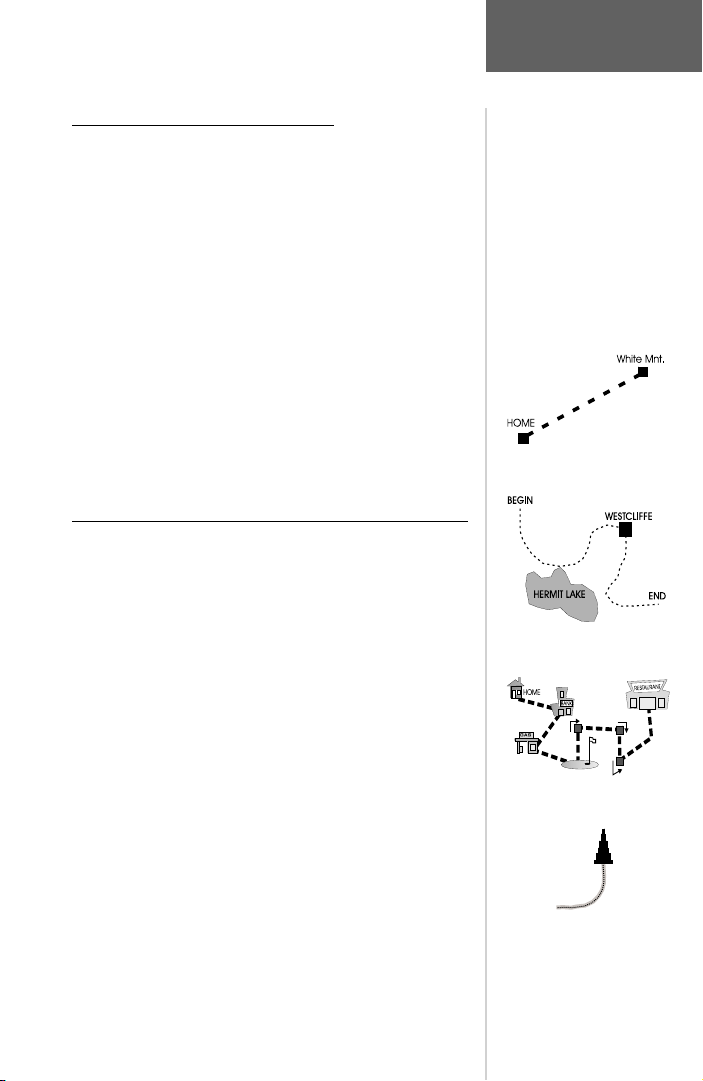
Goto - A direct path to a map location (waypoint,
city, navigation aid, etc.).
Navigation
Methods
A Goto
A Track
Track - A previous path of travel that has been stored
(logged) in the eTrex Mariner. A Track allows you to
repeat a path or to return to your starting point on the
same path using the GARMIN TrackBack feature.
Route - A path to a destination consisting of land marks along the way (waypoints, cities, highway exits,
points of interest, etc.).
Travel when not on a Goto, Track or Route - This
is best described as travel without entering a destina tion in the eTrex Mariner. The Map Page displays your
real-time movement as you travel with the unit turned
on and receiving satellites.
Travel when not on a Goto,
Track, or Route as indicated
by the ‘Pointer Icon’ and a
dotted line indicating your
A Route
path of travel.
15
 Loading...