

Garmin eTrex Legend H, eTrex Vista H Owner Manual

eTrex Legend® H and eTrex Vista® H
owner’s manual

© 2008 Garmin Ltd. or its subsidiaries
Garmin International, Inc.
1200 East 151st Street,
Olathe, Kansas 66062, USA
Tel. (913) 397.8200 or
(800) 800.1020
Fax (913) 397.8282
All rights reserved. Except as expressly provided herein, no part of this manual may be
reproduced, copied, transmitted, disseminated, downloaded or stored in any storage medium, for
any purpose without the express prior written consent of Garmin. Garmin hereby grants permission
to download a single copy of this manual onto a hard drive or other electronic storage medium
to be viewed and to print one copy of this manual or of any revision hereto, provided that such
electronic or printed copy of this manual must contain the complete text of this copyright notice
and provided further that any unauthorized commercial distribution of this manual or any revision
hereto is strictly prohibited.
Information in this document is subject to change without notice. Garmin reserves the right to
change or improve its products and to make changes in the content without obligation to notify any
person or organization of such changes or improvements. Visit the Garmin Web site (www.garmin
.com) for current updates and supplemental information concerning the use and operation of this
and other Garmin products.
Garmin®, the Garmin logo, eTrex®, eTrex Legend®, eTrex Vista®, TracBack®, and MapSource®
are trademarks of Garmin Ltd. or its subsidiaries, registered in the USA and other countries.
myGarmin™ is a trademark of Garmin Ltd. or its subsidiaries. These trademarks may not be used
without the express permission of Garmin.
Other trademarks are those of their respective owners.
December 2008 Part Number 190-00780-00 Rev. B Printed in Taiwan
Garmin (Europe) Ltd.
Liberty House
Hounsdown Business Park,
Southampton, Hampshire,
SO40 9RB UK
Tel. +44 (0) 870.8501241
(outside the UK)
0808 2380000 (within the UK)
Fax +44 (0) 870.8501251
Garmin Corporation
No. 68, Jangshu 2nd Road,
Shijr, Taipei County,
Taiwan
Tel. 886/2.2642.9199
Fax 886/2.2642.9099

Introduction
Introduction
Thank you for choosing the
Garmin® eTrex Legend® H or
eTrex Vista® H. These units
use the proven performance of
Garmin high-sensitivity GPS
and full-featured mapping to
create an unsurpassed portable
GPS receiver. The eTrex models
operate identically except that
the Vista H has an electronic
compass and a barometric
altimeter and the Legend H does
not. Take a moment to compare
the contents of this package with
the packing list on the box. If any
pieces are missing, contact your
Garmin dealer immediately.
eTrex Legend H and eTrex Vista H Owner’s Manual 1
Tips and Shortcuts
To return to the Main Menu
•
from any page, press the
MENU key twice.
To extend battery life, turn off
•
the GPS when not using the
eTrex for navigation. Decrease
the level of the display’s
backlight by quickly pressing
and releasing the POWER
key.
Product Registration
Help us better support you by
completing our online registration
today. Go to http://my.garmin
.com. Keep the original sales
receipt, or a photocopy, in a safe
place.

Introduction
The serial number is located
inside the battery compartment.
In Europe, go to www.garmin
.com/support and click Contact
Support for in-country support
Contact Garmin
Contact Garmin Product Support
if you have any questions while
information, or contact Garmin
(Europe) Ltd. by phone at
+44 (0) 870.8501241.
using your eTrex Legend H or
Vista H. In the USA, go to
www.garmin.com/support, or
contact Garmin USA by phone
at (913) 397.8200 or (800)
800.1020.
Optional Accessories
For a complete list of available
accessories and maps for use with
the eTrex, refer to
In the UK, contact Garmin
http://buy.garmin.com.
(Europe) Ltd. by phone at
0808 2380000.
See the Important Safety and Product Information guide in the product box for
product warnings and other important information.
2 eTrex Legend H and eTrex Vista H Owner’s Manual

Introduction
Table of Contents
Introduction ......................... 1
Tips and Shortcuts ................1
Product Registration .............1
Optional Accessories ............ 2
Getting Started .................... 4
Installing Batteries and the
Lanyard ................................4
Key Functions ....................... 8
Turning on the eTrex ............9
Adjusting the Backlight ....... 10
Initializing the GPS
Receiver .............................10
Basic Operation ................ 13
Creating and Using
Waypoints ........................... 13
Using the Find Menu ..........16
Using Tracks .......................23
Main Pages ........................ 30
Satellite Page .....................31
Map Page ........................... 31
eTrex Legend H and eTrex Vista H Owner’s Manual 3
Compass Page ...................35
Altimeter Page ....................41
Trip Computer Page ........... 45
Main Menu .......................... 46
Tracks ................................. 47
Routes Page ....................... 47
Setup Menu ........................ 47
Calendar .............................56
Calculator ...........................57
Stopwatch ........................... 57
Sun and Moon .................... 57
Hunt & Fish ......................... 57
Games Menu ......................57
Appendix ........................... 58
Specications .....................58
Connecting Your eTrex to a
Computer ............................ 60
Caring for the eTrex ............61
Software License
Agreement ..........................62
Declaration of Conformity ...62
Index .................................. 63
Getting Started
Getting Started
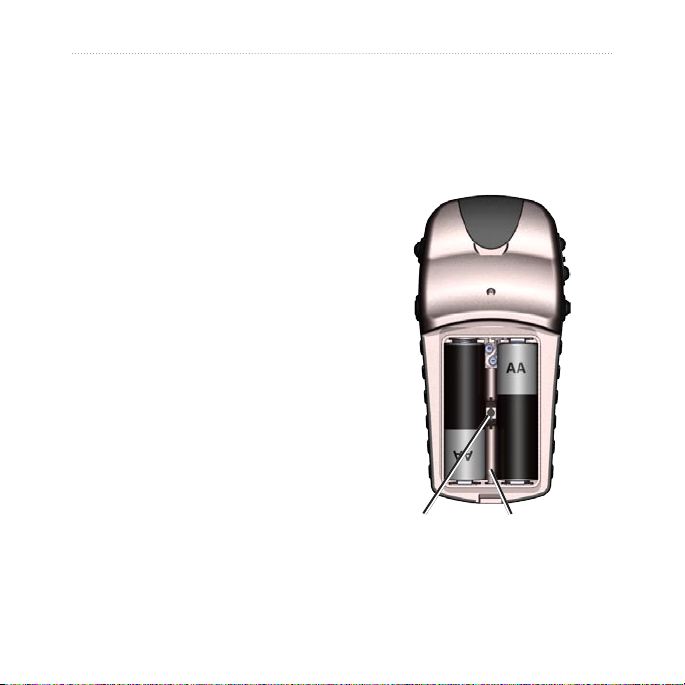
Remove the batteries when you
do not plan to use the unit for
Installing Batteries
several months. Stored data is not
lost when batteries are removed.
and the Lanyard
The eTrex operates on two AA
batteries (not included). Use
Alkaline, NiMH, or Lithium
batteries. See page 48 for setting
the battery type.
To install the batteries:
1. Remove the battery cover by
turning the locking ring 1/4
turn counter-clockwise and
pulling the cover loose.
2. Insert the batteries, observing
the proper polarity.
Locking
pin slot
4 eTrex Legend H and eTrex Vista H Owner’s Manual
Battery
compartment
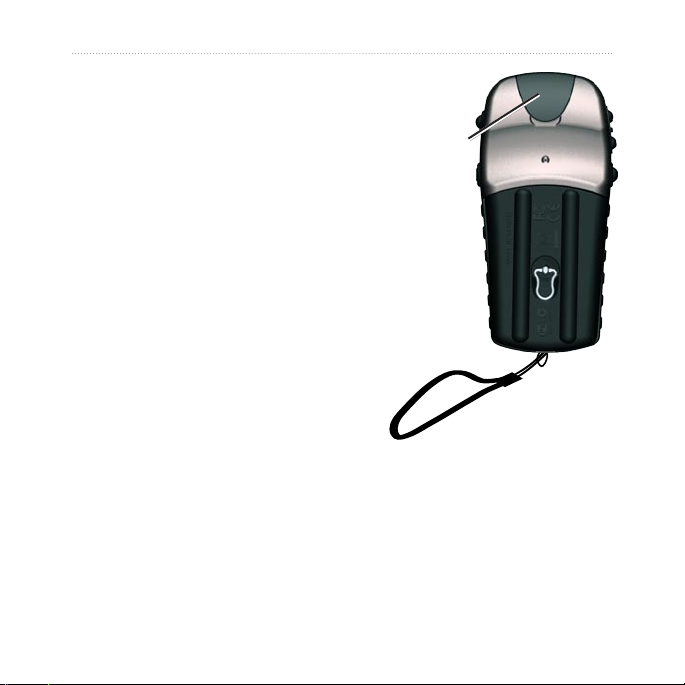
To install the lanyard:
1. Place the loop of the lanyard
through the slot at the base of
the unit.
2. Route the strap through the
loop, and pull tight.
Getting Started
USB connector
port (under
weather cap)
eTrex Legend H and eTrex Vista H Owner’s Manual 5

Getting Started
Understanding Terms
Select—move the highlighted
area on the screen up, down, left,
or right with the ROCKER to
select individual elds.
Key—when you are directed to
press a key, press and quickly
release the key.
Field—the location on a page
where data or an option can be
shown or entered.
On-screen button—use the
ROCKER key to select a button,
and press it in to enter.
a list, press up or down on the
ROCKER, or press the In and
Out Zoom keys to scroll rapidly.
Default—the factory setting
saved in the unit’s memory. You
can change the settings, and
revert to the factory settings when
you select Restore Defaults.
Manual Conventions
In this manual, when you are
instructed to select an item, small
arrows (>) appear in the text.
They indicate that you should
highlight a series of items on
the screen using the ROCKER,
Scroll bar—when viewing a list
of items too long to appear on
the screen, a scroll bar appears
next to the list. To scroll through
6 eTrex Legend H and eTrex Vista H Owner’s Manual
and press in to enter after each
item. For example, if you see
“select Service > Show Info,”
you should highlight Service,
and press the ROCKER. Then
highlight Show Info, and press
the ROCKER again.
Highlighted
eld
Field
On-screen buttons
Getting Started
eTrex Legend H and eTrex Vista H Owner’s Manual 7

Getting Started
MENU/FIND
IN/OUT
Zoom
ROCKER
QUIT/PAGE
POWER
Key Functions
IN/OUT Zoom keys
From the Map page, press to
zoom the map in or out.
From any other page, press to
scroll up or down a list or move a
MENU/FIND key
Press and release to view the
Options Menu for the current
page.
Press and hold to display the Find
Menu.
highlighted slider.
8 eTrex Legend H and eTrex Vista H Owner’s Manual

Getting Started
ROCKER key
Rock up, down, right, or left to:
move through lists
•
highlight elds, on-screen
•
buttons, or icons
move the map panning arrow.
•
Press in and release to enter
highlighted options and data or
QUIT/PAGE key
Press to cycle through the main
pages.
Press and hold to turn the
electronic compass on or off
(Vista H only).
POWER key
Press and hold to turn on or off.
conrm on-screen messages.
Press and release for contrast,
Press in and hold at any time to
mark your current location as a
backlighting, or to view time,
date, and battery capacity.
waypoint.
Turning on the eTrex
To turn the eTrex on and off:
Press and hold POWER.
eTrex Legend H and eTrex Vista H Owner’s Manual 9
Getting Started
Adjusting the Backlight
To adjust the backlight level:
1. Press and quickly release the
POWER key.
2. Press up on the ROCKER to
increase the brightness and
down to decrease.
3. Press the ROCKER or QUIT
to close.
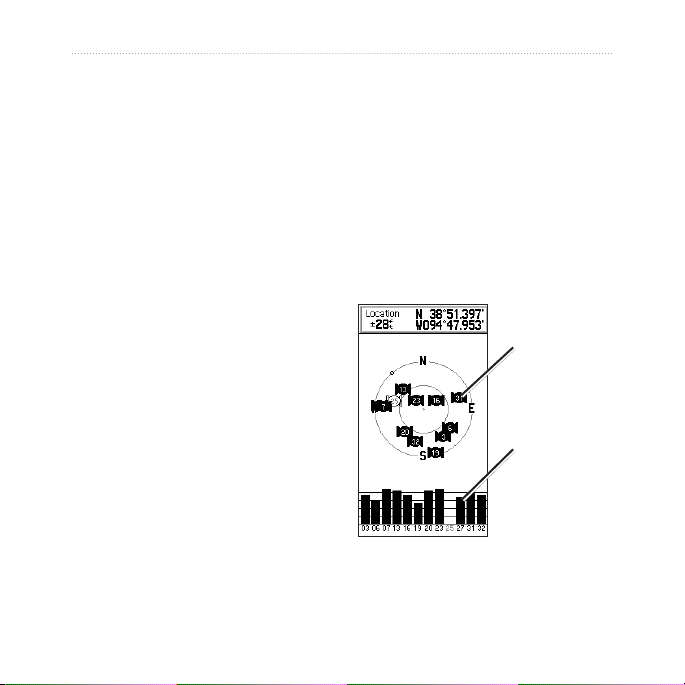
Initializing the GPS Receiver
The rst time you turn on your
eTrex, the GPS receiver must
collect satellite data and establish
its current location. To receive
To initialize your eTrex:
Hold the unit in front of you
facing the sky.
While the GPS receiver is
searching for the satellite
signals, “Acquiring Satellites” is
displayed until enough signals are
acquired to x its location.
The number
of each
overhead
satellite is
shown.
The strength
of each
satellite
signal is
shown.
satellite signals, you must be
outdoors and have a clear view of
the sky.
10 eTrex Legend H and eTrex Vista H Owner’s Manual
If the unit cannot establish a
satellite x, a list of options

Getting Started
appears. Highlight the appropriate
option, and press the ROCKER.
The Status Bar and Date
and Time
The Status Bar and Date/Time
Window appear below the
backlight adjustment slider when
you press and release POWER.
power icon is shown when
the unit is powered externally.
Satellite signal status is shown
when searching for or acquiring
satellites , a 2D x
is attained and a 3D x is
attained.
The Electronic Compass
(Vista H only) appears when
activated.
Power to the unit is provided by
batteries or from an auxiliary
source. Power status is shown on
the Main Menu and the Status
Bar. The battery power icon
shows the remaining power as the
battery is depleted. The external
eTrex Legend H and eTrex Vista H Owner’s Manual 11

Getting Started
Using the Mapping
Databases
Many of the eTrex features
require detailed mapping data
to be fully operational, so you
need to transfer maps before
using the unit. With optional
Use the USB interface cable,
provided with the unit, to transfer
optional MapSource data from
a computer to the eTrex. See the
Garmin Web site www.garmin
.com for compatible MapSource
products.
detailed MapSource® mapping
data, you can view listings of
nearby restaurants, lodging,
shopping centers, attractions and
entertainment, and addresses. The
amount of data transferable is 24
MB.
12 eTrex Legend H and eTrex Vista H Owner’s Manual

Basic Operation
Basic Operation
This section explains some of the
more common operations you
can perform with your eTrex,
including creating and using
waypoints, using the Find Menu,
and how to create and use tracks
and routes.
Creating and Using Waypoints
Waypoints are locations or
landmarks you record and
store in your GPS. You can add
waypoints to routes and even
create a Go To directly to the
selected waypoint.
You can create waypoints
using three methods. Press the
eTrex Legend H and eTrex Vista H Owner’s Manual 13
ROCKER while at a location,
create a waypoint on the Map
page, or enter coordinates for a
waypoint manually.
Marking Your Current
Location
Press in and hold the ROCKER
to mark your current location
creating a new waypoint. You
must have a valid position (2D
or 3D) x to mark your current
location.
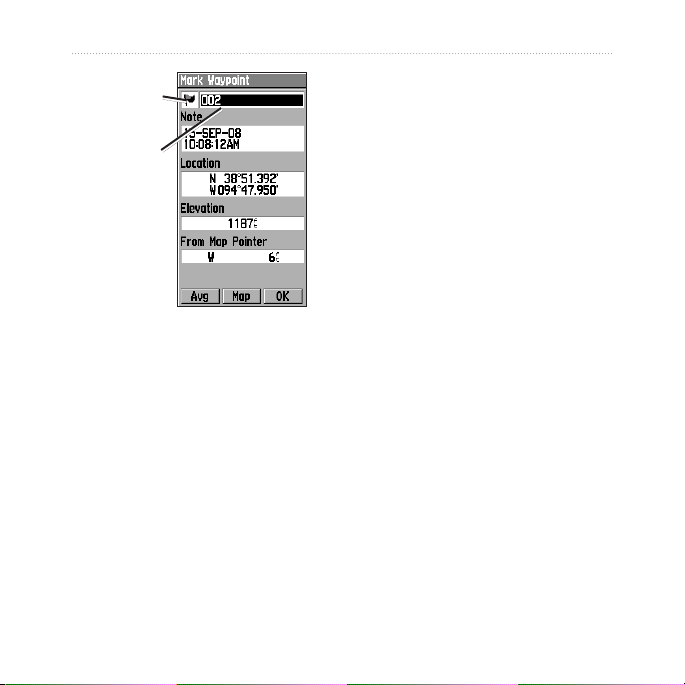
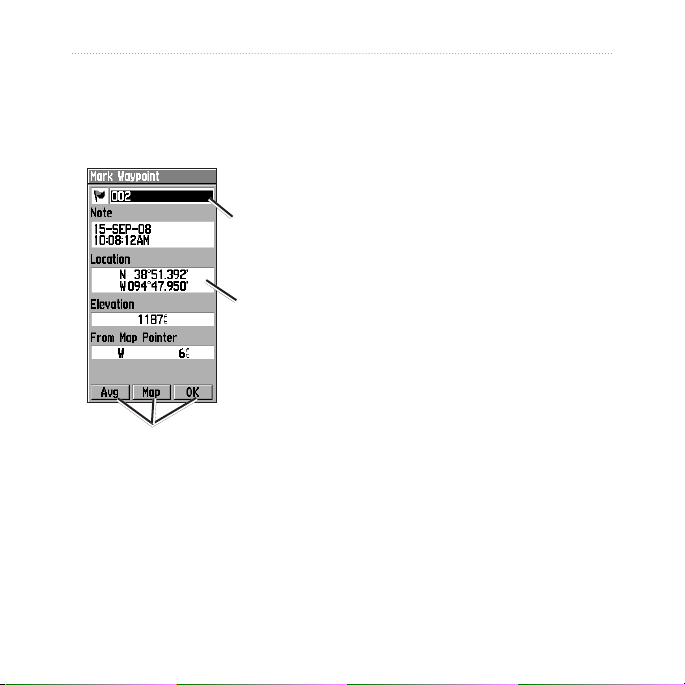
Basic Operation
Waypoint
symbol
2. To accept the waypoint with
the default information, select
OK.
Waypoint
name
OR
To change any information,
select the appropriate eld,
and press the ROCKER to
open the on-screen keypad.
After entering and conrming
your changes, select OK.
Mark Waypoint Page
To mark your current
location:
1. Press and hold the ROCKER
until the Mark Waypoint page
appears. A default threedigit name and symbol are
assigned to the new waypoint.
14 eTrex Legend H and eTrex Vista H Owner’s Manual
Creating Waypoints
Using the Map
To create a waypoint using
the Map page:
1. On the Map page, use the
ROCKER to move the pointer
to the map item you want to
mark.

Basic Operation
2. Press release the ROCKER
to capture the pointer location
and open the information page
for the map item.
3. Select Save. If there is no
information for that point, a
“No map information at this
point. Do you want to create a
user waypoint here?” prompt
appears. Select Yes.
Editing Waypoints
You can edit waypoints to change
the symbol, name, note, location,
and elevation.
To edit a waypoint:
1. Press and hold FIND.
2. Select Waypoints.
3. Select the waypoint you
want to edit, and press the
ROCKER.
eTrex Legend H and eTrex Vista H Owner’s Manual 15
4. Make changes by highlighting
each eld. Use the
waypoint symbol chart and
alphanumeric keypad to enter
new data.
To delete a waypoint:
From the Waypoints page,
select the waypoint you want
to delete > Delete.
NOTE: When you delete a
waypoint, you cannot recover
it from the unit.
To move a waypoint on the
Map Page:
1. Press FIND > Waypoints.
2. Select the waypoint you
want to move, and press the
ROCKER.
3. Select Map to show the
waypoint on the map.

Basic Operation
4. Press the ROCKER to place
a move marker next to the
waypoint.
5. Use the ROCKER to move the
waypoint to a new location,
and press the ROCKER.
To calculate a location bycalculate a location by
averaging:
1. Go to the location that you
want to calculate an average
for. Press and hold the
ROCKER > Avg to begin
averaging.
2. Press Save.
To project a waypoint:
1. Press FIND > Waypoints.
2. Select the waypoint you want
to project. The Waypoint
Information page opens.
3. Press MENU > Project
Waypoint to open the Project
Waypoint page.
4. Enter the distance and bearing
to the projected waypoint in
the appropriate elds, and
press QUIT when nished.
Using the Find Menu
Use the Find Menu to search
Projecting a Waypoint
Create a new waypoint by
projecting the distance and a
bearing from one location to a
new location.
for waypoints, geocaches,
cities, and exits in the eTrex
basemap. Additional icons
appear depending on the optional
MapSource data loaded to the
unit. Press and hold the FIND
16 eTrex Legend H and eTrex Vista H Owner’s Manual

Basic Operation
key to open the Find Menu.
When you access a Find group
list, it contains items near your
current location or the map
pointer.
The options menu for each
category contains search options.
Select a category.
Find By Name
Use Find By Name if you know
the name of the location you want
to nd.
To nd a location using Find
By Name:
1. Press and hold FIND to open
the Find Menu.
eTrex Legend H and eTrex Vista H Owner’s Manual 17
2. Select the icon for the type of
item you want to search for,
or search the entire database
by selecting All Points
of Interest (with optional
MapSource detailed maps).
3. Press MENU > Find By
Name.
4. Use the ROCKER to operate
the on-screen keypad and
enter the name of the location
you want to nd. When the
Find list contains a match,
highlight OK.
5. Select the location item
from the Find list and press
the ROCKER. The item’s
information page opens,
allowing you to save the item
as a waypoint, show the item
on the map, or create a route
to the item (Go To).

Basic Operation
Recent Finds
The Recent Finds page shows a
list of the last 50 items you have
searched for or gone to recently.
on-screen buttons. Different
buttons appear depending on
whether you are selecting a Find
item to navigate to, or adding
a Find item to a route list as a
To go to a recently found
item:
1. Press and hold FIND.
2. Select Recent Find.
3. Use the ROCKER to select
the item you want to go to,
and press the ROCKER.
4. Select Go To.
Using the Find Item
Information Page
When you select an item from
the Find item list and press the
ROCKER, detailed information
about the item is shown. Each
information page contains three
18 eTrex Legend H and eTrex Vista H Owner’s Manual
waypoint.
Find Information Page
Options Menu
To use the Options Menu:
1. With an information page open
for a Find item, press MENU
to open the Options Menu.
2. Use the ROCKER to select an
option:
Average Location—takes
•
several readings at the same
location and uses the average
value to provide more
accuracy. See page 16.

Project Waypoint—create a
•
waypoint by entering bearing
and distance from a referenced
location. See page 16.
Find Near Here—return to
•
the Find Menu to search for
map items near the item.
Change Reference—point
•
to a new location on the Map
page using the pointer.
Add To Route—include this
•
item on a new route or add it
to an existing route. See
page 27.
View Sun And Moon—view
•
Sun and Moon tables for this
item’s location. See page 57.
View Hunt And Fish—view
•
Hunt and Fish tables for this
Basic Operation
item’s location. See page 57.
Reposition Here—reposition
•
the location of the waypoint to
your current location.
To nd an item near another
item:
1. Press and hold FIND.
2. Select a category.
3. Select an item from the Find
list.
4. Press MENU > Find Nearest.
The Find Menu opens with
each category containing
items near the item selected.
5. Select a category icon, and
press the ROCKER to open a
list of items near the item.
eTrex Legend H and eTrex Vista H Owner’s Manual 19
 Loading...