

Page 1

Getting Started
1
power
• Press and hold to turn unit on/off.
• Press to turn backlight on/off.
2
mode
• Press to switch modes.
• Press to return to the previous page.
3
reset/lap
• Press and hold to reset the timer.
• Press to create a new lap.
4
start/stop
Press to start/stop the timer.
5
up/down
• Press to highlight options.
• Press to scroll through menus and data fields.
• Press to adjust contrast when on the Satellite page.
6
enter
Press to select options and to acknowledge messages.
Note: If the Edge locks up, press mode and reset/lap simultaneously
to reset the unit.
1
6
5
2
3
4
Charge the Battery
➊
1. On the back of the Edge, pull up the weather cap from the
mini-USB port. Make sure that this area is completely dry to
prevent corrosion.
2. Plug the mini-USB end of the charger into the mini-USB port on
the unit.
3. Plug the A/C charger into a standard wall outlet. Charge the
Edge for at least 3 hours before using. When the battery is
completely charged, it can run for approximately 12 hours
before recharging.
mini-USB port under
weather cap
Mount the Edge
➋
You can install the bike mount to the stem or handlebars. The stem
installation (shown here) provides a more sturdy location. Make sure
that the Edge is facing up for the best GPS reception.
To install the Edge on your bike stem:
1. Place the wedge on the bike stem, and then place the bike
mount on the wedge. Make sure the release lever is on the left.
For horizontal bars: Separate and remove the top part of the
release lever
bike mount
mount, turn it 90 degrees, and replace. Continue with step 2.
For bars with a diameter less than 1 in (25.4 mm): Place
the additional rubber pad under the bike mount to increase the
diameter of the bar. The rubber pad also keeps the mount from
slipping. Continue with step 2.
wedge
(optional)
2. Attach the bike mount securely using two cable ties.
Note: Make sure the cable ties are threaded through both parts
of the bike mount.
3. Align the Edge with the bike mount so that the unit is vertical.
4. Slide the unit left until it snaps into place.
cable ties
release lever
To release the unit:
Press down on the release lever, and slide the unit to the right.
Configure the Edge
➌
When you first turn on your Edge, the following setup screens appear.
Follow the on-screen instructions.
To configure your Edge:
1
4
Screens 4 and 5
apply to Edge 305
only.
2
5
3
Acquire Satellites
➍
Acquiring satellite signals may take 30–60 seconds. For
troubleshooting information, refer to the owner’s manual.
To acquire satellite signals:
Go outdoors to an open area. Press and hold the
Power button to turn on the Edge.
On the Satellite page, the available satellites are
flashing while the Edge searches for satellite
signals. Acquired satellites and each corresponding
bar below change to solid. The GPS accuracy
appears at the top of the page.
Wait while the Edge searches for satellites. For best
reception, make sure the Edge is facing up. Stand
still in an open area, and do not begin moving until
the Satellite page disappears. After the Satellite
page disappears, you can begin your ride.
Page 2
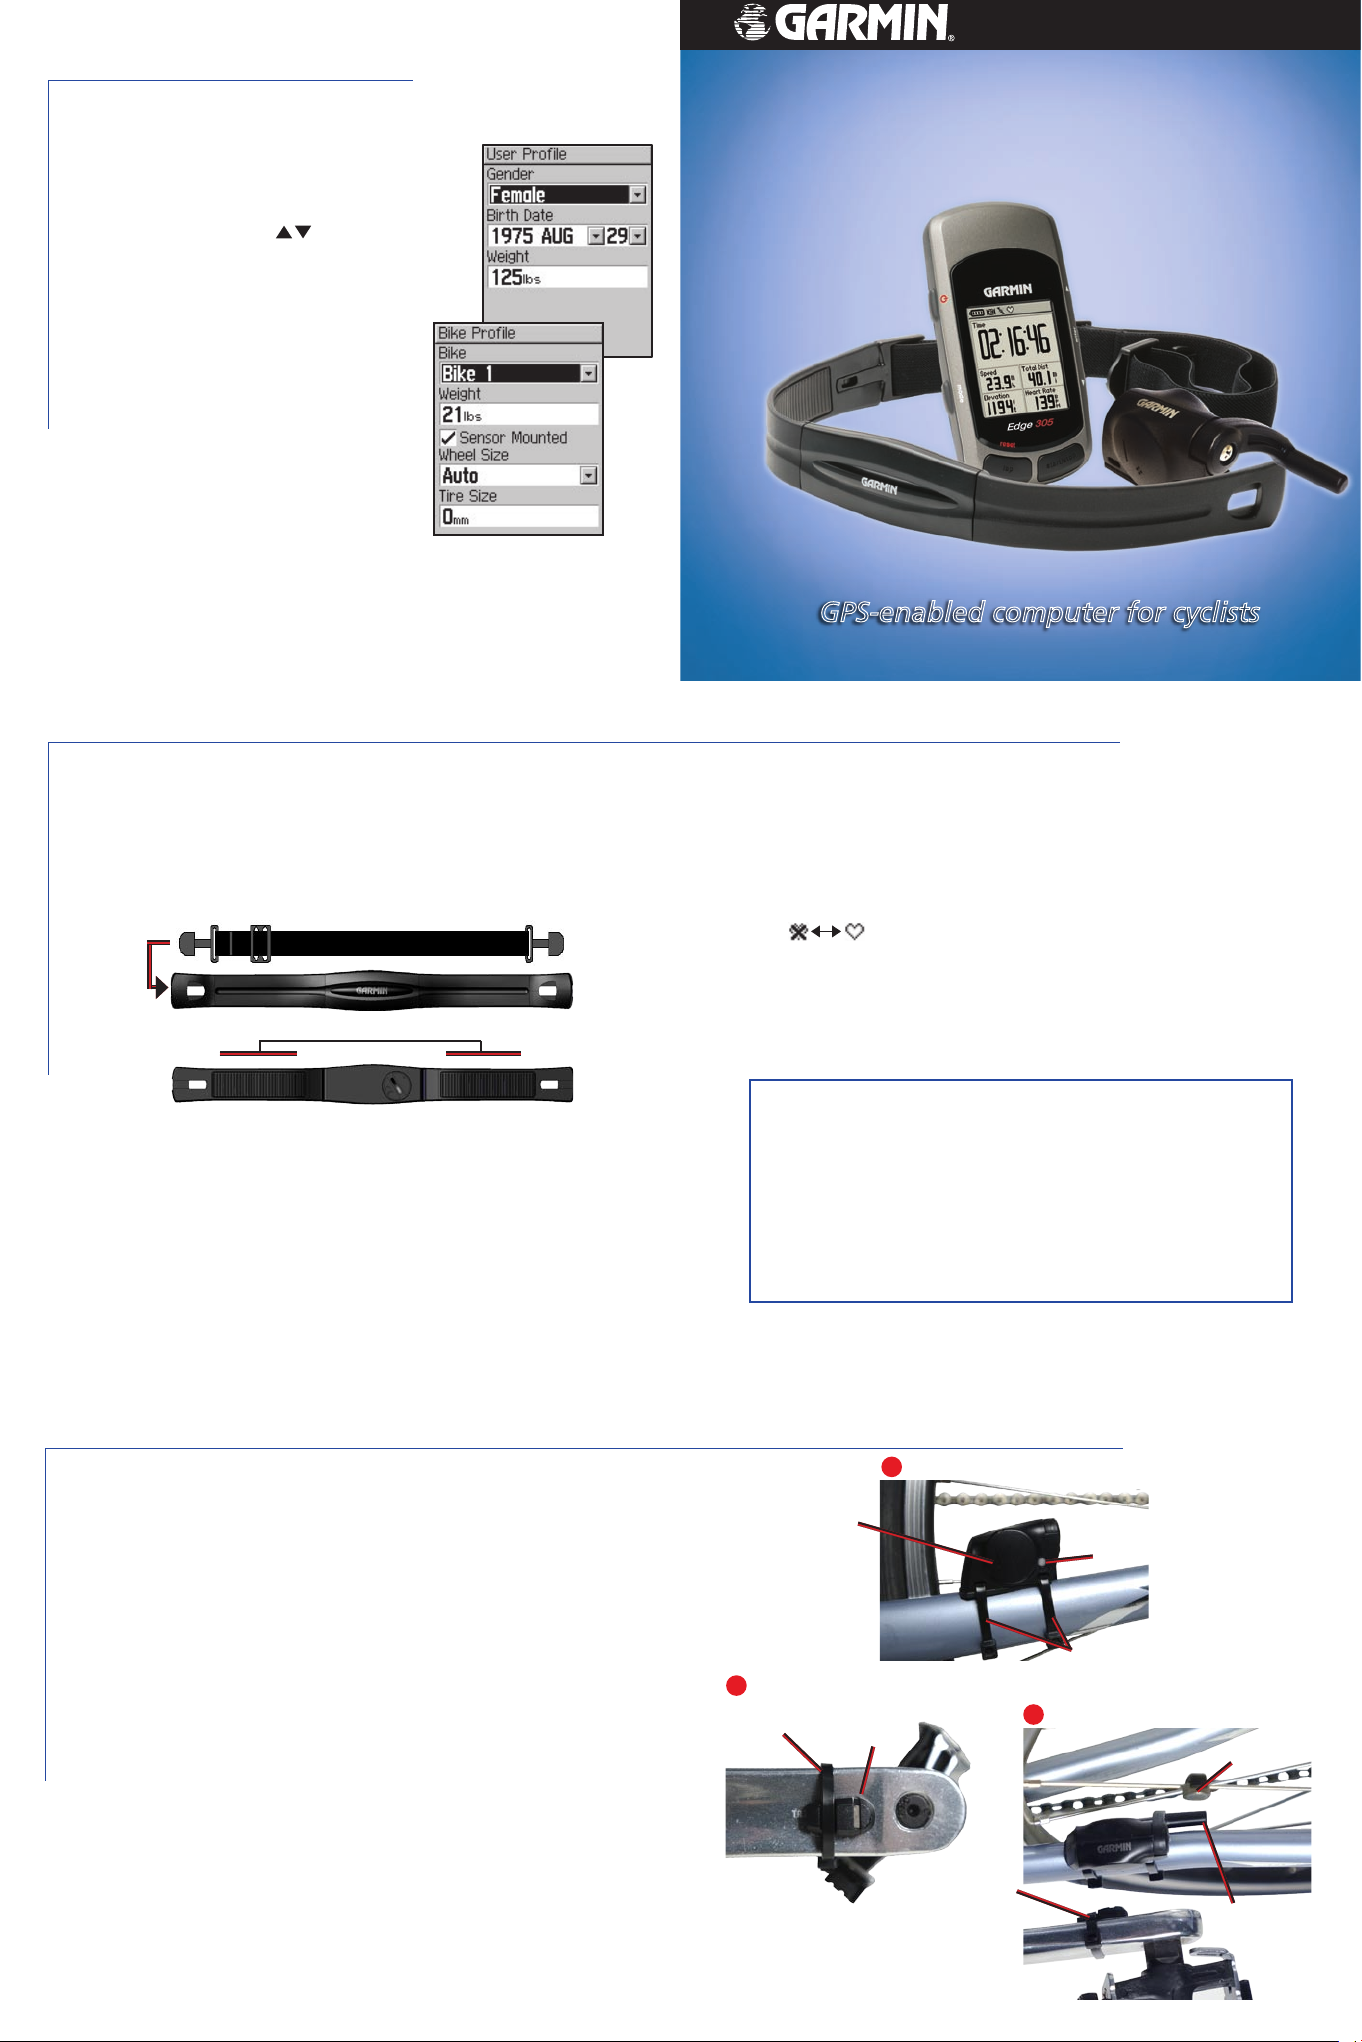
Set Your Profiles
To set your user profile:
1. Press mode to access the Main Menu.
2. Select
3. Specify your
To set your bike profile:
1. Press mode to access the Main
2. Select
3. Specify your
4. If you are using a GSC10, select
May 2006 190-00580-01 Rev. D Printed in Taiwan
Settings > User Profile.
Gender, Birth Date, and
Weight using the arrows and the
enter button.
Menu.
Settings > Bike Profile.
Bike profile
(configure up to three bikes) and
Weight.
Sensor Mounted. Then you can
specify Wheel Size and Tire Size.
Quick Reference Guide
Edge™ 205/305
GPS-enabled computer for cyclists
Install the Heart Rate Monitor
The Edge 305 with heart rate includes a wireless heart rate monitor
that you wear directly on your skin, just below the breastplate.
To position the heart rate monitor:
1. Push one tab on the strap through the slot in the heart rate
monitor. Press the tab down.
sensors
2. Wet both sensors on the back of the heart rate monitor to
create a strong connection between your pulse and the
transmitter.
3. Place the heart rate monitor directly on your skin, just below the
breastplate. Wrap the strap around your chest and attach the
strap to the other side of the heart rate monitor.
4. Adjust the strap so it stays in place during your ride.
5. When positioned correctly, verify that your Edge is receiving
data. The heart rate icon changes from flashing to constant
. If not, go to Main Menu > Settings > System >
Accessories to activate your heart rate monitor or restart scan.
For more information about the heart rate monitor, refer to the
owner’s manual.
Garmin Training Center
Use the Garmin Training Center software on your personal
computer to plan your advanced workouts and courses before
you ride and analyze them afterwards. Install Garmin Training
Center from the installation disk in the product box. For help
using Garmin Training Center, click the Help menu in the
software or press F1 on your keyboard.
™
Install the GSC10™ Sensor
The Edge 305 with cadence includes a wireless speed and cadence
sensor. Both magnets must be aligned with their respective indication
line and be within 5 mm of the GSC10 for the Edge to receive data.
1. Place the GSC10 on the rear chain stay (the side opposite of
the drive train). Loosely attach the GSC10 using two cable ties.
2. Attach the pedal magnet to the crank arm using the adhesive
mount and a cable tie. Make sure the indication line on the
pedal magnet lines up with the indication line on the GSC10.
3. Unscrew and attach the spoke magnet. Make sure it is aligned
with the sensor arm indication line.
4. Unscrew and move the GSC10 sensor arm to within 5 mm of
the spoke magnet.
5. Press the
green. Pedal to test the sensor alignment. The red LED blinks
each time the crank arm passes the sensor, and the green LED
blinks each time the wheel magnet passes the sensor arm.
6. When everything is aligned and working correctly, tighten
the cable ties, sensor arm, and spoke magnet. For more
information about the GSC10, see the owner’s manual.
Reset button on the GSC10. The LED turns red, then
GSC10 on rear chain stay
1
indication
line
Pedal magnet on crank arm
2
cable tie
indication
line
pedal
magnet
reset button
cable ties
3
Spoke magnet on wheel
spoke
magnet
sensor arm
indication
line
 Loading...