

Page 1
D2™ Pilot Watch Quick Start Manual
WARNING
See the Important Safety and Product Information guide in the
product box for product warnings and other important
information.
Getting Started
When using your device the first time, you should complete
these tasks to set up the device and get to know the basic
features.
Charge the device (Charging the Device).
1
Register the device (Registering Your Device).
2
Learn about the sensor data and modes (Viewing the Data
3
Pages).
Acquire satellites and record a track (Acquiring Satellite
4
Signals and Recording a Track).
Create a waypoint (Creating a Waypoint).
5
Get the owner's manual (Getting the Owner's Manual).
6
Charging the Device
NOTICE
To prevent corrosion, thoroughly dry the contacts and the
surrounding area before charging or connecting to a computer.
The device is powered by a built-in lithium-ion battery that you
can charge using a standard wall outlet or a USB port on your
computer.
Plug the USB end of the cable into the AC adapter or a
1
computer USB port.
Plug the AC adapter into a standard wall outlet.
2
Align the left side of the charging cradle À with the groove on
3
the left side of the device.
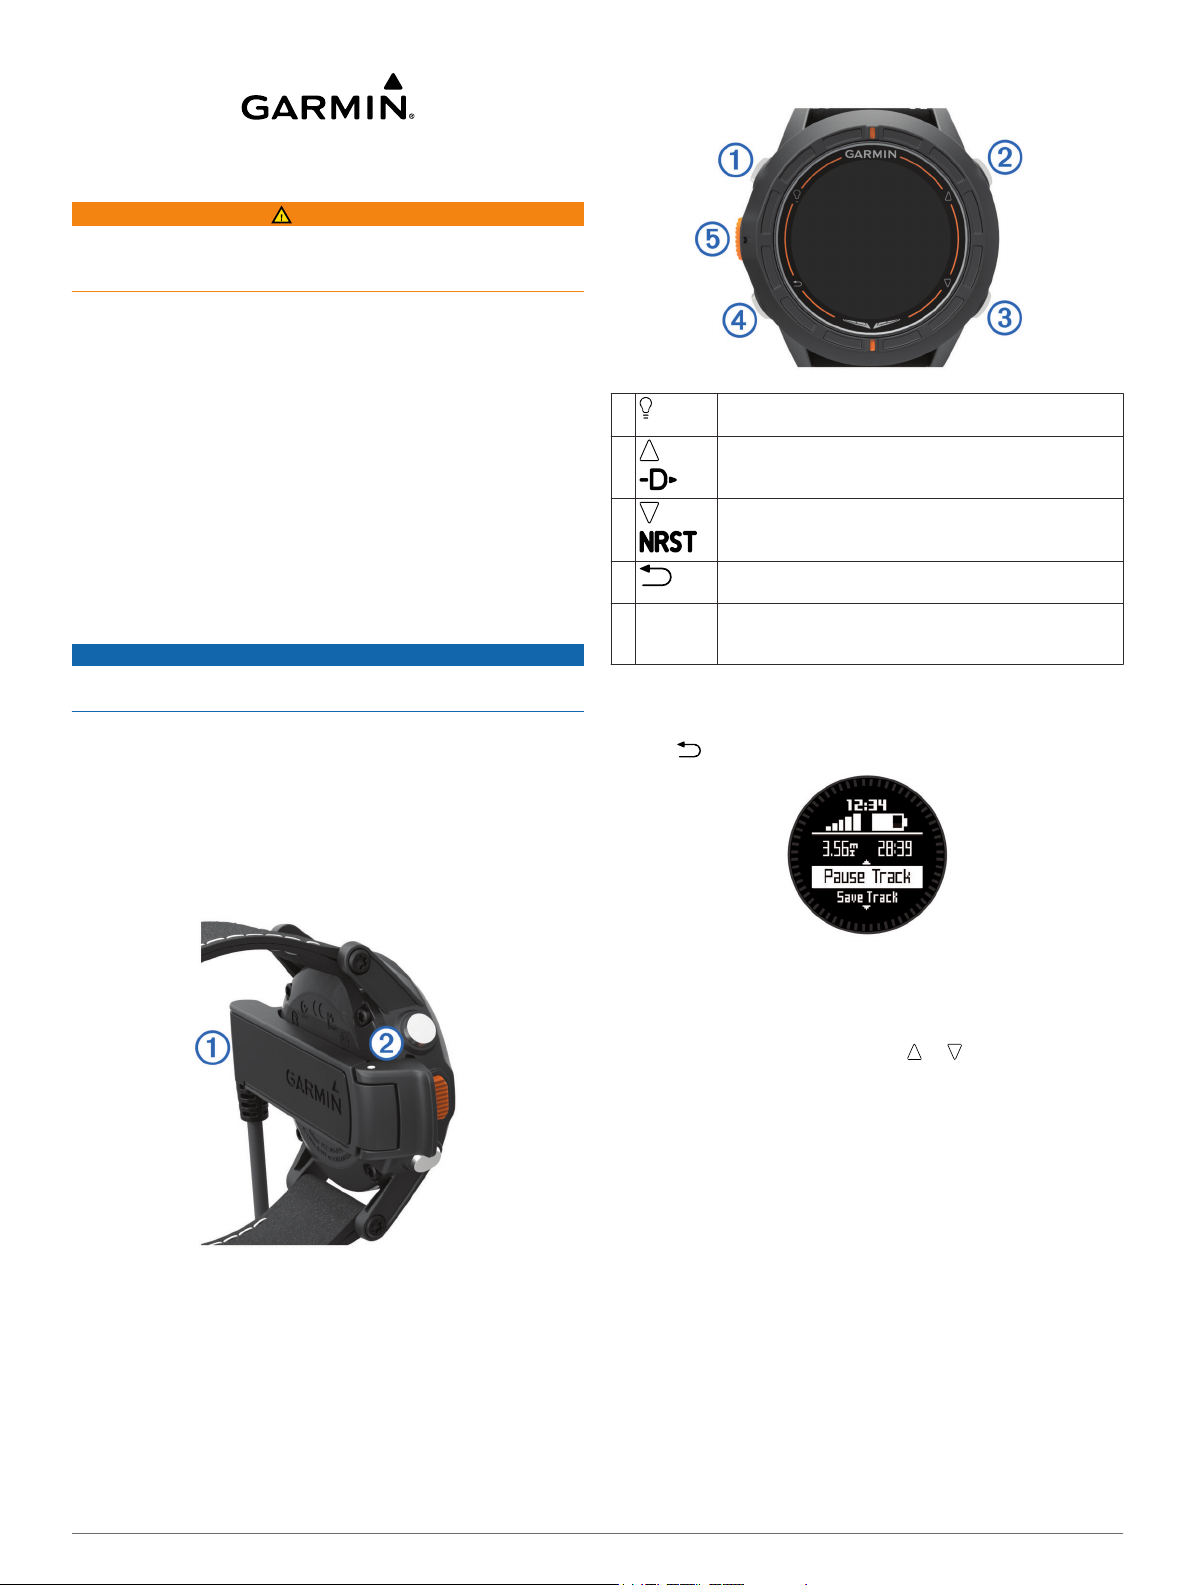
Keys
À
Á
Â
Ã
Action key Select to open the menu for the current screen. Select
Ä
Viewing the Status Page
You can quickly switch to this page to view the time of day,
battery life, and GPS status information from any other page.
Hold .
Select to turn the backlight on and off. Hold to turn the
device on and off.
Select to scroll through the data pages, options, and
settings. Hold to navigate to an airport by airport code
(Navigating to an Airport by Identifier).
Select to scroll through the data pages, options, and
settings. Hold to navigate to the nearest airport
(Navigating to the Nearest Airport).
Select to return to the previous screen. Hold to view the
status page.
to choose an option and to acknowledge a message.
Hold to mark a waypoint.
Align the hinged side of the charger Á with the contacts on
4
the back of the device.
When you connect the device to a power source, the device
turns on.
Charge the device completely.
5
March 2014
Viewing the Data Pages
Customizable data pages allow you to quickly access real-time
data from internal and connected sensors. When you begin
tracking or navigating, additional data pages appear.
From the time of day page, select or to cycle through
the data pages.
Data Pages
The data pages available on your device vary based on the
device mode. In low power mode, GPS is disabled, and the
device does not record data. In tracking mode, GPS is enabled
and sensor data is recorded to the track log, but you are not
navigating to a destination. In navigation mode, you are
navigating to a destination.
NOTE: Your body temperature affects the temperature and
density altitude. To get the most accurate temperature reading,
remove the device from your wrist and wait 20–30 minutes.
190-01674-01_0B Printed in Taiwan
Page 2
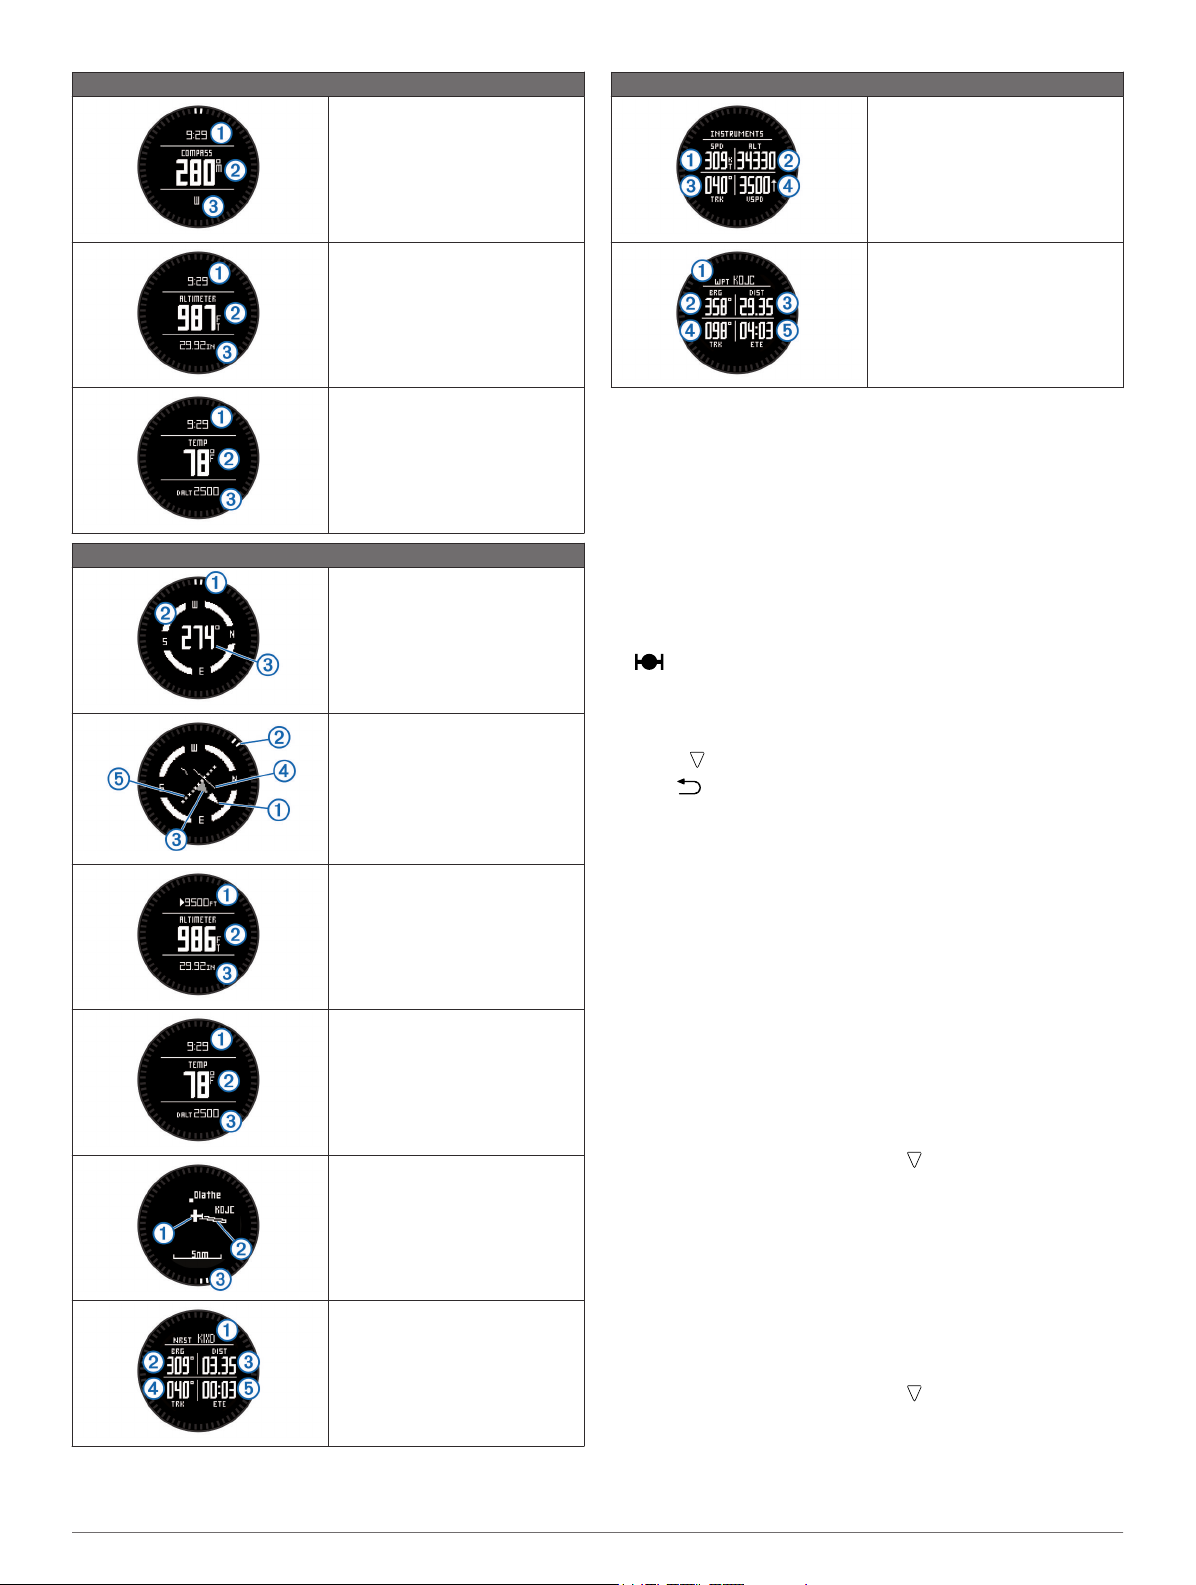
Low Power Mode
The compass page displays the
time of day À, direction of travel in
degrees Á, and cardinal direction
.
Â
Tracking or Navigation Modes
The instruments page displays
your ground speed À, altitude Á,
track over ground Â, and the
vertical speed in feet per minute
.
Ã
Tracking or Navigation Modes
The altimeter page displays the
time of day À, pressure altitude
, and barometric pressure Â.
Á
The temperature page displays the
time of day À, temperature Á,
and density altitude Â.
The compass page displays the
bearing to the nearest airport À,
compass ring Á, and direction of
travel in degrees  (tracking
mode only).
The horizontal situation indicator
(HSI) displays the course line
pointer À, bearing to the next
waypoint Á, to-and-from indicator
, and course deviation indicator
Â
(CDI) Ã. The dots Ä indicate the
distance of deviation (navigation
mode only).
The altimeter page displays the
alert altitude À (Setting the
Altitude Alert), pressure altitude
, and barometric pressure Â.
Á
The temperature page displays the
time of day À, temperature Á,
and density altitude Â.
The map displays your current
location and direction À, the route
to your next waypoint Á, and the
bearing to your next waypoint Â.
The next waypoint page displays
the waypoint name À, bearing to
the waypoint Á, distance to the
waypoint Â, track over ground Ã,
and the estimated time to the next
waypoint Ä (navigation mode
only).
Acquiring Satellite Signals and Recording a Track
Before you can use the GPS navigation features, such as
recording a track, you must acquire satellite signals.
The time and date are set automatically based on the GPS
position.
Select the action key.
1
Select Start GPS.
2
Go to an area with a clear view of the sky and remain
3
stationary while the device acquires satellite signals.
indicates the device acquired satellite signals
successfully.
Walk around or travel to record a track.
4
Your distance and time appear.
Select to view the loop of data pages.
5
Hold .
6
Select an option:
7
• Select Pause Track to pause tracking.
• Select Save Track to save your track.
• Select Clear Track to erase the track without saving.
• Select Stop GPS to turn off GPS without deleting your
track.
Stopping GPS
Select the action key.
1
Select Stop GPS.
2
Setting the Altitude Alert
You can set an alarm to vibrate when you reach a specified
altitude.
NOTE: The altitude alert is not available in low power mode.
From the time of day page, select until the altimeter page
1
appears.
Select the action key.
2
Select Set Alert.
3
Enter the altitude at which the alert is triggered.
4
The nearest airport page displays
the airport identifier À, bearing to
the airport Á, distance to the
airport Â, track over ground Ã,
and the estimated time to the
airport Ä.
2
Setting the Barometric Pressure
You can manually enter the current barometric pressure. This
can help to improve the accuracy of the pressure altitude
reading.
From the time of day page, select until the altimeter page
1
appears.
Select the action key.
2
Select Set Baro..
3
Enter the current barometric pressure.
4
Page 3

Waypoints
Waypoints are locations you record and store in the device.
Creating a Waypoint
You can save your current location as a waypoint.
Hold the action key.
1
Select an option:
2
• To save the waypoint without changes, select Save.
• To make changes to the waypoint, select Edit, make
changes to the waypoint, and select Save.
Flight Plans
A flight plan is a sequence of waypoints or locations that leads
you to your final destination. Flight plans are similar to routes
but use direct routing optimized for aviation. You can create
flight plans on your device or by using the Garmin® Pilot
application for mobile devices.
Creating a Flight Plan
Select the action key.
1
Select Flightplan > Create New.
2
Select First Point.
3
Select a category.
4
Select the first point on the route.
5
Select Next Point.
6
Repeat steps 4–6 until the route is complete.
7
Select Done to save the route.
8
Navigating to a Destination
Before you can navigate to a destination, you must enable
GPS and acquire satellite signals (Acquiring Satellite Signals
and Recording a Track).
Select the action key.
1
Select an option:
2
NOTE: Not all options are available in all profiles.
• Select Waypoints.
• Select Tracks.
• Select Routes.
• Select Flightplan.
• Select GPS Tools > Coordinates.
• Select GPS Tools > POIs.
• Select GPS Tools > Geocaches.
Select a destination or enter information about the
3
destination.
Select Go.
4
The device displays information about your next waypoint.
Select or to view additional navigation data pages
5
(Viewing the Data Pages).
Navigating to the Nearest Airport
Hold .
1
A list of the nearest airports appears.
Select an airport.
2
Navigating to an Airport by Identifier
You can navigate directly to an airport by searching for the
airport identifier.
Hold .
1
Enter all or part of the alphanumeric airport identifier and
2
select the action key.
A list of matching airports appears.
Select the airport.
3
Navigating with the Horizontal Situation Indicator
While navigating, from the time of day page, select .
1
Course line pointer. Indicates the direction of the desired course
À
line from your starting point to your next waypoint.
Bearing indicator. Indicates the bearing to your next waypoint.
Á
To-and-from indicator. Indicates whether you are headed to or
Â
from the waypoint.
Course deviation indicator (CDI). Indicates the location of the
Ã
desired course line in relation to your location.
Course deviation distance. The dots indicate your distance off
Ä
course.
TIP: You can select the action key to adjust the scale.
Change your direction until the bearing indicator is aligned
2
with the painted mark at the top of watch bezel to move
toward your next waypoint.
TIP: If the to-and-from indicator points opposite the course
line pointer, you are moving away from your next waypoint.
Continue toward your next waypoint.
3
The course deviation indicator moves toward the course line
pointer. When the course deviation indicator is fully aligned
with the course line pointer, you are on the selected course
to your next waypoint.
Stopping Navigation
Select the action key.
1
Select Stop Nav..
2
Troubleshooting
Getting the Owner's Manual
You can get the latest owner's manual from the web.
Go to www.garmin.com/support.
1
Select Manuals.
2
Follow the on-screen instructions to select your product.
3
Locking the Keys
You can lock the keys to prevent inadvertent key presses.
Select the data page you want to view while the keys are
1
locked.
Hold and to lock the keys.
2
Hold and to unlock the keys.
3
Resetting Your Device
If the device stops responding, you may need to reset it.
Hold for at least 25 seconds.
1
Hold for one second to turn on the device.
2
3
Page 4

Specifications
TA-2013/1729
Battery type 500 mAh Lithium-ion battery
Battery life Up to 5 weeks
Water resistance Water resistant to 164 ft. (50 m)
NOTE: The watch is designed for surface
swimming.
Operating temperature
range
Radio frequency/
protocol
From -4º to 122ºF (from -20º to 50ºC)
2.4 GHz ANT+™ wireless communications
protocol
Bluetooth® Smart device
Battery Information
The actual battery life depends on how much you use GPS,
device sensors, optional wireless sensors, and the backlight.
Battery Life Mode
16 hours Normal GPS mode
50 hours UltraTrac GPS mode
Up to 2 weeks Always On sensor mode
Up to 5 weeks Watch mode
Registering Your Device
Help us better support you by completing our online registration
today.
• Go to http://my.garmin.com.
• Keep the original sales receipt, or a photocopy, in a safe
place.
Device Care
NOTICE
Do not use a sharp object to clean the device.
Avoid chemical cleaners, solvents, and insect repellents that
can damage plastic components and finishes.
Thoroughly rinse the device with fresh water after exposure to
chlorine, salt water, sunscreen, cosmetics, alcohol, or other
harsh chemicals. Prolonged exposure to these substances can
damage the case.
Avoid pressing the keys under water.
Avoid extreme shock and harsh treatment, because it can
degrade the life of the product.
Do not store the device where prolonged exposure to extreme
temperatures can occur, because it can cause permanent
damage.
®
Garmin
and the Garmin logo are trademarks of Garmin Ltd. or its subsidiaries, registered in the USA and other countries. ANT+™ and D2™ are trademarks of Garmin Ltd. or its subsidiaries. These
trademarks may not be used without the express permission of Garmin.
The Bluetooth® word mark and logos are owned by the Bluetooth SIG, Inc. and any use of such marks by Garmin is under license. Other trademarks and trade names are those of their respective owners.
© 2013–2014 Garmin Ltd. or its subsidiaries
www.garmin.com/support
 Loading...