

Page 1
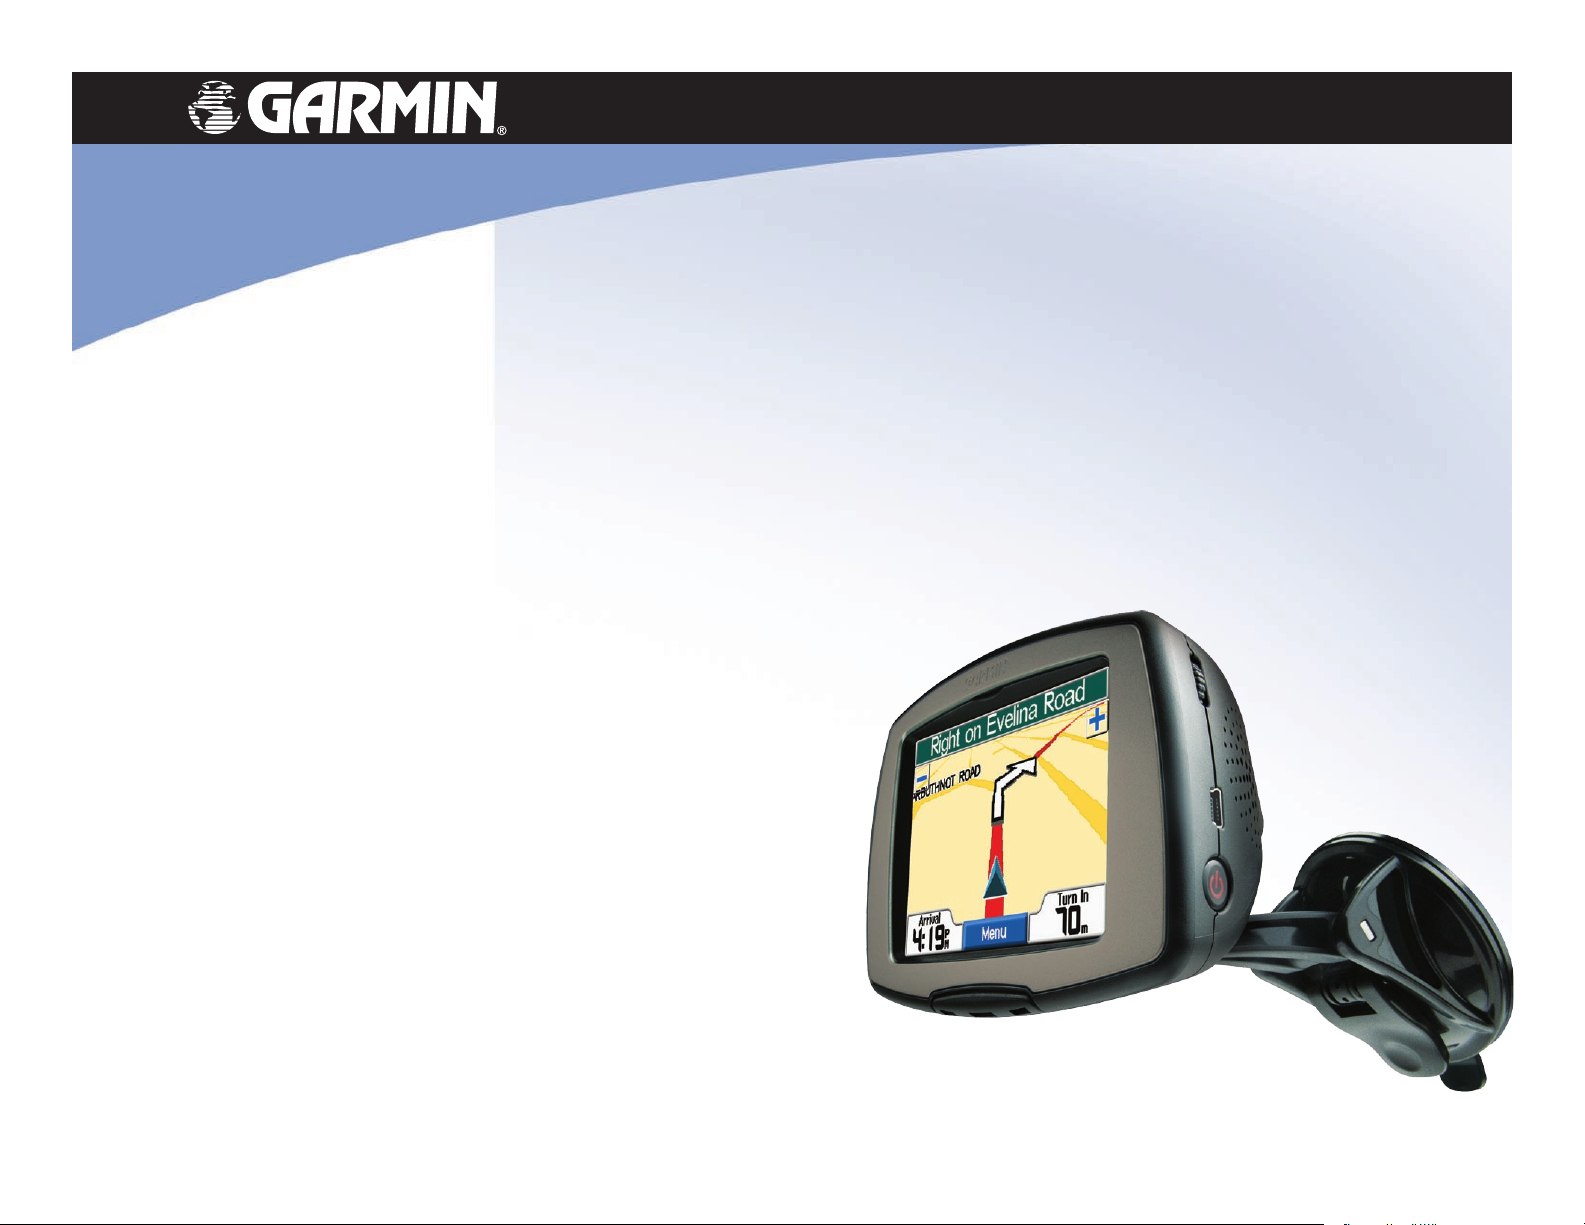
StreetPilot® c310
owner’s manual
Page 2

© Copyright 2005 Garmin Ltd. or its subsidiaries
Garmin International, Inc.
1200 East 151st Street,
Olathe, Kansas 66062, U.S.A.
Tel. 913/397.8200 or 800/800.1020
Fax 913/397.8282
All rights reserved. Except as expressly provided herein, no part of this manual may be reproduced, copied, transmitted,
disseminated, downloaded or stored in any storage medium, for any purpose without the express prior written consent
of Garmin. Garmin hereby grants permission to download a single copy of this manual onto a hard drive or other
electronic storage medium to be viewed and to print one copy of this manual or of any revision hereto, provided that
such electronic or printed copy of this manual must contain the complete text of this copyright notice and provided
further that any unauthorized commercial distribution of this manual or any revision hereto is strictly prohibited.
Information in this document is subject to change without notice. Garmin reserves the right to change
Garmin (Europe) Ltd.
Unit 5, The Quadrangle,
Abbey Park Industrial Estate,
Romsey, SO51 9DL, U.K.
Tel. 44/0870.8501241
Fax 44/0870.8501251
Garmin Corporation
No. 68, Jangshu 2nd Road,
Shijr, Taipei County, Taiwan
Tel. 886/2.2642.9199
Fax 886/2.2642.9099
or improve its products and to make changes in the content without obligation to notify any person or
organization of such changes or improvements. Visit the Garmin Web site (www.garmin.com) for current
updates and supplemental information concerning the use and operation of this and other Garmin products.
Garmin®, StreetPilot®, and MapSource® are registered trademarks of Garmin Ltd. or its subsidiaries and may not be
used without the express permission of Garmin.
June 2005 Part Number 190-00624-00 Rev. A Printed in Taiwan
Page 3

PREFACE
PREFACE
Congratulations on purchasing the Garmin
get the most out of your new navigation system, take the time to go
through this owner’s manual and learn how to use your unit.
®
StreetPilot® c310. To
• To find an address, see page 4.
• To understand information on
Serial Number
the Map page, see page 11.
Record the serial number (8-digit number on the back of the unit)
in case your c310 needs service or you want to buy more maps.
Serial Number: ___ ___ ___ ___ ___ ___ ___ ___
Contact Garmin
Contact Garmin if you have any questions or if you should
encounter any difficulty while using your StreetPilot c310.
In the U.S.A, contact Garmin Product Support by phone at
• To adjust the backlight
brightness, see page 15.
• To clean and store your unit,
see pages 25–26.
• To use the practice mode, see
page 18.
• To understand safe mode, see
page 18.
Quick Links
913/397.8200 or 800/800.1020, Monday–Friday, 8 AM–5 PM
Central Time; or by e-mail at sales@garmin.com.
In Europe, contact Garmin (Europe) Ltd. at 44/0870.8501241.
Garmin © 2005 i c310 Owner’s Manual
Page 4
TABLE OF CONTENTS
Preface .............................i
Serial Number ....................... i
Contact Garmin ..................... i
Find It and Go! ................1
Finding Your Destination ........ 1
Following Your Route .............
2
Where To? ...3
Finding a Place by Spelling
the Name ........................ 3
The Where To? Menu .............
Finding an Address ............... 4
Finding a Place Using the Map 5
Browse Map Tips .................. 5
Expanding Your Search .......... 6
3
Setting a Home Location ........ 9
Going Home ............................ 9
Changing Your Home Location ...
9
Finding Recently Found Places 10
Deleting Recently Found Places 10
Viewing the Map
and Other Pages ..........11
Viewing the Map Page ......... 11
Trip Information Page .......... 12
Current Route Page ............. 13
Next Turn Page
and Voice Directions ......... 13
Adding a Detour to a Route .. 14
Stopping Your Route ...........
14
Customizing the c310 ....15
Appendix .......................23
Mounting the c310 on Your
Dashboard ...................... 23
Caring for Your c310 .......... 25
Using an SD Card ............... 27
Using the USB Drivers
and Cable ....................... 27
Updating the c310 Software
and Map Data ................. 28
Resetting
Technical Specifications .......
Battery Information ........... 29
Changing the Fuse .............. 29
Charging the c310 .............. 29
Software
Your c310 ............ 28
29
License Agreement 30
My Locations .............7
Saving Places You Find .......... 7
Finding Saved Places .............
Understanding My Locations ... 7
Editing Saved Places .............
Changing the Name ................. 8
Changing the Map Symbol ........ 8
Deleting Saved Places .............. 8
Garmin © 2005 ii c310 Owner’s Manual
7
8
Adjusting the Brightness ...... 15
Changing the c310’s Settings
Changing Map Settings ........... 17
Changing System Settings ...... 18
Changing Time ..................... 19
Changing the Color Mode ........ 20
Changing Navigation .............. 21
Changing Language ............... 22
16
Index ............................31
Page 5
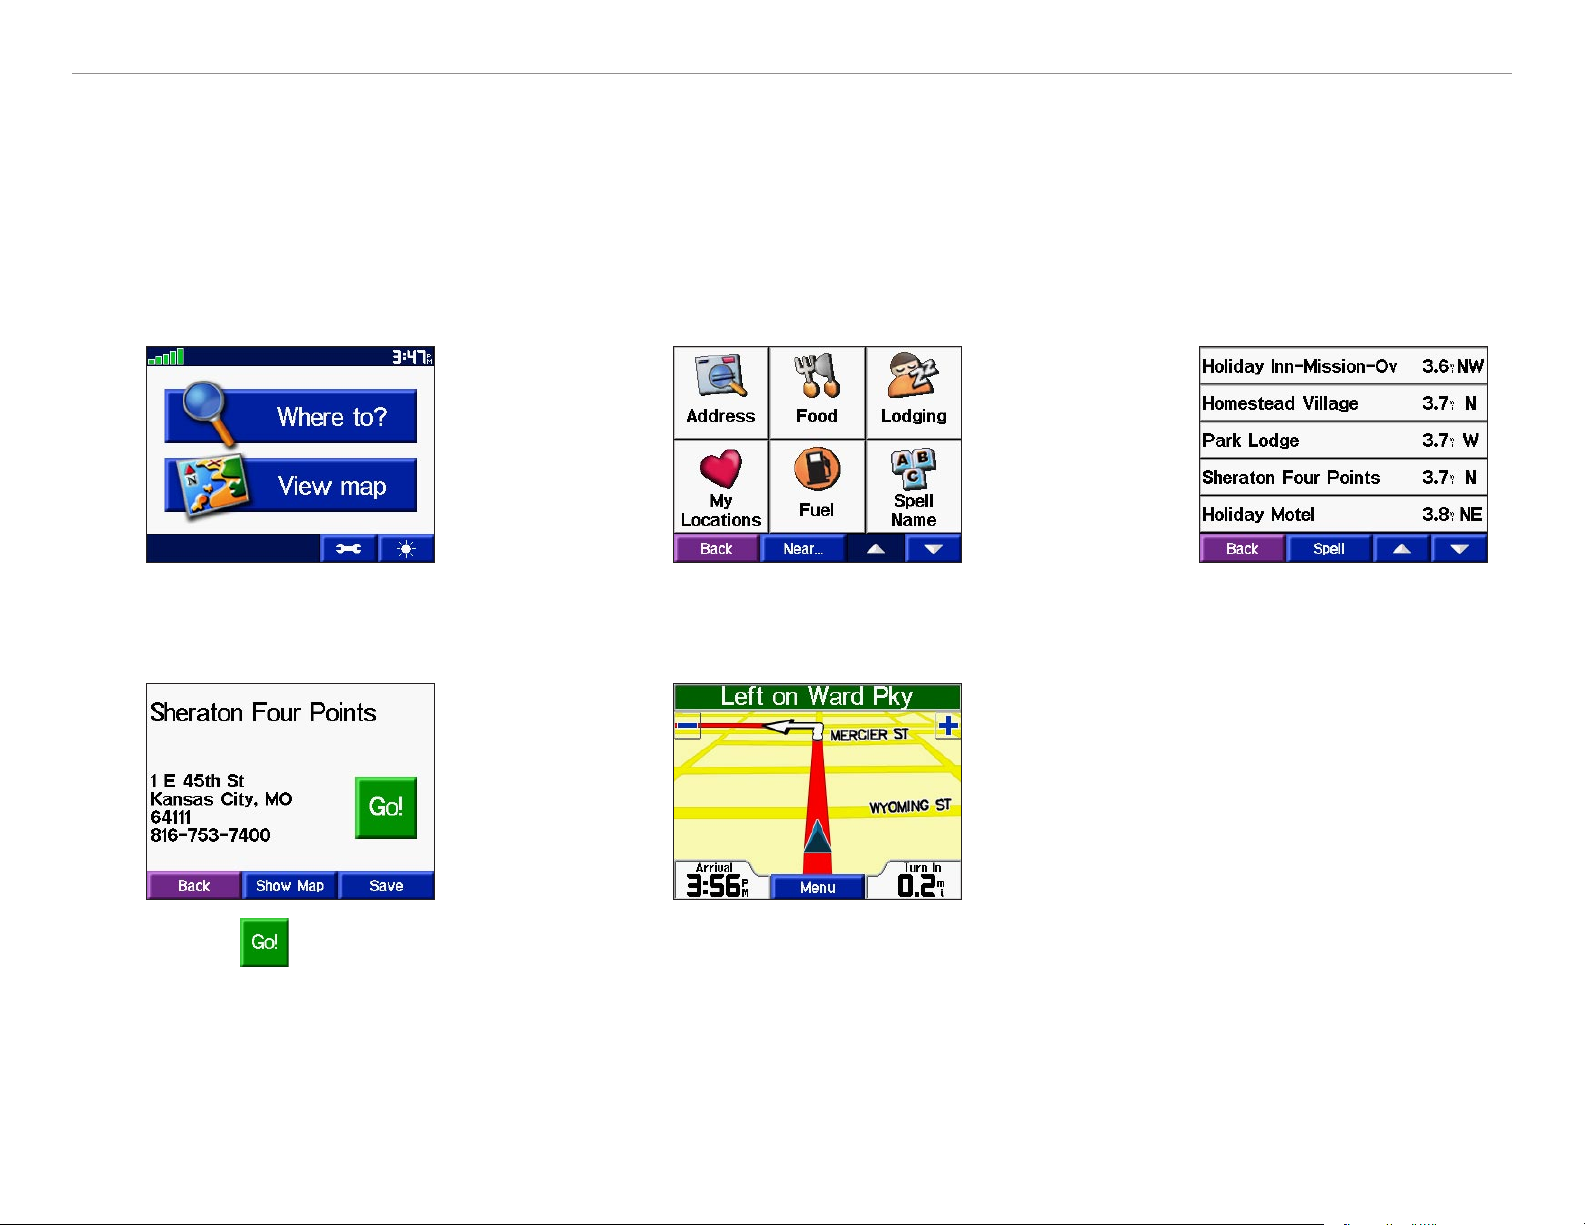
FIND IT AND GO!
FIND IT AND GO!
Use the Garmin StreetPilot c310 to find your destination and go to it!
Finding Your Destination
➊
➍
Touch Where to?
Touch .
➋
➎
Select a category.
Enjoy the route!
➌
Select a destination.
Garmin © 2005 1 c310 Owner’s Manual
Page 6
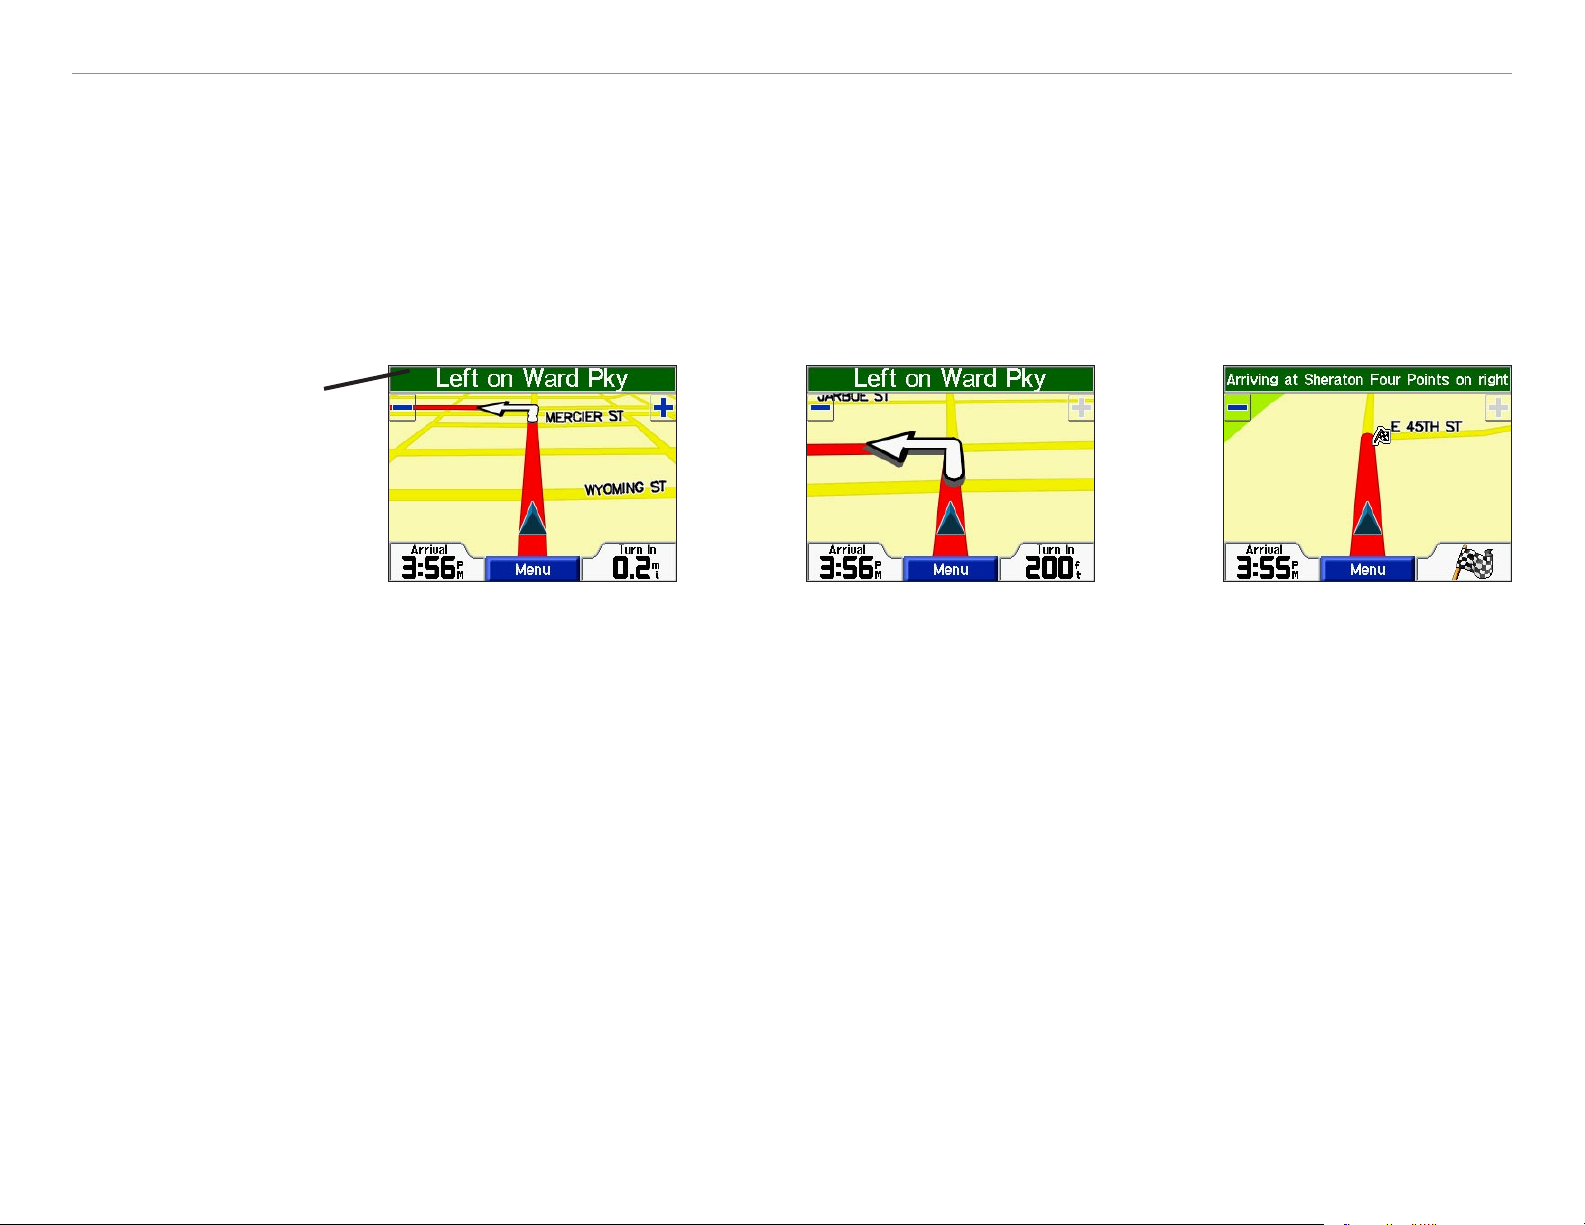
FIND IT AND GO!
Following Your Route
Follow the route to your destination using the Map page. As you travel, your c310 guides you to your
destination with vocal prompts, turn arrows on the map, and directions at the top of the Map page. If you
depart from the original route, your c310 voice announces that you are off-route and then provides new
route instructions.
Read the driving
instructions at
the top of the
page.
Your route is marked
with a red line.
Follow the arrows
as you take turns.
A checkered
flag marks your
destination.
For more information about using the Map page, see pages 11–14.
Garmin © 2005 2 c310 Owner’s Manual
Page 7
WHERE TO?
WHERE TO?
The Where To?
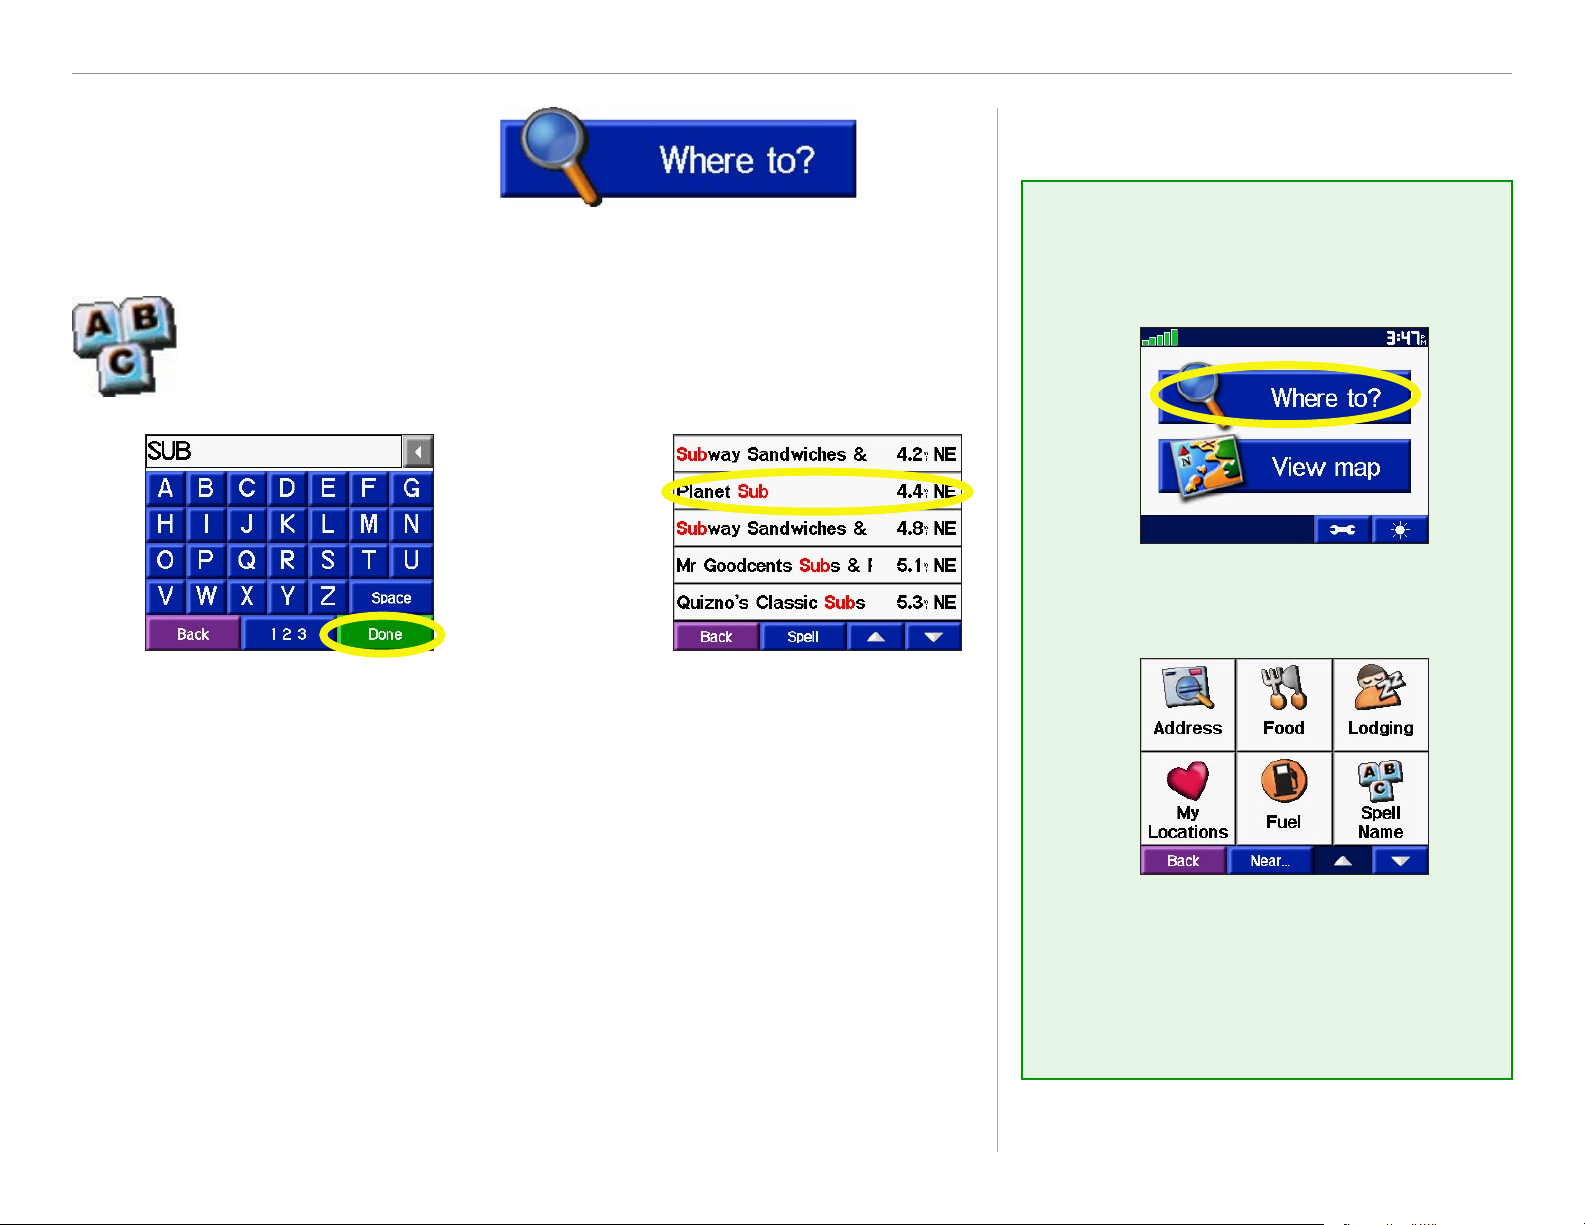
Finding a Place by Spelling the Name
To enter the name of the place you are looking for, open
the Menu page. Touch Where to? > Spell Name.
➊
Enter a place using
the on-screen
keyboard. Then
touch Done.
➋
Select the place
you want to visit.
Menu
➊
Touch Where to?
➋
You can also spell the name of the place you are looking for to
narrow your search results list. If you do not see the place you
want to visit in your list of search results, you can search for the
place by selecting Spell.
Garmin © 2005 3 c310 Owner’s Manual
Select a category.
Touch the arrows
to see more
categories.
Page 8

WHERE TO?
Finding an Address
To find an address, touch Where to? from the Menu page. Touch Address.
➊
➍
Select a state.
Type the street
name until a list of
streets appears or
touch Done. Select
the street.
➋
➎
Touch Search All
Cities.
If necessary, touch
the address. Touch
.
➌
Type the number
of the address and
touch Done.
Finding an
intersection is
very similar to finding
an address; touch
Intersection and enter
the two street names.
Garmin © 2005 4 c310 Owner’s Manual
Page 9

WHERE TO?
Finding a Place Using the Map
Use the Browse Map page to view different parts of the
map. Touch Where to? > Browse Map.
➊
Touch any object
on the map and
select Info.
Viewing Places on the Map
You can view a place you have found on the Browse Map page.
➊
➋
Touch .
➋
Browse Map Tips
• Touch the arrows to move the
map around.
• Use the
zoom in and out.
• Touch the item you are
looking for. An arrow appears
pointing at the object you
selected.
• Touch
return to the previous screen.
and icons to
Back to
Touch Show Map.
Garmin © 2005 5 c310 Owner’s Manual
Touch Back when
you are done.
Page 10
WHERE TO?
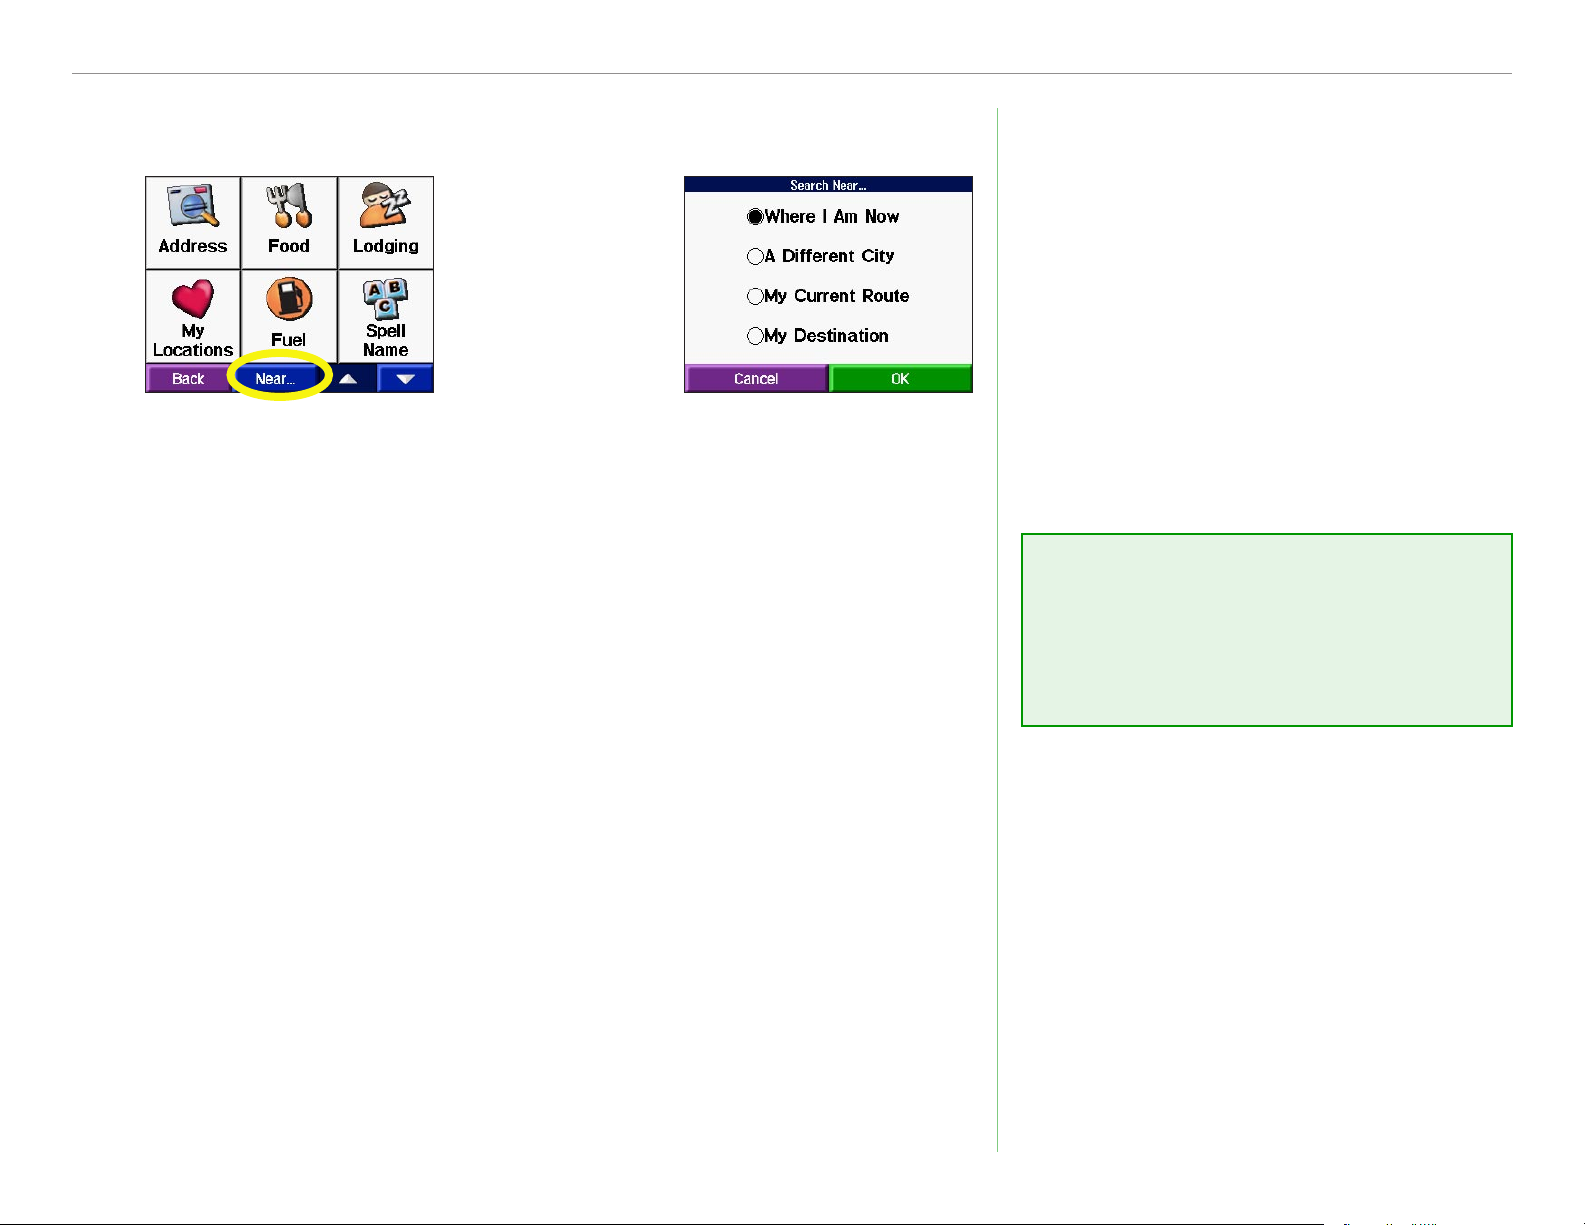
Expanding Your Search
➊
From the Menu
page, touch Where
To? Then touch the
Near button.
Where I Am Now—searches for places near your current
location. Your unit automatically uses this option.
A Different City—searches for places near the city you enter. For
➋
Select one of the
search options.
Touch OK.
Your c310 automatically searches
for places near your current
location.
Tip
example, enter “Denver” to search for places near Denver.
My Current Route—searches for places along the route you are
currently navigating.
My Destination—searches for places near the end of the route
you are currently navigating.
Garmin © 2005 6 c310 Owner’s Manual
Page 11
MY LOCATIONS
MY LOCATIONS
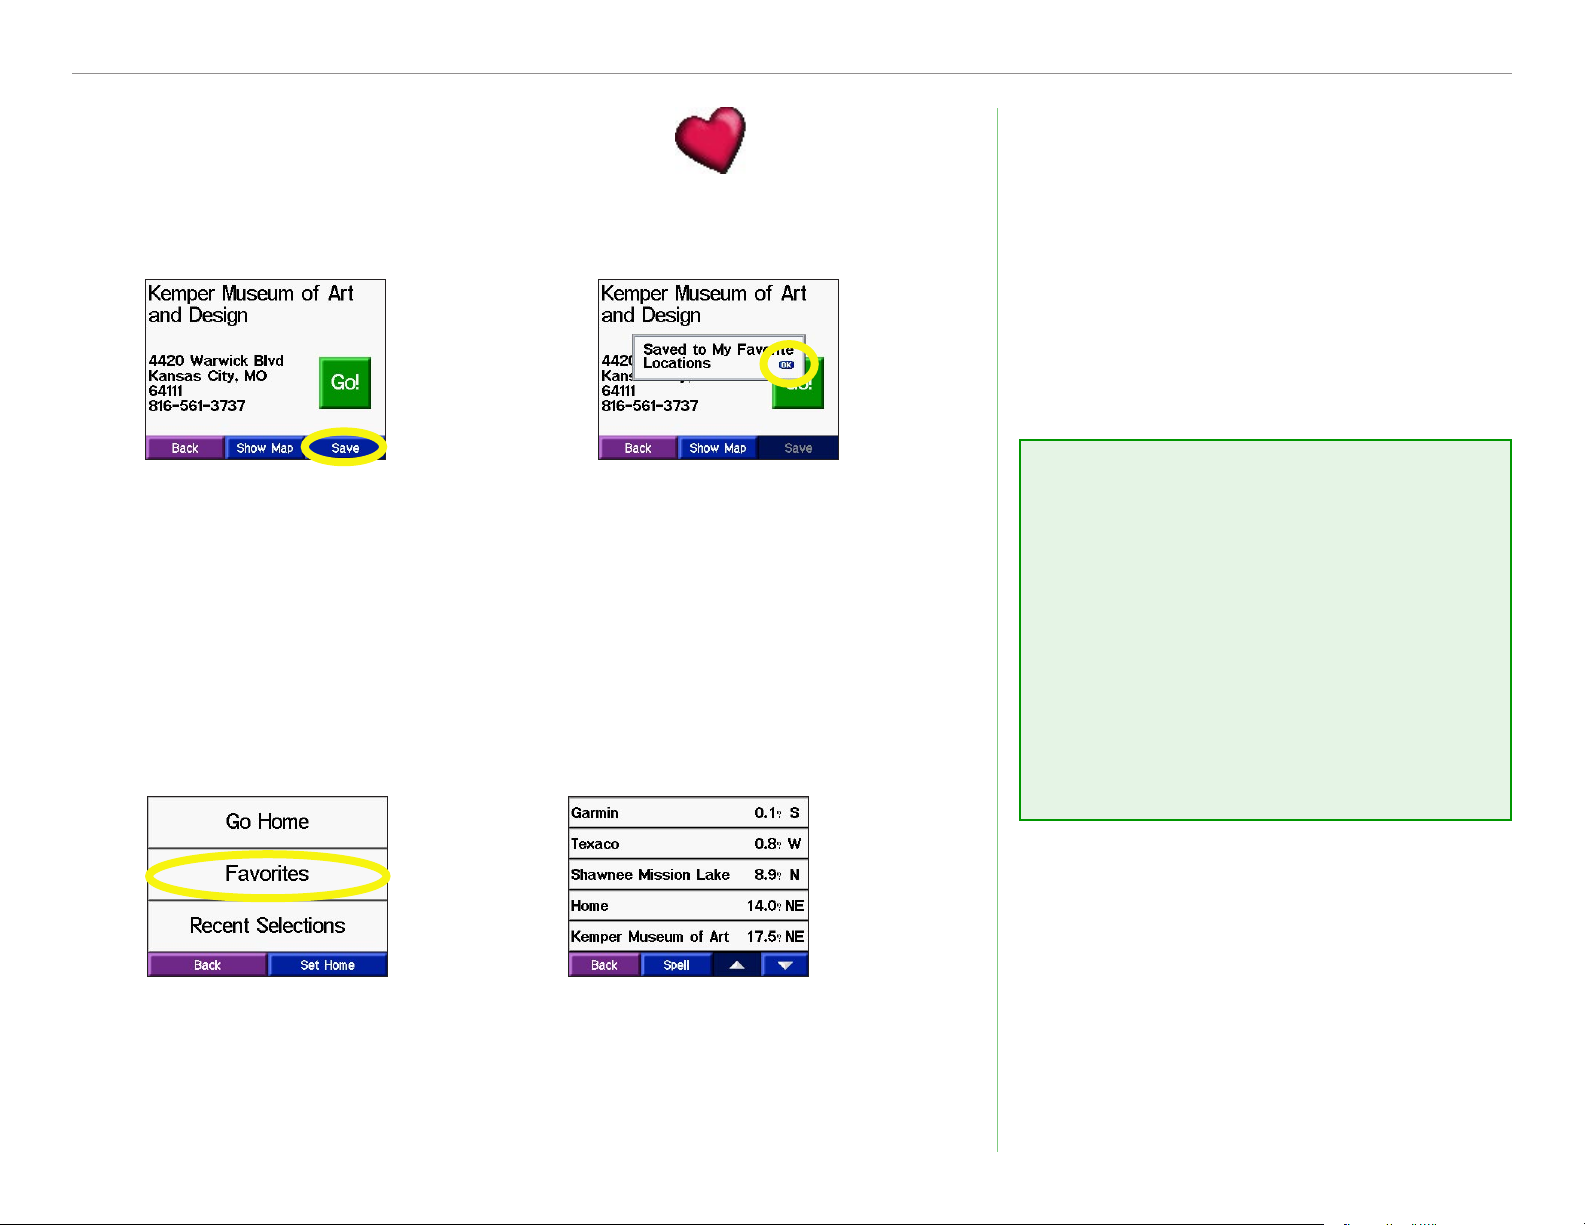
Saving Places You Find
➊
After you have
found a place,
touch Save.
➋
Touch OK to
close the popup window.
Finding Saved Places
From the Menu page, touch Where to? > My Locations.
➋➊
Understanding My
Locations
Think of My Locations as a
container that stores all of your
favorite places. You can set your
Home location in My Locations.
You can also find places that you
have recently found.
Touch Favorites. Select the place
you want to visit.
Garmin © 2005 7 c310 Owner’s Manual
Page 12
MY LOCATIONS
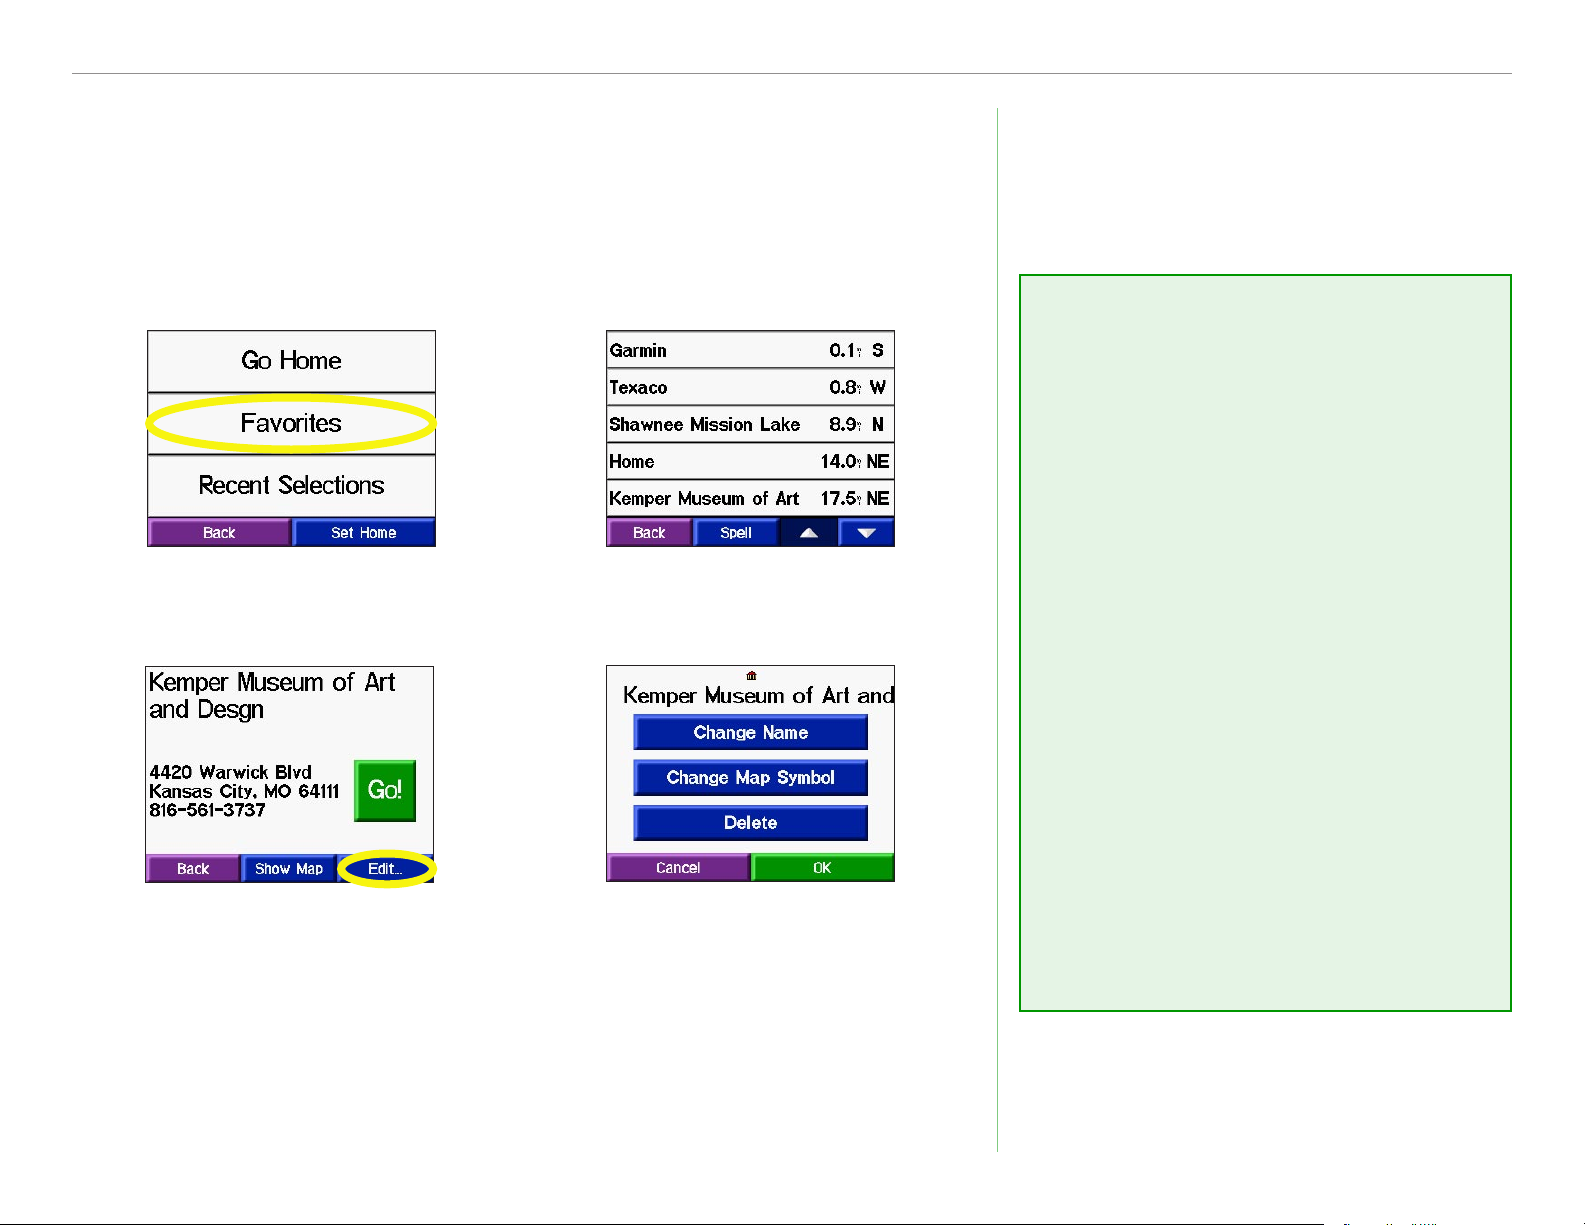
Editing Saved Places
After you save a place, you can change the name of the place and
its symbol on the map. From the Menu page, touch Where to? >
My Locations.
Changing the Name
➊
Touch Favorites.
➋
➌ ➍
Touch the Edit button.
The Edit window opens.
Select the place
you want to edit.
Touch a button to
change the name or
the map symbol, or
To change the name of the saved
place, touch Change Name.
Enter the new name using the
on-screen keyboard that appears.
Touch Done.
Changing the Map Symbol
To change the symbol of this place
used on the map, touch Change
Map Symbol. Select a symbol
from the list that appears.
Deleting Saved Places
To delete this saved place, touch
Delete. Then touch Yes.
to delete the item.
Garmin © 2005 8 c310 Owner’s Manual
Page 13

MY LOCATIONS
Setting a Home Location
You can set a Home location for the place you return to most often. After you have set your Home, you can
easily Go Home.
➊
Touch Where To? >
My Locations.
Going Home
Once your Home location is set, you can route to it at any time by touching My Locations and then Go
Home.
Changing Your Home Location
Change your Home location by repeating the steps you took to set it.
➋
Touch Set Home.
➌
Touch Yes, use my
current location.
Garmin © 2005 9 c310 Owner’s Manual
Page 14

WHERE TO?
Finding Recently Found Places
Your c310 stores the last 50 of your recent finds in Recent
Selections. The most recently viewed places appear at the top of
the list. From the Menu page, touch Where to? > My Locations
to view your recently found items.
➊
Touch My Locations
> Recent Selections.
Deleting Recently Found Places
To remove all places from the Recent Selections list, touch Clear.
Then touch Yes.
➋
Select an item from
the list.
➊ ➋
NOTE: When you touch
Clear, all items from the
list are removed. It does not
delete the actual place from
your unit’s system.
Garmin © 2005 10 c310 Owner’s Manual
Page 15

VIEWING THE MAP PAGE AND OTHER PAGES
VIEWING THE MAP AND OTHER PAGES
Viewing the Map Page
From the Menu page, touch View map to open the Map page. The position
icon shows your current location. Touch buttons on the Map page to see
additional information.
Touch to zoom out.
Touch
Speed to open the Trip
Menu to return to
the Menu page.
Touch Arrival or
Information page. See
page 12.
Touch the text bar to
open the Current Route
page. See page 13.
Touch
Touch Turn In to open
the Next Turn page. See
page 13.
Map Page while Navigating a Route
to zoom in.
Garmin © 2005 11 c310 Owner’s Manual
Page 16

VIEWING THE MAP PAGE AND OTHER PAGES
Trip Information Page
The Trip Information page indicates your current speed and provides helpful statistics about your trip. To
view the Trip Information page, select Speed or Arrival on the Map page.
Distance to your final
Current direction
of travel
destination
Distance traveled
(Odometer)
Trip Information Page
Resetting Trip Information
If you want accurate trip information, reset the trip information before beginning a trip. If you make
frequent stops, leave the c310 turned on so it can accurately measure elapsed time during the trip.
Select Reset Trip to reset the information on the Trip Information page. Select Reset Max to reset the
Maximum Speed.
Garmin © 2005 12 c310 Owner’s Manual
Page 17

VIEWING THE MAP PAGE AND OTHER PAGES
Current Route Page
The Current Route page displays turn-by-turn instructions for your entire route. Touch the green text bar
on the top of the Map page to open the Current Route page. This page displays all turns in the route and
the distance between turns. Select a turn on the list to view the Next Turn page for that turn.
Direction of
the turn
Distance to
the turn
Current Route Page
Next Turn Page
Upcoming turn
Distance to the
upcoming turn
Approximate time
left until this turn
Next Turn Page and Voice Directions
The Next Turn page shows the turn on the map and the distance and time left before you reach the turn.
To view an upcoming turn on the map, select Turn In on the Map page, or select any turn from the
Current Route page.
Use the up and down arrows to view other turns in the route. When you are finished viewing the Next Turn
page, select Back.
Garmin © 2005 13 c310 Owner’s Manual
Page 18

VIEWING THE MAP PAGE AND OTHER PAGES
Adding a Detour to a Route
If you need to take a detour from your current route, select Detour from the Menu page of the c310. The
unit calculates a new route and provides you with new instructions. The c310 attempts to get you back on
your original route as soon as possible.
On some routes, the route you are currently taking might be the only reasonable option. In this case, you
cannot take a detour.
Stopping Your Route
If you want to stop your current route, return to the Menu page and select Stop.
➊
Select Menu to return
to the Menu page.
Garmin © 2005 14 c310 Owner’s Manual
➋
Select Stop to end
navigation. Select Detour
and your unit creates a
new route if possible.
Page 19

CUSTOMIZING THE C310
CUSTOMIZING THE C310
Adjusting the Brightness
➊
Touch the button
➋
Touch the minus
and plus signs to
adjust the backlight.
Touch OK.
Garmin © 2005 15 c310 Owner’s Manual
Page 20

CUSTOMIZING THE C310
Changing the c310’s Settings
To change c310 settings, touch from the Menu page. See the
following pages for more information.
➊
Select the
button to display
the Settings page.
➋
Select the setting
you want to change.
Restoring Settings
To restore all settings you have
changed, press the Restore
Settings button, as shown below.
To restore settings for an
individual category, such as Map,
touch the Restore Settings button
on that particular page.
Garmin © 2005 16 c310 Owner’s Manual
Page 21

CUSTOMIZING THE C310
Changing Map Settings
Map Detail—adjust the amount of detail shown on the map.
Displaying more detail causes the map to redraw slowly.
Map View—change the perspective of the Map page.
• Track Up—display the map in 2 dimensions (2-D) with your
direction of travel at the top.
• North Up—display the map in 2-D with North at the top.
• 3 Dimensional—display the map in 3 dimensions (3-D),
Track Up orientation. This is the default map view.
Map Info—list the maps loaded on your c310. Refer to this when
you are ready to update your map software.
Restore—restore the original map settings.
➊
➋
➌
Garmin © 2005 17 c310 Owner’s Manual
Page 22

CUSTOMIZING THE C310
Changing System Settings
GPS Mode—set the unit’s GPS receiver. Select WAAS to enable
the WAAS system. Select GPS Off if you want to simulate routes
indoors (“practice mode”) with your c310.
Units—change units of measure to kilometers (Metric) or miles
(Statute).
Safe Mode—enable or disable the Safe Mode feature to improve
driver safety. When your vehicle is moving, Safe Mode disables all
unit functions that require significant operator attention and could
become a distraction while driving.
About—display your c310’s software version number, unit ID
number, and audio version number.
Restore—restore the original system settings.
➊
➋
➌
Garmin © 2005 18 c310 Owner’s Manual
Page 23

CUSTOMIZING THE C310
Changing Time
Time Format—choose a 12- or 24-hour time format or UTC time.
Time Zone—set the c310 to one of the U.S. time zones or choose
from a list of cities all over the world.
Daylight Savings—set to On, Off , or Auto if it is available.
Restore Settings—restore the original time settings.
➊
➋
➌
Garmin © 2005 19 c310 Owner’s Manual
Page 24

CUSTOMIZING THE C310
Changing the Color Mode
Color Mode—select one of the following options:
Daytime—light background.
Nighttime—black background.
Auto—automatically switch between the two at sunrise
and sunset.
➊
➋
➌
Garmin © 2005 20 c310 Owner’s Manual
Page 25

CUSTOMIZING THE C310
Changing Navigation
Route Preference—select a preference for calculating your
route. Select Faster Time to calculate routes that are faster to
drive but can be longer in distance. Select Shorter Distance
to calculate routes that are shorter in distance but can take more
time to drive.
Vehicle—specify your vehicle type to optimize routes.
Avoidances—select the Enabled button
to access the road types. Select the road
types you want to avoid on your routes.
The c310 uses these road types only if
alternative routes take you too far out of
your way or if no other roads are available.
Attention Tone—turn the chime before voice prompts on and
off.
➊
➋
Restore Settings—restore the original navigation settings.
➌
Garmin © 2005 21 c310 Owner’s Manual
Page 26

CUSTOMIZING THE C310
Changing Language
Text Language—change all on-screen text to the selected
language. Changing the Text Language does not change the
language of map data, such as street names and places or userentered data.
Voice Language—change the language for all voice prompts and
messages to the selected language.
Restore Settings—restore the original language settings.
➊
➋
➌
Garmin © 2005 22 c310 Owner’s Manual
Page 27

APPENDIX
APPENDIX
Mounting the c310 on Your Dashboard
Use the enclosed mounting disk to mount your unit to the dashboard. California drivers, use the enclosed
disk to comply with California regulations: see the c-series Product Information Sheet that came in the
box for more information.
Important: The permanent mounting adhesive is extremely difficult to remove after it is installed.
To install the mounting disk:
1. Clean and dry the dashboard where you will
place the disk.
2. Remove the backing from the permanent
mounting adhesive on the bottom of the disk and
place the disk on the dashboard.
3. Place the c310 (still mounted to the suction cup
mount) on top of the disk. Flip the suction lever
to secure the suction cup mount to the disk.
Suction
lever
Garmin © 2005 23 c310 Owner’s Manual
Suction
cup mount
Disk
Page 28

APPENDIX
Removing the Unit and the Mount
To remove the unit from the mount, press the indentation on the back of the unit. Then, lift the unit off of
the mount.
To remove the suction cup from the windshield, flip the lever toward you and pull the tab on the suction
cup toward you.
1. Press here.
2. Pull the suction cup
lever toward you.
3. Pull the tab toward you.
Garmin © 2005 24 c310 Owner’s Manual
Page 29

APPENDIX
Caring for Your c310
Your c310 contains sensitive electronic components that can be permanently damaged if exposed to
excessive shock or vibration. To minimize the risk of damage to your c310, avoid dropping your unit and
operating it in high shock/vibration environments.
Cleaning the Unit
The c310 is constructed of high quality materials and does not require user maintenance other than
cleaning. Clean the unit’s outer casing (except for the touch screen) using a cloth dampened with a mild
detergent solution and then wipe dry. Avoid chemical cleaners and solvents that can damage plastic
components.
Cleaning the Touch Screen
The touch screen is intended primarily to be operated with a finger. Though a PDA stylus can also be used
to operate the touch screen, never attempt this while operating a vehicle. Never use a hard or sharp object
to operate the touch screen or damage may result. The touch screen should be cleaned using a soft, clean,
lint-free cloth. Water, isopropyl alcohol, or eyeglass cleaner can be used if needed. If these are used, apply
the liquid to the cloth and then gently wipe the touch screen.
Calibrating the Touch Screen
If you think the touch screen is not responding properly, press and hold the Power button until the
Calibration screen appears. Follow the on-screen instructions.
Garmin © 2005 25 c310 Owner’s Manual
Page 30

APPENDIX
Protecting Your c310
Follow the cautions below to protect your c310 from damage:
• Do not
store the c310 where prolonged exposure to extreme temperatures can occur (such as in the
trunk of a car), as permanent damage may result.
• Do not expose the c310 to water. Contact with water can cause this unit to malfunction.
• Do not leave your c310 in plain sight when you leave your vehicle. Take your unit with you or remove it
from view to avoid theft.
Using the c310 Responsibly
Your unit is equipped with a “Safe Mode” feature to improve driver safety. Safe Mode disables certain
functions that can distract you while driving. See page 18 for more information.
Using the c310 Indoors
You can set your c310 to indoor use, which stops satellite reception. Use this setting when you are
practicing using the unit. To turn off satellite reception, set the unit to GPS Off. See page 18.
Using a Remote Antenna
You can use an optional external remote antenna (Garmin GA 27C). This is very helpful when operating
the unit in a vehicle with a coated windshield or an in-screen (in the window) heating system, which can
block GPS signals. Connect the antenna to the connector located on the back of the c310. To purchase, go
to the Garmin Web site at http://www.garmin.com/products/sp310 and select the Accessories link.
Garmin © 2005 26 c310 Owner’s Manual
Page 31

APPENDIX
Using an SD Card
The SD card slot is located on the side of the c310. To insert
or remove the card, press it in until it clicks.
Purchasing Additional MapSource Maps
You can purchase additional MapSource map data from
Garmin and download the maps to your SD card.Follow the
instructions that came with the new map data to properly
install the maps to your computer and c310. In order to enable additional maps, you need your unit ID
(see page 18) and serial number (see page i).
Using the USB Drivers and Cable
Use the enclosed installation disk to install the USB drivers onto your computer. These drivers must be
installed before you connect the USB cable to your computer.
Use the Garmin USB cable provided to connect your c310 to your computer. This is necessary when
updating your map data, updating the c310 software, or loading additional maps.
Plug the small end of the USB cable into the connector above the power button. Plug the other end of the
cable into an available USB connector on your computer.
Garmin © 2005 27 c310 Owner’s Manual
Page 32

APPENDIX
Updating the c310 Software and Map Data
Garmin periodically updates its software and map data. If you register your unit, you will receive
notification of software and map updates.
Check the Garmin Web site at http://www.garmin.com/unlock/update.jsp to see if an update for your
map software is available. Also check http://www.garmin.com/products/sp310/ and select the Software
Updates link to see if an update to the c310’s internal software is available.
See page 17 for instructions on how to find your current MapSource software and version number.
Resetting Your c310
If your unit locks up, press the Power button to turn off the unit, then press again to turn the unit back
on. If this does not help, reset your c310.
To reset the c310:
1. Place your thumb nail in the groove located
under the Garmin logo on the face plate.
2. Gently pull off the face plate.
3. Press the
4. Turn the unit back on; it will operate
normally.
Garmin © 2005 28 c310 Owner’s Manual
Reset button.
Face plate
Reset button
Power button
Page 33

APPENDIX
Technical Specifications
Size: 4.4” W x 3.2” H x 2.8” D
Weight: 9.45 ounces
Display: QVGA transflective TFT; 64K colors; bright white LED
backlight, and touch screen
Map Storage: Removable SD memory card
Temperature: 32°F to 122°F (0°C to 50°C)
Power Supply: AGC/3AG 2 Amp fuse
Charge Time: Approximately three hours to charge
For a complete list of specifications, visit the Garmin Web site at
http://www.garmin.com/products/sp310/spec.html.
Changing the Fuse
An AGC/3AG 2 Amp, highbreaking capacity, 1500 A-rated
fuse is located at the tip of the
vehicle adapter. Periodically, you
may need to change the fuse.
Unscrew the black, round end
piece and replace the fuse.
Fuse
Battery Information
Your unit contains an internal lithium-ion battery. To maximize
battery life, limit your c310’s prolonged exposure to excessive heat
and direct sunlight. Contact your local waste disposal department
for information on properly disposing of the unit.
Garmin © 2005 29 c310 Owner’s Manual
Charging the c310
You can charge the c310 using
USB cable (see page 27) or the car
adapter that is connected to the
suction mount.
Page 34

APPENDIX
Software License Agreement
BY USING THE c310, YOU AGREE TO BE BOUND BY THE TERMS AND CONDITIONS OF THE
FOLLOWING SOFTWARE LICENSE AGREEMENT. PLEASE READ THIS AGREEMENT CAREFULLY.
Garmin grants you a limited license to use the software embedded in this device (the “Software”) in binary
executable form in the normal operation of the product. Title, ownership rights, and intellectual property
rights in and to the Software remain in Garmin.
You acknowledge that the Software is the property of Garmin and is protected under the United States of
America copyright laws and international copyright treaties. You further acknowledge that the structure,
organization, and code of the Software are valuable trade secrets of Garmin and that the Software in source
code form remains a valuable trade secret of Garmin. You agree not to decompile, disassemble, modify,
reverse assemble, reverse engineer, or reduce to human readable form the Software or any part thereof or
create any derivative works based on the Software. You agree not to export or re-export the Software to
any country in violation of the export control laws of the United States of America.
NOTE: The Garmin c310 has no user-serviceable parts. Should you ever encounter a problem
Garmin © 2005 30 c310 Owner’s Manual
with your unit, take it to an authorized Garmin dealer for repairs.
NOTE: The c310 is fastened shut with screws. Any attempt to open the case to change or
modify the unit in any way voids your warranty and may result in permanent damage to the
equipment.
Page 35

INDEX
INDEX
Symbols
2 Dimensional 17
3 Dimensional 17
A
About Button 18
Audio version 18
Avoiding road types 21
Avoiding water damage 26
B
Backlight brightness 15
Battery information 29
Browse Map Page 5
C
Calibrating the touch screen 25
Caring for your c310 25
Cleaning 25
Color Mode 20
Contact Garmin i
Current Route Page 13
Customizing the c310 15
color mode 20
language 22
map 17
navigation 21
system setup 18
time 19
D
Daylight Savings 19
Deleting saved places 8
Detour, adding 14
Driving directions 13
E
Editing saved places (My
Locations) 8
Expanding your search 6
F
Favorites 7, 8
Finding places
address 4
by name 3
intersection 4
item on the map 5
recent selection 10
saved item 7
Find a place near another
place 6
Following your route 2
Fuse, changing 29
G
Go Home 9
GPS
issues maintaining a fix 26
mode 18
turn off 26
H
Home Location 9
change home 9
go home 9
set home 9
I
Info Button 5
Items and road types to
avoid 21
K
Keyboard 3
L
Language 22
License Agreement 30
M
Map 5, 11
browse 5
customize 17
zoom 11
MapSource 27, 28
Map Info Button 17
Map software
update 28
version 17
Map symbol 8
Map view 17
Metric units 18
Mounting the c310 23
My Locations 7
Favorites 7, 8
Go Home 9
Recent Selections 10
N
Narrowing your results list
spell the name 3
Navigation settings and
preferences 21
Near Button 6
Next Turn Page 13
North Up 17
O
On-screen keyboard 3
P
Position icon 11
Practice mode 18
R
Garmin © 2005 31 c310 Owner’s Manual
Page 36

INDEX
Recently Found places
delete 10
find 10
Resetting your c310 28
Reset Max Speed 12
Reset Trip 12
Routing preferences 21
S
Safe Mode 18, 26
Saved Places
change the map symbol 8
change the name 8
delete 8
edit 8
Saving places you find 7
SD Card 27, 29
Serial Number i
Software License Agreement 30
Software version 18
Spelling the name 3
to find a place 3
to narrow your results 3
Stopping navigation 14
Storing the c310 26
System Setup, customizing 18
Time 19
customize 19
Touch screen
calibrate 25
clean 25
Track Up 17
Trip Information Page 12
Turn-by-turn directions 13
U
Units 18
Unit ID 18
USB 27
Using responsibly 26
V
Vehicle Type 21
Viewing Places on the Map 5
Viewing the Map 11
Voice Directions 13
Z
Zoom 5, 11
T
Theft, avoiding 26
Garmin © 2005 32 c310 Owner’s Manual
Page 37

For the latest free software updates (excluding map data) throughout the life of your
Garmin products, visit the Garmin Web site at www.garmin.com.
© Copyright 2005 Garmin Ltd. or its subsidiaries
Garmin International, Inc.
1200 East 151st Street, Olathe, Kansas 66062, U.S.A.
Garmin (Europe) Ltd.
Unit 5, The Quadrangle, Abbey Park Industrial Estate, Romsey, SO51 9DL, U.K.
Garmin Corporation
No. 68, Jangshu 2nd Road, Shijr, Taipei County, Taiwan
www.garmin.com
Part Number 190-00624-00 Rev. A
 Loading...