

Garmin ASTRO DOG Owner’s Manual
™
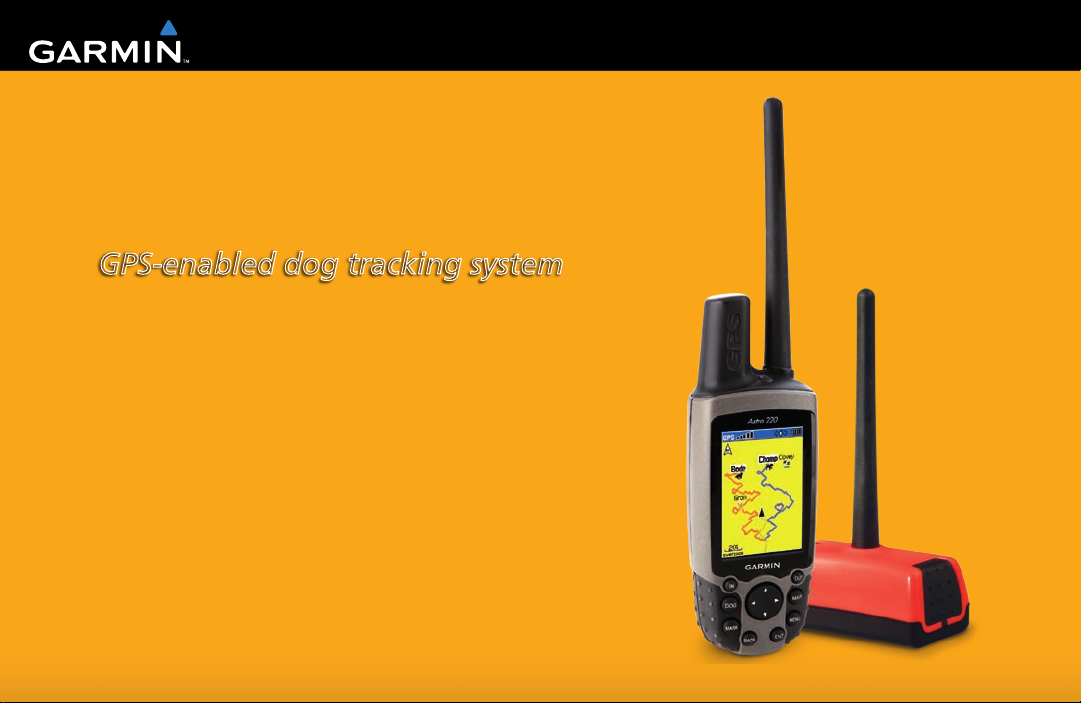
Astro
GPS-enabled dog tracking system
Owner’s Manual

© 2007 Garmin Ltd. or its subsidiaries
Garmin International, Inc.
1200 East 151st Street,
Olathe, Kansas 66062, USA
Tel. (913) 397.8200 or (800) 800.1020
Fax (913) 397.8282
Garmin (Europe) Ltd.
Liberty House
Hounsdown Business Park,
Southampton, Hampshire, SO40 9RB UK
Tel. +44 (0) 870.8501241 (outside the UK)
Garmin Corporation
No. 68, Jangshu 2nd Road,
Shijr, Taipei County, Taiwan
Tel. 886/2.2642.9199
Fax 886/2.2642.9099
0808 2380000 (within the UK)
Fax +44 (0) 870.8501251
All rights reserved. Except as expressly provided herein, no part of this manual may be reproduced, copied, transmitted, disseminated,
downloaded or stored in any storage medium, for any purpose without the express prior written consent of Garmin. Garmin hereby grants
permission to download a single copy of this manual onto a hard drive or other electronic storage medium to be viewed and to print one copy
of this manual or of any revision hereto, provided that such electronic or printed copy of this manual must contain the complete text of this
copyright notice and provided further that any unauthorized commercial distribution of this manual or any revision hereto is strictly prohibited.
Information in this document is subject to change without notice. Garmin reserves the right to change or improve its products and to make
changes in the content without obligation to notify any person or organization of such changes or improvements. Visit the Garmin Web site
(www.garmin.com) for current updates and supplemental information concerning the use and operation of this and other Garmin products.
Garmin®, AutoLocate®, TracBack®, BlueChart®, MotionBased® and MapSource® are registered trademarks and Astro™ is a trademark of
Garmin Ltd. or its subsidiaries and may not be used without the express permission of Garmin.
This product includes technology owned by SiRF Technology, Inc. SiRF’s technology is protected by U.S. and foreign patents pending and
issued. SiRF, SiRFstar and the SiRF logo are registered trademarks of SiRF Technology, Inc. SiRFstarIII and SiRF Powered are
trademarks of SiRF Technology, Inc.
™
microSD
is a trademark of The SD Card Association. TransFlash™ is a trademark of SanDisk Corporation. Other trademarks and
trade names are those of their respective owners.
June 2007 Part Number 190-00714-00 Rev. B Printed in Taiwan

IntroductIon
IntroductIon
Thank you for choosing the Garmin® Astro™ Dog
Tracking System. The Astro 220 uses the proven
performance of Garmin GPS and full-featured mapping
to create an unsurpassed portable GPS receiver and, when
combined with the DC 20, an accurate and reliable dog
tracking system.
Contact Garmin
Contact Garmin if you have any questions while using your
unit. Contact Garmin Product Support by phone: (913)
397-8200 or (800) 800-1020, Monday–Friday, 8 AM–5 PM
Central Time; or go to www.garmin.com/support/.
Tip and Shortcuts
To quickly return to the Main Menu from any page,
•
press the MENU key twice or press the BACK key
repeatedly.
To extend battery life, turn off the GPS when not
•
using the Astro 220 for navigation or dog tracking.
Also, decrease the level of the display’s backlight,
by quickly pressing and releasing the POWER
key.
To extend the battery life of a DC 20, turn the unit
•
off when not tracking a dog, or decrease the update
rate.
Astro Dog Tracking System Owner’s Manual i

IntroductIon
Table of Contents
Introduction .............................................................i
Contact Garmin .........................................................i
Warning ....................................................................iv
DC 20 Battery Warnings ........................................... v
Important Information ..............................................v
myGarmin ................................................................. vi
Getting Started .......................................................1
Unit Overview ...........................................................1
Installing the Batteries ............................................. 2
Using the Astro 220 Keypad Functions .................. 3
Turning on the Astro 220 .........................................4
Charging the DC 20 .................................................. 5
Initializing the GPS Receivers ................................. 5
Calibrating the Astro 220 Compass ........................ 6
Operating the Astro 220 ........................................... 7
Dog Tracking ..........................................................9
Communicating with the DC 20 ..............................9
Tracking a Dog ........................................................ 11
Tips for Successful Tracking.................................14
Main Menu ............................................................15
Start New Hunt ........................................................ 15
Go To Marked Location ..........................................16
View Sunrise/Sunset .............................................. 16
View Hunting Almanac ........................................... 16
Advanced ................................................................17
Mark Location ......................................................17
Marking Your Current Location .............................17
Marking Hunting Specic Locations ....................18
Marking a Location Using the Map ....................... 18
Averaging a Marked Location ...............................19
Projecting a Location ............................................. 19
Map Page ..............................................................20
Map Page Options .................................................. 21
Data Fields ..............................................................22
Measuring Distance ...............................................23
Find Features .......................................................24
Find By Name .........................................................24
Recent Finds ........................................................... 25
Finding a Location .................................................27
Finding a Geocache ...............................................27
Finding a City .......................................................... 28
ii Astro Dog Tracking System Owner’s Manual

IntroductIon
Finding an Interstate Exit ......................................28
Finding an Address ................................................ 28
Intersections ........................................................... 29
Searching for a Point of Interest ........................... 29
GPS Applications ................................................30
Trip Computer Page ............................................... 30
Compass Page ........................................................ 31
Altimeter Page ........................................................35
Using Tracks ........................................................... 40
Routes .....................................................................45
Navigating a Route ................................................. 45
Proximity Locations ............................................... 49
Satellite Page .......................................................... 50
Accessories .........................................................52
Calendar .................................................................. 52
Calculator ................................................................ 52
Stopwatch ...............................................................53
View Sunrise/Sunset .............................................. 53
View Hunting Almanac ........................................... 53
Games Menu ........................................................... 53
Settings ................................................................54
System Setup .......................................................... 54
Dog List Setup ........................................................ 54
Dog Alerts Setup ....................................................55
Display Setup .......................................................... 55
Tones Setup ............................................................55
Main Menu Setup ................................................... 56
Map Page Setup ...................................................... 56
Routing Setup ......................................................... 59
Geocache Setup .....................................................60
Marine Alarms Setup .............................................. 61
Time Setup .............................................................. 61
Units Setup .............................................................61
Heading Setup ........................................................62
Calibration Setup .................................................... 62
Altimeter Setup ....................................................... 63
Appendix ..............................................................64
Specications ......................................................... 64
Caring for the Astro System .................................. 71
Software License Agreement ................................ 72
Product Registration .............................................. 72
FCC Compliance ..................................................... 73
Limited Warranty .................................................... 75
Index .....................................................................77
Astro Dog Tracking System Owner’s Manual iii
IntroductIon
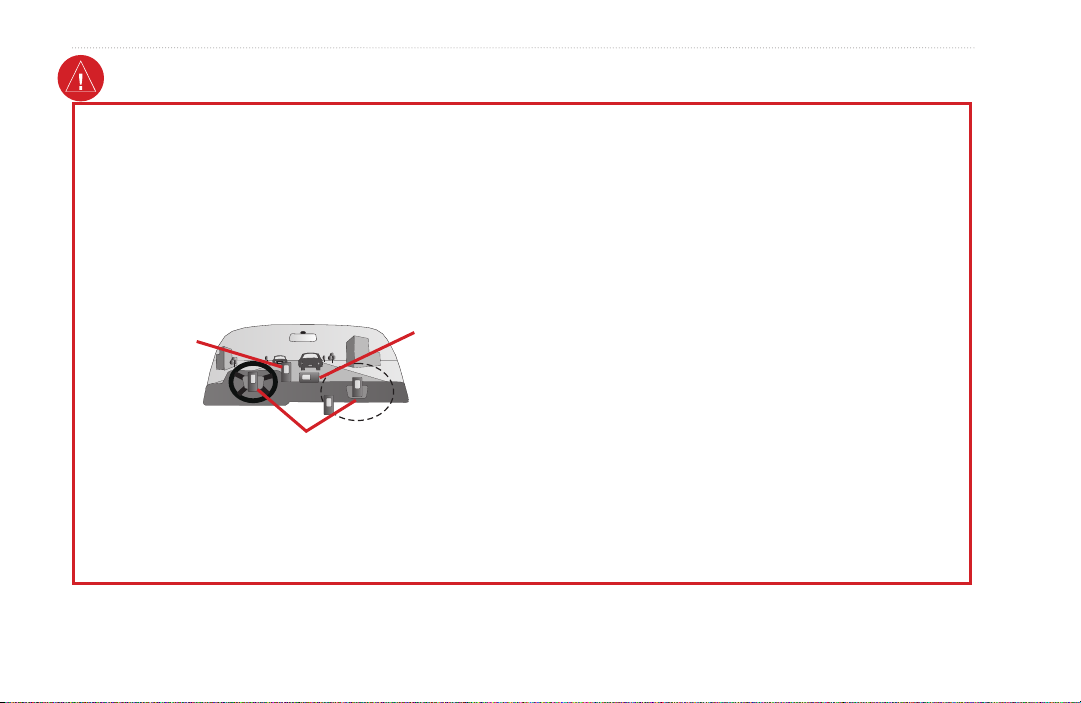
Warning
Failure to avoid the following potentially hazardous
situations could result in an accident or collision resulting in
death or serious injury.
When installing the unit in a vehicle, place the unit securely
•
so that it does not obstruct the driver’s view of the road or
interfere with vehicle operating controls, such as the steering
wheel, foot pedals, or transmission levers. Do not place in
front of or above any airbag. (See diagram).
continuing navigation and defer to posted road signs.
Always operate the vehicle in a safe manner. Do not become
•
distracted by the unit while driving, and always be fully
aware of all driving conditions. Minimize the amount of
time spent viewing the unit’s screen while driving and use
voice prompts when possible. Do not input destinations,
change settings, or access any functions requiring prolonged
use of the unit’s controls while driving. Pull over in a safe
and legal manner before attempting such operations.
Do not mount
where driver’s
eld of vision is
blocked.
Do not mount in front of an airbag
eld of deployment.
When navigating, carefully compare information displayed
•
Do not place
unsecured on
the vehicle
dashboard.
This unit is designed to provide route suggestions. It is
•
not designed to replace the need for driver attentiveness
regarding road closures or road conditions, trafc congestion,
weather conditions, or other factors that may affect safety
while driving.
on the unit to all available navigation sources, including
information from street signs, visual sightings, and maps. For
safety, always resolve any discrepancies or questions before
WARNING: This product, its packaging, and its components contain chemicals known to the State of California to cause cancer, birth
defects, or reproductive harm. This Notice is provided in accordance with California’s Proposition 65. See www.garmin.com/prop65 for
more information.
iv Astro Dog Tracking System Owner’s Manual

Do not recharge the battery outside of the unit or disassemble
DC 20 Battery Warnings
If these guidelines are not followed, the internal lithium-ion battery
may experience a shortened life span or may present a risk of damage
to the DC 20, re, chemical burn, electrolyte leak, and/or injury.
Contact your local waste department to properly dispose of the
•
unit/battery.
Do not leave the unit exposed to a heat source or in a high
•
temperature location, such as in the sun in an unattended vehicle
on a hot day. To prevent damage, remove the unit from the
vehicle or store it out of direct sunlight, such as in the glove
box.
Do not incinerate.
•
When storing the unit for a limited length of time, store within
•
the following temperature range: -4˚ to 140˚F (-20˚ to 40˚C).
When storing the unit for an extended time, store within the
following temperature range: 32˚ to 77˚F (0˚ to 25˚C).
Do not operate the unit outside of the following temperature
•
range: -4˚ to 140˚F (-20˚ to 60˚C).
Recharge the unit within the following temperature range: 32˚
•
to 113˚F (0˚ to 45˚C).
The DC 20 unit contains a replaceable, rechargeable lithium-ion
battery, the following warnings also apply:
•
the battery.
Keep the used battery away from children. Do not disassemble,
•
puncture, or damage the battery.
Only replace with a Garmin lithium-ion battery pack. Using
•
another battery presents a risk of re or explosion. To purchase a
replacement battery, see your Garmin dealer or the Garmin Web
site.
Do not leave the DC 20 where a dog may attempt to chew on it.
•
If the battery cell is punctured, electrolyte can be released that
can be harmful to the dog.
Important Information
MAP DATA INFORMATION: One of the goals of Garmin
is to provide customers with the most complete and accurate
cartography that is available to us at a reasonable cost. We use a
combination of governmental and private data sources, which we
identify in product literature and copyright messages displayed to
the consumer. Virtually all data sources contain some inaccurate
or incomplete data. In some countries, complete and accurate map
information is either not available or is prohibitively expensive.
IntroductIon
Astro Dog Tracking System Owner’s Manual v

IntroductIon
NOTICE REGARDING WINDSHIELD MOUNTING;
SPECIAL NOTICE TO DRIVERS IN CALIFORNIA AND
MINNESOTA: State law prohibits drivers in California and
Minnesota from using suction mounts on their windshields while
operating motor vehicles. Check your state and local laws and
ordinances for similar restrictions. Other Garmin dashboard or
friction mounting options should be used. Garmin does not take
any responsibility for any nes, penalties, or damages that may be
incurred as a result of disregarding this notice or as a result of any
other state or local law or ordinance relating to use of the unit. (See
California Vehicle Code Section 26708(a); Minnesota Statutes
2005, Section 169.71.)
The California Electronic Waste Recycling Act of 2003 requires
the recycling of certain electronics. For more information on the
applicability to this product, see www.erecycle.com.
myGarmin
Go to http://my.garmin.com to access the latest services
for your Garmin products.
From the myGarmin Web site, you can do the following:
•
•
•
•
•
Register your Garmin unit.
Subscribe to online services for Points of Interest
(POIs) and other useful items.
Unlock optional maps.
Access MotionBased® Web-based activity tracker
where you can view your saved tracks on several
types of maps.
Download geocaches to your unit..
vi Astro Dog Tracking System Owner’s Manual
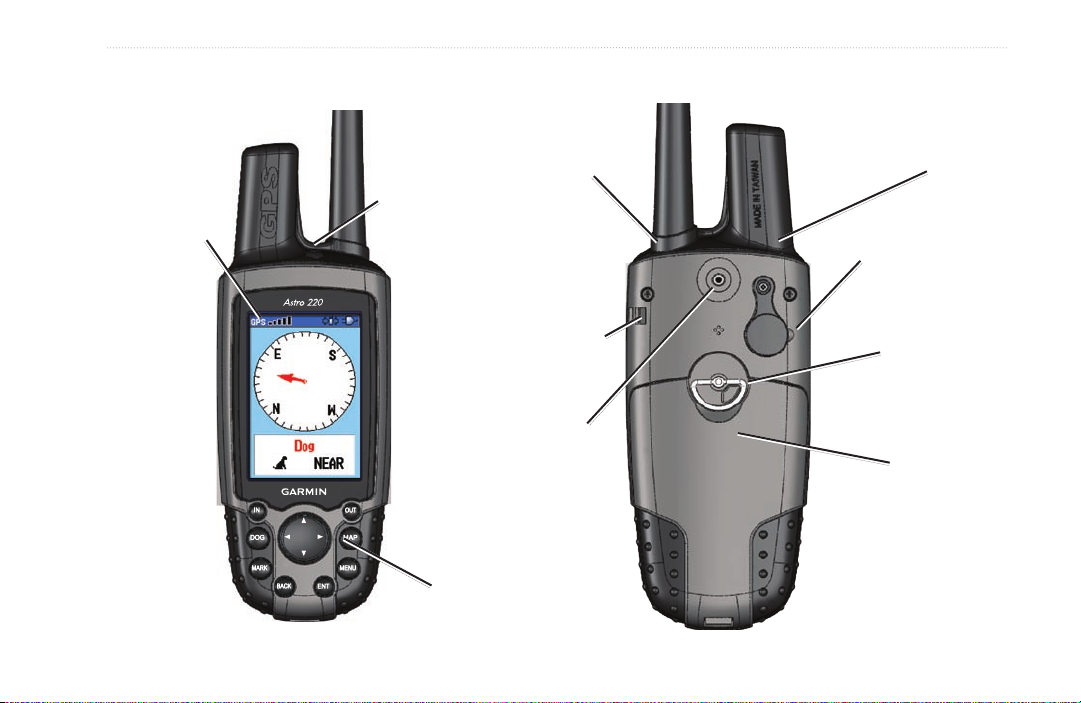
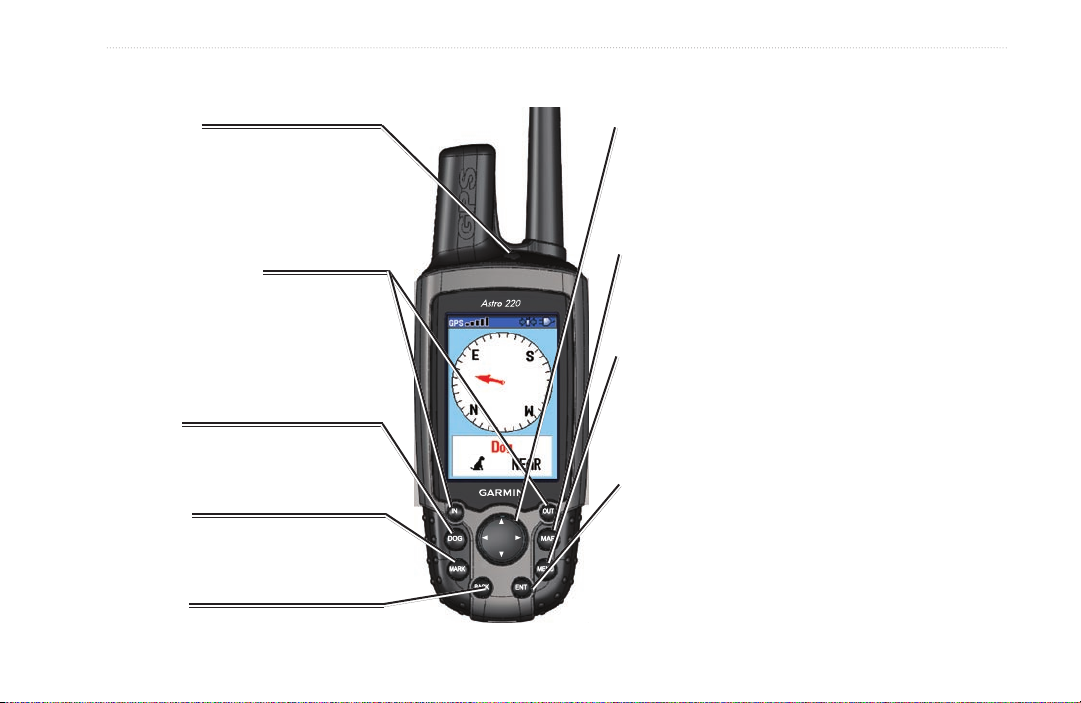
Unit Overview
LCD
screen
Power key
GettInG Started
VHF
antenna
GettInG Started
GPS
antenna
USB connector port
(under weather cap)
Lanyard
attachment slot
Belt clip button
attachment
location
Keypad
Astro Dog Tracking System Owner’s Manual 1
Battery compartment
locking D-Ring
Battery compartment
cover and access to
the microSD card tray
GettInG Started
Battery
compartment
Battery
compartment
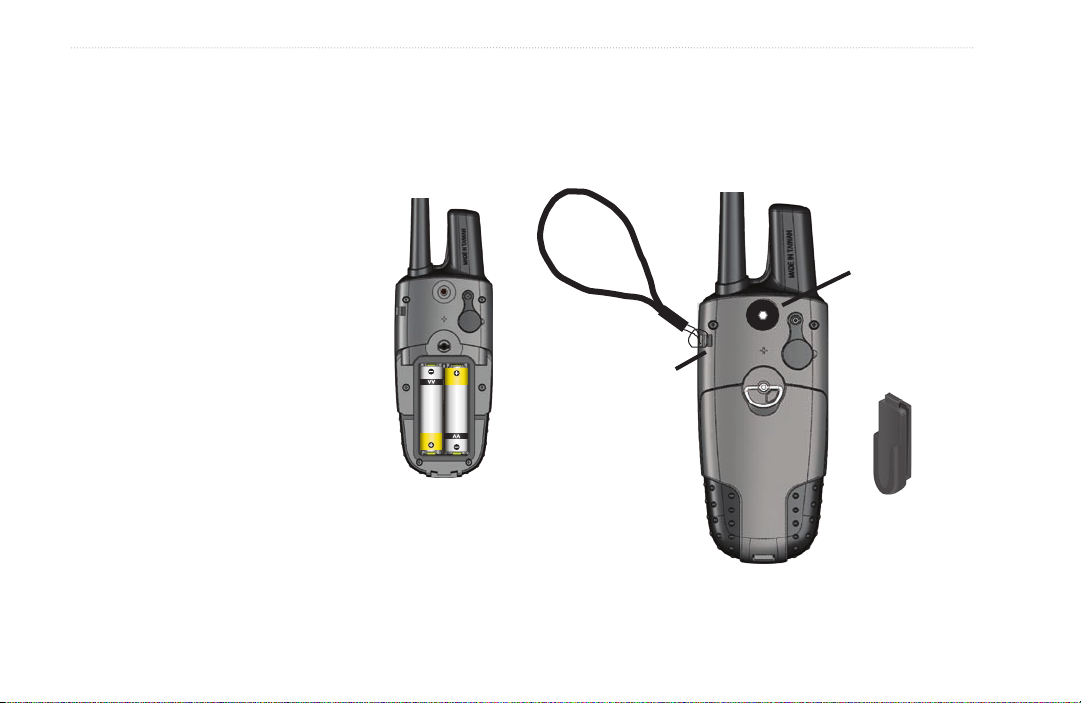
Installing the Batteries
The Astro 220 operates on two AA batteries (not
included), which are located in the back of the unit. You
can use Alkaline or NiMH batteries. See page 54 for
information on setting the battery type.
To install the batteries:
1. Remove the battery by turning the
D-Ring 1/4 turn counter-clockwise
and pulling the cover loose.
2. Insert the batteries, observing
the proper polarity. A polarity
diagram is molded into the battery
compartment.
3. Reinstall the battery cover.
Remove the batteries from your Astro 220 when you do
not expect to use the unit for several months. Data is not
lost when batteries are removed.
Refer to page 67 for information on accessing the
microSD data card in the battery compartment.
To install the lanyard:
1. Place the loop of the lanyard through the slot at the
upper left side on the back of the unit.
2. Route the strap through the loop and pull tight.
Belt clip button
installation
(tighten the
button securely)
Wrist strap
installation
Belt clip
2 Astro Dog Tracking System Owner’s Manual
Using the Astro 220 Keypad Functions
GettInG Started
POWER Key
Press and hold to turn the unit on
or off.
Press and release to adjust the
backlighting.
IN/OUT Zoom Keys
Press to zoom in or out on the Map
page.
Press to scroll up or down a list on
any other page.
DOG Key
Press and release at any time
view the Dog Tracker
MARK Key
Press and release at any time to
mark a variety of locations.
BACK Key
Press and release to cancel data entry or move backwards through the pages to the Main Menu.
Astro Dog Tracking System Owner’s Manual 3
to
page.
ROCKER Key
Press up, down, left, or right to highlight
options and to enter data, or move the map
panning arrow.
MAP Key
Press and release to view the Map page.
MENU Key
Press and release to view page options
Press twice to view the Main Menu.
ENT (ENTER) Key
Press and release to enter highlighted
options, select data or conrm on-screen
messages.

GettInG Started
Turning on the Astro 220
The rst time you turn on the Astro 220, a message
appears followed by a prompt. Thereafter, when the
Astro 220 is turned on, the Introduction page appears,
followed by the Dog Tracker page.
To turn the Astro 220 on and off:
1. Press and hold the POWER key, a tone sounds
and the Introduction page appears, followed by the
Dog Tracker page.
2. To turn off, press and hold the POWER key again.
Introduction Page Dog Tracker Page
Adjusting the Astro 220 Backlight
You may want to adjust the backlight to see the display
better.
To adjust the backlight level:
1. Press and quickly release the POWER key.
2. Press the POWER key repeatedly to cycle through
the brightness levels or use the ROCKER up/down
arrows.
3. Press ENTER or BACK to close the backlight
adjustment window.
Backlight Adjustment Slider
See page 55 for information on changing the display
colors and backlight time out.
4 Astro Dog Tracking System Owner’s Manual
GettInG Started
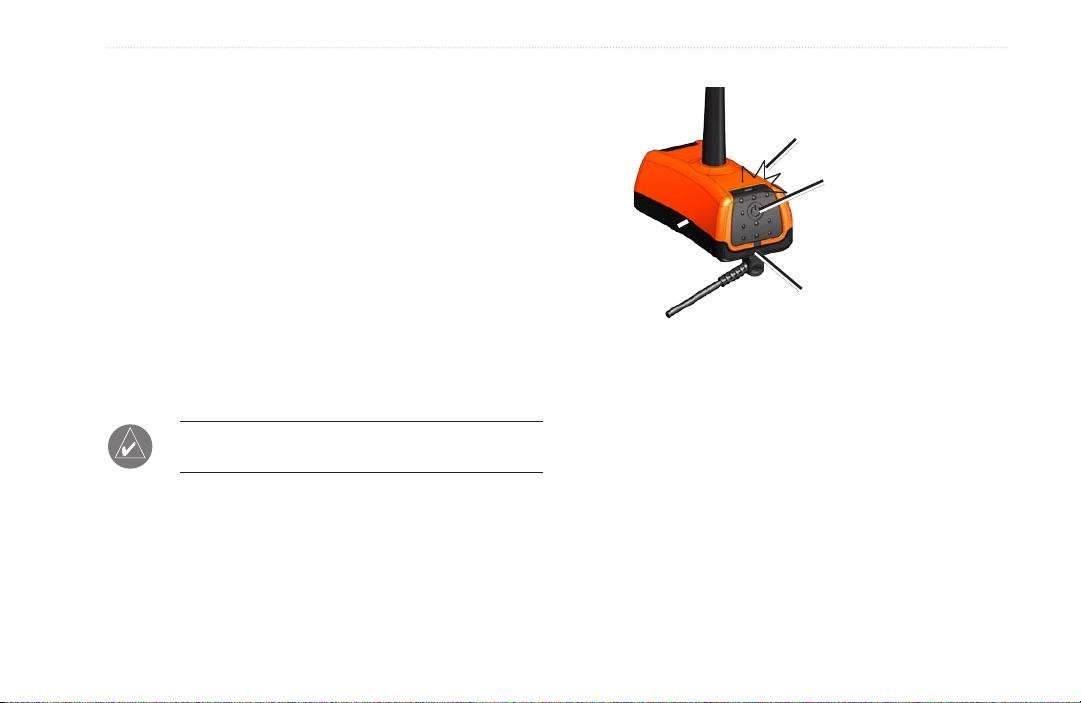
Charging the DC 20
Every DC 20 is partially charged before leaving the
factory, so you don’t need to charge before using it.
However, it is recommended that you fully charge the DC
20 before using it on a hunt.
To charge the DC 20:
1. Connect the charging assembly to an appropriate
electrical source.
2. Slide the slotted spade connector into the matching
slot beneath the power switch.
3. Charge until the blue LED on the top of the unit
turns off.
NOTE: Charging a fully depleted DC 20 battery
requires 3-1/2 to 4 hours.
To turn the DC 20 on and off:
1. Press and hold the POWER key. When the unit
turns on, the LED turns red and blinks at a steady
pulse.
2. To turn off, press and hold the POWER key.
LED blinks
red when
power is on.
DC 20
power key
Battery
charging slot
Initializing the GPS Receivers
The rst time you turn on your Astro 220 and DC 20,
each GPS receiver must collect overhead satellite signal
data to establish its current location. To ensure proper
initialization, the Astro 220 and DC 20 are shipped from
the factory in AutoLocate® mode, which allows each
receiver to “nd itself” anywhere on Earth whenever you
turn it on. To receive satellite signals, both units must be
outdoors and have a clear view of the sky.
Astro Dog Tracking System Owner’s Manual 5
GettInG Started
To initialize your Astro 220 and DC 20:
Hold the units in front of you with the antennas
held upward. While the Astro 220 GPS receiver is
searching for the satellite signals, observe the GPS
Signal Strength bars in the Status Bar at the top of
the page. When the receiver has signals from at
least three satellites, the GPS bars ll to indicate
signal strength and a location x, while the LED
on the DC 20 double blinks at each pulse when a
location x is achieved.
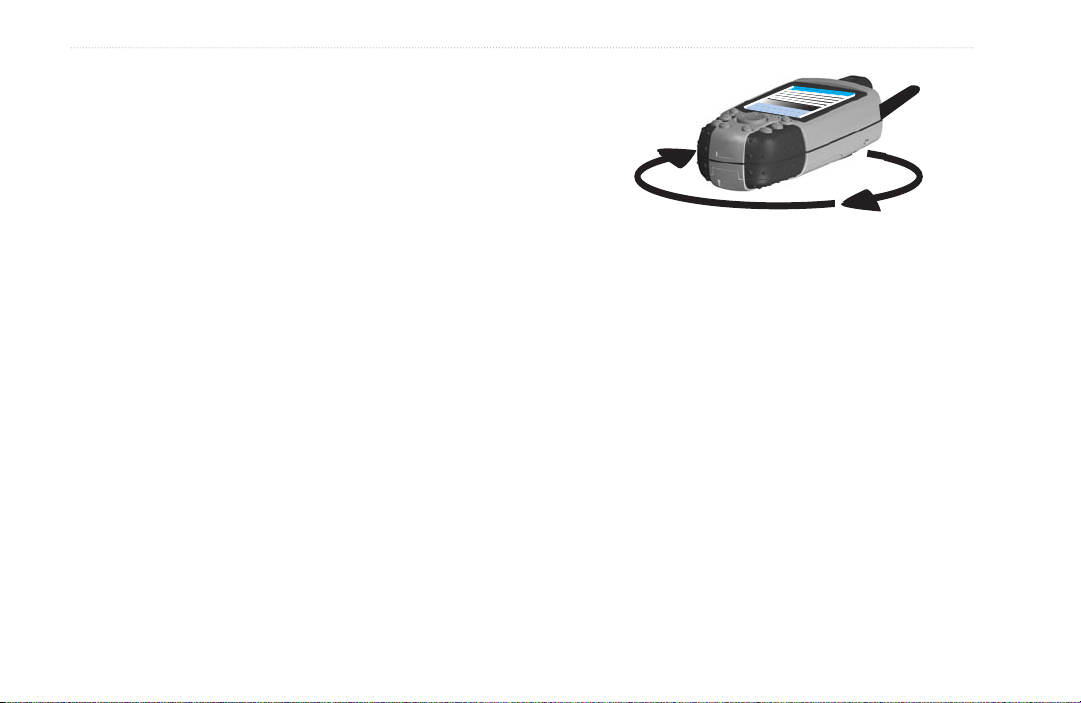
Calibrating the Astro 220 Compass
It is recommended that the Astro 220 compass be
calibrated the rst time you use it, after periods of
storage, after you install new batteries, or when exposed
to temperature changes of greater that 20
Calibrate the electronic compass outdoors. The accuracy
of the electronic compass is adversely affected if the unit
is not held level or you are near objects that generate
magnetic elds, such as cars or buildings.
o
F.
Hold the unit
level and turn
slowly.
To calibrate the electronic compass:
1. From the Dog Tracker page or Compass page,
press MENU to open the options menu.
2. Select Calibrate Compass to open the Calibration
page.
3. Select Start and follow on-screen directions for
holding and turning the unit.
A “Just Right,” “Too Fast,” or “Too Slow”
•
message appears notifying you to adjust your
turning speed, as needed. Hold the unit level
while turning.
A “Calibration Successful” message appears
•
when nished. Press ENTER to exit.
If a “Calibration Failed” message appears,
•
repeat the process.
6 Astro Dog Tracking System Owner’s Manual

GettInG Started
Operating the Astro 220
This section explains how to enter and select information
with the Astro 220.
Default—the factory setting saved in the unit’s memory.
You can change the settings, but you can revert to the
factory settings when you select Restore Defaults when
it is an option.
Understanding Terms
The following terms are used throughout this manual:
Select—move the highlighted area on the screen
up, down, left, or right with the ROCKER to select
individual elds.
Key—when you are directed to press a key, press and
quickly release the key.
Field—the location on a page where data or an option can
be shown and entered. A highlighted eld appears yellow.
On-screen button—use the ROCKER to select a button,
and press ENTER.
Scroll bar—when viewing a list of items too long to
appear on the screen, a scroll bar appears along the right
side of the list. To scroll through a list, press up or down
on the ROCKER or use the In and Out keys to scroll a
set of items.
Wizard—an on-screen guide to performing functions that
require multiple steps and options.
Manual Conventions
In this manual, when you are instructed to select an item,
small arrows (>) appear in the text. They indicate that you
should highlight a series of items on the screen using the
ROCKER, and press the ENTER key after each item.
For example, if you see “select Dog > Show Info,” you
should highlight Dog, and press ENTER. Then highlight
Show Info, and press ENTER again. Many features are
controlled by wizards that guide you through the process
with on-screen instructions and do not require detailed
explanation.
Astro Dog Tracking System Owner’s Manual 7
GettInG Started
Status Bar
To exit or return to a previous setting or page:
Press the BACK key to move backward through
your steps. Press BACK repeatedly to return to the
Main Menu.
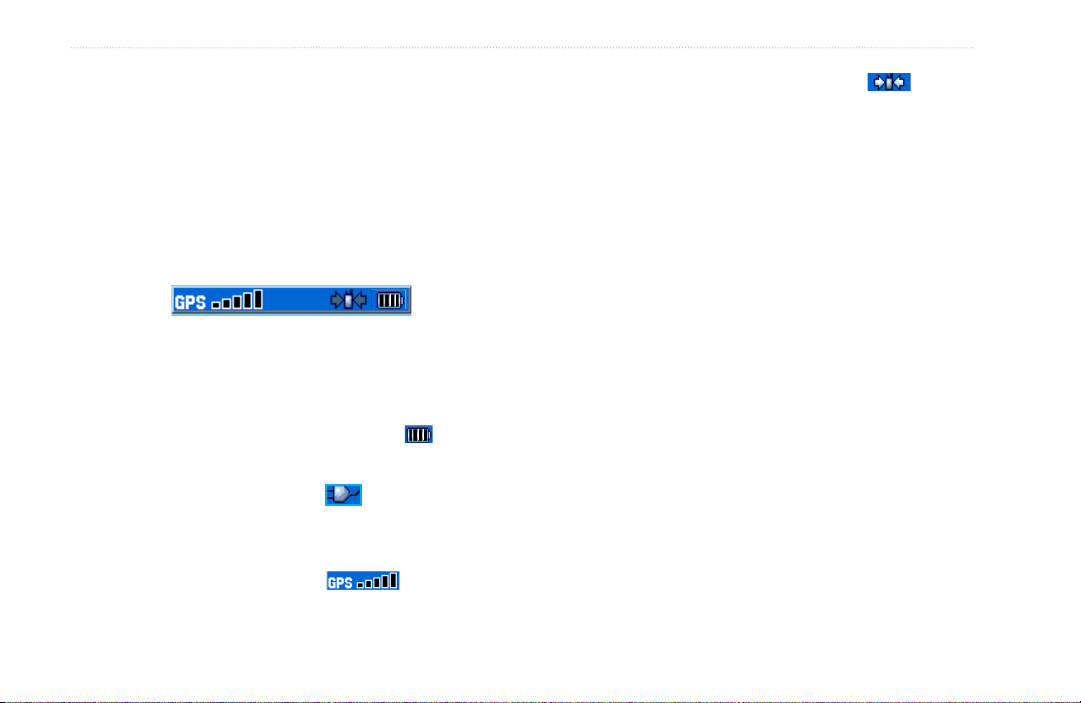
Using the Status Bar
At the top of each page, the status bar provides status
information for several unit features.
The Receiving Communication icon ( ) blinks
•
whenever the unit detects an radio frequency signal
on the channel it is receiving. For example, this
icon blinks each time it receives a DC 20 signal.
On-Screen Messages
When a signicant event in the operation of the unit
occurs, an on-screen message appears to advise you of
the occurrence. In each case, the condition is described
and often a remedy is provided. Press ENTER to
acknowledge the message and close the window.
Power to the unit is provided by either batteries or
•
from an auxiliary source (vehicle power cable or
USB cable). The Battery Power icon ( ) shows
In some instances, the message may indicate a temporary
condition such as the “Calculating Route” message and
closes as soon as the process is completed.
the remaining power as the battery is depleted.
The Auxiliary Power icon ( ) appears when the
•
unit is powered by an external source.
Satellite signal strength bars are lled in when the
•
unit has acquired satellites ( ).
8 Astro Dog Tracking System Owner’s Manual
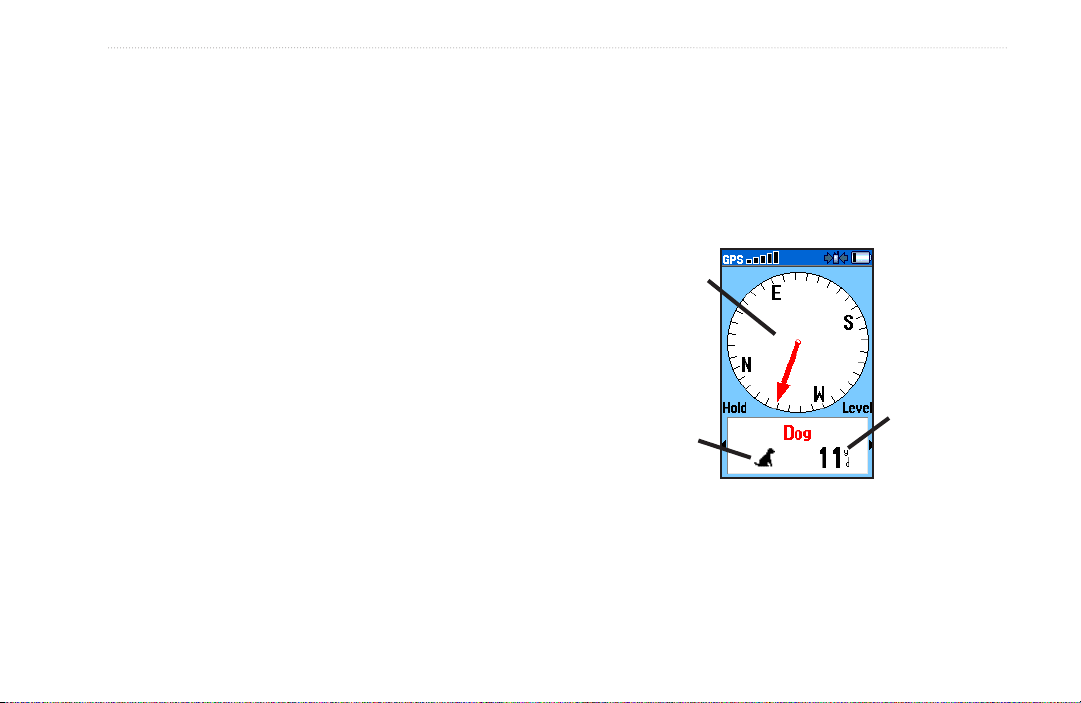
doG trackInG
doG trackInG
When in communication with the DC 20, this page
indicates the direction of the dog, distance away from
This section explains some of the more common
operations you can perform with your Astro 220,
including communicating with the DC 20, tracking dogs,
and adding dogs to the Dog List.
you, and status of the dog’s activity. The Astro 220 can
keep track of ten dogs, but only three at a time are shown
on the Dog Tracker page. When additional dogs are being
tracked, use the ROCKER to scroll through the list of
dogs.
Communicating with the DC 20
After the Astro 220 and the DC 20 have been turned on
and both have a GPS location x, you can then ensure
the DC 20 is communicating with the Astro 220. If you
are using the DC 20 that was packaged with your Astro
220 System, it has been linked with the Astro 220 at the
factory, so you can begin tracking immediately. If you
are using a new DC 20, then also follow instructions for
adding a new dog on page 13.
To view communication with the dog’s DC 20:
Press the DOG key to view the Dog Tracker page
with dog listed below the compass.
To view details about a selected dog unit:
Use the ROCKER key to select the dog on the list
Direction
to dog
Dog status
icon
Dog Tracker Page
and then press ENTER to view its Dog Info page.
Distance to
dog
Astro Dog Tracking System Owner’s Manual 9
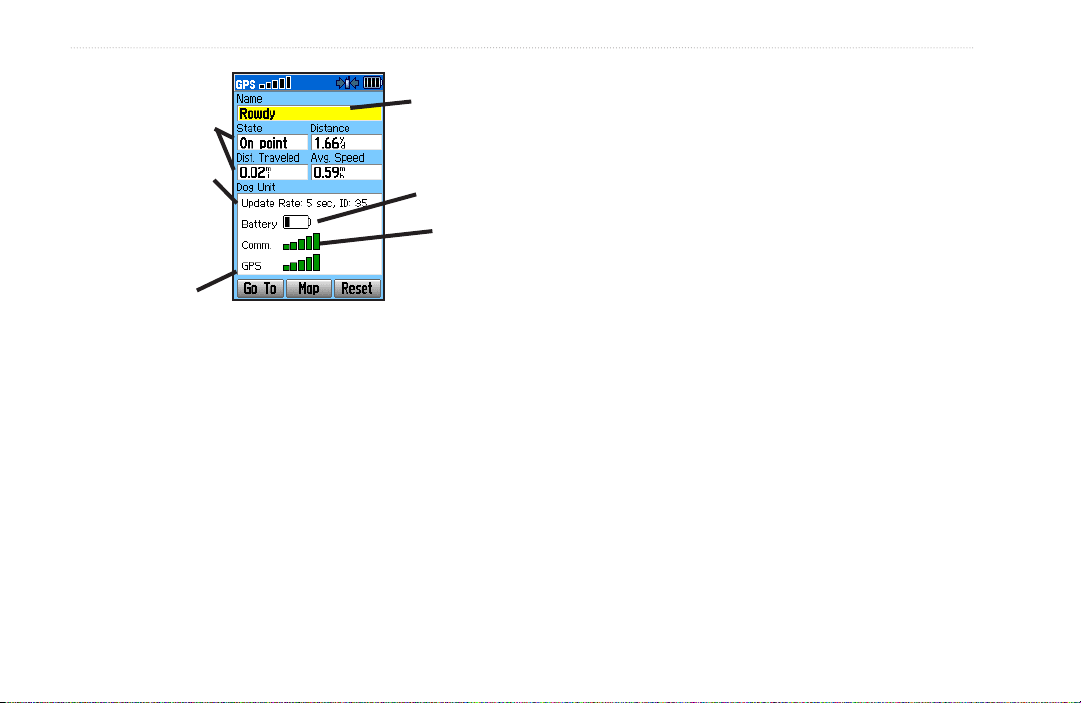
doG trackInG
Naming the dog
Dog status elds
Positon update
rate and dog
communication
ID No.
DC 20 GPS signal
strength
Dog name
eld
DC 20 battery
capacity
DC 20
communication
signal strength
By default the Astro 220 assigns the name Dog (Dog 1,
Dog 2, etc.) to every Dog Unit (DC 20) linked to it. When
you use the ROCKER, to select the Name Field on the
Dog Info page and press ENTER, an on-screen keyboard
appears. Use the ROCKER to move about the keyboard
to place your dog’s name in the Name Field. Select OK
and press ENTER when done.
Using the Go To, Map, and Reset on-
The dog being tracked is named at the top of the Dog Info
page. The elds below the name show the dog’s status
(a Running, Sitting, Treed, On-Point, or Unknown?), the
distance from your location, the distance traveled, and the
average speed. The eld titled “Dog Unit”, indicates the
position reporting update rate, the user assigned DC 20
ID number (0-49), the DC 20 battery capacity, the DC 20
to Astro 220 communication signal strength, and the DC
20 GPS signal strength.
screen buttons
•
•
•
Selecting the Go To button at the bottom of the
page and pressing ENTER takes you to the Map
page with directions for navigating to your dog.
Selecting the Map button takes you to the Map
page to view the location and movement of your
dog.
Selecting the Reset button resets the dog stats and
track log for that dog.
10 Astro Dog Tracking System Owner’s Manual

doG trackInG
Dog Info Page Options Menu
This allows you to:
Stop/Start Tracking
•
the dog associated with the Dog Info page.
Identify Dog Unit
•
red LED for ten seconds and indicates the software
version.
Change Comm. Settings—allows you to assign a
•
new ID number to a dog to avoid conicting signals
and/or the rate of reporting (5, 10, or 30 seconds).
Transfer Dog Unit Track
•
detailed tracks from the DC 20 via the Astro 220 to
a computer. See page 70 for details and procedures.
Delete Dog Unit Track
•
track log.
Change Dog Unit Type
•
your dog type in order to show the appropriate dog
status symbols. Choose from Auto, Pointing Dog,
Treeing Dog, or Pet.
—stops and restarts tracking
—rapidly blinks the DC 20’s
—initiates transfer of
—resets the DC 20 internal
—allows you to identify
Upgrade Dog Unit
•
to the DC 20 from your computer via the Astro 220.
Refer to page 69 for details.
—allows free software upgrades
Tracking a Dog
Once you have attached the DC 20 to your dog (see the
Set-up Guide for instructions on attaching the DC 20) and
the dog begins to move away from you, begin tracking
using the Dog Tracker page or the Map page.
Make certain that your compass is calibrated and you are
holding the Astro 220 level to achieve the most accurate
readings.
Tracking a dog on the Dog Tracker Page
To view the dog’s direction, distance, and activity status,
use the Dog Tracker page.
To view the Dog Tracker page:
Press the DOG key.
Astro Dog Tracking System Owner’s Manual 11
doG trackInG
Observe the Dog Tracker page to see that the dog you are
tracking is identied and the direction pointer is pointing
in its general direction. This works best when the dog
is at least thirty feet away; inside that distance a NEAR
message is shown. When NEAR, the pointer is shortened.
The pointer may not point exactly at your dog as the
Dog Tracker Page Options Menu
With the Dog Tracker page open, press the MENU key to
open the Options Menu. This allows you to:
•
•
system only sends location updates every 5 seconds. When
you are close to the dog, GPS uncertainty and compass
inaccuracy can contribute to several degrees of error on the
•
dog pointer. Hold the Astro 220 level for accuracy.
•
Observe the dog’s name, an icon showing its status, and
the distance from your current location. (An unknown
status symbol [?], indicates that the Astro 220 cannot
•
determine the dog’s location.) Use the pointer to locate
the direction to your dog. To change the color of your
dog’s pointer, see page 40.
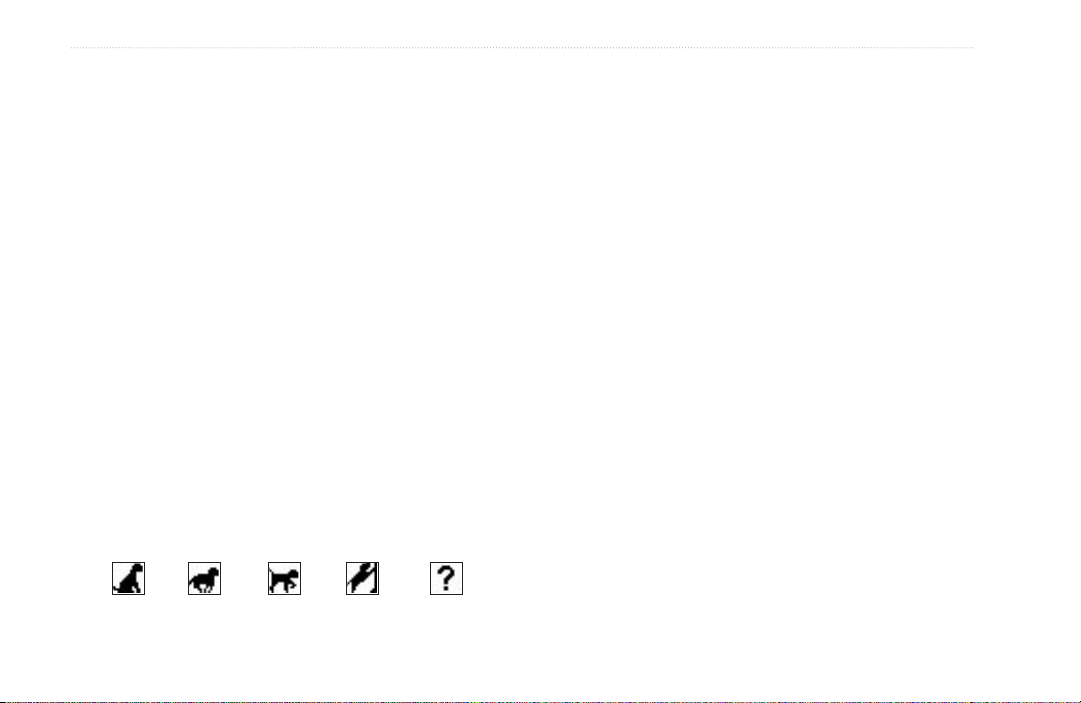
Dog status icons
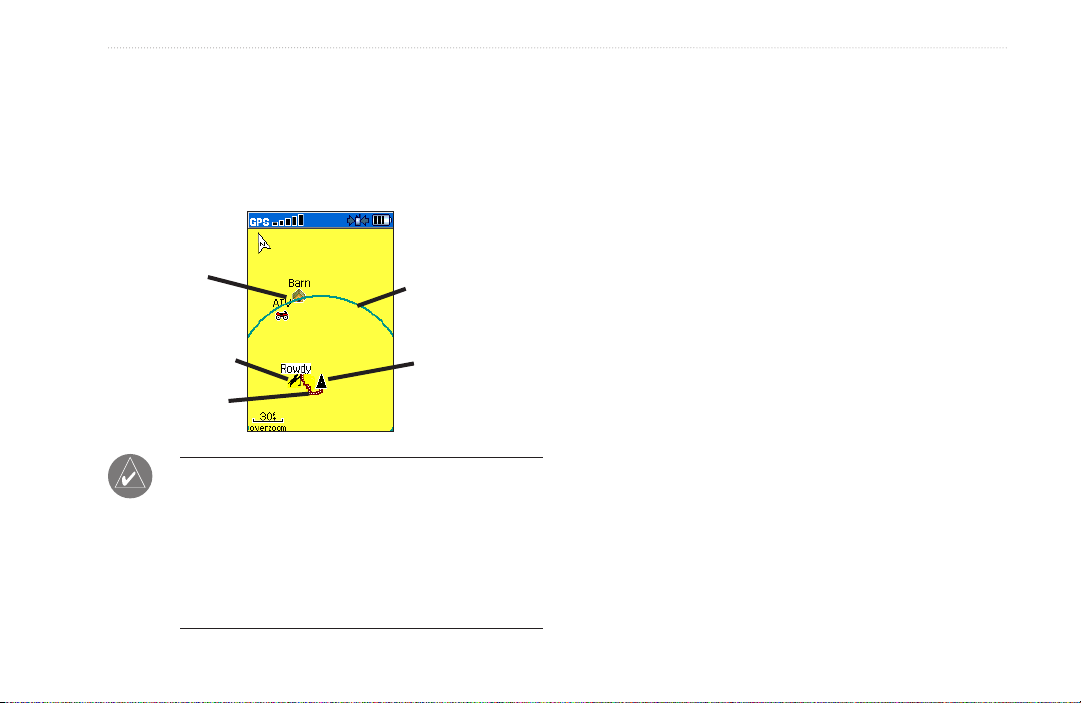
Tracking a dog on the Map Page
To view the dog’s location and your own location, use the
Map page.
To view the Map page:
Sitting TreedRunning On point Unknown
1. Press the MAP key to open the Map page.
Show Info
—opens the Dog Info page for the
selected dog.
Pause/Resume All Tracking
—pauses tracking of
all dogs as you move between hunts.
Calibrate Compass—allows you to calibrate the
compass as explained on page 6.
View Dog List
—opens the Dog List to allow for
adding or removing dogs.
Small Numbers/Big Numbers
—changes the size
of the dog descriptions on the Dog Tracker page.
12 Astro Dog Tracking System Owner’s Manual
doG trackInG
2. Observe a dog icon and the name of the dog on
the map. A track showing the dog’s movements is
also displayed.
3. Observe your current location and track on the
map.
Marked
Locations on
map
Dog status icon
Dog’s track
NOTE: When the Map page is in the Track Up
orientation mode, objects on the map appear to rotate
around your position. Actually, as you move, the
entire map reorients in the direction you are facing.
To make the objects remain stable, set the orientation
to North Up by following instructions for general
map set-up on page 56.
Accuracy Circle
Your position is
indicated by the
black pointer
To learn more about the Map page features and custom
settings, refer to page 56.
Adding dogs to the Dog List
If you purchased your Astro 220 as a kit, the DC 20
provided in the kit was linked to the Astro 220 at the
factory. If you have additional DC 20 units, you can link
them to the Astro 220 using the setup wizard in the Dog
List.
To add a new dog to the list:
1. With the Dog Tracker page open, press MENU
select Dog List > select <Add New>, and press
ENTER to open the setup wizard.
2. Follow the setup wizard instructions using the
ROCKER and ENTER keys to select and conrm
options. By default, the new dog is named Dog and
an ID number is randomly assigned.
3. When asked if the dog is to be sharing a dog unit,
select NEW since the new dog has its own DC 20.
Astro Dog Tracking System Owner’s Manual 13

doG trackInG
Conicting dog signals
Each dog you are tracking has its own ID number. If two
dogs within range of the Astro 220 have the same ID the
Astro 220 warns you of a conicting ID signal. It then
opens a setup wizard to guide you through the process
of ignoring the conict. If necessary, you can assign new
ID numbers to each dog. Also, because you can track 10
dogs at once, certain IDs cannot be used together. For,
example: 12, 22, 32, and 42 cannot be used together. For
this reason, we recommend you allow the Astro 220 to
automatically assign IDs, unless you are an advanced
Tips for Successful Tracking
Use a fully charged DC 20
Observe the Dog Info page to determine the battery
capacity of the DC 20. A fully charged DC 20 operates for
approximately 17 hours with 5 second interval reporting.
user.
Use line-of-sight radio communication
To assign a new ID number to a dog:
1. With the Dog Tracker page open, press MENU >
select Change Comm. Settings.
2. Follow the on-screen instructions.
3. Select an unassigned and non-conicting ID > OK.
4. Change the update rate, if desired. Both 10 and 30
second updates reduce battery drain, but create
a less detailed dog track and collected statistics.
(See page 70 for downloading.)
The Astro 220 and DC 20 use radio signals to
communicate with each other. Objects in the path of radio
signals degrade the quality of signal that reaches your
Astro 220. Keeping an unobstructed “line-of-sight”
between you and your dog’s DC 20 produces the best
communication signal. Partially or fully obstructed radio
waves result in a poor signal.
5. Follow the on-screen instructions to nish the setup
wizard.
NOTE: You must be able to touch the Astro 220 to
the DC 20 to change the ID.
14 Astro Dog Tracking System Owner’s Manual
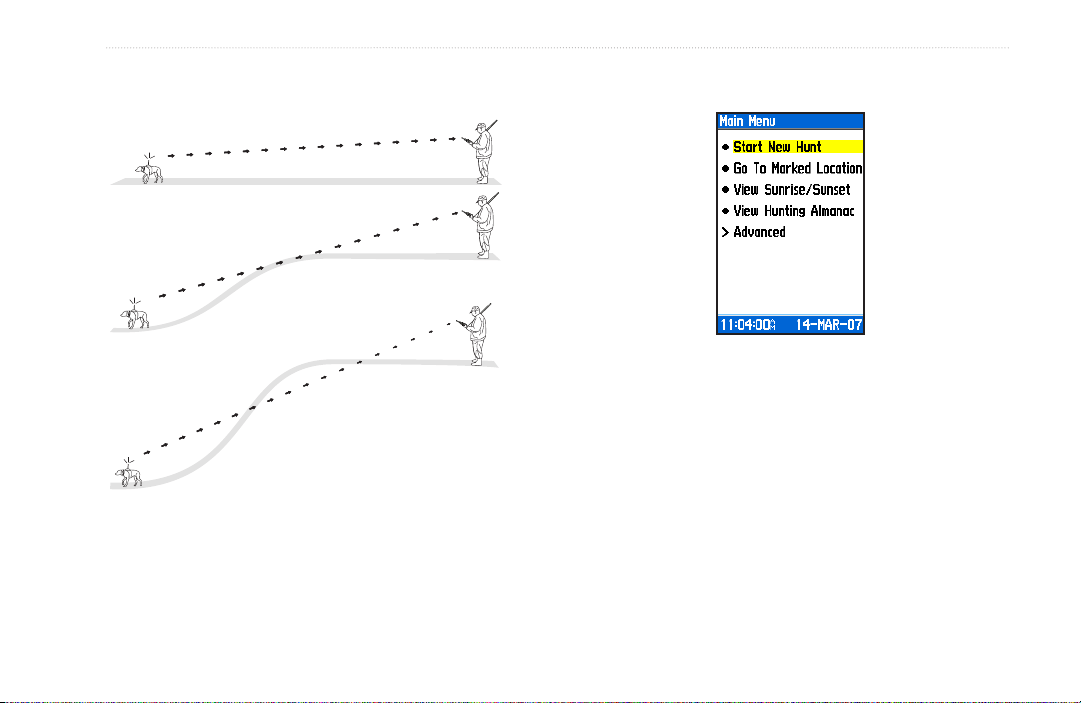
MaIn Menu
Line-of-Sight Radio Communication
BEST
GOOD
MaIn Menu
To open the Main Menu press MENU twice.
Start New Hunt
POOR
Astro Dog Tracking System Owner’s Manual 15
This option provides the ability to easily reset dog
statistics, track logs, and mark the location of your
vehicle.
To clear the statistics from a previous hunt
and mark a new starting location:
Select Start New Hunt and follow on-screen
instructions.

MaIn Menu
Go To Marked Location
To navigate to a location you have marked:
Select Go To Marked Location > select the
location you want from the list.
View Sunrise/Sunset
The View Sunrise/Sunset page shows sunrise, sunset,
moonrise, and moonset times before beginning a hunt.
To view sun and moon locations for a
specied time, date, and location:
1. Select View Sunrise/Sunset.
2. To view the predictions for a different date and
time, select either the Date or Time eld to open
the on-screen keypad.
3. To view the predictions for a different location,
select the Location eld to open the New Location
Options Menu.
16 Astro Dog Tracking System Owner’s Manual
View Hunting Almanac
An almanac of tables provides you with a listing of
predicted best times for hunting and shing for a chosen
date and location.
To show hunting and shing predictions for a
specied date and location:
1. Select View Hunting Almanac. The current date
and location appear in the date and location elds
at the top of the page.
2. To view the predictions for a different date, select
Date to open the on-screen keypad.
3. To view the predictions for a location, select the
Location eld to open the New Location Options
Menu.
4. Choose Use Map to select a point on the map
using the pointer arrow. Press ENTER to show the
table for that location.

Mark LocatIon
Advanced
Select Advanced to view the following advanced feature
menus:
Find
—used
for locating and navigating to marked
locations and other items contained in the Astro 220
basemap and on downloaded MapSource
®
detailed maps.
GPS Applications—navigation tools used to aid
Locations are landmarks you record and store in your
Astro 220. When beginning a hunt, it’s a good practice
to mark the location of your vehicle so you can use your
Astro 220 to navigate back to it. The Start New Hunt
option does this automatically, or you can press the
MARK key.
Mark LocatIon
navigation and provide information about your progress.
Marking Your Current Location
Accessories—convenient tools such as a calendar and
calculator.
Settings—allows you to customize Astro 220 features to
your requirements.
Astro Dog Tracking System Owner’s Manual 17
Use the MARK key to quickly mark new locations. You
must have a valid GPS position x to mark your current
location.
To mark your current location:
1. Press MARK. The Mark Location window appears
with the “New” option highlighted.
2. Press ENTER to view the Mark Location page.
3. To accept the location as a marked location,
select OK.
Mark LocatIon
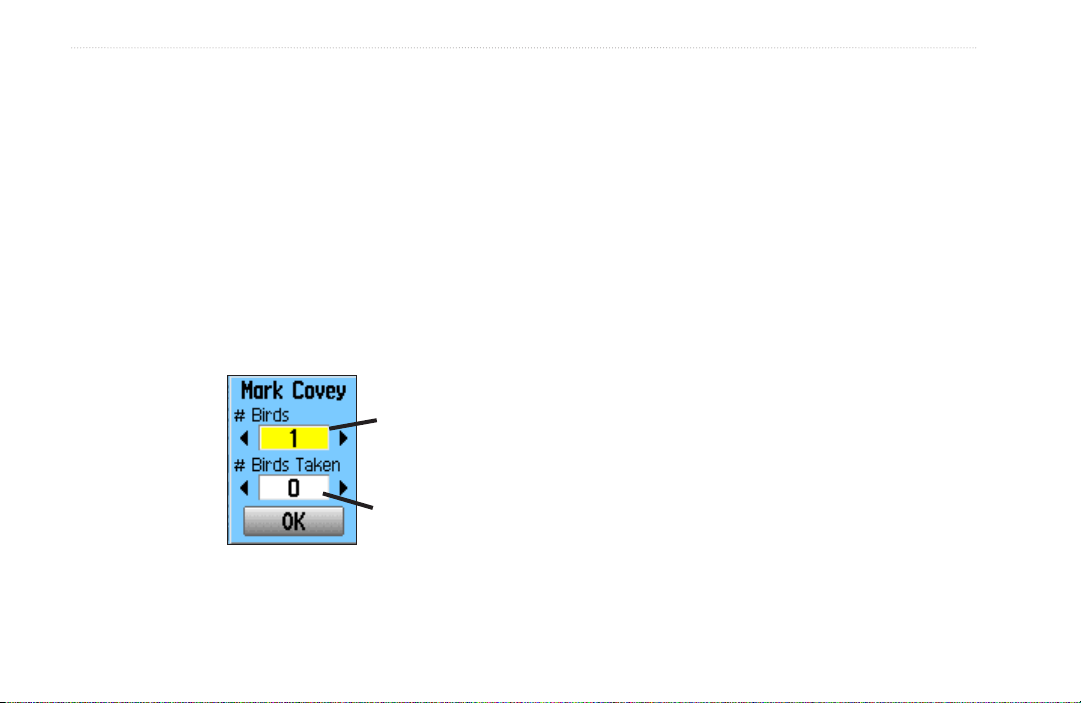
Marking Hunting Specic Locations
When you press the MARK key, the Mark Location
Menu appears with the New option highlighted. All of the
items shown mark your current location, and some assign
Marking a Location Using the Map
You can quickly create a location using the Map page,
when you use the ROCKER key to pan the map and
move the arrow to a map item.
a special hunting related name and symbol to the marked
location. Choose from Covey, Truck, ATV, Lodge, Camp,
Blind, or Tree Stand. The Mark Covey option opens a
window for entering data about a bird covey location for
later review. You can enter the estimated number of birds
ushed and the number taken and then select OK to mark
that location.
When you mark
this location the
Enter the number of
birds ushed
date and time plus
bird information is
recorded to aid in
nding this covey
Enter the number of
birds taken
site again, and to
To mark a location using the Map page:
1. Press MAP, and use the ROCKER to move the
pointer to the map item you want to mark as a
location.
2. Press ENTER to capture the pointer location and
open the information page for the map item.
3. Select Save. If the map item selected contains no
information, a “No map information at this point.
Do you want to mark a location here?” message
appears. Select Yes.
4. To change any information on the Location page,
select the appropriate eld, and press ENTER to
open the on-screen keypad. After entering and
conrming your changes, select OK.
aid in managing
bird numbers.
18 Astro Dog Tracking System Owner’s Manual

Mark LocatIon
Editing a Location
You can edit a location by changing the symbol, name,
Averaging a Marked Location
You can average a marked location for more accuracy.
note, location coordinates, elevation, and depth.
To edit a location:
1. Select Advanced > Find > select Marked
Locations to open the Location page.
2. Select the location you want to edit, and press
ENTER.
3. Make changes by selecting each eld and use the
location symbol chart and alphanumeric keypad to
enter new data.
Projecting a Location
You can create a new location by projecting the distance
and bearing from a marked location to a new location.
To move a location on the Map page:
1. Select Advanced > Find > Marked Locations.
2. Select Map to show the location on the map.
3. Press ENTER again to place a MOVE marker next
to the location.
4. Use the ROCKER to move the location to a new
location on the map, and press ENTER.
To calculate the average location:
1. When at a location that you want to calculate an
average for, and press MARK > Avg to open the
Average Location page to begin averaging.
2. Press Save when done.
To project a location:
1. Select Advanced > Find > Marked Locations >
select the location and press ENTER.
2. Press MENU > select Project Location.
3. Enter the bearing and distance to the projected
location in the appropriate elds at the bottom of
the page then to navigate to it, select Go To.
Astro Dog Tracking System Owner’s Manual 19
 Loading...