

Garmin ASTRO 900/T9 Owner's Manual
ASTRO® 900/T9
Owner’s Manual

© 2018 Garmin Ltd. or its subsidiaries
All rights reserved. Under the copyright laws, this manual may not be copied, in whole or in part, without the written consent of Garmin. Garmin reserves the right to change or improve its
products and to make changes in the content of this manual without obligation to notify any person or organization of such changes or improvements. Go to www.garmin.com for current updates
and supplemental information concerning the use of this product.
Garmin®, the Garmin logo, ANT+®, Astro®, BlueChart®, City Navigator®, and TracBack® are trademarks of Garmin Ltd. or its subsidiaries, registered in the USA and other countries. BaseCamp
™
and chirp™ are trademarks of Garmin Ltd. or its subsidiaries. These trademarks may not be used without the express permission of Garmin.
Windows® is a registered trademark of Microsoft Corporation in the United States and/or other countries. Mac® is a trademark of Apple Inc., registered in the USA and other countries. microSD
®
and the microSD logo are trademarks of SD-3C, LLC.
Other trademarks and trade names are those of their respective owners.
Introduction
WARNING
See the Important Safety and Product Information guide in the
product box for product warnings and other important
information.
Setting Up the System
You must set up the handheld device and the dog collar device
before you can use the devices.
1
Install batteries in the handheld device (Installing Batteries,
page 1).
2
Charge the dog collar device (Charging the Dog Collar
Device, page 1).
3
Turn on the devices (Turning On the Device, page 2).
4
If necessary, add the dog collar device to the handheld
device (Adding a Dog to the Astro 900 Handheld, page 4).
5
Acquire satellite signals (Acquiring Satellite Signals,
page 2).
Device Overviews
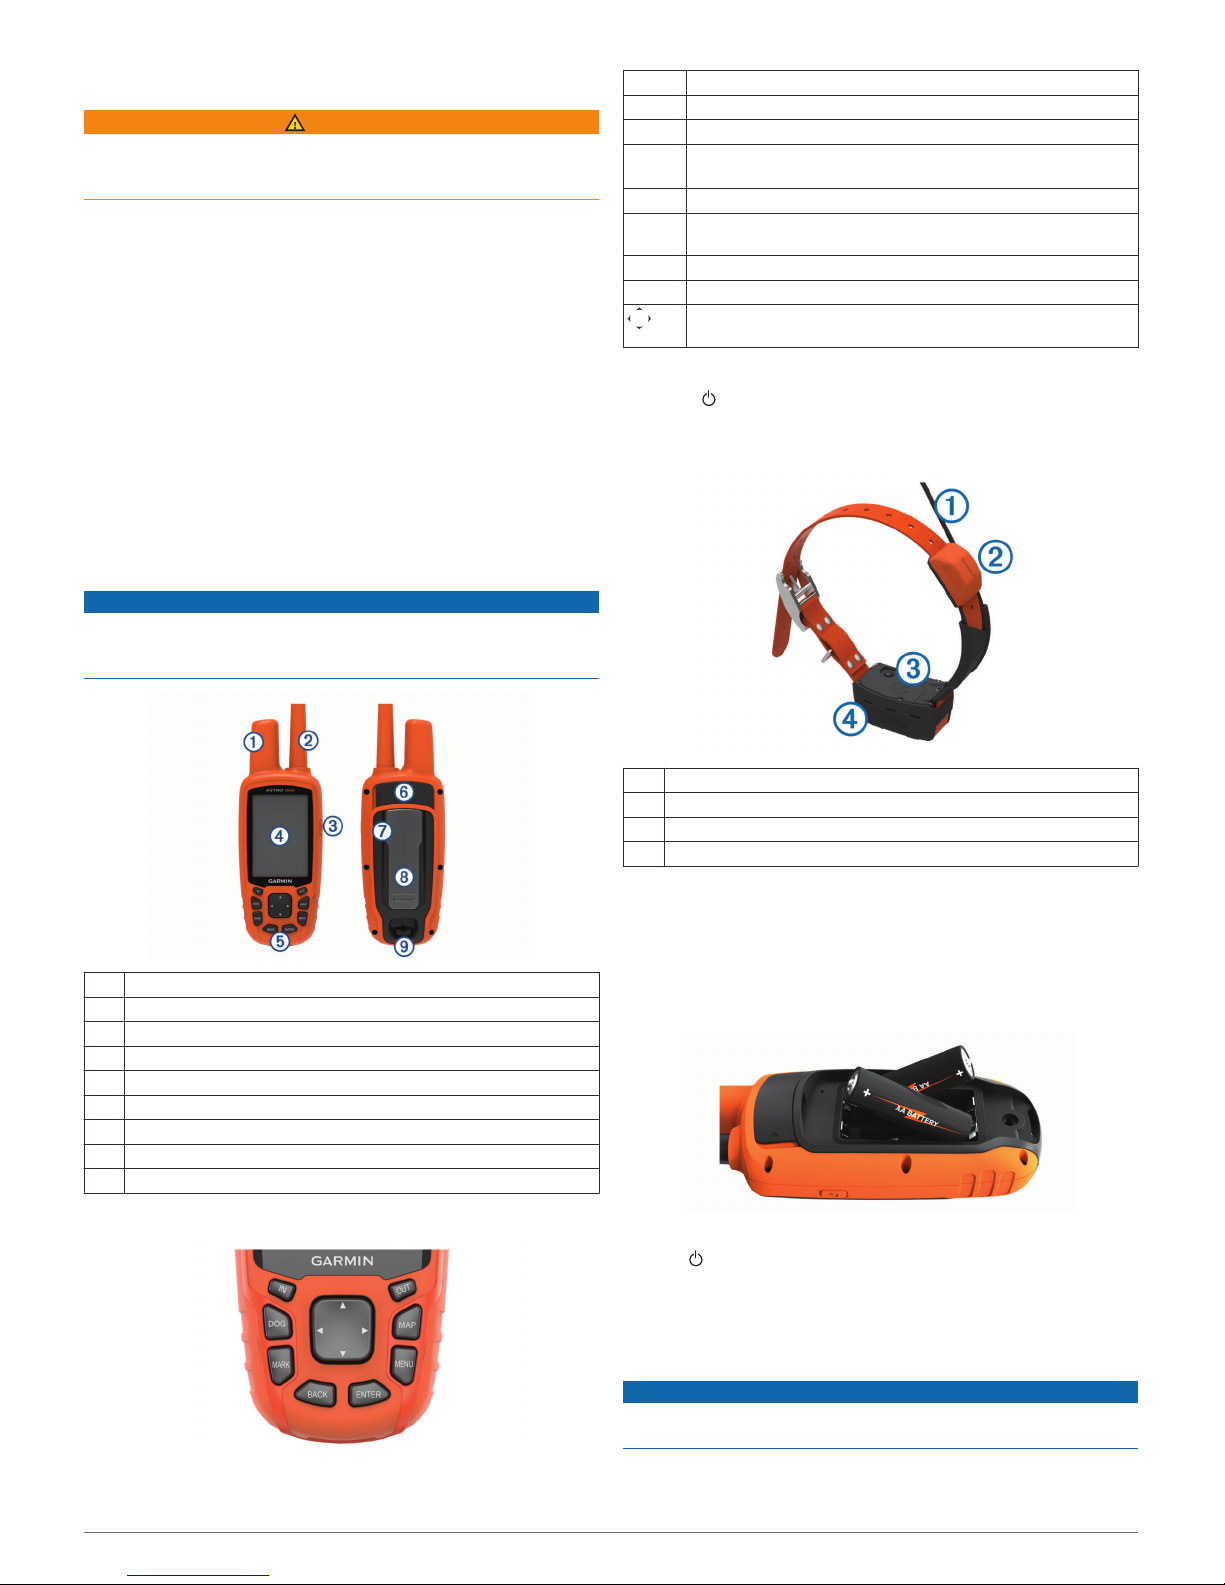
Astro 900 Handheld Device
NOTICE
Avoid using a high-powered radio (greater than 5 W) in close
proximity to the handheld device. It may cause irreversible
damage to the handheld device.
À
GPS antenna
Á
Communication antenna
Â
Power key
Ã
Display
Ä
Keypad
Å
USB port (under weather cap)
Æ
microSD® card slot (under battery door)
Ç
Mounting spine
È
Battery cover D-ring
Keypad
IN Select to zoom in on the map.
OUT Select to zoom out on the map.
MAP Select to view the map.
MENU Select to open the menu for the active page.
Select twice to open the main menu.
ENTER Select to select options and acknowledge messages.
BACK Select to cancel data entry or return to the previous menu or
page.
MARK Select to mark your current location.
DOG Select to view the dog tracking page.
Select to view or scroll through options and to move the map
pointer.
Locking the Keypad
1
Select .
2
Select OUT.
Dog Collar Device
À
Communication antenna
Á
GPS antenna
Â
Power key
Ã
Status LED and flashing beacon LEDs
Installing Batteries
The handheld device operates on two AA batteries (not
included). Use NiMH or lithium batteries for best results.
1
Turn the D-ring counter-clockwise, and pull up to remove the
cover.
2
Insert two AA batteries, observing polarity.
3
Replace the battery cover, and turn the D-ring clockwise.
4
Hold .
5
Select Setup > System > Battery Type.
6
Select Alkaline, Lithium, or Rechargeable NiMH.
Charging the Dog Collar Device
NOTICE
To prevent corrosion, thoroughly dry the contacts on the collar
and the surrounding area before connecting the charging clip.
NOTE: Your dog collar device may look different than the device
pictured.
Introduction 1
You should fully charge the battery before you use the device for
the first time. Charging a fully depleted battery takes about five
hours.
1
Snap the charging clip À onto the device Á.
2
Plug the small end of the power cable into the mini-USB port
on the charging clip cable.
3
Plug the power cable into a power source.
The status LED is solid red when the collar is charging.
4
After the status LED turns solid green, remove the charging
clip from the collar.
Turning On the Device
• On the handheld device, hold the power key until the
LCD display turns on.
• On the dog collar device, hold the power key until the status
LED flashes and the collar beeps.
Turning Off the Device
• On the handheld device, hold the power key until the
LCD screen turns off.
• On the dog collar device, hold the power key until the status
LED turns red.
Acquiring Satellite Signals
Both the collar and handheld device must acquire satellite
signals before you put the collar on your dog. Acquiring satellites
can take a few minutes.
1
Go outdoors to an open area.
2
Turn on both devices (Turning On the Device, page 2).
3
Select the power key on the handheld device.
shows the GPS signal strength.
When the collar has acquired satellite signals, the status LED
flashes a double-blink or triple-blink in green.
Adjusting the Backlight Brightness
NOTE: The backlight brightness may be limited when the
battery strength is low.
Extensive use of screen backlighting can significantly reduce
battery life.
1
Select .
2
Select an option:
• To change between the preset brightness levels, select .
• To adjust the brightness levels manually, select or .
3
Select ENTER.
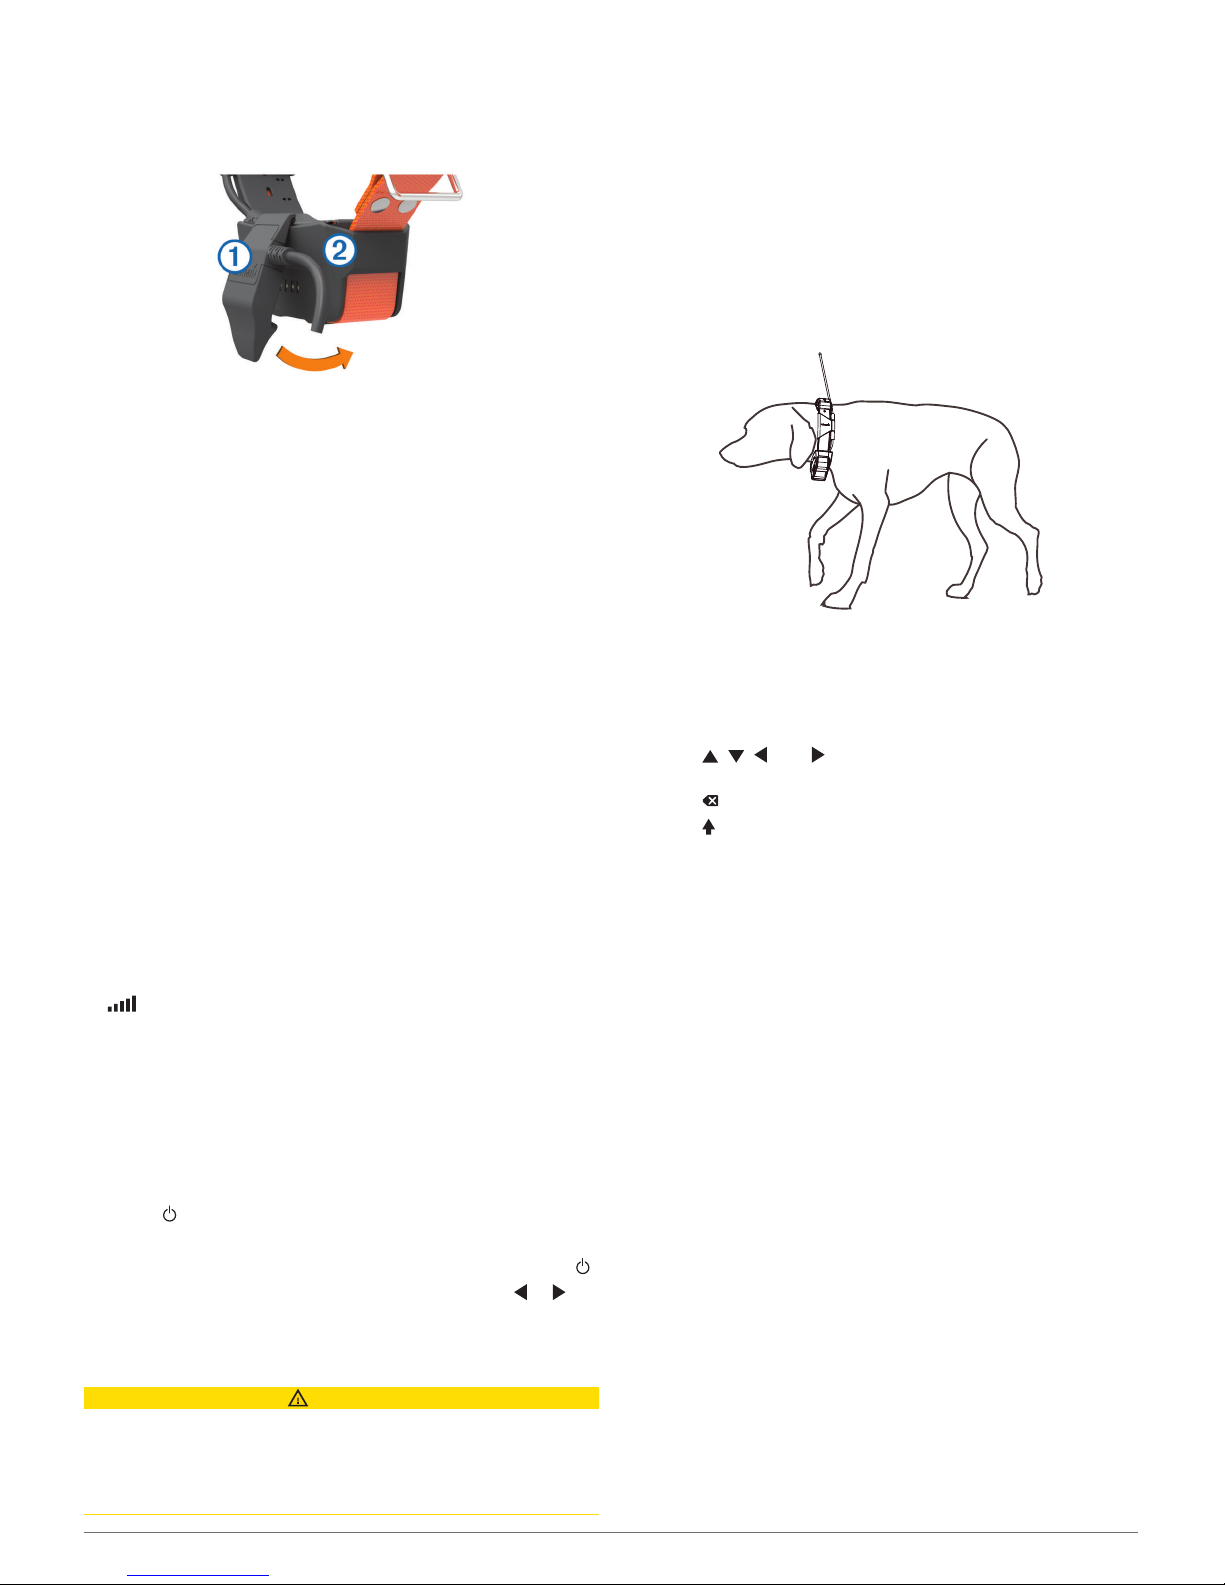
Fitting the Collar on Your Dog
CAUTION
Do not spray the device or collar with harsh chemicals including
but not limited to flea or tick spray. Always ensure that any flea
or tick spray that is applied to the dog is completely dry before
placing the collar on the dog. Small amounts of harsh chemicals
can damage the plastic components and collar laminate.
Before you can put the collar on the dog, you must pair the
handheld device and collar (Adding a Dog to the Astro 900
Handheld, page 4), and acquire satellite signals (Acquiring
Satellite Signals, page 2).
1
Position the collar with the communication antenna pointing
up, the GPS antenna facing up, and the LEDs facing forward.
2
Place the collar around the middle of the dog's neck.
3
Tighten the strap so it is snug around the dog's neck.
NOTE: The collar should fit tightly and should not be able to
rotate or slide on the dog's neck. The dog must be able to
swallow food and water normally. You should observe your
dog's behavior to verify the collar is not too tight.
4
If the strap is too long, cut off the excess, leaving at least
7.62 cm (3 in.) to spare.
Using the On-Screen Keyboard
A keyboard appears when you enter text.
• Select , , , and to select a character, and select
ENTER.
• Select to backspace.
• Select to shift.
• Select IN or OUT to change the character mode of the
keyboard.
• Select Done to save the text and close the keyboard.
Dog Tracking
The handheld device allows you to track your dog or multiple
dogs, using the tracking compass or map. The map displays
your location and your dog's location and tracks. The compass
pointer indicates the direction of the dog's current location.
Tracking Your Dog on the Map
Before you can track a dog on the map, you must add them to
the handheld device (Adding a Dog to the Astro 900 Handheld,
page 4).
You can view the dog's location on the map.
1
Select MAP.
2
Select IN and OUT to zoom in and out of the map.
Navigating to Your Dog
1
Select Dog List.
2
Select the dog.
3
Select Show Info > Go.
The map opens.
4
Follow the magenta line to the dog.
Viewing Dog Status
You can view your dog's status, such as the direction and
distance to the dog from the handheld device.
2 Dog Tracking
1
From the main menu, select DOG to view the dog tracking
page.
2
If you have additional dogs, scroll through the list to find the
dog.
The handheld device can track up to 20 dogs.
3
Select ENTER.
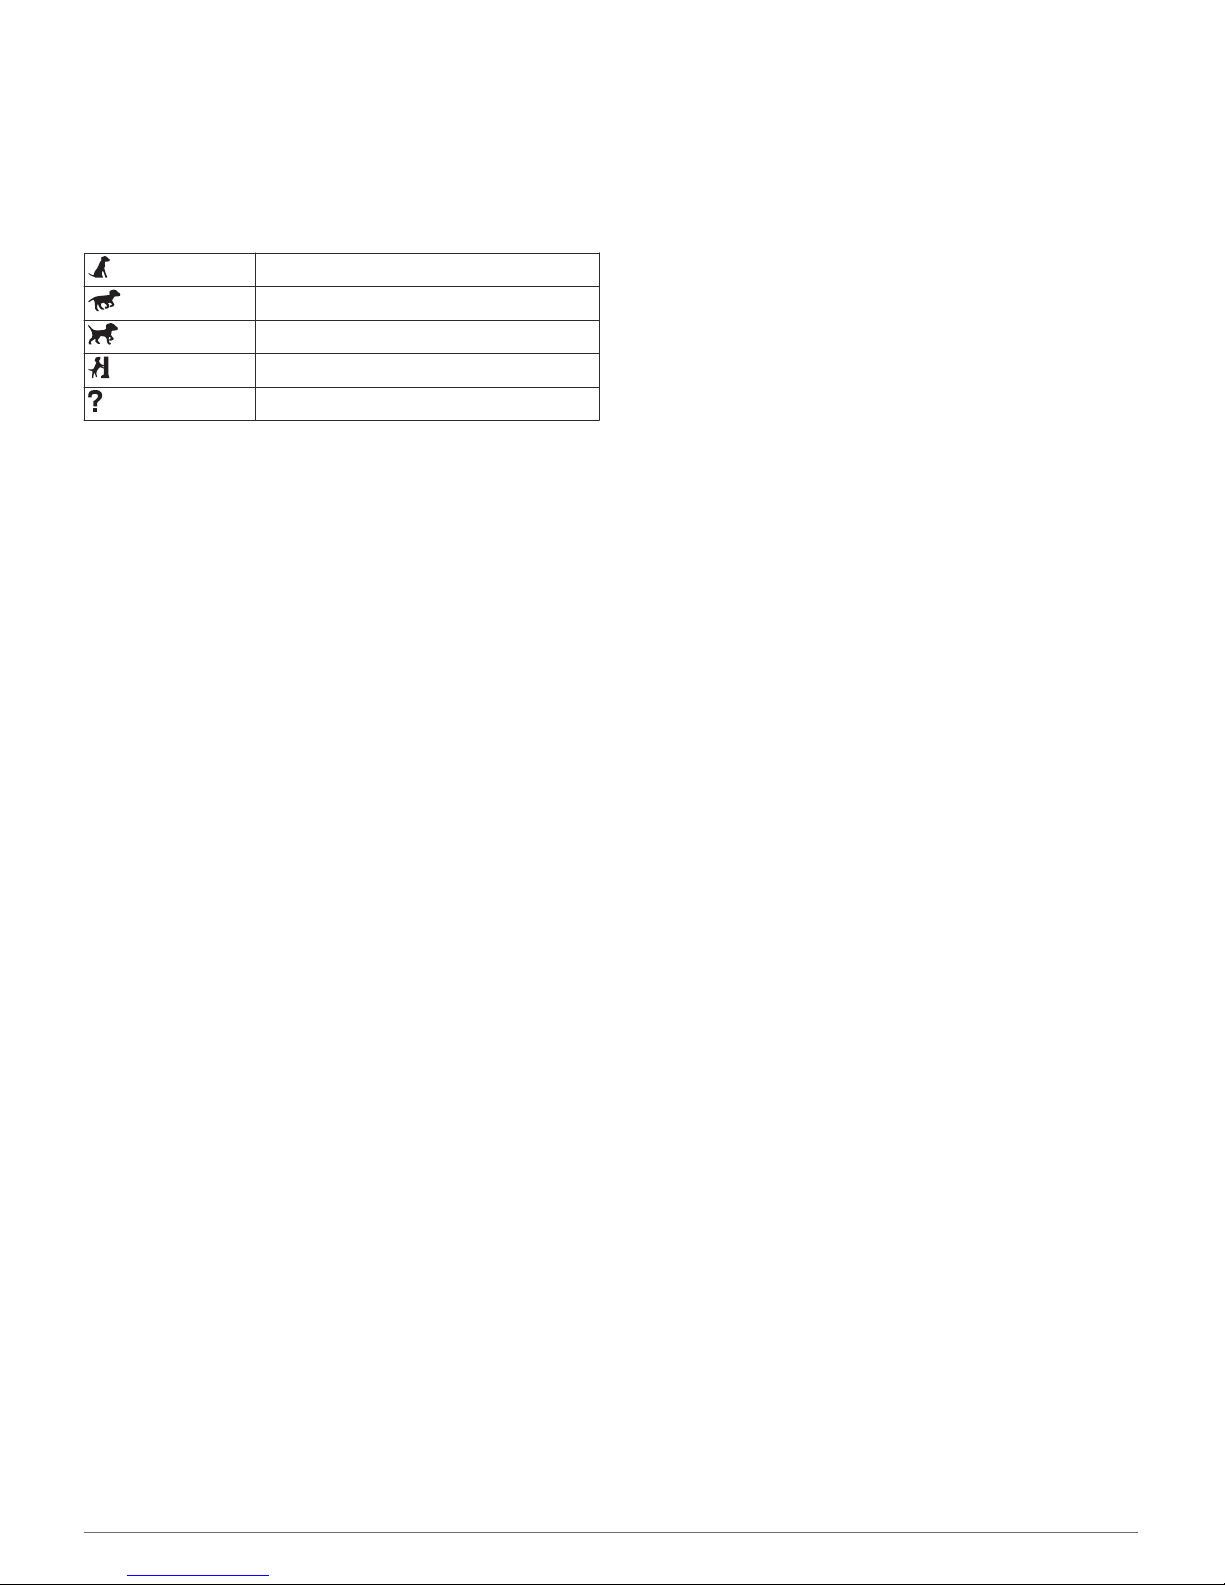
Dog Status Icons
Sitting
Running
On point
Treed
Unknown*
*The unknown status icon indicates that the collar has not
acquired a satellite signal and that the handheld device cannot
determine the location of the dog.
Location Alerts
Location alerts notify you when your dogs enter or exit a
particular location. You can create a custom geofence or use a
radius around your current location.
A geofence is an invisible boundary around an area and is
created using points on the map. The virtual boundaries of a
geofence are accurate up to approximately 3 m (10 ft.).
Geofences perform best when sized to cover an area
encompassing an average sized backyard (approximately
¼ acre).
Setting a Geofence Alert
1
Select Setup > Location Alerts > Add Alert > Geofence.
2
On the map, select a point for the first corner of the geofence,
and select ENTER.
3
Select additional points to define the geofence boundary.
You must select at least 3 points, and you can select up to 10
points.
4
Select BACK.
Setting a Radius Alert
You can receive an alert when a dog or contact moves within or
beyond a specified distance from you.
1
Select Setup > Location Alerts > Add Alert > Radius.
2
Select the unit of measurement.
3
Enter the radius distance, and select Done.
Editing Location Alerts
1
Select Setup > Location Alerts.
2
Select an alert.
3
Select an option:
• Select Disable to turn off notifications for this alert.
• Select Set Alert Type to set the way the device notifies
you for this alert.
• Select Set Alert Mode to set the notification to sound on
exit, entrance, or both.
• Select Delete to remove the alert.
Dog Information
The handheld device assigns a default name, "Dog," to the dog
collar device if it was packaged with the handheld device.
Hunt Metrics
Hunt metrics provides a collection of data that helps you
understand the hunting patterns and behaviors of your dog. The
hunt metrics reset automatically at the beginning of each new
hunt.
Data Fields
Distance: The total distance the dog traveled.
Dog Score: A combination of metrics that indicates how well a
dog performed on a hunt.
On Point: The number of times and the locations where the dog
pointed during the hunt.
Time: The amount of time the dog was afield.
Treed: The number of times and locations where the dog treed
during the hunt.
Resetting a Dog's Statistics and Track
You might want to clear the dog statistics and track before a
new hunt.
1
Select Dog List.
2
Select a dog.
3
Select Show Info > Reset > Yes.
Changing the Length of the Dog's Track
You can adjust the length of time the dog track appears on the
map. Reducing the duration of the track can reduce the clutter
on the map. Changing the map does not affect the tracks stored
in the handheld device.
1
Select Setup > Dogs > Dog Track Length on Map.
2
Select an option.
3
Select Map.
Changing a Dog Name
1
Select DOG > ENTER.
The dog information appears.
2
Select the name field.
The on-screen keyboard appears (Using the On-Screen
Keyboard, page 2).
3
Enter the name of the dog.
Changing the Color of the Dog's Track
You can change the track color of the dog. It is helpful to have
the track color match the color of the collar strap, if possible.
1
Select Dog List.
2
Select a dog.
3
Select Show Info.
4
Select the colored square next to the dog’s name.
5
Select a color.
Changing the Dog Type
Before you can change the dog type, you must turn on the dog
collar device and bring it within 3 m (10 ft.) of the handheld
device.
You can assign a dog type so the appropriate dog status
symbols appear.
1
Select DOG > ENTER > MENU.
2
Select Change Dog Type.
3
Select a type.
Setting Dog Alerts
You can adjust how the handheld device alerts you to certain
actions of the dog.
1
Select Setup > Dogs > Dog Alerts.
2
Select an action.
3
Select the method the device uses to alert you for this action.
4
Repeat steps 2 and 3 as needed.
Dog Tracking 3
Removing a Dog
1
Select Dog List.
2
Select a dog.
3
Select Remove.
Adding a Dog to the Astro 900 Handheld
The handheld device can track up to 20 dogs with dog collar
devices. If you purchase additional dog collar devices, you can
add them to the handheld device.
NOTE: You can only add a dog collar device of the same
communication protocol to your handheld device. Go to
support.garmin.com/collars for compatibility information.
1
Bring your dog collar device within range of the handheld
device.
NOTE: The devices should be close enough to touch.
2
Select DOG.
3
Select Add Dog.
4
Follow the on-screen instructions.
NOTE: An error message could appear if there is a conflict
with the ID number of another dog.
After pairing is complete, you can add the dog collar device to
additional handheld devices using the dog collar device track
code or control code.
Adding a Dog Using the Track and Control Codes
NOTE: This feature varies based on dog collar device type and
feature availability in your area.
Before you can add a dog using the track and control codes, the
dog owner must find the track and control codes (Finding the
Dog ID and Track and Control Codes, page 4) and tell them
to you.
You can use track and control codes to authorize a handheld
device to interact with your dog collar device. If you are not near
the dog you want to add or you cannot put the collar into pairing
mode, you can add the dog using the track and control codes.
1
Select DOG > Add Dog.
2
When asked if you are near the collar, select No.
3
When asked if you know the track and control codes, select
Yes.
4
Enter the track or control code for the collar, and select
Done.
The dog’s track code allows you to track the dog. The dog’s
control code allows you to both track the dog and access the
collar settings.
5
Enter the name of the dog, and select Done > OK.
Finding the Dog ID and Track and Control Codes
You can share a dog’s track code so another person can track
your dog. Also, you can share a dog's control code so another
person can track your dog and access the collar settings.
1
Select Dog List.
2
Select a dog.
3
Select Show Info.
Assigning a Dog ID Manually
Before you can assign a dog ID manually, you must turn on the
dog collar device and bring it within 3 m (10 ft.) of the handheld
device. You must assign a new ID number to the dog.
1
Select DOG.
2
Select a dog.
3
Select Show Info > MENU > Change ID.
4
Select an unassigned and nonconflicting ID.
Changing the Update Rate
You can select a longer duration for the update rate to conserve
battery power. The 30-second and 2-minute rates reduce battery
drain, but they record less-detailed dog tracks and statistics.
1
Bring the handheld device within a few feet of the dog collar
device.
2
Select DOG.
3
Select a dog.
4
Select Show Info > MENU > Change Update Rate.
5
Select an update rate.
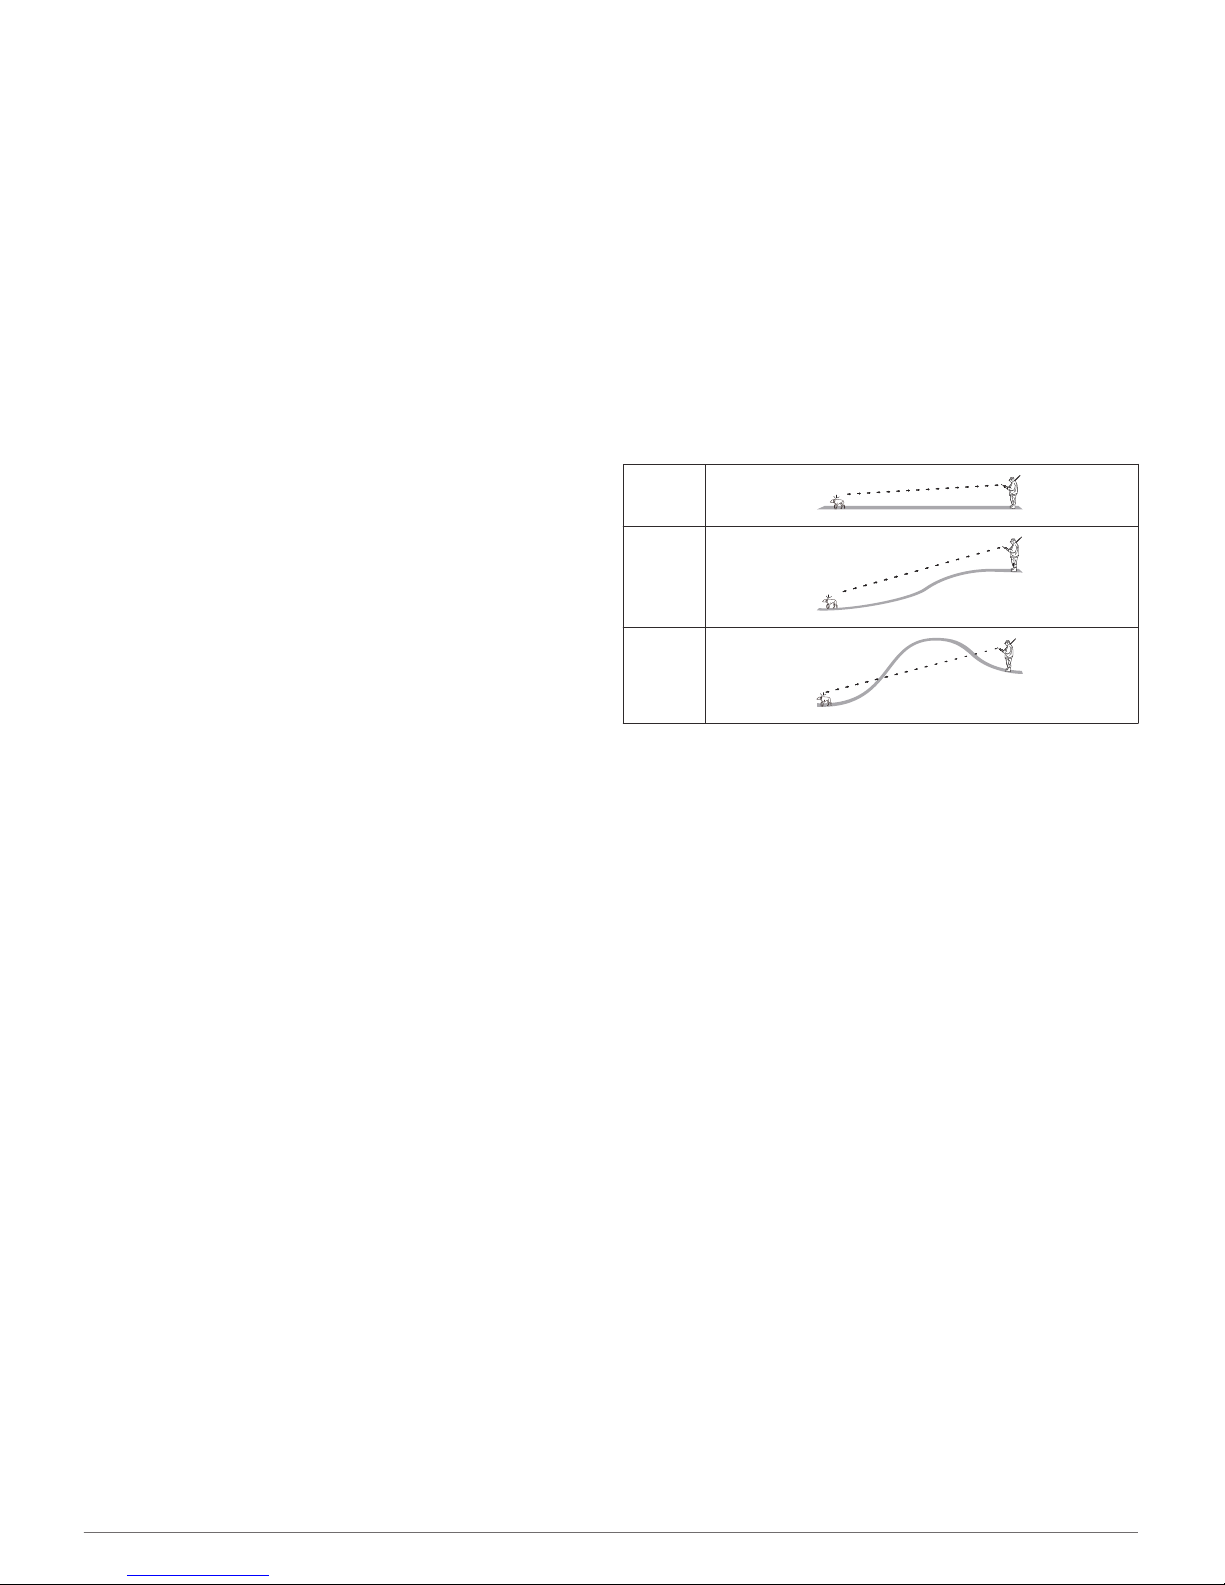
Communication with the Collar
You should keep an unobstructed line of sight between your
handheld device and the dog collar device to produce the best
communication signal. To achieve the best line-of-sight
conditions, you should move to the highest elevation point in
your area (for example, on the top of a hill).
Best
Good
Poor
Tracking with BaseCamp™ BaseStation
Before you can track your dogs using BaseCamp, you must
download BaseCamp to your computer (www.garmin.com
/basecamp).
The BaseStation feature of BaseCamp allows you to track your
dogs in real-time on a computer. For more information on using
BaseCamp, see the help file in the application.
1
Select Setup > System > BaseCamp Basestation >
Prompted.
2
Open BaseCamp.
3
Follow the on-screen instructions.
Waypoints, Routes, and Tracks
Waypoints
Waypoints are locations you record and store in the device.
Waypoints can mark where you are, where you are going, or
where you have been. You can add details about the location,
such as name, elevation, and depth.
Marking Your Vehicle Location
You can mark the location of your vehicle so you can navigate
back to your vehicle after a hunt.
1
Select MARK.
2
Follow the on-screen instructions.
Marking Your Current Location
1
Select MARK.
2
Select an option:
• Select New.
• Select a default location name, such as Truck or Camp.
3
Edit the location information (optional).
4
Select Done.
4 Waypoints, Routes, and Tracks
 Loading...