

Garmin Alpha, TT 10 Owner's Manual
Alpha™ 100 and TT™ 10
Owner’s Manual
July 2012 190-01500-00_0A Printed in Taiwan

All rights reserved. Under the copyright laws, this manual may not be copied, in whole or in part, without the written consent of Garmin. Garmin reserves the
right to change or improve its products and to make changes in the content of this manual without obligation to notify any person or organization of such
changes or improvements. Go to www.garmin.com for current updates and supplemental information concerning the use of this product.
, and
®
City Navigator
, and
TT™
are trademarks of Garmin Ltd. or its subsidiaries. These trademarks may not be used without the express
Garmin®, the Garmin logo,
Alpha™, ANT+™,
permission of Garmin.
microSD™ is a trademark of SD-3C, LLC. Windows® and Windows NT® are registered trademarks of Microsoft Corporation in the United States and other
countries. Mac® is a trademark of Apple Computer, Inc., registered in the U.S. and other countries.
Other trademarks and trade names are those of their respective owners.
BaseCamp™
BlueChart
®
are trademarks of Garmin Ltd. or its subsidiaries, registered in the USA and other countries.

Table of Contents
Getting Started............................................................... 1
Setting Up the Alpha System..................................................... 1
Device Overviews...................................................................... 1
Alpha 100 Handheld Device.................................................. 1
TT 10 Dog Collar Device....................................................... 1
Getting More Information........................................................... 1
Registering Your Device............................................................ 1
Installing the Battery in the Handheld Device............................ 1
Charging the Handheld Device.................................................. 2
Charging the Dog Collar Device................................................ 2
Turning On the Devices............................................................. 2
Turning Off the Devices........................................................ 2
Acquiring Satellite Signals......................................................... 2
Using the Touchscreen.............................................................. 2
Locking the Touchscreen........................................................... 2
Unlocking the Touchscreen .................................................. 3
Dog Collar Device Setup............................................... 3
Methods to Add a Dog to a Handheld Device............................ 3
Adding a Dog Over MURS/VHF............................................ 3
Adding a Dog Using the Track and Train Codes................... 3
Finding the Dog ID and Track and Train Codes............... 3
Sharing a Dog Wirelessly...................................................... 3
Editing Dog Information ............................................................ 3
Resetting a Dog's Statistics and Track.................................. 3
Changing the Length of the Dog's Track............................... 3
Changing the Dog Name....................................................... 3
Changing the Color of the Dog's Track................................. 3
Changing the Dog Type........................................................ 4
Changing the Dog ID ............................................................ 4
Setting Dog Alerts................................................................. 4
Removing a Dog................................................................... 4
Attaching the Collar on Your Dog.............................................. 4
Communication with the Collar.................................................. 4
Dog Tracking.................................................................. 5
Tracking Your Dog on the Map.................................................. 5
Dog Status Icons........................................................................ 5
Dog Tracking Compass............................................................. 5
Navigating to Your Dog.............................................................. 5
Tracking with BaseCamp BaseStation....................................... 5
Pausing Dog Tracking................................................................ 5
Pausing All Dog Tracking........................................................... 6
Location Alerts........................................................................... 6
Setting a Geofence Alert....................................................... 6
Setting a Radius Alert........................................................... 6
Editing Location Alerts.......................................................... 6
Dog Training................................................................... 6
Selecting and Installing the Contact Points................................ 6
Removing the Contact Points................................................ 6
Setting Up the Training Keys for One Intensity Level................ 6
Customizing the Training Keys.................................................. 6
Basic Training Commands......................................................... 7
Training to Heel..................................................................... 7
Training to Sit and Stay......................................................... 7
Training to Come Here.......................................................... 7
Collar Training....................................................................... 7
Training Intensities and Methods..................................... 7
Training the Dog to Heel and Sit with the Collar.............. 8
Training the Dog to Come Here with the Collar................ 8
Contact Tracking............................................................8
Adding a Contact Over MURS/VHF........................................... 8
Adding a Contact Using the ID................................................... 8
Sending a Message to Your Contacts....................................... 8
Tracking a Contact..................................................................... 8
Finding Your Contact ID............................................................. 8
Changing Your Contact ID......................................................... 9
Updating a Contact ID................................................................ 9
Hunting with the Alpha System.................................... 9
Marking Your Truck Location..................................................... 9
Marking a Covey........................................................................ 9
Turning On the Collar Light........................................................ 9
Turning On Rescue Mode.......................................................... 9
Waypoints, Routes, and Tracks ...................................9
Waypoints.................................................................................. 9
Marking Your Current Location............................................. 9
Marking a Waypoint Using the Map...................................... 9
Editing a Waypoint................................................................ 9
Repositioning a Waypoint to Your Current Location............. 9
Moving a Waypoint on the Map............................................. 9
Increasing the Accuracy of a Waypoint Location.................. 9
Projecting a Waypoint......................................................... 10
Deleting a Waypoint............................................................ 10
Routes...................................................................................... 10
Creating a Route................................................................. 10
Editing the Name of a Route............................................... 10
Navigating a Saved Route.................................................. 10
Editing a Route.................................................................... 10
Reversing a Route.............................................................. 10
Viewing a Route on the Map............................................... 10
Viewing the Active Route.................................................... 10
Deleting a Route................................................................. 10
Tracks...................................................................................... 10
Recording Track Logs......................................................... 10
Viewing Details about the Track.......................................... 10
Viewing the Elevation Plot of a Track.................................. 10
Navigating to the Start of a Track........................................ 10
Changing the Track Color................................................... 11
Saving the Current Track.................................................... 11
Saving a Location on a Track ............................................. 11
Clearing the Current Track ................................................. 11
Deleting a Track ................................................................. 11
Archiving a Saved Track .................................................... 11
Archiving Tracks Automatically .......................................... 11
Sending and Receiving Data Wirelessly.................................. 11
Navigation.....................................................................11
Map.......................................................................................... 11
Compass.................................................................................. 11
Calibrating the Compass..................................................... 11
Navigating with the Bearing Pointer.................................... 11
Course Pointer.................................................................... 11
Where To? Menu..................................................................... 11
Finding a Waypoint by Name.............................................. 11
Finding a Waypoint Near Another Waypoint.................. 12
Navigating with Sight 'N Go..................................................... 12
Elevation Plot........................................................................... 12
Calibrating the Barometric Altimeter................................... 12
Navigating to a Point on the Plot......................................... 12
Changing the Plot Type....................................................... 12
Resetting the Elevation Plot................................................ 12
Trip Computer.......................................................................... 12
Resetting the Trip Computer............................................... 12
Applications................................................................. 12
Setting a Proximity Alarm......................................................... 12
Calculating the Size of an Area................................................ 12
Viewing the Calendar and Almanacs....................................... 12
Setting an Alarm...................................................................... 12
Starting the Countdown Timer................................................. 12
Opening the Stopwatch............................................................ 12
Table of Contents i

Satellite Page........................................................................... 12
Changing the Satellite View................................................ 12
Turning Off GPS.................................................................. 13
Simulating a Location.......................................................... 13
Customizing Your Device............................................13
Customizing the Main Menu.................................................... 13
Customizing the Data Fields.................................................... 13
Enabling the Map Data Fields............................................. 13
System Settings....................................................................... 13
Dog Settings............................................................................ 13
Contact Settings....................................................................... 13
Display Settings....................................................................... 13
Calibrating the Touchscreen............................................... 13
Appearance Settings................................................................ 13
Setting the Device Tones......................................................... 13
Map Settings............................................................................ 13
Advanced Map Settings...................................................... 14
Track Settings.......................................................................... 14
Routing Settings....................................................................... 14
Changing the Units of Measure............................................... 14
Time Settings........................................................................... 14
Position Format Settings.......................................................... 14
Heading Settings...................................................................... 14
Altimeter Settings..................................................................... 14
Marine Map Settings................................................................ 14
Device Information.......................................................15
Viewing Device Information..................................................... 15
Updating the Software............................................................. 15
Device Care............................................................................. 15
Cleaning the Device............................................................ 15
Cleaning the Screen............................................................ 15
Specifications........................................................................... 15
Alpha 100 Handheld Device Specifications........................ 15
TT 10 Dog Collar Device Specifications.............................. 15
Battery Information................................................................... 15
Long-Term Storage............................................................. 15
Maximizing the Battery Life................................................. 15
Adjusting the Backlight Brightness................................. 15
Adjusting the Backlight Timeout..................................... 15
Changing the Dog Collar Device Update Rate............... 16
Changing Your Handheld Update Rate.......................... 16
Turning On the Handheld Battery Save Mode............... 16
Adjusting the Map Drawing Speed................................. 16
Turning Off the Transmitter............................................ 16
About Data Management......................................................... 16
File Types............................................................................ 16
Installing a Memory Card.................................................... 16
Connecting the Handheld Device to a Computer................ 16
Connecting the Collar to a Computer.................................. 16
Transferring Dog Tracks to BaseCamp............................... 16
Deleting Files...................................................................... 17
Disconnecting the USB Cable............................................. 17
Appendix.......................................................................17
Accessories and Replacement Parts....................................... 17
Purchasing Accessories...................................................... 17
Optional Maps................................................................ 17
About Memory Cards..................................................... 17
Optional Fitness Accessories......................................... 17
TT 10 Battery Replacement Instructions ............................ 17
TT 10 Components ........................................................ 17
Removing the Old Battery.............................................. 17
Installing the New Battery............................................... 17
Replacing the Collar Strap.................................................. 18
Replacing the VHF Antenna in the Dog Collar Device ....... 18
Changing the Fuse in the Vehicle Power Cable.................. 18
Data Field Options................................................................... 18
Index..............................................................................20
ii Table of Contents
Getting Started
WARNING
See the
product box for product warnings and other important
information.
Setting Up the Alpha System
Before you can use the Alpha handheld device and the TT dog
collar device, you must set up the devices.
1
2
3
4
5
6
Important Safety and Product Information
Install the battery in the handheld device (page 1).
Charge the handheld device (page 2).
Charge the collar (page 2).
Turn on the devices (page 2).
If necessary, add the collar to the handheld device
(page 3).
Acquire satellite signals (page 2).
guide in the
10 Dog Collar Device
TT
Device Overviews
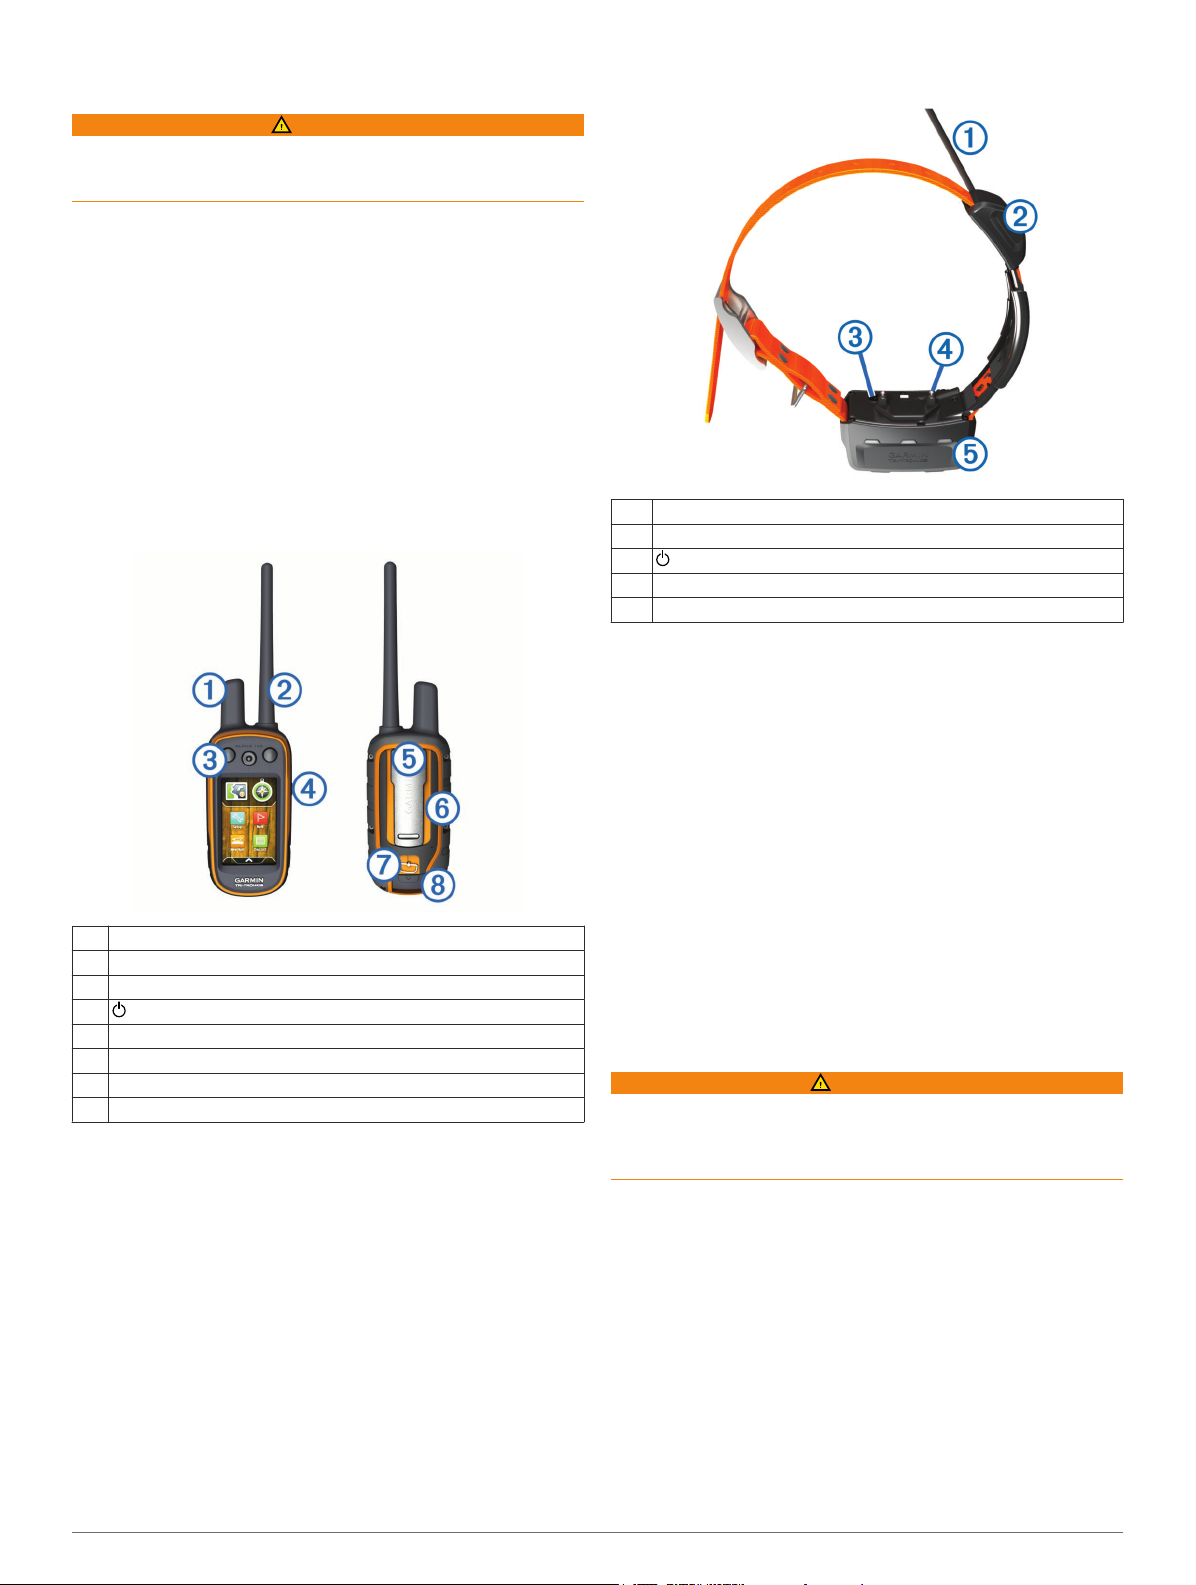
Alpha 100 Handheld Device
GPS antenna
À
VHF radio antenna
Á
Training keys
Â
Power key
Ã
Mounting spine
Ä
microSD™ memory card slot (under battery)
Å
Battery cover D-ring
Æ
Mini-USB port (under weather cap)
Ç
VHF antenna
À
GPS antenna
Á
Power key
Â
Contact points
Ã
Status LED and flashing beacon LEDs
Ä
Getting More Information
You can find more information about this product on the
Garmin® website.
• Go to www.garmin.com/alpha.
• Go to www.garmin.com/outdoor.
• Go to www.garmin.com/learningcenter.
• Go to http://buy.garmin.com, or contact your Garmin dealer
for information about optional accessories and replacement
parts.
Registering Your Device
Help us better support you by completing our online registration
today.
• Go to http://my.garmin.com.
• Keep the original sales receipt, or a photocopy, in a safe
place.
Installing the Battery in the Handheld Device
WARNING
This product contains a lithium-ion battery. To prevent the
possibility of personal injury or product damage caused by
battery exposure to extreme heat, store the device out of direct
sunlight.
Turn the D-ring counter-clockwise, and pull up to remove the
1
cover.
Locate the metal contacts on the end of the lithium-ion
2
battery.
Insert the battery into the compartment, contacts first.
3
Getting Started 1
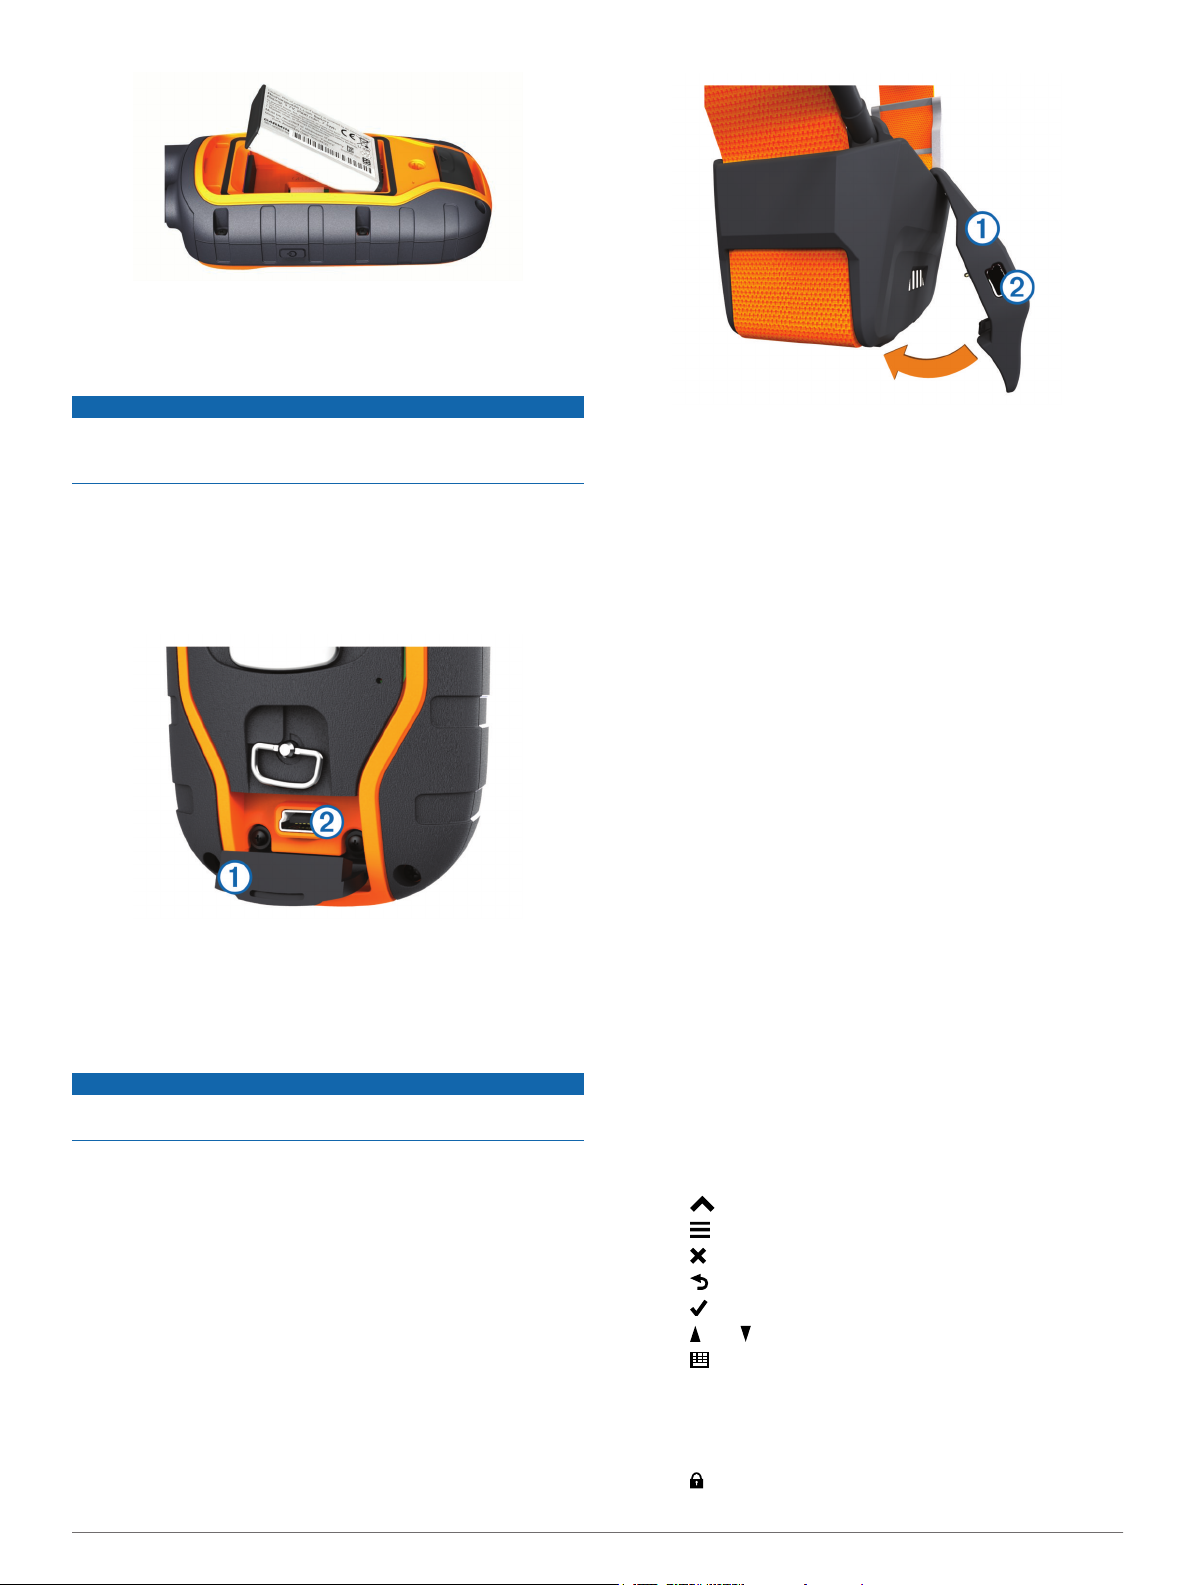
Press the battery into place.
4
Replace the battery cover, and turn the D-ring clockwise.
5
Charging the Handheld Device
NOTICE
To prevent corrosion, thoroughly dry the mini-USB port, the
weather cap, and the surrounding area before charging or
connecting to a computer.
You should charge the handheld device completely before using
it on a hunt. Charging a fully depleted battery takes about 4½
hours.
NOTE: The device will not charge when it is outside the
temperature range of 32°F to 113°F (0°C to 45°C).
Lift the weather cap À.
1
Plug the small end of the power cable into the mini-USB port
2
on the device.
Á
Plug the other end of the power cable into an appropriate
3
power source.
Charging the Dog Collar Device
NOTICE
To prevent corrosion, thoroughly dry the contacts on the collar
and the surrounding area before connecting the charging clip.
You should charge the collar completely before using it on a
hunt. Charging a fully depleted battery takes about 4½ hours.
Snap the charging clip À onto the collar.
1
Plug the small end of the power cable into the mini-USB port
2
on the charging clip.
Á
Plug the other end of the power cable into an appropriate
3
power source.
The status LED is solid red when the collar is charging.
After the status LED turns solid green, remove the charging
4
clip from the collar.
If you do not remove the clip, it may become detached from
the collar and become lost.
Turning On the Devices
• On the handheld device, select the Power key.
• On the collar, select the Power key.
The collar beeps and the status LED blinks green when the
collar is turned on.
Turning Off the Devices
• On the handheld device, hold the Power key.
• On the collar, hold the Power key until the status LED turns
red, about 3 seconds, and then release the Power key.
Acquiring Satellite Signals
Before you put the collar on your dog, both the collar and
handheld device must acquire satellite signals. Acquiring
satellites can take a few minutes.
Go outdoors to an open area.
1
Turn on both devices (page 2).
2
Select the Power key.
3
The GPS signal strength of the handheld device is listed in
the upper-right corner.
When the collar has acquired satellite signals, the status LED
flashes a double-blink or triple-blink in green.
Using the Touchscreen
• Select to open the application drawer.
• Select to open a menu.
• Select to close the page and return to the previous page.
• Select to return to the previous page.
• Select to save changes and close the page.
• Select and to scroll.
• Select to search by name.
Locking the Touchscreen
You can lock the screen to prevent inadvertent screen touches.
Select the Power key.
1
Select .
2
2 Getting Started

Unlocking the Touchscreen
Select the
1
Select .
2
Power
key.
Dog Collar Device Setup
Methods to Add a Dog to a Handheld Device
If you purchased the collar and the handheld device separately,
you must add the collar to the handheld device. You can add up
to 20 collars to one handheld device.
There are three different methods to add (or pair) the collar to
the handheld device: using MURS/VHF, using the track/train
code, or using ANT+™.
Adding over MURS/VHF: Allows you to pair after you have
placed the collar into paring mode by pressing the Power
key.
This method is helpful when you are adding a new accessory
collar to the system prior to leaving for the hunt. See
page 3.
Entering the track and train codes: Allows you to add a dog
that you do not own and that is not in the area. The dog's
owner must determine if people can only track the dog or can
track and train the dog. This method requires the dog's
owner to find and communicate the codes to the person
adding the dog.
This method is helpful when you would like to add a dog
during a hunt, but you are not near the dog. For example,
you are adding another member of your hunting party's dog
to your handheld device, but you do not own the dog. See
page 3.
Sharing wirelessly over
you do not own and that is not in the area. The dog's owner
must determine if people can only track the dog or can track
and train the dog. This method does not require the dog's
owner to find and communicate the codes to the person
adding the dog. This method also adds dog information, such
as the dog's name, communication settings, and initial
position, from the sending handheld device to your device.
The two handheld devices must be within range (10 ft.) to
share data wirelessly.
This method is helpful when you would like to add a dog
during a hunt, but you are not near the dog. For example, the
dogs have already been let loose, and you are near the dog
owner, who can share the dog wirelessly. See page 3.
Adding a Dog Over MURS/VHF
If the collar is on, turn off the collar (page 2).
1
Hold the Power
2
beeps, about 2 seconds, and then release the Power
The status LED begins blinking rapidly in green. The collar is
now ready to be linked, or paired, with a handheld device.
On the handheld device, select Dog List
3
Bring the collar near the handheld device, and select Yes.
4
Enter the name of the dog, and select > OK.
5
Adding a Dog Using the Track and Train Codes
Before you can add a dog using the track and train codes, you
must have the dog owner find the track and train codes
(page 3) and tell them to you.
If you are not near the dog you want to add or you cannot put
the collar into pairing mode, you can add the dog using the track
and train codes.
Add Dog
Select
1
When asked if you are near the collar, select No.
2
ANT+
: Allows you to add a dog that
key until the collar emits two series of
> Add Dog
.
key.
.
When asked if you know the track and train codes, select
3
Yes.
Enter the track or train code for the collar, and select .
4
The dog’s track code allows you to track the dog. The dog’s
train code allows you to both track and train the dog.
Enter the name of the dog, and select > OK.
5
Finding the Dog ID and Track and Train Codes
You can share a dog’s track code so another person can view
your dog’s location with the map and dog tracking compass.
Also, you can share a dog’s train code so another person can
track your dog and train (correct) your dog.
Dog List
Select
1
Select a dog.
2
Select
3
Show Info
.
.
Sharing a Dog Wirelessly
Before you can share data wirelessly over ANT+
bring your Alpha
handheld device.
Select
1
Select the dog to share.
2
Select
3
Select an option:
4
• To allow the other person only to track your dog's location
with the map and dog tracking compass, select Track
Only.
• To allow the other person to track your dog and correct
your dog's behavior, select Track and Train.
On the other handheld device, select Dog List
5
Receive Wirelessly.
handheld device within 10 ft. (3 m) of the other
Dog List
Share Wirelessly
.
.
, you must
>
>
Editing Dog Information
Resetting a Dog's Statistics and Track
You might want to clear the dog statistics and track before a
new hunt.
Dog List
Select
1
Select a dog.
2
Select Show Info >
3
Changing the Length of the Dog's Track
You can adjust the length of the dog's tracks shown on the map.
Showing less tracks on the map can help to declutter the map
view. Changing the length of the track shown on the map does
not affect the tracks stored in the internal memory.
Select Setup
1
Select an option to show more or less of the tracks on the
2
map.
Changing the Dog Name
Dog List
Select
1
Select a dog.
2
Show Info
Select
3
Select the dog’s name.
4
Enter the name, and select > OK.
5
Changing the Color of the Dog's Track
You can change the track color of the dog. It is helpful to have
the track color match the color of the collar strap, if possible.
Dog List
Select
1
Select a dog.
2
Show Info
Select
3
Select the colored square next to the dog’s name.
4
.
Reset > Yes
> Dogs > Dog Track On Map
.
.
.
.
.
.
Dog Collar Device Setup 3
Select a color.
5
Changing the Dog Type
Before you can change the dog type, the collar must be turned
on and within range of the handheld device.
Dog List
Select
1
Select a dog.
2
Select Show Info > >
3
Select a dog type.
4
.
Change Dog Type
.
Changing the Dog ID
Before you can change the dog ID, the collar must be turned on
and within range of the handheld device.
If you are experiencing interference from other collars or
handheld devices in the area, you might need to change the ID
for the dog.
Dog List
Select
1
Select a dog.
2
Select Show Info.
3
Select >
4
Select an available ID.
5
If another handheld device is tracking this dog, for best results,
remove the dog from the device, and use the track and train
codes (page 3) or share wirelessly over ANT+ (page 3) to add
the dog again.
.
Change ID
.
Setting Dog Alerts
You can adjust how the handheld device alerts you to certain
actions of the dog.
Select Setup
1
Select an alert.
2
Select the handheld device action for the specific alert.
3
Repeat steps 2 and 3 as needed.
4
> Dogs > Dog Alerts
.
Removing a Dog
Dog List
Select
1
Select a dog.
2
Select
3
Remove
.
.
NOTICE
Remove the charging clip before putting the collar on the dog. If
you do not remove the clip, it may become detached from the
collar and become lost.
Before you put the collar on the dog, pair the handheld device
and collar (page 3), and acquire satellite signals (page 2).
Select an option:
1
• If you are training your dog with the collar, select and
install the appropriate contact points (page 6).
• If you are not training your dog with the collar, install the
cap over the contact point locations (page 6).
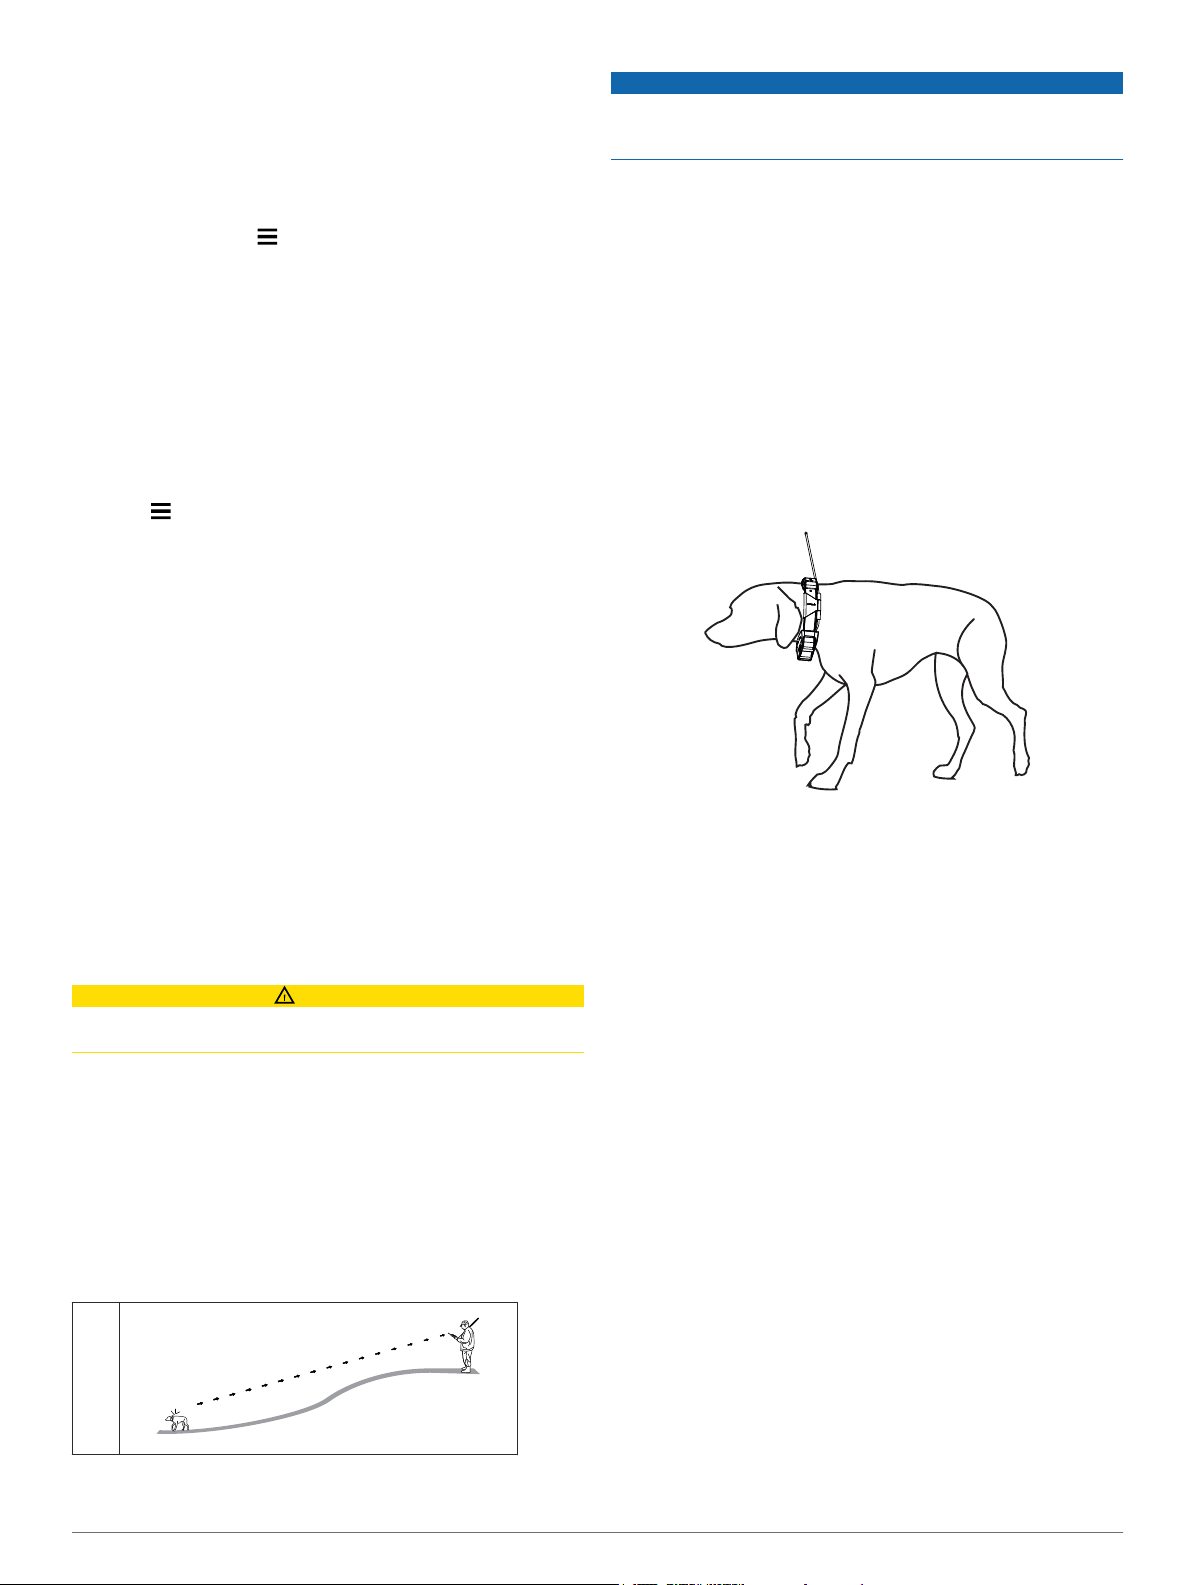
Place the collar in the middle of the dog's neck, directly
2
behind the dog's ears.
Position the collar with the VHF whip antenna pointing up,
3
the GPS antenna facing up, and the LEDs facing forward.
When using the contact points, they can be positioned
anywhere along the dog's neck. The best location for the
contact points is in the front of the neck.
Tighten the strap so that it is snug around the dog's neck.
4
If the strap is too long, cut off the excess, leaving at least 3
5
inches to spare.
Attaching the Collar on Your Dog
CAUTION
To prevent irritation from the contact points, remove the collar
for at least 8 hours out of every 24-hour period.
Communication with the Collar
If the collar and handheld device came in the same packaging, they were paired at the factory. If you are using a collar or handheld
device that you purchased separately, add the collar to the handheld device to establish a communication link between the collar
and handheld device (page 3).
The collar and handheld device must be within range to communicate with each other. The MURS/VHF radio communication range
is up to 9 miles.
The collar and handheld device use radio signals to communicate. Objects in the path of radio signals degrade the quality of the
signals. Keeping an unobstructed line of sight between the collar and handheld device produces the best communication signal.
Obstructed radio waves result in a poor signal. To achieve the best line-of-sight conditions, move to the highest elevation point in
your area (for example, on the top of a hill).
Best
4 Dog Collar Device Setup
 Loading...