

Page 1

TABLE OF CONTENTS
REQUIREMENTS AND INSTALLATION..........................................................................5
Recommended System Requirements ............................................................................................5
Installing ..........................................................................................................................................5
Playing..............................................................................................................................................6
Uninstalling ......................................................................................................................................6
The ReadMe file..............................................................................................................................6
WELCOME TO ARDANIA ........................................................................................................7
A Single Throne & Many Paths......................................................................................................7
RULING YOUR KINGDOM......................................................................................................9
Accepting the Crown ....................................................................................................................10
Choosing a Quest ..........................................................................................................................11
The Sovereign Interface................................................................................................................12
Keyboard Shortcuts ......................................................................................................................15
Rulership in a Nutshell ..................................................................................................................16
Your Palace ....................................................................................................................................18
Constructing Buildings..................................................................................................................20
Using Buildings ..............................................................................................................................21
Your Heroes ..................................................................................................................................24
Reward Flags ................................................................................................................................29
Using Spells ....................................................................................................................................31
Earning Gold..................................................................................................................................32
Freestyle Quests ..........................................................................................................................36
Multiplayer Games........................................................................................................................38
REFERENCE..................................................................................................................................41
Buildings..........................................................................................................................................41
Heroes............................................................................................................................................55
Henchmen......................................................................................................................................64
Monsters ........................................................................................................................................67
Spells ..............................................................................................................................................72
3
Page 2

4
APPENDIX: KEYBOARD SHORTCUTS ........................................................................78
General...........................................................................................................................................78
Options Menu.................................................................................................................................78
Palace.............................................................................................................................................78
Buildings.........................................................................................................................................79
Spell Lists .......................................................................................................................................79
Research........................................................................................................................................80
INFOGRAMES CUSTOMER SERVICES .......................................................................81
Page 3

5
REQUIREMENTS AND INSTALLATION
You can’t start playing until you install the game. Here’s how.
Recommended System Requirements
Before you can install Majesty and start playing, check this list to make sure that your
computer has everything you need:
Operating System: Windows® 95/98
Processor: Pentium® 166MHz or higher
Memory: 32MB RAM
Hard Disk Space: 314MB Free (minimum install)
CD-ROM Drive: 4X Speed
Video: SVGA video card with 2MB (video memory)*
Sound: Sound card*
DirectX: DirectX version 7.0 (included) or higher
Modem: 28.8kps (28,800 baud) for modem/Internet play
* These devices should be compatible with both Windows 95/98 and DirectX version 7.0 or higher.
If you think you have all of these, but still have a problem running the game, please contact
Customer Support for assistance.
Installing
•∑ If you have all of the required equipment, then it’s time to install the game. To do so,
follow these instructions:
•∑ Turn on your computer (Windows 95/98 should load automatically).
•∑ Open the CD-ROM drive, place the Majesty CD in it, and close the drive.
∑ • This is a Windows "AutoPlay" CD-ROM. That means that just putting the disk in the
drivefor the first time starts up the installation program.
If Autoplay Doesn’t Work
If the Autoplay feature does not work when you put the CD in the drive, here’s how to start
the installation program yourself:
∑ • Double-click your "My Computer" desktop icon.
∑ • In the window that opens, double-click your CD-ROM drive (it’s usually the D drive).
∑ • Open the folder called "Majesty".
∑ • In the list that appears, find a file named setup.exe and double-click it.
The installation program should begin.
Page 4

6
• Click the Install button to continue. (If you change your mind at this point, close the
window to Exit.)
• Follow the on-screen instructions to install the game. The installation program copies
some files to your hard drive from the CD-ROM, then adds Majesty to the programs in
your Start menu.
• Majesty requires DirectX 7.0 or higher in order to run. If you do not have this already
installed on your computer, click Yes when asked if you would like to install it.
Playing
Once the automated installation and set-up are complete, the game is ready to play. To start:
• Make sure that the CD-ROM is in your drive.
• Now simply click on the Play Majesty button when the title box appears. Alternatively
(if the box doesn’t appear), you can click the Windows Start button, then choose
Programs, the Majesty menu, then select Play Majesty to run the game.
Uninstalling
If you decide to remove Majesty from your computer, follow these easy instructions.
• ∑Click the Windows Start button.
• Select Settings, then Control Panel.
• In the Control Panel window, double-click on Add/Remove Programs.
• Select Majesty from the list of programs and click the Add/Remove button.
• Follow the on-screen instructions to remove the game from your hard drive.
Note that the uninstall procedure cannot remove files you’ve created—things like saved game
files. You can delete these leftover files manually.
The ReadMe File
The Majesty CD-ROM game has a ReadMe file where you can view updated information about
the game. To view this file, click the Windows Start button, the Programs menu, the
MicroProse sub-menu, then Majesty. Finally, click the ReadMe option. You can also get to the
ReadMe file by double-clicking on it in the Majesty folder on your hard drive.
Page 5

7
WELCOME TO ARDANIA
Majesty offers you the throne of a fledgling kingdom in a fantastic world. As ruler, you make all
the decisions that steer your kingdom—one of many in the land of Ardania—toward rise or ruin.
Ardania is a land both majestic and ancient. It is filled with a variety of peoples, and its
wilderness is ripe with strange creatures—some curious, many deadly. The magic that flows
through this land both enriches and complicates the lives of its inhabitants. From the desolate
Northern Reaches to the pleasant Central Plains, Ardania is a land of shifting aspect. Many
forces are at work here, and where magic is involved, there are few limits to what is possible.
This tendency toward constant change comes at a high price; Ardania is a land without unity.
While some kingdoms share relations and have established treaties, these, too, tend not to last.
Ardania is without a central authority, making it a land of danger and uncertainty.
This is the arena in which you must operate. Some might consider this land unstable and
dangerous, but for a ruler who thrives on the elements of uncertainty and expected change,
it can be a land of unending fascination.
A Single Throne & Many Paths
"So you think you are a worthy sovereign, eh?"
I was unsure of how to reply to the old seer’s unexpected challenge. My vassals were
commanded to wait outside the small dark chamber as Ardania’s most famed prophet,
Juleck, performed his invaluable services. This left me feeling somewhat vulnerable,
especially when faced with such a legendary power.
"I…," my mind stopped spinning and landed on its feet. "That is what I’m here to find out."
"Humph," Juleck muttered. He was one of the most distinctive people I’d ever met. His lean,
swarthy face was all angles. It looked as if it had been carved from stone. While his age
showed clearly in his features, he moved with lithe precision about his dishevelled hut.
Piles of arcane oddities were spread on the earthen floor and across wide tree stumps that
served as tables.
Juleck’s voice was penetrating, effortlessly cutting through the chaff of personality and ego
to speak directly to the soul.
"You came here seeking easy answers and obligatory praise. But the future holds little of
either for you."
His truth burned me. I could not deny his words, but in speaking them, Juleck continued to
cleave away any pretense I’d brought with me.
His eyes locked with mine. They narrowed as his gaze bored into my mind. He starred at me
intensely for a few seconds, and then his features relaxed. He had apparently found what he
was looking for.
Page 6

8
"Very well, young sovereign. Let us begin."
While still staring at me, the seer began reaching behind him and blindly retrieving an
assortment of strange items and artifacts from the walls of the small hut. Some animal
skins, a fistful of dried sonaba nuts, and a collection of other bits and pieces—trinkets and
charms—that I could not identify.
As his hands arranged the gathered items, Juleck started waving his arms about in reflexive
ritual. A throaty chant escaped his unmoving lips. With each repeated cycle of sounds,
it increased in speed. Faster and faster, until—just as suddenly as he had begun this bizarre
exercise—he stopped. His head snapped downward in an inhumanly precise motion. His eyes
focused on the cryptically arrayed artifacts before him. He began to speak, his words
flowing like a quick-moving spring torrent.
"A sleeping evil awakes within your realm. The dead grow restless in the earth. I see the
Lady of Death extending her bony fingers towards your Palace. Beware your aspirations of
northern expansion. The bargain that you have struck is no bargain at all! Nothing is gained
without risk and investment."
I was prepared for some ill predications, but this, well, how could this be true? I asked, and
Juleck replied, "It is what I see. You stand at a crossroads, but there are no easy paths."
We sat in silence for minutes as I absorbed Juleck’s counsel. Finally, I asked, "What can I do
to prepare?"
"If your heart and mind are one, they will know what to do. How to act. Whose services to
call. I sense that you have it in you to rule wisely. It’s in your blood.
"I have done all I can. Now, I am tired." His voice trailed with the last statement.
"Your destiny awaits, Sovereign. Go."
Page 7

9
RULING YOUR KINGDOM
Ardania offers you many challenges, in the form of preordained quests. Quests are detailed,
single-player adventures with many random elements. In addition to the existing quests, you
can also create and play your own challenges by generating freestyle quests. You’ll need to do
this if you want to play a multiplayer game of Majesty, and you can also play freestyle quests
as single-player games.
When you begin the game, you go to the Introduction screen. There are several options here.
Briefly:
Play Game§ You can choose this option by clicking on either the New Game button or
the magical Map lying on the table.
Load Game To reload a game you previously saved, click on either the Load Game
button or the treasure Chest.
Multiplayer To set up and play a multiplayer Majesty game, click on either the
Multiplayer button or the Window to the open countryside.
Adjust Levels If you want to modify the volume settings for the game music and other
sounds, click on either this button or the Horn hanging near the window.
Credits To see the names of the people who worked so hard to bring you Majesty,
click on either the Credits button or the open Book on its stand.
Cinematics This option re-plays the opening movie. You can choose this by clicking on
either the Cinematics button or the battle Painting hanging on the wall.
High Scores To view the best scores on each quest (measured by several different
parameters), click on either the High Scores button or the glittering
Chalice behind the lit candles.
Exit Game To close Majesty and go back to real life, click on the Exit Game button or
the Candles.
Page 8

10
The most interesting choice right now is lying flat on the table. To look over the possible
quests, click the Map (or the New Game button). Before you can see the quests, you must enter
a name for yourself. This is the name under which your scores and successes will be recorded,
so feel free to be creative. Once you’ve entered a name, click the Accept button to move on.
Accepting the Crown
The great hall of my family’s Palace was alive with the chatter of two score nobles and
nearly as many servants. I had never seen our fair Palace more alive than on this, my
coronation day. While I understood that it was an occasion of great celebration, the extent
of the festivities still surprised me.
The hall had been proudly adorned in the colours of my family. Bright banners bearing our
hawk and sunburst crest hung from the highest beams of the lofty ceiling. The great hall
was filled with representatives from every one of our village’s guilds, as well as dignitaries
from communities all over Ardania—from the Valmorgens of the Central Plains to Celdorinii
from the furthest tip of the Western Provinces. Along the boundaries of the space,
the Palace Guards stood silent vigil in their red tabards, halberds polished to a mirror-like
sheen and held in the formal position of salute.
The coronation was a solemn occasion. My mother elected to step down from the throne
and pass the crown to the next generation. In her wisdom, she chose to make sure that she
was present for the transition of power in order to help shepherd the next reign toward the
goals that were so important to her. While the popularity of my mother’s rule lent a
bittersweet edge to the rite, the revelry that followed made it clear that my subjects gave
me their full support as the caretaker of their hopes and dreams for the future.
From the great hall, we adjourned to the courtyard, where the mood quickly changed from
solemn to celebratory. The yard was filled to overflowing with tables full of rich foods,
skilled performers from around the realm, and joyous visitors dressed in bright finery.
The function lasted through the remainder of day and well into the evening.
So engrossed was everyone in the festivities that few took notice of the sudden agitation of
the Palace Guards atop the wall. Across the courtyard, I caught the Captain of the guard
taking my Royal Advisor aside for a brief few seconds. Once they were done, the Captain
quickly returned to his men on the walls, while the Royal Advisor made a direct course
towards me.
It was then that I first heard my Advisor utter a phrase which would become all too familiar
before long.
"Forgive the intrusion, Your Majesty, but a situation has arisen…"
The celebration was over, and the responsibilities only beginning.
Page 9

Choosing a Quest
Having clicked the map on the table and entered your name, you are now at the Quest
Selection map. This is a magical map of Ardania, on which the nineteen potential quests are
marked with special icons. When you move your mouse cursor over one of these icons, the
name of the quest appears in the title bar at the top of the map. Note that the map is larger
than the screen. To reveal the portions of the map that are out of sight, move your cursor to
the edge of the screen; the map will scroll to show you more terrain—and more quests.
Quests come in three difficulty levels: Beginner, Advanced, and Expert. You’re welcome to try
any of them, regardless of your experience, but don’t say you weren’t warned. Once you have
successfully completed a quest, a star is added to the map next to that quest’s icon. (If, for
some reason, you wish to reset the game so that you have no completed quests, click the
Erase Victories button.) Note that you can replay a completed quest, and the random factors
will make it a somewhat different game.
Some of the quests are not available when you first begin a new game. The corresponding
locations are represented by question marks. These are hidden quests—challenges that are
revealed only after you have completed certain other quests. The prerequisites for a hidden
quest are listed in the title bar, and those prerequisites you have already completed are
greyed out.
To choose a quest, simply click on its icon. (If you decide not to select a quest at this time and
would rather return to the Introduction screen, click the Cancel button.) Once you’ve chosen,
your Royal Advisor briefs you on the situation and the story surrounding that quest. Next, you
get a boiled-down outline of your goals. When you’ve read this, click the Continue button.
Majesty includes a map generator that creates a new, different map for every quest each time
you play it. When you click Continue, you generate your map.
11
Page 10
The Sovereign Interface
Before we get into the day to day business of ruling your kingdom, we must digress for a
moment to explain what you see on the screen. The Sovereign Interface is a set of magical
tools that help you to be everywhere and control nearly everything in your realm. Like any
tools, however, they’re no of use to you if you don’t understand what they’re for.
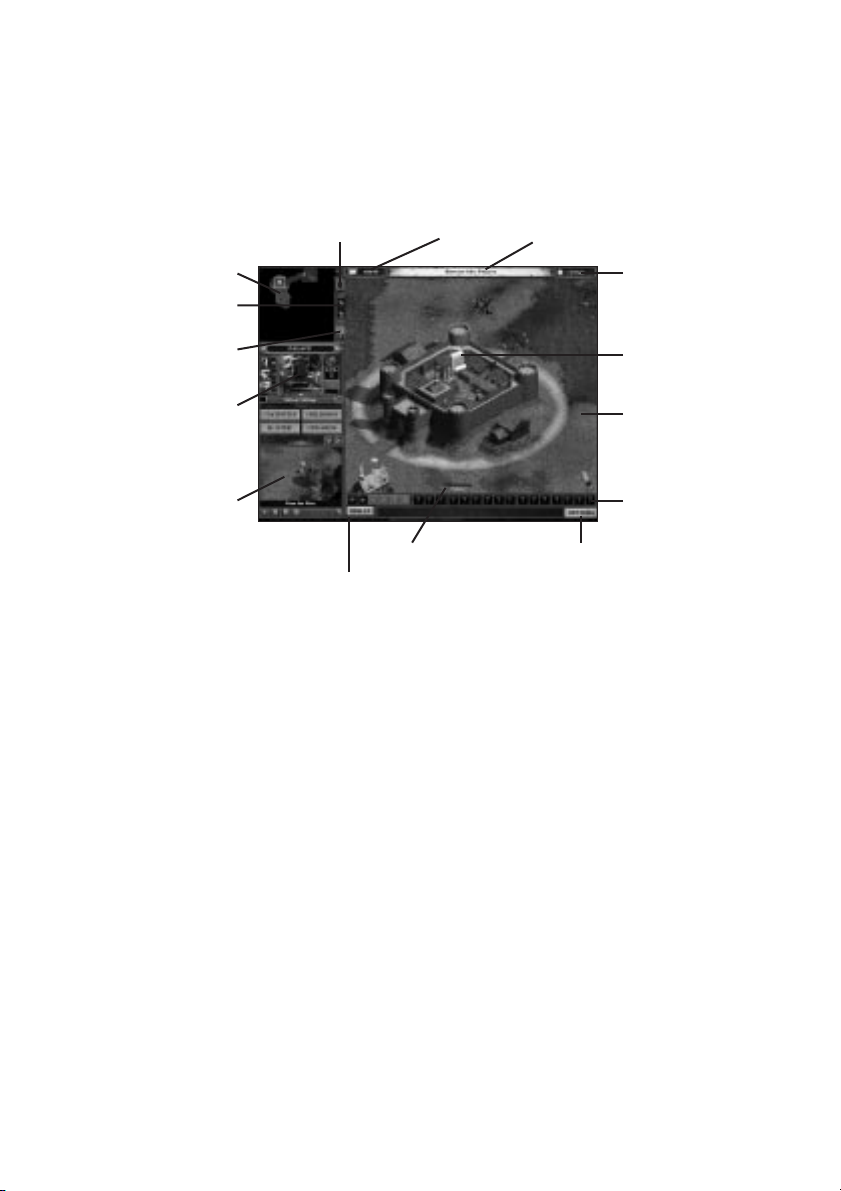
Main Map
This is the window in which all of the action and most of your royal acts
take place. It gives you the best overall view of your characters, buildings,
and foes.
Map Toggles These buttons control the view in the Main Map. You can zoom the view in
or out, and you can choose to see or not see the hit point bars and
character names.
Message Scrolls These handy notices serve many purposes. Click on any Message Scroll to
see the message it contains. In Beginner quests, these are often tips to
help you better understand the game. Scrolls can also convey important
information about the current quest and the characters and events
behind it.
Title Bar This shows the name of your current quest. Click on the Title Bar to see
the goals of this quest.
Treasury This number indicates how much gold your treasury currently holds.
Time Your elapsed time in game days is displayed here. This indicator is
particularly important during timed quests.
12
Mini Map
Control Window
Tracking Window
Map Toggles
Palace Button
Title BarTerrain Toggle
Spell Bar Options Button
Spell Bar Toggle
Main Map
Time
Treasury
Message Scroll
Tool Tip Bar
Page 11

13
Mini Map The entire quest map is displayed in this little window, though not in much
detail. Characters and buildings are represented by coloured dots. The
white rectangle represents the area your Main Map is currently showing,
while the blue rectangle indicates the focus of your Tracking window. Click
anywhere in this map to refocus the Main Map on the area you clicked.
Right-click in the same way to pick the focus of your Tracking window.
Terrain Toggle Click this to switch the display of terrain types on the Mini Map on and off.
Palace Button This button is a handy shortcut; click it to quickly select your Palace as
the active building. Even if your Palace is out of view, its functions become
available in the Control window. You can double-click here to zoom the
Main Map to the Palace (and make the Palace the active building, as well).
Control Window Other than the Main Map, this feature provides a ruler with the most
varied and important functions. The information displayed in the control
window changes depending on what building, character, or other item you
have selected. For example, if a building is selected, that is the active
building, for which (if it is under your control) you can give orders. The
detailed descriptions of how to use the various contents and functions of
the Control window are in the sections throughout this manual, especially
Using Buildings and Your Heroes.
Tracking Window This window is used to watch the activities of specific heroes, buildings,
or locations. Like a scrying spell, it follows and stays focused on whatever
you choose. This can be handy for keeping an eye on key areas, monsters,
and so on.
Tracking Buttons These give you greater control over what’s displayed in the Tracking
window by letting you scan through all the things of a specific type. The
options include reward flags, heroes, henchmen, and buildings; plus, since
these buttons are additive, you can select to scan any combination of
types. Click the button that corresponds to the type of thing you want to
select, then use the right and left arrows at the bottom of the Tracking
window to scan through them. You can also click the Auto-scan button to
have the Tracking window cycle through them for you.
Spell Bar All of the possible Sovereign spells are represented as icons on this bar.
Those you can currently cast are highlighted. Clicking an icon readies the
spell and changes your cursor. Now, clicking on a unit or location in the
Main Map or Tracking window casts the selected spell. When you’re done,
right-click to leave spell casting mode.
Spell Bar Toggle This controls whether the Spell Bar is displayed.
Page 12

ToolTip Bar As you run your cursor over the various parts of the interface, this area
displays information on what you’re pointing to and context-sensitive help
text. Error messages and chats messages are shown just above this bar.
Options Button Takes you to the Options menu. The helpful features there include:
∑Save Game: Lets you store your quest in progress for future play.
Load Game: This is how you play those saved quests-in-progress.
Restart: Scrap all your progress in the current quest and start over
from scratch.
Main Menu: Return to the Introduction screen.
Game Info: Lets you review the goals of the quest.
Adjust Levels: This not only lets you control the various volume levels (like
the Horn on the Introduction screen), but also provides
control over the game speed and the Fast Scrolling map
option.
Quit Majesty: Exit the game completely.
Resume Play: Go back to the quest in progress.
Last but not least, here are a few important ways you can use the mouse:
• Right-click anywhere on the screen where right-clicking has no function. This cancels your
current action-in-progress and undoes the current selection (unit, building, or whatever).
• Double-click in an appropriate place to set a Reward Flag.
• Double-click on an existing Reward Flag to remove it.
• Double-click on a Message Scroll to dismiss the scroll.
• Double-click on a Gravestone to get rid of it.
14
Page 13

15
Keyboard Shortcuts
The mouse is a perfectly sensible way to control your kingdom, but you can respond to
challenges more quickly if you learn the keyboard shortcuts (also called "hot keys"). These
allow you to execute actions in one motion that might otherwise require multiple mouse clicks.
Majesty has two kinds of shortcuts: dedicated, which you cannot change, and customisable,
which you can modify to suit your particular needs.
All of the following are dedicated hot keys:
e In a multiplayer game, this turns on the Chat feature. Pressing e after you’ve
finished your chat message sends the message and exits chat.
AWSZ These move ("scroll") the main map.
z While any enemy is selected, the z places an Attack Flag on that
enemy. If that enemy already has an Attack Flag, however, pressing the z removes
the flag.
1 Makes your Palace the active building.
9 Toggles the display of unit names on and off.
0 Toggles the display of hit point bars on and off.
- Toggles the Main Map between the levels of zoom.
= Toggles the display of terrain textures in the Mini Map.
q Opens the Options menu.
Important Note
Infogrames does not monitor, control, endorse, or accept responsibility for the content of
text or voice chat messages transmitted through the use of this product.
Use of the chat function is at your own risk. Users are strongly encouraged not to give out
personal information through chat transmissions.
Kids, check with your parent or guardian before using the chat function or if you are
concerned about any chat you receive.
Page 14

16
There are some other dedicated keys that are available depending on what’s in your Control
window. These hot keys generally correspond to the highlighted letters on buttons and other
controls. For example, the letter ‘B’ on the Build button tells you that B is the hot key
alternative to clicking the button. For a complete list of the keyboard shortcuts in Majesty,
please refer to the Appendix.
The customisable hot keys are those you can program to perform repetitive tasks quickly and
efficiently. These come in two types: the Spell keys and Focus keys.
Spell keys You can assign each of the number keys (0 through 9) to a specific
Sovereign spell. Select a spell from the Spell Bar, then press the c key
and the number you choose. The next time you press that number key, the
spell you associated it with is instantly selected (it is not cast, of course,
until you select a target).
Focus keys You can assign the function keys 2 through 8 to any unit or
location in your kingdom. Select a unit or centre the Main Map on a
location and make sure that no unit is selected. Next press c and the
function key you choose. The next time you press that function key, the
associated unit (if any) becomes selected and appears in the Control
window. If you press s and the hot key, you both select the unit
(if any) and centre the Main Map on the assigned unit or location. Pressing
a and the hot key selects the associated unit or location and centres it
in the Tracking window.
Rulership in a Nutshell
The details are important, but for the details to make sense, it helps to have an understanding
of the broad strokes—an overview of the process of running the kingdom. That’s what this
little section is, a brief look at the big picture.
Your first action in most quests should be to construct buildings. Guilds and Temples are the
heart of your kingdom. From these buildings, you recruit the heroes you need to accomplish
the goals of the quest. To begin building, click on your Palace, the seat of your power.
It becomes the active building, which means that the Control window shows the Palace and the
controls appropriate to it.
The Buildings button is what you use to begin construction of a building. Click it, then select a
building, and then click the Build button. Now, you’re dragging an outline of the potential
building as your mouse pointer. Click in the Main Map to place it anywhere you like—except
that if the outline is circled in red, you’re in a bad spot. Move to a place where the circle is
green, then try it. When you place a building, a construction site appears.
Page 15

17
The building is gradually assembled either by Peasants (who come from your Palace), magical
energies, or industrious heroes such as Gnomes or Dwarves.
Once you’ve built a Guild or Temple, you can start to recruit heroes. To recruit a hero,
select the appropriate building, then click the Recruit button. When the hero arrives, they
immediately start wandering around.
As is true of any ruler, you cannot control your subjects directly. All of your kingdom’s heroes
have minds of their own, and they act according to their own priorities and goals. You can,
however, motivate them to do what you want them to do. To guide your heroes, you rely on
tools called Reward Flags. Reward Flags are bounties that you set on monsters, buildings,
or—in some cases—heroes. These flags come in two types: Attack and Explore. One merely
specifies that you want some hardy soul to reach the place where the flag is set, and perhaps
collect something there. The other is a price on the head (or hearth) of the monster
(or building) you’ve marked. You create flags using the Palace Control window. Click the
Rewards button to try it. You determine both what the reward is for and the amount of
the reward.
There are twenty-two spells potentially at your disposal; you gain access to them by building
specific structures: Wizards Guilds, Libraries, Temples, and such. With these spells, you can aid
your heroes in their endeavours. As you build and upgrade more Guilds and Temples and such,
more spells become available.
Constructing buildings, recruiting heroes, placing rewards, and casting spells all cost gold.
You begin each quest with gold in your treasury. (The amount is shown at the top left of your
screen.) As you do things, this total steadily drops. Before it hits bottom, you need to gather
more through your kingdom’s economy. Heroes gain money for killing monsters or fulfilling
reward flags. They might also find gold in treasure chests. Eventually, your heroes return
some of this money to their home Guild or Temple. Commerce buildings like the Blacksmith
and Marketplace make money in other ways, like selling improved or additional equipment to
your heroes.
Any gold stored in a building is fair game for an enterprising monarch. Your Palace employs
Tax Collectors, who travel from building to building, collecting your share of the profits these
structures have made. The Tax Collectors then return to the Palace or to a nearby
Guardhouse and add the collected funds to your treasury. This money allows you to continue
building, recruiting, casting spells, and setting rewards. (Be warned: certain monsters and
opposing kings’ Rogues can steal from and even kill your Tax Collectors.)
Those are the basics. If you’d like to try ruling with this little information, Ardania is waiting.
If you’d prefer to be armed with more detailed information about how to wisely rule your
kingdom, please read on.
Page 16
18
Sovereign’s Tip
To help reveal the territory around you kingdom quickly and economically, choose a Rangers
Guild as your first building. Rangers will naturally set out to explore the unrevealed regions
of your kingdom.
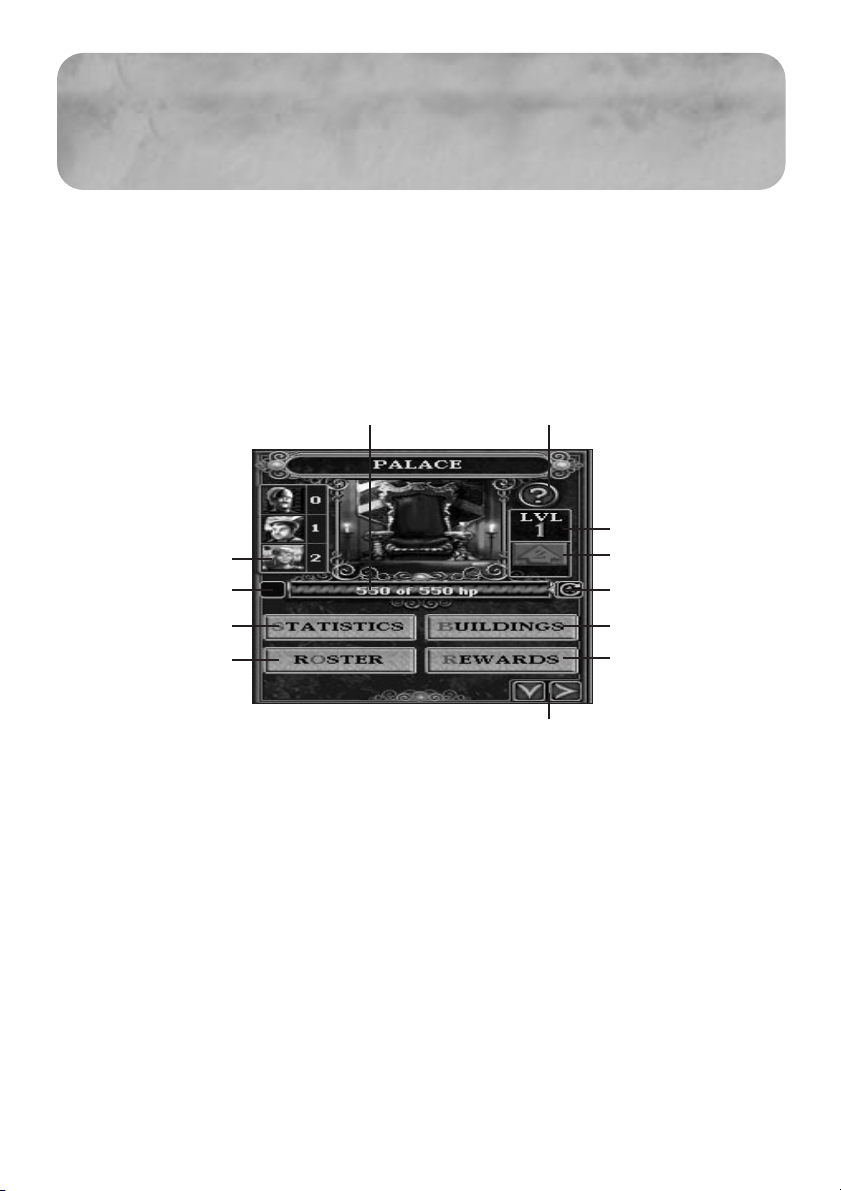
Your Palace
Your Palace is the heart of your kingdom, from which you control most of your kingdom’s major
functions. It’s also the source of and home for most of your henchmen—Peasants, Tax Collectors,
and their ilk. These tenacious characters appear in your realm of their own accord and spend
their days taking care of the mundane maintenance of your realm; adventuring is left to the
heroes. A final warning: if your Palace is ever destroyed, you immediately fail the quest.
When the Palace is selected as the active building, the Control window includes:
Henchmen Each Palace has the potential to support three classes of henchmen:
Tax Collectors, Peasants, and Palace Guards. The number of henchmen
supported by a Palace increases as the Palace is upgraded. These
indicators tell you at a glance how many of each type your Palace is
currently supporting. Click on any of these to go to the Henchmen portion
of the kingdom roster.
Hit Point Bar This shows the structural strength of your Palace in terms of "hit points"
remaining. This number falls as the Palace takes damage and rises as it is
repaired or upgraded.
Henchmen
Repair Once
Tracking/Focus
HelpHit Point Bar
Statistics
Roster
Level
Buildings
Rewards
Upgrade
Add to repair queue
Page 17

19
Statistics Click this button to see a statistical overview of the key events in your
quest so far. The report covers riches, buildings, heroes, vice, and danger.
It’s quite useful for giving you a sense of what you’ve accomplished to date.
Roster This button takes you to a screen that lists and allows you to quickly select
from all your heroes, henchmen, and buildings. Buttons at the top of this
list let you control which type is the focus. Other controls at the bottom let
you sort the list by type, alphabetically, or by level.
Building Level This indicator displays the current level of your Palace.
Upgrade This is what you use to order your Palace upgraded to the next level.
(There are three possible levels.) The Upgrade button is a feature common
to many buildings, but the Palace has its own set of unique upgrade
requirements. To raise your Palace to level two, you need sufficient funds
and four living heroes. To upgrade it to level three requires a total of
twelve living heroes (along with sufficient gold). The amount of gold
required to upgrade to the next level is shown on the button—in red if you
can’t yet afford it.
Tracking/Focus Click the down arrow to put your Palace in the Tracking window. The right
arrow focuses the Main Map on your Palace.
Rewards This button takes you to the controls for placing Reward Flags. These are
discussed in greater detail in the section Placing Flags.
Buildings Use this button to order your subjects to construct a new building. This is
discussed in greater depth in the section Constructing Buildings.
Repair Queue With this toggle button, you determine whether or not your Peasants are
under standing orders to repair your Palace, should it be damaged.
Help The Palace Help feature gives you a brief overview of its function and
abilities, as well as some insightful background information.
Sovereign’s Tip
There are three ways to select your Palace and make it the active building:
∑ • Click on it in the Tracking window or Main Map,
∑ • Click the Palace button,
∑ • Press the keyboard shortcut 1.
Page 18

Constructing Buildings
The first step in trying to accomplish your quest goals is to start building up your kingdom.
Without Guilds and Temples you cannot recruit the heroes necessary to complete your quest.
Through the construction of support buildings, you can offer these heroes the chance to
better equip and train themselves for the hostile regions of Ardania.
Every quest begins with, at the very least, your Palace on the map. The Palace is your key to
constructing all the other major structures you’ll need. Select it, then click the Buildings
button in the Control window. The list that appears includes all the buildings currently available
for construction. (A toggle button lets you view all the buildings that might become available
throughout the quest.) Those you cannot yet afford to build have their cost listed in red.
To order the construction of a building, select it from the list, then click the Build button.
(You can also simply double-click the name of the building.) Now, your mouse cursor
represents the outline of the construction site. Drag it over the Main Map to the place you
want to put this building. As you’re moving the cursor around to find a location, a few things
become apparent. First, your potential construction site has a circle around it. This circle
indicates the building’s construction buffer. This buffer area provides extra room beyond the
walls of all buildings, allowing characters to travel between them. Also notice that any buildings
already placed on your map show their buffers—the total area they take up on the map—as a
similar circular highlight.
If the image of your new building is red, this means that you are over an area that is illegal for
construction. Either there is an overlap between an existing building and the construction
buffer of the building you are placing, or there’s overlap between your new building’s buffer
and the dark, hidden map area. Also, some buildings, like Trading Posts, cannot be placed too
close to others (like Marketplaces). Some, like Wizards Towers, must be placed within a certain
range from an existing structure (a Wizards Guild). All of these special placement rules are
explained in the building entries in the Reference section.
If you run into problems placing a building, try moving it to new locations until it’s no longer
red. Note that hills and other terrain objects (such as trees and rocks) do not obstruct the
placement of your building. If there isn’t any available space for you to place the building,
you can quit trying by right-clicking anywhere. Your heroes will need to explore further to
clear room for the construction.
When you do find a suitable location, click to place the building. Peasants automatically come
to the construction site and start to assemble your chosen structure (or magical energies
carry out the process, if the building is wizard-related). The more workers at the site, the
faster the construction occurs. When you place the construction order, the cost of the building
is immediately deducted from your treasury.
20
Page 19
21
The first building of a type that you build is always the cheapest. Once you start building
multiples of any given building type, the successive duplicates normally become more and
more expensive to construct. (There are exceptions to this rule, like the Wizards Tower.)
Sovereign’s Tip
When you place your buildings, it’s wise to keep in mind how their locations affect your
kingdom overall. For example, if you spread your buildings out too widely, they can be
harder to defend, and your Tax Collector takes longer to complete his rounds.
However, some buildings, like Inns and Trading Posts, need to be built on the frontier in
order to best fulfil their potential.
Using Buildings
Constructing a building provides some immediate benefits, but most buildings also have
features you must choose to use. While most buildings share similar types of functions,
the details differ from building to building. These differences are reflected in the building’s
Control window display. You can see information on a specific building by clicking the building’s
Help button, and greater detail is available in the Reference section under Buildings.
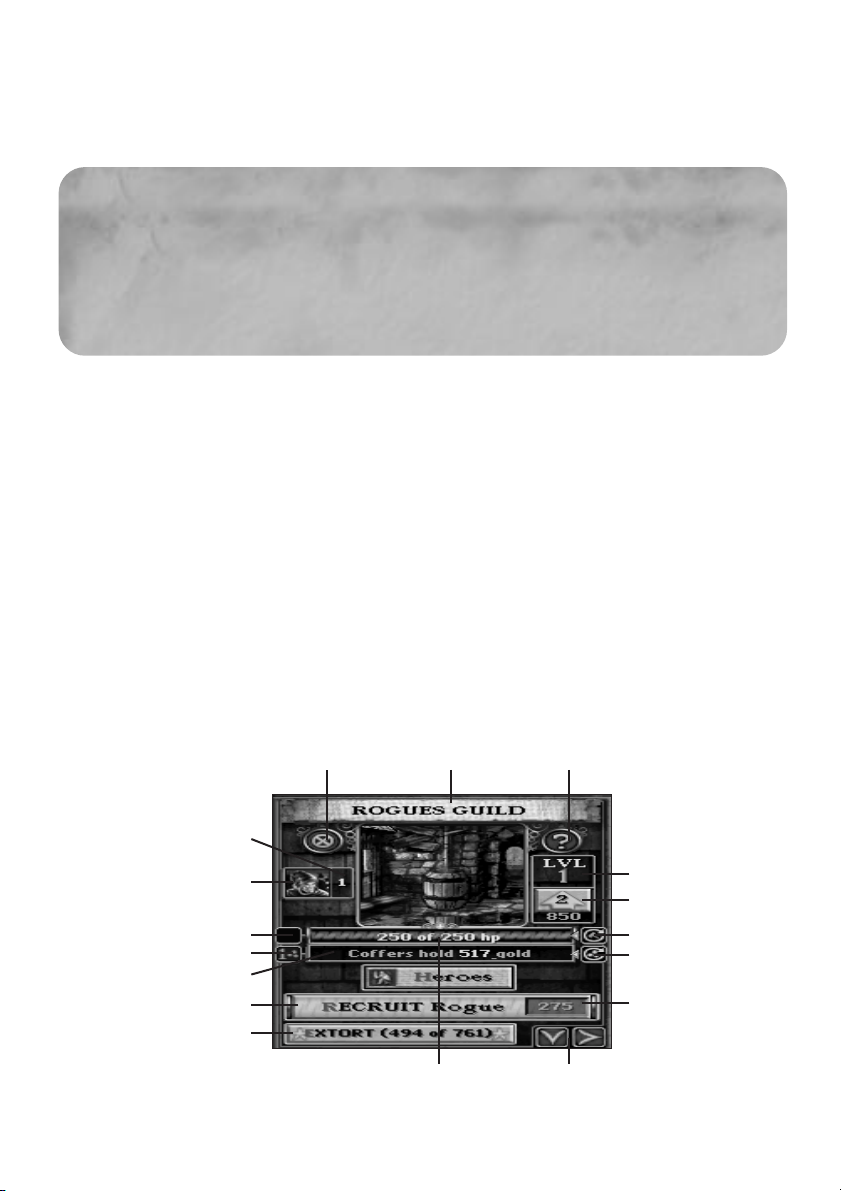
The Building Control Window
Whenever you select a structure as the active building, it shows up in the Control window.
If the building is one that you own (have control over), you get more than information in this
window. What functions are available depends on the type of building. You might have any
(or all) of these:
Tax Route
Heroes
Tax O n ce
Special Ability
No. of Heroes
Coffers
Track/Focus
HelpTitle BarDemolish
Recruit
Level
Amount to Recruit
Upgrade
Remove from Repair Route
Remove from Tax Route
Hit Points
Page 20

22
Title Bar This is the name of the building. You can click here to rename it.
Hit Point Bar This shows the structural strength of this building in terms of hit points
remaining. This number falls as the structure takes damage and rises as it
is repaired or upgraded.
Building Level This indicator displays the current level of the building.
Upgrade This is what you use to order the building upgraded to the next level.
The number of possible levels depends on the type of building, but it is
never more than three. Every structure has upgrade requirements. Once
those have been met, you can purchase the upgrade. The amount of gold
required to upgrade to the next level is shown on the button—in red if you
can’t yet afford it.
Tracking/Focus Click the down arrow to put this site in the Tracking window. The right
arrow focuses the Main Map on it.
Repair Queue With this toggle button, you determine whether or not your Peasants are
under standing orders to repair this building, should it be damaged.
Repair Once This button notifies your Peasants to repair the building one time, and then
to leave it alone until you give other orders.
Coffers This readout displays the amount of gold awaiting tax collection. This
information only appears on buildings that can contain or produce gold.
Tax Route With this toggle button, you determine whether or not your Tax Collectors
visit this building each time they make their rounds. This button only
appears on buildings that can contain or produce gold.
Tax Once This button temporarily adds the building to your tax route. The next time
a Tax Collector makes his rounds, he can stop here to collect taxes
(provided there is gold in its coffers). On subsequent rounds, however, he
bypasses this building unless you give him other orders. This button only
appears on buildings that can contain or produce gold.
Demolish Click this button to destroy the building. Your Peasants sell the materials for
salvage, so you get back a small portion of the original construction price.
Help The Help feature gives you a brief overview of the building’s function and
abilities, as well as some insightful background information.
Support This indicator shows how many heroes this building is currently supporting.
Heroes This button, available only for Temples and Guilds, calls up a list of all the
heroes associated with the building. It includes their names, level, and
current actions. A toggle button at the bottom of this list changes the
entries to a short form that shows only the heroes’ names. The Visitors
button shifts the list to show the visitors in the building.
Page 21

Recruit Heroes The main role of Guilds and Temples is to support the activities of your
heroes. Click this button to add a new hero of the appropriate type
(Rangers from a Rangers Guild, for example) to your employ. The
recruitment cost is subtracted from your treasury and the button turns
into a progress bar showing you when the new hero will arrive.
Special Ability Many buildings have special functions; for example, Guilds have guild skills
and Temples have spells. The relevant special ability buttons activate that
skill, provided that you have the funds to pay for it. The Spells button,
for instance, takes you to a list of that building’s spells.
Combat Damage
Each building and lair can take only a certain amount of damage before it collapses. This is
represented by the structures "hit points". As a site takes damage from attacks, these points
are gradually lost. When the hit point total reaches zero, the building is destroyed.
You can have a damaged building repaired at any time before it reaches zero hit points.
If you need a building that has been destroyed, however, your only option is to construct a
replacement. Also, note that only fully repaired buildings can research new abilities or be
upgraded; damaged sites must be brought into good repair first.
Repair Routes
Buildings damaged by attacks can be repaired. You can choose to have a building repaired
every time it’s damaged (it’s in the Repair Queue), or you can have it repaired only when you
specifically order it (Repair Once). The advantage of having buildings in the queue is that you
can focus your royal attention on other things and let the business of repair go on in the
background. However, if you want to carefully manage your Peasants, the Repair Once option
comes in handy.
You only have a limited number of Peasants, and they divide their time between constructing
new buildings and repairing existing ones. For the most part, the Peasants aren’t as intelligent
as their ruler, and in heated moments, they might focus their efforts wrongly—for example,
repairing a minor structure while a more important one is badly damaged and under attack.
The Repair Once option lets you manage this situation by taking less important buildings off
your Peasants’ Repair Queue, then calling for them to be repaired when the situation allows.
23
Page 22

24
Upgrading
Many buildings may be upgraded one or two levels. (The number of possible levels depends on
the type of building, but no building goes above level three.) In order to upgrade a building
you must have the amount of gold indicated on its upgrade button. Certain buildings also have
upgrade prerequisites. These are detailed in the building’s Help text, and you can also find
them in the Reference section. A missing prerequisite will be listed on the ToolTip Bar.
Once you meet the prerequisites for upgrading, just click the Upgrade button. This prompts
your Peasants to add the job to their construction queue. Once they get to the site, they
start to perform the upgrade work. The more workers are helping with the task, the quicker
it is completed.
Structures You Don’t Build
Some buildings, like Houses, Elven Lounges, and Gambling Halls, are generated without your
involvement. They come about naturally as your settlement grows and certain requirements
are met. Infrastructure, such as Sewers and Graveyards, are also created for you. These
structures cannot be demolished or destroyed. In addition, in some quests your heroes might
find existing buildings and add them to your kingdom.
As your settlement grows, the building roster comes in handy. To use it, select your Palace and
then click the Roster button. Now click the Buildings button in order to make the list display all
your village’s structures. From this list, you can quickly tell what buildings are in your tax and
repair queues and if any building’s current status warrants attention.
Your Heroes
While it’s an important job to construct the buildings that make up your kingdom, the real key
to your success in any quest lies with your heroes. It is only through their courageous
endeavours that your goals can be accomplished.
Page 23

Recruiting Heroes
You recruit heroes through Guilds and Temples. Each of these produces a specific type
(some have two types) of hero and can support up to a maximum number. For instance, a
Rangers Guild creates and supports a maximum of four Rangers, while a Dwarven Settlement
creates and supports three Dwarves.
Each Guild and Temple has a Recruit button. This button shows you the type of hero it can
recruit and displays the cost in gold for recruiting the next hero of that class. When you click,
the gold is subtracted from your treasury and the button becomes a recruitment timer.
This timer shows how long you have to wait before your new hero arrives.
Every hero carries a unique name and set of personal statistics, and all of them have minds of
their own. Your new heroes spring immediately into action, pursuing their own priorities.
Your challenge is to get them to accomplish your goals.
Hero Behaviour
Heroes are intelligent entities (with the occasional exception). They have their own individual
motivations and goals—goals that might not always coincide with your needs. For instance,
no matter how high an attack reward you place on a Skeleton, there is very little chance that
a Ranger will try to attack it. Rangers know that their chances of damaging a Skeleton with
their arrows are slim. However, you can sometimes tempt them to consider such intimidating
actions by offering a particularly high reward.
Likewise, don’t be surprised to see some heroes simply mill about. This is your cue to give
them something to do. Are your Wizards just walking around and resting from time to time?
Maybe you should build a Library, so they can go learn some new spells! Are your Warriors
content to stay at home because there are no enemies to hunt? Maybe it is time to have them
explore the surrounding area for monsters by placing explore flags!
Some heroes are smarter than others. For instance, the intelligent Wizards almost always
equip themselves with any available Healing Potions, but thick-headed Warriors of Discord
almost never do. Likewise, some heroes are more loyal than others. A Rogue’s only loyalty is to
gold and wealth. In a multiplayer game, your own Rogues might attempt to satisfy a Reward
Flag that another sovereign placed on your Palace. Paladins, on the other hand, can only be
tempted to disloyalty by the most excessive rewards, if at all.
These are but a few examples from a long list of behavioural differences between your heroes.
It is one of the challenges facing any sovereign to figure out, understand, and work with these
differences, ultimately manipulating them to your best interests in order to accomplish your goals.
25
Page 24

The Hero Control Window
As is true of buildings, heroes have useful details and handy functions that show up in the
Control window when one is selected.
Name This is the name of the hero. If a hero is level ten or higher, you can click in
this field to change the name.
Type The hero’s class—Ranger or Wizard, for example—is displayed here.
Hit Points This bar displays the hero’s maximum and current hit points. The bar rises
and falls as the hero takes damage and heals. Once a hero’s hit points reach
zero, the hero dies and leaves a Gravestone.
Level This indicator displays the current level of the hero. As characters gain
more experience, they move up in level.
Experience This status bar shows how much more experience is needed before the
hero attains the next level.
Current Action Your hero’s current activity—hunting or fighting, for example—is displayed here.
Weapon The weapon your hero is current wielding and its bonus (if any) are
displayed here. If you move your cursor over this area and look at the
ToolTip Bar, you see a description of the weapon.
Armour What armour the hero is currently wearing and its bonus (if any) are
displayed here.
Spells This button opens a list of all the spells the hero can currently cast and a
list of the enchantments in effect on that hero.
Statistics Click this to see the hero’s unique personal statistics.
Items This button opens the hero’s inventory list. Use this to find out how much
gold this hero has.
Tracking/Focus Click the down arrow to put this hero in the Tracking window. The right
arrow focuses the Main Map on the hero.
26
Dismiss
Weapon
Armour
Name
Spells Items Tracking/Focus
Statistics
Current Action
Type
Hit Points
Experience
Level
Help
Page 25

Dismiss Click this button to dismiss the hero (or corresponding Gravestone) from
your quest. The hero walks to the Palace, enters, and then disappears from
the quest into early retirement. You can then recruit a replacement.
Help The Help feature gives you a brief overview of the hero’s abilities, as well as
some insightful background information.
Improving Heroes
The longer they are out adventuring, the more your heroes increase in skill level. They do this
by gaining experience (measured in points). Once a hero reaches a certain threshold of
experience, that hero’s level increases by one. Getting to higher levels is more difficult,
as each promotion requires progressively more time and experience.
When heroes go up in level, they get more hit points, they might get better at a particular skill,
and they also can gain new spells or skills. The list of actions that heroes can undertake to gain
experience is quite long, and to some degree, it is unique for each hero class. In general, if
heroes are in the field adventuring, they are gaining experience. However, there are ways that
you can promote heroes and make them better at what they do without risking them in the field.
Fairgrounds
The Fairgrounds provide two ways in which heroes can seek self-improvement. First, heroes
can purchase upgrades to their combat skills. Second, they can take part in tournaments.
Tournaments are events held at the Fairgrounds. Each type of tournament focuses on
refining a different one of your heroes’ combat skills. The focus might be melee, archery,
or magic, and there are combination tourneys, too. Heroes that use the relevant skills are
attracted to the Fairgrounds for practice. Combination tournaments are open to heroes
using all types of combat skills.
Heroes who perform admirably in a tournament stand to gain experience and possibly even
some bonus gold. By selecting the tournament type, you can guide specific classes of heroes
to improvement. You can also close down the tournaments to force your heroes into the field.
Library
Libraries have several positive effects on your heroes. For starters, just having a Library in
your kingdom boosts the intelligence of all heroes recruited after the Library has been built.
However, the Library’s most valuable role is in developing magical abilities. Using this building’s
research features, you are able to train your Wizards to use new spells and improve their
intelligence. You can also teach intelligent characters new magic (even non-spellcasters),
and afford them the opportunity to increase their magic resistance.
27
Page 26

Equipment
Heroes can improve their equipment as well as their statistics and skills. This happens when
they visit different buildings throughout your kingdom. Read the Reference section for all the
details, but here are a few of the more useful examples.
Blacksmiths sell better weapons and armour to your heroes, but you have to spend gold in
order to research each new level of improvement.
Wizards Guilds enchant your heroes’ weapons and armour, as long as they are willing to pay
for the service. Enchanted weapons and armour add to damage and protection.
If you have a level two Rogues Guild, heroes can pay to have their weapons poisoned.
A poisoned combatant slowly loses hit points over a given amount of time. It is quite possible
that the infected character will die before the poison wears off.
Marketplaces also sell helpful items to heroes, though you must research each item in order
for it to be available. At level one, you can get Healing Potions. Level two offers Rings of
Protection, and the third level Marketplace introduces Amulets of Teleportation.
Heroes might also find improved weapons and armour as they adventure. Some lairs have
hidden caches, which become available when the lair is destroyed.
Orphaned Heroes
If a Temple or Guild is destroyed and heroes supported by that building decide to return
home, the heroes note the lack of a home to return to and assume that their services are no
longer needed. The heroes then walk to the Palace, enter, and leave your kingdom.
If, however, you build an appropriate replacement Guild or Temple before the homeless heroes
reach the Palace, then the new structure adopts the orphaned heroes. This does not change
the maximum number of heroes that the Guild or Temple can support.
Caring for Dead Heroes
When any hero dies, a Gravestone is left behind. These markers remain on the map for a
limited time after the hero’s death. Gravestones of higher level heroes last longer than those
of lower level heroes. If you have a Resurrection or Re-animation spell available, you can bring
a hero back to life by casting that spell on the Gravestone. Once the Gravestone has gone,
however, there is no way to bring the hero back.
You should count the Gravestone of any hero you expect to bring back toward the maximum
number of heroes a Guild or Temple can support. So, for example, if you have two Rangers
and two Ranger Gravestones you plan to revive on the map, that Rangers Guild (which holds a
maximum of four members) should be considered full. You can immediately recruit new heroes
to replace the dead ones, but if you do this, the lowest-level Gravestone is dismissed and the
28
Page 27

29
newly recruited hero assumes that membership slot. Thus, you would lose your opportunity to
revive the expired hero.
You can also manually dismiss Gravestones by selecting the stone and clicking its Dismiss
button or by double-clicking on the Gravestone itself.
Reward Flags
An important key to success in your game is in learning how to motivate your heroes. Your
main tools for doing this are Reward Flags. These are offers of gold to be awarded to any
hero who successfully fulfils the terms of the flag—explore or attack the indicated target.
There are two different types of flag, as seen here.
Attack Flag Explore Flag
An Attack Flag tells your heroes to defeat the marked creature or destroy the marked
building or lair. An Explore Flag offers a reward for reaching the marked location. Note that
Attack Flags can only be placed on visible things, while Explore Flags can be placed anywhere.
Attack Flags travel with moving targets, but Explore Flags stay wherever you place them.
Heroes don’t always respond to your Reward Flags. You have to appeal to their sense of
greed—and each hero’s thirst for gold is different. Your reward must be high enough to
outweigh the rigors of the distance to be travelled and the dangers to be faced.
Placing Flags
To place a Reward Flag, select your Palace. In the Control window, click the Rewards button to
open the Reward Flags box.
To set the amount of the reward, use the plus and minus signs next to the type of flag you
want—Explore or Attack. Once that’s done, click the name of the type of flag, then move your
cursor onto the Main Map. Notice that you are now "carrying" a Reward Flag on your mouse
pointer. Move your cursor to the target and click to place the flag.
Page 28

30
Note that if you’re placing an Attack Flag, your cursor must be over a structure, character,
or monster to be placed. Otherwise, the flag has a red "Invalid Target" marker over it.
You can’t place Attack Flags just anywhere; they must be placed on valid targets.
If you are trying to place a Reward Flag with a higher reward amount than you currently have in
your treasury, your cursor shows a red "Disallowed" marker with coins attached. This changes
back to a normal cursor once your treasury increases to cover the amount, or after you
decrease the reward amount to within reach of your funds. You can also right-click to cancel.
Since placing flags is a vital part of success in a quest, there are two shortcuts you can
take—after you have set amounts on both types of flag—to speed this action.
• Double-click on the intended target. If the target is a creature or building, you get an
Attack Flag. If it’s vacant land, you get an Explore Flag instead. The flag bounty is dictated
by the current reward amounts. You can set it manually after the fact; see Managing Flags.
∑• Press the z when an enemy target is selected (you see it in the Control window).
This sets an Attack Flag on that target. Again, the flag bounty is dictated by the current
reward amounts, and you can set it manually after the fact.
Managing Flags
Once you’ve set a Reward Flag, that can be the end of it until a hero claims the flag. However,
you can also keep an eye on the flag and make changes if things aren’t working out to your
royal approval. Click on a placed Reward Flag to get that flag into the Control window.
Once a flag has been placed, you can only make changes to it in this window. Naturally the
first thing you might be interested in is the flag’s effectiveness. To check this, look at the
View Heroes button. It has a number indicating how many heroes are presently responding to
the bounty. If no heroes have been tempted by your reward, you might consider increasing the
amount. (Keep in mind, however, that it does take a little time between when you place a flag
and when heroes begin to take note of it.)
Page 29

31
If you click the View Heroes button, you are presented with a list of all the heroes who are
currently trying to achieve that flag’s objective. Clicking on any entry in this list centres the
Tracking window on the chosen hero.
Once a reward flag is placed, it can not be moved. However, you can increase the bounty.
To do this, click the plus sign in the Control window. Each click increases the reward by 100
gold. The reward amount can not be decreased after a flag has been placed.
You can also remove a flag completely from the map. Be warned! If you remove a flag, the bounty
in gold it was carrying is lost—it does not get returned to your treasury. To remove a flag:
• Select the flag, then click the Remove button in the Control window, or
∑• Double-click on the flag in the Main Map.
Claimed Flags
Heroes claim a reward flag’s bounty only after they meet its requirements. In the case of an
Explore Flag, that means the hero must get to the location of the flag. In the case of an Attack
Flag, the hero must destroy the flag’s target. Once the reward is claimed, the flag disappears.
If there are multiple heroes in the vicinity, it is assumed that they all took part, and so they all
divide the reward. In the case of claiming an Attack Flag during a multiplayer game, this
includes the nearby heroes of any player.
Sovereign’s Tip
When your kingdom is under heavy attack, you might want to place Attack Flags on the
monsters or heroes posing the greatest threat.
Using Spells
Magic is a potent force in the land of Ardania. The outcome of any quest is heavily influenced
by spells—those you wield as well as those cast by your heroes and your opposition. There are
two major categories of spells in Majesty, hero spells and Sovereign spells. While both are
quite powerful, they are cast in very different ways.
Hero spells are those cast by your heroes. Your heroes decide for themselves when, where,
and how to use them. The types of spells each can wield depends on the hero’s level and class.
As a hero gains levels, more spells become available for use. There is no limit to the number of
times a hero can cast a spell. However, there is a recharge time between castings. This period
varies by spell. For the details on each hero spell, please see the Reference section.
Sovereign spells are those that you can cast. These spells become available to you when you
control certain Temples and Guilds, and higher level structures tend to give you access to
more potent spells. Sovereign spells differ from hero spells not only in that you decide when
and where to cast them, but also in that each Sovereign spell has a cost in gold associated
Page 30

32
with it. That is, the Guild or Temple charges you for each use of the spell. This price is
deducted from your treasury when you cast. For the details on each Sovereign spell,
please see the Reference section.
You can prepare to cast a Sovereign spell in two ways. The first is to select the relevant
Temple or Guild, then click the Spell button in the Control window, then finally click on the
desired spell in the list. The second, quicker, method is to use the Spell Bar. Each icon on the
bar corresponds to a different spell. If a spell is not yet available, the icon is grey. If you hold
your cursor over an icon, the name and cost of the spell appears in the ToolTip Bar.
Once you have selected your spell, its icon becomes your mouse pointer. Move the cursor over
the target—whether it be a creature, building, or location—on which you want to cast the
spell, then click. The spell is cast, and—unlike reward flags—the spell remains on your mouse
pointer until you right-click to cancel it. This way, you can easily cast a spell repeatedly.
Sovereign’s Tip
If you are trying to cast a spell in a crowded area, you can make sure you have the right
target by watching carefully until the target you want is highlighted and its name appears in
the ToolTip Bar. If you really want to be sure, you can also target the spell by selecting it,
then clicking on its portrait in the Control
As an aid in identifying them, Sovereign spell icons are colour-coded, based on the building
that supplies them:
• Purple: Wizards Guild
• Aqua: Temple to Agrela
ª• Grey: Temple to Dauros
• Red: Temple to Krypta
• Green: Temple to Fervus
• Yellow: Temple to Helia
• Brown: Temple to Lunord
Sovereign spells cast from Temples have no maximum range. You may cast them at any valid
target you can see. Those cast from Wizards Guilds, however, have a limited range. They may
only be cast within a certain distance from the closest Wizards Guild or Wizards Tower. The
actual range is shown as a highlighted area on the Mini Map when the appropriate Wizards
Guild, Wizards Tower, or spell is selected.
Page 31

Earning Gold
As a sovereign in Ardania, you must pay in gold for everything you do or order done. You
begin each quest with some gold in your treasury, but you will need much more in order to
achieve your goals. There are several ways you can replenish your treasury, some better
than others.
Tax Collection
Most of the buildings in your realm generate some amount of gold, however small. Getting that
gold from the various structures into your treasury is the job of the Tax Collector. This rotund
fellow is the workhorse of your economic system. A Tax Collector starts his rounds from
either the Palace or a Guard House, and he visits every building on the Tax Route. Once he’s
gone to each building, he returns with your gold.
Note that if a Tax Collector is killed while making his rounds, he drops whatever gold he’s
carrying. If a hero is nearby to pick up the spilled treasure, all is not lost. However, if no
heroes are near when a Tax Collector is killed, the gold vanishes!
Wandering around to every building is not always the most eff icient means of collecting taxes.
Especially in a large, spread out kingdom, you might want to streamline the process.
There are a number of ways you can do this:
Minimum Return is a threshold you set in a Tax Collector’s Control window. This dictates the
minimum amount of gold that a Tax Collector must be carrying before he considers dropping
it off at your Palace or a Guard House. He will ignore this and drop off anyway only if there is
no more gold left anywhere to collect. You can adjust the value in this field by manipulating
the plus and minus buttons next to it.
Minimum Pickup is another threshold, set and adjusted in the same way. This dictates the
minimum amount of gold that must be in the coffers of a building on the Tax Route before the
Tax Collector will consider visiting that building to collect it. This can save a lot of time that
would otherwise be wasted on tiny sums.
33
Page 32

The Tax Route gives you complete control over which buildings the Tax Collector travels to
visit. This allows you to fine tune your collectors’ routes. If your buildings are widely spread,
collecting money from every one could take your Tax Collector a long time. If you take the less
income-productive buildings off his route, it can significantly speed up tax collection. Use the
Tax Route toggle in the Control window of each building to put it on or off the route. Stay
alert, because whenever a new building is created, it defaults to being on the route. When a
building is off the Tax Route, it might eventually build up a nice amount of gold. You can have
taxes collected on demand using the Tax Once button.
More Tax Collectors is a dependable way to speed up tax collection. You start the quest with
one, and you can gain additional Tax Collectors by upgrading your Palace. The base number of
Tax Collectors you employ is the same as the level of your Palace, up to three. You can
supplement this base number by constructing certain buildings; for every five Fairgrounds,
Blacksmiths, Royal Gardens, and Marketplaces you build, there is a chance that a Fountain will
spontaneously appear in your city. Each Fountain provides an extra Tax Collector.
Guard Houses have a passive but significant impact on tax collection. Your Tax Collectors can
drop off their gold at these outposts, rather than making the long trek back to the Palace
every trip. This generally results in your treasury getting a boost more frequently.
Extortion
When you have a Rogues Guild in your kingdom, you have the option of collecting taxes in a hurry
through Extortion. Click the Extort button in the Rogues Guild Control window, and the Rogues
pressure your entire populace into handing over their taxes immediately. All taxes are collected
and delivered to your treasury, but there’s a catch—the Rogues keep a sizeable percentage of the
take for themselves. A higher level Rogues Guild takes out a smaller percentage of the taxes, but
the cost makes this collection technique perhaps better kept in reserve as an emergency measure.
Marketplaces
A dependable way to make sure your settlement is creating a strong cash flow is to build one
or more Marketplaces. Unlike most buildings, a Marketplace generates a large amount of gold,
which is then gathered by your Tax Collectors on their rounds. You might wish to build multiple
Marketplaces, to make sure you’re generating solid revenue. However, more Marketplaces also
lengthen your Tax Route, so you should strive for a balance. Note that Marketplaces must be
built a certain minimum distance from both each other and from any Trading Posts.
Upgrading your Marketplaces is also very important. The higher level markets bring in greater
amounts of gold from regular business and from Caravans, as well as having increased hit
points. This last is important, as you don’t want such vital revenue generators to be easy
targets for monsters.
34
Page 33

35
Another handy ability of the Marketplace is Market Day. After a Marketplace has successfully
researched this, you can get emergency cash into the coffers when you need it most.
You simply click the Market Day button to instantly create a large cache of gold in the
Marketplace—but there are drawbacks. After the Market Day, the Marketplace must put all its
resources into resting and restocking for a time. Thus, it does not sell any goods to heroes
and ceases to generate new revenue until that time passes.
Sovereign’s Tip
Since your Marketplaces are so vital to the health of your economy, you should consider
placing at least one Guard House near each market. Not only does this help to defend the
Marketplace, but the Guard Houses also present alternate targets for monsters—so that
they won’t necessarily head straight for your vulnerable cash cows.
Trading Posts
Trading Posts are far-flung buildings that collect gold on the frontiers, far from any
Marketplace or other Trading Post. They occasionally send out Caravans to travel to the
closest Marketplace. When the Caravan reaches the Marketplace, it drops off a load of gold.
It’s profitable to have your Trading Posts placed as remotely as possible, as the farther a
Caravan travels, the more money it brings in. Of course, a long Caravan route makes a
tempting target for wandering monsters.
Gambling Hall
While a Gambling Hall usually acts as little more than a distraction for your heroes, you can
sometimes use it to your advantage when you’re feeling desperate—and lucky. The hall
appears on its own after you have both a Rogues Guild and Elves in your kingdom.
The Gambling Hall has a simple roulette wheel for your enjoyment. The odds are against you,
but the payoff can be big if you win. Bring up the Gambling Hall in the Control window, enter
the amount you wish to bet and the colour you wish to bet on, and then click the Spin button.
Good luck, and try not to bankrupt your kingdom!
Page 34

Freestyle Quests
The ability to play your own freestyle quests extends Majesty beyond the predefined quests.
You can generate and play random scenarios or create your own customised challenges to
face—carefully selecting the monsters, victory conditions, the forces you begin with, and the
region where you wish to rule.
To start creating a freestyle quest, click on the New Game button or the Map on the
Introduction screen. Next, click the compass in the bottom centre of the Quest Selection map.
This takes you to the Freestyle Selection box. Here. You can begin a random quest at any of
the difficulty levels, or you can choose to set up the scenario yourself. The Manual Settings
button takes you to the Freestyle Settings screen. This screen has all the options you’ll need
customise your freestyle scenario.
Note that, when you’re setting up a multiplayer game, you will use this same screen to create
the situation.
Player Forces This setting determines the heroic forces each sovereign player has in
existence at the beginning of the scenario. Select one of the force
patterns from the pull-down list.
Enemy Forces Use this to control what forces the monsters start with—lairs and
monsters that are on the map at the beginning of the scenario.
Select one of the enemy force patterns using the pull-down menu.
Wandering Monsters During the scenario, monsters wander onto the map from outside the
realm. This setting is how you determine exactly what monsters will do
so. Select from the pull-down menu.
Landscape Use this to choose the terrain for this freestyle quest.
Starting Gold This determines the amount of gold each sovereign has in the royal
treasury at the start of the scenario. Select less gold to create a more
difficult situation and more gold to make things easier.
36
Page 35

37
Victory Conditions When is the quest completed? You decide using this setting. There are
four possible options:
Eliminate All Foes: To win, a sovereign must destroy all the
monster lairs on the map. Any player whose
Palace is still standing at the end of the
scenario receives a victory.
Gather Gold: If you select this victory condition, you must
enter a number into the Limits box. Select from
the list or use Player Specified to put in your
own. The first player to accumulate the
specified amount of gold immediately wins
the game.
∑ Survive Specified Time: For this victory condition, like the previous one,
you must enter a number into the Limits box.
This time, you’re setting a time limit on the
scenario. Every player whose Palace is still
standing when the time limit is reached and the
game ends receives a victory.
Last Palace Standing: This victory condition is only available if you’re
setting up a multiplayer game. Under this, all
player sovereigns are at war with each other.
The object is to wipe out all of the other
players’ Palaces. The last player with an
undemolished Palace wins the game.
Map Number Normally, the map for every quest or scenario is generated at random,
based on the settings for that quest. However, if you create a scenario
and it turns out to be really fun, make sure to write down the Random
Seed number from that game (it’s in the Game Info on the Options
menu). If you want to re-create the map you played that game on, you
can reproduce it by entering that number in this field. Note that this
control governs only the landscape.
When all the settings are exactly as you want them, click Start Game to give your quest
scenario a try (or begin the multiplayer game you just set up).
Page 36

38
Multiplayer Games
In a multiplayer game of Majesty, up to four kingdoms can occupy a map. Each player starts
with a Palace and, depending on the scenario, might have a few other structures or some
forces in place. The goals for every player depend on the victory condition the host selects.
In some scenarios, the best approach is to band together to thwart the evil that roams the
land. In other cases, players might find themselves warring with each other to achieve victory.
A multiplayer scenario presents you with a different experience than a single-player
quest—what would happen if more than one kingdom occupied the same realm. Since you do
not control your heroes directly, do not be surprised when you see them responding to
another player’s Reward Flags or even spending money in other players’ buildings! Some
subjects are supremely loyal, while others follow the gold.
If you wish, you can place Attack Flags on your opponent’s heroes and buildings. Be warned
that if you do this, you are declaring war on that player. When you are at war, your heroes
and theirs fight whenever they come into contact, and the fortifications of each side
(Wizards Towers, for instance) view the other’s forces as hostile enemies. The state of war
exists until all the Attack Flags between you are resolved—fulfilled or dismissed.
To create (host) or join a multiplayer game, click the Multiplayer button on the Introduction
screen. Just as in single-player, you are prompted to enter the name by which you want to
be known.
After you’ve entered a name, you must select the type of communications you want to use.
This sounds more technical than it is. Just pick one of the options presented to you.
They typically include:
• Direct Modem to play over a modem-to-modem connection with another computer.
You must choose whether you plan to host (create a game) or join. If you’re hosting, you
must verify the modem you want to use, then wait for your guest to join. If you’re joining,
you must also verify the modem, then enter the telephone number of the host. When all is
ready, you move on to the Multiplayer Launch screen.
• Direct Serial if you intend to play via a serial cable linked to another computer. You must
choose whether you plan to host (create a game) or join, then verify the serial port
configuration. When all is ready, you move on to the Multiplayer Launch screen.
• LAN (TCP/IP) to play over a local area network that supports the TCP/IP protocol.
Majesty will automatically search the LAN for games and show them to you on the
Multiplayer Setup Screen.
• Internet to play through the MSN Gaming Zone matching service. This option opens your
web browser and takes you to the MSN Gaming Zone site.
Page 37

39
Finally, click Load Game to go to the Multiplayer Setup screen, where you will either join a
game that someone else is hosting or create your own game for others to join.
LAN Multiplayer Setup
If you want to create and host a game, click the Create Game button on the Multiplayer Setup
screen. You are prompted to enter a session name to identify the game to others on the
network and to choose the number of players you want in the game. When you have set both
of these, click the Accept button. You are taken to the Multiplayer Launch screen.
If you want to join a game, look at the open games—all of those available to you are listed on
the Multiplayer Setup screen. When you’ve chosen one, simply select the game and click the
Join Game button when it appears. You go to the Multiplayer Launch screen.
Creating a Game
The Multiplayer Launch screen shows the currently selected multiplayer options and the
players who have already joined the game. There is also a Chat area for communicating with
other players.
If the current scenario options do not meet with your approval, click the Adjust Settings
button to change them. (See the Freestyle Quests section for the details.)
When you are happy with the settings you have chosen, click the Load Game button. When all
the other players have also signified that they are ready to play, you are given the option to
Start Game.
Joining a Game
When you are satisfied with the options that the host has selected on the Multiplayer Launch
screen, click the confirmation checkbox next to your name. This signals to the host of the
game that you are ready to play. Once everyone has clicked their confirmation boxes, the host
can start the game.
Page 38

40
Chatting
There is a Chat window on both the Multiplayer Setup and Multiplayer Launch screens. You can
communicate with other players by entering text in the Chat field, then clicking the Send Chat
button. What you typed is broadcast to all players in the game. All chat (yours and theirs)
shows up in the chat window.
To chat during the game, press
e
, type your chat, and then press
e
again.
What you typed is broadcast to all players in the game. Watch your screen for chat from other
players. Messages are displayed just above the ToolTip Bar.
Internet Games
Majesty supports Internet play through the MSN Gaming Zone matching service, which you can
find at: http://www.zone.com
MSN Gaming Zone
The MSN Gaming Zone is an independent gaming service run by Microsoft Corporation.
Infogrames does not control, and disclaims any responsibility or liability for, the functioning
and performance of the MSN Gaming Zone and any content on or available through the MSN
Gaming Zone, including, without limitation, links to other web sites or comments or other
contact between users of the MSN Gaming Zone.
In order to play over the Internet, you’ll need:
• Access to the Internet.
• An Internet connection of at least 28.8K baud
Helpful Web Site Addresses:
These two sites provide software for chatting with your friends over the Internet, which can
be useful for organising games:
ICQ — http://www.mirabilis.com
AOL Instant Messenger — http://www.aol.com/aim/
Page 39

41
REFERENCE
Majesty’s built-in Help features contain everything you’re likely to need to know, but there’s not
always time during a quest to read through great stacks of information. It can be helpful to
have a reference you can read in the spare moments between quests. Thus this section, filled
with introductions to all of the important subjects.
Buildings
The buildings under your command and protection can be divided into two broad categories:
those you build and those that appear through the natural course of things.
The Cloaked Man
The newly improved Palace dominated the centre of the village and gleamed in the sunlight
as the Cloaked Man strolled down the bustling main thoroughfare. Few took notice of him,
in part due to his efforts to blend into the crowd, but also because most were too busy to
lend much notice to a stranger.
The Cloaked Man continued down the unpaved street, strolling at a casual pace and taking
in the activity around him. As he approached the new Temple to Lunord, a pair of Adepts
ran down the steep steps of the rose-colored, stone ziggurat. Clothed in the characteristic
red and white garb of their guild, the two split in different directions as they reached the
street, beginning their vigilant patrol of the village. Few could match Lunord’s Adepts when it
came to running with graceful speed.
Everywhere the Cloaked Man looked, something was happening. Near the temple, a group of
Peasants were hard at work on the new Library. The Cloaked Man could catch snippets of
their conversation, as the grumbled and groaned about "our lot in life" and how "we never
get any rest." Still, they tended their duties with unfailing dedication. They began hoisting
up a pallet of shingles for the brick-red cupola roof as the stranger continued his walk
through the town.
The Cloaked Man paced a slow-moving Caravan, travelling into the village from one of the
outlying Trading Posts. The driver looked relieved to be out of the monster-filled wilds and
back in civilisation. As the Caravan veered into the Marketplace, the stranger continued on
toward the heart of the town.
The Cloaked Man soon found himself tailing two of the local adventuring heroes: a Ranger
and Warrior. Eavesdropping on their conversation, he found that they were on their way to
visit Chod the Blacksmith. Both felt compelled to invest their hard-earned gold in new
weaponry after a recent scuffle in the forest to the north. It seemed that more and more
Trolls were showing up in that area since the building of the Boar’s Head Inn.
Page 40

42
The two adventurers entered the Blacksmith’s, and the Cloaked Man proceeded on towards
the heart of the village. As a he approached the Palace, the guards did not challenge him.
The Cloaked Man walked into the Palace courtyard and cast off his cloak. Almost
immediately the Royal Advisor was at his side.
"Was your walk beneficial?" the Advisor inquired.
"Indeed. Send out the word. I offer six hundred gold pieces on the head of any Troll in the
northern woods," the Cloaked Man replied with uncommon authority.
"Right away, Your Majesty!"
Buildings You Construct
Before you can begin recruiting, you need to start assembling your kingdom. When you select
your Palace and click the Buildings button, you see what construction choices are currently
available. Of course, not all of the possible buildings are available at any given time. Many have
prerequisites—they do not become available until something else has been built—and others
might be unavailable due to the restrictions placed on you for the duration of your current quest.
Ballista Tower
This is a defensive emplacement that Dwarves introduce to your kingdom.
An armoured tower fires heavy bolts at any nearby monsters. It is very
expensive to build, but its defensive value is very high.
Main Function: Defense.
Prerequisites: Your kingdom must contain a Dwarven Settlement.
Level One: Fires bolts at nearby enemies.
Blacksmith
The existence of a local Blacksmith gives your subjects the opportunity to
upgrade their weapons and armour. Higher level Blacksmiths offer even
better equipment. Another benefit of having a Blacksmith is that
constructing new buildings in your kingdom becomes less expensive,
though multiple Blacksmiths do not increase the savings.
Main Function: A shop where heroes can buy better weapons and armour.
Prerequisites: None for level one. All available Blacksmith research must be completed
before upgrading to level two. The same is true of level three.
Level One: Reduces the cost of constructing new buildings.
Can research level 2 armour and level 2 weapons.
Level Two: Can research level 3 armour and level 3 weapons.
Level Three: Can research level 4 armour and level 4 weapons.
Page 41

Dwarven Settlement
Dwarves are driven to over-engineer. Their basic settlements are tiny
fortresses. Each one allows you to recruit and support three Dwarven
heroes. The Dwarven Settlement has automated defenses that attack any
monsters that approach too close.
Main Function: Home for Dwarves.
Prerequisites: You must have a level two Palace and a level three Blacksmith. In addition,
you cannot build these if your kingdom contains any Elves or Gnomes.
Level One: Lets you recruit up to three Dwarves.
Fires defensive bolts at nearby enemies.
Allows you to build Ballista Towers.
Elven Bungalow
The bright blue roof of an Elven Bungalow loudly proclaim the Elven
presence. Each Bungalow lets you recruit and support two Elves. The
downside of hosting Elves is that they bring their Elven Lounges and
Gambling Halls with them.
Main Function: Home for Elves.
Prerequisites: You must already have a level two Palace, a Marketplace, and an Inn. In addition,
you cannot build this if your kingdom contains any Dwarves or Gnomes.
Level One: Lets you recruit up to two Elves.
Increases all Marketplace income.
Causes an Elven Lounge to appear.
Causes a Gambling Hall to appear, when combined with a Rogues Guild.
Fairgrounds
A place for festivals, jousts, and tournaments, the Fairgrounds can help
boost your heroes’ experience. Heroes can visit the Fairgrounds to train
and thus increase their combat statistics—for a price.
Main Function: Provides level advancement without the risks of real combat.
Prerequisites: You must have a level three Palace.
Level One: Offers experience training to heroes in exchange for payment.
Research Tournaments in order to train heroes in hand-to-hand combat,
archery, magical warfare, or a combination of all forms of battle.
43
Page 42

Gnome Hovel
Gnomes live in what others call ‘structured piles of debris.’ These hovels do
little to beautify your kingdom, but the Gnomes’ contribution to your
workforce makes up for their unsightly abodes. Gnomes are prone to large
families—after you’ve built your first Gnome Hovel, others will begin to
appear in your kingdom.
Main Function: Home for Gnomes.
Prerequisites: You cannot build this if your kingdom contains any Elves or Dwarves.
Level One: Lets you to recruit up to three Gnomes.
Guardhouse
These small forts can be placed anywhere in your domain to protect
important areas of your kingdom. Once a Guardhouse is built, a City Guard
is automatically hired to man it. He routinely leaves the tiny fort to patrol
the nearby area. Guardhouses also provide refuge for any Solarii who are
patrolling the area. In addition, Tax Collectors can use them as drop off
points for their gold, and Peasants can use them as temporary homes. This
helps both of these types of henchmen to carry out their duties without
having to walk back to the Palace.
Main Function: Provides protection at strategic points in your settlement.
Prerequisites: None for level one. Must research Arrows before upgrading to level two.
Level One: Supports one City Guard.
Used as an auxiliary drop-off point for Tax Collectors.
Solarii can choose to garrison it.
Used as a temporary shelter for Peasants.
Can research auto-firing Arrows.
Level Two: Can research to promote the City Guard to Veteran Guard.
Inn
The Inn is a place where adventurers can rest and regain some of their
health. By building Inns on the frontier, you provide a place where weary
heroes can recuperate without travelling all the way back to their guild or
temple. Inns also generate a small flow of income.
Main Function: An alternate refuge for heroes.
Prerequisites: None.
Level One: Allows heroes to rest and recover health.
44
Page 43

Library
Wizards can visit a Library to improve their abilities. Here, they can
purchase new spells and study to boost their intelligence. All heroes may
visit to improve their magic resistance. Having a Library in your kingdom
increases the intelligence of any heroes you recruit. Another benefit of
having a Library is that it slightly lowers the cost of researching
technologies in your kingdom, though having multiple libraries does not
increase the savings.
Main Function: Offers improvement opportunities for Wizards and some improvement for
other folks.
Prerequisites: Wizards Guild. All level one research must be completed before upgrading
to level two.
Level One: Reduces the cost of researching new technologies.
Can research the Fire Blast spell, which is then available to Wizards.
Trains all heroes for magic resistance.
Trains Wizards for improved intelligence.
Improves the intelligence of all heroes recruited after its construction.
Level Two: Further reduces the cost of researching new technologies.
Can research the Meteor Storm spell, which is then available to Wizards.
Allows high-intelligence heroes to learn the Power Shock spell.
Allows high-intelligence heroes to learn the Flame Shield spell.
Marketplace
Marketplaces are your settlement’s strongest sources of income.
The amount of gold each generates increases as you upgrade its level.
Adventurers can go to the Marketplace to equip themselves with useful
magic items. If you’ve researched Market Day, it gives you the ability to
immediately generate a large sum of gold. However, the Marketplace will
shut down for a period of time while a Market Day is held. every
Marketplace must be built a certain distance from both other Marketplaces
and Trading Posts.
Main Function: Generates additional income for your kingdom.
Prerequisites: None.
Level One: Generates gold.
Can research, then sell, Healing Potions.
Can research the Market Day function to create a fast source of gold.
45
Page 44

Level Two: Generates a greater amount of gold.
Can research, then sell, Rings of Protection (to heroes). These add to the
defense factor a hero’s armour provides.
Level Three: Generates an even greater amount of gold.
Can research, then sell, Amulets of Teleportation (to heroes).
See the Teleport spell for details.
Rangers Guild
Rangers are always ready to set up camp and start exploring the realm.
The Rangers Guild lets you recruit and sustain up to four Rangers.
Once a Guild is placed, you can use the Move Camp guild function to
instantly relocate the guild to a more strategic location—even while it is
under attack!
Main Function: Home for Rangers.
Prerequisites: None.
Level One: Lets you recruit up to four Rangers.
The Move Camp guild function allows you to relocate this building—for a price.
Rogues Guild
The shabby appearance of the Rogues Guild only proves that the Rogues
would rather pocket their gold than use it for renovations. This building lets
you recruit up to four Rogues. Because of their deceitful and greedy nature,
this guild returns a smaller percentage of its income to the Palace than
others. Using the guild skill Extortion, the Rogues will (at your command)
instantly collect all of your taxes—minus a stiff surcharge. A second level
Rogues Guild allows characters with high artifice to poison their weapons.
While poisoned weapons are expensive, they are very helpful in combat.
Main Function: Home for Rogues.
Prerequisites: None.
Level One: Lets you recruit up to four Rogues.
Provides the Extortion guild skill, which allows instant tax collection, minus
a fee.
If there’s an Elven Bungalow in your settlement, having a Rogues Guild
causes a Gambling Hall to spring up.
Level Two: Your heroes can purchase poisoned weapons to improve their attacks.
Using Extortion gains a greater percentage of your taxes. (The ‘fee’ is less.)
46
Page 45

Royal Gardens
Your heroes may visit the Royal Gardens to relax and meditate. When they
leave the Garden, they gain the benefits of a random (always beneficial)
spell. The Royal Gardens also generate gold for you to collect, and can help
boost the loyalty of your heroes (which can be useful when there are other
kingdoms vying for their allegiance).
Main Function: Provides a haven for meditation.
Prerequisites: Requires a third level Palace.
Level One: Provides a location where your heroes can gain a beneficial spell effect.
Generates gold revenue.
Increases the loyalty of your heroes in multiplayer games, thereby
decreasing the likelihood that they will respond to your opponent’s reward
flags or use your opponent’s buildings.
Statues
Statues allow you to customise the look and feel of your kingdom—
to beautify it with public art.
Main Function: Adds unique scenery to your kingdom.
Prerequisites: Requires a second level Palace.
Level One: Enhances the personality of your kingdom.
Increases the loyalty of your heroes in multiplayer games, thereby
decreasing the likelihood that they will respond to your opponent’s reward
flags or use your opponent’s buildings.
Temple to Agrela
The followers of Agrela, the Goddess of Life and the Good Mother, are the
Healers of the land. Agrela’s temple is a peaceful sanctuary where the
Healers learn their soothing arts.
Main Function: Home for Healers.
Prerequisites: Requires a second level Palace. Because of religious disputes, this temple
cannot coexist with a temple to Fervus, Krypta, or Krolm.
Level One: Lets you recruit up to four Healers.
Grants the Sovereign spell Healing.
Level Two: Grants the Sovereign spell Blessing.
Level Three: Grants the Sovereign spell Resurrection.
47
Page 46

Temple to Dauros
The gilded roof of the Temple to Dauros, god of law, belies the stoic lifestyle
of its resident Monks. When this temple is in your kingdom, righteous
Paladins become available at your Warriors’ Guild.
Main Function: Home for Monks.
Prerequisites: Requires a second level Palace. Because of religious disputes, this temple
cannot coexist with a temple to Fervus, Krypta, or Krolm.
Level One: Lets you recruit up to four Monks.
Grants the Sovereign spell Stoneskin.
Allows you to recruit Paladins at Warriors Guilds.
Level Two: Grants the Sovereign spell Vigilance.
Level Three: Grants the Sovereign spell Petrify.
Temple to Fervus
Fervus, the god of chaos and frivolity, is closely tied to natural elements.
Fervus’ temples look as if they’ve sprouted from the landscape. Through a
ritual of transformation, a Cultist may be moulded into a Warrior of
Discord—one of the brutally random "fists of Fervus." Warriors of Discord
make their home in the Warriors’ Guild, where they complete their training
in the destructive arts.
Main Function: Home for Cultists.
Prerequisites: Requires a second level Palace. Because of religious disputes, this temple
cannot coexist with a temple to Agrela, Dauros, or Krolm.
Level One: Lets you recruit up to four Cultists.
Grants the Sovereign spell Healing.
Increases the luck of all heroes recruited after construction.
Allows the creation of Warriors of Discord at Warriors Guilds.
Level Two: Grants the Sovereign spell Illusionary Hero.
Level Three: Grants the Sovereign spell Vines.
48
Page 47

Temple of Helia
Helia, the sun goddess, imbues her loyal Solarii with her own fiery spirit.
Mystic devices within the temple grounds convert sunlight into magical energy.
Main Function: Home for Solarii.
Prerequisites: Requires a third level Palace. Because of religious disputes, this temple
cannot coexist with a temple to Lunord or Krolm.
Level One: Lets you recruit up to four Solarii.
Grants the Sovereign spell Fire Strike.
Level Two: Grants the Sovereign spell Sun Scorch.
Temple to Krolm
= The worship of Krolm is Ardania’s oldest religion, and the Barbarians still
carry on the long tradition of worshipping this god of war. Temples
dedicated to Krolm are usually made from monolithic stones and the bones
of huge predators. Krolm’s temple provides the Rage of Krolm guild function,
which temporarily boosts the statistics of all your heroes.
Main Function: Home for Barbarians.
Prerequisites: Requires a second level Palace. Because of religious disputes, this temple
cannot coexist with any other type of temple.
Level One: Lets you recruit up to four Barbarians.
Provides the Rage of Krolm guild function.
Temple to Krypta
Krypta is the oft-misunderstood goddess of death. The dark, ethereal
chanting of the Priestesses and the odd smell of decay frequently signal
there’s a Temple to Krypta nearby.
Main Function: Home for Priestesses.
Prerequisites: Requires a second level Palace. Because of religious disputes, this temple
cannot coexist with a temple to Agrela, Dauros, or Krolm.
Level One: Lets you recruit up to four Priestesses.
Grants the Sovereign spell Wither.
Level Two: Grants the Sovereign spell Animate Bones.
Level Three: Grants the Sovereign spell Re-animate.
49
Page 48

Temple to Lunord
Lunord is Ardania’s god of the moon and the winds. With huge ornamental
horns that hover over the rest of the kingdom, Lunord’s temple is a less-
than-subtle presence.
Main Function: Home for Adepts.
Prerequisites: Requires a third level Palace. Because of religious disputes, this temple
cannot coexist with a temple to Helia or Krolm.
Level One: Lets you recruit four Adepts.
Grants the Sovereign spell Winged Feet.
Level Two: Grants the Sovereign spell Wind Storm.
Trading Post
The Trading Post is a starting point for Caravans. On occasion, one of these
leaves the Trading Post and heads for the nearest Marketplace. If the
Caravan makes it to its destination, it unloads a cargo of gold. A Trading
Post cannot be built within a certain distance of a Marketplace or other
Trading Post.
Main Function: Create added income by sending Caravans to Marketplaces.
Prerequisites: A Marketplace must be present.
Level One: Creates Caravans.
Can research Healing Potions for sale to your heroes.
Warriors Guild
Few villages feel truly safe without the protection of a Warriors Guild.
The guild’s unique Call to Arms skill instantly teleports all guild members
home—in order to see to your local needs.
Main Function: Home for Warriors.
Prerequisites: None.
Level One: Recruits Warriors, Warriors of Discord, and Paladins—up to a total of four.
Provides the Call to Arms guild function.
Combined with a Temple to Fervus, allows you to recruit Warriors of Discord.
Combined with a Temple to Dauros, allows you to recruit Paladins.
50
Page 49

51
Wizards Guild
The Wizards Guild is a reclusive spire visited only by those skilled in the most
arcane arts and those seeking their aid. Mere Peasants do not possess the
needed skills to assemble this haven. Instead, the Wizards Guild is guided into
being and improvement through carefully controlled magical forces. With
each level of improvement to the guild, you are granted two new Sovereign
spells. All spells are limited in range, but by adding Wizards Towers you can
expand your sphere of magical influence. With a level two guild in place, you
can Enchant your Wizards Towers to give them an offensive sting.
Main Function: Home for Wizards.
Prerequisites: Requires a second level Palace.
Level One: Lets you recruit up to four Wizards.
Grants the Sovereign spell Farseeing.
Grants the Sovereign spell Invisibility.
Heroes can pay to have their armour and weapons enchanted to +++++1.
Allows you to construct Wizards Towers and Libraries.
Level Two: Grants the Sovereign spell Lightning Bolt.
Grants the Sovereign spell Anti-Magic Shield.
Heroes can pay to have their armour and weapons enchanted to ++2.
Provides the ability to Enchant Wizards Towers.
Level Three: Grants the Sovereign spell Lightning Storm.
Grants the Sovereign spell Supercharge.
Heroes can pay to have their armour and weapons enchanted to +3.
Wizards Tower
By building a Wizards Tower, you extend the reach of your Sovereign spells.
Enchanted towers automatically shoot energy bolts at nearby enemies.
This enchantment only lasts a set amount of time, after which you can
Enchant the tower again (and again). Like the Wizards Guild, this building
is magically constructed.
Main Function: Extends the range to which Sovereign spells can be cast (from the Wizards Guild).
Prerequisites: Requires a Wizards Guild. Must be built within range of a Wizards Guild or
another Wizards Tower. You must have a second level Wizards Guild in order
to Enchant a Wizards Tower.
Level One: Extends the range of Sovereign spells.
Can be temporarily Enchanted to fire defensive energy spheres.
Page 50

52
Buildings That Appear
In addition to the buildings you build by choice, there are some that, given the right
circumstances, spring up on their own. Some are vital, like your Palace. Others, like the Sewer
and Graveyard, are more akin to lairs than buildings. Most of these structures are necessary
evils. They provide challenges to your settlement’s growth, but are in fact inescapable results of
that growth as well.
Elven Lounge
Adventurers with low willpower can find themselves wasting large amounts
of gold and time at this den of decadent entertainment. You gather no gold
from this building; all the money spent there is lost.
Main Function: Diverts heroes from their missions.
Cause: Appears once you have invited Elves to join your kingdom.
Effects: Attracts heroes with low willpower and consumes their time and money.
Does not pay taxes.
Fountain
Fountains represent the economic prosperity of your kingdom.
Main Function: Gives you another Tax Collector and beautifies your kingdom.
Cause: Appears once you have a certain number of inns, Blacksmiths, and
Marketplaces.
Effects: Gives you another Tax Collector, which helps you gather your gold more
efficiently.
Gambling Hall
The games of chance available in this building, like the decadent thrills of the
Elven Lounge, can lure your heroes to waste time that should be spent on
adventure and money that could go toward buying necessary equipment.
Main Function: Diverts heroes from their missions.
Cause: Appears once you have a Rogues Guild and have invited Elves to join your
kingdom.
Effects: Attracts heroes and consumes their time and money.
Does not pay taxes.
Allows you to gamble with gold from your treasury if you so choose.
Page 51

Gazebo
The Gazebo is just like an Inn, except that your heroes can visit it for free.
Main Function: Gives heroes a free place to rest and seek refuge; beautifies your kingdom.
Cause: Appears automatically when you have planted Royal Gardens.
Effects: Allows heroes to rest and recover health.
Houses
Along with heroes come their families. These proud folk refuse to live as
long-term guests in your Palace. Rather, as you recruit more heroes into
your kingdom, their families create their own housing outside the walls.
Main Function: Occupies land near your Palace—land on which you could have put useful
buildings.
Cause: Recruiting heroes causes Houses to be erected.
Effects: Creates a small amount of taxable income.
Graveyards
As your heroes are killed, their remains are interred in honoured graves.
When any area contains enough of these graves, it is fenced off and called a
Graveyard. Unless you’re very good at keeping your heroes alive, one or
more of these will eventually appear in your settlement—and thanks to
Ardania’s legacy of residual necromantic magical energies, evil undead might
occasionally rise from any Graveyard.
Main Function: Spawns undead creatures to menace your kingdom.
Cause: Appears in your settlement after a certain number of heroes have died.
Effects: Spawns undead monsters.
Is indestructible.
53
Page 52

Palace
The Palace is the centre of your authority. From here, you can set rewards
for heroes who successfully complete quests and also choose which buildings
you want to construct. Your Palace automatically creates Peasants, Tax
Collectors, and the Palace Guard. Without a Palace, you can no longer rule
the land. If your Palace is ever destroyed, you’ve lost everything.
Main Function: Is the central control from which you run your kingdom; houses your vital
henchmen.
Cause: Appears at the start of every quest.
Level One: Supports two Peasants.
Supports one Tax Collector.
Lets you build Gnome Hovels, Rangers Guilds, Rogues Guilds, Warriors’
Guilds, Blacksmiths, Guardhouses, Inns, and Marketplaces.
Provided their other prerequisites are met, lets you build Trading Posts.
Level Two: Supports four Peasants.
Supports two Tax Collectors.
Supports one Palace Guard.
Lets you build Wizards Guilds and Statues.
Provided their other prerequisites are met, lets you build Dwarven
Settlements, Elven Bungalows, Ballista Towers, Libraries, and Wizards Towers.
Lets you build Temples to Agrela, Dauros, Fervus, Krolm, and Krypta.
Level Three: Supports six Peasants.
Supports three Tax Collectors.
Supports two Palace Guards.
Lets you build Temples to Helia and Lunord.
Lets you build Royal Gardens and Fairgrounds.
Sewer Entrance
As your kingdom grows, so does its civil engineering needs. Sewers appear
as the population of your kingdom becomes larger. Unfortunately, these
urban necessities also serve as homes for vicious creatures. These denizens
of the underground periodically emerge to menace your kingdom.
Main Function: Spawns dangerous vermin.
Cause: Appears as your kingdom grows in size.
Effects: Spawns monsters.
Cannot be destroyed.
54
Page 53

55
Heroes
Heroes are the extension of your power throughout the land. These loyal recruits wander about
the kingdom, exploring uncharted land and looking for things to accomplish. They’re drawn to
the Reward Flags you establish, as well as to adventures of various types.
The Spirit of the Land
All began with the World Birthing.
From the vast nothing, Krolm brought everything into being. He presided as the singular
Master of Ardania’s dawn. While he was pleased with the endless details of this newly crafted
wilderness, something was still missing. Self-admiration for his accomplishments was not
enough. He brought humankind into the world so that they may take joy in his creation and
revere his might and skill.
Ardania’s countenance was still blanketed in darkness and tumult. To soothe this harsh realm
of storm and fury, Krolm divided his essence. The result was Krolm’s two children: Helia, the
eternal Sun, and Lunord, the ever-changing moon.
Helia and Lunord frolicked across the skies, and the people of Ardania watched on with
admiration. The new gods delivered many gifts—the gifts of civilisation. Soon, many of
Ardania’s people turned away from Krolm, in favour of the promise of these new gods. Krolm
grew jealous and instructed his remaining faithful to forever shun the trappings of civilised life.
As civilisation evolved, so did the heavens. In the time of the great King Sydrian, four more
deities vied for the spiritual allegiance of Ardania’s faithful. These children of the new gods
included Krypta, Goddess of Death; Dauros, God of Law; Fervus, God of Chaos; and Agrela,
Goddess of Life. And thus the seven gods and goddesses of Ardania came to be.
Hero Statistics
Every individual hero has a set of unique statistics—numbers that define that hero’s personal
characteristics for your understanding. These statistics are largely dependent on class, but
even within each class, heroes’ ratings vary. The General statistics represent a hero’s decisionmaking abilities; these influence the chances of success when attempting certain actions.
Combat statistics describe a hero’s defensive and offensive prowess in combat. Some of these
statistics are also applied to certain henchmen and monsters.
Page 54

General Statistics
STR Strength The hero’s power; physical capacity.
INT Intelligence The hero’s brain power.
ART Artifice The hero’s stealth skill and craftiness.
VIT Vitality The strength of the hero’s overall constitution.
WIL Willpower The hero’s ability to avoid temptation; piety.
Combat Statistics
Hand-to-hand How proficient the hero is at melee combat.
Ranged The hero’s proficiency at ranged combat.
Parry How well a hero can deflect melee attacks.
Dodge The hero’s skill at evading missiles.
Resist How likely the hero is to be able to avoid harmful magical spells.
Adepts (Followers of Lunord)
"Mystic Warriors"
Trained in the use of both spells and ancient martial techniques, these followers of the god
Lunord are a valued combat asset in any kingdom. Only the most fleet of foot are considered
for training as an Adept, because they are required to be able to literally run like the wind.
Adepts avoid heavy armour, as it hinders their swift style of combat.
Primary Attack: Melee
Usual Activity: Patrolling the settlement
Base Armour: None
Base Weapon: Staff
56
Page 55

Barbarians (Followers of Krolm)
"Warriors of the Wilds"
Barbarians live by the Law of Steel. They have very high hit points and are almost always
berserk—strong, but somewhat thick in the head. Barbarians use two weapons at once,
favouring the axe and club, and have high dodge and parry skills. These brutes equate armour
with fear and weakness, and as such they avoid using it.
Primary Attack: Melee
Usual Activity: Berserking
Base Armour: None
Base Weapon: Axe & club
Cultists (Followers of Fervus)
"Chaotic Druids"
Cultists revel in the apparent chaos of the natural world around them. They favour using two
daggers at once when melee fighting, and often throw their knives for a short ranged attack.
Cultists sow the seeds of poisonous plants that can later be harvested by Rogues to provide
poison for weapons.
Primary Attack: Ranged
Usual Activity: Sowing poisonous plants
Base Armour: None
Base Weapon: Throwing daggers
57
Page 56

Dwarf
"Skilled Craftsmen"
Dwarves are stocky, strong, and a little slow of foot. They attack with their trusty hammers.
Dwarves are the master engineers of Ardania, and they bring a number of mechanical
ingenuities to your settlement. Their engineering instincts also drive them to assist in any of
your construction projects. Their melee combat skills are quite formidable.
Primary Attack: Melee
Usual Activity: Construction
Base Armour: Chain mail
Base Weapon: Hammer
Elf
"Hedonistic Heroes"
This swift and slightly built race has a weakness for the pleasure-drenched lifestyle. Elves have
an excellent ranged attack with the bow and are strongly attracted to financial opportunities.
They also enjoy earning extra gold by performing music for the local population.
Primary Attack: Ranged
Usual Activity: Performing at Inns and Marketplaces
Base Armour: Leather
Base Weapon: Long bow
58
Page 57

Gnome
"Diminutive Workers"
As Gnomes are stunted, gnarly, weak, and somewhat pacifistic, they make rather lackluster
adventurers, but they provide a valuable supplement to your Peasant workforce. When Gnomes
are part of your kingdom, all newly recruited heroes are given a slight bonus to their luck.
Gnomes are a bit like vermin, in that once you establish one Gnome camp in your kingdom, the
number of such camps rapidly increases on its own (to a maximum of three per kingdom).
If, however, you somehow manage to burn down all their homes, the Gnomes will leave your
kingdom.
Primary Attack: Melee
Usual Activity: Construction
Base Armour: None
Base Weapon: Dagger
Healers (Followers of Agrela)
"Spiritual Caregivers"
The Healers are compassionate and self-sacrificing, and therefore are terrible at fighting.
They have higher than average willpower and can cast healing and blessing spells. When a they
find themselves in combat, Healers use a dagger. Their faith prohibits them from donning any
sort of armour.
Primary Attack: Melee
Usual Activity: Healing others
Base Armour: None
Base Weapon: Dagger
59
Page 58

Monks (Followers of Dauros)
"Masters of Spiritual and Physical Discipline"
Monks have very high willpower and will almost never go into Gambling Halls or Elven Lounges.
They are good at fighting, though they tend to be rather cautious. Their spells are generally
protective in nature. Monks abhor weapons and armour, preferring to use their deadly fists
and mental spells in battle.
Primary Attack: Melee
Usual Activity: Praying
Base Armour: None
Base Weapon: Open hand
Paladins
"Righteous Crusaders"
You can recruit Paladins at a Warriors’ Guild, but only if there is a Temple to Dauros in your
kingdom. Paladins are excellent warriors, but they are very expensive to hire. They’re very
high in willpower, use two-handed swords, and have a protective spell they can cast upon
themselves:
Primary Attack: Melee
Usual Activity: Hunting
Base Armour: Plate mail
Base Weapon: Two-handed sword
60
Page 59

61
Priestesses (Followers of Krypta)
"Mistresses of Death"
Priestesses are poor at fighting, suffer from lower than average willpower, but have fairly high
intelligence. Their selection of spells revolves around the dead (necromancy), which skill allows
them to survive dangerous encounters—but oft-times in a chilling fashion. For a weapon,
a Priestess will always choose a staff. At the insistence of Krypta, they never use armour.
Primary Attack: Ranged Spells
Usual Activity: Summoning skeletal familiars
Base Armour: None
Base Weapon: Staff
Ranger
"Rugged Frontiersman"
Rangers generally choose exploration as their means of increasing experience, along with a fair
dose of fighting wandering monsters. Rangers move quickly and enjoy a good distance vision.
After the whole realm has been mapped, they sometimes journey to distant lands, disappearing
off the edge of the map and appearing again later—if they have survived.
Primary Attack: Ranged
Usual Activity: Exploring
Base Armour: Leather
Base Weapon: Long bow
Page 60

62
Rogue
"Nefarious Swindlers"
Rogues generally have high luck. They are useful for generating revenue for your kingdom,
since they are obsessed with finding and stealing gold and treasure. They have the highest
artifice rating of all the classes, low willpower, and fairly high dodge and parry skills. Rogues
fight with a hand-held crossbow. In order to keep themselves quick, quiet, and unhindered,
they refuse to wear chain or plate armour.
Primary Attack: Ranged
Usual Activity: Stealing
Base Armour: Leather
Base Weapon: Crossbow
Solarii (Followers of Helia)
"Fiery Warriors"
Every Solarus fights well with a huge, crushing mace. Solarii have average speed and dodging
skills, but very high strength and damage bonuses. In addition, they wield a dangerous Fire
Spell.
Primary Attack: Melee
Usual Activity: Exploring
Base Armour: Chain mail
Base Weapon: Mace
Page 61

Warrior
"Armoured Champions"
Warriors have high initial hit points and enjoy big hit point increases when they gain levels,
but these simple fighters often have difficulty defeating monsters that use powerful magic.
Warriors have mediocre artifice and lower intelligence than most heroes, but a higher
strength—which perhaps explains their choice of career.
Primary Attack: Melee
Usual Activity: Hunting monsters
Base Armour: Plate mail
Base Weapon: Sword
Wizard
"Masters of the Arcane Arts"
Wizards have a low initial hit points and strength, but as they gain levels, they can learn
powerful spells that make them formidable in battle. Wizards tend to be cautious; they have
high intelligence but low strength. They shun armour, as it interferes with their spell casting.
Primary Attack: Ranged spells
Usual Activity: Research
Base Armour: None
Base Weapon: Staff
63
Page 62

64
Warriors of Discord
"Deranged Soldiers of Chaos"
You can recruit these characters at a Warriors’ Guild, but only if there is a Temple to Fervus in
your kingdom. They are excellent warriors, berserk most of the time, and very expensive.
Warriors of Discord generally are quite strong, but have poor dodge and parry skills. In
addition, they have a special attack that can damage multiple enemies at once or flat-out kill
an enemy in one blow. Their blade of choice is a gruesome, two-handed weapon of their own
devising. Warriors of Discord prefer to wear a type of armour also of their own design, which
consists of leather straps, bits of chain, and large, razor-sharp spikes.
Primary Attack: Melee
Usual Activity: Hunting
Base Armour: Leather harness
Base Weapon: Chaos blade
Henchmen
While your heroes wander the land doing adventurous deeds, your humble henchmen go about
the business of keeping the kingdom running from day to day. Without their unceasing labours,
your rule would soon end, as the infrastructure fell out from under it.
How the Work Gets Done
The young prince lunged at the Royal Advisor, but the elderly nobleman parried the wooden
sword with ease. Doralass the Advisor chuckled. "Worry not fair prince, for when you are
sovereign of this land, the heroes of the Warriors Guild will do your fighting for you."
The pair’s moment of levity was interrupted by a Peasant reporting on the progress of
upgrades to the local Marketplace. After answering several of Doralass’ questions, the
Peasant was dismissed.
"He smelled awful!" commented the prince, wrinkling his nose in obvious displeasure.
"Be thankful your mother did not enlist Gnomes," Doralass replied. "Though industrious little
folk, they carry a stench unmatched in Ardania."
Page 63

65
"When I am sovereign," mused the prince "I will have nothing but heroes in my kingdom!"
The prince knew all too well the disappointed furrow that now crossed Doralass brow.
A lecture was sure to follow.
"And who will build this kingdom of yours? While Warriors swing a blade with considerable skill,
they are not so deft with a carpenter’s hammer, I assure you. And even should you manage to
erect some semblance of a kingdom, remember that heroes require rewards to perform
service. The Palace and City Guards defend you and your kingdom with steadfast loyalty."
"But..." the prince interjected, only to be cut short again.
"And let us not forget the very life blood of your kingdom," the seasoned advisor continued,
skipping past the interruption. "Gold is gathered for you by your Tax Collectors, so that you
may continue to influence these heroes of which you speak so fondly."
The prince sighed his resignation, seating himself on a nearby stump as Doralass continued
to recite the virtues and necessities of maintaining a capable force of henchmen subjects.
The lesson ran well through the afternoon
Caravan
Trading Posts generate income for you by sending Caravans from the
more remote sections of your settlement into your Marketplaces. Once
a Caravan reaches a Marketplace, it drops off its load of goods, which
translates into gold for your Tax Collectors to pick up. The further a
Caravan has to travel, the more gold it generates.
City Guard
Every time you build a Guard House, part of the construction cost
goes toward recruiting a City Guard to be stationed in the structure.
These untiring sentinels patrol the area near the Guard House and
attack any monsters that approach. (Note that killed City Guards
are replaced automatically.)
Primary Attack: Melee
Usual Activity: Patrolling
Armour: Chain mail
Weapon: Halberd
Page 64

Veteran Guard
When you upgrade a Guard House, part of the gold is spent on either
training the City Guard to veteran status or replacing him with a
Veteran Guard hired from elsewhere. The veteran—like a City Guard,
but tougher—garrisons the upgraded Guard House.
Primary Attack: Melee
Usual Activity: Patrolling
Armour: Chain mail
Weapon: Halberd
Palace Guard
As part of the process of upgrading your Palace beyond level one, it is
a matter of course that you recruit a Palace Guard to defend the
improved stronghold. These elite fighting men may look similar to the
City Guard, but they are much better at what they do.
Primary Attack: Melee
Usual Activity: Defending the Palace
Armour: Chain mail
Weapon: Halberd
Peasant
Peasants are the foundation on which and by which your kingdom is
built. These hardy souls populate the less grandiose portions of your
Palace, venturing forth when needed to construct or repair buildings.
When their work is complete, they return either to the Palace or to the
nearest Guard House for refuge.
Tax Collector
Tax Collectors walk from building to building gathering gold, stopping
only at those you’ve left on their routes (or assigned for a one-time
collection). They start out from your Palace, then return there to
deposit the collected gold in your treasury. Tax Collectors can also
operate out of a Guard House; the taxes they deliver there are
instantly transferred to your treasury.
66
Page 65

67
Monsters
As your heroes and henchmen wander the land of Ardania, they cannot help but encounter the
dangerous creatures that lurk all about the countryside. Though many of these beasts are of
natural origin, we use the broad term ‘monsters’ as a category to describe them all.
The Axe of Garbash
Garbash brayed uneasily at the scent on the chill autumn wind. Fire—and...humans! They were
close now, moving into territory clearly marked by the Minotaur as his own. All through the
past summer, more and more humans had plagued Garbash. Humans had settled in this
region earlier in the spring. At first, only the weak ones with stinging arrows had ventured
into the wilds claimed by Garbash as his own. Those had fallen quickly to the Minotaur’s
powerful axe.
Lately, things were different. Humans appeared bearing all manners of weapons and magic.
A day did not pass without some encounter between the Minotaur and humans. Garbash was
filled with unease and superstition, believing some dark curse had been cast over him,
marking him for suffering. Now the humans built great stone piles within his territory!
Rage began to well within his bestial heart as Garbash considered the human incursions and
followed the scent to its origin.
With a thunderous bellow, the Minotaur broke into a determined charge toward the human
building. "Garbash will destroy humans and all their piles of stone!" he thought, visions of
battle and destruction playing out in his primitive mind.
Moment’s later, Sir Daran Swiftblade pulled his sword from the lifeless Minotaur who had
come charging at the Dancing Unicorn Inn from the wood line.
"It appears that my hunt for this beast will not take as long as I imagined," he commented to
the Peasant who was busily repairing the damaged Inn. "The bounty on this one will be
enough to purchase that set of plate armour I’ve been eyeing over at Ogerd’s Smithy."
With a chuckle at his good fortune, Sir Daran begin his journey to see the famed Blacksmith.
Monster Lairs
Most of the monsters of Ardania breed in lairs scattered throughout the wilderness. These lairs
range in quality from primitive animal dens and warrens to elaborate, dark castles. If you want
to get to the root of your monster problems, your best bet is to destroy any lairs you can find.
The less lairs there are, the less monsters you’ll encounter.
"Monsters shelter in all sorts of havens."
Page 66

Some righteous (some might say crazed) heroes will attempt to search out and destroy these
lairs on their own. However, you can also offer rewards to tempt the more timid populace into
attacking and eventually ridding the land of these monster spawning grounds.
It is worth noting that there are some monsters that do not spring from lairs. Instead, these
adversaries cross into your realm from neighbouring lands. Since you cannot attack the source
of these creatures, your only recourse is to slay as many as you can in hopes of discouraging
future monster immigration.
Daemonwood
These ancient tree spirits hark back to the time of the World Birthing,
before Humanity walked the land now called Ardania. They despise
Humans, probably because humans use wood for building and burning.
Dragon
Dragons seldom stir from their underground nests. When they do, they
take to the air in a fury of fire and death.
Dryad
These woodland spirits pass over from the realm of Fey to pursue their
unknown agendas. They prey on Humans, though none know why.
Evil Oculus
Creatures of unknown origin, Oculi are a relatively new menace to
Ardania. Some scholars believe they are somehow related to Dragons.
Oculi cast the Paralytic Gaze and Electrical Fury spells in combat.
68
Page 67

69
Flowering Strangleweed
This vine is a twisted strain of plant life resulting from the misguided
magic of a twisted Wizard. It is rumoured that multiple Strangleweeds
in a small vicinity share a collective, almost animal intelligence.
Goblins
Be careful not to underestimate the threat posed by Goblins, for while they are not very
powerful as individuals, in numbers they quickly form an overwhelming war-band.
Goblins, though rather weak, are vicious warriors that will fight to the
death using their short swords.
Goblin Archers are hunters; they wield poorly crafted bows that launch
crude—but dangerously heavy—arrows.
Goblin Priests worship Grum-Gog, the lord of pestilence. They seek the
destruction of Ardania through a plague of insects, using their Insect
Swarm spell.
Goblin Champions are veteran warriors who wield two weapons at once
as they wade into their opponents.
Giant Rat
Giant Rats are present in all the kingdoms of Ardania. The common
wisdom is that they are spies for their larger bipedal cousins, the Ratmen.
Page 68

70
Giant Spider
A secretive tribe of Goblins once selectively bred these deadly
arachnids. Though they were brought into being for use as guardian
beasts, the spiders swiftly devoured their would-be masters and are
now loose in the forests of Ardania.
Harpy
These foul abominations are the spawn of Scrylia, the serpent queen.
Ultimately, the harpies rebelled against their dark mistress, destroying
her vast empire from within. Now they seek perverse joy by spreading
suffering and pain in the world.
Hell Bear
Foul tempered and malicious, Hell Bears savagely attack any heroes
who stray too close to the bears’ lairs. The remnants of their many
victims are strewn about their dens.
Medusa
These hideous creatures formed the core of the serpent queen
Scrylia’s dreaded legions. The Medusae joined the Harpies in their
rebellion, helping to end Scrylia’s reign of terror. They are now seeking
to bring their own reign of terror to Ardania.
Minotaur
Minotaurs are twisted creatures, but fearsome warriors. Legend has it
that an ancient zealot created the first of them to serve in his army as
shock troops. Minotaurs now roam throughout the land in raiding
parties, and woe betide their victims.
Ratman
Ratmen are greedy thieves that leap forth from sewers to waylay Tax
Collectors and raid unsuspecting settlements. These giant vermin might
be the result of magical discharges seeping into the sewers of the
kingdom, mutating the rats that dwell therein. Rumour holds that these
creatures all trace their lineage back to a gigantic central warren with a
population rivalling that of the greatest kingdoms of Ardania.
Page 69

Rock Golem
These are nature spirits similar in essence to the Daemonwood. When
aroused, the stone titans relentlessly battle against Human settlements,
which greatly fear them—for good reason.
Roc
These large, malicious birds are magically twisted, evil parodies of the
noble Ardanian eagle. They tend to prey on the weak and infirm.
Rust Spitter
In a process similar to that used by some insects, Rust Spitters dissolve
their food externally with projected acid before consuming it. They are
extremely territorial and rarely encountered in groupings of less than
three.
Skeleton
These are animated bones raised through necromantic spells of dark
origin. While Skeletons are not particularly strong, they are resistant
to magic and missiles.
Tro l l
Trolls are tough; they slowly regenerate any damage they have
sustained. Trolls enjoy treasure as much as the average Rogue, and are
often found waylaying Caravans or attacking Marketplaces.
Vampire
Vampires are the most feared of all the undead. According to legend,
Krypta created these horrible monsters when she was first born—in
the flush of her powers, but before she had the experience or maturity
to control their effects. In combat, Vampires employ the spells Life
Leech and Magic Mirror.
71
Page 70

Varg
Vargs are cunning and evil relatives of the common wolf. They attack
with viciously sharp claws and fangs.
Werewolf
A Werewolf is the misshapen creature that results when a Human is
infected with a rare lycanthropic disease. The unceasing pain and rage
of the condition drives even the gentlest person into a permanent state
of homicidal mania.
Zombie
Zombies are corpses animated by evil magic while still in an early state
of decay. They are slow, but attack with surprising force.
Spells
Magic is a powerful force in Ardania. Not only do many of your heroes have the ability to cast
spells, both offensive and defensive, but you as the sovereign hold the power of a set of spells
reserved for your use alone—the Sovereign Spells.
Power for a Price
A portly apprentice ran breathlessly into the great circular chamber of the Wizards Guild.
"Minotaurs have sacked the outer Tower and are heading for the Marketplace!"
"Yes, we are aware of this," replied Theonus, the guild’s unflappable High Wizard.
"The Sovereign has asked for us to activate the Bellanus Orb—and of course sent along the
appropriate payment."
Theonus finished counting the gold in his hands and dropped the last few coins into small
chest. He then closed his eyes, began to concentrate, and lifted his face towards the ceiling.
High above their heads hung the foreboding Bellanus Orb, a magical instrument that worked
with the distant Wizards Towers. The Orb’s surface was an ever-shifting hue of grey and
blue. Electricity arced to nearby supports, and a haze of blue smoke drifted in a tight orbit
around the sphere.
72
Page 71

73
Extending his hands above his head, Theonus began to manipulate the sphere through his
great powers. Invisible to the naked eye, the runes of alignment began shifting to their
charged positions. The great orb crackled audibly as it drew energy from the ether winds.
The stuff of magic was visible in rainbow hues bending away from the arcane sphere.
In his mind’s eye, Theonus could see all of the land through the many Wizard Towers still
standing. He centred his focus on the pack of Minotaurs now rampaging through the newly
built Marketplace. In that moment, Theonus became a living conduit for the tremendous
magical storm growing around the Bellanus Orb.
The furore of a hundred lightning bolts coursed through Theonus’ mind. Miles away,
a destructive lightning storm sprang into being above the nearly destroyed Marketplace.
A fury of piercing white bolts shot down from the heavens. Each bolt was guided to strike
only Minotaur flesh.
A chorus of inhuman howls boomed from the attacking herd. The air was filled with the
smoke and smell of burning fur. A few herd members dropped to the ground, dead. The
remaining members were critically wounded and would be easy targets for the City Guards
already dispatched to the site.
Theonus recoiled from the tremendous effort of the casting. Exhausted, he slumped into a
nearby chair. The apprentice could do little more than quietly leave the room and ponder the
day when his skills would finally qualify him to join the ranks of Ardania’s Guild Wizards.
Hero Spells
Certain classes of heroes use magic in the defense of your kingdom. Each class studies magic
from a different viewpoint, however, and so your heroes are each versed in very different
spells. The listings herein include a brief description of what spells every able class of hero can
use, the effects of each spell, and the level of experience a hero must reach before being able
to cast the spell.
Adept
Teleport 4 Instantly transports the caster a short distance.
Cultist
Charm Monster 1 Causes one animal monster to become friendly and aid the
caster.
Camouflage 4 The caster blends into the background and remains hidden
unless he attacks
Change Shape 7 The caster takes the form of an animal monster.
Page 72

Healer
Healing 1 Heals the target.
Meditation 4 Temporarily increases the caster’s sight, rate of healing, dodge
and parry skills.
Aura of Peace 7 Makes the caster temporarily impervious to all attacks.
Monk
Hands of Steel 1 Adds to the damage done by the caster and makes an instant
kill possible.
Stone Skin 4 Boosts the caster’s defenses (armour rating).
Iron Will 7 Boosts the caster’s resistance to poison, magic, and diseases.
Paladin
Shield of Light 4 All evil creatures have a more difficult time hitting the caster.
Priestess
Drain Life 1 This ranged spell transfers hit points from the target to the
caster’s party.
Animate Skeleton 1 Summons a Skeleton to aid the caster.
Control Undead 7 Causes undead monsters to aid the caster.
Solarus
Sun Scorch 4 All enemies within a radius around the caster are damaged
by fire.
74
Page 73

Wizard
Energy Blast 1 A simple blast of energy (ranged spell) causes minor damage.
Fire Shield 2 Partially protects the caster from both physical and magical
attacks.
Fire Blast 3 This ranged spell is a quick burst of flame that can damage
multiple opponents.
Teleport 4 Teleports the caster anywhere within the explored part of
your kingdom.
Fire Ball 5 A powerful fire attack that can harm many targets in a
large area.
Resist Magic 6 Temporarily boosts the caster’s resistance to magic.
Meteor Storm 7 A tremendously powerful spell that damages everything in a
wide area.
All Classes (Library Spells)
Power Shock 1 Similar to Energy Blast, but available to all magic using heroes.
Flame Shield 1 Similar to Fire Shield, but available to all magic using heroes.
Sovereign Spells
Unlike hero spells, the Sovereign Spells are under your direct control. Once you have completed
the requisite building and done the required research in that building, the spells listed here
become available. Each listing includes a brief description of the spell’s effects, the icon that
represents the spell, and the level at which the particular building makes that spell available.
Temple To Agrela
Healing 1 Restores hit points to the target.
Blessing 2 Gives combat bonuses to the target.
Resurrection 3 Cast on the grave of a recently dead hero, brings that hero back.
75
Page 74

Temple To Dauros
Stone Skin 1 Increases the target’s defenses (armour value).
Vigilance 2 Briefly boosts the target’s willpower, speed, and attack skills.
Petrify 3 Immobilises the target for a short time.
Temple To Fervus
Healing 1 Restores hit points to the target.
Illusionary Hero 2 Confuses enemies with an illusory replica of the target.
Vines 3 Entangles the target.
Temple To Helia
Fire Strike 1 Fire does damage to the target; does not damage buildings.
Sun Scorch 2 Causes burn damage to every creature in the target area.
Temple To Lunord
Winged Feet 1 Increases the target’s speed.
Wind Storm 2 A gale moves and damages everything in the target area.
Temple To Krypta
Wither 1 Lowers the target’s strength and poison and disease attack skills.
Animate Bones 2 Summons a Skeleton that follows and aids the target.
Re-Animate 3 Cast on the grave of a recently dead hero, brings that hero back.
76
Page 75

Wizards Guild
Farseeing 1 Illuminates hidden sections of the land.
Invisibility 1 The target becomes undetectable by its enemies for a short time.
Lightning Bolt 2 Damages the target.
Anti-Magic Shield 2 Temporarily protects the target from magic.
Super Charge 3 Temporarily doubles the range of Wizards Towers and Guilds.
Lightning Storm 3 Causes lightning damage to all enemies in the target area.
77
Page 76

General
q Open Options menu
1 Select Palace
9 Toggle unit names on/off
0 Toggle hit point bars on/off
- Toggle Main Map Zoom Level
= Mini-map Terrain Toggle
z Toggle Attack Flag on/off
in Main Map
B
Center Main Map on the Hero
who Spoke Last
~ Dismiss Selected Message
Scroll
t Back to Previous Screen or
Page (where applicable)
D
Cancel Current Action
Options menu
E Quest Info
S Save Game
L Load Game
A Adjust Levels
R Restart Quest
M Return to Main Menu
Q Quit Majesty
Options Sub-menus
Y Yes
N No
Palace
Control Window
S Statistics
B Buildings
O Roster
R Rewards
Building Selection
I Toggle Icons on/off
U Toggle Unavailable Buildings
on/off
? Help
B Choose Selected Building
Roster
H Heroes List
B Buildings List
E Henchmen List
D Detailed List
A Sort Alphabetically
L Sort by Level
T Sort by Type
S Select Hero/Building/
Henchman
Rewards
A Attack Flag
E Explore Flag
78
APPENDIX: KEYBOARD SHORTCUTS
Page 77

Buildings
Control Windows
R Recruit Hero or Research
U Upgrade
H Hero
X Spells
X Destroy Building
? Help
Heroes and Visitors
M Members
V Visitors
D Detailed Hero Info
Z Zoom to Hero
S Select Hero
Warriors Guild
C Call to Arms
Rogues Guild
E Extort
Rangers Guild
M Move Camp
Temple to Krolm
K Rage of Krolm
Wizards Tower
E Enchant Tower
? Help
Marketplace
R Research
X Destroy Building
? Help
Fairgrounds
H Hand to Hand
A Archery
M Magic
C Combo
N No Contest
V Visitors
R Research
X Destroy Building
? Help
Gambling Hall
B Blue
R Red
G Gold
S Spin
M Make New Bet
+ Increase Bet
- Decreace Bet
? Help
Spells Lists
Wizards Guild
F Farseeing
I Invisibility
L Lightning Bolt
A Anti-Magic Shield
S Lightning Storm
C Supercharge
Temple to Agrela
H Healing
B Blessing
R Resurrection
79
Page 78

Temple to Dauros
S Stone Skin
V Vigilance
P Petrify
Temple to Fervus
H Healing
I Illusionary Hero
V Vines
Temple to Krypta
W Wither
A Animate Bones
R Reanimate
Temple to Helia
F Fire Strike
S Sun Scorch
Temple to Lunord
W Winged Feet
S Wind Storm
Research
Library
F Fire Blast
M Magic Resistance
T Train Intelligence
S Meteor Storm
P Power Shock
L Flame Shield
Marketplace
M Market Day
H Healing Potions
P Protection Rings
T Teleport Amulet
Guardhouse
A Arrows
V Veteran Guard
Blacksmith
W Weapons
A Armour
Fairgrounds
T Tournaments
Hero Control Window
E Spells
I Items
T Statistics
X Dismiss Hero
? Help
80
Page 79

81
•
Australia
helpline@uk.infogrames.com
•
UK
Hints & Cheats:
09067 53 50 10
*
*24 hours a day / 75p/min
Technical Support:
0161 827 8060/1
helpline@uk.infogrames.com
•
Schweiz/Suisse
Technische: 0900-105 172 Spielerische: 0900-105 173
SFR 2,50 pro Minute. Täglich 14.00 bis 21.00 Uhr
(mit Ausnahme von Feiertagen)
hotline@de.infogrames.com
•
Sverige
08-6053611 -
13:00 till 15:00 helgfri måndag till fredag
support@segaklubben.pp.se
•
España
+34 91 747 03 15 +34 91 329 21 00
lunes a viernes de 9,00 -14,00 / 15,30-18,30 h
stecnico@es.infogrames.com
•
Portugal
351 21 460 85 83/89 50 351 21 460 85 88
de 2ª a 6ª, entre as 10:00 e as 17:00
apoiocliente@pt.infogrames.com
•
Norge
0161 827 8060/1 -
10:00 to 19:00 Monday to Friday (except Bank Holidays)
helpline@uk.infogrames.com
•
Nederland
+31 (0)40 23 93 580 +31 (0)40 24 466 36
Open Maandag t/m Vrijdag 9.00 tot 17.30
helpline@nl.infogrames.com
•
Italia
-
Infogrames France / Euro Interactive
Service Consommateur
84 rue du 1er mars 1943
69625 Villeurbanne Cedex
support@fr.infogrames.com
http://www.it.infogrames.com
•
Greece
301 601 88 01 301 601 88 02
http://www.gr.infogrames.com
•
Deutschland
Technische: 0190 771 882 Spielerische: 0190 771 883
(DM 2,42 pro Minute) Täglich 14.00 bis 21.00 Uhr
(mit Ausnahme von Feiertagen)
hotline@de.infogrames.com
Soluces: 0892 68 30 20
Technique: 0825 15 80 80
(0.98 F/mn)
(Du lundi au samedi de 10h-12h, 14h-20h)
3615 Infogrames
(2,21 F/mn)
Infogrames France / Euro Interactive
Service Consommateur
84 rue du 1er mars 1943
69625 Villeurbanne Cedex
•
France
support@fr.infogrames.com
http://www.fr.infogrames.com
helpline@uk.infogrames.com
0161 827 8060/1 -
10:00 to 19:00 Monday to Friday (except Bank Holidays)
•
Suomi
helpline@uk.infogrames.com
0161 827 8060/1 -
10:00 to 19:00 Monday to Friday (except Bank Holidays)
•
Danmark
•
Belgique
helpdesk@nl.infogrames.com
•
Österreich
03614-500 555 -
(Normaltarif) Di. +Do. 15.00bis 19.00 Uhr
(Nur technischer Support)
+32 (0)2 72 18 633 +31 (0)40 24 466 36
Open Maandag t/m Vrijdag 9.00 tot 17.30
http://www.de.infogrames.com
EmailCountry Telephone Fax
Infogrames Games Customer Service Numbers
(2,21 F/mn)
(24h/24)
1902 262 626 -
Page 80

CREDITS
ORIGINAL CONCEPT:
Jim DuBois
PROJECT AND DESIGN LEAD:
Jim DuBois
LEAD PROGRAMMER:
Chris Tohline
LEAD ARTISTS:
Thomas Gale
Peter J. Lawson
PRODUCER:
Rob Caswell
EXECUTIVE PRODUCERS:
Lester Humphreys
Joe Minton
PROGRAMMERS:
Ken Grey
Tom Henderson
Matt Kimmel
Dean Lawson
Michael Pohoreski
Adam Saunders
John Scully
Nathan Sitkoff
Michael White
ADDITIONAL PROGRAMMING:
Scott Lahteine
ARTISTS:
Julie Airoldi
Michael Baker
Michael Clarke
Scott E. LeBlanc
Bryant Johnson
Matt Skutnik
Seth Spaulding
David Stokes
Sean Wang
David White
DESIGNERS:
Bart Simon
FREESTYLE QUEST DESIGN:
David Fifield
SOUND ENGINEER:
Jack Cameron
MUSICAL SCORE:
Kevin Manthei (KMM Productions)
PROMOTIONAL MUSIC:
Matt Skutnik
VOICE TALENT:
Pat Callinan
Keith Field
Judith Fine
K.D. Halprin
George LeDoux
Ann Maggs
Alana Martineau
Alan Maynard
Becca Morrow
Joe O'Rourke
Linda Steele
VOICE AND MUSIC DIRECTION:
Rob Caswell
SOUND EFFECTS:
Jack Cameron
LEAD PLAYTESTER:
T.J. Andrzejczyk
82
Page 81

PLAYTESTERS:
David Fifield
Matt Price
Tao Rodriguez-Seeger
ADDITIONAL PLAYTESTING:
Jesse King
Clarinda Merripen
Tom Rabideau
MARKETING:
Jay Adan
WEB SUPPORT:
Jay Adan
Thomas Gale
Bryant Johnson
Joe Minton
David Stokes
David White
CYBERLORE MANAGEMENT
President:
Lester Humphreys
Vice-President:
Ken Grey
Senior Producer:
Joe Minton
Art Director:
Seth Spaulding
Minister of Keeping It Real:
Matt Kimmel
Producer:
Rob Caswell
Marketing Director:
Jay Adan
Office Manager:
Clarinda Merripen
INFOGRAMES INTERACTIVE CREDITS
Tom Dusenberry
President
Marwan A. Abderrazzaq
Producer
Jennifer McWilliams
Senior Game Designer
Peter Matiss
Product Manager
Michael "Big Mike" Glosecki
Executive Producer
David Walls
Creative Director
John Sutyak
Director of Business Development
Tony Parks
V.P. Research and Development
Rich Reily
V.P. of Technology
Michael Craighead
Director of Quality Assurance
Kurt Boutin
Q.A. Manager
Andy Mazuerk
Q.A. Lead
John Hurlbut
General Manager, Marketing
Jim Buchanan
General Manager, Marketing
Gale Steiner
Director of Marketing
Rich Cleveland
V.P. of Marketing
83
Page 82

Tom Nichols
Director of Marketing
Joe Gammal
Director of Children's Games
George Burtch
Director of Marketing Services
Tim Evans
Channel Marketing Director
Sarah McIlroy
Channel Marketing Manager
Laura Tomasetti
Director of Public Relations
Steve Webster
Creative Services Director
Kathryn Lynch
Creative Services Manager
Steve Martin
Art Director
Dave Cronin
Graphic Designer
Patricia McCarthy
Graphic Designer
Elizabeth Mackney
Editorial Specialist
Tony Moreira
Manager of Technical Services
Bob Sadacca
Director of Operations
Tracy Kureta
Operations and Special Projects Manager
Bruce Kelly
Laurel Marchessault
Donna Mahan
Linda Ferros
Legal and Finance
Special Thanks
Jeff "Bootch" Buccellato
Ken Megill
Bill Levay
Tom Zahorik
84
 Loading...