

Page 1
Longbow2
1997, 1998
Page 2

LONGBOW 2
Written by Tuesday Frase and Chris McCubbin
Additional writing by Jennifer Spohrer
Edited by David Ladyman
Design and Layout by ORIGIN Creative Services
© 1997, 1998 ORIGIN Systems, Inc. Origin is a trademark or registered trademark of ORIGIN Systems, Inc.
Electronic Arts and We Make Sims by the Book are trademarks or registered trademarks of Electronic Arts
in the U.S. and/or other countries. All rights reserved. ORIGIN is an Electronic Arts company.
Jane’s Combat Simulations is an Electronic Arts brand. Jane’s is a registered trademark of Jane’s Information
Group Ltd. Reference work from Jane’s Library © 1997 Jane’s Information Group Ltd. Made in the USA. All
rights reserved, including the right of reproduction in whole or in part in any form. This product is not
licensed or endorsed by McDonnell Douglas Corporation.
ORIGIN Systems, Inc.
5918 West Courtyard Drive
Austin, Texas 78730
Page 3

HOW TO USE
This manual is subdivided into eight chapters. Some (0, 1 and 2) describe how to
play the game, others (3, 6, 7 and Appendices) contain reference information, and
others (4 and 5) contain both.
At the beginning of each chapter, you’ll find a detailed table of contents. Page
references include the chapter and page number — p. 3.12, for example, refers to
Chapter 3, page 12. The appendices at the end of the book give glossary and
acronym information, a bibliography and useful flight charts.
QUICK START For a quick game overview and fundamental
keystokes, see the back inside cover of this manual.
0. INTRODUCTION How to Use (this section) tells you how to find the
information you need in this book. Adetailed table of
contents follows.
Table of Contents (p. 0.6 - 0.11) gives a chapter by
chapter listing of contents for this manual. More
detailed listings appear at the beginning of each chapter.
In a Hurry? (p. 0.12 - 0.16) describes how to start an
Instant Action mission and explains basic keystrokes to
get you up in the air and firing your weapons.
1. ON THE BASE On the Base describes the functionality of all buildings
on the base, as well as how to use the training missions, Jane’s object viewer, and mission planner.
2. COCKPIT/SYSTEMS Aircraft Overview (p. 2.3) introduces the three flyable
helicopters and briefly describes the helicopters’ main
display systems and Master Modes (p. 2.9).
Integrated Helmet and Display Sighting System (p.
2.12) and IHADSS Flight Symbology (p. 2.14) cover
the four IHADSS modes and define each item you see
in the Longbow’s cockpit display.
Multi-Function Displays (p. 2.24) takes you through
all MFD pages for all helicopter types and explains the
items that appear in them.
In-Flight Navigation System (p. 2.44) discusses the
game’s dynamic, in-flight mission planning map, and
Kiowa Digital Moving Map (p. 2.45) covers the Kiowa
Warrior’s scrolling map display.
0: INTRODUCTION
0.3
SHADED TEXT Text in a light-gray box denotes additional information.
Although useful, this info is not required to play the game.
Page 4

AH-64D Targeting and Sight Systems (p. 2.46) talks
about the Longbow’s main systems — the Fire-Control
Radar (FCR), Target Acquisition and Designation Sight
(TADS), and Pilot’s Night Vision System (PNVS).
Co-Pilot/Gunner Cockpit (p. 2.51) describes the frontseat cockpit and the Optical Relay Tube (ORT) Unit.
Black Hawk Analog Cockpit (p. 2.54) contains information and diagrams of instruments on the Black Hawk
dashboard.
View Controls (p. 2.56) lists all of the in-flight camera
views.
3. GROUND SCHOOL Lift Force (p. 3.1) discusses physical theories of flight.
Rotational Motion (p. 3.5) and Horizontal Motion (p.
3.9) examine the inherent physical characteristics of
rotary flight.
4. FLIGHT TRAINING Helicopter Controls (p. 4.1) describes the helicopter’s
control inputs and autopilot functions. It also gives
information on adjusting realism and difficulty options.
Practice Flight (p. 4.8) goes through the basic techniques of taking off, flying to a waypoint and landing.
You’ll also find advanced information on autorotational
and combat landings.
5. COMBAT Staying Alive (p. 5.2) details your Aircraft Survivability
Equipment (ASE) and tells you how to use it to survive
in combat.
Weapons Systems (p. 5.9) explains everything you
need to know about finding, targeting and destroying
an enemy with your helicopter’s weapons.
Laser Operation (p. 5.22) describes how to use the
helicopter’s laser sensor in conjunction with weapon
systems.
Wingmen and Backup (p. 5.24) defines wingman
commands and tells you how to call in artillery and air
strikes, and how to trade targets with your wingman.
Combat Tactics (p. 5.27) illustrates effective helicopter
tactics against ground targets and air opposition.
6. CAMPAIGNS Campaigns (p. 6.1) gives background information on
the game’s Iranian and National Training Center
campaigns, and includes relevant articles from Jane’s
Information Group magazines.
LONGBOW 2
0.4
Page 5

7. JANE’S Jane’s Specifications (p. 7.1) lists actual specifica-
tions and photographs from Jane’s Information Group
for all three flyable helicopters, their weapons and
major avionic systems.
APPENDICES Appendices provide useful lists and glossary information:
Appendix A Longbow vs. Longbow 2
(p. A.1) gives veteran
players an idea of what new, major features to expect
in
Longbow 2
, and describes where to find specifics on
each element.
Appendix B
Acronyms (p. B.1) explains commonly used
acronyms.
Appendix C
Glossary (p. C.1) defines commonly used aircraft,
ground vehicles and military terms.
Appendix D
Flight Charts (p. D.1) lists cruise velocity and autorotational landing charts for the Longbow Apache, Black
Hawk and Kiowa Warrior.
Appendix E
Bibliography (p. E.1) lists the references used in
preparing the game and the manual.
0: INTRODUCTION
0.5
Page 6

IN A HURRY?......................................0.12
Starting the Game............................................0.12
Instant Action Mission Parameters.....................0.12
Flight Basics.....................................................0.13
Basic Flight Controls ...................................0.13
Takeoff Keys..............................................0.13
Navigation Keys.........................................0.14
Targeting Keys...........................................0.14
Weapon Keys.............................................0.14
View Keys..................................................0.15
Ending the Mission .....................................0.15
Useful Hints ...............................................0.16
LONGBOW 2
0.6
0. INTRODUCTION / IN A HURRY?
1. ON THE BASE
READ JANE’S........................................1.1
BUNKHOUSE.........................................1.2
Creating a New Pilot...................................1.3
Pilot Careers...............................................1.4
Deleting a Pilot...........................................1.4
Switching the Active Pilot.............................1.4
TRAINING BUILDING.............................1.5
INSTANT MISSION HELICOPTER.............1.6
MULTI-PLAYER MISSION BUILDING........1.6
SINGLE MISSION BUILDING...................1.6
CAMPAIGN MISSION BUILDING.............1.8
Campaign Options .......................................1.8
Resuming a Campaign.................................1.9
MOBILE MISSION
PLANNING CELL (MMPC).....................1.10
Mission Planner...............................................1.11
Function Buttons..............................................1.13
Mission Summary Bar ......................................1.15
The Map..........................................................1.15
Fly Mission......................................................1.19
Trash Mission...................................................1.19
ENDING A MISSION ............................1.20
Landing at a FARP...........................................1.20
Debriefing Area...............................................1.20
Saving Your Progress.......................................1.20
Crashing, Surviving and Dying.........................1.22
GUARD SHACK....................................1.22
For a three-page Quick Start, please see the back cover and inside back
cover on this manual.
Page 7

Game vs. Reality...............................................2.1
How to Use This Chapter....................................2.2
AIRCRAFT OVERVIEW...........................2.3
Longbow Apache.........................................2.3
Kiowa Warrior............................................2.3
Black Hawk................................................2.3
In-Flight System Keys........................................2.3
Game Options.............................................2.3
Pausing/Ending the Mission.........................2.4
Speeding up Travel......................................2.4
Radio..........................................................2.4
Overview: IHADSS.............................................2.4
Overview: Multi-Function Displays (MFDs)..........2.6
MFD Types ..................................................2.6
Overview: Targeting Systems..............................2.7
MASTER MODES ...................................2.9
Master Mode Settings........................................2.9
Upfront Display...............................................2.10
Black Hawk Indicator Lights .............................2.10
Longbow Fire Warning Lights...........................2.11
Physical Backup Gauges...................................2.11
IHADSS...............................................2.12
IHADSS Helmet System....................................2.13
IHADSS FLIGHT SYMBOLOGY...............2.14
Hover IHADSS Mode........................................2.14
Bob-Up IHADSS Mode......................................2.19
Transition IHADSS Mode...................................2.20
Cruise IHADSS Mode........................................2.21
Weapon-Specific Items.....................................2.22
MULTI-FUNCTION DISPLAYS ................2.24
Tactical Situation Display (TSD) MFD.................2.24
How It Works ............................................2.25
Adjusting TSD Items..................................2.27
TSD with Realistic FCR...............................2.27
Priority Fire Zones (PFZs) ..........................2.28
PFZs and Hellfire Missiles..........................2.28
Radar MFD ......................................................2.29
Air/Ground Radar Modes..........................2.29
Realistic FCROptions and Symbols.............2.30
Realistic FCR Operation Commands............2.31
Downloading Targets to Radar MFD ...........2.31
TADS MFD.......................................................2.32
Panning/Zooming.....................................2.33
TADSand Realistic FCR ..............................2.33
Realistic TADSOperation............................2.33
Weapons MFD.................................................2.33
Aircraft Survivability Equipment (ASE) MFD......2.35
Realistic Jammers.....................................2.36
ASE Autopage...........................................2.37
System MFD....................................................2.38
Engine MFD.....................................................2.38
Interpreting the Symbols...........................2.39
Flight MFD.......................................................2.40
Communications MFD.......................................2.40
Vertical System Display MFD............................2.41
Mast-Mounted Sight (MMS) MFD......................2.43
IN-FLIGHT NAVIGATION SYSTEM .........2.44
KIOWA DIGITAL MOVING MAP............2.45
TARGETING AND SIGHT SYSTEMS........2.46
Mast-Mounted Longbow FCR............................2.46
TADS...............................................................2.47
TADS and MMSCameras ..................................2.47
Pilot’s Night Vision System (PNVS/ANVIS).........2.48
Kiowa Pilot Display Unit...................................2.48
CO-PILOT/GUNNER COCKPIT...............2.51
Kiowa’s Left Seat (CP/G).................................2.51
Longbow’s Front Seat (CP/G)...........................2.51
IHADSS/MFDS/UPFRONT Display.....................2.52
Optical Relay Tube (ORT) Unit..........................2.53
Head-Out/Head-Down Displays.................2.53
BLACK HAWK ANALOG COCKPIT..........2.54
Cockpit Gauges................................................2.54
VIEW CONTROLS ................................2.56
View Panning..................................................2.56
Inside Cockpit Views.........................................2.57
Target Views....................................................2.58
0: INTRODUCTION
0.7
2. COCKPIT/SYSTEMS
Page 8

LIFT FORCE...........................................3.1
Generating Lift..................................................3.2
Bernoulli’s Principle.....................................3.2
Angle of Attack...........................................3.3
Angle of Incidence.......................................3.4
ROTATIONAL MOTION...........................3.5
Dissymmetry of Lift...........................................3.5
Compressibility of Air..................................3.6
Coning ........................................................3.6
Downwash.........................................................3.6
Ground Effect in a Hover.............................3.7
Settling with Power.....................................3.7
Torque...............................................................3.8
Tail Rotor....................................................3.8
Hovering and Translating Tendency..............3.8
HORIZONTAL MOTION..........................3.9
Translational Lift................................................3.9
Drag.........................................................3.10
Asymmetry of Lift............................................3.10
Retreating Blade Stall......................................3.12
Autorotational landing.....................................3.12
HELICOPTER CONTROLS.........................4.1
Rotor.................................................................4.1
Collective Stick...................................................4.2
Advanced Collective Controls........................4.2
How Collective Works..................................4.2
Cyclic Stick........................................................4.3
How Cyclic Works........................................4.3
Directional Control Pedals..................................4.4
How Directional Control Pedals Work...........4.4
In-Game Flight Tutorials.....................................4.4
Adjusting Realism and Difficulty.........................4.5
Autopilot Functions............................................4.5
Autopilot.....................................................4.5
Advanced Autopilot Keys.............................4.6
Hover Hold.................................................4.7
Force Trim...................................................4.7
PRACTICE FLIGHT (NON-COMBAT).........4.8
Startup..............................................................4.9
Takeoff...........................................................4.10
In-Flight..........................................................4.11
Landing...........................................................4.12
Advanced Combat Landing........................4.13
Autorotational Landing..............................4.14
LONGBOW 2
0.8
3. GROUND SCHOOL
4. FLIGHT TRAINING
Page 9

STAYING ALIVE .....................................5.2
Aircraft Survivability Equipment.........................5.2
Evading Missiles.................................................5.3
DAMAGE...............................................5.4
TACTICAL MISSIONS..............................5.6
AH-64D Longbow Apache............................5.6
OH-58D Kiowa Warrior...............................5.7
UH-60LBlack Hawk....................................5.8
WEAPONS SYSTEMS..............................5.9
Finding the Enemy.............................................5.9
Visual Tracking............................................5.9
Sensor Systems...........................................5.9
Target Acquisition Modes..................................5.10
TADS/MMS Target Acquisition Mode...........5.11
FCR Target Acquisition Mode......................5.11
Priority Fire Zones....................................5.11
Selecting Targets from Your Target List.............5.12
Getting Best Cannon Targets......................5.12
Getting Best Missile Targets.......................5.12
Selecting Targets with the Mouse...............5.12
Engaging Targets with Cannon,
FFAR and Stingers........................................5.13
M230 Chain Gun Cannon..........................5.14
Stinger Infrared-Guided Missile..................5.16
Folding Fin Aerial Rocket (FFAR)................5.17
Engaging Targets with Hellfires........................5.18
LOBL Missile Launch Mode.........................5.18
LOAL Missile Launch Mode.........................5.19
Launching Hellfires with PFZs...........................5.19
Troubleshooting — Getting a Valid Lock..........5.20
Weapon Inhibit Field.................................5.20
Identifying the Target................................5.21
Laser Operation...............................................5.22
Realistic TADSand the Laser......................5.23
Using the Laser with Laser Hellfires...........5.23
WINGMEN AND BACKUP.....................5.24
Wingman Commands.......................................5.24
Giving Your Wingman Targets....................5.24
Getting Your Wingman’s Targets................5.25
Other Wingman Commands.......................5.25
Calling on Backup............................................5.26
Calling an Air Strike..................................5.26
Calling an Artillery Strike..........................5.26
COMBAT TACTICS ................................5.27
Air-to-Ground Tactics........................................5.27
Escorting Transports...................................5.28
Terrain Masking ........................................5.28
Contour Chasing – Speed vs. Safety..........5.28
Bob-Up.....................................................5.29
Pop Sideways............................................5.30
Air-To-Air Tactics...............................................5.30
Against Fighters........................................5.31
Against Helicopters....................................5.31
0: INTRODUCTION
0.9
5. COMBAT
Page 10

CAMPAIGNS.........................................6.1
IRAN, AZERBAIJAN AND THE US...............6.2
Fear Drives Caucasian Policy..............................6.2
Iran Warns USA To “Think Twice”
About An Attack................................................6.3
Iran Strives To Regain Military Might;
Rearmament Drive Aims to Restore
Gulf Balance......................................................6.4
Baku and Tehran, Renewed Tensions..................6.6
Azeris Want New Look at Tashkent Accord..........6.8
The Jane’s Interview:
National Training Center....................................6.9
JANE’S SENTINEL
–
THE GULF STATES – IRAN ..........................6.10
Defence Production..........................................6.10
Historical Overview ..........................................6.11
Territorial Disputes – Iraq, UAE........................6.11
International Affairs........................................6.12
JANE’S SENTINEL
– RUSSIA
AND THE CIS – AZERBAIJAN ....................6.14
Risk Pointers...................................................6.14
Azerbaijan’s Oil to Flow...................................6.15
GAME CAMPAIGN BACKGROUND...........6.16
National Training Center..................................6.16
Iran:Operation Fallen Crescent........................6.17
DYNAMIC MISSION GENERATOR.............6.19
Overview.........................................................6.19
Campaign Goals..............................................6.19
Criteria for an Offensive Advance.....................6.21
Resource Management.....................................6.22
Mission Outcomes............................................6.22
LONGBOW 2
0.10
6. CAMPAIGNS
Page 11

DEFINITIONS..................................................7.2
MILITARY AIRCRAFT, ROTARY WING
AH-64D Longbow Apache...................................7.4
UH-60A/L Blackhawk (Sikorsky S-70A).............7.7
OH-58D Kiowa Warrior ....................................7.10
WEAPONRY
AIM-92 Stinger ................................................7.13
Folding Fin Aerial Rocket.................................7.14
Hellfire Missile.................................................7.16
FN 0.50 Browning M2 Heavy
Barrel Machine Gun.........................................7.18
M134 7.62mm Minigun Machine Gun..............7.19
M230 Chain Gun Cannon.................................7.20
M60D 7.62mm Machine Gun...........................7.21
AVIONICS
AN/ALQ-144 Infrared
Countermeasures Set.......................................7.22
AN/APR-39A Threat Warning System...............7.23
AN/AVR-2 Laser Detecting Set..........................7.24
ANVIS/HUD System.........................................7.25
Longbow Radar...............................................7.26
MMSMast Mounted Sight.................................7.27
Target Acquisition Designation Sight/
Pilot Night Vision Sensor..................................7.28
0: INTRODUCTION
0.11
7. SPECIFICATIONS
APPENDICES
GAME COMPARISONS...........................A.1
Longbow vs. Longbow 2.....................................A.1
ACRONYMS..........................................B.1
GLOSSARY............................................C.1
FLIGHT CHARTS....................................D.1
Cruise Charts .....................................................D.1
Longbow Apache.........................................D.1
Kiowa Warrior............................................D.2
Black Hawk................................................D.3
Autorotational Descent Charts............................D.4
Longbow Apache.........................................D.4
Kiowa Warrior............................................D.5
Black Hawk................................................D.6
BIBLIOGRAPHY .....................................E.1
Page 12

LONGBOW 2
0.12
IN A HURRY?
This section is for new pilots who want a basic introduction to the game, as well
as for seasoned pilots who only want enough information to get the game started.
Instant Action encounters don’t affect your pilot’s record, but they’re a great way to
ease into the game before starting an actual campaign.
Check out the Quick Start Reference Card on the back cover/inside back cover
of this manual for basic keystrokes.
Page numbers in parentheses indicate where to go in the manual for more details.
: Once the game starts, you’ll see an overhead view of the base. Right-click the
mouse anywhere to display all the hotspots.
L Left-click on the grounded helicopter (in front of the Campaign hangar) to start
an
INSTANT ACTION mission.
Instant Action Mission Parameters
Instant Action mission mode places you in the pilot’s seat of an AH-64D Longbow
Apache. (A second cockpit, the co-pilot/gunner’s seat, is available as well. This front
seat is usually used for targeting and weapon functions. See p. 2.51 for details.)
♦ Terrain. You’ll fly in whichever map was last decompressed (NTC or Iran).
♦ Helicopter/Weapon. You’ll fly an invulnerable AH-64D Longbow Apache, with
unlimited weaponry (M230 chain gun rounds, RF Hellfire missiles, FFAR rockets and Stinger ATA missiles).
♦ Flight Model.
SIMPLE flight mode is active. You can increase difficulty by acti-
vating the
OPTIONS menu (press aO), then selecting a different flight model
from the
GAMEPLAY menu. You can also adjust REALISM options that change the
characteristics of your chopper and/or weapons.
Starting the Game
1. Ensure that your input devices are calibrated in
Windows 95
. If you have any
questions or problems, please refer to the
Install Guide
.
2. Double-left click on the
Longbow 2
icon, or left-click the
Start
button and select
Programs/Jane’s Combat Simulations/AH64D Longbow 2/Longbow 2
This section assumes that you selected a CASUAL installation. If you selected
EXPERT, you can change the game’s settings in the OPTION menu.
1. Press a O
2. Select
CONTROLS, then CASUAL. Press ACCEPT.
3. Select
GAMEPLAY, then ARCADE. Press ACCEPT twice to close the options screen.
Page 13

0: INTRODUCTION
0.13
♦ Forces. You’ll face a slew of random air and ground enemies — SAMs,
helicopters, anti-aircraft guns, tanks, trucks, etc. Some will be friendly, so you
may want to spend some time watching the ground battles below.
Keeping your targets straight won’t be a problem — you aren’t allowed to
target friendlies with this control type. To track target positions, use the in-flight
mission planner map (aN).
Flight Basics (pp. 4.1-7)
Basic Flight Controls
All helicopters have three basic controls:
♦ The
collective
adjusts vertical velocity (altitude), and can be set from 0-100%.
♦ The
cyclic
controls forward, sideways and backward movement.
♦ The
directional control pedals
change heading by swinging the tail rotor left
or right (most useful at slow speeds).
COLLECTIVE
= / - Increase/decrease vertical velocity (altitude).
or throttle wheel
CYCLIC
W / Z Pitch helicopter down (to move forward)/up (to move backward)
A / S Bank helicopter left/right
or joystick
PEDALS
[ / ] Rotate tail rotor left/right
or pedals
Takeoff Keys
Takeoff is automatic in Instant Action missions. For specific details on how to take
off in other mission types, see Flight Training: Practice Flight, p. 4.8.
This section covers basic keystrokes you need for survival, as does the Quick
Start Reference Card on the back cover of this manual. See the rest of the
manual or the
Reference Card
for a complete listing of keys and game functions.
Page 14
Navigation Keys (p. 2.44, p. 4.5)
A
Activate autopilot (key cycles through
MAINTAIN HEADING(AP
1),
FOLLOW WAYPOINTS(AP
2) and
OFF
(
NONE
).
H
Activate hover hold (must be flying slower than 15 knots, or be in autopilot mode)
t
Cycle through time compression (2x, 4x, 8x)
st
Restore normal time
aN
Open mission planner
Targeting Keys (pp. 5.10-12)
In the Longbow Apache, the square multi-function display (MFD) on the right side
of the dashboard is your Tactical Situation Display (TSD). Small icons are potential targets, and an icon with a diamond represents the current target. Other MFDs
exist — the types and locations vary by helicopter type. (See Cockpit/Systems,
p. 2.1, for details.)
T
Target next enemy object
Targets have the following TSD icons:
Light Structure Heavy Structure
Light Armor Heavy Armor
Light Wheeled Vehicle Heavy Wheeled Vehicle
Light Artiller y Heavy Artiller y
Airplane Helicopter
Ground Threat (ASE) Out-of-Range
Note: The icons change if
REALISTIC FCR SYMBOLS
is active. See the
Options Menu
in the
Install Guide
for details
.
LONGBOW 2
0.14
Page 15

0: INTRODUCTION
0.15
Weapon Keys (pp. 5.13-19)
Target Reticle Rocket I-Beam Constraint
ATA Constraint Hellfire Constraint
The weapon constraint indicator is a square, circle or I-beam, depending on the
active weapon and helicopter type. Line it up with the target reticle (small, dashed
cross hairs that appear over a target in view). When the constraint border turns
from dashed to solid, you have a
VALID LOCK and can fire. (If you can’t fire, mes-
sages will appear on your screen — see Weapon Inhibit Field, p. 5.20.)
b
Switch active weapon to Hellfires/FFARs/Stingers
(On the Longbow Apache, the M230 Chain Gun is always active.)
e
Fire cannon (M230 Chain Gun)
z
Fire rocket/missile
View Controls (p. 2.56)
1
Front cockpit view
s1
Front view, no cockpit
4
Virtual cockpit view (pannable; use a+ joystick to slew view)
6
Next object view (pannable)
7
Next target view (pannable)
View Panning and Zooming
You can pan/zoom the 4, 6 and 7 views. a + joystick also pans these
views.
5
(numpad) Reset view to center position
8
(numpad) Pan view up
2
(numpad) Pan view down
6
(numpad) Pan view right
4
(numpad) Pan view left
+
(numpad) Zoom in
-
(numpad) Zoom out
Ending the Mission
Pause or exit the mission/game with these keys:
aP
Pause the game
aQ
Quit the mission
aX
Exit to Operating System
Page 16

Useful Hints
♦ In all three helicopter types, stay low to avoid detection. Follow the terrain,
flying at a low altitude and speed (below 70 knots). Most importantly, try to
mask your position as long as possible by hiding behind hills or structures, or
in valleys. Only pop up when you absolutely need to.
♦ When SAMs approach your aircraft, reduce altitude as quickly as you can
without hitting the ground. This will help decrease your chances of being hit.
♦ Try sticking with the Longbow Apache and radar Hellfire missiles until you’ve
got the hang of the game. They’ll let you stay far enough away from your
targets to take advantage of LOAL missile launch mode and reduce your
exposure to enemy fire.
♦ Kill the AAA threats that have the longest ranges first when entering enemy ter-
ritory. This makes it easier to maneuver around other threats with shorter
ranges. Keep an eye on your ASE MFD and weave around the arced firing
ranges of the remaining SAMs and AAA.
♦ Focus on mission objectives before you worry about other enemies. You'll
almost always need to hit a few threats along the way — just make sure you
reserve enough weapons to destroy your primary objectives. You can use any
remaining ammo to hit stray targets on the way back.
♦ You aren’t required to fly missions along pre-set waypoints. If you can identify
a path with less resistance, try moving your waypoints. Keep in mind, however, that you’ll need to have ample fuel to return through an alternate route.
♦ Listen to your CPG. He’ll tell you what’s out there, and where.
♦ To identify nearby targets, press U. This toggles on target identification, which
shows identifying names in the UPFRONT display as you switch targets.
♦ If you suspect that you’ll face enemy helicopters in an area, clear out a
section of SAMs near the anticipated area of engagement. This way, you’ll
have room to climb and evade the helos without being tagged by a SAM.
♦ If you become disoriented when dodging fire and think you may crash, quickly
press A so that the game’s autopilot function will restore level flight. As soon
as your altitude and bearing become stable, continue the fight.
♦ Memorize the key commands for your wingman/air support/artillery strikes. Try
to use your limited number of artillery strikes on concentrated SAM areas, and
use the air support strikes only on AAApositions. (If you use air strikes on
SAM sites, you risk having your A-10/F-16 shot down. This will subtract
promotion points from your mission score.)
LONGBOW 2
0.16
Page 17

1
On the Base
Page 18

READ JANE’S........................................1.1
BUNKHOUSE.........................................1.2
Creating a New Pilot..........................................1.3
Pilot Careers......................................................1.4
Deleting a Pilot..................................................1.4
Switching the Active Pilot...................................1.4
TRAINING BUILDING.............................1.5
INSTANT MISSION HELICOPTER.............1.6
MULTI-PLAYER MISSION BUILDING........1.6
SINGLE MISSION BUILDING...................1.6
CAMPAIGN MISSION BUILDING.............1.8
Campaign Options.............................................1.8
Resuming a Campaign.......................................1.9
MOBILE MISSION
PLANNING CELL (MMPC).....................1.10
Mission Planner...............................................1.11
Menu Bars.......................................................1.11
Function Buttons..............................................1.13
Mission Summary Bar ......................................1.15
The Map..........................................................1.15
Waypoint Symbology .......................................1.16
Moving, Adding and Deleting Waypoints......1.16
Waypoint Information Window.........................1.17
Fly Mission......................................................1.19
Trash Mission...................................................1.19
ENDING A MISSION ............................1.20
Landing at a FARP...........................................1.20
Debriefing Area...............................................1.20
Saving Your Progress.......................................1.20
Crashing, Surviving and Dying.........................1.22
GUARD SHACK....................................1.22
LONGBOW 2
1.2
1. ON THE BASE
Page 19
1: ON THE BASE
The first thing you see when you start the game is an overhead view of the complex. Each building performs one or more different functions. To see what action
spots are available, right-click anywhere on the screen. To access a particular
building, move the cursor over it and left-click. Once you’ve finished exploring the
Base, proceed to Training Building, p. 1.5, or Flight Training, Chapter 4.
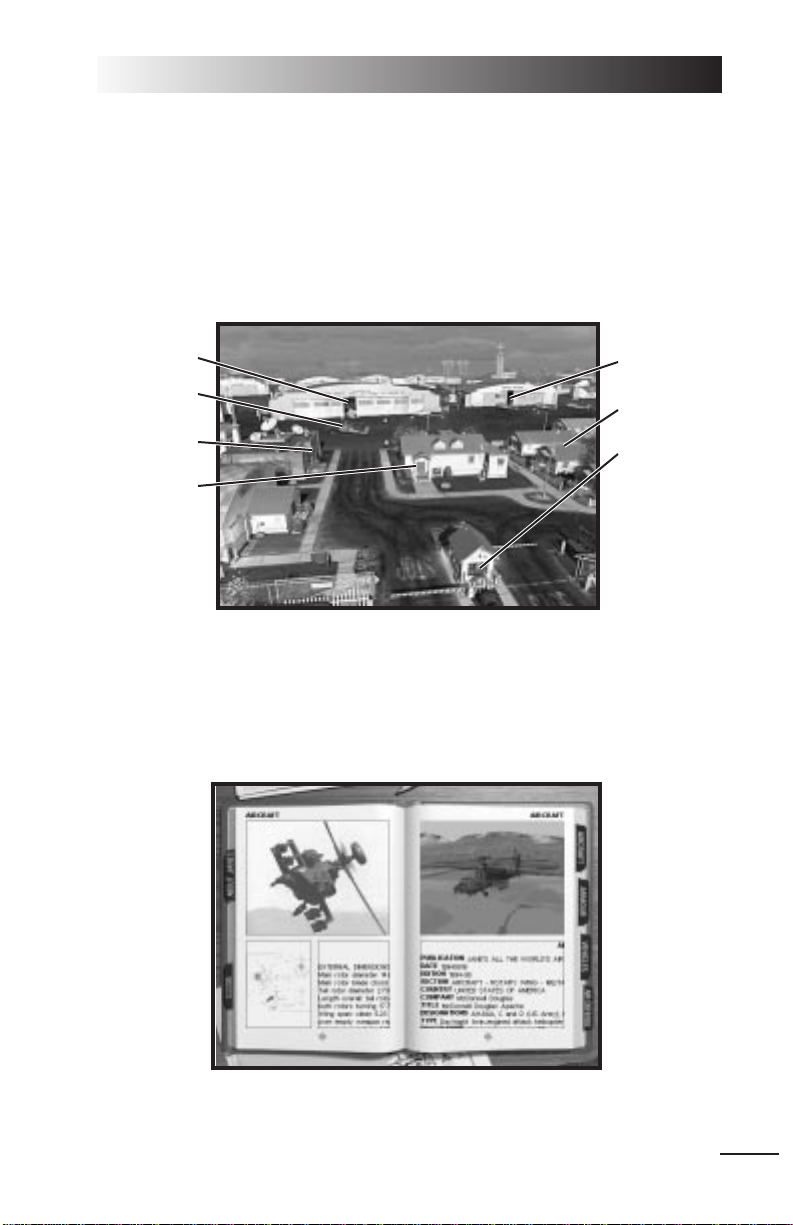
Read Jane’s
The
Jane’s Military Aircraft, Vehicles and Logistics
book lists a variety of information about most objects in the game and about the Jane’s organization. The information and photos that appear here come directly from Jane’s Information Group,
and are identical to the published versions (although some have partial entries).
Jane’s reference books can be accessed from the Bunkhouse, Training Building,
Commo Building, MMPC and Debriefing room.
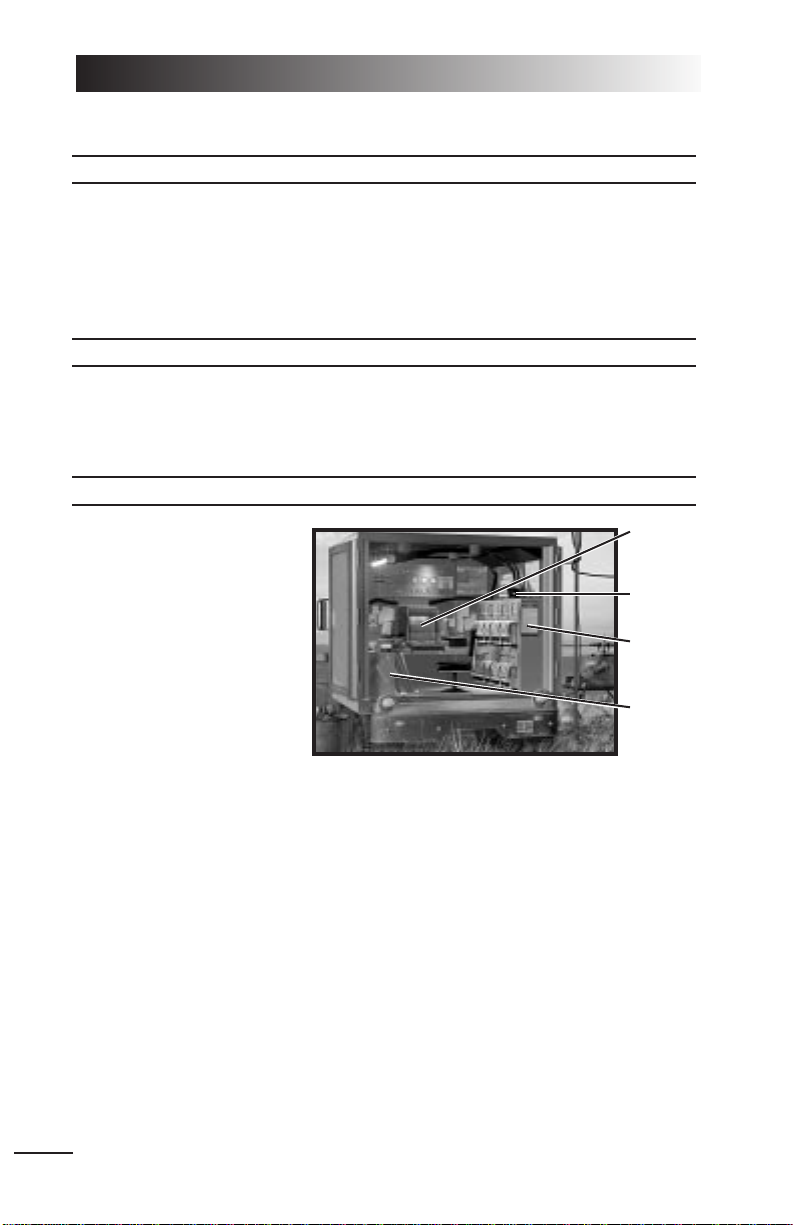
1.1
Campaign
Instant
Action
Commo Building
(Multi-Player)
Tutorial/
Training
Single
Missions
Select
Pilot
Exit to
Operating
System
Page 20

Each tabbed section contains information about items in that category.
♦ To activate, highlight the red Jane’s book, then left-click.
Aircraft Displays information on helicopters and airplanes in the game.
Armour Displays information on armored vehicles in the game.
Vehicles Displays information on unarmored ground vehicles in the game.
Air Defense Displays information on AAguns and SAM sites in the game.
About Jane’s Displays the title page of the Jane’s book and gives information
on the Jane’s organization.
Close Returns to the Base.
By using these pages, you can learn about the objects in the game.
♦ Left-click on the book tabs to change chapters.
♦ Left-click on pictures on the left page to enlarge them to full-screen view.
Left-click again to return to the normal page view.
♦ Left-click inside either white text box to enlarge the text page. Left-click the
vertical scroll bars to scroll through statistics or descriptive text. (Or, use W
and Z to scroll.) Left-click to return to the normal page.
♦ Left-click on the gray arrows at the bottom of either page to turn the page.
♦ Left-click-and-hold on the 3-D object box on the right-hand page to rotate the
object. Dragging the mouse cursor rotates the object in any direction. Pressing
the left and right mouse buttons simultaneously lets you control zoom. Push
the mouse forward to zoom in, backward to pull back.
BUNKHOUSE
Select Pilot
appears when this building is highlighted.
The Bunkhouse is where all existing pilot records are stored. Each time you start
the game, the pilot that you last used will be the active pilot.
Left-click on the building to see a row of lockers. Here, you can create and store
six pilots (one per locker). Once a pilot is MIA (Missing In Action) or KIA (Killed In
Action), he/she is no longer available, and a folded flag appears in the locker.
Note: You must create a pilot before flying Single or Campaign Missions. Once
you create/select a pilot, he/she will remain active until you create/select a
different one.
To select a different active pilot, click on his/her flight helmet.
To create a new pilot, click on a locker and it will open. Click on the notebook to
select a unit and give the pilot a name and callsign. The currently selected pilot
has a flight bag in place of the helmet.
Left-click on the door to exit this room and return to overhead Base view.
LONGBOW 2
1.2
Page 21

Creating a New Pilot
A locker with a flight bag or helmet indicates an active pilot. A locker with a folded
flag means that the pilot is inactive (either missing or killed in action).
To replace a dead pilot with a new one, select the dead pilot and change the
name. This will replace the pilot with a newly created one.
CHANGE UNIT Highlight the space at the top of the spiral notebook and left-
click to change your unit affiliation. You can left-click on the
unit insignias to view available units and select the one you
wish to join, and you can enter a nickname for your squad.
CREATE NEW PILOT Left-click on the name of the default pilot to change the
pilot’s name and callsign.
You will be given a window with the current pilot’s name
and callsign. Left-click on the end of the name and backspace over it, then enter the name you prefer in the space.
Then, press e. If you wish to change your callsign, t
down to the callsign field and do the same. Repeat for your
squad nickname.
When you have the name, callsign and squad name you
wish, left-click on
ACCEPT. Or left-click CANCEL to exit with no
changes.
VIEW SQUAD DATA Left-click on this folder to open it and view a variety of
information about the performance of that pilot and the rest
of his squad.
Left-click on the bottom of the folder to toggle between
pages, and on the top to exit back to the locker.
The first page of Squad Data is your personal record. At
the top are your name, callsign, unit and squad. The left
column consists of your current rank, total number of
missions flown and number successfully completed, flight
hours in each of the four aircraft types, your current score
(your combat activity and successes, expressed in points)
and your rating vs. other pilots in your unit, expressed as a
percentile. Finally, all campaigns and training missions
completed by the pilot are listed. The second column
shows the number of times you’ve fired and hit with each
weapon, and rates your efficiency with it, and also shows
your confirmed kills sorted by unit type.
The second page of the folder displays information about
your squad. Each squad consists of 16 helicopter crews.
The page displays the name of each pilot and CP/G, the
type of helicopter flown by that team (your entry will dis-
1: ON THE BASE
1.3
Page 22

play the type of helicopter flown on your most recent mission), an efficiency rating for the team, total number of kills
for the team, and total flight time logged.
Each pilot created is assigned a squadron of computergenerated characters upon creation. This page keeps track
only of information about that computer-generated squad.
It will not reflect any information about any live players you
may fly with during multi-player missions.
VIEW MEDALS Left-click on the box to the left to view medals you’ve
earned. As you progress in the campaign, you’ll receive
medals and campaign ribbons. Right-click in the medals
screen to see the names of all of the medals.
EXIT Close the locker.
Once you create a pilot and save your progress, this pilot remains active. (Only
one pilot can be active at once.) Whoever was flying the last sortie is the default
pilot when you resume the game.
♦ Left-click on the locker door (at the left-hand side of the screen) to close the locker.
♦ Left-click on the door or on the active pilot’s flight bag to exit the Bunkhouse.
You can now fly this pilot in any mission.
Pilot Careers
Every mission you fly logs hours for the active
pilot and adds points to his/her cumulative
score. Single or Campaign missions all get
recorded on the pilot’s stat sheet. (Instant
Action missions, however, do not.) If you die in
any mission, the active pilot will not be available for future missions, unless you re-fly the
mission and survive.
Once you’ve accumulated enough points, flown enough missions, or met some
other condition, you’ll find new ribbons and medals in your pilot’s locker.
Deleting a Pilot
Once you create a pilot, that locker is occupied until the pilot is dead, captured or
deleted. If you die or are captured during a mission and choose to save your
progress at that point, a yellow ribbon and flag appear in the locker. The ribbon
and flag remain there until you create a new pilot in that locker.
Switching the Active Pilot
To resume another pilot’s career, left-click on the flight helmet of the pilot you want to
use. Aflight bag will appear in the top portion of the locker — left-click on it to return
to the overhead Base view. Now, missions you fly will be saved to that pilot’s record.
LONGBOW 2
1.4
Page 23
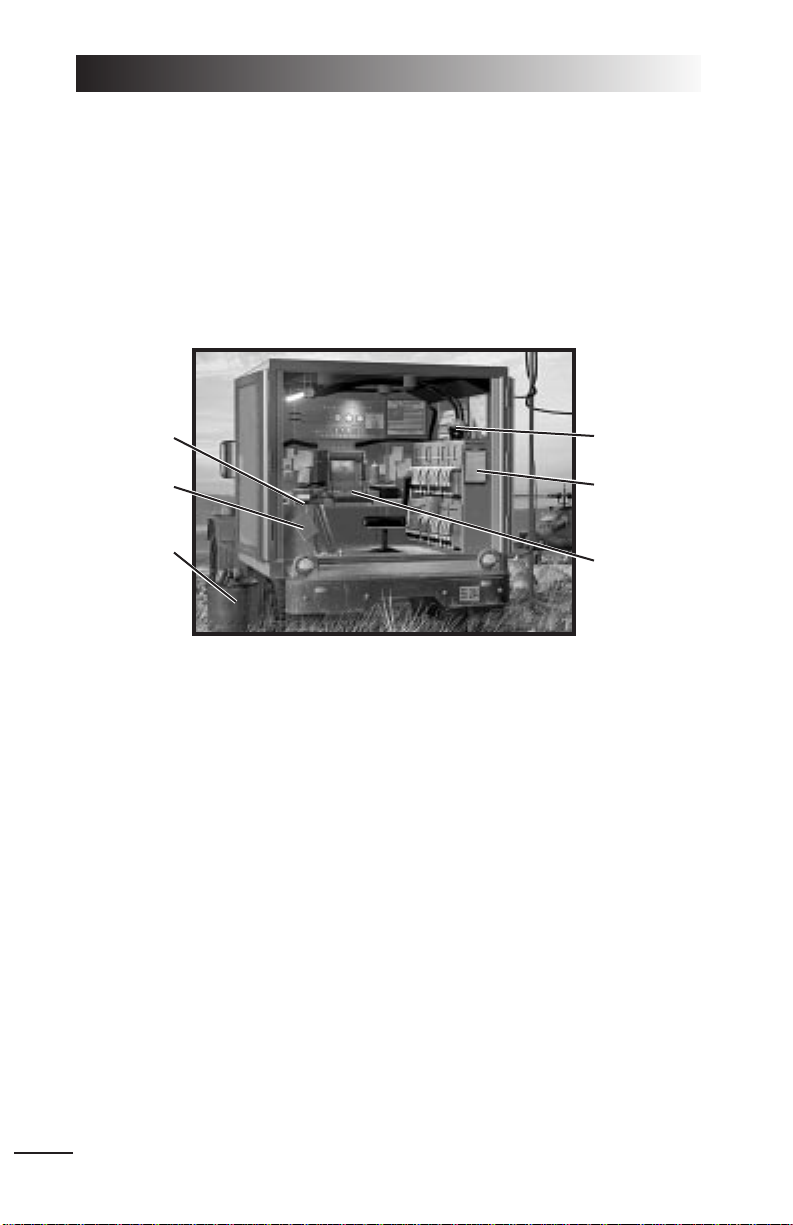
TRAINING BUILDING
Tutorial/Training
appears when this building is highlighted.
Before you head for the flight area, you may want to hone your piloting skills. The
Training Building offers a complete, interactive tutorial that introduces you to the
Longbow Apache, Kiowa Warrior, Black Hawk and helicopter flight in general.
You can access six different training modules. Three are accessed by clicking on
the books on the shelf, the other three by clicking on the helicopter models suspended from the ceiling.
The
Basic Flight Training
mission introduces you to the fundamentals of combat
helicopter operation. There are also specific missions for training in each of the
three helicopter types (two missions — basic and advanced — for the Longbow,
and one each for the Kiowa and Black Hawk). There’s also a
Free Flight Gunnery
Range
mission where you can sharpen your flight and weapons skills at your own
pace.
VIEW FILMS Brings you to an area where you can view promotional
films about the helicopters and their systems. This area
also allows you to view any game cinematics you’ve seen.
♦ Left-click on the stack of films to display a list of promotional films.
♦ Left-click on a film name in the dialog box to load it.
♦ To stop a movie, left click the mouse or press q.
The
News Scrapbook
records cinematics as you progress through the campaign.
Jane’s
displays background information on Jane’s Information Group.
♦ Left-click on the light switch to return to the base view.
1: ON THE BASE
1.5
Basic Black Hawk
Training
Basic Longbow
Training
Free-Flight
Gunnery Practice
Advanced Longbow
Training
Exit
Basic Kiowa
Training
Read Jane’s
Multi-media Room
Basic Flight
Training
Page 24
INSTANT MISSION HELICOPTER
Instant Action
appears when this helicopter is highlighted.
Instant Action missions are for players who want to get up in the air quickly and
destroy targets. Left click on the grounded helicopter to start an Instant Action
Mission (single-player) or Death Match (multi-player). For details, see In a Hurry?
on p. 0.12.
MULTI-PLAYER MISSION BUILDING
Commo Building
appears when this building is highlighted.
From this building you can connect to, join or organize a multi-player
Longbow 2
session. For complete instructions see the: Multi-Player Guide.
SINGLE MISSION BUILDING
Single Missions
appears when this building is highlighted.
When you enter this building
you are taken to the MMPC
(see p. 1.10), from which you
can elect to fly any one of
ten pre-generated missions,
or a random mission.
When you left-click on the
notebook you are given a
menu of pre-generated missions from which to select.
When you left-click on the
clipboard you are given a list of parameters with which to customize a random
mission. You can either play a completely random situation, or pre-set the nature
and difficulty of your task by adjusting the skill level of the enemy pilots (and of
allied forces), the weather, the time of day, the mission type and more.
♦ To customize a mission, move your cursor over an option (most options default
to RANDOM) and left-click to cycle through available parameters.
THEATER OF OPERATION Available options are RANDOM, WESTERN AZERBAIJAN, CENTRAL
AZERBAIJAN
, EASTERN AZERBAIJAN or FORT IRWIN NTC (National
Training Center).
TIME OF DAY Set the mission time to RANDOM, DAY, DAWN/DUSK or NIGHT.
WEATHER Adjust the weather to RANDOM, GOOD (clear skies), FAIR
(partly cloudy) or POOR (cloudy, drizzly).
WEAPONS AVAILABILITY You can limit your weapon selection by selecting RANDOM,
ALLOW ALL, NO HELLFIRES, NO STINGERS and ROCKETS ONLY.
LONGBOW 2
1.6
Mission
Planning
Computer
Fly
Mission
Random
Mission
Clipbaard
Single
Mission
Notebook
Page 25

FORCE ADVANTAGE You can give one side or the other a situational advantage.
Select
FRIENDLY ADVANTAGE, ENEMY ADVANTAGE, NEUTRAL or
RANDOM.
The remaining parameters can be set independently for both both teams.
MISSION TYPES Set the mission objective.
STRIKE (attack enemy positions behind enemy lines)
ESCORT (escort friendlies into dangerous territory)
RECON (scout enemy forces behind enemy lines)
CAP (Combat Air Patrol — engage airborne enemies)
CAS (Combat Air Support — provide air support for a friendly
ground offensive)
RANDOM
SKILL LEVEL
Change the skill level for computer-controlled helicopter
units on both sides of the battle.
CAT III (Crack Enemies possess excellent flying skills and
are difficult to kill)
CAT II (Veteran Enemies possess average flying skills and
are moderately hard to kill)
CAT I (Green Enemies possess poor flying skills and are
easy to kill)
RANDOM
GROUND FORCES
Select LIGHT, MEDIUM, HEAVY or RANDOM for each side.
AIR DEFENSES Select LIGHT, MEDIUM, HEAVY or RANDOM for each side.
HELICOPTERS Select LIGHT, MEDIUM, HEAVY or RANDOM for each side.
AIR SUPPORT Select LIGHT, MEDIUM, HEAVY or RANDOM for each side.
ARTILLERY SUPPORT Select LIGHT, MEDIUM, HEAVY or RANDOM for each side.
♦ When you’re finished configuring the mission, left-click
ACCEPT PARAMETERS to
lock in your choices, or left-click on the pencil to exit to the Clipboard. Once
your parameters are set, the program then generates a random mission
according to your specifications. Left-click on the Mission Planning Computer
to view your mission map, briefing and to set the mission parameters. Then
exit back to the MMPC and fly the mission by left-clicking on the helmet.
Details for the MMPC options appear on pp. 1.10-19.
1: ON THE BASE
1.7
Page 26

CAMPAIGN MISSION BUILDING
Campaign Missions
appears when this building is highlighted.
When you left-click on this building, a plaque displays with both
FALLEN CRESCENT and AZURE
RUNE options. The Azure Rune
training campaign has two variants. In the Friend vs. Enemy
campaign, the opposing force
uses authentic international arms,
while in the Friend vs. Friend
campaign both sides have
American armaments (thereby providing a realistic context for a multiplayer, head-to-head campaign).
Select one of the options to start
that campaign. (See Chapter 6: Campaigns for background information on both
campaigns.)
T
o begin a new campaign:
1. Left-click on the Campaign Mission Building.
2. Select the campaign you wish to fly.
You can have a maximum of ten saved campaign games.
If you attempt to create a new campaign game, but already have ten cam-
paigns in progress, a plaque will prompt you to replace one of them. Select the
campaign slot you wish to replace.
3. Enter a name for your save game file.
4. Set campaign options (see below).
You will be taken to the MMPC for your first mission briefing.
Campaign Options
Note: For info on options specific to Multi-Player play, see the
Multi-Player Guide
.
You will have to select among the following options before starting a new campaign.
CHALLENGE LEVEL Select
Easy, Average
or
Hard
.
FORCE ADVANTAGE Which side in the conflict has the numerical advantage.
Select
NEUTRAL, FRIENDLY ADVANTAGE or ENEMY ADVANTAGE.
CAMPAIGN LIMIT Controls the amount of game-time you are given to suc-
cessfully complete the campaign. Select
TWO, THREE, FOUR
WEEKS
or UNLIMITED.
LONGBOW 2
1.8
Page 27

LIMIT RADAR LONGBOWS If this toggle is set to ON, destroyed Longbows will not be
replaced immediately.
LIMIT OTHER If this toggle is set to ON, destroyed Kiowas, Longbows
HELICOPTERS without radars and Black Hawks will not be replaced
immediately
LIMIT MISSILES If this toggle is set to ON, expended Hellfires and Stingers
will not be replaced immediately.
LIMIT ROCKETS If this toggle is set to ON, expended rockets will not be
replaced immediately.
ORDINANCE Controls the speed at which missiles and rockets will be
REPLACEMENT resupplied, if either is limited. Select SLOW, AVERAGE or FAST.
HELICOPTER The rate at which destroyed helicopters will be replaced,
REPLACEMENT if any of the helicopter types are limited. Select SLOW,
AVERAGE or FAST.
LIMITED INTELLIGENCE If this toggle is set to ON, the “fog of war” may prevent you
from receiving accurate information about the enemy
forces in your briefings.
TIME OF DAY Select RANDOM, ALWAYS DAY or ALWAYS NIGHT.
VISIBILITY Select RANDOM, ALWAYS GOOD or ALWAYS POOR.
Resuming a Campaign
When you restart the game and want to resume a campaign, left-click on the
Campaign building. Then, left-click on the save game name that you used when
you saved that campaign game.
The Campaign Mission Building will sometimes play newscasts that update you
on the situation. Following that, you’ll find yourself in the MMPC, where you
prepare for your next mission.
See pp. 1.10-19 for details on what you can do in this area.
1: ON THE BASE
1.9
Page 28
MOBILE MISSION PLANNING CELL (MMPC)
The MMPC is a tent or truck-mounted system used for tactical mission planning in
the field. Left-clicking on either the Campaign or Single Mission Building will take
you to the MMPC.
When you left-click on the notebook (after entering from the Single Mission
Building) you are given a menu of pre-generated missions from which to select.
When you left-click on the clipboard (after entering from the Single Mission Building)
you are given a list of parameters from which to customize a random mission.
Right-click to display text for the hotspots. You have five options in this area.
When you pass the cursor over an option area, the option will highlight.
The following options are available in both Single and Campaign missions.
MISSION PLANNER Left-click on the computer to access the Mission Planner
(available only after selecting a mission).
READ JANE’S Left-click on the Jane’s book on top of the table to view
statistics, pictures and text descriptions of objects in the
game, just as they appear in the Jane’s books.
FLY MISSION Left-click on the green flight helmet to begin the mission
(available only after selecting a mission).
TRASH MISSION Left-click on the trash can to cancel the mission and return
to the main screen for the current mission type.
LONGBOW 2
1.10
Read Jane’s
Single
Mission
List*
Trash Mission
Fly Mission
Random
Mission
Planner*
Mission Planner
* If in Single Mission Mode
Page 29

Mission Planner
♦ Left-click on the mission
planning computer on the
desk to view the Mission
Planner display. You can
use this interface to
add/delete waypoints
(planned navigation
points), view intelligence
reports on what to expect
during the mission, arm
and assign your squad’s
helicopters, view in detail
the map of the mission
area, and more. You also
get your briefing here (in text form).
In addition to planning your own mission, the mission planner allows you to
direct the computer-controlled flights for the rest of the helicopters in your
squad.
♦ Each mission has a full suite of default options with which you can fly, so you
never have to change anything in the mission planner.
♦ Left-click the red power button to close the tactical planning display and return
to the Mission Planning Center. From the Mission Planning Center, left-click on
the Flight Helmet to fly the mission with your current changes to the Mission
Planner, or left-click on the waste basket or press q to trash the mission and
restore defaults.
♦ Another name for a mission is an Air Tasking Order (ATO).
Using the mission planner gives you control over the mission, not just for your
own helicopter but for an entire squadron. You can assign and arm helicopters,
move or delete waypoints, and even disregard certain objectives entirely to
concentrate your forces on the goals you consider most important.
Even if you have absolutely no interest in tinkering with the default mission parameters assigned by the computer, you are encouraged to at least check the
briefing for any special instructions.
Menu Bars
There are four menu bars across the top of the Mission Planner Screen: System,
Overlays, Map View, Waypoints. You can use them to turn certain map features
on/off. Whatever options you select load the next time you use the Mission
Planner.
1: ON THE BASE
1.11
Page 30

System. This bar contains only three options, one of which is found only in multi-
player games.
Overlays. Toggles the various layers of the map on and off, to make it easier to
notice significant details.
Map View. Controls the overall scale and appearance of the map display.
LONGBOW 2
1.12
FARPS. Toggles FARPS on and off. FARPS (Forward-Arming And Refueling
Points) are the starting points for each mission. There will usually be four
FARPs per mission, each of which can launch one two-helicopter flight (Lead
and Wingman). If you want to mass your forces so more than two helicopters
engage any given objective, you’ll have to assign a flight(s) from another FARP
to rendezvous at the objective.
Friendly Units. Toggles the friendly units (blue counters) on and off.
Enemy Units. Toggles the opposing forces’ units (red counters) on and off.
Air Threats. Toggles known air threats on and off. The rings around the air
threat counters indicate the maximum engagement range of the threat.
Phase Lines. Toggles the Phase Line on and off. These are the imaginary
lines indicating the interface between friendly-controlled and enemy-controlled
territory — the battle front, if you will.
Battle Areas. The map indicates the general operation area for each mission
(ATO). This option toggles those indicators off, as well as the arrow that indicates an escorted friendly’s direction of advance.
5 km Grid Lines. Toggles the grid lines on the map on or off.
Zoom In. Zooms in on the map, until maximum magnification is reached.
Zoom Out. Zooms out until the broadest possible scale is reached.
Satellite. When this option is selected, the map appears as a satellite photo of
the terrain.
Contour. When this option is selected, the map appears as a geographic
contour map.
NATO Icons. When this option is selected, units on the map are displayed
using standard military symbols.
Picture Icons. When this option is selected, units on the map are displayed
using pictographic icons depicting their function.
Exit. Closes the Mission Planner and returns you to the Mission Planning
center. This option is identical in function to the red power button.
Restore All Defaults. Erases all changes to the Mission Planner and restores
the computer’s original defaults.
Transmit FARP Data. (multi-player only, see
Multi-Player Guide
) Transmits
Page 31

Waypoints. This menu allows you to toggle the waypoints for each of the four
flights on and off.
Exit. The “X” in the upper right corner closes the mission planner.
Function Buttons
Each of these five buttons activates a different planning function: Briefing,
Tasking, Arming, Profiler, Rehearse.
Briefing. This button displays a (text) mission briefing. Briefing information
includes general situation reports for friendly and enemy forces, specific objectives for each ATO (Air Tasking Order — in general, each task to be performed
during the course of the mission), and a weather report. Click on the section
headings in the left panel to view each section.
Tasking. This button allows you to assign helicopters and crew to each flight.
Left-click on the colored text fields to change tasking options.
The
Inventories
box, at the top of the Tasking screen, displays the number of each
type of helicopter available at each FARP, and the number of each type of
weapon available for loadout (minus what is currently loaded).
Below the inventories are assignment boxes. Click on the helicopter type to display a list of available aircraft, and on the pilot and CPG boxes to display a list of
available personnel.
Note: In single-player games, you must assign yourself as the pilot of a lead aircraft.
In multi-player games, each flight must have a player lead pilot for each player
wingman pilot, and each aircraft must have a player pilot for each player CP/G,
before exiting the mission planner.
1: ON THE BASE
1.13
Flight 1. When this option is selected, waypoints for Flight 1 are displayed.
Flight 2. When this option is selected, waypoints for Flight 2 are displayed.
Flight 3. When this option is selected, waypoints for Flight 3 are displayed.
Flight 4. When this option is selected, waypoints for Flight 4 are displayed.
All. This option selects all flights and displays their waypoints.
None. This option de-selects all displayed flights.
TOTs. This option toggles the display of waypoint “Time On Target” numbers.
Restore Flight 1 Defaults. Restores this flight’s default waypoints.
Restore Flight 2 Defaults. Restores this flight’s default waypoints.
Restore Flight 3 Defaults. Restores this flight’s default waypoints.
Restore Flight 4 Defaults. Restores this flight’s default waypoints.
Page 32

Arming. Each team window contains a graphic of the team’s helicopters and all
currently available armaments for those helicopters. In most missions the
helicopters will be fully loaded with a computer-selected default loadout. The
weapons appear as brightly colored icons on the graphic. Left-click on the “-” box
in the inventory to de-select a weapon of that type. Once a space has been
opened, you can left-click on the “+” box of the desired weapon on the weapons
list to load a new weapon.
This function opens a window containing arming panels for each team. Left-click
the top tabs to switch teams.
Helicopters do not have to be fully armed for missions. Particularly on recon
missions where engaging the enemy is not part of the objectives, it may be
preferable to take a lighter, partial loadout.
Profiler. This function allows you to view a vertical profile of the land along a
given route.
LONGBOW 2
1.14
Page 33

Left-click on this button to activate the profiling tool, then left-click on any point on
the map, drag to any other point and release. This will create a green line connecting the two points. Abox will open, displaying the vertical contour of the land
along that line. To close the profile box, left-click on the close button. You can then
either draw another profile line, or left-click on the Profiler button to deactivate the
profiler tool.
Rehearse. When you left-click on Rehearse, animated counters representing
each flight will move along their mission path in the same relative time scale.
A control panel will appear in the menu bar, allowing you to control the speed of
the rehearsal.
The
Pause, Play
and
Quit
buttons of the control panel are self-explanatory.
Time
is a readout of the projected elapsed realtime from the beginning of the mis-
sion.
Speed
controls the speed of the rehearsal. Speed can be controlled with the “+”
and “-” buttons. The “+” button makes the rehearsal go faster (but less smoothly),
while the “-” button slows it down.
Mission Summary Bar
The bar along the left side of the map displays a text summary of the current
mission profile, sorted by FARP Teams and ATOs, including mission type,
assigned aircraft and crew personnel. For a list of the various possible mission
types, see Single Mission Building, p. 1.6. You can quickly edit your helicopter
type and seat position by left-clicking on the names. However, you must use the
Tasking window to check your weapons inventory.
The Map
The heart of the mission planner is the mission map itself. Most of the map
functions and symbols are explained
under Menu Bars, p. 1.11. Actions
involving friendly units are represented by a blue connecting line and a
blue box around the action area.
Enemy units work similarly, except
that the lines are yellow with
crosshairs.
∆ Recon or Strike Waypoint
∇ Landing Zone
All other waypoints
Line up/Release Waypoint (for
escort missions)
1: ON THE BASE
1.15
Page 34

♦ You cannot move, add or delete the first waypoint, or delete the last, numbered
waypoint.
♦ To move a waypoint, left-click and drag it to any point on the map.
♦ To add a waypoint, left-click on the small green box between two sequential
waypoints.
♦ To delete a waypoint, right-click on it to open the Waypoint Information
Window, and left-click delete.
♦ Right-click on any waypoint to open an informational window about it.
LONGBOW 2
1.16
Each pair of sequential waypoints in a mission has a small green box with a
“+” sign somewhere along the green flight path between them.
Once the new waypoint has been added, it can be moved to the precise
desired position. The other waypoints will be automatically renumbered to
account for the new waypoint’s presence.
Once a waypoint is deleted, the other waypoints will be automatically
renumbered, and a new flight path will be drawn between the new sequential
waypoints.
Waypoint Symbology
If the assigned action at a waypoint involves another unit — e.g., engaging an
enemy unit, or rendezvous with a friendly — a line appears connecting the
waypoint with that unit.
Moving, Adding and Deleting Waypoints
The most important function of the map, other than its informational content, is
its ability move, add or delete waypoints.
Page 35

1: ON THE BASE
1.17
Not only does the Waypoint Information Window display useful info, it also
allows you to assign new orders to new or pre-existing waypoints.
Waypoint Type. This is, broadly speaking, the reason for the waypoint’s existence.
The type is determined by the nature of the action assigned to the waypoint.
Checkpoint.
This is simply an arbitrary geographical point at which the flight
can wait, change course, or begin a new action.
Battle Point.
A waypoint at which the flight is expected to engage the enemy.
Observation Point.
A waypoint from which the flight may observe enemy movements.
Link-Up Point.
A waypoint at which the flight is to meet other air or ground units.
Release Point.
A waypoint at which the flight separates from units it has been
travelling with.
Landing Zone.
A waypoint where an aircraft is expected to make a landing
under fire and then resume its mission.
Take-off.
The starting point of the day’s mission — the FARP.
Landing Point.
A waypoint where an aircraft is expected to make a landing and
end its mission.
X / Y coordinates. An arbitrary designation of relative position, showing the dis-
tance from the lower left corner of the Mission Map, in kilometers, along the X and Y
axis.
Inbound Profile. This is the recommended elevation and speed from which to
approach the waypoint. Computer controlled flights will follow this profile on
approach. Left-click on the profile to activate a list of choices.
NOE.
Nap-of-the-Earth As close as possible to the ground, flying relatively slowly.
Contour.
Following the contours of the land, at moderate speed.
Waypoint Information Window
Page 36

Power Button
This button will exit you from the Mission Planner and return you to the MMPC,
from which you can fly or trash the current mission.
LONGBOW 2
1.18
Cruise.
Flying above terrain obstacles at full cruise speed.
Alt. Recommended altitude along the route.
Speed. Recommended speed of approach.
ToT. Time on Target. Estimated arrival time at this waypoint in minutes and
seconds from the start of the mission.
Loiter. This is the time the flight is expected to hover above the waypoint
before moving on. Loiter time in minutes and seconds can be set by leftclicking the “-“ and “+” buttons. Each left-click changes the loiter time by 10
seconds. Use sL to change the time by one-second increments and cL
to change the time by 60-second increments.
Action. This is, broadly speaking, what the flight is expected to do (or begin
doing) at the waypoint.
Attack Target.
The flight is to attack the designated target.
CAP.
Combat Air Patrol. The flight is to engage any enemy aircraft in the area.
CAS.
Close Air Support. The flight is to engage the enemy in support of a
particular friendly ground unit.
SEAD.
Suppress Enemy Air Defenses. The flight is to destroy air defense
units.
Escort Unit/Flight.
The flight is to escort a friendly unit or flight to the next way-
point.
Recon.
The flight is to survey the area for enemy activity.
Lase Target.
The flight is to paint a specific target with a targeting laser.
Deploy Troops.
The flight is to insert troops into a battle area.
Pick up Troops.
The flight is to evacuate troops from a battle area.
CAS Defensive.
The flight is to engage a particular enemy unit threatening
friendly forces.
Action Target. If the waypoint’s action involves another unit (either supporting
a friendly unit or engaging a specific enemy unit) this box shows you the unit
involved. Left-click on a map icon of the appropriate type while the waypoint
info box is open to make that unit the action target.
Page 37

Fly Mission
Left-click on the flight helmet to fly the mission you’ve configured (with your newly
loaded helicopter).
For information on the basics of flight, see Flight Training, Chapter 4.
Trash Mission
Left-click the wastebasket (or box) to abort the mission and return to the main
screen for the overhead view of the Base.
1: ON THE BASE
1.19
Loading Terrain Maps
When you go into the game and fly your first mission of a session, the program may
decompress the terrain maps appropriate to that mission and temporarily load them
onto your hard disk. These maps depend on what area of the world you are in, and
which missions you are flying. Successive missions are typically grouped together
onto the same map so as to minimize the need to load new maps.
The default area loaded after you install the game is the National Training Center
(used in the Training Campaign, Tutorial and Instant Action missions). If you fly a
mission in a different area, you’ll have to decompress a new map first. Whenever
you are about to decompress a new terrain area, the game lets you know via a
message plaque. Left-click
OK to confirm the decompression,
CANCEL to abort it. Terrain decompression can take a few minutes.
One way of minimizing decompression time is by using lower levels of terrain
detail. To adjust the terrain detail level, open the
OPTIONS menu and select WRAP-
PER. Then, lower the TERRAIN DETAIL LEVEL setting (options are LOW, NORMAL or
HIGH). This also takes up less space on your hard drive.
Jane’s Book
Fly Mission
Mission Planner
Trash Mission
Page 38

ENDING A MISSION
If you successfully complete your mission objectives, you can end the mission by
landing at your final waypoint, or by meeting one of the following conditions:
♦ You land at a Forward Air Refueling Point (FARP).
♦ You press aQ (quit mission).
♦ Your helicopter takes too much damage and explodes.
♦ You crash and are rescued or captured.
♦ You crash and die.
Landing at a FARP
Your last waypoint is always a FARP, but you can also land at other Forward Air
Refueling Points anytime you find them. However, the number of times you can
use these bases is limited — use them only if you haven’t achieved the mission
objectives. FARP supplies vary from location to location. If you land within 0.5 km
of a FARP, you’ll be presented with an option plaque:
CONTINUE Continue flying the mission.
REARM AND REFUEL Reload weapons and fuel, and resume the mission.
END MISSION End the mission and go to the Debriefing area.
Debriefing Area
Once you’ve completed the mission (whether you succeed, fail, live, die or are captured), you’ll go through a debriefing. The chalkboard points out your successes and
failures in the mission and outlines what targets you destroyed. If the mission was successful, “Success” or “Success+” appears on the chalkboard. If it was a failure, “Fail”
or “Fail–” appears instead. (The “+” means you had a highly successful mission, while
“–” means you failed miserably.) The “Friendly Fire” category keeps track of how many
friendly aircraft or ground vehicles/structures you damaged during the mission.
LONGBOW 2
1.20
Accept
Re-Fly
Mission
Mission
Planning
Computer
Page 39

The acronyms on the chalkboard represent target types, and the numbers beside
each indicate how many targets of that type were eliminated during the mission.
Your score appears on the board, and accumulates during your pilot’s career.
Important Note: If you activate
INVULNERABLE
or
UNLIMITED AMMO
options during a
mission, the current mission score will not be added to your total score.
MISSION PLANNER Select the Mission Planning computer to view a detailed
(Extended Debrief) summary of the previous mission, including a status break-
down of every objective in the mission, all targets hit, an
overall mission summary, and report on friendly casualties.
RE-FLY MISSION Select the flight helmet to fly the previous mission again. A
popup box will display and ask wish to change parameters.
Select
NO to fly with the same mission setup. Select YES to
got the Mission Planner and adjust your setup.
ACCEPT Select the curtain to exit the Debriefing Area. This returns
you to the main mission screen for that mission type. It
also saves your pilot’s progress for that mission.
Saving Your Progress
The game has an automatic save feature that saves your progress each time you
exit the Debriefing Area. It records scores and other mission stats for individual
and campaign missions to the active pilot’s stat sheet. (Instant Action Missions
don’t count.)
Whenever the active pilot is captured, killed or missing in action, he/she moves to
“Inactive” status. Since this is an important action that ends the pilot’s career, the
game prompts you with a plaque to confirm this action.
This happens regardless
of whether automatic saving is active or not.
If you confirm the action (by
pressing Y), that pilot will no longer be available. To preserve the pilot’s career,
press N and re-fly the mission, or select the flight helmet on the table in the
Debriefing area.
The
ALLOW AUTOMATIC SAVING feature may be turned off in the OPTIONS menu by de-
selecting the checkbox (it defaults to
ON).
♦ Leave the
ALLOW AUTOMATIC SAVING feature active if you don’t want to be
prompted to save after every mission. (If your pilot is killed/missing/captured,
however, you will be prompted anyway.)
♦ Deactivate the automatic save feature if you want to be prompted to save after
every mission, whether or not the mission was successful.
1: ON THE BASE
1.21
Page 40

Crashing and Surviving
Your mission ends if you crash or get shot down. If you crash during a battle and
survive, you’ll see your helicopter crash.
Dying
When you are shot down or collide with something at high speed (either terrain or
another aircraft), you’ll see your helicopter crashing. Afterward, you’ll find yourself
in the Debriefing Room. You’ll still get a debriefing and mission success/failure
message (and might become a posthumous war hero).
GUARD SHACK
Exit to Operating System
appears when this building is highlighted.
♦ When you’ve completed your missions for the day, left-click on the Guard
Shack to close
Longbow 2
and exit to
Windows 95
.
LONGBOW 2
1.22
Page 41

2
Cockpits
Page 42

Game vs. Reality...............................................2.1
How to Use This Chapter....................................2.2
AIRCRAFT OVERVIEW...........................2.3
Longbow Apache.........................................2.3
Kiowa Warrior.............................................2.3
Black Hawk................................................2.3
In-Flight System Keys........................................2.3
Game Options.............................................2.3
Pausing/Ending the Mission.........................2.4
Speeding up Travel......................................2.4
Radio..........................................................2.4
Overview: IHADSS.............................................2.4
Overview: Multi-Function Displays (MFDs)..........2.6
MFD Types ..................................................2.6
Overview: Targeting Systems..............................2.7
MASTER MODES ...................................2.9
Master Mode Settings........................................2.9
Upfront Display...............................................2.10
Black Hawk Indicator Lights .............................2.10
Longbow Fire Warning Lights...........................2.11
Physical Backup Gauges...................................2.11
IHADSS...............................................2.12
IHADSS Helmet System....................................2.13
IHADSS FLIGHT SYMBOLOGY...............2.14
Hover IHADSS Mode........................................2.14
Bob-Up IHADSS Mode......................................2.19
Transition IHADSS Mode...................................2.20
Cruise IHADSS Mode........................................2.21
Weapon-Specific Items.....................................2.22
MULTI-FUNCTION DISPLAYS ................2.24
Tactical Situation Display (TSD) MFD.................2.24
How It Works ............................................2.25
Adjusting TSD Items..................................2.27
TSD with Realistic FCR...............................2.27
Priority Fire Zones (PFZs) ..........................2.28
PFZs and Hellfire Missiles..........................2.28
Radar MFD ......................................................2.29
Air/Ground Radar Modes..........................2.29
Realistic FCROptions and Symbols.............2.30
Realistic FCR Operation Commands............2.31
Downloading Targets to the TSD MFD.........2.31
TADS MFD.......................................................2.32
Panning/Zooming.....................................2.33
TADSand Realistic FCR ..............................2.33
Realistic TADSOperation............................2.33
Weapons MFD.................................................2.33
Aircraft Survivability Equipment (ASE) MFD......2.35
Realistic Jammers.....................................2.36
ASE Autopage...........................................2.37
System MFD....................................................2.38
Engine MFD.....................................................2.38
Interpreting the Symbols...........................2.39
Flight MFD.......................................................2.40
Communications MFD.......................................2.40
Vertical System Display MFD............................2.41
Mast-Mounted MFD..........................................2.43
IN-FLIGHT NAVIGATION SYSTEM .........2.44
KIOWA DIGITAL MOVING MAP............2.45
TARGETING AND SIGHT SYSTEMS........2.46
Mast-Mounted Longbow FCR............................2.46
TADS...............................................................2.47
TADS and MMSCameras ..................................2.47
Pilot’s Night Vision System (PNVS/ANVIS).........2.48
Kiowa Pilot Display Unit...................................2.48
CO-PILOT/GUNNER COCKPIT...............2.51
Kiowa’s Left Seat (CP/G).................................2.51
Longbow’s Front Seat (CP/G)...........................2.51
IHADSS/MFDS/UPFRONT Display.....................2.52
Optical Relay Tube (ORT) Unit..........................2.53
Head-Out/Head-Down Displays.................2.53
BLACK HAWK ANALOG COCKPIT..........2.54
Cockpit Gauges.........................................2.54
VIEW CONTROLS ................................2.56
View Panning ............................................2.56
Inside Cockpit Views/Exterior Views ...........2.57
Target Views..............................................2.58
LONGBOW 2
2. COCKPIT/SYSTEMS
Page 43

2: COCKPITS
As systems and weapons technology grow increasingly complex, flying a
helicopter becomes a more difficult task. Pilots constantly have to scan 360° for
threats while keeping both hands and feet on the controls at all times. And over
the last few years, targeting, night vision and display systems have added new
gauges, switches, displays and controls.
The size of the helicopter cockpit and its panels hasn’t increased much to
accommodate these new avionic systems. This has necessitated a more
automated cockpit in which instrument readings are displayed onscreen and
system adjustments are controlled by a computer.
Before your first takeoff, read the following descriptions of the aircrafts’ instrumentation and systems. You can fly either the AH-64D Longbow Apache, the Longbow
without Radar, the Kiowa Warrior or the Black Hawk in any mission.
Game vs. Reality
The heart of
Longbow 2
is its level of realism. Actual Apache pilots have logged
hours testing the game, giving the development team valuable feedback on how
the helicopter should handle and how the weapons should act. Dozens of notebooks full of manufacturing specs, physics, operating characteristics, aerodynamics and other resources were used as well, resulting in a nearly perfect simulation
of helicopter flight.
Cockpit. The real Longbow Apache and Kiowa Warrior have separate cockpits for
the pilot and co-pilot/gunner, as does the game. The CP/G functions (target sighting, prioritization and countermeasures) are automated in the single-player game,
although you can also take direct control over them by adjusting game options. In
a multi-player game, a different player can man each position. The Black Hawk
has only one cockpit, but a door gunner station is modeled, which allows the player to take the part of a crew member manning one of the two pintle-mounted guns
on either side of the Black Hawk’s body.
Flight Dynamics. The dynamics in
Longbow 2
match the actual helicopter and
have been aeronautically designed to correctly respond to control inputs and
external physics. However, because piloting a helicopter — in reality and in this
game — is not easy, you have the option of setting the level of realism (and thus
difficulty) you prefer. (See
OPTIONS menu in the
Install Guide
for details.)
Terrain. The maps used in this game were generated from actual U.S. Geological
Survey maps and offer a variety of interesting combat environments. Perspectivecorrection technology also adds detail to the terrain and gives hills and canyons
smooth edges.
Weapons. In the Longbow Apache, the TADS system automatically rotates the
M230 Chain Gun (as the actual Longbow does) as you slew the camera. (You can
view this in the exterior camera views.) Additionally, the weapons for all aircraft
have realistic dynamics, graphical effects and operational ranges.
2.1
Page 44

How to Use This Chapter
This chapter covers the cockpit and system features of all three flyable helicopters — the Longbow,
Kiowa Warrior and Black Hawk. If a particular section applies to a specific helicopter, you’ll see its
name in bold letters, between horizontal lines like this.
Aircraft Overview, below, gives a description of the cockpits, IHADSS, MFDs,
master modes and other cockpit items in the three aircraft of
Longbow 2
.
Integrated Helmet Display and Sight System, p. 2.12, introduces the IHADSS,
the heart of the Longbow cockpit.
IHADSS Flight Symbology, p. 2.14, explains the intricacies of each IHADSS
mode and defines what each element in the display means. Relevant key
commands are given as well.
Multi-Function Displays, p. 2.24, describes the different pages you can bring up
in the small MFDs mounted in the cockpit dash of each aircraft. Each page gives
different information (such as targeting, navigation, damage, engine info, radar
returns, weapons stores, etc.).
Co-Pilot/Gunner (Front Seat) Cockpit, p. 2.51, introduces the co-pilot/gunner
cockpit and its functions in the Longbow and Kiowa, and gives detailed information about the Longbow’s Optical Relay Tube display.
Targeting and Sight Systems, p. 2.46, discusses the details of the Longbow’s
Target Acquisition and Designation System (TADS), Longbow Fire-Control Radar
(FCR), the Kiowa’s Mast-Mounted Sight (MMS) and the night vision systems used
by the aircraft.
Black Hawk Analog Cockpit, p. 2.54, covers those elements specific to the
Black Hawk cockpit which use traditional analog controls and gauges rather than
the more advanced digital electronics systems of the Longbow or Kiowa.
View Controls, p. 2.56, defines all the cockpit and external views you can use
during the game.
LONGBOW 2
2.2
Page 45

AIRCRAFT OVERVIEW
Longbow Apache
The AH-64D cockpit has three primary information display systems. The first is the
large, green display (IHADSS, or Integrated Helmet and Display Sight System)
overlaid on your forward view. The second consists of two small screens (MFDs,
or Multi-Function Displays) embedded in the cockpit. All the information you need
to fly and engage enemies is displayed in these two systems. The last system, the
Upfront display, gives damage and target information.
Kiowa Warrior
Because the Kiowa’s primary function is to be a scout craft, rather than a gunship,
it does not need the sophisticated radar targeting features of the AH-64D. It does
have an MFD with pages mirroring most of the applicable features of the
Longbow’s system, and it also has a head-up display for rocket and missile targeting information. The Kiowa cockpit features a centrally located, moving map
(shared by both positions) which displays a continually updating digital map of the
area for use as a navigation aid.
Black Hawk
A no-frills transport aircraft, the Black Hawk has no cockpit-controlled weaponry or
electronic targeting systems, and therefore it has no IHADDS or Upfront display. It
does have an MFD which can display a limited number of navigational and communications-related pages, but a significantly greater percentage of its flight information is displayed by old-fashioned analog gauges.
In-Flight System Keys
Here are some common, non-control keystrokes you may need to use during flight:
Game Options
aO
Activate the
OPTIONS
menu
This is useful if you want to adjust play options, audio settings, controls or your key mapping.
The option menu is completely described in the
Install Guide
.
aS
Toggle sound and speech ef fects on/of f
aN
Display an in-flight navigation map
See Mission Planner, p. 1.11, for information on how to interpret and use the map.
2: COCKPITS
2.3
Page 46

Pausing/Ending the Mission
aP
Pause the game
Left-click
OK
or press eto resume play.
aQ
Quit the mission
If you have not achieved your objectives, you fail the mission, but have the option to re-fly it.
aX
Exit to
Windows 95
Keep in mind that the current mission will not be saved if you exit from in-flight.
Speeding up Travel
t
Activate time compression
You can cycle through 2X, 4X and 8X. Use this when you want to get to where you’re going
quickly. If time compression is active, the current rate appears in the top right corner of the
IHADSS display.
st
Restore normal time (1X)
Radio
cS
Replay last radio message with mission-specific information
Overview: Integrated Helmet and Display
Sight System (IHADSS)
Longbow
Of the three helicopters in
Longbow 2
, only the AH-64D itself has an IHADSS
system. (The Kiowa has a simpler head-up display called the Pilot’s Display Unit
— see p. 2.48 for details.)
The IHADSS is a system that superimposes data onto a small eye display mounted
on the wearer’s helmet. In the game, it appears as a bright green assortment of
digital readings and electronic bar gauges in the middle of your viewscreen at all
times.
The IHADSS has four modes of operation —
Hover, Bob-Up, Transition
and
Cruise
. Each IHADSS mode best applies to a certain situation, such as when
you’re navigating or hovering. (See IHADSS Flight Symbology, p. 2.14, for mode
symbology.)
j
Cycle through IHADSS modes
LONGBOW 2
2.4
Note: Time compression does not apply to multi-player games.
Note: In multi-player games, only slave players can exit the game without end-
ing it. If the host player exits or quits, the game ends for all players.
Page 47

What is a Mode?
The term
mode
is used several times in this manual, and has different meanings
in different contexts. However, it always refers to
modes of operation.
Take care
not to confuse the different mode types. The following items are detailed later in
this chapter.
IHADSS modes The 4 IHADSS modes overlay dif ferent information on the IHADSS display in
your viewscreen. See p. 2.14 for more information.
j
Cycle through IHADSS modes
Missile launch modes You can fire Hellfire missiles using LOBL (lock-on-before-launch) or LOAL (lock-
on-after-launch) missile launch mode. See p. 5.18 for a full explanation.
i
Toggle between LOBL/LOAL missile launch modes
Radar modes The Longbow radar has both an air radar mode (which scans 360° for air
targets) and a ground radar mode (which scans a 90° arc in front of the helicopter for ground targets). See p. 2.29 for more information.
U
Toggle between air/ground radar modes
Master modes Each master mode automatically switches the above items to pre-determined
settings. When you select a master mode, you are effectively selecting the
IHADSS mode, MFD pages and missile launch mode with a single keystroke.
Choose a certain master mode based on your current situation (whether you’re
navigating, firing at ground targets, or searching for air targets). See p. 2.9 for
more information.
M
Cycle through master modes
2: COCKPITS
2.5
IHADSS mode Master mode
Missile launch mode
Page 48

Overview: Multi-Function Displays (MFDs)
Longbow, Black Hawk, Kiowa
The green-and-black cathode-ray tube (CRT) displays found in the cockpits of all
three helicopters are Multi-Function Displays (MFDs). Each displays a “page” of
information you access by pressing a key. You can access nine different pages in
the Longbow Apache. All available pages can be displayed in any MFD.
The Longbow has two MFD screens in the pilot’s position, and two more in the
CP/G cockpit. The Kiowa has one MFD for the pilot’s seat, and another for the
CP/G. The Black Hawk has only one MFD.
MFD pages provide a myriad of data, including information on targets, weapons,
navigational points, radar returns and system status.
,
Cycle through left MFDs (also controls Kiowa CP/G MFD, not applicable in Black Hawk)
.
Cycle through right MFDs (also controls Kiowa pilot MFD)
MFD Types
The page reference tells you where to go to find extensive details. (Details on
ranges for various displays apply when you play with certain realism options
active.) For a list of which helicopters display which MFDs, see the facing page.
Tactical Situation Display (p. 2.24) (TSD) Displays battlefield information, including waypoints, targets
and enemy lines.
Radar (p. 2.29) Shows ground targets in a 90° arc in front of the helicopter (ground
radar mode) or air targets in a 360° radius (air radar mode) at 2, 5,
10, 25 or 50 kilometer ranges. With
REALISTIC FOR RANGES
on, the ranges
are .5, 1, 2, 4 or 8 kilometers.
Target Acquisition and (TADS) Displays various TADS camera images and an image of the
currently selected target.
Weapons (p. 2.33) Displays the weapon load for the helicopter, as well as the current
sight system and active weapon.
Aircraft Survivability (ASE) Displays ground threat and missile icons in a 360° view around
your aircraft. It has ranges of 2, 5, 10, 25 and 50 kilometers.
System (p. 2.38) Displays the helicopter’s main systems and gives the status of system
components and the amount of fuel remaining.
Engine (p. 2.38) Gives information on engine torque, RPM, temperature, and fuel
remaining.
Flight (p. 2.40) Displays important IHADSS symbology, including altitude, airspeed,
torque and waypoint information.
Communications (p. 2.40) (Comms) Displays the current designations and callsigns of all units
currently in communications.
Vertical Situation Display (p. 2.41) (VSD) Found only on the Kiowa, this versatile page combines many of
the functions of the Longbow’s Flight and Weapons pages.
Mast-Mounted Sight (p. 2.43) (MMS) The Kiowa’s equivalent to the Longbow’s TADS MFD.
LONGBOW 2
2.6
Designation Sight (p. 2.32)
Page 49

MFDs Sorted by Aircraft
MFD Longbow Apache Black Hawk Kiowa
TSD ♦♦♦
System ♦♦♦
Comms ♦♦♦
ASE ♦♦
Radar ♦
TADS ♦
Weapons ♦
Engine ♦
Flight ♦
VSD ♦
MMS ♦
2: COCKPITS
2.7
Overview: Targeting Systems
What is TADS?
Longbow
TADS stands for Target Acquisition and Designation Sight, the basic sighting and
imaging system of the AH-64D. Essentially, it is a targeting system that uses
lasers, low-light optics and an infrared camera to identify and track targets. The
TADS system lets you lock onto a single target that is in front of you, and also
displays an image of your target inside the TADS MFD.
You can control the TADS camera that is mounted in your helicopter’s nose,
slewing it left or right (as if you were actually moving your head). When you look
left, the camera and the chin mounted gun turn to the left as well. TADS can
look 110° left or right, 30° up and 60° down.
The camera is only
part
of the TADS system; the entire system is quite complex
and uses camera images and a computerized targeting system.
See Target Acquisition and Designation Sight, p. 2.32, for more details on
this system and how to use the TADS camera.
See Target Acquisition Modes, p. 5.10, for information on targeting threats
using TADS.
Page 50

LONGBOW 2
2.8
What is FCR?
Longbow
FCR stands for Fire-Control Radar, a second type of target acquisition system
found only in the Longbow. When you bob-up from behind a hill, the bulbous
Longbow radar dome on top of the helicopter automatically scans either a 90°
pie-shaped arc (for ground threats ) or a 360° circle (for air threats) and
“memorizes” targets. The beauty of the FCR system is that you can store
multiple targets and then fire off missiles in quick succession. After launch, the
missiles lock onto individual targets identified by the FCR. (TADS, by contrast,
can only store/track one target at a time.)
While tracking ground targets with FCR target acquisition active, the safest way
to update radar information is to mask yourself in a valley or behind a hill or
other natural terrain, maintain a steady hover and slowly raise the helicopter.
Your radar automatically updates whenever the top of your mast has a line of
sight (LOS) to the target.
See Mast-Mounted Longbow Radar (FCR), p. 2.46, for more details on this
system.
See Target Acquisition Modes, p. 5.10, for information on targeting threats
using FCR.
What is MMS?
Kiowa
MMS stands for Mast-Mounted Sight. This is the primary sighting and imaging
system of the Kiowa Warrior. In broad terms, it is the functional equivalent of the
Longbow’s TADS. The MMS camera is located high up on the Kiowa’s rotor
mast (hence the name) giving the Kiowa the Longbow’s ability to take sightings
from beneath treelines or ridge lines. The MMS enjoys an arc of 190° to either
the right or left, giving it a functional radius of 360°, and a vertical range of 30°
up or down.
Page 51

2: COCKPITS
2.9
MASTER MODES
Longbow, Kiowa
You can switch your various modes, displays and sensors individually, or you can
use master mode keys to switch your systems to predetermined settings. Each
master mode activates a specific combination of MFDs, sensor system, missile
launch mode and IHADSS (Longbow).
In the Kiowa, the master mode key changes the MFDs and missile launch modes.
Master modes are useful because you can easily activate all the items you need
for a certain situation with a single command.
Four master modes exist — Navigation (NAV), Direct (LOBL), Indirect (LOAL)
and Air-to-Air (ATA). You can cycle through them with a common keystroke (M),
or select modes with a specific keystroke (s1, s2, s3 or s4). In
the Longbow, the name of the current master mode appears in the upper left corner of the IHADSS display.
Master Mode Settings
The chart below shows settings for each of the master modes. The leftmost
column shows the master mode name; the other columns show individual mode
settings. Each system’s details are described in the remainder of this chapter.
Longbow
IHADSS Left Right Target Missile
Master Mode MFD MFD Acquisition Launch
Mode Page Page System Mode
NAV Cruise ASE TSD TADS LOAL
DIRECT Transition TADS TSD TADS LOBL
INDIRECT Bob-Up WPN TSD FCR LOAL
ATA Cruise Radar (air TSD FCR LOBL
radar mode)
M
Cycle through master modes (Navigation, Direct, Indirect and Air-to-Air).
The following keys switch to a master mode immediately, and are useful when
programming a joystick with multiple buttons.
s1
Navigation (NAV) Use when navigating to a waypoint.
s2
Direct (LOBL) Use when firing missiles or rockets at ground targets while in Lock-
On-Before-Launch (LOBL) missile launch mode.
s3
Indirect (LOAL) Use when firing missiles or rockets at ground targets while in Lock-
On-After-Launch (LOAL) missile launch mode.
s4
Air-to-Air (ATA) Use when firing guns or Stinger missiles at air targets.
Page 52

Kiowa
Master Left Right
Mode MFD MFD
Page Page
NAV ASE TSD
DIRECT MMS VSD
INDIRECT MMS VSD
ATA MMS VSD
LONGBOW 2
2.10
Upfront Display
Longbow
This is the digital display in the top right section of your cockpit that gives information, such as system failures and a
mission clock. (See p. 5.21 for additional targeting information using the
UPFRONT display.)
U
Toggle Upfront display (between engine/rotor readings and target infor mation)
Black Hawk Indicator Lights
The red lights on the Black Hawk’s instrument panel give useful information
during flight. You have one light (the Master Caution) over the virtual horizon
gauge, and a strip of three lights in the center of the pilot’s cockpit. Glowing
lights are “on” and indicate the following conditions.
Master Caution Your chopper has taken damage
(Check the System MFD page.)
HDG (Autopilot 1) and NAV (Autopilot 2)
A
Autopilot is engaged
(Move cyclic/collective to disengage.)
ALT (Hover Hold)
H
Autopilot hovering is engaged
(Press again to disengage.)
Indicator Lights
Page 53

Physical Backup Gauges
Longbow, Kiowa
In the Longbow and Kiowa, the incorporation
of electronic systems and helmet displays
have reduced the number of physical gauges
and switches to under 200. Most of the flight
information has been moved into the
IHADSS and MFD displays.
The indicators and readings you’ll need most
appear in electronic form. However, several
physical, secondary gauges are also in the
cockpit in case of cockpit electronics failure.
The following physical backup gauges
appear in the Longbow and Kiowa cockpits:
Airspeed indicator. Dial gauge showing
how fast the helicopter is traveling in knots.
(A knot is a nautical measure of speed,
approximately equal to 6,076 feet/hour. This
distance is equal to a nautical mile.) The
indicator scale ranges from 0 to 250 knots.
2: COCKPITS
2.11
Longbow Fire Warning Lights
The left side of the Longbow cockpit has three lights, that indicate engine fires.
Engine 1 Fire Your port (left) engine is on fire.
APU Fire Your auxiliary power unit (APU) is on fire.
Engine 2 Fire Your starboard (right) engine is on fire.
In case of a fire, use your fire extinguisher (available only once per mission), or
shut down the engine that is on fire.
cF
Activate fire extinguisher (once per mission)
c[, c]
Shut down left/right engine
APU Fire Engine 2 FireEngine 1 Fire
LONGBOW
GAUGES
Artificial
Horizon
Airspeed
Indicator
Altimeter
KIOWA
GAUGES
Artificial
Horizon
Airspeed
Indicator
Altimeter
Page 54

Altimeter. Dial gauge giving the helicopter ’s altitude in feet above sea level (
not
height above ground level). Each clock-wise revolution of the needle indicates
+1000 feet of altitude, and each counter-clockwise revolution indicates -1000 feet.
The counter in the center of the dial increments or decrements one digit for each
revolution.
Artificial Horizon. Dial gauge using a horizontal line to display the helicopter’s
attitude relative to the horizon. This line remains parallel to the horizon regardless
of the craft’s pitch or roll angles.
The Black Hawk makes use of many more physical gauges — see p. 2.54.
Using PNVS / ANVIS (Night Vision Systems)
If you’re having trouble flying at night or in bad weather, try activating the nightvision system. The Longbow Apache uses Martin Marietta’s PNVS (Pilot Night
Vision System) while the Kiowa and Black Hawk use the ANVIS/HUD system from
AEL. These systems make flying easier by using the night vision camera to
provide a passive light amplification image of the terrain. Use night vision if you’re
having trouble seeing the ground. (PNVS and ANVIS are not targeting systems —
they are used solely for flying the aircraft.)
P
Toggle the night vision system on/of f
INTEGRA TED HELMET AND DISPLAY
SIGHTING SYSTEM (IHADSS)
The IHADSS is used only in the Longbow Apache, not in the Kiowa or Black Hawk.
The Longbow Apache’s Integrated Helmet and Display Sighting System (IHADSS)
allows the pilot and co-pilot/gunner to monitor navigational and targeting information on a small eyepiece display mounted on their helmets. (In the game, the
“eyepiece” is what you see in the viewscreen.) The IHADSS combines readings
from several subsystems into a single optical screen.
Using the IHADSS
This integrated helmet system is automatically on whenever the helicopter is in
operation. However, you’ll need to switch IHADSS modes during flight.
The IHADSS has four modes of operation — Hover, Bob-Up, Transition and
Cruise. The name of the current IHADSS mode appears in the upper left corner
of the display. The information presented changes slightly between the different
modes, and also varies with different weapons.
j
Cycle through IHADSS modes
LONGBOW 2
2.12
Page 55

Reading IHADSS information. Everything on this screen is vital, and under-
standing your overall environment is critical to your survival. However, don’t be
overwhelmed by the numbers and lines sitting in the middle of your screen — the
next section (IHADSS Flight Symbology) explains it all.
Adjusting the IHADSS. You can adjust the brightness of the display. The
brightest setting is neon-green, the medium setting is dark-green, and the darkest
setting is black. Change the brightness if you’re having trouble distinguishing
IHADSS items in the forward view.
aI
Brighten IHADSS display (changes to bright green)
cI
Dim IHADSS display (changes to dark green, then black)
Note: IHADSS information is also superimposed onto the 2(left cockpit),
3
(right cockpit) and 4(virtual cockpit) views.
2: COCKPITS
2.13
The following keys switch to an IHADSS mode immediately, and are useful if
you’re programming a joystick with multiple buttons.
s5
Activate Hover IHADSS mode (use when hovering)
s6
Activate Bob-Up IHADSS mode (use when popping out/firing from a masked position)
s7
Activate Transition IHADSS mode (use when taking off, landing, or going from a hover to
forward flight)
s8
Activate Cruise IHADSS mode (use during for ward flight)
IHADSS Helmet System
Both Longbow crew members wear the Honeywelldeveloped IHADSS, which consists of a helmet and
display eyepiece, a graphical adjustment panel, two
electronic units, and two sensor units. The sensor
units are connected to the helmet by two cables that
transmit information about the helmet’s current position and the line of sight for each crew member.
The helmet display unit (HDU), or eyepiece, is
attached to the right side of the helmet and can be flipped vertically when not in
use. Acathode-ray Optical Relay Tube inside the eyepiece projects symbology
and images onto a monocle sight. The display background is a grayscale (10
shades of gray), composite image gathered by infrared camera systems.
Targeting information from the TADS is then superimposed on this image, along
with navigational information, such as compass heading, attitude lines, velocity
vector, vertical speed and altimeter reading.
The IHADSS gives vital flight information to both occupants, and allows the co-pilot/
gunner to aim the guns by moving the helmet. It also allows the pilot to process
multiple pieces of information in a single glance, instead of constantly dividing attention between the dashboard and external environment. This is a major asset during
combat, especially when ground fire and enemy aircraft pose imminent hazards.
Page 56

IHADSS FLIGHT SYMBOLOGY
Longbow
The Integrated Helmet and Display Sighting System projects assorted navigational
and targeting information onto a display. It also displays symbols generated by the
Target Acquisition and Designation Sight system and uses an infrared nighttime
display (the Pilot Night Vision System). Information from the flight instruments,
navigational system and weapons system is overlaid on this video display and
appears in a small reticule mounted on the helmet.
IHADSS Mode Indicator. The name of the current IHADSS mode
appears in the upper left corner as
HOVER, BOB-UP, TRANSITION or CRUISE.
Elements that appear in each mode are discussed in this section.
j
Cycle through IHADSS modes (see p. 2.14 for individual keys).
Master Mode Indicator. The name of the active master mode
appears in the upper right corner of the display as
NAV, DIRECT,
INDIRECT or ATA.
M
Cycle through master modes (see p. 2.9 for more details).
Hover IHADSS Mode
s5
Activate Hover IHADSS mode (use when hovering).
Sight Reticule. Line of sight cross hairs in the center of the
display mark the center of your straight-ahead view. (Asimilar reticule
with dashed lines appears when a target has been selected. Take
care not to confuse the two.) When firing guided weapons, line up the
solid reticule with the target. The appropriate weapon indicator will
turn solid, indicating that you have a valid weapon lock and can let loose with your
missiles or rockets (see Weapon-Specific Items, p. 2.22).
LONGBOW 2
2.14
Magnetic FCR Sweep Alternate Acceleration Command
Heading Tape Indicator Sensor Bearing Cue Heading
FCR Field of View Field of Skip/Slid High-
Centerline Marker Regard Box Lines and Ball Action Display
1
4
17
1 2
18
13
6
7
20
8
9
3
12
16
11
15
19
14
5
10
2
3
IHADSS Mode Indicator
Engine Torque Readout
True Airspeed Readout
Navigation Waypoint
Information Readout
Sight Reticle
Master Mode Indicator
Velocity Vector
Rate of Climb Scale
Radar Altitude
Analog Altimeter Scale
Page 57

Magnetic Heading Tape. Scrolling tick marks on the top of the
display show the four compass directions — N, S, W and E. Other
indicators (the command heading and the FCR radar heading) are
overlaid on the tape.
A, S
Use the cyclic to change headings — the tape scrolls accordingly. (At speeds below 60 knots,
use the rudder pedals —
[
or ].)
Command Heading. This small open carat on the magnetic
heading tape (4) shows the compass heading of the next
programmed waypoint. Center this chevron in the middle of the
heading tape when you’re flying to the next navigational point.
A, S
If the chevron appears to be stuck on the left or right side of the heading tape, turn to move it
toward the center of the heading tape. (Again, you can also use
[
or ]at slow speeds.)
Radar Altitude. This digital readout shows the helicopter’s altitude
in feet above ground level, as long as altitude remains below 1420
feet. It changes in 1-foot increments. When flying above 1420 feet,
rely on your barometric altimeter (25 – see Cruise IHADSS Mode,
p. 2.21).
=, -
Adjust collective to change altitude (at low speed, or while hovering)
W, Z
Move the cyclic up/down to change altitude (while cruising)
Analog Altimeter Scale. An analog version of the radar altitude
indicator, this bar gives the helicopter’s altitude in feet above ground
level (which is not necessarily equal to feet above sea level). As
altitude increases, the thin bar grows taller; as the helicopter
descends, it shortens. Once you climb above 200 feet, this altimeter
disappears.
The five small tick marks that extend to the right (at the bottom of the scale) indicate 10-foot increments up to 50 feet. The other tick marks that extend to the left
apply to the rate of climb scale (13 – see p. 2.17).
If autopilot is active, another number appears above the altitude reading. It gives
the current autopilot altitude setting and changes if you alter it using cW, Z.
True Airspeed Readout. This digital readout indicates the current
forward speed of the helicopter. It doesn’t take wind or sideways/
backward motion into account. This gives the true airspeed (from 0 to
250 knots) in a numerical display. However, it doesn’t reflect accurate
speeds when you’re traveling in a direction other than straight ahead.
W
Push cyclic forward to increase airspeed (but not too far, or you’ll descend)
Z
Ease up on cyclic to reduce airspeed (or pull up sharply)
If autopilot is active, another number appears above the airspeed reading. It gives
the current autopilot airspeed setting and changes if you alter it using cA, S.
2: COCKPITS
2.15
4
5
6
7
8
Page 58

Navigation Waypoint Information Readout. This readout gives
the currently selected waypoint number (such as W06) and the
remaining distance in kilometers. Atime to arrival also appears (in
Cruise and Transition IHADSS modes).
When you specify a new waypoint, navigation information changes. Your current
waypoint appears as a flashing circle in the TSD MFD (see p. 2.24), and as a
number in the IHADSS display. The heading to the next waypoint appears as an
open carat that scrolls along the bottom of the heading tape.
W
Select next waypoint.
sW
Select previous waypoint.
aN
Toggle in-flight Navigation map (to view waypoints and see mission information)
See Mission Planner, p. 1.11, for map details.
High-Action Display. The text fields surrounding the
large box at the bottom of the IHADSS are collectively
called the high-action display. It gives weapon and sensor
information. The high-action display also appears in Head-Down view (see Optical
Relay Tube Unit, p. 2.53), along with current airspeed and altitude readings.
Weapon Type. FFAR rocket (
RKT), Multi-Purpose Sub-Munition rocket (MPSM),
Hellfire (
MSL) or Stinger missile (ATA)
b
Cycle through weapon types (except guns)
Missile Launch Mode. Lock-on-before-launch (LOBL) or lock-on-after-
launch (
LOAL) missile launch mode (see Engaging Targets with
Hellfires, p. 5.18).
i
Switch between LOAL and LOBL missile launch modes
Weapon Inhibit. Weapon launch parameters appear here (see p. 5.20).
Sight Status. This field tells whether the laser or FCR is transmitting. The text
field changes, depending on the active targeting system, and whether or not
you have realistic options selected. If FCR is active and you’re playing with
realistic fcr options,
FCR XMIT appears. (If you’re playing with simple options,
FCR ACQ appears instead.)
When you’re playing with the
REALISTIC TADS option, if the TADS system is active and
the laser is on,
TRGT appears. Whenever the laser transmits, an asterisk flashes
next to this text. (If you’re playing with simple options,
TADS ACQ appears instead.)
h
Switch between TADS and FCR.
Range. Range-to-target in kilometers (such as 1.2). The letter “A” means that
range has been automatically calculated by the computer. The range field
switches formats, using the most accurate method available.
LONGBOW 2
2.16
A##.# TADS triangulation method of calculating range (inaccurate)
R##.# FCR range (more accurate, but only updates once per scan). See
Realistic FCR Operation Commands, p. 2.31.
*#### Laser range (most accurate). See Laser Operation, p. 5.22.
XXX.X No range information is currently available.
9
10
Page 59

2: COCKPITS
2.17
Advanced Hover IHADSS Mode Elements
Alternate Sensor Bearing. The alternate sensor bearing is a
small, solid chevron that displays along the bottom of the heading
tape (4). This symbol indicates the direction of the TADS sensor
relative to the line of travel of the helicopter.
The field of view marker (16) inside the field of regard box (15) moves to reflect
this position, which can move +30° to -60° vertically and 220° horizontally.
If you’re using TADS target acquisition, this indicator shows the bearing of the
currently selected target. As long as you keep TADS active, this chevron “sticks”
to the heading tape and scrolls left or right as the tape moves. If FCR is the
active target acquisition system, it remains locked on the currently designated
target, because the FCR can have multiple targets.
8, 2,
Slew TADS camera (view current line of sight in TADS MFD).
4, 6
Numpad
4
Activate Virtual Cockpit view (you can slew in this view as well).
a
+ Joystick If you’re in the 4 view, you can also use the joystick to slew the camera.
Note: When you’re using FCR target acquisition, you can’t move the TADS
camera. (Press
h
to switch between TADS and FCR.)
FCR Sweep Indicator. This solid, double arrow scans from left
to right and shows the current scanning direction of the mastmounted radar. The radar gathers information on targets identified
during “bob-ups” and transmits this information to the FCR target
acquisition system.
Rate of Climb Scale. The triangular indicator on this tick-mark
scale describes how fast the helicopter is climbing or descending. It
slides vertically along the left side of the scale, moving up when the
rate of change is fast and down when it’s slow. The ticks on the
tape correspond to 100-foot-per-minute changes in altitude.
Skid/Slip Lubber Lines and Ball. The pair of lines (lubber lines)
indicates the center position for the skid/slip ball indicator, much like the
lines on a builder’s level. Skidding, also known as slipping, occurs
when the helicopter is traveling in a forward direction, but slides side-
ways because of forward momentum gained from the previous heading.
The small circle that moves along the lubber lines is called the skid or slip ball.
Like the air bubble in a level, this ball resides between the skid lubber lines
when the helicopter is traveling in a true, forward path. When the helicopter slips
left or right, this circle slides accordingly.
11
12
13
14
Page 60

LONGBOW 2
2.18
Field of Regard Box. The large rectangle centered
along the bottom section of the IHADSS display is the
field-of-regard box. It represents the 220° x 90° field of
view of the TADS camera. When you pan the TADS
camera left or right, the small rectangle inside this box (the field of view marker)
moves accordingly. (See Alternate Sensor Bearing (11) for camera slew commands.)
Field of View Marker. This small rectangle inside the field of
regard box (15) indicates where your TADS camera is pointed in
relation to the current flight path of the helicopter. The rectangle
describes the TADS camera’s current field of view. (This box simu-
lates what the CP/G can see in reality without moving the TADS sensor package.)
FCR Centerline. This centerline appears in the field of regard
box (15) and shows the current bearing of the target locked by the
Fire-Control Radar. A small horizontal line across this centerline
shows the elevation of the radar in relation to the field of regard.
Velocity Vector. This line between the center of the sight
reticule and a small dot is an overhead, graphical representation of
the helicopter’s lateral velocity. It takes both speed and severity of
motion (such as turning sharply) into account. The faster the heli-
copter is traveling, the longer the line. It points in the direction the helicopter is
traveling.
Acceleration Cue. This mobile circle is similar to the velocity
vector, only it provides a graphical position that takes into account
the helicopter’s current acceleration. The higher the rate of acceleration, the further the circle moves away from the center of the
viewscreen.
Engine Torque Readout. This digital indicator shows how
much torque is being output by the engines, and displays the
highest torque of the two engines. Atorque value of 98% or greater
causes this box to gain a solid border, alerting the pilot that the
torque limit has been exceeded.
You can over torque for a while but it adds excessive wear and tear to the heli-
copter.
-
If torque is too high, reduce collective.
15
16
17
18
19
20
Page 61

Bob-Up IHADSS Mode
s6
Activate Bob-Up IHADSS mode (use when you’re hidden and need to bob-up to fire)
This IHADSS mode includes all items that appear in Hover IHADSS mode, but
also incorporates the hover position box and a second command heading.
Hover Position Box. This octagonal box originates at the center
of the viewscreen and gives an “overhead” view of approximately an
8' x 8' area of ground. (The entire IHADSS display, by comparison,
represents a 44' x 44' area.) The sight circle in the middle of the
IHADSS display represents the helicopter’s position. As the helicopter drifts, the
octagonal box moves around onscreen and indicates how far you’ve strayed from
the original hover position.
Try to keep the octagon centered over the sight reticule. The easiest way to do
this is to move your flight control device
toward
the octagon. If the box is to the
left and up, for example, press the joystick left and up. With a little practice, you’ll
be able to anticipate the box’s movements and keep your helo in the middle of it.
If this proves too difficult, use the hover hold feature. (You must be flying at a
speed below 15 knots to activate this autopilot function.) You can also re-center
the octagonal box on your sight reticule.
H
Toggle hover hold (maintain current altitude and hover)
s6
Press the Bob-Up IHADSS mode key again if you drift too far and want to re-center the box
over the sight reticule
2: COCKPITS
2.19
Advanced Bob-Up IHADSS Mode Element
Bob-up Command Heading. During bob-up maneuvers, a
second chevron appears on the magnetic heading tape (4). This
represents the helicopter’s heading as it was when the Bob-Up
IHADSS mode was engaged, and it remains on that heading until
the pilot switches the IHADSS mode.
Bob-Up
Command
Heading
Hover Position Box
22
21
22
21
Page 62

Transition IHADSS Mode
s7
Activate Transition
IHADSS mode (use when landing or moving from a hover into forward flight)
The Transition IHADSS mode displays all the information in Hover IHADSS mode,
along with two additional items — the horizon line and flight path indicator. The
estimated time to arrival for the current waypoint also appears to the left of the
High Action Display (10).
Horizon Line. Whenever the helicopter is flying level,
this dashed line is flat and centered on the sight reticule in
the center of the viewscreen. When you perform a pitch
maneuver, the line moves up or down to reflect the angle
of climb/descent. Similarly, the line “tilts” as you bank the
helicopter left or right.
Flight Path Indicator. The flight-path indicator (FPI) is a small
circle with tick marks extending up and to the left and right. It
indicates the helicopter’s current direction of travel and moves up,
down, left and right as you maneuver.
LONGBOW 2
2.20
Flight Path Indicator
Horizon Line
24
23
24
23
Page 63

Cruise IHADSS Mode
s8
Activate Cruise IHADSS mode (use when cruising in forward flight)
In Cruise IHADSS mode, the IHADSS displays all the information found in
Transition IHADSS mode, except that the horizon line (23) disappears. Instead,
there are three additional readouts — barometric altitude, pitch ladder and bank
angle indicator. The estimated time to arrival for the current waypoint also appears
to the left of the High Action Display (10).
Barometric Altitude. Since the radar altitude indicator (6) only
reads up to 1420 feet, another device is necessary at higher
altitudes. The barometric altitude readout is a digital display that
gives altitudes from 0 to 30,000 feet above sea level. To figure
altitude, it compares the current air pressure to a pressure calibrated at sea level.
(Air pressure decreases as altitude increases.)
Pitch Ladder. The pitch ladder is a series of horizontal lines that
scroll vertically in the center of your view. It describes both vertical
movement and bank/roll angles. When the craft dives, the lines scroll
upward; during ascents, they scroll downward. The pitch ladder is
also capable of rolling 360° (the lines tilt to reflect the bank angle).
Pitch ladder lines above the horizon are solid; those below the horizon are
dashed. (The small tips on the ends of the lines point toward the horizon.)
Bank Angle Indicator. This indicator is a curved scale that
usually displays 30° to the left and right of center in 5° increments.
The same command heading mark (lubber line) that marks the
heading on the heading tape (4) also marks the bank angle of the
helicopter.
2: COCKPITS
2.21
Bank Angle Indicator
Weapon Constraint
(varies between
weapon types)
27
25
26
27
25
26
Barometric Altitude
Pitch Ladder
Page 64

Weapon-Specific Items
Longbow
See Kiowa Pilot Display Unit, p. 2.48, for information on weapon constraints in
the Kiowa.
Whenever you’re using certain weapons, additional items are added to the
IHADSS display. It doesn’t matter which IHADSS mode is currently active —
these elements are dependent on the current weapon type. Ashort name for the
active weapon type appears next to the High-Action Display box (10) —
MSL for
Hellfire missiles,
RKT for rockets, MPSM for multi-purpose submunition rockets, and
ATA for Stinger missiles.
b
Select active weapon (cycle through Hellfires, rockets and Stingers)
cM
Toggle weapons between ARM (active) and SAFE (inactive)
z
Fire active weapon
e
Fire cannon
When the weapon system is active, targeting information is gathered and displayed
by either the TADS or FCR. Much of this information appears in the TADS MFD
as well (see p. 2.32).
Target Reticule. These small, dotted cross hairs mark the location of
the current target.
Hellfire Missile Constraint. Specific to Hellfire missiles, this box indicates the direction in which you need to move to align the helicopter
with the current target. You must maneuver the helicopter to line up
the box with the target reticule.
The computer applies certain constraints to the Hellfire locking mechanism. When
you align the dashed cross hairs with the target, the missile has a valid lock, and
the constraint border switches from a dashed line to a solid one. The constraint
box moves in the direction of the target. For example, when the box drifts to the
right, it indicates that the pilot needs to look/steer right to bring the target into view
and acquire a lock.
Basically, what you need to do is maneuver so that the target reticule (shown
above) is inside the weapon constraint symbol. When you do so, you’ll see
VALID
LOCK
on the screen. This indicates that you have a lock and can fire your weapon.
LONGBOW 2
2.22
Page 65

Rocket Steering Cursor. Specific to 2.75-inch Folding Fin Aerial
Rockets, this I-beam shows what direction the helicopter needs to
move to meet the constraints for firing FFARs. The rocket constraint
only displays if this rocket type is active, and its operation is similar to
that of the Hellfire missile constraint box. The steering cursor’s purpose is to help
the crew members look/steer toward the target and bring it into view for a lock. It
won’t allow a lock if safety or performance is inhibited, or if the Master Arm indicator is set to
SAFE (press cM to arm weapons). When the helicopter is correctly
aligned, the I-beam switches from dashed to solid, indicating that you have a valid
lock and can fire a rocket.
Your FFAR launcher pivots up and down when you’re locked onto a target. This
allow the pilot to hit a target anywhere vertically on the ‘I’ beam reticule.
ATA Missile Constraint Circles. When the air-to-air (ATA) missile
system is active, two concentric circles appear on the display and
indicate where the missile seeker head is looking. The circles are
solid if all performance and safety constraints have been met, and
are dashed if they have not.
Missile Timer. When you launch a Hellfire missile, a missile timer
appears in the High-Action Display (10) on the IHADSS, counting
down in seconds. When it reaches zero, the missile strikes the target.
2: COCKPITS
2.23
Page 66

MULTI-FUNCTION DISPLAYS (MFDS)
All three helicopters use MFDs — each description lists the appropriate helicopters that use that display.
One of the defining features of the current generation of combat helicopter is the
addition of MFD displays in the cockpit. In the Longbow, two CRTscreens exist,
and both can independently display nine different pages of information (see MFD
Types, p. 2.6).
Tactical Situation Display (TSD) (p. 2.24) Aircraft Sur vivability Equipment (ASE) (p. 2.35)
Radar (RAD) (p. 2.29) System (SYS) (p. 2.38)
Target Acquisition Designation Sight (TADS) (p. 2.32) Engine (ENG) (p. 2.38)
Weapons (WPN) (p. 2.33) Flight MFD (p. 2.40)
Communications (Comms) (p. 2.40)
Kiowa Only
Mast-Mounted Sight (MMS) (p. 2.43) Vertical System Display (VSD) (p. 2.41)
In the actual helicopters, the pages are accessed via buttons around the perimeter of the screen. In the game, you use keystrokes.
,
Cycle through the left MFDs (in the order listed above).
(In the Kiowa, this cycles the CP/G MFD.)
s,
Cycle through the left MFDs in reverse order.
.
Cycle through the right MFDs (also the Kiowa Pilot MFD).
s.
Cycle through the right MFDs in reverse order.
M
Switch master mode (changes both MFD displays).
MFDs are explained in order of usefulness, not order of appearance in the game.
Tactical Situation Display (TSD) MFD
Longbow, Kiowa, Black Hawk
The Tactical Situation Display, or TSD, is one of the most vital MFD pages during combat situations. It provides various battlefield information, including waypoints, enemy
positions, air threats, anti-aircraft threats, priority fire zones, enemy lines and more.
LONGBOW 2
2.24
EXAMPLE 1
Priority Fire Zone
Enemy Line
Enemy Radar
Waypoint
Information
Radar Range
Ground Threat
Waypoint
Range to Target
Time to Arrival
Page 67

Although the Black Hawk does not have a targeting system, it can still receive
TSD information through its communications system from other helicopters and
the ABCCC. Since the Black Hawk has no cockpit-controlled weaponry, the targeting functions of the TSD are fairly useless, although the targeting readouts on the
MFD are still useful for recognizing and avoiding threats.
On the Longbow, the heart of the TSD is the cone-shaped radar display that
reflects the FCR scanning area. This display receives its target information from
either the TADS or FCR target acquisition system.
How It Works
The TSD display emanates from the helicopter’s nose (the bottom of the “V”) and
extends 45° to either side for a 90° sweep. (The Radar MFD appears similarly in
ground radar mode — see p. 2.29.) The
scanning limit
of the radar scan appears
as two solid, angled lines. Any enemy craft or vehicles in this cone can be picked
up by the radar and display as TSD icons.
Targets picked up by the radar appear as small icons on the radar (see next
page). Priority fire zones are notated as
PF0, PF1, PF2, etc., and show outlines
around areas you’ve designated as important target areas. Labeling is slightly different in multi-player games. See the
Multi-Player Guide
for details.
Radar Range. Range of the applicable radar.
y
Cycle through radar ranges (2, 5, 10, 25 or 50 kilometers).
The currently selected range appears in the upper right corner of the display.
Alternatively, left-click (
L
) on the current range in the MFD to increase range, right-click to
decrease it.
Targets. Once identified threats (air or ground) move within your radar range,
they switch from small boxes to graphical symbols on the TSD MFD. You can leftclick directly on a threat symbol to lock onto it. SAM and AAAthreats also display
on the Aircraft Survivability Equipment (ASE) page.
2: COCKPITS
2.25
If the Realistic FCR Range Option is selected (see
Option Menus
in the Install
Guide) it is possible to set different ranges for the TSD and Radar. Set TSD
range with y and increase/decrease the Radar range with Z and X.
EXAMPLE 2
Threat Range
Current Target
Current Target Acquisition
System
Declutter Status
Scanning Limits
Page 68

Each category of threat has its own symbol. When REALISTIC FOR SYMBOLOGY is
active, the symbols change. See p. 2.30 for realistic FCR symbols.
Light Structure Heavy Structure
Light Armor Heavy Armor
Light Wheeled Vehicle Heavy Wheeled Vehicle
Light Artillery Heavy Artillery
Airplane Helicopter
Ground Threat (ASE) Out-of-Range Target
Range to Target. The range in kilometers to the locked target appears in the
bottom right corner of the display.
Waypoints. Mission waypoints (if in range) appear as circles with numbers; the
currently selected waypoint flashes. Lines showing your flight route appear in the
display. The box in the lower left corner gives IHADSS information – the selected
waypoint (such as W03) and the distance in kilometers. Time to Arrival also
appears.
Enemy Lines. Linear arrangements of brackets indicate enemy lines. When you
cross these boundaries, your CP/G informs you that you’ve flown into enemy territory.
Current Target/Air Threats. Locked targets have a bright diamond outline.
Priority Fire Zone. Green boxes are PFZs, or primary target areas that you cre-
ate by right-clicking and dragging the mouse (see next page). Your targeting system prioritizes targets in these zones, allowing you to fire multiple Hellfires. Each
missile tracks a different target when you’re in FCR target acquisition mode.
Enemy Radar. When an enemy threat activates its radar system, a solid line
emanates from its icon, indicating that you are being tracked by its radar. If the
line starts flashing, it means the target has gained a lock on you and has fired a
missile.
Threat Range. Large arcs or circles represent effective ranges of SAM sites.
LONGBOW 2
2.26
Page 69

Adjusting TSD Items
In the TSD display, you can adjust scale, designate targets, and declutter symbology.
Range to Target. This is the distance to the current target in kilometers and
appears in a box in the bottom right corner.
y
Cycle through TSD ranges
Alternatively, left-click (
L
) on the current range in the MFD to increase TSD range, right-click to
decrease it
Declutter Status. You can “de-clutter” the TSD by displaying only navigation
information (
NAV), target information (TGT) or both (ALL), in that order.
D
Declutter symbology (cycle)
Current Target.The current target has a diamond around it. With TADS target
acquisition active, you can only cycle through targets in your line of sight. With FCR
active, all detected targets appear, whether you can physically see them or not.
T / sT
Cycle through enemy targets (forward/backward)
Y / sY
As above, but cycles only through friendly or neutral targets
L
Lock onto the target under the mouse cursor in the TSD MFD
Note: If the
REALISTIC TARGETING
option is active, then Tcycles through all targets.
See the
OPTIONS
menu section of the
Install Guide
for details.
2: COCKPITS
2.27
TSD with Realistic FCR
With REALISTIC FCR OPERAITON active, the display changes slightly. The 90-degree
arc is replaced by a pie-shaped arc (in ground mode) or circle (in air mode) that
outlines the new scan area. You control the angle and size of this scan using
Numpad keys. See Realistic FCR Operation Commands, p. 2.31.
Page 70

LONGBOW 2
2.28
Priority Fire Zones (PFZs)
It is useful to select certain zones as target priorities. These zones let you fire up
to 16 Hellfire missiles (your entire bank) one after the other. Each missile tracks
a single target, allowing you to simultaneously engage 16 targets.
By creating a PFZ, you instruct your targeting system to acquire targets in this
area first. You can trade PFZ information with your wingman, or assign your
wingman to different areas (see Wingman Commands, p. 5.24).
:
Right-click-and-drag on the TSD MFD display to create a Priority Fire Zone. This draws a
green box around the designated zone and gives it a label (such as PF0).
When you create a PFZ, the active targeting system loses its current locks and acquires
up to 16 targets within this area instead. Missiles launched into PFZs attack the locked
target first.
If a missile’s target is destroyed before it reaches its target, the missile shifts to another
target within the zone. If all targets have a missile tracking them, then missiles begin doubling up on targets. (See Priority Fire Zones, p. 5.11, for detailed information.)
sL
Add targets to your PFZ target list by pressing s and left-clicking on the target you
want to add. This is useful when new threats move inside your PFZ. You can use this key
to tell Hellfire missiles which targets to strike first — it moves them to the top of the target
list.
Q / sQ
Select next/previous PFZ
Alternatively, left-click (
L
) on a PFZ label to select it.
L
, then :Delete a PFZ by left-click-and-holding on the label, then right-clicking.
sD
Delete currently selected PFZ
cD
Delete all PFZs
PFZs and Hellfire Missiles
PFZs are useful if you’re using radio-frequency (RF) Hellfire missiles in LOAL
missile launch mode. You can bob-up, acquire targets with FCR target acquisition active, and then descend to safety. The FCR system “memorizes” the
objects it detects – so you don’t have to have them in view when you fire. Then,
you can make a PFZ and assign it to your wingman, and make a second one for
yourself.
Once you launch an RF Hellfire, it heads toward the currently selected PFZ and
selects targets based on the FCR’s target list. If the primary target gets
destroyed before the missile arrives, it simply moves on to the next target in the
list. All you have to do is rapidly fire off as many missiles as you have targets.
Time to impact appears in the High-Action Display.)
See Engaging Targets with Hellfires, p. 5.18, for specific details.
Page 71

Radar MFD
Longbow
The Radar MFD reflects raw returns from the helicopter’s radar and displays target
information from either the TADS or FCR targeting system (whichever is active). It
operates in two modes — air or ground — and has different ranges. Use air radar
mode to find air targets, and ground radar mode to sweep for ground targets.
u
Toggle between air-to-air radar mode (360° sweep) or air-to-ground radar mode (90° sweep)
y
Cycle through radar ranges (2, 5, 10, 25 and 50km)
If the
REALISTIC FCR RANGE
option is selected, the distances cycle through .5, 1, 2, 4 and 8km.
Alternatively, left-click (
L
) on the current range in the MFD to increase radar range, right-click
(
:
) to decrease it.
Radar Range. The current range of the radar appears in the upper right corner of
the page.
Threat. Targets picked up on radar appear as small boxes.
Current Target. The currently selected target has a bright diamond around it.
Air Radar Mode
In
air radar mode
, the radar conducts 360° sweeps and displays air threats as
small boxes relative to the helicopter’s position in the middle of the display.
Ground Radar Mode
In
ground radar mode
, the radar conducts periodic 90° sweeps in front of the
helicopter. In addition to the air-mode information, ground radar mode displays
two more items:
Scanning Limits. The angled lines to either side of the display indicate the
scanning limits of the radar when it’s in ground radar mode.
Heading Tape.A heading tape identical to the one on the IHADSS display (4, p.
2.14) scrolls across the top of the display.
2: COCKPITS
2.29
AIR MODE GROUND MODE
Threat
Radar
Range
Scanning
Limits
Heading Tape
Current
Target
Page 72

LONGBOW 2
2.30
Realistic FCR Options
You have more control over the radar if REALISTIC FOR OPERATION is active in the
OPTIONS MENU under
Gameplay/Realism/Custom
. This controls how the FCR oper-
ates and changes the appearance of the TSD MFD (as well as the Radar MFD).
Numpad
e
Tur n radar on/off (or, in TADS mode, turns laser on and of f)
REALISTIC FCR SYMBOLS
This option replaces normal symbology on the Radar and TSD MFDs with new
symbols that indicate whether targets are visible/not visible and moving/
stationary.
REALISTIC FCR RANGE
The second option switches the available FCR ranges from 2.5/5/10/25/50km
to .5/1/2/4/8km. With this option active, you press
Z
and X(or Numpad
+
and -) to cycle forward and backward through the ranges (instead of
y
).
REALISTIC FCR OPERATION
The third option gives you manual control of the FCR scan by letting you change
the size and direction of the radar scan. Since your radar can reveal your presence
to some enemies, adjusting your FCR scan can help you avoid detection.
Realistic FCR Symbols
New symbols show on the Radar/TSD MFDs if REALISTIC FCR SYMBOLS is active.
Tracked Vehicle No LOS*
LOS, stationary
LOS, moving
Wheeled Vehicle No LOS*
LOS, stationary
LOS, moving
Air Defense Unit No LOS*
LOS, stationary
LOS, moving
Unknown Target No LOS*
LOS, stationary
LOS, moving
Helicopter No LOS*
LOS, stationary
LOS, moving
Aircraft LOS, moving
* Line of Sight
Page 73

2: COCKPITS
2.31
Realistic FCR Operation Commands
If FCR is the active target acquisition system, and REALISTIC FCR OPERATION is
selected, you can control your Fire-Control Radar scan as follows.
Numpad 4,
6
Control direction of Fire-Control Radar scan
(left or right)
Numpad
8, 2
Increase, decrease arc size of FCR scan (up to
90 degrees)
Reducing the arc of the scan reduces your
visibility on enemy radar detection systems
and gives you quicker updates.
When the radar is in air-to-air mode, the scan
(at maximum width) appears circular on the
Radar and TSD MFDs. In ground mode, the scan
is pie-shaped.
Z, X
or Increase, decrease radar range (to .5, 1, 2, 4 or 8km)
Numpad
+, -
These ranges apply only if
REALISTIC FCR RANGE
is active. If not, the range is 2, 5,
10, 25 or 50km, and you must use the normal key (
y
) to cycle through
ranges.
Numpad
3
Toggles single or continuous FCR scan
Single means the radar only makes one sweep each time you turn it on.
Continuous means that the radar keeps scanning the entire arc back and forth until
you turn the radar off.
Numpad
9
Zoom Radar MFD image in around your current target.
(ZOOM flashes in the lower left corner of the MFD.)
Downloading Targets to the TSD
You can download targets from other sources onto your TSD if you’ve activated
the realistic FCR options. Nearby ABCCCs (Airborne Battlefield Command and
Control Centers) receive targets from other friendly ground and air units in the
area. These targets are added to the ABCCC’s list, giving you access to a
comprehensive picture of the battlefield.
When you activate ABCCC targeting, targets from the nearest C&C center are
downloaded to your target list.
c~
Download unseen targets to the Longbow target list
Note: If you give your wingman the
c4 Pop-up and Scan Area
command,
he’ll feed targets directly into your target list. You don’t need to use
c~
to get
his targets.
RADAR MFD
Page 74

Target Acquisition and Designation Sight
(TADS) MFD
Longbow
The TADS MFD displays camera images gathered by the TADS sensor package.
From the co-pilot/gunner cockpit (front seat), you can display the TADS MFD as a
full-screen view. (See Co-Pilot/Gunner (Front Seat) Cockpit, p. 2.51, for details.)
Numpad
.
Toggle full-screen, Head-Down Display of TADS MFD (or Radar MFD, if FCR is active).
Press again for normal cockpit view. You must be in the CP/G (front-seat) cockpit to
use this view.
Target. This is a camera image of the currently selected target.
Heading Tape.A replica of the IHADSS heading tape (4, p. 2.14) lines the top of
the MFD, but it doesn’t show the centerline.
Zoom Level. Current TADS camera zoom (
WIDE, MEDIUM, NARROW – see next page).
TADS Gates. Large brackets around an object in the MFD mean that you have
this object targeted. (You target a different object by centering it in the TADS MFD
and pressing L to lock it. If no other targets appear, pan the camera to find one.)
Field of Regard Box. The large box at the bottom of the TADS MFD represents
the entire field of view of the TADS camera. The small box inside this rectangle
shows the TADS camera’s current position relative to its entire field-of-view. (This
item also appears at the bottom of the IHADSS – 15, p. 2.14.)
Active Camera Type.A camera image of the target comes from one of three
TADS sight sensor systems. An acronym for the active system displays in the
upper left — DVO (Direct View Optics), DTV (Daylight TV) or FLIR (Forward-Looking
InfraRed).
Numpad 1 Cycle between TADS camera modes (FLIR, DVO and DTV)
Or, left-click (L) on the camera name to cycle modes.
FLIR
works best in foggy or
dark conditions;
DVO
and
DTO
work best in daytime.
LONGBOW 2
2.32
Heading Type
Zoom Level
Target
Active Camera Type
TADSGates
Field of Regard Box
Page 75

FLIR. This monochrome image has been improved, and you now have “white-hot”
and “black-hot” options. White-hot displays white objects on a black background,
while black-hot displays black objects against a white background.
Numpad
7
Toggle between white-hot/black-hot FLIR imagery
DTV. The Daytime TV camera gives you a good visual of a target at the Narrow
zoom level setting. Use this to identify targets at fairly long range.
DVO. The Direct-Video Optic camera is good for long-distance reconnaissance.
Panning/Zooming
Z, X
or Switch TADS camera (FLIR, DTV and DVO) zoom level to Wide, Medium or Narrow
+, -
on (medium only applies to FLIR)
Numpad Or, left-click (
L
) the current zoom level to change it.
8, 2
, Pan the active camera in any direction. (This corresponds with the head tracking
4, 6
system in actual Longbows.) You can also hold down aand move your joystick
Numpad to pan the camera. As a third option, left-click-and-hold (
L
) in the TADS MFD and
drag the mouse in any direction to pan.
Weapons MFD
Longbow
The Weapons MFD identifies what ordnance the helicopter is carrying and what
sensor system is active. The large schematic represents the helicopter and its four
wing pylons (hardpoints). The indicator text boxes denote the active target acquisition system and weapon tracking system, and whether weapons are armed or not.
2: COCKPITS
2.33
TADS and Realistic FCR
With REALISTIC FCR OPERATION active, target symbology displays on top of the
FLIR, DVO or DTV image when TADS is full-screen (CP/G cockpit only – see p.
2.51). The symbology changes if
REALISTIC FCR SYMBOLOGY is selected (see p.
2.30). The currently locked target has cross hairs on top of it. They move when
you switch targets.
Realistic TADS Operation
If you select REALISTIC TADS OPERATION in the OPTIONS menu (
Gameplay/ Realism/
Custom
), you must manually activate the laser. See Laser Operation, p. 5.22.
Master Arm Indicator
Missile Launch Mode
Indicator
Weapons Display
Rocket Salvo
Sight Indicator
Range Finder Indicator
Active Weapon (highlighted)
Chaff Pods
Gun Burst Rate
Page 76

b
Cycle through weapon types (highlighted box is active weapon)
z
Fire active weapon
e
Fire cannon
h
Switch target acquisition system (
TADS
or
FCR
)
Master Arm Indicator. This safety measure toggles weapons between ARM and
SAFE states. Keep it on SAFE until you’re ready for battle.
cM
Switch between
ARM
and
SAFE
Weapons Display. Shows how many weapons/countermeasures remain of each
type. This display uses an aircraft symbol with boxes that represent weapon
hardpoints.
The gun counter in the middle of the symbol (a box and number) tell how many
cannon rounds remain. You can adjust the number of rounds that fire per trigger
pull (referred to as a gun burst). Press G to cycle between 10, 20, 50 or 100
rounds.
Active Weapon. The active weapon system appears as a reversed (bright green)
image. Numbers inside the rocket box indicate how many rockets are left. In the
case of Hellfires and Stingers, each missile is represented by a single icon.
If you loaded radar-guided Hellfires, the missile hardpoint box reads R. If you
loaded laser-guided Hellfires,
LR appears instead.
If you loaded HE FFAR rockets, the rocket hardpoint box reads
RC. If you loaded
multiple-projectile submunition rockets,
MP appears instead. (You must gain a lock
before firing MPSM rockets. Select rockets as your active weapon, then wait for
the I-beam cursor to turn solid. See Folding Fin Aerial Rockets, p. 5.17.)
Sight Indicator. Shows which targeting system is acquiring and designating
targets.
TADS indicates that you’re selecting targets from the TADS target list. This
list consists of targets the CP/G has chosen for you within range and in a 220° arc
in front of you.
FCR indicates that you’re getting targets from the FCR target list. This list consists
of targets within range and in a 90° arc in front of you.
h
Switch between TADS and FCR target acquisition systems
Range Finder Indicator. Indicates that Hellfires are using the Longbow’s laserdesignator to range targets instead of the Fire-Control Radar (only active if you’re
firing laser-guided Hellfires).
If you’re using TADS target acquisition, this box reads
LRF. If you’re using FCR
target acquisition, the text box changes to
FCR.
Missile Launch Mode Indicator. Shows which missile launch mode is active —
LOAL (lock-on-after-launch) or LOBL (lock-on-before-launch). See Engaging
Targets with Hellfires, p. 5.18, for details.
LONGBOW 2
2.34
Page 77

Chaff Pods. The number to the right of the chaff indicator (C:) shows how many
chaff cartridges remain.
C
Release chaff
Rocket Salvo. The number to the right of RKT tells how many rockets are
launched when you issue a fire command.
S
Cycle through rocket salvo sizes (1, 2, 4, 8, 12 or 24)
Aircraft Survivability Equipment (ASE) MFD
Longbow, Kiowa
The ASE display gathers information from the Radar Warning Receiver (RWR)
and Radio Frequency Interferometer (RFI) and creates a 360° view of missiles,
SAMs and AAAthreats around your helicopter, which is centered in the view.
Whenever a threat is within range and emits radar, this MFD displays its position.
The ASE page also tells you when you have jamming activated.
Threats. Threats located and identified by the RWR and RFI show up as symbols.
Numbers by the symbols identify the threat type — for example, a ground threat
symbol with an 8 indicates a Russian SA-8 SAM site. Asolid diamond denotes an
Approaching Missile. The symbols are defined under Tactical Situation Display
(TSD) MFD, p. 2.24.
Symbol Threat Type
2: COCKPITS
2.35
Threat’s Radius of Attack
Approaching Missile
Threat
ASE Range
Enemy Jamming
(against your aircraft)
Jammer Status
(your aircraft’s jammers)
6 SA-6 SAM
8 SA-8 SAM
9 SA-9 SAM
10 SA-10 SAM
11 SA-11 SAM
13 SA-13 SAM
15 SA-15 SAM
23 ZSU-23 AAA Gun
26 2S6 (SA-19) SAM
Page 78

Radius of Attack. The radius of attack for ground threats, or the area within which
you’re vulnerable to their fire. Circles in the MFD indicate the attack limits of a particular enemy ground gun or SAM site. Stay outside these arcs to avoid their fire.
The arcs change appearance according to the enemy’s actions:
Dotted arc
Threat is searching with radar.
Solid arc
Threat is tracking with radar.
Flashing arc
Threat has launched a guided missile.
Line to you
Threat is searching, tracking or launching missiles specifically
at you.
Jammers. The ASE system indicates whether IR and radar jammers are active or
not. When they’re in use, text appears (
IR JAM or RAD JAM), and a flashing lightning
bolt appears on top of your helicopter icon in the center of the ASE. (The IR
jammer is often called the “disco light.”) Both jammers activate automatically, but
you can also control them manually.
I
Toggle infrared (IR) jamming (attempts to deter IR missiles)
J
Toggle radar jamming (attempts to confuse enemy radar systems)
When your Fire-Control Radar is being jammed by enemy systems, FCR JAM
appears in the upper right corner of the MFD.
Radar Range. This is the range at which the RWR is scanning for threats emitting
radar (the RWR displays its information in the ASE MFD). You must adjust the
ASE range separately from the Radar MFD range.
D
Cycle through ASE ranges (2, 5, 10, 25 and 50 kilometers)
Alternatively, left-click (
L
) on the current range in the MFD to cycle through scan ranges.
LONGBOW 2
2.36
Realistic Jammers
Jammer information displays in the ASE page. The RWR defaults to unrealistic,
meaning that it jams threats in 360° radius. To give the jammer realistic scanning
ability (in a 45° arc to either side of the current flight path), open the
OPTIONS
menu and select CUSTOM from the REALISM section of the GAMEPLAY menu. Then,
select the
REALISTIC JAMMER checkbox.
Page 79

2: COCKPITS
2.37
ASE Autopage
You can automatically instruct the ASE page to appear whenever you’re
engaged by a SAM or AAAgun by pressing sA. (This key toggles the function on/off — it’s on by default.) The ASE Autopage function is useful during
combat and saves you from paging through MFDs while you’re taking fire. When
the battle is over, the ASE doesn’t disappear — you must manually deactivate it.
What is Aircraft Survivability Equipment?
The Longbow and Kiowa have a collection of Aircraft Survivability Equipment
that helps the pilot identify and repel anti-aircraft threats. These include the
following items:
Radar Warning Receiver (AN/APR-39A). Sounds a tone and voice warning
when you’re picked up by an enemy’s radar.
Laser Warning Receiver (AN/AVR-2). Sounds a tone and voice warning when
you’re being tracked by a laser.
Radio Frequency Interferometer (RFI). Detects the strength and wavelength of
incoming radar waves.
Chaff Dispenser (AN/ALQ-136). Releases strips of reflective material designed
to confuse radar-guided missiles by distorting radar.
Radar Jammer (also AN/ALQ-136). Broadcasts radar “noise” that clutters
opposing radar screens.
Infrared Jammer (AN/ALQ-144 IRCM). Reflects laser beams to blind incoming
IR missiles. Also called “disco light.”
IR Suppressor (Black Hole). Cools exhaust during hovers and forward flight to
reduce heat signature.
Information from ASE components appears on the Aircraft Survivability
Equipment (ASE) MFD in the Longbow and Kiowa.
Page 80

System MFD
Longbow, Kiowa, Black Hawk
Components. The helicopter’s components are listed inside the MFD. (The Kiowa
and Black Hawk System MFDs differ slightly, but the status names are the same.)
The System MFD shows how badly your helicopter has been damaged by displaying the status of each important system as follows:
OK System is operational.
MARG System has marginal damage.
INOP/FAIL System is inoperative.
Note: A message appears on the UPFRONT display if the FCR no longer functions. See
Damage, p. 5.4
, for other damage information that appears on the
UPFRONT display.
Fuel. The amount of fuel remaining appears at the bottom of the MFD. Fuel burns
at approximately 1 lb. every 5 seconds.
Engine MFD
Longbow
The Engine MFD monitors the torque level and temperature for both of the
Longbow’s engines. Information appears both in bar format and digital format
(below each bar). Indicators on the bar denote ranges and maximum levels.
LONGBOW 2
2.38
LONGBOW
Components
Fuel
Status
Torque Bars
RPM Bars
Fuel
Engine Temperature Bars
Page 81

The torque bars increase in height when you add collective, and decrease when
you reduce collective. Try to keep the torque level at or below the solid circle
marker at the top of the bar display — it marks the desirable torque setting.
=
Add collective (increases torque)
-
Decrease collective (decreases torque)
Interpreting the Symbols
Symbols beside the bars describe minimum, maximum and safe operational ranges.
Max level of operation. Ideal level of operation.
Maximum level of operation with rotor RPM at approximately 90% (top arrow).
Maximum level of operation with rotor RPM at approximately 50% (lower arrow).
Normal operating range (revolutions per minute).
You can turn individual engines on and off using the keyboard. If one of your
engines catches fire, it’s a good idea to shut it down.
c[
Toggle left engine on/of f
c]
Toggle right engine on/of f
2: COCKPITS
2.39
Additional Information
Torque. Twin bars marked TORQUE indicate the percentage level of torque on the
rotor. The bar rises in height as the collective is increased (greater pitch angles
increase the level of torque) and shrinks as collective is decreased. (The bottom
of the bar represents 0%, the top represents 120%.)
Normally, torque averages 80% to 100%. Ideally, the bar should extend up to the
solid dot (recommended setting). You can take 120% torque for short bursts, but
prolonged high torque can damage your engine. The reading for the engine producing the most torque appears in the upper left corner of the IHADSS (20, p.
2.18).
N
p
/ NRTwo gauges marked NPdisplay revolutions per minute readings for the
left and right turbine engines. The
N
R
gauge displays revolutions per minute for
the rotor shaft.
TGT. The
TGT gauges indicate the temperature of the left and right engines.
Fuel. The amount of fuel remaining appears at the bottom of the MFD. Fuel
burns at approximately 1 lb. every 5 seconds.
Page 82

Flight MFD
Longbow
This MFD page displays important IHADSS information — the pitch ladder, slip
ball, current waypoint and distance to it, altitude, airspeed, heading and torque.
(Refer to Cruise IHADSS Mode, p. 2.21, to learn how to interpret this display.)
Communications (Comms) MFD
Longbow, Kiowa, Black Hawk
This MFD displays the designation and callsign of every unit in communications.
L
Left-click the arrows in the scroll bar to scroll through the list of friendly, airborne units
/
Scroll down COMM MFD
s/
Scroll up COMM MFD
LONGBOW 2
2.40
Pitch/Ladder
Horizon Line
Engine Torque Readout
True Airspeed Readout
Current Waypoint/
Distance and Time Remaining
Magnetic Heading Tape
Radar Altitude
Analog Altimeter Scale
Skid/Skip Lines and Ball
Designation
Callsign
Scroll arrows
Page 83

Vertical System Display (VSD) MFD
Kiowa
This versatile MFD, unique to the Kiowa Warrior, is basically three MFDs in one,
combining many of the functions of the Longbow’s Flight and Weapons MFD
pages. Which one displays depends on a) whether or not the Master Arm function
is on or off, and b) what weapon is active. See IHADSS Flight Symbology,
p. 2.14, for details on items in this display.
Master Arm
OFF (see p. 2.34) The VSD functions as a flight reference, showing
the artificial horizon, speed, distance to waypoint, altitude and similar aids to
navigation.
Master Arm
ON, weapons active The VSD becomes a weapons sight, displaying
available targets, distance to target and other relevant information for the weapon
type selected. The diamond icon on the VSD displays where the Mast-Mounted
Sight is currently pointing, while the circle icon is your pitch indicator. When both
icons are lined up with the target, the target is firmly in your sights.
See Kiowa Weapon Constraints, p. 2.49, for specifics on acquiring locks with
weapons.
FFARS ACTIVE HELLFIRE ACTIVE STINGERS ACTIVE
2: COCKPITS
Magnetic Heading Tape
Command Heading
True Airspeed Readout
Navigation Waypoint
Information Readout
Weapon
Constraint
Target box (Icon)
Pitch Ladder
Horizon Line
Analog Altimeter Scale
Altitude
2.41
Range to
Target
Weapon
Constraint
Weapon
Constraint
Weapon
Loadout
Weapon Status
Information
Page 84

Range to Target. The range in kilometers to the locked target appears in the
bottom right corner of the display.
Waypoints. The box in the lower left corner gives navigation information — the
selected waypoint (such as W03) and the distance in kilometers. Time to Arrival
also appears.
Target Box. Once you have a target in your field of view, a small diamond
appears on the VSD. If the target moves out of view, the diamond moves in that
direction. To gain a firing lock on that target, maneuver the helicopter so that the
diamond moves under the VSD weapon constraint. Your weapon constraint will
turn solid (described in the next paragraph).
Weapon Constraint. The VSD displays a weapon constraint. Its shape differs,
based on whether you have the machine gun, Hellfires, Stingers or rockets active.
This same constraint displays on the Pilot’s Display Unit — see Kiowa Weapon
Constraints, p. 2.49, for details.
Weapon Loadout. These small icons show what missiles you’re carrying
(Hellfires or ATA Stingers). The solid icon indicates the active weapon.
b Switch active weapon
Weapon Status Information. These text fields display the arming status (
ARMED
or SAFE), launch mode and weapon inhibit information for the active weapon.
LONGBOW 2
2.42
Page 85

Mast-Mounted Sight (MMS) MFD
Kiowa
This MFD performs basically the same function for
the Kiowa as the TADS
MFD performs for the
Longbow. Although the
organization of the information is a bit different, the
functionality of the MFD is
the same.
Target. This is a camera image of the currently selected target.
Heading Tape. The helicopter’s heading tape lines the top of the MFD. The
center of this tape indicates the current compass direction in which you are facing.
Gates. Large brackets around an object in the MMS MFD mean that you have
this object targeted. (You target a different object by centering it in the MFD and
pressing L to lock it. If no other targets appear, maneuver around until you find
one.)
Weapon Inhibit Field. In the Longbow, messages describing whether or not you
have a weapon lock, or the reason why you don’t, appears in the IHADSS. In the
Kiowa, this message appears in the MMS MFD in the lower right corner. See
Weapon Inhibit Field, p. 5.20, for a list of messages.
Active Camera Type. The cameras used in the Kiowa are different than those
used in the Longbow. A camera image of the target comes from one of two Kiowa
sight sensor systems. An acronym for the active system displays in the bottom
center —
TIS (Thermal Imaging System) or TVS (Television System).
Numpad
1
Toggle between MMS camera modes (TIS or TVS)
L
Or, left-click on the camera name to toggle modes
To zoom the camera in and out:
Z, X
or Switch MMS camera zoom level
+, -
(TIS zooms to 6X or 25X; TVS to 5X or 17X).
(Numpad) Or, left-click (
L
) the current zoom level to change it.
MMS Bearing. Unlike the TADS, the Kiowa MMS has no field of regard. Instead,
numeric angles appear in the top right corner of the MFD and represents the current slew angles of the MMS sight. The top line indicates vertical slew angle (-30
degrees to +30 degrees) and the second line indicates the horizontal slew angle
(-170 degrees to +170 degrees).
Range. Range to the currently selected target.
2: COCKPITS
2.43
Heading Tape
Target
Gates
Weapon Inhibit Field
Active Camera Type
Page 86

IN-FLIGHT NAVIGATION SYSTEM
See Mobile Mission Planning Cell, p. 1.10, for more details on this map.
The game has an in-flight navigation system that looks and feels very similar to
the Mission Planning screen. The map’s main purpose is to display the current,
real-time position of your helicopter, as well as all helicopters in other flights.
Most of the other data and display options are identical to the Mission Planner —
the major difference is that you can’t change tasking assignments, weapon loadouts, or crew positions. You can’t rehearse the mission or view a terrain profile.
Another difference between the Mission Planner and this map is that you can’t
adjust any waypoints that were set before you took off. You can, however, add
new waypoints to your own flight path (but not the flight paths for other helicopters). Adding waypoints is most useful when you run across unforeseen
situations — by adding a new waypoint, you can sometimes avoid trouble or
answer a request for assistance.
After you’ve added a new waypoint, you’re free to move it or delete it.
♦ To add a waypoint, left-click on the small green box between two sequential
waypoints. All subsequent waypoints will be renumbered accordingly.
♦ To move a waypoint, left-click-and-drag it to any point on the map.
♦ To delete a waypoint, right-click on it to open the Waypoint Information
Window, and left-click on the Delete box. All subsequent waypoints will be
renumbered accordingly.
KIOWA DIGITAL MOVING MAP
Kiowa
The Kiowa comes with a scrolling digital map display that displays known information about the area. The map appears in the center dashboard display, and is
shared by both cockpits. This display has no sighting function — it is purely a
navigational aid. Note that the digital map is based on archived geographic
information, not on the imaging systems of the Kiowa itself.
LONGBOW 2
2.44
Waypoint
Grid Lines
Waypoint Information
Player Helicopter
Mission Clock
Map Coordinate
Contour Map
Page 87

Contour Map. The contour map (see p. 1.12) appears behind this MFD, and
scrolls as you fly over the terrain. The lighter contour, the higher the terrain. Low,
flat areas appear as a darker shade of green. The top of the map is always north.
To toggle the background map, left-click
MAP OFF (it then changes to MAP ON).
Grid Lines/Map Coordinates. The map is segmented into 1-kilometer squares by
thin, green grid lines, as well as into 5-kilometer squares marked by bold, green
grid lines. Where the heavy 5km grid lines intersect, map coordinates appear.
The coordinates of the map quadrant you’re currently flying over appears in the
lower right corner as a letter, followed by a number. This corresponds to the coordinates in the Mission Planner map (see p. 1.11 for details).
Player Helicopter. Your helicopter appears in the center of this MFD as a small
aircraft icon. When you change bearings, the icon rotates to reflect your current
compass direction. The top of the map represents north, the right side east, etc.
Mission Clock. The lower right corner of the digital moving map shows how much
time has elapsed since the mission started.
Waypoint Information. Mission waypoints (if in range) appear as circles with
numbers; the currently selected waypoint flashes. Lines showing your flight route
appear in the display. The box in the lower left corner gives navigation information
– the selected waypoint (such as W03) and the distance in kilometers. Time to
Arrival also appears.
Zoom Level. Current map zoom level in kilometers. This MFD is linked to the
TSD — if you change the zoom level here, it is also reflected in the TSD radar
range.
y
Switch map zoom (also TSD range) to 2, 5, 10, 25 or 50 kilometers
2: COCKPITS
2.45
Page 88

TARGETING AND SIGHT SYSTEMS
The AH-64D Longbow and Kiowa Warrior have several systems that aid in
acquiring and identifying targets. Both have night vision systems that aid pilots at
night and during bad weather.
The Longbow has a Fire-Control Radar (FCR), Target Acquisition and Designation
Sight (TADS), and Pilot Night Vision System (PNVS). The Kiowa has a MastMounted Sight (MMS), Pilot Display Unit (PDU), and ANVIS night vision system
(similar to PNVS). These systems are discussed in more detail in the following
sections.
Mast-Mounted Longbow Fire-Control Radar (FCR)
Longbow
The most significant new system of the AH-64D is the mast-mounted Longbow
radar system. This bulbous addition sits atop the rotor shaft (above the blades)
and provides 360° scanning capabilities.
Interfacing with the Longbow radar is the Fire-Control Radar (FCR) targeting
system, which uses the radar to scan 90° for ground targets (360° for air targets),
then “memorizes” them. It can identify and store up to 256 separate targets
(stationary or mobile ones) and has both an air and ground radar mode.
The FCR system also classifies and prioritizes targets. It can detect a variety of
targets in both a 360° air radar mode and a 90° ground radar mode. The FCR
“memorizes” contacts when you bob up, stores the data, and can transmit this
information to other helicopters, airplanes or command posts via a wireless data
modem. Target information also displays on two separate tactical MFDs (Radar
and TSD pages).
LONGBOW 2
2.46
Page 89

Target Acquisition and Designation Sight (TADS)
Longbow
The second target acquisition system in the AH-64D Longbow is the Target
Acquisition and Designation Sight. Like the FCR, it allows the
crew to identify and target enemy aircraft or ground vehicles
from the air. (However, it can only lock onto targets in a 220°
arc in front of the helicopter.) The entire sensor system is
housed in a turret on the helicopter’s nose and includes camera
systems that allow daytime and nighttime target acquisition.
Also, the TADS contains a laser designator and range finder,
which are used to identify targets for laser-guided missiles.
When the aircraft is being flown by a single human pilot, the
TADS is controlled by the computer co-pilot/gunner, who
searches and prioritizes targets.
You have the choice of using the FCR or TADS system when acquiring targets.
h
Switch between FCR and TADS target acquisition
(The active system appears in Weapons MFD and in the High Action Display – 10, p. 2.14).
TADS and MMS Cameras
Longbow, Kiowa
TADS (Longbow). The TADS/PNVS turret houses the Direct View Optics system
(DVO), the Daylight Television system (DTV) and the Forward-Looking Infrared
system (FLIR). The view you see in your TADS MFD is an image that has been
picked up by one of these turret cameras. The turret can rotate 220° horizontally,
and +30° or -60° vertically. Sensors in the turret relay information through an optical tube to the cockpit.
During night missions, the FLIR camera in the TADS/PNVS turret can provide
backup night vision to the pilot in case the Pilot Night Vision Sensor system fails.
MMS (Kiowa). The MMS assembly consists of a low-light level TV camera, a digitally enhanced thermal imager and the laser range-finder and designator. Although
the ANVIS night-vision system is separate from the MMS, the system is equally
capable of target acquisition in the day or night.
Numpad
8, 2
, Hold down to pan the TADS/MMS MFD camera
4, 6
Alternatively, left-click-and-hold (L) the mouse in the MFD and drag it the desired direction.
As a third option, hold down
a
and move the joystick in the Head-Down Display (see p.
2.53).
5
Recenter the TADS / MMS MFD camera
2: COCKPITS
2.47
TADS CAMERA CONTROL
Page 90

Pilot Night Vision System (PNVS) / ANVIS
Longbow, Kiowa
Another camera (just above the TADS cameras) is the Pilot Night Vision System
(PNVS). It receives thermal images from an infrared camera and lets the pilot fly
the helicopter at night or in bad weather/smoky situations. This camera creates a
picture of the terrain and ground objects by monitoring the amount of heat emitted
from them. In the day, buildings and objects absorb heat and radiation from the
sun. After sunset, the camera picks up heat waves radiating from these ground
objects. The “heat signatures” mark the location of ground targets and accurately
describe the target type.
The Kiowa Warrior uses a thermal imaging system called ANVIS, which performs
the same functions as the PNVS.
P
Toggle PNVS/ANVIS camera on/of f (use at night or in bad weather).
The PNVS turret camera moves independently of the TADS camera. In the real
world, this allows the pilot to move his helmet and receive imagery from one direction while the CP/G moves his helmet in a different direction and views something
else. This occurs in the game as well, except that you can control both views.
Kiowa Pilot Display Unit (PDU)
Kiowa
The Pilot Display Unit (PDU) is the Head-Up display for the Kiowa Warrior. It is
essentially a small glass display mounted in front of the pilot’s seat of the Kiowa
Warrior. The PDU automatically and continuously displays targeting and weapon
constraint information, some of which is also accessible in the VSD MFD (see p.
2.41 for details on this MFD).
Numpad
0
Toggle between pilot’s seat (on the left) and CP/G’s seat (on the right)
Target Box. Once you have a target in your field of view, a small green box
appears around it. If the target moves out of view, the box disappears. To gain a
firing lock on that target, maneuver the helicopter so that the target box moves
under the PDU weapon constraint. Your weapon constraint will turn solid
(described in the next paragraph).
Weapon Constraint. The PDU displays a weapon constraint. Its appearance
differs, based on whether you have the machine gun, Hellfires, Stingers or rockets
active. See Kiowa Weapon Constraints, p. 2.49.
LONGBOW 2
2.48
Page 91

Kiowa Weapon Constraints
Additional weapon-specific items are added to the PDU display when you use
your weapons. It doesn’t matter which master mode is currently active — it all
depends on the current weapon type. To tell which weapon is active, look at the
VSD MFD — an icon appears for whichever weapon you’re using.
b
Select active weapon (cycle through Hellfires, rockets and Stingers)
cM
Toggle weapons between ARM (active) and SAFE (inactive)
z
Fire active weapon
e
Fire cannon
Gun Constraint. When you have the machine gun active, cross hairs appear on
your PDU. However, you can’t slew the gun as you can in the Longbow. This
means that you need to maneuver so that the target box is under the cross hairs.
When the cross hairs turn from dashed to solid, you can fire.
The number of rounds remaining appears in the lower left corner of the VDU
when the gun is active.
Hellfire Missile Constraint. Specific to Hellfire missiles, this constraint box
remains stationary in the PDU. It is dashed when you’re out of constraints (don’t
have a weapon lock) and turns solid when you can fire.
To bring the target into constraints and acquire a lock, you must maneuver your
helicopter so that the target box moves under the dashed missile constraint in the
PDU. When you correctly align the target with the constraint, the missile gains a
valid lock, and the constraint border turns solid.
FFARS ACTIVE HELLFIRE ACTIVE STINGERS ACTIVE
2: COCKPITS
2.49
Active Pitch Circle I-beam
Weapon (Weapon (Weapon
Constraint) Constraint)
Target
Box
Active Weapon Target
Weapon Loadout Box
Weapon Weapon
Status Constraint
Active Target Weapon
Weapon Box Constraint
Weapon
Status
Page 92

Rocket Steering Cursor. When rockets are active in the Kiowa, two separate
weapon constraint items appear on the PDU. These constraints apply only to
multi-purpose submunition (MPSM) rockets — FFARs do not require a lock.
The rocket constraints only display if rockets are active, and both constraints must
be met to gain a lock. The first constraint is an I-beam, which shows what direction the helicopter needs to move horizontally to bring the target into weapon constraints. Swing the helicopter right or left until the target box is under the PDU,
and the I-beam is centered on it.
The second constraint is a pitch circle, which indicates vertical alignment. Nose
the helicopter up or down until the target box is under the PDU, and the circle is
centered on the target.
Once you’ve aligned both elements, you can fire your
MPSM rockets. You can’t fire,
however, if you’re out of range, if you don’t have the I-beam and circle correctly
aligned over the target, or if the Master Arm indicator is set to
SAFE (press cM
to arm weapons).
ATA Missile Constraint Circles. When the air-to-air (ATA) missile system is
active, a large circle appears on the display and indicates where the missile seeker head is looking. The circle turns solid when the target meets the weapon constraints, and remains dashed if it has not. Bring air targets into the center of the
circle to gain a missile lock.
LONGBOW 2
2.50
Page 93

CO-PILOT/GUNNER COCKPIT
Longbow, Kiowa
Both the Longbow and the Kiowa feature a separate cockpit for the co-pilot/gunner
(CP/G). In the Kiowa, the two seats are virtually identical. In the Longbow you can
perform most of the same tasks in the front (CP/G) seat as you can in the pilot’s
seat — the main difference is that the CP/G seat has an
Optical Relay Tube
(ORT) Unit.
Uses for CP/G Cockpit
Unless you’re flying specifically as a CP/G in a multi-player scenario, you don’t
have
to use the second cockpit. The Kiowa’s CP/G really doesn’t have any advantages over the pilot’s seat. In the Longbow, however, the greatest advantage is
that you can display different MFDs in each cockpit. Typically, offensive MFDs are
most useful in the CP/G cockpit, defensives ones in the pilot’s cockpit. In the
Longbow, the cockpit dash view of the ORT is only visible in the front (CP/G) seat
(between the left and right MFDs).
If you are flying in a multi-player scenario, with both a human pilot and a human
CP/G, you may wish to keep in mind that according to Army SOP, the highestranking person in the helicopter occupies the CP/G seat under normal circumstances. This is because he is in the best position to know whether the mission
has been accomplished, gauge the general battlefield situation, and determine in
an emergency situation whether to proceed with the mission or bug out.
Kiowa’s Left Seat (CP/G)
The co-pilot’s seat in the Kiowa is functionally identical to the pilot’s. The only
differences are that the single MFD appears on the opposite side of the panel,
and the PDU doesn’t appear. Kiowa pilots and CP/Gs share the same Digital
Moving Map display (see p. 2.45 for map details).
Numpad
0
Toggle between left seat (CP/G) and right seat (pilot’s cockpit)
2: COCKPITS
2.51
KIOWA LEFT-SEAT DASH
Page 94

Longbow’s Front Seat (CP/G)
The full-screen view of the ORT, called the Head-Down Display (HDD), shows
TADS or Radar MFD image (whichever is active) with target information superimposed on top of it. This screen is repeated in a small, cockpit dash display known
as the Head-Out Display (HOD) – a monochrome image that duplicates the HDD.
Numpad
0
Toggle between front-seat (CP/G) and pilot’s cockpit
Numpad
.
Toggle HDD mode (between full-screen or repeater mode) from the CP/G cockpit
IHADSS Normal IHADSS information appears in this cockpit.
MFDs The front-seat cockpit has two MFDs.
UPFRONT Text Display The top half gives damage information (and target
information, if U is active). The bottom displays the
elapsed mission time.
Optical Relay Tube Unit The ORT shows either the TADS or Radar
MFD. You can view ORT information on a small
screen in the cockpit (Head-Out Display), or in fullscreen mode (Head-Down Display) by pressing
Numpad . (toggle).
IHADSS/MFDs/UPFRONT Display
Longbow
The IHADSS display, MFDs and UPFRONT display operate just as they do in the
back seat. You still switch the left and right MFDs normally (with , and .), and
but you can have different MFDs open in each cockpit.
LONGBOW 2
2.52
(ORT)
IHADSS
Optical Relay Tube
(ORT) Unit
Left MFD
Upfront Display
HOD
Right MFD
Page 95

Optical Relay Tube (ORT) Unit
Longbow
In addition to two regular MFDs, the
Longbow’s CP/G cockpit has an ORT unit
that shows either the TADS or Radar MFD.
The CP/G performs his targeting functions
by either looking through the HDD (an eyepiece mounted in the middle of the cockpit
dash) or at the HOD (small dash display).
Head-Out Display (HOD)
The Head-Out Display emulates either the
TADS or Radar MFD, depending on which
acquisition mode is active. If TADS is the
active target acquisition system, the TADS
page appears. If you have FCR active, the
Radar page appears.
See Radar MFD (p. 2.29) and TADS MFD
(p. 2.32) for ORT view commands specific to
these MFDs.
Head-Down Display (HDD)
Longbow
You can “look” through the optical relay tube in the front-seat (CP/G) cockpit by
using the Head-Down Display. When you do so, target information normally available in the TADS and Radar MFDs is superimposed over camera imagery in a
full-screen view.
Your current airspeed appears in the upper left corner of the High-Action Display
in this view. Current altitude appears in the upper right.
When you’re
not
in HDD view, ORT information appears in the HOD dash display.
Numpad .Toggle ORT display between Head-Down/Head-Out view.
The HDD view displays a full-screen TADS or Radar MFD (whichever system is active).
Press again to return to HOD (dash) view.
2: COCKPITS
2.53
Head-Down Display (HDD)
ORT UNIT
Head-Out Display (HOD)
Page 96

BLACK HAWK ANALOG COCKPIT
Black Hawk
The cockpits of the Longbow and Kiowa are almost entirely digital, with all important flight-status information appearing in the MFDs or Upfront display. The Black
Hawk, however, has far fewer digital readouts, and relies far more on traditional
analog aircraft instrumentation.
Cockpit Gauges
The following appear as dial gauges or bar readings built into the cockpit of the
Black Hawk.
Airspeed Indicator. Dial gauge that shows how fast the helicopter is traveling in
knots. Aknot is a nautical measure of speed, approximately equal to 6076
feet/hour (a distance equal to one nautical mile). The indicator scale ranges from
0 to 250 knots.
Altimeter. Dial gauge that gives the helicopter ’s altitude in feet above sea level
(which differs from height above ground level). Keep in mind that this reading
might indicate 2000 feet above sea level, while your ground altitude may show
much less than that — the ground is usually higher than sea level.
Radar Altimeter. Dial gauge that measures altitude, up to 1500 feet above
ground level. (It uses a primitive radar to bounce signals off of the ground, then
measures how long it takes for signals to return. The scale is logarithmic.)
LONGBOW 2
2.54
Mission Clock
Overtorque
Indicator
TGT Engine Readout
Radar Warning
Receiver
NPReadout
Compass
Airspeed Indicator
Artificial Horizon
Radar Altimeter
Barometer
Altimeter
Rate of Climb
Indicator
Horizontal Situation
Indicator
Engine Torque
Readout
Page 97

Horizontal Situation Indicator. This gauge indicates how far off course you
might be at any given moment. The outer ring of the HSI has a compass, while
the line bisecting the inner ring represents the direct path of your assigned course.
A deviation bar shows (in relative terms) how far you are from your course. If the
course bar is perfectly vertical, and your deviation bar exactly overlays the course
line, then you are on course.
Torque Readout. Gauge that indicates how much engine power/torque is currently
being produced by each engine. When the collective is adjusted, the power and
torque change accordingly.
TGT Engine Readout. Gauge that indicates the temperatures of the left and right
engines.
NPReadout. Gauge that displays revolutions-per-minute readings for the left and
right turbine engines.
Radar Warning Receiver (RWR). Electronic display that identifies radar-emitting
sources. When a threat is detected, lines emanate from the center of the RWR in
the direction of the threat. The longer the lines, the greater the severity of the
threat (as estimated from its radar signal).
Compass. A magnetic compass showing the current heading of the aircraft.
2: COCKPITS
2.55
Page 98

VIEW CONTROLS
Longbow, Black Hawk, Kiowa
During flight, you have access to a number of useful views. You can “look” in any
direction, watch your missile as it strikes a target, slew your TADS helmet view,
pan around your aircraft, and more.
Alternate views are both useful and entertaining. All game objects are highly
detailed (down to their rotating turrets) and are active even while you’re occupied
elsewhere. You can even hear their sound effects in exterior camera views. Using
these views helps you keep track of what’s going on in the combat environment.
View Panning
You can pan the view in any exterior view (outside of the cockpit) as described
below. You cannot, however, pan to an upside-down view.
Numpad
8
Tilt camera up
Tilt any exterior view up slightly.
Numpad
2
Tilt camera down
Tilt any exterior view down slightly.
Numpad
6
Pan right
Rotate any exterior view to the right.
Numpad
4
Pan left
Rotate any exterior view to the left.
Numpad
5
Reset view
Return view to default (centered) position.
Numpad
+
Zoom in
Zoom in any exterior view.
Numpad
-
Zoom out
Back out any exterior view.
a
+ joystick
Tilt/Pan view
Tilt or rotate any exterior view.
LONGBOW 2
2.56
Page 99

Inside Cockpit Views
Note: The “no cockpit” views listed below keep the IHADSS display in your view
at all times.
1
Front cockpit view. Looks out the front of the cockpit.
s1
Front view, no cockpit. Removes cockpit/MFDs and shows only IHADSS. You can pan this
view without affecting the TADS sensor/cannon position. (See View Panning, above, for
controls.)
2
Left cockpit view. Looks out the left side of the cockpit and displays IHADSS information.
s2
Left view, no cockpit. As 2, but without cockpit art.
3
Right cockpit view. Looks out the right side of the cockpit and displays IHADSS information.
s3
Right view, no cockpit. As 3, but without cockpit or MFDs.
4
Virtual cockpit / target lock view. The first press of 4 puts you in a “virtual cockpit”
view looking straight out the aircraft’s wind screen. A second press, however, will lock your
view to the closest target (in the Longbow, your cannon automatically aims itself at this target). Subsequent pressings cycle the view through available targets.
Exterior Views
5
Chase view. Views your helicopter from a fixed position behind the tail rotor. (The camera
“chases” your helicopter.) Pressing this key multiple times cycles to an exterior view of the
left side, an exterior view of the right-side, and then returns to the chase view.
s5
Fly-by view. Views your helicopter as it flies by the camera.
6
Next object view. Cycles through all objects in this order: aircraft, ground vehicles,
inanimate ground objects.
s6
Previous object view. Cycles through all objects in reverse order.
8
Player missile view. Switches to your missile’s viewpoint.
s8
Player missile view toggle. Automatically switches to your missile’s viewpoint anytime you
launch one.
9
Incoming missile view. Switches to the viewpoint of an approaching missile when it closes
in on you.
s9
Incoming missile view toggle. Automatically switches to the viewpoint of any missile that is
approaching you.
=
Death view. Switches to exterior view of a recently destroyed target.
s=
Death view toggle. Automatically switches to exterior view of a target when it’s destroyed.
Note: All of the “toggle” switches (
s8, s9
and
s=
) cause the view
to change automatically under the appropriate conditions. The name of the
camera and its new status briefly displays on the IHADSS (for example,
DEATH
CAMERA ON
).
2: COCKPITS
2.57
Page 100

Target Views
The next six views cycle through a current target list (a list of targets identified by
the FCR, TADS or CP/G). This list varies, depending on which system you’re
using to find targets, and whether or not you’ve established any Priority Fire
Zones (PFZs).
♦ Switching targets in view (by pressing T) transfers the current lock to that
target instead.
♦ If you’re using FCR target acquisition and have designated PFZs, the view
cycles through targets in that zone.
♦ If you’re using FCR target acquisition and have no PFZs, the view cycles
through whatever targets the FCR currently has stored.
♦ If you’re using TADS target acquisition, the view cycles through targets
identified by the TADS sensor.
7
Next target view. Displays a side view of the next target in your target list.
s7
Previous target view. Displays a side view of the previous target in your target list.
0
Player-to-next-target view. Tactical view that lines you up with the next target in the list
(the camera “sees” you, then the enemy, in a direct line of sight). Subsequent presses cycle
through other targets.
s0
Player-to-previous-target view. As above, except that it cycles to the previous target
in the list.
-
Next-target-to-player view. Tactical view that lines your previous target up with you
(the camera “sees” the enemy, then you, in a direct line of sight). Subsequent presses cycle
through other targets in the list.
s-
Previous-target-to-player view. As above, except that it cycles to the previous target
in the list.
LONGBOW 2
2.58
 Loading...