


Page 1

*DJJHQDX
Use and care manual
VI 492 613
Cooktop
Page 2
9,
[
[
[
[
2
Page 3

Table of Contents
Use and care manual
9 Safety Definitions 4
IMPORTANT SAFETY INSTRUCTIONS 5
Fire Safety 5
Cooking Safety 6
Burn Prevention 6
Child Safety 7
Cleaning Safety 7
Cookware Safety 8
Proper Installation and Maintenance 8
Electromagnetic Interference 9
Cooling Fan 10
Proposition 65 Warning 10
Causes of Damage 11
Overview 11
en-us
O
Timer functions 21
The kitchen timer 21
Stopwatch Function 21
v
PowerBoost Function 22
Activate 22
Deactivate 22
x
Frying Sensor 22
Advantages When Frying 22
Frying Pans for the Frying Sensor 22
Temperature Settings 23
Frying Chart 23
Setting Procedure 25
A
Locking the Control Panel for Cleaning 26
7
Environmental protection 12
Energy-Saving Advice 12
f
Cooking with induction 12
Advantages of Induction Cooking 12
Cookware 12
*
Getting to Know your Appliance 14
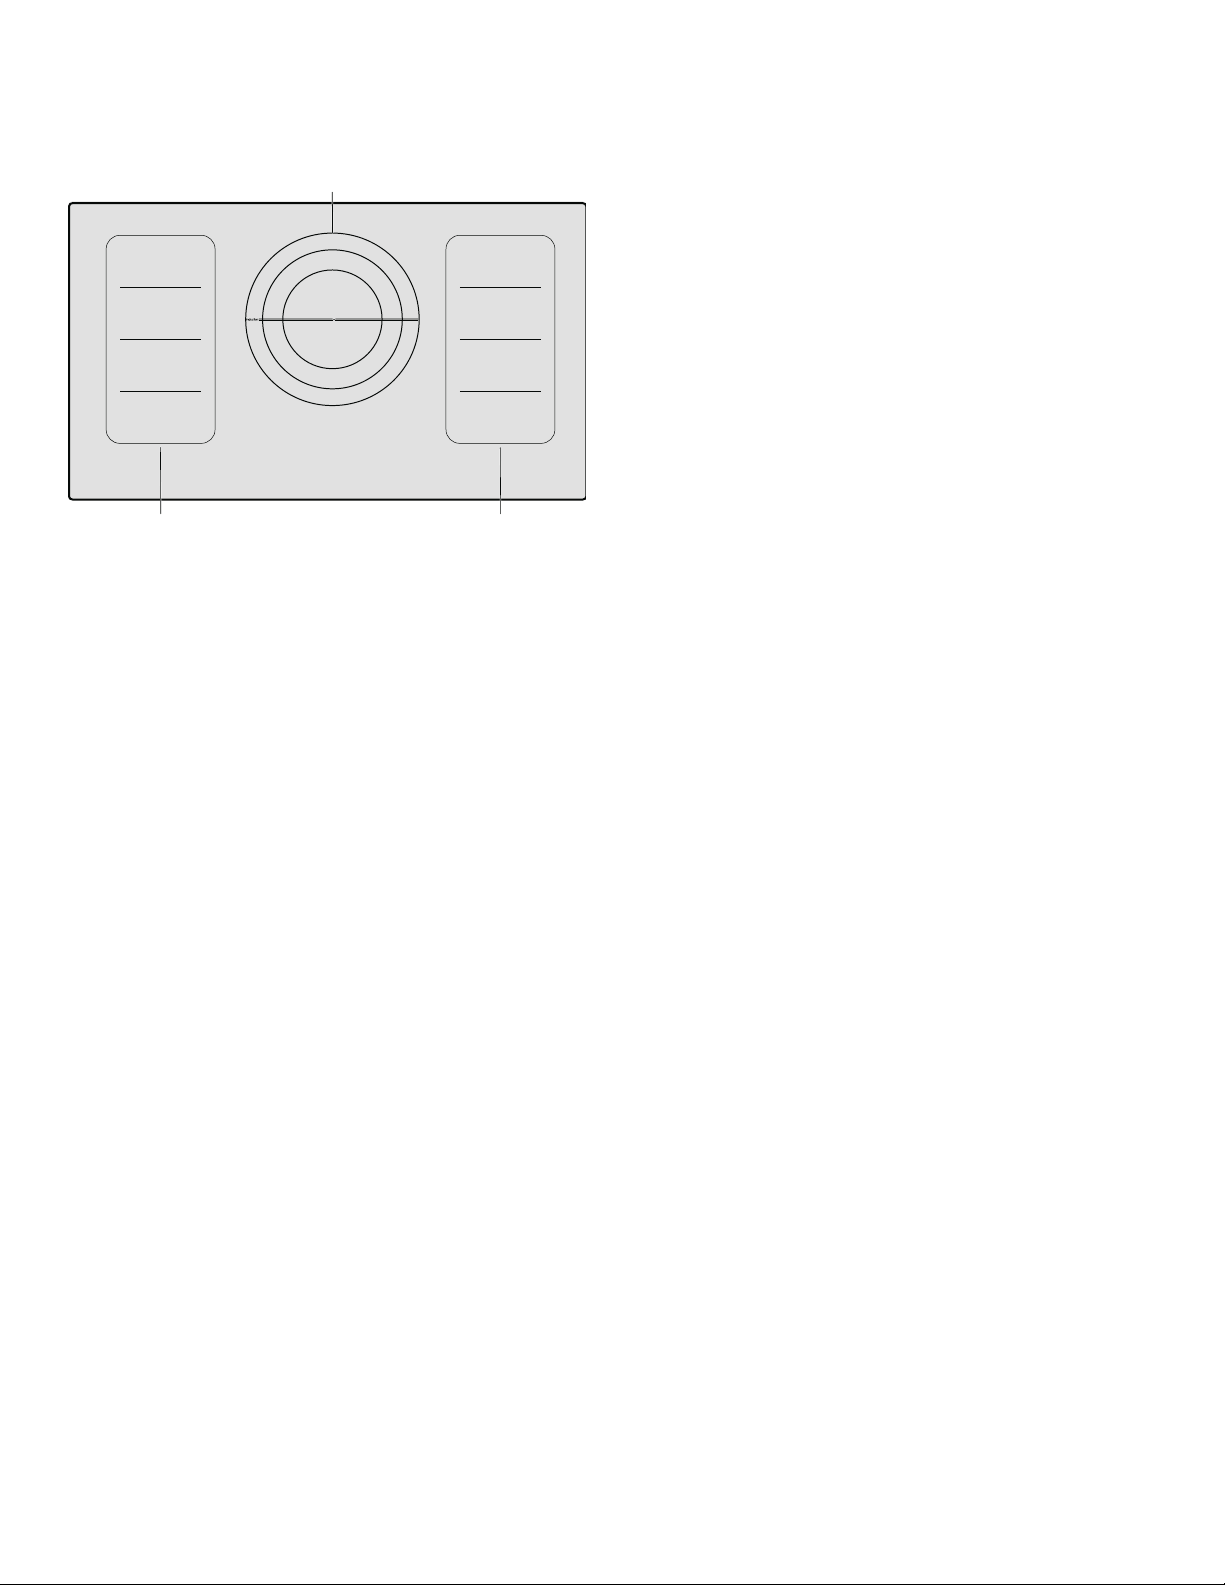
Control Panel 14
Control Knob 15
Cooking Zones 15
Residual Heat Indicator 15
_
Optional accessories 15
1
Operating the Appliance 16
Setting a cooking zone 16
Chef's recommendations 16
j
Wok Function 18
Wok and Wok Accessories 18
Cooking with the Wok 18
Activate 18
Deactivate 18
Table 19
}
Flexible cooking zone 20
Cookware Use Recommendations 20
As Two Independent Cooking Zones 20
As a Combined Cooking Zone 20
Q
Basic Settings 26
Access the Basic Settings 27
o
Home Connect 28
Open or close the Home Connect settings menu 28
Setting Up 28
Switching the Wi-Fi on/off 29
Resetting the Connection 30
Software Update 30
Remote Diagnostics 30
Information on Data Protection 30
Declaration of Conformity 31
Wi-Fi® Module 31
e
Connecting an extractor hood 32
Connecting via your home network 32
Connecting Directly 32
Controlling the Hood via the Cooktop 33
Cleaning and Maintenance 33
Daily Cleaning 33
Cleaning Guidelines 33
Cleaning Chart 34
Maintenance 34
FAQ 35
3
Faults – what to do? 37
Demo Mode 38
Suitability Test of Cookware 38
3
Page 4

en-us Safety Definitions
Customer Service 39
Additional information on products, accessories,
replacement parts and services can be found at
www.gaggenau.com and in the online shop
www.gaggenau.com/zz/store
9 Safety Definitions
Safety Definitions
9 WARNING
This indicates that death or serious injuries may
occur as a result of non-observance of this
warning.
9 CAUTION
This indicates that minor or moderate injuries may
occur as a result of non-observance of this
warning.
NOTICE
This indicates that damage to the appliance or property
may occur as a result of non-compliance with this
advisory.
Note: This alerts you to important information and/or tips.
4
Page 5

9 IMPORTANT SAFETY INSTRUCTIONS
READ AND SAVE THESE INSTRUCTIONS
IMPORTANT SAFETY INSTRUCTIONS
READ AND SAVE THESE INSTRUCTIONS
9 WARNING
When properly cared for, your new
appliance has been designed to be
safe and reliable. Read all
instructions carefully before use.
These precautions will reduce the
risk of burns, electric shock, fire,
and injury to persons. When using
kitchen appliances, basic safety
precautions must be followed,
including those in the following
pages.
Examine the appliance after unpacking it.
In the event of transport damage, do not
plug it in.
This appliance is not intended for
operation with an external clock timer or a
remote control.
This appliance is not intended for use by
persons (including children) with reduced
physical, sensory or mental capabilities,
or lack of experience and knowledge,
unless they have been given supervision
or instruction concerning use of the
appliance by a person responsible for
their safety.
Fire Safety
Do not allow pans to boil dry. Do not
allow aluminum foil, plastic, paper or
cloth to come in contact with a hot
surface element, burner or grate.
Improper installation of these protective
liners may result in a risk of electric
shock, or fire.
If the cooktop is near a window, forced air
vent or fan, be certain that flammable
materials such as window coverings do
not blow over or near the burners or
elements. They could catch on fire.
Always have a working smoke detector
near the kitchen.
Never leave the cooktop unattended when
in use. Boilovers cause smoking and
greasy spillovers may ignite.
9 WARNING
TO REDUCE THE RISK OF A
GREASE FIRE:
1. Never leave surface units
unattended at high settings.
Boilovers cause smoking and
greasy spillovers that may ignite.
Heat oils slowly on low or medium
settings.
2. Always turn hood ON when
cooking at high heat or when
flambeing food (i.e. Crepes
Suzette, Cherries Jubilee,
Peppercorn Beef Flambé).
3. Clean Ventilating Hoods
Frequently. Grease should not be
allowed to accumulate on hood or
filter.
4. Use proper pan size. Always use
cookware appropriate for the size
of the surface element.
In the event that personal clothing or hair
catches fire, drop and roll immediately to
extinguish flames.
5
Page 6

9 IMPORTANT SAFETY INSTRUCTIONS
READ AND SAVE THESE INSTRUCTIONS
Have an appropriate fire extinguisher
available, nearby, highly visible and easily
accessible near the appliance.
Smother flames from food fires other than
grease fires with baking soda. Never use
water on cooking fires.
9 WARNING
TO REDUCE THE RISK OF INJURY
TO PERSONS IN THE EVENT OF A
GREASE FIRE, OBSERVE THE
FOLLOWING:
1. Do Not Use Water on Grease
Fires - Smother fire or flame or
use dry chemcial or foam-type
extinguisher.
2. SMOTHER FLAMES with a close-
fitting lid, cookie sheet, or metal
tray, then turn off the burner. BE
CAREFUL TO PREVENT BURNS.
If the flames do not go out
immediately, EVACUATE AND
CALL THE FIRE DEPARTMENT.
3. NEVER PICK UP A FLAMING PAN
– You may be burned.
4. DO NOT USE WATER, including
wet dishcloths or towels – a
violent steam explosion will result.
5. Use an extinguisher ONLY if:
Whenever possible, do not operate the
ventilation system during a cooktop fire.
However, do not reach through fire to turn
it off.
Cooking Safety
9 WARNING
Use this appliance only for its
intended use as described in this
manual. NEVER use this appliance
as a space heater to heat or warm
the room. Doing so may result in
overheating the appliance. Never use
the appliance for storage.
Burn Prevention
DO NOT TOUCH SURFACE UNITS OR
AREAS NEAR UNITS - Surface units may
be hot even though they are dark in color.
Areas near surface units may become hot
enough to cause burns. During and after
use, do not touch, or let clothing,
potholders, or other flammable materials
contact surface units or areas near units
until they have had sufficient time to cool.
Among these areas are the cooktop and
areas facing the cooktop.
– You know you have a Class ABC
extinguisher, and you already
know how to operate it.
– The fire is small and contained
Do not heat or warm unopened food
containers. Build-up of pressure may
cause the container to burst and cause
injury.
in the area where it started.
– The fire department is being
called.
– You can fight the fire with your
back to an exit.
Always use dry potholders. Moist or damp
potholders on hot surfaces may result in
burns from steam. Do not let potholder
touch hot heating elements. Do not use a
towel or other bulky cloth.
6
Page 7

9 IMPORTANT SAFETY INSTRUCTIONS
READ AND SAVE THESE INSTRUCTIONS
Always turn hood ON when cooking at
high heat or when flambéing food (i.e.
Crêpes Suzette, Cherries Jubilee,
Peppercorn Beef Flambé).
Use high heat settings on the cooktop
only when necessary. To avoid bubbling
and splattering, heat oil slowly, on no
more than a low-medium setting. Hot oil is
capable of causing extreme burns and
injury.
Never move a pan of hot oil, especially a
deep fat fryer. Wait until it is cool.
Secure all loose garments, etc., before
beginning. Tie long hair so that it does
not hang loose, and do not wear loosefitting clothing or hanging garments, such
as ties, scarves, jewelry, or dangling
sleeves.
9 WARNING
Risk of burns!
Metallic objects become hot very
quickly on the cooktop. Never set
down metallic objects such as
knives, forks, spoons and lids on the
cooktop.
Child Safety
When children become old enough to use
the appliance, it is the responsibility of
the parents or legal guardians to ensure
that they are instructed in safe practices
by qualified persons.
Do not allow anyone to climb, stand, lean,
sit, or hang on any part of an appliance,
especially a door, warming drawer, or
storage drawer. This can damage the
appliance, and the unit may tip over,
potentially causing severe injury.
Do not allow children to use this
appliance unless closely supervised by
an adult. Children and pets should not be
left alone or unattended in the area where
the appliance is in use. They should never
be allowed to play in its vicinity, whether
or not the appliance is in use.
9 CAUTION
Items of interest to children should
not be stored in an appliance, in
cabinets above an appliance or on
the backsplash. Children climbing
on an appliance to reach items could
be seriously injured.
9 WARNING
Risk of burns!
After each use, turn off the cooking
zone using the control knob. Don't
wait until the cooking zone
automatically shuts off because
there are no cooking vessels on it
anymore.
Cleaning Safety
Clean Cooktop With Caution - If a wet
sponge or cloth is used to wipe spills on
a hot cooking area, be careful to avoid
steam burn. Some cleaners can produce
noxious fumes if applied to a hot surface.
Do not use steam cleaners to clean the
appliance.
7
Page 8

9 IMPORTANT SAFETY INSTRUCTIONS
READ AND SAVE THESE INSTRUCTIONS
Cookware Safety
Hold the handle of the pan when stirring
or turning food. This helps prevent spills
and movement of the pan.
Use Proper Pan Size.
The use of undersized cookware will
expose a portion of the heating element
or burner to direct contact and may result
in ignition of clothing. Select cookware
having flat bottoms large enough to cover
the surface heating unit. This appliance is
equipped with one or more surface units
of different sizes. Proper relationship of
cookware to heating element or burner
will also improve efficiency.
Cookware not approved for use with
ceramic cooktops may break with sudden
temperature changes. Use only pans that
are appropriate for ceramic induction
cooktops.
9 WARNING
RISK of injury!
When cooking with a double-boiler,
the cooktop and cooking vessel may
crack due to overheating. The
cooking vessel in the double-boiler
must not come in direct contact with
the bottom of the pot filled with
water. Use only heat-resistant
cookware.
9 WARNING
Danger of injury!
Cookware may jump upward due to
fluid trapped between the cookware
bottom and cooking zone. Always
keep cooking zone and cookware
bottom dry.
Always position handles of utensils
inward so they do not extend over
adjacent work areas, burners, or the edge
of the cooktop. This reduces the risk of
fires, spills and burns.
9 WARNING
RISK of injury!
Inappropriate woks may cause
accidents. Use only the wok
provided by the manufacturer as a
special accessory.
Proper Installation and Maintenance
Have the installer show you the location
of the circuit breaker or fuse. Mark it for
easy reference.
This appliance must be properly installed
and grounded by a qualified technician.
Connect only to properly grounded outlet.
Refer to Installation Instructions for
details.
This appliance is intended for normal
family household use only. It is not
approved for outdoor use. See the
Statement of Limited Product Warranty. If
you have any questions, contact the
manufacturer.
8
Page 9

9 IMPORTANT SAFETY INSTRUCTIONS
READ AND SAVE THESE INSTRUCTIONS
Do not store or use corrosive chemicals,
vapors, flammables or nonfood products
in or near this appliance. It is specifically
designed for use when heating or
cooking food. The use of corrosive
chemicals in heating or cleaning will
damage the appliance and could result in
injury.
Make sure reflector pans or drip bowls
are in place - Absence of these bowls or
pans during cooking may subject wiring
or components underneath to damage.
9 WARNING
Failure to operate knobs properly
may result in personal injury and
damage to the appliance.
Do not operate this appliance if it is not
working properly, or if it has been
damaged. Contact an authorized service
provider.
Do Not Cook on Broken Cooktop - If
cooktop should break, cleaning solutions
and spillovers may penetrate the broken
cooktop and create a risk of electric
shock. Contact a qualified technician
immediately.
9 WARNING
If the surface is cracked, switch off
the appliance to avoid the possibility
of electric shock.
servicing to an authorized service
provider.
To avoid electrical shock hazard, before
servicing the appliance, switch power off
at the service panel and lock the panel to
prevent the power from being switched
on accidentally.
Electromagnetic Interference
9 WARNING
This induction cooktop generates
and uses ISM frequency energy that
heats cookware by using an
electromagnetic field. It has been
tested and complies with Part 18 of
the FCC Rules for ISM equipment.
This induction cooktop meets the
FCC requirements to minimize
interference with other devices in
residential installation. Induction
cooktops may cause interference
with television or radio reception. If
interference occurs, the user should
try to correct the interference by:
▯ Relocating the receiving antenna
of the radio or television.
▯ Increasing the distance between
the cooktop and the receiver.
▯ Connecting the receiver into an
outlet different than the cooktop.
It is the user’s responsibility to correct
any interference.
Do not repair or replace any part of the
appliance unless specifically
recommended in this manual. Refer all
9
Page 10

9 IMPORTANT SAFETY INSTRUCTIONS
READ AND SAVE THESE INSTRUCTIONS
9 CAUTION
Persons with a pacemaker or similar
medical device should exercise
caution when standing near an
induction cooktop while it is in use.
Consult your doctor or the
manufacturer of the pacemaker or
similar medical device for additional
information about its effects with
electromagnetic fields from an
induction cooktop.
Cooling Fan
The cooktop is equipped with a cooling
fan on its underside. Should the cooktop
lie above a drawer, there must be no
objects or paper in it. They may be
sucked in and compromise the cooling of
the appliance or damage the fan.
There must be a minimum distance of ¾"
(20mm) between the content of the
drawer and the fan input.
Proposition 65 Warning:
This product may contain a chemical
known to the State of California, which
can cause cancer or reproductive harm.
Therefore, the packaging of your product
may bear the following label as required
by California:
67$7(2)&$/,)251,$352326,7,21:$51,1*
:$5 1,1*
&DQFHUDQG5HSURGXFWLYH+DUPZZZ3:DUQLQJVFDJRY
10
Page 11

Causes of Damage
Causes of damage
NOTICE
▯ Rough pot and pan bases scratch the cooktop.
▯ Never leave cookware cooking empty. This can cause
damage.
▯ Do not place hot pots or pans on the control panel,
the displays or the cooktop surround. This can cause
damage.
▯ Damage can occur if hard or pointed objects fall on
the cooktop.
▯ Aluminum foil and plastic containers can melt and
stick on hot cooking zones. The use of oven protective
foil on the cooktop is not recommended.
Causes of damage en-us
Overview
You will find the most frequently caused damage in the
following table.
Damage Cause Remedy
Stains Boiled-over food. Remove boiled-over food immediately with a glass scraper.
Unsuitable cleaning agent. Only use cleaning agents that are suitable for this type of
cooktop.
Scratches Salt, sugar and sand. Do not use the cooktop as a work surface or storage
space.
Cookware with rough bases scratch the
cooktop.
Discoloration Unsuitable cleaning agent. Only use cleaning agents that are suitable for this type of
Pan abrasion. Lift pots and pans when moving them.
Blisters Sugar, food with a high sugar content. Remove boiled-over food immediately with a glass scraper.
Check the cookware.
cooktop.
11
Page 12
en-us Environmental protection
7
Environmental protection
Environmental protecti on
Energy-Saving Advice
f
Cooking with induction
Cooking with inducti on
Advantages of Induction Cooking
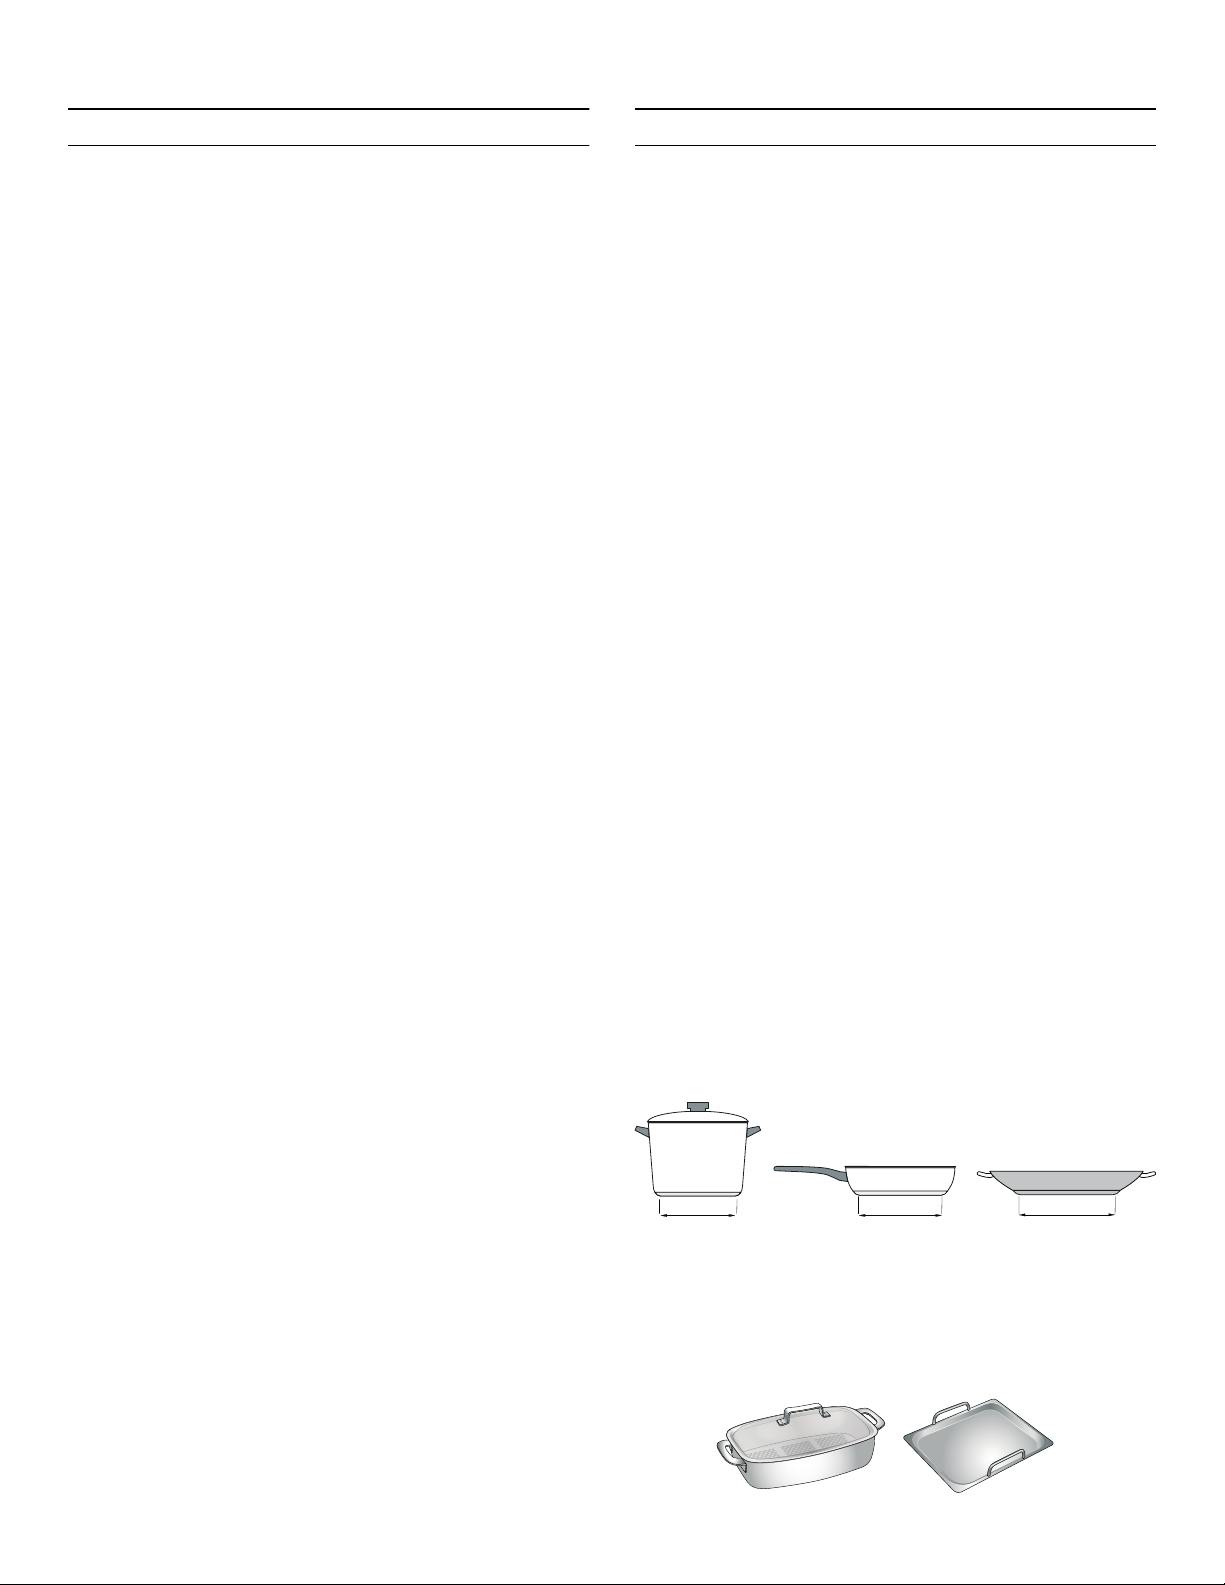
▯ Place a lid on cookware. Cooking with an uncovered
pan will result in a considerable increase in energy
use. Use a glass lid to provide visibility and avoid
having to lift the lid.
▯ Use cookware equipped with a solid, flat bottom.
Curved pan bases increase energy consumption.
▯ The diameter of the pan base must match the size of
the cooking zone. Note: The manufacturer normally
indicates the pan's upper diameter. This is normally
greater than the diameter of the pan's base.
▯ Choose cookware of a size suited to the amount of
food you are going to cook. A large pan that is only
half full will use a lot of energy.
▯ Use a small amount of water when cooking. This saves
energy, and vegetables retain a larger percentage of
their vitamins and minerals.
▯ Select the lowest power level to maintain cooking. If
the power level is too high, energy is wasted.
Induction cooking is very different from traditional
cooking methods, as heat builds up directly in the item of
cookware. This offers numerous advantages:
▯ Saves time when boiling and frying.
▯ Saves energy.
▯ Easier to care for and clean. Spilled food does not
burn on as quickly.
▯ Heat control and safety – the cooktop increases or
decreases the heat supply as soon as the user
changes the setting. The induction cooking zone
stops the heat supply as soon as the cookware is
removed from the cooking zone, without having to
switch it off first.
Cookware
Only use ferromagnetic cookware for induction cooking,
such as:
▯ Cookware made from enameled steel
▯ Cookware made from cast iron
▯ Special induction-compatible cookware made from
stainless steel.
To check whether your cookware is suitable for induction
cooking, refer to the section on ~ "Suitability Test of
Cookware".
To achieve a good cooking result, the ferromagnetic area
on the base of the pan should match the size of the
element. If a element does not detect an item of
cookware, try placing it on another element with a smaller
diameter.
FP
éLQ
FP
éLQ
FP
LQ
If the only element being used is the flexible cooking
zone, larger cookware that is particularly suited to this
zone can be used. You can read more information on the
positioning of the cookware here ~ "Flexible cooking
zone" on page 20
12
Page 13

Cooking with induction en-us
Some induction cookware does not have a fully
ferromagnetic base:
▯ If the base of the cookware is only partially
ferromagnetic, only the area that is ferromagnetic will
heat up. This may mean that heat will not be
distributed evenly. The non-ferromagnetic area may
not heat up to a sufficient temperature for cooking.
▯ The ferromagnetic area will also be reduced if the
material of which the base of the cookware is made
contains aluminum, for example. This may mean that
the cookware will not become sufficiently hot or even
that it will not be detected.
Unsuitable Cookware
Do not ever use adapter plates for induction or cookware
made of:
▯ Traditional stainless steel
▯ Glass
▯ Clay
▯ Copper
▯ Aluminum
No Cookware on Cooking Zone/Cookware of an Unsuitable Size
If no cookware is placed on the selected cooking zone, if
the cookware is made of an unsuitable material, or if it is
not the right size for the cooking zone, the cooking zone
indicator will start to flash. To stop the indicator from
flashing, place suitable cookware on the cooking zone. If
it is left flashing for more than 9 minutes, the cooking
zone will automatically switch off.
Empty Pans or Pans with a Thin Base
Do not heat up empty pans, or use pans with a thin base.
The cooktop is equipped with an internal safety system.
However, an empty pan may heat up so quickly that the
"automatic shut-off" function may not have time to react,
and the pan may reach very high temperatures. The pan
base could melt and damage the cooktop glass. In this
case, do not touch the pan and switch the cooktop off. If
the cooktop fails to work after it has cooled down, please
contact Customer Support.
Pan Detection
Each cooking zone has a lower limit for pan detection.
This depends on the diameter of the ferromagnetic area
of the cookware and the material of which its base is
made. For this reason, you should always use the cooking
zone that best matches the diameter of the base of the
pan.
Automatic Detection in Double and Triple Cooking Zones
These cooking zones can detect cookware of different
sizes. Depending on the material and the properties of
the cookware, the cooking zone automatically activates
the singe, double or triple cooking zone, supplying the
proper power to obtain good cooking results.
Properties of the Base of the Cookware
The material(s) of which the base of the cookware is
made can affect the cooking result. Using pots and pans
made from materials that distribute heat evenly through
them, such as stainless-steel pans with a three-layer
base, saves time and energy.
Use cookware with a flat base; if the base of the
cookware is uneven, this may impair the heat supply.
13
Page 14

en-us Getting to know your appliance
*
Getting to Know your Appliance
Getting to know your appliance
You can find information on the dimensions and power
of the cooking zones in~ Page 2
Control Panel
Note: Depending on the appliance model, individual
details and colors may differ.
This appliance can be networked and also controlled
remotely using a mobile device. To do this, first connect
the appliance to your home network. ~ "Home
Connect" on page 28
Controls
− Locking the control panel for cleaning
Ú Frying sensor
t Basic settings
A/ @ Select settings
® Stopwatch
Š Short-term timer
Displays
‹‹ Operating status
‚-‚ƒ Power levels
•/œ Residual heat
‹‹ Short-term timer
‹‹.‹‹ Stopwatch
Ù Cooktop
Ž / ˜ PowerBoost function
ª Flex Zone activated
« Flex Zone deactivated
¹ Wok function
‘ Frying Sensor
¬/«/ª Frying sensor temperature display
Ö Home network
Controls
When the cooktop heats up, the symbols for the controls
available at this time light up.
Touch a symbol to activate the function it represents. A
confirmation signal sounds.
Notes
▯ The corresponding symbols for the controls will light
up, depending on whether they are available.
The controls that are available will be lit white. When a
function is selected, they turn orange.
▯ Always keep the control panel clean and dry. Moisture
reduces their effectiveness.
▯ Do not place hot cookware anywhere other than the
front cooking zone, and never on the control panel.
There is a risk that the control panel's electronics will
overheat.
14
Page 15

Optional accessories en-us
Control Knob
You can use the control knobs to select the heat setting,
the PowerBoost function, the flex zone, and the wok
function.
1 Lowest heat setting
12 Highest heat setting
Ž PowerBoost Feature
ª Flex zone activated
¹ Wok Function
The control knobs have an illuminated ring with an
illuminated symbol for each function. The illuminated ring
changes color when particular functions or processes
are activated.
Display Meaning
Û Off Appliance OFF
Ú Lights up orange Appliance ON
ˆ Flashes orange Appliance OFF
Residual heat indicator
Ú Lights up blue Home Connect
ˆ Flashes blue Home Connect
ˆ Flashes orange and
white alternately
ˆ Flashes yellow and
magenta alternately
Ú Lights up green for a
few seconds, then turns
yellow
Safety shut-off, power
failure
Appliance fault
Please contact customer service.
Appliance initialized,
only after initial connection or power failure
Cooking Zones
Cooking zones
Û / $ Single-
ring cook-
Use cookware that is a suitable
size.
ing zone
ò Triple-ring
cooking
zone
The cooking zone switches on
automatically when you use cookware with a base that covers the
outer edge of the zone (ð or ò).
á FlexZone See the section entitled
~ "Flexible cooking zone".
Only use cookware that is suitable for induction cook-
ing – see section entitled ~ "Cooking with in-
duction".
Residual Heat Indicator
The cooktop has a residual heat indicator for each
cooking zone. This indicates that a cooking zone is still
hot. Do not touch a cooking zone while the residual heat
indicator is lit up or immediately after it goes out.
The following are shown depending on the amount of
residual heat:
▯ Display •: High temperature
▯ Display œ: Low temperature
and the illuminated ring around the control knob will
flash.
If the cookware is removed from the cooking zone while
cooking is in progress, the heat setting indicator will
flash, and the control knob will be lit orange.
Turn the control knob to the 0 position.
If the cooking zone is switched off, the residual heat
indicator will be lit, and the illuminated ring around the
control knob will flash. Even after the cooktop has been
switched off, the residual heat indicator will remain lit for
as long as the cooking zone is still warm.
_
Optional accessories
Optional accessori es
You can purchase the following accessories from your
specialist retailer:
CA 051 300 Multilayer Teppanyaki plate
CA 052 300 Cast aluminum grill plate
WP 400 001 Wok pan
WZ 400 001 Wok ring
Use the accessories only as indicated. The manufacturer
assumes no liability for incorrect usage of the
accessories.
15
Page 16

en-us Operating the appliance
1
Operating the Appliance
Operating the appliance
This chapter explains how to set a cooking zone. The
table shows heat settings and cooking times for various
meals.
Setting a cooking zone
Use the control knob to select the heat setting you
require.
0 Cooking zone off
Heat setting 1 Lowest setting
Heat setting 12 Highest setting
Notes
▯ To protect the fragile parts of your appliance from
overheating and electrical overloading, the cooktop
may temporarily reduce the power automatically.
▯ In order to prevent the appliance from producing
excess noise, the cooktop may temporarily reduce the
power automatically.
Selecting a Heat Setting
Push in the control knob and turn it to the heat setting
you require.
The selected heat setting will be lit on the cooking zone
display. The illuminated ring around the control knob will
be lit.
Switching Off the Cooking Zone
Turn the control knob to the 0 position.
The residual heat indicator will be lit, and the illuminated
ring around the control knob will flash until the cooking
zone has cooled down.
Note: If there is no cookware on the cooking zone or if the cookware is not detected, the selected heat setting will flash and the illuminated ring around the control knob will be lit orange. After approx. 30 seconds, the cooking zone will switch off.
In this case, the illuminated ring around the control knob
will flash. Turn the control knob back to position 0; the
illuminated ring will stop flashing.
Chef's recommendations
Recommendations
▯ When heating up puree, cream soups, and thick
sauces, stir occasionally.
▯ Set heat setting 10 to 12 for preheating.
▯ When cooking with the lid on, reduce the heat as soon
as you see steam escaping. The cooking result is not
affected by the steam escaping.
▯ After cooking, keep the lid on the cookware until you
serve the food.
▯ To cook with the pressure cooker, observe the
manufacturer's instructions.
▯ Do not cook food for too long, otherwise the nutrients
will be lost. The short-term timer can be used to set
the optimum cooking time.
▯ For a healthier result, ensure that the oil does not
smoke.
▯ To brown food, fry it in small batches.
▯ Cookware may reach high temperatures while the food
is cooking. Use oven mitts.
▯ You can find recommendations for energy-efficient
cooking in section ~ "Environmental protection"
16
Page 17

Operating the appliance en-us
Cooking table
The table shows which heat setting is suitable for each
type of food. The cooking time may vary depending on the
type, weight, thickness and quality of the food.
Heat setting Cooking methods Examples
11 - 12 Boiling Water
Searing Meat
Heating Fat/oil, liquids
Bringing to a boil Soups, sauces
Blanching Vegetables
7 - 10 Frying Meat, potatoes
6 - 8 Frying Fish
8 - 9 Baking Flour-based and/or egg-based dishes, e.g., pan-
cakes
Simmering in an uncovered dish Dough-based foods, liquids
7 - 8 Browning Flour, onions
Roasting Almonds, breadcrumbs
Rendering Bacon
Reducing Stocks, sauces
6 - 7 Poaching in an uncovered dish Dumplings, soup pasta, soup vegetables, soup
meat, poached eggs
5 - 6 Poaching in an uncovered dish Boiled sausages
6 - 7 Steaming Vegetables, potatoes, fish
Steaming Vegetables, fruit, fish
Braising Roulade, roasts, vegetables
3 - 4 Braising Goulash
4 - 5 Cooking with the lid on Soups, sauces
3 - 4 Defrosting Frozen foods
Soaking Rice, legumes, vegetables
Thickening Egg-based dishes, e.g., omelette
1 - 2 Heating/keeping warm Soup, vegetables in sauce
1 Heating/keeping warm Stew
Melting Butter, chocolate
17
Page 18

en-us Wok Function
j
Wok Function
Wok Functi on
The wok feature is only to be used with the wok pan and
wok accessories; it is not suitable for other types of
cookware.
Wok and Wok Accessories
(Not included with the appliance)
Wok pans and wok pan supports can be purchased from
our sales partner Gaggenau.
Since the base of the wok pan is round, it can only be
used with a wok pan support.
Ensure that the wok is properly positioned on the wok
pan support when using it for cooking. Always position
the wok pan support in the center of the cooking zone.
Do not heat the wok up when it is empty.
Use a special curved turner (chan) or a long-handled
wooden turner.
Use a ladle to spoon the food out of the pan. The easiest
way to spoon out food cooked in hot fat or large
quantities of sauce is with a skimming ladle.
Use a bamboo steamer for steaming.
Notes
▯ Use the wok and wok pan support in conjunction with
the wok function only.
▯ Do not clean the wok pan support in the dishwasher.
Proceed as follows here:
▯ Pour oil into the wok. Peanut oil and soybean oil work
well in woks.
▯ Cut the food into small pieces, but not so small that
they burn easily.
▯ Heat the oil to just below its smoke point; you can now
start sautéing the food.
▯ If you wish to sauté large quantities of food, we
recommend that you do this in batches, otherwise not
all the ingredients will be in contact with the base of
the wok at the same time.
9 CAUTION
The wok and wok accessories become very hot
during cooking. Keep out of reach of children. Do
not remove the wok accessories until the residual
heat indicator has gone out.
Activate
Push in the control knob and turn it to position ¹. After
a few seconds, an audible signal will sound and ¹ will
be lit.
The function has now been activated.
Use the control knob to select the heat setting you
require.
Deactivate
Cooking with the Wok
Sautéing is one of the most popular cooking methods to
use with a wok. The ingredients are cut small and cooked
very quickly at a high temperature, with constant stirring.
The large, round-bottomed pan allows you to stir all the
ingredients easily and quickly and turn them as you would
in a normal frying pan. Stirring prevents the ingredients
from sticking to the pan. Any excess fat collects in the
center of the pan. The meat pores will close and the meat
will remain succulent. Vegetables will remain crunchy.
The flavor and vitamins will be retained.
Note: The wok allows you to cook more quickly than with a conventional frying pan. For this reason, all the ingredients should be prepared before you start cooking. The order in which the ingredients are added is equally important: Ingredients that take longer to cook (high-fiber vegetables such as carrots) should be added first, and ingredients with a shorter cooking time (e.g., mushrooms, bean sprouts) should not be added until the end.
18
Turn the control knob to the 0 position. The ¹ display
will go out, the residual heat indicator will appear, and
the illuminated ring around the control knob will flash.
This function has now been deactivated.
Page 19

Wok Function en-us
Table
Preheating setting Heat setting
Heating large volumes of water PowerBoost
Sautéing
Fresh produce, e.g., vegetables - 10 - 11
Frozen products, e.g., sautéed vegetables and chicken - 11 - 12
Deep-frying (100-200 g per batch in 1 l oil, deep-fry in batches)
Fresh products, e.g., spring rolls 12 8 - 9
Frozen products, e.g., spring rolls 12 8 - 9
Frozen vegetables in tempura batter 12 10 - 11
Vegetables in tempura batter 12 9 - 10
Cooking with the lid off
Soup 12 6 - 7
Fondue
Cheese fondue 6 3 - 4
Chocolate fondue 8 3 - 4
Making sauces
e.g., teriyaki sauce - 2 - 3
Keeping food Warm - 1 - 2
19
Page 20

en-us Flexible cooking zone
}
Flexible cooking zone
Flexi ble cooking zone
You can use the flexible cooking zone as a single
cooking zone or as two independent cooking zones, as
required.
It consists of four inductors that work independently of
each other. If the flexible cooking zone is in use, only the
area that is covered by cookware is activated.
Note: Only use cookware with a suitable diameter. The base of the cookware should not protrude over the marked cooking zones.
Cookware Use Recommendations
Place the cookware in the middle. This assures optimal
pot detection and heat distribution.
As a single cooking zone
Diameter smaller than or equal to
5 X" (13 cm)
Place the cookware on one of the
four positions that can be seen in
the illustration.
As Two Independent Cooking Zones
The flexible cooking zone is used like two independent
cooking zones.
Activating
See the section entitled ~ "Operating the
appliance".
As a Combined Cooking Zone
Using the entire cooking zone by connecting both
individual zones.
Linking the two Cooking Zones
1. Position the cookware. Turn one of the control knobs
to the ª position.
2. Use the other control knob to select the heat setting.
The ª display lights up. The heat setting lights up on
the displays for the two cooking zones.
The flex cooking zone has now been activated.
Changing the Heat Setting
To alter the heat setting, use the same control knob you
used to select the original heat setting.
Diameter greater than 5 X" (13 cm)
Place the cookware on one of the
three positions that can be seen in
the illustration.
If the cookware takes up more than
one cooking zone, place it starting
on the upper or lower edge of the
flexible cooking zone.
As two independent cooking zones
The front and rear cooking zones each
have two inductors and can be used
independently of each other. Select the
required heat setting for each of the
cooking zones. Use only one item of
cookware on each cooking zone.
Adding New Cookware
Position the new cookware. Turn the control knob that
was used to select the flex cooking zone to position 0
and then back to the ª position.
The cookware will be detected, and the heat setting that
was previously selected will be retained.
Note: If the cookware is moved from the cooking zone being used or lifted up, the cooking zone begins an automatic search and the heat setting selected previously is retained.
Unlinking the Two Cooking Zones
Turn the control knob that was used to select the flex
cooking zone to the 0 position. The « display lights up.
The flex cooking zone has now been deactivated. The two
cooking zones will now function independently.
Note: If you switch the cooking zone off, and then switch it back on again later, the flexible cooking zone is reset to function as two independent cooking zones.
20
Page 21

Timer functions en-us
O
Timer functions
Timer functi ons
Your cooktop has two timer functions:
▯ Timer
▯ Stop watch
The kitchen timer
You can use the kitchen timer to set a time of up to
99 minutes.
This works independently from the elements and from
other settings. This function does not automatically
switch off an element.
Setting Procedure
1. Touch the Š symbol; ‹‹ and the b and @ symbols will
light up on the short-term timer display.
2. Set the required cooking time using
the A and @ symbols within the next 10 seconds.
Stopwatch Function
The stopwatch shows the cooking time that has elapsed
so far in minutes and seconds (mm.ss). The maximum
duration is 99 minutes and 59 seconds (99.59). If this
value is reached, the display starts again at 00.00.
The stopwatch works independently of the cooking zones
and other settings. This function does not automatically
switch off a cooking zone.
Activate
1. Select a heat setting. The ® display lights up.
2. Touch the ® symbol. ‹‹.‹‹ will light up in the
stopwatch display.
The time begins to elapse.
Stopping the Stopwatch
Touching the ® symbol stops the stopwatch function. The
stopwatch displays remain lit.
Touching the ® symbol again restarts the stopwatch.
Deactivate
Press and hold the ® symbol for a few seconds. This will
stop the stopwatch, and the stopwatch indicators will go
out.
Note: If you press and hold the A or @ symbol, you can set the cooking time more quickly.
3. Touch the Š symbol again to confirm the selected
cooking time.
The time begins to elapse.
Note: If you do not confirm the setting within 10 seconds, the short-term timer will start automatically.
Changing or Cancelling the Cooking Time
1. Touch the Š symbol.
2. Alter the cooking time using the A and @ symbols or
set it to ‹‹.
3. Touch the Š symbol to confirm the cooking time.
When the Cooking Time Has Elapsed
This function has now been deactivated.
An audible signal will sound. ‹‹ flashes in the short-term
timer display.
Touch the Š symbol; the indicators will go out and the
signal tone will cease.
21
Page 22

en-us PowerBoost function
v
PowerBoost Function
PowerBoost functi on
The PowerBoost function enables you to heat up large
volumes of water faster than when using heat setting ‚ƒ.
This function is available for all cooking zones, provided
the other cooking zone in the same group is not in use.
Otherwise, ˜ and‚ƒ will flash on the display for the
selected cooking zone; the‚ƒ heat setting will then be
set automatically without activating this function. In this
case, turn the control knob to position 0.
Note: The power boost function can also be activated in the flexible cooking zone if the cooking zone is being used as a single cooking zone.
Activate
Push in the control knob and turn it to the Ž position.
The ˜ and Ž displays will light up.
x
Frying Sensor
Frying sensor
This function can be used to fry food while maintaining
the suitable frying pan temperature.
Advantages When Frying
▯ The cooking zone only heats up if this is required to
maintain the temperature. This saves energy and
prevents the oil or fat from overheating.
▯ The frying sensor function reports when the empty
frying pan has reached the optimum temperature for
adding oil and then for adding the food.
Notes
▯ Do not place a lid on the pan. Otherwise, the function
does not activate correctly. You can use a splash
guard to prevent splashes of grease.
▯ Use oil or grease that is suitable for deep fat frying. If
butter, margarine, extra virgin olive oil, or lard is used,
use heat setting 1 or 2.
▯ Never leave a frying pan, with or without food,
unattended when it is being heated.
▯ If the temperature of the cooking zone is higher than
that of the cookware or vice-versa, the frying sensor is
not activated correctly.
The function has now been activated.
Deactivate
Turn the control knob to the heat setting you require. The
˜ and Ž display will go out and the heat setting you have
selected will be lit.
This function has now been deactivated.
Note: In certain circumstances, the PowerBoost function may switch itself off automatically in order to protect the electronic elements inside the cooktop.
In this case, the heat setting ‚ƒ will automatically be set.
Turn the control knob to the 0 position or whichever heat
setting you require.
Frying Pans for the Frying Sensor
Frying pans specifically suited for use with the frying
sensor are available. This optional accessory can be
purchased separately from specialist retailers or through
our technical after-sales service. Always quote the
relevant reference number.
▯ GP900001 15 cm frying pan.
▯ GP900002 19 cm frying pan.
▯ GP900003 21 cm frying pan.
▯ GP900004 28 cm frying pan. Only recommended for
the triple cooking zone.
These frying pans have a non-stick coating so that you
only need a small amount of oil to fry food.
22
Page 23

Frying sensor en-us
Notes
▯ The frying sensor has been configured specifically for
this type of frying pan.
▯ Ensure that the diameter of the base of the frying pan
corresponds to the size of the cooking zone. Place the
frying pan in the center of the cooking zone.
▯ The frying sensor may not activate on the flex cooking
zone if the frying pan does not match the size of the
cooking zone or if it is positioned incorrectly. See
section ~ "Cookware Use Recommendations"
▯ Other types of frying pan may overheat. They may
reach a temperature above or below the selected
temperature setting. Select the lowest temperature
setting to begin with and change it if necessary.
Temperature Settings
Heat setting Suitable for
1 Very low Preparing and reducing sauces, steaming vegetables, and frying food in extra virgin olive oil,
butter, or margarine.
2 Low Frying food using extra virgin olive oil, butter, or margarine, e.g. omelettes.
3 Low – medium Frying fish and thick food, such as, meatballs and sausages.
4 Medium – high Frying steaks (medium or well done), frozen breaded products, thin fried food, such as schnit-
zel, strips of meat, and vegetables.
5 High Frying food at high temperatures, e.g. rare steaks (bloody), potato fritters, and fried potatoes.
Frying Chart
The chart lists which heat setting is suitable for each type
of food. The frying time may vary depending on the type,
weight, size and quality of the food.
The set heat setting varies depending on the frying pan
that is used.
Meat
Schnitzel, plain or breaded 4 6 - 10
Fillet 4 6 - 10
Chops* 3 10 - 15
Cordon bleu* 4 10 - 15
Steak, rare (1¼" / 3 cm thick) 5 6 - 8
Steak, medium or well done (1¼" / 3 cm thick) 4 8 - 12
Chicken breast (¾" / 2 cm thick)* 3 10 - 20
Sausages, pre-boiled or raw* 3 8 - 20
Hamburgers, rissoles* 3 6 - 30
Strips of meat, gyros 4 7 - 12
Ground meat 4 6 - 10
Bacon 2 5 - 8
* Turn several times.
** Total cooking time per portion. Fry one after the other.
Preheat the empty pan; add oil and food after the
acoustic signal has sounded.
Temperature setting
Total frying time after the signal tone sounds (min)
23
Page 24

en-us Frying sensor
Temperature
setting
Fish
Fried whole fish, e.g. trout 3 10 - 20
Fish fillet, plain or breaded 3 - 4 10 - 20
Scampi, shrimps 4 4 - 8
Egg dishes
Pancakes** 5 1,5 - 2,5
Omelet** 2 3 - 6
Fried eggs 2 - 4 2 - 6
Scrambled eggs 2 4 - 9
Raisin pancake 3 10 - 15
French toast** 3 4 - 8
Potatoes
Fried potatoes (made from unpeeled boiled potatoes) 5 6 - 12
Fried potatoes (made from raw potatoes) 4 15 - 25
Potato pancakes** 5 2,5 - 3,5
Swiss rösti 2 50 - 55
Glazed potatoes 3 15 - 20
Vegetables
Garlic, onions 1 - 2 2 - 10
Zucchini, eggplants 3 4 - 12
Peppers, green asparagus 3 4 - 15
Braising vegetables (fried in fat but with no water added),
e.g. zucchini, green peppers
Mushrooms 4 10 - 15
Glazed vegetables 3 6 - 10
Fried onions 3 5 - 10
1 10 - 20
Total frying time after the signal
tone sounds (min)
Frozen products
Schnitzel 4 15 - 20
Cordon bleu* 4 10 - 30
Poultry breast* 4 10 - 30
Chicken nuggets 4 10 - 15
Gyros, kebab 4 10 - 15
Fish fillet, plain or breaded 3 10 - 20
Fish sticks 4 8 - 12
French fries 5 4 - 6
Pan-fried dishes, e.g. fried vegetables with chicken 3 6 - 10
Spring rolls 4 10 - 30
Camembert/cheese 3 10 - 15
* Turn several times.
** Total cooking time per portion. Fry one after the other.
24
Page 25

Frying sensor en-us
Temperature
setting
Total frying time after the signal
tone sounds (min)
Sauces
Tomato sauce with vegetables 1 25 - 35
Béchamel sauce 1 10 - 20
Cheese sauce, e.g. Gorgonzola sauce 1 10 - 20
Reduced sauces, e.g. tomato sauce, Bolognese sauce 1 25 - 35
Sweet sauces, e.g. orange sauce 1 15 - 25
Miscellaneous
Camembert/cheese 3 7 - 10
Dried instant meals to which water is added, e.g. pasta dishes 1 5 - 10
Croutons 3 6 - 10
Almonds/walnuts/pine nuts 4 3 - 15
* Turn several times.
** Total cooking time per portion. Fry one after the other.
Setting Procedure
Select the appropriate temperature setting from the
table. Place the empty cooking vessel on the cooking
zone.
1. Use the control knob to select the temperature setting
you require. Temperature settings 1 to 5 are available
for this function; see temperature settings table.
2. Touch the Ú symbol; it will be lit orange.
The ‘ display and the temperature setting you have
selected will be lit.
The function has now been activated.
The ¬, « ,or ª temperature indicator and the
temperature setting you have selected will remain lit
until the frying temperature has been reached. An
audible signal will then sound, and the temperature
indicator will go out.
3. Once the frying temperature has been reached, add
the fat and then the food to the pan.
Notes
▯ If a temperature setting above 5 is selected, the
setting will automatically be set to †. In this case, turn
the control knob to position 5.
▯ Turn the food so that it does not burn.
Switching Off the Frying Sensor
Turn the control knob that was used to select the
temperature to the 0 position. The cooking zone will
switch off, and the residual heat indicator will appear.
25
Page 26

en-us Locking the Control Panel for Cleaning
A
Locking the Control Panel for Cleaning
Locking the Control Panel for Cleaning
If you wipe over the control panel while the cooktop is
switched on, settings may be changed. To avoid doing
this, you can use the cooktop's "Lock control panel for
cleaning" function.
To switch on: Touch the − symbol. An audible signal
sounds. The indicators for the active functions will flash.
The control panel is locked for 10 minutes. You will now
be able to clean the surface of the control panel without
altering the settings.
Switching off: Within the next 10 minutes, touch the −
symbol again.
If the function does not deactivate during these 10
minutes, the cooking field switches off.
Notes
▯ The locking function does not affect the control
knobs. The cook-top can be switched off at any time.
▯ While the locking function is active, the power supply
to the cooktop is disconnected. The cooking zones
may still be hot.
Q
Basic Settings
Basic settings
The appliance has various basic settings. These basic
settings can be altered to suit your individual
requirements.
Display Function
™‚ Signal tones
‹¯ All signal tones activated.*
‹”” Only fault signal activated.
™ƒ Power management function. Limit the total
power of the cooktop (watts)
‹”” Deactivated.*
‚‹‹‹ Lowest setting
‚†‹‹
ƒ‹‹‹
...
Š†‹‹ Highest setting on the cooktop
™„ Check cookware; cooking results
‹ Not suitable
‚ Not ideal
ƒ Suitable
™… Restore to standard settings
‹”” Individual settings.*
‹¯ Restore factory settings.
™† Automatic fan switch-on
‹”” Switched off.
The hood must be switched on manually, if
required.
‘ Switched on in automatic mode.*
In automatic mode, the hood switches itself
on when you switch on one of the cooking
zones.
‚/ƒ/„ Switched on in manual mode.
The hood is switched on at a fixed fan setting
when you switch on any of the cooking zones.
™‡ Fan run-on
‹”” The fan switches itself off when the cooktop
is switched off.
‘ Switched on in automatic mode.*
‹¯ Switched on with standard fan run-on.
¯‹ Settings cannot be changed.
26
™ˆ Switching on the light automatically
‹”” Switched off.*
* Basic setting
Page 27

Basic settings en-us
Display Function
‹¯ Switched on.
The light switches itself on when you switch
on the cooktop.
™‰ Switching off the light automatically
‹”” Switched off.*
The light switches itself off when you switch
off the cooktop.
‹¯ Switched on.
The light switches itself on when you switch
off the hob.
¥—¯ Switched on.
The light switches itself on when the fan runs
on and goes out when the fan run-on time
ends.
* Basic setting
Notes
▯ The ™†, ™‡, ™ˆ and ™‰ settings are only displayed if
the appliance is connected to an extractor hood.
▯ The ™ˆ and ™‰ settings are only displayed if the
appliance is connected to an extractor hood with a
light.
Access the Basic Settings
5. Touch the t symbol.
The displays show the product information.
Product information Display
Customer service index (CSI) ‹‚
Production number ”š
Production number 1 Š†.
Production number 2 ܠ
6. Press the t symbol again to call up the basic
settings.
In the displays, ™‚ and ‹¯ light up as a presetting.
7. Touch the t symbol repeatedly until the required
function is displayed.
8. Then use the @ and A symbols to select the required
setting.
The cooktop must be switched off.
1. Carry out the following operating steps one after the
other without interruption.
2. Push in one of the control knobs and turn it anti-
clockwise to the Ž position.
3. Turn the control knob clockwise to position 1.
4. Turn the control knob anti-clockwise to position 0.
The t symbol will be lit. The illuminated ring around
the control knob will be lit yellow.
9. Touch the t symbol for at least 4 seconds.
The settings have been saved.
Exiting the Basic Settings Menu
1. Turn the control knob anti-clockwise to the
Ž position.
2. Turn the control knob clockwise to position 1.
3. Turn the control knob anti-clockwise to position 0.
The t symbol and the illuminated ring around the control
knob will go out.
27
Page 28

en-us Home Connect
o
Home Connect
Home Connect
This appliance is Wi-Fi enabled and settings can be sent
to the appliance via a mobile device.
If the appliance is not connected to the home network,
the appliance functions in the same way as a cooktop
with no network connection. The cooktop can always be
operated via the control panel.
The availability of the Home Connect function depends
on the availability of Home Connect services in your
country. Home Connect services are not available in
every country. You can find more information on this at
www.home-connect.com.
Notes
▯ Cooktops are not designed to be used unattended –
you must always keep an eye on the cooking process.
▯ Ensure that you follow the safety instructions in this
instruction manual and that these are also observed
when operating the appliance via the Home Connect
app. Follow the instructions in the Home Connect
app.~ "IMPORTANT SAFETY INSTRUCTIONS"
on page 5
▯ Using the Home Connect app, you can send settings
to your appliance, and you must then confirm these on
the appliance. It is not possible to operate the
appliance while you are away from home.
▯ If the appliance is being operated by the controls on
the appliance itself, this mode of operation always has
priority. It is not possible to operate the appliance
using the Home Connect app during this time.
Open or close the Home Connect settings menu
To connect your appliance to Home Connect or establish
the connection to your home network, you will need to
open the Home Connect settings menu on your
appliance.
Note: It is important to carry out the following operating steps without interruption, one after the other.
1. Push in any control knob and turn one notch anti-
clockwise to the Ž position. Keep the control knob
pressed in.
2. Turn the control knob two notches clockwise to
position ª or ¹. Keep the control knob pressed in.
3. Turn the control knob one notch anti-clockwise to
position 0.
Note: If you select settings in the Home Connect settings menu, you will need to exit the Home Connect menu in the same way to save the settings.
Displays on the illuminated ring on the control knob
▯ While you are in the Home Connect menu, the
illuminated ring on the control knob lights up blue.
▯ While the appliance is establishing a connection to
the home network, the illuminated ring on the control
knob flashes blue.
▯ If the appliance has established a connection to the
home network, the illuminated ring on the control
knob lights up green.
▯ If the appliance was not able to establish a connection
to the home network, the illuminated ring on the
control knob lights up red.
Setting Up
To implement settings via Home Connect, you must have
installed and set up the Home Connect app on your
mobile device.
Note: In networked standby mode, your appliance requires a maximum of 2 W.
Setting up the Home Connect app
Note: You require a mobile device with the latest version
of the relevant operating system.
1. On your mobile device, go to the App Store (Apple
devices) or to the Google Play Store (Android
devices).
2. Enter "Home Connect" in the search field.
3. Select the Home Connect app and install it on your
mobile device.
4. Start the app and create your Home Connect login
details. The app will guide you through the
registration process. Make a note of your e-mail
address and password.
28
Page 29

Home Connect en-us
Connecting the appliance to your home network (Wi-Fi)
1. Carry out the following operating steps one after the
other without interruption.
2. Push in any control knob and turn it anti-clockwise to
the Ž position.
3. Turn the control knob clockwise to position ª or ¹.
4. Turn the control knob anti-clockwise to position 0.
The illuminated ring around the control knob lights up
blue.
5. Turn the control knob clockwise to position ª or ¹.
On the control panel, ••’ and ’‹¯‚ are displayed
alternately. The illuminated ring on the control knob
flashes blue. The cooktop is now ready for registration
in the home network.
Automatic Registration in the Home Network
You require a router that has WPS functionality. You will
find information about this in the manual for your router.
You need to be able to access your router.
If you cannot access it, follow the steps under "Manually
logging into your home network".
1. Press the WPS button on the router within the next
two minutes.
2. Launch the Home Connect app on your mobile device
and follow the instructions for automatic network
login.
Manual Registration in the Home Network
Note: To log in to the home network (Wi-Fi) manually,
you require the network name (SSID) and password (key)
for your home network.
1. Wait for two minutes until the illuminated ring on the
control knob flashes red once and ’‹¯ ƒ lights up on
the control panel.
The appliance is now in manual mode.
2. Switch to the general settings menu of your mobile
device and call up the Wi-Fi settings.
The "Home Connect" Wi-Fi connection is available on
your mobile device.
3. Connect to the "Home Connect" (password:
"HomeConnect") Wi-Fi connection.
4. Launch the app on your mobile device and follow the
instructions for automatic network login.
5. The appliance is available in the app on the mobile
device once Ö lights up on the control panel and the
illuminated ring on the control knob lights up green.
Note: If the illuminated ring on the control knob lights up red, it was not possible to establish a connection to the home network. Check the router and start the connection process again. Check that you have correctly entered the password.
Restarting the connection process
1. Turn the control knob anti-clockwise to position 0.
The illuminated ring on the control knob lights up
blue.
2. Turn the control knob clockwise to position ª or ¹.
On the control panel, ••’ and ’‹¯‚ are displayed
alternately. The illuminated ring on the control knob
flashes blue. The cooktop is now ready for registration
in the home network.
Exiting the Home Connect settings menu
1. Carry out the following operating steps one after the
other without interruption.
2. Push in the control knob and turn it anti-clockwise to
the Ž position.
3. Turn the control knob clockwise to position ª or ¹.
4. Turn the control knob anti-clockwise to position 0.
The illuminated ring on the control knob goes out.
Switching the Wi-Fi on/off
You can switch off the Wi-Fi on your cooktop at any time
(e.g. to save energy during a vacation). The connections
to the home network and to the extractor hood remain
saved. When you switch the Wi-Fi back on, the saved
connections are applied.
1. Carry out the following operating steps one after the
other without interruption.
2. Push in any control knob and turn it anti-clockwise to
the Ž position.
29
Page 30

en-us Home Connect
3. Turn the control knob clockwise to position ª or ¹.
4. Turn the control knob anti-clockwise to position 0.
The illuminated ring around the control knob lights up
blue.
5. Turn the control knob clockwise to position 1.
The illuminated ring around the control knob lights up
green. Ö lights up on the control panel. After
five seconds, the Wi-Fi is switched off and the
illuminated ring on the control knob lights up blue.
The Ö symbol on the control panel goes out.
If you want to switch the Wi-Fi back on, run through the
same operating sequence. The illuminated ring on the
control knob lights up blue. After 5 seconds, the Wi-Fi is
switched on and the illuminated ring around the control
knob lights up green. Ö. lights up on the control panel.
Resetting the Connection
You can reset the connections you have saved for your
home network and cooktop at any time.
1. Carry out the following operating steps one after the
other without interruption.
2. Push in any control knob and turn it anti-clockwise to
the Ž position.
3. Turn the control knob clockwise to position ª or ¹.
4. Turn the control knob anti-clockwise to position 0.
The illuminated ring around the control knob lights up
blue.
5. Turn the control knob clockwise to position 2.
¥“† lights up on the control panel. After 30 seconds,
the connection is reset and the illuminated ring on the
control knob flashes. The connection is reset once
š‹¯“ lights up on the control panel and the
illuminated ring on the control knob lights up green.
Notes
▯ You can continue to use your cooktop as normal while
updates are downloading.
▯ Depending on your personal settings in the app,
software updates can also be set to download
automatically.
▯ We recommend that you install security updates as
soon as possible.
Remote Diagnostics
Customer Service can use Remote Diagnostics to access
your appliance if you contact them, have your appliance
connected to the Home Connect server and if Remote
Diagnostics is available in the country in which you are
using the appliance
Note: For further information and details about the availability of Remote Diagnostics in your country, please visit the Service/Support section of your local website: www.home-connect.com
Information on Data Protection
When your appliance is connected to a WLAN network
that is connected to the Internet for the first time, your
appliance transmits the following categories of data to
the Home Connect server (initial registration):
▯ Unique appliance identification (consisting of
appliance codes as well as the MAC address of the
installed Wi-Fi communication module).
▯ Security certificate of the Wi-Fi communication
module (to ensure a secure data connection).
▯ The current software and hardware version of your
appliance.
▯ Status of any previous resetting to factory settings.
Software Update
Using the software update function, your cooktop's
software can be updated (e.g. for the purpose of
optimization, troubleshooting or security updates). To do
this, you need to be a registered Home Connect user,
have installed the app on your mobile device and be
connected to the Home Connect server.
As soon as a software update is available, you will be
informed by the Home Connect app, from which you will
also be able to download the update.
30
This initial registration prepares the Home Connect
functions for use and is only required when you want to
use these Home Connect functions for the first time.
Note: Ensure that the Home Connect functions can be used only in conjunction with the Home Connect app. Information on data protection can be accessed in the Home Connect app.
Page 31

Home Connect en-us
Declaration of Conformity
Gaggenau Hausgeräte GmbH hereby declares that the
appliance with Home Connect functionality meets the
basic requirements and other relevant provisions of
Directive 2014/53/EU.
A detailed RED Declaration of Conformity can be found
online at www.gaggenau.com among the additional
documents on the product page for your appliance.
2.4 GHz band: max. 100 mW
5 GHz band: max. 100 mW
BE BG CZ DK DE EE IE EL
ES FR HR IT CY LV LT LU
y
HU MT NL AT PL PT RO SI
SK FI SE UK NO CH TR
5 GHz WLAN (Wi-Fi): For indoor use only
Wi-Fi® Module
INDUSTRY CANADA STATEMENT
This device complies with Industry Canada licenseexempt RSS standard(s).
Operation is subject to the following two conditions:
1. This device may not cause interference, and
2. This device must accept any interference, including
interference that may cause undesired operation of
the device.
Operation in the band 5150-5250 MHz is only for indoor
use to reduce the potential for harmful interference to cochannel mobile satellite systems.
FCC/IC Statements
Model: COM2
FCC ID: 2AHES-COM2
IC: 21152-COM2
The Home Connect module is a communication device
designed to provide communication between appliances
and smart devices.
This module is integrated at the factory, under direct
control of BSH Home Appliances Corporation, and is not
user servicable or upgradable. At least 77/8 inch (20 cm)
separation distance should be maintained from device to
user.
FCC COMPLIANCE STATEMENT
9 CAUTION
Changes or modifications not expressly approved
could void your authority to use this equipment.
This device complies with Part 15 of the FCC Rules.
Operation to the following two conditions:
1. This device may not cause harmful interference, and
2. This device must accept any interference received,
including interference that may cause undesired
operation.
31
Page 32

en-us Connecting an extractor hood
e
Connecting an extractor hood
Connecti ng an ext r actor hood
You can connect this appliance to a suitable extractor
hood and then control the functions of the hood via your
cooktop.
There are two options for connecting the appliances to
each other:
Connecting appliances via your home network
If both appliances are compatible with Home Connect,
you can connect them via the home network. The
appliances are connected via the Home Connect app.
You can also use both the hood control and Home
Connect.
Connecting via your home network
Ensure that both appliances are connected to the Home
Connect app.
Select the required cooktop in the Home Connect app. In
the settings, you can search for the required extractor
hood and connect to the cooktop.
Connecting appliances directly
You can connect both appliances directly, without
connecting to a home network. It is not possible to use
the Home Connect functions. The appliance functions in
the same way as a cooktop with no network connection.
Notes
▯ Make sure you follow the safety instructions in the
instruction manual for your extractor hood and that
these are complied with even when operating the
appliance via the hood controls on the cooktop.
▯ If the appliance is being operated by means of the
controls on the extractor hood, this mode of operation
always has priority. It is not possible to use the hood
controls on the cooktop during this time.
▯ In networked standby mode, your appliance requires a
maximum of 2 W.
You can connect several cooktops that are compatible with Home Connect to an extractor hood:
1. Connect the first cooktop to the extractor hood.
2. Switch off the Wi-Fi on the cooktop.
3. Connect the second cooktop to the extractor hood.
4. Switch the Wi-Fi on the first cooktop back on again.
Connecting Directly
Note: If you connect your cooktop directly to the
extractor hood, it cannot be connected to your home
network as well and you will not be able to use Home
Connect.
1. Carry out the following operating steps one after the
other without interruption.
2. Push in one of the control knobs and turn it anti-
clockwise to the Ž position.
3. Turn the control knob clockwise to position ª or ¹.
4. Turn the control knob anti-clockwise to position 0.
The illuminated ring around the control knob lights up
blue.
5. Turn the control knob clockwise to position ª or ¹.
On the control panel, ••’ and ’‹¯‚ are displayed
alternately. The illuminated ring on the control knob
flashes blue. The cooktop is now ready for registration
in the home network.
32
Page 33

Cleaning and maintenance en-us
6. You have two minutes to initiate the connection on the
extractor hood. For more information, refer to the
section entitled "Connecting to the cooktop" in the
instruction manual for your extractor hood.
The connection process may take a few minutes. The
cooktop is connected to the extractor hood once ˜‘‚
lights up on the control panel and the illuminated ring
on the control knob lights up green. The Ö symbol is
displayed on the cooktop's control panel.
Saving the connection and exiting the settings menu
1. Carry out the following operating steps one after the
other without interruption.
2. Push in the control knob and turn it anti-clockwise to
the Ž position.
3. Turn the control knob clockwise to position ª or ¹.
4. Turn the control knob anti-clockwise to position 0.
The illuminated ring on the control knob goes out.
Controlling the Hood via the Cooktop
In the Home Connect app, you can adjust the behavior of
your extractor hood depending on the switch-on/off of
the cooktop or individual cooking zones.
Cleaning and Maintenance
Cleaning and maintenance
Daily Cleaning
Note: Recommended cleaners indicate a type of cleaner
and do not constitute an endorsement of a specific
brand.
Glass Ceramic Cooktop
9 CAUTION
Do not use any kind of cleaner on the glass while
the surface is hot; use only the razor blade scraper.
The resulting fumes can be hazardous to your
health. Heating the cleaner can chemically attack
and damage the surface.
Clean the surface when it is completely cool, with the
following exception: remove dry sugar, sugar syrup,
tomato products and milk immediately with the razor
blade scraper (see cleaning chart).
Wipe off spatters with a clean, damp sponge or a paper
towel. Rinse and dry. Use white vinegar if smudge
remains; rinse.
Apply a small amount of the glass ceramic cooktop
cleaner. When dry, buff surface with a clean paper towel
or cloth.
Stainless steel side trim
Use a cleaning pad for this piece. For moderate or heavy
soil, use a powder cleaner such as BonAmi® or
SoftScrub® (without bleach).
Wipe using a damp sponge or cloth, rinse and dry.
Control knob
Wipe with warm soapy cloth, rinse and dry.
Wok Support
The wok support should not be cleaned in the
dishwasher.
Cleaning Guidelines
When using a cleaner, use only a small amount; apply to
a clean paper towel or cloth. Wipe on the surface and
buff with a clean dry towel.
For best results, use cleaners such as glass ceramic
cooktop cleaner, BonAmi®, Soft Scrub® (without
bleach), and white vinegar.
33
Page 34

en-us Cleaning and maintenance
Avoid these Cleaners
▯ Glass cleaners which contain ammonia or chlorine
bleach. These ingredients may damage or permanently
stain the cooktop.
▯ Caustic cleaners - cleaners such as Easy Off® may
stain the cooktop surface.
▯ Abrasive cleaners.
▯ Metal scouring pads and scrub sponges such as
Scotch Brite® can scratch and/or leave metal marks.
▯ Soap-filled scouring pads such as SOS® can scratch
the surface.
▯ Powdery cleaners containing chlorine bleach can
permanently stain the cooktop.
▯ Flammable cleaners such as lighter fluid or WD-40.
Cleaning Chart
Type of Soil Possible Solution
Dry sugar, sugar syrup,
milk or tomato spills.
Melted plastic film or foil.
All these items REQUIRE
IMMEDIATE REMOVAL.
Failure to remove these
immediatly can perma-
nently damage the sur-
face.
Remove these types of spills
while the surface is hot using
the razor blade scraper. Use a
new, sharp razor in the
scraper. Remove pan and turn
off the cooking zone. Wearing
an oven mitt, hold scraper at
30° angle, using care not to
gouge or scratch the glass.
Push soil off the heated area.
After the surface has cooled,
remove the residue and apply
the glass ceramic cooktop
cleaner.
9 WARNING
Risk of injury!
The blade is extremely
sharp. Risk of cuts. Protect the blade when not
in use. Replace the
blade immediately when
any imperfections are
found. Follow manufacturer’s instructions.
Type of Soil Possible Solution
Greasy spatters Use a soapy sponge or cloth
to remove grease; rinse thoroughly and dry. Apply glass
ceramic cooktop cleaner.
Metal marks: Iridescent
stains
Pans with aluminum, copper
or stainless steel bases may
leave marks. Treat immediately after surface has cooled
with glass ceramic cooktop
cleaner. If this does not
remove the marks, try a mild
abrasive (Bon Ami®, Soft
Scrub® without bleach) with a
damp paper towel. Rinse and
reapply glass ceramic cooktop cleaner. Failure to remove
metal marks before the next
heating makes removal very
difficult.
Hard water spots:
Hot cooking liquids
dripped on surface
Minerals in some water can be
transferred onto the surface
and cause stains. Use undiluted white vinegar, rinse and
dry. Recondition with glass
ceramic cooktop cleaner.
Remove boilovers and stains
before using the cooktop
again.
Surface scratches:
Small scratches are
common and do not
affect cooking. They
become smoother and
less noticeable with
daily use of the glass
ceramic cooktop
cleaner.
Apply glass ceramic cooktop
cleaner before using to
remove sand-like grains and
grit such as salt and seasoning. Scratches can be
reduced by using pans with
bases that are smooth, clean,
and dry before use. Use recommended glass ceramic
cooktop cleaner daily.
NOTICE
Avoid contact with surface by
jewelry, wrist watches and metallic utensils. These can
scratch the surface. Do not
stack kitchen utensils or dishware on the appliance.
Burned-on food soil, dark
streaks, and specks
34
Soften by laying a damp paper
towel or sponge on top of soil
for 30 minutes. Use a plastic
scrubber and glass ceramic
cooktop cleaner or use the
razor blade scraper. Rinse
and dry.
Maintenance
This appliance requires no maintenance other than daily
cleaning. For best results, apply cooktop cleaning cream
daily.
Page 35

FAQ
FAQ
Noises
Why can I hear noises while I'm cooking?
Noises may be generated while using the cooktop depending on the base material of the cookware. These
noises are normal for induction technology. They do not indicate a defect.
Possible noises:
A low humming noise like the one a transformer makes:
Occurs when cooking at a high heat setting. The noise disappears or becomes quieter when the heat setting
is reduced.
Low whistling noise:
Occurs when the cookware is empty. The noise disappears when water or food is added to the cookware.
Crackling:
Occurs when using cookware made from layers of different material or when using cookware of different
sizes and different materials at the same time. The volume of the noise can vary depending on the quantity of
food being cooked or the cooking method.
FAQ en-us
High-pitched whistling noises:
Can occur when two cooking zones are used on the highest heat setting at the same time. The whistling
noises disappear or become quieter when the heat setting is reduced.
Fan noise:
The cooktop is equipped with a fan that switches on automatically at high temperatures. The fan may continue to run even after you have switched off the cooktop if the temperature detected is still too high.
Cookware
Which types of cookware can be used with an induction cooktop?
You can find information on which types of cookware can be used with an induction cooktop in the section
~ "Cooking with induction"
Why is the cooking zone not heating up and why is the heat setting flashing?
The cookware is on a different cooking zone the one that has been switched on.
Make sure that you have switched on the cooking zone on which the cookware is standing.
The cookware is too small for the cooking zone that is switched on or it is not suitable for induction cooking.
Check that the cookware is suitable for induction cooking and that it is placed on the cooking zone that best
corresponds to its size. You can find information on the type, size, and positioning of the cookware in the sections ~ "Suitability Test of Cookware"and
Why is it taking so long for the cookware to heat up or why is it not heating up sufficiently despite being on a high
heat setting?
The cookware is too small for the cooking zone that is switched on or it is not suitable for induction cooking.
Check that the cookware is suitable for induction cooking and that it is placed on the cooking zone that best
corresponds to its size. You can find information on the type, size, and positioning of the cookware in the sections ~ "Suitability Test of Cookware"and
35
Page 36

en-us FAQ
Cookware
How do you switch on the two-ring and three-ring cooking zones?
These cooking zones can detect cookware of different sizes. The cooking zone automatically activates the one, two-, or three-ring cooking zone, depending on the material and characteristics of the cookware. This ensures
that the right amount of heat is supplied in order to achieve good cooking results.
Cookware that corresponds to the size of the cooking zone and has a fully ferromagnetic base is most suitable. You can find information on which types of cookware can be used with an induction cooktop in the section ~ "Cooking with induction"
Cleaning
How do I clean the cooktop?
Using a special glass-ceramic cleaning agent produces the best results. We advise against using harsh or
abrasive cleaning agents, dishwater detergent (concentrated) or scouring pads.
You can find more information about cleaning and caring for your cooktop in the section on ~ "Cleaning
and Maintenance"
36
Page 37

Faults – what to do? en-us
3
Faults – what to do?
Faults – what to do?
Generally, faults are easy to remedy. Please read the
notes in the table before calling Customer Service.
Display Possible cause Remedial action
None The power supply has been discon-
nected.
The device has not been connected
according to the circuit diagram.
Use other electrical appliances to check whether a
short-circuit has occurred in the power supply.
Check that the appliance has been connected as
shown in the circuit diagram.
Electronic fault. If the fault cannot be rectified, inform the technical
after-sales service.
An audible signal
sounds.
The cooking zone has
been switched off. The
The control panel is damp or an object
is covering it.
The control knob has not been turned
for an extended period.
Dry the control panel or remove the object.
Turn the control knob to the 0 position. Switch the
cooking zone back on.
illuminated ring on the
control knob is flashing.
The appliance is too hot. Read the fault message on the control panel.
The cooking zone display is flashing.
The cookware is not detected. Ensure
that the cookware is suitable for induction cooking.
Ensure that the diameter of the base of the cook-
ware corresponds to the size of the cooking zone.
Turn the control knob to the 0 position. Switch the
cooking zone back on.
”ƒ The electronics have overheated and
the corresponding cooking zone has
been switched off.
”… The electronics have overheated and
all cooking zones have been switched
Remove any cookware from the cooking zone.
When the fault code goes out, the cooking zone
has cooled down sufficiently. Turn the control knob
to the 0 position. Then select the heat setting as
usual.
off.
Ӡ + heat setting and
audible signal
There is hot cookware near the control
panel. There is a risk that the electron-
Remove the cookware. The fault display goes out
shortly afterwards. You can resume cooking.
ics will overheat.
Ӡ and audible signal There is hot cookware near the control
panel. To protect the electronics, the
cooking zone has been switched off.
”‚ / ”‡ The cooking zone has overheated and
has been switched off to protect the
work surface.
”‰ The cooking zone was operating for an
extended period without interruption.
“Š‹‹‹
“Š‹‚‹
The supply voltage is faulty/outside of
the normal operating range.
Remove the cookware. Wait a few seconds. When
the fault code on the display goes out, you can
resume cooking.
Wait until the electronics have cooled down suffi-
ciently before switching the cooking zone on
again.
Turn the control knob to the 0 position. Switch the
cooking zone back on.
Contact your energy provider.
—…‹‹ The cooktop is not connected properly Disconnect the cooktop from the power supply.
Check that the appliance has been connected as
shown in the circuit diagram.
Do not place hot cookware on the control panel.
Notes
▯ If the fault code is not listed in the table, disconnect
the cooktop from the power supply, and wait
30 seconds before reconnecting it. If this code
appears again, contact technical Customer Service,
and specify which fault code has appeared.
▯ If a fault occurs, the appliance will not switch to
standby mode.
37
Page 38

en-us Faults – what to do?
Demo Mode
If š“ ‹¯ is displayed, demo mode has been activated.
The appliance will not heat up. Disconnect the appliance
from the power supply. Wait 30 seconds before
reconnecting it. Then deactivate the demo mode within
three minutes as follows:
1. Turn one of the control knobs anti-clockwise to
position Ž.
2. Turn the same control knob clockwise to position 1.
3. Turn the same control knob anti-clockwise to position
0.
The illuminated ring around the control knob will be lit
yellow.
4. Turn the same control knob clockwise to position 1.
The ‹¯ display will be lit and the illuminated ring will
be green.
Wait for five seconds. The ‹”” display will be lit and
the illuminated ring will turn yellow.
Demo mode has now been deactivated.
Suitability Test of Cookware
This function can be used to check the speed and quality
of the cooking process depending on the cookware.
The result is a reference value and depends on the
properties of the cookware and the cooking zone being
used.
1. Fill the pan with approx. 8 oz. (200 ml) of water, and
place it at room temperature in the middle of the
cooking zone that most closely matches the diameter
of the pan base.
2. Go to the basic settings, and select the ™„ setting.
The ‹”” indicator lights up.
3. Touch the @ or A symbol. The ‹¯ display will be lit. A
signal tone will sound and the cooking zone indicators
will be lit.
The function has now been activated.
The ¥—¯ display will be lit. After a few seconds, the
cooking zone displays will show the results for the quality
and speed of the cooking process.
Check the result using the table below:
Result
‹ The cookware is not suitable for the cooking zone
and will therefore not heat up.*
‚ The cookware is taking longer to heat up than
expected and the cooking process is not going as
well as it ought to.*
ƒ The cookware is heating up correctly and cooking
is progressing well.
* If there is a smaller cooking zone available, try the cook-
ware again on the smaller cooking zone.
To activate the function again, touch the @ or A symbol.
Notes
▯ Do not use the wok or wok accessories with this
function.
▯ The flex cooking zone is set to function as a single
cooking zone; only test one item of cookware at a time
on it.
▯ If the diameter of the cooking zone that is used is
much smaller than the diameter of the cookware, only
the middle of the cookware can be expected to heat
up. This may result in the cooking results not being as
good as expected or being less than satisfactory.
▯ You can find information about this function in section
~ "Basic settings"
▯ You can find information on the type, size, and
positioning of the cookware in the sections entitled
and ~ "Flexible cooking zone".
38
Page 39

Customer Service
Customer Service
If your appliance needs repairs, our Customer Service is
there for you. We work hard to help solve problems
quickly and without unnecessary service calls, getting
your appliance back up and running correctly in the least
amount of time possible.
When you call, please indicate the product number
(E-Nr.) and serial number (FD-Nr.) so that we can support
you in a qualified manner. You will find the data plate with
these numbers on the bottom of the appliance. To avoid
having to search when you need it, you can enter your
appliance data and the Customer Service telephone
number here.
E-Nr. FD-Nr.
Customer Service O
Customer Service en-us
Please read the use and care instructions provided with
your appliance. Failure to do so may result in an error in
using the appliance resulting in unnecessary service
calls, which may not be covered by the warranty.
Please find the contact data of all countries in the
enclosed customer service list.
To book a service visit and product advice
USA 877 442 4436
toll-free
CANADA 877 442 4436
toll-free
39
Page 40

*DJJHQDX
%6++RPH$SSOLDQFH&RUSRUDWLRQ
0DLQ6WUHHW6XLWH
,UYLQH&$
en-us
ZZZJDJJHQDXFRPXV
%6++RPH$SSOLDQFHV
*DJJHQDX+DXVJHUlWH*PE+
&DUO:HU\6WUDH
0QFKHQ
*(50$1<
9001558678 (000505)
*9001558678*