

Gaggenau BO 480 610, BO 481 610, BX 481 610 Use And Care Manual

Gaggenau Use and care manual
BO 480/481 610
Built-in oven

Table of Contents
Use and care manual
Signal Words for Safety and Best Use 3
IMPORTANT SAFETY INSTRUCTIONS 4
Proper Installation and Maintenance 4
Fire Safety 5
Burn Prevention 5
Child Safety 6
Cleaning Safety 6
Cookware Safety 6
State of California Proposition 65 Warnings 7
Causes of Damage 8
Protecting the environment 8
Tips for saving energy 8
Getting to know the appliance 9
Oven 9
Displays and controls 10
Symbols 10
Colors and display 11
Automatic door opening 11
Additional information ( and ) 11
Cooling fan 11
Program selection positions 12
Accessories 13
Special accessories 13
Before first use 14
Setting the language 14
Setting the time format 14
Setting the time 14
Setting the date format 15
Setting the date 15
Setting the temperature format 15
Completing initial set-up 15
Heating up the oven 15
Cleaning accessories 15
Activating the appliance 16
Standby 16
Activate appliance 16
Operating the appliance 16
Oven interior 16
Inserting accessories 16
Turning on 17
Quick heat 17
Safety lock 17
Timer functions 17
Launching the timer menu 17
Timer 17
Stopwatch 18
Cooking time 18
End of cooking time 19
Sabbath mode 20
Setting the Sabbath mode 20
Personal recipes 21
Recording a recipe 21
Programming a recipe 22
Entering a name 22
Starting a recipe 23
Deleting a recipe 23
Core temperature probe 23
Insert the core temperature probe in the food to be
cooked 23
Setting the core temperature 24
Recommended core temperature values 24
Rotisserie spit 26
Preparation 26
Switching on the rotisserie spit 26
Switching off the rotisserie spit 27
Roasting function 27
Child lock 28
Activating the child lock 28
Deactivating the child lock 28
Factory setting 29
Cleaning and maintenance 31
Cleaning agents 31
Removing slide-in racks 32
Pyrolysis 32
Preparing pyrolysis 33
Starting pyrolysis 33
Cleaning accessories with pyrolysis 33
Troubleshooting 34
Power cut 34
Demo mode 34
Replacing the oven lamp 35
Customer service 35
Tables and tips 36
Acrylamide in foodstuffs 41
2

Additional information on products, accessories,
replacement parts and services can be found at
www.gaggenau.com and in the online shop
www.gaggenau-eshop.com
Signal Words for Safety and Best
Use
9 WARNING
This indicates that death or serious injuries may
occur as a result of non-observance of this
warning.
9 CAUTION
This indicates that minor or moderate injuries
may occur as a result of non-observance of this
warning.
NOTICE: This indicates that damage to the appliance
or property may occur as a result of non-compliance
with this advisory.
Note: This alerts you to important information and/or
tips.
3

9 IMPORTANT SAFETY INSTRUCTIONS
READ AND SAVE THESE INSTRUCTIONS
IMPORTANT SAFETY INSTRUCTION
READ AND SAVE THESE INSTRUCTIONS
WARNING
When properly cared for, your new appliance has
been designed to be safe and reliable. Read all
instructions carefully before use. These precautions
will reduce the risk of burns, electric shock, fire, and
injury to persons. When using kitchen appliances,
basic safety precautions must be followed, including
those in the following pages.
Proper Installation and Maintenance
WARNING
When removing the door make sure oven is cool and
power to the oven has been turned off before
removing the door. Failure to do so could result in
burns.
The oven door is heavy and fragile. Use both hands to
remove the oven door. The door front is glass. Handle
carefully to avoid breaking.
Grasp only the sides of the oven door. Do not grasp
the handle as it may swing in your hand and cause
injury or damage.
Have the installer show you the location of the circuit
breaker or fuse. Mark it for easy reference.
This appliance must be properly installed and
grounded by a qualified technician. Connect only to
properly grounded outlet. Refer to Installation
Instructions for details.
This appliance is intended for normal family
household use only. It is not approved for outdoor
use. See the Warranty. If you have any questions,
contact the manufacturer.
Do not store or use corrosive chemicals, vapors,
flammables or nonfood products in or near this
appliance. It is specifically designed for use when
heating or cooking food. The use of corrosive
chemicals in heating or cleaning will damage the
appliance and could result in injury.
Do not operate this appliance if it is not working
properly, or if it has been damaged. Contact an
authorized servicer.
Do not obstruct oven vents.
Do not repair or replace any part of the appliance
unless specifically recommended in this manual. Refer
all servicing to a factory authorized service center.
Failure to grasp the oven door firmly and properly
could result in personal injury or product damage.
Lay the door on a flat smooth surface so that the door
cannot fall over. Failure to do so may result in
personal injury or damage to the appliance.
WARNING
To avoid injury from hinge bracket snapping closed,
be sure that both levers are securely in place before
removing door. Also, do not force door open or closed
- the hinge could be damaged and injury could result.
WARNING
Make sure the appliance and lights are cool and
power to the appliance has been turned off before
replacing the light bulb(s). Failure to do so could
result in electrical shock or burns.The lenses (if
equipped) must be in place when using the
appliance.The lenses (if equipped) serve to protect
the light bulb from breaking.The lenses (if equipped)
are made of glass. Handle carefully to avoid breaking.
Broken glass can cause an injury.
In the event of an error the display flashes and beeps
continuously. If this happens during self-clean,
disconnect appliance from the power supply and call a
qualified technician.
In the event of an error the display flashes and beeps
continuously. Disconnect appliance from the power
supply and call a qualified technician.
4
WARNING
Light socket is live when door is open if main power
supply is not turned off.

9 IMPORTANT SAFETY INSTRUCTIONS
READ AND SAVE THESE INSTRUCTIONS
Fire Safety
WARNING
NEVER cover any slots, holes or passages in the oven
bottom or cover an entire rack with materials such as
aluminum foil. Doing so blocks air flow through the
oven. Aluminum foil linings may also trap heat,
causing a fire hazard.
If materials inside an oven or warming drawer should
ignite, keep door closed. Turn off the appliance and
disconnect the circuit at the circuit breaker box.
WARNING
Use this appliance only for its intended use as
described in this manual. NEVER use this appliance
as a space heater to heat or warm the room. Doing so
may result in overheating the appliance. Never use the
appliance for storage.
Always have a working smoke detector near the
kitchen.
In the event that personal clothing or hair catches fire,
drop and roll immediately to extinguish flames.
Have an appropriate fire extinguisher available,
nearby, highly visible and easily accessible near the
appliance.
Smother flames from food fires other than grease fires
with baking soda. Never use water on cooking fires.
WARNING
TO REDUCE THE RISK OF INJURY TO PERSONS IN
THE EVENT OF A GREASE FIRE, OBSERVE THE
FOLLOWING:
a) SMOTHER FLAMES with a close-fitting lid,
cookie sheet, or metal tray, then turn off the
burner. BE CAREFUL TO PREVENT BURNS. If
the flames do not go out immediately, EVACUATE
AND CALL THE FIRE DEPARTMENT.
b) NEVER PICK UP A FLAMING PAN – You may be
burned.
c) DO NOT USE WATER, including wet dishcloths
or towels – a violent steam explosion will result.
d) Use an extinguisher ONLY if:
‒ You know you have a Class ABC extinguisher,
and you already know how to operate it.
‒ The fire is small and contained in the area
where it started.
‒ The fire department is being called.
‒ You can fight the fire with your back to an exit.
Burn Prevention
DO NOT TOUCH HEATING ELEMENTS OR
INTERIOR SURFACES OF OVEN - Heating elements
may be hot even though they are dark in color. Interior
surfaces of an oven become hot enough to cause
burns. During and after use, do not touch, or let
clothing, potholders, or other flammable materials
contact heating elements or interior surfaces of oven
until they have had sufficient time to cool. Other
surfaces of the appliance may become hot enough to
cause burns. Among these surfaces are oven vent
openings, surfaces near these openings and oven
doors.
Exercise caution when opening the appliance.
Standing to the side, open the door (or drawer) slowly
and slightly to let hot air and/or steam escape. Keep
your face clear of the opening and make sure there
are no children or pets near the unit. After the release
of hot air and/or steam, proceed with your cooking.
Keep doors shut unless necessary for cooking or
cleaning purposes. Do not leave open doors
unattended.
Do not heat or warm unopened food containers. Buildup of pressure may cause the container to burst and
cause injury.
Use caution when cooking foods with high alcohol
content (e.g. rum, brandy, bourbon) in the oven.
5

9 IMPORTANT SAFETY INSTRUCTIONS
READ AND SAVE THESE INSTRUCTIONS
Alcohol evaporates at high temperatures. There is a
risk of burning as the alcohol vapors may catch fire in
the oven. Use only small quantities of alcohol in foods,
and open the oven door carefully.
Always place oven racks in desired location while
oven is cool. If a rack must be moved while oven is
hot, do not let potholder contact the heating elements.
CAUTION
To avoid possible injury or damage to the appliance,
ensure rack is installed exactly per installation
instructions and not backwards or upside down.
Always use dry potholders. Moist or damp potholders
on hot surfaces may result in burns from steam. Do
not let potholder touch hot heating elements. Do not
use a towel or other bulky cloth.
Secure all loose garments, etc. before beginning. Tie
long hair so that it does not hang loose, and do not
wear loose fitting clothing or hanging garments, such
as ties, scarves, jewelry, or dangling sleeves.
Child Safety
Cleaning Safety
IMPORTANT SAFETY NOTICE: The California Safe
Drinking Water and Toxic Enforcement Act requires
the Governor of California to publish a list of
substances known to the state to cause cancer, birth
defects or other reproductive harm, and requires
businesses to warn customers of potential exposure to
such substances. The burning of gas cooking fuel and
the elimination of soil during self-cleaning can
generate some by-products which are on the list. To
minimize exposure to these substances, always
operate this unit according to the instructions
contained in this booklet and provide good ventilation.
When self-cleaning, confirm that the door locks and
will not open. If the door does not lock, do not run
Self-Clean. Contact service.
Wipe out excessive spillage before self-cleaning the
oven.
Birds have very sensitive respiratory systems. Keep
pet birds out of the kitchen or other rooms where
kitchen fumes could reach them. During self-clean,
fumes are released that may be harmful to birds.
Other kitchen fumes such as overheating margarines
and cooking oils may also be harmful.
When children become old enough to use the
appliance, it is the legal responsibility of the parents
or legal guardians to ensure that they are instructed in
safe practices by qualified persons.
Do not allow anyone to climb, stand, lean, sit, or hang
on any part of an appliance, especially a door,
warming drawer, or storage drawer. This can damage
the appliance, and the unit may tip over, potentially
causing severe injury.
Do not allow children to use this appliance unless
closely supervised by an adult. Children and pets
should not be left alone or unattended in the area
where the appliance is in use. They should never be
allowed to play in its vicinity, whether or not the
appliance is in use.
CAUTION
Items of interest to children should not be stored in an
appliance, in cabinets above an appliance or on the
backsplash. Children climbing on an appliance to
reach items could be seriously injured.
Keep oven free from grease build up.
Cookware Safety
NOTICE: Do not place food directly on oven bottom.
Follow the manufacturer’s directions when using
cooking or roasting bags.
Do not clean parts or accessories in the self-clean
oven.
WARNING
Risk of electric shock
Use of a wrong core temperature probe can damage
the insulation. Use only the core temperature probe
intended for this appliance.
6

9 IMPORTANT SAFETY INSTRUCTIONS
READ AND SAVE THESE INSTRUCTIONS
State of California Proposition 65
Warnings
WARNING
This product contains chemicals known to the State of
California to cause cancer, birth defects or other
reproductive harm.
7

Causes of Damage
Protecting the environment
▯ Accessories, foil, baking paper or cookware on
the bottom of the oven interior: do not place any
accessories on the bottom of the oven interior. Do
not line the bottom of the oven interior with any
type of foil whatever or baking paper. Do not
place cookware on the bottom of the oven interior
when a temperature above 122°F (50 °C) is set.
This produces a build-up of heat. Baking and
roasting times are no longer correct and the
enamel is damaged.
▯ Water in the hot oven interior: Never pour water
into the hot oven interior. Steam is produced.
Damage to the enamel can arise due to the
temperature change.
▯ Do not leave moist groceries in a closed oven for
an extended period of time. It can lead to
corrosion inside the oven.
▯ Fruit juice can leave stains in the oven. Always
remove fruit juice immediately and wipe up first
with a damp and then a dry cloth.
▯ Cooling with the appliance door open: only allow
the oven cavity to cool when it is closed. Even if
the appliance door is only open a little, front
panels of adjacent units could be damaged over
time.
▯ Highly soiled door seal: the appliance door will no
longer close properly during operation if the door
seal is highly soiled. Adjoining furniture fronts
may be damaged. Always keep the door seal
clean.
▯ Appliance door as a seat or storage surface: do
not stand, sit or hang on the appliance door. Do
not place any cookware or accessories on the
appliance door.
▯ Inserting accessories: depending on the
appliance type, accessories can scratch the door
pane when closing the appliance door. Always
slide accessories fully into the oven interior.
▯ Do not hold or carry the appliance by the door
handle. The door handle cannot carry the weight
of the device and could break off.
Unpack the appliance and dispose of the packaging in
line with environmental requirements.
Tips for saving energy
▯ Open the appliance door as little as possible
while cooking, baking or roasting.
▯ Use dark, black-painted or enameled baking
forms. These absorb the heat particularly well.
▯ It is best to bake several cakes in succession. The
oven is still warm. This shortens the baking time
for the second cake. You can also slide in two loaf
tins next to each other.
▯ In the hot air mode, you can bake simultaneously
on several levels.
▯ For longer cooking times, you can switch off the
oven 10 minutes before the end of the cooking
time and you can use the residual heat to finish
cooking.
8

Getting to know the appliance
You will get to know your new appliance here. We
explain the control panel and the individual controls to
you. You are informed about the oven interior and
accessories.
Oven
1 Door seal
2 Rotisserie spit drive
3 Grill heating element
4 Oven vents
5 Socket for additional heating element (special
acessory for baking stone and roaster)
6 Socket for core temperature probe
7 Recessed handle
NOTICE: Do not place food directly on oven bottom.
Do not obstruct oven vents.
9
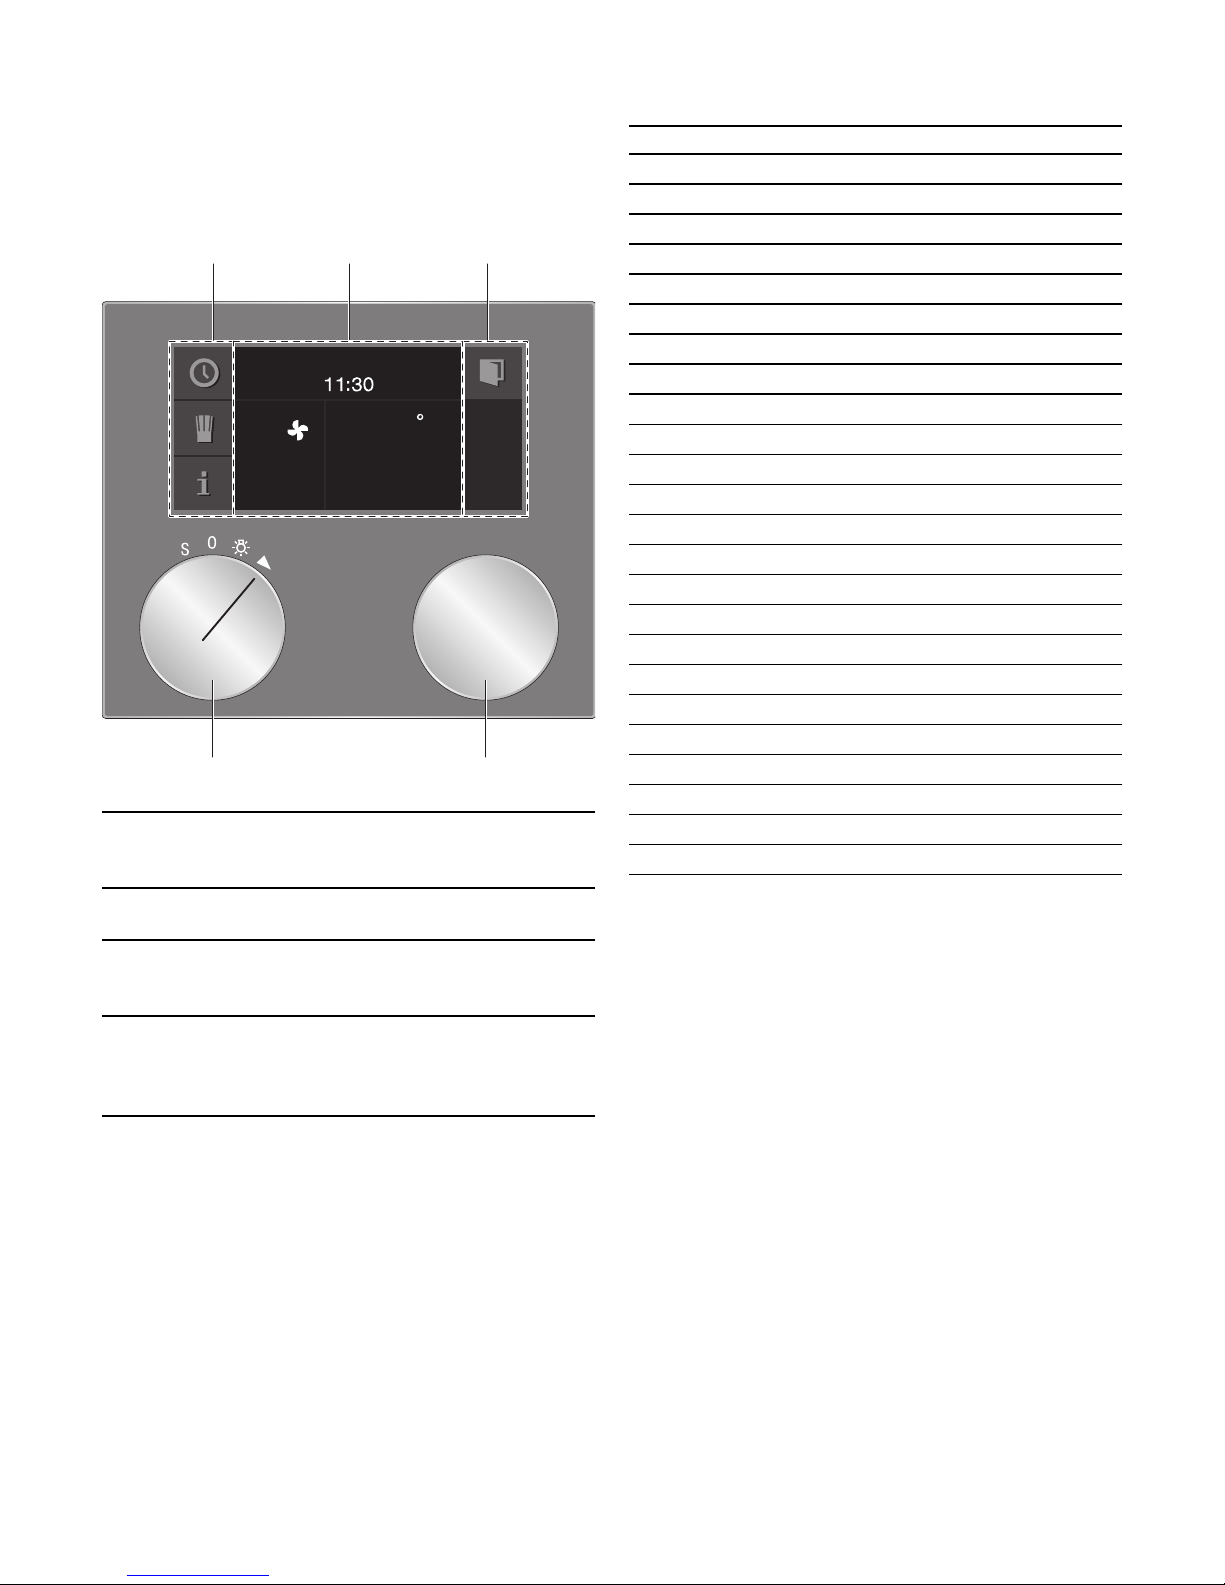
Displays and controls
Symbols
These instructions apply to different versions of the
appliance. Slight deviations are possible depending
on the appliance type.
Operation is identical for all appliance versions.
)
1 Control panel These areas are touch-sensitive.
Touch a symbol to select the applicable function.
2 Display The display shows current set-
tings and options, for example.
3 Rotary selector With the rotary selector you can
select the temperature and make
other settings.
4 Program selector With the program selector, you
can select the heating function,
the cleaning function or the basic
--------
settings.
Symbol Function
I
Ø
H
'
Ž
™
C
!
(
“
i
g
%
4
l
0
M
/
°
+
m
,
¤
£
--------
Start
Stop
Pause/end
Cancel
Delete
Confirm/save settings
Selection arrow
Open appliance door
Launching additional information
Preheating with status display
Launching personal recipes
Recording a menu
Edit settings
Enter a name
Delete letters
Child lock
Launching the timer menu
Launching the Sabbath mode
Demo mode
Core temperature probe
Start rotisserie spit
Stop rotisserie spit
Start pre-roast stage
End pre-roast stage
10

Colors and display
Automatic door opening
Colors
The various colors serve to guide you in the various
adjustment situations.
Orange First settings
Main functions
Blue Basic settings
Cleaning
White Adjustable values
Presentation
The presentation of symbols, values or the entire
display changes depending on the situation.
Zoom The display of the setting you are just
changing is enlarged.
Just before it elapses, a duration that is
just elapsing is enlarged (e.g. the last 60
seconds in the case of timers).
Minimized display screen
After a short time, the display screen is
minimized and only the most important
things are displayed. This function is the
default and can be modified in the basic
settings.
When you touch the ! symbol, the appliance door
springs open and you can open it fully with the handle
recess at the side.
Automatic door opening does not work when the child
lock is activated or in the event of a power failure. You
can open the door manually with the handle recess at
the side.
Additional information ( and )
By touching the ( symbol, you can call up additional
information. For example, information on the heating
function set or on the current temperature of the
cooking compartment.
Note: During continuous operation, small fluctuations
in temperature are normal after the oven has heated
up.
The ) symbol is displayed for important information
and action prompts.Important information on safety
and operation mode are occasionally shown
automatically. These messages either disappear
automatically after a few seconds or must be
confirmed with ™.
Cooling fan
Your appliance has a cooling fan. The cooling fan
switches on during operation. Depending on the
)
appliance version, the warm air escapes above or
under the door.
After removing cooked food, keep the door closed
until the appliance cools down. The appliance door
must not be left ajar, as adjoining kitchen furniture
may be damaged. The cooling fan continues to run for
a while and then switches off automatically.
9 CAUTION
Do not cover up the ventilation slots. Otherwise,
the appliance will become overheated.
11

Program selection positions
Position Function/heating function Temperature Application
0 Zero position
ž
2
Light
H
Convection
120 - 550°F (50 - 300°C)
Default temperature 340°F
(170°C)
Convection: for cakes, cookies and soufflés on
several levels.
The fan on the rear wall distributes the heat
evenly in the oven interior.
3
I
Economy
4
N
Top + bottom heat
120 - 550°F (50 - 300°C)
Default temperature 340°F
(170°C)
120 - 550°F (50 - 300°C)
Default temperature 340°F
Energy-saving convection operation for cakes,
cookies, soufflés and gratins. The oven lighting
stays off.
For cakes in tins or on a tray, soufflés, roasts.
(170°C)
5
O
Top + Y bottom heat
120 - 550°F (50 - 300°C)
Default temperature 340°F
Top heat with reduced bottom heat.
(170°C)
6
P
Top heat
120 - 550°F (50 - 300°C)
Default temperature 340°F
Targeted heat from above, e.g. baking over fruit
flans with meringues.
(170°C)
7
M
top + bottom heat
Y
120 - 550°F (50 - 300°C)
Default temperature 340°F
Bottom heat with reduced top heat.
(170°C)
8
L
Bottom heat
120 - 550°F (50 - 300°C)
Default temperature 340°F
For after-baking, e.g. for moist fruit flans, for preserving or for dishes in a water bath.
(170°C)
9
K
Convection + bottom heat
120 - 550°F (50 - 300°C)
Default temperature 340°F
Additionally heat from below for moist cakes
such as fruit flans.
(170°C)
10
J
Convection + Y bottom heat
120 - 550°F (50 - 300°C)
Default temperature 340°F
Additionally reduced heat from below.
(170°C)
11
12
Z
Full surface grill +
circulated air
Q
Full surface grill
120 - 550°F (50 - 300°C)
Default temperature 430°F
(220°C)
120 - 550°F (50 - 300°C)
Default temperature 430°F
Even all-round heating of meat, poultry and
whole fish.
Flat pieces of meat, sausages, or fish fillet. Baking over and preparing au gratin.
(220°C)
13
S
Compact grill
120 - 550°F (50 - 300°C)
Default temperature 430°F
(220°C)
Only the middle part of the grill heating element
is heated. Energy-saving grilling of small quantities.
12
Position Function/heating function Temperature Application
14
15
16
17
18
S
T
Baking stone operation
U
Roaster operation
V
Dough proofing
W
Defrosting
X
Keeping warm
t Factory setting
œ Pyrolysis
120 - 550°F (50 - 300°C)
Default temperature 480°F
(250°C)
120 - 430°F (50 - 220°C)
Default temperature 360°F
(180°C)
85 - 120°F (30 - 50°C )
Default temperature 100°F
(38°C)
100 - 140°F (40 - 60°C)
Default temperature 115°F
(45°C)
85 - 250°F (30 - 120°C)
Default temperature 160°F
(70°C)
905°F (485°C) Self-cleaning
With special baking stone accessory only
Baking stone heated from below for crispy pizza,
bread or bread rolls like out of a stone oven.
With special roaster accessory only
Heatable cast roaster for large amounts of meat,
soufflé or holiday roast.
Raising: for yeast and sour dough.
The dough rises much faster than at room temperature. The optimum temperature setting for
yeast dough is 100°F (38°C).
Even and gentle thawing.
For vegetables, meat, fish and fruit.
Keeping meals warm, preheating porcelain
dishes.
In the factory setting, you can adapt your appliance individually.
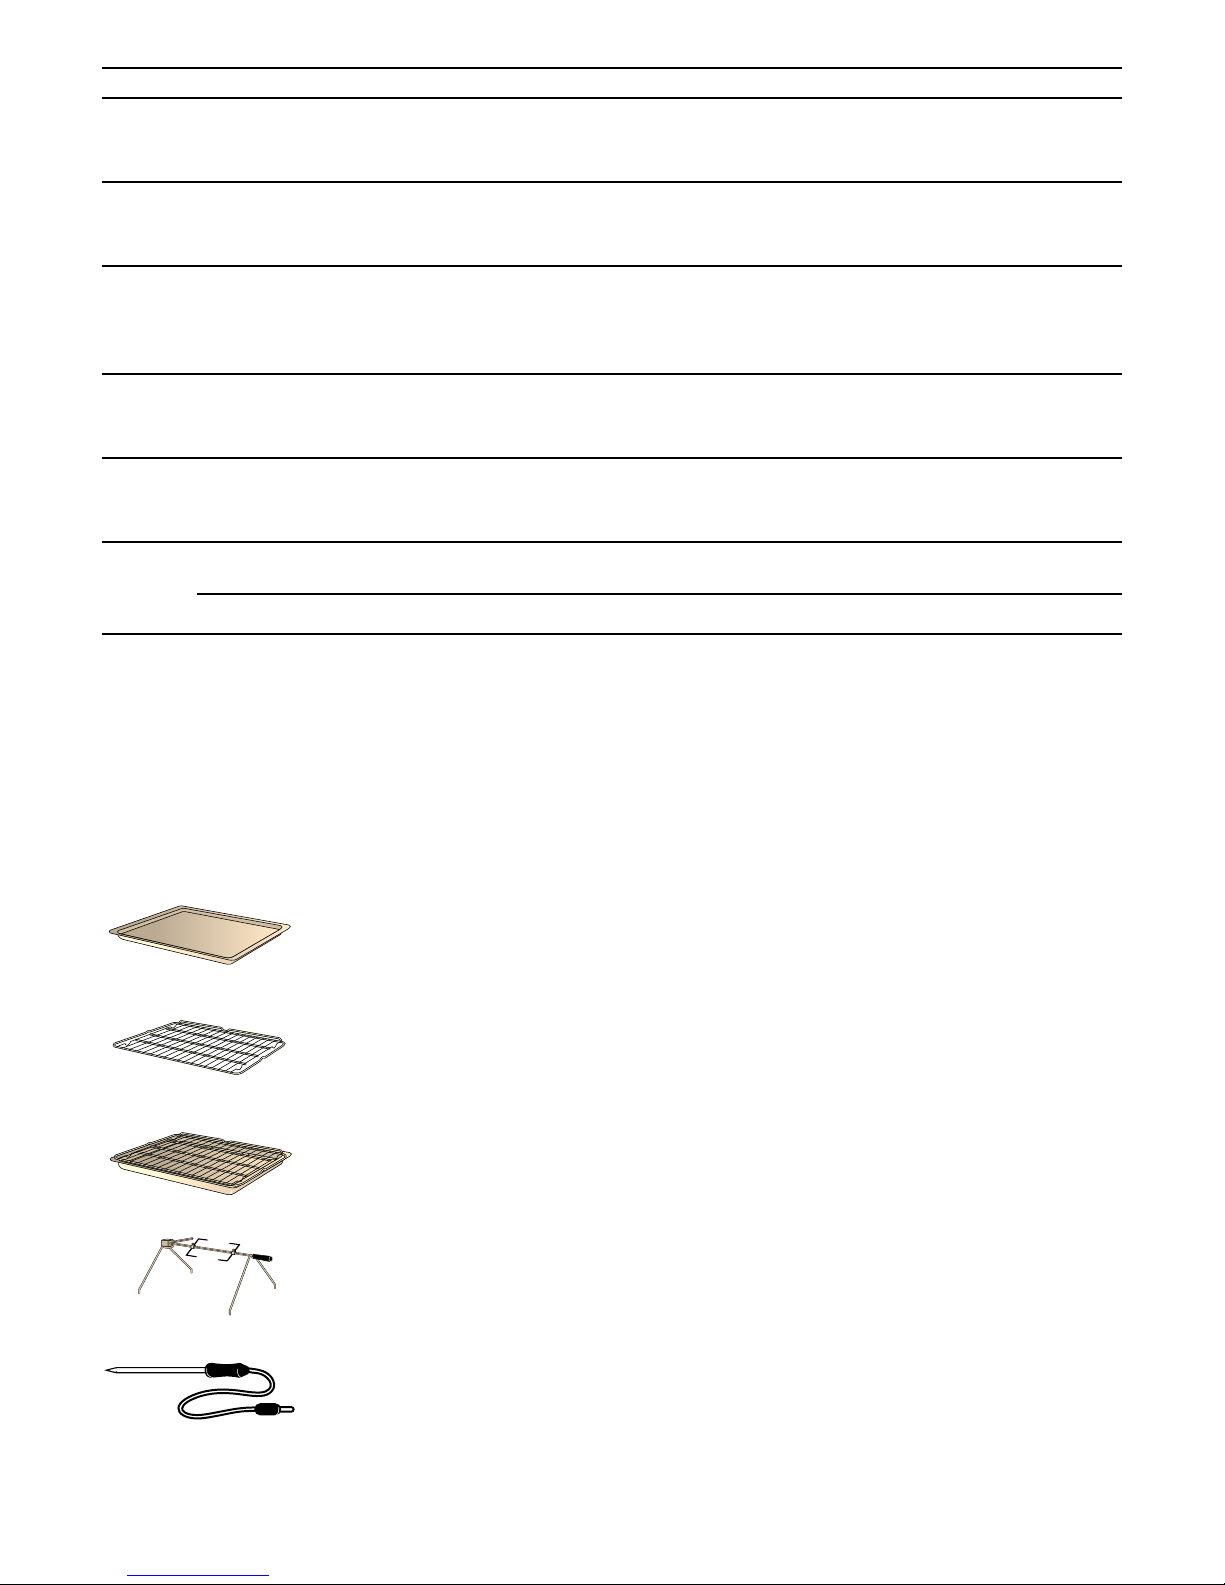
Accessories
Use only the accessories included or obtainable from
after-sales service. It has been specially adapted to
your appliance. Make sure you always insert
accessories into the interior the right way round.
Your appliance comes with the following accessories:
Baking tray, enameled
Wire grill tray
Grill tray with wire rack
Rotisserie spit
Special accessories
You can order the following accessories from your
specialist dealer:
BA 478 110 Handle, stainless steel
BA 018 103 Pull-out system
Fully extendable telescopic pull-out
rack and pyrolysis-proof cast frame
BA 028 113 Baking tray, enameled, 30 mm deep
BA 038 103 Wire rack, chrome-plated, with feet
BA 058 113 Heating element for baking stone and
roaster
BA 058 133 Baking stone
Including heating element and pizza
paddle (order heating element
separately
BS 020 002 Pizza paddle, set of 2
GN 340 230 Cast aluminum roaster GN 2/3,
165 mm high, non-stick
Plug-in core temperature
probe
Use the accessories only as indicated. The
manufacturer assumes no liability for incorrect usage
of the accessories.
13

Before first use
Setting the language
The default language appears in the display.
Here you find out what you have to do before
preparing meals with your appliance for the first time.
Read the section entitled Important safety notes
beforehand.
The "First settings" menu appears in the display after
the mains has been connected. You can now set your
new appliance:
▯ Language
▯ Time format
▯ Time
▯ Date format
▯ Date
▯ Temperature format
The appliance must be completely fitted and
connected.
Notes
‒ The "First settings" menu only appears the first
time the appliance is switched on after
connection to the mains or if the appliance had no
power supply for several days.
After connection to the power, the GAGGENAU
logo first appears for about 30 seconds, after
which the "First settings" menu appears
automatically.
‒ You can change the settings at any time (see the
section entitled Factory setting).
1 Select the desired display language with the
rotary selector.
2 Confirm with ™.
'HXWVFK
6SUDFKH
Note: When the language is changed, the system is
restarted; this procedure takes a few seconds.
Setting the time format
the two possible formats 24h and AM/PM appear in
the display. The default format is 24h.
1 Set the required format with the rotary selector.
2 Confirm with ™.
14
7LPHIRUPDW
Setting the time
The time appears in the display.
1 Set the required time with the rotary selector.
2 Confirm with ™.
7LPH
 Loading...