

Page 1

Ga ggena u Instruction Manual
Oven
BO 270/271
BO 280/281
Page 2

Page 3

Table of Contents
afet y No tes 4
S
Before Use 4
Inte nded Use 4
Safety while Baking 5
Pyrolysis (Self Cleaning) 5
amage to the App liance 5
D
Op erati ng for the First Time 6
Avoiding Dama ge to the Applian ce a nd the
Ca binet 6
Oven 6
Cabinet Fronts near the Oven 6
Features of your New O ven 7
Oven 7
Display and Controls 8
Keys 8
Accesso ries 9
He ating Mod es 10
Fi rst Settings after Inst all ation 11
Note 11
Choosin g the Time Format 11
Setting the Language 11
Setting the Clock 11
Setting the Date 12
Tempe rature Unit °C or °F 12
Exiting Men u an d Savi ng S ettin gs 12
Activating the Oven 13
Standby 13
Activating the Oven 13
Setting the Oven 14
Setting the Temperature and Cooking Mode 14
Current Oven Temperature Display 14
Me at P robe 15
Programming the Meat Probe 15
Note 16
Cleanin g 16
Recommended Temperature Values 16
Rotar y Spit 17
Preparation 17
Switchi ng o n the Rota ry Spit 17
Switchi ng o ff the Rotary S pit 18
Note 18
Ba king Table 19
Roasting Table 20
Grillin g Tab le 22
ip s an d Tricks 23
T
Baking 23
Further Tips for Baking 24
Rising Doug h (Fermenting) 24
Ti ps for Roasting and Grilling 24
efrosting 24
D
Ti mer 25
Calling up the Timer Menu 25
Ti mer 25
Stop watch 26
Cooking Time Duration 27
Cooking Time End 28
Ex tende d Ti mer 29
Setting the Program 29
Note 29
Me mor y Re cipes 30
Calling up the Memo ry Menu 30
Storing the Settings 30
Note 30
Start ing a Memor y Recipe 31
Note 31
Ch ild Lock 32
Activating the Child Lock 32
Deactivating the Child Lock 32
Note 32
Additio nal Fu nctio ns 33
Safety Deactivation 33
Rapid Heating up 33
Quick Ro ast Functio n 33
Ch angin g th e Ba sic Setti ngs 34
Note 34
Example: Changing the Standby Screen 34
Th e Following Settings Can Be Chan ged 35
Ca re and Manual Cle aning 37
Py rolysis 38
Before Starting Pyrolysis 38
Setting the Program 38
Delaying the Switch-of f Time 39
Note 39
Cleanin g Accessories with Pyrolysis 40
Trouble Shooting 41
Error Me ssage s 41
Exhibit ion Mode 41
Power Cut 42
Replaci ng t he O ven Lights 43
Replacing the Ceiling Light 43
Replacing the Side Light 43
3
Page 4

$
Safety Notes
Before Use
The appliance is only guaranteed
safe to use if installed by a specialist
in accordance with the installation
instructions. The installer is liable for
any damage resulting from incorrect
installation.
The appliance may only be
connected by a licensed specialist.
The local electricity supplier’s
regulations and construction
regulations apply.
Read the instruction manual carefully
before operating the appliance. Only
then will you be able to operate your
appliance safely and correctly. Keep
the instruction and installation
Intended Use
This appliance is intended only for
domestic use. Only use the
appliance to prepare meals. Do not
use the appliance to heat up the
room in which it is installed.
Never allow children to play with the
appliance.
Do not let adults or children operate
the appliance unsupervised:
– if they are mentally or physically
unable to use the appliance safely
and correctly
– if they don’t have the knowledge
and experience to use the
appliance safely and correctly.
manual for future reference.
Do not connect the appliance if it
has been damaged.
4
Page 5

Safety while Baking
Pyrolysis (Self Cleaning)
Warning, risk of burns! Do not
touch hot heating elements or
interior surfaces of oven. Keep
children away.
Warning, risk of fire! Do not store
flammable products in the oven.
Only leave the parts needed inside
the oven during use.
Warning, if preparing food with
alcoholic beverages (for example
rum, cognac, wine, etc.). Remember
that alcohol evaporates at high
temperatures. It is possible that
vapours released by the alcohol can
catch fire.
Warning, fire risk! Food remains, fat
and meat juices may ignite during
pyrolysis. Remove coarse soiling
before every pyrolysis operation.
Damage to the Appliance
If the appliance is damaged, switch
off the corresponding household
fuse. Call after-sales service.
Incorrect repairs are dangerous.
Repairs must be carried out by one
of our experienced after-sales
engineers.
Warning, risk of fire! Oil and fat can
ignite quickly. Remove cooking oil
and fat deposits before the next use.
Warning! Hot steam can escape
during use. Do not touch the
ventilation openings.
Warning! Hot steam can escape
when opening the oven door.
Warning, risk of burns! The inside
of the door gets very hot during
operation; observe appropriate
caution when opening the appliance.
The open door can swing back.
Do not trap connecting cables of
electrical appliances in the hot oven
door. The cable insulation can melt.
Risk of short-circuiting!
5
Page 6

Operating for the First Time Avoiding Damage to the Appliance
and the Cabinet
Remove the packaging from the appliance and
ispose of it according to loc al regulations.
d
Be careful to remove all accessories from the
packaging. Keep packaging element s an d pl astic
bags away from children.
heck the appliance for transport damage af ter
C
unpacking it. Do not connect the appliance if it has
been damage d.
The applian ce m ust be connec ted by an authorised
special ist. No wa rranty claims can be lodge d for
any damage resulting from i ncorrect connection.
Observe the installation inst ructi ons.
Thoroughly cl ean the appliance before using it for
the first time. This will eliminate any ‘newness’
smells and soil ing.
This applia nce is l abelled in accordance
with the European Directive 2002/96/EG
concerning used electrical and electro nic
applian ces (waste e lectrical and electronic
equipment – WEE E). The guideline
determines the framework for the return and
recycling of used appliances as applica ble.
Oven
Remove fruit acids such as the juice of lemons or
plums etc. after every baking operation . Th e ac id
an cause spots on the oven’s enamel.
c
Never splash water into a hot oven. This could
damage the enamel.
o not place the baking tray directly onto the
D
bottom of the oven. Do not place utensils (for
example a roaster) directly onto the bottom of the
oven. Do not line the bottom of the oven with
alumini um foil. This will cause a build-up of heat
which can damag e the enamel.
Do not cover the ventilation openings of the oven .
Do not take off the door sea l. A dam aged door seal
must be changed immediately.
The socket for the separate heating ele ment for the
roaster and the baking stone (special ac cessory)
can be found in the middle o f the back panel at the
bottom. During normal operation, please leave the
cover in the socket.
Cabinet Fronts near the Oven
Af ter taking the food out of the oven, allow the oven
to cool down with the door closed. Do not leave th e
oven door half ope n, the h ot air can cause damage
to adjac ent cabinets. The cooling fan will continue
to run for a whil e an d wi ll t hen switch off
auto matically.
6
Page 7
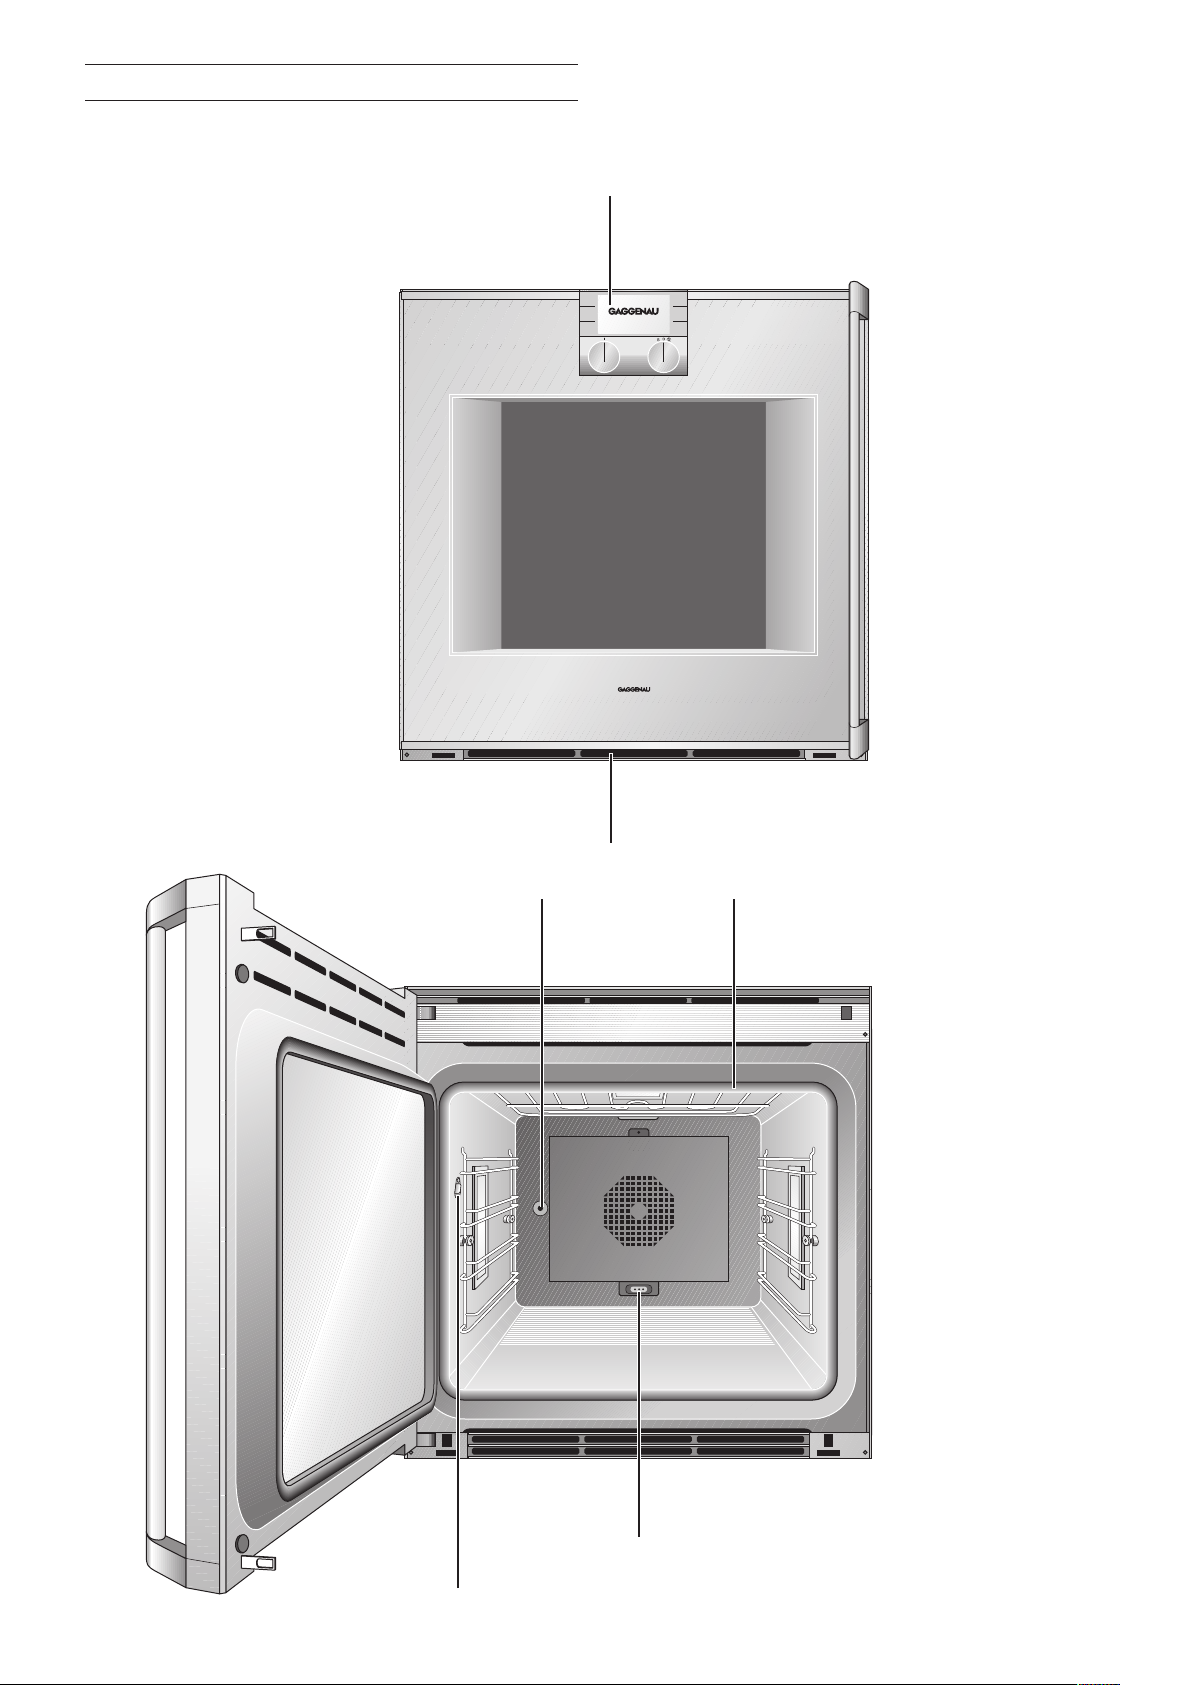
Features of your New Oven
Oven
This manual app lies to
different models .
The pictures show the model
BO 270 /271.
The operation is identic al for
ll models.
a
Display and controls
Ventilation ope nings
Rotary spit
connector
Door seal
Socket for heating e lement
(specia l ac cessory for baking stone)
Socket for meat probe
7
Page 8

Display and Controls
Di splay
In the top par t of the display
is the status bar or a call up
menu. The lowe r part shows
the different settings.
Function sele ctor
Use the left knob to s elect
the cooking mod e you will
use to prepare your meal
or the pyrolysis function.
You can turn the knob to
the right or left.
Touch keys
The keys on the lef t and
right besid e the display
are touch sensitive . Th e
functio n of the keys
depends on the chos en
setting. The icon beside
the key shows the function
of the key.
Tem perat ure selec tor
You can set a temperature
between 50 and 300 °C or
pyrolysis. You can turn the
knob to the righ t or lef t. To
switch on the light in the
oven, turn the temperature
selector one position to
the right.
The light in the oven
remains off if the
temperature is set below
70 °C.
Keys
Sy mbol Function
g move right
f move left
b save selected values / sta rt
j cancel
d increase values
e decrease values
q timer menu
c basic settings menu
I rotary spit
a call up additio nal info
o child lock activate
p child lock deactivate
V extended timer
l timer stop
m t imer star t
k store memory recipe
8
Page 9
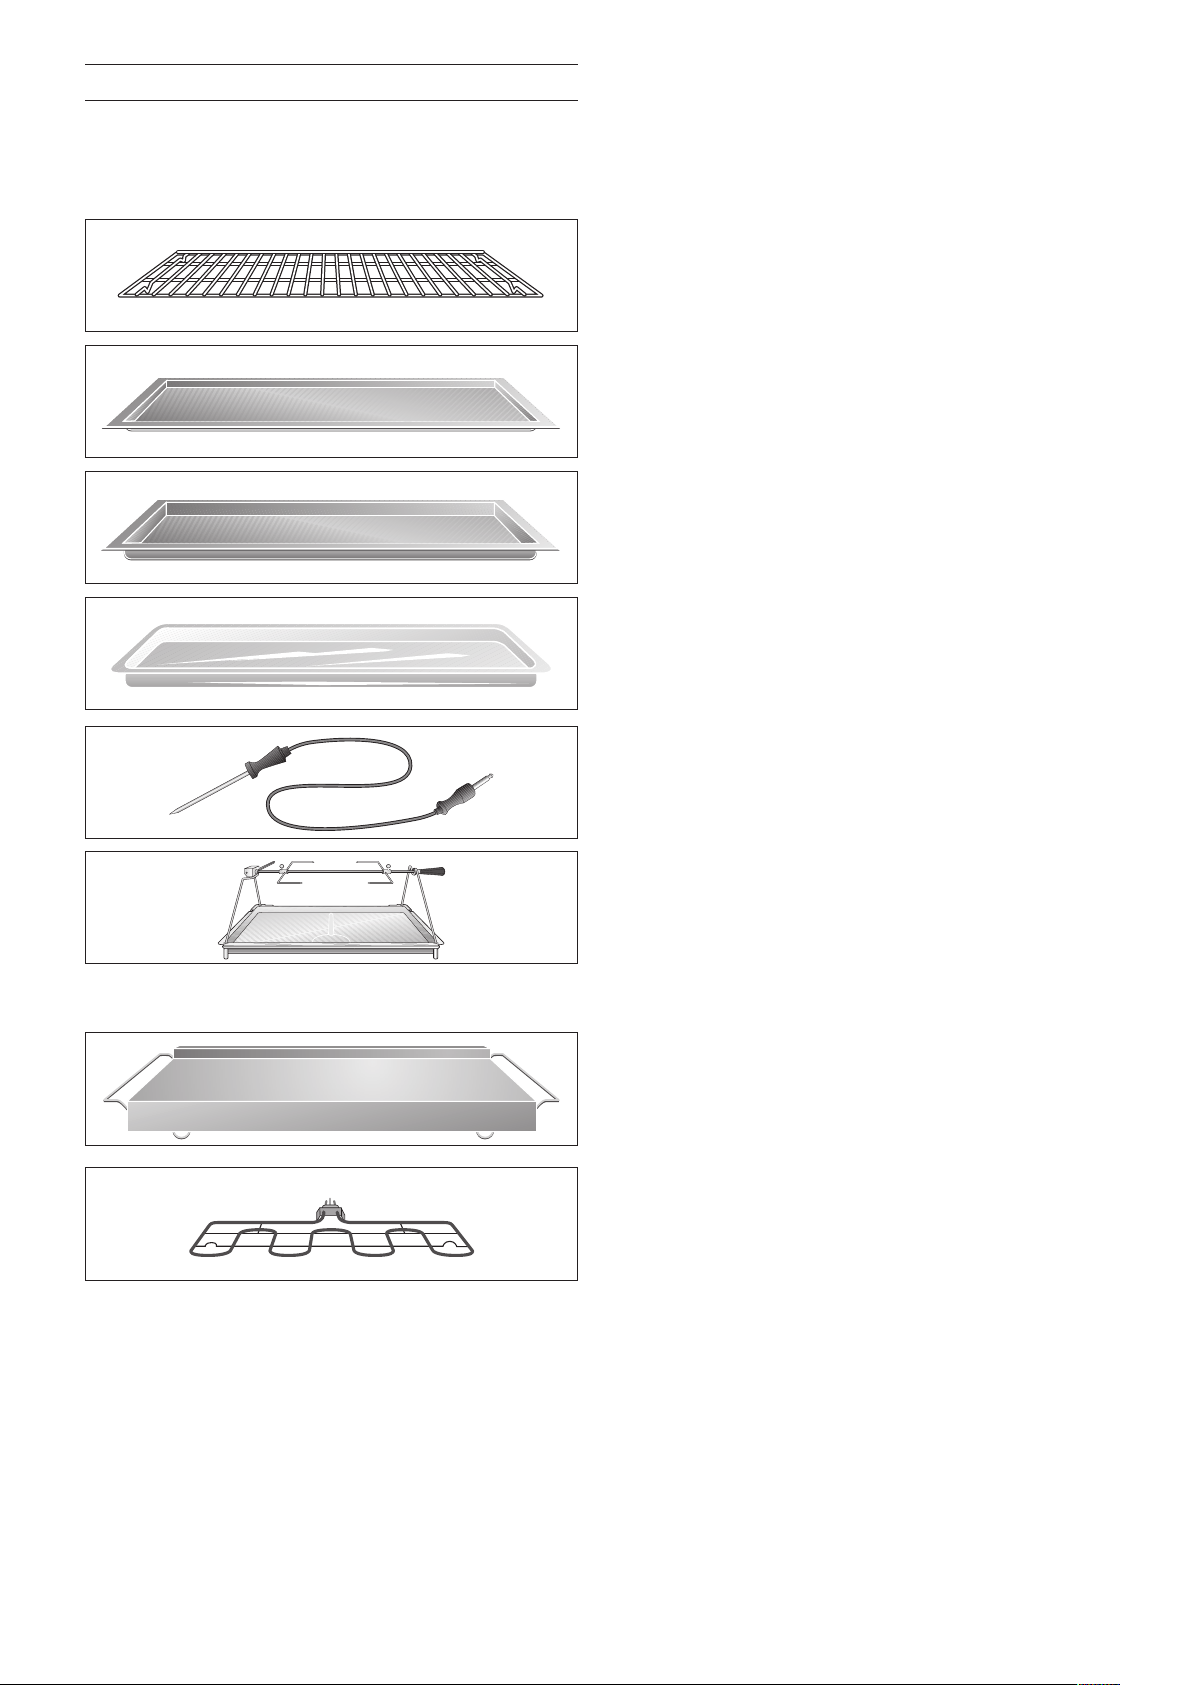
Accessories
As standard, your appliance comes with the
ollowing accessories:
f
Wire rack for cake tins, roasts, grilled pieces
•
and crockery
Always inser t the wire rack with the stopper
double crossbrace) to the back.
(
Baking tray for cakes, bis cuits and pastries
•
Grilling tray for roasts or as a greas e co llecting
•
tray
Mo dels BO 270/2 71 o nly :
•
Glass tray for gratins and fruit cake
Meat probe
•
Rotary spit with support frame
•
You can order the following special accessories:
Baking stone with wire rack and wooden pizza
•
spatula for pizza and bread
Additionally you will require the heating element
Heating ele ment for baking stone and cast
•
roaster
Pull-ou t rack (cast frame and telescopic
•
pull-ou t rack)
Cast roa ster ( can only be used in combi nation
•
with the pull-out rack)
9
Page 10
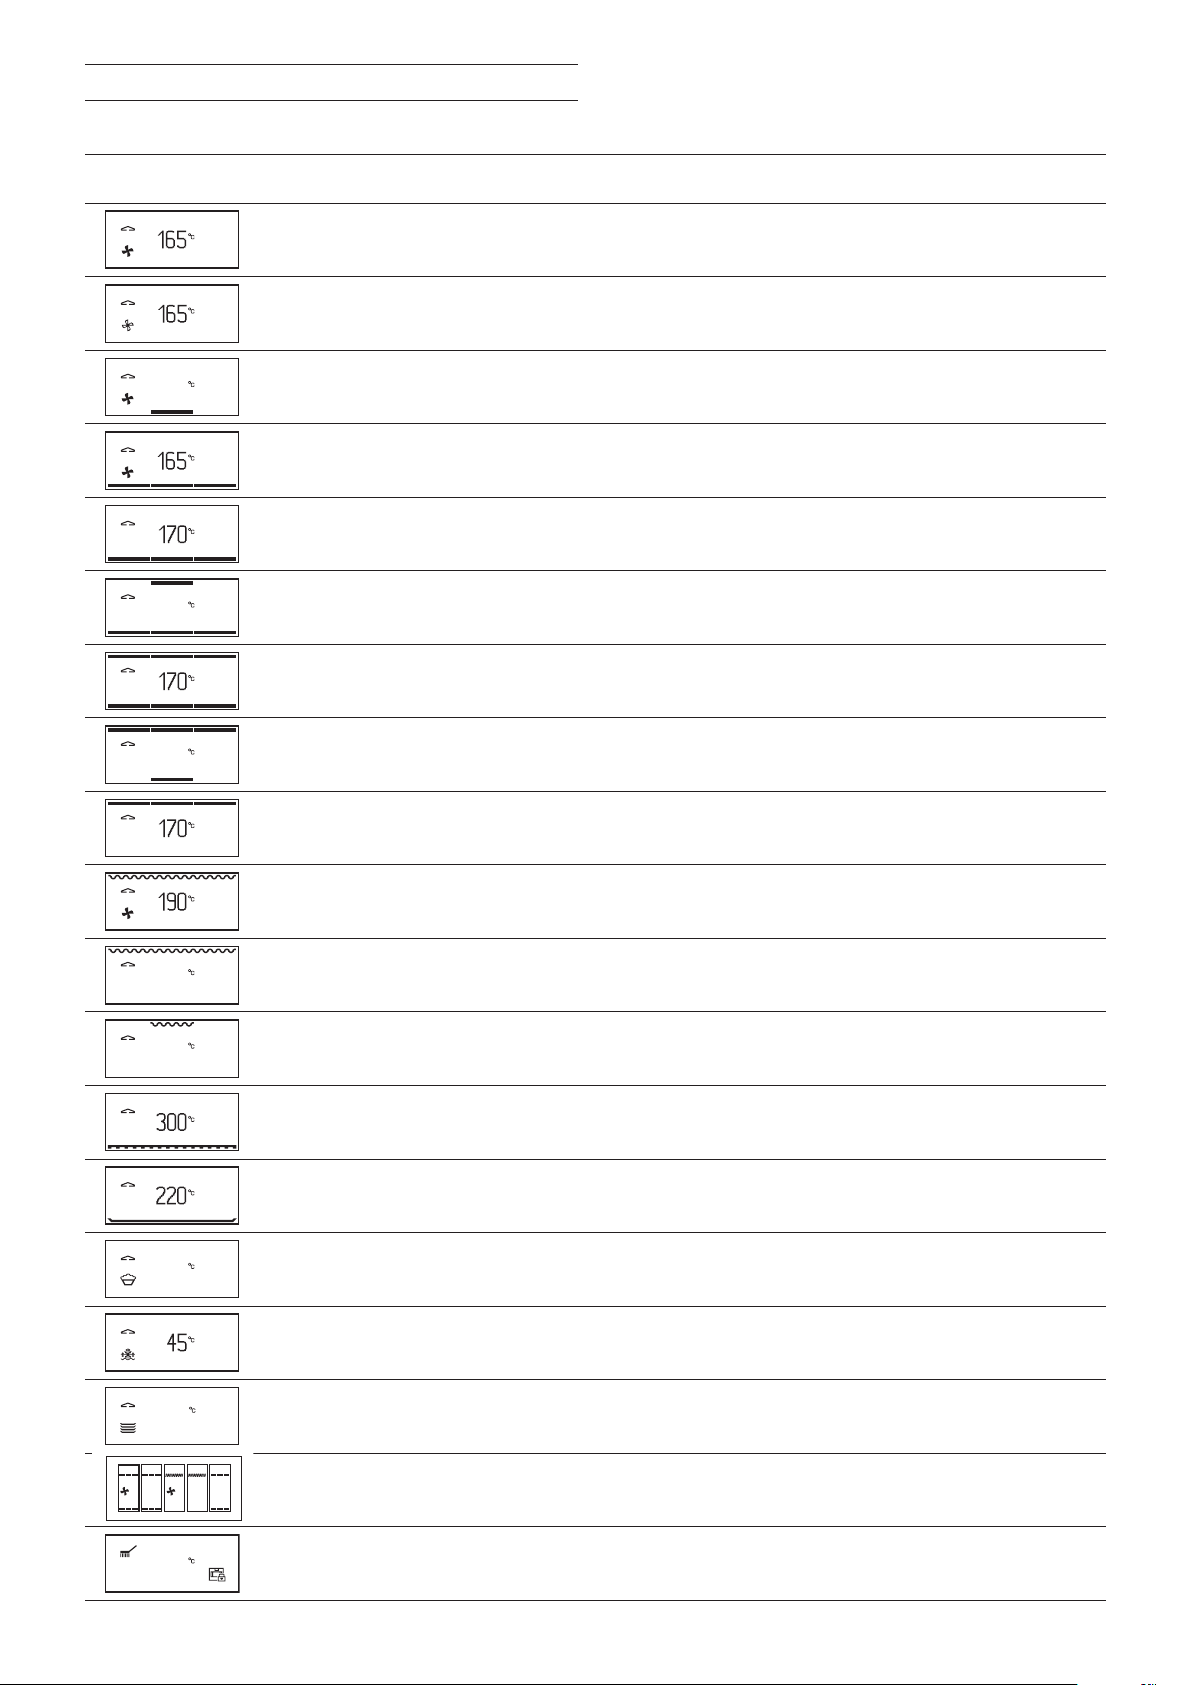
Heating Modes
165
170
170
200
200
3880485
00:20 00:60 00:05 00:05 00:20
220ºc 160ºc 200ºc 220ºc 80ºc
Di splay He ating mod e Us e
Hot air For cakes, biscuits and puf f pastr y on several
evels
l
Economy Energy saving hot air mode for cakes,
(the oven light is off) small pastries or gra tins
Hot air and 1/3 bottom heat Additional reduced heat from beneath.
Hot air and bottom heat Additional heat from beneath for moist cakes,
for example fruit cake s
Bottom heat Fur ther baking, for example for fruit cakes,
for preserving or for food in a bain-ma rie
1/3 Top and bottom heat Bottom heat with reduced top heat
Top and bottom heat For cakes in tins or on trays, gratins or roasts
Top and 1/3 bottom heat Top heat with reduced bottom hea t
Top heat Direct heat from the top, for example to brown
meringue on a fruit cake
Grilling wi th hot air Evenly distributed h eat for meat, poultry or
whole fish
Grilling Grilling fl at p ieces of meat, sausages or fish fillets
melting che ese, gratins
Economy grilling Only the middle part of th e he ating element is on.
Energy saving grilling for small amounts of fo od
Baking stone operation Heated b aking stone for crispy pizza, bread
(only with special accessories) or bread rolls like from a solid stone oven
Roaster operation Heated c ast roaster for large quantities of meat,
(only with special accessories) grat in o r th e Ch ristm as t urkey
10
Dough proofing Raising yeast dough, the per fe ct temperat ure
setting is 38 °C
Defrosting Even and gentle defrosting between
40 - 60 °C depending on the food
Keeping warm Keep meals warm, warm porcellain dishes
Memory recipes Store and recall the setting s for meals that
you often prepare
Pyrolysis Au tomatic self cleaning
Page 11
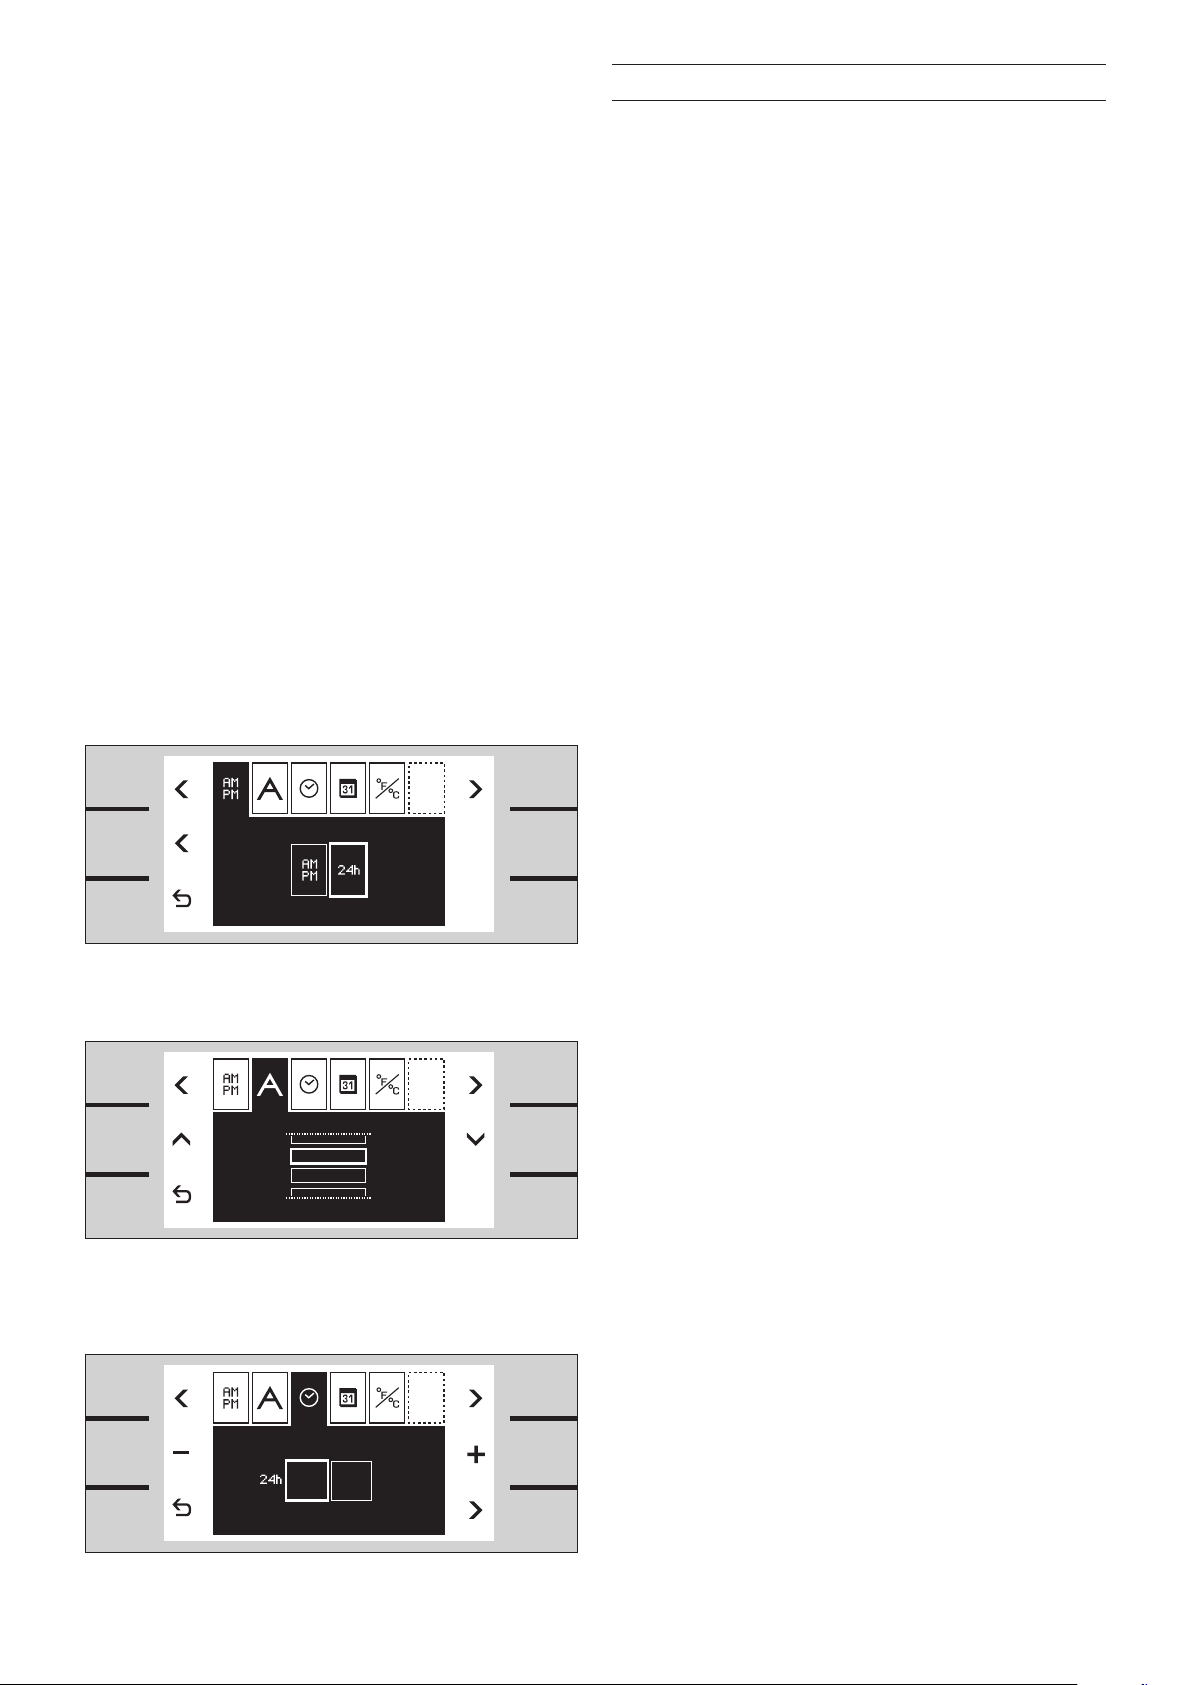
First Settings after Installation
English
Deutsch
Francais
Italiano
3013
When you r new ove n has been connected, the first
ettings menu appears on the disp lay.
s
You can set th e
time format,
•
languag e,
•
clock,
•
date ,
•
temperature unit.
•
Note
The first settings menu appears only afte r th e
applian ce h as b een connected or if the appliance is
without electric ity for severa l days.
Refer to the chapter basic settings if you wish to
change these parameters at any time.
Choosing the Time Format
1 The time fomat s etup menu appears on the
screen.
The time fomat c an b e ei ther 12 hour format
(AM/PM) or 24 hour format . Th e 24 ho ur format
is pre-selected.
2 You can change the time format using the
centre f key.
Setting the Language
1 Using the menu key g select the language
setup menu. The available languages fo r th e
display messages appea r on the screen.
German is pre-selected.
2 You can change the language using the h or i
keys or switch the display messages off.
Setting the Clock
1 Using the menu key g select the clock
functio n Q.
2 Using the d / e keys set the correct time.
Use the arrow key
hours to minutes.
g bottom right to change from
11
Page 12

Setting the Date
07 0926
1 Using the menu key g select the date
functio n a.
2 Using the d / e keys enter day, mon th, year.
Use the arrow key g bottom right to change from
day/month/year.
Temperature Unit °C or °F
1 Using the menu key g select the temperature
unit functi on l. °C is pre-selected.
2 You can change the temperature unit using the
middle f key.
Exiting Menu and Saving Settings
Touch the b key to exit the menu . Al l setting s are
saved.
The oven is on standby. The standby screen
appears.
12
Page 13

13:30
Activating the Oven
Standby
The oven remains on standby when no operating
mode is selected or the child lock is activated.
The keys are not acti vated. The display is not lit.
Note :
You can choose between diffe rent standby screens.
AGGENAU and the clock is p re-selected. Refer to
G
the chapter basic settings if you want to change the
standby screen.
Note :
To p rotect the display, GAGGENAU will not be
show n on the screen between 23.00 and 6.00
o’clock if the oven i s on standby.
Note :
The display contrast depends on the vertica l
viewing angle. You can adjust the co ntrast of the
display in the basic settings.
Activating the Oven
To l eave standby d o on e of the following:
touc h a key
•
open or close the oven doo r
•
turn the temperature kn ob
•
turn the function knob
•
Now you are a ble to set the required function. Read
the relevant chapter on how to activate the required
functio n.
Note :
The standby screen reap pears after one minu te if
no fur the r fu nction is chosen. The display light goes
of f.
13
Page 14

Setting the Oven
165
13.30
166
The main operations of your oven are easily set
sing the knobs.
u
Using the right knob you can set the temperature.
To s witch on the light in the oven, turn the
temperature knob one position to the right.
The temperature ran ge i s 50 - 300 ° C.
xception:
E
Fermentin g 30 - 50 °C
Defrosting 40 - 60 °C
Keeping warm 50 - 120 ° C
Roaster operation 50 - 220 °C
Using the left knob you can set the cooking mode .
The top position is hot air.
Setting the Temperature and
Cooking Mode
1 Set the temperature knob to the required
temperature.
Tempe rature and cooking mode symbol appe ar
on the display. T he l ight in the oven goes on.
To s elect another cook ing mode:
2 Turn the func tion knob until the required
cooking mod e ap pears on the scre en.
The heating up symb ol f appear s until the requi red
temperature is reached. The symbol appears again
when the oven heats during operation .
A signal sounds whe n th e se lected temperature is
reached. Press any key to switch off the signal.
Note : You can deact ivate the heating up signal in
the basic settings.
The temperature and cooking mode can be changed
at any time.
When the meal is ready switch the oven off using
the temperature knob. The oven light goes off. The
standby screen appears.
14
Current Oven Temperature Display
The current oven temperature is briefly shown when
you press the a info key. Using the b key you can
retu rn to the standard screen.
Note :
Depending on the heating mode, a slight temperature
variation after heating up during use is normal.
Page 15

Meat Probe
175
52
175
13:30
65
15
175
13:30
--
15
The meat probe enables you to cook your meat
xactly as you want it.
e
Using the meat probe, during the cooking process
you can meas ure the core temperat ure of the
inte rior of the fo od you are preparing exactly
etween 1 °C and 99 °C.
b
Fully insert the tip of the meat prob e in the mid dle
f the food, at its thickest poin t. T he t ip s hould not
o
be inserted into fat and should not touch any
dishes, bon es o r fatty tissue.
In the case of poultry, do not insert the tip of the
meat probe in the middle (hollow) but between the
belly and the thigh.
When you con nect the meat probe to the socket in
the oven, the
The smaller tempe rature display on the top shows
the measured temperature from the meat pro be.
r symbol appear s on the dis play.
Programming the Meat Probe
You can program the desired core te mperature for
your mea l. T he a ppliance switches off
auto matically, when the pro grammed temperature
has been reached.
1 Preheat the oven to the desired setting.
2 Inser t th e ti p of the mea t probe into the meat.
3 Put the meat in the oven. Connect the meat
probe to the socket. $ Caution, risk of burns
wh en p luggi ng t he c able into the socket!
4 Using the d / e keys set the correct core
temperature.
The larger temperature display on the top s hows the
programmed temp erature, the smaller display
shows the measured temperature from the meat
probe.
The current oven temperature is briefly shown when
you press the
the top shows the measured temperat ure from the
meat probe. Using the b key you can return to the
standard screen.
a info key. The temperature display on
A signal sounds whe n th e programme d core
temperature has been re ached. The appliance stops
heating .
Switch the temperature knob of f and open the oven
door. Rem ove the meat probe before taking the
food from the oven.
$ Dang er, r isk of b urns! Use an oven glove . Th e
meat probe gets ve ry hot during use.
15
Page 16

Note
Recommended Temperature Values
Pull the meat probe from the socket if you want to
end the programming.
If you program meat probe and timer simultaneously,
the program that reaches the entered va lue first will
switch of f th e oven.
nly use the included original meat probe. You can
O
order the meat probe as a spare part.
Only use the meat probe up to a temperature of
250 °C.
Remove the meat probe from the oven when it is not
in use.
Remove the meat probe from the oven during
pyrolysis.
Cleaning
Only rub the meat probe with a moist cloth. The
meat probe is not di shwashe r-proof.
Be ef
Roast be ef / fil let of beef / entrecôte
lood rare 45-47 °C
b
rare 50-52 ° C
medium- rare 58-60 ° C
well-done 70-75 °C
Beef roast 80-85 ° C
or k
P
Roast po rk 72-80 ° C
Back of pork medium-rare 6 5-70 °C
well-done 75 °C
Meat loaf 85 °C
Fillet o f po rk 65-70 °C
Veal
Fillet o f veal rare 50-52 °C
medium- rare 58-60 ° C
well-done 70-75 °C
Roast veal well-done 75-80 ° C
Breast o f veal, st uffed 75-80 °C
Back of veal medium-rare 58-60 °C
well-done 65-70 °C
Venison
Back of venison 60-70 ° C
Leg of venison 70-75 °C
Back of venison steaks 65-70 ° C
Back of hare 65-70 °C
Poultry
Chicke n 85 °C
Guinea fowl 75-80 ° C
Goose,t urkey, duck 80-85 °C
Duck bre ast medium-rare 55-60 °C
well-done 70-80 °C
Ostrich steak 60- 65 °C
La mb
Leg of lamb medium- rare 60-65 ° C
well-done 70-80 °C
Back of lamb medium- rare 55-60 ° C
well-done 65-75 °C
Mu tton
Leg of mutto n medium-rare 70-75 °C
well-done 80-85 °C
Back of mutton medium-ra re 70-75 °C
well-done 80 °C
Fi sh
Fillet 62-65 ° C
Whole 65 °C
Tureen 62-65 ° C
Other
Bread 90 °C
Pâte 72-75 °C
Tureen 60-70 ° C
Foie gras 45 °C
16
Page 17

Rotary Spit
180
13:30
Use the rotary spit to grill large roasts or poultry.
rilling with the rotary spit produces a crispy crust
G
and even browning all-round.
You can use the rotary spit in all heating modes.
You get th e be st results in the grill or top heat
odes.
m
Preparation
1 Push both spit holders in the fittings o n the
grilling tray. The rotar y drive is on the left.
2 Slide the right retai nig clip onto the spit and
tighten the screw.
3 Place the food you want to prepare on the
rotary spit. Secure protruding parts (e.g.
wings) to ma ke sure they do n ot tou ch the grill
heating ele ment.
4 Slide the left reta inig clip onto the spit and
tighten the screw.
5 Place the spit onto the spit holders. Inser t th e
square edge into the drive.
6 Inser t th e grillin g tray and the rotar y spit on the
lowest level of the oven. The drive sha ft has to
engage into the openi ng o n th e ba ck of the
oven interior.
Switching on the Rotary Spit
1 Set the required temperature and mode.
2 Touch the I key, unt il t he I sy mbol appears
next to the temperat ure display. The rotary spit
is switched on.
17
Page 18

Switching off the Rotar y Spit
1 Touch the I key until the I symbol goes off.
Switch of f th e oven by the tempe rature
2
selector.
3 Warn ing, risk of burn s! Use an oven glove to
take out the grill ing tray with the rotary spit.
lace it on a stable, heat-resistant sur face.
P
4 Screw the handle on to the side of the spit to
take it off.
Note
The core temperature se nsor cannot be used in
combina tion with the rotary spit.
Only use the rotary spit up to a temperature of
250 °C.
Do not clean the rotary spit drive in a dishwasher.
18
Page 19

Baking Table
Ca ke s and b iscui ts Level f rom Hot air Ec onomy Hot air and Top a nd Ba king
el ow bottom heat bottom heat ti me
b
Tem p. °C Temp. °C Temp. ° C Temp. °C Min.
Swiss roll 2 21 0 7-9
Flan base 2 165- 175 30-35
Fruit flan on yeast dough 2 16 5 165-175 40-45
Fruit flan on short-crust pastry 2 165 165 165 165 -175 40-45
Small flaky pastry cakes 1+3/2* 180 1 80 190 15-20
Cheesec ake (high) 2 165 165 165 16 5-170 90-100
Cheesec ake slices (flat) 2 165 165 165 16 5-175 45-50
Sponge cake (round) 2 160- 170 160-175 170-175 50-60
Loaf cake 2 1 60-170 160-175 170-175 50-6 0
Yeast dough ring cake (ta ll) 1 160-17 5 165- 175 40-50
Biscuit s 1+3/2* 16 0-175 160-175 165-170 15-20
‘Hefezopf’ 2 16 5 16 5-170 30-40
Cake on baking tray (dry top) 2 165-170 1 65-170 165-170 40-5 0
Cake on baking tray (moist top )2 1 65-170 165 -170 17 0 165 -170 40-50
Cream puffs 1+3/2* 180 180 180-19 0 20-25
Mixe d-grain bread** 2 200/170 2 10/17 0 40-50
* In the economy and hot air modes you can bake simultaneously on several levels.
** Preheat the appliance to the specified temperature. Switch back to the second temperature
when inserting the food.
Note: The values given above should be looked upon as recommended values. We advise you to always
preheat the oven.
For baking yeast dough we recommend the hot air circulation mode.
The recommended mode is printed in bold.
19
Page 20

Roasting Table
Di sh Level f rom Hot ai r Grill and Top an d Coo king Mea t
el ow hot air bottom heat tim e probe
b
Tem p. °C Temp. °C Temp. ° C Minute s temp. °C
Be ef
Roast be ef 1,5 kg* 2 180 180 60-90
Roast be ef rare 1,5 kg** 2 230/1 80 230/180 45-50 45-50
Roast be ef m edium 1,5 kg** 2 230/180 230/180 60-70 55-65
Roast be ef well done 1,5 kg* * 2 230/180 90-100 70-80
Pork
Pork roast 1,5 kg** 2 230/180 230 /180 60-70 7 5-80
Pork roast with rind 1,5 kg*** 2 180/200 180/2 00 60-70 75-80
Smoked pork 1, 5 kg** 2 180/16 0 40-50 65- 70
Leg of pork*** 2 150/200 150 /200 50- 60 80- 85
Collared roast** 2 230/180 230/180 60-70 75-80
Veal
Roast veal ** 2 230/18 0 230/180 60-70 75-80
Leg of veal*** 2 150/18 0 1 50/180 50-60 75
Loin of veal 2 160-170 20 70-75
Stuffed breast of veal* 2 120-1 30 120 75-80
* First brown the meat all-round in the casserole on the cooker.
** Brown the meat at a high heat level, switch back to a lower temperature after 15-20 minutes.
*** Cook the meat at a low temperature, set the temperature higher for the last 15-20 minutes.
Note: The values given above should be looked upon as recommended values. We advise you to always
preheat the oven.
The recommended mode is printed in bold.
20
Page 21

Roasting Table
Di sh Level f rom Hot ai r Grill and Top an d Coo king Mea t
el ow hot air bottom heat tim e probe
b
Tem p. °C Temp. °C Temp. ° C Minute s temp. °C
Venison
Roast bo ar* 2 170-180 60-90
Leg of venison* 2 1 70-180 60-80 75 -80
Saddle of venison 2 165-175 170-180 20 -25 65-70
Leg of lamb* 2 180-200 35-45 65-75
Poultry
Duck 2-3 kg** 2 160/190 16 0/190 100-120 80-85
Duck bre ast 2 1 60 160 15-20 70
Goose 2-3 kg** 2 160/190 160/190 100-1 20 85-90
Turkey 3-4 kg** 2 160/190 160/190 12 0-180 85-90
Roast ch icken 2 180 18 0 50 -60 85
* First brown the meat all-round in the casserole on the cooker.
** Brown the meat at a high heat level, switch back to a lower temperature after 15-20 minutes.
Note: The values given above should be looked upon as recommended values. We advise you to always
preheat the oven.
The recommended mode is printed in bold.
21
Page 22

Grilling Table
Di sh Level from No Temp. Grill Grill and hot air Co oking
el ow pre- °C Min utes Minutes Time
b
he at 1.side 2.si de 1.si de 2.side Minutes
Sliced pork belly 3 180-200 6455 10
Kebab 3 190 88 16
Fried sausage 3 200 54 9
Merguez (grilled sausage) 3 200 66 12
Roast ch icken* 2X180 30 30 60
Leg of chicken 3 180 20 20 15 15 30-4 0
Spare Ribs 3 1 80-200 15 15 12 12 24-30
Leg of pork** 2 150/ 200 50-60
Trout 3 180-200 88 16
Vegetable kebabs 3 200 77 14
Shrimp keb abs 3 175 77 14
Prepari ng au gratin
Toasted sandwich 3 190 5-7
Crème caramel*** 4X250
Crème brulée*** 4X250
Cake with meringue*** 3 200
Important: Only grill with the oven door closed.
For grilling use the wire rack that fits the grilling tray (accessory or special accessory,
depending on the version) to collect dripping fat.
* In the case of appliances featuring a rotary spit, you are advised to use the spit in the grill mode.
** Do not turn the leg of pork. Set the temperature high for the last 15-20 minutes.
*** You should bake this dish au gratin until it has reached the level of browning you require.
Note: The values given above should be looked upon as recommended values.
The recommended mode is printed in bold.
22
Page 23

Tips and Tricks
Baking
Wh at to do if… Th e so lutio n
…a cake baked in a tray is too light at the bottom? Insert the tray on a lower level and remove all othe r
rays from the oven.
t
…a cake baked in a form is too light a t the bottom? Do not inser t the bakin g form in the oven on the tray,
but on the wire rack.
…a cake/small cakes and pastr ies are to o da rk Insert the cake/pastries at a higher level.
at the bottom?
a cake is too dry? Set the oven temperature to a slightly higher value.
…
Preheat the oven.
…a cake is too moist on the inside or if meat is Set the baking or roasting temp erature to a slightly
not cooked on the insi de? lower value. Important : baking or roasting times cannot
be shortened by selecting higher temperatures. It is
better to choo se a sli ghtly longer bakin g or roasting
time and to allow the dough to bake l onger.
…a cake baked with hot air in a form o r a Do not place the baking form directly in front of the rear
rectangular form is too dark at the back? wall of the oven, but in the middle.
…a cake sinks? Use less fluid the next time or set the oven temperature
to a value that is lower by 10 degrees. Pay attention to
the stirring times specified in the re cipe. Do not open
the oven door too s oon.
…a cake has risen in the middle and is lower Do not grease the edge of the spring form. After
at the edges? baking, carefully loosen the cake with a knife.
…a cake is too dark at the top? Insert it on a lower level, sel ect a lower temperature
and bake the cake for a slightly longer time.
…a cake is too dark at the bottom? Insert it at a higher level and choose a lower
temperature the next time.
…a fruit cake is too light at the bottom and Use the deeper grilling tray for baking.
the fruit juices spill over ?
…a cake is too dr y at the bottom? Use a toothpick to make small holes in the finished
cake. Then sprinkle fruit juice or an alcoholic beverage
over it. The next t ime, choose a temperature that is
higher by 10 degrees and shor ten the baking time.
…bread or a cake looks good from the out side, T he n ext time, use slightly less fluid and bake sli ghtly
but is too moist on the inside? longer at a lower temperature. In the case of cakes with
a moist covering, first bake the base, sprinkle almonds
or breadcrumbs over it and then add the covering.
Pay attentio n to recip es a nd b aking times.
…you have baked on several levels and your If you select a slightly lower temperature , your cakes
cake on the top tray is darker than and p astries will be b rowned more evenly. Trays inon the bottom one? serted at the same time need not be ready at the same
time. Allow the bottom trays to bake for 5-10 minutes
longer and inse rt them at an appro priately earlier time.
…biscui ts stick to the tray? Briefly reinsert the tray in the oven and rem ove the
biscuit s im mediately.
…a cake does not come out of the tin easily? Carefully loosen the edg e wi th a kni fe . Turn out the
cake again and cover the form s everal times with a cold
wet cloth. The next time, grease the form well and
additio nally sprinkle breadcrumbs into i t.
23
Page 24

Further Tips for Baking
You are ad vised to use dark metal bak ing forms.
You may also use light baking forms in the hot air
ode. In this case, the baking time is longer.
m
The values in the cooking tab les apply to the
preheated oven. The temperature and duration
depend on the quantity and consistency of the
ough. This is why the tables list temperature
d
ranges. You are adv ised to begin with the lowest
temperature the first t ime. If required, set i t hi gher
the next tim e.A lower temperature ensures more
even browning.
To f ind out if your cake has baked prope rly, insert a
wood en stick at the highest point of the cake after
expi ry of the bakin g ti me s pecified in the recipe .
The cake is ready if dough no longer sticks to the
wood .
will stay nice and juicy. Never grill steaks salted!
lace pieces for grilling directly on the wire rack.
P
Poultry becomes particularly crispy brown if you
coat it with butter, salt water, dripped-off fat or
orange juice.
For roasting use the wire rack that fits the gril ling
tray (acce ssory o r special accessory, depending on
he versi on). Put a s mall amount of water into the
t
grilling tray. This ensures that the juices of the meat
are collected and the oven stays clean.
In the case of duck or goose, pierce the skin und er
the wings to all ow the fat to drain off.
Wh at to do, if…
…a roast has bec ome dark and parts of the crust
are burnt?
Check the inser tio n height and the temperature.
Rising Dough (Fermenting)
Use the fermenting mode. Set the temperature to
38 °C.
For large amounts of doug h (for example bread) set
the temperature betwe en 3 8-40 °C. The dough will
rise evenly from the middle to the edge.
For smal l pi eces of dough (for exampl e bread rolls)
set the temperature between 40-45 °C.
Tips for Roasting and Grilling
You can use any heat-resistant dishes.
Place dishe s in the mid dle of the w ire rack.
You can also use the grilling tray for large roasts.
The side racks can be removed when pre paring
large, bulky roasts. Place the wire rack directly onto
the bottom of the oven and place the dish or the
roaster onto the wire rack. Do not place the d ish or
roaster directly onto the ena melled bottom of th e
oven.
Af ter removin g gl ass dishes, place them on a dry
kitchen cloth or cooling grill. Do not place them on
a cold or wet suppor t sur face. The gla ss c ould
crack.
Before serving, allow the roast to re st for
10 minutes with the oven switche d of f and closed.
This keeps the roast juicy.
Always grill in the closed oven. If possible, grilled
pieces shou ld b e eq ually thick, at least 2 to 3 cm.
When this is the case, they will brown evenly an d
…a roast loo ks good, but the sauce is burnt?
The next tim e, c hoose a smaller roasting d ish and
add more fluid.
…a roast loo ks good, but the sauce is too light and
has become watery ?
The next tim e, c hoose a large r roasting dish and
use less fluid.
…the table does not list a weight for the roast?
Choose the next lowest weight in the list and
prolong the roasting time.
Defrosting
Use the defrosting mode. Set the te mperature
between 40-60 °C.
Inser t th e wi re rack with the f rozen food on the
second level. Insert the grilling tray below to collect
the liquid.
Impor tant: pour away the defrost ing liquid.
Defrost large pieces of m eat (roasts, chicken, etc.)
between 45-50 °C, otherwise the outer part may
start to b rown.
You can defrost sma ll o r fl at p ieces bet we en
50-55 ° C.
Do not place the baking tray directly onto the
bottom of the oven. Do not place utensils (for
example a roaster) directly onto the bottom of the
oven.
24
Page 25

Timer
13:30
165
13:3028.39
Using the timer men u you can set the followin g:
M timer
topwat ch
N s
P cooki ng t ime duration (not during stand-by)
O cooki ng t ime end (not during stand-by )
Calling up the Timer Menu
Touch the key beside the symbol q to call up the
timer menu.
If the appliance is on standby, touch any key. N ow
the display is activated. The info a and timer q
symbols are shown.
Touch the key next to the timer symb ol q. The timer
menu appear s.
Timer
The timer count s down independently of all other
settings of the appliance. You can enter a maximum
value of 90 minutes.
Setting the Timer
1 Call up the timer menu. The tim er f unction M is
show n on the display.
2 Using d or e set the desired duration.
3 Start usi ng the b key.
The timer menu is close d. T he symbol M and the
elapsin g ti me a re shown in the status bar.
Note : th e ti mer starts automatica lly after a few
seconds without touching the b key.
A signal sounds whe n th e ti me h as e lapsed. Touch
the q key to switch off the signal.
Note
To c ancel an active timer:
Call up the timer menu, sel ect the timer fun ction M
and touc h th e j key.
25
Page 26

Stopwatch
165
13:3000.05
The stopwatch will coun t th e el apsed time up to
90 minutes.
The pause funct ion pauses the stopwatch.
The stopwatch runs independently of all other
settings of the appliance.
Star ting the Stopwatch
1 Call up the timer menu.
2 Using f or g select the stopwatch functi on N .
3 Start usi ng the m key.
The timer menu is close d. T he symbol
elapsin g ti me a re shown in the status bar.
A signal sounds whe n th e ti me h as e lapsed. Touch
q key to switch off the signal.
the
The timer menu is close d im mediately when you
touc h th e b key.
N and the
Pausing the Stopwatch
1 Call up the timer menu.
2 Using f or g select the stopwatch functi on N .
3 Touch the l key. Th e co unter stops. The key
reverts to start m.
4 Start again u sing the m key. Th e co unter
continu es.
26
Af ter 90 m inutes the time rever ts to 00:00 minutes.
The symbol
stopwatch is switch ed o ff.
N in the status bar disappear s. The
Note
To c ancel the stopwatch:
Call up the timer menu, sel ect the stopwatch
functio n N a nd touch the j key.
Page 27

Cooking Time Duration
00:40
165
00:4013:30
If you set a cooking time duration for your meal, the
applian ce s witches off automatically af ter th e
elected time.
s
This enable s you to leave the kitchen while the meal
is being prepared.
ou can select a cooking tim e between 1 mi nute
Y
and 23 hours 59 m inutes.
Select the temperature and heating mode and place
your mea l in the oven.
Switching off Automatically
1 Call up the timer menu.
2 Using f or g select the cooking time duration
functio n P.
3 Using d or e set the required cooking time.
4 Start the program using the b key.
The timer menu is close d. Temperature and heatin g
mode are shown on the display. The elaps ing time
is shown in the status bar.
Af ter the time has elapsed the appliance switches
of f. A signal sou nds. Touch the q key or open th e
applian ce d oor to switch off the signal.
Note
To c ancel the cooking time:
Call up the timer menu. Touch the j key, then touch
b to con firm.
To c hange the coo king time:
Call up the timer menu. Cha nge the time with d o r
e , then touc h b to confirm.
To sto p th e program:
Switch the temperature knob of f.
27
Page 28

Cooking Time End
00:40
15:30
165
15:3000:4013:30
You can program a cooking time end. Example: it is
13:30. The meal wil l ta ke 40 minutes to cook and
ust be ready at 15:30.
m
Set the cooking time duration and set the cook ing
time end to 15:30. The electronics will calculate the
start tim e. T he a ppliance will start autom atically at
4:50 and switch off a t 15:30.
1
Please note that food which can eas ily go off shou ld
not stay in the oven too l ong.
Note :
Always set the desired temperature, heating mode
and cooking tim e du ratio n fi rst. Only by setting
these values can the cooking time end be
programmed.
Switching on and off Automatically
1 Set the required cooking time.
2 Using g select cook ing time end O. The switch
of f time appe rs on the display.
3 Using d set a l ater switch-of f time.
4 Start usin g the b key. The timer menu is
closed.
Tempe rature and operating mode appear on the
display. The statu s ba r ap pears. The appliance is
on standby and will start automatically. After the
cooking tim e du ration it wil l sw itch of f.
Af ter the time has elapsed the appliance switches
of f. A signal sou nds. Touch the
applian ce d oor or s witch off the temperature
selector to switch of f the signal.
q key, open the
Note
To c ancel the cooking time:
Call up the timer menu. Touch the j key, then touch
b to con firm. Coo king time duration and end are
cancell ed.
28
To sto p th e program:
Switch the temperature knob of f.
If the P symbol fla shes:
You have not set the cooking time duration. Always
set the cooking time duration first.
Page 29

Extended Timer
1
3:30
This functi on keeps the oven at a temperature of
5 °C in the top and bottom hea t mo de.
8
You can keep food warm 24 to 74 hours, without
switchi ng the oven on or of f.
Please note that food which can eas ily go off shou ld
not stay in the oven too l ong.
upposit ion:
S
The ente nded timer key
make the entended timer key ava ilable in the basic
settings. See chapter basic settings.
V is available. You have to
Setting the Program
1 Turn the temperature knob one position to the
right to the lig ht p osition.
2 Touch the key beside the symbol V . The
suggested value of 28 h appears on the display.
3 Using d or e set the desired duration.
4 Start usi ng the b key.
The cooking mod e an d temperatu re appear on the
display. The oven light stays off. The keys are
locked. The display lighting is switched off. The
softkey tone is switche d of f.
At the end of the p rogrammed time the oven stops
heating . Th e di splay is empty. Swit ch the
temperature knob off.
Note
If you cannot find the V key :
You have to make the extended timer key available.
See chapter basic settings – ex tended timer.
To sto p th e program:
Switch the temperature knob of f.
29
Page 30

Memory Recipes
00:20 00:60 00:05 00:05 00:20
220ºc 160ºc 200ºc 220ºc 80ºc
00:20 00:60 00:05 00:05 00:20
220ºc 160ºc 200ºc 220ºc 80ºc
00:20 00:60 00:05 00:05 00:20
220ºc 160ºc 200ºc 220ºc 80ºc
>5
Using the memor y recipes, you can store the
ettings for a meal and call them up at any time. It is
s
possibl e to store six memor y recipes.
You may set and store a total of five dif ferent steps
for a meal. Each step has to last a t le ast 2 minutes.
You can also store the settin g of the meat probe. In
this case the programmed meat probe temperature
alue is stored, not th e co oking time.
v
Calling up the Memory Menu
1 Turn the temperature knob one position to the
left.
2 Turn the function knob two positions to the left
to “memo ry recipes”.
The memory menu with a list of 6 recipes appears.
The symbol is grey w hen program med with a
recipe. Use the f or g menu keys to select the
desired recipe slot. The stored settings of a
programmed recipe are s hown on the display.
Storing the Settings
1 Cook the meal with the re quired settings.
2 Call up the memory menu when the meal is
ready.
3 Use the f or g menu keys to select the desired
recipe slot.
4 Touch the
k key for at least 3 seconds.
All the settings you used to prepare the meal are
stored. The settings are sh ow n on the dis play.
Note
If you want to store different settings:
Simply store the new settings. The old settings are
erased.
Before you can store the setti ngs fo r an other meal
the oven has to be swit ched of f for at least
5 minutes.
30
If > 5 appears on the display :
The programm you are storing consists of more
than 5 steps. Only the last 5 steps are stored.
Page 31

Star ting a Memory Recipe
0
0:20 00:60 00:05 00:05 00:20
2
20ºc 160ºc 200ºc 220ºc 80ºc
13.30
00:20 00:60 00:05 00:05 00:20
220ºc 160ºc 200ºc 220ºc 80ºc
1 Turn the temperature knob one position to the
left.
2 Turn the function knob two positions to the left
to “memo ry recipes”.
3 Use the f or g menu keys to select the desired
ecipe slot.
r
4 Start usi ng the
b key.
The settings are shown on the display. The oven
switche s on . Th e frame for the step that is running
is in bold.
Switch of f th e temp erature and function knob when
the program has ended.
Note
If the r symbol flashes when you start the
program:
The meal has been stored with a programmed meat
probe temperature. Conne ct t he m eat probe before
start ing the memor y recipe.
31
Page 32

Child Lock
13:30
13:30
13:30
The oven has a child lock. It prevents the oven
eing turned on unin tentionally.
b
Supposi tion:
You have to make the child lock avail able in the
basic settings. See chapter basic settings.
Activating the Child Lock
Supposi tion:
The temperature knob is in the OFF position.
1 Touch any key. The symbol o appears besi de
the centre left key.
2 Touch the key o for at least 6 seconds.
The child lock is active, the controls are locked.
The standby screen appears. The symbol o
appears in the status bar.
Deactivating the Child Lock
1 Touch any key. The symbol p appears beside
the centre left key.
2 Touch the key p for at least 6 seconds.
The child lock is deactivated. You can operate t he
applian ce a s us ual.
Note
If you cannot find the o key bes ide the centre key:
Call up the basic settings menu. Select the child
lock function. Selec t “c hild lock availab le” o .
If the child lock key is no lon ger required:
Call up the basic settings menu. Select the child
lock function. Selec t “c hild lock not available” p.
32
Page 33

Additional Functions
1
3:30
175
13:30
Safety Deactivation
For your protection the appliance has a s afety
deactivation. The safety dea ctivati on switches off
he heat if the oven is left on for more than 12 hours
t
without the controls being tou ched.
Three dashes appear on the display. Swi tch the
temperature knob off. Then you can operate the
pplianc e as usu al.
a
Rapid Heating up
This mode heats up the ove n pa rticularly fast.
You can activate the rapid heating up in the basic
settings menu.
If you have selected rapid hea ting up, always heat
up the empty oven b efore putti ng t he d ish in t he
oven.
Quick Roast Function
Only during roaster ope ratio n: d uring the qui ck
roast fu nction the oven will heat up at full power for
approx. 3 minutes.
You can use the quick roast function for example to
sear steaks.
Keep the
The quick ro ast funct ion starts. You can select the
quick ro ast funct ion again several times if required.
If you want to abor t the quick roast function press
the g key again.
Note :
the quick roast function ends when the oven d oor is
opened.
g key pressed until a signal is sounded .
33
Page 34

Changing the Basic Settings
13:30
Your appliance has several basic settings.
You can customize these settings:
Turn the temperature knob one position to the right
to the light pos ition.
Call up the basic settings menu with the c key.
•
Use the top f or g keys to move bet ween the
•
ettings.
s
Use the centre keys to change the selected
•
setting. You can change several sett ings
individ ually without leavin g th e me nu.
Touch the b key to exit the menu . Al l setting s
•
are saved.
Note
The status bar only shows six options.
Use the top f or g keys to move to the required
option. You can scroll back- or for ward with these
keys.
If no key has been touched for 60 secods the menu
disappe ars. The standby screen appears. All
settings are saved.
Example: Changing the Standby
Screen
1 Call up the basic settings menu by turning the
temperature knob one position to the right to
the light position.
Touch the key next to the c symbol. The menu
appears.
2 Use the menu key
standby screen M .
3 Use the middle keys f or g to select the
required setting. The sele cted screen appears
briefly.
Now you can change further settings or exi t th e
menu with the b key.
g to select the f unction
34
Page 35

The Following Settings Can Be
3008
07 0926
Changed
Ti me format
12 hour format (AM/PM ) or 24 hour forma t
•
Cl ock
Hours / mi nutes
•
Use the arrow key g bottom right to change from
hours to minutes.
Da te
Day / month / year
•
Use the arrow key g bottom right to change from
day to month to year.
Key tones volume
In 8 levels
•
Adjust the volume of the key to nes.
The signal volume cannot be adjusted.
Di splay brightness
In 8 levels
•
Di splay contrast
In 8 levels
•
The display contrast depends on the viewing angle.
St andby screen
Gaggena u wi th clock / clock and date / clock
•
The selected scre en a ppears briefly.
Ex tende d ti mer
Exte nded timer key not available / available
•
Reset al l pa rameters to the factor y setting
No / ye s
•
Immedia tely confirm a reset with the b key.
35
Page 36

English
Deutsch
F
rancais
Italiano
Ex hibit ion mode
The setting
selected and must not be changed. The appl iance
does not heat up during exhib ition mode x.
You can only c hange this setting 3 minutes after the
applian ce h as b een connected to the el ectri city.
Tem perat ure unit
°F or °C
•
Da te format
Day.m onth. year or
•
day/month/year or
month/day/year
He ating up with / witho ut s ignal
Rapid heating up with signal / normal heating
•
up with signal / rapid heating up without signal
/ normal heating up without sign al
The signal soun ds w hen the oven has heated up.
w “exhibition mode not active” must be
La nguag e
Select the language for t he d isplay mess ages
•
or switch the displ ay messages off.
Key tones
Sound 1 (beep) / sound 2 ( click ) / key tones off
•
Choose the key tones.
The signal tone cannot be cha nged.
Ch ild lock
Child lock key not available / available
•
36
Page 37

Care and Manual Cleaning
Safety Notes
$ Warnin g! D o not clean the hob using hig h
pressure cleaners or steam jets.
$ Warnin g, r isk of b urns! Before cleanin g, wai t
until the appli ance has cooled down.
Cleaning the Oven Interior
Clean the oven with a cloth/sponge and a small
amount of hot soapy water. Avoid residues burning
in. Af ter cleaning, leave the door open until the
oven has dried.
Do not scrap e of f baked-i n remainders of food.
Instead, moiste n th em w ith a wet cloth and
detergent.
If the oven is heavily soiled use the pyrolysi s for
best res ults.
Fruit juices from moist cakes dripping onto the oven
inte rior can damage the enamel. Remove suc h
soiling as soon as the ove n ha s co oled down
suffi ciently.
Do not use non-suitable clea ning agents:
– scouring cleaning agents
– nitro polishing agents
– clean ers containing chloride
– abrasive sponges or obje cts
Cleaning the Door Seal
Always keep the door seal clean and free of food
remains.
Do not use aggressive cleaning agents (e.g. oven
cleaner ) on the doo r se al. They c an d estroy the
door seal.
o not remove the door seal.
D
Cleaning the Accessories
Clean acces sories (baking tray, wire grill and grill
pan) with hot soapy liquid.
Soak baked-in remainders and clean with a brush.
Cleaning the Baking Stone
(s pecia l accessory )
Remove coarse soiling from the baking stone. Turn
the baking stone round before using it again. This
will burn off most residues from the botto m si de.
No te: Do not clean the baking stone with water and
detergents! Moisture ins ide the baking stone can
cause cracking.
Note : On ly use oven cleaner on the enamel in the
oven interior. Do not let the oven cle aner come into
contact with the door seal. Do not spray oven
cleaner onto the door fra me.
Cleaning the Glass Front
Clean the glass front with a soft cloth and glass
cleaner. Do not wipe the glass front with a soaking
wet cloth as wate r mi ght enter behind the glass.
Do not use aggressive, scou ring cleaning agents or
glass scrapers. They can scratch the surface and
destroy th e gl ass.
A rainbow coloured shimmer may be seen on the
front glass. This is the heat res istan t co ating.
Only clean the display with a sof t cloth. Do not wipe
the display with a soaking wet cloth as water might
ente r be hind the screen.
37
Page 38

Pyrolysis
16:30
485
02:5913:30
$ Warnin g, r isk of b urns! Very high temperatures
ccur during the pyrolysis! Keep chi dren away!
o
During the pyrolytic self cleani ng t he oven is heated
to 485 °C. Any food residues from baking, roast ing
and grilling are reduced to ash.
The duration of the pyrolysis is 3 hours.
For your safety the oven door remains locked.
During pyrolysis the light in the oven remain s
switche d of f.
Before Star ting Pyrolysis
Remove coarse soiling and foo d remains from
•
the oven.
$ Warnin g, f ire risk! Food remains, fat a nd
meat juices may ignite duri ng pyrolysis.
Manually clean the door seal, the inside of the
•
door and the glass pane l. T he pyrolysis does
not clean these par ts.
Remove all loose interior par ts (for example
•
wire rack or meat probe) from the oven . No
objects sho uld be l eft in the oven!
Close the oven door.
•
Setting the Program
1 Turn the temperature knob and the function
knob one positi on to the left.
2 The pyrolysis menu appears. The swit ch o ff
time appear s on the dis play.
3 Press b to start.
The pyrolysis menu disappear s. T he F sy mbol and
the pyrolysi s temperatu re appear on the display.
The status bar shows the d urati on o f the pyrolysis.
The oven light and the dis play light stay off during
pyrolysis.
38
Page 39

Delaying the Switch-off Time
16:30
---
2
1:00
0
3:00
1
3:30
If you want the pyrolys is to run at a la ter time (for
example during the night), you can change the
witch-o ff time. In this way you can use your ove n
s
during the day as usual.
Make the settings as d escri bed in 1 and 2.
Press the
3
4 Press the
Af ter confirmation the F symbol appears o n the
display. The statu s ba r sh ows the switch-off time of
the pyrolysi s. Three dash es i nstead of the
temperature are shown on the disp lay. After the
start of the pyrolysis the temperature appears on
the display.
A signal is sounded at the swit ch-off time.
Exception: There is no signal between 22.00 and
8.00.
The pyrolysis has ended. Switch off the
temperature knob.
Allow the oven to cool down fully. Then wipe out the
oven using a moist cloth.
ey to change the switc h-off time.
d k
b key to confirm.
Note
The duration of the pyrolysis can not be change d.
If the pyrolysis does not start and the
symbol flas hes on t he d isplay:
Check if the door is fully c losed and the meat probe
has been removed.
If you want to stop the pyrolysis:
Switch of f th e temp erature knob.
For your safety the oven door remains locked. The
door is auto matically unlocked when the oven has
cooled down and the o symbol disappears.
G or r
39
Page 40

Cleaning Accessories with Pyrolysis
Gaggena u ba king trays a nd grilling trays are coated
with pyrolysis-proof enamel. To arrive at an o ptimu m
leaning result, you are advised to remove all
c
accesso ries from the oven before the pyrolytic
cleanin g process. Only this will ensure optimum
heat distributio n.
f you would l ike to remove burnt-in residues
I
from your baking tray or your grilling tray, it is
imperative that you observe the followin g
safety notes:
Remove extreme fatty soiling, roast juice and
•
food remainders b efore the pyro lytic cleaning
process.
$ Warnin g, f ire risk! Food remains, fat a nd
meat juices may ignite duri ng pyrolysis.
Only insert one baking tray or one gr illing tray
•
in the lowest shelf in the oven.
Fully insert the baking tray or grilling tray.
•
Do not clean wire rack, rotary spit, cast roaster,
•
baking stone, mea t probe or other accessories
in the pyrolytic cleaning p rocess.
40
Page 41

Trouble Shooting
E104
13:30
13:30
m
In case of a malfunctio n fi rst check the hou sehold
uses. If the power sup ply is functioning correctly
f
contact your dealer or Gaggenau after-sal es
service.
Please spec ify the E nu mber and FD number of the
pplianc e wh en c alling our after-sal es s ervice. You
a
find these numbers on t he rating pla te of the
applian ce.
Repairs may only be carried out by authorised
tech nicians, in order to guarantee the electrical
safety of the appliance.
$ Warnin g! I ncorrect re pairs may result in serious
injury to the user.
All poles of the applia nce must be disco nnected
from the electricity when being repaire d (s witch off
the household f use or the circuit breaker in the fuse
box) .
Non compliance with these recomme ndations
results in the warranty coverage becoming invalid.
Error Messages
If a malunction occ urs and the appliance does not
heat up, an erro r co de w ill be s hown on the display.
If E003, E303, E11 5 or E215 is shown on the display
the appliance i s too hot. Swi tch off the appliance
and let it cool down.
If a diffe rent error code is shown on the display cal l
the af ter- sales service. Please specif y the erro r
code and the applia nce type. You f ind the appliance
type on the rating plate.
Switch of f th e temp erature knob.
Note :
The short timer and stop clock can still be used.
Exhibition Mode
If the x symbol appears on the standby screen,
exhi bition mode is activated. The ap pliance does
not heat up.
Disconn ect the appliance from the electric ity for a
few second s (s witch off the household fuse or the
circuit breaker in the f use box). Wit hin 3 mi nutes
af ter reconnecti ng the appl iance go to the basic
settings menu and deactivate exhibition mode.
41
Page 42

Power Cut
13:30
The applian ce b ridges a power cut of up to
5 minutes. The operation continues.
Af ter a lo nger power cut the appliance will switch
of f the operation. The J symbol appears on the
display and three dashes instead of the
temperature.
Switch of f th e temp erature knob and switch the
applian ce b ack on.
The “first settings” menu reappears if the applian ce
is without elec trici ty for several days. You have to
set the clock an d da te.
Note : Th e ba sic setti ngs remain stored even if the
applian ce i s wi thout electricity for several days.
42
Page 43

Replacing the Oven Lights
If an oven light fa ils, it must be replaced. Heat -
esistant replacement bulbs can be obt ained from
r
the af ter- sales service or specialist shops. Only use
these bulbs.
$ Warnin g, r isk of b urns! Oven lights get ver y hot
uring use. Only repla ce the oven light when it is
d
cold.
isconne ct the appliance from the electrici ty b efore
D
replacing the light (switch off the hou sehold fuse or
the circuit breaker in t he f use box).
Replacing the Ceiling Light
1 Loosen the screw on the lamp cover.
Ti lt d own th e lamp c over.
2 Pull out the bulb. Push the new bulb in firmly.
Make sure that the pins are in the correct
positio n.
Note : On ly use a heat-resistant halogen bulb of
the same type (BO 270: 60 W, BO 280: 75 W /
230 V / G9). Do not touch the halogen lamp
with your hands. Use a d ry cloth.
3 Ti lt the l amp cover up and screw it back on.
4 Switch the circui t breaker back o n.
Replacing the Side Light
1 Place a tea towel in the oven to prevent
damage.
2 Pull out the shelf after undoing the knurled
nuts.
3 Push the top mou nting bracket back and
remove the glass cover.
4 Pull out the bulb. Push the new bulb in firmly.
Make sure that the pins are in the correct
positio n.
Note : On ly use a heat-resistant halogen bulb of
the same type (10 W / 12 V / G4).
Do not touch the halogen lamp with your hands.
Use a dry cloth.
5 Inser t th e gl ass cover under the bottom
mountin g bracket and press it down firmly on
the top. The slo ping edges must face to the
inte rior of the oven .
6 Remove the tea towel and swit ch t he c ircuit
breake r ba ck on.
You must replac e a damaged glass cover. Suitable
glass cove rs m ay be obtained from the after-s ales
service.
43
Page 44

Ga ggena u Ha usgeräte GmbH
Carl-Wery -Straße 3 4
D-81739 Mün chen
ww. gagge nau.com
w
9000653 858 EB 910518 en
 Loading...