Furrion DV 7200 Instruction Manual

Entertainment System
DV 7200
Instruction Manual
2

Welcome
Thank you for purchasing this Furrion® Entertainment System. Before placing your new product into operation, please read these operating instructions carefully. They contain important information for safe use, installation and maintenance of the product.
Please keep this instruction manual in a safe place for future reference. Pass it onto possible new owners of the product. The manufacturer does not accept responsibility for any damages that may arise due to non-observation of these instructions.
If you have any further questions regarding our products, please contact us at support@furrion.com
1

Contents |
|
Welcome................................................................................................ |
1 |
Contents................................................................................................ |
2 |
Locations and Names of the Controls.................................................... |
3 |
Remote Control .................................................................................... |
5 |
Installation............................................................................................ |
7 |
Connections........................................................................................... |
9 |
Operation............................................................................................ |
14 |
Common Operation.......................................................................... |
14 |
Radio Operation................................................................................ |
17 |
USB Operation.................................................................................. |
18 |
Bluetooth Operation......................................................................... |
20 |
Specification........................................................................................ |
24 |
Warranty............................................................................................. |
26 |
2

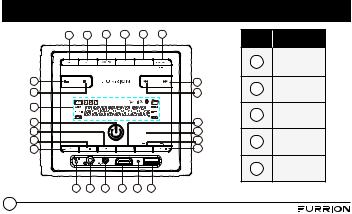
Locations and Names of the Controls
5 |
6 |
7 |
8 |
9 |
10 |
Item |
Button |
|
|
|
|
|
|
||
|
|
|
|
|
|
1 |
Power & |
|
|
|
|
|
|
Mute |
|
|
|
|
|
|
|
|
|
4 |
|
|
|
|
11 |
2 |
LCD Display |
3 |
|
|
|
|
12 |
||
|
|
|
|
|
|
||
2 |
|
|
|
|
|
3 |
Volume + |
1 |
|
|
|
|
16 |
||
|
|
|
|
|
|
||
15 |
|
|
|
|
25 |
4 |
|
14 |
|
|
|
|
17 |
Volume - |
|
13 |
|
|
|
|
18 |
|
|
|
|
|
|
|
|
5 |
ZONE 1 |
19 |
20 |
21 |
22 |
23 |
24 |
|
|
3

Locations and Names of the Controls
Item |
Button |
Item |
Button |
Item |
Button |
|
6 |
ZONE 2 |
11 |
Next |
16 |
4/RDM |
|
7 |
AM/FM |
12 |
Previous |
17 |
5/Backlight/ |
|
Hang up |
||||||
|
|
|
|
|
||
8 |
USB |
13 |
1/Play/ |
18 |
6/Clock Adjust/ |
|
Pause |
Alarm/TEL |
|||||
|
|
|
|
|||
9 |
BT |
14 |
2/STOP |
19 |
RESET |
|
10 |
SOURCE/ |
15 |
3/RPT |
20 |
Headphone |
|
SEL |
Socket |
|||||
|
|
|
|
Item Button
21Aux In Jack
22HDMI In Jack
23Microphone
24USB Socket
25NFC Detection Area
4

|
Remote Control |
|
|
|
||
|
|
|
|
18 |
Item |
Button |
|
|
|
|
17 |
||
1 |
|
|
|
|
|
|
|
|
|
|
1 |
POWER |
|
2 |
|
|
|
16 |
||
|
|
|
|
|
||
3 |
|
|
|
|
2 |
|
4 |
|
|
|
15 |
APS |
|
5 |
|
|
|
|
|
|
6 |
|
|
|
14 |
3 |
|
7 |
|
|
|
|
SCAN |
|
8 |
|
|
|
13 |
|
|
9 |
|
|
|
12 |
4 |
CLOCK |
10 |
ALARM |
ZONE1 |
ZONE2 |
11 |
|
|
19 |
|
|
|
21 |
|
|
20 |
|
|
|
|
5 |
BAND |
|
|
|
|
|
||
5 |
|
|
|
|
|
|
Item Button
6MODE
Number(0-9)
1/ PLAY/ PAUSE
7/TOP Button 2/INT Button 3/RPT Button 4/RDM Button
8* Button

Remote Control
Item |
Button |
Item |
Button |
Item |
Button |
9 |
MUTE |
14 |
LOUD |
19 |
ALARM |
|
|
|
|
||
10 |
CALL LOG |
15 |
LOCAL |
|
|
11 |
TEL |
16 |
UP & DOWN |
20 |
ZONE 1 |
|
|
||||
12 |
HANG UP |
17 |
SEL |
|
|
13 |
# Button |
18 |
|
21 |
ZONE 2 |
+ & - |
|
|
6

Installation
Location
●● Choose a mounting location away from humid areas, water sources, burning products or any equipment that can radiate heat.
●● Select an area on the wall or cabinet, which is free from cable, fuel or brake lines. There is a vent hole at the back of the unit for cooling purpose, do not block it.
●● Ensure when the stereo is mounted in the cut out that the wires at the rear of the unit are not pressed against the heat sink.
Installing the unit
●● Before finally installing the unit, connect the wiring temporarily and make sure the unit and the system can work properly.
●● Fix the unit to the wall using 4 self-tapping screw as indicated in the illustration.
7

Installation
1. Remove plastic frame of the front panel from the unit.
Screw 2. Fix the unit to the wall with 4 #8 pan head self-tapping screw.
3. Replace the plastic frame of the front panel to the unit.
Screw
Plastic frame of the front panel
8

Connections
Supported Audio Format
File Extension |
.mp3 |
|
.wma |
|
|
|
|
|
|
Audio Code |
MP3 |
|
WMA |
|
|
|
|
|
|
Bit Rate |
16kbps - 320kbps CBR/VBR |
|
16kbps - 320kbps |
|
|
|
|
|
|
Sampling |
8k - 48kHz |
|
8k - 48kHz |
|
Rate |
|
|||
|
|
|
||
|
|
|
|
|
Remark |
/ |
WMA only support WMA7/WMA8/WMA9/ |
||
(CBR/VBR)(only support 353 format) |
||||
|
|
|||
|
|
|
|
|
NOTE: Reading the above file formats is not guaranteed.
9
 Loading...