


DV1200 Instruction Manual
0 0 12
DV
4 IN 1 WALLMOUNT ENTERTAINMENT SYSTEM
WITH DVD/CD/USB/BLUETOOTH/AM/FM/WEATHERBAND
|
|
|
|
|
|
|
|
|
|
|
|
|
|
|
1 |
|
|
|
|
|
|
|
30 |
|
|
|
|
|
|
|
|
|
|
|
|
|
|
|
|
|
|
|
|
|
|
|
|
|
|
|
|
|
|
|
|
PRECAUTION |
|
|
|
|
|
|
|
|
|
|
|
|
|
|
|
|
|||||
|
|
|
|
|
CAUTION |
|
WARNING: TO REDUCE THE |
|||||
|
|
|
|
|
! |
RISK OF FIRE OR ELECTRIC |
||||||
|
|
|
|
|
RISK OF ELECTRIC SHOCK |
SHOCK, DO NOT EXPOSE |
||||||
|
|
|
|
|
THIS APPLIANCE TO RAIN OR |
|||||||
|
|
|
|
|
DO NOT OPEN |
|
MOISTURE. |
|||||
|
|
|
|
|
|
|
||||||
CAUTION: TO REDUCE THE RISK OF ELECTRIC SHOCK, DO NOT REMOVE
COVER (OR BACK). NO USER SERVICEABLE PARTS INSIDE. REFER
SERVICING TO QUALIFIED SERVICE PERSONNEL.
The lightning flash with arrowhead symbol, within an equilateral triangle, is intended to alert the user to the presence of uninsulated dangerous voltage within the products enclosure that may be of sufficient magnitude to constitute a risk of electric shock to persons.
The exclamation point within an equilateral triangle is intended to alert user to
!the presence of important operating and maintenance (servicing) instructions in the literature accompanying the appliance.
CLASS 1 LASER PRODUCT
Laser product symbol: located on the rear panel of the unit, indicate this player is a class laser product, only use weak laser and no hazardous radiation outside of the unit.
1.Read through this instruction manual before installation and use. 2.Do not touch the power plug with wet hand.
3.Switch off the main power when the unit is not in use. (Disconnect the power plug from the power outlet when you do not intend to use the unit for a prolonged period of time.) Before moving the unit, remove the disc from the unit/ tray first.
4.Do not open the cover or touch any of the components exposed out of the unit, only for qualified technicians.
5.Do not expose the unit under direct sunlight or nearby objects that radiate heat to avoid damage the unit.
6.Do not place the unit in moist and humid conditions, which effect the pick-up of the unit lead to out of work.
7.Place the unit on a flat surface and ventilative condition. Please ensure the ventilation holes are not covered to avoid overheating and malfunction.
8.Clear the panel and case with soft dry cloth only, do not apply any kind of thinner, alcohol or sprays.
9.The apparatus shall not be exposed to dripping or splashing and that no objects filled with liquids, such as vases, shall be placed on the apparatus .

|
|
|
|
|
|
|
|
|
|
|
|
29 |
|
|
|
|
|
2 |
|
|
|
|
|
|
|
|
|
|
|
|
|
|
|
|
|
|
|
|
|
Contents |
|
|
1. Before Operation........................................................................................... |
3 |
|
1.1 |
Feature................................................................................................. |
3 |
1.2 |
Precautions............................................................................................ |
3 |
1.3 |
Maintenance and Cleaning of Discs.......................................................... |
4 |
1.4 |
Battery Information of the Remote Control................................................. |
4 |
1.5 |
The Remote Control Description............................................................... |
5 |
1.6 |
Locations and Names of the Controls......................................................... |
6 |
1.7 |
Wiring Diagram............................................... ........................................ |
7 |
1.8 |
Mouting Installation.................................................................................. |
7 |
2. Common Operation....................................................................................... |
8 |
|
3. Radio Operation.......................................................................................... |
10 |
|
4. Basic Disc, USB Operation........................................................................... |
12 |
|
4.1 |
Begin Playback...................................................................................... |
12 |
4.2 |
Pause Playback..................................................................................... |
13 |
4.3 |
Stop Playback ....................................................................................... |
13 |
4.4 |
Select Chapter/Track with the the >>|/|<< Buttons..................................... |
13 |
4.5 |
Select Chapter/Track with the Number Buttons......................................... |
13 |
4.6 |
Select Chapter/Track with the Root/PBC Menu......................................... |
13 |
4.7 |
Terminate the Playback.......................................................................... |
14 |
5. Advanced Disc, USB Operation.................................................................... |
14 |
|
5.1 |
Playback with Speed.............................................................................. |
14 |
5.2 |
Playback with Slow Speed...................................................................... |
14 |
5.3 |
Playback with Still Frame ........................................................................ |
15 |
5.4 |
Playback Repeatedly............................................................................. |
15 |
5.4.1 One/All Repeat................................................................................... |
15 |
|
5.4.2 A-B Repeat......................................................................................... |
15 |
|
5.5 |
Playback from a specified Chapter/Track or a Specified Time.................... |
16 |
5.6 |
Playback in Random.............................................................................. |
16 |
5.7 |
Playback in Different Angle..................................................................... |
16 |
5.8 |
Playback in Zoom Mode......................................................................... |
16 |
5.9 |
Change the Caption Language............................................................... |
17 |
5.10 Change the Audio Language................................................................. |
17 |
|
5.11 Look over the Playback Status..... .......................................................... |
17 |
|
5.12 Program Playback................... ............................................................. |
18 |
|
5.13 Playback the Picture CD in JPEG Format................................................ |
18 |
|
5.14 Mp4 OPERATION................................................................................ |
19 |
|
5.15 ESP and ID3 Function.......................................................................... |
19 |
|
5.16 USB Operation ..................................................................................... |
19 |
|
5.17 The DVD System Menu Setup Operation................................................ |
19 |
|
5.18 The Parental Control............................................................................ |
23 |
|
5.19 The Region Code................................................................................. |
24 |
|
6. Bluetooth Handfree System.......................................................................... |
25 |
|
7. The Trouble Shooting................................................................................... |
27 |
|
8. Specification............................................................................................... |
28 |


 3
3
1.Before Operation
Thank you for purchasing a Furrion Product, we hope you will enjoy using our product. For maximum enjoyment please look through the following manual to learn about all the features of your Furrion Stereo.
1.1 Features:
Digital AM / FM Tuner with Weather band (WB)
DVD/CD-R/RW/MP3/MP4/WMA Compatible
Auxiliary inputs on front and rear
USB input with charging function*
3 Zone output with built in Subwoofer output in Zone A Backlit controls with Sleep Tight light function Clock/Alarm Clock
1 x HDMI output for HD viewing
2 x RCA Audio/Video outputs for connecting 2 additional Tv’s Coaxial and Optical Audio input connections on the rear of the unit
*not all products can be charged from the unit.
1.2 Precautions
Ensure to connect this product to a 12V DC negative ground battery system which is standard in North America and European Vehicles.
Ensure when installing the Stereo all wire ends which are not being used are terminated with a insulated end to avoid wires shorting or earthing which can lead to the risk of fire or electrical shock.
Avoid inserting foreign objects into the disk loading slot of the Stereo as this will cause malfunction.
Do not expose this product in moist or wet environments, if condensation is present in the screen, wait for 1 hour or more for the moisture to evaporate If the interior of the vehicle is extremely hot, do not use the player until the vehicle internal temperature has cooled down.
Do not use cleaning products on the front face of the product, only use a slightly damp cloth for cleaning.
Do Not attempt to disassemble or adjust this product, contact a service cente for assistance

 28
28 

8. Specification |
|
|
|
General Specification |
|
|
|
Power Supply Requirement |
.................................................. |
|
DC 12V |
Maximum Power Output................... |
|
|
6 x 25W(measured at DC 14.4 V) |
Maximum Sub woofer Power .....................................Output |
1 x 50W |
||
Dimensions(w x h x d)........................................... |
|
|
281 x 173 x 175mm |
DVD Deck Specification |
|
|
|
Format..................................... |
|
DVD/VCD/JPEG/MP4/MP3/WMA/CD |
|
Video System.................... |
NTSC/PAL/PAL - M/PAL - N/AUTO(optional) |
||
Audio System.............................................................. |
|
|
24 bit/96KHz |
Loading System.......................................................... |
|
|
Auto Loading |
Mounting Angle................................................................. |
|
|
0 to +/-30 |
Video Specification |
|
|
|
Video Type................................................................... |
|
|
16:9 and 4:3 |
Video Output level...................................... |
|
|
Composite:1.0± 0.2Vp-p |
|
|
|
Load impedance: 75 ohms |
Horizontal Resolution................................................................ |
|
|
600 |
Audio Specification |
|
|
|
Audio Output(Analog audio).......................................... |
|
2.0+0-1.0Vrms |
|
Frequency Response............................. |
|
|
20Hz ~ 20KHz(at 1KHz 0 dB) |
S/N Ratio(Audio)............................................. |
|
|
≥90dB(at 1KHz 0 dB) |
Radio Specification |
|
|
|
FM Section |
|
|
|
Frequency range........................................... |
|
|
87.5MHz - 107.9MHz(US) |
Usable sensitivity |
|
|
87.5MHz -108.0MHz(EU) |
|
|
3uV |
|
I.F Frequency.................................................................... |
|
|
10.7MHz |
AM Section |
|
|
|
Frequency....................................................... |
|
|
530KHz - 1710KHz(US) |
|
|
|
522KHz - 1620KHz(EU) |


 27
27 

7. The Trouble Shooting
Please read the user s manual carefully before using the DVD player. If you have any problems with this product please refer to the bellow Trouble shooting guide to help you resolve the issue.
NO PICTURE, SOUND AND INDICATION
*Ensure that the power switch is on.
*Ensure that the wall inlet is ok.
*Ensure that the power cord is not damaged or the fuse is not blown.
*Ensure that the power plug is connected to the inlet tightly.
NO SOUND BUT PICTURE OK
*Ensure that the player s audio output has a good connection with TV s audio input.
*Check whether the audio connector is damaged.
*Check whether you have turned down the volume.
*Ensure that you have set the right AUDIO setup of the player.
*Ensure that the audio is not under mute.
NO PICTURE BUT SOUND OK
*Ensure that the player s video output has a good connection with TV s video input.
*Ensure that you have turned your TV to the AV input channel connecting to your player.
*Check whether the video connector is damaged.
*Ensure that you have set the right VIDEO settings of the player.
BLACK AND WHITE PICTURE OR SCREEN ROLLING
* Ensure that you have set the right TV SYSTEM (e.g. PAL, NTSC) setting.
FLAWS OF PICTURE OR SOUND
*Check whether the setting of AUDIO is right.
*Check whether the disc is scratched or stained.
*Check whether the AV connector and the output terminal is stained.
*Check whether there is condensation inside the Lens. If so, leave the player off for an hour or so, then try again.
*Check whether the installation angle is less than 30.
DISPLAY NO DISC OR BAD DISC
*Ensure that you have put the disc on the tray.
*Check whether the disc is put in the reverse side.
*Check whether the disc is distorted.
*Check whether the disc is stained or scratched badly.
*Ensure that the disc format is compatible to the player.
*Ensure that the temperature inside the car is not too high. If so, cool off until the ambient temperature returns to normal.
*Replace another disc to insert it into the disc compartment.
REMOTE CONTROL IS INSENSITIVE OR DOES NOT WORK
*Check the batteries of remote control and make sure that they are not flat.
*Direct the remote control to the IR sensor of the player.
*Check whether there are some obstacles between the remote control and IR sensor.
SOME FUNCTION BUTTONS DO NOT WORK
*Turn off the power, then turn on again.
*Reset the unit to zero, then turn on again.
*Remove the front panel from the unit, then install it again and then turn on again.
THE RADIO DOES NOT WORK
* Check whether the antenna cable is connected firmly. Or manually tune for a station.

 4
4 

1.3 Maintenance and Cleaning of Discs
Disc Maintenance
1.To keep the disc clean, handle the disc by its edge, do not touch the disc surface of the play side.
2.Do not stick paper or tape on the disc. If there is glue (or analog) on the disc surface, must wipe it up before using.
3.Do not expose the disc to direct sunlight, or nearby heat sources such as caliduct, or leave it in a car parked in direct sunlight where there can be a considerable rise in temperature.
4.Put the disc inside disc case to keep temperature after finishing playback.
Disc Cleaning
1.Before playing, wipe the disc with a clean lint. wipe the disc outwards from the disc center.
2.Do not use petrol, thinners, commercially available cleaners or anti-static sprays for plastic LP's to wipe discs.
+ side up
|
|
B |
|
|
A |
Fig.1 |
Fig.2 |
Fig.3 |
1.4 Battery Information of the Remote Control
Replace Battery in the Remote Control:
1.Before using the remote control for the first time, pull the insulating sheet out of the remote control as the direction indicated by the arrow.(see fig.1)
2.Press the movable block hold as the direction indicated by the A arrow (See fig.2), then pull the battery holder out of the remote control as the direction indicated by the B arrow(see fig.2).
3.Replace the old battery by a new battery with (+) polarity side upward.
(See fig.3).
4.Insert the battery holder to the original position in remote control.
(See fig.3).
Note about the Battery of the Remote Control:
1.Improper use of battery may cause overheating or explosion. so that
Result in injury or fire .
2.Battery leakage may cause damage to the remote control(Battery
Life: 6 months with normal use in normal room temperature).
3.Do not short the battery.
4.Do not throw the battery into the fire.
5.To avoid the risk of accident, keep the battery out of reach of children.

 5
5
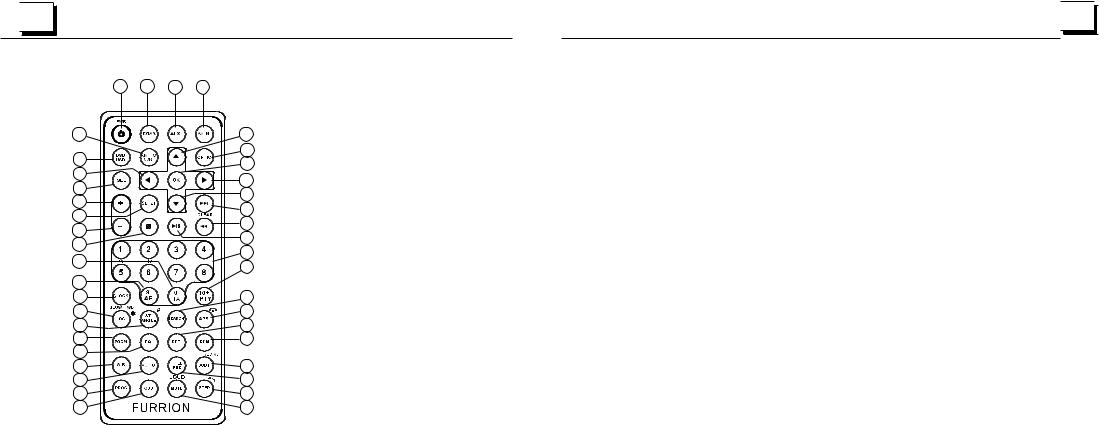
1.5 The Remote Control Description
3 |
27 |
35 |
1 |
14 |
4 |
|
29 |
2 |
|
33 |
||
32 |
||
6 |
||
9 |
||
8 |
||
34 |
||
5 |
||
13 |
||
7 |
||
31 |
||
10 |
||
30 |
||
11 |
||
40 |
||
12 |
||
|
||
41 |
|
|
24 |
16 |
|
28 |
15 |
|
21 |
18 |
|
22 |
17 |
|
26 |
|
|
25 |
19 |
|
23 |
20 |
|
36 |
39 |
|
37 |
38 |
1.AV IN BUTTON
2.OPTICAL BUTTON
3.POWER BUTTON
4.^ BUTTON
5.>>| BUTTON
6.> BUTTON
7.|<</CLEAR BUTTON
8.v BUTTON
9.SEL BUTTON
10.PLAY/PAUSE BUTTON
11.NUMBER(0~10,+10 -10) BUTTONS
12.10+/PTY BUTTON
13.SETUP BUTTON
14.AM/FM WB BUTTON
15.APS/Hang Up BUTTON
16. SEARCH BUTTON |
29. DVD/USB MODE BUTTON |
17. RDM BUTTON |
30. STOP BUTTON |
18. RPT BUTTON |
31. VOLUMEBUTTON |
19. SUBTITLE/REDIAL BUTTON |
32. < BUTTON |
20. TITLE/PBC BUTTON |
33. OK BUTTON |
21.ST/ANGEL/# BUTTON |
34. VOLUME+ BUTTON |
22. ZOOM BUTTON |
35. AUX MODE BUTTON |
23. AUDIO BUTTON |
36. PROG BUTTON |
24. CLOCK BUTTON |
37. OSD BUTTON |
25. A-B BUTTON |
38. MUTE/LOUD BUTTON |
26. EQ BUTTON |
39. STEP /TEL BUTTON |
27. COAXIAL BUTTON |
40. TA BUTTON |

 26
26 

4.3To redial the last phone number dialled
(1)Short press TEL button ,it will show last phone number on LCD, then it will execute the dialling
(2)Short press REDIAL button, It will dial the last phone number.
5. Accept/Reject/End Call
5.1Incoming call Ringing, short press TEL button to accept the call
5.2To reject incoming call, short press HANG UP button to reject the call
5.3During a phone call, short press HANG UP button to end the call
Note: When a incoming call is present the caller’s phone number will be displayed on the screen.
6.Dialling or receiving call when the unit is in standby (while your phone is paired) When the Stereo is in sleep mode (Acc on and standby), to execute a dialling (with mobile phone) or recieving a call, the car audio will temporarily wake up.
7.To play a AUDIO le from a external bluetooth device (mobile phone) on the Wall mount Stereo
After the device has been paired sucessfully and the Wall mount Stereo screen displays LINK OK.
If your mobile device supports A2DP you will then we able to stream music from your Blue Tooth device so it can be played by the stereo speaker.
You must select on your mobile blue tooth device to play the audio through bluetooth.
If your mobile device supports AVRCP then you will be able to control the basic phone audio output functions by the Wall mount Stereo controls. Eg. Play Pause.
28. LOC/SLOW-FWD/* BUTTON |
41. AF BUTTON |
 Loading...