

Page 1

EMERSON AND THE G-CLEF LOGO ARE REGISTERED TRADEMARKS
OF EMERSON RADIO CORP., PARSIPPANY, NEW JERSEY, U.S.A.
LC320EMX
Owner’s Manual
Guide d’utilisation
Manual del Usuario
EnglishEspañol Français
NEED HELP?
BESOIN D’AIDE ?
¿NECESITA AYUDA?
PLEASE CALL TOLL FREE!
APPELEZ NOTRE NUMÉRO GRATUIT !
¡LLAME POR FAVOR SIN COSTO!
1-866-309-8819
OR VISIT OUR WEB SITE AT
OU VISITEZ NOTRE SITE WEB À L’ADRESSE
Ó VISITE NUESTRO SITIO WEB EN
www.emersonaudiovideo.com/
MODEL NUMBER SERIAL NUMBER
HIGH-DEFINITION TELEVISION
TO RECEIVE DIGITAL/ANALOG SIGNAL,
YOU MUST CONNECT ANTENNA.
POUR RECEVOIR LE SIGNAL
NUMÉRIQUE /ANALOGIQUE, VOUS
DEVEZ CONNECTER L’ANTENNE.
PARA RECIBIR LA SEÑAL DIGITAL/
ANALÓGICA, DEBE CONECTAR LA
ANTENA.
© 2009 Funai Electric Co., Ltd.
Page 2

The model and serial numbers of this unit may be found on the cabinet.
You should record and retain those numbers for future reference.
Model No.:
Serial No.:
Precautions5
WARNING: TO REDUCE THE RISK OF FIRE OR ELECTRIC SHOCK, DO NOT EXPOSE THIS APPARATUS
TO RAIN OR MOISTURE.
APPARATUS SHALL NOT BE EXPOSED TO DRIPPING OR SPLASHING AND NO OBJECTS
FILLED WITH LIQUIDS, SUCH AS VASES, SHALL BE PLACED ON THE APPARATUS.
CAUTION
RISK OF ELECTRIC SHOCK
DO NOT OPEN
CAUTION: TO REDUCE THE RISK OF ELECTRIC
SHOCK, DO NOT REMOVE COVER (OR BACK). NO USER
SERVICEABLE PARTS INSIDE. REFER SERVICING TO
QUALIFIED SERVICE PERSONNEL.
The caution marking is located on the rear or bottom of the cabinet.
The lightning flash with arrowhead symbol, within an
equilateral triangle, is intended to alert the user to the
presence of uninsulated “dangerous voltage” within the
apparatus’s enclosure that may be of sufficient magnitude
to constitute a risk of electric shock to persons.
The exclamation point within an equilateral triangle is
intended to alert the user to the presence of important
operating and maintenance (servicing) instructions in
the literature accompanying the apparatus.
Important Safety Instructions
1. Read these instructions.
2. Keep these instructions.
3. Heed all warnings.
4. Follow all instructions.
5. Do not use this apparatus near water.
6. Clean only with dry cloth.
7. Do not block any ventilation openings. Install in
accordance with the manufacture’s instructions.
8. Do not install near any heat sources such as radiators,
heat registers, stoves, or other apparatus (including
amplifiers) that produce heat.
9. Do not defeat the safety purpose of the polarized or
grounding-type plug. A polarized plug has two blades
with one wider than the other. A grounding type plug
has two blades and a third grounding prong. The wide
blade or the third prong are provided for your safety. If
the provided plug does not fit into your outlet, consult
an electrician for replacement of the obsolete outlet.
10. Protect the power cord from being walked on or
pinched particularly at plugs, convenience receptacles,
and the point where they exit from the apparatus.
11. Only use attachments/accessories specified by the
manufacturer.
12. Use only with the cart, stand, tripod, bracket,
or table specified by the manufacturer, or
sold with the apparatus. When a cart is used,
use caution when moving the cart/apparatus
combination to avoid injury from tip-over.
13. Unplug this apparatus during lightning storms or when
unused for long periods of time.
14. Refer all servicing to qualified service personnel.
Servicing is required when the apparatus has been
damaged in any way, such as power-supply cord or
plug is damaged, liquid has been spilled or objects
have fallen into the apparatus, the apparatus has
been exposed to rain or moisture, does not operate
normally, or has been dropped.
Do not place the unit on the furniture that is capable of being tilted by a child and an adult leaning, pulling, standing or climbing
on it. A falling unit can cause serious injury or even death.
FCC WARNING
This apparatus may generate or use radio frequency energy. Changes or modifications to this apparatus may cause
harmful interference unless the modifications are expressly approved in the manual. The user could lose the authority to
operate this apparatus if an unauthorized change or modification is made.
RADIO-TV INTERFERENCE
This apparatus has been tested and found to comply with the limits for a Class B digital device, pursuant to Part 15 of
the FCC Rules. These limits are designed to provide reasonable protection against harmful interference in a residential
installation. This apparatus generates, uses, and can radiate radio frequency energy and, if not installed and used in
accordance with the instructions, may cause harmful interference to radio communications. However, there is no
guarantee that interference will not occur in a particular installation. If this apparatus does cause harmful interference to
radio or television reception, which can be determined by turning the apparatus off and on, the user is encouraged to
try to correct the interference by one or more of the following measures:
1) Reorient or relocate the receiving antenna.
2) Increase the separation between the apparatus and receiver.
3) Connect the apparatus into an outlet on a circuit different from that to which the receiver is connected.
4) Consult the dealer or an experienced radio/TV technician for help.
This Class B digital apparatus complies with Canadian ICES-003.
2
EN
Page 3

EnglishEspañol Français
This apparatus should not be placed in a built-in installation such as a bookcase or rack unless proper ventilation is provided.
Make sure to leave a space of 3.2 inches (8cm) or more around this apparatus.
Disconnect the mains plug to shut off when find trouble or not in use. The mains plug shall remain readily operable.
CAUTION: Danger of explosion if battery is incorrectly replaced. Replace only with the same or equivalent type.
WARNING: Batteries (battery pack or battery installed) shall not be exposed to excessive heat such as sunshine, fire or the like.
LAMP IN LCD CONTAINS MERCURY, DISPOSE ACCORDING TO LOCAL, STATE OR FEDERAL LAW.
WARNING: To prevent injury, this apparatus must be securely attached to the floor/wall in accordance with the instructions.
TO AVOID THE HAZARDS OF ELECTRICAL SHOCK AND FIRE
Do not handle the AC power cord with wet hands.
•
Do not remove this unit’s cabinet. Touching parts inside the cabinet could result in electric shock and/or damage to
•
this unit. For service and adjustment inside the cabinet, call a qualified dealer or an authorized service center.
Do not pull on the AC power cord when disconnecting it from an AC outlet. Grasp it by the plug.
•
Do not put your fingers or objects into the unit.
•
LOCATION AND HANDLING
The openings should not be blocked by placing the unit on a bed, sofa, carpet, rug, or other similar surface.
•
Do not install the unit near or over a radiator or heat register.
•
Do not install the unit in direct sunlight, near strong magnetic fields, or in a place subject to dust or strong vibration.
•
Avoid a place with drastic temperature changes.
•
Install the unit in a horizontal and stable position. Do not place anything directly on top or bottom of the unit.
•
Depending on your external devices, noise or disturbance of the picture and/or sound may be generated if the unit is
placed too close to them. In this case, please ensure enough space between the external devices and the unit.
Depending on the environment, the temperature of this unit may increase slightly. This is not a malfunction.
•
NOTE ABOUT RECYCLING
This unit’s packaging materials are recyclable and can be reused.
•
Please dispose of any materials in accordance with your local recycling regulations.
Batteries should never be thrown away or incinerated but disposed of in accordance with your
•
local regulations concerning chemical wastes.
WHEN CARRYING THIS UNIT
At least two people are required when carrying this unit.
•
Make sure to hold the upper and bottom frames of the unit firmly as illustrated.
•
Trademark Information
5
HDMI, the HDMI logo and High-Definition Multimedia Interface are trademarks or registered trademarks of HDMI
•
Licensing LLC.
Manufactured under license from Dolby Laboratories. “Dolby” and the double-D symbol are trademarks of Dolby
•
Laboratories.
Products that have earned ENERGY STAR® are designed to protect the environment through superior energy efficiency.
•
3
EN
Page 4

NTRODUCTION
AAA
AAA
➂➂
screw holes screw holes screw holes
I
Supplied Accessories5
owner’s manual
(1EMN24300)
If you need to replace these accessories, please refer to the part No. with the illustrations and call our toll free
•
customer support line found on the cover of this manual.
5
Attaching the Stand
You must attach the stand to the unit to have it as a table top unit. Be sure the front and rear of the stand match the proper
direction.
quick start guide
(1EMN24640)
remote control
(NH000UD)
batteries
(AAA x 2)
registration card
(1EMN24701)
Phillips pan screw for
attaching the stand x 4
(FPH34200)
Spread a thick and soft cloth over a
1
table as shown below.
Place the main unit face down onto it.
Make sure not to damage the screen.
At least two people are required at
this step.
Align the 2 stand hooks with the two
2
hooks under the bottom of the main
unit (shown by arrow
the stand in the direction as shown
by arrow
mounting holes are aligned.
Make sure not to put the AC power
cord between the stand and the
unit.
➁
front side
To remove the stand from this unit
Unscrew the Phillips pan screws indicated by above “➂”screw
holes. After the screws are removed pull the stand up toward
the rear of the unit. Be careful not to drop the stand when you
remove it.
), then slide
➀
until it stops and the 4
➁
➀
➀
Drive Phillips pan screws in the 4
3
threaded holes at the bottom of the
stand until they are tight.
Note:
• When attaching the stand, ensure that all screws are tightly fastened. If the stand is not properly attached, it could cause the unit to fall,
resulting in injuries as well as damage to the unit.
• Make sure to use a table which can support the weight of this unit and is larger than this unit.
• Make sure the table is in a stable location.
Symbols Used in this Manual
5
The following is the description for the symbols used in this manual. Description refers to:
TV
• If neither symbol appears under the function heading, operation is applicable to both.
4
EN
: Analog TV operation
DTV
: Digital TV operation
Page 5

EnglishEspañol Français
INTRODUCTION PREPARATION
Features5
DTV/TV/CATV
•
You can use your remote control to select
-
channels which are broadcast in digital format and
conventional analog format. Also, cable subscribers
can access their cable TV channels.
Information Display (DTV only)
•
You can display the title, contents and other
-
information of the current DTV program on the TV
screen.
Autoscan
•
This unit automatically scans and memorizes
-
channels available in your area, eliminating difficult
setup procedures.
Child Lock
•
This feature allows you to block children’s access to
-
inappropriate programs.
Closed Caption Decoder
•
Built-in closed caption decoder displays text for
-
closed caption supported programs.
MTS/SAP Tuner
•
Audio can be selected from the remote control.
-
Auto Shut Off Function
•
If there is no signal input from the antenna terminal
-
and no operation for 15 minutes, the unit will turn
off automatically.
Sleep Timer
•
This feature will automatically turn off the power of
-
the unit at a specific time.
Choices for On-screen Language
•
Select your on-screen language:
-
English, Spanish or French.
Stereo Sound Function
•
PLL Frequency Synthesized Tuning
•
Provides free and easy channel selection and lets
-
you tune directly to any channel using the number
buttons on the remote control.
Various Adjustment for Picture and Sound
•
Customizes image quality to suitable for your room
-
and sets the sound as your preference.
HDMI Input
•
When using HDMI1 input, you can enjoy this unit as
-
a PC monitor if your PC has DVI output terminal.
Component Video Input
•
S-video Input
•
AV Input
•
Digital Audio Output
•
Analog Audio Output
•
Contents5
Precautions . . . . . . . . . . . . . . . . . . . . . . . . . . . . . . . . . . . . . . . . . . . . . 2
Trademark Information. . . . . . . . . . . . . . . . . . . . . . . . . . . . . . . . . .3
INTRODUCTION
Supplied Accessories . . . . . . . . . . . . . . . . . . . . . . . . . . . . . . . . . . . . 4
Attaching the Stand . . . . . . . . . . . . . . . . . . . . . . . . . . . . . . . . . . . . . 4
Symbols Used in this Manual . . . . . . . . . . . . . . . . . . . . . . . . . . . .4
Features . . . . . . . . . . . . . . . . . . . . . . . . . . . . . . . . . . . . . . . . . . . . . . . . .5
Control Panel . . . . . . . . . . . . . . . . . . . . . . . . . . . . . . . . . . . . . . . . . . .6
Terminals . . . . . . . . . . . . . . . . . . . . . . . . . . . . . . . . . . . . . . . . . . . . . . .6
Remote Control Function . . . . . . . . . . . . . . . . . . . . . . . . . . . . . . . 7
Installing the Batteries . . . . . . . . . . . . . . . . . . . . . . . . . . . . . . . . . . . 7
PREPARATION
Antenna Connection . . . . . . . . . . . . . . . . . . . . . . . . . . . . . . . . . . . .8
Connection to Cable Receiver or Satellite Box . . . . . . . . . . . 8
External Device Connection . . . . . . . . . . . . . . . . . . . . . . . . . . . . .9
Cable Management . . . . . . . . . . . . . . . . . . . . . . . . . . . . . . . . . . . .12
Plug In the AC Power Cord . . . . . . . . . . . . . . . . . . . . . . . . . . . . .12
Initial Setup . . . . . . . . . . . . . . . . . . . . . . . . . . . . . . . . . . . . . . . . . . . .13
WATCHING TV
Channel Selection . . . . . . . . . . . . . . . . . . . . . . . . . . . . . . . . . . . . . .14
Volume Adjustment . . . . . . . . . . . . . . . . . . . . . . . . . . . . . . . . . . . .14
Sleep Timer . . . . . . . . . . . . . . . . . . . . . . . . . . . . . . . . . . . . . . . . . . . .14
Still Mode . . . . . . . . . . . . . . . . . . . . . . . . . . . . . . . . . . . . . . . . . . . . . .15
Switching Each Input Mode . . . . . . . . . . . . . . . . . . . . . . . . . . . .15
Switching Audio Mode . . . . . . . . . . . . . . . . . . . . . . . . . . . . . . . . .15
TV Screen Information. . . . . . . . . . . . . . . . . . . . . . . . . . . . . . . . . .16
TV Screen Display Mode . . . . . . . . . . . . . . . . . . . . . . . . . . . . . . . .17
OPTIONAL SETTING
Main Menu . . . . . . . . . . . . . . . . . . . . . . . . . . . . . . . . . . . . . . . . . . . . .18
Autoscan . . . . . . . . . . . . . . . . . . . . . . . . . . . . . . . . . . . . . . . . . . . . . . .18
Channel List . . . . . . . . . . . . . . . . . . . . . . . . . . . . . . . . . . . . . . . . . . . .19
Manual Register . . . . . . . . . . . . . . . . . . . . . . . . . . . . . . . . . . . . . . . .19
Antenna Confirmation . . . . . . . . . . . . . . . . . . . . . . . . . . . . . . . . .20
Language Selection . . . . . . . . . . . . . . . . . . . . . . . . . . . . . . . . . . . .20
Picture Adjustment . . . . . . . . . . . . . . . . . . . . . . . . . . . . . . . . . . . .21
Sound Adjustment . . . . . . . . . . . . . . . . . . . . . . . . . . . . . . . . . . . . .22
Closed Caption . . . . . . . . . . . . . . . . . . . . . . . . . . . . . . . . . . . . . . . . .23
Child Lock . . . . . . . . . . . . . . . . . . . . . . . . . . . . . . . . . . . . . . . . . . . . . .26
PC Settings . . . . . . . . . . . . . . . . . . . . . . . . . . . . . . . . . . . . . . . . . . . . .30
Energy Saving Mode . . . . . . . . . . . . . . . . . . . . . . . . . . . . . . . . . . .31
Location . . . . . . . . . . . . . . . . . . . . . . . . . . . . . . . . . . . . . . . . . . . . . . .31
Current Software Info . . . . . . . . . . . . . . . . . . . . . . . . . . . . . . . . . .32
TROUBLESHOOTING
FAQ . . . . . . . . . . . . . . . . . . . . . . . . . . . . . . . . . . . . . . . . . . . . . . . . . . . .33
Troubleshooting Guide . . . . . . . . . . . . . . . . . . . . . . . . . . . . . . . .34
INFORMATION
Glossary . . . . . . . . . . . . . . . . . . . . . . . . . . . . . . . . . . . . . . . . . . . . . . . .36
Maintenance . . . . . . . . . . . . . . . . . . . . . . . . . . . . . . . . . . . . . . . . . . .36
Cable Channel Designations . . . . . . . . . . . . . . . . . . . . . . . . . . .37
General Specifications . . . . . . . . . . . . . . . . . . . . . . . . . . . . . . . . . .37
Electrical Specification . . . . . . . . . . . . . . . . . . . . . . . . . . . . . . . . .37
Other Specifications . . . . . . . . . . . . . . . . . . . . . . . . . . . . . . . . . . . .37
WATCHING TV
OPTIONAL SETTING TROUBLESHOOTING
INFORMATION
Limited Warranty . . . . . . . . . . . . . . . . . . . . . . . . . . . . . . . . . . . . . . .38
© 2009 Funai Electric Co., Ltd.
All rights reserved. No part of this manual may be reproduced, copied, transmitted, disseminated, transcribed, downloaded or stored in
any storage medium, in any form or for any purpose without the express prior written consent of Funai.
Furthermore, any unauthorized commercial distribution of this manual or any revision hereto is strictly prohibited.
Information in this document is subject to change without notice. Funai reserves the right to change the content herein without the
obligation to notify any person or organization of such changes.
with the design is a registered trademark of Funai Electric Co., Ltd and may not be used in any way without the express written
consent of Funai. All other trademarks used herein remain the exclusive property of their respective owners. Nothing contained in this
manual should be construed as granting, by implication or otherwise, any license or right to use any of the trademarks displayed herein.
Misuse of any trademarks or any other content in this manual is strictly prohibited. Funai shall aggressively enforce its intellectual property
rights to the fullest extent of the law.
EN
5
Page 6

NTRODUCTION
K
L
L
I
Control Panel5
1. VOLUME
Press to adjust the volume or move right
1
2
3
4
5
6
7
(
2. SETUP (p. 13)
Press to display the main menu.
CHANNEL K /
3.
Press to select channels or move
through the main menu items.
4. POWER (p. 13)
Press to turn the unit on and off.
5. infrared sensor window
Receives infrared rays transmitted from the remote
control.
6. POWER ON indicator
Lights up green when power is on.
7. STAND BY indicator
Lights up red when power is off.
) through the main menu items.
/
(p. 14)
L
(p. 14 / p. 15)
(K) / left
up (K) / down (L)
Ter mi na ls5
8
9
10
11
*
19
20
Note:
service terminal (service use only)
*
• Use this terminal only when a software update is necessary.
• User should not connect any devices to the service terminal such
as digital camera, keyboard, mouse, etc. (because these will not
work).
• The software update is, in most cases, handled by an authorized
service person or in some circumstances the user may be asked
to do the software upgrade themselves.
6
EN
[Side Panel]
8. S-video input jack (p. 10)
S-video cable connection from an external device.
9. video input jack (p. 11)
RCA video cable connection from an external
device.
10. audio input jack (p. 10 / p. 11)
RCA audio cable connection from an external
device.
11. HDMI 2 input jack (p. 8 / p. 9)
HDMI connection from HDMI device.
[Rear Panel]
12. AC power cord (p. 12)
12
13
14
15
16
17
18
Connect to a standard AC outlet to supply power to
this unit.
13. cable management (p. 12)
Use this holder to bundle the cables.
component video and audio input jack
14.
RCA component video cable and RCA audio cable
connection from an external device.
15. audio output jack (p. 11)
RCA audio cable connection for an external device.
16. audio input jack for HDMI 1 (p. 9
RCA audio cable connection from a DVI device.
When you connect your PC that has a DVI terminal,
use a stereo mini plug-RCA conversion cable as well.
(For HDMI 1 input jack only)
17. digital audio output jack (p. 11)
Coaxial digital cable connection for a decoder or an
audio receiver.
18. antenna input jack (p. 8)
coaxial cable connection for your antenna or cable
RF
TV signal.
19. HDMI 1 input jack (p. 8 / p. 9 / p. 12)
HDMI connection for HDMI or DVI device.
When you connect your PC that has a DVI terminal,
you can enjoy this unit as a PC monitor.
20. HDMI 3 input jack (p. 8 / p. 9)
HDMI connection from HDMI device.
/ p. 12
(p. 8 / p. 10)
)
Page 7

Remote Control Function5
7
2
8
9
10
12
14
16
4
1
3
5
11
15
6
13
7. VOL. X/Y (p. 14)
Press to adjust the volume.
8. Number buttons (p. 14)
• Press to select channels.
-
(hyphen)
• Press to shift the subchannel from the main channel.
9. POWER (p. 13)
Press to turn the unit on and off.
10. AUDIO (p. 15)
Digital mode (DTV)
• Press to select the audio language.
Analog mode (TV)
• Press to select the audio mode.
11. SCREEN MODE
Press to select aspect ratio available for the TV screen.
12. INFO (p. 16)
Digital mode (DTV)
• Press to display the channel information, signal type
and TV setting.
Analog mode (TV)
• Press to display the channel number, signal type and
TV setting.
External input mode
• Press to display the external input mode, signal type
and TV setting.
13. ENTER (p. 13)
Press to decide the command of setting when the
main menu is displayed.
1. STILL (p. 15)
Press to pause screen image.
2. INPUT SELECT (p. 15)
Press to access connected external devices
like a BD/DVD recorder.
3. SETUP (p. 13)
Press to display the main menu.
4.
s
/ B / K / L (p. 13)
Press to move left / right / up / down through the
items.
5. BACK (p. 16)
Press to return to the previous menu operation.
6. CH RETURN (p. 14)
Press to return to previously viewed channel.
14. CH K/L (p. 15)
P
ress to select channels and the external input mode.
15. MUTE (p. 14)
Press to turn the sound on and off.
16. SLEEP (p. 14)
Press to activate the sleep timer.
When using a universal remote control to operate
this unit.
• Make sure the component code on your universal remote
control is set to our brand.
Refer to the manual accompanying your remote control for
more details.
• We do not guarantee 100% interoperability with all universal
remote controls.
Installing the Batteries
5
Install the batteries (AAA x 2) matching the polarity indicated inside battery compartment of the remote control.
(p. 17)
EnglishEspañol Français
INTRODUCTION PREPARATION
WATCHING TV
OPTIONAL SETTING TROUBLESHOOTING
INFORMATION
Battery Precautions:
• Be sure to follow the correct polarity as indicated in the battery compartment. Reversed batteries may cause damage to the device.
• Do not mix different types of batteries together (e.g., Alkaline and Carbon-Zinc, or rechargeable batteries like ni-cad, ni-mh, etc) or
old batteries with fresh ones.
• If the device is not to be used for a long period of time, remove the batteries to prevent damage or injury from possible battery leakage.
• Do not try to recharge batteries; they can overheat and rupture.
7
EN
Page 8

REPARATION
(red)
(blue)
(green)
(red)
(blue)
(green)
P
No supplied cables are used in this connection:
Please purchase the necessary cables at your local store.
High Speed HDMI cable (also known as HDMI category 2 cable) is recommended for the better compatibility.
Before you connect...
Be sure your antenna or other device is connected properly before plugging in the AC power cord.
Antenna Connection
5
Connect the RF coaxial cable on your home outlet to the antenna input jack of this unit.
e.g.)
VHF / UHF
antenna
RF coaxial cable
or
cable TV signal
Once connections are completed, turn on the unit and begin initial setup. Channel scanning is necessary for the unit
*
rear of this unit
to memorize all available channels in your area. (Refer to “Initial Setup” on page 13.)
Note:
• If you have any question about the DTV’s antenna, visit www.antennaweb.org for further information.
• Depending on your antenna system, you may need different types of combiners (mixers) or separators (splitters). Contact your local
electronics store for these items.
• For your safety and to avoid damage to this unit, please unplug the RF coaxial cable from the antenna input jack before moving the unit.
• If you use an antenna to receive analog TV, it should also work for DTV reception. Outdoor or attic antennas will be more effective than
settop versions.
• To switch your reception source easily between antenna and cable, install an antenna selector.
• If you connect to the cable system directly, contact the CAT V installer.
Connection to Cable Receiver or Satellite Box
5
Use an HDMI or an RCA component video cable to connect the HDMI or the component video input jack of the unit to the
HDMI or the component video output jack of the cable receiver / satellite box.
If you connect to the unit’s component Video Input jack, connect RCA audio cables to the Audio L/R jacks below the
Component Video connector.
e.g.)
satellite dish
cable TV signal
including PPV
You can also connect this unit to the cable receiver or satellite box other than the HDMI or the component video
*
HDMI OUT
or
AUDIO OUT
or
RF coaxial
cable
ANT IN
STEREO
PCM
cable receiver / satellite box
HDMI cable
COMPONENT VIDEO OUT
RL
(green)
(green)
(blue)
(blue)
Pr/CrPb/CbY
(red)
(red)
or
RCA component video cable
and RCA audio cable
or
side or rear of this unit
(green)
(green)
(blue)
(blue)
(red)
(red)
output jack because they might have different output jacks.
Required cables and connecting methods of the cable receiver / satellite box, or the availability channel for the
*
clear QAM may differ depending on the cable / satellite provider. For more information, please contact your cable /
satellite provider.
8
EN
Page 9

No supplied cables are used in this connection:
Please purchase the necessary cables at your local store.
High Speed HDMI cable (also known as HDMI category 2 cable) is recommended for the better compatibility.
External Device Connection
5
[HDMI Connection]
HDMI connection offers the highest picture quality.
HDMI (High-Definition Multimedia Interface) transports high definition video and multi-channel digital audio
through a single cable.
e.g.)
side or rear of this unit
EnglishEspañol Français
INTRODUCTION
PREPARATION
WATCHING TV
HDMI cable
or
or
TITLE 5
CHAPTER 15
REPEAT A-B
BD/DVD recorder
with the HDMI output jack
HDMI OUT
Note:
• This unit accepts 480i / 480p / 720p / 1080i video signals, and 32kHz / 44.1kHz / 48kHz audio signals.
• This unit accepts only 2 channel audio signal (LPCM).
• You need to select “PCM” for the digital audio output of the device you connected or check the HDMI audio setting.
There may be no audio output if you select “Bitstream”, etc.
• This unit only accepts signals in compliance with EIA861.
[HDMI-DVI Connection]
Use an HDMI-DVI conversion cable to connect the unit to external video devices equipped with DVI output jack.
e.g.)
HDMI-DVI
conversion cable
To HDMI1
input jack only
STEREO
PCM
cable receiver or satellite box
with the DVI output jack
DVI OUT
AUDIO OUT
RL
OPTIONAL SETTING TROUBLESHOOTING
INFORMATION
rear of this unit
RCA audio cable
Note:
• This unit accepts 480i / 480p / 720p / 1080i video signals.
• HDMI-DVI connection requires separate RCA audio connections as well.
• Audio signals are converted from digital to analog for this connection.
• DVI does not display 480i image that is not in compliance with EIA/CEA-861/861B.
9
EN
Page 10

REPARATION
P
No supplied cables are used in this connection:
Please purchase the necessary cables at your local store.
[Component Video Connection]
RCA component video connection offers better picture quality for video devices connected to the unit.
If you connect to the unit’s component Video Input jack, connect RCA audio cables to the Audio L/R jacks below the
Component Video Connector.
e.g.)
RCA component video cable
rear of this unit
TITLE 5
CHAPTER 15
REPEAT A-B
BD/DVD recorder with
(red)(blue)(green)
COMPONENT VIDEO OUT
AUDIO OUT
Pr/CrPb/CbY
RL
(green)
(blue)
(red)
the component video output jack
RCA audio cable
Note:
• This unit accepts 480i / 480p / 720p / 1080i video signals.
[S-video Connection]
S-video connection offers good picture quality for video devices connected to the unit.
If you connect to the unit’s S-Video Input jack, connect RCA audio cables to the Audio L/R jacks below the Video
connector.
e.g.)
TITLE 5
CHAPTER 15
REPEAT A-B
AUDIO OUT
S-VIDEO
OUT
RL
S-video cable
side of this unit
BD/DVD recorder with
the S-Video output jack
RCA audio cable
Note:
• If you connect to the S-video input jack and the video input jack at the same time, the S-video connection will have priority.
10
EN
Page 11

No supplied cables are used in this connection:
Please purchase the necessary cables at your local store.
EnglishEspañol Français
INTRODUCTION
[Video Connection]
RCA video connection offers standard picture quality for video devices connected to the unit.
If you connect to the unit’s Video Input jack, connect RCA audio cables to the Audio L/R jacks below the Video
connector.
When the audio jack of the video device is monaural, connect an RCA audio cable to the audio L input jack.
e.g.)
camcorder video game
STEREO
STAND-BY
VCR
AUDIO OUT
VIDEO
RL
OUT
RCA audio cable
RCA video cable
side of this unit
Note:
• If you connect to the S-video input jack and the video input jack at the same time, the S-video connection will have priority.
[Audio Output Connection]
PREPARATION
WATCHING TV
OPTIONAL SETTING TROUBLESHOOTING
À Digital (for digital broadcasting only)
If you connect this unit to an external digital audio device, you can enjoy multi-channel audio like 5.1ch digital
broadcasting sound.
Use a digital audio coaxial cable to connect the unit to external digital audio devices.
À Analog (for both analog and digital broadcasting)
If you connect this unit to an external analog audio device, you can enjoy stereo (2-channel) audio.
Use an RCA audio cable to connect the unit to external analog audio devices.
e.g.)
AUDIO IN
RL
stereo system
RCA audio cable
rear of this unit
digital audio coaxial cable
Dolby Digital
decoder
or
DIGITAL AUDIO
COAXIAL IN
INFORMATION
EN
11
Page 12

REPARATION
To HDMI1
input jack only
HDMI-DVI
conversion cable
P
No supplied cables are used in this connection:
Please purchase the necessary cables at your local store.
[PC Connection]
This unit can be connected to your PC that has a DVI terminal. Use an HDMI-DVI conversion cable for this connection
and it requires stereo mini plug-RCA conversion cable as well.
If you connect this unit to your PC, you can use this unit as a PC monitor.
e.g.)
stereo mini plug-RCA
conversion cable
DVI OUT
personal computer
The following signals can be displayed:
Format Resolution Refresh rate Format Resolution Refresh rate
VGA 640 x 480 60Hz
SVGA 800 x 600 60Hz
XGA 1,024 x 768 60Hz
Other formats or non-standard signals will not be displayed correctly.
HDMI-DVI conversion cable should be with ferrite core.
To HDMI1
To HDMI1
input jack only
input jack only
HDMI-DVI
HDMI-DVI
conversion cable
conversion cable
1,280 x 768 60Hz
WXGA
1,360 x 768 60Hz
rear of this unit
Note:
• Please purchase the HDMI-DVI conversion cable that has a ferrite core.
• The following operations may reduce noise.
- Attach a ferrite core to the AC power cord of your PC.
- Unplug the AC power cord and use the built-in battery of your PC.
Cable Management
5 Plug In the AC Power Cord
5
Keep the cables through this holder to avoid tangle
them.
12
EN
rear of this unit
Make sure that the AC power cord must be plugged
to an AC outlet after all the necessary connections are
completed.
AC power cord
AC outlet
rear of this unit
Caution:
• Do not connect the AC power cord to a power supply outside the
indicated voltage of this unit (AC 120V).
Connecting the AC power cord to a power supply outside of this
range may result in fire or electrical shocks.
Note:
• Each time you plugged in the AC power cord, any operations will
not be performed for a few seconds. This is not a malfunction.
Page 13

These operations are accessible by remote control. Some may also be accessible by controls on the main unit.
Initial Setup
5
This section will guide you through the unit’s initial setting which includes
selecting a language for your on-screen menu and autoscan, which
automatically scans and memorizes viewable channels.
Before you begin:
Make sure the unit is connected to antenna or cable.
After making all the necessary connections,
1
Use [Cursor s / B] to select the desired location setting,
4
then press [ENTER].
Initial Setup
Initial Setup
Select “Retail” or “Home” for your location.
press [POWER] to turn on the unit.
Select Enter
This operation may take a few moments.
•
Use [Cursor K / L] to select the on-screen language
2
from the choices on the right side of the TV screen.
(English / Español / Français)
Initial Setup
Initial Setup
Select the language for setup display.
Elija el idioma de ajuste.
Sélectionner langue écran config.
English
Español
Français
Select ”Retail”, the unit will be set up with predefined
•
setting for retail displays. In this setting, the power
consumption may possibly exceed the limited
requirement of the ENERGY STAR® qualification.
Select ”Home”, the unit is set to maximize the energy
•
efficiency for home setting and it can be adjusted
through a choice of picture and sound quality
according to your preference.
When the initial setup is completed, the lowest
•
memorized channel with the confirmation message
of the location setting will be displayed on the TV
screen.
Note:
Select Skip
•
“Initial Setup” menu on step 3 will be displayed in the
ENTER
Enter
SETUP
selected language after you press [ENTER].
Use [Cursor K / L] to select “Antenna” for TV channels
3
or “Cable” for CATV channels, then press [ENTER].
Initial Setup
Initial Setup
Make sure the antenna is connected to“ANT. IN” jack.
Select the destination of “ANT. IN” jack.
Antenna
Or
“Autoscan” will begin.
•
Cable
ENTER
Select Skip
Initial Setup
Initial Setup
Now the system is scanning for channels,please wait.
Autoscan will take up to 20 minutes to complete.
0%
Analog channels 0ch
Digital channels 0ch
ANT.IN
SETUPBACK
BackEnter
SETUP
Skip
Antenna
Cable
Skip
• If you connect the cable system directly, contact the CAT V
installer.
• If you press [POWER] or [SETUP] during autoscan, this
setting will be canceled.
• The initial autoscan function can be executed for either
“Antenna” or “Cable” only once. When you change the
connection (Antenna / Cable), set autoscan again.
(Refer to page 18.)
• If there is no signal input from the antenna terminal and
no operation for several seconds after you turn on the unit,
“Helpful Hints” appears. Follow the instructions listed on
the TV screen.
Initial Setup
Initial Setup
No channel is registered.
Try Autoscan again?
Verify that you have a cable connected to the
on the back of the TV, the channel installation process
searches this connection. If you are using a cable or satellite
box, please confirm the input which you have connected the
box and press the “INPUT SELECT” key on the remote control to
select the appropriate source input.
"ANT. IN" jack
Enter
SETUP
ENTER
Select Skip
• You must set ”Home” in step 4. Otherwise, the settings
of picture and sound quality you adjusted will not be
memorized after you turn off the unit.
After an initial setup is completed...
If you want to scan the channels automatically again,
•
refer to “Autoscan” on page 18.
You can add the desired channels unmemorized by
•
“Autoscan”. Refer to “Manual Register” on page 19.
If you want to change to another language, refer to
•
“Language Selection” on page 20.
•
If you want to change the location setting, refer to
“Location” on page 31.
Retry
Later
EnglishEspañol Français
INTRODUCTION
PREPARATION
HomeRetail
ENTER
WATCHING TV
OPTIONAL SETTING TROUBLESHOOTING
INFORMATION
EN
13
Page 14

ATCHING TV
W
5
Channel Selection
Select channels by using [CH K / L] or [the Number buttons].
•
To select the memorized channels, use [CH K / L] or
[the Number buttons].
To select the non-memorized channels, use
•
[the Number buttons].
To Use [the Number buttons]
TV
When selecting channel 11
-
DTV
When selecting digital channel 11-1
-
Be sure to press [-] before entering
the subchannel number.
Press [CH RETURN] to return to the previously
•
channel.
About digital TV broadcasting:
With its high definition broadcast, digital broadcasting
far surpasses analog broadcasting in both its picture
and sound quality. Not all digital TV broadcasts are high
definition (HD). To confirm whether your watching TV
program is in HD, refer to the program guide, contact
your cable / satellite provider or local TV stations.
NTSC
(analog mode)
(Soccer)
CH4
Air time
6:00pm
ATSC
(digital mode)
(Soccer)
CH4-1
Volume Adjustment
5
This section describes how to adjust the volume. The mute function, which
turns the sound off and on, is also described.
Use [VOL. X / Y] to adjust the audio volume.
Volume 30
The volume bar will be displayed at the bottom of the
TV screen when adjusting the volume.
The volume bar will automatically disappear in a few
•
seconds.
Press [MUTE ] to turn off and on the sound.
Mute
“Mute” is displayed on the TV screen for a few seconds.
Press [MUTE
] again or [VOL. X / Y] to recover the
original volume.
Sleep Timer
5
The sleep timer can be set to automatically turn off the unit after an
incremental period of time.
Press [SLEEP] to set the sleep timer.
1
main channel
CH4-2
CH4-1
main channel
(News)
(Soccer)
CH4-2
subchannel
(Soccer)
(Soccer)
can be changed by using
CH4
CH4
CH4
(Soccer)
(Soccer)
(Soccer)
6:30pm
7:00pm
7:30pm
8:00pm
CH4-1
main channel
CH4-1
main channel
What is the subchannel?
By using high compression technology, digital
broadcasting offers a service that enables multiple
signals to send simultaneously.
Therefore, you can select more than one program per
main channel since digital broadcasting technology
distinguishes between multiple channels broadcast by
a single network.
Note:
• “No Signal” will appear on the TV screen after the
subchannel broadcast is over.
• “Audio only program“ message will appear on the TV
screen, when you receive only sound signal.
14
EN
CH4-3
subchannelsubchannel
(News)
[CH K / L]
(Tennis)
Sleep
Off
Sleep timer display appears on the TV screen.
Press [SLEEP] repeatedly to change the amount of time
2
until shut off.
Sleep
120min.
You can set your unit to turn off after a set period of
time (from 30 to 120 minutes).
.
Each press of [SLEEP] will increase the time by 30
•
minutes.
After setup, the sleep timer display can be called up
•
for checking by pressing [SLEEP].
To cancel the sleep timer
Press [SLEEP] repeatedly until “Sleep Off” is displayed
on the TV screen.
Note:
• The sleep timer display will automatically disappear in a
few seconds.
• When you disconnect the unit from the AC outlet or when
a power failure occurs, the sleep timer setting will be
canceled.
Page 15

Still Mode
5
You can pause the image shown on the TV screen.
Press
5
You can easily switch with the remote control to the DTV (ATSC) and TV
(NTSC) or to access external devices when they are connected to the unit.
[STILL] to pause the image shown on the TV
screen.
Still
The sound output will not be paused.
•
If no signal is detected or protected signal is received
•
during still mode, the image remains paused and the
sound output will be muted.
The still function will be released after 5 minutes.
•
To cancel still mode, press any button except [POWER].
Switching Each Input Mode
Press [INPUT SELECT] or [CH K] repeatedly to cycle
through the input modes.
DTV/TV channel
Video
or
Component
EnglishEspañol Français
Switching Audio Mode
5
This section describes how to switch the audio in the analog mode and how
to switch the audio language in the digital mode.
TV
Press [AUDIO] to display the currently selected
audio mode. While receiving an MTS broadcast,
press repeatedly to cycle through the available audio
channel.
11
When all audio are available
When stereo and monaural audio are available
When SAP and monaural audio are available
When only monaural audio is available
STEREO : Outputs stereo-audio
SAP : Outputs second audio program
MONO : Outputs mono-audio
DTV
Press [AUDIO] to display the currently selected
1
language and the number of available languages.
SAP / STEREO SAP / MONO
SAP / STEREO
MONO / STEREO MONO / STEREO
SAP / MONO SAP / MONO
(cannot be switched)
SAP / STEREO
MONO
INTRODUCTION
PREPARATION WATCHING TV
OPTIONAL SETTING TROUBLESHOOTING
INFORMATION
(or PC input)
HDMI1
Pressing [CH L] reverses the direction of the input
•
modes.
HDMI2
HDMI3
11-1
Press [AUDIO] repeatedly to cycle through the
2
available audio languages.
Available languages differ depending on the
•
broadcast. “Other” is displayed when the audio
language cannot be acquired, or the acquired
languages are other than English, Spanish or French.
English 1/3
Note:
• [AUDIO] does not control external audio devices.
• The information display will automatically disappear in a
few seconds.
15
EN
Page 16

ATCHING TV
11-1
English 1/2
TV: TV-14
Rating
1080i
1080i
16:9
16:9HDHD
CC
CC
A Day of Memories
A Day of Memories
KABC
KABC
A quarter-century ago,which may now qualify as the
good old days of newspapering,run-of-paper sales
accounted for 80 percent of the industry's advertising
revenues. Department stores and supermarket were
1 2
34
5
6, 7, 8
9
10
W
TV Screen Information
5
You can display the currently selected channel or other information such as
the audio mode on the TV screen.
TV
In the analog mode, the current channel number and the audio mode are
displayed.
DTV
In the digital mode, the detailed broadcasting information for the current
channel such as program title, program guides are displayed.
Press [INFO].
11
SAP / STEREO
480i
480i
The current channel number, audio mode, type of
•
resolutions for video signal, TV aspect ratio, CC and
TV program rating are displayed on the top-right
corner of the TV screen.
To clear the display, press [INFO] again. You can also
•
press [BACK].
SD
SD
TV-PG DLSV
4:3
4:3
CC
CC
Press [INFO] to display the details of the currently
selected program.
Broadcasting information
The following information is displayed.
1 program title
2 program guide
(The program guide added to broadcasting
information is displayed to a maximum of 4 lines.)
3 broadcast station
4 channel number
5 audio language
(Refer to “Switching Audio Mode” on page 15.)
6 effective scanning lines and scan mode
7 digital TV format
8 program aspect ratio
9 CC (not available if closed caption is set to “Off”)
10 child lock rating
16
EN
Note:
• When the program guide consists of more than 4 lines, use
[Cursor K/ L] to scroll.
• “No description provided.” is displayed when the program
guide is not provided.
• While the program guide is displayed, the closed caption
function is interrupted.
• In external input mode, the following screen is displayed;
e.g.) When an external device is connected to VIDEO input
jack.
Video
480iSDSD
480i
TV-PG DLSV
• The information display will automatically disappear in
1 minute.
CC
CC
Page 17

TV Screen Display Mode
5
4 types of display modes can be selected when the broadcasting station
is sending 4:3 or 16:9 video signal. And 3 types of display modes can be
selected for PC input signal.
Press [SCREEN MODE ] repeatedly to switch the TV
aspect ratio.
For 4:3 video signal
EnglishEspañol Français
INTRODUCTION
PREPARATION WATCHING TV
For 16:9 video signal
Sidebar Full
Wide Cinema
Sidebar
Display a 4:3 picture at its original size. Sidebars appear
on both edges of the screen.
Full
Display a 4:3 picture at a 16:9 size; the picture is
stretched horizontally to fill the screen.
Cinema
Display a 4:3 picture at a 16:9 size; the picture is
stretched horizontally and vertically to fill the screen.
This crops out the top and bottom of the picture.
Wide
Display the picture with its center at the original size
and the edges stretched horizontally to fill the screen.
Full
Expand
Zoom
Cinema
Full
Display a 16:9 picture at its original size.
Zoom
Display a 16:9 picture at its maximum size without
changing its horizontal and vertical ratio.
Cinema
Display a vertically stretched picture.
Expand
Display a horizontally stretched picture.
For PC input signal through
Normal Full
HDMI1
input mode
OPTIONAL SETTING TROUBLESHOOTING
INFORMATION
Dot By Dot
Normal
Display a proportionately stretched picture. Sidebars
appear on both edges of the screen.
Full
Display a picture that is stretched out of proportion to
fill the screen.
Dot By Dot
Display a picture in its original size.
17
EN
Page 18

PTIONAL SETTING
O
Main Menu
5
This section describes the overview of the main menu displayed when you
press [SETUP]. For more details, see the reference page for each item.
The main menu consists of the function setting items below.
Press [SETUP].
PICTURE
You can adjust the picture quality.
(Refer to “Picture Adjustment” on page 21.)
SOUND
You can adjust the sound quality.
(Refer to “Sound Adjustment” on page 22.)
CHANNEL
•
You can automatically scan the viewable channels.
(Refer to “Autoscan” on page 18.)
•
You can skip the undesired channels when selecting
the channels using [CH K / L].
(Refer to “Channel List” on page 19.)
•
You can add the channels that were not scanned by
the autoscan.
(Refer to “Manual Register” on page 19.)
DETAIL
•
You can change the display format for closed
caption, which displays the dialogue of a TV program
or other information across the TV screen.
(Refer to “Closed Caption” on page 23.)
•
You can set the viewing limitations.
(Refer to ‘‘Child Lock” on page 26.)
•
You can adjust the position, stability and clarity of the
PC screen.
(Refer to “PC Settings” on page 30.)
•
You can select the energy saving mode.
(Refer to “Energy Saving Mode” on page 31.)
•
When you adjust the desired “PICTURE” and
“SOUND” mode, you must switch the setting from
“Retail” to “Home”. (Refer to “Location” on page 31.)
•
You can confirm the version of the software currently
used in this unit.
(Refer to ”Current Software Info” on page 32.)
LANGUAGE
You can change the language (English, Spanish,
French) displayed on the main menu.
(Refer to “Language Selection” on page 20.)
18
EN
Autoscan
5
If you switch wires (e.g., between antenna and CATV) or if you move the
unit to a different area after the initial setting, or if you restore the DTV
channel you deleted, you will need to perform autoscan.
Before you begin: Make sure the unit is connected to antenna or cable.
Press [SETUP] to display the main menu.
1
Use [Cursor K / L] to select “CHANNEL” , then press
2
[ENTER].
Use [Cursor K / L] to select “Autoscan”, then press
3
[ENTER].
Channel
Channel
Autoscan
Channel List
Manual Register
Antenna
Use [Cursor K / L] to select an appropriate option, then
press [ENTER].
Autoscan
Autoscan
Autoscan will rescan all channels.
Autoscan will take up to 20 minutes to
complete.
Select the destination of "ANT.IN" jack.
Antenna
Or
Cable
When aerial antenna is connected, select “Antenna”.
•
When connected to CATV, select “Cable”.
•
“Autoscan” will begin.
•
When the scanning and memorizing are completed,
•
Now the system is scanning for Channels,please wait
Autoscan will take up to 20 minutes to complete.
75%
Analog channels 10ch
Digital channels 6ch
SETUP
Exit
Back
Antenna
Cable
ANT.IN
the lowest memorized channel will be displayed.
Note:
• After setting “Autoscan”, using [CH K / L] on the remote
control skips unavailable programs automatically.
• If you connect the cable system directly, contact the CAT V
installer.
• If you press [POWER] or [SETUP] during autoscan, the
setting will be canceled.
• Even if “Autoscan“ is completed, the channel setting will be
lost if the AC power cord is unplugged before turning off
the unit by pressing [POWER].
• The PIN Code will be required once you set a PIN Code in
the “Child Lock“ (Refer to page 26).
• If you want to change your PIN Code, follow the instruction
of “New Password” (Refer to page 29).
Page 19

5
Channel List
The channels selected here can be skipped when selecting the channels
using [CH K / L].
Those channels can still be selected with [the Number buttons].
Press [SETUP] to display the main menu.
1
Manual Register
5
This function lets you add the channels that were not added by
the autoscan due to the receptible condition at the initial setting.
Press [SETUP] to display the main menu.
1
EnglishEspañol Français
INTRODUCTION
PREPARATION
Use [Cursor K / L] to select “CHANNEL”, then press
2
[ENTER].
Use [Cursor K / L] to select “Channel List”, then press
3
[ENTER].
Channel
Channel
Autoscan
Channel List
Manual Register
Antenna
Use [Cursor K / L] to select the channel you want to
4
remove, then press [ENTER].
Channel List
Channel List
Highlight channels for Ch
Up/Down key selection.
ENTER
The channel display for the removed channel
•
Ch Select Watch/Skip Back
darkens. You will not be able to select the channel
again using [CH K / L].
To reactivate a removed channel, use [Cursor K / L] and
•
press [ENTER]. The registered channels are highlighted.
When you remove a main channel, its subchannels
•
are removed as well.
Note:
• The channel with the “DTV” indicated on the display is
ATSC. Otherwise the channel is NTSC.
Press [SETUP] to exit.
5
DTV 6
DTV 6
DTV 8
DTV 8
DTV 48
DTV 48
DTV 67
BACK
Use [Cursor K / L] to select “CHANNEL”, then press
2
[ENTER].
WATCHING TV
OPTIONAL SETTING
Use [Cursor K / L] to select “Manual Register”, then
3
press [ENTER].
Use [the Number buttons] to enter the number of the
4
channel you want to add, then press [ENTER].
Channel
Channel
Autoscan
Channel List
Manual Register
Antenna
TROUBLESHOOTING
INFORMATION
27
9
9
Manual Register
58
58
Manual Register
For analog channels, select a
channel to register using number
keys.
For digital channels, you must
perform Autoscan function.
Ch Change
Press [SETUP] to exit.
5
Note:
• If setup completes successfully,
“Added to the channel list” is displayed.
• If external input is used, it is not possible to register the
channel and “Unavailable” will be displayed on the TV
screen.
• By using [CH K / L], you can select the memorized
channels only.
11
Register
BACK
Back
EN
19
Page 20

PTIONAL SETTING
O
Antenna Confirmation
5
DTV
This function lets you check the digital signal strength of each channel.
Language Selection
5
You can choose English, Spanish, or French as your on-screen language.
Press [SETUP] to display the main menu.
1
Use [Cursor K / L] to select “CHANNEL”, then press
2
[ENTER].
Use [Cursor K / L] to select “Antenna”, then press
3
[ENTER].
Channel
Channel
Autoscan
Channel List
Manual Register
Antenna
Use [the Number buttons] or [CH
4
K / L
] to select the
channel for which you want to check the digital signal
strength.
Press [SETUP] to display the main menu.
1
Use [Cursor K / L] to select “LANGUAGE”, then press
2
[ENTER].
Use [Cursor K / L] to select “English”, “Español” or
3
“Français”, then press [ENTER].
Language
Language
Select the language for setup display.
Elija el idioma de ajuste.
Sélectionner langue écran config.
Press [SETUP] to exit.
4
English
Español
Français
If the channel is set to analog channel or external
•
input, you cannot confirm the antenna condition.
Press [SETUP] to exit.
5
20
EN
Note:
11-1
Antenna
Antenna
Current50 50 Max
CH
Back
Ch Change
Video
Antenna
Antenna
Indicator is available
for digital broadcasting
only.
CH
Ch Change
Back
• If you need the English menus instead of the Spanish or
French menus, press [SETUP]. Use [Cursor K / L] to select
“IDIOMA” or “LANGUE”, then press [ENTER].
Use [Cursor K / L] to select “English”, then press [ENTER].
Press [SETUP] to exit the main menu.
Page 21

Picture Adjustment
5
You can adjust brightness, contrast, color, tint, sharpness and color
temperature.
EnglishEspañol Français
INTRODUCTION
Before you begin: You must set ”Home” in ”Location” (Refer to page 31).
Otherwise, the settings you adjusted will not be
memorized after you turn off the unit.
Press [SETUP] to display the main menu.
1
Use [Cursor K / L] to select “PICTURE”, then press
2
[ENTER].
Use [Cursor K / L] to select the item you want to adjust,
3
then press [ENTER].
Picture
Adjust the picture quality.
4
Picture
Picture Mode
Brightness
Contrast
Color
Tint
Sharpness
Color Temperature
Personal
Normal
Picture Mode
Use [Cursor K / L] to select the desired setting, then
press [ENTER].
(‘‘Personal“, ‘‘Standard“, ‘‘Sports“, ‘‘Movie“ and ‘‘Game“)
Picture
Picture
Picture Mode
Brightness
Contrast
Color
Tint
Sharpness
Color Temperature
Personal
Standard
Sports
Movie
Game
30
60
36
0
0
5
Brightness, Contrast, Color, Tint, Sharpness,
Color Temperature
Use [Cursor K / L] to select the desired setting, then
use [Cursor
Brightness
Brightness 30
Adjust
Contrast
Contrast
Adjust Move
Color
Color
Adjust Move
Tint
Tint
Adjust Move
Sharpness
Adjust Move
Color Temperature
Color Temp. Normal
Adjust Move
Press [SETUP] to exit.
/
s
B
] to adjust.
Cursor
s
to decrease
ENTER
Move
Enter
60
36
0
0Sharpness
ENTER
Enter
ENTER
Enter
ENTER
Enter
ENTER
Enter
ENTER
Enter
brightness
to decrease
contrast
to decrease
color intensity
to add red to add green
to soften to sharpen
to add warm
colors
Cursor
to increase
brightness
to increase
contrast
to increase
color intensity
to add cool
colors
PREPARATION
WATCHING TV
OPTIONAL SETTING
B
TROUBLESHOOTING
INFORMATION
Note:
• To cancel picture adjustment, press [SETUP].
• Only the ‘‘Personal“ setting can be adjusted.
21
EN
Page 22

PTIONAL SETTING
O
Sound Adjustment
5
You can adjust the sound mode, equalizer and some other sound functions.
Before you begin: You must set ”Home” in ”Location” (Refer to page 31).
Otherwise, the settings you adjusted will not be
memorized after you turn off the unit.
Press [SETUP] to display the main menu.
1
Use [Cursor K / L] to select “SOUND”, then press
2
[ENTER].
Use [Cursor K / L] to select the sound type you want to
3
adjust, then press [ENTER].
Sound
Sound
Sound Mode
Equalizer
TV Speakers
Standard
Ext. Amp
TV Speakers
Select the audio output from the unit’s speakers, or not.
If your amplifier compatible with the CEC function is
connected to this unit using an HDMI cable, some part
of the sound operations such as volume up can access
synchronized by using this unit’s remote control.
Use [Cursor K / L] to select the desired option, then
press [ENTER].
TV Speakers
TV Speakers
"On":
Sound will be output from the TV
speakers.
"Off":
Sound will not be output from the
TV speakers.
"Ext. Amp":
Operation is possible by connecting
to the HDMI-CEC compatible amp
with a HDMI cable. For details look
in the user manual.
On
Off
Ext. Amp
Press [SETUP] to exit.
5
The sound will be output from the unit’s
speakers.
The sound will not be output from the
unit’s speakers.
This function allows you to control audio
output from CEC-compatible devices
with the unit’s remote control.
On
Off
Ext. Amp
Adjust the following items.
4
Sound Mode
Use [Cursor K / L] to select the desired setting, then
press [ENTER].
(“Personal “, “Standard “, “Movie “, “Music “and “News “)
Sound
Sound
Sound Mode
Equalizer
TV Speakers
Equalizer
Adjust tonal quality for each frequencies.
Use [Cursor s /
and use [Cursor K / L] to adjust the level, then press
[ENTER].
<>
] to select the specific frequency
B
Equalizer
Equalizer
0
Personal
Standard
Movie
Music
News
Note:
• To cancel sound adjustment, press [SETUP].
• We do not guarantee 100% interoperability with other
brands of CEC compliant devices.
22
120Hz0500Hz01.5kHz05kHz010kHz
EN
Page 23

Closed Caption
A. Caption Service
5
You can view closed captioning (CC) for TV programs, movies and news.
Closed caption refers to text of dialogue or descriptions displayed onscreen.
Press [SETUP] to display the main menu.
1
A. Caption Service
Use [Cursor K / L] to select “Caption Service”, then
4
press [ENTER].
Closed Caption
Closed Caption
Caption Service
Digital Caption Service
Caption Style
EnglishEspañol Français
INTRODUCTION
PREPARATION
Off
Off
Use [Cursor K / L] to select “DETAIL”, then press
2
[ENTER].
Use [Cursor K / L] to select “Closed Caption”, then
3
press [ENTER].
Detail
Detail
Closed Caption
Child Lock
PC Settings
Energy Saving Mode
Location
Current Software Info
See the following description for setting each item.
Closed Caption
Closed Caption
Caption Service
Digital Caption Service
Caption Style
Off
Off
...
A
“A. Caption Service”
...
B
“B. Digital Caption Ser vice”
...
C
“C. Caption Style”.
D page 23
D page 24
D page 24
Use [Cursor K / L] to select the desired closed caption,
5
WATCHING TV
then press [ENTER].
Closed Caption
Closed Caption
Caption Service Off
Digital Caption Service
Caption Style
CC1
OPTIONAL SETTING
CC2
CC3
CC4
Text1
Text2
Text3
Text4
Caption mode
TROUBLESHOOTING
On
Home
CC1 and Text1;
are the primary caption and text services.
The captioning or text is displayed in the same
language as the program’s dialogue
(up to 4 lines of script on the TV screen, where it
does not obstruct relevant parts of the picture).
CC3 and Text3;
serve as the preferred data channels.
A
B
C
The captioning or text is often a secondary language.
CC2, CC4, Text2 and Text4;
are rarely available and broadcasters use them only
in special conditions, such as when “CC1” and “CC3”
or “Text1” and “Text3” are not available.
There are 3 display modes according to programs:
•
Paint-on mode:
Displays input characters on the TV screen
immediately.
Pop-on mode:
Once characters are stored in memory, they are
displayed all at once.
Roll-up mode:
Displays the characters continuously by scrolling
(max. 4 lines).
INFORMATION
Press [SETUP] to exit.
6
23
EN
Page 24

PTIONAL SETTING
B. Digital Caption Service
C. Caption Style
O
B. Digital Caption Service
DTV
In addition to the basic closed caption described on page 23, DTV has its
own closed caption called digital caption service. Use this menu to change
the settings for digital caption service.
/
Use [Cursor
4
K
L] to select “Digital Caption Service”,
then press [ENTER].
Closed Caption
Closed Caption
Use [Cursor
5
Caption Service
Digital Caption Service
Caption Style
/
K
L] to select the desired digital caption
Off
Off
service, then press [ENTER].
Closed Caption
Off
Service 1~6
Press [SETUP] to exit.
6
Closed Caption
Caption Service
Digital Caption Service
Caption Style
Select if you do not want digital caption
service. This is the default.
Select one of these before changing
any other item in “Closed Caption”
menu. Choose “Service1” under normal
circumstances.
Off
Service1
Service2
Service3
Service4
Service5
Service6
C. Caption Style
DTV
You can change the caption style such as font, color or size, etc.
/
Use [Cursor
4
K
L] to select “Caption Style”, then press
[ENTER].
Closed Caption
Closed Caption
Caption Service
Digital Caption Service
Caption Style
Use [Cursor
5
/
K
L] to select “User Setting”, then press
[ENTER].
Caption Style
Caption Style
User Setting
Font Style
Font Size
Font Color
Font Opacity
Background Color
Background Opacity
Edge Color
Use [Cursor
6
/
K
L] to select “On”, then press [ENTER].
Edge Type
Caption Style
Caption Style
User Setting
Font Style
Font Size
Font Color
Font Opacity
Background Color
Background Opacity
Edge Color
Edge Type
Off
Off
Off
Font0
Middle
White
Solid
Black
Solid
Black
None
On
Off
24
Note:
• “Digital Caption Service” that you can switch differs
depending on the broadcast description.
EN
/
K
Use [Cursor
7
[ENTER]. Then use [Cursor
L] to select an item, then press
/
K
L] to select the desired
setting and press [ENTER].
Picture display
ABCDEFGHIJKL
ABCDEFGHIJKL
Edge
(Edge Color and Edge Type)
Font
(Font Style, Font Size, Font Color and Font Opacity
or Transparency)
Background
(Background Color and Background Opacity or Transparency)
The setting description for each item is shown on the
•
next page.
Review your setting choice made on the next page
•
by looking in the upper right corner of the displayed
setting box (not all selections show the differences
selected).
Page 25

EnglishEspañol Français
FONT7
INTRODUCTION
Font Style
Closed Captioning font style can be changed as below.
Caption Style
Caption Style
User Setting
Font Style
Font Size
Font Color
Font Opacity
Background Color
Background Opacity
Edge Color
Edge Type
Closed Caption
Font0
Font6
FONT7
Font Size
Font size of the displayed caption can be switched as
below.
Caption Style
Caption Style
User Setting
Font Style
Font Size
Font Color
Font Opacity
Background Color
Background Opacity
Edge Color
Edge Type
Closed Caption
Large
Middle
Small
Font Color
Font color of the displayed caption can be switched as
below.
Caption Style
Caption Style
User Setting
Font Style
Font Size
Font Color
Font Opacity
Background Color
Background Opacity
Edge Color
Edge Type
Closed Caption
White
Black
Red
Green
Blue
Yellow
Magenta
Cyan
Edge Color
Edge color of the displayed caption can be switched as
below.
Caption Style
Caption Style
User Setting
Font Style
Font Size
Font Color
Font Opacity
Background Color
Background Opacity
Edge Color
Edge Type
Closed Caption
Edge Type
Edge type of the displayed caption can be switched as
below.
Press [SETUP] to exit.
8
Caption Style
Caption Style
User Setting
Font Style
Font Size
Font Color
Font Opacity
Background Color
Background Opacity
Edge Color
Edge Type
Closed Caption
White
Black
Red
Green
Blue
Yell ow
Magenta
Cyan
None
Raised
Depressed
Uniform
L.Shadow
R.Shadow
PREPARATION
WATCHING TV
OPTIONAL SETTING
TROUBLESHOOTING
Font Opacity
Font opacity of the displayed caption can be switched
as below.
Caption Style
Caption Style
User Setting
Font Style
Font Size
Font Color
Font Opacity
Background Color
Background Opacity
Edge Color
Edge Type
Closed Caption
Solid
Flash
Translucent
Transparent
Background Color
Background color of the displayed caption can be
switched as below.
Caption Style
Caption Style
User Setting
Font Style
Font Size
Font Color
Font Opacity
Background Color
Background Opacity
Edge Color
Edge Type
Closed Caption
White
Black
Red
Green
Blue
Yellow
Magenta
Cyan
Background Opacity
Background opacity of the displayed caption can be
switched as below.
Caption Style
Caption Style
User Setting
Font Style
Font Size
Font Color
Font Opacity
Background Color
Background Opacity
Edge Color
Edge Type
Closed Caption
Solid
Flash
Translucent
Transparent
Note:
• To show the closed caption on your TV screen, broadcast
signal must contain the closed caption data.
• Not all TV programs and commercials have the closed
caption or all types of the closed caption.
• Captions and texts may not match the TV voice exactly.
• Changing channels may delay the closed caption for a few
seconds.
• Adjusting or muting the volume may delay the closed
caption for a few seconds.
• Abbreviations, symbols and other grammatical shortcuts
may be used in order to keep pace with the on-screen
action. This is not a malfunction.
• The caption or text characters will not be displayed while
the main menu or functions display is shown.
• If a black box appears on the TV screen, this means that
the closed caption is set to the text mode. To clear the box,
select “CC1”, “CC2”, “CC3”, “CC4” or “Off ”.
• If the unit receives poor quality television signals, the
captions may contain errors, or there might be no captions
at all. Some possible causes of poor quality signals are:
- Automobile ignition noise
- Electric motor noise
- Weak signal reception
- Multiplex signal reception (ghosts or screen flutter)
• The unit retains the closed caption setting if the power
fails.
• Closed caption will not be displayed when you are using
an HDMI connection.
• When the unit receives special effects playback signal (i.e.,
Search, Slow and Still) from a VCR’s video output channel
(CH3 or CH4), the unit may not display the correct caption
or text.
INFORMATION
25
EN
Page 26

PTIONAL SETTING
O
Child Lock
5
Child lock reads the ratings for programs, then denies access to the
programs which exceed the rating level you set. With this function, you
can block certain programs inappropriate for children and any channels or
external input modes can be invisible.
Press [SETUP] to display the main menu.
1
/
K
Use [Cursor
2
L] to select “DETAIL”, then press
[ENTER].
Use [Cursor K / L] to select “Child Lock”, then press
3
[ENTER].
Detail
Detail
Closed Caption
Child Lock
PC Settings
Energy Saving Mode
Location
Current Software Info
Use [the Number buttons] to enter the 4-digit
4
numbers for your PIN Code.
Child Lock
Child Lock
Enter password.
On
Home
See the following description for setting each item.
Child Lock
Child Lock
Channel Lock
MPAA Rating
TV Rating
Canadian English Rating
Canadian French Rating
Downloadable Rating
Clear Downloadable Rating
New Password
A
B
C
D
...
A
“A. Channel Lock”
...
B
“B. MPAA Rating”
...
C
“C. TV Rating”.
...
D
“D. New Password”
D page 27
D page 27
D page 28
D page 29
Note:
• When you select a rating and set it to “Block”, the higher
ratings will be blocked automatically. The lower ratings
will be available for viewing.
• When you set the highest rating to “View”, all ratings turn
to “View” automatically.
• To block any inappropriate programs, set your limits in
“MPAA Rating”, “TV Rating” and “Downloadable Rating”.
• The child lock setting will be retained after a power failure
(except the access code reverts to 0000).
• If the rating is blocked, will appear.
• “Downloadable Rating” will be available when the unit
receives a digital broadcast using the new rating system.
• If the broadcasting signal does not have the
Downloadable Rating information, “Downloadable
Rating is currently not available.” will appear.
This message will also appear when you try to access
“Downloadable Rating” after you have cleared the
Downloadable Rating information, and the new
information has not been downloaded since.
• The Canadian rating systems on this unit based on
CEA-766-A and the Canadian Radio-Television and
----
Telecommunications Commission (CRTC) policy.
26
PIN Code
When you have not set up your PIN Code, enter 0000.
•
When the PIN Code is correct, “Child Lock” menu is
•
displayed.
EN
BACK
Back
Page 27

EnglishEspañol Français
A. Channel Lock
B. MPAA Rating
INTRODUCTION
A. Channel Lock
Particular channels or external input modes can be invisible in this
function.
Use [Cursor K / L] to select “Channel Lock”, then press
5
[ENTER].
Child Lock
Child Lock
Cannel Lock
MPAA Rating
TV Rating
Canadian English Rating
Canadian French Rating
Downloadable Rating
Clear Downloadable Rating
New Password
Use [Cursor K / L] to select the desired rating, then
6
press [ENTER] repeatedly to switch between “View”
and “Block”.
Channel Lock
Channel Lock
Video
Component
HDMI 1
HDMI 2
HDMI 3
11-1 DTV
11-2 DTV
ENTER
Press [SETUP] to exit.
7
Select View/Block Back
B. MPAA Rating
MPAA Rating is the rating system created by MPAA (Motion Picture
Association of America).
PREPARATION
Use [Cursor K / L] to select “MPAA Rating”, then press
5
[ENTER].
Child Lock
Child Lock
Cannel Lock
MPAA Rating
TV Rating
Canadian English Rating
Canadian French Rating
Downloadable Rating
Clear Downloadable Rating
New Password
Use [Cursor K / L] to select the desired rating, then
6
press [ENTER] repeatedly to switch between “View”
and “Block”.
MPAA Rating
MPAA Rating
X
NC-17
R
PG-13
PG
G
BACK
Rating Category
X Mature audience only
NC-17 No one under 17 admitted
R
Restricted; under 17 requires accompanying
parent or adult guardian
PG-13 Unsuitable for children under 13
PG Parental guidance suggested
G General audience
NR No rating
NR
ENTER
Select View/Block Back
WATCHING TV
OPTIONAL SETTING
BACK
TROUBLESHOOTING
INFORMATION
Press [SETUP] to exit.
7
27
EN
Page 28

PTIONAL SETTING
C. TV Rating
O
C. TV Rating
Use [Cursor K / L] to select “TV Rating”, then press
5
[ENTER].
Child Lock
Child Lock
Cannel Lock
MPAA Rating
TV Rating
Canadian English Rating
Canadian French Rating
Downloadable Rating
Clear Downloadable Rating
New Password
Use [Cursor K / L / s
6
/
B
] to select the desired rating,
then press [ENTER] repeatedly to switch between
“View” and “Block”.
TV Rating
TV Rating
TV-MA
TV-14
TV-PG
TV-G
TV-Y7
TV-Y
ENTER
Press [SETUP] to exit.
7
Select View/Block Back
To set the sub ratings
As for TV-MA, TV-14, TV-PG, or TV-Y7, you can further
set the sub ratings to block specific elements of
programming. To set the sub ratings, follow the step
below.
FV
V S L D
BACK
Rating Category
TV-MA Mature audience only higher
TV-14 Unsuitable for children under 14
TV-PG Parental guidance suggested
TV-G General audience
TV-Y7
Appropriate for all children 7 and
older
TV-Y Appropriate for all children lower
Sub Rating Category Rating
FV Fantasy Violence TV-Y7
V Violence
S Sexual Situation
L Coarse Language
TV-PG
TV-14
TV-MA
D Suggestive Dialogue TV-PG, TV-14
Note:
• Blocked sub rating will appear beside the main rating
category in “TV Rating” menu.
• You cannot block a sub rating (D, L, S or V) if the main
rating is set to “View”.
• Changing the category to “Block” or “View” automatically
changes all its sub ratings to the same (“Block” or “View”).
/
s
B
Use [Cursor K / L /
] to select the desired rating,
then press [ENTER] repeatedly to switch between
“View” and “Block”.
TV Rating
TV Rating
28
EN
V S L D
FV
TV-MA
TV-14
TV-PG
TV-G
TV-Y7
TV-Y
BACK
ENTER
Select View/Block Back
Page 29

D. New Password
D. New Password
Although the default code “0000” is supplied with the unit, you can set
your own PIN Code.
EnglishEspañol Français
INTRODUCTION
Use [Cursor K / L] to select “New Password”, then press
5
[ENTER].
Child Lock
Child Lock
Channel Lock
MPAA Rating
TV Rating
Canadian English Rating
Canadian French Rating
Downloadable Rating
Clear Downloadable Rating
New Password
Press [the Number buttons] to enter the new 4-digit
6
PIN Code.
Enter PIN Code again in “Confirm password.” entry
•
field.
New Password
New Password
Enter password.
Confirm password.
----
----
PIN Code
Press [SETUP] to exit.
7
PREPARATION
WATCHING TV
OPTIONAL SETTING
BACK
Back
TROUBLESHOOTING
Note:
• Make sure new PIN Code and confirm PIN Code must be
exactly the same. If they are different, the space is cleared
for reentering.
• Your PIN Code will be erased and return to the default
(0000) when a power failure occurs.
If you forget the PIN Code, unplug the AC power cord for 10
seconds to restore the PIN Code to 0000.
INFORMATION
EN
29
Page 30

PTIONAL SETTING
O
PC Settings
5
This function lets you adjust the PC screen position during PC input through
the HDMI 1 input jack.
Press [SETUP] to display the main menu.
1
/
K
Use [Cursor
2
L] to select “DETAIL”, then press
[ENTER].
Use [Cursor
3
/
K
L] to select “PC Settings”, then press
[ENTER].
Detail
Detail
Closed Caption
Child Lock
PC Settings
Energy Saving Mode
Location
Current Software Info
On
Home
Adjust the setting.
5
Position Reset
Use [Cursor K / L] to select “Reset”, then press
[ENTER].
Position Reset
Position Reset
Resets the display position of the
picture.
The horizontal/vertical position, of the PC screen are
•
automatically adjusted.
Horizontal Position, Vertical Position
Use [Cursor
Horizontal Position
H. Position
Adjust Move
Vertical Position
V. Position
Adjust Move
/
s
B
] to adjust.
Cursor
s
to move PC
-
0
-
0
+
ENTER
Enter
ENTER
Enter
screen left
to move PC
+
screen down
Cancel
Reset
Cursor
to move PC
screen right
to move PC
screen up
B
Use [Cursor K / L] to select the setting you want to
4
adjust, then press [ENTER].
PC Settings
PC Settings
Position Reset
Horizontal Position
Vertical Position
Press [SETUP] to exit.
6
0
0
Note:
• You may not obtain an appropriate screen with
“Position Reset” for some signals. In this case, adjust the
settings manually.
30
EN
Page 31
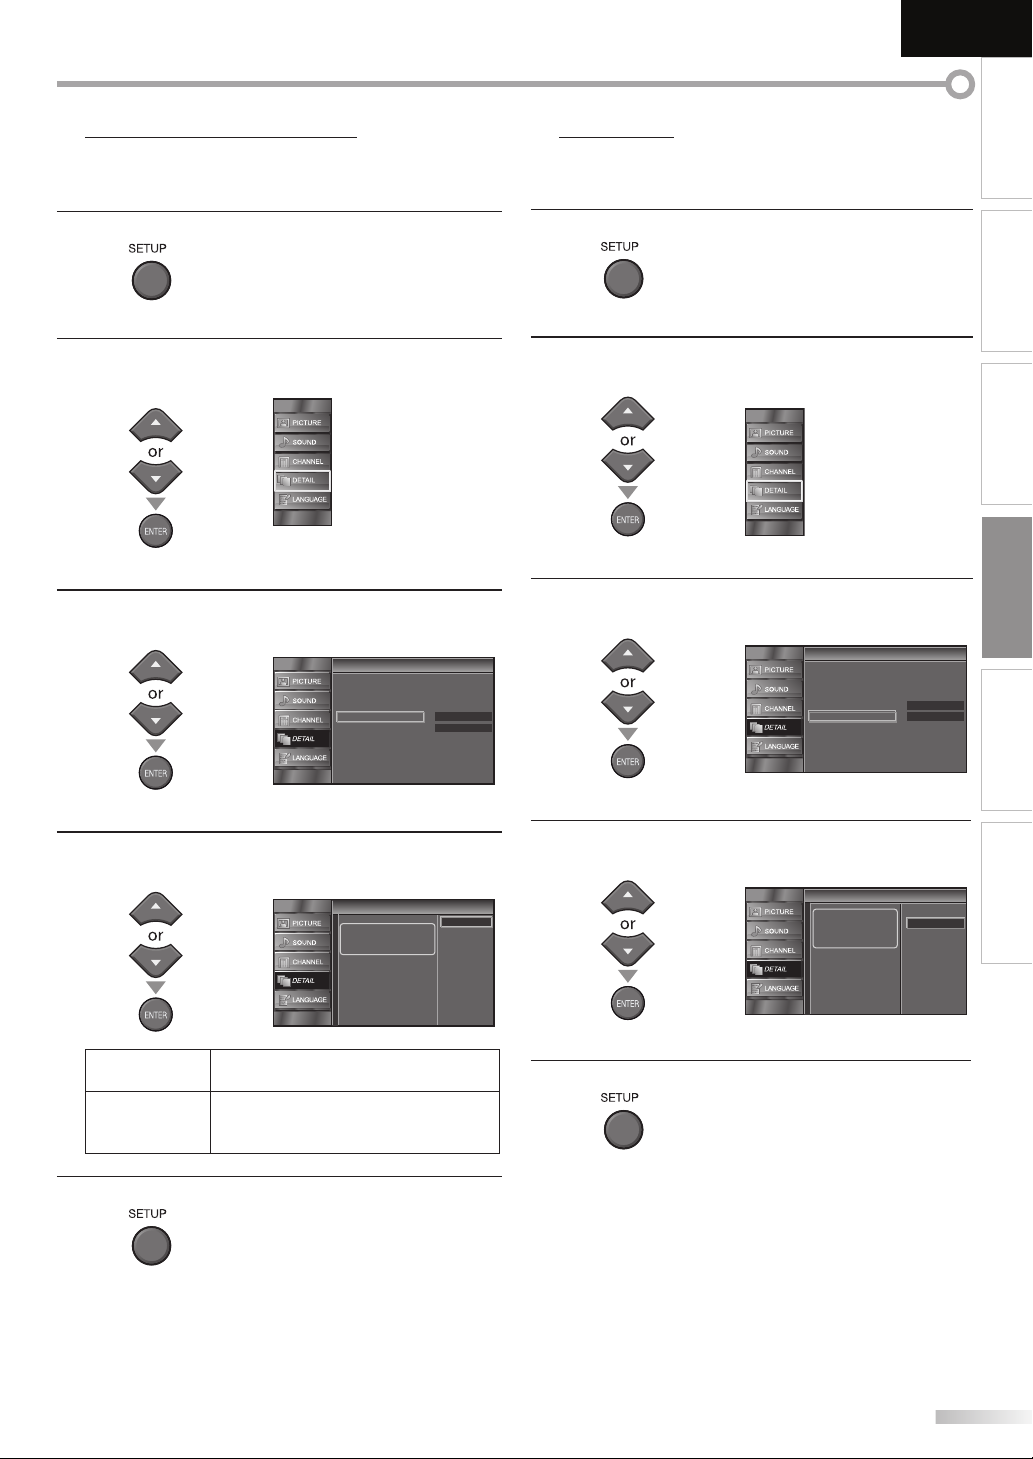
Energy Saving Mode
5 Location
You can set whether the power consumption is saved or not.
5
When you select ”Retail”, the power consumption may possibly exceed the
limited requirement of the ENERGY STAR® qualification.
EnglishEspañol Français
INTRODUCTION
Press [SETUP] to display the main menu.
1
/
K
Use [Cursor
2
L] to select “DETAIL”, then press
[ENTER].
Use [Cursor
3
/
K
L] to select “Energy Saving Mode”, then
press [ENTER].
Detail
Detail
Closed Caption
Child Lock
PC Settings
Energy Saving Mode
Location
Current Software Info
On
Home
Press [SETUP] to display the main menu.
1
/
K
Use [Cursor
2
L] to select “DETAIL”, then press
[ENTER].
Use [Cursor
3
/
K
L] to select “Location”, then press
[ENTER].
Detail
Detail
Closed Caption
Child Lock
PC Settings
Energy Saving Mode
Location
Current Software Info
On
Home
PREPARATION
WATCHING TV
OPTIONAL SETTING
TROUBLESHOOTING
Use [Cursor
4
press [ENTER].
On
Off
Press [SETUP] to exit.
5
/
K
L] to select the desired mode, then
Energy Saving Mode
Energy Saving Mode
When set to “On”, power
consumption is reduced by
decreasing backlight
brightness.
Select if you want to reduce the power
consumption.
The power consumption may possibly
exceed the limited requirement of the
ENERGY STAR® qualification.
/
K
Use [Cursor
4
L] to select the desired location, then
INFORMATION
press [ENTER].
Location
Location
Location Home is
On
Off
Press [SETUP] to exit.
5
recommended for normal
home use.
In the Retail Store mode, all
settings are fixed.
Retail
Home
31
EN
Page 32

PTIONAL SETTING
O
Current Software Info
5
This function shows what version of the software currently used.
Press [SETUP] to display the main menu.
1
/
K
Use [Cursor
2
L] to select “DETAIL”, then press
[ENTER].
Use [Cursor
3
/
K
L] to select “Current Software Info”,
then press [ENTER].
Detail
Detail
Closed Caption
Child Lock
PC Settings
Energy Saving Mode
Location
Current Software Info
Confirm the version of the software currently used.
4
Current Software Info
Current Software Info
Release Version:
E32OS_1.0
Press [SETUP] to exit.
5
On
Home
Back
32
EN
Page 33

ROUBLESHOOTING
T
FAQ5
EnglishEspañol Français
INTRODUCTION
Question Answer
Check the antenna or cable connection to the main unit.
•
Check the batteries of the remote control.
•
Check if there is an obstacle between the infrared sensor window and the
•
remote control.
Test the signal output. If OK, then possible infrared sensor trouble.
•
My remote control does not work.
What should I do?
How come the Initial setup appears every
time I turn on this unit?
Why I cannot watch some TV programs.
How come there is no image from the
connected external devices?
Whenever I entered channel number,
it changes automatically.
Why are captions not displayed entirely?
Or, captions are delayed behind the
dialogue.
How can I set the clock ? There is no clock function on this unit.
(Refer to “IR Signal Check” on page 36.)
Aim the remote control directly at the infrared sensor window on the
•
front of the unit.
Reduce the distance to the unit.
•
Re-insert the batteries with their polarities (+/– signs) as indicated.
•
When there is an infrared-equipped device such as PC near this unit, it
•
may interrupt the remote control signal of this unit.
Move the infrared-equipped device away from this unit, change the angle
•
of the infrared sensor or turn off the infrared communication function.
Connect the RF coaxial cable to the unit directly and run the initial setup.
•
Make sure to complete the channel scan before turning off the unit.
•
Make sure autoscan has been completed.
•
(Refer to “Autoscan” on page 18.)
Autoscan must be completed when you set up the unit for the first
•
time or move it to a location where previously unavailable channels are
broadcast.
The selected channel may not be broadcasting.
•
When autoscan is interrupted and not completed,
•
some channels will not be received. Make sure to complete.
(Refer to “Autoscan” on page 18.)
The selected channel cannot be viewed by the “Child Lock” setting.
•
(Refer to ‘‘Child Lock” on page 26.)
The unit requires some kind of antenna input. An indoor antenna
•
(VHF /UHF), an external antenna (VHF /UHF) or an RF coaxial cable from
your wall cable/satellite box needs to be plugged into the unit.
•
Check if the right input mode is selected by pressing [INPUT SELECT] or
[CH K / L]. (Refer to “Switching Each Input Mode” on page 15.)
using
Check the antenna or cable connection to the unit.
•
When using the Composite Video Connection check that the Green
•
(Y), Blue (Pb/Cb) and Red (Pr/Cr) connectors are connected to their
corresponding colored jacks on the unit.
Many digital channels have alternate channel numbers. The unit changes
•
the numbers automatically to the ones signifying the broadcasting
stations. These are the numbers used for analog broadcasts.
Captions that are delayed a few seconds behind the actual dialogue are
•
common for live broadcasts. Most captioning production companies can
display a dialogue to maximum of 220 words per minute. If a dialogue
exceeds that rate, selective editing is used to insure that the captions
remain up-to date with the current TV screen dialogue.
•
PREPARATION
WATCHING TV
OPTIONAL SETTING
TROUBLESHOOTING
INFORMATION
EN
33
Page 34

ROUBLESHOOTING
T
Troubleshooting Guide
5
If the unit does not perform properly when operated as instructed in this manual,
check the following chart and all connections once before calling for service.
Symptom Remedy
Make sure the AC power cord is plugged in.
•
Make sure that the AC outlet supplies the proper voltage, plug another electrical
No power
Control button does not work.
Power is ON but no screen
image.
No picture or sound
No color
Adjusted ‘‘PICTURE” or ‘‘SOUND”
is not effective every time turn
on the unit.
Sound OK, picture poor
Picture OK, sound poor
You see a distorted picture or
hear an unusual sound.
•
appliance into the AC outlet.
If a power failure occurs, unplug the AC power cord for 1 minute to allow the unit to
•
reset itself.
Press only one button at a time. Do NOT press more than one buttons at the same
•
time.
Check whether the connection of the antenna, cable receiver or satellite box is
•
connected correctly.
Check whether all the cables to the unit are connected to the correct output jack of
•
your device like BD/DVD recorder.
Make sure that the selected input mode is connected to the working input jack.
•
Check if your computer is NOT in sleep mode when the input mode of this unit is in
•
PC mode. Tap any key on the keyboard to wake up your computer.
Check if the power is on.
•
Check if the right input mode is selected.
•
Check whether all the cables to the unit are connected to the correct output jack of
•
your device like BD/DVD recorder.
View other TV channels. The problem might be limited to the broadcasting station.
•
Turn off the unit and wait for about 1 minute, then turn on the unit again.
•
Check whether the connection of the antenna, cable receiver or satellite box is
•
connected correctly.
•
Make sure that the selected input mode is connected to the working input jack.
•
Check if your computer is NOT in sleep mode when the input mode of this unit is in PC
mode. Tap any key on the keyboard to wake up your computer.
•
Make sure that the sound is not muted. Press [MUTE
current volume level will appear on the TV screen.
Make sure that the volume is NOT set to “0” or “Mute”. If so, use [VOL. X / Y] to adjust
•
the desired volume.
View other TV channels. The problem might be limited to the broadcasting station.
•
Adjust “Color” in the main menu.
•
You must set ”Home” in ”Location” (Refer to page 31).
•
Otherwise, the settings you adjusted will not be memorized after you turn off the unit.
Electrical interference from nearby appliances may affect picture quality.
•
Adjust “Contrast” and “Brightness” in the main menu.
•
View other TV channels. The problem might be limited to the broadcasting station.
•
For the best picture quality, watch “high definition” wide screen programs.
•
If the HD content is not available, watch “standard definition” programs instead.
View other TV channels. The problem might be limited to the broadcasting station.
•
Check if the audio cable is connected in correctly .
•
You may be getting interference from electrical appliances, automobiles, motorcycles
•
or uorescent lights.
Try moving the unit to another location to see if this is the cause of the problem.
•
] so that the volume bar and
Ghosts, lines or streaks in
picture
You see “noise” or “trash” on the
screen.
Different color marks on the TV
screen
34
EN
Electrical interference from nearby appliances may affect picture quality.
•
View other TV channels. The problem might be limited to the broadcasting station.
•
When the capabilities of the unit exceed the capabilities of the digital broadcasting,
•
the signal will be increased to match the capabilities of the display of the unit. This
may cause noise or trash.
View other TV channels. The problem might be limited to the broadcasting station.•
Page 35

EnglishEspañol Français
INTRODUCTION
Symptom Remedy
•
You switch to a different input
and the volume.
You switch to a different input
and the screen size changes.
The display image does not
cover the entire screen.
Captions are displayed as a
white box.
No caption is displayed in the
Closed Caption-supported
program.
No caption is displayed when
playing back a disc or a cassette
tape containing captions.
Black box is displayed on the TV
screen.
This unit will memorize the volume level from the last time you adjusted it.
If the volume of the sound from another device is higher or lower, then the loudness
•
will change.
This unit will memorize the viewing mode from the last time you used the particular
•
input modes.
If you are using the unit as a PC monitor, make sure that “Horizontal Position” and
•
“Vertical Position” in “PC Settings” are set correctly.
•
If you are watching TV or using the video, S-video, component video or HDMI with
480i input, press [SCREEN MODE
Interference from buildings or weather conditions may cause captioning to be
•
incomplete.
Broadcasting station may shorten the program to insert advertisement.
•
The closed caption decoder cannot read the information of the shortened program.
The disc or cassette tape may be illegally copied, or the caption signal might not have
•
been read during copying.
The text mode is selected for caption. Select “CC1”, “CC2”, “CC3”, “CC4” or “Off”.•
] repeatedly to switch various screen modes.
Note:
The LCD panel is manufactured to provide many years of useful life. Occasionally a few non active pixels may appear as a fixed point of
•
blue, green or red. This is not to be considered a defect in the LCD screen.
Some functions are not available in specific modes, but this is not a malfunction. Read the description in this manual for more details on
•
correct operations.
PREPARATION
WATCHING TV
OPTIONAL SETTING
TROUBLESHOOTING
INFORMATION
35
EN
Page 36

NFORMATION
I
Glossary5
ATS C
Acronym that stands for Advanced
Television Systems Committee and the
name of the digital broadcasting standards.
Aspect Ratio
The width of a TV screen relative to its
height. Conventional TVs are 4:3 (in other
words, the TV screen is almost square);
widescreen models are 16:9 (the TV screen
is almost twice as wide as its height).
CEC (Consumer Electronics Control)
This allows you to operate the linked
functions between our brand devices
with CEC feature and this unit. We do not
guarantee 100% interoperability with other
brands of CEC compliant devices.
Component Video
This is a video signal format that conveys
each of 3 principal colors of light (red,
blue and green) through different signal
lines. This allows the viewers to experience
picture colors as original as it is. There are
several signal formats, including Y / Pb / Pr
and Y / Cb / Cr.
Dolby Digital
The system developed by Dolby
Laboratories to compress digital sound. It
offers stereo sound (2ch) or multi-channel
audio.
HDMI
(High-Definition Multimedia Interface)
Interface that supports all uncompressed,
digital audio/video formats including
set-top box, BD/DVD recorder or digital
television, over a single cable.
HDTV (High Definition TV)
Ultimate digital format that produces high
resolution and high picture quality.
NTSC
Acronym that stands for National Television
Systems Committee and the name of the
current analog broadcasting standards.
Off the air NTSC signals will no longer be
sent by broadcasting stations after Feb 17,
2009.
Password / PIN Code
A stored 4-digit number that allows access
to parental control features.
SAP (Secondary Audio Program)
Second-audio channel delivered separately
from main-audio channel. This audio
channel is used as an alternate in bilingual
broadcasting.
SDTV (Standard Definition TV)
Standard digital format that is similar to the
NTSC picture quality.
S-video
Offers higher quality images by delivering
each signal, color (c) and luminance (y)
independently of each other through a
separate cable.
Maintenance
5
Cabinet Cleaning
Wipe the front panel and other exterior surfaces of the
•
unit with a soft cloth immersed in lukewarm water and
wrung dry.
•
Never use a solvent or alcohol. Do not spray insecticide
liquid near the unit. Such chemicals may cause damage
and discoloration to the exposed surfaces.
Panel Cleaning
Wipe the panel of the unit with a soft cloth. Before
cleaning the panel, disconnect the AC power cord.
Servicing
Should your unit become inoperative, do not try to correct
the problem yourself. There are no user serviceable parts
inside. Turn off the unit, unplug the AC power cord and call
our toll free customer support line found on the cover of
this manual to locate an authorized service center.
IR Signal Check
If the remote control is not working properly, you can use
a digital camera (including a cellular phone with built-in
camera) to see if it is sending out an infrared signal.
With a digital camera
•
(including built-in cell phone cameras):
Point the Digital Camera towards the
remote control infrared diode at the front
of the remote control. Press any button on
the remote control and look through the
camera display. If the infrared pulsating
light appears through the camera, the
remote control is sending out an IR signal.
36
EN
Page 37

EnglishEspañol Français
Cable Channel Designations5
If you subscribe to cable TV, the channels are displayed as 1-135. Cable companies often designate channels with letters or letter-number combinations.
Please check with your local cable company. The following is a chart of common cable channel designations.
CATV channel
TV Display
CATV channel
TV Display
CATV channel
TV Display
CATV channel
TV Display
CATV channel
TV Display
CATV channel
TV Display
CATV channel
TV Display
5A122334455667788991010111112121313A14B15C16D17E18F19G20H
I22J23K24L25M26N27O28P29Q30R31S32T33U34V35W36W+1
W+743W+844W+945W+1046W+1147W+1248W+1349W+1450W+1551W+16
W+2864W+2965W+3066W+3167W+3268W+3369W+3470W+3571W+3672W+3773W+3874W+3975W+4076W+4177W+4278W+4379W+4480W+4581W+4682W+4783W+48
W+4985W+5086W+5187W+5288W+5389W+5490W+5591W+5692W+5793W+5894A-595A-496A-397A-298A-199W+59
W+65
W+66
W+67
W+68
W+69
W+70
W+71
W+72
106
W+86
127
107
W+87
128
108
W+88
129
109
W+89
130
110
W+90
131
111
W+91
132
112
W+92
133
113
W+93
134
W+73
114
W+94
135
W+1753W+1854W+1955W+2056W+2157W+2258W+2359W+2460W+2561W+2662W+27
52
W+74
W+75
W+76
W+77
W+78
115
116
117
118
119
W+79
120
W+2 W+339W+440W+541W+6
37 38
W+60
W+61
100
W+80
121
101
W+81
122
102
W+82
123
W+62
103
W+83
124
W+63
104
W+84
125
21
42
63
84
W+64
105
W+85
126
INTRODUCTION
PREPARATION
WATCHING TV
General Specifications
5
TV format: ATSC / NTSC-M TV standard
Closed caption system:
§15.122/FCC (digital CC)
§15.119/FCC (analog CC)
Channel coverage (ATSC/NTSC):
Terrestrial VHF: 2~13 UHF: 14~69
CATV 2~13, A~W,
W+1~W+94 (analog W+1~W+84),
A-5~A-1, 5A
Tuning system: Channel frequency synthesized tuning system
Channel access: Direct access keyboard,
Programmable scan, and up/down
Electrical Specification
5
Sound Output: 5W, 8Ω x 2
5
Other Specifications
Terminals:
Antenna input: VHF/UHF/CATV 75Ω unbalanced (F-type)
Audio input: RCA jack (L/R) x 6 500mV rms
Video input: RCA jack x 1 1V p-p (75Ω)
S-video input: Mini DIN 4-pin jack x 1 Y: 1V p-p (75Ω)
C: 286mV p-p (75Ω)
Component video input:
RCA jack x 3 Y: 1V p-p (75Ω)
Pb/Cb: 700mV p-p (75Ω)
Pr/Cr: 700mV p-p (75Ω)
HDMI input: HDMI 19pin x 3
Coaxial digital audio output:
RCA jack x1 500mV p-p (75Ω)
Audio output: RCA jack (L/R) x 2 500mV rms
Remote control:
Digital encoded infrared light system
Operating temperature:
41°F (5°C) to 104°F (40°C)
Power requirements:
120V~ AC +/- 10%, 60Hz +/- 0.5%
Power consumption (maximum):
155W
LCD: 32 inches class (31.5 inches measured diagonally)
Dimensions: <without stand> <with stand>
W: 30
H: 20
D: 3
9
/16 inches (776mm) 30 9/16 inches (776mm)
1
/2 inches (520.3mm) 21 7/16 inches (543mm)
15
/16 inches (100mm) 9 3/8 inches (238mm)
Weight: 19.2 lbs. (8.7kg) 20.1 lbs. (9.1kg)
OPTIONAL SETTING TROUBLESHOOTING
INFORMATION
• Designs and speci cations are subject to change without notice and without
our legal obligation.
• If there is a discrepancy between languages, the default language will be
English.
37
EN
Page 38

LIMITED WARRANTY
NINETY(90) DAY LABOR / ONE(1)YEAR PARTS
WARRANTY COVERAGE:
This warranty obligation is limited to the terms as set forth
below.
WHO IS COVERED:
This product warranty is issued to the original purchaser or the
person receiving the product as a gift against defects in materials
and workmanship as based on the date of original purchase
(“Warranty Period”) from an Authorized Dealer. The original
sales receipt showing the product name and the purchase date
from an authorized retailer is considered such proof.
WHAT IS COVERED:
This warranty covers new products if a defect in material or
workmanship occurs and a valid claim is received within the
Warranty Period. At its option, the company will either (1)
repair the product at no charge, using new or refurbished
replacement parts, or (2) exchange the product with a product
that is new or which has been manufactured from new, or serviceable used parts and is at least functionally equivalent or most
comparable to the original product in current inventory, or (3)
refund the original purchase price of the product.
Replacement products or parts provided under this warranty are
covered against defects in materials and workmanship from the
date of the replacement or repair for ninety (90) days or for the
remaining portion of the original product’s warranty, whichever
provides longer coverage for you. When a product or part is
exchanged, any replacement item becomes your property and the
replaced item becomes company property. When a refund is
given, your product becomes company property.
Note: Any product sold and identified as refurbished or
renewed
Replacement product can only be sent if all warranty
requirements are met. Failure to follow all requirements
can result in delay.
WHAT IS NOT COVERED - EXCLUSIONS AND LIMITATIONS:
This Limited Warranty applies only to new company manufac-
to any hardware product or any software, even if packaged or
sold with the product, as manufacturers, suppliers, or publishers
may provide a separate warranty for their own products packaged with the bundled product.
carries a ninety (90) day limited warranty.
mission, or (d) if any serial number has been removed or defaced,
or (e) product, accessories or consumables sold “AS IS” without
warranty of any kind by including refurbished product sold “AS
IS” by some retailers.
This Limited Warranty does not cover:
• Shipping charges to return defective product.
• Labor charges for installation or setup of the product, adjustment of customer controls on the product, and installation or
repair of antenna/signal source systems outside of the product.
• Product repair and/or part replacement because of improper
installation or maintenance, connections to improper voltage
supply, power line surge, lightning damage, retained images or
tent for extended periods, product cosmetic appearance items
due to normal wear and tear, unauthorized repair or other
cause not within the control of the company.
• Damage or claims for products not being available for use, or
for lost data or lost software.
• Damage from mishandled shipments or transit accidents when
returning product.
it to operate in any country other than the country for which
it was designed, manufactured, approved and/or authorized, or
• A product used for commercial or institutional purposes
(including but not limited to rental purposes).
can be provided.
• Failure to operate per Owner’s Manual.
TO OBTAIN ASSISTANCE…
Contact the Customer Care Center at:
1-866-309-8819
REPAIR OR REPLACEMENT AS PROVIDED UNDER THIS
WARRANTY IS THE EXCLUSIVE REMEDY FOR THE CONSUMER, WITH THE ISSUING COMPANY NOT LIABLE FOR
ANY INCIDENTAL OR CONSEQUENTIAL DAMAGES FOR
BREACH OF ANY EXPRESS OR IMPLIED WARRANTY ON
THIS PRODUCT. EXCEPT TO THE EXTENT PROHIBITED BY
APPLICABLE LAW, ANY IMPLIED WARRANTY OF MERCHANTABILITY OR FITNESS FOR A PARTICULAR PURPOSE
ON THIS PRODUCT IS LIMITED IN DURATION TO THE
DURATION OF THIS WARRANTY.
The company is not liable for any damage to or loss of any programs, data, or other information stored on any media contained
within the product, or other additional product or part not covered by this warranty. Recovery or reinstallation of programs,
data or other information is not covered under this Limited
Warranty.
This warranty does not apply (a) to damage caused by accident,
abuse, misuse, neglect, misapplication, or non-supplied product,
(b) to damage caused by service performed by anyone other than
company approved Authorized Service Location, (c) to a product
FUNAI CORPORATION, Inc. 19900 Van Ness Avenue, Torrance, CA 90501
38
EN
Some states do not allow the exclusions or limitation of incidental or consequential damages, or allow limitations on how long an
implied warranty lasts, so the above limitations or exclusions may
not apply to you.
Printed in China
Page 39

EMERSON AND THE G-CLEF LOGO ARE REGISTERED TRADEMARKS
OF EMERSON RADIO CORP., PARSIPPANY, NEW JERSEY, U.S.A.
LC320EMX
Owner’s Manual
Guide d’utilisation
Manual del Usuario
EnglishEspañol Français
NEED HELP?
BESOIN D’AIDE ?
¿NECESITA AYUDA?
PLEASE CALL TOLL FREE!
APPELEZ NOTRE NUMÉRO GRATUIT !
¡LLAME POR FAVOR SIN COSTO!
1-866-309-8819
OR VISIT OUR WEB SITE AT
OU VISITEZ NOTRE SITE WEB À L’ADRESSE
Ó VISITE NUESTRO SITIO WEB EN
www.emersonaudiovideo.com/
MODEL NUMBER SERIAL NUMBER
HIGH-DEFINITION TELEVISION
TO RECEIVE DIGITAL/ANALOG SIGNAL,
YOU MUST CONNECT ANTENNA.
POUR RECEVOIR LE SIGNAL
NUMÉRIQUE /ANALOGIQUE, VOUS
DEVEZ CONNECTER L’ANTENNE.
PARA RECIBIR LA SEÑAL DIGITAL/
ANALÓGICA, DEBE CONECTAR LA
ANTENA.
© 2009 Funai Electric Co., Ltd.
Page 40

Le modèle et le numéro de série de cet appareil sont indiqués sur le boîtier.
Nous vous recommandons de conserver ces informations pour référence
ultérieure.
Précautions5
N° de modèle :
N° de série :
AVERTISSEMENT:
POUR RÉDUIRE LES RISQUES D’INCENDIE OU DE CHOC ÉLECTRIQUE, N’EXPOSEZ PAS
CET APPAREIL À LA PLUIE OU À L’HUMIDITÉ.
NE PAS EXPOSER L’APPAREIL À DES ÉGOUTTEMENTS OU DES ÉCLABOUSSURES ; NE
PLACER AUCUN OBJET REMPLI DE LIQUIDE (VASE) SUR L’APPAREIL.
CAUTION
RISK OF ELECTRIC SHOCK
DO NOT OPEN
ATTENTION:
NE RETIREZ PAS LA COUVERCLE (OU LE PANNEAU ARRIÈRE). AUCUNE
PIÈCE RÉPARABLE PAR L’UTILISATEUR À L’INTÉRIEUR. CONFIEZ LES
RÉPARATIONS AU PERSONNEL D’UN SERVICE APRÈS-VENTE AGRÉÉ.
L’étiquette mentionnant les précautions se trouvent à l’arrière ou sur le dessous du boîtier.
POUR RÉDUIRE LES RISQUES DE CHOC ÉLECTRIQUE,
Le symbole de l’éclair dans un triangle équilatéral est
conçu pour alerter l’usager de la présence d’une “tension
dangereuse” non isolée à l’intérieur de l’appareil et qui
peut être d’une importance suffisante pour constituer un
risque d’électrocution.
Le symbole du point d’exclamation dans un
triangle équilatéral est conçu pour avertir l’usager
que la documentation accompagnant l’appareil
contient des instructions importantes concernant le
fonctionnement et l’entretien (réparation) de l’appareil.
Consignes de Sécurité Importantes
1. Lisez ces instructions.
2. Conservez ces instructions.
3. Respectez tous les avertissements.
4. Suivez toutes les instructions.
5. N’utilisez pas cet appareil près de l’eau.
6. Nettoyez-le uniquement avec un chiffon sec.
7. Ne bouchez pas les ouvertures de ventilation. Installez
cet appareil conformément aux instructions du fabricant.
8. Ne placez pas l’appareil à proximité de sources de
chaleur telles que radiateurs, poêles, bouches de chaleur
ou autres appareils produisant de la chaleur (y compris
des amplificateurs).
9. Ne modifiez pas le dispositif de sécurité de la fiche
polarisée ou de la fiche de terre. Une fiche polarisée
comporte deux lames dont l’une est plus large que
l’autre. Une fiche de terre comporte deux lames et une
broche de terre. La lame large ou la broche sont des
équipements de sécurité. Si la fiche d’alimentation
fournie n’entre pas dans la prise, demandez à un
électricien de remplacer la vieille prise par une neuve.
Ne placez pas cet appareil sur un meuble qui pourrait être renversé par un enfant ou un adulte qui pourrait s’y appuyer, le tirer ou
monter dessus. La chute de l’appareil peut causer des blessures graves ou même la mort.
AVERTISSEMENT DE LA FCC
Cet appareil peut générer ou utiliser de l’énergie de radiofréquence. Des changements ou modifications apportés à cet
appareil peuvent causer un brouillage nuisible, à l’exception des modifications explicitement approuvées dans ce manuel.
L’utilisateur peut perdre le droit d’utiliser cet appareil s’il effectue un changement ou une modification sans autorisation.
10. Protégez les cordons d’alimentation contre le piétinement
ou le pincement en particulier au niveau des fiches, des
prises de courant et des points de sortie de l’appareil.
11. Utilisez uniquement les fixations/accessoires spécifiés
par le fabricant.
12. Utilisez uniquement le chariot, le support,
le socle, la fixation ou la table spécifiés
par le fabricant ou vendus avec l’appareil.
En cas d’utilisation d’un chariot, déplacez
l’ensemble chariot/appareil avec précaution
pour éviter des blessures en cas de basculement.
13. Débranchez cet appareil en cas d’orage ou lors de
longues périodes d’inutilisation.
14. Confiez toute intervention à un technicien qualifié. Une
intervention est nécessaire si l’appareil a été endommagé
de quelque façon que ce soit, par exemple si le cordon
ou la fiche d’alimentation est abîmé, si du liquide a été
répandu sur l’appareil ou si des objets sont tombés
à l’intérieur, si l’appareil a été exposé à la pluie ou à
l’humidité, ne fonctionne pas normalement ou est tombé.
BROUILLAGE RADIO-TV
Cet appareil a été testé et jugé conforme aux limites pour appareil numérique de Classe B, conformément à la Partie 15 des
Règlements de la FCC. Ces limites sont conçues pour assurer une protection raisonnable contre le brouillage nuisible dans une
installation résidentielle. Cet appareil génère, utilise et peut émettre de l’énergie de radiofréquence ; s’il n’est pas installé et
utilisé conformément aux instructions, il peut brouiller les communications radio. Par ailleurs, il n’est pas garanti qu’il ne causera
pas de brouillage dans une installation donnée. Si cet appareil brouille la réception de la radio ou du téléviseur, ce qui peut être
vérifié en éteignant et rallumant l’appareil, l’utilisateur est invité à essayer d’annuler le brouillage en prenant l’une ou plusieurs
des mesures suivantes :
Réorientez ou repositionnez l’antenne.
1.
Augmentez la distance entre l’appareil et le récepteur.
2.
Branchez l’appareil sur une prise de courant qui se trouve sur un circuit différent de celui auquel le récepteur est branché.
3.
4.
Informez-vous auprès du détaillant ou d’un technicien spécialisé en radios/téléviseurs pour obtenir de l’aide.
Cet appareil numérique de la classe B est conforme à la norme NMB-003 du Canada.
2
FR
Page 41

Français
Cet appareil ne doit pas être placé dans un meuble fermé, par exemple une bibliothèque ou une étagère, sans assurer une
ventilation appropriée. Laissez un espace de 3,2 pouces, ou 8 cm, minimum autour de cet appareil.
Débranchez la fiche d’alimentation pour éteindre l’appareil en cas de problème ou lorsque vous ne l’utilisez pas. La fiche
d’alimentation doit être facilement accessible.
ATTENTION: Il y a danger d’explosion si les piles ne sont pas remplacées correctement. Remplacez-les uniquement avec
AVERTISSEMENT: Les piles (emballées ou installées) ne doivent jamais être exposées à une chaleur excessive telle que celle
LA LAMPE DE L’ÉCRAN LCD CONTIENT DU MERCURE. DÉTRUISEZ-LA CONFORMÉMENT À LA
LÉGISLATION EN VIGUEUR.
AVERTISSEMENT: Pour éviter les risques de blessure, cet appareil doit être fermement fixé au sol/mur conformément
POUR ÉVITER LES RISQUES DE CHOC ÉLECTRIQUE ET D’INCENDIE
Ne manipulez jamais le cordon d’alimentation secteur avec les mains mouillées.
•
Ne démontez pas le boîtier du téléviseur. Si vous touchez les composants se trouvant à l’intérieur du boîtier, vous
•
risquez une électrocution ou d’endommager le téléviseur. Pour l’entretien et le réglage d’éléments se trouvant dans le
boîtier, faites appel à un revendeur qualifié ou à un centre de réparation agréé.
Ne tirez pas sur le cordon d’alimentation pour le débrancher de la prise murale.
•
N’introduisez ni vos doigts ni aucun objet dans le téléviseur.
•
EMPLACEMENT ET MANIPULATION
Ne bloquez pas les orifices en plaçant le téléviseur sur un lit, un sofa, de la moquette, un tapis ou une surface similaire.
•
Ne placez pas le téléviseur à proximité ou sur un radiateur ou une bouche de chaleur.
•
N’exposez pas le téléviseur à la lumière directe du soleil ; ne le placez pas à proximité de champs magnétiques
•
importants, ni à un endroit soumis à de fortes vibrations.
Évitez les emplacements soumis à des changements de température extrêmes.
•
Installez le téléviseur en position horizontale et stable. Ne placez rien directement sous ou sur le téléviseur. Si le téléviseur est placé
•
trop près de vos équipements externes, il est possible que ceux-ci (selon leur type) provoquent du bruit ou des perturbations de
l’image et/ou du son. Dans ce cas, assurez-vous de laisser suffisamment d’espace entre les équipements externes et le téléviseur.
En fonction de l’environnement, la température du téléviseur peut augmenter légèrement. Il ne s‘agit pas d’un
•
dysfonctionnement.
REMARQUE SUR LE RECYCLAGE
Le matériel d’emballage de ce téléviseur est recyclable et peut être réutilisé. Veuillez procéder à la
•
sélection de ce matériel conformément aux réglementations locales de recyclage.
Vous ne devez jamais jeter les piles ni les incinérer mais les déposer dans les endroits recommandés
•
par les réglementations concernant les déchets chimiques.
LORSQUE VOUS DÉPLACEZ CE APPAREIL
Il faut au moins deux personnes pour porter ce appareil.
•
Assurez-vous de tenir fermement les cadres inférieur et supérieur du
•
téléviseur comme indiqué sur l’illustration.
des piles du même modèle ou d’un modèle équivalent.
du soleil, des flammes ou autre source similaire.
aux instructions.
Information sur les Marques Commerciales
5
HDMI, le logo HDMI et High-Definition Multimedia Interface (Interface multi-support haute définition) sont des
•
marques commerciales ou marques déposées de HDMI Licensing LLC.
Fabriqué sous licence de Dolby Laboratories. Le terme «Dolby» et le sigle double D sont des marques commerciales de
•
Dolby Laboratories.
Les produits labellisés ENERGY STAR® sont conçus pour protéger l’environnement par un rendement énergétique supérieur.
•
3
FR
Page 42
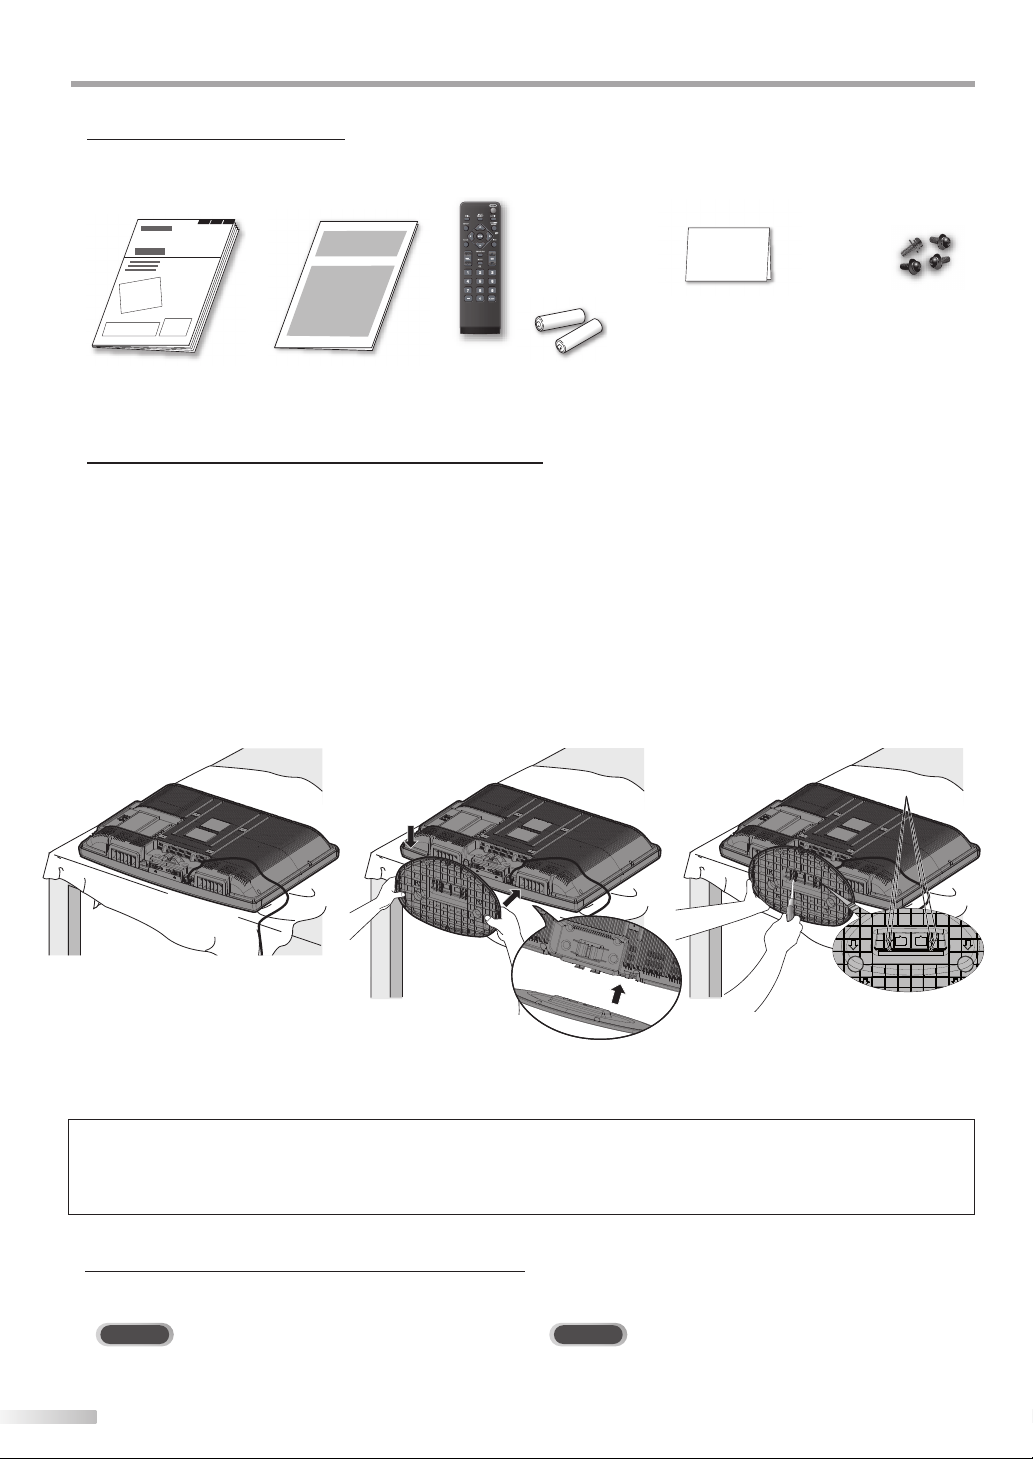
NTRODUCTION
trous de vistrous de vis
➂
trous de vis
➂
I
Accessoires Fournis5
guide d’utilisation
(1EMN24300)
Si vous devez remplacer ces accessoires, veuillez prendre comme référence le numéro indiqué sur les illustrations et
•
contacter le numéro gratuit de notre service d’aide à la clientèle, indiqué sur la couverture de ce manuel.
Montage du Support du Téléviseur
5
Vous devez fixer l’appareil sur son socle pour pouvoir le poser sur un meuble. Assurez-vous que l’avant et l’arrière du
support sont dans la bonne position.
Passez un chi on épais et doux sur
1
une table, tel qu’indiqué ci-dessous.
Placez l’appareil face avant sur
le tissu. Assurez-vous de ne pas
endommager l’écran. Il faut au
moins deux personnes pour réaliser
cette étape.
guide de
démarrage rapide
(1EMN24640)
Alignez les 2 crochets du socle avec
2
télécommande
(NH000UD)
piles
(AAA x 2)
AAA
AAA
ceux situés sous l’unité principale
(indiqués par la èche
coulisser le socle dans la direction
indiquée par la èche
point d’arrêt et jusqu’à ce que les
quatre trous de xation soient
alignés.
Assurez-vous de ne pas coincer
le cordon d’alimentation entre le
support et l’appareil.
), puis faites
➀
jusqu’au
➁
carte
d’enregistrement
(1EMN24701)
Insérez les vis à tête plate Philips
3
dans les 4 trous letés situés sous le
socle et vissez-les à fond.
vis à tête cylindrique
large Phillips pour
montage du support x4
(FPH34200)
➁
c
ô
t
é
a
v
a
Pour Enlever le Support du Appareil
Dévissez les vis à tête plate Philips indiquées dans le
paragraphe “
le socle vers le haut et vers l’arrière de l’appareil. Attention
de ne pas faire tomber le socle en le retirant.
” ci-dessus. Après avoir retiré les vis, tirez
➂
Remarque :
• Lorsque vous montez le support, vérifiez que toutes les vis sont serrées correctement. Si le support n’est pas fixé correctement, l’appareil
risque de tomber, ce qui peut provoquer des blessures et endommager l’appareil.
• Utilisez une table qui puisse supporter le poids du appareil et qui soit plus grande que celui-ci.
• Assurez-vous que la table se trouve sur un emplacement stable.
Symboles Utilisés dans ce Manuel
5
Les symboles utilisés dans ce manuel sont décrits ci-dessous. La description concerne :
TV
: L’utilisation d’un téléviseur analogique
• Si aucun symbole n’apparaît sous l’indication de la fonction, son utilisation s’applique aux deux types de téléviseur.
➀
n
t
➀
DTV
: L’utilisation d’un téléviseur numérique
4
FR
Page 43

Français
INTRODUCTION PRÉPARATION
Caractéristiques5
DTV/TV/CATV
•
Vous pouvez utiliser la télécommande pour
sélectionner les chaînes diffusées en format
numérique ou analogique classique. Les abonnés
du câble peuvent également accéder aux chaînes
de câblodiffusion.
Affichage d’Informations (uniquement DTV)
•
Vous pouvez afficher le titre, le contenu et d’autres
informations relatives à l’émission DTV sur l’écran
du téléviseur.
Autoscan
•
Cet appareil balaye automatiquement les chaînes
et mémorise celles qui sont disponibles dans
votre région, vous épargnant ainsi les difficiles
procédures de configuration.
Verrouillage
•
Cette fonction permet de bloquer l’accès des
enfants à des émissions inappropriées.
Décodeur Sous-titres
•
Le décodeur de sous-titres intégré affiche le texte
des émissions sous-titrées.
Syntoniseur MTS/SAP
•
L’audio peut être sélectionnée à l ‘aide de la
télécommande.
Fonction de Mise Hors Tension Automatique
•
Si aucun signal n’est reçu par la borne d’antenne et
qu’aucune commande n’est exécutée pendant 15
minutes, l’appareil se met automatiquement hors tension.
Minuterie de Sommeil
•
Cette fonction permet d’éteindre l’appareil
automatiquement à l’heure spécifiée.
Choix de Langue pour l’Affichage sur Écran
•
Sélectionnez la langue du menu sur écran :
Anglais, Espagnol ou Français.
Fonction de Son Stéréo
•
Syntonisation par Synthétiseur de Fréquences PLL
•
Permet de sélectionner librement et facilement
les chaînes, ainsi que de les syntoniser
directement à l’aide des touches numériques de la
télécommande.
Divers Réglages pour l’Image et le Son
•
Permet de personnaliser la qualité de l’image en
fonction des paramètres convenant à votre pièce et
de régler le son selon vos préférences.
Entrée HDMI
•
Grâce à l’entrée HDMI1, vous pouvez utiliser ce
appareil comme moniteur pour votre PC (pour cela,
ce dernier doit être équipé d’une sortie DVI).
Entrée Vidéo à Composantes
•
Entrée S-vidéo
•
Entrée AV
•
Sortie Audio Numérique
•
Sortie Audio Analogique
•
Contenu5
Précautions . . . . . . . . . . . . . . . . . . . . . . . . . . . . . . . . . . . . . . . . . . . . . . . . .2
Information sur les Marques Commerciales . . . . . . . . . . . . . . . . .3
INTRODUCTION
Accessoires Fournis . . . . . . . . . . . . . . . . . . . . . . . . . . . . . . . . . . . . . . . . .4
Montage du Support du Téléviseur . . . . . . . . . . . . . . . . . . . . . . . . .4
Symboles Utilisés dans ce Manuel . . . . . . . . . . . . . . . . . . . . . . . . . . .4
Caractéristiques . . . . . . . . . . . . . . . . . . . . . . . . . . . . . . . . . . . . . . . . . . . . .5
Panneau de Commande . . . . . . . . . . . . . . . . . . . . . . . . . . . . . . . . . . . .6
Bornes . . . . . . . . . . . . . . . . . . . . . . . . . . . . . . . . . . . . . . . . . . . . . . . . . . . . . .6
Boutons de la Télécommande . . . . . . . . . . . . . . . . . . . . . . . . . . . . . .7
Insérer les Piles . . . . . . . . . . . . . . . . . . . . . . . . . . . . . . . . . . . . . . . . . . . . . .7
PRÉPARATION
Connexion de l’Antenne . . . . . . . . . . . . . . . . . . . . . . . . . . . . . . . . . . . .8
Connexion à un Décodeur de Diffusion
par Câble / Satellite . . . . . . . . . . . . . . . . . . . . . . . . . . . . . . . . . . . . . . . . .8
Connexion d’un Appareil Externe . . . . . . . . . . . . . . . . . . . . . . . . . . .9
Gestion des Câbles . . . . . . . . . . . . . . . . . . . . . . . . . . . . . . . . . . . . . . . . 12
Branchez le Cordon d’Alimentation Secteur . . . . . . . . . . . . . . . 12
Installation Initiale . . . . . . . . . . . . . . . . . . . . . . . . . . . . . . . . . . . . . . . . 13
REGARDER LA TÉLÉVISION
Sélection de Chaîne . . . . . . . . . . . . . . . . . . . . . . . . . . . . . . . . . . . . . . . 14
Réglage du Volume . . . . . . . . . . . . . . . . . . . . . . . . . . . . . . . . . . . . . . . 14
Minuterie de Sommeil . . . . . . . . . . . . . . . . . . . . . . . . . . . . . . . . . . . . 14
Arrêt sur Image . . . . . . . . . . . . . . . . . . . . . . . . . . . . . . . . . . . . . . . . . . . 15
Parcours des Modes d’Entrée . . . . . . . . . . . . . . . . . . . . . . . . . . . . . 15
Changement du Mode Audio . . . . . . . . . . . . . . . . . . . . . . . . . . . . . 15
Informations sur Écran . . . . . . . . . . . . . . . . . . . . . . . . . . . . . . . . . . . . 16
Mode d’Affichage sur Écran de Télévision . . . . . . . . . . . . . . . . . 17
CONFIGURATION OPTIONNELLE
Menu Principal . . . . . . . . . . . . . . . . . . . . . . . . . . . . . . . . . . . . . . . . . . . . 18
Autoscan . . . . . . . . . . . . . . . . . . . . . . . . . . . . . . . . . . . . . . . . . . . . . . . . . 18
Liste Chaînes . . . . . . . . . . . . . . . . . . . . . . . . . . . . . . . . . . . . . . . . . . . . . . 19
Enregistrer Manuel . . . . . . . . . . . . . . . . . . . . . . . . . . . . . . . . . . . . . . . . 19
Vérification de l’Antenne . . . . . . . . . . . . . . . . . . . . . . . . . . . . . . . . . . 20
Sélection de la Langue . . . . . . . . . . . . . . . . . . . . . . . . . . . . . . . . . . . . 20
Réglage de l’Image . . . . . . . . . . . . . . . . . . . . . . . . . . . . . . . . . . . . . . . . 21
Réglage du Son . . . . . . . . . . . . . . . . . . . . . . . . . . . . . . . . . . . . . . . . . . . 22
Sous-titres . . . . . . . . . . . . . . . . . . . . . . . . . . . . . . . . . . . . . . . . . . . . . . . . 23
Verrouillage . . . . . . . . . . . . . . . . . . . . . . . . . . . . . . . . . . . . . . . . . . . . . . . 26
Réglages PC . . . . . . . . . . . . . . . . . . . . . . . . . . . . . . . . . . . . . . . . . . . . . . . 30
Mode Economie d’Energie . . . . . . . . . . . . . . . . . . . . . . . . . . . . . . . . 31
Région . . . . . . . . . . . . . . . . . . . . . . . . . . . . . . . . . . . . . . . . . . . . . . . . . . . . 31
Info Logiciel Actuel. . . . . . . . . . . . . . . . . . . . . . . . . . . . . . . . . . . . . . . . 32
DÉPANNAGE
Foire aux Questions (FAQ) . . . . . . . . . . . . . . . . . . . . . . . . . . . . . . . . 33
Guide de Dépannage . . . . . . . . . . . . . . . . . . . . . . . . . . . . . . . . . . . . . 34
INFORMATION
Glossaire . . . . . . . . . . . . . . . . . . . . . . . . . . . . . . . . . . . . . . . . . . . . . . . . . . 36
Entretien . . . . . . . . . . . . . . . . . . . . . . . . . . . . . . . . . . . . . . . . . . . . . . . . . . 36
Désignation des Chaînes de Câblodiffusion . . . . . . . . . . . . . . . 37
Spécifications Générales . . . . . . . . . . . . . . . . . . . . . . . . . . . . . . . . . . 37
Spécifications Électriques . . . . . . . . . . . . . . . . . . . . . . . . . . . . . . . . . 37
Autres Spécifications . . . . . . . . . . . . . . . . . . . . . . . . . . . . . . . . . . . . . . 37
Garantie Limitée . . . . . . . . . . . . . . . . . . . . . . . . . . . . . . . . . . . . . . . . . . 38
REGARDER LA
TÉLÉVISION
CONFIGURATION
OPTIONNELLE
DÉPANNAGE INFORMATION
© 2009 Funai Electric Co., Ltd.
Tous droits réservés. Aucune partie du présent manuel ne peut être reproduite, copiée, transmise, di usée, transcrite, téléchargée ou
stockée sur un support de stockage quelconque, sous aucune forme ou dans n’importe quel but sans consentement écrit exprès préalable
de Funai. En outre, toute di usion commerciale non autorisée du présent manuel ou de l’une de ses révisions est strictement interdite.
Les informations contenues dans ce document sont susceptibles d’être modi ées sans préavis. Funai se réserve le droit de modi er son
contenu sans obligation d’en informer une personne ou une organisation.
et le dessin forment une marque commerciale déposée de Funai Electric Co., Ltd et ne peuvent être utilisés en aucune façon
sans consentement écrit exprès de Funai. Toutes les autres marques mentionnées ici sont la propriété exclusive de leurs détenteurs
respectifs. Aucune information contenue dans le présent ne doit être interprétée comme un octroi, implicite ou autre, d’une licence ou
d’un droit quelconque à utiliser l’une de marques commerciales présentées ci-dessus. L’usage abusif de toute marque commerciale ou de
tout autre contenu du présent manuel est strictement interdit. Funai fera appliquer avec
détermination ses droits de propriété intellectuelle dans toute l’étendue des lois.
FR
5
Page 44

NTRODUCTION
I
Panneau de Commande5
Bornes5
8
9
10
11
*
19
20
Remarque :
prise de maintenance (usage du service seulement)
*
• N’utilisez ce port que si une mise à jour du logiciel est nécessaire.
•
L’utilisateur ne doit raccorder aucun périphérique au prise de
maintenance (appareil photo numérique, clavier, souris, etc.) : ces
derniers ne fonctionneront plus.
• Dans la plupart des cas, la mise à jour du logiciel est faite par un
technicien agréé. Toutefois, dans certains cas, l’utilisateur peut
être invité à effectuer la mise à jour du logiciel lui-même.
6
FR
1. VOLUME
Appuyez pour régler le volume ou vous déplacer à
droite (
menu principal.
2. SETUP (p. 13)
1
2
3
4
5
6
7
Appuyez pour afficher le menu principal.
3.
CHANNEL K /
Appuyez pour sélectionner les chaînes ou pour vous
déplacer vers le haut (
du menu principal.
4.
POWER (p. 13)
Appuyez pour allumer ou éteindre l’appareil.
5. fenêtre de capteur infrarouge
Capte les signaux de commande infrarouges émis
par la télécommande.
6. indicateur POWER ON
S’allume en vert lorsque l’appareil est sous tension.
7. indicateur STAND BY
S’allume en rouge lorsque l’appareil est éteint.
[Panneau Latéral]
8. prise d’entrée S-vidéo (p. 10)
Raccordement d’un périphérique externe à l’aide
d’un câble S-vidéo.
9. prise d’entrée vidéo (p. 11)
Raccordement d’un périphérique externe à l’aide d’un
câble vidéo RCA.
10. prise d’entrée audio (p. 10 / p. 11)
Raccordement d’un périphérique externe à l’aide d’un
câble audio RCA.
11. prise d’entrée HDMI 2 (p. 8 / p. 9)
Branchement d’un périphérique HDMI à l’aide d’un
câble HDMI.
X/Y
(p. 14)
X
) / gauche (Y) en utilisant les options du
L
(p. 14 / p. 15)
K
) / bas (L) dans les options
[Panneau Arrière]
12. cordon d’alimentation (p. 12)
Branchez-le sur une prise de courant standard pour
alimenter cet appareil.
13. gestion des câbles (p. 12)
12
13
14
15
16
17
18
Utilisez ce support pour regrouper les câbles.
14. prise d’entrée vidéo
à composantes et audio (p. 8 / p. 10)
Raccordement d’un périphérique externe à l’aide
d’un câble vidéo composant RCA et d’un câble
audio RCA.
15. prise de sortie audio (p. 11)
Connexion de câble audio RCA pour un appareil externe.
16. prise d’entrée audio pour HDMI 1 (p. 9 / p. 12)
Raccordement d’un périphérique DVI à l’aide d’un
câble audio RCA.
En connectant un PC doté d’un port DVI, utilisez un
câble de conversion à mini-fiche RCA stéréo.
(pour prise d’entrée HDMI 1 uniquement)
17. prise de sortie audio numérique (p. 11)
Connexion par câble coaxial numérique pour un
décodeur ou un récepteur audio.
18. prise d’antenne (p. 8)
Connexion de câble coaxial RF pour antenne ou
décodeur de diffusion par signal TV par câble.
19. prise d’entrée HDMI 1 (p. 8 / p. 19 / p. 12)
Connexion HDMI pour appareil HDMI ou DVI.
En connectant un PC doté d’un port DVI, vous pouvez
utiliser cet appareil comme moniteur pour votre PC.
20. prise d’entrée HDMI 3 (p. 8 / p. 9)
Raccordement d’un périphérique HDMI à l’aide d’un
câble HDMI.
Page 45
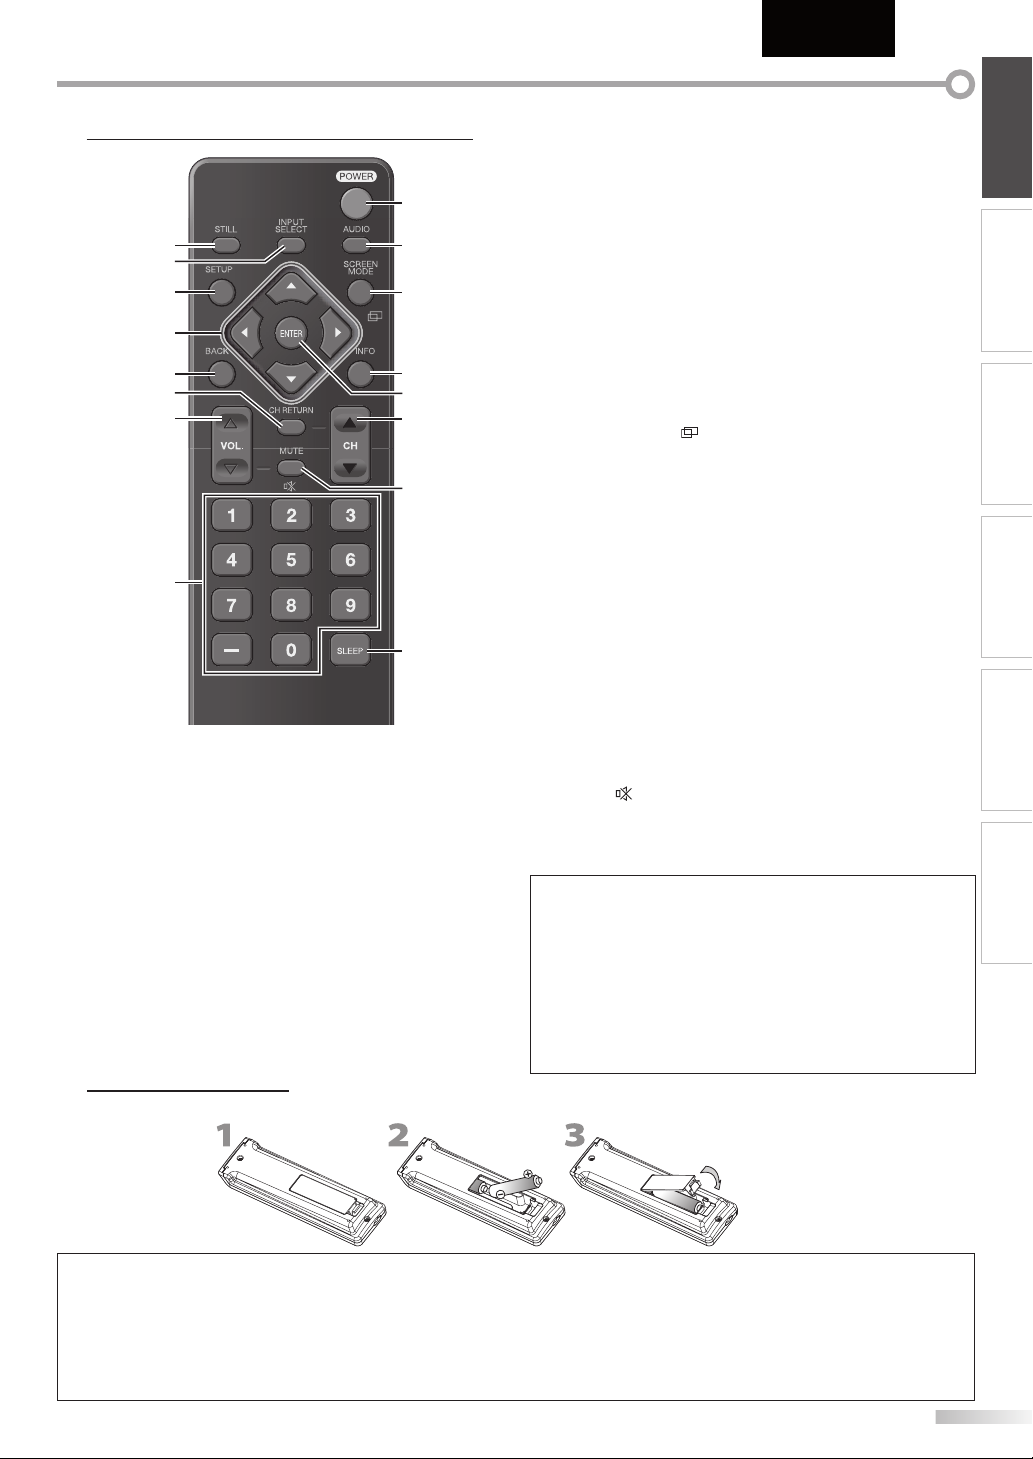
Français
Boutons de la Télécommande5 Boutons de la Télécommande5
7. VOL. X/Y (p. 14)
9
1
2
3
10
11
4
5
6
7
12
13
14
15
8
16
1. STILL (p. 15)
Appuyez pour fait une pause d’image sur l’écran.
2. INPUT SELECT (p. 15)
Permet d’accéder à des périphériques extérieurs
connectés au téléviseur (un enregistreur
BD/DVD, par exemple).
3. SETUP (p. 13)
Appuyez pour afficher le menu principal.
s
/ B / K / L (p. 13)
4.
Appuyez pour vous déplacer vers la gauche, la droite,
le haut ou le bas dans les options.
5. BACK (p. 16)
Appuyez pour revenir au menu précédent.
6. CH RETURN (p. 14)
Appuyez pour retourner au visionnement de la chaîne
précédente.
Insérer les Piles
5
Insérez les piles (AAA x 2) en faisant correspondre leurs pôles avec ceux indiqués dans le logement à piles de la télécommande.
Appuyez pour régler le volume.
8. Touches numériques (p. 14)
• Appuyez pour sélectionner les chaînes.
-
(trait d’union)
• Appuyez pour passer de la canal principale à la souscanal.
9. POWER (p. 13)
Permet d’allumer et d’éteindre l’appareil.
10. AUDIO (p. 15)
Mode numérique (DTV)
• Appuyez pour sélectionner la langue audio.
Mode analogique (TV)
• Appuyez pour sélectionner le mode audio.
11. SCREEN MODE
Appuyez pour sélectionner les rapports de format
disponibles pour l’écran du téléviseur.
12. INFO (p. 16)
Mode numérique (DTV)
• Appuyez pour afficher les informations de chaîne, le
type de signal et le réglage de télévision.
Mode analogique (TV)
(p. 17)
• Appuyez pour afficher le numéro de chaîne, le type
de signal et le réglage de télévision.
Mode d’éntrée externe
• Appuyez pour afficher le mode d’entrée externe, le
type de signal et le réglage de télévision.
13. ENTER (p. 13)
Appuyez pour valider la commande de configuration
lorsque le menu principal s’affiche.
14. CH K/L (p. 15)
Appuyez pour sélectionner les chaînes et le mode
d’entrée externe.
15. MUTE (p. 14)
Appuyez pour activer ou désactiver le son.
16. SLEEP (p. 14)
Appuyez pour activer la minuterie de sommeil.
Utilisation d’une télécommande universelle pour
commander cet appareil.
• Assurez-vous que le code composant de votre
télécommande universelle correspond bien à celui de
notre marque.
Consultez le manuel accompagnant votre
télécommande pour toute information complémentaire.
• Nous ne garantissons pas une interopérabilité à 100 %
avec toutes les télécommandes universelles.
INTRODUCTION PRÉPARATION
REGARDER LA
TÉLÉVISION
CONFIGURATION
OPTIONNELLE
DÉPANNAGE INFORMATION
Précautions Concernant les Piles :
Vous devez insérer les piles en plaçant les pôles dans le bon sens, tel qu’indiqué dans le logement à piles. L’inversion des pôles des piles peut
•
causer des dommages à l’appareil.
N’utilisez pas simultanément des piles de types différents (ex., alcalines et carbone/zinc ou piles rechargeables de type Ni-Cd, Ni-Mh, etc.) ou
•
des piles usagées avec des piles neuves.
Si vous prévoyez de laisser l’appareil inutilisé pour une période prolongée, retirez les piles pour éviter les risques de dommages ou de
•
blessure causés par une fuite d’électrolyte.
N’essayez pas de recharger les piles ; elles risqueraient de surchauffer et d’éclater.
•
7
FR
Page 46
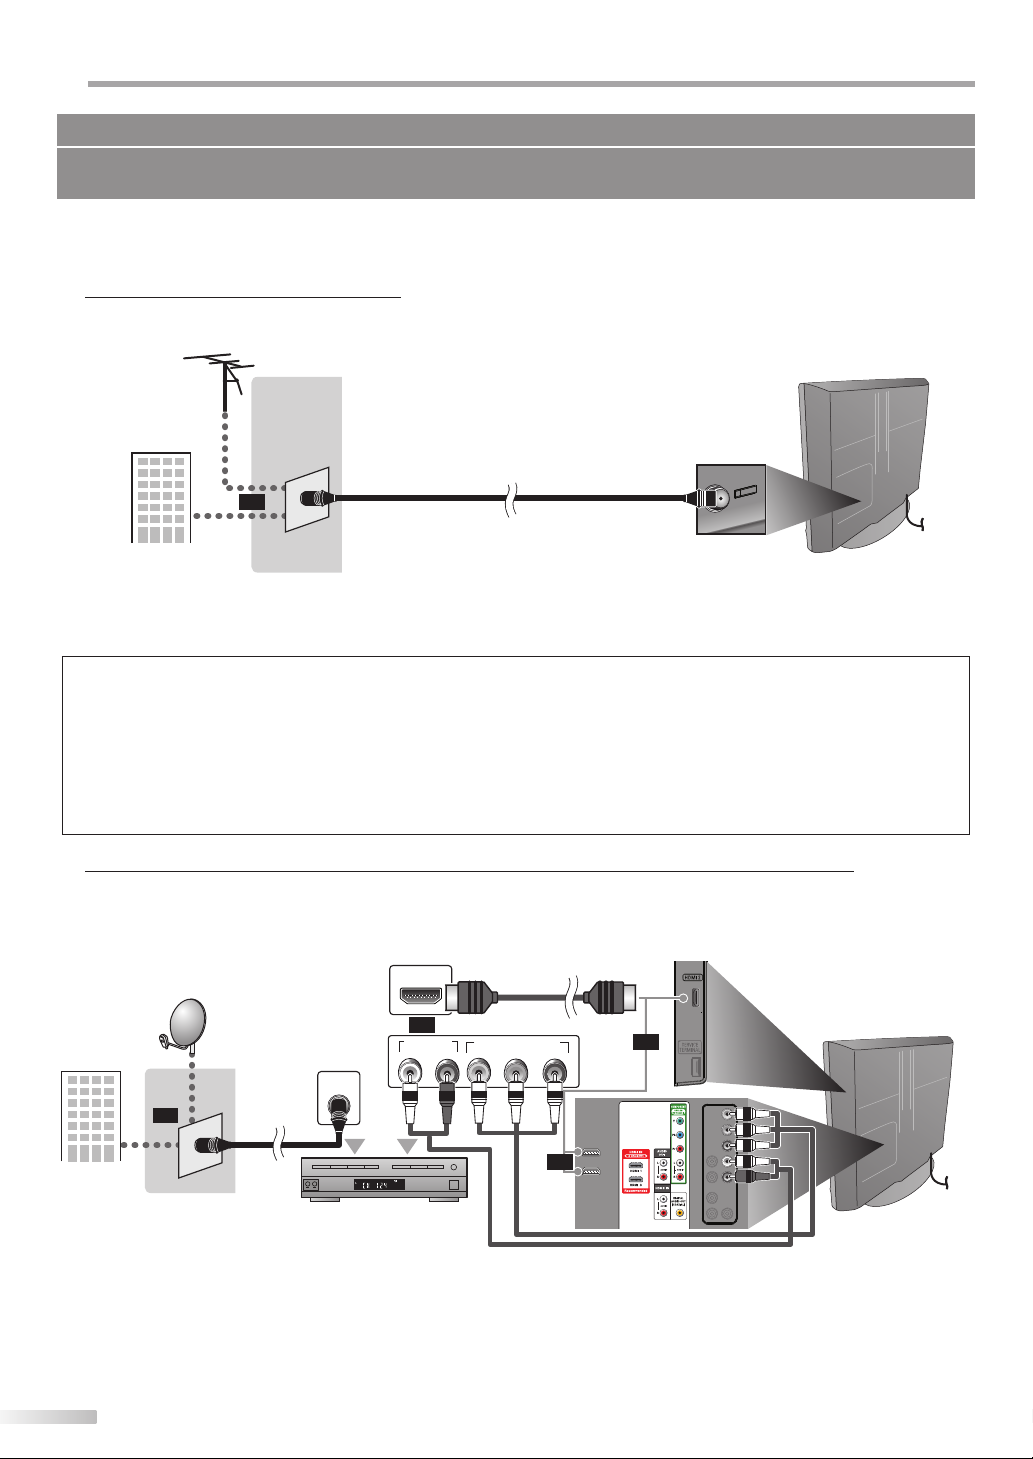
RÉPARATION
(bleu)
(vert)
(bleu)
(vert)
(rouge)
(rouge)
P
Les câble pour cette connexion ne sont pas fournis :
Procurez-vous les câbles nécessaires chez votre détaillant local.
Le câble High Speed HDMI (connu également comme câble HDMI catégorie 2) est recommandé pour une meilleure compatibilité.
Avant toute connexion...
Avant de brancher le cordon d’alimentation, assurez-vous que l’antenne ou l’autre appareil est bien connecté.
Connexion de l’Antenne
5
Connectez le câble coaxial RF de la sortie murale à la prise d’entrée d’antenne de l’appareil.
ex.)
arrière de l’appareil
antenne
VHF / UHF
câble coaxial RF
ou
signal TV par câble
*
Une fois les connexions terminées, allumez l’appareil et exécutez l’installation initiale.
Le balayage des chaînes est nécessaire pour que l’appareil mémorise toutes les chaînes disponibles dans votre région.
(Reportez-vous à “Installation Initiale”, page 13.)
Remarque :
Visitez le site www.antennaweb.org pour toute question concernant l’antenne de télévision numérique (DTV).
•
Suivant le type d’antenne, vous aurez peut-être besoin de types différents de combinateurs (mélangeurs) ou séparateurs (diviseurs).
•
Contactez votre magasin local de produits électroniques pour vous procurer ces articles.
Par mesure de sécurité et pour éviter d’endommager l’appareil, déconnectez le câble coaxial RF de la prise d’entrée d’antenne avant de
•
déplacer l’appareil.
Si vous utilisez une antenne pour capter la télévision analogique, cette antenne devrait également fonctionner pour capter la télévision
•
numérique (DTV). Les antennes installées à l’extérieur ou au grenier sont plus efficaces que les antennes posées sur le téléviseur.
Pour permuter facilement la source entre l’antenne et le câble, installez un sélecteur d’antenne.
•
Pour connecter le téléviseur directement au réseau de câblodiffusion (CATV), contactez le câblodistributeur.
•
5
Connexion à un Décodeur de Diffusion par Câble / Satellite
Utilisez un câble HDMI ou vidéo à composantes RCA pour relier la prise d’entrée HDMI ou vidéo à composantes de
l’appareil à la prise de sortie correspondante sur le décodeur de diffusion par câble / satellite.
Si vous branchez un périphérique sur la prise d’Entrée Vidéo composant de l’appareil, branchez des câbles audio RCA
sur les prises Audio L/R situées sous le connecteur Vidéo Composant.
ex.)
antenne
parabolique
signal TV par
câble avec PPV
ou
câble
coaxial RF
HDMI OUT
ou
AUDIO OUT
ANT IN
STEREO
PCM
décodeur de diffusion
par câble / satellite
câble HDMI
COMPONENT VIDEO OUT
RL
(vert)(vert)
(bleu)(bleu)
Pr/CrPb/CbY
(rouge)(rouge)
ou
câble video á composantes RCA
et câble audio RCA
ou
côte ou
arrière de l’appareil
(vert)(vert)
(bleu)(bleu)
(rouge)(rouge)
* Vous pouvez également connecter cet appareil à une prise de sortie autre que HDMI ou vidéo par composantes si le
décodeur de diffusion par câble / satellite possède des prises de sortie différentes.
Les câbles requis et les méthodes de connexion au décodeur, ainsi que le canal de réception des signaux MAQ en
*
clair varient suivant le fournisseur de diffusion par câble / satellite. Pour de plus amples informations, contactez
votre fournisseur de service de télévision par câble ou par satellite.
8
FR
Page 47
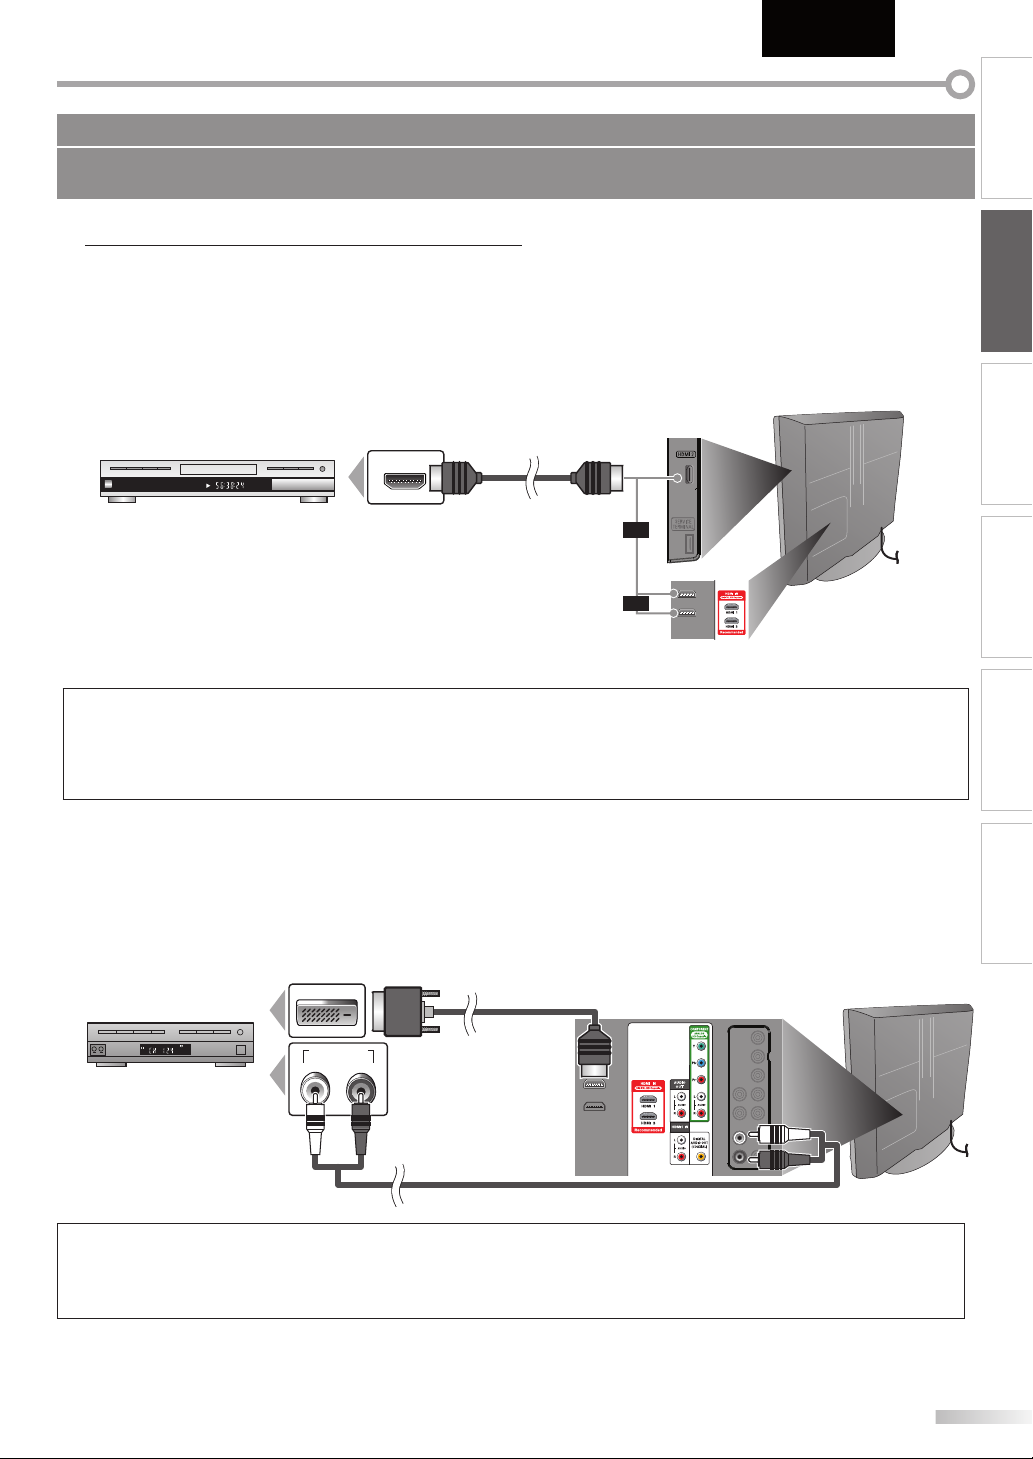
Français
Les câble pour cette connexion ne sont pas fournis :
Procurez-vous les câbles nécessaires chez votre détaillant local.
Le câble High Speed HDMI (connu également comme câble HDMI catégorie 2) est recommandé pour une meilleure compatibilité.
INTRODUCTION
Connexion d’un Appareil Externe
5
[Connexion HDMI]
La connexion HDMI permet d’obtenir une image de meilleure qualité.
La connexion HDMI (interface multimédia haute-définition) permet le transfert de signaux vidéo haute-définition et de
signaux numériques audio multicanal à l’aide d’un seul câble.
ex.)
TITLE 5
CHAPTER 15
REPEAT A-B
enregistreur BD/DVD avec prise de
sortie HDMI
HDMI OUT
câble HDMI
ou
ou
côte ou
arrière de l’appareil
Remarque :
• Ce appareil prend en charge les signaux vidéo 480i / 480p / 720p / 1080i, et les signaux audio 32kHz / 44,1kHz / 48kHz.
• Ce appareil ne prend en charge que le signal audio à 2 chaînes (LPCM).
• Vous devez sélectionner “PCM” pour la sortie audio numérique de l’appareil connecté ou vérifier le réglage audio HDMI.
Le signal audio risque de ne pas être restitué si vous sélectionnez “Bitstream”, etc.
• Ce appareil ne prend en charge que les signaux conformes EIA861.
PRÉPARATION
REGARDER LA
TÉLÉVISION
CONFIGURATION
OPTIONNELLE
DÉPANNAGE INFORMATION
[Connexion HDMI-DVI]
Utilisez un câble de conversion HDMI-DVI pour raccorder l’appareil aux appareils vidéo externes équipés d’une prise de
sortie DVI.
ex.)
STEREO
PCM
décodeur de diffusion par
câble / satellite avec prise de
sortie DVI
DVI OUT
AUDIO OUT
câble de conversion
HDMI-DVI
RL
vers la prise d’entrée
HDMI1 uniquement
câble audio RCA
arrière de l’appareil
Remarque :
• Ce appareil prend en charge les signaux vidéo 480i / 480p / 720p / 1080i.
• La connexion HDMI-DVI nécessite également des branchements audio RCA séparés.
• Les signaux audio sont convertis d’analogique en numérique pour cette connexion.
• Le DVI n’affiche pas d’image 480i non conforme à la norme EIA/CEA-861/861B.
9
FR
Page 48

RÉPARATION
P
Les câble pour cette connexion ne sont pas fournis :
Procurez-vous les câbles nécessaires chez votre détaillant local.
[Connexion Vidéo à Composantes]
La connexion vidéo à composantes RCA offre une meilleure qualité d’image pour les appareils vidéo raccordés á
l’appareil.
Si vous branchez un périphérique sur la prise d’Entrée Vidéo composant de l’appareil, branchez des câbles audio RCA
sur les prises Audio L/R situées sous le connecteur Vidéo Composant.
ex.)
câble vidéo à composantes RCA
arrière de l’appareil
TITLE 5
CHAPTER 15
REPEAT A-B
enregistreur BD/DVD avec prise de
(rouge)(bleu)(vert)
COMPONENT VIDEO OUT
AUDIO OUT
Pr/CrPb/CbY
RL
(vert)
(bleu)
(rouge)
sortie vidéo composant
câble audio RCA
Remarque :
• Cet appareil prend en charge les signaux vidéo 480i / 480p / 720p / 1080i.
[Connexion S-vidéo]
La connexion S-vidéo offre une bonne qualité d’image pour les appareils vidéo raccordés á l’appareil.
Si vous branchez un périphérique sur la prise d’entrée S-vidéo de l’appareil, branchez des câbles audio RCA sur les
prises audio L/R situées sous le connecteur Vidéo.
ex.)
TITLE 5
CHAPTER 15
REPEAT A-B
AUDIO OUT
S-VIDEO
OUT
RL
câble S-vidéo
côté de cette unité
enregistreur BD/DVD avec prise de
sortie S-vidéo
câble audio RCA
Remarque :
• Si vous connectez à la fois la prise S-vidéo et la prise vidéo, la connexion S-vidéo aura la priorité.
10
FR
Page 49

Les câble pour cette connexion ne sont pas fournis :
Procurez-vous les câbles nécessaires chez votre détaillant local.
Français
INTRODUCTION
[Connexion Vidéo]
La connexion vidéo RCA offre une qualité d’image standard pour les appareils vidéo raccordés á l’appareil.
Si vous branchez un périphérique sur la prise d’entrée vidéo de l’appareil, branchez des câbles audio RCA sur les prises
audio L/R situées sous le connecteur Vidéo.
Si la prise audio de l’appareil vidéo est monaurale, connectez le câble audio RCA à la prise d’entrée audio L (gauche).
ex.)
caméscope jeu vidéo
magnétoscope
AUDIO OUT
STEREO
STAND-BY
VIDEO
RL
OUT
câble audio RCA
câble vidéo RCA
côté de cette unité
Remarque :
• Si vous connectez à la fois la prise S-vidéo et la prise vidéo, la connexion S-vidéo aura la priorité.
[Connexion de Sortie Audio]
PRÉPARATION
REGARDER LA
TÉLÉVISION
CONFIGURATION
OPTIONNELLE
DÉPANNAGE INFORMATION
À Numérique (pour le contenu diffusé en numérique uniquement)
Si vous connectez l’appareil à un appareil audio numérique externe, vous pourrez profiter d’un rendu audio
multicanal similaire au son diffusé en mode numérique 5,1 canaux.
Utilisez un câble coaxial audio numérique pour raccorder l’appareil aux appareils audio numériques externes.
À Analogique (diffusion analogique et numérique)
En connectant cet appareil à un appareil audio analogique externe, vous pourrez profiter d’un son stéréo (2 canaux).
Utilisez un câble audio RCA pour connecter l’appareil à des appareils audio analogiques externes.
ex.)
AUDIO IN
RL
système stéréo
câble audio RCA
arrière de l’appareil
câble coaxial audio numérique
décodeur
Dolby Digital
ou
DIGITAL AUDIO
COAXIAL IN
FR
11
Page 50

RÉPARATION
câble de conversion
HDMI-DVI
vers la prise d’entrée
HDMI1 uniquement
vers la prise d’entrée
HDMI1 uniquement
P
Les câble pour cette connexion ne sont pas fournis :
Procurez-vous les câbles nécessaires chez votre détaillant local.
[Connexion PC]
Cet appareil peut être connecté à un PC doté d’un port DVI. Utilisez un câble de conversion HDMI-DVI pour établir cette
connexion. Vous aurez également besoin d’un câble de conversion à mini-fiche RCA stéréo.
Si vous connectez l’appareil à votre PC, vous pouvez l’utiliser comme moniteur.
ex.)
câble de conversion à
mini-fiche RCA stéréo
vers la prise d’entrée
vers la prise d’entrée
HDMI1 uniquement
HDMI1 uniquement
DVI OUT
ordinateur personnel
Les signaux suivants peuvent être affichés :
Format Résolution
VGA 640 x 480 60Hz
SVGA 800 x 600 60Hz
XGA 1 024 x 768 60Hz
Les autres formats ou les signaux non-standard ne sont pas affichés correctement.
Le câble de conversion HDMI-DVI doit être à noyau en ferrite.
Fréquence du
balayage vertical
câble de conversion
câble de conversion
HDMI-DVI
HDMI-DVI
Format Résolution
WXGA
Remarque :
• Veuillez acheter un câble de conversion HDMI-DVI avec un noyau en ferrite.
• Les opérations suivantes peuvent réduire le bruit.
- Placez un tore magnétique sur le cordon d’alimentation de votre PC.
- Débranchez le cordon d’alimentation de votre PC et utilisez la batterie intégrée.
Gestion des Câbles
5
Regrouper les câbles sur ce support afin qu’ils ne
s’emmêlent pas.
arrière de l’appareil
Branchez le Cordon d’Alimentation Secteur
5
Ne branchez le cordon d’alimentation sur une prise
murale qu’après avoir effectué tous les branchements
nécessaires.
arrière de l’appareil
Fréquence du
balayage vertical
1 280 x 768 60Hz
1 360 x 768 60Hz
arrière de l’appareil
12
cordon
d’alimentation
secteur
prise murale
Mise en garde :
• Ne branchez pas le cordon d’alimentation secteur sur une prise
murale alimentée par une tension supérieure à celle préconisée
pour cet appareil (120 V c.a.).
En ne respectant pas cette mise en garde, vous risquez de
provoquer un incendie ou de vous électrocuter.
Remarque :
• À chaque fois que vous branchez le cordon d’alimentation,
aucune opération ne peut être réalisée pendant quelques
secondes. Il ne s’agit pas d’un dysfonctionnement.
FR
Page 51

Français
Ces opérations sont accessibles par la télécommande. Certaines peuvent aussi être accessibles par les commandes de l’appareil principal lui-même.
Installation Initiale
5
Cette section vous guide à travers les étapes de la confi guration initiale
de l’appareil, qui comprennent la sélection de la langue pour le menu
sur écran, et la autoscan, c’est-à-dire du balayage automatique et de la
mémorisation des chaînes captées.
Avant de commencer :
Assurez-vous que l’appareil est relié à une antenne ou au câble.
Une fois les connexions nécessaires eff ectuées,
1
appuyez sur [POWER] pour allumer l’appareil.
Cette opération peut prendre un certain temps.
•
Utilisez [Curseur K / L] pour sélectionner la langue du
2
menu sur écran parmi les choix qui s’affi chent du côté
droit de l’écran du téléviseur.
(English / Español / Français)
Initial Setup
Initial Setup
ou
•
Le menu “Configuration Initiale”, à l’étape 3, s’affi
Select the language for setup display.
Elija el idioma de ajuste.
Sélectionner langue écran config.
Select Skip
ENTER
Enter
chera dans la langue sélectionnée après la pression
sur [ENTER].
Utilisez [Curseur K / L] pour sélectionner “Antenne”
3
pour les chaînes de télévision ou “Câble” pour les
chaînes de câblodiff usion, puis appuyez sur [ENTER].
Configuration initiale
Configuration initiale
ou
La “Autoscan” commence.
•
Vérifier que l’antenne est connectée à “ANT. IN”.
Sélectionner la destination de “ANT. IN”.
Antenne
Câble
Ou
ENTER
Sélectionner
Configuration initiale
Configuration initiale
Le système balaie les chaînes. Attendre.
Il faudra jusqu’à 20 minutes pour terminer le Autoscan.
0%
Chaînes analogiques 0ch
Chaînes numériques 0ch
English
Español
Français
SETUP
Antenne
Câble
Saut
ANT.IN
SETUPBACK
Saut
RetourEntrer
SETUP
Saut
Sélectionnez le paramètre région de votre choix à l’aide
4
du [Curseur s / B], puis appuyez sur [ENTER].
Configuration initiale
Configuration initiale
ou
Si vous sélectionnez “Magasin”, l’appareil est
•
Sélectionnez “Magasin” ou “Maison” comme emplacement.
Magasin Maison
Sélectionner Entrer
ENTER
configuré avec des paramètres d’affichage prédéfinis
et sa consommation peut parfois dépasser les valeurs
limites prévues par la norme ENERGY STAR®.
Si vous sélectionnez “Maison”, le rendement
•
énergétique de l’appareil est optimisé pour une
utilisation à domicile et vous pouvez régler la qualité
de l’image et du son en fonction de vos préférences.
Une fois les réglages initiaux effectués, la chaîne
•
mémorisée dotée du plus petit numéro ainsi qu’un
message vous demandant de confirmer le réglage du
lieu d’utilisation s’affichent sur l’écran du téléviseur.
Remarque :
• Pour connecter le téléviseur directement au réseau de
câblodiff usion (CATV), contactez le câblodistributeur.
• Si vous appuyez sur [POWER] ou [SETUP] pendant la
autoscan, le paramètre sera annulé.
• La fonction de la autoscan ne peut être exécutée qu’une
seule fois, pour “Antenne” ou “Câble”. Lorsque vous
changez le branchement (Antenne / Câble), eff ectuez de
nouveau la autoscan. (Reportez-vous à la page 18.)
•
Si aucun signal n’est reçu par la borne d’antenne et qu’aucune
commande n’est exécutée pendant plusieurs secondes après la
mise sous tension de l’appareil, “Conseils Utiles” apparaît. Suivez
les instructions qui apparaissent sur l’écran du téléviseur.
Configuration initiale
Configuration initiale
Pas de chaine enregistrée.
Essayer Autoscan à nouveau?
Vérifiez si un câble est bien connecté à la prise "ANT. IN" à
l’arrière du téléviseur, le procédé d’installation des chaînes
recherche cette connexion. Si vous utilisez un décodeur de
diffusion par câble ou satellite, confirmez l’entrée que vous
avez connectée au décodeur et appuyez sur la touche
"INPUT SELECT" de la télécommande pour sélectionner
l’entrée source appropriée.
ENTER
Sélectionner Saut
Entrer
SETUP
Recommencer
Plus tard
• Vous devez sélectionner “Maison” à l’étape 4.
Dans le cas contraire, les modifications que vous aurez
apportées aux réglages ne seront pas mémorisées lorsque
vous éteindrez l’appareil.
Une fois la configuration initiale effectuée...
•
Si vous souhaitez effectuer une nouvelle recherche
automatique des chaînes, consultez la section
“Autoscan” en page 18.
•
Vous pouvez ajouter les chaînes désirées non
mémorisées par le “Autoscan”. Reportez-vous à
“Enregistrer Manuel”, page 19.
Si vous souhaitez modifier la langue, consultez la
•
section “Sélection de la Langue” en page 20.
Si vous souhaitez modifier l’Emplacement
•
géographique, consultez la section “Région” en page
31.
INTRODUCTION
PRÉPARATION
REGARDER LA
TÉLÉVISION
CONFIGURATION
OPTIONNELLE
DÉPANNAGE INFORMATION
FR
13
Page 52

EGARDER LA TÉLÉVISION
R
Sélection de Chaîne
5
Sélectionnez les chaînes en utilisant sur [CH K / L] ou sur [les touches numériques].
Pour sélectionner les chaînes mémorisées, utilisez
•
[CH K / L]
Pour sélectionner les chaînes non mémorisées,
•
ou [les touches numériques].
5
Cette section explique comment régler le volume. La fonction de coupure,
qui permet d’activer et de désactiver le son, y est aussi expliquée.
utilisez [les touches numériques].
Pour utiliser [les touches numériques]
TV
-
Pour sélectionner la chaîne analogique 11
DTV
-
Lorsque vous sélectionnez le canal numérique 11-1
N’oubliez pas d’appuyer sur la touche [-] avant
d’appuyer sur le numéro du sous-canal.
Appuyez sur [CH RETURN] pour revenir à la chaîne
•
que vous regardiez.
À propos de la télédiffusion numérique :
Avec sa diffusion à haute définition, la diffusion numérique surpasse
de loin la diffusion analogique, à la fois en termes de qualité d’image
et de qualité sonore.
Les programmes de télévision numérique ne sont pas tous diffusés
en haute définition (HD). Pour savoir si le programme visionné est en
HD, consultez un guide des programmes, contactez le fournisseur
câble / satellite du programme ou les stations locales de télévision.
NTSC
(mode analogique)
(Football)
CH4
(Football)
CH4
En Ondes
6:00pm
6:30pm
CH4-1
(Football)
ATSC
(mode numérique)
(Football)
CH4-1
canal principale
(JT)
CH4-2
CH4-3
(Tennis)
5
La minuterie de sommeil peut être réglée pour éteindre automatiquement
l’appareil après l’écoulement d’une période de temps donnée.
1
Réglage du Volume
Utilisez [VOL. X / Y] pour régler le volume audio.
Volume 30
La barre de volume s’affiche au bas de l’écran du
téléviseur pendant le réglage du volume.
La barre de volume disparaît automatiquement après
•
quelques secondes.
Appuyez sur [MUTE ] pour activer ou désactiver le
son.
Sourdine
“Sourdine” s’affiche sur l’écran du téléviseur pendant
quelques secondes.
Appuyez de nouveau sur [
[
VOL. X / Y] pour rétablir le niveau de volume initial.
MUTE
] ou utilisez
Minuterie de Sommeil
Appuyez sur [SLEEP] pour régler la minuterie de sommeil.
Sommeil
L’affichage de la minuterie de sommeil apparaît sur
l’écran du appareil.
Hf
canal principale
CH4
CH4
(Football)
(Football)
7:00pm
7:30pm
8:00pm
(Football)
CH4-1
canal principale
bascule à lt’aide de [CH
CH4-1
canal principale
(Football)
CH4-2
sous-canal
Qu’est-ce qu’un sous-canal ?
Grâce à une technologie de compression élevée, la diffusion
numérique offre un service qui permet d’envoyer des
signaux multiples simultanément.
Il s’ensuit que vous pouvez sélectionner plus d’une émission
par chaîne principale, puisque la technologie de diffusion
numérique permet au téléviseur de faire la distinction entre
plusieurs chaînes diffusées par un seul réseau.
Remarque :
• “Pas de Signal” apparaît sur l’écran du téléviseur une fois la
diffusion de la sous-canal terminée.
•
Le message “Prog. audio seulement“ apparaît sur l’écran du
téléviseur lorsque vous recevez uniquement un signal audio.
14
FR
sous-canalsous-canal
K
(JT)
/ L]
Appuyez plusieurs fois sur [SLEEP] pour modifi er le temps
2
qui doit s’écouler avant que le téléviseur ne s’éteigne.
120min.
Sommeil
Vous pouvez régler votre appareil pour qu’il s’éteigne
après une durée donnée (de 30 à 120 minutes).
Chaque pression sur [SLEEP] fait augmenter le temps
•
de 30 minutes.
Une fois la minuterie de sommeil réglée, il est possible
•
de l’afficher pour vérification en appuyant sur [SLEEP].
Pour annuler la minuterie de sommeil
Appuyez plusieurs fois sur [SLEEP] jusqu’à ce que
“Sommeil Hf” s’affiche sur l’écran du téléviseur.
Remarque :
• L’affichage du paramètre de minuterie de sommeil
disparaît automatiquement après quelques secondes.
• Si vous débranchez l’appareil de la prise de courant ou
si une panne de courant survient, le paramètre de la
minuterie de sommeil sera annulé.
Page 53

Arrêt sur Image
5
Vous pouvez figer l’image qui s’affiche à l’écran du téléviseur.
Appuyez sur
l’écran du téléviseur.
La sortie audio n’est pas mise en pause.
•
Si aucun signal n’est détecté ou aucun signal protégé
•
n’est reçu pendant le mode arrêt sur image, l’image
reste en pause et la sortie audio est mise en sourdine.
La fonction d’arrêt sur image sera désactivéeau bout
•
de 5 minutes.
Pour annuler le mode arrêt sur image, appuyez sur
n’importe quel bouton sauf [POWER].
Parcours des Modes d’Entrée
5
Vous pouvez facilement commuter la télécommande sur DTV(ATSC) et
TV(NTSC) ou accéder à un appareil externe connecté à l’appareil.
Appuyez plusieurs fois sur [INPUT SELECT] ou [CH K]
pour parcourir les modes d’entrée.
[STILL] pour figer l’image qui s’affiche à
Image Fixe
Français
Changement du Mode Audio
5
Cette section explique comment permuter l’audio en mode analogique et
comment changer la langue audio en mode numérique.
TV
Appuyez sur [AUDIO] pour afficher le mode audio
actuellement sélectionnée. Pendant la réception
d’une diff usion des MTS, appuyez plusieurs fois pour
parcourir les canaux audio disponibles.
11
Quand tous les modes sont disponibles
Quand les modes audio stéréo et monaural sont
disponibles
Quand les modes audio SAP et monaural sont disponibles
Quand seul le mode audio monaural est disponible
STÉRÉO : Émet l’audio stéréo
SAP : Émet le deuxième programme audio
MONO : Émet l’audio mono
SAP / STÉRÉO SAP / MONO
SAP / STÉRÉO
MONO / STÉRÉO MONO / STÉRÉO
SAP / MONO SAP / MONO
(commutation impossible)
SAP / STÉRÉO
MONO
INTRODUCTION
PRÉPARATION
REGARDER LA
TÉLÉVISION
CONFIGURATION
OPTIONNELLE
DÉPANNAGE INFORMATION
Chaîne DTV/TV
Video
ou
Appuyer sur [CH L ] inverse le sens du cycle des
•
modes d’entrée.
Component
HDMI1
HDMI2
HDMI3
(ou entrée PC)
DTV
Appuyez sur [AUDIO] pour afficher la langue
1
actuellement sélectionnée et le nombre de langues
disponibles.
Appuyez plusieurs fois sur [AUDIO] pour parcourir les
2
langues audio disponibles.
Les langues disponibles varient d’une diffusion à
•
l’autre. “Autre” s’affiche lorsque la langue audio n’est
pas disponible ou lorsque les langues disponibles
sont autres que l’anglais, l’espagnol ou le français.
11-1
Anglais 1/3
Remarque :
• [AUDIO] ne commande pas les appareils audio externes.
• L’affichage des informations disparaît automatiquement
après quelques secondes.
FR
15
Page 54

EGARDER LA TÉLÉVISION
R
Informations sur Écran
5
Vous pouvez affi cher sur l’écran du téléviseur la chaîne actuellement
sélectionnée ou d’autres informations, telles que le mode audio.
TV
En mode analogique, le numéro de canal actuel et le mode audio
s’affichent.
DTV
En mode numérique, les informations d’émission détaillées pour le canal actuel
telles que titre du programme ou guide des programmes sont affichées.
Appuyez sur [INFO].
11
SAP / STÉRÉO
480i
480i
Le numéro de chaîne actuellement sélectionnée, le
•
mode audio, le type de résolution du signal vidéo, le
rapport de format du téléviseur, le type de soustitres et la cote de télévision s’affichent dans le coin
supérieur droit del’écran.
Pour effacer l’affichage, appuyez de nouveau sur
•
[INFO]. Vous pouvez aussi appuyer sur [BACK].
SD
SD
TV-PG DLSV
4:3
4:3
CC
CC
Appuyez sur [INFO] pour afficher les informations du
programme actuel sélectionné.
Informations de diffusion
Les informations suivantes s’a chent.
1 2
Un jour de souvenirs
Un jour de souvenirs
Il y a un quart de siècle, à une époque que l’on peut
qualifier de bon vieux temps de la presse écrite, les ventes
d’espace publicitaire en emplacement indéterminé
représentaient 80 pour cent des revenus de publicité de cette
TV: TV-14
1 titre d’émission
2 guide des émissions
(Le guide des émissions s’affiche en plus des
informations de diffusion. Affichage de 4 lignes
maximum.)
3 station émettrice
4 numéro de chaîne
5 langue audio
(Reportez-vous à “Changement du Mode Audio”,
page 15.)
6 nombre réel de lignes de balayage et mode de
balayage
7 format de TV numérique
8 cotes lues par la puce en V
9 CC (non disponible si le paramètre Sous-titres
codés est réglé sur “Hf”)
10 catégorie de contenu bloquée
34
KABC
KABC
Anglais 1/2
1080i
1080i
Cote
11-1
16:9HDHD
16:9
CC
CC
5
6, 7, 8
9
10
16
FR
Remarque :
• Lorsque le guide des émissions comporte plus de 4 lignes,
utilisez [Curseur K/ L] pour faire défiler le texte.
• “Aucune description fournie.” s’affiche lorsque le guide des
émissions n’est pas disponible.
• Lorsque le guide des programmes est affiché, la fonction
de sous-titres est interrompue.
• En mode d’entrée externe, l’écran suivant s’affiche;
e.g.) Lorsqu’un appareil externe est connecté à la prise
d’entrée VIDEO.
Video
480iSDSD
480i
TV-PG DLSV
• L’affichage des informations disparaît automatiquement
au bout d’une minute.
CC
CC
Page 55

Mode d’Affichage sur Écran de
5
Télévision
4 types de mode d’affichage peuvent être sélectionnés lorsque le diffuseur
émet un signal vidéo 4:3 ou 16:9. De même, 3 types de mode d’affichage
peuvent être sélectionnés lorsque le signal d’entrée provient d’un PC.
Appuyez plusieurs fois sur [SCREEN MODE ] pour
changer lerapport de format du téléviseur.
Français
INTRODUCTION
PRÉPARATION
Pour un signal vidéo 4:3
Sidebar
Large
Plein
Cinéma
Sidebar
Affiche une image 4:3 à sa taille originale. Des bandes
latérales apparaissent des deux côtés de l’écran.
Plein
Affiche une image 4:3 au format 16:9 ; l’image est étirée
horizontalement pour remplir l’écran.
Cinéma
Affiche une image 4:3 au format 16:9 ; l’image est étirée
horizontalement et verticalement pour remplir l’écran.
Le haut et le bas de l’image sont coupés.
Large
Affiche l’image avec le centre de celle-ci à la taille
originale et les côtés étirés horizontalement pour
remplir l’écran.
Pour un signal vidéo 16:9
Plein
Elargi
Zoom
Cinéma
Plein
Affiche une image 16:9 à sa taille originale.
Zoom
Affiche une image 16:9 à sa taille maximum sans
modifier ses proportions horizontales et verticales.
Cinéma
Affiche une image étirée verticalement.
Elargi
Affiche une image étirée horizontalement.
Pour un signal d’entrée PC
via le mode d’entrée
HDMI1
REGARDER LA
TÉLÉVISION
CONFIGURATION
OPTIONNELLE
DÉPANNAGE INFORMATION
Normal Plein
Pt par pt
Normal
Affiche une image étirée de façon proportionnelle. Des
bandes latérales apparaissent des deux côtés de l’écran.
Plein
Affiche une image étirée de façon non proportionnelle
pour remplir l’écran.
Pt Par Pt
Affiche une image à sa taille originale.
FR
17
Page 56

ONFIGURATION OPTIONNELLE
C
Menu Principal
5
Cette section présente un aperçu du menu principal qui s’affiche lors de la pression
sur [SETUP]. Pour de plus amples informations, reportez-vous à la page de
référence des options respectives.
Le menu principal comprend les options de configuration des fonctions ci-dessous.
Appuyez sur [SETUP].
IMAGE
SON
CHAîNE
DÉTAIL
LANGUE
IMAGE
Vous pouvez régler la qualité de l’image.
(Reportez-vous à “Réglage de l’Image”, page 21.)
SON
Vous pouvez régler la qualité du son.
(Reportez-vous à “Réglage du Son”, page 22.)
CHAÎNE
•
Vous pouvez lancer un balayage automatique des
chaînes captées et retirer les chaînes indésirables.
(Reportez-vous à “Autoscan”, page 18.)
•
Vous pouvez ignorer les chaînes non désirées à l’aide
de la touche [CH K / L].
(Reportez-vous à “Liste Chaînes”, page 19.)
Vous pouvez ajouter manuellement les chaînes non
•
détectées lors de la autoscan.
(Reportez-vous à “Enregistrer Manuel”, page 19.)
DÉTAIL
Vous pouvez changer le format d’affichage des sous-titres,
•
qui affichent soit le dialogue des émissions de télévision,
soit d’autres informations, sur l’écran du téléviseur.
(Reportez-vous à “Sous-titres”, page 23.)
Vous pouvez spécifier des restrictions d’accès au visionnement.
•
(Reportez-vous à “Verrouillage”, page 26.)
Vous pouvez régler la position, la stabilité et la clarté
•
de l’écran du PC.
(Reportez-vous à ”Réglages PC”, page 30.)
Vous pouvez choisir le mode d’économie d’énergie.
•
(Reportez-vous à “Mode Economie d’Energie”, page 31.)
Lorsque vous réglez les modes “IMAGE” et “SON”
•
de votre choix, vous devez remplacer le réglage
“Magasin” par “Maison”.
(Reportez-vous à “Région”, page 31.)
Vous pouvez vérifier le numéro de la version du
•
logiciel actuellement utilisée dans cet appareil.
(Reportez-vous à “Info Logiciel Actuel”, page 32.)
LANGUE
Vous pouvez changer la langue d’affichage du menu
principal (Anglais, Espagnol ou Français).
(Reportez-vous à “Sélection de la Langue”, page 20.)
18
FR
Autoscan
5
Si vous changez de source de signal de câble (ex., si vous passez de celui de l’antenne
à celui de la câblodiffusion (CATV)), si vous déplacez l’appareil dans une région
différente après le réglage initial, ou si vous restaurez les canaux DTV après les avoir
supprimés, vous devrez effectuer à nouveau le balayage automatique des chaînes.
Avant de commencer : Assurez-vous que l’appareil est relié à une antenne ou au câble.
Appuyez sur [SETUP] pour afficher le menu principal.
1
Utilisez [Curseur K / L] pour sélectionner “CHAÎNE”,
2
puis appuyez sur [ENTER].
ou
Utilisez [Curseur K / L] pour sélectionner “Autoscan”,
3
IMAGE
SON
CHAîNE
DÉTAIL
LANGUE
puis appuyez sur [ENTER].
Chaînes
Chaînes
IMAGE
Autoscan
ou
Utilisez [Curseur K / L] pour sélectionner une option
SON
CHAîNE
DÉTAIL
LANGUE
Liste chaînes
Enregistrer manuel
Antenne
appropriée, puis appuyez sur [ENTER].
Autoscan
Autoscan
IMAGE
Autoscan balaye à nouveau toutes les chaînes.
ou
Si une antenne hertzienne est connectée, sélectionnez “Antenne”.
•
Si un décodeur de câblodiffusion est connecté, sélectionnez “Câble”.
•
La “Autoscan” commence.
•
Une fois le balayage et la mémorisation terminés, la chaîne
•
Le système balaie les chaînes. Attendre.
Il faudra jusqu’à 20 minutes pour terminer le Autoscan.
Il faudra jusqu’à 20 minutes pour terminer le
Autoscan.
SON
Sélectionner la destination de “ANT. IN”.
CHAîNE
Antenne
DÉTAIL
LANGUE
75%
Chaînes analogiques 10ch
Chaînes numériques 6ch
Ou
Câble
SETUP
Quitter
Retour
Antenne
Câble
ANT.IN
mémorisée dont le numéro est le plus bas s’affichera.
Remarque :
•
Après avoir effectué “Autoscan”, utiliser [
télécommande permet de sauter automatiquement les
programmes indisponibles.
• Pour connecter le téléviseur directement au réseau de
câblodiffusion (CATV), contactez le câblodistributeur.
• Si vous appuyez sur [POWER] ou [SETUP] pendant la
autoscan, le paramètre sera annulé.
•
Même après un “Autoscan”, le réglage des chaînes est perdu
si vous débranchez le cordon d’alimentation avant d’éteindre
l’appareil en appuyant sur [POWER].
•
Le Code NIP sera nécessaire une fois que vous aurez défini un
Code NIP de “Verrouillage” (Reportez-vous à la page 26).
• Pour modifier votre Code NIP, suivez les instructions
fournies dans la section “Nouveau Mot de Passe”
(Reportez-vous à la page 29).
CH K / L] sur la
Page 57

Liste Chaînes
5
Les chaînes sélectionnées ici peuvent être ignorées lors de la sélection de la
chaîne via la touche [CH K / L].
Ces chaînes restent accessibles à l’aide des [touches numériques].
Appuyez sur [SETUP] pour quitter le menu principal.
1
Français
Enregistrer Manuel
5
Cette fonction vous permet d’ajouter les chaînes qui n’ont pas été ajoutées
par le balayage automatique des chaînes en raison des conditions de
réception lors du réglage initial.
Appuyez sur [SETUP] pour quitter le menu principal.
1
INTRODUCTION
PRÉPARATION
Utilisez [Curseur K / L] pour sélectionner “CHAÎNE”,
2
puis appuyez sur [ENTER].
IMAGE
ou
Utilisez [Curseur K / L] pour sélectionner
3
SON
CHAîNE
DÉTAIL
LANGUE
“Liste chaînes”, puis appuyez sur [ENTER].
Chaînes
Chaînes
IMAGE
Autoscan
Liste chaînes
ou
Utilisez [Curseur K / L] pour sélectionnez la chaîne que
4
SON
CHAîNE
DÉTAIL
LANGUE
Enregistrer manuel
Antenne
vous désirer ignorer, puis appuyez sur [ENTER].
Liste chaînes
Liste chaînes
IMAGE
ou
L’affichage de la chaîne qu la été supprimée devient
•
SON
CHAîNE
DÉTAIL
LANGUE
Allume chaînes pour sélection avec
touches Ch Up/Down.
ENTER
Sélection Ch
Visionner/Saut
sombre. Vous ne pouvez plus sélectionner cette
chaîne en utilisant [CH K / L].
Pour réactiver une chaîne supprimée, utilisez
•
[Curseur K / L] et appuyez sur [ENTER]. Les chaînes
enregistrées sont surlignées.
Lorsque vous supprimez une canal principale, ses
•
sous-canal sont supprimées aussi.
Remarque :
• Les chaînes sont en mode ATSC si elles portent
l’indication“DTV”. Autrement elles sont en mode NTSC.
Appuyez sur [SETUP] pour quitter.
5
DTV 6
DTV 6
DTV 8
DTV 8
DTV 48
DTV 48
DTV 67
BACK
Retour
Utilisez [Curseur K / L] pour sélectionner “CHAÎNE”,
2
puis appuyez sur [ENTER].
ou
Utilisez [Curseur K / L] pour sélectionner
3
IMAGE
SON
CHAîNE
DÉTAIL
LANGUE
REGARDER LA
TÉLÉVISION
CONFIGURATION
OPTIONNELLE
“Enregistrer Manuel”, puis appuyez sur [ENTER].
Chaînes
Chaînes
IMAGE
Autoscan
Liste chaînes
ou
Utilisez [les touches numériques] pour entrer le
4
SON
CHAîNE
DÉTAIL
LANGUE
Enregistrer manuel
Antenne
DÉPANNAGE
numéro de la chaîne que vous voulez ajouter, puis
appuyez sur [ENTER].
27
9
9
58
58
IMAGE
SON
CHAîNE
DÉTAIL
LANGUE
Enregistrer manuel
Enregistrer manuel
Chaînes analogiques,
sélectionner une chaîne avec les
touches numériques.
Chaînes numériques, exécuter la
fonction Autoscan.
Changement Ch
Consigner
BACK
Retour
INFORMATION
11
Appuyez sur [SETUP] pour quitter.
5
Remarque :
• Si le réglage a été correctement effectué, le message
“Ajouté à la liste des chaînes” apparaît.
• Si l’entrée externe est utilisée, il n’est pas possible
d’enregistrer la chaîne et “Non disponible” s’affiche sur
l’écran du téléviseur.
• En utilisant [CH K / L], vous pouvez sélectionner les
chaînes mémorisées seulement.
FR
19
Page 58
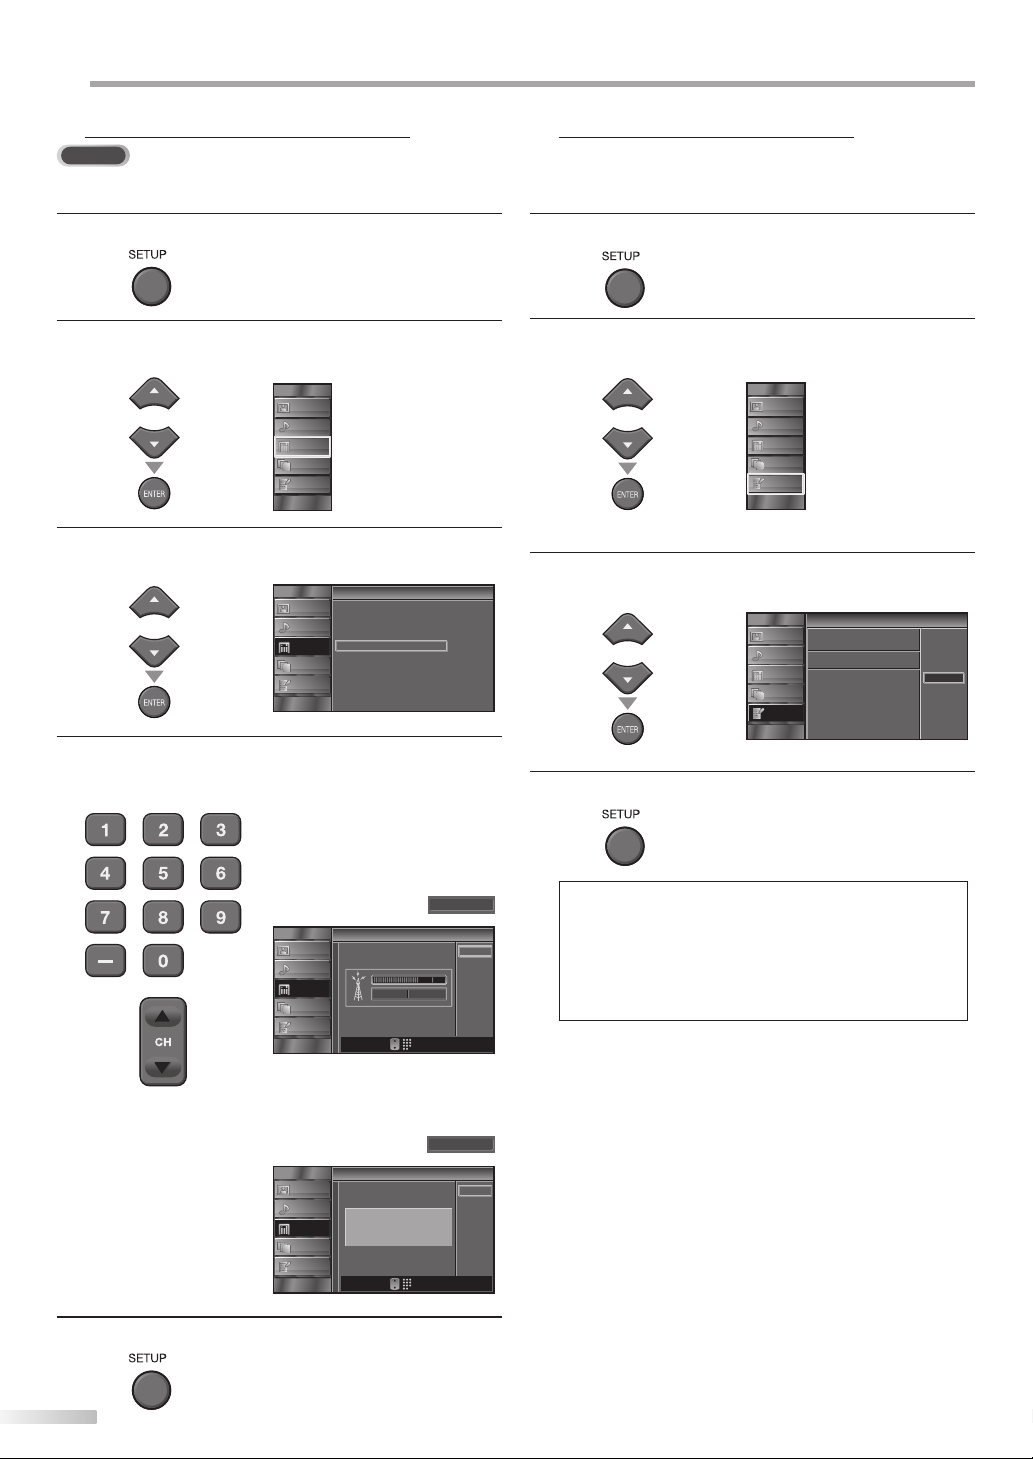
ONFIGURATION OPTIONNELLE
C
Vérification de l’Antenne
5
DTV
Cette fonction vous permet de vérifier la force du signal numérique de chaque chaîne.
Sélection de la Langue
5
Vous avez le choix entre l’anglais, l’espagnol et le français comme langue de
menu sur écran.
Appuyez sur [SETUP] pour quitter le menu principal.
1
Utilisez [Curseur K / L] pour sélectionner “CHAÎNE”,
2
puis appuyez sur [ENTER].
ou
Utilisez [Curseur K / L] pour sélectionner “Antenne”,
3
puis appuyez sur [ENTER].
ou
Utilisez [les touches numériques] ou [CH
4
sélectionnez la chaîne pour laquelle vous désirez vérifier
IMAGE
SON
CHAîNE
DÉTAIL
LANGUE
IMAGE
SON
CHAîNE
DÉTAIL
LANGUE
Chaînes
Chaînes
Autoscan
Liste chaînes
Enregistrer manuel
Antenne
K / L]
la puissance du signal numérique capté par l’antenne.
pour
Appuyez sur [SETUP] pour quitter le menu principal.
1
Utilisez [Curseur K / L] pour sélectionner “LANGUE”,
2
puis appuyez sur [ENTER].
ou
Utilisez [Curseur K / L] pour sélectionner “English”,
3
IMAGE
SON
CHAîNE
DÉTAIL
LANGUE
“Español” ou “Français” puis appuyez sur [ENTER].
Langue
Langue
IMAGE
Select the language for setup display.
ou
Appuyez sur [SETUP] pour quitter.
4
SON
CHAîNE
DÉTAIL
LANGUE
Elija el idioma de ajuste.
Sélectionner langue écran config.
English
Español
Français
ou
Si la chaîne est réglée sur chaîne analogique ou entrée
•
externe, vous ne pouvez pas confirmer l’état de l’antenne.
Appuyez sur [SETUP] pour quitter.
5
20
FR
Remarque :
• Si vous souhaitez afficher les menus en anglais, et
non en espagnol ou en français, appuyez sur [SETUP].
Sélectionnez “IDIOMA” ou “LANGUE” à l’aide du
[Curseur K / L], puis appuyez sur [ENTER].
Sélectionnez “English” à l’aide du [Curseur K / L], puis
appuyez sur [ENTER]. Appuyez sur [SETUP] pour quitter le
menu principal.
IMAGE
SON
CHAîNE
DÉTAIL
LANGUE
Antenne
Antenne
Actuel 50 50 Max
CH
11-1
Retour
Changement Ch
Video
Antenne
Antenne
IMAGE
SON
CHAîNE
DÉTAIL
LANGUE
Indicateur disponible
uniquement pour la
transmission numérique.
CH
Changement Ch
Retour
Page 59

Réglage de l’Image
5
Vous pouvez régler la luminosité, le contraste, la couleur, la teinte, la
netteté et la température couleurs.
Français
INTRODUCTION
Avant de commencer : Vous devez sélectionner le paramètre ”Maison”
dans ”Région” (repor tez-vous à la page 31). Dans
le cas contraire, les modifications que vous aurez
apportées aux réglages ne seront pas mémorisées
lorsque vous éteindrez l’appareil.
Appuyez sur [SETUP] pour quitter le menu principal.
1
Utilisez [Curseur K / L] pour sélectionner “IMAGE”, puis
2
appuyez sur [ENTER].
ou
Utilisez [Curseur K / L] pour sélectionner l’option que
3
IMAGE
SON
CHAîNE
DÉTAIL
LANGUE
vous désirez régler, puis appuyez sur [ENTER].
Image
Image
ou
Régler la qualité de l’image.
4
IMAGE
SON
CHAîNE
DÉTAIL
LANGUE
Mode image
Luminosité
Contraste
Couleur
Teinte
Netteté
Température couleur
Préférentiel
Normal
Mode Image
Utilisez [Curseur K / L] pour sélectionner le réglage
souhaité, puis appuyez sur [ENTER].
(“Préférentiel”, “Standard”, “Sport”, “Film” et “Jeu”)
Image
Image
IMAGE
Mode image
Luminosité
ou
SON
CHAîNE
DÉTAIL
LANGUE
Contraste
Couleur
Teinte
Netteté
Température couleur
Préférentiel
Standard
Sport
Film
Jeu
Luminosité
Luminosité 30
Contraste
Contraste
30
60
36
Couleur
0
0
Couleur
Teinte
Teinte
Netteté
Température couleur
Temp. Couleur Normal
5
Luminosité, Contraste, Couleur, Teinte, Netteté,
Température couleur
Utilisez [Curseur K / L] pour sélectionner le réglage de
votre choix, puis utilisez [Curseur
au réglage.
/
s
B
] pour procéder
ou
Curseur
s
Curseur
B
pour réduire la
Ajuster
Ajuster Déplacer
Ajuster Déplacer
Ajuster Déplacer
Ajuster Déplacer
Déplacer
60
36
0
0Netteté
ENTER
Entrer
ENTER
Entrer
ENTER
Entrer
ENTER
Entrer
ENTER
Entrer
luminosité
pour réduire le
contraste
pour atténuer
la couleur
pour accentuer
le rouge
pour adoucir
pour ajouter
Ajuster Déplacer
ENTER
Entrer
des couleurs
chaudes
Appuyez sur [SETUP] pour quitter.
pour
augmenter la
luminosité
pour
augmenter le
contraste
pour
accentuer la
couleur
pour
accentuer le
vert
pour rendre
plus net
pour ajouter
des couleurs
froides
PRÉPARATION
REGARDER LA
TÉLÉVISION
CONFIGURATION
OPTIONNELLE
DÉPANNAGE
INFORMATION
Remarque :
• Pour annuler réglage de l’image, appuyez sur [SETUP].
• Seul le paramètre “Préférentiel” peut être réglé.
21
FR
Page 60
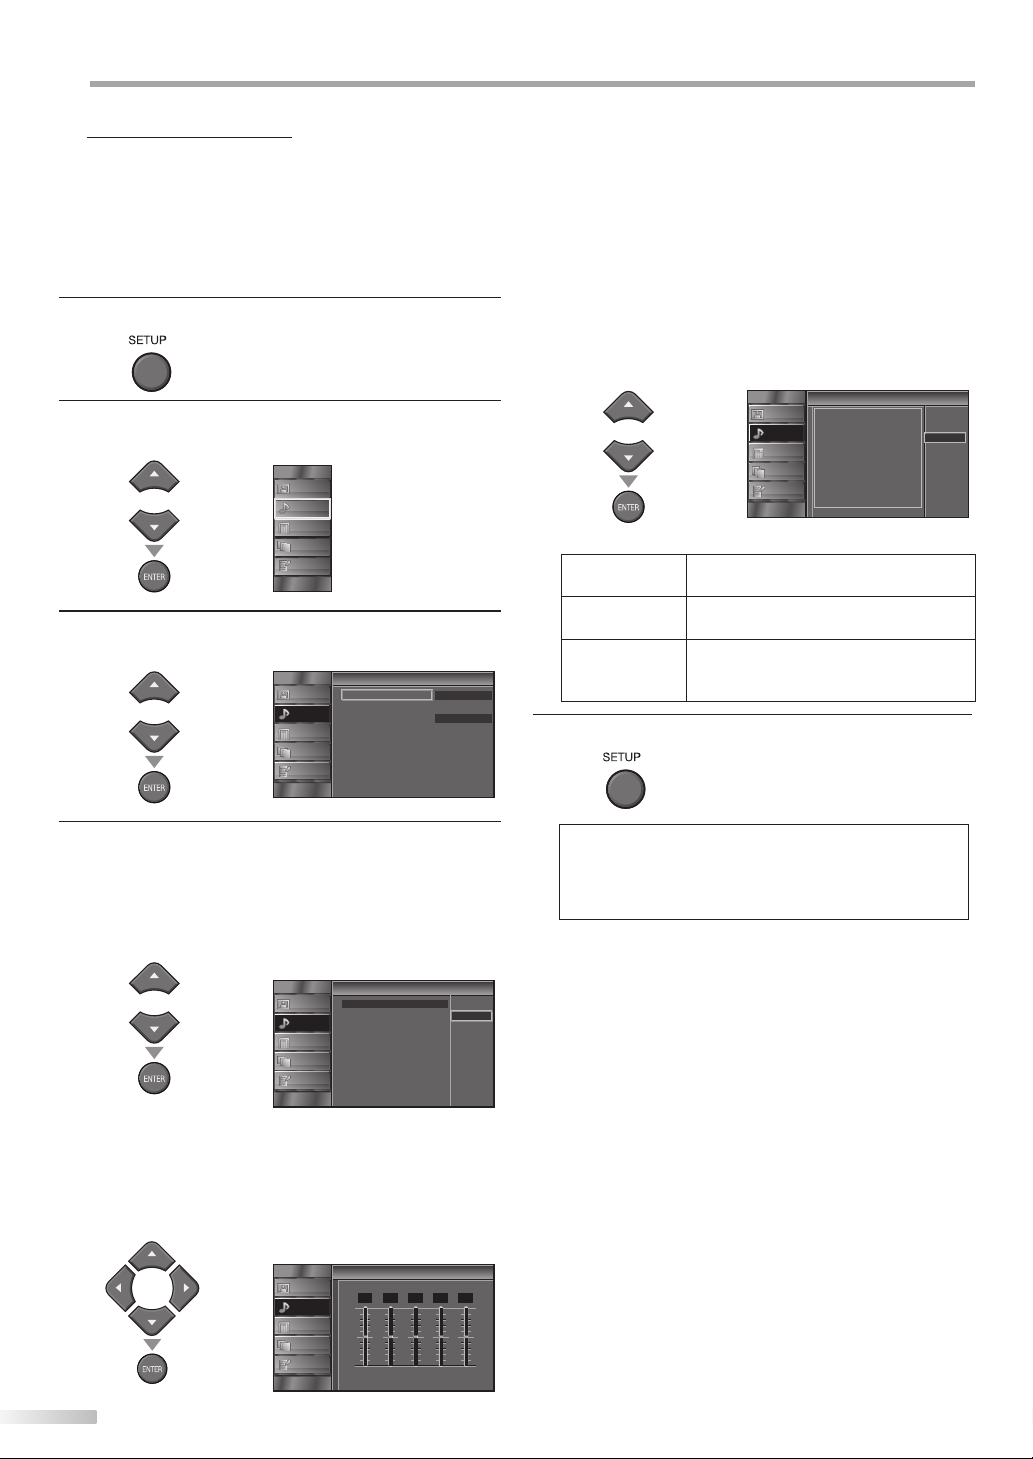
ONFIGURATION OPTIONNELLE
C
Réglage du Son
5
Vous pouvez régler le modo audio, l’équaliseur et un certain nombre
d’autres fonctions sonores.
Avant de commencer : Vous devez sélectionner le paramètre ”Maison”
dans ”Région” (repor tez-vous à la page 31).
Dans le cas contraire, les modifications que vous
aurez apportées aux réglages ne seront pas
mémorisées lorsque vous éteindrez l’appareil.
Appuyez sur [SETUP] pour quitter le menu principal.
1
Utilisez [Curseur K / L] pour sélectionner “SON”, puis
2
appuyez sur [ENTER].
ou
Utilisez [Curseur K / L] pour sélectionner le type de
3
son que vous voulez régler, puis appuyez sur [ENTER].
ou
IMAGE
SON
CHAîNE
DÉTAIL
LANGUE
IMAGE
SON
CHAîNE
DÉTAIL
LANGUE
Son
Son
Mode audio
Egaliseur
Haut-parleurs du téléviseur
Standard
Amp. ext.
Haut-parleurs du téléviseur
Permet de déterminer si le son est reproduit par les
haut-parleurs de l’appareil ou non.
Si un amplificateur compatible avec la fonction CEC
est connecté à cet appareil à l’aide d’un câble HDMI,
une partie des opérations effectuées sur le son
(augmentation du volume, par exemple) est accessible
de manière synchronisée à l’aide de la télécommande.
Utilisez [Curseur K / L] pour sélectionner l’option de
votre choix, puis appuyez sur [ENTER].
Haut-parleurs du téléviseur
Haut-parleurs du téléviseur
"Ef" :
IMAGE
Son restitué par les haut-parleurs
du téléviseur.
ou
Ef
Hf
Le son sera émis par les haut-parleurs de
l’appareil.
Le son ne sera pas émis par les hautparleurs de l’appareil.
Cette fonction vous permet de contrôler la
Amp. ext.
sortie audio des appareils compatibles avec
la fonction CEC à l’aide de la télécommande.
Appuyez sur [SETUP] pour quitter.
5
SON
CHAîNE
DÉTAIL
LANGUE
"Hf" :
Son non restitué par les
haut-parleurs.
"Amp. ext." :
Utilisation possible de
l’amplificateur compatible
HDMI-CEC connecté avec un câble
HDMI. Pour plus d’information, voir
le manuel d’utilisation.
Ef
Hf
Amp. ext.
Réglez les paramètres suivants.
4
Modo Audio
Utilisez [Curseur K / L] pour sélectionner le réglage de
votre choix, puis appuyez sur [ENTER].
(“Préférentiel”, “Standard”, “Film”, “Musique” et “Nouvelle”)
Son
Son
Mode audio
ou
IMAGE
SON
CHAîNE
DÉTAIL
LANGUE
Egaliseur
Haut-parleurs du téléviseur
Egaliseur
Permet de régler la qualité du son pour chaque
fréquence.
Utilisez
[Curseur
/
s
B] pour sélectionner la fréquence
spécifique et utilisez [Curseur K / L] pour régler le
volume sonore, puis appuyez sur [ENTER].
Egaliseur
Egaliseur
ou
IMAGE
SON
CHAîNE
DÉTAIL
LANGUE
0
120Hz0500Hz01.5kHz05kHz010kHz
22
FR
Préférentiel
Standard
Film
Musique
Nouvelle
Remarque :
• Pour annuler le réglage du son, appuyez sur [SETUP].
• Nous ne pouvons garantir une interopérabilité à 100 %
avec d’autres marques d’appareils compatibles avec le
protocole CEC.
Page 61
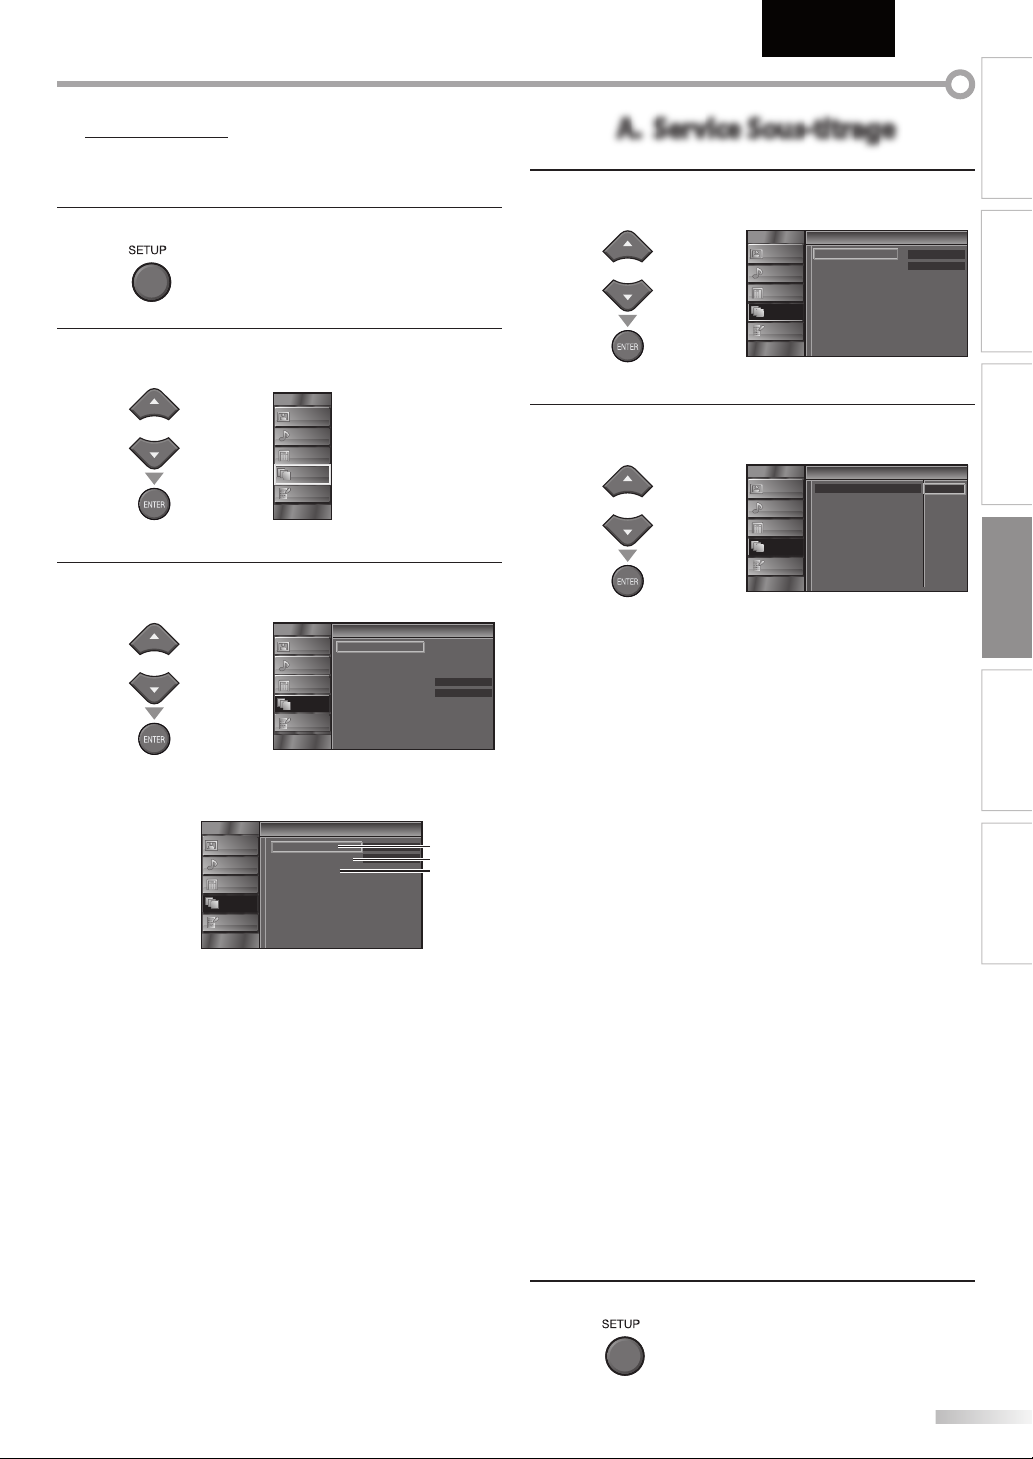
Sous-titres
A. Service Sous-titrage
5
Vous pouvez affi cher les sous-titres des émissions de télévision, des films
et des nouvelles. Les sous-titres désignent le texte des dialogues ou les
descriptions qui s’affichent à l’écran pour les personnes malentendantes.
Appuyez sur [SETUP] pour quitter le menu principal.
1
Utilisez [Curseur K / L] pour sélectionner “DÉTAIL”,
2
puis appuyez sur [ENTER].
ou
Utilisez [Curseur K / L] pour sélectionner “Sous-titre”,
3
IMAGE
SON
CHAîNE
DÉTAIL
LANGUE
puis appuyez sur [ENTER].
Détail
Détail
IMAGE
Sous-titre
Verrouillage
ou
SON
CHAîNE
DÉTAIL
LANGUE
Configurations du PC
Mode economie d’energie
Région
Info logiciel actuel
Ef
Maison
Suivez les instructions ci-dessous pour configurer
chacune des options.
Sous-titre
Sous-titre
IMAGE
SON
CHAîNE
DÉTAIL
LANGUE
Service sous-titrage
Service sous-titrage num
Style des sous-titres
Hf
Hf
A
B
C
...
A
“A. Service Sous-titrage”
...
B
“B. Service Sous-titrage Num”
...
C
“C. Style des Sous-titres”.
D page 23
D page 24
D page 24
Français
A. Service Sous-titrage
Utilisez [Curseur K / L] pour sélectionner
4
“Service sous-titrage”, puis appuyez sur [ENTER].
Sous-titre
Sous-titre
IMAGE
Service sous-titrage
Service sous-titrage num
ou
Utilisez [Curseur K / L] pour sélectionner le sous-titre
5
souhaité, puis appuyez sur [ENTER].
ou
Mode de Sous-titres
S-T1 et Texte1 ;
sont les principaux services de sous-titres et de texte.
Les sous-titres ou le texte s’affichent dans la même
langue que le dialogue de l’émission
(jusqu’à 4 lignes de texte sur l’écran du téléviseur, là
où le texte ne cache pas les parties importantes de
l’image).
S-T3 et Texte3 ;
servent de chaînes de données préférées.
Le sous-titrage ou le texte est souvent une langue
secondaire.
S-T2, S-T4, Texte2 et Texte4 ;
sont rarement disponibles car les diffuseurs
les utilisent uniquement dans des conditions
particulières, comme par exemple lorsque
“S-T1” et “S-T3” ou “Texte1” et “Texte3” ne sont pas
disponibles.
3 modes d’affichage sont disponibles, suivant le
•
type d’émission :
Mode “Paint-on” :
Affiche immédiatement les caractères saisis sur
l’écran du téléviseur.
Mode “Pop-on” :
Affiche tous les caractères en même temps après
leur mise en mémoire.
Mode “Roll-up” :
Affiche les caractères de manière continue, par
défilement (max. 4 lignes).
SON
CHAîNE
DÉTAIL
LANGUE
IMAGE
SON
CHAîNE
DÉTAIL
LANGUE
Style des sous-titres
Sous-titre
Sous-titre
Service sous-titrage
Service sous-titrage num
Style des sous-titres
INTRODUCTION
PRÉPARATION
Hf
Hf
REGARDER LA
TÉLÉVISION
Hf
S-T1
S-T2
S-T3
S-T4
Texte 1
Texte 2
Texte 3
Texte 4
CONFIGURATION
OPTIONNELLE
DÉPANNAGE
INFORMATION
Appuyez sur [SETUP] pour quitter.
6
23
FR
Page 62
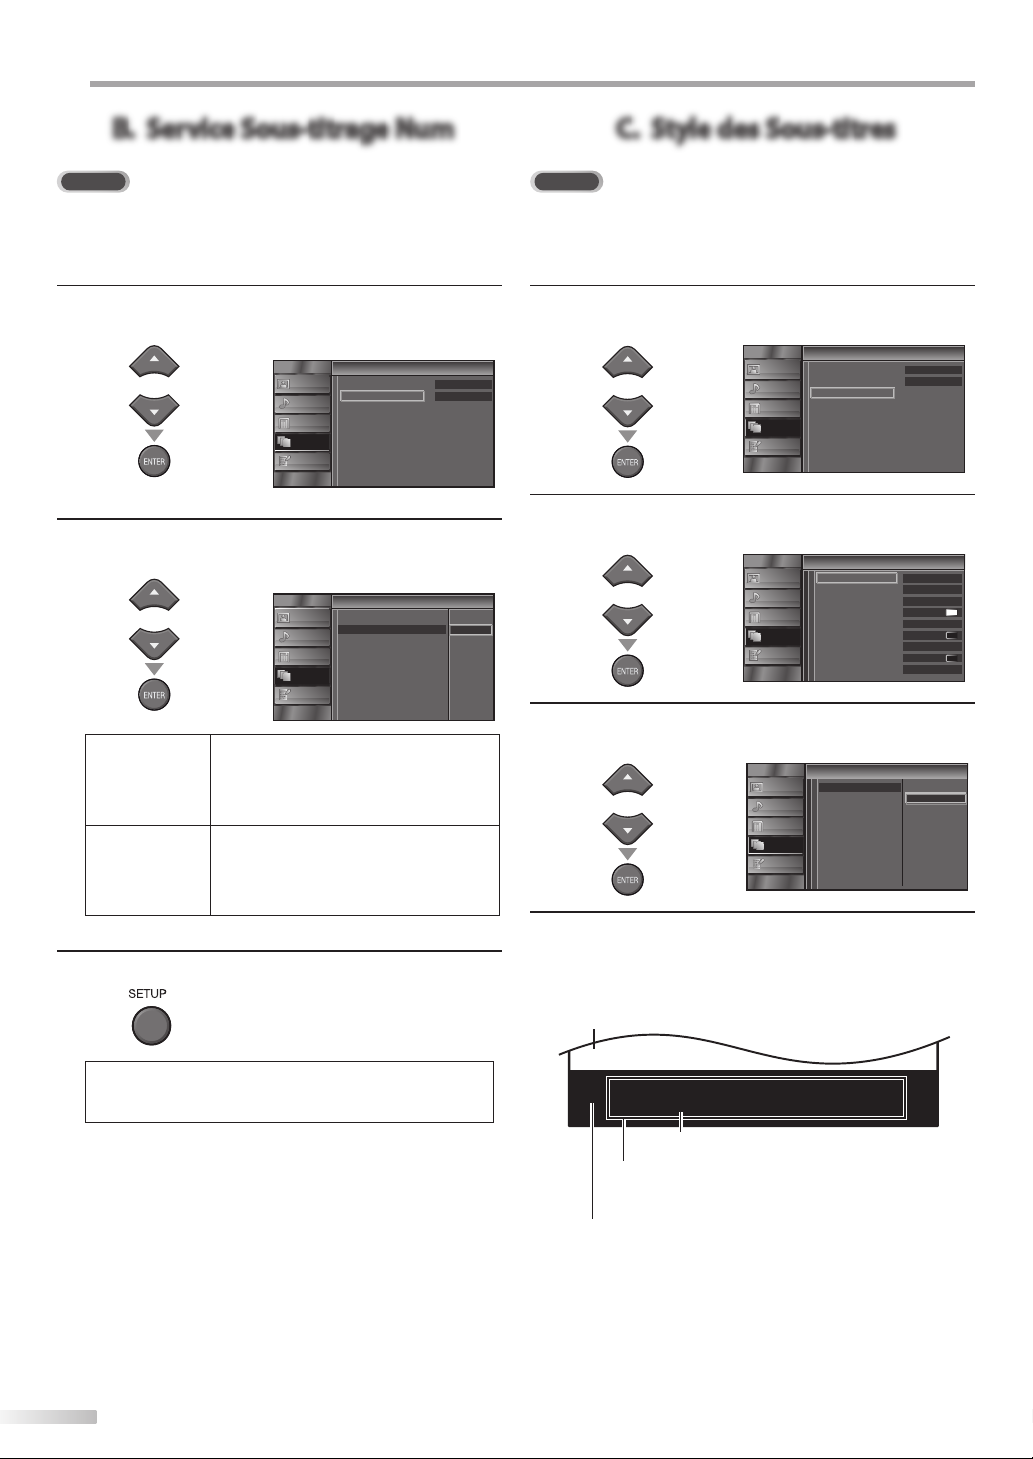
ONFIGURATION OPTIONNELLE
B. Service Sous-titrage Num
C. Style des Sous-titres
C
B. Service Sous-titrage Num
DTV
Outre les sous-titres codés de base décrits en page 23, le téléviseur
numérique possède ses propres sous-titres codés appelés service de soustitres numériques. Utilisez ce menu pour modi er les réglages du service de
sous-titres numériques.
/
K
Utilisez [Curseur
4
L] pour sélectionner
“Service sous-titrage num”, puis appuyez sur [ENTER].
Sous-titre
Sous-titre
IMAGE
ou
Sélectionnez les sous-titres numériques de votre choix
5
à l’aide du [Curseur
/
K
L], puis appuyez sur [ENTER].
ou
SON
CHAîNE
DÉTAIL
LANGUE
IMAGE
SON
CHAîNE
DÉTAIL
LANGUE
Service sous-titrage
Service sous-titrage num
Style des sous-titres
Sous-titre
Sous-titre
Service sous-titrage
Service sous-titrage num
Style des sous-titres
Hf
Hf
Hf
Service 1
Service 2
Service 3
Service 4
Service 5
Service 6
Sélectionnez ce paramètre si vous ne
Hf
désirez pas les DTVCC (sous-titres de
télévision numérique). Il s’agit du réglage
par défaut.
Sélectionnez un de ces services avant de
Service1-6
changer toute autre option dans le menu
“Sous-Titre”. En temps normal, choisissez
“Service1”.
Appuyez sur [SETUP] pour quitter.
6
C. Style des Sous-titres
DTV
Vous pouvez changer le style des sous-titres, comme par exemple la police
de caractères, la couleur, la taille, etc.
/
K
Utilisez [Curseur
4
L] pour sélectionner
“Style des sous-titres”, puis appuyez sur [ENTER].
Sous-titre
Sous-titre
IMAGE
Service sous-titrage
Service sous-titrage num
SON
Style des sous-titres
CHAîNE
DÉTAIL
LANGUE
/
L] pour sélectionner “Param.
Utilisez [Curseur
5
ou
K
utilis”, puis appuyez sur [ENTER].
Style des sous-titres
Style des sous-titres
IMAGE
Param. utilis
Style police
SON
Taille police
Couleur police
CHAîNE
Opacité police
Couleur l’arrière-plan
DÉTAIL
Opacité l’arrière-plan
LANGUE
Couleur bord
Type bord
/
L] pour sélectionner “Ef”, puis
Utilisez [Curseur
6
ou
K
appuyez sur [ENTER].
Style des sous-titres
Style des sous-titres
IMAGE
Param. utilis
Style police
SON
Taille police
Couleur police
CHAîNE
Opacité police
Couleur l’arrière-plan
DÉTAIL
Opacité l’arrière-plan
LANGUE
Couleur bord
Type bord
L] pour sélectionner une option,
Utilisez [Curseur
7
ou
/
K
puis appuyez sur [ENTER]. Puis utilisez [Curseur
pour sélectionner le réglage souhaité, et appuyez sur
[ENTER].
Affichage de l’image
Hf
Hf
Hf
Police0
Moyenne
Blanc
Plein
Noir
Plein
Noir
Aucun
Ef
Hf
/
K
L]
24
FR
Remarque :
• Les “Service sous-titrage num” disponibles varient suivant
les spécifications de diffusion.
ABCDEFGHIJKL
ABCDEFGHIJKL
Bord
(Couleur bord et Type bord)
Police
(Style police, Taille police, Couleur police,
Opacité ou Transparence police)
Arrière-plan
(Couleur de l’arrière-plan,
Opacité ou Transparence de l’arrière-plan)
•
Les différents réglages sont décrits sur la page
suivante.
•
Consultez les réglages que vous avez effectués
dans la page suivante en vous reportant au coin
supérieur droit de la fenêtre des paramètres affichée
(toutes les sélections n’indiquent pas les différences
sélectionnées).
Page 63
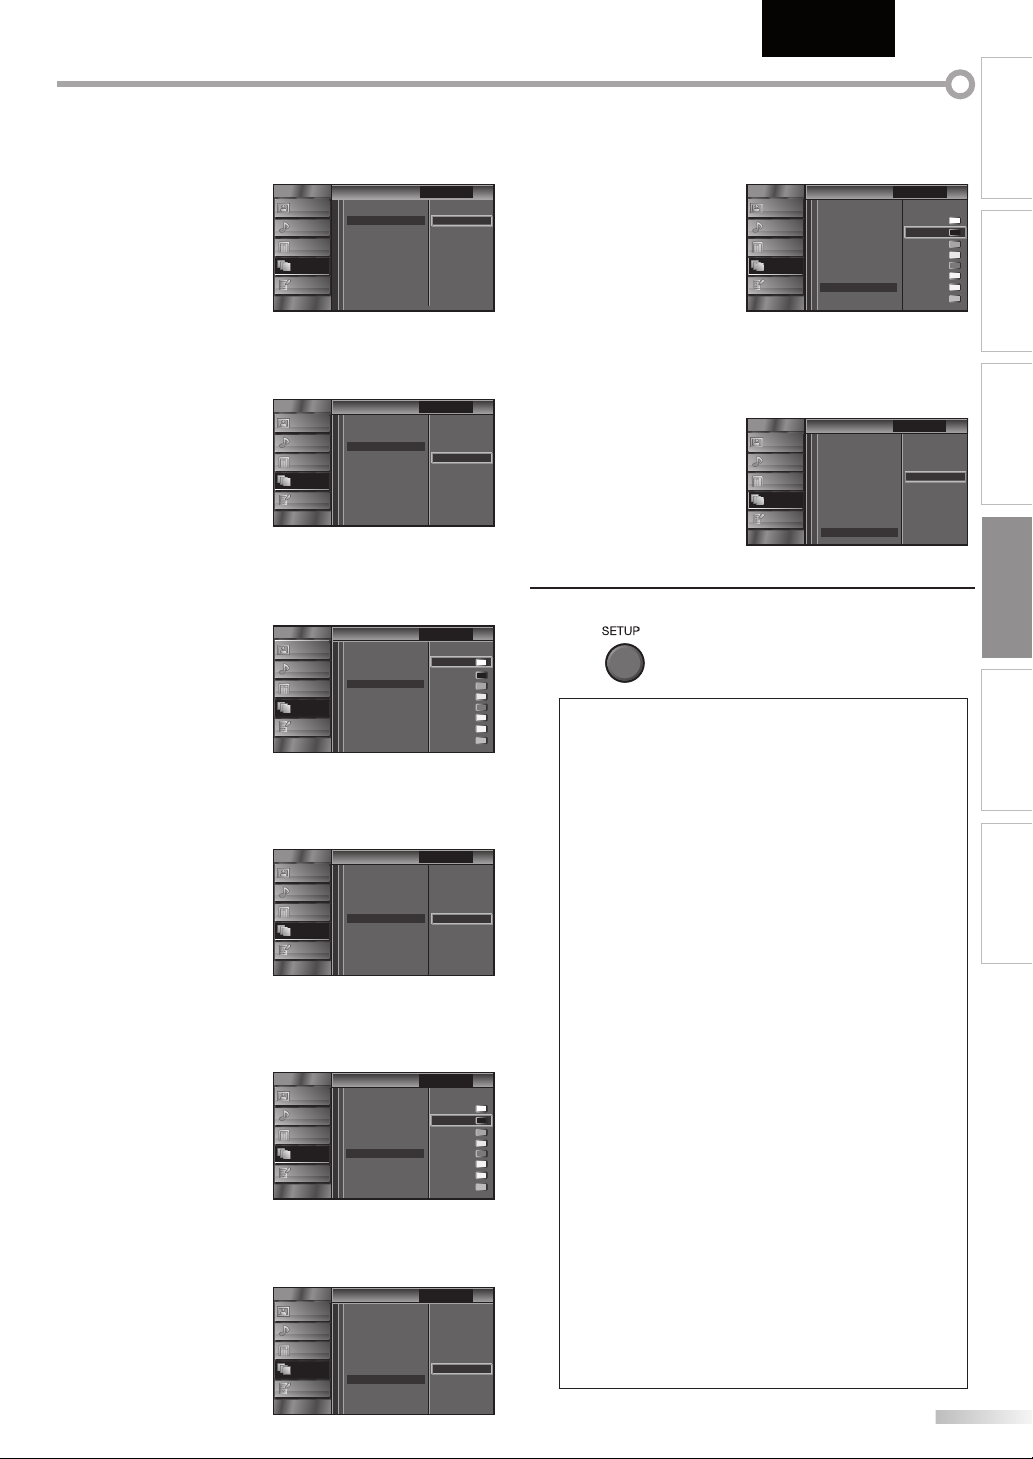
Français
INTRODUCTION
Style police
Il est possible de changer comme ci-dessous le style de
police des sous-titres affichés.
IMAGE
SON
CHAîNE
DÉTAIL
LANGUE
Style des sous-titres
Style des sous-titres
Param. utilis
Style police
Taille police
Couleur police
Opacité police
Couleur l’arrière-plan
Opacité l’arrière-plan
Couleur bord
Type bord
Sous-titre
Police0
Police1
Police2
Police3
Police 4
Police5
Police6
Police7
Taille police
Il est possible de changer comme ci-dessous lataille de
police des sous-titres affichés.
IMAGE
SON
CHAîNE
DÉTAIL
LANGUE
Style des sous-titres
Style des sous-titres
Param. utilis
Style police
Taille police
Couleur police
Opacité police
Couleur l’arrière-plan
Opacité l’arrière-plan
Couleur bord
Type bord
Sous-titre
Grande
Moyenne
Petite
Couleur police
Il est possible de changer comme ci-dessous la couleur
de police des sous-titres affichés.
Style des sous-titres
IMAGE
SON
CHAîNE
DÉTAIL
LANGUE
Style des sous-titres
Param. utilis
Style police
Taille police
Couleur police
Opacité police
Couleur l’arrière-plan
Opacité l’arrière-plan
Couleur bord
Type bord
Sous-titre
Blanc
Noir
Rouge
Vert
Bleu
Jaune
Magenta
Cyan
Opacité police
Il est possible de changer comme ci-dessous l’opacité
de police des sous-titres affichés.
IMAGE
SON
CHAîNE
DÉTAIL
LANGUE
Style des sous-titres
Style des sous-titres
Param. utilis
Style police
Taille police
Couleur police
Opacité police
Couleur l’arrière-plan
Opacité l’arrière-plan
Couleur bord
Type bord
Sous-titre
Plein
Clignotement
Translucide
Transparentt
Couleur de l’arrière-plan
Il est possible de changer comme ci-dessous la couleur
d’arrière-plan des sous-titres affichés.
Style des sous-titres
IMAGE
SON
CHAîNE
DÉTAIL
LANGUE
Style des sous-titres
Param. utilis
Style police
Taille police
Couleur police
Opacité police
Couleur l’arrière-plan
Opacité l’arrière-plan
Couleur bord
Type bord
Sous-titre
Blanc
Noir
Rouge
Vert
Bleu
Jaune
Magenta
Cyan
Opacité de l’arrière-plan
Il est possible de changer comme ci-dessous l’opacité
d’arrière-plan des sous-titres affichés.
IMAGE
SON
CHAîNE
DÉTAIL
LANGUE
Style des sous-titres
Style des sous-titres
Param. utilis
Style police
Taille police
Couleur police
Opacité police
Couleur l’arrière-plan
Opacité l’arrière-plan
Couleur bord
Type bord
Sous-titre
Plein
Clignotement
Translucide
Transparentt
Couleur bord
Il est possible de changer comme ci-dessous la couleur
de bordure des sous-titres affichés.
Style des sous-titres
Style des sous-titres
IMAGE
Param. utilis
Style police
SON
Taille police
Couleur police
CHAîNE
Opacité police
Couleur l’arrière-plan
DÉTAIL
Opacité l’arrière-plan
LANGUE
Couleur bord
Type bord
Type bord
Il est possible de changer comme ci-dessous le type de
bordure des sous-titres affichés.
Style des sous-titres
Style des sous-titres
IMAGE
Param. utilis
Style police
SON
Taille police
Couleur police
CHAîNE
Opacité police
Couleur l’arrière-plan
DÉTAIL
Opacité l’arrière-plan
LANGUE
Couleur bord
Appuyez sur [SETUP] pour quitter.
8
Type bord
Remarque :
•
Pour que les sous-titres s’affichent sur l’écran du téléviseur, il
faut que le signal diffusé contienne des données de sous-titres.
• Les émissions de télévision et les annonces télévisées ne
sont pas toutes sous-titrées ou ne possèdent pas tous les
types de sous-titres.
• Il se peut que les sous-titres et le texte ne soient pas
parfaitement synchronisés avec la voix sur le téléviseur.
• Les changements de chaîne peuvent causer le retard des
sous-titres pendant quelques secondes.
• Le réglage du volume ou la coupure du son peuvent causer
le retard des sous-titres pendant quelques secondes.
•
Il se peut que des abréviations, des symboles ou d’autres formes
grammaticales abrégées soient utilisées pour que le texte
n’accuse pas de retard par rapport à l’action qui se déroule sur
l’écran. Il ne s’agit pas d’un dysfonctionnement.
• Les caractères des sous-titres ou du texte ne s’affichent pas
pendant l’affichage du menu principal ou des fonctions.
• Si une case noire apparaît sur l’écran du appareil, cela
signifie que les sous-titres sont réglés sur le mode texte.
Pour enlever la case, sélectionnez “S-T1”, “S-T2”, “S-T3”,
“S-T4” ou “Hf”.
•
Si l’appareil reçoit des signaux de mauvaise qualité, il se
peut que les sous-titres contiennent des erreurs ou
qu’aucun sous-titre ne soit disponible. Les causes possibles
de mauvaise qualité des signaux sont :
-
Le brouillage causé par le démarrage d’un véhicule automobile
- Le brouillage d’un moteur électrique
- La faiblesse du signal capté
- La réception d’un signal multiplex (image fantôme ou
scintillement de l’écran)
• En cas de coupure de courant, l’appareil garde en mémoire
les réglages de sous-titres que vous avez choisis.
• Le sous-titrage codé ne s’affichera pas si vous utilisez
uneconnexion HDMI.
• Lorsque l’appareil reçoit un signal de lecture d’effets
spéciaux (par exemple Recherche, Ralenti et Arrêt sur
image) depuis la chaîne de sortie vidéo du magnétoscope
(CH3 ou CH4), il se peutqu’il n’affiche pas les bons soustitres ou le bon texte.
Sous-titre
Blanc
Noir
Rouge
Vert
Bleu
Jaune
Magenta
Cyan
Sous-titre
Aucun
Accru
Réduit
Uniforme
Ombre G.
Ombre Dr.
PRÉPARATION
TÉLÉVISION
OPTIONNELLE
DÉPANNAGE
INFORMATION
25
FR
REGARDER LA
CONFIGURATION
Page 64

ONFIGURATION OPTIONNELLE
C
Verrouillage
5
Le contrôle parental lit les cotes de protection parentale des émissions et
refuse l’accès aux émissions dont la cote est supérieure au niveau que vous
avez spéci é. Grâce à cette fonction, vous pouvez bloquer l’accès à certains
programmes ne convenant pas aux enfants et rendre invisibles certaines
chaînes ou modes d’entrée externe.
Appuyez sur [SETUP] pour quitter le menu principal.
1
/
K
Utilisez [Curseur
2
L] pour sélectionner “DÉTAIL”, puis
appuyez sur [ENTER].
IMAGE
ou
Utilisez [Curseur K / L] pour sélectionner
3
SON
CHAîNE
DÉTAIL
LANGUE
“Verrouillage”, puis appuyez sur [ENTER].
Détail
Détail
IMAGE
Sous-titre
Verrouillage
ou
Utilisez [les touches numériques] pour saisir votre
4
SON
CHAîNE
DÉTAIL
LANGUE
Configurations du PC
Mode economie d’energie
Région
Info logiciel actuel
Ef
Maison
Code NIP à quatre chiffres.
Verrouillage
Verrouillage
IMAGE
SON
CHAîNE
Entrer le mot de passe.
DÉTAIL
LANGUE
Code NIP
----
BACK
Retour
Suivez les instructions ci-dessous pour configurer
chacune des options.
Verrouillage
Verrouillage
IMAGE
SON
CHAîNE
DÉTAIL
LANGUE
Verrouillage de chaîne
Cote MPAA
Cote TV
Classement EN-CA
Classement FR-CA
Cote téléchargée
Effacer cote téléchargée
Nouveau mot de passe
A
B
C
D
...
A
“A. Verrouillage de Chaîne”
...
B
“B. Cote MPAA”
...
C
“C. Cote T V”.
...
D
“D. Nouveau Mot de Passe”
D page 27
D page 27
D page 28
D page 29
Remarque :
• Lorsque vous sélectionnez une cote et la réglez sur “Barré”,
les cotes plus élevées sont automatiquement bloquées.
Les émissions à cote plus basse seront disponibles pour le
visionnement.
• Si vous réglez la cote la plus élevée sur “Vision”, toutes les
cotes sont automatiquement réglées sur “Vision”.
• Afin de verrouiller l’accès à tout programme inapproprié,
définissez vos préférences dans les paramètres “Cote
MPAA”, “Cote TV” et “Cote téléchargée”.
• Le réglage de verrouillage est mémorisé en cas de panne
de courant (mais le code d’accès est remis à 0000).
• Si la cote est bloquée, s’affiche.
• “Cote téléchargée” est disponible lorsque l’appareil capte
une diffusion numérique au moyen du nouveau système
de cotes.
• Si le signal d’émission ne dispose pas des informations
régionales sur le verrouillage des cotes, “La cote
téléchargée n’est actuellement pas disponible.” s’affiche.
Ce message apparaît aussi lorsque vous essayez d’accéder
à “Cote téléchargée” après avoir effacé les informations
régionales sur le verrouillage des cotes, et si de nouvelles
informations n’ont pas été téléchargées depuis.
• Le système de cotes canadien sur ce appareil est basé sur
la norme CEA-766-A et la politique du CRTC (Conseil de la
radiodiffusion et des télécommunications canadiennes).
26
Si vous n’avez pas encore défini votre Code NIP,
•
saisissez 0000.
Lorsque le Code NIP est correct, le menu
•
“Verrouillage” s’affiche.
FR
Page 65

Français
A. Verrouillage de Chaîne
B. Cote MPAA
INTRODUCTION
A. Verrouillage de Chaîne
Certaines chaînes ou certains modes d’entrée externes spécifiques peuvent
être invisibles lorsque cette fonction est active.
Utilisez [Curseur K / L] pour sélectionner “Verrouillage
5
de chaîne”, puis appuyez sur [ENTER].
Verrouillage
Verrouillage
IMAGE
Verrouillage de chaîne
Cote MPAA
ou
Utilisez [Curseur K / L] pour sélectionner le rating de
6
SON
CHAîNE
DÉTAIL
LANGUE
Cote TV
Classement EN-CA
Classement FR-CA
Cote téléchargée
Effacer cote téléchargée
Nouveau mot de passe
votre choix, puis appuyez plusieurs fois sur [ENTER]
pour basculer entre “Vision” et “Barré”.
Verrouillage
Verrouillage
IMAGE
ou
Appuyez sur la touche [SETUP] pour quitter.
7
SON
CHAîNE
DÉTAIL
LANGUE
Sélectionner
Video
Component
HDMI 1
HDMI 2
HDMI 3
11-1 DTV
11-2 DTV
ENTER
Vision/Barré
BACK
Retour
B. Cote MPAA
Le système américain de classement des films est celui créé par la MPAA
(Motion Picture Association of America).
Utilisez [Curseur K / L] pour sélectionner “Cote MPAA”,
5
puis appuyez sur [ENTER].
Verrouillage
Verrouillage
IMAGE
Verrouillage de chaîne
Cote MPAA
ou
Utilisez [Curseur K / L] pour sélectionner la cote
6
SON
CHAîNE
DÉTAIL
LANGUE
Cote TV
Classement EN-CA
Classement FR-CA
Cote téléchargée
Effacer cote téléchargée
Nouveau mot de passe
désirée, puis appuyez plusieurs fois sur [ENTER] pour
permuter entre “Vision” et “Barré”.
Cote MPAA
Cote MPAA
IMAGE
ou
Caractéristique
SON
CHAîNE
DÉTAIL
LANGUE
Catégorie
X Public adulte seulement
NC-17 Aucune personne de moins de 17 ans admise
Restreint ; les moins de 17 ans doivent être
R
accompagnés d’un parent ou d’un tuteur
adulte
PG-13
Ne convient pas aux enfants de moins de 13 ans
PG Supervision parentale recommandée
G Tout public
NR Pas de classement
Sélectionner
X
NC-17
R
PG-13
PG
G
NR
ENTER
Vision/Barré Retour
BACK
PRÉPARATION
REGARDER LA
TÉLÉVISION
CONFIGURATION
OPTIONNELLE
DÉPANNAGE
INFORMATION
Appuyez sur [SETUP] pour quitter.
7
27
FR
Page 66

ONFIGURATION OPTIONNELLE
C. Cote TV
C
C. Cote TV
Utilisez [Curseur K / L] pour sélectionner “Cote TV”,
5
puis appuyez sur [ENTER].
Verrouillage
Verrouillage
IMAGE
ou
Utilisez [Curseur K / L / s
6
/
B
Verrouillage de chaîne
Cote MPAA
SON
Cote TV
Classement EN-CA
CHAîNE
Classement FR-CA
DÉTAIL
Cote téléchargée
Effacer cote téléchargée
LANGUE
Nouveau mot de passe
] pour sélectionner la cote
désirée, puis appuyez plusieurs fois sur [ENTER] pour
permuter entre “Vision” et “Barré”.
Cote TV
Cote TV
ou
IMAGE
SON
CHAîNE
DÉTAIL
LANGUE
Appuyez sur [SETUP] pour quitter.
7
TV-MA
TV-14
TV-PG
TV-G
TV-Y7
TV-Y
Sélectionner
V S L D
FV
ENTER
Vision/Barré Retour
BACK
Pour spécifier les cotes secondaires
Dans le cas de TV-MA, TV-14, TV-PG et TV-Y7, vous
pouvez aussi spécifier des cotes secondaires pour
bloquer l’accès à des éléments spécifiques des
émissions. Pour spécifier les cotes secondaires, suivez
les étapes ci-dessous.
Caractéristique
TV-MA Public adulte seulement
TV-14
TV-PG
Ne convient pas aux enfants de
moins de 14 ans
Supervision parentale
recommandée
Catégorie
élevée
TV-G Tout public
TV-Y7
TV-Y Convient à tous les enfants
Convient à tous les enfants de 7
ans et plus
basse
Sous
caractéristique
FV Fantaisie Violence TV-Y7
V Violence
S Scène à Caractère Sexuel
L Langage Vulgaire
D Dialogues Suggestifs TV-PG, TV-14
Catégorie Caractéristique
TV-PG
TV-14
TV-MA
Remarque :
• Les cotes secondaires barrées apparaissent à côté de la
catégorie de cote principale dans le menu “Cote TV”.
• Il n’est pas possible de barrer une cote secondaire (D, L, S
ou V) si la cote principale est réglée sur “Vision”.
• Le changement d’une catégorie sur “Barré” ou “Vision”
règle automatiquement toutes ses cotes secondaires sur la
même valeur (“Barré” ou “Vision”).
plus
plus
/
s
B
Utilisez [Curseur K / L /
] pour sélectionner la cote
désirée, puis appuyez plusieurs fois sur [ENTER] pour
permuter entre “Vision” et “Barré”.
Cote TV
Cote TV
ou
IMAGE
SON
CHAîNE
DÉTAIL
LANGUE
TV-MA
TV-14
TV-PG
TV-G
TV-Y7
TV-Y
Sélectionner
V S L D
FV
ENTER
Vision/Barré Retour
28
FR
BACK
Page 67

D. Nouveau Mot de Passe
D. Nouveau Mot de Passe
Le code par défaut “0000” est fourni ave l’appareil, mais vous pouvez
spécifier votre propre Code NIP.
Français
INTRODUCTION
Utilisez [Curseur K / L] pour sélectionner “Nouveau
5
mot de passe”, puis appuyez sur [ENTER].
Verrouillage
Verrouillage
IMAGE
Verrouillage de chaîne
Cote MPAA
ou
Appuyez sur [les touches numériques] pour saisir le
6
SON
CHAîNE
DÉTAIL
LANGUE
Cote TV
Classement EN-CA
Classement FR-CA
Cote téléchargée
Effacer cote téléchargée
Nouveau mot de passe
nouveau Code NIP à 4 chiffres.
Saisissez de nouveau le Code NIP dans l’espace
•
“Confirm le mot de passe”.
Nouveau mot de passe
Nouveau mot de passe
IMAGE
Entrer le mot de passe.
SON
CHAîNE
Confirmer le mot de passe.
DÉTAIL
LANGUE
Code NIP
Appuyez sur [SETUP] pour quitter.
7
----
----
BACK
Retour
PRÉPARATION
REGARDER LA
TÉLÉVISION
CONFIGURATION
OPTIONNELLE
DÉPANNAGE
Remarque :
• Assurez-vous que le nouveau Code NIP et le Code NIP de
confirmation sont identiques. S’ils sont différents, l’espace
de saisie devient vide pour permettre de saisir à nouveau le
Code NIP.
• Votre Code NIP sera effacé et remis à la valeur par défaut
(0000) si une panne de courant survient. Si
vous oubliez le Code NIP, débranchez le cordon
d’alimentation pendant 10 secondes pour remettre le Code
NIP à 0000.
INFORMATION
FR
29
Page 68

ONFIGURATION OPTIONNELLE
C
Réglages PC
5
Cette fonction vous permet de régler la position de l’écran du PC lorsque le
PC transmet des données via la prise d’entrée HDMI 1.
Appuyez sur [SETUP] pour quitter le menu principal.
1
/
K
Utilisez [Curseur
2
L] pour sélectionner “DÉTAIL”,
puis appuyez sur [ENTER].
IMAGE
SON
CHAîNE
DÉTAIL
LANGUE
L] pour sélectionner
Utilisez [Curseur
3
ou
/
K
“Configurations du PC”, puis appuyez sur [ENTER].
Détail
Détail
IMAGE
Sous-titre
Verrouillage
ou
SON
CHAîNE
DÉTAIL
LANGUE
Configurations du PC
Mode economie d’energie
Région
Info logiciel actuel
Hf
Maison
Régler la configuration.
5
Réinitialisation de la Position
Utilisez [Curseur K / L] pour sélectionner “Rétablir”,
puis appuyez sur [ENTER].
Réinitialisation de la position
Réinitialisation de la position
IMAGE
Réinitialise la position d’affichage
de l’image.
ou
La position horizontale/verticale de l’écran du PC est
•
SON
CHAîNE
DÉTAIL
LANGUE
réglée automatiquement.
Position Horizontale, Position Verticale
Utilisez [Curseur
Position Horizontale
-
0
Position H.
Ajuster Déplacer
Position Verticale
-
0
Position V.
Ajuster Déplacer
/
s
B
ENTER
Entrer
ENTER
Entrer
] pour régler.
Curseur
pour déplacer
+
l’écran du PC
vers la gauche
pour déplacer
+
l’écran du PC
vers le bas
s
pour déplacer
l’écran du PC
vers la droite
pour déplacer
l’écran du PC
vers le haut
Curseur
Annuler
Rétablir
B
Utilisez [Curseur K / L] pour sélectionner le paramètre
4
que vous voulez régler, puis appuyez sur [ENTER].
Configurations du PC
Configurations du PC
IMAGE
Réinitialisation de la position
ou
SON
CHAîNE
DÉTAIL
LANGUE
Position vorizontale
Position verticale
Appuyez sur [SETUP] pour quitter.
6
0
0
Remarque :
• Vous risquez de ne pas obtenir un écran approprié si
vous utilisez la fonction “Réinitialisation de la position”
avec certains signaux. Dans ce cas, réglez les paramètres
manuellement.
30
FR
Page 69

Mode Economie d’Energie
5 Région
Vous pouvez choisir de réduire ou non la consommation électrique.
5
Si vous avez sélectionné “Magasin”, il se peut que la consommation
dépasse les valeurs limites prévues par la norme ENERGY STAR®.
Français
INTRODUCTION
Appuyez sur [SETUP] pour affi cher le menu principal.
1
/
K
Utilisez [Curseur
2
L] pour sélectionner “DÉTAIL”, puis
appuyez sur [ENTER].
IMAGE
SON
CHAîNE
DÉTAIL
LANGUE
L] pour sélectionner
Utilisez [Curseur
3
ou
/
K
“Mode economie d’energie”, puis appuyez sur [ENTER].
Détail
Détail
IMAGE
Sous-titre
Verrouillage
ou
SON
CHAîNE
DÉTAIL
LANGUE
Configurations du PC
Mode economie d’energie
Région
Info logiciel actuel
Ef
Maison
Appuyez sur [SETUP] pour accéder au menu principal.
1
/
K
Utilisez [Curseur
2
L] pour sélectionner “DÉTAIL”,
puis appuyez sur [ENTER].
IMAGE
SON
CHAîNE
DÉTAIL
LANGUE
/
L] pour sélectionner “Région”,
Utilisez [Curseur
3
ou
K
puis appuyez [ENTER].
Détail
Détail
IMAGE
Sous-titre
Verrouillage
ou
SON
CHAîNE
DÉTAIL
LANGUE
Configurations du PC
Mode economie d’energie
Région
Info logiciel actuel
Ef
Maison
PRÉPARATION
REGARDER LA
TÉLÉVISION
CONFIGURATION
OPTIONNELLE
DÉPANNAGE
/
K
Utilisez [Curseur
4
L] pour sélectionner le mode
désiré, puis appuyez sur [ENTER].
ou
Ef
Sélectionnez ce réglage si vous souhaitez
réduire la consommation électrique.
Il se peut que la consommation de cet
Hf
appareil soit supérieure aux valeurs limites
prévues par la norme ENERGY STAR®.
Appuyez sur [SETUP] pour quitter.
5
IMAGE
SON
CHAîNE
DÉTAIL
LANGUE
Mode economie d’energie
Mode economie d’energie
Quand param étré sur “Ef”, la
conso. est réduite en
diminuant la luminosité du
rétro-éclairage.
/
K
Utilisez [Curseur
4
votre choix, puis appuyez sur [ENTER].
Ef
Hf
ou
Appuyez sur [SETUP] pour quitter.
5
L] pour sélectionner le région de
Région
Région
IMAGE
L’emplacement Maison est
recommandé pour une
utilisation domestique normale.
SON
En mode Magas in de détail,
tous les réglages sont fixes.
CHAîNE
DÉTAIL
LANGUE
Magasin
Maison
INFORMATION
FR
31
Page 70

ONFIGURATION OPTIONNELLE
C
Info Logiciel Actuel
5
Cette fonction indique la version du logiciel actuellement utilisée.
Appuyez sur [SETUP] pour accéder au menu principal.
1
/
K
Utilisez [Curseur
2
L] pour sélectionner “DÉTAIL”, puis
appuyez [ENTER].
IMAGE
SON
CHAîNE
DÉTAIL
LANGUE
L] pour sélectionner
Utilisez [Curseur
3
ou
/
K
“Info logiciel actuel”, puis appuyez sur [ENTER].
Détail
Détail
IMAGE
Sous-titre
Verrouillage
ou
Permet de connaître le numéro de la version du logiciel
4
SON
CHAîNE
DÉTAIL
LANGUE
Configurations du PC
Mode economie d’energie
Région
Info logiciel actuel
actuellement utilisée.
Info logiciel actuel
Info logiciel actuel
IMAGE
Release Version:
SON
E32OS_1.0
CHAîNE
DÉTAIL
LANGUE
Ef
Maison
Retour
Appuyez sur [SETUP] pour quitter.
5
32
FR
Page 71

ÉPANNAGE
D
Foire aux Questions (FAQ)5
Question Réponse
Vérifiez la connexion entre l’appareil principal et l’antenne ou le câble.
•
Vérifiez les piles de la télécommande.
•
Assurez-vous que rien ne fait obstacle entre la fenêtre du capteur
•
infrarouge et la télécommande.
Vérifiez la sortie du signal. S’il est correct, il s’agit peut être d’un
•
dysfonctionnement du capteur infrarouge. (Reportez-vous à “Vérification
du Signal IR”, page 36.)
Pointez la télécommande directement vers la fenêtre du capteur
Ma télécommande ne fonctionne pas.
Que dois-je faire ?
Pourquoi le menu de configuration initiale
apparaît-il à chaque fois que j’allume
l’appareil ?
Pourquoi ne puis-je pas regarder certains
programmes télévisés ?
Pourquoi les images provenant
des appareils externes connectés
n’apparaissent-elles pas ?
A chaque fois que je saisi un numéro de
chaîne, il change automatiquement.
Pourquoi les sous-titres n’apparaissent-ils
pas entièrement ou sont-ils en retard par
rapport au dialogue ?
Comment puis-je régler l’horloge ? Il n’y a pas de fonction horloge sur ce appareil.
•
infrarouge à l’avant de l’appareil.
Rapprochez-vous de l’appareil.
•
Réinsérez les piles en plaçant les pôles (signes +/–) dans le sens indiqué.
•
Lorsqu’un appareil équipé d’un système infrarouge (par exemple un PC)
•
se trouve à proximité de ce appareil, il se peut qu’il interrompe le signal
de la télécommande du appareil.
Éloignez l’appareil équipé d’un système infrarouge de ce appareil,
•
changez l’angle du capteur infrarouge ou éteignez la fonction de
communication infrarouge.
Connectez le câble coaxial RF directement à l’appareil et effectuez la
•
configuration initiale.
Vérifiez que le balayage des chaînes est terminé avant d’éteindre
•
l’appareil.
Vérifiez que la autoscan est terminé.
•
(Reportez-vous à “Autoscan”, page 18.)
La autoscan doit être effectué lors de la première configuration
•
de l’appareil ou s’il est déplacé en un endroit où certaines chaînes
auparavant non disponibles sont diffusées.
Il se peut que la chaîne sélectionnée ne soit pas en ondes.
•
Certaines chaînes ne seront pas captées si la autoscan est interrompu
•
avant la fin. Assurez-vous qu’il est exécuté jusqu’à la fin. (Reportez-vous à
“Autoscan”, page 18.)
Les réglages de la supervision parentale ne permettent pas de regarder la
•
chaîne sélectionnée.
(Reportez-vous à “Verrouillage”, page 26.)
L’appareil nécessite l’utilisation d’une antenne. Une antenne interne
•
(VHF /UHF), une antenne externe (VHF /UHF) ou un câble coaxial RF raccordé
à votre décodeur câble/satellite doit être branché(e) sur l’appareil.
Vérifiez si le bon mode d’entrée est sélectionné en appuyant sur
•
[INPUT SELECT] ou en utilisant [CH K / L].
(Reportez-vous à “Parcours des Modes d’Entrée”, page 15.)
Vérifiez la connexion entre l’appareil principal et l’antenne ou le câble.
•
Lors de l’utilisation d’un câble de Branchement Vidéo Composite, assurez-
•
vous que les connecteurs Vert (Y), Bleu (Pb/Cb) et Rouge (Pr/Cr) sont
branchés sur les prises colorées correspondantes de l’appareil.
De nombreuses chaînes numériques possèdent des numéros de chaînes
•
optionnels. L’appareil remplace automatiquement les numéros par ceux
qui indiquent les télédiffuseurs. Il s’agit des numéros utilisés pour les
diffusions analogiques.
Il arrive fréquemment que les sous-titres accusent du retard de quelques
•
secondes par rapport au dialogue lors des diffusions en direct. La plupart
des compagnies de production de sous-titres peuvent afficher les
sous-titres des dialogues à une vitesse maximale de 220 mots par minute.
Si le débit du dialogue est plus rapide, le texte est édité pour assurer que
les sous-titres suivent le débit du dialogue sur l’écran du appareil.
•
Français
INTRODUCTION
PRÉPARATION
REGARDER LA
TÉLÉVISION
CONFIGURATION
OPTIONNELLE
DÉPANNAGE INFORMATION
FR
33
Page 72

ÉPANNAGE
D
Guide de Dépannage
5
Si l’appareil ne fonctionne pas correctement même si vous l’utilisez en suivant les instructions de ce manuel,
vérifiez le tableau suivant et toutes les connexions avant d’appeler pour une demande de réparation.
Symptôme Solution
Assurez-vous que le cordon d’alimentation CA est branché.
•
Véri ez que la prise murale CA délivre la tension correcte ; branchez un autre appareil
Pas d’alimentation
La touche de commande ne
fonctionne pas
L’appareil est allumé mais
aucune image n’est visible à
l’écran.
Pas d’image ou de son
Pas de couleur
Les réglages des paramètres “IMAGE”
ou “SON” ne sont pas actifs à chaque
fois que vous allumez l’appareil.
Son correct mais image
médiocre
Image correcte mais son
médiocre
L’image est déformée ou vous
entendez un son inhabituel
Image fantôme, lignes ou
bande sur l’image
L’écran affiche du brouillage ou
des parasites.
Marques de couleurs
différentes sur l’écran du
téléviseur
•
électrique sur la prise murale CA.
En cas de panne de courant, débranchez le cordon d’alimentation pendant 1 minute
•
pour permettre á l’appareil de se réinitialiser.
Appuyez sur une seule touche à la fois. N’appuyez pas simultanément sur plusieurs
•
touches.
Véri ez la connexion de l’antenne ou du décodeur de di usion par câble / satellite.
•
Véri ez que tous les câbles de l’appareil sont connectés aux prises de sortie correctes
•
du dispositif externe tel qu’enregistreur BD/DVD.
Véri ez que le mode d’entrée choisi correspond bien à la prise d’entrée utilisée.
•
Assurez-vous que votre ordinateur N’EST PAS en mode veille lorsque le mode d’entrée
•
du appareil est dé ni sur PC. Appuyez sur n’importe quelle touche du clavier pour
réactiver votre ordinateur.
Assurez-vous que l’appareil est allumé.
•
Assurez-vous que le bon mode d’entrée est sélectionné.
•
Vérifiez que tous les câbles de l’appareil sont connectés aux prises de sortie correctes
•
du dispositif externe tel qu’enregistreur BD/DVD.
Vérifiez les autres chaînes de télévision. Le problème vient peut-être du télédiffuseur.
•
Éteignez l’appareil et attendez environ 1 minute, puis rallumez-le.
•
Vérifiez la connexion de l’antenne ou du décodeur de diffusion par câble/satellite.
•
Vérifiez que le mode d’entrée choisi correspond bien à la prise d’entrée utilisée.
•
Assurez-vous que votre ordinateur N’EST PAS en mode veille lorsque le mode d’entrée
•
du appareil est défini sur PC. Appuyez sur n’importe quelle touche du clavier pour
réactiver votre ordinateur.
Vérifiez que le son n’est pas réglé sur la sourdine. Appuyez sur [MUTE ] pour afficher
•
à l’écran la barre de volume et vérifier le réglage.
Vérifiez que le volume n’est pas réglé sur “0” ou “Sourdine”. Si c’est le cas, réglez le
•
volume au niveau désiré à l’aide des touches [VOL. X / Y].
Vérifiez les autres chaînes de télévision. Le problème vient peut-être du télédiffuseur.
•
Réglez “Couleur” dans le menu principal.
•
Vous devez sélectionner le paramètre “Maison” dans “Région” (reportez-vous à la page
•
31).
Dans le cas contraire, les modi cations que vous aurez apportées aux réglages ne
seront pas mémorisées lorsque vous éteindrez l’appareil.
Le brouillage électrique causé par d’autres appareils près du téléviseur peut affecter la
•
qualité de l’image.
Réglez “Contraste” et “Luminosité” dans le menu principal.
•
Vérifiez les autres chaînes de télévision. Le problème vient peut-être du télédiffuseur.
•
Pour une qualité d’image optimale, regardez les programmes “haute définition“
•
conçus pour écrans larges. Si vous n’avez pas accès à des programmes HD, regardez
des programmes de “définition standard“.
Vérifiez les autres chaînes de télévision. Le problème vient peut-être du télédiffuseur.
•
Assurez-vous que le câble audio est branché correctement.
•
L’appareil reçoit peut-être des interférences causées par des appareils électriques, des
•
automobiles, des motocyclettes ou des éclairages uorescents.
Déplacez l’appareil pour véri er si des interférences sont bien la cause du problème.
•
Le brouillage électrique causé par d’autres appareils près du téléviseur peut affecter la
•
qualité de l’image.
Vérifiez les autres chaînes de télévision. Le problème vient peut-être du télédiffuseur.
•
Lorsque les capacités de l’appareil dépassent celles du signal numérique diffusé, le signal est
•
augmenté pour s’adapter aux capacités de l’appareil, ce qui peut causer le brouillage.
Véri ez les autres chaînes de télévision. Le problème vient peut-être du télédi useur.
•
34
FR
Page 73

Symptôme Solution
L’appareil garde en mémoire le dernier réglage de volume.
Vous changez de source
d’entrée et le volume sonore
change
Vous changez de source
d’entrée et la taille de l’écran
change
L’image affichée ne couvre pas
la totalité de l’écran
Les sous-titres s’a chent sous
forme de case blanche.
Les sous-titres ne s’a chent
pas même s’il s’agit d’une
émission sous-titrée.
Les sous-titres ne s’a chent
pas lors de la lecture d’un
disque ou d’une vidéocassette
sous-titrés.
Une case noire s’a che sur
l’écran du téléviseur.
•
Si le volume sonore de l’autre dispositif est réglé plus bas ou plus haut, le volume
•
sonore.
Cet appareil garde en mémoire le dernier mode d’a chage utilisé lors de la
•
dernière utilisation de la source considérée.
Si vous utilisez l’appareil comme un moniteur PC, assurez-vous que les paramètres
•
“Position H.” et “Position V.” du menu “Configurations du PC” sont correctement
réglés.
Si vous regardez la télévision ou que vous utilisez l’entrée vidéo, S-vidéo, vidéo
•
à composantes ou HDMI avec un signal 480i, appuyez plusieurs fois de suite sur
[SCREEN MODE
Il se peut que le brouillage généré dans l’édifice ou que les conditions
•
météorologiques rendent les sous-titres incomplets.
Il se peut que le télédiffuseur réduise la longueur de l’émission pour insérer de
•
la publicité. Le décodeur de sous-titres ne peut pas lire les informations des
émissions ainsi raccourcies.
Il peut s’agir d’une copie illégale du disque ou de la vidéocassette, ou il se peut
•
que le signal de sous-titrage n’ait pas été reproduit lors de la copie.
•
Le mode texte est sélectionné pour les sous-titres. Sélectionnez “S-T1”, “S-T2”, “S-T3”,
“S-T4” ou “Hf”.
Français
] pour basculer entre les différents modes d’écran proposés.
INTRODUCTION
PRÉPARATION
REGARDER LA
TÉLÉVISION
CONFIGURATION
OPTIONNELLE
DÉPANNAGE INFORMATION
Remarque :
Le panneau à cristaux liquides (LCD) est fabriqué pour durer de longues années. Il peut arriver que quelques pixels non actifs s’affichent en
•
permanence sous forme de points bleus, verts ou rouges. Cela ne doit pas être considéré comme un vice de fabrication de l’écran à cristaux
liquides (LCD).
Certaines fonctions ne sont pas disponibles dans certains modes, mais cela n’est pas un dysfonctionnement. Lisez les explications de ce
•
manuel pour plus de détails sur les opérations correctes.
FR
35
Page 74
NFORMATION
I
Glossaire5
ATS C
Il s’agit d’un acronyme pour “Advanced
Television Systems Committee” (Comité de
systèmes de télévision évolués), et du nom
donné aux normes de diffusion numérique.
CEC (contrôle “inter-éléments”)
Ce protocole de liaison permet à votre
appareil de communiquer avec nos différents
appareils compatibles CEC et de contrôler
automatiquement certaines fonctions.
Dolby Digital
Il s’agit du système développé par Dolby
Laboratories pour la compression du son
numérique. Il permet d’obtenir un son
stéréo (2 canaux) ou l’audio multicanal.
HDMI
(interface multimédiahaute définition)
Interface qui prend en charge, surun
seul câble, tous les formatsaudio/vidéo
numériques non com-primés, y compris
ceux d’un“décodeur”, d’un lecteur BD / DVD
et d’un téléviseur numérique.
HDTV (télévision haute définition)
Il s’agit du format numérique ultime, qui
produit une image à haute résolution et
une qualité d’image supérieure.
Mot de Passe / Code NIP
Il s’agit d’un numéro à 4 chiffres qui donne
accès aux fonctions de supervision parentale.
NTSC
Il s’agit d’un acronyme pour “National Television
Systems Committee” (Comité du système de
télévision national), et du nom donné aux
normes actuelles de diffusion analogique.
Les signaux NTSC captés actuellement ne seront
plus émis par les stations de télédiffusion à
compter du 17 février 2009.
Rapport de Format
La largeur de l’écran du téléviseur par rapport
à sa hauteur. Les téléviseurs classiques ont un
rapport de format 4:3 (autrement dit, l’écran
du téléviseur est presque carré), contre un
rapport de format 16:9 pour les modèles à
écran large (l’écran du téléviseur est presque
deux fois plus large que haut).
Entretien5
Nettoyage du Boîtier
Essuyez le panneau avant et les autres surfaces
•
extérieures de l’appareil avec un chiffon doux trempé
dans l’eau tiède et essoré.
•
N’utilisez jamais un solvant ou de l’alcool. Ne pulvérisez
pas d’insecticide près de l’appareil. De tels produits
chimiques peuvent endommager et décolorer les
surfaces exposées.
Nettoyage du Panneau
Essuyez le panneau de l’unité avec un chiffon doux.
Avant de nettoyer le panneau, débranchez le cordon
d’alimentation CA.
Réparation
Si votre appareil ne fonctionne plus, n’essayez pas de
le réparer vous-même. Aucune pièce intérieure n’est
réparable par l’utilisateur. Éteignez l’appareil, débranchez
le cordon d’alimentation CA et appelez le numéro
gratuit d’assistance à la clientèle que vous trouverez sur
la couverture de ce manuel pour localiser un centre de
service autorisé.
SAP (canal audio secondaire)
Il s’agit du canal audio secondaire diffusé
séparément du canal audio principal. Ce
canal audio sert de canal optionnel dans
les diffusions bilingues.
SDTV (télévision à définition standard)
Il s’agit d’un format numérique standard
dont la qualité équivaut à celle d’une
image NTSC.
S-vidéo
Offre une qualité d’image supérieure
en transmettant chaque signal, chaque
couleur (c) et chaque luminance (y)
indépendamment par le biais d’un câble
séparé.
Vidéo à Composantes
Il s’agit d’un format de signal vidéo où
chacune des 3 couleurs primaires (le rouge,
le bleu et le vert) est transportée sur une
ligne de signaux différente. Cela permet
aux téléspectateurs d’obtenir une image
aux couleurs très fidèles à l’original. Il existe
plusieurs formats de signaux, dont Y / Pb /
Pr et Y / Cb / Cr.
Vérification du Signal IR
Si la télécommande ne fonctionne pas correctement, vous
pouvez utiliser un appareil photo numérique (ou un téléphone
mobile doté d’une fonction appareil photo) pour voir si le
signal infrarouge qu’il envoie est bien reçu par l’appareil.
Avec un appareil photo numérique
•
(y compris les appareils photos intégrés
dans un téléphone portable) :
Dirigez l’Appareil Photo Numérique vers
la diode infrarouge située à l’avant de la
télécommande. Appuyez sur n’importe
quelle touche de la télécommande et
regardez l’écran de l’appareil photo. Si la
lumière clignotante infrarouge apparaît,
ceci signifie que la télécommande envoie
bien un signal infrarouge.
36
FR
Page 75

Français
Désignation des Chaînes de Câblodiffusion5
Si vous êtes abonné au service de câblodi usion (CATV), les chaînes s’a chent de 1-135. Les câblodi useurs désignent souvent les chaînes sous la forme
de lettres ou d’une combinaison de lettres et de chi res. Informez-vous auprès de votre câblodi useur local. Le tableau ci- dessous présente la désignation
commune des chaînes de câblodi usion.
Chaîne de CATV
Affichage du téléviseur
Chaîne de CATV
Affichage du téléviseur
Chaîne de CATV
Affichage du téléviseur
Chaîne de CATV
Affichage du téléviseur
Chaîne de CATV
Affichage du téléviseur
Chaîne de CATV
Affichage du téléviseur
Chaîne de CATV
Affichage du téléviseur
5
Format de télévision
Sous-titres système :
§15,122/FCC (sous-titres numériques)
§15,119/FCC (sous-titres analogiques)
Couverture des chaînes (ATSC/NTSC) :
Hertzienne VHF : 2~13 UHF : 14~69
CATV 2~13, A~W, W+1~W+94
A-5~A-1, 5A
Système de syntonisation :
Syntonisation par synthétiseur de fréquence de
Accès aux chaînes : Clavier d’accès direct,
Balayage programmable, et touches de haut/bas
5
Sortie audio : 5W, 8Ω x 2
5A122334455667788991010111112121313A14B15C16D17E18F19G20H
I22J23K24L25M26N27O28P29Q30R31S32T33U34V35W36W+1
W+743W+844W+945W+1046W+1147W+1248W+1349W+1450W+1551W+16
W+2864W+2965W+3066W+3167W+3268W+3369W+3470W+3571W+3672W+3773W+3874W+3975W+4076W+4177W+4278W+4379W+4480W+4581W+4682W+4783W+48
W+4985W+5086W+5187W+5288W+5389W+5490W+5591W+5692W+5793W+5894A-595A-496A-397A-298A-199W+59
W+65
W+66
W+67
W+68
W+69
W+70
W+71
W+72
106
W+86
127
107
W+87
128
108
W+88
129
109
W+89
130
110
W+90
131
111
W+91
132
112
W+92
133
113
W+93
134
W+73
114
W+94
135
Spécifications Générales
: Norme de télévision ATSC / NTSC-M
W+1753W+1854W+1955W+2056W+2157W+2258W+2359W+2460W+2561W+2662W+27
52
W+74
W+75
W+76
W+77
W+78
115
116
117
118
5
Autres Spécifications
119
W+79
120
Bornes :
Entrée d’antenne
: VHF/UHF/CATV 75Ω asymétrique (type F)
W+2 W+339W+440W+541W+6
37 38
W+60
W+61
100
W+80
121
101
W+81
122
102
W+82
123
W+62
103
W+83
124
Entrée audio : Prise RCA (G/D) x 6 500mV rms
Entrée vidéo : Prise RCA x 1 1V p-p (75Ω)
Entrée S-vidéo : Miniprise DIN à 4 broches x 1 Y : 1V p-p (75Ω)
C : 286mV p-p (75Ω)
(analogique W+1~W+84),
Entrée vidéo à composantes :
Prise RCA x 3 Y : 1V p-p (75Ω)
Pb/Cb : 700mV p-p (75Ω)
Pr/Cr : 700mV p-p (75Ω)
chaîne
Entrée HDMI : Prise HDMI à 19 broches x 3
Sortie audio numérique coaxiale :
Prise RCA x 1 500mV p-p (75Ω)
Spécifications Électriques
Sortie audio : Prise RCA (G/D) x 2 500mV rms
Télécommande :
Système de lumière infrarouge codée numériquement
Température de fonctionnement :
41°F (5°C) à 104°F (40°C)
Alimentation :
120V~ AC +/- 10%, 60Hz +/- 0,5%
W+63
104
W+84
125
21
42
63
84
W+64
105
W+85
126
INTRODUCTION
PRÉPARATION
REGARDER LA
TÉLÉVISION
CONFIGURATION
OPTIONNELLE
DÉPANNAGE INFORMATION
• Le design et les spéci cations sont sujets à modi cation sans préavis et
n’impliquent aucune obligation légale de notre part.
• En cas de di érence entre les langues, la langue anglaise a priorité.
Consommation (maximale) :
155W
LCD : Téléviseur 32 pouces (31,5 pouces en diagonale)
Dimensions : <sans suppor t> <avec support>
Largeur : 30
Hauteur : 20
Profondeur : 3
9
/16 po (776mm) 30 9/16 po (776mm)
1
/2 po (520,3mm) 21 7/16 po (543mm)
15
/16 po (100mm) 9 3/8 po (238mm)
Poids : 19,2 lb (8,7kg) 20,1 lb (9,1kg)
37
FR
Page 76
GARANTIE LIMITÉE
QUATRE-VINGT-DIX(90)JOURS LA MAIN D’ŒUVRE / UN(1)AN SUR LES PIÉCES
COUVERTURE DE GARANTIE:
La provision pour la garantie se limite aux termes énumérés cidessous.
QUI EST COUVERT?
La compagnie garantit le produit au premier acheteur ou à la personne recevant le produit en cadeau contre tout défaut de matière
ou de main d’œuvre conformément à la date d’achat originale («
Période de garantie ») d’un distributeur agréé. Le reçu de vente
original indiquant le nom du produit ainsi que la date d’achat d’un
détaillant agréé est considéré comme une preuve d'achat.
QU'EST-CE QUI EST COUVERT?
La garantie couvre les nouveaux produits contre tout défaut de
matière ou de main d’œuvre et suivant la réception d’une réclamation valide dans les limites de la garantie. La compagnie s’engage, à
son choix, à (1) réparer le produit gratuitement avec des pièces de
rechange neuves ou remises à neuf, ou à (2) échanger le produit
pour un produit neuf ou ayant été fabriqué à partir de pièces
neuves ou usagées en bon état et au moins fonctionnellement
équivalent ou comparable au produit d’origine dans l’inventaire
actuel de Philips, ou à (3) rembourser le prix d’achat initial du produit.
La compagnie garantit les produits ou pièces de remplacement
prévus sous cette garantie contre tout défaut de matière ou de
main d’œuvre à partir de la date de remplacement ou de réparation pour une période de quatre-vingt-dix (90) jours ou pour la
portion restante de la garantie du produit d’origine, la plus longue
de ces couvertures étant à retenir. Lorsqu’un produit ou une pièce
est échangée, tout article de rechange devient votre propriété et
l’article remplacé devient la propriété de la compagnie. Lorsqu’un
remboursement est effectué, votre produit devient la propriété de
la compagnie.
Remarque : tout produit vendu et idenifié comme étant
remis à neuf ou rénové porte une garantie limitée de qua-
tre-vingt-dix (90) jours.
Un produit de remplacement ne pourra être envoyé que si
toutes les exigences de la garantie ont été respectées.
Tout manquement de répondre à toutes les exigences
pourra entraîner un délai.
CE QUI N’EST PAS COUVERT - EXCLUSIONS ET LIMITATIONS:
Cette garantie limitée ne s’applique qu’aux nouveaux produits fab-
que de commerce, le nom commercial ou le logo qui y sont
apposés. Cette garantie limitée ne s’applique à aucun produit
matériel ou logiciel, même si celui-ci est incorporé au produit ou
vendu avec celui-ci. Les fabricants, fournisseurs ou éditeurs peuvent
fournir une garantie séparée pour leurs propres produits intégrés
au produit fourni.
La compagnie ne saurait être tenu responsable de tout dommage
ou perte de programmes, données ou autres informations mis en
mémoire dans tous médias contenus dans le produit, ou autre
additionnel produit ou pièce non couvert par cette garantie. La
récupération ou réinstallation des programmes, données ou autres
informations n’est pas couverte par cette garantie limitée.
Cette garantie ne s’applique pas (a) aux dommages causés par un
accident, un abus, un mauvais usage, une négligence, une mauvaise
application ou à un produit non fournis, (b) aux dommages causés
par un service réalisé par quiconque autre que la compagnie ou
qu’un centre de service agréé de la compagnie, (c) à un produit ou
un produit, accessoire ou produit non durable vendu « TEL QUEL
» sans garantie de quelque description que ce soit par l’inclusion de
produits remis vendu « TEL QUEL » par certains détaillants.
Cette garantie limitée ne couvre pas:
• les frais d'expédition pour le renvoi du produit défectueux.
produit, le réglage des commandes sur le produit du client ainsi
que l'installation ou la réparation du système d'antenne/source
sonore externe au produit.
• la réparation du produit et/ou le remplacement des pièces à
cause d'une mauvaise installation ou entretien, d'un raccordement à
une alimentation électrique incorrecte, d’une surtension temporaire, de dommages occasionnés par la foudre, d’une rémanence de
l’aspect esthétique du produit causé par une usure normale, d'une
réparation non autorisée ou de toute autre cause non contrôlable
par la compagnie.
• tout dommage ou réclamation pour des produits non disponibles
à l’utilisation ou pour des données perdues ou logiciel perdu.
• tout dommage causé par un mauvais acheminement du produit
ou par un accident encouru lors du renvoi du produit.
permettre l'utilisation dans tout pays autre que celui pour lequel il
était désigné, fabriqué, approuvé et/ou autorisé ou toute réparation
• un produit perdu lors de l’expédition sans preuve signée de la
réception.
• tout manquement d’exploiter le produit selon le manuel de l’utilisateur.
POUR OBTENIR DE L’AIDE…
Communiquez avec le centre de service à la clientèle:
1-866-309-8819
LA RÉPARATION OU LE REMPLACEMENT CONFORMÉMENT
À CETTE GARANTIE CONSTITUE LE SEUL REMÈDE POUR LE
CONSOMMATEUR, AVEC LA COMPAGNIE ÉMETTRICE NON
RESPONSABLE N’EST AUCUNEMENT RESPONSABLE DE TOUT
DOMMAGE ACCESSOIRE OU INDIRECT RÉSULTANT DE LA
VIOLATION DE TOUTE GARANTIE EXPRESSE OU IMPLICITE
SUR CE PRODUIT. SAUF DANS LA MESURE INTERDITE PAR
LES LOIS APPLICABLES, TOUTE GARANTIE IMPLICITE DE
QUALITÉ LOYALE ET MARCHANDE OU D’UTILITÉ PARTICULIÈRE DU PRODUIT EST LIMITÉE DANS LE TEMPS À LA
DURÉE DE CETTE GARANTIE.
Certains états ne reconnaissent pas l'exclusion ou la limitation de la
responsabilité pour dommages indirects ou accessoires, ou
autorisent des limitations sur la durée d’une garantie implicite, il est
donc possible que les limitations ou exclusions mentionnées cidessus soient sans effet dans votre cas.
38
FUNAI CORPORATION, Inc. 19900 Van Ness Avenue, Torrance, CA 90501
Imprimé en Chine
FR
Page 77
EMERSON AND THE G-CLEF LOGO ARE REGISTERED TRADEMARKS
OF EMERSON RADIO CORP., PARSIPPANY, NEW JERSEY, U.S.A.
LC320EMX
Owner’s Manual
Guide d’utilisation
Manual del Usuario
EnglishEspañol Français
NEED HELP?
BESOIN D’AIDE ?
¿NECESITA AYUDA?
PLEASE CALL TOLL FREE!
APPELEZ NOTRE NUMÉRO GRATUIT !
¡LLAME POR FAVOR SIN COSTO!
1-866-309-8819
OR VISIT OUR WEB SITE AT
OU VISITEZ NOTRE SITE WEB À L’ADRESSE
Ó VISITE NUESTRO SITIO WEB EN
www.emersonaudiovideo.com/
MODEL NUMBER SERIAL NUMBER
HIGH-DEFINITION TELEVISION
TO RECEIVE DIGITAL/ANALOG SIGNAL,
YOU MUST CONNECT ANTENNA.
POUR RECEVOIR LE SIGNAL
NUMÉRIQUE /ANALOGIQUE, VOUS
DEVEZ CONNECTER L’ANTENNE.
PARA RECIBIR LA SEÑAL DIGITAL/
ANALÓGICA, DEBE CONECTAR LA
ANTENA.
© 2009 Funai Electric Co., Ltd.
Page 78
El modelo y el número de serie de esta unidad se pueden encontrar
en la caja. Deberá anotar y guardar el modelo y el número de serie
para consultarlos, si los necesita, en el futuro.
Precauciones5
Número de modelo:
Número de serie:
ADVERTENCIA:
PARA REDUCIR EL RIESGO DE QUE SE PRODUZCA UN INCENDIO O SE RECIBA UNA DESCARGA
ELÉCTRICA, NO EXPONGA ESTE APARATO A LA LLUVIA NI A LA HUMEDAD.
EL APARATO NO DEBERÁ EXPONERSE A LOS GOTEOS NI A LAS SALPICADURAS, Y ENCIMA DE ÉL NO
DEBERÁN PONERSE OBJETOS CON LÍQUIDOS EN SU INTERIOR COMO, POR EJEMPLO, FLOREROS.
CAUTION
RISK OF ELECTRIC SHOCK
DO NOT OPEN
AVISO:
NO QUITE LA CUBIERTA (O EL PANEL POSTERIOR). EN EL INTERIOR DEL
APARATO NO HAY PIEZAS QUE DEBA MANIPULAR EL USUARIO. SOLICITE EL
SERVICIO DE REPARACIONES AL PERSONAL DE SERVICIO CUALIFICADO.
La marca de aviso está situada en la parte inferior o posterior de la caja.
PARA REDUCIR EL RIESGO DE SUFRIR UNA DESCARGA ELÉCTRICA
El símbolo del rayo con punta de flecha, en el interior de un
triángulo equilátero, tiene la finalidad de avisar al usuario
de la presencia de “tensión peligrosa” dentro de la caja del
aparato que podría ser de suficiente intensidad como para
constituir un riesgo para las personas en caso de que éstas
recibiesen una descarga eléctrica.
El signo de exclamación dentro de un triángulo equilátero
tiene la nalidad de avisar al usuario de la presencia de
instrucciones de utilización y mantenimiento (servicio) en el
material impreso que acompaña al aparato.
Instrucciones de Seguridad Importantes
1. Lea estas instrucciones.
2. Guarde estas instrucciones.
3. Haga caso de todas las advertencias.
4. Siga todas las instrucciones.
5. No utilice este aparato cerca del agua.
6. Limpie el aparato con un paño seco.
7. No tape ninguna abertura de ventilación. Haga la
instalación siguiendo las instrucciones del fabricante.
8.
No instale el aparato cerca de fuentes de calor como, por
ejemplo, radiadores, salidas de aire caliente, estufas u otros
aparatos (incluyendo amplificadores) que produzcan calor.
9. No anule la función de seguridad de la clavija polarizada
o con conexión a tierra. Una clavija polarizada tiene
dos patillas, una de la cuales es más ancha que la otra.
Una clavija del tipo de conexión a tierra tiene dos
patillas y una espiga de conexión a tierra. La patilla
más ancha y la espiga se incluyen para su seguridad.
Si la clavija suministrada no se puede conectar en su
toma de corriente, consulte a un electricista para que le
reemplace la toma de corriente obsoleta.
No coloque la unidad sobre un mueble que pueda volcar si algún niño o adulto lo inclina, empuja, se coloca encima o trepa por
él. La caída de la unidad puede provocar lesiones graves e incluso la muerte.
ADVERTENCIA DE LA FCC
Este aparato puede generar o utilizar energía radioeléctrica. Los cambios o las modificaciones que se hagan en este aparato
podrán causar interferencias a menos que éstos sean aprobados expresamente en este manual. El usuario podrá perder la
autorización que tiene para utilizar este aparato si hace algún cambio o modificación que no haya sido autorizado.
10. Proteja el cable para que nadie lo pise ni sea pellizcado,
particularmente en la clavija, receptáculo de
conveniencia o punto por donde sale del aparato.
11. Utilice solamente los accesorios especificados por el
fabricante.
12.
Utilice el aparato sólo con el carrito, soporte,
trípode, ménsula o mesa especificado por el
fabricante, o vendido con el aparato. Cuando
utilice un carrito, tenga cuidado para mover
la combinación del carrito/aparato, para
evitar causar heridas o que el aparato se caiga.
13. Desenchufe este aparato durante las tormentas eléctricas
o cuando no se vaya a utilizar durante mucho tiempo.
Solicite todas las reparaciones al personal de servicio
14.
cualificado. Las reparaciones serán necesarias cuando el
aparato se haya estropeado de cualquier forma como,
por ejemplo, cuando el cable o la clavija de alimentación
se hayan dañado, cuando se hayan derramado líquidos o
hayan caído objetos en el interior del aparato, cuando el
aparato haya estado expuesto a la lluvia o a la humedad,
cuando no funcione normalmente o cuando se haya caído.
INTERFERENCIA DE RADIO Y TV
Este aparato ha sido probado y ha demostrado cumplir con los límites existentes para los dispositivos digitales de la
Clase B, de conformidad con el Apartado 15 de las Normas de la FCC. Este aparato genera, utiliza y puede radiar energía
radioeléctrica, y, si no se instala y utiliza de acuerdo con las instrucciones, puede causar interferencias perjudiciales
en las comunicaciones por radio. Sin embargo, no existen garantías de que no se produzcan interferencias en una
instalación particular. Si este aparato causa interferencias perjudiciales en la recepción de la radio o la televisión, lo
que se puede determinar apagando y luego encendiendo el aparato, al usuario se le recomienda intentar eliminar la
interferencia tomando una, o más, de las medidas siguientes:
1) Cambie la orientación y la ubicación de la antena de recepción.
2) Aumente la separación entre el aparato y el receptor.
3) Conecte el aparato en una toma de corriente o circuito que sean diferentes de aquellos a los que está conectado el receptor.
4) Consulte a su concesionario o técnico en radio/TV con experiencia para solicitar su ayuda.
Este aparato digital de la clase B cumple con la norma canadiense ICES-003.
2
ES
Page 79
EnglishEspañol Français
Este aparato no deberá colocarse en una instalación empotrada como, por ejemplo, una librería o estantería, a menos que disponga de
una ventilación apropiada. Asegúrese de dejar un espacio libre de unos 3,2 pulgadas (8cm) alrededor de este aparato.
Desconecte la clavija de alimentación de la toma de corriente cuando busque un problema o no utilice el aparato. La clavija de
la alimentación deberá estar siempre lista para ser conectada.
AVISO: Si la pila se sustituye incorrectamente existe el riesgo de que se produzca una explosión. Sustitúyala siempre por otra de
ADVERTENCIA:
tipo equivalente.
Las baterías y las pilas (la batería o la pila que está instalada) no deberán exponerse a un calor excesivo como, por
ejemplo, el del sol, el de un incendio u otro similar.
LA LUZ DE LA LCD CONTIENE MERCURIO, DESHÁGASE DE ELLA CUMPLIENDO LA LEY LOCAL, ESTATAL O FEDERAL.
ADVERTENCIA:
PARA EVITAR PELIGROS DE DESCARGA ELÉCTRICA O INCENDIO
No maneje el cable de alimentación de CA con las manos mojadas.
•
No retire la caja de esta unidad. Tocar las piezas del interior de la caja puede causar una descarga eléctrica y/o daños en
•
esta unidad. Para realizar reparaciones y ajustes en el interior de este aparato, llame a un concesionario cualificado o a
un centro de reparaciones autorizado.
No tire del cable de alimentación CA cuando lo desconecte de una toma de CA. Sujete la clavija y tire de ella.
•
No meta sus dedos ni otros objetos en la unidad.
•
COLOCACIÓN Y MANEJO
Las aberturas no deberán taparse colocando la unidad en una cama, sofá, alfombra u otra superficie similar.
•
No instale la unidad cerca de un radiador o salida de aire caliente.
•
No instale la unidad expuesta a la luz solar directa, cerca de campos magnéticos o en lugares expuestos al polvo o a
•
vibraciones fuertes.
Evite colocar la unidad donde se produzcan cambios extremos de temperatura.
•
Instale la unidad en una posición horizontal y estable. No ponga nada directamente encima o debajo de la unidad.
•
Dependiendo de los dispositivos externos, es posible que se produzcan ruidos y alteraciones en la imagen y/o sonido
si la unidad se coloca demasiado cerca de ellos. En este caso, deje un buen espacio entre los dispositivos externos y la
unidad.
•
Dependiendo del medio ambiente, la temperatura de esta unidad puede aumentar un poco, pero esto no indica
ningún fallo de funcionamiento.
NOTA ACERCA DEL RECICLADO
Los materiales de embalaje de esta unidad son reciclables y pueden volver a utilizarse.
•
Disponga de ellos según los reglamentos de reciclado locales.
Las baterías y las pilas nunca deberán tirarse a la basura ni incinerarse, sino que se deberá disponer de ellas
•
según los reglamentos locales relacionados con la basura química.
TRANSPORTE DE ESTA UNIDAD
Esta unidad deberá ser llevada por un mínimo de dos personas.
•
Asegúrese de sujetar firmemente los bastidores superior e inferior de
•
la unidad como se muestra en la ilustración.
Para impedir lesiones, este aparato deberá fijarse firmemente al suelo/pared siguiendo las instrucciones.
Información sobre Marcas Registradas
5
HDMI, el logotipo de HDMI y High-Definition Multimedia Interface son marcas comerciales o marcas registradas de HDMI
•
Licensing LLC.
Fabricado bajo licencia de Dolby Laboratories. “Dolby” y el símbolo de la doble D son marcas comerciales de Dolby
•
Laboratories.
Los Productos que han conseguido el ENERGY STAR® están diseñados para proteger el medio ambiente a través de una
•
mejor eficiencia en el consumo de energía.
3
ES
Page 80

NTRODUCCIÓN
panel delantero
➂
agujeros de tornillo
I
Accesorios Suministrados5
manual del usuario
(1EMN24300)
Si necesita cambiar estos accesorios, consulte el número de pieza que aparece junto a las ilustraciones y llame a nuestro
•
teléfono de atención al cliente, que encontrará en la portada de este manual.
Conectar el Soporte
5
Debe colocarle el soporte a la unidad para que sirva como unidad de mesa. Compruebe que la parte trasera y la delantera del
soporte coinciden en la dirección apropiada.
Extienda un paño grueso y suave
1
sobre una mesa, como se muestra
abajo.
Coloque la unidad principal con la
pantalla hacia abajo sobre la mesa.
Compruebe que no daña la pantalla.
Se necesitan al menos dos personas
para llevar a cabo este paso.
guía de inicio rápido
(1EMN24640)
Alinee los 2 ganchos del soporte con
2
los dos ganchos bajo la parte inferior
de la unidad principal (indicados por
la echa
en la dirección que indica la echa
hasta que tope y que los 4 ori cios de
montaje queden alineados.
Compruebe que el cable de
alimentación de CA no esé entre el
soporte y la unidad.
mando a distancia
(NH000UD)
pilas
(AAA x 2)
AAA
AAA
), luego deslice el soporte
➀
tarjeta de registro
(1EMN24701)
Atornille tornillos Phillips en los
3
4 ori cios roscados de la base
del soporte hasta que queden
apretados.
➁
tornillo Phillips para
enganchar el soporte x 4
(FPH34200)
agujeros de tornillo
agujeros de tornillo
➂
➁
panel delantero
panel delantero
➀
➀
Para retire es sporte de esta unidad
Desatornille los tornillos Phillips de los orificios indicados
en “➂”. Después de que se hayan retirado los tornillos
tire el soporte hacia la parte trasera de la unidad. Tenga
cuidado de no dejar caer el soporte cuando lo retire.
Nota:
• Al poner el soporte, compruebe que todos los tornillos están bien apretados. Si el montaje no está bien puesto, podría hacer que se caiga
la unidad con el resultado de heridas así como daños a la unidad.
• Asegúrese de utilizar una mesa que pueda soportar el peso de la unidad y que sea más grande que la unidad.
• Asegúrese de que la mesa se encuentra en posición estable.
Símbolos Utilizados en este Manual
5
Ésta es la descripción de los símbolos utilizados en este manual. La descripción se refiere a:
• Si no aparece ninguno de los símbolos bajo el encabezamiento de función, el funcionamiento es aplicable a ambos.
4
ES
TV
: Funcionamiento de TV analógica
DTV
: Funcionamiento de TV digital
Page 81

EnglishEspañol Français
INTRODUCCIÓN PREPARACIÓN
Características5
DTV/TV/CATV
•
Puede utilizar su mando a distancia para
-
seleccionar canales emitidos en formato digital y
en formato analógico convencional. Además, los
suscriptores de cable pueden acceder a sus canales
de televisión por cable.
Visualización de Información (solamente DTV)
•
Puede visualizar el título, el contenido y otra
-
información del actual programa DTV en la pantalla
del televisor.
Exploración Automática de Canales
•
Esta unidad explora y memoriza automáticamente
-
los canales disponibles en su zona, eliminando
complicados procedimientos de configuración.
Bloqueo Infantil
•
Esta función le permite bloquear el acceso de los
-
niños a programas inapropiados.
Decodificador de Subtítulos
•
El decodificador de subtítulos incorporado muestra
-
el texto de la programas que contiene subtítulos.
Sintonizador MTS/SAP
•
Puede seleccionarse el audio desde el mando a
-
distancia.
Función de Apagado Automático
•
Si no hay entrada de señal desde el terminal de
-
antena y no se realiza ninguna operación durante
15 minutos, la unidad se apagará automáticamente.
Temporizador de Apagado
•
Esta función apagará la corriente de la unidad
-
automáticamente en un momento concreto.
Opciones para Idioma de Pantalla
•
Seleccione el idioma que aparecerá en la pantalla:
-
Inglés, español o francés.
Función de Sonido Estéreo
•
Sintonización de Frecuencia PLL Sintonizada
•
Proporciona una selección de canales gratuita y
-
sencilla y le permite sintonizar directamente con
cualquier canal mediante los botones de número
de canal del mando a distancia.
Diversos Ajustes de la Imagen y el Sonido
•
Personaliza la calidad de las imágenes apropiada
-
para su cuarto, y ajusta el sonido a sus preferencias.
Entrada HDMI
•
Cuando utilice una entrada HDMI1, puede utilizar
-
esta unidad a modo de monitor de PC siempre que
su PC disponga de un terminal de salida DVI.
Entrada de Vídeo en Componentes
•
Entrada de S-video
•
Entrada AV
•
Salida de Audio Digital
•
Salida Analógica de Audio
•
© 2009 Funai Electric Co., Ltd.
Todos los derechos reservados. No se permite la reproducción total o parcial de este manual, ni su copia, transmisión, difusión,
transcripción, descarga o almacenamiento en ningún soporte de almacenamiento, en forma alguna o con fin alguno sin la autorización
expresa y previa por escrito de Funai.
Además, toda distribución comercial no autorizada de este manual o toda revisión del mismo queda estrictamente prohibida.
Contenido5
Precauciones. . . . . . . . . . . . . . . . . . . . . . . . . . . . . . . . . . . . . . . . . . . . . . . .2
Información sobre Marcas Registradas . . . . . . . . . . . . . . . . . . . . . .3
INTRODUCCIÓN
Accesorios Suministrados . . . . . . . . . . . . . . . . . . . . . . . . . . . . . . . . . . .4
Conectar el Soporte . . . . . . . . . . . . . . . . . . . . . . . . . . . . . . . . . . . . . . . . .4
Símbolos Utilizados en este Manual . . . . . . . . . . . . . . . . . . . . . . . . .4
Características . . . . . . . . . . . . . . . . . . . . . . . . . . . . . . . . . . . . . . . . . . . . . .5
Panel de Control . . . . . . . . . . . . . . . . . . . . . . . . . . . . . . . . . . . . . . . . . . . .6
Terminales . . . . . . . . . . . . . . . . . . . . . . . . . . . . . . . . . . . . . . . . . . . . . . . . . .6
Función del Mando a Distancia . . . . . . . . . . . . . . . . . . . . . . . . . . . . .7
Instalación de las Pilas. . . . . . . . . . . . . . . . . . . . . . . . . . . . . . . . . . . . . . .7
PREPARACIÓN
Conexión de Antena . . . . . . . . . . . . . . . . . . . . . . . . . . . . . . . . . . . . . . . .8
Conexión al Receptor de Cable o Caja de Satélite . . . . . . . . . . .8
Conexión de Dispositivo Externo . . . . . . . . . . . . . . . . . . . . . . . . . . . .9
Colocación de los Cables . . . . . . . . . . . . . . . . . . . . . . . . . . . . . . . . . . 12
Enchufe el Cable Alimentador de CA . . . . . . . . . . . . . . . . . . . . . . 12
Configuración Inicial . . . . . . . . . . . . . . . . . . . . . . . . . . . . . . . . . . . . . . 13
PARA VER LA TELEVISIÓN
Selección de Canal . . . . . . . . . . . . . . . . . . . . . . . . . . . . . . . . . . . . . . . . 14
Ajuste de Volumen . . . . . . . . . . . . . . . . . . . . . . . . . . . . . . . . . . . . . . . . 14
Temporizador de Apagado . . . . . . . . . . . . . . . . . . . . . . . . . . . . . . . 14
Modo Fijo . . . . . . . . . . . . . . . . . . . . . . . . . . . . . . . . . . . . . . . . . . . . . . . . . 15
Para Cambiar Entre Cada Modo de Entrada . . . . . . . . . . . . . . . 15
Para Cambiar el Modo de Audio. . . . . . . . . . . . . . . . . . . . . . . . . . . 15
Información de Pantalla . . . . . . . . . . . . . . . . . . . . . . . . . . . . . . . . . . . 16
Modo de Visualización de Pantalla del Televisor . . . . . . . . . . . 17
AJUSTE OPCIONAL
Menú Principal . . . . . . . . . . . . . . . . . . . . . . . . . . . . . . . . . . . . . . . . . . . . 18
Autoscan . . . . . . . . . . . . . . . . . . . . . . . . . . . . . . . . . . . . . . . . . . . . . . . . . 18
Lista de Canales . . . . . . . . . . . . . . . . . . . . . . . . . . . . . . . . . . . . . . . . . . . 19
Registro Manual . . . . . . . . . . . . . . . . . . . . . . . . . . . . . . . . . . . . . . . . . . 19
Confirmación de la Antena . . . . . . . . . . . . . . . . . . . . . . . . . . . . . . . . 20
Selección de Idioma . . . . . . . . . . . . . . . . . . . . . . . . . . . . . . . . . . . . . . 20
Ajuste de Imagen . . . . . . . . . . . . . . . . . . . . . . . . . . . . . . . . . . . . . . . . . 21
Ajuste de Sonido . . . . . . . . . . . . . . . . . . . . . . . . . . . . . . . . . . . . . . . . . . 22
Subtítulo Cerrado . . . . . . . . . . . . . . . . . . . . . . . . . . . . . . . . . . . . . . . . . 23
Bloqueo Infantil . . . . . . . . . . . . . . . . . . . . . . . . . . . . . . . . . . . . . . . . . . . 26
Ajustes de PC . . . . . . . . . . . . . . . . . . . . . . . . . . . . . . . . . . . . . . . . . . . . . 30
Modo de Ahorro de Energía . . . . . . . . . . . . . . . . . . . . . . . . . . . . . . . 31
Ubicación . . . . . . . . . . . . . . . . . . . . . . . . . . . . . . . . . . . . . . . . . . . . . . . . 31
Información sobre el Software Actual . . . . . . . . . . . . . . . . . . . . . 32
SOLUCIÓN DE PROBLEMAS
Preguntas Frecuentes . . . . . . . . . . . . . . . . . . . . . . . . . . . . . . . . . . . . . 33
Guía de Solución de Problemas . . . . . . . . . . . . . . . . . . . . . . . . . . . 34
INFORMACIÓN
Glosario . . . . . . . . . . . . . . . . . . . . . . . . . . . . . . . . . . . . . . . . . . . . . . . . . . . 36
Mantenimiento . . . . . . . . . . . . . . . . . . . . . . . . . . . . . . . . . . . . . . . . . . . 36
Denominaciones de Canales de Cable . . . . . . . . . . . . . . . . . . . . 37
Especificaciones Generales . . . . . . . . . . . . . . . . . . . . . . . . . . . . . . . . 37
Especificación Eléctrica. . . . . . . . . . . . . . . . . . . . . . . . . . . . . . . . . . . . 37
Otras Especificaciones . . . . . . . . . . . . . . . . . . . . . . . . . . . . . . . . . . . . 37
Garantía Limitada . . . . . . . . . . . . . . . . . . . . . . . . . . . . . . . .tapa trasera
PARA VER LA TELEVISIÓN
AJUSTE OPCIONAL
SOLUCIÓN DE PROBLEMAS
INFORMACIÓN
La información contenida en este documento puede ser objeto de cambios sin previo aviso. Funai se reserva el derecho de cambiar el
contenido de este documento sin la obligación de notificar dichos cambios a ninguna persona u organización.
con el diseño es una marca comercial registrada de Funai Electric Co., Ltd y no se puede utilizar en modo alguno sin la
autorización expresa por escrito de Funai. Todas las restantes marcas comerciales utilizadas en este documento siguen siendo propiedad
exclusiva de sus respectivos propietarios. Nada de lo contenido en este manual debe ser entendido como concesión, implícita o de otro
tipo, de cualquier licencia o derecho de uso de cualquiera de las marcas comerciales en él visualizadas. El uso indebido de cualquier marca
comercial o de cualquier otro contenido de este manual queda estrictamente prohibido. Funai hará cumplir enérgicamente sus derechos
de propiedad intelectual dentro de los límites máximos establecidos por la ley.
ES
5
Page 82

NTRODUCCIÓN
K
L
K
I
Panel de Control5
Ter mi na le s5
8
9
10
11
*
19
20
Nota:
servicio del terminal (uso de servicio sólo)
*
• Utilice esta terminal sólo cuando sea necesaria una
actualización de softwate.
• El usuario no debe conectar ningún dispositivo al servicio
del terminal, tales como: cámara digital, teclado, mouse, etc.
(porque éstos no funcionarán).
• La actualización de software, en la mayoría de los casos, la
realiza personal de servicio autorizado, pero bajo ciertas
circunstancias se les podría solicitar al los usuarios llevarla a
cabo ellos mismos.
6
ES
1. VOLUME
Presione para ajustar el volumen o para moverse a
1
2
3
4
5
6
7
derecha (
menú principal.
2. SETUP (p. 13)
Presione para visualizar el menú principal.
CHANNEL K /
3.
Presione para seleccionar canales o desplazarse
arriba (K) / abajo (L) por los elementos del menú
principal.
POWER (p. 13)
4.
Presione para encender o apagar la unidad.
5. ventana del sensor de infrarrojos
Recibe los rayos infrarrojos transmitidos desde el
mando a distancia.
6. indicador de POWER ON
Se ilumina de color verde cuando está encendido.
7. indicador de STAND BY
Se ilumina de color rojo cuando está apagado.
/
(p. 14)
) / izquierda (L) por los elementos del
L
(p. 14 / p. 15)
[Panel Lateral]
8. toma de entrada de S-video (p. 10)
Conexión para cable S-video de dispositivo externo.
9. toma de entrada de vídeo (p. 11)
Conexión para cable RCA vídeo de dispositivo
externo.
10. toma de entrada de audio (p. 10 / p. 11)
Conexión para cable RCA audio de dispositivo
externo.
11. toma de entrada HDMI 2 (p. 8 / p. 9)
Conexión HDMI para dispositivos HDMI.
[Panel Trasero]
12
12. cable de alimentación de CA (p. 12)
13
14
15
16
17
18
Conéctelo a una toma estándar de CA para
suministrar alimentación eléctrica a esta unidad.
13. colocación de los cables (p. 12)
Utilice este soporte para ordenar los cables.
14. toma de entrada de vídeo
en componente y audio (p. 8 / p. 10)
Conexión para cables de vídeo en componentes
RCA y audio RCA de dispositivo externo.
15. toma de salida de audio (p. 11)
Conexión del cable de audio RCA para un
dispositivo externo.
16. toma de entrada de audio para HDMI 1 (p. 9 / p. 12)
Conexión para cable RCA audio de dispositivo DVI.
Cuando conecte un PC con terminal DVI, Utilice
un cable de conversión RCA-mini-plug estéreo.
(Solamente para la toma de entrada HDMI1)
17. toma de salida de audio digital (p. 11)
Conexión de cable digital coaxial para un
decodificador o un receptor de audio.
18. toma de entrada de antena (p. 8)
Conexión de cable coaxial RF para la señal de cable/TV
o antena.
19. toma de entrada HDMI 1 (p. 8 / p. 9 / p. 12)
Conexión HDMI para dispositivos HDMI o DVI.
Cuando conecte un PC con terminal DVI, podrá
utilizar esta unidad como monitor del PC.
20. toma de entrada HDMI 3 (p. 8 / p. 9)
Conexión HDMI para dispositivos HDMI.
Page 83

Función del Mando a Distancia5
7
2
8
9
10
12
14
16
4
1
3
5
11
15
6
13
X
Y
X /
7. VOL.
Presione para ajustar el volumen.
8. Botones de Número de canal (p. 14)
• Presione para seleccionar los canales.
-
• Presione para cambiar de canal inferior a superior.
9. POWER (p. 13)
Presione para encender o apagar la unidad.
10. AUDIO (p. 15)
Modo digital (DTV)
• Presione para seleccionar el idioma de audio.
Modo analógico (TV)
• Presione para seleccionar el modo de audio.
11. SCREEN MODE
Presione para sel eccionar las relaciones de aspecto
disponibles para la pantalla del televisor.
12. INFO (p. 16)
Modo digital (DTV)
• Presione para mostrar la información de canal, tipo
Modo analógico (TV)
• Presione para mostrar el número de canal, tipo de
Modo de entrada externo
• Para mostrar modo de entrada externo, tipo de señal
13. ENTER (p. 13)
1. STILL (p. 15)
Presione para pausar la imagen de pantalla.
2. INPUT SELECT (p. 15)
Presione el botón para acceder a los dispositivos
externos conectados, como por ejemplo una
grabadora BD/DVD.
3. SETUP (p. 13)
Presione para visualizar el menú principal.
4.
s
/ B / K / L (p. 13)
Presione para desplazarse por los elementos, izquierda /
derecha / arriba / abajo.
5. BACK (p. 16)
Presione para volver a la operación de menú anterior.
6. CH RETURN (p. 14)
Presione para volver al canal que se estaba
viendo antes.
Instalación de las Pilas
5
Instale las pilas (AAA x 2) de manera que coincida la polaridad indicada en el interior del compartimiento de las pilas del
mando a distancia.
Presione para confirmar su selección.
14. CH K / L (p. 15)
Presione ara seleccionar los canales y el modo de
entrada externo.
15. MUTE
Presione para activar y desactivar el sonido.
16. SLEEP (p. 14)
Presione para activar el temporizador de apagado.
A la hora de utilizar un mando a distancia
universal para esta unidad.
• Verifique que está seleccionada nuestra marca en el código del
componente del mando a distancia universal. Consulte más
detalles en el manual suministrado con el mando a distancia.
• No garantizamos la interoperabilidad al 100% con todos los
mandos a distancia universales.
(p. 14)
(guión)
(p. 17)
de señal y ajuste de TV.
señal y ajuste de TV.
y ajuste de TV.
(p. 14)
EnglishEspañol Français
INTRODUCCIÓN PREPARACIÓN
PARA VER LA TELEVISIÓN
AJUSTE OPCIONAL
SOLUCIÓN DE PROBLEMAS
INFORMACIÓN
Precauciones sobre las Pilas:
• Asegúrese de seguir la polaridad correcta según lo indicado en el compartimiento de las pilas. Unas pilas en posición invertida pueden causar daños
en el dispositivo.
• No mezclar diferentes tipos de pilas (p. ej. pilas alcalinas y carbono-zinc, o pilas recargables como de ni-cad, y ni-mh, etc) o pilas viejas con pilas
nuevas.
• Si el dispositivo no se va a usar durante un período prolongado de tiempo, quite las pilas para evitar daños o lesiones por posibles fugas de las pilas.
• No intente recargar las pilas; ya que podrían sobrecalentarse y romperse.
ES
7
Page 84

REPARACIÓN
(rojo)
(azul)
(verde)
(rojo)
(azul)
(verde)
P
Ningún cable suministrado se emplea en esta conexión:
Deberá adquirir los cables necesarios en su establecimiento local.
El cable de alta velocidad HDMI cable (también conocido como HDMI cable de categoría 2) se recomienda para una mejor compatibilidad.
Antes de proceder a la conexión...
Asegúrese de que la antena u otros dispositivos están bien conectados antes de enchufar el cable de
alimentación de CA.
Conexión de Antena
5
Conecte el cable coaxial RF de su toma de corriente a la toma de entrada de antena de esta unidad.
p. ej.)
*
antena
VHF / UHF
cable coaxial RF
o
señal de televisión
por cable
Una vez completadas las conexiones, encienda la unidad e inicie la configuración inicial.
parte trasera de la unidad
La exploración de canales es necesaria para que la unidad memorice todos los canales disponibles en su zona.
(Consulte “Configuración Inicial” en la página 13.)
Nota:
• Si tiene alguna duda acerca de la antena del DTV, visite la página www.antennaweb.org para obtener más información.
• Dependiendo de su sistema de antena, podrá necesitar diferentes tipos de combinadores (mixers) o separadores (splitters). Contacte a
su tienda de electrónica local para estas piezas.
• Para su seguridad y para evitar daños en esta unidad, desenchufe el cable coaxial RF de la toma de entrada de antena antes de mover
la unidad.
• Si utiliza una antena para recibir televisión analógica, ésta debería funcionar también para recepción de DTV. Las antenas de exterior
tejado serán más eficaces que las de versiones de sobremesa.
• Para cambiar fácilmente su fuente de recepción entre antena y cable, instale un selector de antena.
• Si se conecta directamente al sistema de cable, póngase en contacto con el instalador de CATV.
Conexión al Receptor de Cable o Caja de Satélite
5
Utilice un cable HDMI o un cable de vídeo en componentes RCA para conectar el HDMI o la toma de entrada del vídeo en
componentes de la unidad al HDMI o a la toma de salida del vídeo en componentes del receptor de cable / caja de satélite.
Si lo conecta a la toma de Entrada de Vídeo en componentes de la unidad, conecte los cables de audio RCA a las tomas de
Audio L/R, abajo del conector de Vídeo en Componentes.
COMPONENT VIDEO OUT
RL
(verde)
(verde)
cable HDMI
Pr/CrPb/CbY
(rojo)
(azul)
(rojo)
(azul)
o
o
(verde)(verde)
(azul)(azul)
(rojo)(rojo)
cable de component vídeo RCA
y cable de audio RCA
parte lateral o
trasera de la unidad
p. ej.)
plato de
satélite
o
señal de televisión por cable
incluyendo la televisión de pago
*
También puede conectar esta unidad al receptor de cable o caja de satélite, en lugar de a la toma de salida del vídeo
HDMI OUT
AUDIO OUT
cable
coaxial RF
ANT IN
STEREO
PCM
receptor de cable / caja de satélite
o
en componentes o HDMI porque quizá tengan tomas de salida diferentes.
*
Los cables y métodos de conexión del receptor de cable o caja de satélite, o el canal de disponibilidad para
una QAM clara pueden variar en función del proveedor de cable / satélite. Para más información, consulte a su
8
proveedor de cable / satélite.
ES
Page 85

EnglishEspañol Français
Ningún cable suministrado se emplea en esta conexión:
Deberá adquirir los cables necesarios en su establecimiento local.
El cable de alta velocidad HDMI cable (también conocido como HDMI cable de categoría 2) se recomienda para una mejor compatibilidad.
Conexión de Dispositivo Externo
5
[Conexión HDMI]
La conexión HDMI ofrece la máxima calidad de imagen.
HDMI (High-Definition Multimedia Interface / Interfaz multimedia de alta definición) es una interfaz que transmite
vídeo y audio digital por canales múltiples de alta definición mediante un solo cable.
p. ej.)
parte lateral o
trasera de la unidad
INTRODUCCIÓN
PREPARACIÓN
PARA VER LA TELEVISIÓN
cable HDMI
o
o
TITLE 5
CHAPTER 15
REPEAT A-B
grabador BD/DVD
con la toma de salida HDMI
HDMI OUT
Nota:
• Esta unidad acepta señales de vídeo de 480i / 480p / 720p / 1080i, y señales de audio de 32 kHz / 44,1 kHz / 48 kHz.
• Esta unidad solamente acepta señal de audio de 2 canales (LPCM).
• Es necesario seleccionar “PCM” para la salida de audio digital del dispositivo conectado o compruebe la configuración de audio HDMI.
Puede que no haya señal de audio si selecciona “Bitstream” (Secuencia de bits), etc.
• Esta unidad solamente acepta señales compatibles con la norma EIA861.
[Conexión HDMI-DVI]
Si su dispositivo de vídeo tiene una toma de salida DVI, utilice un cable conversor HDMI-DVI para esta conexión.
p. ej.)
STEREO
PCM
receptor de cable o
caja de satélite con la
toma de salida DVI
DVI OUT
AUDIO OUT
cable de conversión
HDMI-DVI
RL
sólo para la toma de
entrada HDMI1
parte trasera de la unidad
AJUSTE OPCIONAL
SOLUCIÓN DE PROBLEMAS
INFORMACIÓN
cable de audio RCA
Nota:
• Esta unidad acepta señales de vídeo de 480i / 480p / 720p / 1080i.
• La conexión HDMI-DVI también requiere una conexión de cable de audio RCA separada.
• Las señales de audio se convierten de digitales a analógicas para esta conexión.
• DVI no muestra la imagen de resolución 480i que no es compatible con la norma EIA/CEA-861/861B.
9
ES
Page 86

REPARACIÓN
(verde)
(azul)
(rojo)
(rojo)
(azul)
(verde)
P
Ningún cable suministrado se emplea en esta conexión:
Deberá adquirir los cables necesarios en su establecimiento local.
[Conexión de Vídeo en Componentes]
La conexión de vídeo en componentes RCA ofrece una mejor calidad de imagen para dispositivos de vídeo conectados
a la unidad.
Si lo conecta a la toma de Entrada de Vídeo en componentes de la unidad, conecte los cables de audio RCA a las tomas
de Audio L/R, abajo del conector de Vídeo en Componentes.
p. ej.)
cable de vídeo en componentes RCA
parte trasera de la unidad
(rojo)(rojo)
(azul)(azul)
TITLE 5
CHAPTER 15
REPEAT A-B
grabador BD/DVD con la toma
de salida de video componente
(verde)(verde)
COMPONENT VIDEO OUT
AUDIO OUT
Pr/CrPb/CbY
RL
(verde)
(azul)
(rojo)
cable de audio RCA
Nota:
• Esta unidad acepta señales de vídeo de 480i / 480p / 720p / 1080i.
[Conexión de S-video]
La conexión S-video ofrece una buena calidad de imagen para dispositivos de vídeo conectados a la unidad.
Si lo conecta a la toma de entrada de S-video de la unidad, conecte los cables de audio RCA a las tomas de audio L/R
bajo el conector Vídeo.
p. ej.)
TITLE 5
CHAPTER 15
REPEAT A-B
grabador BD/DVD con la toma
de salida de S- video
AUDIO OUT
S-VIDEO
OUT
RL
cable de audio RCA
cable S-video
parte lateral de la unidad
Nota:
• Si se conecta a la toma de entrada de S-video y a la toma de entrada de vídeo al mismo tiempo, tendrá prioridad la conexión S-video.
10
ES
Page 87

Ningún cable suministrado se emplea en esta conexión:
Deberá adquirir los cables necesarios en su establecimiento local.
EnglishEspañol Français
INTRODUCCIÓN
[Conexión de Vídeo]
La conexión de vídeo RCA ofrece una calidad normal de imagen para dispositivos de vídeo conectados a la unidad.
Si lo conecta a la toma de entrada de vídeo de la unidad, conecte los cables de audio RCA a las tomas de audio L/R bajo
el conector Vídeo.
Cuando la toma de audio del dispositivo de vídeo sea monoaural, conecte el cable de audio RCA a la toma de entrada
de audio L (izquierda).
p. ej.)
cámara
de vídeo
STEREO
aparato de vídeo
videojuego
STAND-BY
AUDIO OUT
VIDEO
RL
OUT
cable de vídeo RCA
cable de audio RCA
parte lateral de la unidad
Nota:
• Si se conecta a la toma de entrada de S-video y a la toma de entrada de vídeo al mismo tiempo, tendrá prioridad la conexión S-video.
[Conexión de Salida de Audio Digital]
PREPARACIÓN
PARA VER LA TELEVISIÓN
AJUSTE OPCIONAL
SOLUCIÓN DE PROBLEMAS
À Digital (solamente para la emisión digital)
Si conecta esta unidad a un dispositivo de audio digital externo, podrá disfrutar de audio multicanal, como el sonido
deemisiones digitales de 5+1 canales (5.1ch).
Utilice un cable coaxial de audio digital para conectar la unidad a un dispositivo de audio digital externo.
À Analógica (para radiodifusión tanto analógica como digita)
Si conecta esta unidad a un dispositivo de audio analógico externo, podrá disfrutar de audio estéreo (2 canales).
Utilice un cable de audio RCA para conectar la unidad a dispositivos de audio analógicos externos.
p. ej.)
AUDIO IN
RL
sistema estéreo
cable de audio RCA
parte trasera de la unidad
cable coaxial de audio digital
decodificador Dolby Digital
o
DIGITAL AUDIO
COAXIAL IN
INFORMACIÓN
11
ES
Page 88

REPARACIÓN
únicamente
a toma de
entrada HDMI1
cable de conversión
HDMI-DVI
P
Ningún cable suministrado se emplea en esta conexión:
Deberá adquirir los cables necesarios en su establecimiento local.
[Conexión de PC]
Esta unidad puede conectarse a un PC con terminal DVI. Utilice un cable de conversión HDMI-DVI para esta conexión.
También requiere un cable de conversión RCA-mini-plug estéreo.
Si conecta esta unidad al PC, puede utilizarla como monitor del PC.
p. ej.)
DVI OUT
cable de conversión RCA-miniplug estéreo
únicamente
a toma de
entrada HDMI1
cable de conversión
HDMI-DVI
parte trasera
de la unidad
computadora personal
Pueden aparecer las siguientes señales:
Formato Resolución
VGA 640 x 480 60Hz
SVGA 800 x 600 60Hz
XGA 1.024 x 768 60Hz
Otros formatos o señales no estándares no aparecerán correctamente.
El cable de conversión HDMI-DVI debe tener el núcleo de ferrita.
Frecuencia vertical
Nota:
• Por favor, compre el cable de conversión HDMI-DVI que tenga el núcleo de ferrita.
• Las siguientes operaciones podrían reducir el ruido en la pantalla del televisor.
- Coloque un núcleo de ferrita en el cable de alimentación de CA de su PC.
- Desenchufe el cable de alimentación de CA y utilice la batería incorporada de su PC.
Colocación de los Cables
5
Utilice este soporte para ordenar los cables y evitar que
cuelguen.
parte trasera
de la unidad
5
Formato Resolución
1.280 x 768 60Hz
WXGA
1.360 x 768 60Hz
Frecuencia vertical
Enchufe el Cable Alimentador de CA
Asegúrese de que el cable de alimentación esté
enchufado a una toma de CA, después de que todas las
conexiones necesarias estén completas.
parte trasera
de la unidad
alimentación de CA
toma de CA
cable de
12
Precaución:
• No conecte el cable de alimentación de CA a un suministro de
energía con voltaje diferente al indicado para esta unidad (120V
CA). Conectar el cable de alimentación de CA a un suministro de
energía fuera de este rango puede ocasionar fuego o un choque
eléctrico.
Nota:
• Cada vez que enchufe el cable de alimentación de CA, por
algunos segundos no funcionará ninguna operación. Esto no es
una avería.
ES
Page 89

EnglishEspañol Français
Se puede acceder a estas operaciones mediante el mando a distancia. Algunas también pueden ser accesibles mediante
los mandos de la unidad principal.
Configuración Inicial
5
Esta sección le guiará a través del ajuste inicial de la unidad, que incluye
la selección de un idioma para sus menús de pantalla y la exploración
automática de canales, que explora y memoriza automáticamente los
canales visibles.
Antes de comenzar :
Asegúrese de que la unidad esté conectada a la antena o al cable.
Después de hacer todas las conexiones necesarias,
1
presione [POWER] para encender la unidad.
Esta operación tardará unos momentos.
•
Utilice [Cursor K / L] para seleccionar el idioma de
2
pantalla entre las opciones de la derecha de la pantalla
del televisor. (English / Español / Français)
Initial Setup
Initial Setup
Select the language for setup display.
Elija el idioma de ajuste.
Sélectionner langue écran config.
ENTER
Select Enter Skip
Aparecerá en pantalla el menú “Ajuste Inicial” en
•
el paso 3, en el idioma seleccionado después de
presionar [ENTER].
Utilice [Cursor K / L] para seleccionar “Antena” para
3
canales de televisión o “Cable” para canales CATV, y
luego presione [ENTER].
Ajuste Inicial
Ajuste Inicial
Confirme que antena está conectada a toma
Elija el destino de la toma
Antena
Cable
Seleccionar
ENTER
"ANT.IN".
"ANT.IN".
O
English
Español
Français
SETUP
Antena
Cable
Saltar
ANT.IN
SETUPBACK
Saltar
AtrásEntre
Utilice [Cursor s / B] para seleccionar la locación
4
deseada, y luego presione [ENTER].
Ajuste Inicial
Ajuste Inicial
Seleccione para su ubicación “Tienda” o “Casa”.
Tienda Casa
Seleccionar Entre
Seleccione “ Tienda”, la unidad se configurará con la
•
configuración predefinida para mostradores. En esta
configuración, el consumo de energía posiblemente exceda
el requerimiento límite de la calificación ENERGY STAR®.
•
Seleccione “Casa”, la unidad está configurada para
maximizar la eficiencia de energía para un arreglo de casa, y
se puede ajustar con una selección de imágenes y calidades
de sonido según su preferencia.
•
Cuando haya finalizado la configuración inicial, aparecerá
en la pantalla del TV el canal memorizado inferior con un
mensaje de confirmación del valor de la ubicación.
Nota:
• Si se conecta directamente al sistema de cable, póngase en
contacto con el instalador de CATV.
• Si pulsa [POWER] o [SETUP] durante la búsqueda
automática de canales, este valor quedará cancelado.
• La función de exploración automática inicial de canales
puede ejecutarse, para “Antena” o “Cable”, solamente una
vez. Al cambiar la conexión (Antena / cable), establezca de
nuevo la exploración automática de canales.
(Consulte la página 18.)
• Si no hay entrada de señal desde el terminal de antena y
no se produce ninguna operación durante varios segundos
después de encender la unidad, aparecerá “Sugerencias
Útiles”. Siga las instrucciones de la pantalla del televisor.
Ajuste Inicial
Ajuste Inicial
Sin canal registrado.
¿Prueba otra vez?
Compruebe que hay un cable conectado a la toma "ANT. IN"
situada en la parte trasera del TV; el proceso de instalación
de emisoras busca esta conexión. Si utiliza un receptor de
cable o una caja de satélite, verifique la entrada a la que ha
conectado la caja y pulse la tecla "INPUT SELECT" del
mando a distancia para seleccionar la entrada de la fuente
apropiada.
ENTER
Seleccionar
Entre
• Debe configurar “Casa” en paso 4. De otra forma, los ajustes
que configure no se memorizarán cuando apague la
unidad.
Otro ensayo
Después
SETUP
Saltar
SETUP
ENTER
Exit
INTRODUCCIÓN
PREPARACIÓN
PARA VER LA TELEVISIÓN
AJUSTE OPCIONAL
SOLUCIÓN DE PROBLEMAS
INFORMACIÓN
Se inicia la función “Autoscan”.
•
Ajuste Inicial
Ajuste Inicial
Sistema escanea canales, espere.
Autoscan puede tardar hasta 20 minutos en finalizar.
0%
Canales analógicos 0ca
Canales digitales 0ca
SETUP
Saltar
Una vez finalizada la configuración inicial…
Si quiere explorar de nuevo los canales
•
automáticamente, consulte la sección “Autoscan” en
la página 18.
Puede añadir los canales deseados que no hayan sido
•
memorizados con “Autoscan”.
Consulte “Registro Manual” en la página 19.
Si quiere cambiar a otro idioma, consulte la sección
•
“Selección de idioma” en la página 20.
Si quiere cambiar a otro ajuste de ubicación, consulte
•
la sección “Ubicación” en la página 31.
13
ES
Page 90
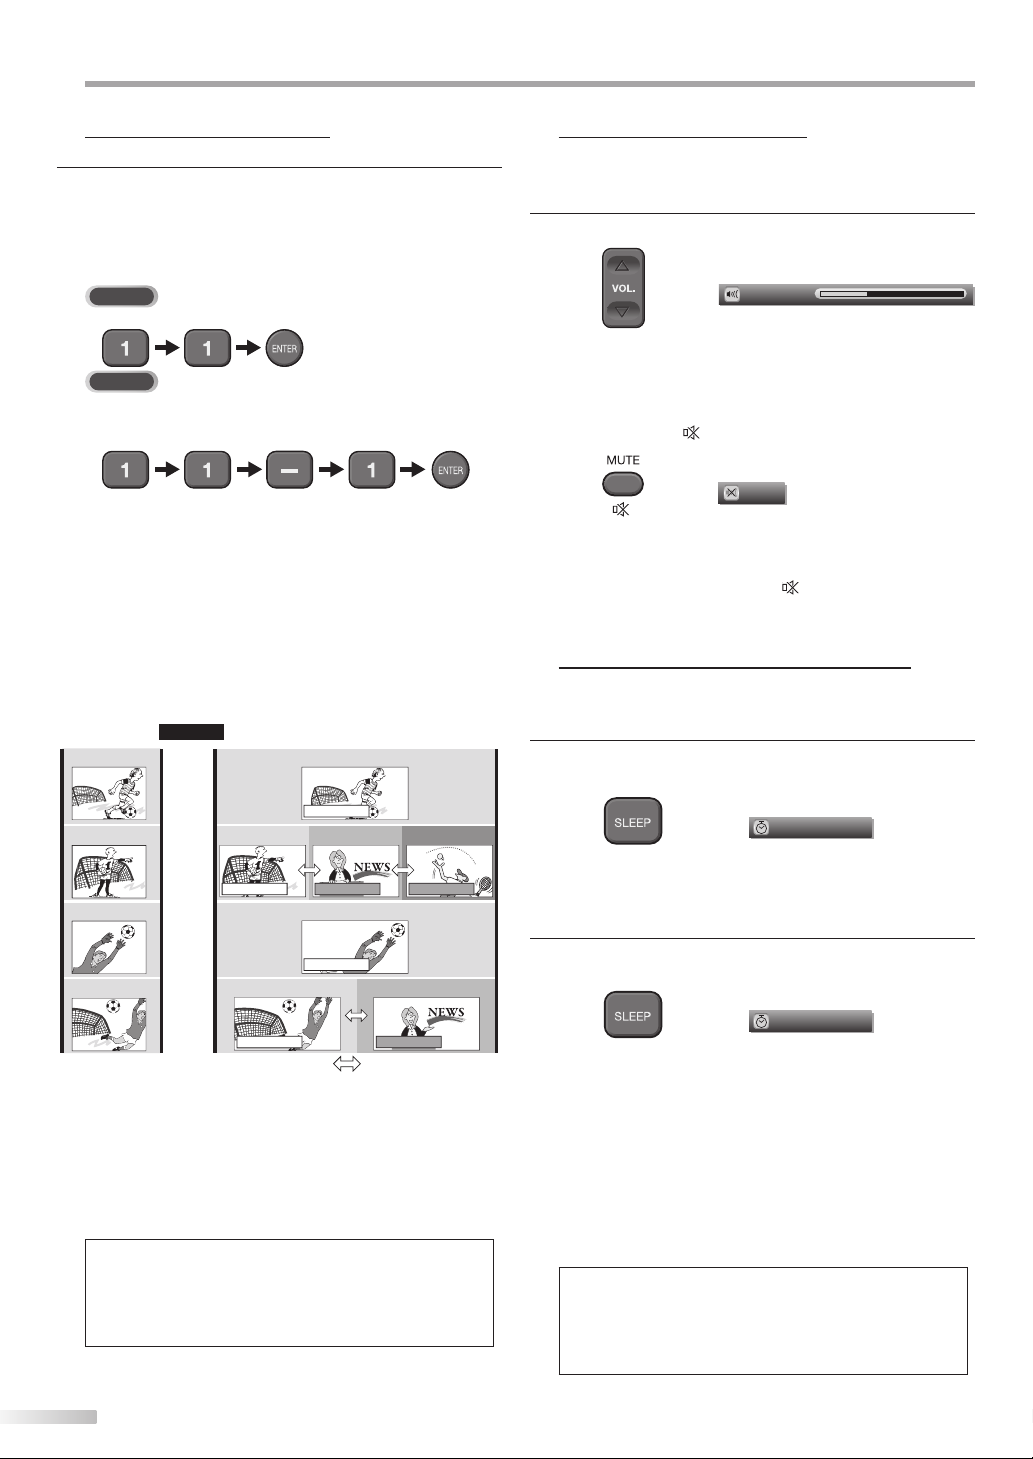
ARA VER LA TELEVISIÓN
X
Y
X
Y
P
Selección de Canal
5
Seleccione los canales utilizando [CH K / L] o [los botones numéricos].
Para seleccionar los canales memorizados, utilice
•
[CH K / L]
Para seleccionar los canales no memorizados, utilice
•
o [los botones numéricos].
[los botones numéricos].
Utilizando [los botones numéricos]
TV
Cuando seleccione el canal analógico 11
-
DTV
Cuando seleccione el canal digital 11-1
-
asegúrese de presionar [-] antes
de indicar el número de subcanal.
Presione [CH RETURN] para volver al canal
•
anteriormente visualizado.
Acerca de la emisión de televisión digital:
Con su emisión de alta definición, la emisión digital es
muy superior a la emisión analógica en su calidad tanto
de imagen como de sonido. No todos los televisores de
emisión digital son de alta definición (HD).
Para confirmar si el programa televisivo que está
viendo es HD, consulte la guía de programas, póngase
en contacto con su proveedor de cable / satélite o con
las estaciones de televisiones locales.
NTSC
(modo analógico)
(Fútbol)
CA4
Hora de emisión
6:00pm
ATSC
(modo digital)
(Fútbol)
CA4-1
Ajuste de Volumen
5
En esta sección se describe cómo ajustar el volumen. También se describe la
función de silenciamiento, que activa y desactiva el sonido.
X /
Utilice [VOL.
] para ajustar el volumen de audio.
Volumen 30
La barra de volumen se mostrará en la parte inferior de
la pantalla del televisor cuando ajuste el volumen.
La barra de volumen automáticamente dentro de
•
unos segundos.
Presione [MUTE ] para activar y desactivar el sonido.
Mudo
“Mudo” (silencio) aparece en la pantalla del televisor
durante unos segundos.
X /
Presione nuevamente [MUTE
] o utilice [VOL.
]
para recuperar el volumen original.
Temporizador de Apagado
5
El temporizador de apagado puede configurarse para apagar
automáticamente la unidad después de un período incremental de tiempo.
Presione [SLEEP] para ajustar el temporizador de
1
apagado.
CA4
CA4
CA4
(Fútbol)
(Fútbol)
(Fútbol)
6:30pm
CA4-1
canal prin cipal
7:00pm
7:30pm
8:00pm
CA4-1
canal principal
Se puede cambiar usando [CH K / L ].
(Fútbol)
(Fútbol)
canal principal
CA4-2
CA4-1
canal principal
(
Informativos
(Fútbol)
CA4-2
subcanal
)
CA4-3
subcanalsubcanal
(Informativos)
(Tenis)
¿Qué es el subcanal?
Mediante una tecnología de alta compresión, la
emisión digital ofrece un servicio que permite el envío
simultáneo de múltiples señales.
Por tanto, puede seleccionar más de un programa por
canal principal, dado que la tecnología de emisión
digital distingue entre múltiples canales emitidos por
una determinada red.
Nota:
• Aparecerá “Sin Señal” en la pantalla del televisor una vez
terminada la emisión del canal menor.
• El mensaje “Programa de sólo audio” aparecerá en la
pantalla del televisor cuando se reciba solamente una
señal de sonido.
Reposar
Off
La visualización del temporizador de apagado aparece
en la pantalla del televisor.
Presione [SLEEP] repetidamente para cambiar el
2
tiempo que debe transcurrir hasta el apagado.
120min.
Reposar
Puede preparar su unidad para que se apague después de
transcurrir un período de tiempo (de 30 a 120 minutos).
Cada presión de [SLEEP] aumentará el tiempo en 30
•
minutos.
Después del ajuste, puede visualizarse el
•
temporizador de apagado, para su comprobación,
[SLEEP].
Para cancelar el temporizador de apagado
Presione [SLEEP] repetidamente hasta que aparezca
“Reposar Off” en la pantalla del televisor.
Nota:
• La visualización del temporizador de apagado
desaparecerá automáticamente dentro de unos segundos.
• Cuando desconecte la unidad de la toma de CA o cuando
se produzca un fallo de suministro eléctrico, el ajuste del
temporizador de apagado quedará anulado.
14
ES
Page 91

Modo Fijo
5
Puede fijo la imagen mostrada en la pantalla del televisor.
Presione
imagen mostrada en pantalla.
•
•
•
Para anular el modo fijo, presione cualquier botón
excepto el botón [POWER].
Para Cambiar Entre Cada Modo
5
[STILL] para detener momentáneamente la
La salida de sonido no se detiene.
Si no se detecta ninguna señal y no se recibe
ninguna señal protegida en el modo fijo, la imagen
permanece detenida y se desactiva la salida de
sonido.
La función fijo debe reactivarse después de 5
minutos.
Imagen fija
de Entrada
Puede cambiar fácilmente entre DTV (ATSC) y TV (NTSC) o acceder a
dispositivos externo con el mando a distancia cuando estén conectados a
la unidad.
EnglishEspañol Français
Para Cambiar el Modo de Audio
5
En esta sección se describe cómo cambiar el audio en el modo analógico y
cómo cambiar el idioma de audio en el modo digital.
TV
Presione [AUDIO] para mostrar por pantalla el modo de
audio actualmente seleccionado. Durante la recepción
de una emisión MTS, presione repetidamente para
recorrer los canales de audio disponibles.
11
Cuando todo el audio está disponible
Cuando los modos de audio estéreo y mono están
disponibles
Cuando los modos de audio SAP y mono están
disponibles
Cuando únicamente el modo de audio mono está
disponible
SAP / ESTÉREO
SAP / ESTÉREO
MONO / ESTÉREO MONO / ESTÉREO
SAP / MONO SAP / MONO
(no puede cambiarse)
SAP / ESTÉREO
SAP / MONO
MONO
INTRODUCCIÓN
PREPARACIÓN
PARA VER LA TELEVISIÓN
AJUSTE OPCIONAL
SOLUCIÓN DE PROBLEMAS
Presione [INPUT SELECT] o [CH
pasar a través de todos los modos de entrada.
o
Al presionar [CH L] cambia el modos de entrada en
•
sentido contrario.
K
] varias veces para
Canal DTV/TV
Video
Component
HDMI1
HDMI2
HDMI3
( o entrada de PC)
ESTÉREO : Emite audio en estéreo
SAP : Emite un segundo programa de audio
MONO : Emite audio en mono
DTV
Presione [AUDIO] para visualizar el idioma actualmente
1
seleccionado y el número de idiomas disponibles.
11-1
Inglés
Presione [AUDIO] repetidamente para recorrer los
2
idiomas de audio disponibles.
Los idiomas disponibles difieren según la emisión.
•
Se muestra “Otro” cuando no puede obtenerse el
idioma de audio o si los idiomas que se obtienidos no
son Inglés, Español o Francés.
1/3
Nota:
• [AUDIO] no se controla dispositivos de audio externo.
• La visualización de información desaparecerá
automáticamente dentro de unos segundos.
INFORMACIÓN
15
ES
Page 92
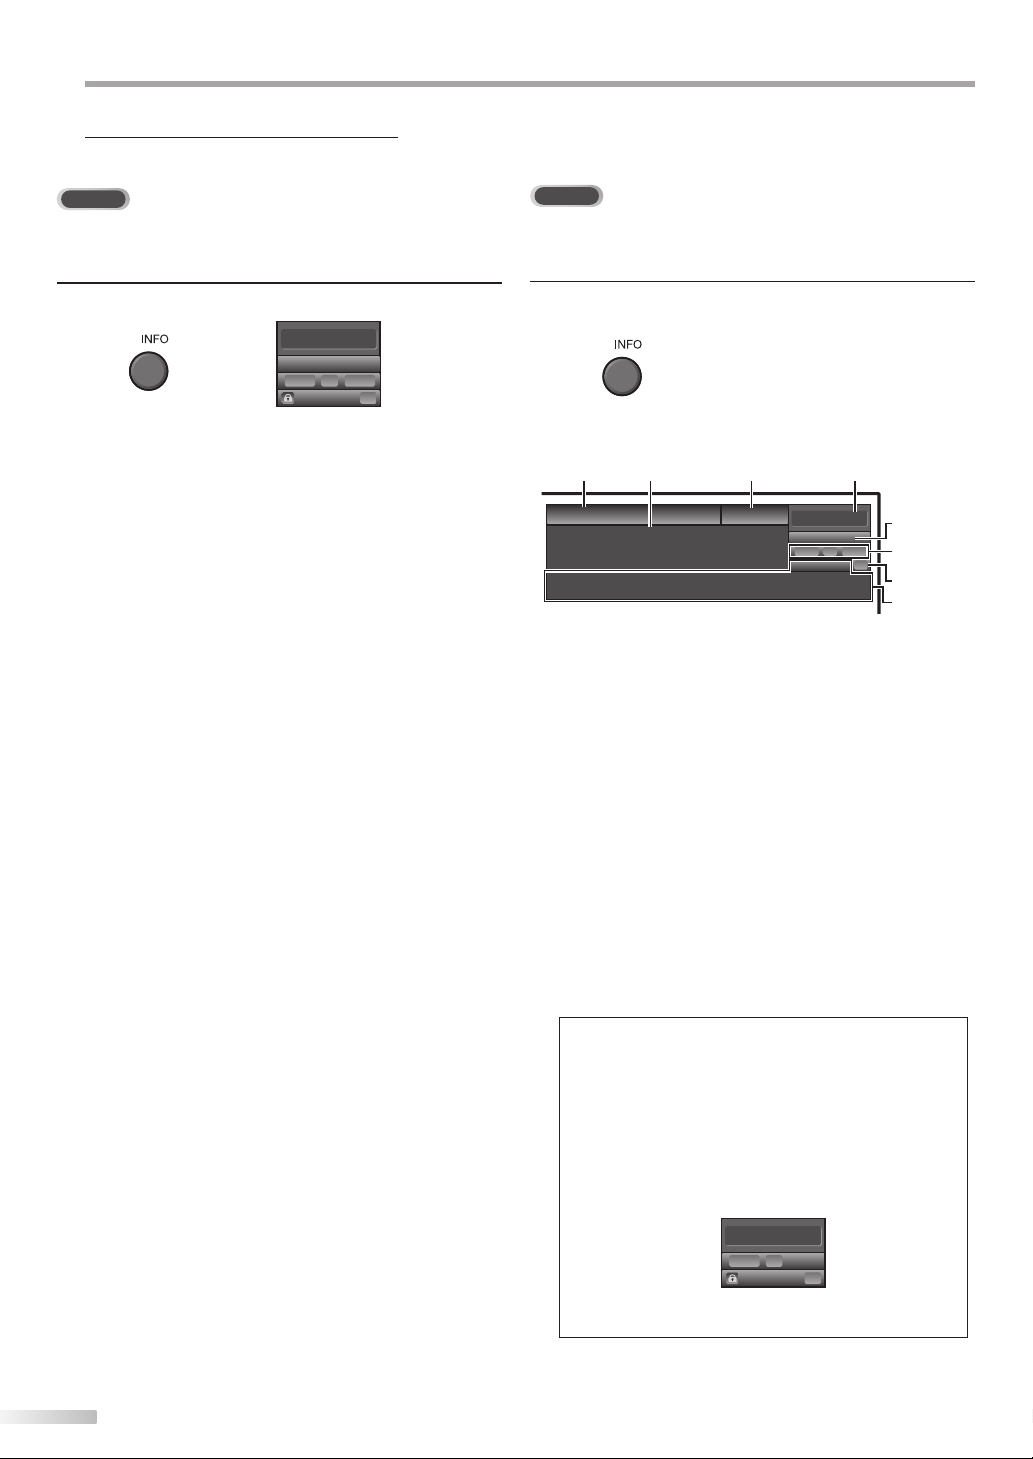
ARA VER LA TELEVISIÓN
P
Información de Pantalla
5
Puede visualizar el canal actualmente seleccionado u otra información, por
ejemplo el modo de audio, en la pantalla del televisor.
TV
En el modo analógico se visualizan el número del canal actual y el modo de
audio.
DTV
En el modo digital se visualiza la información de emisión detallada para
el canal actual como, por ejemplo, el título del programa y las guías de
programas.
Presione [INFO].
11
SAP /
ESTÉREO
480i
480i
El número de canal actual, el modo de audio, el tipo
•
de resoluciones para señales de vídeo, la relación
de aspecto del televisor, los subtítulos y la clase
de Clasificación de programas de televisión en la
esquina superior derecha de la pantalla del televisor.
Para borrar la pantalla, presione [INFO] nuevamente.
•
También puede presionar [BACK].
SD
SD
TV-PG DLSV
4:3
4:3
CC
CC
Presione [INFO] para mostrar por pantalla los detalles
del programa seleccionado actualmente.
Información de emisión
Se muestra la siguiente información.
1 2
Un día de recuerdos
Un día de recuerdos
Hace un cuarto de siglo, en una época que ahora puede considerarse
como los viejos tiempos de la prensa, los anuncios en medios
impresos suponeeían el 80 % de los ingresos por publicidad de la
industria. Los grandes almacenes y los supermercados eran
TV: TV-14
1 título de programa
2 guía de programas
(Se muestra la guía de programas añadida a la
información de emisión. Se muestra un máximo
de 4 líneas).
3 emisora
4 número de canal
5 idioma de audio
(Consulte “Para Cambiar el Modo de Audio” en la
página 15.)
6 líneas de exploración efectivas y modo de
exploración
7 el formato de televisión digital
8 relación de aspecto del programa
9 CC (no disponible si el subtitulado opcional se fija
en “Off”)
10 la clasificación bloqueo infantil
34
KABC
KABC
1080i
1080i
11-1
Inglés 1/2
Clase
16:9HDHD
16:9
CC
CC
5
6, 7, 8
9
10
16
Nota:
• Cuando la guía de programas tenga más de 4 líneas,
utilice [Cursor K/ L] para desplazarse.
• Se visualiza “No se proporciona descripción.” cuando no se
facilita la guía de programas.
• Mientras se visualiza la guía de programas se interrumpe
la función de subtítulos.
• En el modo de entrada externa, se muestra la siguiente
pantalla;
p. ej.) Cuando se ha conectado un dispositivo externo a la
toma de entrada VIDEO.
Video
480iSDSD
480i
TV-PG DLSV
• La visualización de información desaparecerá
automáticamente en 1 minuto.
ES
CC
CC
Page 93
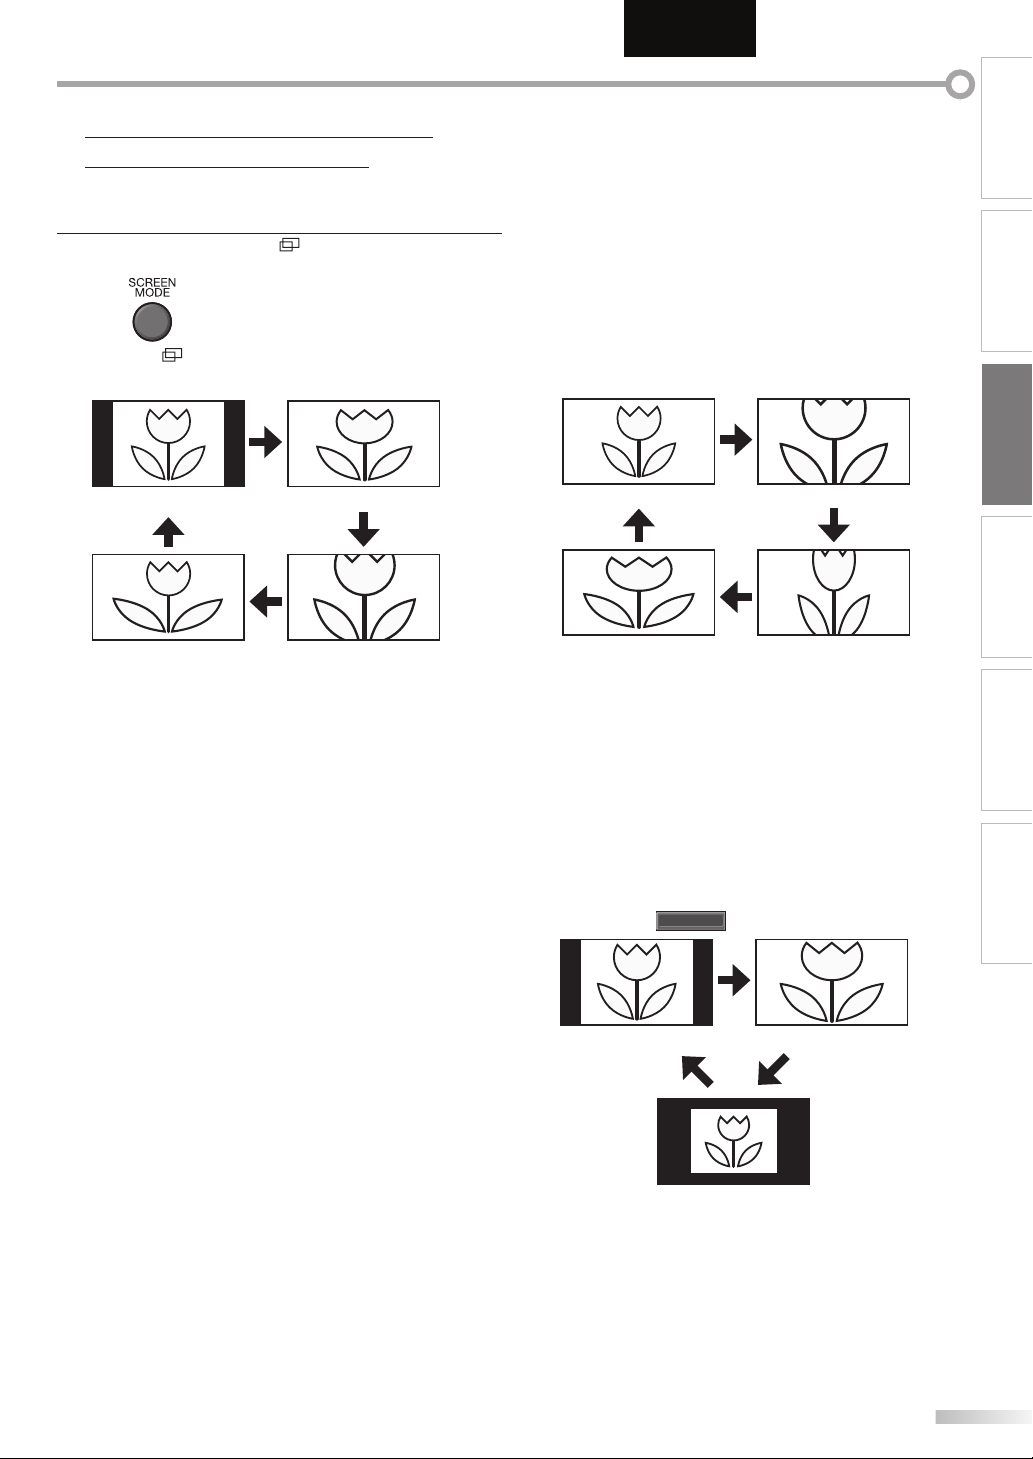
Modo de Visualización de
5
Pantalla del Televisor
Pueden seleccionarse 4 tipos de modos de visualización cuando la emisora
envía una señal de vídeo de 4:3 o 16:9. Y pueden seleccionarse 3 tipos de
modos de visualización para señales de entrada PC.
Presione [SCREEN MODE ] repetidamente para
cambiar la relación del aspecto del televisor.
EnglishEspañol Français
INTRODUCCIÓN
PREPARACIÓN
Para señal de vídeo 4:3
Normal
Ancha
16:9
Ampliar imáge
Normal
Visualización de una imagen 4:3 en su tamaño original. Las
barras laterales aparecen en ambos extremos de la pantalla.
16:9
Visualización de una imagen 4:3 en un tamaño a escala 16:9;
la imagen se extiende horizontalmente para llenar la pantalla.
Ampliar imáge
Visualización de una imagen 4:3 en un tamaño a escala 16:9;
la imagen se extiende horizontal y verticalmente para llenar
la pantalla. Esto recorta las partes superior e inferior de la
imagen.
Ancha
Visualización de una imagen que se muestra con su centro en
tamaño original y los extremos se extienden horizontalmente
para llenar la pantalla.
Para señal de vídeo 16:9
Normal
Ancha
Zoom
Ampliar imáge
Normal
Visualización de una imagen 16:9 en su tamaño original.
Zoom
Visualización de una imagen 16:9 en su mayor tamaño sin
modificar el aspecto horizontal o vertical.
Ampliar imáge
Visualización de una imagen que se extiende verticalmente.
Ancha
Visualización de una imagen que se extiende
horizontalmente.
Para señal de entrada del PC a través del modo
de entrada
HDMI1
PARA VER LA TELEVISIÓN
AJUSTE OPCIONAL
SOLUCIÓN DE PROBLEMAS
INFORMACIÓN
Normal Total
Punto Por Punto
Normal
Visualización de una imagen que se extiende
proporcionalmente. Las barras laterales aparecen en ambos
extremos de la pantalla.
Total
Visualización de una imagen que se estira para ocupar la
pantalla proporcionalmente.
Punto Por Punto
Visualización de una imagen en su tamaño original.
17
ES
Page 94
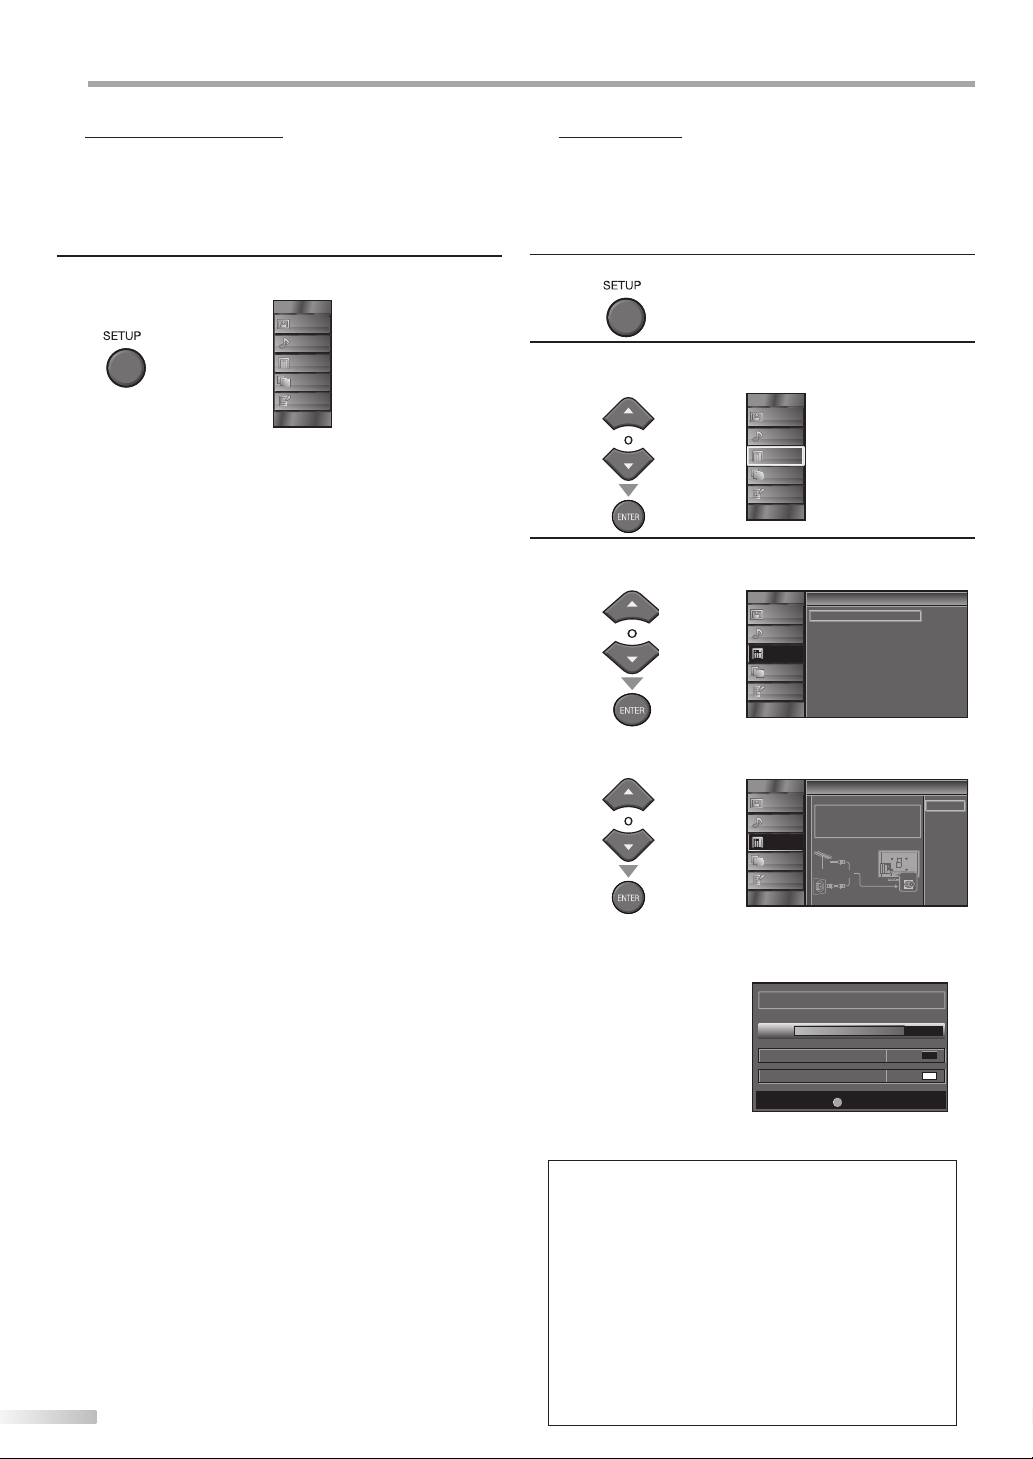
JUSTE OPCIONAL
A
Menú Principal
5
En esta sección se describen los aspectos generales del menú principal que
aparece al presionar [SETUP]. Para más detalles, consulte la página de
referencia de cada elemento.
El menú principal se compone de los siguientes elementos de ajuste de función.
Presione [SETUP].
Autoscan
5
Si cambia los cables, por ejemplo entre la antena y CATV, si mueve la unidad a
una zona diferente después de la configuración inicial o si restaura el canal de
DTV que borró, deberá realizar una exploración automática de los canales.
Antes de comenzar:
Asegúrese de que la unidad esté conectada a la antena o al cable.
Presione [SETUP] para visualizar el menú principal.
1
IMAGEN
SONIDO
CANAL
DETALLE
IDIOMA
IMAGEN
Puede ajustar la calidad de la imagen.
(Consulte “Ajuste de Imagen” en la página 21.)
SONIDO
Puede ajustar la calidad de sonido.
(Consulte “Ajuste de Sonido” en la página 22.)
CANAL
Puede explorar automáticamente los canales visibles.
•
(Consulte “Autoscan” en la página 18.)
Al seleccionar los canales, puede saltar los canales no
•
deseados usando [CH K / L].
(Consulte “Lista de Canales” en la página 19.)
Puede añadir los canales que no fueron explorados
•
durante la exploración automática de canales.
(Consulte “Registro Manual” en la página 19.)
DETALLE
Puede cambiar el formato de visualización para
•
subtítulos, que muestran el diálogo de un programa de
televisión u otra información en la pantalla del televisor.
(Consulte “Subtítulo Cerrado” en la página 23.)
Puede ajustar las limitaciones de visión.
•
(Consulte “Bloqueo Infantil” en la página 26.)
Puede ajustar la posición, la estabilidad y la claridad
•
de la pantalla del PC.
(Consulte “Ajustes de PC” en la página 30.)
Puede seleccionar el modo de ahorro eléctrico.
•
(Consulte “Modo de Ahorro de Energía” en la página 31.)
Para ajustar los modos “IMAGEN” y “SONIDO”, debe
•
cambiar el valor de “Tienda” a “Casa”
(Consulte “Ubicación” en la página 31.)
Puede confirmar la versión del software utilizado
•
actualmente en esta unidad
(Consulte “Información sobre el Software Actual” en
la página 32.)
IDIOMA
Puede cambiar el idioma (Inglés, Español, Francés)
visualizado en el menú principal.
(Consulte “Selección de Idioma” en la página 20.)
18
ES
Utilice [Cursor K / L] para seleccionar “CANAL”, y luego
2
presione [ENTER].
IMAGEN
SONIDO
CANAL
DETALLE
IDIOMA
Utilice [Cursor K / L] para seleccionar “Autoscan”, y
3
luego presione [ENTER].
Canales
Canales
IMAGEN
Autoscan
Lista canales
SONIDO
Registro manual
Antena
CANAL
DETALLE
IDIOMA
Utilice [Cursor K / L] para seleccionar la opción
apropiada, y luego presione [ENTER].
Autoscan
Autoscan
IMAGEN
Autoscan volverá a explorar todos los canales.
Autoscan puede tardar hasta 20 minutos en
finalizar.
SONIDO
Elija el destino de la toma “ANT. IN”.
CANAL
Antena
DETALLE
IDIOMA
Cuando la antena aérea esté conectada, seleccione “Antena”.
•
•
Cuando se conecte a un CATV, seleccione “Cable“.
•
Se inicia la función “Autoscan”.
Cuando la exploración y la memorización han
•
Sistema escanea canales, espere.
Sistema escanea canales, espere.
Autoscan puede tardar hasta 20 minutos en finalizar.
Autoscan puede tardar hasta 20 minutos en finalizar.
75%
75%
Canales analógicos 10ca
Canales analógicos 10ca
Canales digitales 6ca
Canales digitales 6ca
O
Cable
SETUP
SETUP
Salir
Salir
ANT.IN
finalizado, se muestra el canal memorizado más bajo.
Nota:
• Luego de configurar el “Autoscan”, utilice las opciones
[CH K / L] del control remoto para saltar automáticamente
los programas no disponibles.
• Si se conecta directamente al sistema de cable, póngase en
contacto con el instalador de CATV.
• Si presiona [POWER] o [SETUP] durante la exploración
automática de canales, este ajuste se cancelará.
• Aún cuando se haya finalizado “Autoscan”, se perderá su
configuración si se desconecta el cable CA antes de apagar la
unidad presionando [POWER].
• Se le solicitará un código Id. cuando haya registrado uno en
“Bloqueo Infantil” (consulte la página 26).
• Si desea modificar el código Id., siga las instrucciones de
“Nuevo Código de Acceso” (consulte la página 29).
Atrás
Antena
Cable
Page 95
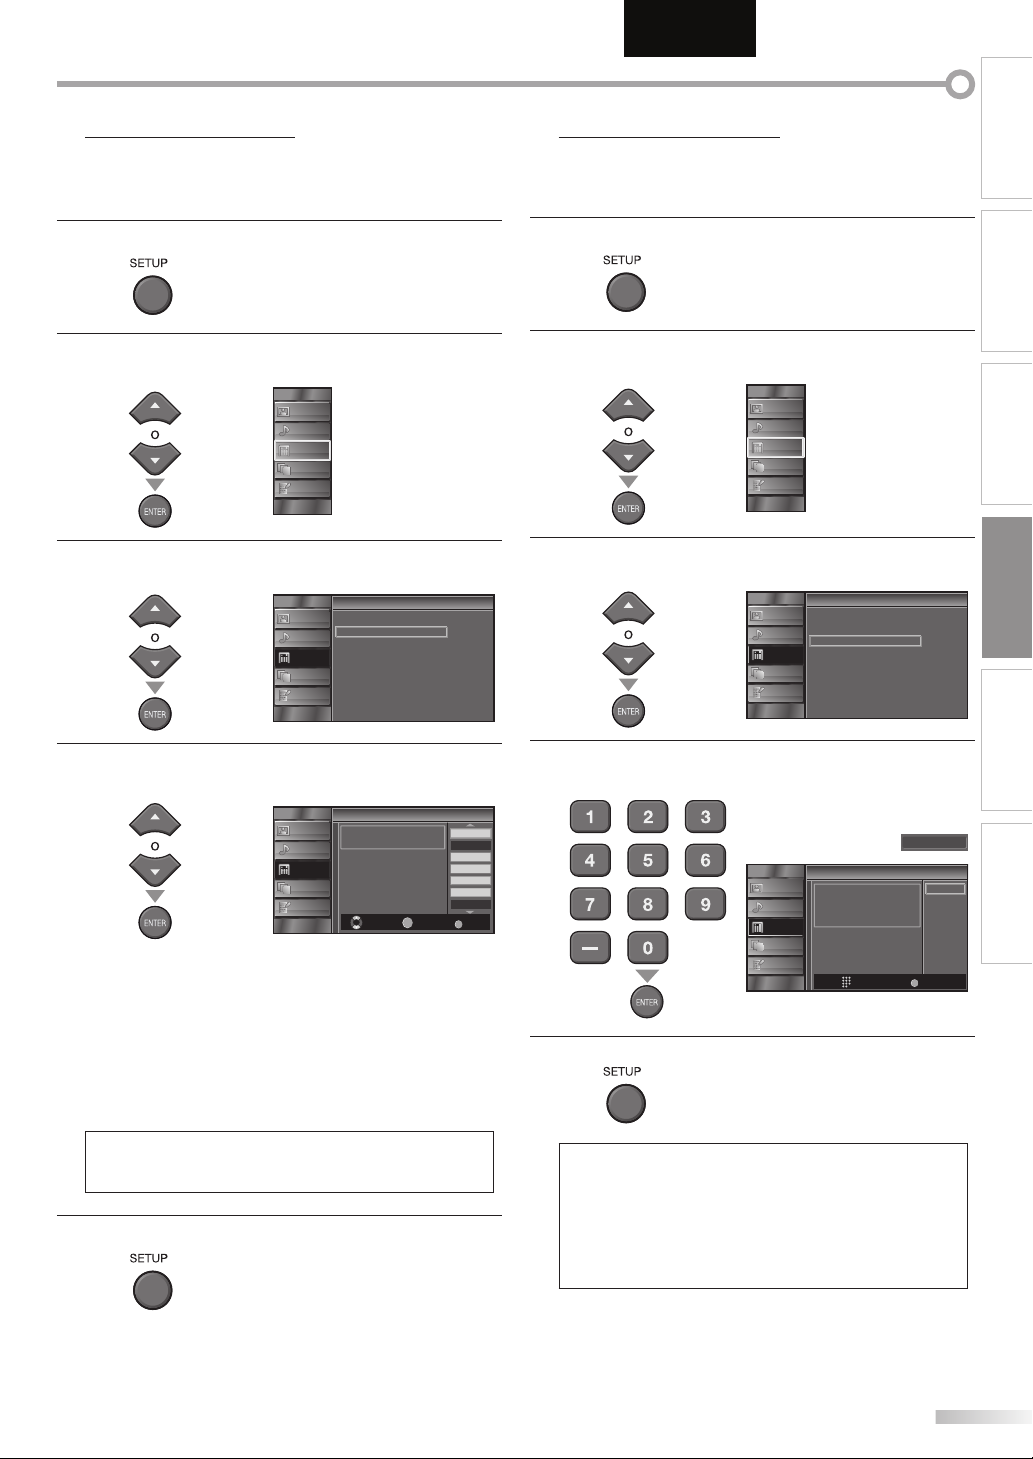
Lista de Canales
5
Los canales elegidos aquí pueden ser saltados cuando se realice la selección
de canales usando [CH K / L].
Todavía podrán seleccionarse esos canales con [los botones numéricos].
Presione [SETUP] para visualizar el menú principal.
1
EnglishEspañol Français
Registro Manual
5
Esta función le permite añadir los canales que no fueron añadidos durante la
Autoscan debido a las condiciones de recepción en la configuración inicial.
Presione [SETUP] para visualizar el menú principal.
1
INTRODUCCIÓN
PREPARACIÓN
Utilice [Cursor K / L] para seleccionar “CANAL”, y luego
2
presione [ENTER].
IMAGEN
SONIDO
CANAL
DETALLE
IDIOMA
Utilice [Cursor K / L] para seleccionar “Lista canales”, y
3
luego presione [ENTER].
Canales
Canales
IMAGEN
Autoscan
Lista canales
SONIDO
Registro manual
Antena
CANAL
DETALLE
IDIOMA
Utilice [Cursor K / L] para seleccionar el canal que
4
desea eliminar, y luego presione [ENTER].
Lista canales
Lista canales
IMAGEN
Subraye canales para selección
Ch Up/Down.
SONIDO
CANAL
DETALLE
IDIOMA
Se oscurece la visualización del canal eliminado. No
•
Selección Ca
ENTER
Ver/Saltar Atrás
podrá volver a seleccionar este canal utilizando
[CH K / L].
Para volver a activar un canal eliminado, utilice
•
[Cursor K / L] y presione [ENTER]. Los canales
registrados aparecen resaltados.
Cuando salte un canal mayor, también se saltarán sus
•
canales menores.
Nota:
• El canal con la indicación “DTV” en la pantalla es ATSC. En
caso contrario, el canal es NTSC.
Presione [SETUP] para salir.
5
DTV 6
DTV 6
DTV 8
DTV 8
DTV 48
DTV 48
DTV 67
BACK
Utilice [Cursor K / L] para seleccionar “CANAL”, y luego
2
presione [ENTER].
IMAGEN
SONIDO
CANAL
DETALLE
IDIOMA
Utilice [Cursor K / L] para seleccionar
3
PARA VER LA TELEVISIÓN
AJUSTE OPCIONAL
“Registro manual”, y luego presione [ENTER].
Canales
Canales
IMAGEN
Autoscan
Lista canales
SONIDO
Registro manual
Antena
CANAL
DETALLE
IDIOMA
Utilice [los botones numéricos] para introducir el número
4
SOLUCIÓN DE PROBLEMAS
de canal que desea agregar, y luego presione [ENTER].
INFORMACIÓN
27
9
9
58
58
IMAGEN
SONIDO
CANAL
DETALLE
IDIOMA
Registro manual
Registro manual
Para los canales analógicos,
seleccione un canal a registrar
con la tecla numérica.
Para los canales digitales, debe
realizar la función Autoscan.
Cambia Ca
11
Registra
BACK
Atrás
Presione [SETUP] para salir.
5
Nota:
• Si la configuración se completa correctamente, se muestra el
mensaje “Agregado a la lista de canales”.
• Si se utiliza una señal externa, no es posible registrar el canal
y el mensaje “No disponible” se mostrará en la pantalla del
televisor.
• Si utiliza [CH K / L], podrá seleccionar sólo los canales
memorizados.
19
ES
Page 96

JUSTE OPCIONAL
A
Confirmación de la Antena
5
DTV
Esta función le permite comprobar la intensidad de la digital señal de cada canal.
Selección de Idioma
5
Puede elegir Inglés, Español o Francés como idioma de pantalla.
Presione [SETUP] para visualizar el menú principal.
1
Utilice [Cursor K / L] para seleccionar “CANAL” y luego
2
presione [ENTER].
IMAGEN
SONIDO
CANAL
DETALLE
IDIOMA
Utilice [Cursor K / L] para seleccionar “Antena”, y luego
3
presione [ENTER].
Utilice [los botones numéricos] o [
4
seleccionar el canal respecto del cual desea comprobar
IMAGEN
SONIDO
CANAL
DETALLE
IDIOMA
Canales
Canales
Autoscan
Lista canales
Registro manual
Antena
CH K / L] para
la intensidad de la señal.
Presione [SETUP] para visualizar el menú principal.
1
Utilice [Cursor K / L] para seleccionar “IDIOMA”, y
2
luego presione [ENTER].
IMAGEN
SONIDO
CANAL
DETALLE
IDIOMA
Utilice [Cursor K / L] para seleccionar “English”,
3
“Español” o “Français”, y luego presione [ENTER].
Idioma
Idioma
IMAGEN
Select the language for setup display.
SONIDO
Elija el idioma de ajuste.
Sélectionner langue écran config.
CANAL
DETALLE
IDIOMA
Presione [SETUP] para salir.
4
English
Español
Français
Si el canal está ajustado a canal analógico o una
•
entrada externa, no puede confirmar el estado de la
antena.
Presione [SETUP] para salir.
5
20
ES
Nota:
11-1
Antena
Antena
IMAGEN
SONIDO
CANAL
DETALLE
IDIOMA
IMAGEN
SONIDO
CANAL
DETALLE
IDIOMA
Corr. 50
Antena
Antena
El indicador sólo está
disponible para
transmisión digital.
CH
CH
50 Máx.
Cambia Ca
Cambia Ca
Atrás
Video
Atrás
• Si tiene menús el inglés o en francés y necestia en español,
presione [SETUP]. Utilice [Cursor K / L] para seleccionar
”LANGUAGE” o “LANGUE”, y luego presione [ENTER].
Utilice [Cursor K / L] para seleccionar ”Español”, y luego
presione [ENTER]. Presione [SETUP] para eliminar el menú
principal.
Page 97

Ajuste de Imagen
5
Puede ajustar el claridad, el contraste, el color, el matiz, la nitidez y la
temperatura color.
EnglishEspañol Français
INTRODUCCIÓN
Antes de comenzar: Debe seleccionar “Casa” en “Ubicación ” (consulte
la página 31). Si no lo hace así, los valores que ha
ajustado no se guardarán cuando apague la unidad.
Presione [SETUP] para visualizar el menú principal.
1
Utilice [Cursor K / L] para seleccionar “IMAGEN”, y
2
luego presione [ENTER].
IMAGEN
SONIDO
CANAL
DETALLE
IDIOMA
Utilice [Cursor K / L] para seleccionar el elemento que
3
desea ajustar, y luego presione [ENTER].
Imagen
Imagen
Ajuste la calidad de imagen.
4
IMAGEN
SONIDO
CANAL
DETALLE
IDIOMA
Modo de Imagen
Claridad
Contraste
Color
Matiz
Nitidez
Temperatura Color
Personal
Normal
Mode de imagen
Utilice [Cursor K / L] para seleccionar el valor deseado,
y luego presione [ENTER].
(“Personal”, “Estándar”, “Deportes”, “Cine” y “Juego”)
Imagen
Imagen
IMAGEN
Modo de Imagen
Claridad
SONIDO
Contraste
Color
CANAL
Matiz
Nitidez
DETALLE
Temperatura Color
IDIOMA
Personal
Estándar
Deportes
Cine
Juego
Claridad
Contraste
30
Color
60
36
0
0
Matiz
Nitidez
Temperatura color
5
Claridad, Contraste, Color, Matiz, Nitidez,
Temperatura color
Utililce [Cursor K / L] para seleccionar el valor deseado,
y luego presione [Cursor
Claridad 30
Ajuste
Contraste 60
Ajuste Mover
Color 36
Ajuste
Matiz 0
Ajuste Mover
Nitidez 0
Ajuste Mover
Tempe. color Normal
Ajuste Mover
Mover
Mover
ENTER
Entre
ENTER
Entre
ENTER
Entre
ENTER
Entre
ENTER
Entre
ENTER
Entre
Presione [SETUP] para salir.
/
s
B
] para ajustarlo.
Cursor
s
para reducir el
brillo
para reducir el
contraste
para reducir la
intensidad de
color
para agregar
rojo
Cursor
para aumentar
el brillo
para aumentar
el contraste
para
aumentar la
intensidad
de color
para agregar
verde
para suavizar para agudizar
Para añadir
colores cálidos
Para añadir
colores fríos
PREPARACIÓN
PARA VER LA TELEVISIÓN
AJUSTE OPCIONAL
B
SOLUCIÓN DE PROBLEMAS
INFORMACIÓN
Nota:
• Para cancelar el ajuste de la imagen, presione [SETUP].
• Sólo se puede configurar el ajuste “Personal”.
21
ES
Page 98

JUSTE OPCIONAL
A
Ajuste de Sonido
5
Puede ajustar el modo de sonido, el ecualizador y otras funciones
relacionadas con el sonido.
Antes de comenzar: Debe seleccionar “Casa” en “Ubicación ” (consulte
la página 31). Si no lo hace así, los valores que ha
ajustado no se guardarán cuando apague la unidad.
Presione [SETUP] para visualizar el menú principal.
1
Utilice [Cursor K / L] para seleccionar “SONIDO”, y
2
luego presione [ENTER].
IMAGEN
SONIDO
CANAL
DETALLE
IDIOMA
Utilice [Cursor K / L] para seleccionar el tipo de sonido
3
que desea ajustar, y luego presione [ENTER].
Ajuste de los siguientes elementos.
4
IMAGEN
SONIDO
CANAL
DETALLE
IDIOMA
Sonido
Sonido
Modo sonido
Ecualizador
Altavoces TV
Personal
Amp ext.
Modo sonido
Utilice [Cursor K / L] para seleccionar el valor deseado ,
y luego presione [ENTER].
(“Personal”, “Estándar”, “Cine”, “Música” y “Noticia”)
IMAGEN
SONIDO
CANAL
DETALLE
IDIOMA
Sonido
Sonido
Modo sonido
Ecualizador
Altavoces TV
Personal
Estándar
Cine
Música
Noticia
Altavoces TV
Seleccione o no la salida de audio de los altavoces
de la unidad. Si está conectado a esta unidad un
amplificador compatible con la función CEC utilizando
un cable HDMI, podrá acceder sincronizadamente a
parte de las operaciones relacionadas con el sonido,
por ejemplo, incremento del volumen, utilizando el
mando a distancia de la unidad.
Utilice [Cursor K / L] para seleccionar la opción
deseada, y luego presione [ENTER].
Altavoces TV
Altavoces TV
IMAGEN
“On”:
los altavoces del TV emitirán
sonidos.
SONIDO
“Off”:
los altavoces del TV no emitirán
CANAL
sonidos.
”Amp ext.”:
DETALLE
Se puede utilizar conectando el
amp compatible con HDMI-CEC
con un cable HDMI. Si desea más
IDIOMA
detalles, consulte el manual del
usuario.
On Los altavoces emitirán el sonido.
Off Los altavoces no emitirán el sonido.
Esta función le permite controlar la salida
Amp ext.
de audio de dispositivos compatibles
con CEC con el mando a distancia de la
unidad.
Presione [SETUP] para salir.
5
Nota:
• Para cancelar el ajuste del sonido, presione [SETUP].
• No garantizamos la interoperabilidad al 100% con
dispositivos compatibles con CEC de otras marcas.
On
Off
Amp ext.
Ecualizador
Ajuste la calidad tonal de cada frecuencia.
Utilice [Cursor
específica, y utilice [Cursor K / L] para ajustar el nivel, y
luego presione [ENTER].
<>
] para seleccionar la frecuencia
s
/
B
Ecualizador
Ecualizador
IMAGEN
SONIDO
CANAL
DETALLE
IDIOMA
0
120Hz0500Hz01.5kHz05kHz010kHz
22
ES
Page 99

Subtítulo Cerrado
A. Servicio de Subtítulos
5
Puede ver los subtitulado opcional (CC) de los programas de televisión,
películas e informativos. Subtítulo se refiere al texto de diálogo o
descripciones mostradas en la pantalla.
Presione [SETUP] para visualizar el menú principal.
1
Utilice [Cursor K / L] para seleccionar “DETALLE”, y
2
luego presione [ENTER].
IMAGEN
SONIDO
CANAL
DETALLE
IDIOMA
Utilice [Cursor K / L] para seleccionar
3
“Subtítulo Cerrado”, y luego presione [ENTER].
Detalle
Detalle
Subtítulo cerrado
IMAGEN
Bloqueo infantil
SONIDO
Ajustes de PC
Modo de ahorro de energía
CANAL
Ubicación
DETALLE
Información actual del software
IDIOMA
On
Casa
Consulte la siguiente descripción para ajustar cada
elemento.
Subtítulo cerrado
Subtítulo cerrado
IMAGEN
SONIDO
CANAL
DETALLE
IDIOMA
Servicio de subtítulos
Servicio digital de subtítulos
Estilo de los subtítulos
Off
Off
A
B
C
...
A
“A. Servicio de Subtítulos”
...
B
“B. Servicio Digital de Subtítulos”
...
C
“C. Estilo de los Subtítulos”.
D página 23
D página 24
D página 24
A. Servicio de Subtítulos
Utilice [Cursor K / L] para seleccionar
4
“Servicio de subtítulos”, y luego presione [ENTER].
Subtítulo cerrado
Subtítulo cerrado
Servicio de subtítulos
IMAGEN
Servicio digital de subtítulos
SONIDO
Estilo de los subtítulos
CANAL
DETALLE
Utilice [Cursor K / L] para seleccionar el subtítulo
5
IDIOMA
deseado, y luego presione [ENTER].
Subtítulo cerrado
Subtítulo cerrado
IMAGEN
Servicio de subtítulos
Servicio digital de subtítulos
SONIDO
Estilo de los subtítulos
CANAL
DETALLE
IDIOMA
Modo de subtítulos
S.C.1 y Texto1;
son los servicios primarios de subtítulos y texto.
Los subtítulos o el texto se muestran en el mismo
idioma que el diálogo del programa
(hasta 4 líneas de escritura sobre la pantalla del
televisor, sin tapar zonas relevantes de la imagen).
S.C.3 y Texto3;
sirven como canales de datos preferidos.
Los subtítulos o el texto se muestran con frecuencia
en un idioma secundario.
S.C.2, S.C.4, Texto2 y Texto4;
están raramente disponibles y las emisoras los
utilizan solamente en circunstancias especiales,
por ejemplo cuando “S.C.1” y “S.C.3” o “Texto1” y
“Texto3” no están disponibles.
Hay 3 modos de visualización según los programas:
•
Modo “Paint-on”:
Visualiza inmediatamente en la pantalla del televisor
los caracteres introducidos.
Modo “Pop-on”:
Una vez que los caracteres son almacenados en
memoria, se muestran todos a la vez.
Modo “Roll-up”:
Muestra los caracteres continuadamente mediante
desplazamiento de líneas (máximo 4 líneas).
EnglishEspañol Français
INTRODUCCIÓN
PREPARACIÓN
Off
Off
PARA VER LA TELEVISIÓN
Off
S.C.1
S.C.2
S.C.3
S.C.4
Texto 1
Texto 2
Texto 3
Texto 4
AJUSTE OPCIONAL
SOLUCIÓN DE PROBLEMAS
INFORMACIÓN
Press [SETUP] para salir.
6
23
ES
Page 100

JUSTE OPCIONAL
B. Servicio Digital de Subtítulos
C. Estilo de los Subtítulos
A
B. Servicio Digital de Subtítulos
DTV
Además del subtitulado opcional básico descrito en la página 23, DTV posee
su propio subtitulado llamado digital caption service. Utilice este menú
para cambiar la con guración del servicio de subtitulado digital.
/
Utilice [Cursor
4
K
L] para seleccionar
“Servicio digital de subtítulos”, y luego presione
[ENTER].
Subtítulo cerrado
Subtítulo cerrado
Utilice [Cursor
5
Servicio de subtítulos
IMAGEN
Servicio digital de subtítulos
SONIDO
Estilo de los subtítulos
CANAL
DETALLE
IDIOMA
/
K
L] para seleccionar los servicio
Off
Off
digital de subtítulos DTV deseados, y luego presione
[ENTER].
Subtítulo cerrado
Subtítulo cerrado
IMAGEN
Off
Servicio1 a
Servicio6
Servicio de subtítulos
Servicio digital de subtítulos
SONIDO
Estilo de los subtítulos
CANAL
DETALLE
IDIOMA
Selecciónelo si no desea Servicio digital de
subtítulos. Éste es el ajuste predeterminado.
Seleccione uno de ellos antes de cambiar
cualquier otro elemento del menú
“Subtítulo Cerrado”. Seleccione “Servicio1”
en circunstancias normales.
Off
Servicio1
Servicio2
Servicio3
Servicio4
Servicio5
Servicio6
C. Estilo de los Subtítulos
DTV
Puede cambiar el estilo de subtitulado, p.ej. fuente, color o tamaño, etc.
/
K
Utilice [Cursor
4
L] para seleccionar
“Estilo de los subtítulos”, y luego presione [ENTER].
Subtítulo cerrado
Subtítulo cerrado
Servicio de subtítulos
IMAGEN
Servicio digital de subtítulos
SONIDO
Estilo de los subtítulos
CANAL
DETALLE
Utilice [Cursor
5
/
K
L] para seleccionar “Config. usuarid”,
IDIOMA
y luego presione [ENTER].
Estilo de los subtítulos
Estilo de los subtítulos
Estilo de los subtítulos
Estilo de los subtítulos
IMAGEN
Config. usuarid
Estilo fuente
SONIDO
Tamaño fuente
Color fuente
CANAL
Opaco fuente
Color fondo
DETALLE
Opacidad fondo
IDIOMA
Color borde
Utilice [Cursor
6
/
K
L] para seleccionar “On”, y luego
Tipo borde
presione [ENTER].
Estilo de los subtítulos
Estilo de los subtítulos
Estilo de los subtítulos
Estilo de los subtítulos
IMAGEN
Config. usuarid
Estilo fuente
SONIDO
Tamaño fuente
Color fuente
CANAL
Opaco fuente
Color fondo
DETALLE
Opacidad fondo
IDIOMA
Color borde
Tipo borde
Off
Off
Off
Fuente0
Mediano
Blanco
Rellena
Negro
Rellena
Negro
Ninguno
On
Off
Presione [SETUP] para salir.
6
Nota:
• “Servicio digital de subtítulos” se puede cambiar
dependiendo de la descripción de la emisión.
24
ES
/
K
Utilice [Cursor
7
L] para seleccionar un elemento,
y luego presione [ENTER]. Utilice [Cursor
seleccionar el ajuste deseado, y presione [ENTER].
Visualización de la imagen
ABCDEFGHIJKL
ABCDEFGHIJKL
Borde
Fuente
(Color borde y Tipo borde)
(Estilo fuente, Tamaño fuente,
Color fuente y Opaco o Transparencia fuente)
Fondo
(Color fondo y Opacidad o Transparencia fondo)
La descripción de ajuste de cada elemento se
•
muestra en la siguiente página.
Revise la selección de ajustes que realizó en la
•
siguiente página en la esquina superior derecha
del recuadro de ajustes mostrado (no todas las
selecciones muestran las cambios realizados).
/
K
L] para
 Loading...