

Page 1

OWNER’S
As an ENERGY STAR
Partner, our company has
determined that this product meets
the E
NERGY STAR guidelines for
energy efficiency. E
NERGY STAR is
a U.S. registered mark.
®
®
®
MANUAL
COLOR TV/VCR
DCC1303 (13 inch)
DCC1903 (19 inch)
This Owner’s Manual is made of
recycled paper.
19” MODEL ILLUSTRATED
Please read before using this equipment
Page 2
WARNING: TO REDUCE THE RISK OF FIRE OR ELECTRIC SHOCK, DO NOT EXPOSE THIS APPLIANCE
PORTABLE CART WARNING
S3126A
TO RAIN OR MOISTURE.
CAUTION
RISK OF ELECTRIC SHOCK
DO NOT OPEN
CAUTION: TO REDUCE THE RISK OF ELECTRIC
SHOCK, DO NOT REMOVE COVER (OR BACK).
NO USER SERVICEABLE PARTS INSIDE. REFER
SERVICING TO QUALIFIED SERVICE PERSONNEL.
The caution marking is located on the rear of the cabinet.
IMPORTANT SAFEGUARDS
1.Read instructions-All the safety and operating instructions
should be read before the appliance is operated.
2.Retain Instructions-The safety and operating instructions
should be retained for future reference.
3.Heed Warnings-All warnings on the appliance and in the
operating instructions should be adhered to.
4.Follow Instructions-All operating and use instructions
should be followed.
5.Cleaning-Unplug TV/VCR from the wall outlet before
cleaning. Do not use liquid cleaners or aerosol cleaners. Use
a damp cloth for cleaning.
EXCEPTION: A product that is meant for uninterrupted
service and, that for some specific reason, such as the possibility of the loss of an authorization code for a CATV converter, is not intended to be unplugged by the user for cleaning or any other purpose, may exclude the reference to
unplugging the appliance in the cleaning description otherwise required in item 5.
6.Attachments-Do not use attachments not recommended by
the TV/VCR manufacturer as they may cause hazards.
7.Water and Moisture-Do not use this TV/VCR near water-
for example, near a bath tub, wash bowl, kitchen sink, or
laundry tub, in a wet basement, or near a swimming pool,
and the like.
8.Accessories-Do not place this TV/VCR on an unstable cart,
stand, tripod, bracket, or table. The TV/VCR may fall, causing serious injury to someone, and serious damage to the
appliance. Use only with a cart, stand, tripod, bracket, or
table recommended by the manufacturer, or sold with the TV/VCR. Any
mounting of the appliance should
follow the manufacturer’s instructions and should use a mounting
accessory recommended by the manufacturer. An appliance and cart
combination should be moved with
care.
THIS SYMBOL INDICATES THAT DANGEROUS VOLTAGE CONSTITUTING A
RISK OF ELECTRIC SHOCK IS PRESENT
WITHIN THIS UNIT.
THIS SYMBOL INDICATES THAT THERE
ARE IMPORTANT OPERATING AND
MAINTENANCE INSTRUCTIONS IN THE
LITERATURE ACCOMPANYING THE
APPLIANCE.
Quick stops, excessive force, and uneven surfaces may
cause the appliance and cart combination to overturn.
9.Ventilation-Slots and openings in the cabinet and the back
or bottom are provided for ventilation and to ensure reliable
operation of the TV/VCR and to protect it from overheating, and these openings must not be blocked or covered.
The openings should never be blocked by placing the
TV/VCR on a bed, sofa, rug, or other similar surface. This
TV/VCR should never be placed near or over a radiator or
heat register. This TV/VCR should not be placed in a builtin installation such as a bookcase or rack unless proper
ventilation is provided or the manufacturer’s instructions
have been adhered to.
10.Power Sources-This TV/VCR should be operated only
from the type of power source indicated on the marking
label. If you are not sure of the type of power supply to
your home, consult your appliance dealer or local power
company. For TV/VCRs intended to operate from battery
power, or other sources, refer to the operating instructions.
11.Grounding or Polarization-This TV/VCR is equipped
with a polarized alternating-current line plug(a plug having
one blade wider than the other). This plug will fit into the
power outlet only one way. This is a safety feature. If you
are unable to insert the plug fully into the outlet, try reversing the plug. If the plug should still fail to fit, contact your
electrician to replace your obsolete outlet. Do not defeat the
safety purpose of the polarized plug.
12.Power-Cord Protection-Power-supply cords should be
routed so that they are not likely to be walked on or
pinched by items placed upon or against them, paying particular attention to cords at plugs, convenience receptacles,
and the point where they exit from the appliance.
- 2 - EN
9I03
Page 3
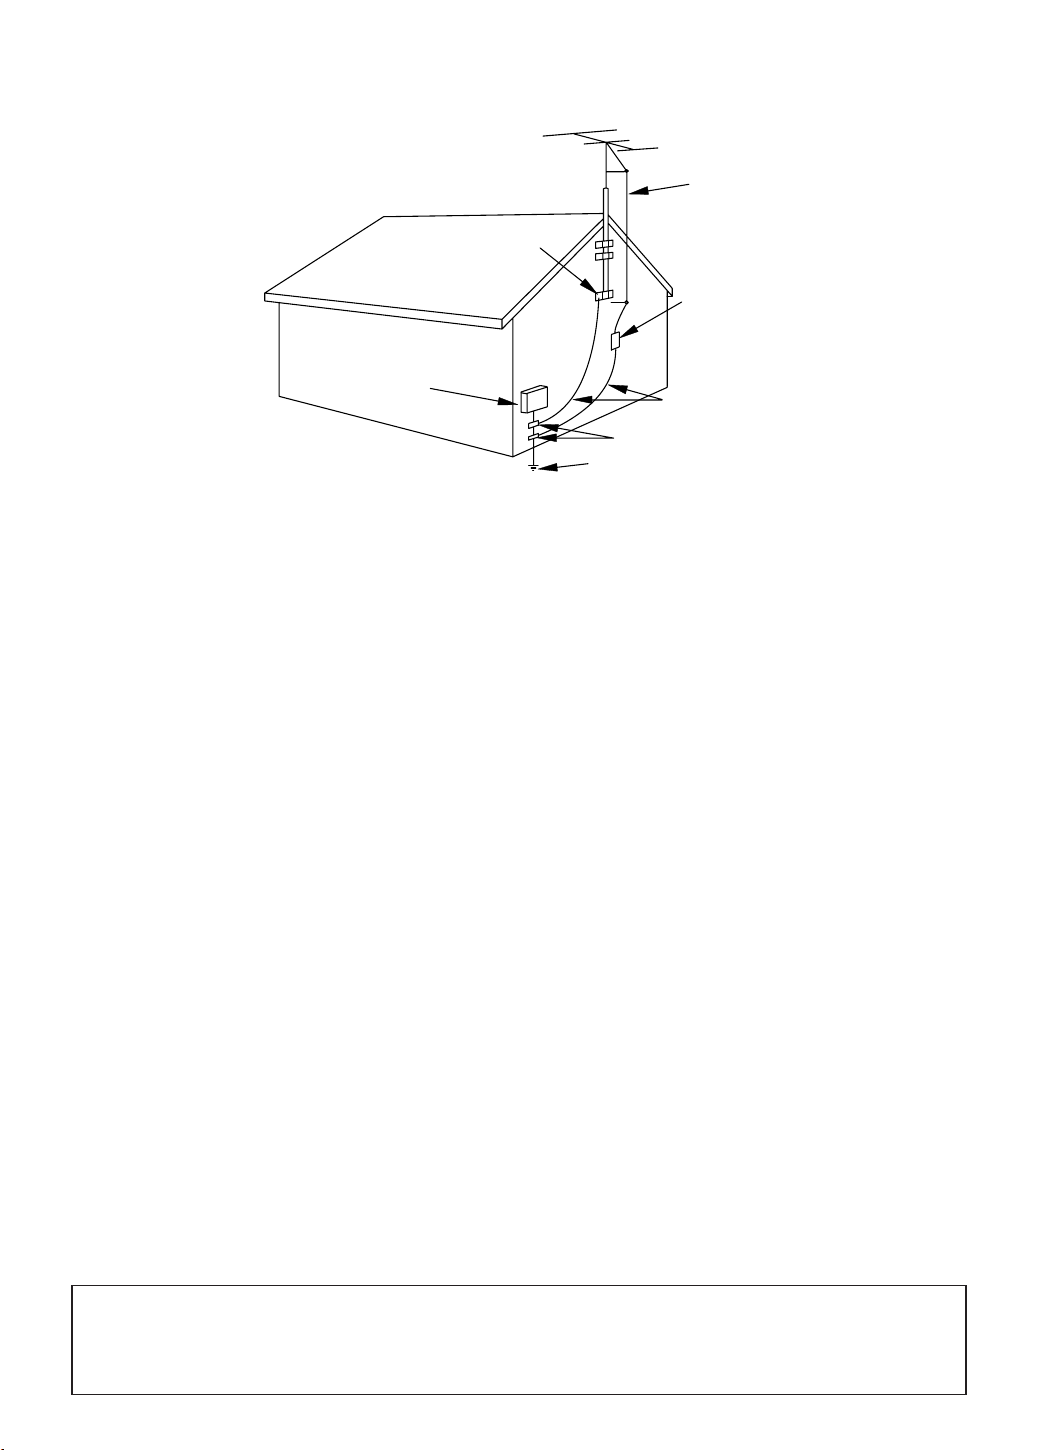
EXAMPLE OF ANTENNA GROUNDING AS P ER
NATIONAL ELECT RICAL CODE
S2898A
FIGURE A
ELECTRIC
SERVICE
EQUIPMENT
NEC - NATIONAL ELECTRICAL CODE
GROUND
CLAMP
ANTENNA
LEAD IN
WIRE
ANTENNA
DISCHARGE UNI T
(NEC SECTION 810-20)
GROUNDING CONDUCTORS
(NEC SECTION 810-21)
GROUND CLAMPS
POWER SERVICE GROUNDI NG
ELECTRODE SYSTEM
(NEC ART 250, PART H)
13.Outdoor Antenna grounding-If an outside antenna or
cable system is connected to the TV/VCR, be sure the
antenna or cable system is grounded so as to provide some
protection against voltage surges and built-up static
charges. Article 810 of the National Electrical Code,
ANSI/NFPA No. 70, provides information with respect to
proper grounding of the mast and supporting structure,
grounding of the lead-in wire to an antenna discharge unit,
size of grounding conductors, location of antenna-discharge
unit, connection to grounding electrodes, and requirements
for the grounding electrode. (Fig. A)
14.Lightning-For added protection for this TV/VCR receiver
during a lightning storm, or when it is left unattended and
unused for long periods of time, unplug it from the wall
outlet and disconnect the antenna or cable system. This will
prevent damage to the TV/VCR due to lightning and
power-line surges.
15.Power Lines-An outside antenna system should not be
located in the vicinity of overhead power lines or other
electric light or power circuits, or where it can fall into
such power lines or circuits. When installing an outside
antenna system, extreme care should be taken to keep from
touching such power lines or circuits as contact with them
might be fatal.
16.Overloading-Do not overload wall outlets and extension
cords as this can result in a risk of fire or electric shock.
17.Object and Liquid Entry-Never push objects of any kind
into this TV/VCR through openings as they may touch dangerous voltage points or short out parts that could result in
a fire or electric shock. Never spill liquid of any kind on
the TV/VCR.
18.Servicing-Do not attempt to service this TV/VCR yourself
as opening or removing covers may expose you to dangerous voltage or other hazards. Refer all servicing to qualified service personnel.
19.Damage Requiring Service-Unplug this TV/VCR from
the wall outlet and refer servicing to qualified service per-
sonnel under the following conditions:
a. When the power-supply cord or plug is damaged or frayed.
b. If liquid has been spilled, or objects have fallen into the
TV/VCR.
c. If the TV/VCR has been exposed to rain or water.
d. If the TV/VCR does not operate normally by following the
operating instructions. Adjust only those controls that are
covered by the operating instructions, as improper adjust-
ment of other controls may result in damage and will often
require extensive work by a qualified technician to restore
the TV/VCR to its normal operation.
e. If the TV/VCR has been dropped or damaged in any way.
f. When the TV/VCR exhibits a distinct change in perfor-
mance-this indicates a need for service.
20.Replacement Parts-When replacement parts are required,
be sure the service technician has used replacement parts
specified by the manufacturer that have the same character-
istics as the original part. Unauthorized substitutions may
result in fire, electric shock, injury to persons or other haz-
ards.
21.Safety Check-Upon completion of any service or repairs to
this TV/VCR, ask the service technician to perform routine
safety checks to determine that the TV/VCR is in proper
operating condition.
22.Heat-This TV/VCR product should be situated away from
heat sources such as radiators, heat registers, stoves, or
other products (including amplifiers) that produce heat.
Note to CATV system installer:
This reminder is provided to call the CATV system installer’s attention to Article 820-40 of the NEC that
provides guidelines for proper grounding and, in particular, specifies that the cable ground shall be connected to the grounding system of the building as close to the point of cable entry as practical.
- 3 - EN
9I03
Page 4

PRECAUTIONSPRECAUTIONS
LOCATION
For safe operation and satisfactory performance of
your TV/VCR, keep the following in mind when
selecting a place for its installation:
Shield it from direct sunlight and keep it away
•
from sources of intense heat.
Avoid dusty or humid places.
•
Avoid places with insufficient ventilation for proper
•
heat dissipation. Do not block the ventilation holes
at the top and bottom of the unit. Do not place the
unit on a carpet because this will block the ventilation holes.
Install unit in a horizontal position.
•
Avoid locations subject to strong vibration.
•
Do not place the TV/VCR near strong magnetic fields.
•
Avoid moving TV/VCR to locations where temper-
•
ature differences are extreme.
AVOID THE HAZARDS OF
ELECTRICAL SHOCK AND FIRE
Do not handle the power cord with wet hands.
•
Do not pull on the power cord when disconnecting
•
it from an AC wall outlet. Grasp it by the plug.
If, by accident, water is spilled on your unit, unplug
•
the power cord immediately and take the unit to our
Authorized Service Center for servicing.
Do not put your fingers or objects into the
•
TV/VCR cassette holder.
Do not place anything directly on top of the unit.
•
WARNING
Moisture condensation may occur inside the unit
when it is moved from a cold place to a warm place,
or after heating a cold room or under conditions of
high humidity. If a tape is played in a TV/VCR
which has moisture, it may damage the tape and
TV/VCR. Therefore when the condensation occurs
inside the unit, turn the POWER button on and allow
at least 2 hours for the unit to dry out.
CAUTION:TO PREVENT ELECTRIC SHOCK, MATCH WIDE BLADE OF PLUG TO WIDE SLOT, FULLY
INSERT.
IMPORTANT COPYRIGHT INFORMATION
Unauthorized recording or use of broadcast television programming, video tape, film or other copyrighted
material may violate applicable copyright laws. We assume no responsibility for the unauthorized duplication,
use, or other acts which infringe upon the rights of copyright owners.
The serial number of this product may be found on the back of the unit. No other TV/VCR has the same serial
number as yours. You should record the number and other vital information here and retain this book as a permanent record of your purchase to aid identification in case of theft. Serial numbers are not kept on file.
Date of Purchase
Dealer Purchase from
Dealer Address
Dealer Phone No.
Model No.
Serial No.
- 4 - EN
9I03
Page 5

TABLE OF CONTENTS
C IMPORTANT SAFEGUARDS . . . . . . . . . . . . .2
C PRECAUTIONS . . . . . . . . . . . . . . . . . . . . . . . .4
LOCATION . . . . . . . . . . . . . . . . . . . . . . . . . . . .4
AVOID THE HAZARDS OF ELECTRICAL
SHOCK AND FIRE . . . . . . . . . . . . . . . . . . . . . .4
WARNING . . . . . . . . . . . . . . . . . . . . . . . . . . . .4
C FEATURES . . . . . . . . . . . . . . . . . . . . . . . . . . . .6
C SUPPLIED ACCESSORIES . . . . . . . . . . . . . . .6
C VIDEO CASSETTE . . . . . . . . . . . . . . . . . . . . .7
C OPERATING CONTROLS AND FUNCTIONS 8
C PREPARATION FOR USE . . . . . . . . . . . . . . .10
ANTENNA/CABLE CONNECTIONS . . . . . . .10
INSTALLING THE BATTERIES . . . . . . . . . . .11
EXTERNAL INPUT MODE . . . . . . . . . . . . . .11
C SET UP FOR USE . . . . . . . . . . . . . . . . . . . . .12
CHANNEL SET UP FOR THE FIRST TIME .12
DELETING (OR ADDING) CHANNEL . . . . .12
CHANNEL SET UP AGAIN . . . . . . . . . . . . . .13
SELECTING THE LANGUAGE . . . . . . . . . . .13
DAYLIGHT-SAVING TIME . . . . . . . . . . . . . .13
CLOCK SET UP (AUTO / MANUAL) . . . . . .14
C ON SCREEN DISPLAY . . . . . . . . . . . . . . . . .16
C SPECIAL FEATURES . . . . . . . . . . . . . . . . . .16
DEGAUSSING . . . . . . . . . . . . . . . . . . . . . . . .16
REAL TIME TAPE COUNTER . . . . . . . . . . . .16
AUTO REWIND-EJECT . . . . . . . . . . . . . . . . .16
C TV OPERATION . . . . . . . . . . . . . . . . . . . . . . .17
WATCHING ATV PROGRAM . . . . . . . . . . . .17
GAME MODE . . . . . . . . . . . . . . . . . . . . . . . . .17
PICTURE CONTROL . . . . . . . . . . . . . . . . . . .17
CLOSED CAPTION SYSTEM . . . . . . . . . . . .18
V-CHIP SET UP . . . . . . . . . . . . . . . . . . . . . . . .19
C PLAYBACK . . . . . . . . . . . . . . . . . . . . . . . . . . .21
NORMAL PLAYBACK . . . . . . . . . . . . . . . . . .21
TRACKING ADJUSTMENT . . . . . . . . . . . . . .21
PICTURE SEARCH . . . . . . . . . . . . . . . . . . . .21
STILL PICTURE . . . . . . . . . . . . . . . . . . . . . . .21
NOISE CANCEL (in the Still mode) . . . . . . . .21
VERTICALHOLD CONTROL . . . . . . . . . . . .21
C SPECIAL PLAYBACK . . . . . . . . . . . . . . . . . .22
RENTAL PLAYBACK . . . . . . . . . . . . . . . . . . .22
AUTO REPEAT PLAYBACK . . . . . . . . . . . . .22
C SEARCH . . . . . . . . . . . . . . . . . . . . . . . . . . . . .23
ZERO RETURN . . . . . . . . . . . . . . . . . . . . . . .23
TIME SEARCH . . . . . . . . . . . . . . . . . . . . . . . .23
C RECORDING . . . . . . . . . . . . . . . . . . . . . . . . .24
NORMAL RECORDING . . . . . . . . . . . . . . . . .24
SKIPPING UNWANTED SCENES DURING
RECORDING . . . . . . . . . . . . . . . . . . . . . . . . .24
OTR (One Touch Recording) . . . . . . . . . . . . . .25
COPYING A VIDEO CASSETTE
(Requires a VCR or camcorder) . . . . . . . . . . . .25
C TIMER . . . . . . . . . . . . . . . . . . . . . . . . . . . . . .26
AUTOMATIC TIMER RECORDING . . . . . . .26
TIMER PROGRAM EXTENSION . . . . . . . . .27
HINTS FOR AUTOMATIC TIMER
RECORDING . . . . . . . . . . . . . . . . . . . . . . . . .28
AUTO RETURN . . . . . . . . . . . . . . . . . . . . . . .28
WAKE UP TIMER . . . . . . . . . . . . . . . . . . . . . .28
SLEEP TIMER . . . . . . . . . . . . . . . . . . . . . . . . .29
C MAINTENANCE . . . . . . . . . . . . . . . . . . . . . . .29
C TROUBLESHOOTING GUIDE . . . . . . . . . . .30
C SPECIFICATIONS . . . . . . . . . . . . . . . . . . . . .31
C CABLE CHANNEL DESIGNATIONS . . . . . .31
C WARRANTY . . . . . . . . . . . . . . . . . . . . . . . . . .32
A NOTE ABOUT RECYCLING
This product’s packaging materials are recyclable and can be reused. Please dispose of any materials in
accordance with your local recycling regulations.
Batteries should never be thrown away or incinerated but disposed of in accordance with your local regulations concerning chemical wastes.
- 5 - EN
9I03
Page 6
FEATURES
Owner’s
Manual
Infrared remote control
•
Bilingual on screen menu display selectable in
•
English or French
Real time counter–This shows the elapsed record-
•
ing or playback time in hours, minutes, and seconds. The “–” indication will appear when the tape
is rewound further than the tape counter position
“0:00:00”.
181 channel capability PLL frequency synthesiz-
•
er tuner with direct station call–
be necessary to view scrambled cable channels.)
Auto Clock Setting–Allows you to set the clock
•
function from a PBS broadcast station.
Closed caption system–You may view specially
•
labeled (cc) TV programs, movies, news, prerecorded tapes, etc. with either a dialogue caption or
text display added to the program.
Game mode–Automatically sets external input
•
mode and allows TV/VCR display to be suitable
for use with TV games.
Auto power on and off system–Automatically
•
turns on the TV/VCR when you insert the cassette,
turns off after auto-rewind, and ejects when the
beginning of the tape is reached.
Auto rewind when the end of a tape is
•
reached–
timer recording.
2 Step picture search operation–You can view a
•
video program at a high speed or super high speed
in either a forward or reverse direction in LP and
SLP mode. For SP mode only high speed.
Three different playback tape speeds : SP/LP/SLP
•
Two different recording tape speeds : SP/SLP
•
Auto Head Cleaner–Automatically cleans video
•
heads as you insert or remove a cassette.
This function doesn’t occur when using
(A converter may
Zero Return–The tape returns to counter of
•
0:00:00 by rewinding or fast forwarding.
Still–“Freeze” the picture at any time, for close
•
viewing of a particular scene. Only tapes recorded
in SLP mode will show a fairly clear picture.
Digital Auto Tracking (DTR)–Automatically
•
adjusts the tracking for each tape you play.
Rental play mode–Improves playback picture
•
quality from worn tapes, such as rental tapes.
Auto repeat–Allows you to repeat the playing of a
•
tape indefinitely without pressing the PLAY button.
Time search–Let you set the TV/VCR to advance
•
the tape by entering the desired playback time you
want to skip.
OTR (One Touch Recording)–Instant timed
•
recording from 30 to 480 minutes is possible at the
push of the REC/OTR button.
1 Year, 8 events (including Daily and Weekly
•
Timer Recording)–
record up to 8 programs at different times on different channels up to 1 year in advance. The Daily
timer allows recordings to be made of daily broadcasts, and the Weekly timer allows recording to be
made once a week up to the end of the tape.
Auto return–After timer recording is finished, the
•
TV/VCR can return to the beginning of the recording.
Wake up/Sleep timer–Allows you to have the
•
TV/VCR automatically turn on or off at a desired
time.
Timer Program Extension–Allow you to shift the
•
time schedule for automatic timer recording.
V-CHIP–Enables parents to prevent their children
•
from watching inappropriate material on TV.
The built-in timer allows you to
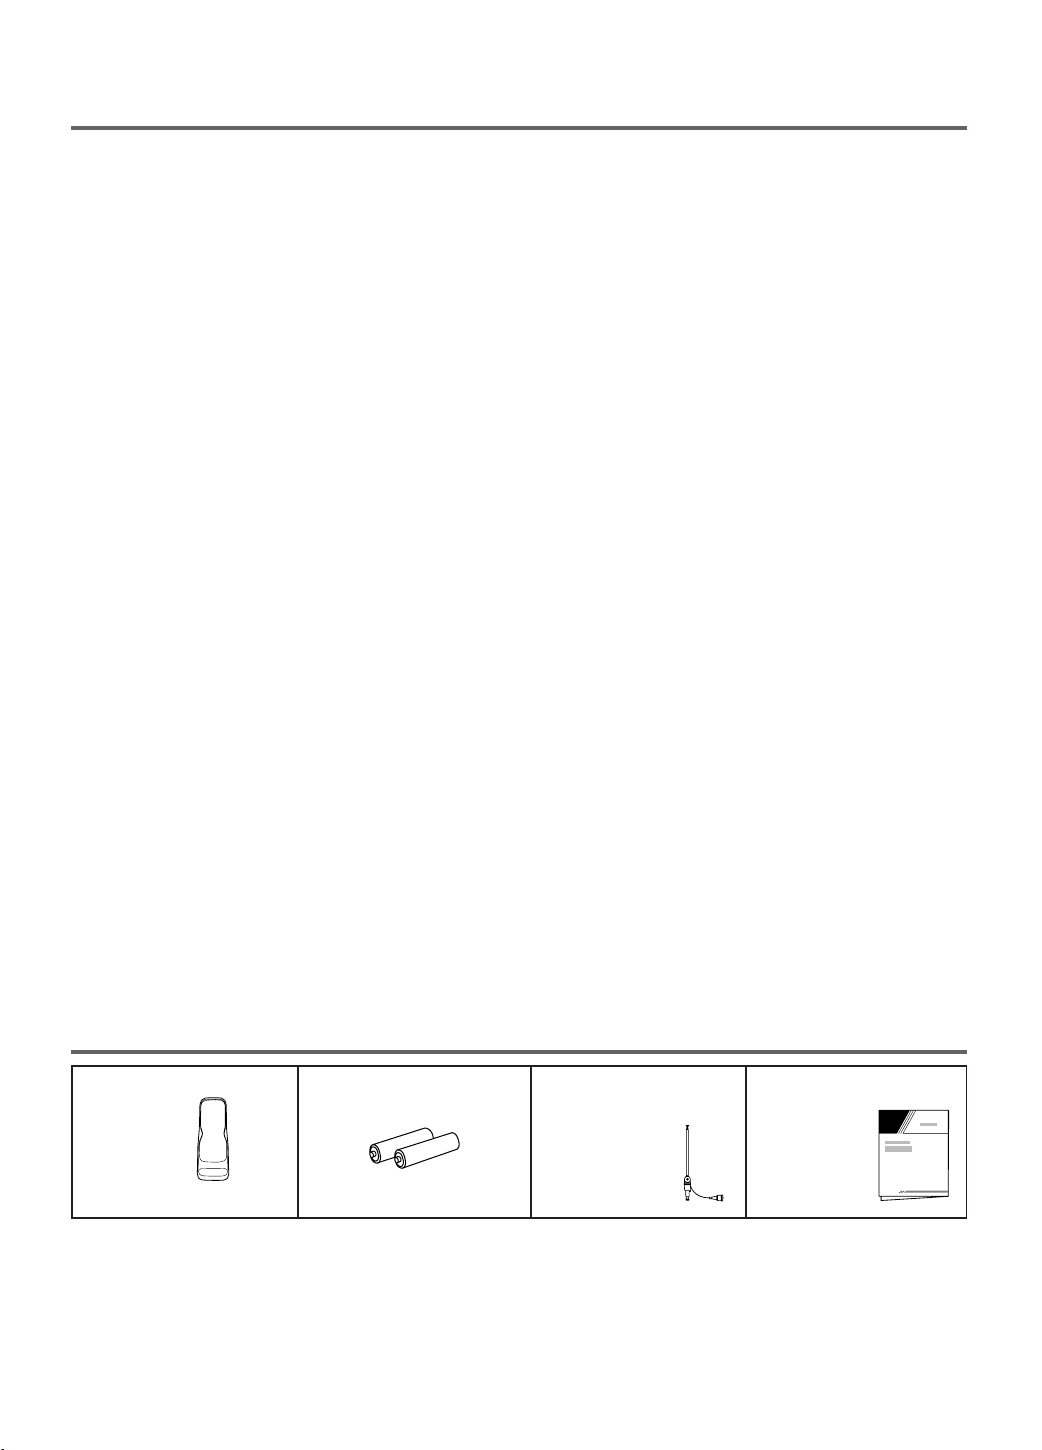
SUPPLIED ACCESSORIES
Remote Control Unit
PART NO.
(N0150UD or N0107UD)
Depending on your antenna system, you may need different types of Combiners (Mixer) or Separators
•
(Splitter). Contact your local electronics store for these items.
We do not recommend the use of universal remote controls. Not all of the functions may be controlled with
•
a universal remote control. If you decide to use a universal remote control with this unit, please be aware
that the code number given may not operate this unit. In this case, please call the manufacturer of the universal remote control.
2 AA Batteries Rod Antenna
(13 inch model only)
PART NO.
(0EMN00673 or
0EMN01755 or
0EMN01599)
- 6 - EN
Owner’s Manual
PART NO.
(0EMN02176)
9I03
Page 7
VIDEO CASSETTE
This TV/VCR will operate with any cassette that has the mark. For best results, we
recommend the use of high-quality tapes. Do not use poor quality or damaged tapes.
PRECAUTIONS
Avoid moisture. Moisture condensation may occur
•
on the tape if it is moved from a cold place to a
warm place or visa versa. Before using a tape with
these conditions, to avoid damage of the tape and
your TV/VCR, wait until the tape has warmed to
room temperature and the moisture has evaporated.
Avoid extreme heat, high humidity and magnetic
•
fields.
Do not tamper with the cassette mechanism.
•
Do not touch the tape with your fingers.
•
TWO DIFFERENT TAPE SPEEDS
Before recording, select the tape speed from : SP
mode (Standard Play) or SLP mode (Super Long
Play).
The table below shows the maximum recording/play-
back time using T60, T120 or T160 tapes in each
mode.
Tape Speed Recording/Playback Time
Type of tape
SP mode 1 hour 2 hours 2-2/3 hours
SLP mode 3 hours 6 hours 8 hours
Note: You can play back a tape recorded in LP mode
(Long Play).
T60 T120 T160
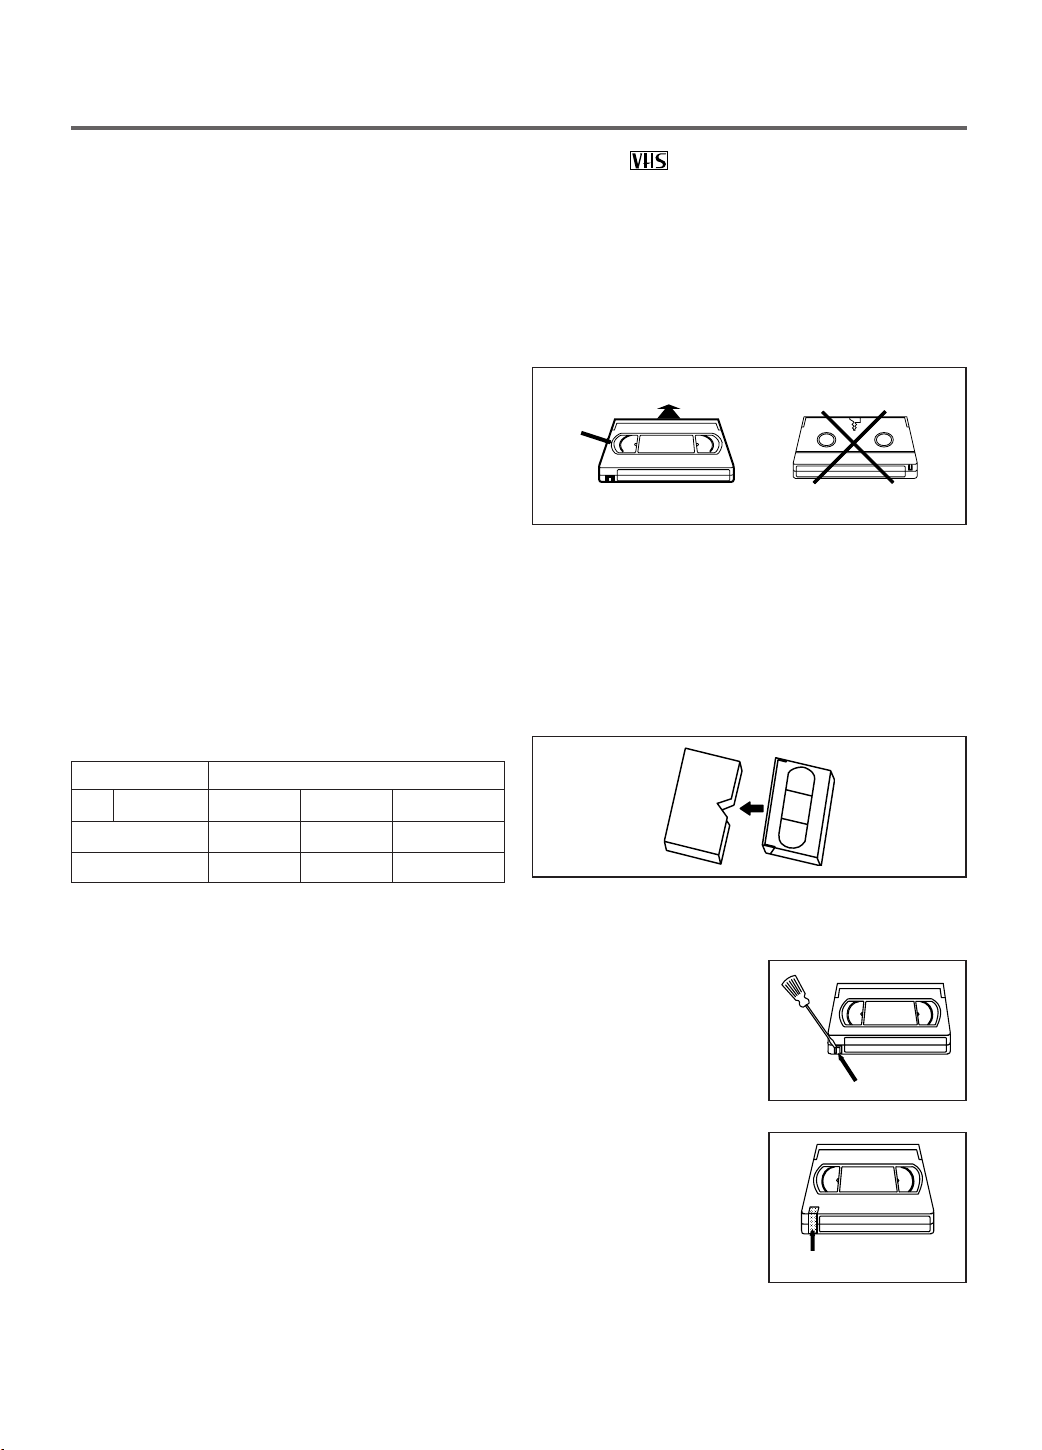
INSERTING A CASSETTE
Insert the cassette in the direction as shown. Push in
gently, but continuously, on the center-back of the
cassette until it is drawn into the TV/VCR. The
TV/VCR will automatically turn on.
Window
CORRECT
WRONG
REMOVING A CASSETTE
1)In the Stop mode, press the EJECT button on the
remote control or press the STOP/EJECT button on
the TV/VCR. The cassette will eject.
2)Pull the cassette out of the cassette compartment.
3)Store the cassette in its case as shown.
ERASE PREVENTION
You can prevent accidental
erasing of recording by
breaking off the tab on the
back edge of the cassette.
Tab
If you decide to record on
the tape again, cover the
hole with plastic tape.
Plastic Tape
- 7 - EN
9I03
Page 8

OPERATING CONTROLS AND FUNCTIONS
AUDIO
EARPHONE
VIDEO
STOP/EJECT REW
PLAY
F.FWD REC/OTRCHANNEL
VOLUME
POWER
1 92 3 4 5 6 78131011 1412
POWER
WAKE-UP
/SLEEP
123
456
789
+100
0
EJECT
CHANNEL
RETURN
REW
PLAY
STOP
F.FWD
GAME
RECORD
PAUSE/STILL
SPEED
TIME SEARCH
CHANNEL
T-PROG.
CLEAR
COUNTER
RESET
DISPLAY MUTE
MENU
VOLUME
3
15
5
7
16
8
11
18
19
20
7
24
4
10
9
22
21
23
17
25
This manual covers 13" and 19". The operation of the two models are exactly the same except the
appearance. 19" model is illustrated in this manual.
NOTE:
We do not recommend the use of universal remote controls. Not all of the functions may be controlled with
•
a universal remote control.
If you decide to use a universal remote control with this unit, please be aware that the code number given
may not operate this unit. In this case, please call the manufacturer of the universal remote control.
- TV/VCR FRONT P ANEL -
- REMOTE CONTROL -
1 VIDEO input jack– Connect to the video output
jack of your video camera or another VCR.
2 AUDIO input jack– Connect to the audio output
jack of your audio equipment, video camera or
another VCR.
3 POWER button– Press to turn TV/VCR on and
off. Press to activate timer recording.
4 VOLUME
XX/ YY
buttons– Adjust the volume
level.
5 CHANNEL K / L buttons– Press to select the
desired channels for viewing or recording.
You may display the main menu on the TV screen
by pressing repeatedly this button on the
TV/VCR.
TRACKING function– Press to minimize video
‘noise’ (lines or dots on screen) during playback
mode. (See page 21.)
6 Remote Sensor Window– Receives the infrared
signals from the remote control.
7 STOP button– Press to stop the tape motion.
EJECT button– Press in the Stop mode to remove
tape from TV/VCR.
L button–
Press to select setting modes from the on screen
•
menu.
Press to enter digits when setting program.
•
(for example: setting clock or timer program)
- 8 - EN
9I03
Page 9

- REAR VIEW -
ANT.
2726
8 REW button– Press to rewind the tape, or to view
the picture rapidly in reverse during playback
mode. (Rewind Search)
s button–
Press to select a mode from a particular menu.
•
(for example: LANGUAGE or USER’S SET UP)
9 PLAY button– Press to begin playback.
K button–
Press to select setting modes from the on screen
•
menu.
Press to enter digits when setting program.
•
(for example: setting clock or timer program)
10 F.FWD button– Press to rapidly advance the tape,
or to view the picture rapidly in forward during
playback mode. (Forward Search)
B button–
When setting program (for example: setting clock
•
or timer program), press to determine your selection and proceed to the next step you want to
input.
Press to determine setting modes from on screen
•
menu.
Press to select a mode from a particular menu.
•
(for example: LANGUAGE or USER’S SET UP)
REC button– Press for manual recording.
11
OTR button–Activates One Touch Recording.
(only on the TV/VCR)
12 RECORD indicator– Flashes during recording.
Lights up in the Stand-by mode for Timer
Recording.
13 EARPHONE jack– Connects to earphones (not
supplied) for personal listening. The size of jack is
1/8” monaural (3.5mm).
14 Cassette compartment
15 Number buttons– Press to select desired channels
for viewing or recording. To select channels from
1 to 9, first press the 0 button and then 1 to 9.
+100 button– When selecting cable channels
which are higher than 99, press this button first,
then press the last two digits. (To select channel
125, first press the “+100” button then press “2”
and “5”).
16 MENU button– Press to display the main menu on
the TV screen.
17 DISPLAY button– Display the counter or the cur-
rent channel number and current time on the TV
screen. (See page 16.)
18 SPEED button– Press to choose the desired
recording speed:SP/SLP.
19 T-PROG. CLEAR button– Press to cancel a setting
of timer program. (See page 27.)
COUNTER RESET button– Press to reset counter
to 0:00:00.
20 GAME button– Sets the game mode and external
input mode at the same time. (See page 17.)
21 TIME SEARCH button– Press to activate Time
Search mode.
22 PAUSE/STILL button– Press to temporarily stop
the tape during the recording or to view a still picture during playback.
23 MUTE button– Mutes the sound. Press it again to
resume sound.
24 CHANNEL RETURN button– Press to go back to
the previously viewed channel. For example,
pressing this button once will change channel display from 3 (present channel) to 10 (previously
viewed channel), and pressing it a second time
will return from 10 to 3.
25 WAKE-UP/SLEEP button– Sets the Wake up or
Sleep Timer. (See page 28 and 29.)
26 Power cord– Connect to a standard AC outlet
(120V/60Hz).
27 ANT. terminal– Connect to an antenna or cable
system.
- 9 - EN
9I03
Page 10
PREPARATION FOR USE
ANT.
ANT.
ANT.
ANT.
ANT.
ANT.
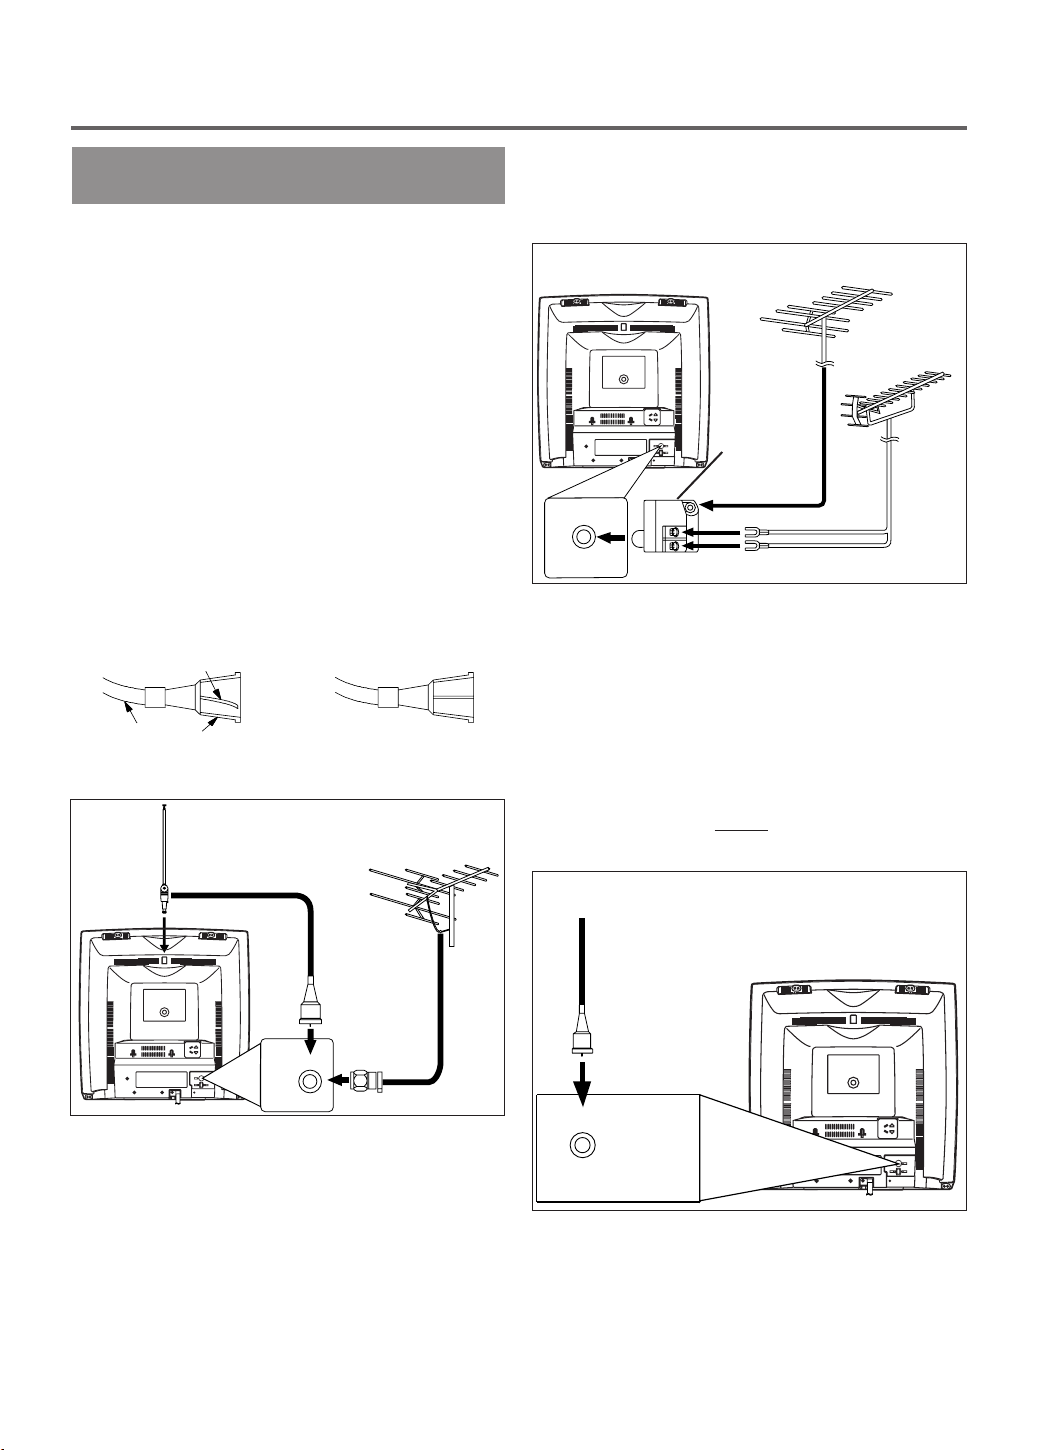
ANTENNA/CABLE
CONNECTIONS
VHF/UHF COMBINED ANTENNA
The VHF/UHF Rod Antenna (supplied with 13 inch
model only) is detachable. Insert the stem of the
antenna into the hole on the upper-back portion of
the TV/VCR.Connect the VHF/UHF Rod Antenna or
VHF/UHF Combination Antenna to the ANT. terminal of the TV/VCR as shown in the diagram below.
For the best reception, fully extend the VHF/UHF
Rod Antenna and make the necessary adjustments.
(Avoid touching the top section when adjusting.)
NOTE:
Before plugging the Rod antenna into antenna terminal, check that the pin is not bent. If it is bent,
straighten the pin as illustrated, then plug the pin into
antenna terminal.
Bent pin
Cable Plug
(Needs to be straightened)
Rod Antenna
(Supplied with
13” model)
(Straight pin)
VHF/UHF Antenna
(Not supplied)
VHF/UHF SEPARATE ANTENNAS
In some areas it will be necessary to use an outdoor
antenna.
VHF Antenna (Not supplied)
UHF Antenna
VHF/UHF
Combiner
(Not
supplied)
Flat twin-lead cable
(Not supplied)
CABLE WITHOUT CONVERTER/
DESCRAMBLER BOX
Use this connection if your cable system connects
directly to your TV/VCR without a converter box.
By using this connection you can:
1) Use the TV/VCR remote to select channels.
2) Program one or more unscrambled channels for
Automatic Timer Recording.
NOTE: This unit will ONL
same channel.
From Cable System
Y record and view the
NOTE:
The connection of an indoor antenna may not always
give acceptable TV reception.
Antenna/Cable Connections Continued on the Next Page.
75-ohm Coaxial
Cable (Not
supplied)
- 10 - EN
9I03
Page 11
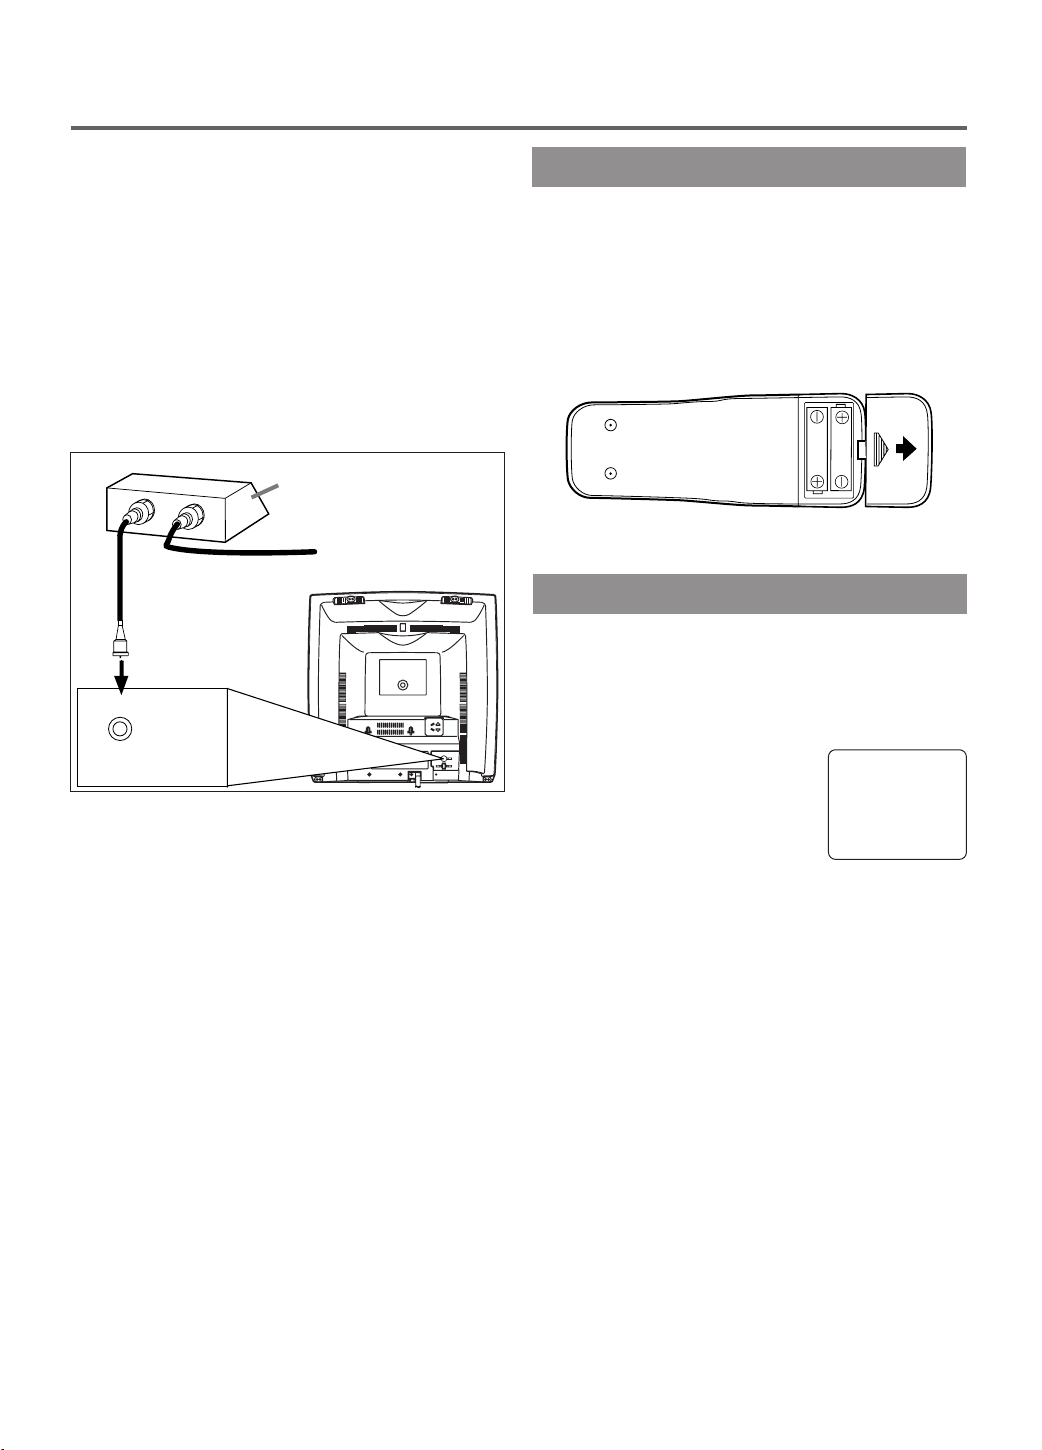
CABLE WITH CONVERTER/
ANT.
IN
OUT
ANT.
DESCRAMBLER BOX OR SATELLITE
BOX
If your cable service supplies you with a converter
box or if you use a satellite system, you can use the
basic connection shown here.
By using this connection you can also record scrambled channels. However, channel selection must be
made with the converter box or satellite box. This
means that channels cannot be changed using the
TV/VCR Remote Control. Unattended timer recording is limited to one channel at a time.
Satellite Box or
Cable Box (Not supplied)
From Cable System
or Satellite Dish
INSTALLING THE BATTERIES
1)Open the battery compartment cover by pressing
the cover on the remote unit in the direction of the
arrow.
2)Insert 2 “AA” penlight batteries into the battery
compartment in the direction indicated by the
polarity (+/-) markings.
3)Replace the cover.
75-ohm Coaxial
Cable
(Not supplied)
TO RECORD A SCRAMBLED/UNSCRAMBLED
CHANNEL
1. Set the TV/VCR channel selector to the output
channel of the Cable Converter Box or Satellite
Box. (Ex. CH3)
2.Select the channel to record from your Cable
Converter Box or Satellite Box.
EXTERNAL INPUT MODE
When using an external input signal (another VCR or
camcorder), connect the player’s audio/video output
cables to the AUDIO IN/ VIDEO IN jacks of your
TV/VCR. Then press the CHANNEL K or L button
until “AUX” appears on the screen.
AUX
- 11 - EN
9I03
Page 12

SET UP FOR USE
You can program the tuner to scan all the channels you receive in your area.
NOTE: Channel memory programming is NOT needed when connected to a cable box or satellite box. Just
select the TV/VCR channel selector to the output channel of the cable box or satellite box (Ex CH3). Then
select the channel to be viewed on the Cable Box or Satellite Box.
CHANNEL SET UP FOR THE
FIRST TIME
1 Plug in the TV/VCR power cord
Plug the TV/VCR power cord into a
standard AC outlet.
NOTE:
If some digits appear in the corner of
•
the screen, press the POWER button
without unplugging the power cord.
2 Turn on the TV/VCR
Press the POWER button to turn on the TV/VCR.
3 Select “ENGLISH” or “FRANÇAIS”
Select “ENGLISH” or
“FRANÇAIS”=French using the
F.FWD/B or REW/s button. “[ ]”
indicate the selected language.
4 Begin auto preset
Press the PLAY/K or STOP/L but-
ton to point to “AUTO PRESET”.
Then press the F.FWD/B button.
The tuner scans and memorizes all
active channels in your area.
NOTES:
The TV/VCR distinguishes between standard TV
•
channels and cable channels.
If you want to play or record a video tape
•
BEFORE
MENU button on the remote control. To preset the
tuner again, see “CHANNEL SET UP AGAIN” on
page 13.
The TV/VCR may recognize TV channels to be
•
CATV channels by the receiving conditions. In this
case, try auto preset again in the fine receiving
conditions.
presetting the tuner, you must press the
– SET UP –
B LANGUAGE
[ENGLISH] FRANÇAIS
AUTO PRESET
– SET UP –
LANGUAGE
[ENGLISH] FRANÇAIS
B AUTO PRESET
DELETING (OR ADDING)
CHANNEL
The channels you no longer receive or seldom watch
can be deleted from the memory. (Of course, you can
add the deleted channel into the memory again.)
1 Select “CHANNEL SET UP”
Press the MENU button on the
remote control.
Press the PLAY/K or STOP/L but-
ton to point to “CHANNEL SET
UP”.
Then, press the F.FWD/B button.
2 Select “ADD/DELETE CH”
Press the PLAY/K or STOP/L but-
ton to point to “ADD/DELETE
CH”.
Press the F.FWD/B button.
3 Enter the desired channel number
Press the PLAY/K or STOP/L but-
ton until your desired channel number appears. (You can also use the
number buttons or the CHANNEL
K/L button to enter it.) (Example:
CH8)
4 Delete (or add) it from (into) memory
Press the F.FWD/B or REW/s button. The channel
number changes to light red. The channel is deleted
from memory.
To delete another channel, repeat steps [3] and [4].
•
If you press the F.FWD/B or REW/s button
•
again, the channel is memorized again.
Added channel: Light blue .
Deleted channel: Light red.
– M E N U –
TIMER PROGRAMMING
PICTURE CONTROL
SETTING CLOCK
B CHANNEL SET UP
USER’S SET UP
V-CHIP SET UP
LANGUAGE [ENGLISH]
CAPTION [OFF]
ZERO RETURN
TIME SEARCH
– CHANNEL SET UP –
B ADD / DELETE CH (TV)
AUTO PRESET
ADD / DELETE
08
5 After scanning
The tuner stops on the lowest memorized channel.
If you want to recall the selected channels, you can
select the desired channel directly with the remote
control number buttons or
CHANNEL
K or L button.
5 Exit the channel setup mode
Press the MENU button on the remote control to
returns to TV mode.
NOTE: To confirm that channel(s) has been deleted
or added, press the CHANNEL K or L button.
- 12 - EN
9I03
Page 13

CHANNEL SET UPAGAIN
DAYLIGHT-SAVING TIME
Make sure ...
Press the POWER button to turn on the TV/VCR.
•
1 Select “CHANNEL SET UP”
Press the MENU button on the
remote control.
Press the PLAY/K or STOP/L but-
ton to point to “CHANNEL SET
UP”.
Then, press the F.FWD/B button.
2 Begin auto preset
Press the PLAY/K or STOP/L but-
ton to point to “AUTO PRESET”.
Then, press the F.FWD/B button.
The tuner scans and memorizes all
the active channels in your area.
– M E N U –
TIMER PROGRAMMING
PICTURE CONTROL
SETTING CLOCK
B CHANNEL SET UP
USER’S SET UP
V-CHIP SET UP
LANGUAGE [ENGLISH]
CAPTION [OFF]
ZERO RETURN
TIME SEARCH
– CHANNEL SET UP –
ADD / DELETE CH (TV)
B AUTO PRESET
3 After scanning
The tuner stops on the lowest memorized channel.
SELECTING THE LANGUAGE
Make sure ...
Press the POWER button to turn on the TV/VCR.
•
NOTE: This function effects only the language on
the screen menu and not the audio source.
Select this feature and the TV/VCR’s clock automatically will advance one hour in April, then reverse one
hour in October.
When Daylight-Saving Time is ON, the clock will
change automatically as follows:
First Sunday of April : At 2 AM the clock imme-
•
diately changes to 3 AM. Any timer programming
you have set to occur between 2 AM and 3 AM
will not record.
Last Sunday of October : At 2 AM the clock
•
immediately changes to 1 AM.
Make sure ...
Press the POWER button to turn on the TV/VCR.
•
1 Select “SETTING CLOCK”
Press the MENU button on the
remote control.
Press the PLAY/K or STOP/L but-
ton to point to “SETTING
CLOCK”.
Then, press the F.FWD/B button.
– M E N U –
TIMER PROGRAMMING
PICTURE CONTROL
B SETTING CLOCK
CHANNEL SET UP
USER’S SET UP
V-CHIP SET UP
LANGUAGE [ENGLISH]
CAPTION [OFF]
ZERO RETURN
TIME SEARCH
2 Set “D.S.T.” (Daylight-Saving Time) to [ON]
Press the PLAY/K or STOP/L but-
ton to point to “D.S.T.”.
Then, press the F.FWD/B or
REW/s button until [ON] appears.
– SETTING CLOCK –
AUTO CLOCK [ON]
AUTO CLOCK CH SEARCH
AUTO CLOCK CH [ 02 ]
MANUAL CLOCK SET
B D.S.T. [ON]
1 Select “LANGUA GE”
Press the MENU button on the
remote control.
Press the PLAY/K or STOP/L but-
ton to point to “LANGUAGE”.
– M E N U –
TIMER PROGRAMMING
PICTURE CONTROL
SETTING CLOCK
CHANNEL SET UP
USER’S SET UP
V-CHIP SET UP
B LANGUAGE [ENGLISH]
CAPTION [OFF]
ZERO RETURN
TIME SEARCH
2 Select “ENGLISH” or “FRANÇAIS”
Select “ENGLISH” or “FRANÇAIS”= French using
the F.FWD/B or REW/s button.
3 Exit the Language mode
Press the MENU button on the remote control to
return to TV mode.
NOTE: If for some reason the menu is in French,
press the MENU button on the remote control, press
the PLAY/K button to point to “LANGAGE
[FRANÇAIS]”, then press the F.FWD/B button, then
press the MENU button on the remote control.
3 Exit the Daylight-Saving Time mode
Press the MENU button on the remote control to
return to TV mode.
TO CANCEL THE DAYLIGHT-SAVING
TIME
Repeat steps [1] to [2], select [OFF] using the
F.FWD/B or REW/s button. then, press the MENU
button on the remote control to return to TV mode.
- 13 - EN
9I03
Page 14

CLOCK SET UP
(AUTO / MANUAL)
The TV/VCR clock must be set correctly before
VCR timer recording is possible. It is suggested that
the clock be set manually when first setting up the
TV/VCR. Then, set to [on] the auto clock setting
which will periodically correct the setting if necessary.
NOTE: If you cannot receive a station with time
signals, auto clock setting cannot be performed. Use
manual setting only.
6 Select the hour
Press the PLAY/K or STOP/L but-
ton until your desired hour appears.
(Example: 5, PM)
Then, press the F.FWD/B button.
7 Select the minute
Press the PLAY/K or STOP/L but-
ton until the desired minute
appears. (Example: 40)
– MANUAL CLOCK SET –
MONTH DAY YEAR
0 5 / 0 6 TUE 2 0 0 3
HOUR MINUTE
0 5 : – – PM
– MANUAL CLOCK SET –
MONTH DAY YEAR
0 5 / 0 6 TUE 2 0 0 3
HOUR MINUTE
0 5 : 4 0 PM
MANUAL CLOCK SETTING
Make sure ...
The TV/VCR is turned on.
•
In the example below, the clock is to be set to:
DATE May 6th, 2003
SETTING TIME 5:40PM
1 Select “SETTING CLOCK”
Press the MENU button on the
remote control.
Press the PLAY/K or STOP/L
button to point to “SETTING
– M E N U –
TIMER PROGRAMMING
PICTURE CONTROL
B SETTING CLOCK
CHANNEL SET UP
USER’S SET UP
V-CHIP SET UP
LANGUAGE [ENGLISH]
CAPTION [OFF]
ZERO RETURN
TIME SEARCH
CLOCK”.
Then, press the F.FWD/B button.
2 Select “MANUAL CLOCK SET”
Press the PLAY/K or STOP/L
button to point to “MANUAL
CLOCK SET”.
Then, press the F.FWD/B button.
3 Select the month
Press the PLAY/K or STOP/L
button until your desired month
appears. (Example: May → 05)
Then, press the F.FWD/B button.
4 Select the day
Press the PLAY/K or STOP/L but-
ton until your desired day appears.
(Example: 6th → 06)
Then, press the F.FWD/B button.
– SETTING CLOCK –
AUTO CLOCK [ON]
AUTO CLOCK CH SEARCH
AUTO CLOCK CH [ 02 ]
B MANUAL CLOCK SET
D.S.T. [OFF]
– MANUAL CLOCK SET –
MONTH DAY YEAR
0 5 / – – – – – – – – –
HOUR MINUTE
– – : – – – –
– MANUAL CLOCK SET –
MONTH DAY YEAR
0 5 / 0 6 – – – – – – –
HOUR MINUTE
– – : – – – –
8 Start the clock
5:40 PM
Press the MENU button on the
remote control.
Although seconds are not displayed,
they begin counting from 00 when
you press the MENU button on the remote control.
Use this feature to synchronize the clock with the
correct time.
NOTE:
When unplugging the AC cord or if there is a power
failure for more than 3 seconds, you may have to
reset the clock.
TO CHANGE CLOCK SETTING
If you want to change the clock,
1)Follow steps [1] and [2].
2)Select where you want to change using the
F.FWD/B or REW/s button.
3)Enter correct numbers using the PLAY/K or
STOP/L button.
4)Press the MENU button on the remote control to
start the clock.
PLEASE NOTE:
If there is no local PBS station in your area or on
your cable system, select “AUTO CLOCK” and
press the F.FWD/B or REW/s button to turn [OFF]
this function. Then you can manually adjust the
clock.
5 Select the year
Press the PLAY/K or STOP/L but-
ton until your desired year appears.
(Example: 2003)
Then, press the F.FWD/B button.
– MANUAL CLOCK SET –
MONTH DAY YEAR
0 5 / 0 6 TUE 2 0 0 3
HOUR MINUTE
– – : – – – –
- 14 - EN
9I03
Page 15

AUTOMATIC CLOCK SETTING
Make sure ...
The TV/VCR is turned on.
•
Confirm the TV/VCR is receiving a RF (Radio
•
Frequency) signal from either an antenna or cable
system connection using the ANT IN jack on the
rear of the TV/VCR.
NOTE:
If a cable converter box is being used, make sure it
•
is powered on.
You must use the TV/VCR remote control to per-
•
form the clock setting procedure.
If the TV/VCR is connected directly to a cable con-
•
verter box or satellite box, the local PBS station
must be selected on the cable box itself, and the
TV/VCR must be set to the output channel of the
cable converter box or satellite box (usually channel 3 or 4), to be able to set up or correct the clock
automatically
1 Select “SETTING CLOCK”
Press the MENU button on the
remote control.
Press the PLAY/K or STOP/L but-
ton to select “SETTING CLOCK”.
Press the F.FWD/B button to enter
“SETTING CLOCK” menu.
– M E N U –
TIMER PROGRAMMING
PICTURE CONTROL
B SETTING CLOCK
CHANNEL SET UP
USER’S SET UP
V-CHIP SET UP
LANGUAGE [ENGLISH]
CAPTION [OFF]
ZERO RETURN
TIME SEARCH
Clock signal. Auto Clock Setting is not possible.
Please use Manual Clock Setting on page 14.
Press the MENU button to exit the screen.
NOTE: During Auto Clock CH Search, the picture
may be distorted. This is normal.
4 Enter the channel number that contains the
Automatic Clock Setting Signal
Press the MENU button on the
remote control.
Press the PLAY/K or STOP/L
button to select “SETTING
CLOCK”.
Press the F.FWD/B button to enter
– M E N U –
TIMER PROGRAMMING
PICTURE CONTROL
B SETTING CLOCK
CHANNEL SET UP
USER’S SET UP
V-CHIP SET UP
LANGUAGE [ENGLISH]
CAPTION [OFF]
ZERO RETURN
TIME SEARCH
“SETTING CLOCK” menu.
Press the STOP/L button to select
“AUTO CLOCK CH”.
Press the F.FWD/B or REW/s
– SETTING CLOCK –
AUTO CLOCK [ON]
AUTO CLOCK CH SEARCH
B AUTO CLOCK CH [ 45]
MANUAL CLOCK SET
D.S.T. [OFF]
buttons until you locate Auto
Clock Set station number. See item
3 above.
Press the MENU button to exit the screen.
5 Turn off the TV/VCR
Once the TV/VCR is turned off , it will periodically
check and set the correct date and time.
2 Set “AUT O CLOCK” to [ON]
Press the F.FWD/B button until
AUTO CLOCK [ON] appears.
– SETTING CLOCK –
B AUTO CLOCK [ON]
AUTO CLOCK CH SEARCH
AUTO CLOCK CH [ 02 ]
MANUAL CLOCK SET
D.S.T. [OFF]
3 Begin “AUTO CLOCK CH SEARCH”
Press the STOP/L button to select “AUTO CLOCK
CH SEARCH”.
Press the F.FWD/B button.
The TV/VCR is now searching
•
for the station which contain the
auto clock set signal. The search
for a signal may take up to 20
seconds per channel.
“_ _” appears at the lower left of
•
the screen when the search has
ended.
Auto Clock station- write down
•
the number(s) that appear on the
screen. These are the auto clock
station(s) in your area. See item
4 below.
If no number(s) appear on the TV screen, there are
•
no stations in your area which contain the Auto
– SETTING CLOCK –
AUTO CLOCK [ON]
B AUTO CLOCK CH SEARCH
AUTO CLOCK CH [ 02 ]
MANUAL CLOCK SET
D.S.T. [OFF]
– AUTO CLOCK CH SEARCH –
08 10 13
_ _
- 15 - EN
9I03
Page 16
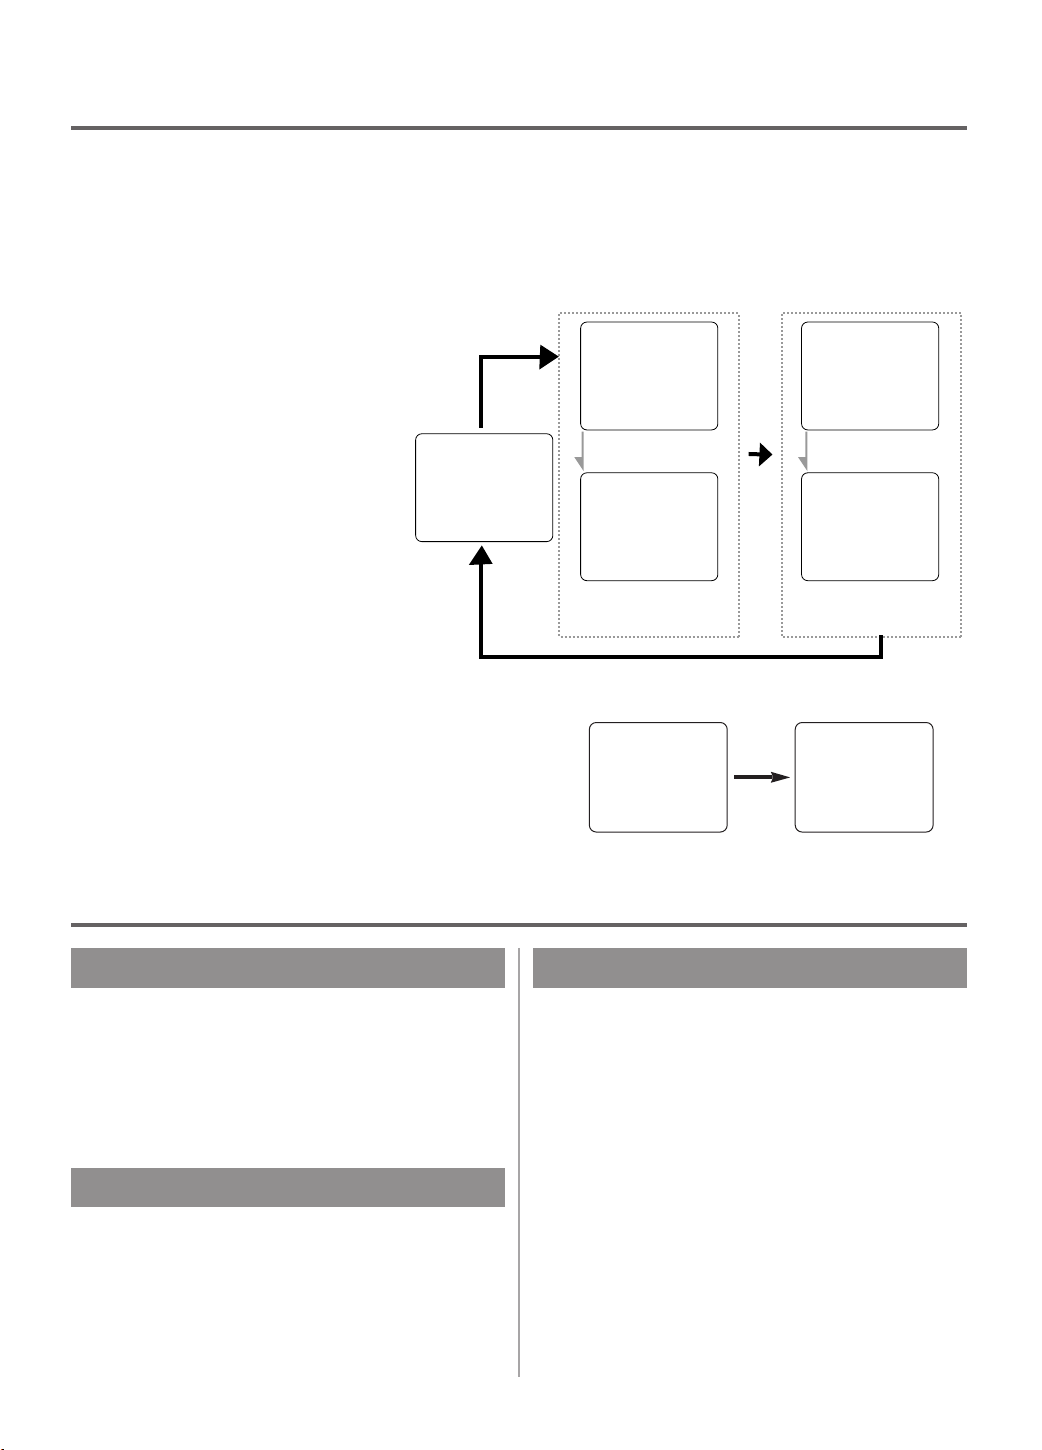
ON SCREEN DISPLAY
To check the Counter, Clock and Channel number on the TV screen, press the DISPLAY button on the remote
control. Each time you press the DISPLAY button on the remote control, the TV screen will change as follows:
When the Closed Caption mode is OFF:
Counter mode: After 5 seconds, only
•
the counter remains. To clear it, press
the DISPLAY button.
Clock mode: After 5 seconds, only
•
the clock and the channel number
remain. To clear them, press the DISPLAY button.
OFF mode Counter mode Clock mode
When the Closed Caption mode is ON:
The On Screen Display disappear after 5 seconds.
•
This is true even if the MUTE button is pressed, or
•
the PAUSE/STILL button is pressed while recording.
STOP STOP
SP SPCOUNT 0:12:34
5:40PM
CH2
After 5 seconds After 5 seconds
5:40PM
CH2
COUNT 0:12:34
Counter
remains
OFF mode Clock/Counter mode
Clock & Channel
remains
STOP 5:40 PM
SP COUNT 0:12:34
CH2
SPECIAL FEATURES
DEGAUSSING
Magnetism from nearby appliances might affect the
color of the TV picture.
If this happens, move this unit away from the appliance. If the color is still not correct, disconnect
power cord from AC outlet then reconnect it after 30
minutes.
REAL TIME TAPE COUNTER
This shows the elapsed recording or playback time in
hours, minutes, and seconds. (The displayed time
will not change on a blank tape or blank portions on
the tape.)The “–” indication will appear when the
tape has rewound further than “0:00:00” on the tape
counter.
AUTO REWIND-EJECT
When the end of a tape is reached during record-
•
ing, playback, or fast-forward, the tape will automatically rewind to the beginning. After rewinding
finishes, the TV/VCR will eject the tape and turn
itself to off.
This function is operative when Repeat Play is set
•
to the [OFF] position.
The tape will not auto-rewind during timer record-
•
ing or One Touch Recording.
- 16 - EN
9I03
Page 17

TV OPERATION
WATCHING A TV PROGRAM
1 Turn on the TV/VCR
Press the POWER button to turn on the TV/VCR.
2 Select the channel number
Press the CHANNEL K or L button to select your
desired channel number or press the number buttons
on the remote control.
Remember: If the TV/VCR is connected to a cable
box or satellite box, the TV/VCR must be on CH3 or
CH4, then the channel to be viewed must be selected
on the cable box or satellite box.
3 Adjust sound
Press the VOLUME XXor YYbutton
to adjust the volume.
VOLUME 20
C C C C C C C C C C C C
GAME MODE
This function enables you to decrease the TV screen
contrast and making it suitable for use with a TV
GAME.
NOTE: This function can not be set during recording.
Press the GAME button on the
remote control. “GAME” appears
on the screen.
When you press the GAME button;
The TV/VCR comes on automatically if it is off.
•
The TV/VCR will be in external input mode auto-
•
matically.
GAME
PICTURE CONTROL
The TV/VCR’s picture controls – BRIGHT, CONTRAST, COLOR, TINT and SHARPNESS – are
preset to factory specifications. Although they are
usually the best, you may need to make some further
adjustments for a natural looking image.
NOTES:
Procedures must be followed within 5 seconds or
•
the Picture Control mode will be cancelled.
When setting the Picture Control, the Game mode
•
will be cancelled.
Make sure ...
TV/VCR power must be turned on.
•
1 Select “PICTURE CONTROL”
Press the MENU button on the
remote control.
Press the PLAY/K or STOP/L but-
ton to point to ”PICTURE CONTROL”.
Then, press the F.FWD/B button.
2 Select item you want to adjust
Press the PLAY/K or STOP/L but-
ton until desired control is displayed.
BRIGHT
CONTRAST
COLOR
TINT
SHARPNESS
3 Adjust the picture control
Press the F.FWD/B or REW/s button to adjust to
your desired level.
– M E N U –
TIMER PROGRAMMING
B PICTURE CONTROL
SETTING CLOCK
CHANNEL SET UP
USER’S SET UP
V-CHIP SET UP
LANGUAGE [ENGLISH]
CAPTION [OFF]
ZERO RETURN
TIME SEARCH
BRIGHT
PP PP PP PP PP PP PP CC PP PP PP PP PP PP PP
–
+
TO CANCEL THE GAME MODE
Press the GAME button or CHANNEL K or L but-
ton on the remote control.
REW/s F.FWD/B
BRIGHT to decrease to increase
brightness brightness
CONTRAST to decrease to increase
contrast contrast
COLOR to pale to brilliant
TINT to purple to green
SHARPNESS to soft to clear
If there is a power failure of any kind, the unit will
•
retain its memory for this feature.
- 17 - EN
9I03
Page 18

CLOSED CAPTION SYSTEM
You can view specially labeled (cc) TV programs,
movies, news, pre-recorded tapes with either a dialogue caption or text display.
CAPTION mode: By choosing the caption mode, you
can watch dramas, movies and news while captioning
the dialogues and the contents of news.
TEXT mode: By choosing the text mode, you can
watch half screen text information if you want.
1-2: You may get these captions or text information
by selecting either “1” or “2”. Caption “2” is used,
usually for a second language if available.
1 Select “CAPTION”
Press the MENU button on the
remote control.
Press the PLAY/K or STOP/L but-
ton to point to “CAPTION”.
2 Select your desired caption menu
Press the F.FWD/B or REW/s
button until your desired caption
menu appears.
([CAPTION1], [CAPTION2],
[TEXT1] or [TEXT2])
– M E N U –
TIMER PROGRAMMING
PICTURE CONTROL
SETTING CLOCK
CHANNEL SET UP
USER’S SET UP
V-CHIP SET UP
LANGUAGE [ENGLISH]
B CAPTION [OFF]
ZERO RETURN
TIME SEARCH
– M E N U –
TIMER PROGRAMMING
PICTURE CONTROL
SETTING CLOCK
CHANNEL SET UP
USER’S SET UP
V-CHIP SET UP
LANGUAGE [ENGLISH]
B CAPTION [CAPTION1]
ZERO RETURN
TIME SEARCH
NOTE:
Not all programs are broadcast with closed captions.
Your television is designed to provide error free
closed captions from high quality antenna, cable and
VCR signals. Conversely, poor quality signals are
likely to result in caption errors or no captions at all.
Common signal conditions which may cause captions
errors are listed below:
Automobile ignition noise
•
Electric motor brush noise
•
Weak snowy reception on TV screen
•
Multiplex signal reception displaying picture
•
ghosts or airplane flutter.
Playback of poorly recorded or worn VCR tapes.
•
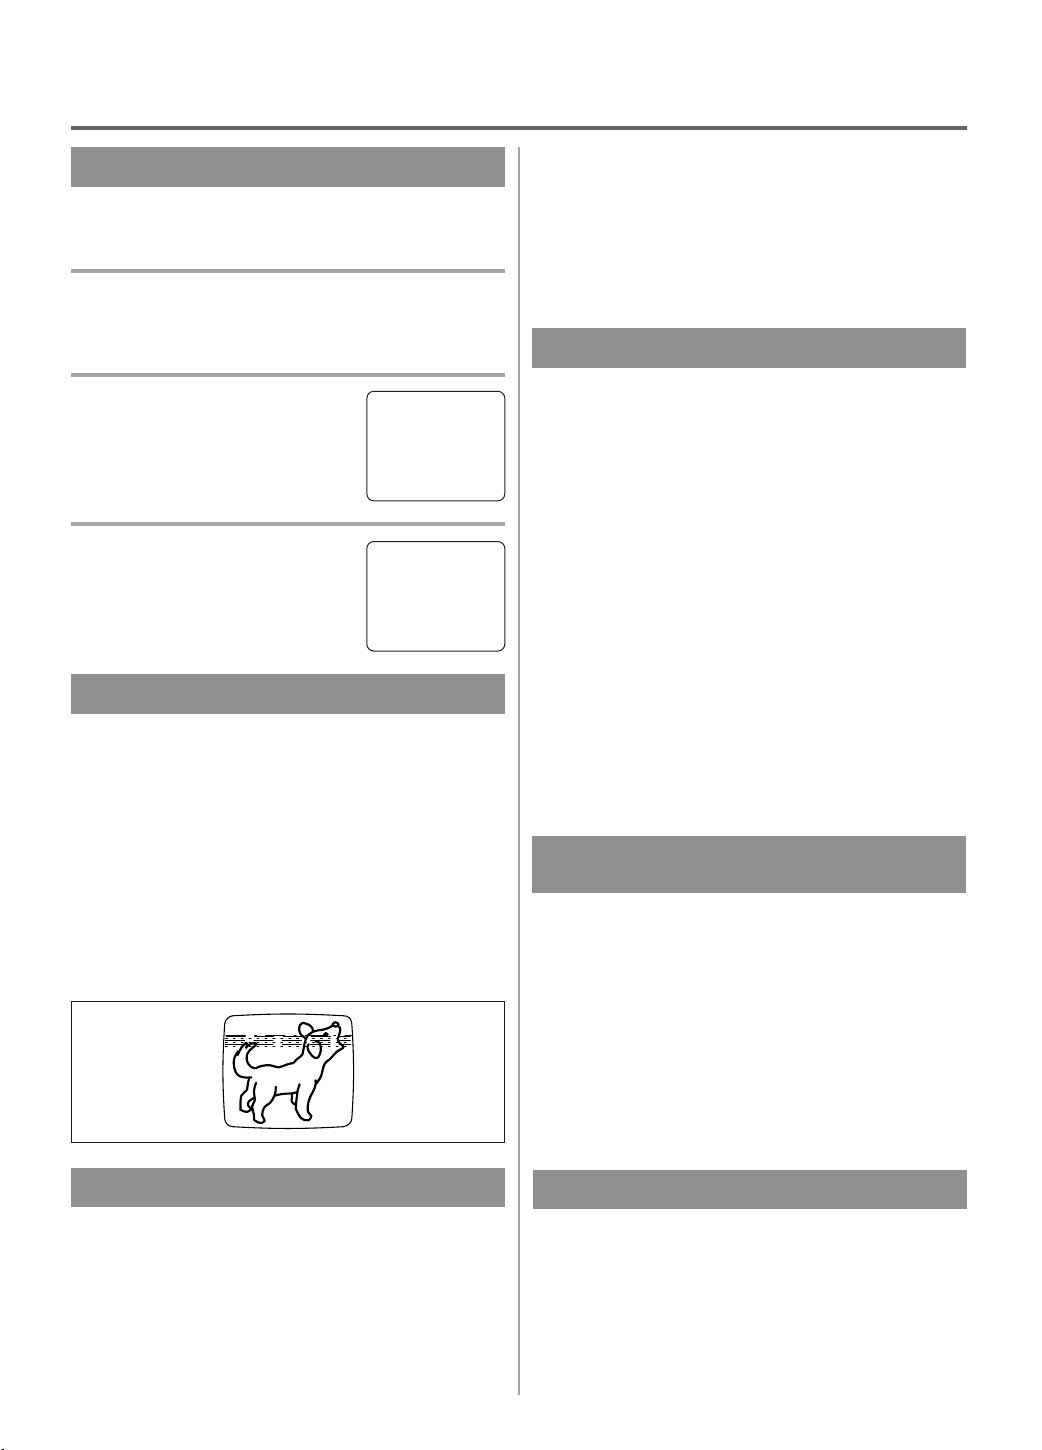
NOTE:
If the TV/VCR displays a black box
on the TV screen, this means that
the TV/VCR is set to the TEXT
mode. To clear screen, select [CAPTION1], [CAPTION2] or [OFF].
Make sure ...
TV/VCR power must be turned on.
•
3 Exit the caption setting mode
Press the MENU button on the remote control to
return to TV mode.
TO CANCEL THE CLOSED CAPTION
SYSTEM
Repeat steps [1] and [2], select [OFF] using the
F.FWD/B or REW/s button. Press the MENU button on the remote control to return to TV mode.
WHEN THE CLOSED CAPTION MODE
IS ON
The On-Screen Display will disappear after 5 seconds.
This is also true when the MUTE button is pressed,
•
and when the PAUSE/STILL button is pressed
while recording.
If there is a power failure of any kind, the unit will
•
retain its memory for this feature.
- 18 - EN
9I03
Page 19

V-CHIP SET UP
V-CHIP enables parents to prevent their children
from watching inappropriate material on TV.
V-CHIP reads the ratings for programming (except
for news and sports programs, unedited movies on
premium cable channels, and Emergency Broadcast
System signals), then denies access to programming
if the program’s rating meets the limitations you
select. In this case, “PROTECTED PROGRAM by
...” message appears on the TV screen.
To block ratings, follow the steps below.
Programming may be rated by the Motion Picture
•
Association of America (MPAA) or according to
the Television Parental Guidelines. In order to
block any inappropriate programming, set your
limits in both places (MPAA RATING and TV
RATING).
TV RATING SET UP
Make sure ...
TV/VCR power must be turned on.
•
1 Select “V-CHIP SET UP”
Press the MENU button on the
remote control.
Press the PLAY/K or STOP/L but-
ton to point to “V-CHIP SET UP”.
Then, press the F.FWD/B button.
2 Select “TV RA TING”
Press the PLAY/K or STOP/L but-
ton to point to “TV RATING”.
Then, press the F.FWD/B button.
3 Select your desired item
Press the PLAY/K or STOP/L but-
ton to point to your desired item.
Then, press the F.FWD/B button to
select [BLOCK] or [VIEW].
When you select the rating category and turn it
•
[BLOCK], the higher rating will turn [BLOCK]
automatically. Also, the lower rating will turn
[VIEW] automatically.
When you turn “TV-Y” to [VIEW], the all ratings
•
will turn to [VIEW] automatically.
– M E N U –
TIMER PROGRAMMING
PICTURE CONTROL
SETTING CLOCK
CHANNEL SET UP
USER’S SET UP
B V-CHIP SET UP
LANGUAGE [ENGLISH]
CAPTION [OFF]
ZERO RETURN
TIME SEARCH
– V-CHIP SET UP –
B TV RATING
MPAA RATING
B TV–Y [VIEW]
TV–Y7 ( ) [VIEW]
TV–G [VIEW]
TV–PG( ) [VIEW]
TV–14 ( ) [VIEW]
TV–MA( ) [VIEW]
Selection Rating Category Explanations
TV-Y Appropriate for all children
TV-Y7 Appropriate for children seven and older
TV -G General Audience
TV-PG Parental Guidance suggested.
TV-14 Unsuitable for children under 14
TV-MA Mature audience only
When you select TV-Y7, TV-PG, TV-14, or TV-MA
and you press the F.FWD/B button, the sub-ratings
will appear on the TV screen.
If you select the rating category (example: TV-PG)
and turn it [BLOCK] or [VIEW], the sub-ratings
(example: V for Violence) will turn [BLOCK] or
[VIEW] automatically.
You can set the sub-ratings to [BLOCK] or [VIEW]
individually when the rating category is set to
[BLOCK].
To set the sub-ratings individually, follow the steps
below.
When you select [TV-Y7]:
•
Press the STOP/L or PLAY/K
button to select “FV” (Fantasy
Violence).
TV–Y7 [BLOCK]
B FV [BLOCK]
Then, press the F.FWD/B button
to select [BLOCK] or [VIEW].
When you select [TV-PG], [TV-14] or [TV-MA]:
•
Press the STOP/L or PLAY/K
button to select “D”(Suggestive
Dialog), “L”(Coarse Language),
“S”(Sexual Situation), or
TV–PG [BLOCK]
B D [BLOCK]
L [BLOCK]
S [BLOCK]
V [BLOCK]
“V”(Violence). Then, press the
F.FWD/B button to select
[BLOCK] or [VIEW].
Note: When you select [TV-MA], “D” does not
appear on the TV screen.
The sub-ratings which set to
•
[BLOCK] appears next to the rating category in the TV RATING
menu.
B TV–Y [VIEW]
TV–Y7 ( ) [VIEW]
TV–G [VIEW]
TV–PG (DLSV) [BLOCK]
TV–14 (DLSV ) [BLOCK]
TV–MA ( LSV) [BLOCK]
4 Exit the V-Chip setting mode
Press the MENU button on the remote control to
return to original mode.
- 19 - EN
9I03
Page 20

MPAA RATING SET UP
Make sure ...
TV/VCR power must be turned on.
•
1 Select “V-CHIP SET UP”
Press the MENU button on the
remote control.
Press the PLAY/K or STOP/L but-
ton to point to “V-CHIP SET UP”.
– M E N U –
TIMER PROGRAMMING
PICTURE CONTROL
SETTING CLOCK
CHANNEL SET UP
USER’S SET UP
B V-CHIP SET UP
LANGUAGE [ENGLISH]
CAPTION [OFF]
ZERO RETURN
TIME SEARCH
Then, press the F.FWD/B button.
2 Select “MP AA RATING”
Press the PLAY/K or STOP/L but-
– V-CHIP SET UP –
TV RATING
B MPAA RATING
ton to point to “MPAA RATING”.
Then, press the F.FWD/B button.
3 Select your desired item
Press the PLAY/K or STOP/L but-
ton to point to your desired item.
Then, press the F.FWD/B button to
select [BLOCK] or [VIEW].
Selection Rating Category Explanations
G General Audience
PG Parental Guidance suggested.
PG-13 Unsuitable for children under 13
R Restricted; under 17 requires accompa-
nying parent or adult guardian
NC-17 No one under 17 admitted
X Mature audience only
When you select the rating category and turn it
•
[BLOCK], the higher rating will turn [BLOCK]
automatically. Also, the lower rating will turn
[VIEW] automatically.
When you turn “G” to [VIEW], the all ratings will
•
turn to [VIEW] automatically.
G [VIEW]
PG [VIEW]
PG–13 [VIEW]
B R [BLOCK]
NC–17 [BLOCK]
X [BLOCK]
4 Exit the V-Chip setting mode
Press the MENU button on the remote control to
return to original mode.
- 20 - EN
9I03
Page 21
PLAYBACK
NORMAL PLAYBACK
Make sure ...
TV/VCR power must be turned on.
•
1 Insert a prerecorded tape
If the erase-protection tab has been removed, the
TV/VCR will start playback automatically.
2 To begin playback
Press the PLAY button.
3 To stop playback
Press the STOP button when playback is completed.
PLAY
STOP
B
TRACKING ADJUSTMENT
Tracking adjustment will be set automatically
•
(Digital Tracking function) when you start playback.
However when playing pre-recorded tapes or tapes
•
recorded on units other than your own, noise lines
(black and white streaks) may appear on the playback picture. If this occurs, you can adjust the
tracking control manually by pressing the CHANNEL K or L button until the streaks disappear. To
return to the DTR function, stop the tape once and
start playback again.
2)Press it again and the TV/VCR will now search in
super high speed. (in the LP / SLP modes only)
NOTE: Tapes recorded in the SP or LP mode will
display a noise bar on the TV screen and the picture may revert to Black and White. This is normal.
3)Press the PLAY button to return to normal speed.
STILL PICTURE
You can view a still picture on the TV screen during
playback (the Still mode). Press the PAUSE/STILL
button during playback. Only tapes recorded in the
SLP mode will show the least amount of lines.Press
the PLAY button to return to playback.
NOTES:
Usually there will be video “noise” lines (black
•
and white streaks or dots) on the screen. This is
normal.
If the tape was originally recorded in SP or LP
mode, the still picture will be black and white in
addition to the “noise” lines.
This is not a fault of the machine, but is a byproduct of the technology involved in producing
a TV/VCR with 2 video heads.
If it is left in the Pause mode for more than five
•
minutes, the TV/VCR will automatically switch to
the Stop mode.
NOISE CANCEL
(in the Still mode)
This feature allows you to reposition or reduce the
noise lines of a still picture.Press the PAUSE/STILL
button so that the noise lines change position on the
screen so you can see the picture in its entirety without distracting noise lines.
NOTE: This feature can be activated ONLY when
viewing a tape recorded in the SLP mode. If the tape
was originally recorded in the SP or LP mode, the
still picture may revert to black and white in addition
to the “noise bars”. This is normal.
PICTURE SEARCH
This feature is very useful in finding or skipping over
a particular scene on a tape. In this mode, the sound
will be muted.
1)You may view a video tape at a high speed in
either a forward or reverse direction by pressing
the F.FWD or REW button during playback.
(in the SP / LP / SLP modes)
VERTICALHOLD CONTROL
In the Pause/Still mode only, when the picture begins
to vibrate vertically, stabilize the picture by pressing
the CHANNEL K or L button.
NOTE:
If there are video noise lines on the screen, reposition
or reduce them. Refer to “NOISE CANCEL”.
- 21 - EN
9I03
Page 22

SPECIAL PLAYBACK
Make sure ...
TV/VCR power must be turned on.
•
Insert a prerecorded tape.
•
Before playback, follow steps below.
•
RENTAL PLAYBACK
This function enables you to improve the picture
quality when playing back worn cassettes such as
rented tapes.
1 Select “USER’S SET UP”
Press the MENU button on the
remote control.
Press the PLAY/K or STOP/L but-
ton to point to “USER’S SET UP”.
Then, press the F.FWD/B button.
2 Set “RENT AL” to [ON]
Press the PLAY/K or STOP/L but-
ton to point to “RENTAL”.
Press the F.FWD/B or REW/s
button until [ON] appears.
3 Exit the Rental setting
Press the MENU button on the remote control to
return to the TV mode.
4 Start playback
Press the PLAY button to start playback. “RENTAL
PLAY B” appears.
Once you select the Rental mode, it stays in effect
•
even after you turn off the TV/VCR.
TO CANCEL THE RENTAL MODE
Repeat steps [1] and [2], select [OFF] using the
F.FWD/B or REW/s button on the remote control.
Press the MENU button on the remote control to
return to TV mode.
If there is a power failure of any kind, the unit
will retain its memory for this feature.
– M E N U –
TIMER PROGRAMMING
PICTURE CONTROL
SETTING CLOCK
CHANNEL SET UP
B USER’S SET UP
V-CHIP SET UP
LANGUAGE [ENGLISH]
CAPTION [OFF]
ZERO RETURN
TIME SEARCH
USER’S SET UP
–
B RENTAL [ON]
REPEAT PLAY [OFF]
AUTO RETURN [OFF]
–
AUTO REPEAT PLAYBACK
The TV/VCR has the auto repeat function that allows
you to repeat a tape indefinitely without touching the
PLAY button.
ALL REPEAT: Repeat playback from the beginning
to the end of the tape.
BLANK REPEAT: Repeat playback from the begin-
ning to a blank part, which is blank for more than
10 seconds.
1 Select “USER’S SET UP”
Press the MENU button on the
remote control.
Press the PLAY/K or STOP/L but-
ton to point to “USER’S SET UP”.
Then, press the F.FWD/B button.
2 Select “ALL” or “BLANK”
Press the PLAY/K or STOP/L but-
ton to point to “REPEAT PLAY”.
Press the F.FWD/B or REW/s
button repeatedly until your desired
selection [ALL] or [BLANK]
appears.
3 Exit the Repeat Play setting
Press the MENU button on the remote control to
return to the TV mode.
4 Start playback
Press the PLAY button to start the Repeat Play.
“REPEAT PLAY B” appears.
Once you select the Repeat Play mode, it stays in
•
effect even after you turn off the TV/VCR.
If the Rental mode is set [ON], the “RENTAL
•
PLAY B” display has priority.
TO CANCEL THE REPEAT PLAY MODE
Repeat steps [1] and [2], select [OFF] using the
F.FWD/B or REW/s button on the remote control.
Press the MENU button on the remote control to
return to TV mode.
If there is a power failure of any kind, the unit
will retain its memory for this feature.
– M E N U –
TIMER PROGRAMMING
PICTURE CONTROL
SETTING CLOCK
CHANNEL SET UP
B USER’S SET UP
V-CHIP SET UP
LANGUAGE [ENGLISH]
CAPTION [OFF]
ZERO RETURN
TIME SEARCH
USER’S SET UP
–
RENTAL [OFF]
B REPEAT PLAY [ALL]
AUTO RETURN [OFF]
–
- 22 - EN
9I03
Page 23

SEARCH
Make sure ...
TV/VCR power must be turned on.
•
Insert a tape.
•
ZERO RETURN
This function allows you to search easily a beginning
point that you want to review by rewinding or fast
forwarding.
NOTE:
Zero Return WILL NOT work on a blank tape or a
blank portion of a tape.
This function will not operate in recording mode.
•
This function is not operative when a cassette tape
•
is not inserted in the TV/VCR.
In the example below: To watch a program after 2
hour 50 minutes from the present position, in either
direction.
1 Insert a tape.
1 Stop a tape at your desired point
Rewind or fast forward the tape to the beginning
point at which you want to review.
2 Reset the counter to 0:00:00
Press the COUNTER RESET button repeatedly.
3 Begin recording or playback
Press the RECORD or PLAY button.
Press the STOP button when recording or playback is
completed.
4 To activate “ZERO RETURN” mode
Press the MENU button on the
remote control.
Press the PLAY/K or STOP/L but-
ton to point to “ZERO RETURN”.
Then, press the F.FWD/B button.
The counter will appear on the TV screen.
The tape will automatically stop when the counter
returns to 0:00:00.
– M E N U –
TIMER PROGRAMMING
PICTURE CONTROL
SETTING CLOCK
CHANNEL SET UP
USER’S SET UP
V-CHIP SET UP
LANGUAGE [ENGLISH]
CAPTION [OFF]
B ZERO RETURN
TIME SEARCH
TIME SEARCH
The Time Search function makes it possible to quickly advance the tape to your desired position simply
by entering the exact amount of playback time you
want to skip.
NOTES:
Time Search can be set up to a maximum of 9
•
hours 50 minutes (9:50) by 10 minutes at a time.
2 Select “TIME SEARCH” mode
Press the TIME SEARCH button (with each push it
will increase by 10 minute).
OR
Press the MENU button on the
remote control.
Press the PLAY/K or STOP/L but-
ton to point to “TIME SEARCH”.
– M E N U –
TIMER PROGRAMMING
PICTURE CONTROL
SETTING CLOCK
CHANNEL SET UP
USER’S SET UP
V-CHIP SET UP
LANGUAGE [ENGLISH]
CAPTION [OFF]
ZERO RETURN
B TIME SEARCH
Then, press the F.FWD/B button.
3 Enter your desired time
Press the PLAY/K or STOP/L but-
ton until your desired time appears.
(Example: “2:50” stands for 2 hours
50 minutes)
If you wish to cancel the Time
Search at this point, press the MENU button on the
remote control.
TIME SEARCH
2 : 50
4 Begin Time Search
By pressing the REW/s or F.FWD/B button, the
TV/VCR will rewind or fast forward to the specified
point.
The time counts down as the searching progresses.
When 0:00 is reached, the tape will start playback
automatically.
TO CANCEL THE TIME SEARCH at this
point
Press the STOP/EJECT button on the TV/VCR or the
remote control. This will delete the selected time.
- 23 - EN
9I03
Page 24

RECORDING
Make sure ...
TV/VCR power must be turned on.
•
Insert a cassette tape with its erase prevention tab in place. (If necessary, rewind or fast forward the tape to
•
the point at which you want to begin recording.)
NOTE: This unit will ONLY record and view the same channel.
NORMAL RECORDING
You can ONLY watch the same TV program that is
being recorded.
1 Select the channel to be recorded
Press the number buttons on the
remote control or the CHANNEL
K or L button.
Remember: If the TV/VCR is connected to a cable box or satellite
box, the TV/VCR must be on CH3 or CH4, then the
channel to be recorded must be selected on the cable
box or satellite box.
2 Select the tape speed
Press the SPEED button to select
the desired tape speed (SP/ SLP).
SP
3 Begin recording
Press the RECORD button.
REC
CH 10
SKIPPING UNWANTED
SCENES DURING RECORDING
Press the PAUSE/STILL button to
temporarily stop recording.
Press the PAUSE/STILL or
RECORD button to resume recording.
NOTES:
After five minutes, the TV/VCR will automatically
•
switch to the Recording mode to prevent tape damage.
If “CLOSED CAPTION (ON)” is selected, the On-
•
Screen Display will appear for 5 seconds, then disappear.
PAUSE
SP
SP
4 Stop recording
Press the STOP button when recording is completed.
- 24 - EN
9I03
Page 25

OTR (One Touch Recording)
VIDEO
IN
OUT
AUDIO
AUDIOVIDEO
This function enables you to set a recording length simply by pressing the REC/OTR button on the TV/VCR.
Make sure ...
TV/VCR power must be turned on.
•
Insert a cassette tape with its erase prevention tab in
•
place. (If necessary, rewind or fast forward the tape
to the point at which you want to begin recording.)
NOTES:
This function CANNOT be done from the remote
•
control.
Recording starts immediately when the REC/OTR
•
button is pressed.
When the REC/OTR button is pressed 18 times, the
•
TV/VCR returns to the Normal Recording mode.
To stop the OTR operation, press the STOP button
•
on the TV/VCR or on the remote control.
To show the remaining time, press the DISPLAY
•
button on the remote control so that “OTR” appears
on the TV screen. (It will show up momentarily
then disappear.)
Recording stops when 0:00 is reached.
•
Please note that in the SLP mode maximum record-
•
ing time, assuming the tape is started at the beginning, is 8 hours using T-160 (or 6 hours using T-120).
If the tape runs out before the end time, the
•
TV/VCR will switch to the Stop mode immediately,
ejects the tape and turns itself off.
If you press the power button during OTR, the
•
TV/VCR continues recording until the selected length
is reached.
1 Select the channel to be recorded
Press the number buttons on the remote control or the
CHANNEL K or L button.
Remember: If the TV/VCR is connected to a cable
box or satellite box, the TV/VCR must be on CH3 or
CH4, then the channel to be recorded is selected on
the cable box or satellite box.
2 Select the tape speed
Press the SPEED button to select the desired tape
speed (SP/ SLP).
3 Begin OTR
Press the REC/OTR button on the
TV/VCR as many times as needed.
The recording length will be determined by the number of times you
press the REC/OTR button. Each additional push will
increase the recording time by 30 minutes. It is set up
to 8 hours.
OTR(2 : 30)
SP
Push(es) Display Recording length
1 push (normal recording)
2 pushes 0:30 30 minutes
3 pushes 1:00 60 minutes
17 pushes 8:00 480 minutes
COPYING A VIDEO CASSETTE
(Requires a VCR or camcorder)
You can make copies of video tapes made by friends
or relatives for your enjoyment.
WARNING: Unauthorized recordings of
copyrighted video tapes may be an
infringement of copyright laws.
Connect your TV/VCR and a Source (Playing) VCR
using the following diagram.
[The TV/VCR]
[Ex: Source (playing)
VCR or camcorder]
Audio/Video
adapter cable
(not supplied)
1)Insert a pre-recorded video cassette into the Source
(Playing) VCR or camcorder.
2)Insert a blank video cassette, or one you want to
record over, into the TV/VCR’s cassette compartment.
3)Press the SPEED button on remote control for the
TV/VCR to select the desired recording speed
(SP/SLP).
4)Press the CHANNEL K or L button on the
TV/VCR until “AUX” appears on the screen.
5)Press the RECORD button on the TV/VCR.
6)Begin playback of the tape in the source (Playing)
VCR or camcorder.
NOTE: For best results during dubbing, use the
TV/VCR’s front panel controls whenever possible.
The remote control might affect the source (Playing)
VCR’s playback operation.
- 25 - EN
9I03
Page 26

TIMER
9:00AM 10:00AM 12:00PM
Program 1
10:00AM-11:00AM
Program 2
9:00AM-10:00AM
Program 3
9:30AM-12:00PM
11:00AM
Recording Sequence
*Recording period is SHADED
AUTOMATIC TIMER
RECORDING
You may set the TV/VCR to start and end a recording while you are away. You can set 8 programs to
record on specific days, daily or weekly within a 1
year period.
In the example below, the timer is being set to record:
DATE: July 4th, 2003
SETTING TIME: from 7:30PM to 8:50PM
CHANNEL: CH61
TAPE SPEED: SP
Make sure ...
If a cable box or satellite box is connected with the
•
TV/VCR you will be limited to record only one
channel. And the channel selector on the TV/VCR
must be selected to the output channel of the boxes
CH 3 or CH 4 and then the actual channel to be
recorded must be selected on the boxes.
Clock must be set to the correct time and date
•
before setting the timer.
TV/VCR power must be turn on to program it.
•
Insert a cassette tape with its erase prevention tab
•
in place. (If necessary, rewind or fast forward the
tape to the point at which you want to begin
recording.)
The channel you want to record is properly set in
•
advance. (See page 13.)
Avoid over lap of programs ...
There is a chance that a program will not be recorded. when programs overlap;
The program with an earlier start has priority.
•
Once the earliest program finishes, the overlapping
•
programs will begin recording in sequence.
The illustration below demonstrates the sequence
•
of recordings.
Program 1 10:00AM - 11:00AM
Program 2 9:00AM - 10:00AM
Program 3 9:30AM - 12:00PM
And press the F.FWD/B button.
If you have not yet set the clock,
•
“MANUAL CLOCK SET”
appears. If so, follow stops [3] to
[8] on page 14. Then set the timer
– M E N U –
B TIMER PROGRAMMING
PICTURE CONTROL
SETTING CLOCK
CHANNEL SET UP
USER’S SET UP
V-CHIP SET UP
LANGUAGE [ENGLISH]
CAPTION [OFF]
ZERO RETURN
TIME SEARCH
recording.
2 Select your desired program position (1~8)
Press the PLAY/K or STOP/L but-
ton to select the desired program
position.
Then, press the F.FWD/B button.
3 Set the channel number
Press the PLAY/K or STOP/L but-
ton until the desired channel number appears.
(Example: CH61)
Then, press the F.FWD/B button.
Remember: If the TV/VCR is connected to a cable
box or satellite box, the TV/VCR must be on CH3 or
CH4, then the channel to be recorded is selected on
the cable box or satellite box.
– TIMER PROGRAMMING –
CH DATE BEGIN END
- - -/- - - - - -:- - -:- - - -
- - -/- - - - - -:- - -:- - - -
- - -/- - - - - -:- - -:- - - -
- - -/- - - - - -:- - -:- - - -
B
- - -/- - - - - -:- - -:- - - -
- - -/- - - - - -:- - -:- - - -
- - -/- - - - - -:- - -:- - - -
- - -/- - - - - -:- - -:- - - -
– TIMER PROGRAMMING –
CH DATE BEGIN END
- - -/- - - - - -:- - -:- - - -
- - -/- - - - - -:- - -:- - - -
- - -/- - - - - -:- - -:- - - 61 -/- - - - - -:- - -:- - - -
B
- - -/- - - - - -:- - -:- - - -
- - -/- - - - - -:- - -:- - - -
- - -/- - - - - -:- - -:- - - -
- - -/- - - - - -:- - -:- - - -
4 Select once, every day or weekly recording
For once recording :
Press the PLAY/K (up) button
until the desired date appears.
(Example: “7/04” for July 4th).
Then, press the F.FWD/B but-
ton.
For every day recording : To record a TV program at
the same time on the same channel every day.
(Example: Monday through Sunday)
Press the STOP/L (down) button
until “EVRY DAY” appears.
Then, press the F.FWD/B but-
ton.
– TIMER PROGRAMMING –
CH DATE BEGIN END
- - -/- - - - - -:- - -:- - - -
- - -/- - - - - -:- - -:- - - -
- - -/- - - - - -:- - -:- - - 61 7/04 FRI -:- - -:- - - -
B
- - -/- - - - - -:- - -:- - - -
- - -/- - - - - -:- - -:- - - -
- - -/- - - - - -:- - -:- - - -
- - -/- - - - - -:- - -:- - - -
– TIMER PROGRAMMING –
CH DATE BEGIN END
- - -/- - - - - -:- - -:- - - -
- - -/- - - - - -:- - -:- - - -
- - -/- - - - - -:- - -:- - - 61 EVRY DAY -:- - -:- - - -
B
- - -/- - - - - -:- - -:- - - -
- - -/- - - - - -:- - -:- - - -
- - -/- - - - - -:- - -:- - - -
- - -/- - - - - -:- - -:- - - -
1 Select “TIMER PROGRAMMING”
Press the MENU button on the remote control.
Confirm “TIMER PROGRAMMING” is pointed by
pressing the PLAY/K button.
For weekly recording : To record a TV program at
the same time on the same channel every week.
(Example: every Monday)
Press the STOP/L (down) button
until “EVRY” and your desired
day of the week appear together.
Then, press the F.FWD/B but-
ton.
– TIMER PROGRAMMING –
CH DATE BEGIN END
- - -/- - - - - -:- - -:- - - -
- - -/- - - - - -:- - -:- - - -
- - -/- - - - - -:- - -:- - - 61 EVRY MON -:- - -:- - - -
B
- - -/- - - - - -:- - -:- - - -
- - -/- - - - - -:- - -:- - - -
- - -/- - - - - -:- - -:- - - -
- - -/- - - - - -:- - -:- - - -
- 26 - EN
9I03
Page 27

5 Set beginning hour
Press the PLAY/K or STOP/L but-
ton until the desired hour appears.
(Example: “ 7, PM” for 7:30PM)
Then, press the F.FWD/B button.
6 Set beginning minute
Press the PLAY/K or STOP/L but-
ton until the desired minute
appears. (Example: “30” for
7:30PM)
– TIMER PROGRAMMING –
CH DATE BEGIN END
- - -/- - - - - -:- - -:- - - -
- - -/- - - - - -:- - -:- - - -
- - -/- - - - - -:- - -:- - - 61 7/04 FRI 7:12
B
- - -/- - - - - -:- - -:- - - -
- - -/- - - - - -:- - -:- - - -
- - -/- - - - - -:- - -:- - - -
- - -/- - - - - -:- - -:- - - -
– TIMER PROGRAMMING –
CH DATE BEGIN END
- - -/- - - - - -:- - -:- - - -
- - -/- - - - - -:- - -:- - - -
- - -/- - - - - -:- - -:- - - 61 7/04 FRI 7:30
B
- - -/- - - - - -:- - -:- - - -
- - -/- - - - - -:- - -:- - - -
- - -/- - - - - -:- - -:- - - -
- - -/- - - - - -:- - -:- - - -
P
M
P
M
-:- - - -
-:- - - -
Then, press the F.FWD/B button.
7 Set end hour
Press the PLAY/K or STOP/L but-
ton until the desired hour appears.
(Example: “8, PM” for 8:50PM)
Then, press the F.FWD/B button.
8 Set end minute
Press the PLAY/K or STOP/L but-
ton until the desired minute
appears. (Example: “50” for
8:50PM)
– TIMER PROGRAMMING –
CH DATE BEGIN END
- - -/- - - - - -:- - -:- - - -
- - -/- - - - - -:- - -:- - - -
- - -/- - - - - -:- - -:- - - 61 7/04 FRI 7:30
B
- - -/- - - - - -:- - -:- - - -
- - -/- - - - - -:- - -:- - - -
- - -/- - - - - -:- - -:- - - -
- - -/- - - - - -:- - -:- - - -
– TIMER PROGRAMMING –
CH DATE BEGIN END
- - -/- - - - - -:- - -:- - - -
- - -/- - - - - -:- - -:- - - -
- - -/- - - - - -:- - -:- - - 61 7/04 FRI 7:30
B
- - -/- - - - - -:- - -:- - - -
- - -/- - - - - -:- - -:- - - -
- - -/- - - - - -:- - -:- - - -
- - -/- - - - - -:- - -:- - - -
P
M
P
M
P
8:30
M
P
8:50
M
Then, press the F.FWD/B button.
9 Set the tape speed
Press the PLAY/K or STOP/L but-
ton until the desired tape speed
appears. (Example: SP)
– TIMER PROGRAMMING –
CH DATE BEGIN END
- - -/- - - - - -:- - -:- - - -
- - -/- - - - - -:- - -:- - - -
- - -/- - - - - -:- - -:- - - 61 7/04 FRI 7:30
B
- - -/- - - - - -:- - -:- - - -
- - -/- - - - - -:- - -:- - - -
- - -/- - - - - -:- - -:- - - -
- - -/- - - - - -:- - -:- - - -
P
M
P
M
8:50
10 Finish setting the program
Press the F.FWD/B or REW/s button. The program
is now completed.
To set another program, repeat steps [2] to [10].
•
Press the MENU button on the remote control to
•
return to original mode.
11 Set the timer
Press the POWER button to set automatic timer
recording. The TIMER REC indicator lights up.
You must turn off the TV/VCR to activate automat-
•
ic timer recording.
If power is not turned off and you continue watch-
ing TV, “TIMER REC STANDBY” starts flashing
on the TV screen 2 minutes before the programmed
start time.
TIMER PROGRAM EXTENSION
To shift the time schedule of an automatic timer
recording.
1)Press the POWER button.
2)Repeat step [1] on page 26.
3)Press the RECORD button and select the desired
program using the PLAY/K or STOP/L button.
4)Press the RECORD button again.
Each additional push will shift forward the
begin/end time for recording by 10 minutes. When
the recording is already in progress, each additional
push will shift forward the end time only. If you
want to cancel while setting, press the
PAUSE/STILL button on the remote control. The
recording time returns to the original time.
NOTE: When you shift forward the time schedule
- -
during recording, the recording speed will automatically be set to the SLP mode.
5)Press the F.FWD/B or REW/s button to exit the
setting menu. Then press the MENU button on the
remote control to return to original mode.
TO CORRECT A PROGRAM
- -
While setting a program; press the REW/s but-
•
ton to go back one step and enter the correct numbers using the PLAY/K or STOP/L button.
After setting a program;
•
1)Press the POWER button.
SP
2)Repeat steps [1] - [2] on page 26.
3)Press the F.FWD/B button (or press the REW/s
button to go back one step) until the part you
want to correct begins flashing, then make the
changes pressing the PLAY/K or STOP/L but-
ton.
4)Press the POWER button to set automatic timer
recording.
TO CANCELAN AUTOMATIC TIMER
RECORDING
After setting a program;
•
1)Press the POWER button.
2)Repeat steps [1] ~ [2] on page 26 and select a
program you want to cancel.
3)Press the T-PROG. CLEAR button.
4)Press the MENU button on the remote control to
return to TV mode.
While recording is in progress;
•
1)Press POWER button.
2)Press the STOP/EJECT button on the TV/VCR.
- 27 - EN
9I03
Page 28

TO CHECK THE BEGIN/END TIME
1)Press the POWER button so that the REC indicator
goes off.
2)Press the MENU button on the remote control.
3)Confirm “TIMER PROGRAMMING” is pointed.
4)Press the F.FWD/B button. The details of programs appear on the TV screen.
5)Press the MENU button on the remote control to
return to TV mode.
HINTS FOR AUTOMATIC
TIMER RECORDING
Make sure the channel you want to record is prop-
•
erly set in advance.
It is not necessary to press the RECORD button for
•
timer recording.
Recording begins automatically at the Start time.
•
If you are recording using a Timer mode, you may
•
not operate the unit manually.
The erase-prevention tab on the cassette must be in
•
place (or you must put tape over the hole).
If the erase-prevention tab is removed, the cassette
•
will be ejected when the POWER button is pressed
to off.
If the tape runs out before the end time, the
•
TV/VCR will switch to the Stop mode immediately, and the tape will be ejected.
AUTO RETURN
With this feature, after timer recording is finished,
the beginning of the recorded program(s) can be
searched for automatically.
3 Auto Return will begin
When all the timer recordings are completed, the
TV/VCR will rewind to the beginning of the recorded
program(s).
NOTE:
If you press the POWER button while tape is
•
rewinding, the Auto Return will stop.
4 Watch the recorded program
Press the PLAY button.
TO CANCEL THE AUTO RETURN
MODE
Repeat steps [1] and [2], select [OFF] using the
F.FWD/B or REW/s button. Then, press the MENU
button on the remote control to return to TV mode.
If there is a power failure of any kind, the unit
will retain its memory for this feature.
WAKE UP TIMER
The Wake Up Timer function turns on the TV/VCR
without using the POWER button after a desired
period of time.
NOTES:
Use the remote control for this procedure.
•
Clock must be set to the correct time before setting
•
the timer.
If you want to select [TAPE], you must insert a
•
cassette tape in the TV/VCR. The tape will start
playback automatically on your desired time.
1 Select “USER’S SET UP”
Press the MENU button on the
remote control.
Press the PLAY/K or STOP/L but-
ton to point to “USER’S SET UP”.
Then, press the F.FWD/B button.
2 Set “AUT O RETURN” to [ON]
Press the PLAY/K or STOP/L but-
ton to point to “AUTO RETURN”.
Press the F.FWD/B or REW/s
button until [ON] appears. Then,
press the MENU button on the
remote control to return to TV mode.
– M E N U –
TIMER PROGRAMMING
PICTURE CONTROL
SETTING CLOCK
CHANNEL SET UP
B USER’S SET UP
V-CHIP SET UP
LANGUAGE [ENGLISH]
CAPTION [OFF]
ZERO RETURN
TIME SEARCH
USER’S SET UP
–
RENTAL [OFF]
REPEAT PLAY [OFF]
B AUTO RETURN [ON]
1 Select “WAKE UP TIMER”
Press the WAKE-UP/SLEEP button
on the remote control once, and
confirm “ON/OFF” is pointed.
Press the F.FWD/B or REW/s
button until [ON] appears.
WAKE UP BON/OFF [ON]
TIMER TV/TAPE [TV]
TIME [12:00AM]
2 Select “TV” or “TAPE”
–
Press the PLAY/K or STOP/L but-
ton until to point to “TV/TAPE”.
Press the F.FWD/B or REW/s
button, and select [TV] or [TAPE].
WAKE UP ON/OFF [ON]
TIMER B TV/TAPE [TV]
TIME [12:00AM]
- 28 - EN
9I03
Page 29

3 Set wake up time
Press the PLAY/K or STOP/L but-
ton until to point to “TIME”.
Press the F.FWD/B or REW/s
button until your desired wake up
time appears.
Each additional push will increase (or decrease) the
time by 10 minutes.
WAKE UP ON/OFF [ON]
TIMER TV/TAPE [TV]
BTIME [12:00AM]
4 Exit the Wake Up Timer setting
Press the MENU button on the remote control to
return to TV mode.
TO CANCEL THE WAKE UP TIMER
Press the WAKE-UP/SLEEP button on the remote
control once, and confirm “ON/OFF” is pointed.
Press the F.FWD/B or REW/s button until [OFF]
appears.
SLEEP TIMER
The Sleep Timer function turns off the TV/VCR
without using the POWER button after a desired
period of time.
NOTE:
This function does not operate during Recording
•
mode.
1 Select “SLEEP TIMER”
Press the WAKE UP/SLEEP button on the remote
control until “SLEEP TIMER” appears.
2 Set sleep time
Press the PLAY/K, STOP/L,
F.FWD/B or REW/s button until
your desired sleep time appears.
Each additional push will increase
the time by 30 minutes up to 120
minutes.
Press the MENU button on the remote control to exit
the Sleep Timer setting.
SLEEP TIMER [2:00]
TO CANCEL THE SLEEP TIMER
Press the WAKE-UP/SLEEP button on the remote
control until “SLEEP TIMER” appears, then press
the PLAY/K, STOP/L, F.FWD/B or REW/s button
until [OFF] appears.
To view the time left for sleep timer, press the
•
WAKE-UP/SLEEP button until “SLEEP TIMER”
appears. Press the MENU button on the remote
control to exit the sleep timer setting.
MAINTENANCE
CABINET CLEANING
Wipe the front panel and other exterior surfaces of
•
the TV/VCR with a soft cloth immersed in lukewarm water and wrung dry.
Never use a solvent or alcohol. Do not spray insec-
•
ticide liquid near the TV/VCR. Such chemicals
may cause damage and discoloration to the
exposed surfaces.
AUTO HEAD CLEANING
Automatically cleans video heads as you insert or
•
remove a cassette, so you can see a clear picture.
Playback picture may become blurred of interrupt-
•
ed while the TV program reception is clear. Dirt
accumulated on the video heads after long periods
of use, or the usage of rental or worn tapes can
cause this problem.
If a streaky or snowy picture appears during playback, the video heads in your TV/VCR may need
to be cleaned.
1.Please visit your local Audio/Video store and purchase a good quality VHS Video Head Cleaner.
2.If a Video Head Cleaner does not solve the problem,
consult our nearest Authorized Service Center.
Professional video head cleaning requires highly
technical attention.
NOTES:
Remember to read the instructions included with
•
the video head cleaner before use.
Clean video heads only when problems occur.
•
SERVICING
Should your TV/VCR become inoperative, do not
•
try to correct the problem by yourself. There are no
user-serviceable parts inside. Turn off, unplug the
power cord, take the unit to our Authorized Service
Center.
- 29 - EN
9I03
Page 30

TROUBLESHOOTING GUIDE
If you have followed the instructions contained in this manual and have difficulty in operating your TV/VCR,
locate the PROBLEM in the left column below. Check the corresponding CORRECTIVE ACTION column to
remedy the problem.
PROBLEM CORRECTIVE ACTION
No power.
No picture and sound.
No picture or poor picture on
TV/VCR.
No sound or poor sound.
Timer recording is not possible.
Cannot go into Record mode.
Playback picture is partially noisy.
No picture but the audio is OK in
playback.
No operation by infrared Remote
Control.
Video or color fades in and out
when making a copy of a video tape
Different color marks on screen.
Make sure the AC cord is connected to an AC outlet.
•
Make sure the power is turned on.
•
Make sure the AC cord is connected to an AC outlet.
•
Check antenna connection.
•
Let the TV/VCR program its’ tuner memory.
•
Adjust direction or replace antenna.
•
Adjust picture controls.
•
Adjust volume control on remote control or main unit.
•
Press the MUTE button to restore sound.
•
Make sure the timer recording is set correctly.
•
Make sure the power is off.
•
Make sure the TV/VCR clock is set correctly.
•
Make sure the tape has an erase-prevention tab. If need, cover the
•
hole with plastic tape.
•
Adjust tracking control for a better picture using the CHANNEL K
•
or L button on the TV/VCR.
•
Head cleaning may be necessary. Refer to “AUTO HEAD
•
CLEANING” on page 29.
•
Make sure the AC cord is connected to an AC outlet.
•
Check batteries in remote control.
•
You can not copy a copyrighted video tape. You are experiencing
•
.•copy guard protection.
Magnetism from nearby appliances and geomagnetism might affect
•
the color of the TV picture. Move the TV/VCR away from the appliances, the TV/VCR can repair itself automatically. If you want to
repair immediately, unplug the TV/VCR power cord, then plug it in
again 30 minutes or so later.
CLOSED CAPTION PROBLEM POSSIBLE REMEDY
My TV/VCR is showing captions • You are watching a live broadcast and spelling errors made by the
that are misspelled. • closed captioning production company may pass through uncorrected.
• A prerecorded program will not show any misspelled words because
• of the normal time available for editing the captions.
My TV/VCR will not show the text • Captions that are delayed a few seconds behind the actual dialogue
in its entirety or there is a delay of • are common for live broadcast. Most captioning production companies
what is being said. • can display a dialogue to a maximum of 220 words per minute. If a
• dialogue exceeds that rate, selective editing is used to insure that the
• captions remain up-to-date with the current TV screen dialogue.
My captions are scrambled with • Interference caused by building, power lines, thunderstorms, etc.
white boxes on the TV screen. • may cause scrambled or incomplete captions to appear.
My program guide listed a TV show
as being closed captioned but none • up the actual program so that additional advertising time can be
of the captions were displayed. • given. Since the decoder cannot read the compressed information,
My prerecorded video tape does not
show any captions. The tape box • company accidentally left out the captioning signals during the
mentions it being closed captioned. • copying process.
My TV screen shows a black box • You are in the TEXT mode. Select CAPTION mode to CAPTION
on certain channels. • [OFF].
• Broadcasters may at times use a time compression process to speed
• captions will be lost.
• The video tape was either an illegal copy or the tape duplicating
- 30 - EN
9I03
Page 31

SPECIFICATIONS
TV Display
TV Display
TV Display
TV Display
TV Display
TV Display
TV Display
TV Display
CATV channel
TV Display
W+80 W+81 W+82 W+83 W+84
W+65 W+66 W+67 W+68 W+69 W+70 W+71 W+72 W+73 W+74 W+75 W+76 W+77 W+78 W+79
W+55 W+56 W+57 W+58 A-4 A-3 A-2 A-1 W+59 W+60 W+61 W+62 W+63 W+64
W+40 W+41 W+42 W+43 W+44 W+45 W+46 W+47 W+48 W+49 W+50 W+51 W+52 W+53 W+54
W+25 W+26 W+27 W+28 W+29 W+30 W+31 W+32 W+33 W+34 W+35 W+36 W+37 W+38 W+39
W+10 W+11 W+12 W+13 W+14 W+15 W+16 W+17 W+18 W+19 W+20 W+21 W+22 W+23 W+24
A-5
RSTUVWW+1W+2W+3 W+4 W+5 W+6 W+7 W+8 W+9
CDEFGHI JKLMNOPQ
5A 2 3 4 5 6 7 8 9 10 11 12 13 A B
123456789101112131415
16 17 18 19 20 21 22 23 24 25 26 27 28 29 30
31 32 33 34 35 36 37 38 39 40 41 42 43 44 45
46 47 48 49 50 51 52 53 54 55 56 57 58 59 60
61 62 63 64 65 66 67 68 69 70 71 72 73 74 75
76 77 78 79 80 81 82 83 84 85 86 87 88 89 90
91 92 93 94 95 96 97 98 99 100 101 102 103 104 105
106 107 108 109 110 111 112 113 114 115 116 117 118 119 120
121 122 123 124 125
CATV channel
CATV channel
CATV channel
CATV channel
CATV channel
CATV channel
CATV channel
CATV channel
GENERAL SPECIFICATIONS
CRT : 13/19 inch in-line gun, 90˚
deflection tube
Television system : NTSC-M
Closed caption system :§15.119/FCC
Video Heads : Rotary two-head
Tape width : 1/2 inch
Tape speed
SP : 33.40mm/sec.
LP : 16.67mm/sec.
SLP : 11.12mm/sec.
Tuner channel
TV VHF Low : #2~#6
TV VHF High : #7~#13
TV UHF : #14~#69
CATV
VHF : 5A
MID band : A5~A1, A~I
SUPER band : J~W
HYPER band : W+1~W+84
Terminals
Antenna input : VHF/UHF 75 ohms
unbalanced
Video input : RCA connector [ 1
Audio input : RCA connector [ 1
Earphone : 1/8” monaural (3.5 mm)
ELECTRICAL SPECIFICATIONS
Video input level : 0.5~2.0Vp-p
Audio input level : -15dBs
Video S/N ratio : More than 46dB
Audio S/N ratio : More than 43dB
OTHER SPECIFICATIONS
[ 13 inch model ]
Power requirement : AC 120V/60Hz
Power consumption : 65W
Dimensions : H:15-5/16” (389mm)
W:14-7/16” (367mm)
D:14-7/8” (377mm)
Weight : 23.1 lbs (10.5kg)
[ 19 inch model ]
Power requirement : AC 120V/60Hz
Power consumption : 80W
Dimensions : H:19-3/8” (493mm)
W:19-5/16” (491mm)
D:18-11/16” (475mm)
Weight : 43.0 lbs (19.5kg)
Designs and specifications are subject to change
•
without notice.
If there is a discrepancy between languages, the
•
default language will be English.
CABLE CHANNEL DESIGNATIONS
If you subscribe to cable TV, the channels are displayed as 1-125. Cable companies often designate channels
with letters or letter-number combinations. Please check with your local cable company. The following is a
chart of common cable channel designations.
- 31 - EN
9I03
Page 32

!
" # $ $ $
$ % &
#
'(" ) ( *+ +, (+- - . +,+- *! - "+/(+
.+0 $ # 0
%& -
%& )
%& $ $
%& - $ 1
%& (
.+0 $ #0
%& - % &
%& # % &
%& -
%& .$ 2 $
3
%& " $ 4 $
%& ($ /5/ $
'(" ! (" . "+*+ - ,,(+" . ! . '+ .(6 ,)
'"+ - -.+" . +7+ - . ")*"+8)+ . +" . '+ ,.-) !
,,(*+ (,(+- (+"( )-( 6 '+ ! . +' *((!
+ ((+- ( -)(. . ,+(.- . '+ +7,+""+- ! " ,./(-+-
'++( *+6( ( 6 (' '+ -+ . .(6( ,)'"+ +( - .
(+" '+'+ +7,+""+- . (,(+- "' ,,! . '(" ,.-)
'+++
) -+ . ()" +" "' - *+ (*+ . ! .""
-(+ ( -(+ ( (-+ ",+( .. "+8)+ (-6+ ("( 6.).
.( . +(. (''+ )"+. '(" ,.-)
- (
9:;<
.
= 9,:
Printed in Malaysia 0EMN02176
T5405CF / T7405CF * * * * *
Page 33

GUIDE
®
®
®
En tant que partenaire de
E
NERGY STAR , notre
société a conclu que ce produit
répond aux normes d'économie
énergétique de E
NERGY STAR .
E
NERGY STAR est une marque
déposée aux Etats Unis.
D’UTILISATION
TÉLÉVISEUR COULEUR/MAGNÉTOSCOPE
DCC1303 (
DCC1903 (
13 POUCES)
19 POUCES)
Ce guide d’utilisation est fait en
papier recyclé.
Le modèle de 19" est illustré
Veuillez lire ce guide avant d’utiliser cet appareil.
Page 34

AVERTISSEMENT:
SYMBOLE D'AVERTISSEMENT POUR
LES COMPOSANTES
APPAREIL ET MEUBLE A ROULETTES
S3126A
AFIN DE PREVENIR LE RISQUE D’INCENDIE OU D’ELECTROCUTION, N’EXPOSEZ PAS CET APPAREIL À
LA PLUIE OU À L’HUMIDITE.
ATTENTION: AFIN DE REDUIRE LE RISQUE
D’ELECTROCUTION, N’ENLEVEZ PAS LA PARTIE
ARRIÈRE (ENDOS) DU BOÎTIER DE CET APPAREIL.
IL NE CONTIENT AUCUNE PIÈCE POUVANT ÊTRE
REPAREE PAR L’USAGER. CONFIEZ LA
REPARATION À UN TECHNICIEN QUALIFIE.
Cette note importante est située à l’endos de l’appareil.
CONSIGNES DE SÉCURITÉ
1.LISEZ LES INSTRUCTIONS- Avant d’utiliser cet
appareil, veuillez lire toutes les instructions relatives au
fonctionnement et à la sécurité.
2.CONSERVEZ CE GUIDE D’UTILISATION- Les
instructions relatives au fonctionnement et à la sécurité
doivent être conservées pour pouvoir les consulter
ultérieurement.
3.RESPECTEZ LES AVERTISSEMENTS- Il est très
important de suivre tous les avertissements et les mises en
garde apparaissant sur l’appareil ainsi que dans le guide
d’utilisation.
4.SUIVEZ LES INSTRUCTIONS- Il est très important de
suivre toutes les directives du guide d’utilisation concernant
le fonctionnement.
5.NETTOYAGE- Débranchez le téléviseur/magnétoscope de
la prise murale avant de procéder à un nettoyage. N’utilisez
pas de produits à nettoyer liquides ou en aérosols. Utilisez
un tissu légèrement humide.
Exception: Ne débranchez pas un appareil devant être utilisé
d’une manière ininterrompue et qui, pour une raison
spécifique, tel que le risque de perdre un code d’autorisation
pour un câblodistributeur, n’est pas conçu pour être
débranché par l’utilisateur pour un entretien ou toute autre
raison. Cependant, il est nécessaire de respecter les autres
directives indiquées plus haut au paragraphe 5.
6.ACCESSOIRES- N’utilisez que les accessoires
recommandés par le fabricant du téléviseur/magnétoscope.
L’utilisation d’autres accessoires risque d’être dangereuse.
7.EAU ET HUMIDITÉ- N’utilisez pas cet appareil à
proximité de l’eau; par exemple, près d’une baignoire, d’un
évier, d’une piscine, d’une machine à laver, ou dans un soussol humide.
8.AMEUBLES- Cet appareil ne doit être placé que sur un
meuble (avec ou sans roulettes) recommandé par le
fabricant. Si vous l’installez sur un meuble
à roulettes, déplacez les deux ensembles
avec précaution. Un arrêt brusque,
l’utilisation d’une force excessive et des
surfaces irrégulières risquent de
déstabiliser l’ensemble et de le renverser.
ATTENTION
RISQUE D’ELECTROCUTION
NE PAS OUVRIR
Le symbole de l’éclair dans un triangle
équilatéral indique la présence d’une tension
suffisamment élevée pour engendrer un
risque de choc électrique.
Le point d’exclamation dans un triangle
équilatéral indique que le guide d’utilisation
inclus avec l’appareil contient d’importantes
recommandations quant au fonctionnement et
à l’entretien de ce dernier.
9.VENTILATION- Le boîtier de cet appareil est muni de
fentes et d’orifice de ventilation permettant d’assurer un
fonctionnement adéquat du téléviseur/magnétoscope en
l’empêchant de surchauffer. Ces fentes et ces orifices ne
doivent pas être bloquées ou recouverts. Ainsi, l’appareil ne
doit pas être placé sur un lit, un divan, un tapis ou autre
surface similaire risquant d’obstruer les orifices d’aération.
De même, il ne doit pas être encastré dans une bibliothèque
ou un meuble qui risquerait d’empêcher une circulation de
l’air dans les orifices de ventilation.
10.SOURCE D’ALIMENTATION- Cet appareil ne devra
être branché que sur une prise du type spécifiquement
indiqué dans le guide d’utilisation ou sur l’appareil.
11.MISE À LA TERRE ET POLARISATION- Ce
téléviseur/ magnétoscope a un fil d’alimentation C.A. dont
la fiche est polarisée (une des lames est plus large que
l’autre). Cette fiche ne s’insère dans la prise de courant que
dans un sens par mesure de sécurité. Si l’insertion à fond
de la fiche dans la prise de courant est difficile, inversez sa
position. S’il est toujours impossible d’insérer la fiche,
demandez à un électricien qualifié de la remplacer.
N’essayez jamais d’insérer de force une fiche polarisée.
12.PROTECTION DES FILS D’ALIMENTATION- Les
fils d’alimentation devront être disposés de manière à ce
qu’ils ne soient pas écrasés en marchant dessus ou en
plaçant des objets dessus. Faites particulièrement attention
aux fiches, aux prises murales et aux endroits où les fils
sortent de l’appareil.
13.
MISE À LA TERRE D’UNE ANTENNE EXTÉRIEURE-
Si une antenne extérieure est raccordée à cet appareil,
veillez à ce que cette dernière ainsi que tous les fils de
raccordement soient reliés à la terre pour éviter une
surtension et des surcharges statiques. La sction 810 du
Code national de l’électricité (NEC) ANSI/NFPA N˚ 70,
contient les renseignements concernant la mise à la terre du
mât et de la structure qui le supporte, ainsi que du câble de
descente vers le limiteur de tension, du calibrage du fil de
terre, l’emplacement du limiteur de tension, le
raccordement à l’électrode de terre et les normes touchant
cette dernière (voyez la Figure A).
- 2 - FR
9J12
Page 35

DESCENTE
D’ANTENNE
DECHARGE D’ANTENNE
(section 810-20 du CNE)
CONDUCTEURS DE MISE A
LA TERRE (section 810-21 du CNE)
COLLIERS DE MISE A LA TERRE
DISPOSITIF DE MISE A LA TERRE
(article 250 du CNE, section H)
COLLIER DE
MISE A LA TERRE
BOÎTE D’ENTRÉE DE
SERVICE
CNE - CODE NATIONAL SUR L’ÉLECTRICITÉ
S2898A
Modèle de mise à la terre d’une antenne suivant les
directives du Code national sur l’électricité.
14.ORAGES ÉLECTRIQUES- Par mesure de protection
supplémentaire du téléviseur/magnétoscope, il est conseillé
lors d’orages ou d’une inutilisation prolongée de l’appareil
de débrancher le fil d’alimentation du réseau électrique
ainsi que le câble de raccordement à l’antenne. Cette
mesure permettra d’éviter que l’appareil ne soit
endommagé lors d’un orage ou d’une surtension.
15.LIGNES ÉLECTRIQUES- Une antenne extérieure reliée
à cet appareil ne devra pas se trouver à proximité de câbles
électriques ou d’un éclairage, ni près de circuits électriques
sur lesquels elle risquerait de tomber. Lors de l’installation
d’une telle antenne, faites en sorte de ne pas toucher de tels
fils ou câbles car leur contact peut être mortel.
16.SURCHARGE- Ne surchargez pas les prises murales ou
les fils de prolongement. Cela pourrait entraîner un risque
d’incendie ou de choc électrique.
17.OBJETS ET LIQUIDES- Aucun objet ou liquide ne doit
pénétrer à l’intérieur de l’appareil par l’intermédiaire des
orifices de ventilation car cela risquerait de toucher des
pièces sous haute tension ou de provoquer un court-circuit
des composants entraînant un début d’incendie ou un choc
électrique. Veillez aussi à ne renverser aucun liquide sur le
téléviseur/ magnétoscope.
18.RÉPARATIONS- N’essayez jamais de réparer vous-même
l’appareil. En ouvrant ou en retirant le boîtier de ce dernier
on risque de s’exposer à la tension élevée de certaines
pièces ainsi qu’à d’autres dangers. Pour n’importe quelle
réparation, faites appel à un technicien qualifié.
19.DOMMAGE NÉCESSITANTUNE RÉPARATION-
Débranchez l’appareil de la prise murale et confiez-le à un
technicien qualifié dans les cas suivants:
a. Lorsque le fil d’alimentation ou sa fiche est endommagé.
b. Lorsqu’un liquide ou un objet a pénétré dans l’appareil.
c. Lorsque l’appareil a été exposé à la pluie ou à de l’eau.
d. Si l’appareil ne fonctionne pas normalement bien que l’on
ait suivi les instructions. Ne réglez que les ajustements
décrits dans ce guide d’utilisation. Un réglage erroné risque
d’endommager l’appareil et de nécessiter ensuite un long
travail de la part d’un technicien qualifié pour remettre
l’appareil en état de fonctionner.
e. Lorsqu’on a laissé tomber l’appareil ou qu’il a été
endommagé.
f. Lorsque le fonctionnement de l’appareil diffère de la
période initiale ou ne présente plus les mêmes
performances.
20.PIÈCES DE RECHANGE- Lorsque des pièces de
rechange sont nécessaires, assurez-vous que le technicien
utilise les pièces recommandées par le fabricant ou qu’elles
présentent les mêmes caractéristiques que les pièces
d’origine. L’utilisation de pièces différentes risque de
provoquer un incendie, un choc électrique ou d’autres
dommages.
21.INSPECTION POUR LA SÉCURITÉ- A l’achèvement
de la réparation ou de l’entretien, demandez au technicien
de procéder à une inspection afin de s’assurer que
l’appareil soit en état de fonctionner sans danger.
22.CHALEUR- Ce téléviseur/magnétoscope doit être éloigné
de sources de chaleur telles que celles d’un appareil de
chauffage, d’une bouche d’air chaud, d’un poêle ou de tout
autre appareil (y compris des amplificateurs) dégageant de
la chaleur.
- 3 - FR
9J12
Page 36

PRÉCAUTIONS À PRENDRE
EMPLACEMENT
Afin de s’assurer d’un fonctionnement sans danger
de ce téléviseur/magnétoscope et de manière à en
obtenir un rendement optimal, veuillez suivre les
recommandations suivantes lors du choix d’un
emplacement:
Evitez une exposition à une lumière solaire directe
•
et éloignez-le de toute source de chaleur intense.
Ne l’installez pas dans un endroit humide ou
•
poussiéreux.
Evitez les endroits où la ventilation de l’appareil
•
serait insuffisante. N’obstruez pas les orifices de
ventilation situés sur le dessus et le dessous de
l’appareil. Ne l’installez pas sur un tapis car cela
bloquerait les orifices de ventilation.
Installez l’appareil sur un plan horizontal.
•
N’installez pas l’appareil dans un endroit où il
•
risque d’être soumis à d’intenses vibrations.
Ne placez pas l’appareil à proximité de champs
•
magnétiques puissants.
Ne déplacez pas subitement l’appareil d’une pièce
•
chaude à une pièce froide, et vice versa.
DANGERS D’ÉLECTROCUTION
ET D’INCENDIE
Ne manipulez pas le fil d’alimentation avec des
•
mains mouillées.
Pour débrancher le téléviseur/magnétoscope, ne
•
tirez pas sur le fil d’alimentation de la prise secteur
(C.A.). Tirez-le, en le tenant par sa fiche.
Si de l’eau est accidentellement renversée sur
•
l’appareil, débranchez immédiatement le fil
d’alimentation secteur et apportez-le
téléviseur/magnétoscope au centre d’entretien/
dépannage le plus proche de votre domicile.
N’introduisez pas les doigts dans l’appareil et ne
•
tentez pas d’insérer des objets par la porte du
compartiment pour vidéocassettes.
Ne déposez rien sur le dessus de l’appareil.
•
AVERTISSEMENT
De l’humidité provoquée par de la condensation
risque d’apparaître à l’intérieur de l’appareil lorsque
ce dernier est déplacé d’une pièce froide à une pièce
chauffée, lorsqu’une pièce froide est chauffée ou
lorsque les conditions d’humidité sont élevées. Si
vous faites fonctionner l’appareil dans ces conditions,
la vidéocassette et le téléviseur/magnétoscope seront
endommagés. Par conséquent, si vous remarquez de
la condensation dans l’appareil, appuyez sur
l’interrupteur d’alimentation et laissez l’appareil sous
tension pendant deux heures pour qu’il sèche.
ATTENTION: POUR ÉVITER LES CHOC ÉLECTRIQUES, INTRODUIRE LA LAME LA PLUS LARGE DE
LA FICHE DANS LA BORNE CORRESPONDANTE DE LA PRISE ET POUSSER JUSQU’AU FOND.
INFORMATION IMPORTANTE SUR LES DROITS D’AUTEURS
L’enregistrement ou l’utilisation non-autorisé d’émissions télévisées, de vidéocassette, de films ou de tout
autre matériel protégé par la loi sur les droits d’auteurs est illégal. Nous n’assumons aucune responsabilité
pour une reproduction non-autorisée qui serait réalisée, ainsi que toute utilisation ou toute action qui
viendrait enfreindre la loi sur les droits d’auteurs des propriétaires.
Le numéro de série de ce téléviseur/magnétoscope est indiqué au dos de l’appareil. Aucun autre
téléviseur/magnétoscope ne possède le même numéro. Vous devez mentionner ce numéro ainsi que d’autres
renseignements importants indiqués ci-dessous et conservez ce guide en tant que référence permanente sur
votre date d’achat et le type de modèle pour aider à son identification en cas de vol.
Date de l’achat
Nom du revendeur
Adresse du revendeur
Numéro de téléphone du revendeur
Numéro du modèle
Numéro de série
- 4 - FR
9J12
Page 37

TABLE DES MATIÈRES
C CONSIGNES DE SÉCURITÉ . . . . . . . . . . . . . .2
C PRÉCAUTIONS À PRENDRE . . . . . . . . . . . . .4
EMPLACEMENT . . . . . . . . . . . . . . . . . . . . . . .4
DANGERS D’ÉLECTROCUTION ET
D’INCENDIE . . . . . . . . . . . . . . . . . . . . . . . . . .4
AVERTISSEMENT . . . . . . . . . . . . . . . . . . . . . .4
C CARACTÉRISTIQUES . . . . . . . . . . . . . . . . . . .6
C ACCESSOIRES AVEC L’APPAREIL . . . . . . . .6
C VIDÉOCASSETTES . . . . . . . . . . . . . . . . . . . . .7
C EMPLACEMENT DES COMMANDES . . . . . .8
C PRÉPARATION DE L’APPAREIL . . . . . . . . .10
RACCORDEMENTS . . . . . . . . . . . . . . . . . . . .10
INSERTION DES PILES . . . . . . . . . . . . . . . . .11
ENTRÉE - SIGNAL EXTERNE . . . . . . . . . . .11
C PROGRAMMATION DE L’APPAREIL . . . . .12
PREMIÈRE PROGRAMMATION
AUTOMATIQUE DES CANAUX EN
MÉMOIRE . . . . . . . . . . . . . . . . . . . . . . . . . . .12
EFFACEMENT (OU AJOUT) DE CANAUX EN
MÉMOIRE . . . . . . . . . . . . . . . . . . . . . . . . . . .12
REPROGRAMMATION DE CANAUX EN
MÉMOIRE . . . . . . . . . . . . . . . . . . . . . . . . . . .13
SÉLECTION DE LANGUE D’UTILISATION 13
CHANGEMENT AUTOMATIQUE DE
L’HEURE . . . . . . . . . . . . . . . . . . . . . . . . . . . . .13
RÉGLAGE DE L’HORLOGE (AUTOMA
TIQUEMENT OU MANUELLEMENT) . . . . .14
C AFFICHAGE À L’ÉCRAN . . . . . . . . . . . . . . .16
C CARACTÉRISTIQUES SPÉCIALES . . . . . . .17
DÉMAGNÉTISATION . . . . . . . . . . . . . . . . . .17
MINUTERIE/COMPTEUR DE BANDE . . . . .17
REMBOBINAGE/ÉJECTION AUTOMATIQUES
C FONCTIONNEMENT DU TÉLÉVISEUR . . .17
VISIONNEMENT D’UNE ÉMISSION
TÉLÉVISÉE . . . . . . . . . . . . . . . . . . . . . . . . . .17
MODE D’UTILISATION DE JEUX VIDÉO . .17
AJUSTEMENT DE L’IMAGE . . . . . . . . . . . . .18
DÉCODEUR DE SOUS-TITRES . . . . . . . . . . .18
RÉGLAGE DU CIRCUIT V . . . . . . . . . . . . . .20
. .17
C LECTURE . . . . . . . . . . . . . . . . . . . . . . . . . . . .22
LECTURE NORMALE . . . . . . . . . . . . . . . . . .22
ALIGNEMENT . . . . . . . . . . . . . . . . . . . . . . . .22
RECHERCHE VISUELLE . . . . . . . . . . . . . . . .22
ARRÊT SUR IMAGE . . . . . . . . . . . . . . . . . . .22
RÉDUCTION DES PARASITES
(en mode d’arrêt sur image) . . . . . . . . . . . . . . .22
COMMANDE DE STABILITÉ VERTICALE .23
C MODES DE LECTURE . . . . . . . . . . . . . . . . .23
VISIONNEMENT DE VIDÉOCASSETTES DE
LOCATION . . . . . . . . . . . . . . . . . . . . . . . . . . .23
RÉPÉTITION AUTOMATIQUE DE LA
LECTURE . . . . . . . . . . . . . . . . . . . . . . . . . . . .23
C RECHERCHE . . . . . . . . . . . . . . . . . . . . . . . . .24
RETOUR À LA POSITION ZÉRO (00) . . . . . .24
RECHERCHE SELON LA DURÉE . . . . . . . . .24
C ENREGISTREMENT . . . . . . . . . . . . . . . . . . .25
ENREGISTREMENT NORMALE . . . . . . . . . .25
INTERRUPTION MOMENTANÉE DE
L’ENREGISTREMENT . . . . . . . . . . . . . . . . . .25
ENREGISTREMENT EXPRESS À UNE
SEULE TOUCHE (OTR) . . . . . . . . . . . . . . . . .26
COPIES DE VIDÉOCASSETTES
(nécessite l’emploi d’un second magnétoscope ou
d’un caméscope) . . . . . . . . . . . . . . . . . . . . . . .26
C
FONCTIONNEMENT DE LA MINUTERIE
ENREGISTREMENT PAR LA MINUTERIE
EXTENSION DU PROGRAMME DE LA
MINUTERIE . . . . . . . . . . . . . . . . . . . . . . . . . .29
CONSEILS AU SUJET DE
L’ENREGISTREMENT PAR LAMINUTERIE
RETOUR AUTOMATIQUE . . . . . . . . . . . . . .30
MISE EN CIRCUIT AUTOMATIQUE . . . . . . .30
MINUTERIE-SOMMEIL . . . . . . . . . . . . . . . . .31
C ENTRETIEN . . . . . . . . . . . . . . . . . . . . . . . . . .32
C PROBLÈMES DE FONCTIONNEMENT . . .33
C CORRESPONDANCES DES CANAUX DU
CÂBLE . . . . . . . . . . . . . . . . . . . . . . . . . . . . . .34
C FICHE TECHNIQUE . . . . . . . . . . . . . . . . . . .35
C GARANTIE . . . . . . . . . . . . . . . . . . . . . . . . . . .36
. .27
. . .27
. .29
REMARQUE CONCERNANT LE RECYCLAGE
Les matériaux d’emballage de ce produit sont recyclables et peuvent être réutilisés. Veuillez disposer de
tout matériau conformément à vos règlements de recyclage locaux.
Les piles ne doivent jamais être jetées ou incinérées mais mises au rebut conformément aux règlements
locaux concernant les déchets chimiques.
- 5 - FR
9J12
Page 38

CARACTÉRISTIQUES
GUIDE
D'UTILISATION
Télécommande à infrarouge
•
Choix sur l’affichage de l’écran du menu en deux
•
langues: anglais ou français.
Minuterie/compteur de bande - Indique la durée de
•
lecture ou d’enregistrement écoulée en heures, minutes
et secondes. Le symbole "--" apparaîtra sur l’affichage si
on rembobine la bande au-delà de "0:00:00".
Syntonisation des fréquences avec circuit de
•
verrouillage de phase pour 181 canaux du câble avec
accès direct aux canaux - (pour la réception de certains
canaux de la télévision payante, un convertisseur peut
être nécessaire).
Réglage automatique de l’horloge - Le raccordement
•
au système de câblodistribution permet de régler
automatiquement l’horloge de l’appareil.
Décodeur de sous-titres - Permet d’afficher au bas de
•
l’écran le texte ou le dialogue d’émissions télévisées
spécifiques (variétés, bulletins d’information, films,
matériel préenregistré, etc.) identifiées par les lettres
"CC" et diffusées avec sous-titrage.
Mode d’utilisation pour des jeux vidéo - L’appareil
•
permet de présenter une image adaptée aux jeux vidéo.
Mise sous/hors tension automatique - Dès que l’on y
•
insère une vidéocassette, le téléviseur/magnétoscope se
met en marche automatiquement et s’éteint de lui-même
après avoir atteint la fin de la vidéocassette, avoir
rebobiné cette dernière jusqu’au début et l’avoir éjecté.
Rembobinage automatique en fin de bande - excepté
•
sur le mode d’enregistrement par minuterie.
Recherche d’images à deux vitesses - Il vous est
•
possible de visionner un enregistrement à vitesse rapide
(LP: longue durée) ou très rapide (SLP: super-longue
durée) en avance rapide ou en sens inverse. Une
recherche d’images ne peut être effectuée qu’à vitesse
rapide sur des enregistrements réalisés à la vitesse SP
(vitesse normale).
Trois vitesses différentes de défilement de la lecture:
•
SP (vitesse normale), LP (longue durée), SLP (superlongue durée)
Deux vitesses différentes de défilement de
•
l’enregistrement: SP (vitesse normale)/SLP (superlongue durée)
Retour à la position 0:00:00 - Cette fonction permet de
•
rembobiner ou d’avancer sur la bande jusqu’à la position
0:00:00.
Arrêt sur l’image - Vous pouvez à tout moment fixez
•
une image sur l’écran afin de visionner attentivement
une scène particulière. Seules les bandes contenant un
enregistrement effectué à la vitesse SLP (super-longue
durée) procureront une image claire lors de l’arrêt sur
l’image.
Dépistage numérique et automatique (DTR) d’une
•
image - L’appareil effectue automatiquement le
dépistage numérique nécessaire avec chaque
vidéocassette utilisée.
Mode de lecture pour les vidéocassettes de location -
•
Ce mode permet d’améliorer la qualité de l’image lors
du visionnement de bandes vidéos usagées, telles les
vidéocassettes de location.
Répétition automatique d’une lecture - Cette fonction
•
vous permet de répéter indéfiniment la lecture d’une
bande vidéo sans devoir appuyer sur la touche PLAY
(lecture).
Positionnement sur la bande selon la durée - Il vous
•
est possible de programmer l’avance rapide du
téléviseur/ magnétoscope sur une portion spécifique de la
bande, portion que vous aurez déterminé par sa durée de
visionnement.
Enregistrement express à une seule touche - En
•
appuyant simplement sur cette touche (REC/OTR), le
téléviseur/magnétoscope peut effectuer un
enregistrement d’une durée de 30 à 480 minutes.
Programmation 1 an/8 émissions (pouvant
•
comprendre des enregistrements quotidiens ou
hebdomadaires) - La minuterie incorporée vous permet
de programmer l’enregistrement de 8 émissions diffusées
à des heures et sur des canaux différents sur une période
d’une année. Cette minuterie permet de programmer
l’enregistrement d’émissions diffusées quotidiennement
ou hebdomadairement et ce, jusqu’à ce que le
téléviseur/magnétoscope atteigne la fin du ruban de la
vidéocassette.
Retour automatique - Une fois effectué un
•
enregistrement par la minuterie, il est possible d’utiliser
cette fonction pour positionner exactement le
téléviseur/magnétoscope à l’endroit où l’enregistrement
débute sur la bande.
Mise en fonction automatique/minuterie - Cette
•
fonction permet de programmer à l’avance la mise en et
hors fonction automatique du téléviseur/magnétoscope.
Extension programme minuterie - Vous permet de
•
commuter l’horaire pour l’enregistrement par la
minuterie automatique.
CIRCUIT V - Permet aux parents d’éviter que leurs
•
enfants ne regardent des programmes télévisés qui ne
leur sont pas destinés.
ACCESSOIRES AVEC L ’APPAREIL
Télécommande
2 piles de type AA Guide d’utilisation
Pièce no.
(N0150UD ou N0107UD)
Vous devrez utiliser un type de raccord ou de séparateur spécifiquement adapté au système de l’antenne
•
raccordée à l’appareil. Pour cela, consultez votre revendeur d’articles électroniques.
Nous vous conseillons de ne pas utiliser de télécommande universelle avec cet appareil car vous ne pourriez
•
pas utiliser toutes les fonctions de ce téléviseur/magnétoscope avec une telle commande. Cependant, si vous
décidez quand même d’en utiliser une, vous devez savoir que le code numérique de programmation d’une
télécommande universelle correspondant au téléviseur/magnétoscope risque de ne pas fonctionner. Dans ce
cas, il sera nécessaire de contacter le fabricant de la télécommande universelle pour résoudre ce problème.
Antenne tige (Fournie
avec le modèle de 13
pouces seulement.)
Pièce no.
(0EMN00673 ou
0EMN01755 ou
0EMN01599)
Pièce no.
(0EMN02176)
- 6 - FR
9J12
Page 39

VIDÉOCASSETTES
Ce téléviseur/magnétoscope effectue la lecture de toutes les vidéocassette de type . Utilisez des
vidéocassette de bonne qualité afin d’obtenir les meilleurs résultats. N’utilisez pas des vidéocassettes abîmées
ou de mauvaise qualité.
PRÉCAUTIONS À PRENDRE AVEC LES
VIDÉOCASSETTES
Évitez l’humidité, il pourrait se former de la
•
condensation sur la bande si une vidéocassette est
déplacée rapidement d’un endroit froid à un endroit
chaud. Si vous utilisez une vidéocassette avec une
bande sur laquelle il y a de la condensation, cela
endommagera la cassette et le
téléviseur/magnétoscope. Avant d’utiliser une
vidéocassette dans ces conditions, attendez que la
vidéocassette soit à la température ambiante et que
la condensation se soit évaporée.
Évitez la chaleur ou l’humidité extrême, de même
•
que les champs magnétiques.
Ne tentez pas d’altérer le mécanisme de la
•
vidéocassette.
Ne touchez pas la bande de la vidéocassette avec
•
vos doigts.
DEUX VITESSES DE DÉFILEMENT
DIFFÉRENTES
Avant d’effectuer un enregistrement, choisissez la
vitesse de défilement souhaitée: mode SP (vitesse
normale) ou mode SLP (super- longue durée).
Le tableau ci-dessous montre la durée
d’enregistrement/ lecture maximale sur chaque mode
pour les types de vidéocassettes T60, T120 et T160.
INSERTION D’UNE VIDÉOCASSETTE
Insérez la vidéocassette dans la direction indiquée cidessous. Poussez-la doucement mais sans arrêter, sur
le centre arrière de la vidéocassette jusqu’à ce que le
mécanisme de chargement attire la vidéocassette en
entier dans le téléviseur/magnétoscope.
Le téléviseur/magnétoscope se mettra en marche
automatiquement lorsque la vidéocassette sera bien
positionnée dans l’appareil.
Fenêtre
correcte
incorrecte
RETRAIT D’UNE VIDÉOCASSETTE
1)Pressez la commande d’éjection (EJECT) située sur
la télécommande ou la commande d’arrêt/éjection
(STOP/EJECT) sur le téléviseur/magnétoscope.
2)Tirez doucement la vidéocassette hors de
l’appareil.
3)Rangez la vidéocassette dans son étui tel qu’illustré
ci-dessous.
Vitesse de
défilement
Type de
vidéocassette
Mode SP 1 heure 2 heures 2-2/3 heures
Mode SLP 3 heures 6 heures 8 heures
REMARQUE: Vous pouvez faire jouer sur une
bande enregistrée en mode LP (longue durée).
Durée d’enregistrement/lecture
T60 T120 T160
PRÉVENTION CONTRE L’EFFACEMENT
Vous pouvez vous prémunir contre l’effacement
accidentel d’un
enregistrement contenu sur
une vidéocassette en brisant
la languette de protection
située à l’arrière de la
vidéocassette.
Si vous changez d’avis et
désirez enregistrer à
nouveau avec la
vidéocassette, couvrez
l’orifice de ruban adhésif.
- 7 - FR
Languette de protection
Ruban adhésif transparent
9J12
Page 40

AUDIO
EARPHONE
VIDEO
STOP/EJECT REW
PLAY
F.FWD REC/OTRCHANNEL
VOLUME
POWER
1 92 3 4 5 6 7 8131011 1412
POWER
WAKE-UP
/SLEEP
123
456
789
+100
0
EJECT
CHANNEL
RETURN
REW
PLAY
STOP
F.FWD
GAME
RECORD
PAUSE/STILL
SPEED
TIME SEARCH
CHANNEL
T-PROG.
CLEAR
COUNTER
RESET
DISPLAY MUTE
MENU
VOLUME
3
15
5
7
16
8
11
18
19
20
7
24
4
10
9
22
21
23
17
25
EMPLACEMENT DES COMMANDES
Ce manuel couvre les modèles de 13" et de 19". Le fonctionnement de ces deux modèles est exactement le
même, à l'exception de l'apparence. Le modèle de 19" est illustré dans ce manuel.
- AVANT DE L’APPAREIL -
- TÉLÉCOMMANDE -
1 Entrée vidéo (VIDEO) - Raccordez cette borne à
la borne de sortie d’une composante vidéo ; d’un
caméscope ou d’un autre magnétoscope.
2 Entrée audio (AUDIO) - Raccordez cette borne à
la borne de sortie d’un composant audio, d'un
caméscope ou d'un magnétoscope.
3 Interrupteur d’alimentation (POWER) - Pressez
cet interrupteur pour allumer ou éteindre le
téléviseur/magnétoscope. Pressez également la cet
interrupteur pour activer la fonction
d’enregistrement par minuterie.
4 Commandes de hausse
volume -
d’intensité désiré.
5 Commandes des canaux (CH K / L) - Pressez
ces touches afin de sélectionner le canal désiré
pour le visionnement ou l’enregistrement.
Servent à régler le volume au niveau
XX
/ baisse YYdu
Vous pouvez faire apparaître le menu principal à
l’écran du téléviseur en appuyant plusieurs fois
sur la touche téléviseur/magnétoscope.
Fonction de dépistage - Pressez ces touches
afin de réduire la quantité de parasites (lignes ou
points blancs dans l’image) lors du visionnement
d’enregistrements (consultez la page 22 à ce
sujet).
6 Fenêtre du capteur à infrarouge - Reçoit les
signaux infrarouges émis par la télécommande.
7 Commande d’arrêt (STOP) - Une pression de
cette touche arrête le défilement de la bande.
Commande d’éjection (EJECT) - Une pression
de cette touche en mode arrêt actionne l’éjection
de la vidéocassette se trouvant dans l’appareil.
Commande L -
Pressez-la pour sélectionner une des fonctions
•
du menu à l’écran.
Pressez-la pour programmer des données
•
numériques (par exemple lorsque vous réglez
l’horloge ou un enregistrement par minuterie).
8 Commande de rembobinage (REW) - Pressez
cette touche pour rembobiner la vidéocassette ou
pour visionner la bande en marche arrière à une
vitesse plus rapide que la vitesse normale
(recherche rapide en marche arrière).
Commande s -
Pressez-la pour sélectionner un des paramètres
•
d’un menu spécifique (par exemple : langue
d’utilisation ou programmation).
9 Commande de lecture (PLAY) - Pressez cette
touche afin d’entamer le visionnement d’une
bande vidéo.
Commande K -
Pressez-la pour sélectionner une des fonctions
•
du menu à l’écran.
Pressez-la pour programmer des données
•
numériques (par exemple lorsque vous réglez
l’horloge ou un enregistrement par minuterie).
10 Commande d’avance rapide (F.FWD) - Pressez
cette touche afin de faire avancer la bande
rapidement ou pour visionner la bande qui
avance plus rapidement que la vitesse normale
de défilement (recherche rapide en marche
avant).
- 8 - FR
9J12
Page 41

- ARRIÈRE DE L’APPAREIL -
ANT.
2726
Commande B -
Lorsque vous programmez une des fonctions de
•
l’appareil (par exemple : réglage de l’horloge ou
d’un enregistrement par la minuterie), pressez-la
pour effectuer votre sélection et pour passer à
l’étape suivante de la programmation.
Pressez-la pour sélectionner une des fonctions
•
du menu à l’écran.
Pressez-la pour sélectionner un des paramètres
•
d’un menu spécifique (par exemple : langue
d’utilisation ou programmation).
11 Commande d’enregistrement (REC) - Pressez
cette touche afin d’entamer un enregistrement
manuel.
Commande d’enregistrement express à une
eule touche (OTR) -
Pressez cette touche (se
trouvant sur la télécommande seulement) afin
d’activer la fonction d’enregistrement à une
seule touche.
12 Voyant d’enregistrement (REC) - Clignote pour
indiquer qu’un enregistrement est en cours. Il
s’allume lorsqu’un enregistrement par minuterie
a été programmé, avant qu’il ne soit effectué.
13 Prise pour écouteurs (EARPHONE) - Branchez
des écouteurs (non compris) sur cette prise afin
d’écouter sans déranger votre entourage. Cette
prise monaurale mesure 3,5 mm (1/8’’) de
diamètre.
14 Compartiment à cassette
15 Commandes numériques - Pressez ces touches
afin de sélectionner les canaux désirés pour
l’enregistrement ou le visionnement. Pour
sélectionner les canaux 1 à 9, pressez d’abord la
touche "0", puis appuyez sur la touche 1 à 9.
Commande +100 - Lorsque vous sélectionnez
des canaux de télévision par câble dont le
numéro est supérieur à 100, pressez d’abord
cette touche puis composez les deux derniers
chiffres correspondants au numéro de canal
désiré. (Ainsi, pour sélectionner le canal 125,
pressez la touche +100, puis les touches "2" et
"5").
Commande MENU - Pressez cette touche afin
16
de faire apparaître le menu principal à l’écran du
téléviseur.
17 Commande d’affichage (DISPLAY) - Pressez
cette touche afin de faire apparaître à l’écran du
téléviseur le compteur de bande, ou le numéro
du canal syntonisé et l’heure (consultez la page
16 à ce sujet).
18
Sélecteur de vitesse de défilement (SPEED) -
Pressez ce sélecteur afin de sélectionner la
vitesse de défilement de la bande désirée
(SP/SLP).
19 Commande d’annulation d’un enregistrement
par la minuterie (T. PROG CLEAR) -
Pressez-la
pour annuler un enregistrement par la minuterie
(consultez la page 29 à ce sujet).
Commande de remise à zéro (COUNTER
RESET) -
Pressez cette touche afin de remettre
le compteur de bande à zéro (0 : 00 : 00).
20 Commande du mode de jeux vidéo (GAME) -
Pressez cet interrupteur afin d’activer le mode
de jeux vidéo et simultanément, celui du mode
d’entrée d’un signal externe. (consultez la page
17 à ce sujet)
21 Commande de recherche selon la durée
(TIME SEARCH) -
Pressez cette touche afin
d’activer le mode de recherche sur la bande
selon la durée de visionnement.
22 Commande de pause/arrêt sur image
(PAUSE/STILL) -
Pressez-la pour interrompre
momentanément un enregistrement ou pour fixer
une séquence spécifique à l’écran lors du
visionnement d’une bande vidéo.
23 Commande de suppression du son (MUTE) -
Pressez-la pour couper la reproduction sonore.
Une seconde pression sur cette touche activera à
nouveau la reproduction sonore.
Commande de rappel de canal (CHANNEL
24
RETURN) -
Pressez-la pour que l’appareil
retourne au canal précédemment syntonisé. Par
exemple, pressez la touche de rappel pour passer
du 3 (syntonisé à ce moment-là) au canal 10
(canal syntonisé précédemment) et pressez-la à
nouveau pour revenir au canal 3.
25 Commande de mise en circuit
automatique/minuterie-sommeil (WAKE
UP/SLEEP) -
Pressez cette commande pour
programmer à l’avance l’heure à laquelle l’appareil
se mettra automatiquement en ou hors circuit
(consultez la page 30 à ce sujet).
26 Cordon d’alimentation - Raccordez le cordon
d’alimentation à la prise de courant alternatif
conventionnelle (120 V/60 Hz).
27 Borne d’antenne (ANT.) - Pour y raccorder le
câble de l’antenne ou du système de
câblodistribution.
- 9 - FR
9J12
Page 42

PRÉPARATION DE L’APPAREIL
ANT.
ANT.
ANT.
ANT.
ANT.
ANT.
RACCORDEMENTS
ANTENNE COMBINÉE VHF/UHF
L’antenne VHF/UHF à tige (Fournie avec le modèle de
13 pouces seulement.)
plastique à la base de l’antenne dans l’orifice prévu à
cette fin dans la partie supérieure de
l’appareil.Raccordez l’antenne tige de réception
UHF/VHF ou une antenne combinée VHF/UHF à la
borne d’antenne ANT. de l’appareil tel qu’indiqué
dans l’illustration ci-dessous.Afin d’obtenir la
meilleure réception possible, allongez l’antenne tige
de réception UHF/VHF et réglez sa hauteur et sa
position (ne manipulez pas l’antenne par son
extrémité lorsque vous ajustez sa position).
REMARQUE :
Avant de raccorder l’antenne tige sur la borne
d’antenne de l’appareil, veillez à ce que la petite tige
métallique à l’intérieur de la fiche soit bien droite. Si
elle est tordue, redressez-la en position tel qu’illustré
ci-dessous, puis branchez la fiche sur la borne
d’antenne de l’appareil.
Tige tordue
Câble Fiche
(doit être redressie)
) est amovible. Poussez la tige en
(tige droite)
Antenne combiné UHF/VHF
Antenne tige
(Fournie avec le modèle de
13 pouces seulement.
(non comprise)
)
ANTENNES VHF/UHF SÉPARÉES
Dans certaines régions, vous devrez utiliser une
antenne extérieure.
Antenne VHF (non comprise)
Antenne UHF
(non comprise)
Adaptateur
combiné
VHF/UHF
(non
comprise)
Câble bifilaire plat
RACCORDEMENT - ABONNÉ AU CÂBLE
SANS CONVERTISSEUR NI DÉCODEUR
SÉPARÉ
Effectuez ce type de raccordement si le
téléviseur/magnétoscope est raccordé au système de
câblodistribution directement, sans convertisseur
séparé. Avec ce type de raccordement, vous pouvez :
1) utiliser la télécommande du
téléviseur/magnétoscope pour syntoniser les
canaux.
2) programmer l’enregistrement par la minuterie
simultané d’émissions diffusées sur un ou
plusieurs canaux débrouillés.
REMARQUE : Cet appareil ne vous permettra pas
d’effectuer un enregistrement à partir d’un certain
canal tout en en visionnant un autre.
REMARQUE :
Il est fort probable que le raccordement du
téléviseur/magnétoscope à une antenne intérieure ne
vous permette pas d’obtenir une image claire et de
bonne qualité.
Autres raccordements à la page suivante.
Câble provenant du réseau de
câblodistribution
Câble coaxial
de 75 ohms
(non comprise)
- 10 - FR
9J12
Page 43

RACCORDEMENT - ABONNÉ AU CÂBLE
ANT.
IN(ENTRÉE)
OUT(SORTIE)
ANT.
AVEC CONVERTISSEUR OU DÉCODEUR
SÉPARÉ
Si la compagnie de câblodistribution desservant votre
région vous fournit un convertisseur séparé ou si
vous êtes branché sur une antenne parabolique,
effectuez le type de raccordement illustré ci-dessous.
Avec ce type de raccordement, vous pouvez effectuer
un l’enregistrement d’émissions diffusées sur les
canaux de la télévision payante (à condition, bien
entendu, que vous y soyez abonné). Et pour le faire,
la syntonisation de canaux doit être effectuée à partir
du convertisseur fourni par le câblodistributeur ou le
fournisseur du signal vidéo de l’antenne parabolique.
Cela signifie aussi que vous ne pourrez pas
syntoniser les canaux en utilisant la télécommande du
téléviseur/magnétoscope. L’enregistrement sans
visionnement simultané ne peut être effectué que sur
un canal à la fois.
Convertisseur du câble ou
de l’antenne parabolique
(non comprise)
Câble provenant du
réseau de
câblodistribution ou de
l’antenne parabolique
Câble coaxial 75 ohms
(non comprise)
INSERTION DES PILES
1) Glissez le couvercle du compartiment à piles en
pressant dessus dans la direction indiquée par la
flèche.
2) Insérez deux (2) piles de type AAdans le
compartiment en respectant les polarités indiquées
par les signes (+ / -).
3) Remettez le couvercle du compartiment en place.
ENTRÉE - SIGNAL EXTERNE
Lorsque le signal de télévision provient d’une source
extérieure, vous devez raccorder les câbles
audio/vidéo de la source de ce signal sur les bornes
d’entrée audio (AUDIO IN) et vidéo (VIDEO IN) du
téléviseur/magnétoscope. Ensuite, pressez les
commandes des canaux (CH K / L) à plusieurs
reprises jusqu’à ce que l’abréviation AUX (pour
composante auxiliaire) apparaisse à l’écran du
téléviseur/magnétoscope.
AUX
ENREGISTREMENT ET VISIONNEMENT
SIMULTANÉ D’UN CANAL DE LA
TÉLÉVISION PAYANTE OU DU CABLE
RÉGULIER
1. Le téléviseur/magnétoscope doit syntoniser le
même canal que le convertisseur du câble ou de
l’antenne parabolique (par ex. le canal 3).
2. Syntonisez, à partir du convertisseur, le canal à
visionner ou à partir duquel vous désirez effectuer
l’enregistrement.
- 11 - FR
9J12
Page 44

PROGRAMMATION DE L’APPAREIL
– RÉGLAGE INITIAL –
LANGAGE
ENGLISH [FRANÇAIS]
RÉGLAGE AUTO.
– RÉGLAGE INITIAL –
LANGAGE
ENGLISH [FRANÇAIS]
RÉGLAGE AUTO.
– M E N U –
PROG. EN DIFFÉRÉ
RÉGLAGE DE L’ IMAGE
RÉGLAGE DE L’ HORLOGE
RÉGLAGE DES CANAUX
RÉGLAGES DE L’ USAGER
RÉGLAGE CIRCUIT V
LANGAGE [FRANÇAIS]
S-TITRES [HF]
REMISE À ZÉRO
RECH. CHRONOMÉTRQUE
– RÉGLAGE DES CANAUX –
AJOUT/SUPP. (TV)
RÉGLAGE AUTO.
AJOUT/SUPP.
08
A ce stade-ci, nous vous recommandons de programmer tous les canaux que vous êtes en mesure de capter
dans votre région.
REMARQUE : La programmation du syntonisateur de cet appareil n’est pas nécessaire lorsque vous utilisez
un convertisseur/décodeur du câble ou de l’antenne parabolique. Il vous suffit de syntoniser, à partir du
téléviseur/magnétoscope, le même canal que celui que syntonise le convertisseur/décodeur (par exemple, le
canal 3). Puis, sélectionnez le canal de votre choix à partir du convertisseur du câble ou l’antenne parabolique.
PREMIÈRE PROGRAMMATION
AUTOMATIQUE DES CANAUX
EN MÉMOIRE
1 Branchement du cordon d’alimentation du
téléviseur/magnétoscope
Branchez le cordon d’alimentation du
téléviseur/magnétoscope sur une prise de
courant alternatif conventionnelle.
REMARQUES :
Si des chiffres apparaissent dans le coin
•
de l’écran, appuyez sur la touche "POWER" sans
brancher le cordon d’alimentation.
2 Mise en circuit du téléviseur/magnétoscope
Appuyez sur l’interrupteur d’alimentation (POWER)
afin de mettre le téléviseur/magnétoscope en circuit.
3 Sélection du langage d’utilisation: [ENGLISH]
ou [FRANÇAIS]
A l’aide de la commande d’avance
rapide (F.FWD/B) ou rembobinage
(REW/s), sélectionnez le langage
d’utilisation: l’anglais [ENGLISH]
ou le français [FRANÇAIS]. Le
mot correspondant au langage sélectionné apparaîtra
entouré des symboles "[ ]".
4 Programmation automatique du syntonisateur
Entamez la programmation
automatique des canaux en
mémoire en pressant la commande
de lecture (PLAY/K) ou d’arrêt
(STOP/L) jusqu’à ce que la flèche
pointe les mots RÉGLAGE AUTO.
à l’écran.
Puis pressez la commande d’avance rapide
(F.FWD/B). Le syntonisateur effectuera le balayage
automatique des canaux en programmant en mémoire
ceux qui sont captés dans votre région.
REMARQUES :
Le téléviseur/magnétoscope détermine
•
automatiquement s’il s’agit de canaux de la
télévision (distribution par les ondes aériennes) du
réseau de câblodistribution.
Si vous désirez effectuer une reprodution ou un
•
enregistrement sur une videocassette AVANT que
le syntonisateur soit programmé, vous devez
presser la commande MENU de la télécommande.
Pour programmer les canaux à nouveau, consultez la
section intitulée " Reprogrammation des canaux en
mémoire " à la page 13 du présent guide.
Le téléviseur/magnétoscope peut reconnaître les
•
canaux de télévision pour ceux de télévision de
câble à cause des conditions de réception. En ce
cas, essayez le préréglage automatique de nouveau
en les conditions fines de réception.
5 Après le balayage
Une fois le balayage terminé, le syntonisateur revient
au plus bas canal disponible. Lorsque vous désirez
syntoniser les canaux programmés dans la mémoire
du syntonisateur, procédez directement, en pressant
les touches numériques sur la télécommande ou les
commandes des canaux (CH K / L).
EFF ACEMENT (OU AJOUT) DE
CANAUX EN MÉMOIRE
Voici la procédure pour effacer de la mémoire du
syntonisateur les canaux qui ne diffusent plus dans votre
région ou que vous regardez rarement. Évidemment,
vous pourrez toujours les programmer à nouveau dans
la mémoire de l’appareil si vous changez d’avis.
1 Sélection de la fonction RÉGLAGE DES
CANAUX
Pressez la commande MENU de la
télécommande.
Puis sélectionnez la fonction
RÉGLAGE DES CANAUX en
pressant la commande de lecture
(PLAY/K) ou d’arrêt (STOP/L) plusieurs fois
jusqu’à ce que la flèche pointe les mots RÉGLAGE
DES CANAUX.
Puis pressez la commande d’avance rapide (F.FWD/B).
2 Sélection de la fonction AJOUT/SUPP.
Sélectionnez la fonction
AJOUT/SUPP. en pressant la
commande de lecture (PLAY/K)
ou d’arrêt (STOP/L) plusieurs fois
jusqu’à ce que la flèche pointe sur
les mots AJOUT/SUPP..
Puis pressez la commande d’avance rapide (F.FWD/B).
3 Sélection du canal
Sélectionnez le canal approprié en
pressant la commande de lecture
(PLAY/K) ou d’arrêt (STOP/L)
plusieurs fois jusqu’à ce que ce
canal désiré apparaisse à l’écran.
Vous pouvez également utiliser les commandes
numériques ou les commandes des canaux (CH K /
L) de la télécommande pour le faire. Par exemple
ici, on sélectionne le canal 8.
- 12 - FR
9J12
Page 45

4 Effacement (ou ajout) de la mémoire
– M E N U –
PROG. EN DIFFÉRÉ
RÉGLAGE DE L’ IMAGE
RÉGLAGE DE L’ HORLOGE
RÉGLAGE DES CANAUX
RÉGLAGES DE L’ USAGER
RÉGLAGE CIRCUIT V
LANGAGE [FRANÇAIS]
S-TITRES [HF]
REMISE À ZÉRO
RECH. CHRONOMÉTRQUE
– RÉGLAGE DES CANAUX –
AJOUT/SUPP. (TV)
RÉGLAGE AUTO.
– M E N U –
PROG. EN DIFFÉRÉ
RÉGLAGE DE L’ IMAGE
RÉGLAGE DE L’ HORLOGE
RÉGLAGE DES CANAUX
RÉGLAGES DE L’ USAGER
RÉGLAGE CIRCUIT V
LANGAGE [FRANÇAIS]
S-TITRES [HF]
REMISE À ZÉRO
RECH. CHRONOMÉTRQUE
Pressez les commandes d’avance rapide (F.FWD/B)
ou de rembobinage (REW/s) afin d’effacer (ou
ajouter) le canal sélectionné. Vous verrez le numéro
du canal effacé passer au rouge à l’écran. Cela
confirme son effacement de la mémoire.
Si vous désirez effacer d’autres canaux de la
•
mémoire, répétez les directives données aux étapes
3 et 4 ci-haut.
Si vous pressez les commandes d’avance rapide
•
(F.FWD/B) ou de rembobinage (REW/s) à
nouveau, le canal sera remis en mémoire.
UN CANAL AJOUTÉ A LA MÉMOIRE EST
AFFICHÉ EN BLEU À L’ÉCRAN.
UN CANAL EFFACÉ DE LA MÉMOIRE EST
AFFICHÉ EN ROUGE À L’ÉCRAN.
5 Fin de la programmation de l’appareil
Pressez la commande MENU de la télécommande
afin de revenir au mode télévision.
REMARQUE : Pour vérifier si le(s) canal(aux)
a(ont) bel et bien été ajouté(s) ou effacé(s) de la
mémoire du syntonisateur, essayer de le(s) syntoniser
avec les commandes des canaux (CH K / L).
3 Après le balayage
Une fois le balayage terminé, le syntonisateur revient
au plus bas canal disponible.
SÉLECTION DE LA LANGUE
D’UTILISATION
Vous devez presser l’interrupteur d’alimentation
•
(POWER) afin de mettre le
téléviseur/magnétoscope en circuit.
REMARQUE: Cette fonction n’affecte que le
langage sur le menu d’affichage mais pas le son de la
source audio.
1 Activez la fonction LANGAGE
Pressez la commande MENU de la
télécommande. Sélectionnez la
fonction LANGAGE (sélection
langue d’utilisation) en pressant la
commande de lecture (PLAY/K)
ou d’arrêt (STOP/L) plusieurs fois
jusqu’à ce que la flèche pointe le
mot LANGAGE.
2 Sélection de [ENGLISH] ou [FRANÇAIS]
Sélectionnez l’anglais [ENGLISH] ou le français
[FRANÇAIS] en utilisant la commande d’avance
rapide (F.FWD/B) ou rembobinage (REW/s).
REPROGRAMMATION DE
CANAUX EN MÉMOIRE
Vous devez presser l’interrupteur d’alimentation
•
(POWER) afin de mettre le
téléviseur/magnétoscope en circuit.
1 Sélection de la fonction RÉGLAGE DES
CANAUX
Pressez la commande MENU de la
télécommande. Sélectionnez la
fonction RÉGLAGE DES
CANAUX en pressant la
commande de lecture (PLAY/K)
ou d’arrêt (STOP/L) plusieurs fois
jusqu’à ce que la flèche pointe les mots RÉGLAGE
DES CANAUX.
Puis pressez la commande d’avance rapide (F.FWD/B).
2 Programmation automatique
Entamez la programmation
automatique des canaux en
mémoire en pressant la commande
de lecture (PLAY/K) ou d’arrêt
(STOP/L) jusqu’à ce que la flèche
pointe les mots RÉGLAGE AUTO.
à l’écran.
Puis pressez la commande d’avance rapide
(F.FWD/B).
Le syntonisateur effectuera le balayage automatique
des canaux en programmant en mémoire ceux qui
sont captés dans votre région.
3 Fin de la sélection de la langue d’utilisation
Pressez la commande MENU de la télécommande
pour revenir au mode télévision.
REMARQUE: S’il advenait que le menu soit en
anglais, pressez la commande MENU de la
télécommande, puis pressez la commande de lecture
(PLAY/K) pour pointer les mots “LANGUAGE
[ENGLISH]”. Pressez ensuite la commande
d’advance rapide (F.FWD/B), puis pressez à
nouveau la commande MENU de la télécommande.
CHANGEMENT AUTOMATIQUE
DE L’HEURE
Cette fonction permet au téléviseur/magnétoscope
d’ajuster automatiquement l’heure de l’horloge lors
des changements de saison. Elle avance l’horloge
d’une heure en avril et la recule d’une heure en
octobre. Lorsque le mode de changement
automatique de l’heure est mis en fonction, l’heure
de l’horloge est changée ainsi :
Le premier dimanche d’avril, à 2 h du matin,
•
l’horloge avance d’une heure (soit à 3 h)
immédiatement. Tout enregistrement programmé
devant débuter entre 2h00 et 3h00 ne sera pas
enregistré.
Le dernier dimanche d’octobre, à 2 h du matin,
•
l’horloge recule d’une heure (soit à 1 h)
immédiatement.
Assurez-vous de faire ce qui suit...
Vous devez presser l’interrupteur d’alimentation
•
(POWER) afin de mettre le
téléviseur/magnétoscope en circuit.
- 13 - FR
9J12
Page 46

1 Sélection de la fonction RÉGLAGE DE
– M E N U –
PROG. EN DIFFÉRÉ
RÉGLAGE DE L’ IMAGE
RÉGLAGE DE L’ HORLOGE
RÉGLAGE DES CANAUX
RÉGLAGES DE L’ USAGER
RÉGLAGE CIRCUIT V
LANGAGE [FRANÇAIS]
S-TITRES [HF]
REMISE À ZÉRO
RECH. CHRONOMÉTRQUE
L’HORLOGE
Pressez la commande MENU de la
télécommande. Sélectionnez la
fonction RÉGLAGE DE
L’HORLOGE en pressant plusieurs
fois la commande de lecture
(PLAY/K) ou d’arrêt (STOP/L)
jusqu’à ce que la flèche pointe les mots RÉGLAGE
DE L’HORLOGE à l’écran.
Puis pressez la commande d’avance rapide (F.FWD/B).
2 Mettez l’HEURE D’ÉTÉ à [EF (En Fonction)].
Appuyez sur la commande de
lecture (PLAY/K) ou d’arrêt
(STOP/L) jusqu’à ce que la flèche
pointe les mots [HEURE D’ÉTÉ].
Puis pressez la commande d’avance
rapide (F.FWD/B) ou de
rembobinage (REW/s) jusqu’à ce que le mot [EF
(En Fonction)] apparaisse à l’écran.
– RÉGLAGE DE L’HORLOGE –
RÉG. AUTO HORL. [EF]
RECH. AUTO HORLOGE CH.
CHANG. AUTO HORL.
B
RÉGLAGE MANUEL HORLOGE
HEURE D’ÉTÉ [EF]
3 Fin de la sélection du mode de changement
automatique de l’heure
Appuyez sur la touche MENU de la télécommande
pour revenir au mode TV.
ANNULATION DU MODE DE CHANGEMENT
AUTOMATIQUE DE L’HEURE
Répétez les directives données aux étapes 1 et 2, puis
pressez la commande d’avance rapide (F.FWD/B) ou
de rembobinage (REW/s) jusqu’à ce que le mot [HF
(Hors Fonction)] apparaisse à l’écran.
RÉGLAGE DE L'HORLOGE
(AUTO/MANUELLE)
L'horloge du téléviseur/magnétoscope doit être
réglée correctement pour que l'enregistrement avec
minuterie soit possible. Il est suggéré de mettre
manuellement l'horloge au réglage initial du
téléviseur/magnétoscope. Puis régler la correction
d'horloge automatique qui corrigera périodiquement
le réglage si nécessaire.
REMARQUE: Si la réception d'une station est
impossible avec les signaux de temps, le réglage
d'horloge automatique est impossible. Utiliser
seulement le réglage manuel.
REGLAGE MANUEL DE L'HORLOGE
Vérifier que…
Le téléviseur/magnétoscope est sous tension.
•
Dans l'exemple ci-dessous, l'horloge doit être réglée à:
DATE 6 mai 2003
HEURE DE REGLAGE 5:40 (PM)
1 Sélectionner “RÉGLAGE DE L'HORLOGE”.
Appuyer sur la touche MENU sur
la télécommande.
Appuyer sur PLAY/K ou STOP /L
pour pointer “RÉGLAGE DE
L'HORLOGE”.
Puis, appuyer sur la touche
F.FWD/B.
– M E N U –
PROG. EN DIFFÉRÉ
RÉGLAGE DE L’ IMAGE
RÉGLAGE DE L’ HORLOGE
RÉGLAGE DES CANAUX
RÉGLAGES DE L’ USAGER
RÉGLAGE CIRCUIT V
LANGAGE [FRANÇAIS]
S-TITRES [HF]
REMISE À ZÉRO
RECH. CHRONOMÉTRQUE
2 Sélectionner
“RÉGLAGE MANUEL HORLOGE”.
Appuyer sur PLAY/K ou STOP /L
pour pointer “RÉGLAGE
[ 02 ]
MANUEL HORLOGE”.
Puis, appuyer sur la touche
F.FWD/B.
3 Sélectionner le mois.
Appuyer sur PLAY/K ou STOP /L
jusqu'à ce que le mois souhaité
apparaisse. (Exemple: Mai → 05).
Puis, appuyer sur la touche
F.FWD/B.
4 Sélectionner le jour.
Appuyer sur PLAY/K ou STOP /L
jusqu'à ce que le jour souhaité
apparaisse. (Exemple: 6 → 06).
Puis, appuyer sur la touche
F.FWD/B.
5 Sélectionner l'année.
Appuyer sur PLAY/K ou STOP /L
jusqu'à ce que l'année souhaitée
apparaisse. (Exemple: 2003).
Puis, appuyer sur la touche
F.FWD/B.
6 Sélectionner l'heure.
Appuyer sur PLAY/K ou STOP /L
jusqu'à ce que l'heure souhaitée
apparaisse. (Exemple: 5, PM).
Puis, appuyer sur la touche
F.FWD/B.
7 Sélectionner les minutes.
Appuyer sur PLAY/K ou STOP /L
jusqu'à ce que les minutes
souhaitées apparaissent. (Exemple:
40).
- 14 - FR
– RÉGLAGE DE L’HORLOGE –
RÉG. AUTO HORL. [EF]
RECH. AUTO HORLOGE CH.
CHANG. AUTO HORL.
B
RÉGLAGE MANUEL HORLOGE
HEURE D’ÉTÉ [HF]
– MANUAL CLOCK SET –
MONTH DAY YEAR
0 5 / – – – – – – – – –
HOUR MINUTE
– – : – – – –
– MANUAL CLOCK SET –
MONTH DAY YEAR
0 5 / 0 6 – – – – – – –
HOUR MINUTE
– – : – – – –
– MANUAL CLOCK SET –
MONTH DAY YEAR
0 5 / 0 6 TUE 2 0 0 3
HOUR MINUTE
– – : – – – –
– MANUAL CLOCK SET –
MONTH DAY YEAR
0 5 / 0 6 TUE 2 0 0 3
HOUR MINUTE
0 5 : – – PM
– MANUAL CLOCK SET –
MONTH DAY YEAR
0 5 / 0 6 TUE 2 0 0 3
HOUR MINUTE
0 5 : 4 0 PM
[ 02 ]
9J12
Page 47

8 Démarrer l'horloge.
5:40 PM
Appuyer sur la touche MENU sur
la télécommande.
Bien que les secondes ne soient pas
affichées, leur comptage commence
à 00 à la pression de la touche MENU sur la
télécommande. Utiliser cette fonction pour
synchroniser l'horloge à l'heure correcte.
REMARQUE:
Au débranchement du cordon secteur ou en cas de
panne de courant de plus de 3 secondes, il faudra
peut-être refaire le réglage de l'horloge.
POUR MODIFIER LE RÉGLAGE DE
L'HORLOGE
Pour changer le réglage de l'horloge
1)Effectuer les étapes [1] et [2].
2)Sélectionner l'emplacement à modifier avec la
touche F.FWD/B ou REW/s.
3)Entrer les chiffres corrects avec la touche PLAY/K
ou STOP/L.
4)Appuyer sur la touche MENU sur la télécommande
pour démarrer l'horloge.
À NOTER:
S'il n'y a pas de station PBS locale dans la zone ou
sur le système câblé, sélectionner “RÉG. AUTO
HORL” et appuyer sur la touche F.FWD/B ou
REW/s. pour mettre cette fonction [HF].
L'ajustement manuel de l'horloge sera alors possible.
RÉGLAGE AUTOMATIQUE DE
L'HORLOGE
Vérifier que …
Le téléviseur/magnétoscope est sous tension.
•
Confirmer que le téléviseur/magnétoscope reçoit
•
un signal RF (radiofréquence) d'une connexion de
système d'antenne ou câblé en utilisant la prise
ANT IN à l'arrière du téléviseur/magnétoscope.
REMARQUES:
Si une boîte de conversion câble est utilisée,
•
vérifier qu'elle est sous tension.
La télécommande du téléviseur/magnétoscope doit
•
être utilisée pour effectuer la procédure de réglage
de l'horloge.
Si le téléviseur/magnétoscope est directement
•
raccordé à un convertisseur du câble ou de
l’antenne parabolique, la station PBS locale doit
être syntonisée sur le câblosélecteur et le
téléviseur/magnétoscope devra être syntonisé au
même canal de sortie que le câblosélecteur ou
récepteur d'antenne parabolique (soit le canal 3 ou
4) afin que l’horloge soit réglée de façon
automatique et juste.
1 Sélectionner
“RÉGLAGE DE L'HORLOGE”.
Appuyer sur la touche MENU sur
la télécommande.
Appuyer sur PLAY/K ou STOP /L
pour sélectionner “RÉGLAGE DE
L'HORLOGE”.
Appuyer sur la touche F.FWD/B
pour accéder au menu “RÉGLAGE DE
L'HORLOGE”.
– M E N U –
PROG. EN DIFFÉRÉ
RÉGLAGE DE L’ IMAGE
RÉGLAGE DE L’ HORLOGE
RÉGLAGE DES CANAUX
RÉGLAGES DE L’ USAGER
RÉGLAGE CIRCUIT V
LANGAGE [FRANÇAIS]
S-TITRES [HF]
REMISE À ZÉRO
RECH. CHRONOMÉTRQUE
2 Régler “RÉG. AUTO HORL.”à “EF”.
Appuyer sur la touche F.FWD/B
jusqu'à ce que “RÉG. AUTO
HORL.” [EF] apparaisse.
– RÉGLAGE DE L’HORLOGE –
B RÉG. AUTO HORL. [EF]
RECH. AUTO HORLOGE CH.
CHANG. AUTO HORL.
RÉGLAGE MANUEL HORLOGE
HEURE D’ÉTÉ [HF]
[ 02 ]
3 Commencer “RECH.AUTO HORLOGE CH.”
Appuyer sur la touche STOP/L pour sélectionner
“RECH. AUTO HORLOGE CH.”.
Appuyer sur la touche F.FWD/B.
Le téléviseur/magnétoscope
•
recherche maintenant la station
contenant le signal de réglage
d'horloge automatique. La
recherche du signal peut
demander jusqu'à 20 secondes
par chaîne.
“--” apparaît dans la partie
•
inférieure gauche de l'écran à la
fin de la recherche.
- 15 - FR
– RÉGLAGE DE L’HORLOGE –
RÉG. AUTO HORL. [EF]
B RECH. AUTO HORLOGE CH.
CHANG. AUTO HORL.
RÉGLAGE MANUEL HORLOGE
HEURE D’ÉTÉ [HF]
–
RECH. AUTO HORLOGE CH.
08 10 13
_ _
[ 02 ]
9J12
–
Page 48

ARRÉT
SP COMPTEUR 0:12:34
COMPTEUR 0:12:34
ARRÉT 5 : 40 PM
CH2
SP
5 : 40 PM
CH2
5 secondes
plus tard
Le compteur de
bande reste
affiché à l’écran
L’heure et le numéro
de canal restent
affichés à l’écran
5 secondes
plus tard
ARRÉT 5 : 40 PM
CH2
SP COMPTEUR 0:12:34
Station d'horloge automatique - noter le ou les
– M E N U –
PROG. EN DIFFÉRÉ
RÉGLAGE DE L’ IMAGE
RÉGLAGE DE L’ HORLOGE
RÉGLAGE DES CANAUX
RÉGLAGES DE L’ USAGER
RÉGLAGE CIRCUIT V
LANGAGE [FRANÇAIS]
S-TITRES [HF]
REMISE À ZÉRO
RECH. CHRONOMÉTRQUE
•
numéros apparaissant sur l'écran. C'est la ou les
stations d'horloge automatique dans la région. Voir
le paragraphe 4 ci-dessous.
Si aucun numéro n'apparaît sur l'écran du
•
téléviseur, il n'y a pas de station contenant un
signal d'horloge automatique dans la région. Le
réglage automatique d'horloge est impossible.
Passer au réglage d'horloge manuel de la page 14.
Appuyer sur la touche MENU pour quitter l'écran.
REMARQUE: Pendant la recherche "CHANG.
AUTO HORL.", l'image peut etre deformee. Ceci est
normal.
4 Entrer le numéro de la chaîne contenant le
signal de réglage automatique d'horloge.
Appuyer sur la touche MENU de
la télécommande.
Appuyer sur la touche PLAY/K ou
STOP/L pour sélectionner
“RÉGLAGE DE L'HORLOGE”.
Appuyer sur la touche F.FWD/B
AFFICHAGE À L’ÉCRAN
pour accéder au menu
“RÉGLAGE DE L'HORLOGE”.
Appuyer sur la touche STOP/L
pour sélectionner “CHANG.
– RÉGLAGE DE L’HORLOGE –
RÉG. AUTO HORL. [EF]
RECH. AUTO HORLOGE CH.
B
CHANG. AUTO HORL.
RÉGLAGE MANUEL HORLOGE
HEURE D’ÉTÉ [HF]
[ 45]
AUTO HORL.”.
Appuyer sur la touche F.FWD/B ou REW/s
jusqu'au repérage du numéro de station à réglage
automatique d'horloge. Voir le paragraphe 3 cidessus.
Appuyer sur la touche MENU pour quitter l'écran.
5 Mettre le téléviseur/magnétoscope hors
tension.
Une fois le téléviseur/magnétoscope hors tension, il
effectuera un contrôle périodiquement et réglera la
date et l'heure correctes.
Lorsque vous souhaitez faire apparaître le compteur de bande, l’heure et le numéro du canal syntonisé à
l’écran du téléviseur/magnétoscope, pressez la commande d’affichage (DISPLAY) sur la télécommande. A
chaque pression de la commande d’affichage (DISPLAY) sur la télécommande, l’information apparaissant à
l’écran du téléviseur/magnétoscope changera dans l’ordre indiqué ci-dessous.
Lorsque le mode d’affichage des sous-titres est désactivé :
Mode d’affichage
En mode d’affichage du compteur de
•
désactivé
bande, seul le compteur de bande
demeure affiché pendant plus de 5
secondes à l’écran. Pour le faire
disparaître de l’écran, pressez la
commande d’affichage (DISPLAY).
En mode d’affichage de l’horloge,
•
seuls l’heure et le numéro du canal
syntonisé apparaissent à l’écran
pendant plus de 5 secondes. Pour les
faire disparaître de l’écran, pressez la
commande d’affichage (DISPLAY).
Lorsque le mode d’affichage des sous-titres est mis en fonction :
L’affichage à l’écran disparaîtra après 5 secondes.
•
Cela se produit même si la commande de
•
suppression du son (MUTE) ou la commande de
pause/arrêt sur image (PAUSE/STILL) est pressée
pendant qu’un enregistrement est en cours.
- 16 - FR
Mode d’affichage du
compteur de bande
Mode d’affichage
désactivé
Mode d’affichage
Mode d’affichage de
l’horloge/compteur de bande
de l’horloge
9J12
Page 49

CARACTÉRISTIQUES SPÉCIALES
VOLUME 20
JEU
DÉMAGNÉTISATION
La magnétisation provenant d’appareils se trouvant à
proximité risque d’altérer les couleurs de l’image du
téléviseur/magnétoscope.
Si cela se produisait, éloignez le
téléviseur/magnétoscope de tels appareils. Si, malgré
cela, la couleur n’est pas acceptable, débranchez
l’appareil de la prise de courant secteur et
rebranchez-le après 30 minutes.
MINUTERIE/COMPTEUR DE BANDE
Indique la durée d’enregistrement ou de lecture
écoulée en heures, minutes et secondes (lors du
défilement des portions vierges sur la bande la durée
écoulée ne variera pas sur l’affichage).
Le symbole "-" apparaîtra sur l’affichage si l’on
rembobine la bande au-delà de la position 0:00:00.
FONCTIONNEMENT DU TÉLÉVISEUR
VISIONNEMENT D’UNE
ÉMISSION TÉLÉVISÉE
REMBOBINAGE / ÉJECTION
AUTOMATIQUES
Lorsque pendant une lecture, un enregistrement ou
•
une avance rapide le téléviseur/magnétoscope
atteint la fin de la cassette, il rembobinera
automatiquement la bande jusqu’au début, puis, il
éjectera la vidéocassette et se mettra hors circuit.
Le rembobinage automatique ne s’effectuera que si
•
la fonction de répétition automatique de la lecture
est désactivée.
Le téléviseur/magnétoscope ne rebobinera pas la
•
bande si on effectue un enregistrement par
minuterie ou un enregistrement express avec une
seule touche.
MODE D’UTILISATION DE
JEUX VIDÉO
1 Mise en circuit de l’appareil
Pressez l’interrupteur d’alimentation (POWER) afin
de mettre le téléviseur/magnétoscope en circuit.
2 Sélection d’un canal
Sélectionnez le canal désiré en utilisant les
commandes des canaux (CH K / L) ou procédez
directement en pressant les touches numériques de la
télécommande pour composer le numéro du canal de
votre choix.
Remarque : Si le téléviseur/magnétoscope est
directement raccordé à un convertisseur du câble ou
de l’antenne parabolique, il doit syntoniser le même
canal que le sélecteur CH3/CH4 du convertisseur
(soit le canal 3 ou 4), la sélection du canal à
visionner doit ensuite être effectuée à partir du
convertisseur lui-même.
3 Réglage du volume
Réglez le volume au niveau désiré
à l’aide des commandes de hausse
XX
/baisse YYdu volume (VOLUME
XX/YY
).
Cette fonction vous permet d’ajuster l’image - en
réduisant notamment le contraste - de manière à
convenir parfaitement à l’utilisation de jeux vidéo.
Remarque : ce mode ne peut être sélectionné
lorsqu’un enregistrement est en cours.
Pressez la commande du mode de
jeux vidéo (GAME) se trouvant sur
la télécommande. Le mot JEU
apparaîtra dans le coin supérieur
droit de l’écran.
Lorsque vous pressez la commande du mode de jeux
vidéo (GAME) ;
Le téléviseur/magnétoscope se met
•
automatiquement en circuit, s’il était éteint.
Le téléviseur/magnétoscope sélectionne
•
automatique le mode d’entrée d’un signal externe.
ANNULATION DU MODE
D’UTILISATION DE JEUX VIDÉO
Pressez l’interrupteur du mode de jeux vidéo
(GAME) ou les commandes des canaux (CH K / L)
se trouvant sur la télécommande.
- 17 - FR
9J12
Page 50

AJUSTEMENT DE L’IMAGE
– M E N U –
PROG. EN DIFFÉRÉ
RÉGLAGE DE L’ IMAGE
RÉGLAGE DE L’ HORLOGE
RÉGLAGE DES CANAUX
RÉGLAGES DE L’ USAGER
RÉGLAGE CIRCUIT V
LANGAGE [FRANÇAIS]
S-TITRES [HF]
REMISE À ZÉRO
RECH. CHRONOMÉTRQUE
LUMINOSITÉ
–
+
DÉCODEUR DE SOUS-TITRES
Les commandes de l’image du
téléviseur/magnétoscope - LUMINOSITÉ,
CONTRASTE, COULEUR, TEINTE et
NETTETÉ - sont préréglées aux spécifications de
l’usine. Bien que ces commandes soient préréglées
au mieux, il vous sera peut-être nécessaire
d’effectuer certains ajustements pour obtenir une
image d’un aspect naturel.
REMARQUES :
Vous devez effectuer les procédures suivantes
•
avant que 5 secondes ne s’écoulent, sinon, le mode
d’ajustement de l’image sera désactivé.
Lorsque vous ajustez les aspects de l’image, le
•
mode d’utilisation de jeux vidéo (GAME MODE)
sera automatiquement mis hors fonction (OFF).
Vous devez presser l’interrupteur d’alimentation
•
(POWER) afin de mettre le
téléviseur/magnétoscope en circuit.
1
Sélection de la fonction RÉGLAGE DE L’IMAGE
Pressez la commande MENU de la
télécommande. Sélectionnez le
paramètre RÉGLAGE DE
L’IMAGE en pressant plusieurs
fois les commandes de lecture
(PLAY/K) ou d’arrêt (STOP/L)
jusqu’à ce que la flèche pointe les mots RÉGLAGE
DE L’IMAGE à l’écran.
Puis pressez la commande d’avance rapide (F.FWD/B).
2 Sélection des aspects de l’image
Sélectionnez l’aspect de l’image à ajuster en pressant
plusieurs fois les commandes de lecture (PLAY/K)
ou d’arrêt (STOP/L) jusqu’à ce
que l’aspect désiré de l’image
apparaisse à l’écran. Chaque
pression sur ces touches fait
apparaître les aspects de l’image :
LUMINOSITÉ, CONTRASTE,
COULEUR, TEINTE et NETTETÉ dans cet ordre à
l’écran du téléviseur.
3 Ajustement des aspects de l’image
Ajustez chaque aspect de l’image en utilisant les
commandes d’avance rapide (F.FWD/B) ou de
rembobinage (REW/s).
TOUCHES REW/s F.FWD/B
LUMINOSITÉ
CONTRASTE diminue augmente
COULEUR diminue augmente
TEINTE plus rouge plus vive
NETTETÉ plus floue plus claire
diminue augmente
Cet appareil vous permet de visionner des émissions
télévisées, des films, des enregistrements, etc. qui
contiennent des sous-titres, du dialogue ou du texte
de la bande sonore.
Mode d’affichage de sous-titres : Vous pouvez
visionner des téléromans, des films ou le journal
télévisé tout en ayant les sous-titres du dialogue ou
du contenu des informations affichés au bas de
l’écran du téléviseur/magnétoscope lorsque vous
mettez le mode d’affichage des sous-titres
(CAPTION) en fonction.
Mode d’affichage du texte : Vous pouvez visionner
un texte informatif couvrant la moitié de l’écran du
téléviseur/magnétoscope si vous le désirez, il vous
suffit de mettre l’appareil en mode d’affichage de
texte (TEXT).
Canaux 1 et 2 (C1 / C2) : Les sous-titres (dialogue,
informations ou texte) sont diffusés sur les canaux
1 ou 2. Le canal 2, lorsqu’il est utilisé, sert plus
particulièrement à la diffusion de sous-titres dans
une autre langue que celle de télédiffusion.
REMARQUE :
Toutes les émissions télévisées ne sont pas diffusées
avec des sous-titres. Cet appareil a été conçu pour
vous offrir des sous-titres de qualité, sans erreur en
autant que ceux-ci proviennent d’une antenne, d’un
système de câblodistribution ou d’un signal vidéo
d’un magnétoscope de bonne qualité. Par conséquent,
si le signal reçu est mauvais, il est fort probable que
les sous-titres contiendront des erreurs ou qu’il n’y
ait pas de sous-titres du tout. Voici une courte liste
des principaux facteurs qui pourraient altérer la
qualité des sous-titres apparaissant à l’écran.
interférence causée par un moteur d’automobile
•
interférence causée par le moteur d’un appareil
•
électrique
image faible et enneigée
•
prolifération de signaux captés causant un
•
dédoublement ou des ondes dans l’image
bande vidéo dans le téléviseur/magnétoscope
•
contenant un enregistrement de mauvaise qualité
ou usée
REMARQUE :
Si vous voyez apparaître un grand
carré noir à l’écran ceci signifie que
l’appareil est en mode d’affichage
de texte (TEXT). Libérez l’écran en
sélectionnant le mode [S-TIT1], [STIT2] ou [EF (En Fonction)].
Le téléviseur/magnétoscope doit être mis en circuit
•
pour effectuer cette opération.
Si une interruption de l’alimentation électrique
•
de l’appareil survient (panne ou
débranchement), ce dernier conservera en
mémoire l’ajustement des aspects de l’image.
- 18 - FR
9J12
Page 51

1 Sélection de la fonction S-TITRES
– M E N U –
PROG. EN DIFFÉRÉ
RÉGLAGE DE L’ IMAGE
RÉGLAGE DE L’ HORLOGE
RÉGLAGE DES CANAUX
RÉGLAGES DE L’ USAGER
RÉGLAGE CIRCUIT V
LANGAGE [FRANÇAIS]
S-TITRES [HF]
REMISE À ZÉRO
RECH. CHRONOMÉTRQUE
– M E N U –
PROG. EN DIFFÉRÉ
RÉGLAGE DE L’ IMAGE
RÉGLAGE DE L’ HORLOGE
RÉGLAGE DES CANAUX
RÉGLAGES DE L’ USAGER
RÉGLAGE CIRCUIT V
LANGAGE [FRANÇAIS]
S-TITRES [S-TIT1]
REMISE À ZÉRO
RECH. CHRONOMÉTRQUE
(Sous-TITRES)
Pressez la commande MENU de la
télécommande. Sélectionnez la
fonction S-TITRES (SousTITRES) en pressant plusieurs fois
la commande de lecture (PLAY/K)
ou d’arrêt (STOP/L) jusqu’à ce que la flèche pointe
le mot S-TITRES à l’écran.
2 Sélection du mode d’affichage de sous-titres
approprié
Sélectionnez le mode d’affichage
de sous-titres qui convient en
utilisant les commandes d’avance
rapide (F.FWD/B) ou de
rembobinage (REW/s) jusqu’à ce
que la flèche pointe le mot [S-TIT1], [S-TIT2],
[TEXT1] ou [TEXT2] à l’écran.
3 Fin de la sélection du mode d’affichage de
sous-titres
Appuyez sur la touche MENU de la télécommande
pour revenir au mode TV.
ANNULATION DU MODE D’AFFICHAGE
DE SOUS-TITRES
Répétez les directives données aux étapes 1 et 2 puis
sélectionnez [EF (En Fonction)] en utilisant les
commandes d’avance rapide (F.FWD/B) ou de
rembobinage (REW/s). Appuyez sur la touche
MENU de la télécommande pour revenir au mode
TV.
LORSQUE LE MODE D’AFFICHAGE DE
SOUS-TITRES EST MIS EN FONCTION
L’affichage à l’écran disparaît après cing (5)
secondes.
Ceci fonctionne même si la commande de
•
suppression du son (MUTE) a été pressée ou même
si la commande de pause/arrêt sur image
(PAUSE/STILL) a été pressée lors d’un
enregistrement.
Si une interruption de l’alimentation électrique
•
de l’appareil survient (panne ou
débranchement), ce dernier conservera en
mémoire le mode d’affichage des sous-titres
sélectionné.
- 19 - FR
9J12
Page 52

RÉGLAGE DU CIRCUIT V
– M E N U –
PROG. EN DIFFÉRÉ
RÉGLAGE DE L’ IMAGE
RÉGLAGE DE L’ HORLOGE
RÉGLAGE DES CANAUX
RÉGLAGES DE L’ USAGER
RÉGLAGE CIRCUIT V
LANGAGE [FRANÇAIS]
S-TITRES [HF]
REMISE À ZÉRO
RECH. CHRONOMÉTRQUE
TV-Y7 [BARRÉ]
FV [BARRÉ]
TV-PG [BARRÉ]
D [BARRÉ]
L [BARRÉ]
S [BARRÉ]
V [BARRÉ]
TV-Y [VISION]
TV-Y7 ( ) [VISION]
TV-G [VISION]
TV-PG(DLSV) [BARRÉ]
TV-14 (DLSV) [BARRÉ]
TV-MA( LSV) [BARRÉ]
– RÉGLAGE CIRCUIT V –
COTE TV
COTE MPAA
TV-Y [VISION]
TV-Y7 ( ) [VISION]
TV-G [VISION]
TV-PG( ) [VISION]
TV-14 ( ) [VISION]
TV-MA( ) [VISION]
Le CIRCUIT V permet aux parents d'éviter que leurs
enfants ne regardent des programmes télévisés qui ne
leur sont pas destinés.
Le CIRCUIT V lit les classements pour la
programmation (à l'exception des nouvelles et des
programmes de sports, de films non montés sur des
canaux de câbles à redevances et des signaux du
système d'émissions d'urgence), et refuse alors l'entrée
pour une programmation si le classement du
programme répond aux limitations que vous
choisissez. Dans ce cas, "ÉMISSION PROTÉGÉE par
..." apparaît sur l'écran du téléviseur.
Pour bloquer les classements, suivez les étapes ci-dessous.
La programmation peut être classée par
•
l'Association des Films des Etats-Unis (MPAA) ou
selon les Règles Directrices Parentales sur la
Télévision. De manière à verrouiller n'importe
quelle programmation inappropriée, réglez vos
limitations aux endroits COTE MPAA et COTE TV.
RÉGLAGE COTE TV
Assurez-vous de faire ce qui suit…
Le téléviseur/magnétoscope doit être mis en circuit.
•
1 Sélectionnez “RÉGLAGE CIRCUIT V”
Pressez la commande MENU de la
télécommande.
Pressez la commande de lecture
(PLAY/K) ou d’arrêt (
pour pointer sur "RÉGLAGE
CIRCUIT V".
Puis, pressez la commande d’avance rapide (F.FWD/B).
2 Sélectionnez “COTE TV”
Pressez la commande de lecture
(PLAY/K) ou d’arrêt (STOP/L)
pour pointer sur "COTE TV".
Puis, pressez la commande d’avance
rapide (F.FWD/B).
3 Sélectionnez l’article que vous désirez
Pressez la commande de lecture
(PLAY/K) ou d’arrêt (STOP/L)
pour pointer sur l’article que vous
désirez.
Puis, pressez la commande d’avance
rapide (F.FWD/B) pour sélectionner
[BARRÉ] ou [VISION].
Lorsque vous choisissez la catégorie de classement
•
et que vous la tournez sur [BARRÉ], le classement
le plus élevé tournera automatiquement sur
[BARRÉ]. De même, le classement le plus bas
tournera automatiquement sur [VISION].
STOP/L)
Lorsque vous tournez "TV-Y" sur [VISION], tous
•
les classements tourneront automatiquement sur
[VISION].
Sélection
Explications sur la catégorie de classement
TV-Y Approprié pour tous les enfants
TV-Y7
Appoprié pour les enfants de 7 ans et plus
TV-G Pour tout le monde
TV-PG Gouverne parentale conseillée
TV-14 Ne convient pas pour les enfants au-
dessous de 14 ans
TV-MA Seulement pour les adultes
Lorsque vous sélectionnez TV-Y7, TV-PG, TV-14 ou
TV-MA et que vous pressez la commande d’avance
rapide (F.FWD/B), les sous-classements apparaîtront
sur l'écran du téléviseur.
Si vous sélectionnez une des catégorie de classement
(exemple: TV-PG) et que vous la tourniez sur
[BARRÉ] ou [VISION], les sous-classements
(exemple: V pour violence) tourneront
automatiquement sur [BARRÉ] ou [VISION].
Vous pouvez régler individuellement les sousclassemements sur [BARRÉ] ou [VISION] lorsque la
catégorie de classement est réglée sur [BARRÉ].
Pour régler individuellement les sous-classements,
suivez les étapes ci-dessous.
Lorsque vous choisissez [TV-Y7]:
•
Pressez la commande d’arrêt
(STOP/L) ou de lecture
(PLAY/K) pour sélectionner
"FV" (violence fantastique).
Puis, pressez la commande
d’avance rapide (F.FWD/B)
pour sélectionner [BARRÉ] ou [VISION].
Lorsque vous choisissez [TV-PG], [TV-14] ou
•
[TV-MA]:
Pressez la commande d’arrêt
(STOP/L) ou de lecture
(PLAY/K) pour sélectionner "D"
(dialogue suggestif), "L"
(language brutal), "S" (situation
sexuelle) ou "V" (violence). Puis, pressez la
commande d’avance rapide (F.FWD/B) pour
sélectionner [BARRÉ] ou [VISION].
Remarque: Lorsque vous sélectionnez [TV-MA],
"D" n'apparaîtra pas sur l'écran du téléviseur.
Les sous-classements qui sont
•
réglés sur [BARRÉ] apparaîtront
à côté de la catégorie de
classement sur le menu COTE
TV.
4 Quittez le mode du réglage circuit V.
Pressez la commande MENU de la télécommande
pour revenir au mode original.
- 20 - FR
9J12
Page 53

RÉGLAGE COTE MPAA
– M E N U –
PROG. EN DIFFÉRÉ
RÉGLAGE DE L’ IMAGE
RÉGLAGE DE L’ HORLOGE
RÉGLAGE DES CANAUX
RÉGLAGES DE L’ USAGER
RÉGLAGE CIRCUIT V
LANGAGE [FRANÇAIS]
S-TITRES [HF]
REMISE À ZÉRO
RECH. CHRONOMÉTRQUE
– RÉGLAGE CIRCUIT V –
COTE TV
COTE MPAA
G [VISION]
PG [VISION]
PG-13 [VISION]
R [BARRÉ]
NC-17 [BARRÉ]
X [BARRÉ]
Assurez-vous de faire ce qui suit…
Le téléviseur/magnétoscope doit être mis en circuit.
•
1 Sélectionnez “RÉGLAGE CIRCUIT V”.
Pressez la commande MENU de la
télécommande.
Pressez la commande de lecture
(PLAY/K) ou d’arrêt
(STOP/L)
pour pointer sur "RÉGLAGE
CIRCUIT V".
Puis, pressez la commande d’avance rapide (F.FWD/B).
2 Sélectionnez “COTE MPAA”.
Pressez la commande de lecture
(PLAY/K) ou d’arrêt (STOP/L)
pour pointer sur "COTE MPAA".
Puis, pressez la commande
d’avance rapide (F.FWD/B).
3 Sélectionnez l’article que vous désirez
Pressez la commande de lecture
(PLAY/K) ou d’arrêt (STOP/L)
pour pointer sur l’article que vous
désirez.
Puis, pressez la commande d’avance
rapide (F.FWD/B) pour sélectionner
[BARRÉ] ou [VISION].
Sélection
Explications sur la catégorie de classement
G Pour tout le monde
PG Gouverne parentale conseillée
PG-13 Ne convient pas pour les enfants au-
dessous de 13 ans
R Limité; au-dessous de 17 ans, nécessite
la présence des parents ou d'un adulte
NC-17 I
nterdit aux enfants au-dessous de 17 ans
X Seulement pour les adultes
Lorsque vous choisissez la catégorie de classement
•
et que vous la tournez sur [BARRÉ], le classement
le plus élevé tournera automatiquement sur
[BARRÉ]. De même, le classement le plus bas
tournera automatiquement sur [VISION].
Lorsque vous tournez "G" sur [VISION], tous les
•
classements tourneront automatiquement sur
[VISION].
4 Quittez le mode du réglage circuit V.
Pressez la commande MENU de la télécommande
pour revenir au mode original.
- 21 - FR
9J12
Page 54

LECTURE
LECTURE
ARRÉT
LECTURE NORMALE
Le téléviseur/magnétoscope doit être mis en circuit
•
pour effectuer cette opération.
1 Introduisez une vidéocassette contenant déjà
un enregistrement
Si la languette de protection de la vidéocassette a été
brisée, le téléviseur/magnétoscope entamera
automatiquement la lecture de la bande.
2 Entamez la lecture
Pressez la commande de lecture
(PLAY) afin d’entamer la lecture
de la bande.
3 Interrompez la lecture
Pressez la commande d’arrêt
(STOP) lorsque vous désirez cesser
la lecture de la vidéocassette.
ALIGNEMENT
L’alignement est effectué de façon automatique par
•
l’appareil (alignement numérique DTR) lorsque le
téléviseur/magnétoscope est en mode de lecture.
Toutefois, lorsque vous visionnez une bande
•
contenant un enregistrement qui n’a pas été
effectué avec votre propre
téléviseur/magnétoscope, des lignes parasites
(blanches et noires) pourraient apparaître sur
l’image. Si cela se produit, ajustez la commande
d’alignement en pressant les commandes des
canaux (CH K / L) se trouvant sur le
téléviseur/magnétoscope jusqu’à ce que les lignes
disparaissent. Réactivez la fonction de dépistage
numérique (DTR) en arrêtant le défilement de la
bande un moment, puis pressez la commande de
lecture (PLAY) à nouveau.
RECHERCHE VISUELLE
Cette fonction est très utile pour chercher ou sauter
une portion spécifique de la bande. Il n’y a pas de
son dans ce mode.
1) Effectuez une recherche visuelle très rapide en
pressant la commande d’avance rapide (F.FWD)
ou de rembobinage (REW) lorsque l’appareil est
en mode lecture (vitesses de défilement SP, LP ou
SLP). Relâchez la touche.
2) Pressez-la à nouveau pendant une seconde. Vous
activerez ainsi la recherche visuelle très rapide
(vitesses de défilement LP ou SLP seulement).
REMARQUE : La recherche visuelle effectuée
sur des bandes enregistrées à vitesse SP ou LP
peuvent présenter des lignes parasites à l’écran,
l’image pourrait même perdre ses couleurs. Ceci
est normale.
3) Pressez la commande de lecture (PLAY) lorsque
vous désirez reprendre le visionnement à une
vitesse normale.
ARRÊT SUR IMAGE
Vous pouvez fixer une image précise à l’écran lors du
visionnement d’une bande (mode d’arrêt sur image).
Pressez la commande de pause/arrêt sur image
(PAUSE/STILL) lors de la lecture et l’image se
fixera à l’écran. Pressez la commande de lecture
(PLAY) à nouveau afin de reprendre la lecture.
REMARQUES :
Il devrait normalement y avoir des lignes ou points
•
de couleur noir ou blanc à l’écran lorsque vous
effectuez un arrêt sur image. Ceci est normale.
Si l’enregistrement sur bande a été réalisé à vitesse
SP ou LP, vous obtiendrez, en plus de ces lignes
parasites, une image en noire et blanc lorsque vous
tenterez de fixer une séquence à l’écran.
Ceci ne représente pas un mauvais
fonctionnement de l’appareil mais le résultat
d’une technologie vous procurant un
téléviseur/magnétoscope muni de deux têtes
vidéo.
Le téléviseur/magnétoscope passera
•
automatiquement au mode d’arrêt s’il est laissé en
mode de pause/arrêt sur image pendant plus de
cinq (5) minutes.
RÉDUCTION DES PARASITES
(en mode d’arrêt sur image)
Cette fonction vous permet de déplacer ou de réduire
les lignes parasites apparaissant à l’écran lors d’un
arrêt sur image.
Pressez la commande de pause/arrêt sur image
(PAUSE/STILL) à plusieurs reprises afin que les
lignes se déplacent à l’écran et que vous puissiez voir
l’image en son entier sans aucun parasite.
REMARQUE : Cette fonction peut être utilisée
uniquement avec des enregistrements effectuées à
vitesse SLP. Si vous tentez de réduire les parasites
dans l’image obtenu à partir d’un enregistrement
effectué à vitesse SP ou LP, l’écran pourrait perdre
ses couleurs en plus des lignes parasites qui y
apparaîtront. Ceci est normale.
- 22 - FR
9J12
Page 55

COMMANDE DE STABILITÉ
– M E N U –
PROG. EN DIFFÉRÉ
RÉGLAGE DE L’ IMAGE
RÉGLAGE DE L’ HORLOGE
RÉGLAGE DES CANAUX
RÉGLAGES DE L’ USAGER
RÉGLAGE CIRCUIT V
LANGAGE [FRANÇAIS]
S-TITRES [HF]
REMISE À ZÉRO
RECH. CHRONOMÉTRQUE
–
RÉGLAGES DE L’ USAGER
–
LOCATION
[EF]
LECT. RÉPÉTÉE [HF]
RETOUR AUTO.
[HF]
– M E N U –
PROG. EN DIFFÉRÉ
RÉGLAGE DE L’ IMAGE
RÉGLAGE DE L’ HORLOGE
RÉGLAGE DES CANAUX
RÉGLAGES DE L’ USAGER
RÉGLAGE CIRCUIT V
LANGAGE [FRANÇAIS]
S-TITRES [HF]
REMISE À ZÉRO
RECH. CHRONOMÉTRQUE
–
RÉGLAGES DE L’ USAGER
–
LOCATION
[HF]
LECT. RÉPÉTÉE [TOUS]
RETOUR AUTO.
[HF]
VERTICALE
Cette commande sert exclusivement à faire cesser le
déplacement vertical de l’image seulement lorsque le
téléviseur/magnétoscope se trouve en mode d’arrêt
sur image. Pour le faire, pressez les touches des
canaux (CH K / L).
MODES DE LECTURE
REMARQUE :
Si vous notez la présence de lignes parasites à
l’écran, déplacez-les ou réduisez leur nombre en
suivant les directives données à la section précédente
(RÉDUCTION DES PARASITES).
Vous devez presser l’interrupteur d’alimentation
•
(POWER) afin de mettre le
téléviseur/magnétoscope en circuit pour pouvoir
utiliser les fonctions décrites ci-dessous.
Insérez une vidéocassette contenant déjà un
•
enregistrement dans l’appareil.
Avant de procéder au visionnement, suivez les
•
directives ci-dessous.
VISIONNEMENT DE
VIDÉOCASSETTES DE LOCATION
Cette fonction vous permet d’obtenir une meilleure
qualité d’image lorsque le téléviseur/magnétoscope
effectue la lecture de vidéocassettes dont la bande est
usée telles les vidéocassettes de location.
1
Sélection de la fonction RÉGLAGES DE L’USAGER
Appuyez sur la touche MENU de
la télécommande pour revenir au
mode TV.
Sélectionnez le paramètre
RÉGLAGES DE L’USAGER en
pressant plusieurs fois la
commande de lecture (PLAY/K) ou d’arrêt
(STOP/L) jusqu’à ce que la flèche pointe les mots
RÉGLAGES DE L’USAGER à l’écran.
Puis pressez la commande d’avance rapide (F.FWD/B).
2
Sélection du mode de lecture de vidéocassettes
de location
Pressez d’abord la commande de
lecture (PLAY/K) ou d’arrêt
(STOP/L) plusieurs fois afin que la
flèche pointe le mot LOCATION à
l’écran. Puis activez le mode de
lecture de vidéocassettes de location (RENTAL
MODE) en pressant les commandes d’avance rapide
(F.FWD/B) ou de rembobinage (REW/s) jusqu’à ce
que le mot [EF (En Fonction)] apparaisse à l’écran à
côté du mot LOCATION.
3 Fin de la sélection du mode de lecture de
vidéocassettes de location
Appuyez sur la touche MENU de la télécommande
pour revenir au mode TV.
Une fois que l’appareil est en mode de lecture
•
de vidéocassettes de location, il conserve ce
mode de lecture même après que vous ayez
éteint le téléviseur/magnétoscope.
ANNULATION DU MODE DE LECTURE
DE VIDÉOCASSETTES DE LOCATION
Répétez les directives données à l’étape 1 puis à
l’étape 2, sélectionnez [HF (Hors Fonction)] en
utilisant la touche F.FWD/B (avance rapide) ou
REW/s (rembobinage) sur la télécommande.
Appuyez sur la touche MENU de la télécommande
pour revenir au mode TV.
Si une interruption de l’alimentation électrique de
l’appareil survient (panne ou débranchement), ce
dernier conservera en mémoire la sélection du
mode de lecture de vidéocassettes de location.
RÉPÉTITION AUTOMATIQUE DE
LA LECTURE
Ce combiné téléviseur/magnétoscope est muni d’une
fonction de répétition automatique de la lecture qui
vous permet de répéter le visionnement d’une
vidéocassette indéfiniment sans devoir presser la
commande de lecture (PLAY) à chaque fois. Il y a
deux modes de répétition de lecture :
RÉPÉTITION TOUTE LA BANDE : l’appareil répète
la lecture de la vidéocassette au complet.
RÉPÉTITION PORTIONS ENREGISTRÉES :
l’appareil répète la lecture uniquement des portions
de la bande sur lesquelles un enregistrement a été
effectué et saute toutes les portions de 10 secondes
sans enregistrement.
1
Sélection de la fonction RÉGLAGES DE L’USAGER
Pressez la commande MENU de la
télécommande.
Sélectionnez le paramètre
RÉGLAGES DE L’USAGER en
pressant plusieurs fois la
commande de lecture (PLAY/K)
ou d’arrêt (STOP/L) jusqu’à ce que la flèche pointe
les mots RÉGLAGES DE L’USAGER à l’écran.Puis
pressez la commande d’avance rapide (F.FWD/B).
4 Début de la lecture
Pressez la commande de lecture (PLAY) afin
d’entamer la lecture, en mode de lecture de
vidéocassettes de location. Les mots LECT.
LOCATION (apparaîtront brièvement à l’écran.
2 Sélection du mode de
répétition approprié
Pressez plusieurs fois la commande
de lecture (PLAY/K) ou d’arrêt
(STOP/L) jusqu’à ce que la flèche
- 23 - FR
9J12
Page 56

pointe les mots LECT. RÉPÉTÉE à l’écran. Puis
– M E N U –
PROG. EN DIFFÉRÉ
RÉGLAGE DE L’ IMAGE
RÉGLAGE DE L’ HORLOGE
RÉGLAGE DES CANAUX
RÉGLAGES DE L’ USAGER
RÉGLAGE CIRCUIT V
LANGAGE [FRANÇAIS]
S-TITRES [HF]
REMISE À ZÉRO
RECH. CHRONOMÉTRQUE
activez le mode de répétition de lecture de votre
choix (toute la bande ou portions enregistrées
seulement) en pressant les commandes d’avance
rapide (F.FWD/B) ou de rembobinage (REW/s)
pour faire apparaître les mots [TOUS](toute la bande)
ou [VIERGE] (seulement les portions enregistrées) à
côté des mots LECT. RÉPÉTÉE à l’écran.
3 Fin de la sélection du mode de répétition
Appuyez sur la touche MENU de la télécommande
pour revenir au mode TV.
4 Début de la répétition de lecture
Pressez la commande de lecture (PLAY) afin
d’entamer la lecture, en mode de répétition
automatique. Les mots LECT. RÉPÉTÉE
apparaîtront brièvement à l’écran.
Une fois que vous avez sélectionné la fonction de
•
répétition de lecture, l’appareil conserve cette
commande même après qu’il ait été mis hors
circuit.
RECHERCHE
Si le mode de lecture de vidéocassettes de location
•
(RENTAL) a été mis en fonction [EF (En
Fonction)], il aura priorité et les mots LECT.
LOCATION apparaîtront à l’écran pour le
confirmer.
ANNULATION DE LAFONCTION DE
RÉPÉTITION DE LECTURE
Répétez les directives données à l’étape 1 puis à
l’étape 2, sélectionnez [HF (Hors Fonction)] en
utilisant la commande F.FWD/B (avance rapide) ou
REW/s (rebobinage) sur la télécommande.
Appuyez sur la touche MENU de la télécommande
pour revenir au mode TV.
Si une interruption de l’alimentation électrique de
l’appareil survient (panne ou débranchement), ce
dernier conservera en mémoire le mode de
répétition de lecture sélectionné.
Vous devez presser l’interrupteur d’alimentation
•
(POWER) afin de mettre le
téléviseur/magnétoscope en circuit pour pouvoir
utiliser les fonctions décrites ci-dessous.
Insérez une vidéocassette dans l’appareil.
•
RETOUR À LA POSITION ZÉRO (00)
Cette fonction permet de rechercher facilement le début
de l’endroit que vous désirez visualiser en rembobinage
la bande ou en la faisant avancer rapidement.
REMARQUE:
Le retour sur zéro NE FONCTIONNERA PAS sur
une bande vierge ou la portion vierge d’une bande.
1
Arrêt du défilement de la bande au point désiré
Faites avancer ou rembobiner la bande pour atteindre
le point précis sur celle-ci où vous souhaitez revenir
plus tard.
2 Remise à zéro du compteur de bande
Pressez plusieurs fois la commande de remise à zéro
du compteur de bande (COUNTER RESET) afin de
remettre le compteur à la position 0 : 00 : 00.
3 Enregistrement ou lecture
Pressez la commande d’enregistrement (RECORD)
ou de lecture (PLAY) afin d’entamer l’opération de
votre choix. Pressez la commande d’arrêt (STOP)
pour cesser l’enregistrement ou la lecture.
4 Retour à la position zéro
Pressez la commande MENU de la
télécommande. Sélectionnez le
paramètre REMISE À ZERO en
pressant plusieurs fois la
commande de lecture (PLAY/K)
ou (STOP/L) jusqu’à ce que la flèche pointe les mots
REMISE À ZERO à l’écran.
Puis pressez la commande d’avance rapide (F.FWD/B).
Le compteur de bande apparaîtra à l’écran du
téléviseur. Le téléviseur/magnétoscope rebobinera
automatiquement la bande jusqu’au point 0 : 00 : 00.
RECHERCHE SELON LA DURÉE
La fonction de positionnement sur la bande selon la
durée de visionnement vous permet d’avancer
rapidement à une portion spécifique de la bande en
indiquant la durée exacte de défilement qui doit être
"sautée".
REMARQUES :
La durée maximale de visionnement pouvant être
•
"sautée" est de 9 heures et 50 minutes, divisée en
portions de 10 minutes.
Cette fonction ne peut être utilisée en mode
•
d’enregistrement.
Cette fonction ne peut être utilisée s’il n’y a pas de
•
vidéocassette dans l’appareil.
Voici un exemple : Vous désirez regarder un
enregistrement situé à 2 heures 50 minutes du début
de la bande.
1 Insérez une vidéocassette dans l’appareil.
2 Sélectionnez le mode RECH.
CHRONOMÉTRQUE
Pressez plusieurs fois la commande de recherche
selon la durée (TIME SEARCH). Chaque pression
ajoute 10 minutes à la durée de visionnement de
bande " à sauter ".
OU
- 24 - FR
9J12
Page 57

Pressez la commande MENU de la
– M E N U –
PROG. EN DIFFÉRÉ
RÉGLAGE DE L’ IMAGE
RÉGLAGE DE L’ HORLOGE
RÉGLAGE DES CANAUX
RÉGLAGES DE L’ USAGER
RÉGLAGE CIRCUIT V
LANGAGE [FRANÇAIS]
S-TITRES [HF]
REMISE À ZÉRO
RECH. CHRONOMÉTRQUE
RECH. CHRONOMÉTRQUE
2 : 50
CH 10
SP
ENREGISTREMENT
SP
PAUSE
SP
télécommande. Pressez plusieurs
fois la commande de lecture
(PLAY/K) ou d’arrêt (STOP/L)
jusqu’à ce que la flèche pointe les
mots RECH.
CHRONOMÉTRQUE.
Puis pressez la commande d’avance rapide (F.FWD/B).
3 Programmez la durée de visionnement
correspondant à la portion de la bande où
l’appareil doit se positionner.
Pressez la commande de lecture
(PLAY/K) ou d’arrêt (STOP/L)
plusieurs fois jusqu’à ce que la
durée appropriée (dans cet
exemple, il s’agit de 2h50 minutes)
apparaisse à l’écran du téléviseur/magnétoscope.
Pour cesser le mode de recherche sur la bande selon
la durée de visionnement à ce stade-ci, pressez la
commande MENU de la télécommande.
ENREGISTREMENT
Vous devez presser l’interrupteur d’alimentation
•
(POWER) afin de mettre le
téléviseur/magnétoscope en circuit pour effectuer
les opérations suivantes.
Introduisez dans le téléviseur/magnétoscope une
•
vidéocassette dont la languette de protection est
toujours en place. Au besoin, faites avancer la
bande ou rembobinez-la afin de positionner
l’appareil au point précis sur la bande où vous
désirez que l’enregistrement débute.
REMARQUE : Cet appareil ne vous permettra pas
d’effectuer un enregistrement à partir d’un certain
canal tout en en visionnant un autre.
ENREGISTREMENT NORMALE
Vous devez visionner l’émission télévisée que vous
enregistrez, vous ne pouvez en regarder une autre.
1 Sélection du canal à par tir duquel
l’enregistrement sera effectué
Sélectionnez le canal diffusant
l’émission que vous souhaitez
enregistrer en pressant les touches
numériques de la télécommande ou
les commandes des canaux (CH K
/ L).
Remarque : Si le téléviseur/magnétoscope est
directement raccordé à un convertisseur du câble ou
une antenne parabolique, il doit syntoniser le même
canal que le sélecteur CH3/CH4 du convertisseur
(soit le canal 3 ou 4), la sélection du canal à partir
duquel on effectue l’enregistrement doit ensuite être
effectuée à partir du convertisseur lui-même.
4 Activez le positionnement sur la bande selon
la durée de visionnement
Pressez la commande d’avance rapide (F.FWD/B) ou
de rembobinage (REW/s).
Le téléviseur/magnétoscope ira se positionner au
point spécifique que vous avez identifié. La durée de
visionnement "sautée" indiquée à l’écran diminue à
mesure que l’appareil s’approche du point désiré.
Lorsque la durée de visionnement est écoulée (0 :00),
l’appareil entame automatiquement la lecture de la
bande à partir du point où il se trouve.
POUR CESSER LE MODE DE RECHERCHE
SUR LA BANDE SELON LA DURÉE DE
VISIONNEMENT À CE STADE-CI.
Pressez la commande d’arrêt/éjection (STOP/EJECT)
sur le téléviseur/magnétoscope ou sur la
télécommande. Cela effacera la durée de
visionnement programmée en mémoire.
2 Sélection de la vitesse de défilement de la
bande
Sélectionnez la vitesse de
défilement qui convient (SP, SLP)
en pressant le commande de vitesse
de défilement (SPEED).
3 Début de l’enregistrement
Entamez l’enregistrement en
pressant la commande
d’enregistrement (RECORD). Le
voyant d’enregistrement (REC)
apparaîtra momentanément à
l’écran pour confirmer que
l’opération est en cours.
4 Fin de l’enregistrement
Cessez l’enregistrement en pressant la commande
d’arrêt (STOP) une fois que vous avez terminé.
INTERRUPTION MOMENTANÉE DE
L’ENREGISTREMENT
Pressez la commande de pause/arrêt sur image
(PAUSE/STILL) lorsque vous désirez interrompre
momentanément l’enregistrement afin d’éviter
d’enregistrer du matériel indésiré. Pressez à nouveau
la commande de pause/arrêt sur
image (PAUSE/STILL) ou la
commande d’enregistrement
(RECORD) afin de poursuivre
l’enregistrement.
- 25 - FR
9J12
Page 58

VIDEO (VIDÉO)
IN(ENTRÉE)
OUT(SORTIE)
AUDIO
AUDIOVIDEO
REMARQUES :
ECS (2 : 3 0)
SP
Afin de protéger le ruban de la vidéocassette, le
•
téléviseur/magnétoscope ne reste pas en mode de
pause pendant plus de 5 minutes. Lorsque ces 5
minutes se sont écoulées, l’appareil reprend
l’enregistrement afin d’éviter que ruban soit abîmé.
Si le mode d’affichage de sous-titres est activé S-
•
TITRES [EF], l’affichage apparaîtra à l’écran
pendant 5 secondes puis disparaîtra.
ENREGISTREMENT EXPRESS À
UNE SEULE TOUCHE (OTR)
Cette fonction vous permet de programmer la durée
d’un enregistrement d’une simple pression de la
commande d’enregistrement express à une seule touche
(REC/OTR) se trouvant sur le téléviseur/magnétoscope.
Vous devez presser l’interrupteur d’alimentation
•
(POWER) afin de mettre le téléviseur/magnétoscope
en circuit pour effectuer les opérations suivantes.
Introduisez dans le téléviseur/magnétoscope une
•
vidéocassette dont la languette de protection est
toujours en place. Au besoin, faites avancer la
bande ou rembobinez-la afin de positionner
l’appareil au point précis sur la bande où vous
désirez que l’enregistrement débute.
REMARQUES :
Il est impossible de commander un enregistrement
•
express (OTR) à partir de la télécommande. Utilisez
les commandes situées sur le téléviseur/magnétoscope.
Le téléviseur/magnétoscope entame
•
l’enregistrement dès que la commande
d’enregistrement express (REC/OTR) est pressée.
Si vous pressez la commande d’enregistrement
•
express (REC/OTR) à 18 reprises, le
téléviseur/magnétoscope retournera au mode
d’enregistrement régulier.
Si vous désirez arrêter l’enregistrement express,
•
pressez la commande d’arrêt (STOP) sur la
télécommande ou sur le téléviseur/magnétoscope.
Pendant l’enregistrement express, vous pouvez
•
presser la commande d’affichage (DISPLAY) sur
la télécommande afin que les lettres "ECS" et la
durée d’enregistrement restant à faire apparaissent
à l’écran du téléviseur. Cet affichage ne durera que
quelques secondes.
L’enregistrement cesse lorsque la minuterie atteint 0:00.
•
A la vitesse de défilement SLP, la durée maximale
•
d’enregistrement pour une cassette de type T-160
est de 8 heures, à condition que l’enregistrement ait
commencé au début de la bande (ou 6 heures pour
les cassettes de type T-120).
Si le téléviseur/magnétoscope atteint la fin de la
•
vidéocassette utilisée avant que l’enregistrement
express soit terminé, il s’arrêtera automatiquement,
éjectera la vidéocassette et se mettra hors circuit de
lui-même.
Si vous pressez l'interrupteur d'alimentation
•
pendant un enregistrement express (OTR), le
téléviseur/magnétoscope continue l'enregistrement
jusqu'à ce que la durée sélectionnée soit atteinte
1 Sélectionnez le canal diffusant l’émission que
Pressez les touches numériques sur la télécommande
vous désirez enregistrer
ou utilisez les touches des canaux (CH K / L).
Remarque : Si le téléviseur/magnétoscope est
directement raccordé à un convertisseur du câble ou
de l’antenne parabolique, il doit syntoniser le même
canal que le sélecteur CH3/CH4 du convertisseur
(soit le canal 3 ou 4), la sélection du canal à partir
duquel on effectue l’enregistrement doit ensuite être
effectuée à partir du convertisseur lui-même.
2 Sélectionnez la vitesse de défilement de la
bande.
Appuyez sur la commande de vitesse de défilement
(SPEED) pour choisir la vitesse de défilement
souhaitée: SP (vitesse normale)/SLP (super-longue
durée).
3 Entamez l’enregistrement express
Pressez la commande
d’enregistrement express
(REC/OTR) le nombre de fois
nécessaire. La durée de
l’enregistrement sera déterminée par
le nombre de fois que vous presserez
la commande d’enregistrement express (REC/OTR).
Chaque pression sur la commande d’enregistrement
express (REC/OTR) allonge la durée
d’enregistrement de 30 minutes (jusqu’à un
maximum de 8 heures ou la fin de la bande).
PRESSION(S)
1 pression (mode régulier d’enregistrement)
2 pressions 0:30 30 minutes
3 pressions 1:00 60 minutes
↓↓ ↓
17 pressions 8:00 480 minutes
AFFICHAGE
DURÉE
D’ENREGISTREMENT
COPIES DE VIDÉOCASSETTES
(nécessite l’emploi d’un second
magnétoscope ou d’un caméscope)
Cet appareil vous permet de copier des vidéocassettes
afin de les échanger avec vos amis et les membres de
votre famille.
AVERTISSEMENT : le doublage des
vidéocassettes dont le contenu est protégé
par les droits d’auteurs est illégal en vertu
de la loi sur les droits d’auteurs.
Raccordez votre téléviseur/magnétoscope (effectuant
l’enregistrement) et le magnétoscope source
(effectuant la lecture) tel qu’illustré ci-dessous.
Téléviseur/magnétoscope
(effectuant l’enregistrement)
[Ex.: Source d’un magnétoscope
de lecture ou d’un caméscope]
Câbles audio/vidéo
(non compris)
- 26 - FR
9J12
Page 59

1) Introduisez une vidéocassette préenregistrée dans
9:00AM 10:00AM 12:00PM
Programmation 1
(10:00 AM à 11:00 AM)
Période d’enregistrement
Programmation 2
(9:00 AM à 10:00 AM)
Programmation 3
(9:30 AM à 12:00 PM)
11:00AM
La zone foncée indique l’enregistrement effectué.
– M E N U –
PROG. EN DIFFÉRÉ
RÉGLAGE DE L’ IMAGE
RÉGLAGE DE L’ HORLOGE
RÉGLAGE DES CANAUX
RÉGLAGES DE L’ USAGER
RÉGLAGE CIRCUIT V
LANGAGE [FRANÇAIS]
S-TITRES [HF]
REMISE À ZÉRO
RECH. CHRONOMÉTRQUE
la source du magnétoscope de lecture ou du
caméscope.
2) Insérez une vidéocassette vierge (ou une
vidéocassette sur laquelle vous pouvez effectuer
un second enregistrement) dans le
téléviseur/magnétoscope (effectuant
l’enregistrement).
3) Pressez la commande de vitesse de défilement
(TAPE SPEED) sur le téléviseur/magnétoscope
afin de sélectionner la vitesse désirée (SP/SLP).
4) Pressez les commandes des canaux (CH K / L) à
plusieurs reprises jusqu’à ce que l’abréviation
" AUX " (pour composante auxiliaire) apparaisse à
l’écran du téléviseur/magnétoscope.
FONCTIONNEMENT DE LA MINUTERIE
5) Pressez la commande d’enregistrement
(RECORD) du téléviseur/magnétoscope
(effectuant l’enregistrement).
6) Commencez la lecture de la bande à partir de la
source du magnétoscope de lecture ou du
caméscope.
REMARQUE : Afin d’obtenir de meilleurs résultats
lors du doublage, utilisez autant que possible les
commandes situées sur le téléviseur/magnétoscope
(et non celles sur les télécommandes). Il se peut que
les télécommandes affectent le fonctionnement du
magnétoscope de lecture, source du signal vidéo à
doubler.
ENREGISTREMENT PAR LA
MINUTERIE
Vous pouvez programmer le téléviseur/magnétoscope
pour qu’il entame et termine un enregistrement
pendant votre absence. Vous pouvez programmer
l’enregistrement de 8 émissions différentes diffusées
une journée précise, quotidiennement ou de façon
hebdomadaire sur une période d’un an.
Dans l’exemple suivant, nous allons programmer la
minuterie pour effectuer un enregistrement :
DATE : 4 juillet 2003
HEURES : de 7 :30 PM à 8 :50 PM
CANAL : 61
VITESSE DE DÉFILEMENT : SP
Assurez-vous de faire ce qui suit...
Si le téléviseur/magnétoscope est directement
•
raccordé à un convertisseur du câble ou de
l’antenne parabolique, vous ne pourrez effectuer
l’enregistrement qu’à partir d’un seul et unique
canal.
De plus, le téléviseur/magnétoscope doit syntoniser
le même canal que le sélecteur CH3/CH4 du
convertisseur (soit le canal 3 ou 4) et la sélection
du canal à partir duquel on effectue
l’enregistrement doit ensuite être effectuée à partir
du convertisseur lui-même.
L’horloge doit être réglée correctement (heure et
•
date) pour que vous puissiez programmer un
enregistrement par la minuterie.
Le téléviseur/magnétoscope doit être mis en circuit
•
pour que vous puissiez programmer un
enregistrement par la minuterie.
Introduisez dans le téléviseur/magnétoscope une
•
vidéocassette dont la languette de protection est
toujours en place. Au besoin, faites avancer la
bande ou rembobinez-la afin de positionner
l’appareil au point précis sur la bande où vous
désirez que l’enregistrement débute.
Assurez-vous que le canal à partir duquel vous
•
désirez effectuer un enregistrement par la minuterie
soit bien bel et bien programmé dans la mémoire
du syntonisateur du téléviseur/magnétoscope.
(consultez la page 13 à ce sujet)
Évitez les chevauchements dans la programmation...
Dans certains cas, une programmation ne pourra être
enregistrée s’il y a un chevauchement des
programmations.
Lorsque plusieurs programmations d’enregistrement
•
par la minuterie se chevauchent, la programmation
dont l’heure de déclenchement est la première dans
l’ordre chronologique a la priorité.
Lorsque la première programmation
•
d’enregistrement par la minuterie est terminée et
que plus d’une programmation se chevauchent,
l’appareil sélectionne la programmation ayant le
numéro d’identification le moins élevé.
Si les programmations d’enregistrement en
•
mémoire sont telles qu’illustrées ci-dessous,
l’enregistrement sera effectué de la façon suivante
(les zones grises correspondant aux
enregistrements effectués).
Programmation 1 (10:00 AM à 11:00 AM)
Programmation 2 (9:00 AM à 10:00 AM)
Programmation 3 (9:30 AM à 12:00 PM)
1 Sélectionnez le menu PROG. EN DIFFÉRÉ
Pressez la commande MENU de la
télécommande.
Pressez la commande de lecture
(PLAY/K) à plusieurs reprises
jusqu’à ce que la flèche pointe les
mots PROG. EN DIFFÉRÉ à l’écran.
Puis pressez la commande d’avance rapide (F.FWD/B).
Si vous n’avez toujours mis l’horloge de l’appareil
•
à l’heure, les mots RÉGLAGE MANUEL
HORLOGE apparaîtront à l’écran. Dans ce cas,
suivez les directives données aux étapes 3 à 8 de la
page 14 du présent manuel afin de mettre l’horloge
à l’heure.
Vous pourrez ensuite programmer un
enregistrement par minuterie.
- 27 - FR
9J12
Page 60

2 Sélectionnez la position de la programmation
– PROG. EN DIFFÉRÉ –
CH DATE DÉBUT FIN
- - -/- - - - - -:- - -:- - - -
- - -/- - - - - -:- - -:- - - -
- - -/- - - - - -:- - -:- - - -
- - -/- - - - - -:- - -:- - - -
- - -/- - - - - -:- - -:- - - -
- - -/- - - - - -:- - -:- - - -
- - -/- - - - - -:- - -:- - - -
- - -/- - - - - -:- - -:- - - -
– PROG. EN DIFFÉRÉ –
CH DATE DÉBUT FIN
- - -/- - - - - -:- - -:- - - -
- - -/- - - - - -:- - -:- - - -
- - -/- - - - - -:- - -:- - - 61
-/- - - - - -:- - -:- - - -
- - -/- - - - - -:- - -:- - - -
- - -/- - - - - -:- - -:- - - -
- - -/- - - - - -:- - -:- - - -
- - -/- - - - - -:- - -:- - - -
– PROG. EN DIFFÉRÉ –
CH DATE DÉBUT FIN
- - -/- - - - - -:- - -:- - - -
- - -/- - - - - -:- - -:- - - -
- - -/- - - - - -:- - -:- - - 61 7/04 VEN
-:- - -:- - - -
- - -/- - - - - -:- - -:- - - -
- - -/- - - - - -:- - -:- - - -
- - -/- - - - - -:- - -:- - - -
- - -/- - - - - -:- - -:- - - -
– PROG. EN DIFFÉRÉ –
CH DATE DÉBUT FIN
- - -/- - - - - -:- - -:- - - -
- - -/- - - - - -:- - -:- - - -
- - -/- - - - - -:- - -:- - - 61
TOUS
JR
-:- - -:- - - -
- - -/- - - - - -:- - -:- - - -
- - -/- - - - - -:- - -:- - - -
- - -/- - - - - -:- - -:- - - -
- - -/- - - - - -:- - -:- - - -
– PROG. EN DIFFÉRÉ –
CH DATE DÉBUT FIN
- - -/- - - - - -:- - -:- - - -
- - -/- - - - - -:- - -:- - - -
- - -/- - - - - -:- - -:- - - 61
TOUS
LUN
-:- - -:- - - -
- - -/- - - - - -:- - -:- - - -
- - -/- - - - - -:- - -:- - - -
- - -/- - - - - -:- - -:- - - -
- - -/- - - - - -:- - -:- - - -
– PROG. EN DIFFÉRÉ –
CH DATE DÉBUT FIN
- - -/- - - - - -:- - -:- - - -
- - -/- - - - - -:- - -:- - - -
- - -/- - - - - -:- - -:- - - 61 7/04 VEN 7:12 -:- - - -
- - -/- - - - - -:- - -:- - - -
- - -/- - - - - -:- - -:- - - -
- - -/- - - - - -:- - -:- - - -
- - -/- - - - - -:- - -:- - - -
P
M
– PROG. EN DIFFÉRÉ –
CH DATE DÉBUT FIN
- - -/- - - - - -:- - -:- - - -
- - -/- - - - - -:- - -:- - - -
- - -/- - - - - -:- - -:- - - 61 7/04
VEN 7:30 -:- - - -
- - -/- - - - - -:- - -:- - - -
- - -/- - - - - -:- - -:- - - -
- - -/- - - - - -:- - -:- - - -
- - -/- - - - - -:- - -:- - - -
P
M
– PROG. EN DIFFÉRÉ –
CH DATE DÉBUT FIN
- - -/- - - - - -:- - -:- - - -
- - -/- - - - - -:- - -:- - - -
- - -/- - - - - -:- - -:- - - 61
7/04
VEN 7:30 8:30
- -
- - -/- - - - - -:- - -:- - - -
- - -/- - - - - -:- - -:- - - -
- - -/- - - - - -:- - -:- - - -
- - -/- - - - - -:- - -:- - - -
PMP
M
– PROG. EN DIFFÉRÉ –
CH DATE DÉBUT FIN
- - -/- - - - - -:- - -:- - - -
- - -/- - - - - -:- - -:- - - -
- - -/- - - - - -:- - -:- - - 61 7/04 VEN 7:30 8:50
- -
- - -/- - - - - -:- - -:- - - -
- - -/- - - - - -:- - -:- - - -
- - -/- - - - - -:- - -:- - - -
- - -/- - - - - -:- - -:- - - -
PMP
M
– PROG. EN DIFFÉRÉ –
CH DATE DÉBUT FIN
- - -/- - - - - -:- - -:- - - -
- - -/- - - - - -:- - -:- - - -
- - -/- - - - - -:- - -:- - - 61
7/04
VEN 7:30 8:50
SP
- - -/- - - - - -:- - -:- - - -
- - -/- - - - - -:- - -:- - - -
- - -/- - - - - -:- - -:- - - -
- - -/- - - - - -:- - -:- - - -
PMP
M
désirée (1 à 8).
Appuyez sur la commande
PLAY/K (lecture) ou STOP/L
(arrêt) à plusieur reprises jusqu’à
ce que la flèche pointe la position
de la programmation désirée.
Puis pressez la commande d’avance rapide (F.FWD/B).
3 Sélectionnez le canal diffusant l’émission que
vous désirez enregistrer
Pressez la commande de lecture
(PLAY/K) ou d’arrêt (STOP/L) à
plusieurs reprises jusqu’à ce que
le numéro du canal diffusant
l’émission que vous désirez
enregistrer apparaisse à l’écran du téléviseur (par
exemple ici, on sélectionne le canal 61).
Puis pressez la commande d’avance rapide (F.FWD/B).
Remarque : Si le téléviseur/magnétoscope est
directement raccordé à un convertisseur du câble ou à
une antenne parabolique, il doit syntoniser le même
canal que le sélecteur CH3/CH4 du convertisseur
(soit le canal 3 ou 4), la sélection du canal à partir
duquel on effectue l’enregistrement doit ensuite être
effectuée à partir du convertisseur lui-même.
4
Sélectionnez le type d’enregistrement : unique,
quotidien ou hebdomadaire
Pour l’enregistrement unique :
Pressez la commande de lecture
(PLAY/K) plusieurs fois
jusqu’à ce que la date désirée
apparaisse à l’écran (par
exemple ici, on sélectionne 7/04, soit le 4 juillet).
Puis pressez la commande d’avance rapide (F.FWD/B).
Pour l’enregistrement quotidien : ce mode vous
permet d’enregistrer une émission diffusée chaque
jour, sur le même canal et à la même heure (par
exemple: du lundi au dimanche).
Pressez la commande d’arrêt
(STOP/L) à plusieurs reprises
jusqu’à ce que les mots TOUS
JR(JOUR) apparaissent à
l’écran.
Puis pressez la commande d’avance rapide (F.FWD/B).
Pour l’enregistrement hebdomadaire: ce mode vous
permet d’enregistrer une émission diffusée chaque
semaine, sur le même canal et à la même heure (par
exemple : tous les lundis).
Pressez la commande d’arrêt
(STOP/L) à plusieurs reprises
jusqu’à ce que le mot TOUR et
le jour (de la semaine)
approprié apparaissent à l’écran.
Puis pressez la commande d’avance rapide (F.FWD/B).
5 Sélectionnez l’heure à laquelle
l’enregistrement doit débuter
Pressez la commande de lecture
(PLAY/K) ou d’arrêt (STOP/L) à
plusieurs reprises jusqu’à ce que
l’heure à laquelle vous désirez que
l’enregistrement débute apparaisse
à l’écran du téléviseur (par
exemple ici, on sélectionne 7 heures du soir = 7,
PM).
Puis pressez la commande d’avance rapide (F.FWD/B).
6 Sélectionnez les minutes dans l’heure à
laquelle l’enregistrement doit débuter
Pressez la commande de lecture
(PLAY/K) ou d’arrêt (STOP/L) à
plusieurs reprises jusqu’à ce que le
nombre de minutes correspondant
à l’heure précise à laquelle vous
désirez que l’enregistrement débute
apparaisse à l’écran du téléviseur (par exemple ici,
on sélectionne 30 minutes = 30).
Puis pressez la commande d’avance rapide (F.FWD/B).
7 Sélectionnez l’heure à laquelle
l’enregistrement doit se terminer
Pressez la commande de lecture
(PLAY/K) ou d’arrêt (STOP/L) à
plusieurs reprises jusqu’à ce que
l’heure à laquelle vous désirez que
l’enregistrement se termine
apparaisse à l’écran du téléviseur
(par exemple ici, on sélectionne 8 heures du soir = 8,
PM).
Puis pressez la commande d’avance rapide (F.FWD/B).
8 Sélectionnez les minutes dans l’heure à
laquelle l’enregistrement doit se terminer
Pressez la commande de lecture
(PLAY/K) ou d’arrêt (STOP/L) à
plusieurs reprises jusqu’à ce que le
nombre de minutes correspondant
à l’heure précise à laquelle vous
désirez que l’enregistrement se
termine apparaisse à l’écran du téléviseur (par
exemple ici, on sélectionne 50 minutes = 50). Puis
pressez la commande d’avance rapide (F.FWD/B).
9 Sélectionnez la vitesse de défilement de la
bande lors de l’enregistrement
Pressez la commande de lecture
(PLAY/K) ou d’arrêt (STOP/L) à
plusieurs reprises jusqu’à ce que
les lettres correspondant à la
vitesse de défilement désirée
apparaissent à l’écran du téléviseur
(par exemple ici, on sélectionne la vitesse SP).
- 28 - FR
9J12
Page 61

10 Quittez le mode de programmation
Appuyez sur la touche F.FWD/B (avance rapide) ou
REW/s (rembobinage). La programmation est
maintenant achevée.
Pour programmer un autre enregistrement par
•
la minuterie, répétez les directives données aux
étapes 2 à 10.
Appuyez sur la touche MENU de la télécommande
•
pour revenir au mode initial.
11 Réglez la minuterie.
Pressez l’interrupteur d’alimentation (POWER). Le
voyant d’enregistrement (REC) s’allumera.
Vous devez mettre le téléviseur/magnétoscope hors
•
circuit afin d’activer la fonction d’enregistrement
par la minuterie.
Si vous n’éteignez pas l’appareil et continuez de
visionner une émission télévisée, les mots MISE
EN ATT. MINUTERIE se mettront à clignoter à
l’écran du téléviseur deux minutes avant l’heure à
laquelle l’enregistrement a été programmé pour
débuter.
EXTENSION DU PROGRAMME DE
LA MINUTERIE
Pour commuter l’heure programmée de la fonction
d’enregistrement par la minuterie.
1) Appuyez sur l’interrupteur d’alimentation
POWER.
2)
Répétez les directives données à l’étape 1 à la page 27.
3) Appuyez sur la commande d’enregistrement
(REC) puis sélectionnez la programmation désirée
en utilisant la commande de lecture (PLAY/K) ou
d’arrêt (STOP/L).
4) Appuyez sur la commande d’enregistrement
(REC) à nouveau.
Chaque pression supplémentaire fera avancer
l’heure de démarrage/fin de l’enregistrement de 10
minutes. Lorsque l’enregistrement est déjà en
cours, chaque pression supplémentaire fera
avancer seulement l’heure de fin. Si vous désirez
annuler pendant le réglage, appuyez sur la
commande de pause/arrêt sur image de la
télécommande. L’heure d’enregistrement retourne
à l’heure initiale.
REMARQUE: Lorsque vous commutez l’horaire
vers l’avant pendant l’enregistrement, la vitesse
d’enregistrement sera automatiquement réglée sur le
mode SLP (super-longue durée).
5) Appuyez sur la commande d’avance rapide
(F.FWD/B) ou de rembobinage (REW/s) pour
sortir du menu de réglage. Ensuite, appuyez sur la
touche MENU de la télécommande pour revenir
au mode initial.
CHANGEMENT DE LA PROGRAMMATION
D’ENREGISTREMENT PAR LA
MINUTERIE
Pendant les étapes de la programmation d’un
•
enregistrement par la minuterie, pressez la
commande de rembobinage (REW/s) si vous
désirez revenir sur une étape précédente de la
démarche de programmation de l’appareil et
programmez les paramètres numériques qui
conviennent en utilisant la commande de lecture
(PLAY/K) ou d’arrêt (STOP/L).
Une fois que la programmation a été complétée :
•
1) Pressez l’interrupteur d’alimentation (POWER) du
téléviseur/magnétoscope.
2) Répétez les étapes 1 et 2 à la page 27.
3) Pressez la commande d’avance rapide (F.FWD/B)
(ou de rembobinage (REW/s))afin de faire défiler
tour à tour les paramètres de l’enregistrement par
minuterie à l’écran du téléviseur/magnétoscope et
effectuer les changements désirés en pressant la
commande de lecture (PLAY/K) ou d’arrêt
(STOP/L).
4) Pressez l’interrupteur d’alimentation (POWER) du
téléviseur/magnétoscope afin d’activer la fonction
d’enregistrement par la minuterie.
ANNULATION D’UNE PROGRAMMATION
D’ENREGISTREMENT PAR LA MINUTERIE
Une fois la programmation terminée :
•
1) Pressez l’interrupteur d’alimentation (POWER) du
téléviseur/magnétoscope.
2) Répétez les étapes 1 et 2 à la page 27 et
sélectionnez la programmation que vous souhaitez
annuler.
3) Pressez la commande d’annulation d’un
enregistrement par la minuterie (T. PROG
CLEAR).
4) Appuyez sur la touche MENU de la télécommande
pour revenir au mode TV.
Pendant que l’enregistrement par la minuterie
•
est en cours :
1) Pressez l’interrupteur d’alimentation (POWER) du
téléviseur/magnétoscope.
2) Pressez la commande d’arrêt/éjection
(STOP/EJECT) se trouvant sur le
téléviseur/magnétoscope.
VÉRIFICATION DE L’HEURE À LAQUELLE
DOIT DÉBUTER ET SE TERMINER UN
ENREGISTREMENT PAR LA MINUTERIE
1) Pressez l’interrupteur d’alimentation (POWER)
pour éteindre le voyant d’enregistrement (REC).
2) Pressez la commande MENU de la télécommande.
3) Assurez-vous que la flèche pointe les mots PROG.
EN DIFFÉRÉ à l’écran.
4) Pressez la commande d’avance rapide (F.FWD/B)
afin de faire défiler tour à tour les paramètres de
l’enregistrement par minuterie à l’écran du
téléviseur/magnétoscope.
5) Appuyez sur la touche MENU de la télécommande
pour revenir au mode TV.
CONSEILS AU SUJET DE
L’ENREGISTREMENT PAR LA
MINUTERIE
Veillez à ce que le canal diffusant l’émission à
enregistrer soit correctement programmé dans la
mémoire du syntonisateur du
téléviseur/magnétoscope.
- 29 - FR
9J12
Page 62

Il n’est pas nécessaire de presser la commande
– M E N U –
PROG. EN DIFFÉRÉ
RÉGLAGE DE L’ IMAGE
RÉGLAGE DE L’ HORLOGE
RÉGLAGE DES CANAUX
RÉGLAGES DE L’ USAGER
RÉGLAGE CIRCUIT V
LANGAGE [FRANÇAIS]
S-TITRES [HF]
REMISE À ZÉRO
RECH. CHRONOMÉTRQUE
–
RÉGLAGES DE L’ USAGER
–
LOCATION
[HF]
LECT. RÉPÉTÉE [HF]
RETOUR AUTO.
[EF]
MINUTERIE
EF/HF
[EF]
RÉVEIL
TV/CASS [TV]
HEURE
[12:00AM]
•
d’enregistrement (RECORD) pour effectuer un
enregistrement par la minuterie.
Les enregistrements par la minuterie commencent
•
automatiquement à l’heure pour laquelle ils ont été
programmés pour débuter.
Lorsque vous effectuez un enregistrement par la
•
minuterie, vous ne pouvez pas utiliser les
commandes de l’appareil, à moins d’annuler celuici en suivant les directives données à la section
intitulée "Annulation d’une programmation par la
minuterie" à la page précédente.
La languette de protection contre les
•
enregistrements accidentels doit être intacte (ou
l’orifice doit être couvert de ruban).
Une vidéocassette n’ayant pas de languette de
•
protection sera automatiquement éjectée de
l’appareil dès qu’il sera mis hors circuit.
Si le téléviseur/magnétoscope atteint la fin de la
•
bande de la vidéocassette utilisée avant la fin de
l’enregistrement, il s’arrêtera automatiquement et
la vidéocassette sera éjectée.
Grâce à cette fonction, vous pourrez positionner
l’appareil précisément au début de chaque
enregistrement par la minuterie effectué sur la bande
d’une vidéocassette.
1 Sélectionnez le menu approprié
Pressez la commande MENU de la télécommande.
Sélectionnez le paramètre RÉGLAGES DE
L’USAGER en pressant plusieurs
fois la commande de lecture
(PLAY/K) ou d’arrêt (STOP/L)
jusqu’à ce que la flèche pointe les
mots RÉGLAGES DE L’USAGER
à l’écran.
Puis pressez la commande d’avance
rapide (F.FWD/B).
2 Activez la fonction de retour automatique au
Pressez la commande de lecture (PLAY/K) ou d’arrêt
(STOP/L) plusieurs fois afin que la flèche pointe les
mots RETOUR AUTO. Puis
activez la fonction de retour
automatique au début de
l’enregistrement par la minuterie
(RETOUR AUTO.) en pressant la
commande d’avance rapide
(F.FWD/B) ou de rembobinage (REW/s) jusqu’à ce
que le mot [EF (En Fonction)] apparaisse à l’écran à
côté des mots RETOUR AUTO.
RETOUR AUTOMATIQUE
début de l’enregistrement par la minuterie
3 Le retour automatique au début des
enregistrements par la minuterie commence
Une fois que tous les enregistrements par la minuterie
programmés ont été effectués, le
téléviseur/magnétoscope rebobinera la bande
jusqu’au début des enregistrements.
REMARQUE :
Si vous pressez l’interrupteur d’alimentation
•
(POWER) pendant que l’appareil effectue le retour
automatique, l’opération sera interrompue.
4 Regardez vos enregistrements
Pour visionner les enregistrements effectués, pressez
la commande de lecture (PLAY).
ANNULATION DE LAFONCTION DE
RETOUR AUTOMATIQUE
Répétez les directives données aux étapes 1 et 2 puis,
désactivez la fonction de retour automatique en
pressant la commande d’avance rapide (F.FWD/B)
ou de rembobinage (REW/s) jusqu’à ce que le mot
[HF (Hors Fonction)] apparaisse à l’écran à côté des
mots RETOUR AUTO.
Si une interruption de l’alimentation électrique de
l’appareil survient (panne ou débranchement), ce
dernier conservera en mémoire la sélection de la
fonction de retour automatique.
MISE EN CIRCUIT AUTOMATIQUE
Cette fonction vous permet de programmer à
l’avance la mise en fonction automatique du
téléviseur/magnétoscope sans que vous ayez à presser
l’interrupteur d’alimentation.
REMARQUES :
Vous devez utiliser la télécommande pour
•
effectuer les opérations suivantes.
L’horloge du téléviseur/magnétoscope doit être mis
•
à l’heure pour que vous puissiez utiliser cette
fonction.
Si vous souhaitez utiliser le magnétoscope, il vous
•
faudra mettre une vidéocassette dans l’appareil.
Ainsi, la composante magnétoscope de votre
téléviseur/magnétoscope se mettra
automatiquement à faire la lecture de la
vidéocassette à l’heure où vous aurez programmé
la mise en circuit automatique de l’appareil.
1 Activez la fonction MINUTERIE RÉVEIL
Pressez la commande de mise en
circuit automatique/minuteriesommeil (WAKE UP/SLEEP) de la
télécommande une fois, et vérifiez
que les mots “EF/HF” sont
pointés.
Pressez la commande d’avance rapide (F.FWD/B)
ou de rembobinage (REW/s) jusqu’à ce que le mot
[EF] apparaisse à l’écran.
- 30 - FR
9J12
Page 63

2 Sélectionnez la composante qui se mettra en
MINUTERIE
EF/HF
[EF]
RÉVEIL
TV/CASS [TV]
HEURE
[12:00AM]
MINUTERIE
EF/HF
[EF]
RÉVEIL
TV/CASS [TV]
HEURE
[12:00AM]
MINUTERIE
SOMMEIL [2:00]
marche ; le téléviseur (TV) ou le magnétoscope
(CASS)
Pressez la commande de lecture
(PLAY/K) ou d’arrêt (STOP/L)
plusieurs fois jusqu’à ce que la
flèche pointe sur les mots
TV/CASS. Pressez la commande
d’avance rapide (F.FWD/B) ou de rembobinage
(REW/s) afin de sélectionner la composante qui
fonctionnera lorsque l’appareil se mettra en circuit
automatiquement ; le téléviseur [TV] ou le
magnétoscope [CASS].
3 Programmez la durée de temps qui doit
s’écouler avant la mise en circuit automatique
de l’appareil
Pressez la commande de lecture
(PLAY/K) ou d’arrêt (STOP/L)
plusieurs fois jusqu’à ce que la
flèche pointe le mot HEURE à
l’écran.
Pressez la commande d’avance rapide (F.FWD/B) ou
de rembobinage (REW/s) le nombre de fois
correspondant à la durée de temps qui doit s’écouler
avant que l’appareil ne se mette en marche apparaisse
à l’écran.
Chaque pression de ces touches ajoute (ou enlève)
dix minutes à durée programmée.
4 Quittez le mode de programmation de la mise
en circuit automatique
Appuyez sur la touche MENU de la télécommande
pour revenir au mode TV.
MINUTERIE-SOMMEIL
La minuterie-sommeil vous permet de programmer à
l’avance l’heure à laquelle le
téléviseur/magnétoscope se mettra hors circuit de luimême sans que vous ayez à presser l’interrupteur
d’alimentation (POWER).
REMARQUE :
Cette ne peut être utilisée lorsque l’appareil est en
•
mode d’enregistrement.
1 Mettez la minuterie-sommeil en fonction
Pressez la commande de mise en circuit
automatique/minuterie-sommeil (WAKE UP/SLEEP)
située sur la télécommande jusqu’à ce que les mots
MINUTERIE-SOMMEIL apparaissent à l’écran.
2 Programmez la durée de temps qui doit
s’écouler avant la mise hors circuit
automatique de l’appareil
Pressez la commande de lecture
(PLAY/K), la commande d’arrêt
(STOP/L), la commande d’avance
rapide, (F.FWD/B) ou la
commande de rembobinage
(REW/s) jusqu’à ce que la durée de temps qui doit
s’écouler avant que l’appareil s’éteigne de lui-même
apparaisse à l’écran.
Chaque pression d’une de ces commandes augmente
la durée de 30 minutes. La durée maximale pendant
laquelle l’appareil peut fonctionner avant de
s’éteindre de lui-même est de 120 minutes.
Pressez la commande MENU de la télécommande
pour quitter le réglage de la minuterie-sommeil.
ANNULATION DE LAFONCTION DE
MISE EN CIRCUIT AUTOMATIQUE
Répétez les directives données à l’étape 1 et pressez
la commande d’avance rapide (F.FWD/B) ou de
rembobinage (REW/s) jusqu’à ce que le mot [HF
(Hors Fonction)] apparaisse à l’écran.
ANNULATION DE LAFONCTION DE
MISE HORS CIRCUIT AUTOMATIQUE
Pressez la commande de mise en circuit
automatique/minuterie-sommeil (WAKE UP/SLEEP)
située sur la télécommande jusqu’à ce que les mots
MINUTERIE-SOMMEIL apparaissent à l’écran et
pressez la commande de lecture (PLAY/K), la
commande d’arrêt (STOP/L), la commande d’avance
rapide, (F.FWD/B) ou la commande de rembobinage
(REW/s) jusqu’à ce que le mot [HF (Hors
Fonction)] apparaisse à l’écran.
Pour voir le temps restant de la minuterie-sommeil,
•
pressez la commande de mise en circuit
automatique/minuterie-sommeil (WAKE UP/SLEEP)
située sur la télécommande jusqu’à ce que les mots
MINUTERIE-SOMMEIL apparaissent à l’écran
Pressez la commande MENU de la télécommande
pour quitter le réglage de la minuterie-sommeil.
- 31 - FR
9J12
Page 64

ENTRETIEN
NETTOYAGE DU BOÎTIER EXTÉRIEUR
Essuyez le panneau frontal et les autres surfaces
•
externes avec un tissu doux trempé dans de l’eau
tiède et essorez- le bien.
N’utilisez jamais de solvant ou de l’alcool. Ne
•
vaporisez pas un insecticide liquide à proximité de
l’appareil. De tels produits chimiques risquent
d’endommager et de décolorer les surfaces
exposées.
NETTOYAGE AUTOMATIQUE DES
TÊTES
Pour une image claire et nete, les têtes vidéo sont
•
automatiquement nettoyées lorsqu’une
vidéocassette est introduite ou retirée.
L’image visionnée risque d’être brouillée ou
•
interrompue alors que la réception d’un programme
télévisé est claire. La saleté accumulée sur les têtes
vidéo après de longues périodes d’utilisation, ou
l’utilisation de vidéocassettes de location ou usées
peut provoquer ce problème. Si des images
présentant des trainées horizontales ou un effet de
chute de neige apparaissent pendant la lecture, les
têtes vidéo de votre téléviseur/magnétoscope ont
sans doute besoin d’être nettoyées.
1.Achetez un nettoyeur de têtes vidéo VHS de bonne
qualité dans votre magasin Audio/Vidéo.
2.Toutefois, si cela ne résout pas le problème, nous
vous recommandons de consulter votre centre de
service autorisé le plus près avant d’aller plus loin.
Le nettoyage professionnel des têtes requiert une
grande expertise technique.
REMARQUES:
N’oubliez pas de lire les instructions jointes au
•
nettoyeur de têtes vidéo avant de l’utiliser.
Ne nettoyez les têtes vidéo que lorsqu’un problème
•
se présente.
RÉPARATION
Si le
téléviseur/magnétoscope
•
pas essayer de corriger le problème soi-même. Cet
appareil ne contient pas de pièces réparables par
l'utilisateur. Eteindre l'appareil, débrancher la fiche
d'alimentation et emporter l'appareil à un Centre de
service agréé.
devient inopérant, ne
- 32 - FR
9J12
Page 65

PROBLÈMES DE FONCTIONNEMENT
Si vous avez suivi les instructions contenues dans ce manuel et vous éprouvez toujours de la difficulté à faire
fonctionner l’appareil, consultez la colonne intitulée "PROBLÈMES" puis la ligne correspondante dans la
colonne intitulée "MESURES CORRECTIVES" afin de remédier au problème.
PROBLÈMES MESURES CORRECTIVES
Pas d’alimentation.
Pas d’image ni de reproduction sonore.•Assurez-vous que le cordon d’alimentation CA soit sur une prise
Pas d’image ou image de mauvaise •Ajustez l’orientation de l’antenne ou changez-la.
qualité à l’écran du téléviseur/
magnétoscope.
Pas de reproduction sonore ou
reproduction sonore de mauvaise
qualité.
Impossible d’effectuer un
enregistrement par minuterie.
Impossible de mettre l’appareil en
mode d’enregistrement.
Il y a des parasites dans l’image
lors du visionnement.
Pas d’image, seulement la
reproduction sonore lors de la
lecture d’une vidéocassette.
La télécommande ne fonctionne pas.•Assurez-vous que le cordon d’alimentation CA soit sur une prise
On perd l’image ou les couleurs
lorsqu’on tente de doubler une
vidéocassette.
Présence de marques de couleur
différentes à l'écran. altérer les couleurs du téléviseur. Eloignez le téléviseur/magnétoscope
Assurez-vous que le cordon d’alimentation CA soit sur une prise
•
murale de courant alternatif conventionnelle.
Le téléviseur/magnétoscope doit être hors circuit.
•
murale de courant alternatif conventionnelle.
Vérifiez si l’antenne est correctement raccordée à l’appareil.
•
Les canaux doivent être programmés dans la mémoire du
•
syntonisateur du téléviseur/magnétoscope.
Ajustez les paramètres de l’image.
•
Réglez la commande de volume à partir de l’appareil ou de la
•
télécommande.
•
Pressez la commande de suppression du son (MUTE) afin de
•
réactiver la reproduction sonore.
•
Vérifiez si la programmation de l’enregistrement par la minuterie a
•
été effectuée correctement.
•
L’appareil doit être hors circuit.
•
L’horloge du téléviseur/magnétoscope doit être correctement mise à
•
l’heure.
•
La vidéocassette doit être munie d’une languette de protection, si
•
celle-ci a été brisée, couvrez l’orifice sur la vidéocassette de ruban
•
adhésif.
•
Réglez la commande de dépistage en pressant les commandes des
•
canaux (CH K / L) situées sur le téléviseur/magnétoscope.
•
Un nettoyage des têtes est peut-être nécessaire. Se référer à la
•
section "NETTOYAGE AUTOMATIQUE DES TÊTES" à la
•
page 32.
•
murale de courant alternatif conventionnelle.
•
Vérifiez les piles de la télécommande, elles sont peut-être trop faibles.
•
Vous ne pouvez pas copier une vidéocassette dont les droits sont
•
réservés. Vous êtes en train de reproduire une vidéocassette
•
présentant un programme de protection de copie.
•
Les appareils environnants peuvent créer un champ magnétique et
•
de la proximité des appareils émettant des ondes magnétiques. Le
téléviseur/magnétoscope peut se réparer automatiquement. Si vous
désirez le réparer immédiatement, faites ce qui suit. Débranchez le
cordon d’alimentation du téléviseur/magnétoscope, puis rebranchez-le
environ 30 minutes plus tard.
- 33 - FR
9J12
Page 66

Canaux du câble
Affichage
du téléviseur
Canaux du câble
Affichage
du téléviseur
Canaux du câble
Affichage
du téléviseur
Canaux du câble
Affichage
du téléviseur
Canaux du câble
Affichage
du téléviseur
Canaux du câble
Affichage
du téléviseur
Canaux du câble
Affichage
du téléviseur
Canaux du câble
Affichage
du téléviseur
Canaux du câble
Affichage
du téléviseur
W+80 W+81 W+82 W+83 W+84
W+65 W+66 W+67 W+68 W+69 W+70 W+71 W+72 W+73 W+74 W+75 W+76 W+77 W+78 W+79
W+55 W+56 W+57 W+58 A-4 A-3 A-2 A-1 W+59 W+60 W+61 W+62 W+63 W+64
W+40 W+41 W+42 W+43 W+44 W+45 W+46 W+47 W+48 W+49 W+50 W+51 W+52 W+53 W+54
W+25 W+26 W+27 W+28 W+29 W+30 W+31 W+32 W+33 W+34 W+35 W+36 W+37 W+38 W+39
W+10 W+11 W+12 W+13 W+14 W+15 W+16 W+17 W+18 W+19 W+20 W+21 W+22 W+23 W+24
A-5
RSTUVWW+1 W+2 W+3 W+4 W+5 W+6 W+7 W+8 W+9
CDEFGHI JKLMNOPQ
5A 2 3 4 5 6 7 8 9 10 11 12 13 A B
123456789101112131415
16 17 18 19 20 21 22 23 24 25 26 27 28 29 30
31 32 33 34 35 36 37 38 39 40 41 42 43 44 45
46 47 48 49 50 51 52 53 54 55 56 57 58 59 60
61 62 63 64 65 66 67 68 69 70 71 72 73 74 75
76 77 78 79 80 81 82 83 84 85 86 87 88 89 90
91 92 93 94 95 96 97 98 99 100 101 102 103 104 105
106 107 108 109 110 111 112 113 114 115 116 117 118 119 120
121 122 123 124 125
PROBLÈMES AVEC
LES SOUS-TITRES
CAUSES POSSIBLES
Les sous-titres comportent des • Il se peut que l’émission télévisée que vous regardez en direct soit
fautes d’orthographe. • diffusée avec des sous-titres qui contiennent des erreurs. Les
• émissions enregistrées ne devraient pas comporter des fautes
• d’orthographe étant donné le temps disponible pour vérifier et
• corriger les sous-titres.
Les sous-titres sont incomplets ou •
apparaissent en retard sur le dialogue.
Il est normale que les sous-titres apparaissent avec quelques secondes
• de retard pour les émissions diffusées en direct. La plupart des
• compagnies oeuvrant dans ce domaine sont en mesure d’afficher 220
• mots à la minute. Si le dialogue est plus rapide, des coupures sont
• effectuées dans la transmission du dialogue afin que ce dernier suive
• l’action à l’écran.
Les sous-titres sont parsemés de • De l’interférence causé par l’édifice où se trouve l’appareil, les
blocs blancs. • réseaux électriques à proximité, les orages, etc. pourrait brouiller ou
• provoquer des coupures dans les sous-titres.
Selon l’horaire publié, l’émission • Il arrive souvent que les stations accélèrent le rythme de l’émission
que je regarde devrait être diffusée • afin de laisser plus de temps pour la diffusion de publicité. Étant
avec les sous-titres, et pourtant • donné que le décodeur de sous-titres ne peut déchiffrer de
aucun n’apparaît au bas de l’écran. • l’information "accélérée", les sous-titres n’apparaissent pas au bas de
• l’écran.
La vidéocassette que je visionne • Il s’agit peut-être d’une vidéocassette copiée illégalement, ou les
contient des sous-titres, pourtant • signaux comportant les sous-titres ont peut-être été coupés lors de la
ceux-ci n’apparaissent pas au bas de • copie légitime de la bande.
l’écran lorsque je visionne la bande.
Il y a un carré noir à l’écran lorsque • L’appareil est en mode d’affichage de texte (TEXT). Utilisez la
je syntonise certains canaux. • commande d’affichage (DISPLAY) afin de mettre la fonction
• d’affichage des sous-titres (S-TITRES) hors circuit [HF (Hors
• Fonction)].
CORRESPONDANCES DES CANAUX DU CÂBLE
Si vous êtes abonné à un service de câblodistribution des stations de télévision, cet appareil vous permettra de
recevoir 125 canaux. Les différentes compagnies de câblodistribution désignent souvent d’autres canaux avec des
lettres ou des combinaisons lettre-numéro. Veuillez contacter votre câblodistributeur afin d’obtenir plus de
renseignements à ce sujet. Le tableau suivant contient les correspondances de canaux les plus couramment utilisées.
- 34 - FR
9J12
Page 67

FICHE TECHNIQUE
RENSEIGNEMENTS GÉNÉRAUX
Tube image : 13 ou 19 pouces, canon à rayons
alignés tube à parcours électronique
dirigé à 90˚
Système telévision : NTSC télévision standard
Décodeur de sous-titres : 15.119/FCC
Système d’enregistrement : rotatif à deux têtes
Largeur de la bande : 1/2 pouce (12,65 mm)
Vitesses de la bande :
SP 33,40 mm/sec.
LP 16,67 mm/sec.
SLP 11,12 mm/sec.
Syntonisation des canaux :
Bande télévision
VHF basse : 2 à 6
Bande télévision
VHF haute : 7 à 13
Bande télévision UHF: 14 à 69
Câblodistribution
Bande VHF : 5A
Bande moyenne : A5 - A1, A - I
Super bande : J - W
Hyper bande : W + 1 - W + 84
Bornes:
Entrée d’antenne :
Entrée vidéo: 1 borne de type RCA
Entrée audio : 1 bornes de type RCA
Casque d’écoute : borne monaurale de
borne UHF/VHF 75 ohms,
non-équilibrée
1/8” de diamètre (3,5 mm)
SPÉCIFICATIONS - ÉLECTRICITÉ
Niveau - sortie vidéo : 0,5 - 2,0Vp-p
Niveau - sortie audio : -15 décibels
Rapport signal
/bruit - vidéo : plus de 46 décibels
Rapport signal
/bruit audio : plus de 43 décibels
AUTRES SPÉCIFICATIONS
[ 13 pouces ]
Source d’alimentation : courant alternatif 120 volts,
60 hertz
Consommation : 65 watts
Dimensions :
Hauteur 15-5/16” (389mm)
Largeur 14-7/16” (367mm)
Profondeur 14-7/8” (377mm)
Poids : 23.1 lb (10.5kg)
[ 19 pouces ]
Source d’alimentation : courant alternatif 120 volts,
60 hertz
Consommation : 80W
Dimensions :
Hauteur 19-3/8” (493mm)
Largeur 19-5/16” (491mm)
Profondeur 18-11/16” (475mm)
Poids : 43.0 lbs (19.5kg)
La conception et les spécifications de cet
•
appareil peuvent être changées sans préavis ni
obligation légale.
S’il y a une différence entre les langues,
•
l’anglais est décisif.
- 35 - FR
9J12
Page 68

GARANTIE
limitée
DURABRAND
18 MOIS
(a)
(b)
(c)
(d)
(e)
(a)
(b)
(c)
(d)
(e)
(f)
WAL-MART CANADA Inc.
1940 Argentia Road
Mississauga, Ontario
L5N 1P9
Canada
WAL-MART garantit que ce produit sera exempt de vices de fabrication, de matériaux et de
façon dans des conditions d'utilisation normales pendant la période désignée à partir de la
date d'achat originale au Canada. Période de GARANTIE de
Endommagé par négligence, emploi incorrect, mauvais traitement ou accident.
Utilisé dans une application commerciale ou locative.
Modifié ou réparé par quiconque d'autre que Wal-Mart Canada.
Dommages causés par une connexion incorrecte à un autre appareil.
Si la preuve de l'achat original ne peut pas être présentée.
Les dommages de la bande ou cassette (si applicable)
Le nettoyage des têtes vidéo (si applicable)
Les dommages survenus ou les coûts encourus pour le transport du produit à
Wal-Mart Canada.
Les ajustements ordinaires du produit qui peuvent être effectués par le client
comme expliqué dans le mode d'emploi.
Les problèmes de réception de signal causés par une antenne extérieure, des
systèmes câblés ou des interférences.
Une incompatibilité due au changement du système de diffusion TV/CATV après
la vente du produit.
CET APPAREIL PEUT ETRE REPARE ET/OU REMPLACE PAR LE SERVICE WALMART Canada
NOTE: Cette garantie est nulle si le produit est:
CETTE GARANTIE N'EST PAS TRANSFERABLE ET S'APPLIQUE UNIQUEMENT A
L'ACHETEUR D'ORIGINE. ELLE NE S'ETEND PAS AUX PROPRIETAIRES
SUBSEQUENTS DU PRODUIT. TOUTES LES GARANTIES APPLICABLES IMPLIQUEES,
Y COMPRIS LA GARANTIE DE COMMERCIABILITE, SONT LIMITEES EN DUREE A LA
PERIODE DE LA GARANTIE EXPRIMEE INDIQUEE ICI, COMMENCANT A LA DATE DE
L'ACHAT ORIGINAL AU REVENDEUR. AUCUNE GARANTIE, EXPRIMEE OU SOUSENTENDUE, NE S'APPLIQUERA A CE PRODUIT PAR LA SUITE.
EN AUCUN CAS, WAL-MART CANADA NE SERA TENU RESPONSABLE D'UNE PERTE,
D'UN DOMMAGE DIRECT, INDIRECT, INCIDENTEL, SPECIAL OU CONSECUTIF
DECOULANT DE OU EN RELATION AVEC L'EMPLOI DE CE PRODUIT.
NOTE: Cette garantie ne couvre pas:
Si le service est requis sous cette garantie pour une raison due à un vice de fabrication
découvert pendant la période de garantie, Wal-Mart Canada réparera ou remplacera (à sa
discrétion) la marchandise défectueuse à titre gratuit.
FR
9J12
Page 69

documentation manual, user maintenance, brochure, user reference, pdf manual
This file has been downloaded from:
User Manual and User Guide for many equipments like mobile phones, photo cameras, monther board, monitors, software, tv, dvd, and othes..
Manual users, user manuals, user guide manual, owners manual, instruction manual, manual owner, manual owner's, manual guide,
manual operation, operating manual, user's manual, operating instructions, manual operators, manual operator, manual product,
 Loading...