

Page 1

OWNER’S
As an ENERGY STAR
Partner, our company has
determined that this product meets
the E
NERGY STAR guidelines for
energy efficiency. E
NERGY STAR
is a U.S. registered mark.
®
®
®
Owner's Manual
MANUAL
COLOR TV/DVD
CSC520DE (20 inch)
SUPPLIED ACCESSORIES
BatteriesRemote Control Unit
2 AA BatteriesNE220UD
If you need additional assistance for set-up or operating after
reading owner’s manual, please call TOLL FREE : 1-800-242-7158.
Or visit our WEB SITE at
Please read before using this equipment
http://www.funai-corp.com
Owner’s Manual
0EMN02494
Page 2
WARNING: TO REDUCE THE RISK OF FIRE OR ELECTRIC SHOCK, DO NOT EXPOSE THIS APPLIANCE
TO RAIN OR MOISTURE.
CAUTION
RISK OF ELECTRIC SHOCK
DO NOT OPEN
CAUTION: TO REDUCE THE RISK OF ELECTRIC
SHOCK, DO NOT REMOVE COVER (OR BACK).
NO USER SERVICEABLE PARTS INSIDE. REFER
SERVICING TO QUALIFIED SERVICE PERSONNEL.
The caution marking is located on the rear of the cabinet.
IMPORTANT SAFEGUARDS
1.Read instructions-All the safety and operating instructions
should be read before the appliance is operated.
2.Retain Instructions-The safety and operating instructions
should be retained for future reference.
3.Heed Warnings-All warnings on the appliance and in the
operating instructions should be adhered to.
4.Follow Instructions-All operating and use instructions
should be followed.
5.Cleaning-Unplug TV/DVD from the wall outlet before
cleaning. Do not use liquid cleaners or aerosol cleaners. Use
a damp cloth for cleaning.
EXCEPTION: A product that is meant for uninterrupted
service and, that for some specific reason, such as the possibility of the loss of an authorization code for a CATV converter, is not intended to be unplugged by the user for cleaning or any other purpose, may exclude the reference to
unplugging the appliance in the cleaning description otherwise required in item 5.
6.Attachments-Do not use attachments not recommended by
the TV/DVD manufacturer as they may cause hazards.
7.Water and Moisture-Do not use this TV/DVD near waterfor example, near a bath tub, wash bowl, kitchen sink, or
laundry tub, in a wet basement, or near a swimming pool,
and the like.
8.Accessories-Do not place this TV/DVD on an unstable cart,
stand, tripod, bracket, or table. The TV/DVD may fall, causing serious injury to someone, and serious damage to the
appliance. Use only with a cart, stand, tripod, bracket, or
table recommended by the manufacturer, or sold with the
TV/DVD. Any mounting of the
appliance should follow the manufacturer’s instructions and should use
a mounting accessory recommended
by the manufacturer. An appliance
and cart combination should be
moved with care.
Quick stops, excessive force, and
uneven surfaces may cause the appliance and cart combination to overturn.
PORTABLE CART WARNING
AVERTISSEMENT POUR UNE
TABLE ROULANTE PORTATIVE
S3126A
THIS SYMBOL INDICATES THAT DANGEROUS VOLTAGE CONSTITUTING A
RISK OF ELECTRIC SHOCK IS PRESENT
WITHIN THIS UNIT.
THIS SYMBOL INDICATES THAT THERE
ARE IMPORTANT OPERATING AND
MAINTENANCE INSTRUCTIONS IN THE
LITERATURE ACCOMPANYING THE
APPLIANCE.
9. Ventilation-Slots and openings in the cabinet and the back
or bottom are provided for ventilation and to ensure reliable
operation of the TV/DVD and to protect it from overheating, and these openings must not be blocked or covered.
The openings should never be blocked by placing the
TV/DVD on a bed, sofa, rug, or other similar surface. This
TV/DVD should never be placed near or over a radiator or
heat register. This TV/DVD should not be placed in a builtin installation such as a bookcase or rack unless proper
ventilation is provided or the manufacturer’s instructions
have been adhered to.
10.Power Sources-This TV/DVD should be operated only
from the type of power source indicated on the marking
label. If you are not sure of the type of power supply to
your home, consult your appliance dealer or local power
company. For TV/DVDs intended to operate from battery
power, or other sources, refer to the operating instructions.
11.Grounding or Polarization-This TV/DVD is equipped
with a polarized alternating-current line plug(a plug having
one blade wider than the other). This plug will fit into the
power outlet only one way. This is a safety feature. If you
are unable to insert the plug fully into the outlet, try reversing the plug. If the plug should still fail to fit, contact your
electrician to replace your obsolete outlet. Do not defeat the
safety purpose of the polarized plug.
–2–
–2–
EN
0C28
Page 3

EXAMPLE OF ANTENNA GROUNDING AS PER
NATIONAL ELECTRICAL CODE
S2898A
FIGURE A
ELECTRIC
SERVICE
EQUIPMENT
NEC - NATIONAL ELE CTRICAL CODE
GROUND
CLAMP
ANTENNA
L EAD IN
WIRE
ANTENNA
DISCHARGE UNI T
(NEC SECTION 810-20)
GROUNDING CONDUCTORS
(NEC SECTION 810-21)
GROUND CLAMPS
POWER SERVICE GROUNDI NG
ELECTRODE SYSTEM
(NEC ART 250, PART H)
12.Power-Cord Protection-Power-supply cords should be
routed so that they are not likely to be walked on or
pinched by items placed upon or against them, paying particular attention to cords at plugs, convenience receptacles,
and the point where they exit from the appliance.
13.Outdoor Antenna grounding-If an outside antenna or
cable system is connected to the TV/DVD, be sure the
antenna or cable system is grounded so as to provide some
protection against voltage surges and built-up static
charges. Article 810 of the National Electrical Code,
ANSI/NFPA No. 70, provides information with respect to
proper grounding of the mast and supporting structure,
grounding of the lead-in wire to an antenna discharge unit,
size of grounding conductors, location of antenna-discharge
unit, connection to grounding electrodes, and requirements
for the grounding electrode. (Fig. A)
14.Lightning-For added protection for this TV/DVD receiver
during a lightning storm, or when it is left unattended and
unused for long periods of time, unplug it from the wall
outlet and disconnect the antenna or cable system. This will
prevent damage to the TV/DVD due to lightning and
power-line surges.
15.Power Lines-An outside antenna system should not be
located in the vicinity of overhead power lines or other
electric light or power circuits, or where it can fall into
such power lines or circuits. When installing an outside
antenna system, extreme care should be taken to keep from
touching such power lines or circuits as contact with them
might be fatal.
16.Overloading-Do not overload wall outlets and extension
cords as this can result in a risk of fire or electric shock.
17.Object and Liquid Entry-Never push objects of any kind
into this TV/DVD through openings as they may touch dangerous voltage points or short out parts that could result in
a fire or electric shock. Never spill liquid of any kind on
the TV/DVD.
18.Servicing-Do not attempt to service this TV/DVD yourself
as opening or removing covers may expose you to dangerous voltage or other hazards. Refer all servicing to qualified
service personnel.
19.Damage Requiring Service-Unplug this TV/DVD from
the wall outlet and refer servicing to qualified service personnel under the following conditions:
a. When the power-supply cord or plug is damaged or frayed.
b. If liquid has been spilled, or objects have fallen into the
TV/DVD.
c. If the TV/DVD has been exposed to rain or water.
d. If the TV/DVD does not operate normally by following the
operating instructions. Adjust only those controls that are
covered by the operating instructions, as improper adjustment of other controls may result in damage and will often
require extensive work by a qualified technician to restore
the TV/DVD to its normal operation.
e. If the TV/DVD has been dropped or damaged in any way.
f. When the TV/DVD exhibits a distinct change in perfor-
mance-this indicates a need for service.
20.Replacement Parts-When replacement parts are required,
be sure the service technician has used replacement parts
specified by the manufacturer that have the same characteristics as the original part. Unauthorized substitutions may
result in fire, electric shock, injury to persons or other hazards.
21.Safety Check-Upon completion of any service or repairs to
this TV/DVD, ask the service technician to perform routine
safety checks to determine that the TV/DVD is in proper
operating condition.
22.Heat-This TV/DVD product should be situated away from
heat sources such as radiators, heat registers, stoves, or
other products (including amplifiers) that produce heat.
–3–
–3–
EN
0C28
Page 4

PRECAUTIONS
IMPORTANT COPYRIGHT INFORMATION
Unauthorized copying, broadcasting, public performance and lending of discs are prohibited.
This product incorporates copyright protection technology that is protected by method claims of certain
U.S. patents and other intellectual property rights
owned by Macrovision Corporation and other rights
owners. Use of this copyright protection technology
must be authorized by Macrovision Corporation,
and is intended for home and other limited viewing
uses only unless otherwise authorized by
Macrovision Corporation. Reverse engineering or
disassembly is prohibited.
RADIO-TV INTERFERENCE
This equipment has been tested and found to comply with the limits for a Class B digital device, pursuant to Part 15 of the FCC Rules. These limits are
designed to provide reasonable protection against
harmful interference in a residential installation.
This equipment generates, uses, and can radiate
radio frequency energy and, if not installed and
used in accordance with the instructions, may cause
harmful interference to radio communications.
However, there is no guarantee that interference
will not occur in a particular installation. If this
equipment does cause harmful interference to
radio or television reception, which can be determined by turning the equipment off and on, the
user is encouraged to try to correct the interference by one or more of the following measures:
1) Reorient or relocate the receiving antenna.
2) Increase the separation between the equipment
and receiver.
3) Connect the equipment into an outlet on a circuit different from that to which the receiver is
connected.
4) Consult the dealer or an experienced radio/TV
technician for help.
LASER SAFETY
This unit employs a laser. Only a qualified service
person should remove the cover or attempt to service this device, due to possible eye injury.
CAUTION: USE OF CONTROLS OR ADJUSTMENTS OR PERFORMANCE OF PROCEDURES OTHER THAN THOSE SPECIFIED
HEREIN MAY RESULT IN HAZARDOUS
RADIATION EXPOSURE.
CAUTION: VISIBLE AND INVISIBLE LASER
RADIATION WHEN OPEN AND INTERLOCK
DEFEATED. DO NOT STARE INTO BEAM.
LOCATION: INSIDE, NEAR THE DECK
MECHANISM.
This Class B digital apparatus complies with
Canadian ICES-003.
CAUTION: TO PREVENT ELECTRIC SHOCK,
MATCH WIDE BLADE OF PLUG TO WIDE
SLOT, FULLY INSERT.
A NOTE ABOUT RECYCLING
This product’s packaging materials are recyclable
and can be reused. Please dispose of any materials
in accordance with your local recycling regulations.
Batteries should never be thrown away or incinerated but disposed of in accordance with your local
regulations concerning chemical wastes.
The serial number of this product may be found on the back of the unit. No other TV/DVD has the same serial
number as yours. You should record the number and other vital information here and retain this book as a permanent record of your purchase to aid identification in case of theft. Serial numbers are not kept on file.
Date of Purchase
Dealer Purchase from
Dealer Address
Dealer Phone No.
Model No.
Serial No.
–4–
–4–
EN
0C28
Page 5

LOCATION
For safe operation and satisfactory performance of
your TV/DVD, keep the following in mind when
selecting a place for its installation:
Shield it from direct sunlight and keep it away from
•
sources of intense heat.
Avoid dusty or humid places.
•
Avoid places with insufficient ventilation for proper
•
heat dissipation. Do not block the ventilation holes at
the top and bottom of the unit. Do not place the unit
on a carpet because this will block the ventilation
holes.
Install unit in a horizontal position.
•
Avoid locations subject to strong vibration.
•
Do not place the TV/DVD near strong magnetic fields.
•
Avoid moving TV/DVD to locations where temper-
•
ature differences are extreme.
AV OID THE HAZARDS OF
ELECTRICAL SHOCK AND FIRE
Do not handle the power cord with wet hands.
•
Do not pull on the power cord when disconnecting
•
it from an AC wall outlet. Grasp it by the plug.
If, by accident, water is spilled on your unit, unplug
•
the power cord immediately and take the unit to our
Authorized Service Center for servicing.
Do not put your fingers or objects into the
•
TV/DVD disc loading tray.
Do not place anything directly on top of the unit.
•
SYMBOLS USED IN THIS MANUAL
The following symbols below appear in some headings and notes in this manual, with the following
meanings
TV
: Description refers to TV operation (in the TV mode).
DVD-V
: Description refers to playback of DVD video discs
(in the DVD mode).
CD
: Description refers to playback of audio CDs
(in the DVD mode).
MP3
: Description refers to playback of MP3 discs
(in the DVD mode).
QUICK
: Description refers to the items to be set by the
QUICK mode (in the DVD mode).
WARNING
Moisture condensation may occur inside the unit
when it is moved from a cold place to a warm place,
or after heating a cold room or under conditions of
high humidity. If a DVD is played in a TV/DVD
which has moisture, it may damage the DVD and
TV/DVD. Therefore when the condensation occurs
inside the unit, turn the POWER button on and allow
at least 2 hours for the unit to dry out.
–5–
–5–
EN
0C28
Page 6

TABLE OF CONTENTS
C IMPORTANT SAFEGUARDS . . . . . . . . . . . . .2
C PRECAUTIONS . . . . . . . . . . . . . . . . . . . . . . . .4
C TABLE OF CONTENTS . . . . . . . . . . . . . . . . . .6
C FEATURES . . . . . . . . . . . . . . . . . . . . . . . . . . . .7
OPERATING CONTROLS AND FUNCTIONS
C
INSTALLING THE BATTERIES . . . . . . . . . . .9
C PREPARATION FOR USE . . . . . . . . . . . . . . .10
ANTENNA/CABLE CONNECTIONS . . . . . . .10
CONNECTING TO EXTERNAL INPUT JACKS .11
CONNECTING TO AN AMPLIFIER
EQUIPPED WITH DIGITAL INPUT JACKS,
MD DECK OR DAT DECK (for DVD only) . .11
CONNECTING TO A DOLBY DIGITAL
DECODER (for DVD) . . . . . . . . . . . . . . . . . . .12
TV SECTION
C SET UP FOR USE . . . . . . . . . . . . . . . . . . . . .13
SELECTING THE LANGUAGE . . . . . . . . . . .13
CHANNEL SET UP . . . . . . . . . . . . . . . . . . . . .13
DELETING (OR ADDING) CHANNELS . . . .14
C TV OPERATION . . . . . . . . . . . . . . . . . . . . . . .15
WATCHING A TV PROGRAM . . . . . . . . . . . .15
DEGAUSSING . . . . . . . . . . . . . . . . . . . . . . . .15
PICTURE CONTROL . . . . . . . . . . . . . . . . . . .15
SLEEP TIMER . . . . . . . . . . . . . . . . . . . . . . . . .16
CLOSED CAPTION SYSTEM . . . . . . . . . . . .16
V- CHIP SET UP . . . . . . . . . . . . . . . . . . . . . . . .17
VD SECTION
D
C ABOUT THE DISCS . . . . . . . . . . . . . . . . . . . .19
PLAYABLE DISCS . . . . . . . . . . . . . . . . . . . . .19
DISC TYPES . . . . . . . . . . . . . . . . . . . . . . . . . .19
C PLAYING A DISC . . . . . . . . . . . . . . . . . . . . . .20
BASIC PLAYBACK . . . . . . . . . . . . . . . . . . . .20
GENERAL FEATURES . . . . . . . . . . . . . . . . . .20
DISC MENU . . . . . . . . . . . . . . . . . . . . . . . . . .20
TITLE MENU . . . . . . . . . . . . . . . . . . . . . . . . .20
RESUME . . . . . . . . . . . . . . . . . . . . . . . . . . . . .21
PAUSE . . . . . . . . . . . . . . . . . . . . . . . . . . . . . . .21
STEP BY STEP PLAYBACK . . . . . . . . . . . . .21
FAST FORWARD/REVERSE SEARCH . . . . .21
SLOW FORWARD / SLOW REVERSE . . . . .21
. . .8
C SEARCH FUNCTION . . . . . . . . . . . . . . . . . .22
TRACK SEARCH . . . . . . . . . . . . . . . . . . . . . .22
TITLE / CHAPTER SEARCH . . . . . . . . . . . . .22
TIME SEARCH . . . . . . . . . . . . . . . . . . . . . . . .22
MARKER SETUP SCREEN . . . . . . . . . . . . . .22
C SPECIAL PLAYBACK FUNCTION . . . . . . . .23
REPEAT . . . . . . . . . . . . . . . . . . . . . . . . . . . . .23
PROGRAM . . . . . . . . . . . . . . . . . . . . . . . . . . .23
RANDOM PLAYBACK . . . . . . . . . . . . . . . . .23
C PLAYING A MP3 DISC . . . . . . . . . . . . . . . . . .24
MP3 PLAYBACK . . . . . . . . . . . . . . . . . . . . . .24
REPEAT . . . . . . . . . . . . . . . . . . . . . . . . . . . . .24
PROGRAM . . . . . . . . . . . . . . . . . . . . . . . . . . .24
RANDOM PLAYBACK . . . . . . . . . . . . . . . . .24
C CHANGING THE SETTINGS . . . . . . . . . . . .25
SUBTITLE LANGUAGE . . . . . . . . . . . . . . . .25
AUDIO LANGUAGE . . . . . . . . . . . . . . . . . . .25
STEREO SOUND MODE . . . . . . . . . . . . . . . .25
CAMERA ANGLE . . . . . . . . . . . . . . . . . . . . . .25
BLACK LEVEL SETTING . . . . . . . . . . . . . . .25
VIRTUAL SURROUND . . . . . . . . . . . . . . . . .25
C THE ON-SCREEN INFORMATION . . . . . . .26
C CHANGING THE DVD SETUP ITEMS . . . .27
LANGUAGE SETTING . . . . . . . . . . . . . . . . .27
DISPLAY SETTING . . . . . . . . . . . . . . . . . . . .28
AUDIO SETTINGS . . . . . . . . . . . . . . . . . . . . .28
PARENTAL CONTROL . . . . . . . . . . . . . . . . .29
INITIALIZE . . . . . . . . . . . . . . . . . . . . . . . . . . .29
C TROUBLESHOOTING GUIDE . . . . . . . . . . .30
C MAINTENANCE . . . . . . . . . . . . . . . . . . . . . . .32
DISC HANDLING . . . . . . . . . . . . . . . . . . . . . .32
C SPECIFICATIONS . . . . . . . . . . . . . . . . . . . . .33
C WARRANTY . . . . . . . . . . . . . . . . . . .Back Cover
–6–
–6–
EN
0C28
Page 7

FEATURES
TV Mode
181 channel capability PLL frequency synthesiz-
•
er tuner with direct station call
(A converter may be necessary to view scrambled cable
channels.)
Infrared remote control
•
Trilingual on screen menu display selectable in
•
English, Spanish, or French
¡Sleep Timer
The Sleep Timer function enables you to shut off the power
without pressing POWER after a desired time period.
¡Closed Caption Decoder
You may view specially labeled (cc) TV programs,
movies, news, etc. with either a dialogue caption or text
display added to the program.
¡Auto Shut Off Function
If there is no air signal input from the antenna terminal and
no operation for 15 minutes, the TV/DVD will turn itself
off automatically.
¡V-CHIP
Enables parents to prevent their children from watching
inappropriate material on TV.
DVD Mode
¡Dolby Digital sound
This TV/DVD can handle Dolby Digital surround sound
having 5.1 channels when connected to a Dolby Digital
decoder.
¡Still/fast/slow/step playback
Various playback modes are available including still pictures, fast forward/reverse, slow motion and step frames.
¡Random playback for audio CD and MP3
This TV/DVD can shuffle the order of tracks to play them
in random order.
¡Program playback for audio CD and MP3
You can program the order of tracks to play them in any
desired order.
¡DVD menus in a desired language
You can display DVD menus in a desired language, if
available on a DVD.
¡Screen saver/Auto power-off functions
The screen saver program starts when there is no input
from the TV/DVD for five minutes in the stop mode.
When the screen saver program is activated for 15 minutes, the power is automatically turned off.
¡Subtitles in a desired language
You can select a desired language for the display subtitles,
if that language is available on a disc.
¡Selecting a camera angle
You can select the desired camera angle, if a disc contains
sequences recorded from different angles.
¡Choices for audio language and sound mode
You can select the desired audio language and sound mode,
if different languages and modes are available on a disc.
¡Parental lock
You can set the control level to limit playback of discs
which may not be suitable for children.
¡Automatic detection of discs
This TV/DVD automatically detects if the loaded disc is
DVD, audio CD or MP3 disc.
¡On-screen display
Information about the current operation can be displayed
on a TV screen, allowing you to confirm the currently
active functions (such as program playback), on the TV
screen using the remote control.
¡Search
Chapter search / Title search / Track search / Time search
¡Repeat
Chapter / Title / Track / Group / All / A-B
¡Marker
The part designated by user can be called back.
¡Resume Play
User can resume to playback from the part at which the
play was stopped.
¡Virtual Surround
¡Bit rate indication
¡DRC (Dynamic range control)
You can control the range of sound volume.
–7–
–7–
EN
0C28
Page 8
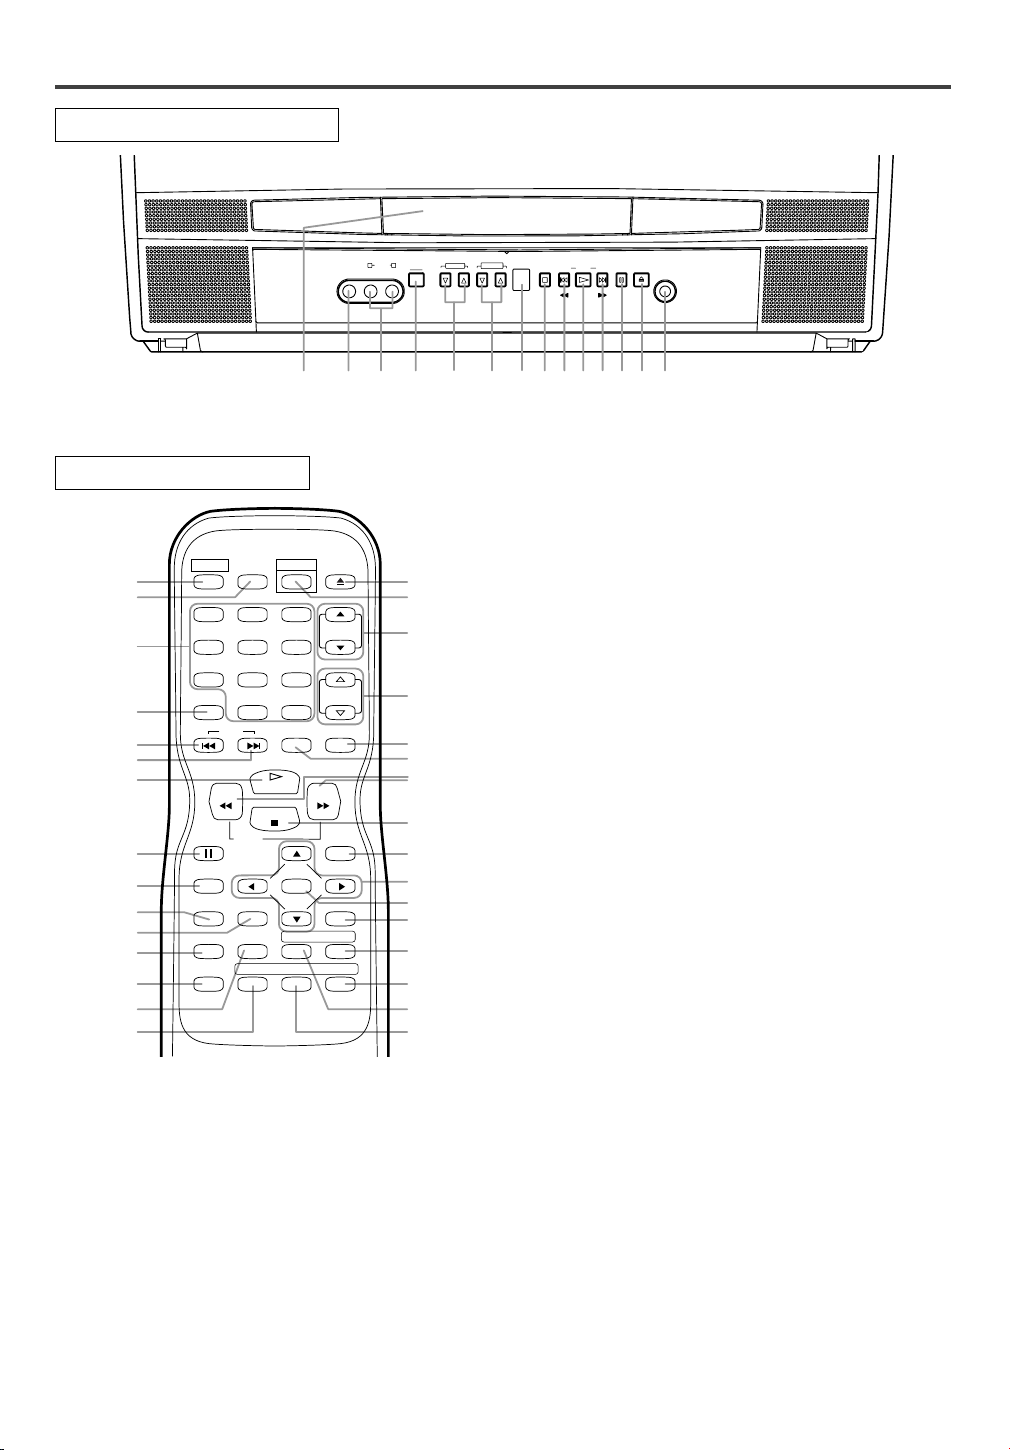
OPERATING CONTROLS AND FUNCTIONS
VIDEO
AUDIO
POWER
VOLUME CHANNEL
STOP SKIP SKIPPLAY PAUSE
OPEN/CLOSE
HEADPHONE
–SEARCH–
LR
742 89101112 13 146531
26
27
16
17
9
11
12
23
20
22
15
25
24
21
10
28
29
30
33
35
5
6
13
34
19
18
8
31
32
4
36
REV
SLOW
PLAY
STOP
FWD
ENTER
PAUSE
DISC
MENU
RETURNTITLESETUP
A
-
B
REPEATSEARCH MODE
CLEAR
MODE
ANGLESUBTITLEAUDIO
DISPLAY
SKIP
SELECT
POWER PICTURE
OPEN/
CLOSE
CH.
VOL.
MUTEV.SURR
SLEEP
123
456
789
0 +10
+100
TV/DVD FRONT PANEL
REMOTE CONTROL
1.Disc loading tray
2.VIDEO input Jack [page 11]
Connect to the video output jack of a video
camera or VCR.
3.AUDIO L/R input Jacks [page 11]
Connect to the audio output jacks of a video
camera or VCR.
4.POWER Button [page 13]
Press to turn the power on and off.
5.VOLUME K/L (VOL. X/Y) Buttons
Press to control the volume level for the DVD and TV.
6.CHANNEL K/L (CH.K/L) Buttons [page 13]
Press to select memorized channel.
Press to change to TV mode when in DVD mode.
7.Remote Sensor Window
8.STOP Button [page 20]
Stops operation of the disc.
9.SKIP H Button [page 22]
Plays back from the beginning of the current chapter
or track.
SEARCH (REV) E Button (Front Panel)
[page 21]
During playback or in the pause mode, press and
hold the button down
for a few seconds to change
reverse playback speed.
10. PLAY Button [page 20]
Starts playback of the disc contents.
Press to change to DVD mode when in TV mode.
11. SKIP G Button [page 22]
Plays back from the beginning of the next chapter or
track.
SEARCH (FWD) D Button (Front Panel)
[page 21]
During playback or in the pause mode, press and
hold the button down
for a few seconds to change for-
ward playback speed.
12. PAUSE Button [page 21]
Pauses the current disc operation.
13. OPEN/CLOSE Button [page 20]
Press to insert discs into or remove them from the
tray.
14. HEADPHONE Jack
To connect headphone (not supplied) for personal
listening.
15. MODE Button [pages 23-25]
Activates program playback or random playback mode
when playing CDs or MP3.
16. Number Button
TV Mode: [page 15]
Press two digits to directly access the desired channel.
Remember to press a "0" before a single digit channel.
+100 Button–
Press to select cable channels which are equal or
greater than number 100.
DVD Mode: [page 22]
Press to enter the desired number.
+10 Button–
Press to enter the desired numbers which are equal
or greater than number 10.
–8–
–8–
EN
0C28
Page 9
COAXIAL
ANT.
3938
37
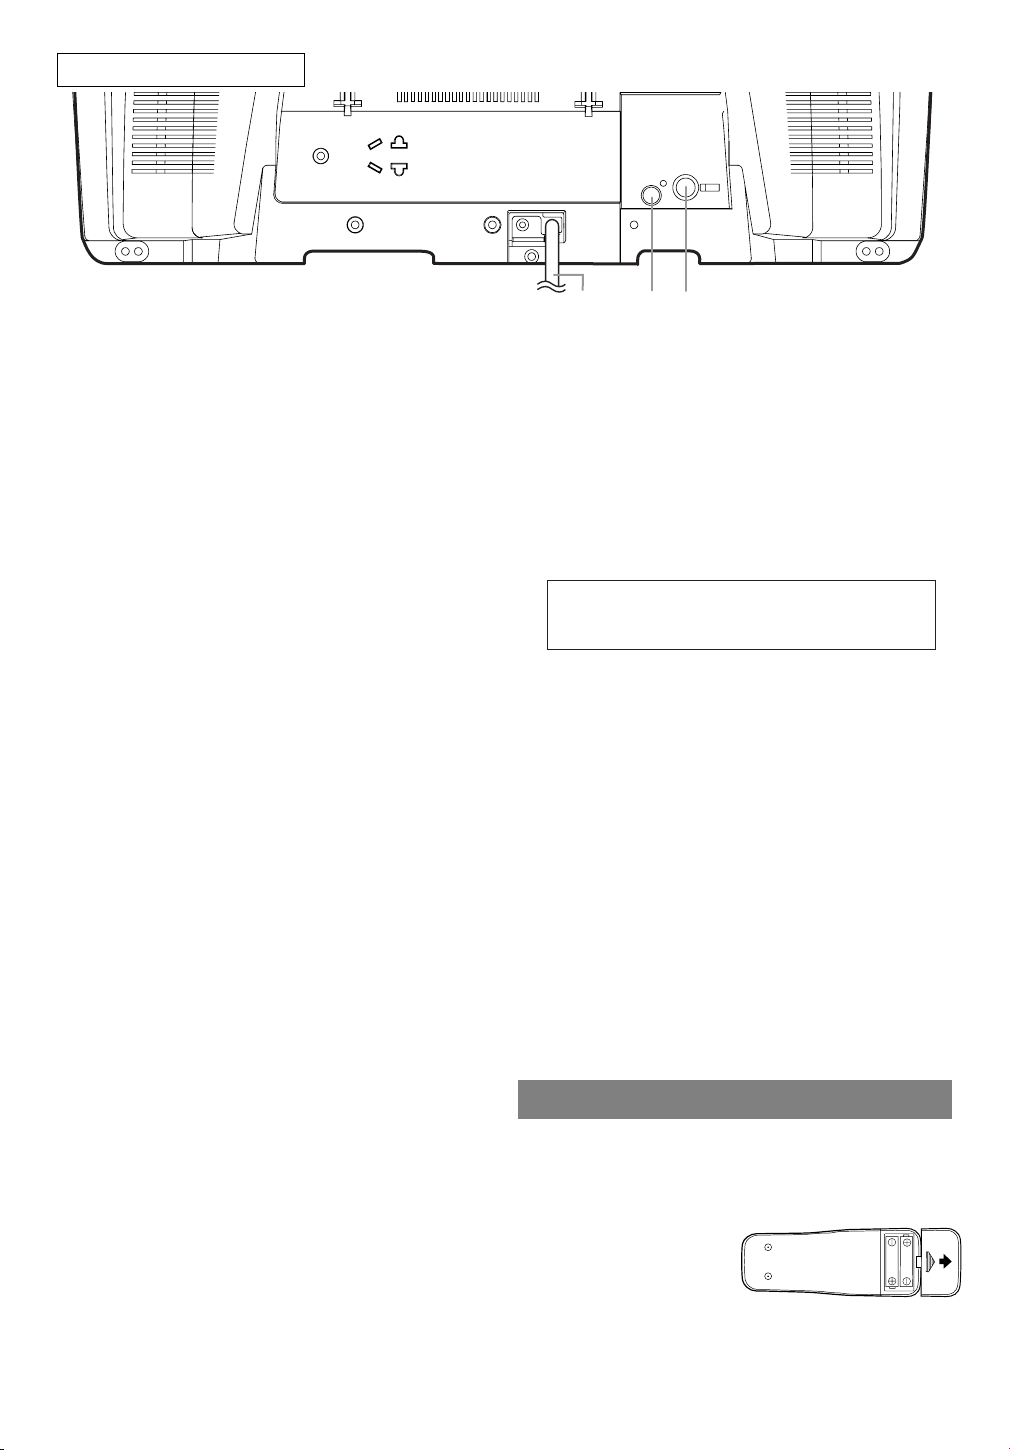
TV/DVD REAR VIEW
17. SLEEP Button [page 16]
Press SLEEP to display the sleep timer and start the
function. The shut off time can be determined by the
number of times you press this button. (0, 30, 60,
90, or 120 minutes)
18. REV h Button [page 21]
Press to view the DVD picture in fast reverse motion.
Press PAUSE, then press this button to begin slow
motion playback. Press this button repeatedly to change
the reverse speed of slow motion.
FWD g Button [page 21]
Press to fast forward the Disc. Press PAUSE, then
press this button to begin slow motion playback. Press
this button repeatedly to change the forward speed of
slow motion.
19. V.SURR (VIRTUAL SURROUND) Button
[page 25]
Press to set virtual surround on/off.
20. SETUP Button [pages 13, 27-29]
Press to enter or exit the TV menu or DVD setup
mode.
21. TITLE Button [page 20]
Displays the title menu.
22. CLEAR Button [pages 22-24]
Resets a setting.
23. DISPLAY Button
TV Mode:
Press to display the channel number on the screen.
If you press it again, the channel number will disappear.
DVD Mode: [page 26]
Displays the current status on the TV screen for
checking purposes.
24. SEARCH MODE Button [page 22]
Press to locate a desired point.
25. AUDIO Button [page 25]
Press to select a desired audio language or sound
mode.
26. SUBTITLE Button [page 25]
Press to select a desired subtitle language.
27. REPEAT Button [page 23]
Repeats playback of the current disc, title, chapter
or track.
28. ANGLE Button [page 25]
Press to change the camera angle to see the sequence
being played back from a different angle.
29. REPEAT A-B [page 23]
Repeats playback of a selected section.
30. RETURN Button [page 25]
Returns to the previous operation.
31. ENTER Button [pages 13, 20]
Press to accept a setting.
32. Arrow Buttons
TV Mode: [page 13]
Press to select a setting mode from the menu on the
TV screen.
Press to select or adjust from a particular menu.
DVD Mode: [page 20]
Use when making settings while watching the
display on a TV screen.
33. DISC MENU Button [page 20]
Displays the main menus of the DVD.
34. SELECT Button [page 20]
Press to change to TV mode, external input mode or
DVD mode.
NOTE: When you select the DVD mode with
this button, press PLAY or OPEN/CLOSE first.
Otherwise, the DVD features are not operated.
35. MUTE Button
Press MUTE to turn off the sound portion of the TV
program. (Volume level display turns LIGHT RED
from LIGHT BLUE.) Press MUTE again or press
VOL. m or n to restore sound.
36. PICTURE Button [page 15]
Press to enter picture adjustment mode.
37. Power cord
Connect to a standard AC outlet (120V/60Hz).
NOTE: Remove the power cord from the hook to
avoid breaking a wire before you connect to
a standard AC outlet.
38. COAXIAL digital audio out Jack (DVD Audio
Only) [page 11, 12]
Connect to the digital input of an external
amplifier or decoder.
39. ANT. in Jack
Connect to an antenna, cable system, or satellite system.
INSTALLING THE BATTERIES
1)Open the battery compartment cover by pressing the
cover on the remote unit in the direction of the arrow.
2)Insert 2 “AA” penlight batteries into the battery
compartment in the direction indicated by the
polarity (+/-) markings.
3)Replace the cover.
NOTES
¡Do not mix alkaline and manganese batteries.
¡Do not mix old and new batteries.
–9–
–9–
EN
0C28
Page 10
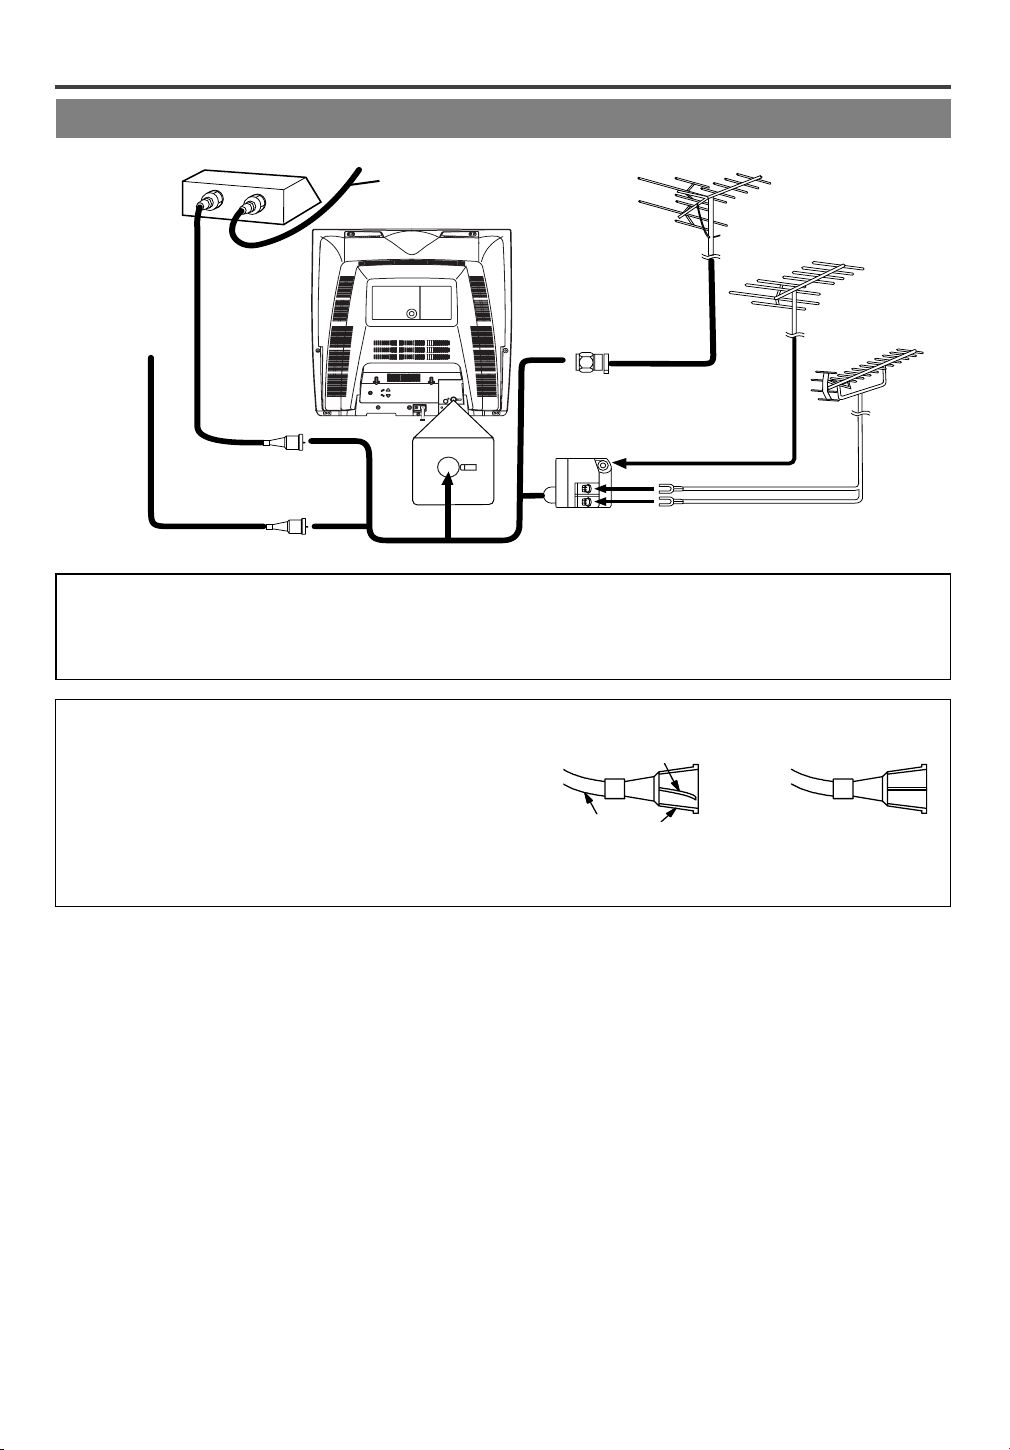
PREPARATION FOR USE
ANTENNA/CABLE CONNECTIONS
Satellite Box or
Cable Box
(Not supplied)
OUT
IN
From Cable System or
Satellite Dish
VHF/UHF Antenna
(Not supplied)
VHF Antenna
(Not supplied)
From
Cable System
75-ohm Coaxial
or
COAXIAL
ANT.
ANT.
VHF/UHF
Combiner
or
(Not supplied)
UHF Antenna
(Not supplied)
Cable (Not supplied)
or
Note to CATV system installer:
This reminder is provided to call the CATV system installer’s attention to Article 820-40 of the NEC that provides
guidelines for proper grounding and, in particular, specifies that the cable ground shall be connected to the grounding
system of the building as close to the point of cable entry as practical.
NOTE:
Before plugging the antenna into the ANT. IN jack of the
TV/DVD, check that the pin is not bent. If it is bent,
straighten the pin as illustrated, then plug the pin into the
ANT. IN jack of the TV/DVD.
Cable
Bent pin
Plug
Flat twin-lead cable
VHF/UHF COMBINED ANTENNA
A VHF UHF 75 ohm combination antenna can be
connected to ANT terminal.
VHF/UHF SEPARATE ANTENNAS
In some areas it will be necessary to use an outdoor
antenna.
CABLE WITHOUT CONVERTER/
DESCRAMBLER BOX
Use this connection if your cable system connects
directly to your TV/DVD without a converter box.
Use the TV/ DVD Remote Control to select channels.
(Needs to be straightened)
(Straight pin)
CABLE WITH CONVERTER/DESCRAMBLER BOX OR SATELLITE BOX
If your cable service supplies you with a converter
box or if you use a satellite system, you can use the
basic connection shown here.
Channel selection must be made with the converter
box or satellite box. This means that channels cannot
be changed using the TV/ DVD Remote Control.
TO VIEW A SCRAMBLED/UNSCRAMBLED
CHANNEL
1.Set the TV/DVD channel selector to the output
channel of the Cable Converter Box or Satellite
Box. (Ex. CH3)
2.Select the channel to view on your Cable Converter
Box or Satellite Box.
–10–
–10–
EN
0C28
Page 11
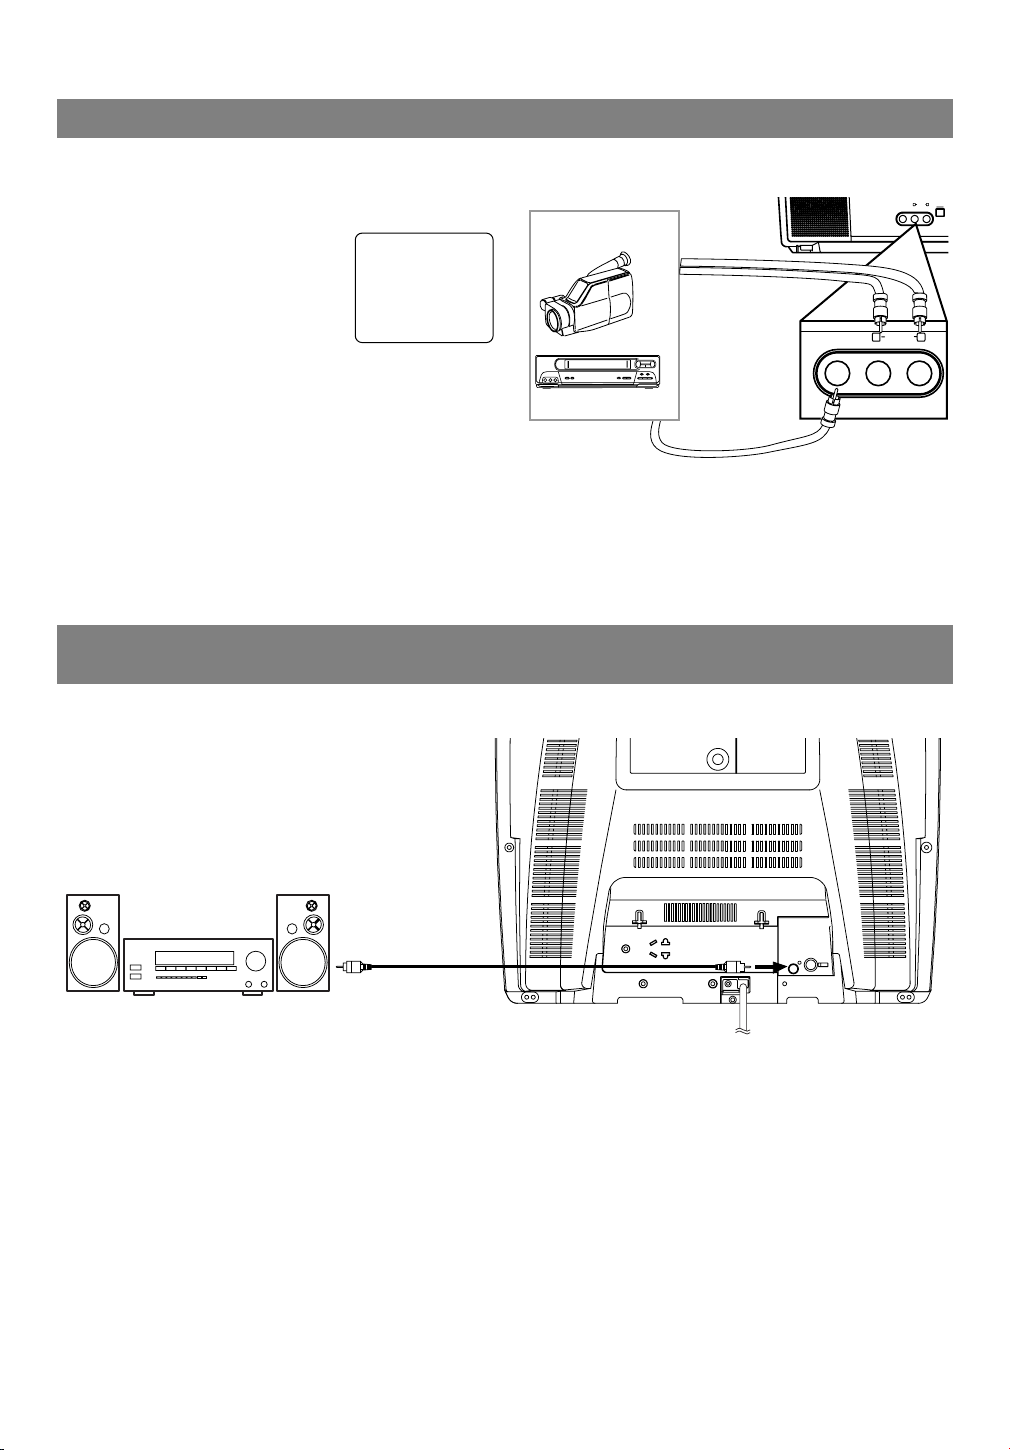
CONNECTING TO EXTERNAL INPUT JACKS
COAXIAL
ANT.
Amplifier equipped with digital
input jacks, MD deck,
DAT deck, etc.
To COAXIAL DIGITAL
AUDIO INPUT jack
To DIGITAL AUDIO OUT
(PCM/BITSTREAM)
COAXIAL jack
(only DVD AUDIO OUT)
When you watch a program recorded on an another
source (VCR or video camera), use the audio/video
input jacks on the front of the TV/DVD.
Connect the audio/video output jacks
of another source to the AUDIO L/R
AUX
[Another source]
To the
audio output jacks
[Front of the TV/DVD]
and VIDEO input jacks of this
TV/DVD. Then press SELECT until
"AUX" appears on the screen.
NOTE:
When you connect a monaural VCR (another
•
source) to this TV/DVD, connect the Audio output
jack of the monaural VCR (another source) to the
AUDIO L input jack of this TV/DVD. The audio
will output in both L and R channel equally.
To the video
output jack
Audio/Video
cables
(not supplied)
etc.
CONNECTING TO AN AMPLIFIER EQUIPPED WITH DIGITAL
INPUT JACKS, MD DECK OR DAT DECK (for DVD only)
VIDEO
AUDIO
LR
VIDEO
AUDIO
LR
POWER
Use an audio coaxial digital cable available at retail for the audio connections.
NOTES:
The audio source on a disc in a 5.1 channel Dolby Digital surround format cannot be recorded as digital
•
sound by an MD or DAT deck.
Be sure to turn off the power to all components in the system before connecting another component.
•
Refer to the Owner's Manuals for the components to be connected to the TV/DVD.
•
Set DOLBY DIGITAL to OFF for audio output in the setup mode. Playing a TV/DVD using incorrect set-
•
tings may generate noise distortion, and may also damage the speakers. (See page 28 to set DOLBY
DIGITAL to OFF.)
–11–
–11–
EN
0C28
Page 12
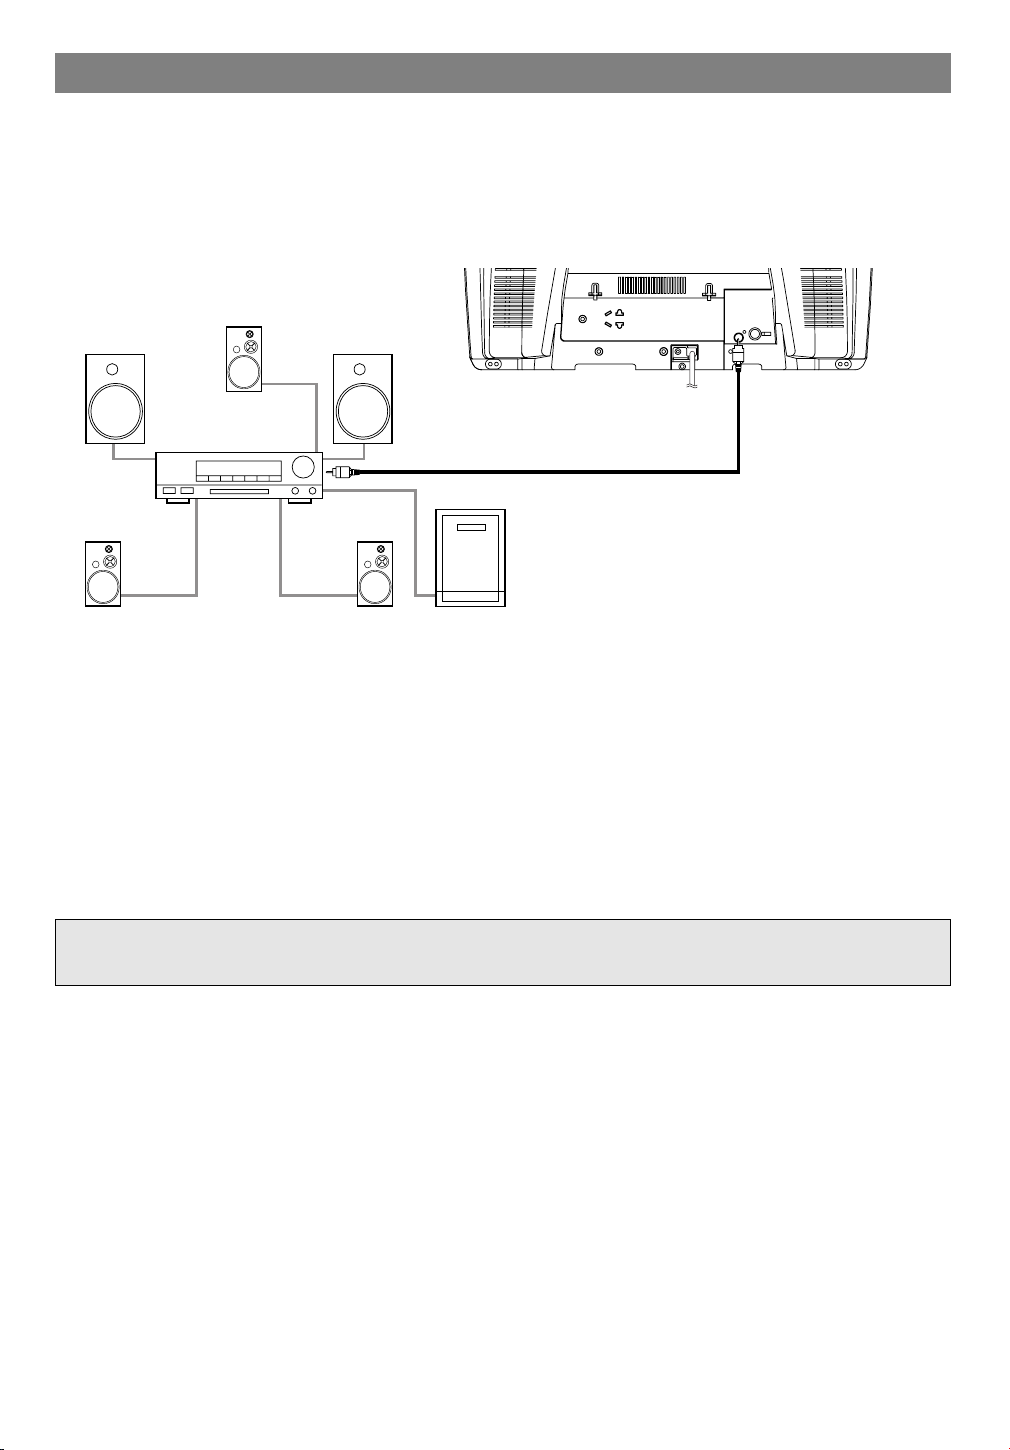
CONNECTING TO A DOLBY DIGITAL DECODER (for DVD)
COAXIAL
ANT.
Front speaker
(left)
Center
speaker
Front speaker
(right)
Surround
speaker
(left)
Surround
speaker
(right)
Subwoofer
To DIGITAL AUDIO OUT
(PCM/BITSTREAM)
COAXIAL jack
To COAXIAL DIGITAL
AUDIO INPUT jack
Dolby Digital decoder
If using this TV/DVD to play a DVD disc in a 5.1 channel Dolby Digital surround format, the TV/DVD outputs a DOLBY DIGITAL Data stream from its COAXIAL digital audio out jack. By hooking the TV/DVD up
to a Dolby Digital decoder, you can enjoy a more convincing, realistic ambience with powerful and highquality surround sound as enjoyed in movie theaters.
Use audio coaxial digital cables available at retail for the audio connections.
NOTES:
Be sure to turn off the power to all components in the system before connecting another component.
•
Refer to the Owner's Manuals for the components to be connected to the TV/DVD.
•
If connected to a Dolby Digital decoder, set DOLBY DIGITAL to ON for audio output in the setup mode.
•
(See page 28 to set DOLBY DIGITAL to ON.)
Unless connected to a Dolby Digital decoder, set DOLBY DIGITAL to OFF for audio output in the setup
•
mode. Playing a TV/DVD using incorrect settings may generate noise distortion, and may also damage the
speakers.
Manufactured under license from Dolby Laboratories.“Dolby” and the double-D symbol are
trademarks of Dolby Laboratories.
–12–
–12––12–
EN
0C28
Page 13

SET UP FOR USE
TV SECTION
SELECTING THE LANGUAGE
TV
1 Plug in the TV/DVD power cord
Plug the TV/DVD power cord into a
standard AC outlet.
NOTE:
If any digits appear in the corner of
•
the screen, press POWER without
unplugging the power cord.
Make sure ...
Press POWER to turn on the TV/DVD.
•
NOTE: This function effects only the language on
the screen menu and not the audio source.
2 Select “LANGUAGE”
Press SETUP on the remote control.
Press Arrow (K/L) to point to
“LANGUAGE”.
3 Select “ENGLISH”, “ESPAÑOL” or “FRANÇAIS”
Select “ENGLISH”, “ESPAÑOL”= Spanish or
“FRANÇAIS”= French using ENTER.
4 Exit the Language mode
Press SETUP to return to TV mode.
NOTE: If for some reason the menu is in Spanish or
French, press SETUP, press Arrow (K/L) to point to
“IDIOMA [ESPAÑOL]” or “LANGAGE
[FRANÇAIS]”, then press ENTER, then press
SETUP on the remote control.
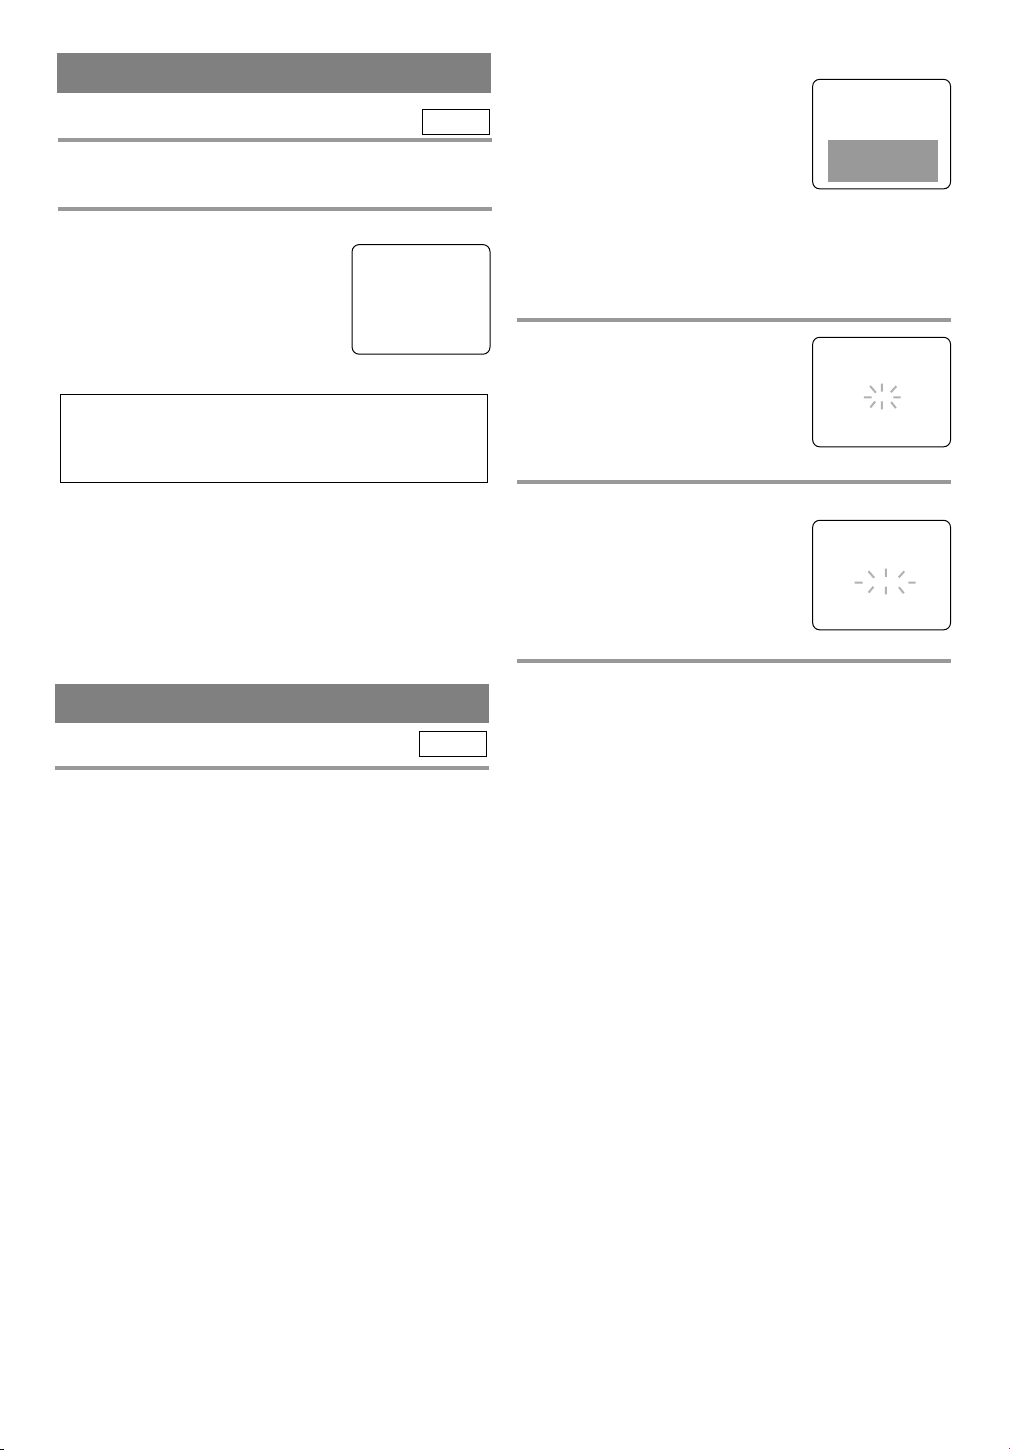
- TV SETUP -
CHANNEL SET UP
V-CHIP SET UP
B LANGUAGE [ENGLISH]
CAPTION [OFF]
CHANNEL SET UP
TV
You can program the tuner to scan all the channels
you receive in your area.
NOTE: Channel memory programming is NOT
needed when connected to a cable box or satellite
box. Just select the TV/DVD channel selector to the
output channel of the cable box or satellite box (Ex
CH3). Then select the channel to be viewed on the
Cable Box or Satellite Box.
Make sure ...
Press POWER to turn on the TV/DVD.
•
1 Select “CHANNEL SET UP”
Press SETUP on the remote control.
Press Arrow (K/L) to point to
“CHANNEL SET UP”.
Then, press ENTER.
2 Begin auto ch programming
Press Arrow (K/L) to point to
“AUTO CH PROGRAMMING”.
Then, press ENTER.
The tuner scans and memorizes all
the active channels in your area.
3 After scanning
The tuner stops on the lowest memorized channel.
When AUTO CH PROGRAMMING is activated
•
where there is no TV signal input, “NO TV SIGNALS” will appear on the display after the completion of the channel scanning.
The TV/DVD may memorize TV channels as
•
CATV channels if reception conditions are poor. If
this happens, check the antenna connections and
try the AUTO CH PROGRAMMING action again,
or wait until reception conditions are better and try
it again.
- TV SETUP -
B CHANNEL SET UP
V-CHIP SET UP
LANGUAGE [ENGLISH]
CAPTION [OFF]
– CHANNEL SET UP –
ADD / DELETE CH (CATV)
B AUTO CH PROGRAMMING
–13–
–13––13–
EN
0C28
Page 14

DELETING (OR ADDING)
CHANNELS
TV
The channels you no longer receive or seldom watch
can be deleted from the memory. (Of course, you can
add the deleted channel into the memory again.)
1 Select “CHANNEL SET UP”
Press SETUP on the remote control.
Press Arrow (K/L) to point to
“CHANNEL SET UP”.
Then, press ENTER.
- TV SETUP -
B CHANNEL SET UP
V-CHIP SET UP
LANGUAGE [ENGLISH]
CAPTION [OFF]
2 Select “ADD/DELETE CH”
Press Arrow (K/L) to point to
“ADD/DELETE CH”.
– CHANNEL SET UP –
B ADD / DELETE CH (CATV)
AUTO CH PROGRAMMING
Press ENTER.
3 Enter the desired channel number
Press Arrow (K/L) until your
desired channel number appears.
(You can also use the number buttons or CHANNEL(CH.) K/L to
08
ADD / DELETE
enter it) (Example: CH8)
You must precede single-digit
•
channel numbers with a zero (Example: 02 ... 09).
When selecting cable channels which are higher
•
than 99, press +100 first, then, press the last two
digits. (Example: to select channel 125, first press
+100, then press 2 and 5).
4 Delete (or add) it from (into) memory
Press ENTER. The channel number changes to light
red. The channel is deleted from memory.
To delete another channel, repeat steps [3] and [4].
•
If you press ENTER again, the channel is memo-
•
rized again.
Added channel: Light blue.
Deleted channel: Light red.
5 Exit the channel setup mode
Press SETUP to return to TV mode.
NOTE: To confirm that channel(s) has been deleted
or added, press CHANNEL(CH.) K/L.
–14–
–14––14–
EN
0C28
Page 15

TV OPERATION
to decrease
brightness
to decrease
contrast
to pale to brilliant
to green
to clear
to purple
to soft
to increase
brightness
to increase
contrast
BRIGHT
CONTRAST
COLOR
TINT
SHAPNESS
Arrow Button { Arrow Button B
WATCHING A TV PROGRAM
TV
1 Turn on the TV/DVD
Press POWER to turn on the TV/DVD.
2 Select the channel number
Press CHANNEL(CH.) K/L to select your desired
channel number or press the number buttons on the
remote control.
Note for using the number buttons:
¡When selecting cable channels which are higher
than 99, press +100 first, then press the last two
digits. (Example: to select channel 125, first press
“+100” then press “2” and “5”).
¡You must precede single-digit channel numbers
with a zero (For example: 02, 03, 04 and so on).
Remember:
¡If the TV/DVD is connected to a cable box or
satellite box, the TV/DVD must be on CH3 or
CH4, then the channel to be viewed must be selected on the cable box or satellite box.
3 Adjust sound
Press VOLUME(VOL.) XX/YYto
adjust the volume.
VOLUME 20
NOTE:
If you press CHANNEL(CH.) K/L in the DVD
•
mode, you can change the TV channels.
Even if you turn off the TV/DVD in the DVD
mode, when you turn it on again, it will go into the
TV mode.
C C C C C C C C C C C C C C C C
PICTURE CONTROL
TV
The TV/DVD’s picture controls – BRIGHT, CONTRAST, COLOR, TINT and SHARPNESS – are
preset to factory specifications. Although they are
usually the best, you may need to make some further
adjustments for a natural looking image.
Make sure ...
TV/DVD power must be turned on.
•
1 Select “PICTURE CONTROL”
Press PICTURE on the remote control.
2 Select item you want to adjust
Press Arrow (K/L) until desired control is displayed.
BRIGHT
CONTRAST
COLOR
TINT
SHARPNESS
3 Adjust the picture control
Press Arrow (B/s) to adjust to your desired level
within 5 seconds.
NOTE:
At step [3], the picture adjustment display will dis-
•
appear from the TV screen after about 5 seconds
unless you press any buttons, even though you may
not be finished. In this case, repeat from step [1].
BRIGHT
PP PP PP PP PP PP PP CC PP PP PP PP PP PP PP
–
+
DEGAUSSING
Magnetism from nearby appliances and speakers
might affect the color of the TV picture.
If this happens, move this unit away from the appliance. If the color is still not correct, disconnect power
cord from AC outlet then reconnect it after 30 minutes.
If there is a power failure of any kind, the unit will
•
retain its memory for this feature.
–15–
–15––15–
EN
0C28
Page 16
SLEEP TIMER
TV
T
he Sleep Timer function enables you to shut off the power
without pressing POWER after a desired time period.
1 Set “SLEEP TIMER”
Press SLEEP on the remote control.
You may change the sleep time by
pressing SLEEP on the remote control repeatedly. The timer is set up
to 120 minutes, 30 minutes each
time SLEEP is pressed.
To cancel the sleep timer:
Press SLEEP repeatedly until "SLEEP 0 MINUTE"
is displayed.
SLEEP 120 MINUTE
NOTE:
If the TV/DVD displays a black
box on the TV screen, this means
that the TV/DVD is set to the
TEXT mode. To clear screen, select
[CAPTION1], [CAPTION2] or
[OFF].
Make sure ...
TV/DVD power must be turned on.
•
1 Select “CAPTION”
Press SETUP on the remote control.
Press K or L to point to “CAP-
TION”.
- TV SETUP -
CHANNEL SET UP
V-CHIP SET UP
LANGUAGE [ENGLISH]
B CAPTION [OFF]
NOTES:
When you disconnect the unit from the AC outlet,
•
or if you have a power failure, the sleep time will
be lost.
To view the time left for sleep timer press SLEEP
•
once when SLEEP display disappears. After 10
seconds, display will disappear again.
CLOSED CAPTION SYSTEM
TV
You can view specially labeled (cc) TV programs,
movies, news, etc. with either a dialogue caption or
text display.
CAPTION mode: By choosing the caption mode, you
can watch dramas, movies and news while captioning
the dialogues and the contents of news.
TEXT mode: By choosing the text mode, you can
watch half screen text information.
1-2: You may get these captions or text information
by selecting either “1” or “2”. Caption “2” is used,
usually for a second language if available.
NOTE:
Not all programs are broadcast with closed captions.
Your television is designed to provide error free
closed captions from high quality antenna, cable and
VCR signals. Conversely, poor quality signals are
likely to result in caption errors or no captions at all.
Common signal conditions which may cause captions
errors are listed below:
Automobile ignition noise
•
Electric motor brush noise
•
Weak snowy reception on TV screen
•
Multiplex signal reception displaying picture
•
ghosts or airplane flutter.
2 Select your desired caption menu
Press ENTER until your desired
caption menu appears.
([CAPTION1], [CAPTION2],
CHANNEL SET UP
V-CHIP SET UP
LANGUAGE [ENGLISH]
B CAPTION [OFF]
[TEXT1] or [TEXT2])
3 Exit the caption setting mode
Press SETUP to return to TV mode.
TO CANCEL THE CLOSED CAPTION
SYSTEM
Repeat steps [1] and [2], select [OFF] using ENTER.
Press SETUP on the remote control to return to TV
mode.
WHEN THE CLOSED CAPTION MODE
IS ON
The On-Screen Display will disappear after 5 seconds.
This is also true when MUTE is pressed.
•
If there is a power failure of any kind, the unit will
•
retain its memory for this feature.
–16–
–16––16–
- TV SETUP -
EN
0C28
Page 17

V-CHIP SET UP
TV
V- CHIP enables parents to prevent their children
from watching inappropriate material on TV.
V- CHIP reads the ratings for programming (except
for news and sports programs, unedited movies on
premium cable channels, and Emergency Broadcast
System signals), then denies access to programming
if the program’s rating meets the limitations you
select. In this case, “PROTECTED PROGRAM by
...” message appears on the TV screen.
To block certain ratings, follow the steps below.
Programming may be rated by the Motion Picture
•
Association of America (MPAA) or according to
the Television Parental Guidelines. In order to
block any inappropriate programming, set your
limits in both places (MPAA RATING and TV
RATING).
TV RATING SET UP
Make sure ...
TV/DVD power must be turned on.
•
1 Select “V-CHIP SET UP”
Press SETUP on the remote control.
Press Arrow (K/L) to point to “V-
CHIP SET UP”.
Then, press ENTER.
2 Input Access code
Press the number buttons to enter 4digit access code. The default code
is 0000.
3 Select “TV RATING”
Press Arrow (K/L) to point to “TV
RATING”.
Then, press ENTER.
4 Select your desired item
Press Arrow (K/L) to point to your
desired item.
Then, press ENTER to select
[BLOCK] or [VIEW].
- TV SETUP -
CHANNEL SET UP
B V-CHIP SET UP
LANGUAGE [ENGLISH]
CAPTION [OFF]
ACCESS CODE
_ _ _ _
– V-CHIP SET UP –
B TV RATING
MPAA RATING
CHANGE CODE
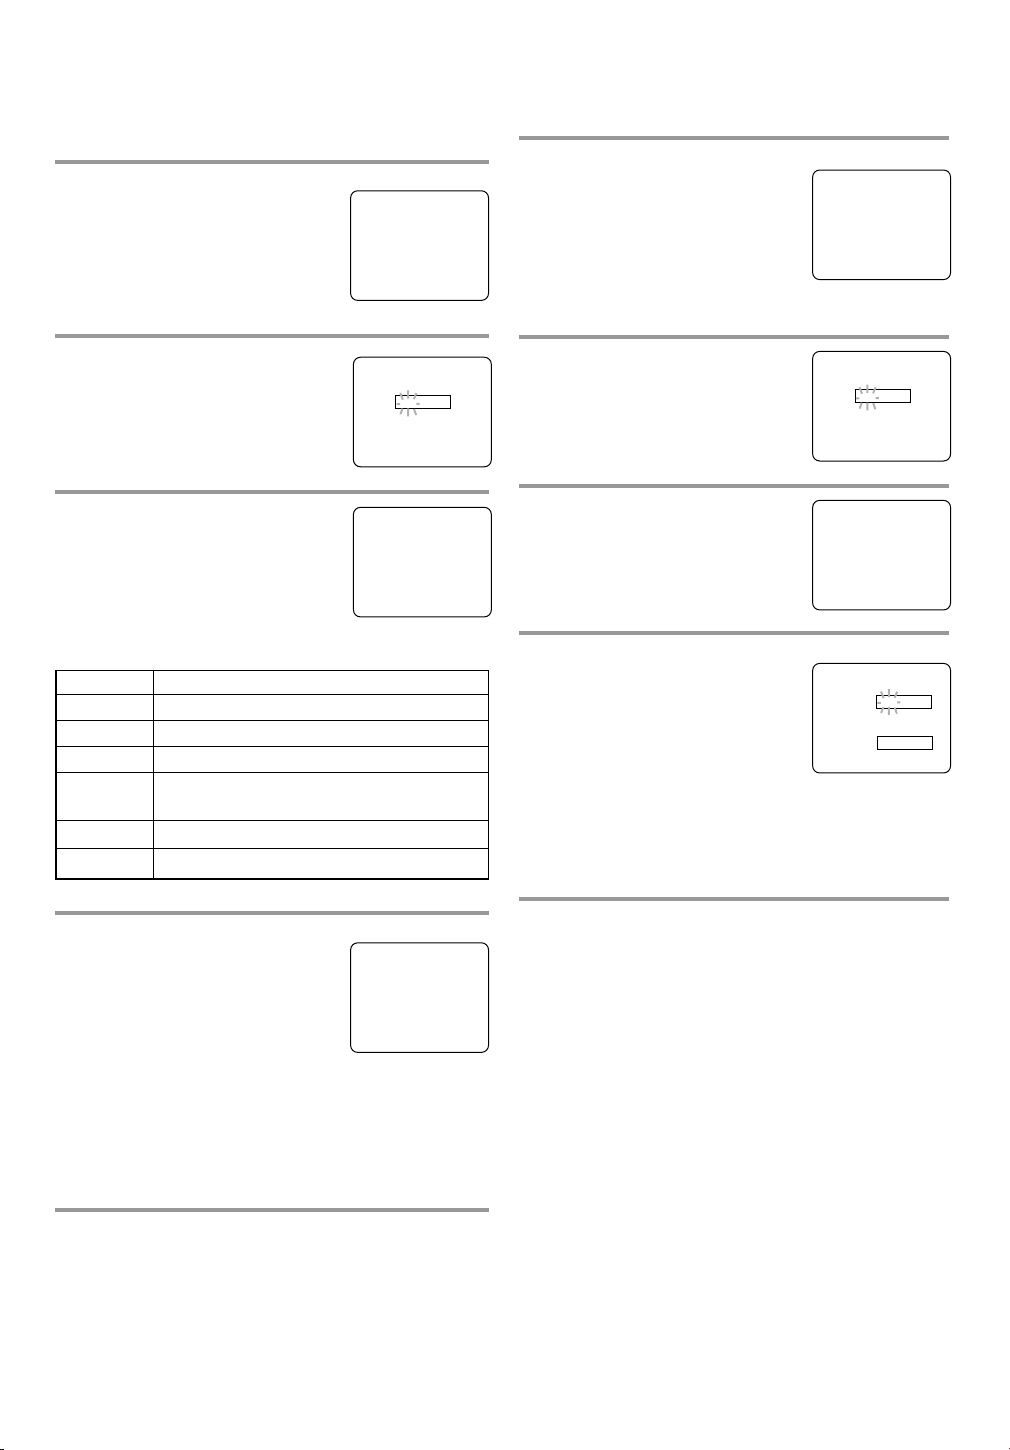
B TV–Y [VIEW]
TV–Y7 ( ) [VIEW]
TV–G [VIEW]
TV–PG ( ) [VIEW]
TV–14 ( ) [VIEW]
TV–MA( ) [VIEW]
When you select a rating category and turn it
•
[BLOCK], the higher rating will turn [BLOCK]
automatically. Also, the lower rating will turn
[VIEW] automatically.
When you turn “TV-Y” to [VIEW], all ratings will
•
turn to [VIEW] automatically.
Selection Rating Category Explanations
TV-Y Appropriate for all children
TV-Y7 Appropriate for children seven and older
TV-G General Audience
TV-PG Parental Guidance suggested.
TV-14 Unsuitable for children under 14
TV-MA Mature audience only
When you select TV-Y7, TV-PG, TV-14, or TV-MA
and you press ENTER, the sub-ratings will appear
on the TV screen.
If you select the rating category (example: TV-PG)
and turn it [BLOCK] or [VIEW], the sub-ratings
(example: V for Violence) will turn [BLOCK] or
[VIEW] automatically.
You can set the sub-ratings to [BLOCK] or [VIEW]
individually when the rating category is set to
[BLOCK].
To set the sub-ratings individually, follow the steps
below.
When you select [TV-Y7]:
•
Press Arrow (K/L) to select
“FV” (Fantasy Violence).
TV–Y7 [BLOCK]
B FV [BLOCK]
Then, press ENTER to select
[BLOCK] or [VIEW].
When you select [TV-PG], [TV-14] or [TV-MA]:
•
Press Arrow (K/L) to select
“D”(Suggestive Dialog),
“L”(Coarse Language),
“S”(Sexual Situation), or
TV–PG [BLOCK]
B D[BLOCK]
L[BLOCK]
S[BLOCK]
V[BLOCK]
“V”(Violence). Then, press
ENTER to select [BLOCK] or [VIEW].
NOTE: When you select [TV-MA], “D” does not
appear on the TV screen.
The sub-ratings which set to
•
[BLOCK] appears next to the rating category in the TV RATING
B TV–Y [VIEW]
TV–Y7 ( ) [VIEW]
TV–G [VIEW]
TV–PG (DLSV) [BLOCK]
TV–14 (DLSV ) [BLOCK]
TV–MA ( LSV) [BLOCK]
menu.
5 Exit the V-Chip setting mode
Press SETUP on the remote control to return to original mode.
–17–
EN
0C28
Page 18
MPAA RATING SET UP
Make sure ...
TV/DVD power must be turned on.
•
1 Select “V-CHIP SET UP”
Press SETUP on the remote control.
Press Arrow (K/L) to point to “V-
CHIP SET UP”.
Then, press ENTER.
- TV SETUP -
CHANNEL SET UP
B V-CHIP SET UP
LANGUAGE [ENGLISH]
CAPTION [OFF]
CHANGE ACCESS CODE
To change access code, follow the steps.
1 Select “V-CHIP SET UP”
Press SETUP on the remote control.
Press Arrow (K/L) to point to “VCHIP SET UP”.
Then, press ENTER.
B V-CHIP SET UP
- TV SETUP -
CHANNEL SET UP
LANGUAGE [ENGLISH]
CAPTION [OFF]
2 Enter 4-digit access code
Press the number buttons. The
default code is 0000.
3 Select “MPAA RATING”
Press Arrow (K/L) to point to
ACCESS CODE
_ _ _ _
– V-CHIP SET UP –
TV RATING
B MPAA RATING
CHANGE CODE
“MPAA RATING”.
Then, press ENTER.
Selection Rating Category Explanations
G General Audience
PG Parental Guidance suggested.
PG-13 Unsuitable for children under 13
R Restricted; under 17 requires accompa-
nying parent or adult guardian
NC-17 No one under 17 admitted
X Mature audience only
4 Select your desired item
Press Arrow (K/L) to point to your
desired item.
Then, press ENTER to select
[BLOCK] or [VIEW].
When you select the rating cate-
•
gory and turn it [BLOCK], the higher rating will
turn [BLOCK] automatically. Also, the lower rating will turn [VIEW] automatically.
When you turn “G” to [VIEW], all ratings will turn
•
to [VIEW] automatically.
G[VIEW]
PG [VIEW]
PG–13 [VIEW]
B R[BLOCK]
NC–17 [BLOCK]
X[BLOCK]
2 Enter 4-digit access code
Press the number buttons. The
ACCESS CODE
_ _ _ _
default code is 0000.
3 Select “CHANGE CODE”
Press Arrow (K/L) to point to
– V-CHIP SET UP –
TV RATING
MPAA RATING
B CHANGE CODE
“CHANGE CODE".
Then, press ENTER.
4 Enter 4-digit access code
Press the number buttons to enter
your desired access code in the
NEW CODE space. Then, enter the
same code in the CONFIRM
CODE space. V-CHIP SET UP
screen appear on the screen.
If you enter wrong code, repeat step 4, making
•
sure you enter the same new code exactly in the
confirm code space.
NEW CODE
_ _ _ _
CONFIRM CODE
_ _ _ _
5 Exit the V-Chip setting mode
Press SETUP on the remote control to return to original mode.
NOTE:
If you unplug the power cord or power failure
•
occurs, the changed access code will be lost and
will return to default (0000). Change your access
code again as necessary.
5 Exit the V-Chip setting mode
Press SETUP on the remote control to return to original mode.
–18–
EN
0C28
Page 19

ABOUT THE DISCS
Example
Title 1 Title 2
Chapter 1 Chapter 2 Chapter 1 Chapter 2Chapter 3 Chapter 4
Example
Track 1 Track 2 Track 3 Track 4 Track 5 Track 6
Example
Group 1 Group 2
Track 1 Track 2 Track 5 Track 6Track 3 Track 4
DVD SECTION
PLAYABLE DISCS
The following discs can be played back on this TV/DVD.
¡
DVD video
¡
DVD+R/RW*
¡
CD-R/RW*
* Depending on the type of disc or the writing method of
the medium some discs can not be played.
• Some DVD-R/RW, DVD+R/RW, or CD-R/RW discs
made on personal computers, or on DVD recorders may
not be played back properly due to the factors such as
scratches, dirt or special properties of the disc.
• Discs made on personal computers may not be played
back properly due to the different environment or the
settings of the application you use. We recommend
always to use the standardized, properly formatted
discs. (Please contact the sales agency for more detail).
This TV/DVD conforms to the NTSC color system. You
cannot play discs recorded in other color systems such as
PA L or SECAM.
¡Some discs include region codes as shown below.
¡
DVD-R/RW*
¡
Audio CD
¡
MP3*
DISC TYPES
[
]
DVD
Data on a DVD is divided into sections called "titles", and
then into subsections called "chapters", each of which is
given a title or chapter number. Playback conditions are
preset on some DVD video discs, and these playback conditions take priority over user operations on this
TV/DVD. If a function you selected does not run as
desired, refer to the manual accompanying the disc.
[
AUDIO CD
Data on an audio CD is divided into sections called
“tracks”, each of which is given a track number.
]
¡The number inside the symbol refers to a region of the
world, and a disc encoded in a specific region format
can only be played back on TV/DVD with the same
region code.
The following discs cannot be played back on this
TV/DVD.
¡
DVD with region codes other than 1 or ALL.
¡
DVD-ROM
¡
DVD-RAM (Never play back, otherwise malfunc-
¡
CD-ROM
¡
VSD
¡
CDV (Only plays back the audio part.)
¡
CD-G (Only plays back the sound.)
¡
CD-I (Never play back, otherwise malfunction
¡
SACD
¡
Photo CD (Never play back, otherwise malfunc-
¡
Video CD (Never play back, otherwise malfunc-
Any other discs without compatibility indications.
tion may result.)
may result.)
tion may result.)
tion may result.)
[
]
MP3
Data on an MP3 is divided into sections called "groups",
and then into subsections called "tracks", each of which is
given a group or track number.
–19–
–19––19–
EN
0C28
Page 20

PLAYING A DISC
BASIC PLAYBACK
DVD-V
Getting started
¡Turn on the power of amplifier and any other com-
ponents, if necessary.
1 Press POWER.
¡
The power will turn on.
2 Press OPEN/CLOSE to open disc loading
tray.
3 Place the chosen disc in the tray, with the
label facing up.
4 Press PLAY.
¡
The tray will close automatically and playback will
then start from the first chapter or track of the disc.
If the playback does not start automatically, press
PLAY.
¡When you playback a DVD which contains a title
menu, it may appear on the screen. In this case, refer
to “TITLE MENU”.
5 Press STOP to stop playback.
MP3CD
GENERAL FEATURES
DVD-V
DVD may contain menus to navigate the disc and
access special features. Press appropriate number buttons or use Arrow (K/L/s/B) to highlight your
selection in the DVD main menu and press ENTER to
confirm.
NOTES
¡Select DVD mode by pressing SELECT on the
remote control. Then, press PLAY or OPEN/CLOSE
before you operate the DVD functions.
¡Unless stated, all operations described are based on
remote control use. Some operations can be carried out
using the buttons on the front panel of the TV/DVD.
DISC MENU
DVD-V
1 Press DISC MENU.
¡
The DVD main menu will appear.
2 If the feature is not available, symbol
may appear on the TV screen.
3 If disc menu is available on the disc, audio
language, subtitle options, chapters for the
title and other options will appear for selection.
4 Press Arrow (K/L/s/B) to select an item,
and ENTER to confirm selection.
NOTES
¡When the DVD mode has been switched to the TV
mode, the DVD mode shuts down first and then TV
picture and sound appears in about 4 seconds.
Similarly, when POWER is pressed to turn off in the
DVD mode, this mode shuts down first and then the
TV/DVD’s power is turned off.
¡A “prohibited icon” may appear at
the top-right on the TV screen during operation, warning that a prohibited operation has been encountered by the DVD or the disc.
¡With DVDs that use titles for play-
back program signals, playback may start from the
second title, or it may skip these titles.
¡During the playback of a two layered disc, pictures
may stop for a moment. This happens when the 1st
layer switches to the 2nd layer. This is not a malfunction.
TITLE MENU
1 Press TITLE.
¡
The title menu will appear.
2 If the feature is not available, symbol
may appear on the TV screen.
3 Press Arrow (K/L/s/B) to select an item,
and ENTER to confirm selection.
CALLING UP A MENU SCREEN
DURING PLAYBACK
For DVD-Vs
¡Press DISC MENU to call up the DVD menu.
¡Press TITLE to call up the title menu.
NOTE
¡Contents of menus and corresponding menu opera-
tions may vary between discs. Refer to the manual
accompanying the disc for details.
–20–
–20––20––20–
DVD-V
EN
0C28
Page 21

RESUME
DVD-V
1 During playback, press STOP.
¡
Resume message will appear on the TV screen.
2 Press PLAY, playback will resume from the
point at which playback was stopped.
¡
To cancel resume, press STOP twice.
¡If TV/DVD is turned off, resume function will be
cancelled.
¡For MP3, playback will resume from the beginning
of the track at which playback was stopped.
MP3CD
PAUSE
FAST FORWARD/REVERSE
SEARCH
DVD-V
1 During playback, press and hold F.FWD g
or REV h for a few seconds.
¡
“ g 1” or “h 1” appears on the screen.
2 To select another speed, repeat step1 until
your required speed appears on the screen.
¡
For DVDs, fast forward/reverse search speed is different depending on the disc. Approximate speed is
1(×2), 2(×8), 3(×50) and 4(×100).
¡For audio CDs, approximate speed is ×16.
¡For MP3, approximate speed is ×8
¡When you use buttons on the main unit, use SKIP
G / SEARCH g or SKIP H / SEARCH h.
MP3CD
DVD-V
1 During playback, press PAUSE.
¡
Playback will pause and sound will be muted.
2 To continue playback, press PLAY.
STEP BY STEP PLAYBACK
1 During playback, press PAUSE.
¡
Playback will pause and sound will be muted.
2 The disc goes forward by one frame each
time PAUSE is pressed.
3 To exit step by step playback, press PLAY.
MP3CD
DVD-V
3 To return to normal playback, press PLAY.
SLOW FORWARD /
SLOW REVERSE
DVD-V
1 During playback, press PAUSE.
2 Press and hold F.FWD g or REV h for
a few seconds.
¡
“ 1” or “ 1” appears on the screen.
3 To select another speed, repeat step2 until
your required speed appears on the screen.
¡
Slow forward or reverse speed varies with the disc.
Approximate speed is 1(1/16), 2(1/8) and 3(1/2).
¡When you use buttons on the main unit, use SKIP
G / SEARCH g or SKIP H / SEARCH h.
4 To return to normal playback, press PLAY.
–21–
–21––21––21–
EN
0C28
Page 22

SEARCH FUNCTION
TRACK SEARCH
MP3CD
There are three ways to begin playback on an Audio
CD and MP3 at a specific track.
Using the number buttons on the remote control
1 Press the number buttons to enter the
desired Track number.
¡
Playback will start at the selected track.
¡For single digit tracks (1-9), press a single number
(eg. track 3, press 3).
¡To play track 26, press +10, 2, 6.
Using SEARCH MODE
1 Press SEARCH MODE.
¡
The track search display appears.
2 Within 30 seconds, select a desired track
number using the number buttons on the
remote control.
¡
For single digits press 0 first.
¡Playback will start at the selected track.
Using SKIP
During playback, press SKIP G to move to the next
track. Press it repeatedly to skip subsequent tracks.
Press SKIP H to go back to beginning of the current
track. Press it repeatedly to go to the previous tracks.
¡If SKIP is pressed while the playback is paused, the
playback will be paused again after skipping to the
next track.
NOTE
¡SKIP HG are not available when playback is
stopped.
HG
TIME SEARCH
DVD-V
1 During playback, press SEARCH MODE
three times (CD: twice) to display the Time
Search on the TV screen.
2 Within 30 seconds, enter a desired disc
time using the number buttons on the
remote control.
¡
Playback will start at the specified time.
¡Press CLEAR to erase the incorrect input.
¡When there is no need to enter a number, “0”
appears automatically. For example, “ 0 : 0 - :
appears in the Time Search display if the total time
of the disc is less than 10 minutes.
CD
- -
MARKER SETUP SCREEN
DVD-V
Use markers to memorise your favorite places on a
disc.
1 Press SEARCH MODE four times (CD: three
times) during playback.
¡
The display screen and Markers will appear on the
TV screen.
2 Press Arrow (s/ B) to select 1, 2, 3, 4, 5, 6,
7, 8, 9, or 10 and ensure that “
appears in the display.
- - - - :- - :- -
3 When you reach the desired point, press
ENTER.
¡
The Title or Track and elapsed playing time will
appear in the TV screen.
CD
”
”
TITLE / CHAPTER SEARCH
DVD-V
1 Press SEARCH MODE once for the Chapter
search, twice for the Title search during
playback.
_/2
2 Enter the desired chapter/title number using
the number buttons on the remote control.
¡
Playback will start at the selected Chapter or Track.
¡Press CLEAR to erase the incorrect input.
¡For single digit chapters/titles press 0 first.
4 To return to the Marker later, press SEARCH
MODE four times (CD: three times) during
playback and Arrow (s/ B) to choose the
desired marker, then press ENTER.
NOTES
¡Opening the disc tray or turning off the power or
selecting AC at step 2 and pressing ENTER will
erase all Markers.
¡To clear a marker, using Arrow (s/ B
)
, position the
cursor on to the marker number to be cleared and
press CLEAR.
¡You can mark up to 10 points.
5 Press SEARCH MODE or RETURN to exit.
–22–
–22––22––22–
EN
0C28
Page 23

SPECIAL PLAYBACK FUNCTION
REPEAT
REPEAT is available only during playback.
REPEAT TITLE / CHAPTER
DVD-V
To activate the repeat function, press REPEAT
during playback.
¡
The repeat mode changes as described below every
time you press the button.
CHAPTER TITLE OFF
(current chapter repeat) (current title repeat)
NOTES
¡Repeat Title/Chapter is not available with some
scenes.
¡The REPEAT setting will be cleared when moving
to other title or chapter.
REPEAT TRACK
To activate the repeat function, press REPEAT
during playback.
¡
The repeat mode changes as described below every
time you press the button.
TRACK ALL OFF
(current track repeat) (entire disc repeat)
NOTES
¡Repeat setting will be cleared when moving to
aother track.
¡Repeat playback does not function during repeat A-
B playback.
REPEAT A-B
DVD-V
1 Press REPEAT A-B at your chosen starting
point.
¡
A- appears briefly on the TV screen.
(repeat off)
CD
(repeat off)
CD
PROGRAM
CD
You may determine the order in which tracks will play.
1 In stop mode, press MODE.
¡
The PROGRAM screen will appear.
2 Press Arrow (▲/▼) to select a track, then
press ENTER.
¡
Press CLEAR to erase the
TOTAL
most recently entered program.
3 Repeat step 2 until you have selected all the
tracks you want to play in the program.
4 Press PLAY to play the programmed tracks.
NOTES
¡While the program is being played back, STOP
works as follows.
¡Press STOP once and then PLAY again, playback
will restart from the point where STOP was pressed.
(Program continued)
¡Press STOP twice and then PLAY again, playback will
restart from the track in the usual way. (Program cleared)
¡Up to 99 programs can be entered.
¡To erase all programs at once, select ALLCLEAR at
the bottom of the list at Step2.
¡If you like to repeat the current track in the program,
press REPEAT repeatedly until TRACK appears
during playback. If you like to repeat the entire program press REPEAT repeatedly until ALL
appears during playback.
RANDOM PLAYBACK
CD
This shuffles the playing order of tracks instead of
playback in sequence.
2 Press REPEAT A-B again at your chosen
end point.
¡
A-B appears briefly on the TV screen, and the
repeat sequence begins.
3 To exit the sequence, press REPEAT A-B.
NOTES
¡The repeat A-B section can only be set within the cur-
rent title (for DVDs), or current track (for audio CDs).
¡Repeat A-B is not available with some scenes in DVD.
¡To cancel the A point which was set, press CLEAR.
¡Repeat A-B playback does not function during title,
chapter, track or all repeat playback.
1 In stop mode, press MODE twice.
¡
RANDOM screen appears.
RANDOM
CD-DA TOTAL 0:45:55
PLAY
RANDOM PROGRAM
- - no indication - -
2 Press PLAY to start random playback.
NOTE
¡If you like to repeat the current track in the random
selection, press REPEAT repeatedly until
TRACK appears during playback. If you like to
repeat the entire random selection press REPEAT
repeatedly until ALL appears during playback.
–23–
–23–
EN
0C28
Page 24

3
PLAYING A MP3 DISC
MP3 PLAYBACK
MP3
When a CD with MP3 files is in the TV/DVD, press
DISC MENU to call up the MP3 menu on the TV
screen.
1 In stop mode, press Arrow (K/L) to select
the desired group or
track.
¡
If a group is selected, press
or ENTER to go on to the
track selection screen. Press
Arrow (K/L) to choose a
B
folder name 1
folder name 2
folder name 3
folder name 4
file name 1
file name 2
file name 3
folder name 1
track, then press ENTER.
¡If a track is selected, press ENTER to start playing
tracks. Starting from the one you’ve just chosen the
subsequent tracks will be played in order of appearance.
¡Press TITLE to return to the first item.
2 Press STOP to stop playback.
NOTES
¡Folders are known as Groups; files are known as
Tracks.
¡MP3 files are accompanied by icon.
¡Maximum of 255 folders can be recognized.
¡Maximum of 512 files can be recognized.
¡Up to 8 hierarchies can be created.
We recommend the use of files recorded at the below
specifications:
¡Sampling frequency: 44.1kHz or 48kHz
¡Constant bit rate: 112kbps ~ 320kbps.
REPEAT
REPEAT is available only during playback.
PROGRAM
MP3
This feature allows you to program an MP3 disc to
play in a desired sequence.
1 In stop mode, press MODE.
¡
The PROGRAM screen will appear.
2 Select a desired track using Arrow (K/L/s/B).
Then, press ENTER.
¡
Press B when you want to go to the next hierarchy.
¡Press s when you want to go back to the previous
hierarchy.
¡Press CLEAR to erase the most recently entered pro-
gram.
3 Repeat step 2 until you have selected all the
Tracks you want to play in the program.
4 Press PLAY to start programmed playback.
NOTES
¡While the program is being played back, the STOP
works as follows.
¡Press STOP once and then PLAY again, playback
will restart from the point where STOP was pressed.
(Program continued)
¡Press STOP twice and then PLAY again, playback will
restart from the track in the usual way. (Program cleared)
¡To erase all programs at once, select ALLCLEAR at
the bottom of the list at Step2.
RANDOM PLAYBACK
MP3
1 In stop mode, press MODE twice.
¡
RANDOM screen appears.
To activate the repeat function, press REPEAT
during playback.
¡
The repeat mode changes as described below every
time you press the button.
TRACK ALL OFF
(current track
repeat)
GROUP
(current group
repeat)
(entire disc
repeat)
NOTE
¡Repeat setting will be cleared when moving to other
track.
MP3
(repeat off)
2 Press PLAY to start random playback.
–24–
–24––24––24–
EN
0C28
Page 25

CHANGING THE SETTINGS
OFF
SUBTITLE LANGUAGE CAMERA ANGLE
DVD-V
The DVD allows you to select a language for subtitles
during DVD disc playback (if available).
1 Press SUBTITLE during playback.
2 Press SUBTITLE repeatedly to select your
desired subtitle language.
¡
The subtitle language will be displayed on the display bar at the top of the screen.
3 To turn off subtitles, press SUBTITLE
repeatedly until OFF appears.
NOTES
¡
Some discs allow audio language setting/subtitle language
setting on the disc menu. (Operation varies between discs,
so refer to the manual accompanying the disc.)
¡If the desired language is not shown after pressing
SUBTITLE several times, the disc does not have
subtitles in that language.
¡If you choose a Language that has a 3 letter language
code, the code will be displayed every time you
change the Subtitle language setting. If you choose
any other languages, ‘---’ will be displayed instead.
(Refer to page 27.)
AUDIO LANGUAGE
DVD-V
DVD-V
Some DVD discs contain scenes which have been shot
simultaneously from various angles. You can change
the camera angle when the ( ) icon appears on the
screen.
1 Press ANGLE during playback.
¡
The selected angle will be displayed on the display
bar at the top of the screen.
2 Press ANGLE repeatedly to select your
desired angle.
BLACK LEVEL SETTING
DVD-V
Adjust the Black Level Settings to make the black
parts of the picture brighter.
1 Press MODE during playback.
OFF
2 Press ENTER to switch ON/OFF.
ON: Makes the dark parts brighter.
OFF: Shows the original picture as recorded.
The TV/DVD allows you to select a language during
DVD disc (if multi languages are available) playback.
1 Press AUDIO during playback.
2 Press AUDIO repeatedly to select your
desired language.
NOTE
¡Pressing AUDIO may not work on some DVDs with
multiple audio languages (e.g. DVDs which have
audio language settings on the disc menu).
STEREO SOUND MODE
CD
1 Press AUDIO repeatedly during playback to
select between STEREO, L-CH or R-CH.
¡
STEREO - both right and left channels are active
(stereo)
L-CH - only left channel is active
R-CH - only right channel is active
NOTE
¡If the Virtual Surround setting is ON, the sound
mode will be fixed to STEREO, and can not be
changed.
3 Press MODE twice or RETURN to exit.
NOTE
¡The setting will be saved even if the TV/DVD is
turned off.
VIRTUAL SURROUND
DVD-V
You can enjoy surround-sound effect over two speakers on this TV/DVD.
1 Press V.SURR once or MODE twice
(CD/MP3: once) during playback.
2 Press ENTER to set it 1 (Natural effect) or 2
(Emphasized effect) or OFF.
3 Press V.SURR or MODE or RETURN to exit.
NOTE (for CD play only)
¡Virtual Surround will not be effective if the sound
mode is set to something other than STEREO.
–25–
–25––25––25–
MP3CD
EN
0C28
Page 26

THE ON-SCREEN INFORMATION
DVD-V
You can check the information about the current disc by pressing DISPLAY on the remote control.
For DVD-Vs
1 Press DISPLAY during playback to show
current Chapter.
¡
The elapsed and remaining
playing time of the current
chapter will be displayed.
9/49 0:00:00 -0:03:30
For audio CDs
1 Press DISPLAY during playback to show
the current Track.
¡
The elapsed and remaining playing time of the current track will be displayed.
2 Press DISPLAY again to show current Total
2 Press DISPLAY again to show current Title.
¡
The elapsed and remaining playing time of the current title will be displayed.
3 Press DISPLAY again.
¡
The BIT RATE and the current repeat setting will be
displayed.
¡If you are playing a dual layered disc, the layer num-
ber will also be displayed (L0: Layer 0 is playing.
L1: Layer 1 is playing).
4 Press DISPLAY again to exit the display.
Track.
¡
The elapsed and remaining playing time of the current track will be displayed.
3 Press DISPLAY again to exit the display.
For MP3
1 Press DISPLAY during playback.
¡
The name of the file currently in play will be displayed.
2 Press DISPLAY again to show the track
number, the elapsed time, the repeat status,
and the playback status at the top of the
screen.
¡
will be displayed when repeat play has been
selected.
T- indicates Track repeat
G - indicates Group (folder) repeat
A- indicates Disc repeat
MP3CD
3 Press DISPLAY again to exit the display.
–26–
–26––26––26–
EN
0C28
Page 27

CHANGING THE DVD SETUP ITEMS
LANGUAGE SETTING
DVD-V
Language options are not available with some discs.
1 Press SETUP twice in STOP mode so that
the DVD SETUP menu appears.
¡
If the menu does not appear, press PLAY, STOP,
then SETUP twice.
SETUP
QUICK
CUSTOM
INITIALIZE
2 Press Arrow L to select “CUSTOM”, then
press ENTER.
¡
CUSTOM mode will appear.
3 Press Arrow (K/L) to select “LANGUAGE”,
then press ENTER to confirm.
SETUP CUSTOM
LANGUAGE
DISPLAY
AUDIO
PARENTAL
4 Press Arrow (K/L) to select the next items,
then press ENTER.
AUDIO: Sets the audio language.
SUBTITLE: Sets the subtitle language.
DISC MENU: Sets the language for DVD menu.
5 Press Arrow (K/L) to select a setting, then
press ENTER.
¡
If OTHER is selected on the AUDIO, SUBTITLE or
DISC MENU screen, press four-digit number to
enter the code for the desired language. (Refer to the
language code list.)
¡Only the languages supported by the disc can be
selected.
6 Press SETUP to exit.
NOTE
¡Language Setting for Audio and Subtitle is not avail-
able with some discs. Then use the AUDIO and the
SUBTITLE button. Details are on page 25.
TO CHANGE THE ON-SCREEN MENUS
You can access the TV SETUP menu by pressing
SETUP from the DVD mode. Refer to “Selecting the
Language” on page 13 to changing the on-screen
menus.
¡In case of selecting from the DVD mode, you cannot
select “CHANNEL SET UP” menu.
Language Code
Abkhazian 4748
Afar 4747
Afrikaans 4752
Albanian 6563
Amharic 4759
Arabic 4764
Armenian 5471
Assamese 4765
Aymara 4771
Azerbaijani 4772
Bashkir 4847
Basque 5167
Bengali;Bangla 4860
Bhutani 5072
Bihari 4854
Bislama 4855
Breton 4864
Bulgarian 4853
Burmese 5971
Byelorussian 4851
Cambodian 5759
Catalan 4947
Chinese [CHI] 7254
Corsican 4961
Croatian 5464
Czech 4965
Danish [DAN] 5047
Dutch [DUT] 6058
English [ENG] 5160
Esperanto 5161
Estonian 5166
Faroese 5261
Fiji 5256
Finnish [FIN] 5255
French [FRE] 5264
Frisian 5271
Galician 5358
Georgian 5747
German [GER] 5051
Greek [GRE] 5158
Greenlandic 5758
Guarani 5360
Gujarati 5367
Hausa 5447
Hebrew 5569
Hindi 5455
Hungarian [HUN] 5467
Icelandic [ICE] 5565
Indonesian 5560
Interlingua 5547
Interlingue 5551
Inupiak 5557
Irish [IRI] 5347
Italian [ITA] 5566
Japanese [JPN] 5647
Javanese 5669
Kannada 5760
Kashmiri 5765
Kazakh 5757
Kinyarwanda 6469
Kirghiz 5771
Kirundi 6460
Korean [KOR] 5761
Kurdish 5767
A-B
C-E
F-H
I-K
Language Code
Laothian 5861
Latin 5847
Latvian;Lettish 5868
Lingala 5860
Lithuanian 5866
Macedonian 5957
Malagasy 5953
Malay 5965
Malayalam 5958
Maltese 5966
Maori 5955
Marathi 5964
Moldavian 5961
Mongolian 5960
Nauru 6047
Nepali 6051
Norwegian [NOR] 6061
Occitan 6149
Oriya 6164
Oromo(Afan) 6159
Panjabi 6247
Pashto;Pushto 6265
Persian 5247
Polish 6258
Por tuguese [POR] 6266
Quechua 6367
Rhaeto-Romance 6459
Romanian [RUM] 6461
Russian [RUS] 6467
Samoan 6559
Sangho 6553
Sanskrit 6547
Scots Gaelic 5350
Serbian 6564
Serbo-Croatian 6554
Sesotho 6566
Setswana 6660
Shona 6560
Sindhi 6550
Singhalese 6555
Siswat 6565
Slovak 6557
Slovenian 6558
Somali 6561
Spanish [SPA] 5165
Sundanese 6567
Swahili 6569
Swedish [SWE] 6568
Tagalog 6658
Tajik 6653
Tamil 6647
Tatar 6666
Telugu 6651
Thai 6654
Tibetan 4861
Tigrinya 6655
Tonga 6661
Tsonga 6665
Tu rkish [TUR] 6664
Tu rkmen 6657
Tw i 6669
Ukrainian 6757
Urdu 6764
Uzbek 6772
Vietnamese 6855
Volapuk 6861
Welsh 4971
Wolof 6961
Xhosa 7054
Yiddish 5655
Yo r uba 7161
Zulu 7267
L-N
O-R
S
T
U-Z
If you choose a Language that has a 3 letter language
code, the code will be displayed every time you change
the Audio or Subtitle language setting on page 25. If
you choose any other languages, ‘---’ will be displayed
instead. (3 letter language code is written in bracket.)
–27–
–27––27––27–
EN
0C28
Page 28

DISPLAY SETTING
AUDIO SETTINGS
DVD-V
You can change certain aspects of the DVD display
screens and on-screen messages on the TV screen.
1 Press SETUP twice in STOP mode so that
the DVD SETUP menu appears.
¡
If the menu does not appear, press PLAY, STOP,
then SETUP twice.
SETUP
QUICK
CUSTOM
INITIALIZE
2 Press Arrow L to select “CUSTOM”, then
press ENTER.
¡
CUSTOM mode will appear.
3 Press Arrow (K/L) to select “DISPLAY”,
then press ENTER to confirm.
SETUP CUSTOM
LANGUAGE
DISPLAY
AUDIO
PARENTAL
4 Press Arrow (K/L) to select the below items,
then press ENTER.
TV MODE:
¡Press Arrow (K/L) for an item selection, then press
ENTER.
¡Select 4:3 LETTER BOX for black bars to appear on
top and bottom of the screen.
¡Select 4:3 PAN & SCAN for a full height picture
with both sides trimmed.
¡The default setting is 4:3 LETTER BOX.
STILL MODE:
¡Press Arrow (K/L) for an item selection, then press
ENTER.
¡Select “AUTO” usually.
¡If you select “FIELD”, the picture in the still mode
will be stabilized.
¡If you select “FRAME”, the picture in the still mode
will be highly defined.
ANGLE ICON:
¡Press ENTER repeatedly to turn Angle icon ON or
OFF.
¡The default setting is ON.
AUTO POWER OFF:
¡Press ENTER repeatedly to turn Auto Power off ON
or OFF.
¡
The default setting is ON and it will turn the TV/DVD
off automatically after 15 minutes of no use.
QUICK
DVD-V
Choose the appropriate Audio settings for your equipment as it only affects the playback of DVD discs.
1 Press SETUP twice in STOP mode so that
the DVD SETUP menu appears.
¡
If the menu does not appear, press PLAY, STOP,
then SETUP twice.
SETUP
QUICK
CUSTOM
INITIALIZE
2 Press Arrow L to select “CUSTOM”, then
press ENTER.
¡
CUSTOM mode will appear.
3 Press Arrow (K/L) to select “AUDIO”, then
press ENTER to confirm.
SETUP CUSTOM
LANGUAGE
DISPLAY
AUDIO
PARENTAL
4 Press Arrow (K/L) to select the below items,
then press ENTER.
DRC (Dynamic Range Control):
¡To compress the range of sound volume.
¡The default setting is ON.
DOWN SAMPLING:
¡Set to ON when outputting in 48 kHz.
¡The default setting is ON.
When playing disc with copyright Protection
¡If you select OFF, copyright protection will be acti-
vated and sound will be down sampled at 48kHz.
DOLBY DIGITAL:
QUICK
Set to On when the unit is connected to a Dolby Digital
Decoder.
(ON: Output by Dolby Digital)
(OFF: Convert the Dolby Digital to PCM (2 channel
stereo))
¡The default setting is ON.
5 Press SETUP to exit.
5 Press SETUP to exit.
–28–
–28––28––28–
EN
0C28
Page 29

PARENTAL CONTROL
DVD-V
Parental Control limits the disc viewing that exceed
your settings. (requires a password or playback will
stop.)
This feature allows you to prevent discs with alternative scenes from being played by your children.
PARENTAL LEVEL
Parental Level allows you to set the rating level of
your DVD discs. Playback will stop if the disc’s ratings exceed the level you set.
1 Press SETUP twice in STOP mode so that
the QUICK SETUP menu appears.
¡
If the menu does not appear, press PLAY, STOP,
then SETUP twice.
SETUP
QUICK
CUSTOM
INITIALIZE
CONTROL LEVELS
¡
ALL
All parental lock is cancelled.
¡
Level 8
DVD software of any grade (adult/general/children)
can be played back.
¡
Levels 7 to 2
Only DVD software intended for general use and
children can be played back.
¡
Level 1
Only DVD software intended for children can be
played back, with those intended for adult and
general use is prohibited.
IF YOU FORGET THE PASSWORD
1 Press the number buttons 4, 7, 3, 7 at step
4. Then enter your new password.
¡
Password will be cleared and parental level will be
set to ALL.
2 Follow Steps [5]-[7] again.
2 Press Arrow L to select “CUSTOM”, then
press ENTER.
3 Press Arrow (K/L) to select “PARENTAL”,
then press ENTER.
SETUP CUSTOM
LANGUAGE
DISPLAY
AUDIO
PARENTAL
4 Enter your four-digit password then press
ENTER.
5 Press Arrow (K/L) to select PARENTAL
LEVEL, then press ENTER.
6 Press Arrow (K/L) to select the desired
level, then press ENTER.
7 Press SETUP to exit.
NOTES
¡When doing this for the first time, enter any 4 digits.
(except for 4737) That number will be used as the
password from the second time onward.
¡To change the password, press Arrow (K/L) to
select CHANGE at step 5, then press ENTER. Enter
the four-digit password, then press ENTER.
¡With some DVDs, it may be difficult to find if they
are compatible with parental lock. Be sure to check
if the parental lock function operates the way you
have set it.
¡Record the password in case you forget it.
INITIALIZE
This allows you to return all selections of SETUP
(except for PARENTAL) to their default settings.
1 Press SETUP twice in STOP mode so that
the INITIALIZE menu appears.
2 Press Arrow (K/L) to select “INITIALIZE”,
then press ENTER.
3 Select “YES”, then press ENTER twice. All
the settings (except for “PARENTAL”) will be
cleared.
¡
To cancel the initialization, select “NO”.
4 Press SETUP to exit.
–29–
–29––29––29–
EN
0C28
Page 30

TROUBLESHOOTING GUIDE
If the TV/DVD does not perform properly when operated as instructed in this Owner’s Manual, check the
TV/DVD, consulting the following checklist.
Problem Corrective Action
No power.
The TV/DVD does not respond to
the remote control.
TV Mode
Problem Corrective Action
No Picture or Sound
Bars On Screen
Picture Distorted or Blurred
Picture Rolls Vertically
Lines or Streaks in Picture
No Color
Poor Reception on Some Channels
Ghosts in Picture
Weak Picture
Sound OK, Picture Poor
Picture OK, Sound Poor
Different color marks on screen.
Make sure the power plug is connected to an AC outlet.
•
Make sure the power is turned on.
•
Check if the power plug is connected to an AC outlet.
•
Check the batteries in the remote control.
•
Aim the remote control directly at the remote sensor. If necessary,
•
remove all the obstacles between the sensor and the remote.
You have to be within 23 feet of the TV/DVD.
•
Check if the correct mode is selected. If not switch the mode by
•
pressing SELECT on the remote control,whichever you need.
Try a new channel, if OK, then possible station trouble.
•
Make sure the power is turned on.
•
Press SELECT on the remote control to select TV mode. Then try
•
other TV feature.
Is antenna connected to terminal on the back of the set?
•
If outside antenna is being used, check for broken wire.
•
If outside antenna is being used, check for broken wire.
•
Check for local interference.
•
Try a new channel, if OK, then possible station trouble.
•
If outside antenna is being used, check for broken wire.
•
Try a new channel, if OK, then possible station trouble.
•
If outside antenna is being used, check for broken wire.
•
Check for local interference.
•
Try a new channel, if OK, then possible station trouble.
•
Is antenna connected to terminal on the back of the set?
•
If outside antenna is being used, check for broken wire.
•
Adjust COLOR control.
•
Try a new channel, if OK, then possible station trouble.
•
Is antenna connected to terminal on the back of the set?
•
If outside antenna is being used, check for broken wire.
•
Check for local interference.
•
Try a new channel, if OK, then possible station trouble.
•
Is antenna connected to terminal on the back of the set?
•
If outside antenna is being used, check for broken wire.
•
Adjust CONTRAST & BRIGHT control.
•
Try a new channel, if OK, then possible station trouble.
•
Is antenna connected to terminal on the back of the set?
•
If outside antenna is being used, check for broken wire.
•
Check for local interference.
•
Adjust CONTRAST & BRIGHT control.
•
Try a new channel, if OK, then possible station trouble.
•
Check for local interference.
•
Magnetism from nearby appliances and geomagnetism might affect
•
the color of the TV picture. Move the TV/DVD away from the appliances, the TV/DVD can repair itself automatically. If you want to
repair immediately, unplug the TV/DVD power cord, then plug it in
again 30 minutes or so later.
–30–
–30––30––30––30–
EN
0C28
Page 31

Closed Caption Problem Possible Remedy
My TV/DVD is showing captions • You are watching a live broadcast and spelling errors made by the
that are misspelled. • closed captioning production company may pass through uncorrected.
• A prerecorded program will not show any misspelled words because
• of the normal time available for editing the captions.
My TV/DVD will not show the text • Captions that are delayed a few seconds behind the actual dialogue
in its entirety or there is a delay of • are common for live broadcast. Most captioning production companies
what is being said. • can display a dialogue to a maximum of 220 words per minute. If a
• dialogue exceeds that rate, selective editing is used to insure that the
• captions remain up-to-date with the current TV screen dialogue.
My captions are scrambled with • Interference caused by building, power lines, thunderstorms, etc.
white boxes on the TV screen. • may cause scrambled or incomplete captions to appear.
My program guide listed a TV show
as being closed captioned but none • actual program so that additional advertising time can be given.
of the captions were displayed. • Since the decoder cannot read the compressed information,
My TV/DVD screen shows a black • You are in the TEXT mode. Select CAPTION mode or CAPTION
box on certain channels. • [OFF].
• Broadcasters may at times use a time compression process to the
• captions will be lost.
DVD Mode
Problem Corrective Action
No picture • Connect the video cables firmly.
• Insert a correct video disc that plays on this TV/DVD.
• Press SELECT on the remote control to select DVD mode. Next,
press PLAY or OPEN/CLOSE. Then, try other DVD feature.
Disc cannot be played
No sound
No DTS audio is output
Distorted picture
Audio or subtitle language • The selected language is not available for audio or subtitles on the
does not match the set up DVD.
The camera angle cannot be • The DVD does not contain sequences recorded from different camera
changed angles. This is not a malfunction
Audio or subtitle language cannot • The DVD does not contain audio source or subtitles in the selected
be changed language. This is not a malfunction.
“Prohibited icon” appears on the • That operation is prohibited by the TV/DVD or the disc.
screen, prohibiting an operation This is not a malfunction.
CD sound dropout • Scratched disc. Replace the disc with unscratched one.
No CD reproduction
DVD picture dropout
DVD picture freeze
DVD picture in mosaic
No DVD reproduction
• Insert the disc.
• Clean the disc.
• Place the disc correctly, with the label side up.
• Cancel the parental lock or change the control level.
• Connect the audio cables firmly.
• Turn the power of the audio component on.
• Correct the audio output settings.
• Correct the input settings on the audio component.
• This TV/DVD does not support DTS audio. This is not a malfunction.
• There are some cases where pictures may be slightly distorted, which
are not a sign of a malfunction.
• Although pictures may stop for a moment, this is not a malfunction.
This is not a malfunction
NOTES:
Some functions are not available in specific modes, but this is not a malfunction. Read the description in
•
this Owner’s Manual for details on correct operations.
Playback from a desired track and random playback are not available during program playback.
•
–31–
–31––31––31––31–
EN
0C28
Page 32

MAINTENANCE
RecordableRecordable
ReWritableReWritable
CABINET CLEANING
Wipe the front panel and other exterior surfaces of
•
the TV/DVD with a soft cloth immersed in lukewarm water and wrung dry.
Never use a solvent or alcohol. Do not spray insec-
•
ticide liquid near the TV/DVD. Such chemicals
may cause damage and discoloration to the
exposed surfaces.
SERVICING
Should your TV/DVD become inoperative, do not
•
try to correct the problem by yourself. There are no
user-serviceable parts inside. Turn off, unplug the
power cord, and please call our help line at 1-800242-7158, to locate an Authorized Service Center.
IF THE LASER OPTICAL PICKUP UNIT IS DIRTY
If the TV/DVD still does not perform properly when it is operated while referring to the relevant sections and
•
"TROUBLESHOOTING GUIDE" in this Owner's Manual, the laser optical pickup unit may be dirty. Consult
your dealer or an Authorized Service Center for inspection and cleaning of the laser optical pickup unit.
DISC HANDLING
Use discs which have the following logos on them.
•
(Optical audio digital discs.)
Handle the discs so that fingerprints and dust do
•
not adhere to the surfaces of the discs.
To clean-off, use a soft cloth.
•
Do not use a hard cloth since this will mar the disc.
•
Wipe the disc in a straight line from center to edge.
•
Never wipe with a circular motion.
•
Do not use detergent or abrasive cleaning agents.
•
Always store the disc in its protective case when it
•
is not used.
–32–
–32––32––32––32–
EN
0C28
Page 33

SPECIFICATIONS
GENERAL SPECIFICATIONS ELECTRICAL SPECIFICATIONS
TV
Sound output: 2 speakers, 1W, 8 ohm
CRT : 20 inch in-line gun,
90˚ deflection tube
Television system: NTSC-M
TV Standard
Closed caption system:
Channel coverage:
VHF: 2 ~ 13
UHF: 14 ~ 69
CATV: 2 ~13, A ~ W,
Tuning System: 181 channel
Channel access: Direct access keyboard,
§15.119/FCC
W+1 ~ W+84,
A-5 ~ A-1, 5A
frequency synthesized
tuning system
programmable
scan and up/down
DVD
Discs: DVD video, Audio CD
Output signal format: NTSC color
OTHER SPECIFICATIONS
Terminals
Antenna input: VHF/UHF/CATV
75 ohm unbalanced (F-type)
Video input: RCA connector [ 1
Audio L/R input: RCA connector [ 2
Headphone: 1/8” stereo (3.5 mm)
Coaxial digital
audio output
(only DVD): One pin jack,
500m Vpp (75 ohm)
Remote control: Digital encoded
infrared light system
Operating
temperature: 5°C to 40°C
(41°F~104°F)
Power requirements: AC 120V, 60Hz
Power consumption
(Maximum) : 80W
Dimensions : H:20-1/4”(514mm)
W:20-3/16”(512mm)
D:19-13/16”(503mm)
Weight : 46,3lbs. (21.0kg)
Designs and specifications are subject to change without notice.
•
If there is a discrepancy between languages, the default language will be English.
•
–33–
EN
0C28
Page 34

FUNAI CORPORATION
LIMITED WARRANTY
FUNAI CORP. will repair this product, free of charge in CANADA in the event of defect in materials or workmanship as follows:
DURATION:
PAR TS: FUNAI CORP. will provide parts to replace defective parts without charge for one (1) year from the date of
original retail purchase. Two (2) years for Picture Tube. Certain parts are excluded from this warranty.
LABOR: FUNAI CORP. will provide the labor without charge for a period of ninety (90) days from the date of original
retail purchase.
LIMITS AND EXCLUSIONS:
THIS WARRANTY IS EXTENDED ONLY TO THE ORIGINAL RETAIL PURCHASER. A PURCHASE RECEIPT OR OTHER
PROOF OF ORIGINAL RETAIL PURCHASE WILL BE REQUIRED TOGETHER WITH THE PRODUCT TO OBTAIN SERVICE UNDER THIS WARRANTY.
This warranty shall not be extended to any other person or transferee.
This warranty is void and of no effect if any serial numbers on the product are altered, replaced, defaced, missing or if service was
attempted by AUTHORIZED SERVICE FACILITY. This FUNAI CORPORATION Limited warranty does not apply to any the
product not purchased and used in CANADA.
This warranty only covers failures due to defects in material or workmanship which occurs during normal use. It does not cover
damage which occurs in shipment, or failures which are caused by repairs, alterations or product not supplied by FUNAI CORP.,
or damage which results from accident, misuse, abuse, mishandling, misapplication, alteration, faulty installation, improper maintenance, commercial use such as hotel, rental or office use of this product or damage which results from fire, flood, lightning or
other acts of God.
THIS WARRANTY DOES NOT COVER PACKING MATERIALS, ANY ACCESSORIES (EXCEPT REMOTE CONTROL),
ANY COSMETIC PARTS, COMPLETE ASSEMBLY PARTS, DEMO OR FLOOR MODELS.
FUNAI CORP. AND ITS REPRESENTATIVES OR AGENTS SHALL IN NO EVENT BE LIABLE FOR ANY GENERAL,
INDIRECT OR CONSEQUENTIAL DAMAGES ARISING OUT OF OR OCCASIONED BY THE USE OF OR THE INABILITY TO USE THIS PRODUCT. THIS WARRANTY IS MADE IN LIEU OF ALL OTHER WARRANTIES, EXPRESS OR
IMPLIED, AND OF ALL OTHER LIABILITIES ON THE PART OF FUNAI, ALL OTHER WARRANTIES INCLUDING THE
WARRANTY OF MERCHANTABILITY, AND FITNESS FOR A PARTICULAR PURPOSE, ARE HEREBY DISCLAIMED BY
FUNAI AND ITS REPRESENTATIVES IN CANADA.
ALL WARRANTY INSPECTIONS AND REPAIRS MUST BE PERFORMED BY AUTHORIZED SERVICE FACILITY.
THIS WARRANTY IS VALID WHEN THE UNIT IS CARRIED-IN TO AUTHORIZED SERVICE FACILITY.
THE PRODUCT MUST BE ACCOMPANIED BYA COPY OF THE ORIGINAL RETAIL PURCHASE RECEIPT. IF NO
PROOF OF PURCHASE IS ATTACHED, THE WARRANTY WILL NOT BE HONORED AND REPAIRS COSTS WILL BE
CHARGED.
ATTENTION:
FUNAI CORP. RESERVES THE RIGHT TO MODIFY ANY DESIGN OF THIS PRODUCT WITHOUT PRIOR NOTICE.
To locate your nearest AUTHORIZED SERVICE FACILITY or general service procedure, please contact to us:
FUNAI CORPORATION
Customer Service
100 North Street; Teterboro, NJ 07608 , USA
Tel: 1-800-242-7158
http://www.funai-corp.com
PLEASE DO NOT SHIP YOUR UNIT TO THE TETERBORO ADDRESS.
Printed in China 0EMN02494
T9009CK ★★★★★
Page 35

MANUEL DE
®
®
®
En tant que partenaire de
E
NERGY STAR , notre
société a conclu que ce produit
répond aux normes d'économie
énergétique de E
NERGY STAR .
E
NERGY STAR est une marque
déposée aux Etats Unis.
Owner's Manual
L’UTILISATEUR
APPAREIL DE TÉLÉ/DVD COULEUR
CSC520DE (de 20 pouces)
ACCESSOIRES AVEC L’APPAREIL
ilesTélécommande
P
NE220UD
Si apres la lecture de ce manuel, vous avez besoin d’une aide
supplementaire pour l’installation ou le fonctionnement de cet
appareil, veuillez composer LE NUMERO D’APPEL GRATUIT 1-800-242-7158
Ou consultez notre SITE INTERNET http://www.funai-corp.com
Veuillez lire ce guide avant d’utiliser cet appareil.
2 piles AA
Guide d’utilisation
0EMN02494
Page 36

AVERTISSEMENT: AFIN DE RÉDUIRE LES RISQUES D’INCENDIE OU D’ÉLECTROCUTION,
N’EXPOSEZ CET APPAREIL NI À LA PLUIE NI À L’HUMIDITÉ.
CE SYMBOLE INDIQUE UN RISQUE
PRUDENCE
INTERDIT D’OUVRIR,
RISQUE D’ÉLECTROCUTION
D’ÉLECTROCUTION DÛ À LA TENSION
DANGEREUSE À L’INTÉRIEUR DE
CETTE UNITÉ.
CE SYMBOLE INDIQUE QUE DES
PRUDENCE:
N’ENLEVEZ PAS LE CAPOT (OU LE
DOS) AFIN DE RÉDUIRE LES RISQUES
D’ÉLECTROCUTION. NE CONTIENT AUCUN ÉLÉMENT
SUSCEPTIBLE D’ÊTRE RÉPARÉ PAR L’UTILISATEUR.
FAITES EFFECTUER LES RÉPARATIONS PAR DU
PERSONNEL QUALIFIÉ.
Les indications de prudence se trouvent à l’arrière du boîtier.
INSTRUCTIONS IMPORTANTES SUR
L’ENTRETIEN ET LE
FONCTIONNEMENT SE TROUVENT
SUR LA DOCUMENTATION QUI
ACCOMPAGNE CET APPAREIL.
MESURES DE SÉCURITÉ IMPORTANTES
1.Lisez les instructions-
à la sécurité et au fonctionnement avant d’utiliser l’appareil.
2.Conservez les instructions- Veuillez conserver les
instructions relatives à la sécurité et à l’entretien afin de
pouvoir les consulter par la suite.
3.Respectez les avertissements-
avertissements qui se trouvent sur l’appareil et dans le mode d’emploi
4.Suivez les instructions- Veuillez suivre toutes les
instructions relatives à l’utilisation et au fonctionnement.
5.Nettoyage- Débranchez cet appareil de TÉLÉ/DVD de la
prise murale avant de le nettoyer. N’utilisez aucun produit
de nettoyage liquide ou en bombe. Servez-vous d’un chiffon
humide pour effectuer le nettoyage.
EXCEPTION: Si l’appareil doit fonctionner de façon
ininterrompue et si, pour une raison précise, comme le
risque de perte du code d’accès d’un convertisseur CATV,
l’utilisateur ne peut pas le débrancher pour le nettoyer ou
pour une toute autre raison, les instructions de nettoyage ne
demandent pas au point 5 de débrancher l’appareil.
6.Accessoires- N’utilisez que des accessoires recommandés
par le fabricant de cet appareil de TÉLÉ/DVD afin de ne pas
provoquer d’accidents.
7.Eau et humidité- N’utilisez pas cet appareil de TÉLÉ/DVD
à proximité de l’eau, par exemple près d’une baignoire, d’un
lavabo, d’un évier, d’une lessiveuse, dans une cave humide,
près d’une piscine, etc..
8.Supports-
roulante, un piétement, un trépied ou une étagère instable.
L’appareil de TÉLÉ/DVD pourrait tomber et blesser grièvement
quelqu’un ou s’endommager. N’utilisez que la table roulante, le
piétement, le trépied ou l’étagère recommandé/e par le fabricant, ou
vendu/e avec l’appareil de TÉLÉ/DVD.
Montez l’appareil en suivant les
instructions du fabricant à l’aide des
dispositifs de fixation recommandés par
le fabricant. Si l’appareil se trouve sur
une table roulante, déplacez-le tout avec
prudence.
Les arrêts brusques, l’excès de force
et les irrégularités du sol risquent de
faire basculer la table roulante et
l’appareil.
Ne placez pas cet appareil de TÉLÉ/DVD sur une table
Veuillez lire toutes les instructions relatives
Veuillez respecter les
PORTABLE CART WARNING
AVERTISSEMENT POUR UNE
TABLE ROULANTE PORTATIVE
S3126A
.
9. Ventilation- Les fentes et les ouvertures du boîtier, à
l’arrière ou dans le fond, servent à la ventilation et à
garantir le fonctionnement fiable de l’appareil de
TÉLÉ/DVD en le protégeant de la surchauffe ; il est
interdit de boucher ou de couvrir ces ouvertures. Ne
bouchez jamais ces ouvertures en plaçant l’appareil de
TÉLÉ/DVD sur un lit, un canapé, un tapis, ou une surface
similaire. Ne placez jamais cet appareil de TÉLÉ/DVD à
proximité ou au-dessus d’un radiateur ou d’un registre de
chaleur. Ne placez jamais cet appareil de TÉLÉ/DVD dans
un meuble encastrable comme une bibliothèque ou une
étagère à moins qu’il n’y ait une ventilation suffisante et
que les instructions du fabricant ne soient respectées.
10.Sources d’alimentation- Ne faites fonctionner cet appareil
de TÉLÉ/DVD que sur la source d’alimentation indiquée
sur l’étiquette. Si vous avez des doutes sur le type
d’alimentation électrique de votre maison, consultez votre
revendeur ou votre distributeur d’électricité. Pour les
appareils de TÉLÉ/DVD fonctionnant sur piles, ou sur
d’autres sources d’alimentation, consultez le mode
d’emploi.
11.Mise à la terre ou polarisation- Cet appareil de
TÉLÉ/DVD est équipé d’une fiche de courant alternatif
polarisé (une fiche ayant un plot plus large que les autres).
Cette fiche ne s’enfile dans la prise murale que d’une seule
façon. C’est un dispositif de sécurité. Si vous n’arrivez pas
à introduire la fiche complètement dans la prise, essayez
dans l’autre sens. Si la fiche ne s’adapte toujours pas,
adressez-vous à votre électricien pour faire remplacer votre
prise qui est obsolète. Respectez le dispositif de sécurité de
la prise polarisée.
–2–
–2–
FR
0C28
Page 37

llustration A
Modèle de mise à la masse d'une antenne
suivant les directives du Code National
de l'Électricité
Descente
d'antenne
CNE-Code National de l'Électricité.
Limiteur de tension
(CNE, section 810-20)
Conducteurs de terre
(CNE, section 810-21)
Collier de mise
à la masse
Colliers de mise à la masse
Boîte d'entrée
de service
Système d'électrodes de mise à
la masse de l'entrée de service
(CNE, art. 250, partie H)
S2898A
12.Protection du câble d’alimentation- Gainez les câbles
d’alimentation électrique afin d’éviter de les écraser ou de
les pincer en plaçant des objets au-dessus, en faisant très
attention, en particulier au niveau des prises, aux
prolongateurs et à la sortie des câbles de l’appareil.
13.Mise à la terre de l’antenne extérieure- Si une antenne
extérieure ou un réseau câblé est connecté sur l’appareil de
TÉLÉ/DVD, vérifiez si l’antenne ou le réseau câblé est mis
à la terre afin de protéger les organes intérieurs des
poussées momentanées de tension. L’article 810 du Code
électrique national, ANSI/NFPA No. 70, donne les
informations nécessaires sur la mise à la terre du mât et de
la structure de support, sur la mise à la terre de l’entrée de
courant sur l’unité de décharge de l’antenne, sur la
dimension des conducteurs de mise à la terre, sur
l’emplacement de l’unité de décharge de l’antenne, sur la
connexion sur les électrodes de mise à la terre et sur les
caractéristiques de l’électrode de mise à la terre. (Fig. A)
14.Foudre- Pour mieux protéger ce récepteur de TÉLÉ/DVD
contre la foudre, ou si vous devez le laisser longtemps sans
surveillance ou sans l’utiliser, débranchez la prise de
courant et déconnectez l’antenne ou le réseau câblé. Vous
éviterez ainsi que l’appareil de TÉLÉ/DVD ne soit
endommagé par la foudre ou les poussées momentanées de
tension.
15.Lignes électriques- L’antenne extérieure ne doit pas se
trouver à proximité de lignes électriques aériennes, d’autres
circuits d’éclairages ou électriques ou dans un endroit d’où
elle pourrait tomber sur ces lignes et ou sur ces circuits.
Lorsque vous installez une antenne extérieure faites très
attention à ne pas toucher les lignes et les circuits
électriques car vous pourriez être foudroyé.
16.Surcharge- Ne surchargez pas les prises et les rallonges
pour éviter de provoquer un incendie ou une électrocution.
17.Pénétration de liquide ou d’objet- Ne faites jamais
pénétrer d’objet, quel qu’il soit, dans l’appareil de
TÉLÉ/DVD à travers les ouvertures car il pourraient
toucher ses pièces sous tension ou causer des courts-circuits
susceptibles de provoquer un incendie ou une électrocution.
Ne versez jamais de liquide, quel qu’il soit, sur l’appareil
de TÉLÉ/DVD.
18.Réparations- N’essayez pas de réparer vous-même cet
appareil de TÉLÉ/DVD car en ouvrant ou en ôtant les
capots vous vous exposeriez à une tension élevée ou à
d’autres dangers. Faites effectuer les réparations par du
personnel qualifié.
19.Dégâts nécessitant réparation- Débranchez cet appareil de
TÉLÉ/DVD de la prise murale et faites-le réparer par du
personnel qualifié dans les conditions suivantes :
a. Lorsque le câble d’alimentation est effiloché ou la prise
abîmée.
b. En cas de versement de liquide ou de chute d’objet sur
l’appareil de TÉLÉ/DVD.
c.
Si l’appareil de TÉLÉ/DVD a été exposé à la pluie ou à l’eau.
d. Si l’appareil de TÉLÉ/DVD ne fonctionne pas normalement
si vous suivez le mode d’emploi. Ne réglez que les
commandes indiquées par le mode d’emploi ; le réglage
erroné des autres commandes risque d’endommager
l’appareil et de demander l’intervention coûteuse d’un
technicien spécialisé pour rétablir le bon fonctionnement de
l’appareil de TÉLÉ/DVD.
e. Si l’appareil de TÉLÉ/DVD est tombé ou qu’il est
endommagé.
Lorsque l’appareil de TÉLÉ/DVD manifeste un changement de
f.
performance important, il a besoin d’être réparé.
20.Pièces de rechange-
nécessaires vérifiez si le technicien a utilisé les pièces de
rechange indiquées par le fabricant, ayant les mêmes
Si des pièces de rechange sont
caractéristiques que les pièces originales. Les remplacements
non autorisés peuvent provoquer un incendie, une
électrocution, des blessures ou d’autres accidents
21.Contrôle de sécurité- Au terme de toutes les interventions
(entretien ou réparation) effectuées sur cet appareil de
TÉLÉ/DVD, demandez au technicien d’effectuer les
contrôles de sécurité de routine pour vérifier si l’appareil de
TÉLÉ/DVD fonctionne correctement.
22.Chaleur- Cet appareil de TÉLÉ/DVD doit être placé loin
de toute source de chaleur, comme les radiateurs, les
registres de chaleur, les poêles, ou de tout autre appareil
produisant de la chaleur (y compris les amplificateurs).
.
–3–
–3–
FR
0C28
Page 38

PRÉCAUTIONS
INFORMATIONS IMPORTANTES SUR LE
COPYRIGHT
Ce produit utilise une technologie de protection des
droits d’auteur protégée par les revendications de
méthode de certains brevets U.S. et d’autres droits
intellectuels appartenant à la Macrovision
Corporation et à d’autres propriétaires des droits.
L’utilisation de cette technologie de protection des
droits d’auteur doit ê tre autorisée par la
Macrovision Corporation, et est seulement destinée
à l’usage domestique et d’autres visionnements
limités seulement à moins d’une autorisation
spéciale de la Macrovision Corporation. Les
applications techniques inversées ou le démontage
sont strictement interdits.
INTERFÉRENCES TÉLÉ-RADIO
Cet apapreil a été essayé et déclaré conforme aux
prescriptions sur les dispositifs numériques de
Classe B, conformément à la Partie 15 du règlement
du FCC. Ces prescriptions ont pour but de protéger
correctement les installations domestiques contre les
interférences dangereuses. Cet appareil crée, utilise
et peut émettre un rayonnement causé par la
fréquence radioélectrique et, à moins d’être installé
et utilisé conformément aux instructions, il peut en
outre causer des interférences en mesure de gêner
les communications radio.
Cependant, il est impossible de garantir que des
interférences ne se produisent sur certaines
installations. Si cet appareil cause des interférences
qui gênent la réception télé ou radio, vérifiables en
allumant et en éteignant le récepteur, l’utilisateur
peut résoudre le problème en appliquant l’une des
mesures suivantes :
1) Réorienter ou replacer l’antenne de réception.
2) Augmenter la distance entre l’appareil et le
récepteur.
3) Brancher l’appareil sur une prise d’un circuit
différent de celui sur lequel le récepteur est
branché.
4) S’adresser au revendeur ou à un technicien
radio/télé qualifié.
SÉCURITÉ DU LASER
Cet appareil utilise un laser. Seul un technicien
qualifié est autorisé à enlever le capot pour réparer
ce dispositif, car il risque de blesser les yeux.
PRUDENCE: EN EFFECTUANT DES
CONTRÔLES OU DES RÉGLAGES OU EN
UTILISANT DES PROCÉDURES AUTRES
QUE CEUX/CELLES INDIQUÉS/EÉS ICI
VOUS RISQUEZ DE VOUS EXPOSER À UN
RAYONNEMENT DANGEREUX.
PRUDENCE: RAYONNEMENT LASER
VISIBLE ET INVISIBLE EN CAS
D’OUVERTURE ET D’ENLÈVEMENT DU
VERROUILLAGE. NE STATIONNEZ PAS
DANS LE FAISCEAU LASER.
EMPLACEMENT: À L’INTÉRIEUR, PRÈS DU
MÉCANISME DU PLATEAU.
Cet appareil numérique de Classe B est
conforme à la norme canadienne ICES-003.
ATTENTION: POUR ÉVITER LES CHOC
ÉLECTRIQUES, INTRODUIRE LA LAME LA
PLUS LARGE DE LA FICHE DANS LA BORNE
CORRESPONDANTE DE LA PRISE ET
POUSSER JUSQU’AU FOND.
REMARQUE SUR LE RECYCLAGE
Cet article est emballé dans du matériel recyclable
qui peut être réutilisé. Veuillez vous débarrassez
de l’emballage conformément au règlement local
sur le recyclage.
Ne jetez pas les piles et ne les brûlez pas ;
débarrassez-vous des piles conformément au
règlement local sur les déchets chimiques.
Le numéro de série de cet article se trouve au dos de l’appareil. Aucun autre appareil de TÉLÉ/DVD n’a le
même numéro de série que le vôtre. Rappelez-vous ce numéro ainsi que les autres informations vitales et
conservez ce manuel comme preuve d’achat ; vous faciliterez ainsi l’identification de votre appareil en cas de
vol. Les numéros de série ne sont pas archivés.
Date de l’achat
Revendeur
Adresse du revendeur
N° de téléphone du revendeur
N° de modèle
N° de série
–4–
–4–
0C28
FR
Page 39

EMPLACEMENT
Pour que votre appareil de TÉLÉ/DVD fonctionne de
façon satisfaisante et sûre, rappelez-vous ce qui suit
lorsque vous choisissez où l’installer:
Protégez-le de la lumière solaire directe et
•
éloignez-le des sources de chaleur intense.
Evitez les endroits poussiéreux ou humides.
•
Evitez les endroits insuffisamment ventilés, afin de
•
dissiper correctement la chaleur. Ne bouchez pas les
trous d’aération en haut et en bas de l’appareil. Ne
placez pas l’appareil sur un tapis pour ne pas
boucher les trous d’aération.
Installez l’appareil à l’horizontale.
•
Evitez les endroits sujets à de fortes vibrations.
•
Ne placez pas l’appareil de TÉLÉ/DVD près de
•
champs magnétiques forts.
Evitez de transporter l’appareil de TÉLÉ/DVD
•
entre deux endroits ayant des températures très
différentes.
POUR ÉVITER LES RISQUES
D’ÉLECTROCUTION ET D’INCENDIE
Ne touchez pas le câble d’alimentation électrique
•
avec les mains humides.
Ne tirez pas sur le câble d’alimentation électrique
•
pour débrancher l’appareil d’une prise de C.A.
Saisissez-le par la fiche.
Si vous renversez par erreur de l’eau sur l’appareil,
•
débranchez-le immédiatement et apportez-le au
service après-vente pour le faire réparer.
N’introduisez pas ni doigts ni objets dans le plateau
•
de l’appareil de TÉLÉ/DVD.
Ne placez aucun objet directement au-dessus de
•
l’appareil.
SYMBOLES UTILISÉS DANS CE MANUEL
Les symboles suivants qui apparaissent au-dessous
de certains titres et remarques de ce manuel ont les
significations suivantes
TV
: Décrit le fonctionnement de la télé (en mode télé).
DVD-V
: Décrit la lecture des disques DVD
(en mode DVD).
CD
: Décrit la lecture des cédés musicaux
(en mode DVD).
MP3
: Décrit la lecture des disques MP3
(en mode DVD).
QUICK
: Décrit les éléments à configurer avec le mode
QUICK (en mode DVD).
AVERTISSEMENT
Des condensats peuvent se produire à l’intérieur de
l’appareil si vous transportez l’appareil d’un endroit
froid dans un endroit chaud, lorsque vous chauffez
une pièce froide ou en cas de forte humidité. Si vous
effectuez la lecture d’un DVD dans un appareil de
TÉLÉ/DVD humide vous risquez d’endommager le
DVD et l’appareil de TÉLÉ/DVD. Par conséquent si
des condensats se forment à l’intérieur de l’appareil
METTEZ le courant et laissez l’appareil sécher
pendant au moins 2 heures.
–5–
–5–
FR
0C28
Page 40

TABLE DES MATIÈRES
C
MESURES DE SÉCURITÉ IMPORTANTES
C PRÉCAUTIONS . . . . . . . . . . . . . . . . . . . . . . . .4
C TABLE DES MATIÈRES . . . . . . . . . . . . . . . . .6
C CARACTÉRISTIQUES . . . . . . . . . . . . . . . . . . .7
POSTE DE COMMANDE ET FONCTIONS
C
MISE EN PLACE DES PILES . . . . . . . . . . . . . .9
C PRÉPARATION À L’USAGE . . . . . . . . . . . . .10
CONNEXIONS ANTENNE/CÂBLE . . . . . . . .10
CONNEXION SUR DES JACKS D’ENTRÉE
EXTÉRIEURS
CONNEXION SUR UN AMPLIFICATEUR
ÉQUIPÉ DE JACKS D’ENTRÉE NUMÉRIQUES,
MAGNÉTOPHONE MD OU MAGNÉTOPHONE
AUDIONUMÉRIQUE À TÊTE ROTATIVE
(uniquement pour le DVD)
CONNEXION D’UN DÉCODEUR DOLBY
DIGITAL (pour DVD) . . . . . . . . . . . . . . . . . . .12
SECTION
C PROGRAMMATION DE L’APPAREIL . . . . .13
SÉLECTION DE LA LANGUE D’UTILISATION
PROGRAMMATION DES CANAUX EN MEMOIRE
EFFACEMENT (OU AJOUT) DE
CANAUX EN MÉMOIRE . . . . . . . . . . . . . . . .14
C FONCTIONNEMENT DE LA TÉLÉ . . . . . . .15
POUR REGARDER UN PROGRAMME DE TÉLÉ
DÉMAGNÉTISATION . . . . . . . . . . . . . . . . . .15
REGLAGÉ DE L’IMAGE . . . . . . . . . . . . . . . .15
SLEEP TIMER . . . . . . . . . . . . . . . . . . . . . . . . .16
DÉCODEUR DE SOUS-TITRES . . . . . . . . . . .16
RÉGLAGE DU CIRCUIT V . . . . . . . . . . . . . .17
SECTION D
C À PROPOS DES DISQUES . . . . . . . . . . . . . .19
DISQUES POUVANT ÊTRE JOUÉS . . . . . . . .19
TYPES DE DISQUES . . . . . . . . . . . . . . . . . . .19
C LECTURE D’UN DISQUE . . . . . . . . . . . . . . .20
LECTURE DE BASE . . . . . . . . . . . . . . . . . . .20
CARACTÉRISTIQUES GÉNÉRALES . . . . . .20
DISC MENU . . . . . . . . . . . . . . . . . . . . . . . . . .20
TITLE MENU . . . . . . . . . . . . . . . . . . . . . . . . .20
REPRISE . . . . . . . . . . . . . . . . . . . . . . . . . . . . .21
PAUSE . . . . . . . . . . . . . . . . . . . . . . . . . . . . . . .21
LECTURE PAS-À-PAS . . . . . . . . . . . . . . . . . .21
RECHERCHE RAPIDE AVANT/ARRIÈRE . .21
AVANCE LENTE/ RECUL LENT . . . . . . . . . .21
. . . . . . . . . . . . . . . . . . . . . . . . . . .
. . . . . . . . . . . . . . . . .11
TÉLÉ
VD
. . .2
. . . .8
11
. . .13
. .13
. .15
C FONTION RECHERCHE . . . . . . . . . . . . . . . .22
RECHERCHE DE PISTE . . . . . . . . . . . . . . . .22
RECHERCHE PAR TITRE/ CHAPITRE . . . . .22
RECHERCHE HORAIRE . . . . . . . . . . . . . . . .22
ECRAN DE CONFIGURATION DU
MARQUEUR . . . . . . . . . . . . . . . . . . . . . . . . . .22
C FONCTION DE LECTURE SPÉCIALE . . . .23
RÉPÉTER . . . . . . . . . . . . . . . . . . . . . . . . . . . .23
PROGRAMME . . . . . . . . . . . . . . . . . . . . . . . .23
LECTURE ALÉATOIRE . . . . . . . . . . . . . . . . .23
C LECTURE D’UN MP3 . . . . . . . . . . . . . . . . . .24
LECTURE D’UN MP3 . . . . . . . . . . . . . . . . . .24
RÉPÉTITION . . . . . . . . . . . . . . . . . . . . . . . . .24
PROGRAMME . . . . . . . . . . . . . . . . . . . . . . . .24
LECTURE ALÉATOIRE . . . . . . . . . . . . . . . . .24
MODIFICATION DE LA CONFIGURATION
C
LANGUE DU SOUS-TITRAGE . . . . . . . . . . .25
LANGUE . . . . . . . . . . . . . . . . . . . . . . . . . . . .25
MODE STÉRÉO . . . . . . . . . . . . . . . . . . . . . . .25
ANGLE DE LA CAMÉRA . . . . . . . . . . . . . . .25
RÉGLAGES DU NIVEAU DU NOIR . . . . . . .25
QUADRIPHONIE VIRTUELLE . . . . . . . . . . .25
C INFORMATIONS À L’ÉCRAN . . . . . . . . . . . .26
C MODIFICATION DES ÉLÉMENTS DE
CONFIGURATION DU DVD . . . . . . . . . . . . .27
CONFIGURATION DE LA LANGUE . . . . . . .27
RÉGLAGE DE L’AFFICHAGE . . . . . . . . . . . .28
RÉGLAGES SON . . . . . . . . . . . . . . . . . . . . . .28
CONTRÔLE PARENTAL . . . . . . . . . . . . . . . .29
INITIALISATION . . . . . . . . . . . . . . . . . . . . . .29
C GUIDE DE RECHERCHE DES PANNES . . .30
C ENTRETIEN . . . . . . . . . . . . . . . . . . . . . . . . . .32
MANIPULATION DES DISQUES . . . . . . . . .32
C CARACTÉRISTIQUES . . . . . . . . . . . . . . . . . .33
C WARRANTY . . . . . . . . . . . . . .Couverture de dos
–6–
–6–
. . . . .25
FR
0C28
Page 41

CARACTÉRISTIQUES
Mode Télé
¡Récepteur synthétiseur à fréquence PLL avec
181 chaînes sélectionnables et rappel direct des
stations
(Un convertisseur peut être nécessaire pour visualiser les
chaînes câblées brouillées.)
¡Télécommande à infrarouges
¡Affichage à l’écran du menu en trois langues
sélectionnables: anglais, espagnol ou français.
¡Minuterie de veille
La fonction minuterie de veille vous permet de couper
automatiquement le courant, après un certain délai, sans
appuyer sur la touche POWER.
¡Décodeur de sous-titrage codé
Vous pouvez visionner des programmes de télévision,
films, informations etc. spécialement marqués (cc) avec
un affichage de sous-titres de dialogue ou de texte ajouté
au programme.
¡Fonction de coupure automatique
Si pendant 15 minutes il n’y a ni signal provenant de
l’antenne ni opération, la TÉLÉ/DVD s’éteint d’ellemême automatiquement.
¡CIRCUIT V
Permet aux parents d'empêcher leurs enfants de visionner
des matériaux inadaptés sur l'appareil de TÉLÉ/DVD.
Mode DVD
¡Dolby Digital
Ce TÉLÉ/DVD supporte le Dolby Digital ayant 5.1
chaînes lorsqu’il est branché sur un décodeur Dolby
Digital.
¡Lecture fixe/rapide/ralenti/pas à pas
Plusieurs modes de lecture sont disponibles y compris
images fixes, avant/arrière rapide, ralenti et pas à pas.
¡Lecture aléatoire des cédés musicaux et MP3
Ce TÉLÉ/DVD peut bouleverser l’ordre des pistes et les
lire en ordre aléatoire
¡
Lecture d’un programme de cédés musicaux et MP3
Vous pouvez programmer l’ordre des pistes pour les lire
dans l’ordre voulu.
¡Menus des DVD dans la langue voulue
Vous pouvez afficher les menus des DVD dans la langue
de votre choix, si cette option est disponible sur le DVD.
¡
Fonctions économiseur d’écran/coupure automatique
Le programme économiseur d’écran démarre si aucun signal ne
parvient au TÉLÉ/DVD pendant cinq minutes en mode stop.
Lorsque le programme économiseur d’écran est activé depuis 15
minutes, le courant est coupé automatiquement.
¡Sous-titrage dans la langue voulue
Vous pouvez choisir la langue de votre choix pour afficher
le sous-titrage, si cette langue est disponible sur ce disque.
¡Sélection d’un angle de la caméra
Vous pouvez choisir l’angle de caméra voulu si le disque
contient des séquence tournées avec des angles différents.
¡Choix de la langue son et du mode son
Vous pouvez choisir la langue son et le mode son, si
plusieurs langues et modes sont disponibles sur le disque.
¡Verrouillage parental
Vous pouvez configurer le niveau de contrôle pour
interdire aux enfants la lecture des disques non indiqués.
¡Détection automatique des disques
Ce TÉLÉ/DVD détecte automatiquement si le disque
placé sur le plateau est un DVD, un cédé musical ou un
MP3.
¡Affichage à l’écran
Vous pouvez afficher les informations sur le mode de
fonctionnement en cours sur l’écran de télé afin de confirmer
éventuellement les fonctions activées (comme la lecture
programmée) sur l’écran à l’aide de la télécommande.
¡Recherche
Recherche par chapitre/titre/piste/horaire
¡Répéter
Le chapitre/ Le titre/ La piste / Le groupe/ Tout/ A-B
¡Marqueur
Permet de rappeler la partie indiquée par l’utilisateur.
¡Reprendre la lecture
L’utilisateur peut reprendre la lecture à partir de l’endroit
où elle avait été interrompue.
¡Quadriphonie virtuelle
¡Indication du débit binaire
¡DRC (commande de débit dynamique)
Permet de contrôler l’intensité sonore.
–7–
–7–
FR
0C28
Page 42

VIDEO
AUDIO
POWER
VOLUME CHANNEL
STOP SKIP SKIPPLAY PAUSE
OPEN/CLOSE
HEADPHONE
–SEARCH–
LR
742 89101112 13 146531
26
27
16
17
9
11
12
23
20
22
15
25
24
21
10
28
29
30
33
35
5
6
13
34
19
18
8
31
32
4
36
REV
SLOW
PLAY
STOP
FWD
ENTER
PAUSE
DISC
MENU
RETURNTITLESETUP
A
-
B
REPEATSEARCH MODE
CLEAR
MODE
ANGLESUBTITLEAUDIO
DISPLAY
SKIP
SELECT
POWER PICTURE
OPEN/
CLOSE
CH.
VOL.
MUTEV.SURR
SLEEP
123
456
789
0 +10
+100
POSTE DE COMMANDE ET FONCTIONS
PANNEAU DE COMMANDE TÉLÉ/DVD
TÉLÉCOMMANDE
1. Plateau
2. Jack d’entrée VIDÉO
Pour brancher le jack de sortie vidéo d’une caméra
vidéo ou d’un magnétoscope.
3. Jacks d’entrée SON G/D
Pour brancher les jacks de sortie son d’une caméra
vidéo ou d’un magnétoscope.
4. Touche POWER
Appuyez dessus pour allumer ou éteindre l’appareil.
5. Touches VOLUME K/L (VOL.K/L)
Appuyez dessus pour régler le volume du DVD et de
la TÉLÉ.
Touches CHANNEL K/L (CH.K/L)
6.
Appuyez dessus pour sélectionner la chaîne mémorisée.
Appuyez dessus pour passer du mode DVD au mode
TÉLÉ.
7. Fenêtre capteur à distance
8. Touche STOP
Arrête le disque.
[page 11]
[page 13]
[page 20]
[page 11]
[page 13]
9.Touche SKIPH [page 22]
Effectue la lecture à partir du début de la piste ou du
chapitre en cours.
Touche SEARCH (REV) E Button (panneau
de commande)
Pendant la lecture ou en mode pause, appuyez sur la
touche sans la lâcher pendant quelques secondes pour
modifier la vitesse de lecture arrière.
10. Touche PLAY [page 20]
Démarre la lecture du contenu d’un disque.
Appuyez dessus pour passer du mode TÉLÉ au
mode DVD.
11. Touche SKIP G
Effectue la lecture à partir du début de la piste ou du
chapitre suivant.
Touche SEARCH (FWD) D (panneau de
commande)
[page 21]
Pendant la lecture ou en mode pause, appuyez sur la
touche sans la lâcher pendant quelques secondes
pour modifier la vitesse de lecture avant.
12. Touche PAUSE
Interrompt la marche du disque en cours.
13. Touche OPEN/CLOSE
Appuyez dessus pour introduire ou sortir les disques
du plateau.
14. Jack CASQUE D’ÉCOUTE
Pour brancher le casque d’écoute (non fourni) pour
l’écoute individuelle.
15. Touche MODE
Active le mode lecture du programme ou lecture aléatoire
lors de la lecture de cédés ou de MP3.
16. Touches numérique
Mode Télé:
[page 15]
Tapez deux chiffres pour accéder directement à la
chaîne voulue.
Rappelez-vous d’appuyer sur “0” devant les numéros
de chaîne à un seul chiffre.
Touche +100 -
Appuyez dessus pour sélectionner les chaînes
câblées ayant un nombre égal ou supérieur à 100.
Mode DVD
[page 22]
Appuyez dessus pour saisir le numéro voulu.
Touche +10 -
Appuyez dessus pour sélectionner les numéros égaux
ou supérieurs à 10.
17. Touche SLEEP
Appuyez sur la touche SLEEP pour afficher la
minuterie de veille et démarrer la fonction. Vous
pouvez définir le délai de coupure automatique à
l’aide du nombre de pressions exercées sur cette
–8–
–8–
touche. (0, 30, 60, 90, ou 120 minutes)
[page 21]
[page 22]
[page 21]
[page 20]
[pages 23-25]
[page 16]
FR
0C28
Page 43

COAXIAL
ANT.
3938
37
VUE ARRIÈRE TÉLÉ/DVD
18. Touche REV h [page 21]
Appuyez dessus pour visualiser l’image DVD en
mouvement arrière rapide. Appuyez sur la touche
PAUSE, puis sur cette touche pour commencer la lecture
au ralenti. Appuyez plusieurs fois sur cette touche pour
changer la vitesse arrière du ralenti.
Touche FWD g [page 21]
Appuyez dessus pour faire avancer le disque
rapidement. Appuyez sur la touche PAUSE, puis sur
cette touche pour commencer la lecture au ralenti.
Appuyez plusieurs fois sur cette touche pour changer
la vitesse avant du ralenti.
19.
Touche V.SURR(QUADRIPHONIE VIRTUELLE) [page 25]
Appuyez dessus pour activer/désactiver la
quadriphonie virtuelle.
20. Touche SETUP
Appuyez dessus pour entrer ou sortir du menu
TÉLÉ ou du mode de configuration DVD.
21. Touche TITLE
Affiche le menu des titres.
22. Touche CLEAR
Remet à zéro une configuration.
23. Touche DISPLAY
Mode Télé:
Appuyez dessus pour afficher le numéro de la
chaîne sur l’écran. Si vous appuyez encore dessus,
le numéro de la chaîne disparaît.
Mode DVD:
Affiche l’état réel sur l’écran de télé pour effectuer
les contrôles.
24. Touche SEARCH MODE
Appuyez dessus pour localiser un endroit voulu.
25. Touche AUDIO
Appuyez dessus pour sélectionner la langue son ou
le mode son voulu.
26. Touche SUBTITLE
Appuyez dessus pour sélectionner la langue voulue
pour le sous-titrage.
27. Touche REPEAT
Répète la lecture du disque, du titre, du chapitre ou
de la piste en cours.
28. Touche ANGLE
Appuyez dessus pour modifier l’angle de la caméra pour
voir la séquence à partir d’un autre angle.
29. Touche REPEAT A-B
Répète la lecture d’une partie sélectionnée.
30. Touche RETURN
Retourne à l’opération précédente en mode de
configuration DVD.
31. Touche ENTER
Appuyez dessus pour accepter une configuration.
32. Touches directionnelles
Mode Télé:
Appuyez dessus pour sélectionner un mode de
configuration sur le menu affiché sur l’écran de télé.
Appuyez dessus pour effectuer une sélection ou un
réglage à partir d’un menu particulier.
[pages 13, 27-29]
[page 20]
[pages 22-24]
[page 26]
[page 22]
[page 25]
[page 25]
[page 23]
[page 25]
[page 23]
[page 25]
[pages 13, 20]
[page 13]
Mode DVD: [page 20]
Pour effectuer les réglages tout en regardant
l’affichage sur l’écran de télé.
33. Touche DISC MENU
Affiche les menus du DVD.
34. Touche SELECT
Appuyez dessus pour passer au mode TÉLÉ, au
mode entrée extérieure ou au mode DVD.
REMARQUE :
[page 20]
[page 20]
Lorsque vous sélectionnez le mode
DVD avec cette touche, appuyez d’abord sur la touche
PLAY ou sur la touche OPEN/CLOSE. Autrement, les
fonctionnalités DVD ne fonctionnent pas.
35. Touche MUTE
Appuyez sur la touche MUTE pour couper le son du
programme de télé. (l’affichage du volume passe de BLEU
CLAIR à ROUGE CLAIR) Appuyez encore sur la touche
MUTE, sur la touche VOL, sur la touche m ou sur la
touche n pour rétablir le son
36. Touche PICTURE
Appuyez dessus pour accéder au mode réglage de l’image.
37. Câble d’alimentation électrique
A brancher sur une prise de C.A. ordinaire (120V/60Hz).
REMARQUE:
Enlevez le câble d’alimentation électrique du crochet
pour éviter de casser un fil avant de le brancher sur
une prise de C.A.
38. Jack de sortie son numérique COAXIALE
(uniquement son DVD)
A brancher sur l’entrée son numérique d’un
amplificateur extérieur ou d’un décodeur.
39. Jack entrée ANT.
A brancher sur une antenne, un réseau câblé ou un
système satellite.
.
[page 15]
[pages 11, 12]
MISE EN PLACE DES PILES
1)
Ouvrez le couvercle du compartiment des piles de la
télécommande en poussant dessus dans le sens de la flèche.
2)Placez deux piles stylo “AA” dans le compartiment
des piles en respectant leurs polarités (+/-).
3)Refermez le couvercle.
REMARQUES
¡N’utilisez pas ensemble des piles alcalines et des
¡
–9–
–9–
piles au manganèse.
Ne mélangez pas les piles neuves et les vieilles piles.
FR
0C28
Page 44

Boîtier
satellite ou
Boîtier câble
(non fournis)
OUT
PRÉPARATION À L’USAGE
CONNEXIONS ANTENNE/CÂBLE
IN
A partir du réseau câblé ou
de l’antenne parabolique
Antenne VHF/UHF
(non fournie)
Antenne VHF
(non fournie)
A partir du
réseau câblé
Câble coaxial de 75
ou
COAXIAL
ANT.
ANT.
Multiplexeur
VHF/UHF
ou
(non fourni)
Antenne UHF
(non fournie)
ohm (non fourni)
ou
Remarque pour les installateurs de télécâble :
Nous tenons à rappeler à l’attention des installateurs de télécâble l’article 820-40 du NEC qui prescrit les lignes
directrices pour effectuer une mise à la terre correcte et qui prescrit en particulier que la mise à la masse du câble doit
être branchée sur le système de mise à la terre de l’immeuble près du point d’entrée du câble.
REMARQUE :
Avant de brancher l’antenne sur le jack entrée ANT de l’appareil de TÉLÉ/DVD,
contrôlez si la broche n’est pas pliée. Si elle est pliée, redressez-la de la façon
illustrée, puis branchez-la dans le jack d’entrée ANT de l’appareil de TÉLÉ/DVD.
ANTENNE COMBINÉE VHF/UHF
Une antenne VHF UHF de 75 ohm peut être branchée
sur la borne ANT.
ANTENNES SÉPARÉES VHF/UHF
Dans certains endroits vous devez utiliser une
antenne extérieure.
CÂBLE SANS
CONVERTISSEUR/DÉSEMBROUILLEUR
Utilisez cette connexion si votre réseau câblé se
connecte directement sur votre apapreil de
TÉLÉ/DVD sans convertisseur. Utilisez la
télécommande de l’appareil TÉLÉ/DVD pour
sélectionner les chaînes.
CÂBLE AVEC
CONVERTISSEUR/DÉSEMBROUILLEU
R OU BOÎTIER SATELLITE
Si votre service câblé vous fournit un convertisseur
ou si vous utilisez un système par satellite, vous
pouvez utiliser la connexion de base illustrée ici.
Effectuez la sélection de la chaîne avec le
convertisseur ou le boîtier satellite. Cela veut dire
que vous ne pouvez pas changer de chaîne avec la
télécommande TÉLÉ/DVD.
POUR VISUALISER UNE CHAÎNE
BROUILLÉE/DÉSEMBROUILLÉE
1.Configurez le sélecteur de chaîne TÉLÉ/DVD sur
la chaîne de sortie du convertisseur du réseau câblé
ou sur le boîtier satellite. (Ex. CH3)
Câble plat à deux conducteurs
Broche pliée
Câble
Fiche
(doit être redressée)
(Broche droite)
2.Sélectionnez la chaîne que vous voulez regarder sur
le convertisseur du réseau câblé ou sur le boîtier
satellite.
–10–
–10–
FR
0C28
Page 45

CONNEXION SUR DES JACKS D’ENTRÉE EXTÉRIEURS
COAXIAL
ANT.
Amplificateur équipé de jacks d’entrée numériques,
magnétophone MD, magnétophone
audionumérique
à tête rotative, etc.
Vers le jack
D’ENTRÉE SON
NUMÉRIQUE COAXIAL
Vers le jack DE SORTIE SON
NUMÉRIQUE COAXIAL
(PCM/BITSTREAM)
(uniquement SORTIE SON DVD)
Lorsque vour regardez un programme enregistré avec une
[avant de l’appareil de TÉLÉ/DVD]
autre source (magnétoscope ou caméra vidéo) utilisez les
prises d’entrée vidéo/son du panneau de commande de
l’appareil de TÉLÉ/DVD.
Branchez les prises de sortie son/vidéo
d’une autre source sur les jacks VIDÉO
AUX
[une autre source]
Sur les
jacks de
sortie son
et SON G/D de cet appareil de
TÉLÉ/DVD. Appuyez ensuite sur la
touche SELECT jusqu’à ce que “AUX”
s’affiche à l’écran.
REMARQUE:
Lorsque vous branchez un magnétoscope monaural
•
(autre source) sur cet appareil de TÉLÉ/DVD,
branchez le jack de sortie son du magnétoscope
monaural (autre source) sur le jack SON G de cet
appareil de TÉLÉ/DVD. Le son sortira de façon
Câbles
son/vidéo
(non fournis)
etc.
Sur le jack de
sortie vidéo
VIDEO
égale des deux canaux G et D.
CONNEXION SUR UN AMPLIFICATEUR ÉQUIPÉ DE JACKS D’ENTRÉE
NUMÉRIQUES, MAGNÉTOPHONE MD OU MAGNÉTOPHONE
AUDIONUMÉRIQUE À TÊTE ROTATIVE(uniquement pour le DVD).
Utilisez les câbles son numériques coaxiaux en vente dans le commerce pour les connexions son.
AUDIO
LR
VIDEO
POWER
AUDIO
LR
REMARQUES:
La source son d’un disque en format Dolby Digital canal 5.1 ne peut pas être enregistrée comme son
•
numérique par un magnétophone audionumérique à tête rotative ou un magnétophone MD.
composant.
Consultez le Manuel de l’utilisateur pour connaître les composants à brancher sur l’appareil de TÉLÉ/DVD.
•
Configurez DOLBY DIGITAL sur HF comme sortie son en mode configuration, En fonctionnant avec des
•
Assurez-vous d’avoir coupé le courant sur tous les composants du système avant de brancher un autre
•
configurations incorrectes l’appareil de TÉLÉ/DVD peut provoquer la déformation des sons et même
endommager les hauts-parleurs. (Cf. la page 28 pour configurer Dolby Digital sur HF).
–11–
–11–
FR
0C28
Page 46

CONNEXION D’UN DÉCODEUR DOLBY DIGITAL (pour DVD)
COAXIAL
ANT.
Haut-parleur avant
(gauche)
Haut-parleur
central
Haut-parleur avant
(droit)
Haut-parleur
quadriphonique
(gauche)
Haut-parleur
quadriphonique
(droit)
Subwoofer
Sur le jack DE SORTIE
SON NUMÉRIQUE
COAXIAL (PCM/BITSTREAM)
Sur le jack
D’ENTRÉE SON NUMÉRIQUE
COAXIAL
Décodeur Dolby Digital
Si vous utilisez cet appareil de TÉLÉ/DVD pour lire un DVD en format Dolby Digital 5.1 canal, l’appareil de
TÉLÉ/DVD émet un faisceau de données DOLBY DIGITAL par son jack de sortie son numérique
COAXIAL. En connectant le lecteur sur un décodeur Dolby Digital vous pouvez obtenir un environnement
plus réaliste et convaincant avec la même quadriphonie puissante de haute qualité qu’au cinéma.
Utilisez les câbles son numériques coaxiaux en vente dans le commerce pour les connexions son.
REMARQUES:
Assurez-vous d’avoir coupé le courant sur tous les composants du système avant de brancher un autre
•
composant.
Consultez le Manuel de l’utilisateur pour connaître les composants à brancher sur l’appareil de TÉLÉ/DVD.
•
Si l’appareil est branché sur un décodeur Dolby Digital, configurez DOLBY DIGITAL sur ON comme
•
sortie son en mode configuration, (Cf. la page 28 pour configurer Dolby Digital sur ON).
Sauf si l’appareil est branché sur un décodeur Dolby Digital, configurez DOLBY DIGITAL sur OFF
•
comme sortie son en mode configuration, En fonctionnant avec des configurations incorrectes l’appareil de
TÉLÉ/DVD peut provoquer la déformation des sons et même endommager les hauts-parleurs.
Fabriqué sous licence de Dolby Laboratories. “Dolby” et le symbole double D sont des
marques de commerce de Dolby Laboratories.
–12–
FR
0C28
Page 47

PROGRAMMATION DE L’APPAREIL
SECTION TÉLÉ
SÉLECTION DE LA LANGUE
D’UTILISATION
TV
1 Branchement du cordon d’alimentation du
TÉLÉ/DVD
Branchez le cordon d’alimentation du
TÉLÉ/DVD sur une prise de courant
alternatif conventionnelle.
REMARQUE :
Si des chiffres apparaissent dans le
•
coin de l’écran, appuyez sur la touche
POWER sans débrancher le cordon
secteur.
Assurez-vous que …
Vous devez presser l’interrupteur d’alimentation
•
(POWER) afin de mettre le TÉLÉ/DVD en circuit.
REMARQUE: Cette fonction n’affecte que le
langage sur le menu d’affichage mais pas le son de la
source audio.
2 Activez la fonction LANGUAGE
Pressez SETUP sur la
télécommande.
Pressez la flèche (K/L) pour
qu’elle pointe sur le mot
“LANGUAGE”.
-RÉGLAGE DES TV-
RÉGLAGE DES CANAUX
RÉGLAGE CIRCUIT V
B LANGAGE [FRANÇAIS]
S-TITRES [HF]
PROGRAMMATION DES
CANAUX EN MEMOIRE
TV
A ce stade-ci, nous vous recommandons de
programmer tous les canaux que vous êtes en mesure
de capter dans votre région.
REMARQUE:
cet appareil n’est pas nécessaire lorsque vous utilisez un
convertisseur/décodeur du câble ou de l’antenne
parabolique. Il vous suffit de syntoniser, à partir du
TÉLÉ/DVD, le même canal que celui que syntonise le
convertisseur/décodeur (par exemple, le canal 3). Puis,
sélectionnez le canal de votre choix à partir du
convertisseur du câble ou l’antenne parabolique.
Assurez-vous que …
Vous devez presser l’interrupteur d’alimentation
•
(POWER) afin de mettre le TÉLÉ/DVD en circuit.
1 Sélection de la fonction RÉGLAGE DES
CANAUX
Pressez SETUP sur la
télécommande.
Pressez la flèche (K/L) pour
qu’elle pointe sur le mot
“CHANNEL SET UP”.
Puis pressez ENTER.
La programmation du syntonisateur de
-RÉGLAGE DES TV-
RÉGLAGE DES CANAUX
B
RÉGLAGE CIRCUIT V
LANGAGE [FRANÇAIS]
S-TITRES [HF]
3 Sélection de [ENGLISH], [ESPAÑOL] ou
[FRANÇAIS]
Sélectionnez “ENGLISH” = Anglais, “ESPAÑOL” =
Espagnol ou “FRANÇAIS” à la touche ENTER.
4 Fin de la sélection de la langue d’utilisation
Pressez SETUP pour revenir au mode TV.
REMARQUE: Si pour une raison quelconque le
menu est en Espagnol ou Français, pressez SETUP,
pressez sur la flèche (K/L) pour qu’elle pointe sur le
mot “IDIOMA” [ESPAÑOL]” ou “LANGAGE
[FRANÇAIS]”, puis pressez ENTER, et enfin sur
SETUP sur la télécommande.
2 Commencez le autoprog. des canaux.
Pressez la flèche (K/L) pour
qu’elle pointe sur le mot “AUTO
CH PROGRAMMING”.
Puis pressez ENTER.
– RÉGLAGE DES CANAUX –
AJOUT/SUPP. (CATV)
AUTOPROG. DES CANAUX
3 Après le balayage
Une fois le balayage terminé, le syntonisateur revient
au plus bas canal disponible.
Quand AUTOPROG. DES CANAUX est activé
•
quand il n’y a pas d’entrée de signal de télévision,
“PAS DE SIGNAL TV” apparaît sur l’affichage
après l’achèvement du balayage des canaux.
Le TÉLÉ/DVD peut reconnaître les canaux de
•
télévision pour ceux de télévision de câble à cause
des conditions de réception. En ce cas, essayez le
autoprog. des canaux de nouveau en les conditions
fines de réception.
–13–
FR
0C28
Page 48

EFFACEMENT (OU AJOUT) DE
CANAUX EN MÉMOIRE
TV
Voici la procédure pour effacer de la mémoire du
syntonisateur les canaux qui ne diffusent plus dans
votre région ou que vous regardez rarement.
Évidemment, vous pourrez toujours les programmer à
nouveau dans la mémoire de l’appareil si vous
changez d’avis.
1 Sélection de la fonction RÉGLAGE DES
CANAUX
Pressez SETUP sur la
télécommande.
Pressez la flèche (K/L) pour
qu’elle pointe sur le mot
“CHANNEL SET UP”.
Puis pressez ENTER.
2 Sélection de la fonction AJOUT/SUPP.
Pressez la flèche (K/L) pou qu’elle
pointe sur le mot “ADD/DELETE
CH”.
Puis pressez ENTER.
-RÉGLAGE DES TV-
RÉGLAGE DES CANAUX
B
RÉGLAGE CIRCUIT V
LANGAGE [FRANÇAIS]
S-TITRES [HF]
– RÉGLAGE DES CANAUX –
AJOUT/SUPP. (CATV)
AUTOPROG. DES CANAUX
5 Fin de la programmation de l’appareil
Pressez SETUP pour revenir au mode TV.
REMARQUE: Pressez CHANNEL(CH.) pour
vérifier l’effacement ou l’ajout d’un ou de canaux.
3 Sélection du canal
Pressez la flèche (K/L) jusqu’à ce
que le numéro de canal souhaité
apparaisse. (Vous pouvez aussi
utiliser les touches numériques ou
CHANNEL(CH.) K/L pour
l’entrer.)(Exemple: CH8)
A la sélection de canaux de cable supérieurs à 99,
•
appuyez d’abord sur +100, puis sur les deux
derniers chiffres. (Exemple: pour sélectionner le
canal 125, appuyez d’abord sur +100, puis sur “2”
et “5”.)
Vous pouvez faire précéder les numéros de canaux
•
à un chiffre d’un zéro. (Exemple: 02 … 09)
AJOUT/SUPP.
08
4 Effacement (ou ajout) de la mémoire
Pressez ENTER. Le numéro de canal passe au rouge
clair. Le canal est effacé de la mémoire.
Si vous désirez effacer d’autres canaux de la
•
mémoire, répétez les directives données aux étapes
3 et 4 ci-haut.
Si vous pressez ENTER à nouveau, le canal est à
•
nouveau mémorisé.
Canaux ajoutés: Bleu clair
Canaux supprimés: Rouge clair
–14–
FR
0C28
Page 49

FONCTIONNEMENT DE LA TÉLÉ
POUR REGARDER UN
PROGRAMME DE TÉLÉ
TV
1 Allumez l’appareil de TÉLÉ/DVD
Appuyez sur la touche POWER pour allumer
l’appareil de TÉLÉ/DVD.
2 Sélectionnez le numéro de la chaîne
Pour rappeler le numéro de la chaîne voulue, vous
pouvez sélectionner la chaîne voulue directement
avec les touches numériques de la télécommande ou
avec la touche CHANNEL (CH.) o/p.
Remarque sur l’usage des touches numériques
¡Lorsque vous sélectionnez les chaînes câblées dont
le numéro dépasse 99, appuyez d’abord sur +100,
puis sur les deux derniers chiffres. (Exemple : pour
sélectionner la chaîne 125, appuyez d’abord sur
“+100” puis sur “2” puis sur “5”).
¡
Vous devez mettre un zéro devant les numéros de
chaînes à un chiffre (par exemple : 02, 03, 04, etc..).
Rappelez-vous que :
¡
Si l’appareil de TÉLÉ/DVD est branché sur un boîtier
câblé ou satellite l’appareil de TÉLÉ/DVD doit être sur
CH3 ou CH4. Sélectionnez ensuite la chaîne que vous
voulez voir sur le boîtier câblé ou satellite.
REGLAGÉ DE L’IMAGE
TV
Les contrôles de l’image TÉLÉ/DVD -
LUMINOSITÉ, CONTRASTE, COLEUR,
TEINTE et NETTETÉ - sont déjà configurés en
usine. Bien qu’ils soient généralement parfaits, il est
parfois nécessaire de les régler encore pour que
l’image soit plus naturelle.
Assurez-vous que …
l’apapreil de TÉLÉ/DVD soit allumé.
•
1 Sélectionnez “REGLAGÉ DE L’IMAGE”
Appuyez sur la touche PICTURE de la
télécommande.
2 Sélectionnez l’élément que vous voulez régler
Appuyez sur la touche
directionnelle (K/L) jusqu’à ce que
le contrôle voulu apparaisse.
LUMINOSITÉ
CONTRASTE
COULEUR
TEINTE
NETTETÉ
LUMINOSITÉ
PP PP PP PP PP PP PP CC PP PP PP PP PP PP PP
–
+
3 Réglez le volume.
Appuyez sur la touche VOLUME
(VOL.) X/Y pour régler le volume.
REMARQUE:
Si vous appuyez sur la touche
•
CHANNEL (CH.) K/L en mode
DVD vous pouvez changer de chaîne télé.
Même si vous éteignez l’appareil de TÉLÉ/DVD
en mode DVD, lorsque vous le rallumez il se met
en mode télé.
VOLUME 20
C C C C C C C C C C C C C C C C
DÉMAGNÉTISATION
Le magnétisme des appareils voisins et des hautsparleurs peut affecter les couleurs de l’image télé.
Si cela se produit, éloignez l’appareil de TÉLÉ/DVD
de l’appareil en question. Si la couleur n’est toujours
pas bonne, débranchez le câble d’alimentation
électrique de la prise de C.A. et rebranchez-le après
30 minutes.
3 Réglez le contrôle de l’image
Appuyez sur la touche directionnelle (B/s) pour régler
au niveau voulu dans les 5 secondes qui suivent.
REMARQUE:
Au point [3], l’affichage du réglage de l’image
•
disparaît de l’écran de télé après 5 secondes, sauf si
vous appuyez sur une touche, même si vous n’avez
pas fini. Dans ce cas, répétez la procédure en
partant du point [1].
sB
LUMINOSITÉ pour diminuer pour augmenter
la luminosité la luminosité
CONTRASTE
COULEUR pour éclaircir pour intensifier
TEINTE vers le rouge vers le vert
NETTETÉ pour adoucir pour éclaircir
En cas de panne de courant, l’appareil mémorise
•
cette fonction.
pour diminuer
le contraste le contraste
pour augmenter
–15–
FR
0C28
Page 50

SLEEP TIMER
TV
La fonction Sleep Timer (minuterie de veille) vous
permet de couper automatiquement le courant après un
certain délai sans devoir appuyer sur la touche POWER.
1 Configurez “SLEEP TIMER”
Appuyez sur la touche SLEEP de la
télécommande. Vous pouvez modifier la
durée de la veille en appuyant plusieurs
fois sur la touche SLEEP de la
télécommande. La minuterie se
configure sur 120 minutes, 30 minutes chaque fois que
vous appuyez sur la touche SLEEP.
Pour effacer la minuterie de veille:
Appuyez plusieurs fois sur la touche SLEEP
jusqu’à ce que s’affiche “SOMMEIL 0 MINUTE”.
REMARQUES:
Lorsque vous débranchez l’appareil d’une prise de
•
C.A., ou en cas de panne de courant, la mémoire
de la durée de la veille se perd.
Pour voir le temps restant de la minuterie de veille,
•
appuyez une fois sur la touche SOMMEIL lorsque
l’affichage SOMMEIL disparaît. Après 10
secondes, l’affichage disparaît à nouveau.
DÉCODEUR DE SOUS-TITRES
Vous pouvez visionner des programmes TV à
étiquette spéciale (cc), des films, informations etc.
avec les sous-titres ou bien le texte des dialogues
affichés.
Mode d’affichage de sous-titres : Vous pouvez
visionner des téléromans, des films ou le journal
télévisé tout en ayant les sous-titres du dialogue ou
du contenu des informations affichés au bas de
l’écran du TÉLÉ/DVD lorsque vous mettez le
mode d’affichage des sous-titres (CAPTION) en
fonction.
Mode d’affichage du texte : Vous pouvez visionner
un texte informatif couvrant la moitié de l’écran du
TÉLÉ/DVD si vous le désirez, il vous suffit de
mettre l’appareil en mode d’affichage de texte
(TEXT).
Canaux 1 et 2 (C1 / C2) : Les sous-titres (dialogue,
informations ou texte) sont diffusés sur les canaux
1 ou 2. Le canal 2, lorsqu’il est utilisé, sert plus
particulièrement à la diffusion de sous-titres dans
une autre langue que celle de télédiffusion.
REMARQUE :
Toutes les émissions télévisées ne sont pas diffusées
avec des sous-titres. Cet appareil a été conçu pour
vous offrir des sous-titres de qualité, sans erreur en
autant que ceux-ci proviennent d’une antenne, d’un
système de câblodistribution ou d’un signal vidéo
d’un magnétoscope de bonne qualité. Par conséquent,
si le signal reçu est mauvais, il est fort probable que
les sous-titres contiendront des erreurs ou qu’il n’y
ait pas de sous-titres du tout. Voici une courte liste
des principaux facteurs qui pourraient altérer la
qualité des sous-titres apparaissant à l’écran.
SOMMEIL 120 MINUTE
TV
–16–
interférence causée par un moteur d’automobile
•
interférence causée par le moteur d’un appareil
•
électrique
image faible et enneigée
•
prolifération de signaux captés causant un
•
dédoublement ou des ondes dans l’image
REMARQUE :
Si le téléviseur/DVD affiche une
case noire sur l’écran, cela signifie
qu’il est réglé au mode TEXT. Pour
supprimer l’écran, sélectionnez
[CAPTION1], [CAPTION2] ou
[OFF].
Assurez-vous que …
Le TÉLÉ/DVD doit être mis en circuit pour
•
effectuer cette opération.
1 Sélection de la fonction S-TITRES
(Sous-TITRES)
Pressez SETUP sur la
télécommande.
Pressez K ou L pour pointer sur le
mot “CAPTION”.
-RÉGLAGE DES TV-
RÉGLAGE DES CANAUX
RÉGLAGE CIRCUIT V
LANGAGE [FRANÇAIS]
B S-TITRES [HF]
2 Sélection du mode d’affichage de sous-titres
approprié
Pressez ENTER jusqu’à ce que le
menu de sous-titres souhaité
apparaisse.
[CAPTION1], [CAPTION2],
-RÉGLAGE DES TV-
RÉGLAGE DES CANAUX
RÉGLAGE CIRCUIT V
LANGAGE [FRANÇAIS]
B S-TITRES [HF]
[TEXT1] ou [TEXT2])
3 Fin de la sélection du mode d’affichage de
sous-titres
Pressez SETUP pour revenir au mode TV.
ANNULATION DU MODE D’AFFICHAGE
DE SOUS-TITRES
Répétez les étapes [1] et [2], sélectionnez [OFF] en
utilisant ENTER. Pressez SETUP sur la télécommande
pour revenir au mode TV.
LORSQUE LE MODE D’AFFICHAGE DE
SOUS-TITRES EST MIS EN FONCTION
L’affichage à l’écran disparaît après cing (5)
secondes.
C’est également vrai quand MUTE est pressé.
•
Si une interruption de l’alimentation électrique de
•
l’appareil survient (panne ou débranchement), ce
dernier conservera en mémoire le mode d’affichage
des sous-titres sélectionné.
FR
0C28
Page 51

RÉGLAGE DU CIRCUIT V
TV
Le CIRCUIT V permet aux parents d'éviter que leurs
enfants ne regardent des programmes télévisés qui ne leur
sont pas destinés.
Le CIRCUIT V lit les classements pour la programmation
(à l'exception des nouvelles et des programmes de sports,
de films non montés sur des canaux de câbles à redevances
et des signaux du système d'émissions d'urgence), et refuse
alors l'entrée pour une programmation si le classement du
programme répond aux limitations que vous choisissez.
Dans ce cas, "ÉMISSION PROTÉGÉE par ..." apparaît sur
l'écran du téléviseur.
Pour bloquer les classements, suivez les étapes ci-dessous.
La programmation peut être classée par l'Association des
•
Films des Etats-Unis (MPAA) ou selon les Règles Directrices
Parentales sur la Télévision. De manière à verrouiller
n'importe quelle programmation inappropriée, réglez vos
limitations aux endroits COTE MPAA et COTE TV.
RÉGLAGE COTE TV
Assurez-vous que …
Le TÉLÉ/DVD doit être mis en circuit.
•
1 Sélectionnez “RÉGLAGE CIRCUIT V”
Pressez SETUP sur la
télécommande.
Pressez la flèche (K/L) pour
qu’elle pointe sur le mot “V-CHIP
SET UP”.
Puis pressez ENTER.
2 Code d’accès d’entrée
Appuyez sur les touches numériques
pour entrer le code d’accès à 4
chiffres. Le code par défaut est
0000.
3 Sélectionnez “COTE TV”
Pressez la flèche (K/L) pour qu’elle
pointe sur le mot “COTE TV”.
Puis pressez ENTER.
4 Sélectionnez l’article que vous désirez
Pressez la flèche (K/L) pour
qu’elle pointe sur l’article
souhaité.
Puis pressez ENTER pour
sélectionner [BLOCK] ou [VIEW].
Lorsque vous choisissez la
•
catégorie de classement et que vous la tournez sur
[BARRÉ], le classement le plus élevé tournera
automatiquement sur [BARRÉ]. De même, le
classement le plus bas tournera automatiquement
sur [VISION].
-RÉGLAGE DES TV-
RÉGLAGE DES CANAUX
B RÉGLAGE CIRCUIT V
LANGAGE [FRANÇAIS]
S-TITRES [HF]
CODE DE ACCèS
_ _ _ _
RÉGLAGE CIRCUIT V
–
B COTE TV
COTE MPAA
CHANGEMENT CODÉ
TV-Y [VISION]
TV-Y7 ( ) [VISION]
TV-G [VISION]
TV-PG( ) [VISION]
TV-14 ( ) [VISION]
TV-MA( ) [VISION]
–
–17–
Quand vous tournez “TV-Y” à [VISION], tous les
•
classements tournent automatiquement à
[VISION].
Sélection
Explications sur la catégorie de classement
TV-Y Approprié pour tous les enfants
TV-Y7
Appoprié pour les enfants de 7 ans et plus
TV-G Pour tout le monde
TV-PG Gouverne parentale conseillée
TV-14 Ne convient pas pour les enfants au-
dessous de 14 ans
TV-MA Seulement pour les adultes
Quand vous sélectionnez TV-Y7, TV-PG, TV-14 ou
TV-MA et pressez ENTER,les sous-cotes
apparaissent sur l’écran.
Si vous sélectionnez une des catégorie de classement
(exemple: TV-PG) et que vous la tourniez sur
[BARRÉ] ou [VISION], les sous-classements
(exemple: V pour violence) tourneront
automatiquement sur [BARRÉ] ou [VISION].
Vous pouvez régler individuellement les sousclassemements sur [BARRÉ] ou [VISION] lorsque
la catégorie de classement est réglée sur [BARRÉ].
Pour régler individuellement les sous-classements,
suivez les étapes ci-dessous.
Lorsque vous choisissez [TV-Y7]:
•
Pressez la flèche (K/L) pour
qu’elle pointe sur “FV”
(Fantaisie Violence).
TV–Y7 [BLOCK]
B FV [BLOCK]
Puis pressez ENTER pour
sélectionner [BLOCK] ou
[VIEW].
Lorsque vous choisissez [TV-
•
PG], [TV-14] ou [TV-MA]:
Pressez la flèche (K/L) pour
sélectionner “D” (Dialogue
TV–PG [BLOCK]
B D[BLOCK]
L[BLOCK]
S[BLOCK]
V[BLOCK]
suggestif), “L” (Langage
vulgaire”), “S” (Situation
sexuelle) ou “V” (Violence). Puis pressez ENTER
pour sélectionner [BLOCK] ou [VIEW].
REMARQUES: Lorsque vous
sélectionnez [TV-MA], "D"
n'apparaîtra pas sur l'écran du
téléviseur.
Les sous-classements qui sont
•
B TV–Y [VIEW]
TV–Y7 ( ) [VIEW]
TV–G [VIEW]
TV–PG (DLSV) [BLOCK]
TV–14 (DLSV ) [BLOCK]
TV–MA ( LSV) [BLOCK]
réglés sur [BARRÉ] apparaîtront à côté de la
catégorie de classement sur le menu COTE TV.
5 Quittez le mode du réglage circuit V.
Pressez la commande SETUP de la télécommande
pour revenir au mode original.
0C28
FR
Page 52

RÉGLAGE COTE MPAA
Assurez-vous que …
Le TÉLÉ/DVD doit être mis en circuit.
•
CHANGEMENT DE CODE D’ACCES
Procédez comme suit pour changer de code d’accès.
1 Sélectionnez “RÉGLAGE CIRCUIT V”
Pressez SETUP sur la
télécommande.
Pressez la flèche (K/L) pour
qu’elle pointe sur le mot “V-CHIP
SET UP”.
Puis pressez ENTER.
-RÉGLAGE DES TV-
RÉGLAGE DES CANAUX
B RÉGLAGE CIRCUIT V
LANGAGE [FRANÇAIS]
S-TITRES [HF]
2 Entrez le code d’accès de 4 chiffres
Appuyez sur les touches
numériques. Le code par défaut est
0000.
CODE DE ACCèS
_ _ _ _
3 Sélectionnez “COTE MPAA”.
RÉGLAGE CIRCUIT V
Pressez la flèche (K/L) pour qu’elle
pointe sur le mot “COTE MPAA”.
–
COTE TV
B COTE MPAA
CHANGEMENT CODE
Puis pressez ENTER.
Sélection
Explications sur la catégorie de classement
G Pour tout le monde
PG Gouverne parentale conseillée
PG-13 Ne convient pas pour les enfants au-
dessous de 13 ans
R Limité; au-dessous de 17 ans, nécessite
la présence des parents ou d'un adulte
NC-17 I
nterdit aux enfants au-dessous de 17 ans
X Seulement pour les adultes
4 Sélectionnez l’article que vous désirez
Pressez la flèche (K/L) pour
qu’elle pointe sur l’article souhaité.
Puis pressez ENTER pour
sélectionner [BLOCK] ou [VIEW].
Lorsque vous choisissez la
•
catégorie de classement et que vous la tournez sur
[BARRÉ], le classement le plus élevé tournera
automatiquement sur [BARRÉ]. De même, le
classement le plus bas tournera automatiquement
sur [VISION].
Lorsque vous tournez "G" sur [VISION], tous les
•
classements tourneront automatiquement sur
[VISION].
G [VISION]
PG [VISION]
PG-13 [VISION]
R [BARRÉ]
NC-17 [BARRÉ]
X [BARRÉ]
1 Sélectionnez “RÉGLAGE CIRCUIT V”
Pressez SETUP sur la
télécommande.
Pressez la flèche (K/L) pour
qu’elle pointe sur le mot “V-CHIP
SET UP”.
Puis pressez ENTER.
2 Entrez le code d’accès de 4 chiffres
Appuyez sur les touches
numériques. Le code par défaut est
0000.
3 Sélectionnez “CHANGEMENT CODE”
–
Pressez la flèche (K/L) pour
qu’elle pointe sur le mot
“CHANGEMENT CODE”.
Puis pressez ENTER.
4 Entrez le code d’accès de 4 chiffres
Pressez les touches numériques
pour entrer le code d’accès souhaité
dans la zone NEW CODE. Puis
entrez le même code dans la zone
CONFIRM CODE. L’écran VCHIP SEP UP apparaît sur l’écran.
Si vous avez entré un code erroné, répétez l’étape
•
4 et vérifiez que le même nouveau code est entré
dans la zone de confirmation du code.
5 Quittez le mode de réglage V-Chip
Pressez SETUP sur la télécommande pour retourner
au mode original.
REMARQUE:
Si vous débranchez le cordon d’alimentation ou en
•
cas de panne de courant, le code d’accès modifié
sera perdu et reviendra à la valeur par défaut
(0000). Rechangez votre code d’accès si
nécessaire.
-RÉGLAGE DES TV-
RÉGLAGE DES CANAUX
B RÉGLAGE CIRCUIT V
LANGAGE [FRANÇAIS]
S-TITRES [HF]
CODE DE ACCèS
_ _ _ _
RÉGLAGE CIRCUIT V
–
COTE TV
COTE MPAA
B CHANGEMENT CODE
NEW CODE
_ _ _ _
CONFIRM CODE
_ _ _ _
–
5 Quittez le mode du réglage circuit V.
Pressez la commande SETUP de la télécommande
pour revenir au mode original.
–18–
FR
0C28
Page 53

À PROPOS DES DISQUES
Exemple
Titre 1 Titre 2
Chapitre 1 Chapitre 2 Chapitre 1 Chapitre 2Chapitre 3 Chapitre 4
Exemple
Piste 1 Piste 2 Piste 3 Piste 4 Piste 5 Piste 6
Exemple
Groupe 1 Groupe 2
Piste 1 Piste 2 Piste 5 Piste 6Piste 3 Piste 4
SECTION DVD
DISQUES POUVANT ÊTRE JOUÉS
Cet appareil de TÉLÉ/DVD permet de lire les disques
suivants.
¡
DVD video
¡
DVD+R/RW*
¡
CD-R/RW*
* Certains disques ne peuvent pas être lus à cause du type
et de la méthode de gravure utilisés.
• Il arrive que certains disques DVD-R/RW, DVD+R/RW,
ou CD-R/RW réalisés sur PC ou sur des enregistreurs de
DVD soient mal reproduits parce qu’ils sont rayés, sales
ou en raison de leurs propriétés particulières.
• Il arrive que les disques réalisés sur PC soient mal
reproduits en raison des différences de réglages de
l’environnement de votre application. Nous vous
recommandons de toujours utiliser des disques
normalisés et correctement formatés. (Veuillez vous
adresser à votre revendeur pour de plus amples détails).
Ce TÉLÉ/DVD est compatible avec le système couleur
NTSC. Vous ne pouvez pas lire les disque enregistrés avec
d’autres systèmes de couleur comme PAL ou SECAM.
¡
Certains disques contiennent les codes régionaux ci-dessous.
¡
DVD-R/RW*
¡
Cédés musicaux
¡
MP3*
TYPES DE DISQUES
[
]
DVD
Les données d’un DVD sont divisées en deux parties
appelées “titres”, divisées à leur tour en “chapitres”, qui
ont tous un titre ou un numéro de chapitre. Les conditions
de reproduction de certains DVD sont prédéfinies et elles
ont donc la priorité sur toutes les autres opérations de ce
TÉLÉ/DVD. Si la fonction que vous avez sélectionnée ne
marche par correctement, consultez le manuel du disque.
[CÉDÉ MUSICAL]
Les données sur les cédés musicaux ou sur les cédés
vidéo sont divisées en parties appelées “pistes”, chacune
d’elles ayant un numéro.
¡Le nombre dans le symbole est celui de la région du
globe et les disques codés pour une région précise ne
peuvent être lus qu’avec un lecteur de DVD ayant le
même code régional.
Cet appareil de TÉLÉ/DVD ne peut pas lire les
disques suivants.
¡
DVD avec codes régionaux autres que 1 et ALL.
¡
DVD-ROM
¡
DVD-RAM (Interdiction de les lire, peuvent
provoquer des dysfonctionnements).
¡
CD-ROM
¡
VSD
¡
CDV (Ne reproduisez que la partie son).
¡
CD-G (Ne reproduisez que le son).
¡
CD-I (Interdiction de les reproduire, peuvent
provoquer des dysfonctionnements).
¡
SACD
¡
CD Photo (Interdiction de les reproduire, peuvent
•CD vidéo (Interdiction de les reproduire, peuvent
Tous les autres disques sans indication de
compatibilité.
provoquer des dysfonctionnements).
provoquer des dysfonctionnements).
[
]
MP3
Les données d’un MP3 sont divisées en deux parties
appelées “groupes”, divisées à leur tour en “pistes”, qui
ont tous un numéro de groupe ou de piste.
–19–
FR
0C28
Page 54

LECTURE D’UN DISQUE
LECTURE DE BASE
DVD-V
Pour commencer
¡Au besoin, allumez l’amplificateur et les autres
dispositifs.
1 Appuyez sur la touche POWER.
¡
L’appareil s’allume.
2 Appuyez sur OPEN/CLOSE pour ouvrir le
plateau.
3 Placez le disque de votre choix sur le
plateau, avec l’étiquette vers le haut.
4 Appuyez sur la touche PLAY.
¡
Le plateau se referme automatiquement et la lecture
commence à partir du premier chapitre ou de la
première piste du disque. Si la reproduction ne
démarre pas automatiquement, appuyez sur PLAY.
¡Pendant la reproduction d’un DVD doté d’un menu
des titres, celui-ci s’affiche parfois à l’écran. Dans
ce cas, consultez “TITLE MENU”.
5
Appuyez sur la touche STOP pour arrêter la lecture.
REMARQUES
¡Lorsque vous passez du mode DVD au mode TÉLÉ,
tout d’abord le mode DVD s’arrête, puis l’image et
le son télé apparaissent après environ 4 secondes. De
même, lorsque vous appuyez sur la touche POWER
pour éteindre le mode DVD, tout d’abord le mode
DVD s’éteint puis l’appareil de TÉLÉ/DVD s’éteint.
¡Une “icône d’interdiction”
s’affiche parfois en haut et à droite
de l’écran de télé pendant le
fonctionnement pour avertir que le
lecteur de DVD ou le disque a
rencontré une opération interdite.
¡La lecture des DVD qui utilisent des titres comme
signaux de programme de reproduction débutent
parfois à partir du deuxième titre, ou parfois même
sautent ces titres.
¡Pendant la lecture d’un disque à deux couches, il
arrive que les images s’arrêtent un court instant. Cela
se produit lors du passage de la première à la deuxième
couche. Ce n’est pas un dysfonctionnement.
MP3CD
–20–
CARACTÉRISTIQUES GÉNÉRALES
DVD-V
Les DVD contiennent parfois des menus permettant de
naviguer à l’intérieur du disque et d’accéder à certaines
fonctions. Appuyez sur les touches numériques à cet effet ou
utilisez les touches directionnelles
surligner votre sélection dans le menu principal du DVD et
appuyez sur ENTER pour confirmer.
REMARQUES
¡
Sélectionnez le mode DVD en appuyant sur la touche SELECT
de la télécommande. Appuyez alors sur la touche PLAY ou sur
la touche OPEN/CLOSE avant d’utiliser les fonctions DVD.
¡Sauf indication contraire, toutes les opérations décrites
s’effectuent à l’aide de la télécommande. Il est possible
d’effectuer certaines opérations à l’aide de la barre des
menus de l’écran de télé.
(K /L /s /B)
pour
DISC MENU
DVD-V
1 Appuyez sur la touche DISC MENU.
¡
Le menu principal du DVD s’affiche.
2 Si la fonction n’est pas disponible, le
symbole s’affiche sur l’écran de télé.
3 Si le disque contient un menu, la langue
son, les options sous-titrage, les chapitres
pour le titre et les autres options s’affichent
pour vous permettre de choisir.
4 Appuyez sur les flèches (K/L/s /B) pour
sélectionner un élément, puis sur ENTER
pour confirmer la sélection.
TITLE MENU
DVD-V
1 Appuyez sur la touche TITLE.
¡
Le menu des titres s’affiche.
2 Si la fonction n’est pas disponible, le
symbole s’affiche sur l’écran de télé.
3 Appuyez sur les flèches (K/L/s /B) pour
sélectionner un élément, puis sur ENTER
pour confirmer la sélection.
RAPPEL D’UN ÉCRAN MENU
PENDANT LA LECTURE
Pour les DVD-V
¡
Appuyez sur DISC MENU pour rappeler le menu du DVD.
¡Appuyez sur TITLE pour rappeler le menu des titres.
REMARQUE
¡Le contenu des menus et les opérations de menu
correspondantes peuvent varier d’un disque à
l’autre. Consultez le mode d’emploi du disque pour
de plus amples détails.
FR
0C28
Page 55

REPRISE
DVD-V
1
Appuyez sur la touche STOP pendant la lecture.
¡Le message de reprise s’affiche sur l’écran de télé.
2 Appuyez sur PLAY, la lecture reprend à partir
de l’endroit où elle avait été interrompue.
¡
Pour annuler la reprise, appuyez deux fois sur STOP.
¡Si l’appareil de TÉLÉ/DVD est éteint, la fonction de
reprise sera annulée.
¡ Pour les MP3, la lecture reprendra à partir du début
de la piste à laquelle elle s’est arrêtée.
MP3CD
PAUSE
DVD-V
1
Appuyez sur la touche PAUSE pendant la lecture.
¡La lecture s’interrompt et le son est en sourdine.
2 Pour continuer la lecture, appuyez sur PLAY.
MP3CD
RECHERCHE RAPIDE
AVANT/ARRIÈRE
DVD-V
1
Pendant la lecture, appuyez et maintenez F.FWD
g ou REV h pressé quelques secondes.
¡“ g 1” ou “h 1” s’affiche à l’écran.
2 Pour sélectionner une autre vitesse, répétez
l’étape 1 jusqu’à ce que la vitesse souhaitée
s’affiche à l’écran.
¡
Pour les DVD, la vitesse de recherche rapide
avant/arrière varie selon les disques. La vitesse
approximative est 1(x2), 2(x8), 3(x50) et 4(x100).
¡La vitesse approximative pour les cédés musicaux
est de x16.
¡La vitesse approximative pour MP3 est de x8.
¡Si vous opérez sur l’unité principale, utilisez la
touche SKIP G/ SEARCH g ou SKIP H /
SEARCH h.
3 Pour revenir en lecture normale, appuyez
sur la touche PLAY.
MP3CD
AVANCE LENTE / RECUL LENT
LECTURE PAS-À-PAS
DVD-V
1
Appuyez sur la touche PAUSE pendant la lecture.
¡La lecture s’interrompt et le son est en sourdine.
2 Le disque avance d’une image à chaque
pression de la touche PAUSE.
3 Pour quitter la lecture pas-à-pas, appuyez
sur PLAY.
DVD-V
1 Pendant la lecture, appuyez sur la touche
PAUSE.
2 Appuyez et maintenez F.FWD g ou REV
h pressé quelques secondes.
¡
“1” ou “ 1” s’affiche à l’écran.
3 Pour sélectionner une autre vitesse, répétez
l’étape 2 jusqu’à ce que la vitesse souhaitée
s’affiche à l’écran.
¡
La vitesse d’avance lente ou de recul lent varie selon
les disques. La vitesse approximative est 1(1/16),
2(1/8) et 3(1/2).
¡Si vous opérez sur l’unité principale, utilisez la
touche SKIP G / SEARCH g ou SKIP H /
SEARCH h.
4 Pour revenir en lecture normale, appuyez
sur la touche PLAY.
–21–
FR
0C28
Page 56

FONTION RECHERCHE
RECHERCHE DE PISTE
MP3CD
Il y a trois manières de commencer la lecture d’un cédé
musical et d’un MP3 à une piste spécifique.
A l’aide des touches numériques de la télécommande
1 Appuyez sur les touches numériques pour
saisir le numéro de la piste voulue.
¡
La lecture commence à partir de la piste sélectionnée.
¡Pour les pistes à un chiffre (1-9), tapez sur un seul
chiffre (ex. piste 3, appuyez sur 3).
¡Pour lire la piste 26, tapez sur +10, sur 2 et sur 6.
A l’aide de la touche SEARCH MODE
1 Appuyez sur la touche SEARCH MODE.
¡
L’écran de recherche de la piste s’affiche.
2 Vous disposez de 2 secondes pour
sélectionner le numéro de la piste voulue à
l’aide des touches numériques de la
télécommande.
¡
Pour les numéros à un seul chiffre tapez d’abord sur “0”.
¡
La lecture commence à partir de la piste sélectionnée.
A l’aide des touches SKIP
Pendant la lecture, appuyez sur la touche SKIP G pour
aller à la piste suivante. Appuyez plusieurs fois pour
sauter les pistes suivantes. Appuyez sur la touche SKIP
H pour revenir au début de la piste en cours. Appuyez
plusieurs fois pour aller aux pistes précédentes.
¡Si vous appuyez sur la touche SKIP pendant une
pause de la lecture, la lecture se remet en pause après
le passage à la piste suivante.
REMARQUE
¡Les touches SKIP H G ne sont pas disponibles
lorsque la lecture est arrêtée.
HH GG
RECHERCHE PAR TITRE/ CHAPITRE
RECHERCHE HORAIRE
DVD-V
1
Pendant la lecture, appuyez trois fois sur la
touche SEARCH MODE (CD : deux fois) pour
afficher la recherche Horaire sur l’écran de télé.
2 Vous disposez de 30 secondes pour saisir
l’horaire du disque voulu à l’aide des
touches numériques de la télécommande.
¡
La lecture commence à l’horaire indiqué.
¡Appuyez sur la touche CLEAR pour effacer les
erreurs de saisie.
¡Quand il est inutile d’entrer un nombre, “0” apparaît
automatiquement. Par exemple, “0 : 0 - : --“
s’affiche dans l’affichage de recherche horaire si le
temps total du disque est inférieur à 10 minutes.
CD
ECRAN DE CONFIGURATION DU
MARQUEUR
DVD-V
Utilisez des marqueurs pour mémoriser vos morceaux
préférés sur un disque.
1 Pendant la lecture, appuyez quatre fois sur
la touche SEARCH MODE (CD : trois fois)
pendant la lecture.
¡
L’écran de visualisation et les Marqueurs s’affichent
sur l’écran de télé.
2
Appuyez sur les touches directionnelles (s/ B)
pour sélectionner 1, 2, 3, 4, 5, 6, 7, 8, 9 ou 10 et
vérifiez que “-- --:--:--“ s’affiche à l’écran.
3 Quand vous arrivez à l’endroit voulu,
appuyez sur la touche ENTER.
¡
Le titre ou la piste ainsi que le temps de lecture
écoulé s’affichent sur l’écran de télé.
CD
DVD-V
1
Pendant la lecture, appuyez une fois sur la
touche SEARCH MODE pour la recherche par
Chapitre et deux fois pour la recherche par Titre.
_/2
2 Saisissez le numéro du chapitre/titre voulu
à l’aide des touches numériques de la
télécommande.
¡
La lecture commence à partir du chapitre ou du titre
sélectionné.
¡Appuyez sur la touche CLEAR pour effacer les
erreurs de saisie.
¡
Pour les numéros à un seul chiffre tapez d’abord sur “0”
.
–22–
4
Pour revenir ensuite au marqueur, appuyez
quatre fois sur la touche SEARCH MODE (CD :
trois fois) pendant la lecture et sur les touches
directionnelles (s/ B) pour choisir le marqueur
voulu, puis appuyez sur la touche ENTER.
REMARQUES
¡En ouvrant le plateau, en coupant le courant, en
sélectionnant AC au point 2 et en appuyant sur la
touche ENTER vous effacez tous les marqueurs.
¡P
our effacer un marqueur, à l’aide des touches
directionnelles (s/B), placez le curseur sur le numéro du
marqueur à effacer et appuyez sur la touche CLEAR.
¡Vous pouvez marquer 10 endroits au maximum.
5 Pour sortir, appuyez sur la touche SEARCH
MODE ou sur la touche RETURN.
FR
0C28
Page 57

FONCTION DE LECTURE SPÉCIALE
RÉPÉTER
La fonction REPEAT n’est disponible que pendant la lecture.
RÉPÉTER LE TITRE / CHAPITRE
DVD-V
Pour activer la fonction Répéter, appuyez sur
REPEAT pendant la lecture.
¡
Le mode de répétition change de la façon décrite cidessous chaque fois que vous appuyez sur la touche.
CHAPITRE TITRE HF
(répéter le chapitre en cours)
(répéter le titre en cours)
REMARQUES
¡La fonction Répéter le titre/chapitre n’est pas
disponible pour toutes les scènes.
¡Le réglage de REPEAT s’efface lorsque vous
changez de titre ou de chapitre.
RÉPÉTER LA PISTE
Pour activer la fonction Répéter, appuyez sur
REPEAT pendant la lecture.
¡
Le mode de répétition change de la façon décrite cidessous chaque fois que vous appuyez sur la touche.
PISTE TOUT HF
(répéter la piste en cours
) (répéter tout le disque)
REMARQUES
¡La configuration de REPEAT s’efface lorsque vous
changez de piste.
¡La fonction de répétition de la lecture ne fonctionne
pas pendant la répétition de la lecture A-B.
RÉPÉTER A-B
1 Appuyez sur la touche REPEAT A-B au
point d’où vous désirez commencer.
¡
A- s’affiche un court instant sur l’écran de télé.
2 Appuyez encore sur la touche REPEAT A-B
au point où vous désirez finir.
¡
A-B s’affiche un court instant sur l’écran de télé
et la séquence de répétition commence.
3 Pour sortir de la séquence, appuyez sur la
touche REPEAT A-B.
REMARQUES
¡La section REPEAT A-B ne peut se configurer que
dans le titre en cours (pour les DVD) ou la piste en
cours (pour les cédés musicaux).
¡REPEAT A-B n’est pas disponible pour toutes les
certaines scènes des DVD.
¡
Pour effacer le point A configuré, appuyez sur la touche CLEAR.
¡La répétition de la lecture de A à B ne fonctionne pas
pendant la répétition de la lecture d’un titre, d’un
chapitre, d’une piste ou de tout le disque.
DVD-V
(répéter off)
CD
(répéter off)
CD
–23–
PROGRAMME
CD
Vous pouvez configurer l’ordre de lecture des pistes.
1
En mode stop, appuyez sur la touche MODE.
¡L’écran PROGRAMME s’affiche.
2
Appuyez sur la touche directionnelle (o/p) pour
sélectionner une piste, puis
sur la touche ENTER.
¡
Appuyez sur la touche CLEAR
DURÉE
pour effacer le dernier programme
saisi.
3
Répétez le point 2 jusqu’à ce que vous ayez
sélectionné toutes les pistes de votre programme.
4 Appuyez sur la touche PLAY pour lire les
pistes du programme.
REMARQUES
¡Pendant la lecture du programme, la commande
STOP fonctionne de la façon suivante.
¡
Appuyez une fois sur la touche STOP puis sur la touche
PLAY, la lecture redémarre à partir de l’endroit où vous
avez appuyé sur la touche STOP. (Programme continu)
¡
Appuyez deux fois sur la touche STOP puis à nouveau sur
la touche PLAY, la lecture redémarre à partir de la piste de
façon normale. (Programme effacé)
¡Vous pouvez saisir un maximum de 99 programmes.
¡
Pour effacer tous les programmes à la fois, sélectionnez
ANNUL TOUT en bas de la liste à l’étape 2.
¡
Pour répéter la piste en cours dans le programme, appuyez
plusieurs fois sur la touche REPEAT jusqu’à ce que
PISTE s’affiche pendant la lecture. Pour répéter tout le
programme, appuyez plusieurs fois sur la touche REPEAT
jusqu’à ce que TOUT s’affiche pendant l
a lecture.
LECTURE ALÉATOIRE
CD
Permet d’effectuer la lecture désordonnée des pistes au
lieu de la lecture en séquence.
1 En mode stop, appuyez deux fois sur la
touche MODE.
¡
L’ écran ALÉATOIRE s’affiche.
2 Appuyez sur la touche PLAY pour commencer la
lecture aléatoire.
REMARQUE
¡
Pour répéter la piste en cours dans la sélection aléatoire,
appuyez plusieurs fois sur la touche REPEAT jusqu’à ce que
PISTE s’affiche pendant la lecture. Pour répéter toute la
sélection aléatoire, appuyez plusieurs fois sur la touche
REPEAT jusqu’à ce que TOUT s’affiche pendant la lecture.
ALÉATOIRE
CD-DA DURÉE 0:45:55
PLAY
PROGRAMME ALÉATOIRE
- - PAS D'INDICATION - -
FR
0C28
Page 58

3
LECTURE D’UN MP3
LECTURE D’UN MP3
MP3
Quand un cédé avec fichiers MP3 est inséré dans
l’appareil de TÉLÉ/DVD, appuyez sur DISC MENU
pour appeler le menu MP3 sur l’écran du téléviseur.
Cette fonction vous permet de programmer un MP3
pour le lire dans la séquence voulue.
1
1 En mode d’arrêt, appuyez sur les touches
directionnelles (
groupe ou la piste souhaitée.
¡
Si un groupe est sélectionné,
appuyez sur la touche B ou
sur la touche ENTER pour
revenir à l’écran de sélection
de piste. Appuyez sur les
touches directionnelles (K/L)
pour sélectionner une piste,
puis sur la touche ENTER.
¡Si une piste est sélectionnée, appuyez sur la touche
ENTER pour commencer la lecture des pistes. Les
pistes sont lues les unes après les autres en partant de
celle que vous avez choisie.
¡Appuyez sur la touche TITLE pour revenir au
premier élément.
K/L) pour sélectionner le
Liste des fichiers
NOM DU DISQUE
nom du fichier 1
nom du fichier 2
nom du fichier 3
nom du fichier 4
nom du dossier 1
nom du dossier 2
nom du dossier 3
nom du fichier 1
2 Appuyez sur la touche STOP pour arrêter la
lecture.
REMARQUES
¡
Les dossiers sont les Groupes ; les fichiers sont les pistes.
¡Une icône accompagne les fichiers MP3.
¡255 dossiers maximum peuvent être reconnus.
¡512 fichiers maximum peuvent être reconnus.
¡Vous pouvez créer un maximum de 8 hiérarchies.
Il est recommandé d’utiliser sur ce TÉLÉ/DVD des
fichiers enregistrés ayant les caractéristiques
suivantes:
¡Fréquence d’échantillonnage : 44,1 kHz ou 48 kHz
¡Débit binaire constant : 112kbps ~ 320kbps.
¡L’écran PROGRAMME s’affiche.
2 Sélectionnez la piste voulue à l’aide des touches
¡
Appuyez sur la touche B pour aller à la prochaine
hiérarchie.
¡Appuyez sur la touche s pour aller à la hiérarchie
précédente.
¡Appuyez sur la touche CLEAR pour effacer le
dernier programme saisi.
3
4 Appuyez sur la touche PLAY pour
REMARQUES
¡Pendant la lecture du programme, la touche STOP
ne fonctionne pas.
¡Appuyez sur la touche STOP puis à nouveau sur
PLAY, et la lecture redémarrera du point où la
touche STOP a été pressée (suite du programme).
¡Appuyez deux fois sur la touche STOP puis à
nouveau sur PLAY, et la lecture redémarrera de la
piste de manière ordinaire (programme annulé).
¡Pour effacer tous les programmes à la fois, sélectionnez
ANNUL TOUT en bas de la liste à l’étape 2.
RÉPÉTITION
La RÉPÉTITION est disponible seulement pendant la lecture.
MP3
1 En mode stop, appuyez deux fois sur la
¡
L’ écran ALÉATOIRE s’affiche.
PROGRAMME
MP3
En mode stop, appuyez sur la touche MODE.
directionnelles (
la touche ENTER.
Répétez le point 2 jusqu’à ce que vous ayez
sélectionné toutes les pistes de votre programme.
commencer la lecture du programme.
K/L/s/B). Appuyez ensuite sur
LECTURE ALÉATOIRE
MP3
touche MODE.
Appuyez sur la touche REPEAT pendant la
lecture pour activer la fonction de répétition.
¡
Le mode de répétition change comme indiqué cidessous à chaque pression de la touche.
PISTE TOUT HF
(répétition de la
piste actuelle)
GROUPE
(répétition du
groupe actuel)
(répétition
de tout le
disque)
REMARQUE
¡Le réglage de répétition peut être annulé en passant
à une autre piste.
(répétition
désactivée)
2 Appuyez sur la touche PLAY pour
commencer la lecture aléatoire.
–24–
FR
0C28
Page 59

MODIFICATION DE LA CONFIGURATION
HF
LANGUE DU SOUS-TITRAGE ANGLE DE LA CAMÉRA
DVD-V
Le DVD vous permet de sélectionner la langue du sous-titrage
pendant la lecture du DVD (si l’option langue est disponible).
1
Appuyez sur la touche SUBTITLE pendant la lecture.
Certains DVD contiennent des scènes qui ont été
tournées avec plusieurs angles de prise de vue à la fois.
Vous pouvez changer l’angle de la caméra lorsque
l’icône ( ) s’affiche à l’écran.
2 Appuyez plusieurs fois sur la touche
1
SUBTITLE pour sélectionner la langue
voulue pour le sous-titrage.
¡La langue sélectionnée s’affiche sur la barre
d’informations en haut de l’écran.
Appuyez sur la touche ANGLE pendant la lecture.
¡L’angle sélectionné s’affiche sur la barre
d’informations en haut de l’écran.
2 Appuyez plusieurs fois sur la touche
3 Pour arrêter le sous-titrage, appuyez
plusieurs fois sur la touche SUBTITLE
jusqu’à ce que OFF s’affiche.
REMARQUES
¡
Certains disques offrent la possibilité d’effectuer la
configuration de la langue son/langue du sous-titrage sur le
menu du disque. (Le fonctionnement variant d’un disque à
l’autre, veuillez donc consulter le mode d’emploi du disque).
¡
Si la langue voulue n’apparaît pas alors que vous avez
appuyé plusieurs fois sur la touche SUBTITLE , le disque
ne dispose pas de sous-titrage dans cette langue.
¡
Si vous choisissez une langue ayant un code d’identification de 3
lettres, le code s’affiche chaque fois que vous changez la
configuration de la langue du sous-titrage. Si vous choisissez une
autre langue, ‘---‘ s’affiche à la place. (Consultez la page 27).
LANGUE SON
DVD-V
L’appareil de TÉLÉ/DVD vous permet de sélectionner une langue
pendant la lecture du DVD (si plusieurs langues sont disponibles).
1
Appuyez sur la touche AUDIO pendant la lecture.
ANGLE pour sélectionner l’angle voulu.
RÉGLAGES DU NIVEAU DU NOIR
Réglez le niveau du noir pour éclaircir les parties
sombres de l’image.
1
Pendant la lecture, appuyez sur la touche MODE.
2
Appuyez sur ENTER pour activer/désactiver.
EF: Eclaircit les parties sombres.
HF:
Montre l’image d’origine telle qu’elle est enregistrée.
3 Pour sortir, appuyez deux fois sur la touche
MODE ou sur la touche RETURN.
REMARQUE
¡Le réglage sera sauvegardé même si l’appareil de
TÉLÉ/DVD est éteint.
DVD-V
DVD-V
HF
2 Appuyez plusieurs fois sur la touche
AUDIO pour sélectionner la langue voulue.
REMARQUE
¡
La touche AUDIO peut ne pas fonctionner avec certains DVD disposant
de l’option langues son multiples (c’est-à-dire avec les DVD permettant
d’effectuer la configuration de langue son sur le menu du disque).
QUADRIPHONIE VIRTUELLE
Cet appareil de TÉLÉ/DVD vous permet d’apprécier
un effet de son quadriphonique sur deux enceintes.
1 Appuyez une fois sur la touche V.SURR ou
MODE STÉRÉO
duex fois sur la touche MODE (CD/MP3 :
une fois) pendant la lecture.
CD
1 Appuyez plusieurs fois sur la touche AUDIO
2
pendant la lecture pour choisir STÉRÉO. LCH ou R-CH.
¡
STÉRÉO – les deux canaux, droit et gauche, sont
activés (stéréo)
L-CH – seul le canal gauche est activé
R-CH – seul le canal droit est activé
REMARQUE
¡
Si la quadriphonie virtuelle est activée, le mode son se
configure sur STÉRÉO et ne peut pas être modifié.
–25–
Appuyez sur la touche ENTER pour régler sur 1
(effet naturel), sur 2 (effet accru) ou sur HF.
3 Pour sortir, appuyez sur la touche V.SURR ou
sur la touche MODE ou sur la touche
RETURN.
REMARQUE (pour les cédés uniquement)
¡Il n’y a pas d’effet de quadriphonie virtuelle si le
mode son n’est pas configuré sur
DVD-V
STÉRÉO
MP3CD
.
FR
0C28
Page 60

INFORMATIONS À L’ÉCRAN
DVD-V
MP3CD
Vous pouvez contrôler les informations sur le disque en cours en appuyant sur la touche DISPLAY de la télécommande.
Pour les DVD-V
1 Appuyez sur la touche DISPLAY pendant la
lecture pour voir le
chapitre en cours.
¡
Le temps écoulé et restant du
9/49 0:00:00 -0:03:30
Pour les cédés musicaux
1 Appuyez sur la touche DISPLAY pendant la
lecture pour voir la piste en cours.
¡
Le temps écoulé et restant de la piste en cours
s’affiche.
chapitre en cours s’affiche.
2
Appuyez encore sur la touche DISPLAY pendant
2 Appuyez encore sur la touche DISPLAY
pendant la lecture pour voir le titre en
cours.
¡
Le temps de lecture écoulé et restant du titre en
cours s’affiche.
la lecture pour voir la piste totale en cours.
¡Le temps écoulé et restant de la piste totale en cours
s’affiche.
3 Appuyez encore sur la touche DISPLAY
pour sortir de l’affichage.
3 Appuyez encore sur la touche DISPLAY.
¡
Le DÉBIT BINAIRE et la configuration de la
répétition en cours s’affichent.
¡Si vous êtes en train de lire des disques à deux
couches, le nombre de la couche s’affiche ( L0 : La
couche 0 est en cours de lecture. L1 : La couche 1
est en cours de lecture).
4 Appuyez encore sur la touche DISPLAY
pour sortir de l’affichage.
Pour les MP3
1 Appuyez sur la touche DISPLAY pendant la
lecture.
¡
Le nom du fichier en cours de lecture s’affiche.
2 Appuyez à nouveau sur la touche DISPLAY
pour afficher le numéro de piste, le temps
écoulé, l’état de répétition et l’état de
lecture en haut de l’écran.
¡
s’affichent lorsque la lecture répétée est
sélectionnée.
T- indique la répétition de Piste
G - indique la répétition de Groupe (dossier)
A- indique la répétition du Disque
3 Appuyez encore sur la touche DISPLAY
pour sortir de l’affichage.
–26–
FR
0C28
Page 61

MODIFICATION DES ÉLÉMENTS DE CONFIGURATION DU DVD
CONFIGURATION DE LA LANGUE
DVD-V
L’option langue n’est pas disponible sur certains disques.
1 Appuyez deux fois sur la touche SETUP en
mode STOP pour faire apparaître le menu
configuration du DVD.
¡
Si le menu n’apparaît pas, appuyez encore sur la touche PLAY,
sur la touche STOP puis deux fois sur la touche SETUP.
SETUP
QUICK
CUSTOM
INITIALIZE
2 Appuyez sur la touche directionnelle L
pour sélectionner “CUSTOM”, puis sur la
touche ENTER.
¡
Le mode CUSTOM s’affiche.
3 Appuyez sur les touches directionnelles
(
K/L) pour sélectionner “LANGUE”, puis
sur ENTER pour confirmer la sélection.
SETUP CUSTOM
LANGUE
AFFICHAGE
SON
PARENT
4 Appuyez sur les touches directionnelles
(
K/L) pour sélectionner les éléments
suivants, puis sur la touche ENTER.
SON:Règle la langue du son.
SOUS-TITRE:Règle la langue des sous-titres.
MENU DU DISQUE:Règle la langue pour le menu de DVD.
5 Appuyez sur les touches directionnelles
(
K/L) pour sélectionner une configuration,
puis appuyez sur la touche ENTER.
¡
Si AUTRE est sélectionné sur l’écran SON, SOUSTITRE ou MENU DU DISQUE, tapez un nombre à 4
chiffres pour saisir le code de la langue voulue.
(Consultez la liste des codes des langues).
¡Seules les langues supportées par le disque peuvent
être sélectionnées.
6 Appuyez sur la touche SETUP pour sortir.
REMARQUE
¡
La configuration de la langue du Son et du Sous-titrage
n’est pas disponible sur tous les disques. Utilisez alors
la touche AUDIO et la touche SUBTITLE. Vous
trouverez plus de détails à la page 25.
POUR MODIFIER LES MENUS À L’ÉCRAN
Vous pouvez accéder au menu RÉG. TV en appuyant
sur la touche SETUP en mode DVD. Consultez
“Sélection de la langue” à la page 13 pour modifier les
menus à l’écran.
¡En cas de sélection en mode DVD, vous ne pouvez
pas sélectionner le menu “REGLAGÉ DES
CANAUX”.
–27–
Langue Code
Abkhazian 4748
Afar 4747
Afrikaans 4752
Albanais 6563
Amharique 4759
Arabe 4764
Arménien 5471
Assamais 4765
Aymara 4771
Azerbaïdjan 4772
Bashkir 4847
Basque 5167
Bengali;Bangla 4860
Bhutan 5072
Bihari 4854
Bislama 4855
Breton 4864
Bulgare 4853
Birman 5971
Biélorusse 4851
Cambodgien 5759
Catalan 4947
Chinois [CHI] 7254
Corse 4961
Croate 5464
Tchèque 4965
Danois [DAN] 5047
Hollandais [DUT] 6058
Anglais [ENG] 5160
Espéranto 5161
Estonien 5166
Iles Faroe 5261
Fidji 5256
Finnois [FIN] 5255
Français [FRE] 5264
Frison 5271
Galicien 5358
Georgien 5747
Allemand [GER] 5051
Grec [GRE] 5158
Groenlandais 5758
Guarani 5360
Gujarati 5367
Hausa 5447
Hébreu 5569
Hindi 5455
Hongrois [HUN] 5467
Islandais [ICE] 5565
Indonésien 5560
Interlingua 5547
Interlingua 5551
Inupiak 5557
Irlandais [IRI] 5347
Italien [ITA] 5566
Japonais [JPN] 5647
Javanais 5669
Kannada 5760
Kashmiri 5765
Kazakh 5757
Kinyarwanda 6469
Kirghize 5771
Kirundi 6460
Coréen [KOR] 5761
Kurde 5767
A-B
C-E
F-H
I-K
Langue Code
Laotien 5861
Latin 5847
Letton 5868
Lingala 5860
Lituanien 5866
Macédonien 5957
Malagasy 5953
Malais 5965
Malayalam 5958
Maltais 5966
Maori 5955
Marathi 5964
Moldave 5961
Mongole 5960
Nauru 6047
Népalais 6051
Norvégien [NOR] 6061
Occitan 6149
Oriya 6164
Oromo(Afan) 6159
Panjabi 6247
Pashto;Pushto 6265
Perse 5247
Polonais 6258
Por tugais [POR] 6266
Quechua 6367
Rhéto-roman 6459
Roumain [RUM] 6461
Russe [RUS] 6467
Samoain 6559
Sangho 6553
Sanscrit 6547
Ecossais gaélique 5350
Serbe 6564
Serbo-croate 6554
Sesotho 6566
Setswana 6660
Shona 6560
Sindhi 6550
Cingalais 6555
Siswat 6565
Slovaque 6557
Slovène 6558
Somali 6561
Espagnol [SPA] 5165
Soudanais 6567
Swahili 6569
Suédois [SWE] 6568
Tagalog 6658
Tajik 6653
Tamil 6647
Tatar 6666
Telugu 6651
Thaï 6654
Tibétain 4861
Tigrinya 6655
Tonga 6661
Tsonga 6665
Turc [TUR] 6664
Tu rkmène 6657
Tw i 6669
Ukrainien 6757
Urdu 6764
Ouzbek 6772
Vietnamien 6855
Volapuk 6861
Gallois 4971
Wolof 6961
Xhosa 7054
Yiddish 5655
Yo r uba 7161
Zoulou 7267
L-N
O-R
S
T
U-Z
Si vous choisissez une langue dont le code est formé par 3
lettres, le code s’affiche chaque fois que vous changez la
configuration du son ou du sous-titrage à la page 25. Si vous
choisissez une autre langue, c’est qui “ --- ” s’affiche. (les
codes formés de 3 lettres sont entre-parenthèses).
FR
0C28
Page 62

RÉGLAGE DE L’AFFICHAGE
SETUP CUSTOM
LANGUE
AFFICHAGE
SON
PARENT
SETUP
QUICK
CUSTOM
INITIALIZE
RÉGLAGES SON
Vous pouvez modifier certains aspects des écrans d’affichage
des DVD et des messages affichés sur l’écran de télé.
1 Appuyez deux fois sur la touche SETUP en
mode STOP pour faire apparaître le menu
configuration du DVD.
¡
Si le menu n’apparaît pas, appuyez encore sur la
touche PLAY, sur la touche STOP puis deux fois sur
la touche SETUP.
2
Appuyez sur la touche directionnelle Lpour
sélectionner “CUSTOM”, puis sur la touche ENTER.
¡Le mode CUSTOM s’affiche.
3 Appuyez sur les touches directionnelles
(
K/L) pour sélectionner “AFFICHAGE”,
puis sur ENTER pour confirmer la sélection.
4 PAppuyez sur les touches directionnelles
(
K/L) pour sélectionner les éléments
suivants, puis sur la touche ENTER.
MODE TV:
¡Appuyez sur les flèches directionnelles (K/L) pour
sélectionner un élément, puis sur ENTER pour
confirmer la sélection.
¡
Sélectionnez 4:3 LETTER BOX pour faire apparaître
des barres noires en haut et en bas de l’écran.
¡Sélectionnez 4:3 PAN & SCAN pour avoir une
image plein-écran sans bords.
¡La configuration par défaut est 4:3 LETTER BOX.
ARRÊT SUR IMAGE:
¡ Pressez la flèche (K/L) pour sélectionner un article,
puis pressez ENTER.
¡Sélectionnez d’ordinaire “AUTO”.
¡Si vous sélectionnez “FIELD”, l’image en mode
d’arrêt sur image sera stabilisée.
¡Si vous sélectionnez “FRAME”, l’image en mode
d’arrêt sur image sera hautement définie.
ICÔNE DE L'ANGLE:
¡Appuyez plusieurs fois sur la touche ENTER pour
Activer ou Désactiver l’icône de l’angle.
¡La configuration par défaut est EF.
ARRÊT AUTO. :
¡Appuyez plusieurs fois sur la touche ENTER pour
Activer ou Désactiver la coupure automatique.
¡Le réglage par défaut est EF et il éteindra
automatiquement l’appareil de TÉLÉ/DVD après 15
minutes de non-utilisation.
5 Appuyez sur la touche SETUP pour sortir.
QUICK
DVD-V
–28–
DVD-V
Choisissez le réglage du son adapté à votre appareil parce
qu’il affecte seulement la lecture de DVD.
1 Appuyez deux fois sur la touche SETUP en
mode STOP pour faire apparaître le menu
configuration du DVD.
¡
Si le menu n’apparaît pas, appuyez encore sur la
touche PLAY, sur la touche STOP puis deux fois sur
la touche SETUP.
SETUP
QUICK
CUSTOM
INITIALIZE
2 Appuyez sur la touche directionnelle L
pour sélectionner “CUSTOM”, puis sur la
touche ENTER.
¡
Le mode CUSTOM s’affiche.
3 Appuyez sur les touches directionnelles
(
K/L) pour sélectionner “SON”, puis sur
ENTER pour confirmer la sélection.
SETUP CUSTOM
LANGUE
AFFICHAGE
SON
PARENT
4 Appuyez sur les touches directionnelles
(
K/L) pour sélectionner les éléments
suivants, puis sur la touche ENTER.
DRC (commande de débit dynamique):
¡Permet de comprimer l’intensité sonore.
¡Le réglage par défaut est EF.
SOUS ÉCHANTILLON:
¡
Configurez sur ON lorsque la fréquence est de 48 kHz.
¡La configuration par défaut est EF.
Lecture d’un disque protégé par un copyright.
¡Si vous sélectionnez HF, la protection du copyright
s’active et le son est échantillonné en 48 kHz.
DOLBY DIGITAL:
QUICK
Configurez sur ON lorsque le lecteur est branché sur
un décodeur Dolby Digital.
(EF: Sortie par Dolby Digital)
(HF: Convertit le Dolby Digital en PCM (2 canaux
stéréo))
¡La configuration par défaut est EF.
5 Appuyez sur la touche SETUP pour sortir.
FR
0C28
Page 63

CONTRÔLE PARENTAL
DVD-V
Le contrôle parental interdit la vision des disques qui
ne sont pas compris dans votre configuration. (avec un
mot de passe ou la lecture s’arrête).
Cette fonction vous permet d’empêcher vos enfants de
reproduire des disques contenant d’autres scènes.
NIVEAU PARENTAL
Le niveau parental vous permet de configurer le niveau
d’évaluation de vos DVD. La lecture s’interrompt si le
niveau d’évaluation dépasse le niveau que vous avez fixé.
1 Appuyez deux fois sur la touche SETUP en
mode STOP pour faire apparaître le menu
configuration du DVD.
¡
Si le menu n’apparaît pas, appuyez encore sur la
touche PLAY, sur la touche STOP puis deux fois sur
la touche SETUP.
SETUP
QUICK
CUSTOM
INITIALIZE
2
Appuyez sur la touche directionnelle Lpour
sélectionner “CUSTOM”, puis sur la touche ENTER.
¡Il arrive qu’il soit difficile de trouver si certains
DVD sont compatibles avec le verrouillage parental.
Pour en être certain, contrôlez si la fonction de
verrouillage parental fonctionne de la façon voulue.
¡Enregistrez votre mot de passe, au cas où vous
l’oublieriez.
NIVEAUX DE CONTRÔLE
¡TOUT
Tout le verrouillage parental est effacé.
¡
Niveaul 8
Tous les DVD, de tous les niveaux
(adulte/général/enfants), peuvent être lus.
¡
Niveaux de 7 à 2
Seuls les DVD d’usage général ou pour enfants
peuvent être lus.
¡
Niveau 1
Seuls les DVD pour enfants peuvent être lus, les
DVD d’usage général ou pour adultes sont interdits.
SI VOUS OUBLIEZ LE CODE D’ACCÈS
1 Tapez sur les touches numériques 4, 7, 3 et
7 au point 4. Puis saisissez votre nouveau
mot de passe.
¡
Le mot de passe s’efface et le niveau parental se
configure sur TOUT.
3 Appuyez sur les touches directionnelles
(
K/L) pour sélectionner “PARENT”, puis
sur ENTER.
SETUP CUSTOM
LANGUE
AFFICHAGE
SON
PARENT
4 Saisissez votre mot de passe de 4 chiffres
et appuyez sur la touche ENTER.
5 Appuyez sur les touches directionnelles
(
K/L) pour sélectionner NIVEAU
PARENTAL , puis sur la touche ENTER.
6 Appuyez sur les touches directionnelles
(
K/L) pour sélectionner le niveau voulu.
7 Appuyez sur la touche SETUP pour sortir.
REMARQUES
¡La première fois, vous pouvez saisir 4 chiffres
quelconques. (sauf 4737) Ce numéro vous servira de
mot de passe à partir de la deuxième utilisation.
¡Pour modifier le mot de passe, appuyez sur les
touches directionnelles (K/L) pour sélectionner
CHANGEMENT au point 5, puis appuyez sur la
touche ENTER. Saisissez votre mot de passe de 4
chiffres et appuyez sur la touche ENTER.
2 Refaites les étapes [5] à [7].
INITIALISATION
Ceci vous permet de remettre toutes les sélections de
RÉGLAGE (sauf PARENT) à leurs réglages par
défaut.
1 Appuyez deux fois sur la touche SETUP en
mode PARENT pour afficher le menu
INTIALIZE.
2
Appuyez sur les touches directionnelles
pour sélectionner “INITIALISER”, puis sur la
touche ENTER.
3 Sélectionnez “OUI”, puis appuyez deux fois
sur la touche ENTER.Tous les réglages (sauf
“
PARENT”) seront effacés.
¡
Pour annuler l’initialisation, sélectionnez “NON”.
4
Appuyez sur la touche SETUP pour quitter.
–29–
(K/L)
FR
0C28
Page 64

GUIDE DE RECHERCHE DES PANNES
Si l’appareil de TÉLÉ/DVD ne fonctionne pas correctement même si vous respectez les instructions de ce
manuel de l’utilisateur, contrôlez le TÉLÉ/DVD à l’aide de cette liste de contrôle.
Problème Action correctrice
Pas de courant.
L’appareil de TÉLÉ/DVD ne répond
pas à la télécommande.
Mode Télé
Problème Action correctrice
Pas d’image ou de son
Barres à l’écran
Image déformée ou floue
L’image défile en lignes
verticales ou est striée
Pas de couleur
Mauvaise réception de certaines chaînes, •Essayez une autre chaîne, si tout est OK, c’est la station qui a des problèmes.
images fantômes
Image faible
Son OK, Image mauvaise
Image OK, son mauvais
Marques de couleurs
différentes sur l’écran. nuire aux couleurs de l’image télé. Eloignez l’appareil de TÉLÉ/DVD de
Vérifiez si la fiche de courant est branchée sur une prise murale de C.A.
•
Vérifiez si l’appareil est allumé.
•
Contrôlez si la fiche de courant est branchée sur une prise de C.A.
•
Contrôlez s’il y a des piles dans la télécommande.
•
Dirigez la télécommande sur le capteur à distance. Au besoin,
•
enlevez les obstacles entre le capteur et la télécommande
Vous devez vous trouver à moins de 23 pieds de l’appareil de TÉLÉ/DVD.
•
Contrôlez si le mode correct est sélectionné. Si ce n’est pas le cas faites-le en
•
appuyant sur la touche SELECT de la télécommande de la façon voulue.
Essayez une autre chaîne, si tout est OK, c’est la station qui a des problèmes.
•
Vérifiez si l’appareil est allumé.
•
Appuyez sur la touche SELECT de la télécommande pour
•
sélectionner le mode TV. Essayez ensuite une autre fonction télé.
Est-ce que l’antenne est bien branchée sur la borne au dos de l’appareil?
•
Si vous utilisez l’antenne extérieure, vérifiez s’il y a un conducteur cassé.
•
Si vous utilisez l’antenne extérieure, vérifiez s’il y a un conducteur cassé.
•
Contrôlez s’il y a des interférences locales.
•
Essayez une autre chaîne, si tout est OK, c’est la station qui a des problèmes.
•
Si vous utilisez l’antenne extérieure, vérifiez s’il y a un conducteur cassé.
•
Essayez une autre chaîne, si tout est OK, c’est la station qui a des problèmes.
•
Si vous utilisez l’antenne extérieure, vérifiez s’il y a un conducteur cassé.
•
Contrôlez s’il y a des interférences locales.
•
Essayez une autre chaîne, si tout est OK, c’est la station qui a des problèmes.
•
Est-ce que l’antenne est bien branchée sur la borne au dos de l’appareil
•
Si vous utilisez l’antenne extérieure, vérifiez s’il y a un conducteur cassé
•
Réglez le contrôle COLOR.
•
Est-ce que l’antenne est bien branchée sur la borne au dos de l’appareil
•
Si vous utilisez l’antenne extérieure, vérifiez s’il y a un conducteur cassé.
•
Contrôlez s’il y a des interférences locales.
•
Essayez une autre chaîne, si tout est OK, c’est la station qui a des problèmes.
•
Est-ce que l’antenne est bien branchée sur la borne au dos de l’appareil
•
Si vous utilisez l’antenne extérieure, vérifiez s’il y a un conducteur cassé.
•
Réglez le contrôle CONTRASTE et LUMINOSITÉ.
•
Essayez une autre chaîne, si tout est OK, c’est la station qui a des problèmes.
•
Est-ce que l’antenne est bien branchée sur la borne au dos de l’appareil
•
Si vous utilisez l’antenne extérieure, vérifiez s’il y a un conducteur cassé.
•
Contrôlez s’il y a des interférences locales.
•
Réglez le contrôle CONTRASTE et LUMINOSITÉ.
•
Essayez une autre chaîne, si tout est OK, c’est la station qui a des problèmes.
•
Contrôlez s’il y a des interférences locales.
•
Le magnétisme des appareils voisins et le géomagnétisme peuvent
•
ces appareils, le problème disparaît de lui-même. Si vous voulez l’éliminez
immédiatement, débranchez le câble d’alimentation électrique de l’appareil
de TÉLÉ/DVD et rebranchez-le 30 minutes plus tard.
?
?
?
?
–30–
FR
0C28
Page 65

Problème Action correctrice
Ma Télé indique des sous-titres mal •
orthographiés. •
Ma Télé n’indique pas le texte en •
entier, ou bien il y a du retard sur ce •
qui est dit. •
Les sous-titres sont parsemés de • De l’interférence causé par l’édifice où se trouve l’appareil, les
blocs blancs. • réseaux électriques à proximité, les orages, etc. pourrait brouiller ou
Selon l’horaire publié, l’émission •
que je regarde devrait être diffusée •
avec les sous-titres, et pourtant •
aucun n’apparaît au bas de l’écran. •
Il y a un carré noir à l’écran lorsque •
je syntonise certains canaux. •
Il se peut que l’émission télévisée que vous regardez en direct soit diffusée
avec des sous-titres qui contiennent des erreurs. Les émissions enregistrées
•
ne devraient pas comporter des fautes d’orthographe étant donné le temps
•
disponible pour vérifier et corriger les sous-titres.
Il est normale que les sous-titres apparaissent avec quelques secondes de
retard pour les émissions diffusées en direct. La plupart des compagnies
oeuvrant dans ce domaine sont en mesure d’afficher 220 mots à la minute.
•
Si le dialogue est plus rapide, des coupures sont effectuées dans la
•
transmission du dialogue afin que ce dernier suive l’action à l’écran.
• provoquer des coupures dans les sous-titres.
Les diffuseurs peuvent parfois utiliser un processus de compression du
temps sur le programme réel pour obtenir un temps publicitaire additionnel.
Comme le décodeur ne peut pas lire les informations comprimées, les soustitres sont perdus.
L’appareil est en mode d’affichage de texte (TEXT). Utilisez la commande
d’affichage (DISPLAY) afin de mettre la fonction d’affichage des sous-titres
•
(S-TITRES) hors circuit [HF (Hors Fonction)].
Mode DVD
Problème Action correctrice
Pas d’image. • Branchez solidement les câbles vidéo.
•
Introduisez un disque vidéo que cet appareil de TÉLÉ/DVD est en mesure de lire.
• Appuyez sur la touche SELECT de la télécommande pour
sélectionner le mode DVD.Appuyez alors sur la touche PLAY ou sur
la touche OPEN/CLOSE. Essayez ensuite une autre fonction DVD.
Le disque ne peut pas être lu.
Pas de son.
Pas de son DTS à la sortie.
Image déformée.
La langue son ou sous-titrage •
ne correspond pas à la configuration. Ce n’est pas un dysfonctionnement
Impossible de changer l’angle de la caméra
Impossible de modifier la langue • Le DVD ne contient pas de source son ou sous-titrage dans la langue
son ou sous-titrage sélectionnée. Ce n’est pas un dysfonctionnement
“L’icône interdit” apparaît à l’écran • Cette opération est interdite par le TÉLÉ/DVD ou le disque.
et interdit toute opération Ce n’est pas un dysfonctionnement
Défaut d’enregistrement du son du cédé
Pas de reproduction du cédé
Défaut d’enregistrement de l’image du DVD
Image DVD figée
Image du DVD en mosaïque
Pas de reproduction du DVD
• Introduisez un disque.
• Nettoyez le disque.
• Placez correctement le disque, avec l’étiquette vers le haut.
• Effacez le verrouillage parental ou changez le niveau de contrôle.
• Branchez solidement les câbles son.
• Allumez le composant son.
• Corrigez les réglages de la sortie son.
• Corrigez les réglages de l’entrée du composant son.
• Cet appareil de TÉLÉ/DVD ne supporte pas le son DTS. Ce n’est pas
un dysfonctionnement.
• Il arrive que les images soient légèrement déformées, ce n’est pas un
signe de dysfonctionnement.
• Même s’il arrive que les images s’arrêtent pendant un instant, ce
n’est pas un signe de dysfonctionnement.
La langue sélectionnée n’est pas disponible pour le son ou le sous-titrage sur ce DVD.
• Le DVD ne contient pas de séquences enregistrées avec des angles
de caméra différents. Ce n’est pas un dysfonctionnement
• Disque rayé. Remplacez le disque par un autre non rayé.
REMARQUES:
Certaines fonctions ne sont pas disponibles dans certains modes, mais ce n’est pas un dysfonctionnement. Lisez
•
les descriptions de ce manuel de l’utilisateur pour avoir de plus amples détails sur la façon correcte de procéder.
La lecture à partir d’une piste voulue et la lecture aléatoire ne sont pas possibles pendant la lecture d’un programme.
•
–31–
FR
0C28
Page 66

RecordableRecordable
ReWritableReWritable
ENTRETIEN
NETTOYAGE DU BOÎTIER
Essuyez le panneau de commande et les autres
•
surfaces extérieures de l’appareil de TÉLÉ/DVD
avec un chiffon imbibé d’eau tiède et séchez.
N’utilisez jamais ni solvant ni alcool. Ne pulvérisez pas
•
d’insecticide à proximité de l’appareil de TÉLÉ/DVD.
Ces produits chimiques risquent d’endommager et
décolorer les surfaces exposées.
RÉPARATIONS
Si votre TÉLÉ/DVD devient inopérant, n’essayez
•
pas de corriger le problème vous-même. Il n’y a
pas de pièces entretenables par l’utilisateur à
l’intérieur. Mettez hors tension, débranchez le
cordon d’alimentation, et appelez notre ligne
d’aide 1-800-242-7158 pour localiser le Centre de
service agréé.
SI L’OBJECTIF LASER EST SALE
Si le TÉLÉ/DVD continue à ne pas marcher correctement même si vous respectez les conseils du GUIDE DE
•
RECHERCHE DES PANNES de ce manuel de l’utilisateur, l’objectif laser est peut-être sale. Adressez-vous à
votre revendeur ou à un service après-vente agréé pour faire inspecter et nettoyer l’objectif laser.
MANIPULATION DES DISQUES
Utilisez des disques portant les symboles suivants.
•
(Disques laser musicaux numériques).
Manipulez les disques de façon à ne laisser ni trace
•
de doigt ni poussière à leur surface.
Utilisez un chiffon doux pour les nettoyer.
•
N’utilisez pas de chiffon rêche pour ne pas rayer le
•
disque.
Essuyez le disque en ligne droite du milieu vers le
•
bord.
N’essuyez jamais avec un mouvement circulaire.
•
N’utilisez ni détergent, ni agent nettoyant abrasif.
•
Toujours ranger les disques dans leur coffret
•
protecteur lorsqu’ils ne sont pas utilisés.
–32–
FR
0C28
Page 67

CARACTÉRISTIQUES
CARACTÉRISTIQUES GÉNÉRALES CARACTÉRISTIQUES ÉLECTRIQUES
TÉLÉ
Sortie son: 2 hauts-parleurs, 1 W, 8 ohm
ÉCRAN: canon en ligne de 20 pouces,
CATHODIQUE tube à parcours électronique
dirigé à 90°
Système de télé: NTSC-M
TÉLÉ standard
Décodeur de sous-titres:
Couverture de chaîne:
VHF: 2 ~ 13
UHF: 14 ~ 69
Cahînes câblées: 2 ~13, A ~ W,
Système de
syntonisation: Chaîne 181
Accès aux chaînes: Clavier d’accès direct,
15.119/FCC
W+1 ~ W+84,
A-5 ~ A-1, 5A
Fréquence synthétisée
système de syntonisation
programmable
balayage et haut en bas
DVD
Disques: DVD vidéo, cédés musicaux
Format du signal
de sortie: Couleur NTSC
AUTRES CARACTÉRISTIQUES
Bornes
Entrée antenne: VHF/UHF/Chaînes câblées
75 ohm dissymétrique
(Type-F)
Entrée vidéo: Connecteur RCA [ 1
Entrée son G/D: Connecteur RCA [ 2
Casque d’écoute: 1/8 po. stéréo (3,5 mm)
Sortie son
numérique coaxiale
(uniquement DVD): Jack à une broche,
500 m Vpp (75 ohm)
Télécommande: système à infrarouges
codé numérique
Température de
fonctionnement: de 5°C à 40°C
(41°F~104°F)
Caractéristique
du courant: 120V, 60Hz CA
Consommation de courant
(Maximum): 80W
Dimensions:
Poids: 46,3 lbs. (21,0 kg)
Hauteur :20-1/4 po. (514 mm)
Largeur :20-3/16
Profondeur :19-13/16 po. (503 mm)
po.
(512 mm)
Le design et les caractéristiques techniques peuvent être modifiés sans préavis.
•
En cas de désaccord entre les langues, la langue par défaut est l’anglais.
•
–33–
FR
0C28
Page 68

GARANTIE LIMITEE
SOCIETE FUNAI
FUNAI CORP. réparera ce produit à titre gratuit au Canada en cas de défaut de matériau ou de façon comme suit:
DUREE:
PIECES:
MAIN-D’ŒUVRE: FUNAI CORP. fournira la main-d’œuvre à titre gratuit pendant une période de
LIMITES ET EXCLUSIONS:
CETTE GARANTIE CONCERNE UNIQUEMENT L’ACHETEUR AU DETAIL D’ORIGINE. UN RECU D’ACHAT OU UNE
AUTRE PREUVE DE L’ACHAT AU DETAIL D’ORIGINE SERA REQUISE AVEC LE PRODUIT POUR OBTENIR UN
SERVICE SOUS CETTE GARANTIE.
Cette garantie ne sera étendue à aucune autre personne ou cessionnaire.
Cette garantie est vide et sans effet si un des numéros de série du produit est altéré, remplacé, dégradé, manquant ou si le service a
été tenté dans une INSTALLATION DE SERVICE AUTORISEE. La garantie limitée de FUNAI CORPORATION ne s’applique à
aucun produit non acheté et utilisé au CANADA.
Cette garantie couvre uniquement les défaillances dues aux défauts en matériaux ou façon survenant pendant l’emploi normal. Elle
ne couvre pas les dommages survenant pendant l’expédition, ou les défaillances causées par des réparations, modifications ou
produits non fournis par FUNAI CORP., ou les dommages résultant d’un accident, d’un usage incorrect, d’un usage abusif, d’un
traitement erroné, d’une application erronée, d’une modification, d’une installation incorrecte, d’une maintenance incorrecte, d’un
usage commercial par exemple dans un hôtel, en location ou dans un bureau de ce produit, ou de dommages dus à un incendie, une
inondation, la foudre ou d’autres actes de Dieu.
CETTE GARANTIE NE COUVRE PAS LES MATERIAUX D’EMBALLAGE, LES ACCESSOIRES (SAUF LA
TELECOMMANDE), LES PARTIES ESTHETIQUES, LES PIECES D’ASSEMBLAGE COMPLET, LES MODELES DE
DEMONSTRATION OU DE SURFACE.
FUNAI CORP. fournira les pièces pour remplacer les pièces défectueuses à titre gratuit pendant un (1) an à partir de
la date d’achat au détail d’origine. Deux (2) ans pour le tube image. Certaines pièces sont exclues de cette garantie
.
quatre-vingt-dix (90) jours à partir de la date d’achat au détail d’origine.
FUNAI CORP. ET SES REPRESENTANTS OU AGENTS NE SERONT EN AUCUN CAS RESPONSABLES DE TOUT
DOMMAGE GENERAL, INDIRECT OU CONSEQUENTIEL SURVENANT OU OCCASIONNE PAR L’EMPLOI OU
L’INCAPACITE D’UTILISER CE PRODUIT. CETTE GARANTIE EST FAITE AU LIEU DE TOUTE AUTRE GARANTIE,
EXPRESSE OU IMPLIQUEE, ET TOUTES LES AUTRES RESPONSABILITES DE LA PART DE FUNAI, TOUTES LES
AUTRES GARANTIES INCLUANT LA GARANTIE DE COMMERCIALIBILITE, ET L’ADAPTATION A UN BUT
PA RTICULIER, SONT ICI DENIEES PAR FUNAI ET SES REPRESENTANTS AU CANADA.
TOUTES LES INSPECTIONS DE GARANTIE ET REPARATIONS DOIVENT ETRE EFFECTUEES PAR UNE
INSTALLATION DE SERVICE AUTORISEE. CETTE GARANTIE EST VALIDE QUAND L’APPAREIL EST APPORTEE A
UNE INSTALLATION DE SERVICE AUTORISEE.
CE PRODUIT DOIT ETRE ACCOMPAGNE D’UNE COPIE DU RECU D’ACHAT AU DETAIL D’ORIGINE. SI AUCUNE
PREUVE DE L’ACHAT N’EST JOINTE, LA GARANTIE NE SERA PAS HONOREE ET LE COUT DES REPARATIONS
SERA A PAYER.
ATTENTION:
FUNAI CORP. SE RESERVE LE DROIT DE MODIFIER TOUTE CONCEPTION DE CE PRODUIT
SANS PREAVIS.
Veuillez nous contacter pour trouver l’INSTALLATION DE SERVICE AUTORISEE la plus proche de chez vous ou pour un
réparateur général.
FUNAI CORPORATION
Service clientèle
100 North Street; Teterboro, NJ 07608, USA
Tel: 1-800-242-7158
http://www.funai-corp.com
N’ENVOYEZ PAS VOTRE APPAREILA L’ADRESSE DE TETERBORO.
Fabriqué en China 0EMN02494
T9009CK ★★★★★
Page 69

documentation manual, user maintenance, brochure, user reference, pdf manual
This file has been downloaded from:
User Manual and User Guide for many equipments like mobile phones, photo cameras, monther board, monitors, software, tv, dvd, and othes..
Manual users, user manuals, user guide manual, owners manual, instruction manual, manual owner, manual owner's, manual guide,
manual operation, operating manual, user's manual, operating instructions, manual operators, manual operator, manual product,
 Loading...