

Page 1

Copyright
Copyright
Fujitsu Limited has made every effort to ensure
the accuracy and completeness of this document.
However, as ongoing development efforts are
continually improving the capabilities of our
products, we cannot guarantee the accuracy of
the contents of this document. We disclaim
liability for errors, omissions or future changes.
LifeBook is a trademark of Fujitsu Limited.
Microsoft, Windows, MS , MS-DOS and Windows
NT are registered trademarks of the Microsoft
Corporation of the United States in the United
States and other countries.
Phoenix is a registered trademark of Phoenix
Technologies Corporation of the United States.
ExpressCard™ module technology is a
registered trademark of Personal Computer
Memory Card International Association.
ExpressCard ID: EC100096 (A6010).
ExpressCard ID: EC100097 (A3110).
Copyright© 1981-1999 Microsoft Corporation, All
rights reserved.
Copyright© 1999 Phoenix Technologies , Ltd., All
rights reserved.
Other product names are trademarks or
registered trademarks of their respective
companies.
© Copyright 2006 Fujitsu Limited. All rights
reserved. No part of this publication may be
copied, reproduced or translated, without the
prior written consent of Fujitsu Limited. No part
of this publication may be stored or transmitted
in any electronic form without the written consent
of Fujitsu Limited.
This device complies with Part 15 of the FCC
rules. Operations are subject to the following two
conditions:
(1) This device may not be allowed to cause
harmful interference.
(2) This device must accept any interference
received, including interference that may
cause undesired operation.
Website: www.pc-ap.fujitsu.com
DECLARATION OF CONFORMITY
according to FCC Part 15
i
Page 2

IMPORTANT SAFETY
INSTRUCTIONS
1. Read these instructions carefully. Sav e these
instructions for future reference.
2. Follow all warnings and instructions marked
on the product.
3. Unplug this product from the wall outlet
before cleaning Do not use liquid cleaners
or aerosol cleaners. Use a damp cloth for
cleaning.
4. Do not use this product near water.
5. Do not place this product on an unstable cart,
stand or table. The product may f all, causing
serious damage to the product.
6. Slots and openings in the cabinet and the
back or bottom are provided for ventilation;
to ensure reliable operation of the product
and to protect it from overheating, these
openings must not be blocked or covered.
The openings should never be blocked by
placing the product on a bed, sofa, rug or
other similar surface. This product should
never be placed near or over a radiator or
heat register or in a built-in installation unless
proper ventilation is provided.
7. This product should be operated from the
type of power indicated on the marking label.
If you are not sure of the type of power
available, consult y our dealer or local pow er
company.
8. Do not allow anything to rest on the power
cord. Do not locate this product where
persons will walk on the cord.
9. If an extension cord is used with this product,
make sure that the total ampere rating of the
equipment plugged into the extension cord
does not exceed the extension cord ampere
rating. Also, make sure that the total rating
of all products plugged into the wall outlet
does not exceed 15 amperes.
10. Never push objects of any kind into this
product through cabinet slots as they may
touch dangerous voltage points that could
result in a fire or electric shock. Never spill
liquid of any kind on the product.
11. Do not attempt to service this product
yourself, as opening or removing cov ers may
expose you to dangerous voltage points or
other risks. Refer all servicing to qualified
service personnel.
12. Unplug this product from the wall outlet and
refer servicing to qualified service personnel
under the following conditions:
a. When the power cord or plug is damaged
or frayed.
b. If liquid has been spilled into the product.
c. If the product has been exposed to rain or
water.
d. If the product does not operate normally
when the operating instructions are followed.
Adjust only those controls that are covered
by the operating instructions since improper
adjustment of other controls may result in
damage and will often require extensive
work by a qualified technician to restore the
product to normal condition.
e. If the product has been dropped or the
cabinet has been damaged.
f. If the product exhibits a distinct change in
performance, indicating a need for service.
ii
Page 3

13. CAUTION: When replacing the battery , be
sure to install it with the polarities in the
correct position. There is a danger of
explosion if the battery is replaced with
an incorrect type or is mistreated. Do not
recharge, disassemble or dispose of in
fire. Replace only with the same or
equivalent type recommended by the
manufacturer. Dispose of the used battery
according to the manufacturer’s
instructions.
14. Use only the proper type of power supply
cord set (provided in your accessories box)
for this unit. It should be a detachable type:
UL listed/CSA certified, BS1363, ASTA,
SS145 certified, rated 10A 250V minimum,
VDE approved or its equivalent. Maximum
length is 15 feet (4.6 meters).
iii
Page 4

Changes or modifications not expressly
approved by Fujitsu could void this
user’s authority to operate the
equipment.
FCC NOTICES
Notice to Users of Radios and Television
These limits are designed to provide reasonable
protection against harmful interference in a
residential installation. This equipment generates,
uses, and can radiate radio frequency energy
and, if not installed and used in accordance with
the instructions, may cause harmful interference
to radio communications. However, there is no
guarantee that interference will not occur in a
particular installation. If this equipment does
cause harmful interference to radio or television
reception, which can be determined by turning
the equipment off and on, the user is encouraged
to try to correct the interference by one or more
of the following measures:
• Reorient or relocate the receiving antenna.
• Increase the separation between the
equipment and receiver.
• Connect the equipment into an outlet that is
on a different circuit than the receiver.
• Consult the dealer or an experienced radio/
TV technician for help.
Shielded interconnect cables must be employed
with this equipment to ensure compliance with
the pertinent RF emission limits governing this
device.
Notice to Users of the US T elephone Netw ork
Your LifeBook notebook may be supplied with
an internal modem which complies with Part 68
of the FCC rules. On this notebook is a label that
contains the FCC Registration Number and the
Ringer Equivalence Number (REN) for this
equipment among other information. If requested,
the user must provide their telephone company
with the following information:
1. The telephone number to which the
notebook is connected.
2. The Ringer Equivalence Number (REN) for
this equipment.
3. That the equipment requires a standard
modular jack type USOC RJ-11C which is
FCC Part 68 compliant.
4. The FCC Registration Number.
This equipment is designed to be connected to
the telephone network or premises wiring using
a standard modular jack type USOC RJ-11C
which is FCC Part 68 compliant and a line cord
between the modem and the telephone network
with a minimum of 26AWG.
The REN is used to determine the number of
devices that you may connect to y our telephone
line and still have all of those devices ring when
your number is called. Too man y de vices on one
line may result in failure to ring in response to an
incoming call. In most, but not all, areas the sum
of the RENs of all of the devices should not
exceed five (5). To be certain of the number of
devices you may connect to your line, as
determined by the RENs, contact your local
telephone company.
If this equipment causes harm to the telephone
network, your telephone company may
discontinue your service temporarily . If possib le,
they will notify you in advance. If advance notice
is not practical they will notify you as soon as
possible. You will also be advised of y our right to
file a complaint with the FCC.
This fax modem also complies with fax branding
requirements per FCC Part 68.
Your telephone company will probably ask you
to disconnect this equipment from the telephone
network until the problem is corrected and you
are sure that the equipment is not malfunctioning.
iv
Page 5

This equipment may not be used on coinoperated telephones provided by your telephone
company. Connection to party lines is subject to
state tariffs. Contact your state’s public utility
commission, public service commission or
corporation commission for more information.
This equipment includes automatic dialing
capability . When programming and/or making test
calls to emergency numbers:
• Remain on the line and br iefly explain to the
dispatcher the reason for the call.
• Perform such activities in off-peak hours, such
as early morning or late evening.
FCC rules prohibit the use of non-hearing aid
compatible telephones in the following locations
or applications:
• All public or semipublic coin-operated or credit
card telephones.
• Elevators, highways, tunnels (automobile,
subway , railroad or pedestrian) where a person
with impaired hearing might be isolated in an
emergency.
• Places where telephones are specifically
installed to alert emergency authorities such
as fire, police or medical assistance personnel.
• Hospital rooms, residential health care
facilities, convalescent homes and prisons.
• Workstations for the hearing impaired.
• Hotel, motel or apartment lobbies.
• Stores where telephones are used by patrons
to order merchandise.
• Public transportation terminals where
telephones are used to call taxis or to reserve
lodging or rental cars.
• In hotel and motel rooms as at least ten percent
of the rooms must contain hearing aid
compatible telephones or jacks for plug-in
hearing aid compatible telephones which will
be provided to hearing impaired customers on
request.
v
Page 6

For safety, users should ensure that the
electrical ground of the power utility , the
telephone lines and the metallic water
pipes are connected together. Users
should NOT attempt to make such
connections themselves but should
contact the appropriate electric
inspection authority or electrician. This
may be particularly important in rural
areas.
UL Notice
This unit requires an AC adapter to operate. Use
only UL Listed Class 2 adapter, output rating
19VDC, 4.22A. Ref er to the illustration below f or
the correct AC Adapter output polarity:
For Authorized Repair Technicians Only
For continued protection against risk of
fire, replace only with the same type and
rating fuse.
Danger of explosion if Lithium (CMOS)
battery is incorrectly replaced. Replace
only with the same or equivalent type
recommended by the manufacturer.
Dispose of used batteries according to
the manufacturer’s instruction.
To reduce the risk of fire, use only #26
AWG or larger telecommunications line
cord.
vi
+
Proper Disposal of Battery
Under federal, state or local law , it ma y be illegal
to dispose of batteries by putting them in the
rubbish bins or trash cans. Please take care of
our environment and dispose of batteries
properly. Check with your local government
authority for details regarding recycling or
disposing of unwanted batteries.
Page 7

Copyright
NOTE ON USE REQUIRED HIGH
SAFETY
This product is designed and manufactured for
general use, including general office use,
personal use, household use and ordinary
industrial use.
This product is not designed for or intended for
use under dangerous (fatal) conditions, unless
extreme safety precautions are implemented.
Do not use this product without implementing
high-level safety precautions.
Failure to follow this warning may result in death,
personal injury, se vere physical damage or other
loss, if used in or near any or more of the
following:
• nuclear reaction control system in a nuclear
facility
• automatic flight control system in an airplane
or other flight control system
• mass transport control system
• medical instruments for life support system
• missile launching control for weapon system
NOTE ON BACKUP DATA
Please make a backup of the Operating System,
any software programs, and created files (and
update regularly).
If you send this product to Fujitsu, or any of its
affiliates, suppliers, service providers or resellers
for repair, Fujitsu does not guarantee the data
integrity. It is your responsibility to back data up
beforehand.
Fujitsu does not assume any obligation for
compensation for damages, data integrity, or
restoration, etc., if your data is lost for any reason,
except as written in the warranty.
vii
Page 8

AUSTRALIAN W ARNINGS
WARNING
FOR SAFETY REASONS, ONLY CONNECT
EQUIPMENT WITH A TELECOMMUNICATIONS COMPLIANCE LABEL. THIS INCLUDES
CUSTOMER EQUIPMENT PREVIOUSLY LABELLED PERMITTED OR CERTIFIED.
Connection of Non Certified/Approved
peripherals may result in the equipment
operating outside the Australian EMI
Standards.
Modems connected to the Australian
telecommunications network must be operated
in accordance with the Labelling Notice. This
modem has been specifically configured to
ensure compliance with the ACA Standards. Do
not adjust your modem or software outside the
values indicated below. To do so would result in
your modem being operated in a non-compliant
manner.
Call Attempts/Retries:
Applications software shall be configured so that
no more than 3 attempts are made to establish a
connection to a given number (Note: if the modem
can detect service tones, up to 10 attempts can
be made). If the call sequence is unsuccessful,
there shall be a delay of at least 30 minutes
before attempting to call the number again.
Failure to set the modem and any application
software used with the modem, to the values
shown above will result in the modem being
operated in a non-compliant manner.
Consequently, this would be in violation of the
Labelling Notice for this equipment and the
Telecommunications Act 1997 prescribes
penalties for the connection of non-compliant
equipment.
viii
Page 9

Copyright
NEW ZEALAND WARNINGS
The grant of a Telepermit for any item of terminal
equipment indicates only that Telecom has
accepted that the item complies with minimum
conditions for connection to its network. It
indicates no endorsement of the product by
T elecom, nor does it provide any sort of warranty .
Above all, it provides no assurance that any item
will work correctly in all respects with another
item of Telepermitted equipment of a different
make or model, nor does it imply that any product
is compatible with all of Telecom’s network
services.
This equipment is not capable under all operating
conditions of correct operation at the higher
speeds for which it is designed. 56 KBPS
connections are likely to be restricted to lower
bit rates when connected to some PSTN
implementations. Telecom will accept no
responsibility should difficulties arise in such
circumstances.
Immediately disconnect this equipment should it
become physically damaged, and arrange for its
disposal or repair.
This equipment shall not be used in any manner,
which could constitute a nuisance to other
Telecom customers.
This equipment shall not be set to make
automatic calls to the Telecom “111” Emergency
Service.
This device is equipped with pulse dialing while
the New Zealand standard is DTMF tone dialing.
There is no guarantee that Telecom lines will
always continue to support pulse dialing. It is
strongly recommended that pulse dialing is not
used.
Some parameters required for compliance with
Telecom’s Telepermit requirements are
dependent on the equipment (PC) associated
with this device. The associated equipment shall
be set to operate within the following limits for
compliance with Telecom’s Specifications:
For repeat calls to the same number.
There shall be no more than 10 call attempts
to the same number within any 30 minute
period for any single manual call initiation and
the equipment shall go on-hook for a period of
not less than 30 seconds between the end of
one attempt and the beginning of the next
attempt.
For Automatic calls to different numbers.
The equipment shall go on-hook for a period
of not less than 5 seconds between the end of
one attempt and the beginning of the next
attempt.
For Automatically answered Incoming
Calls.
Incoming calls shall be answered between 3
and 30 seconds from the start of the ringing.
For correct operation, the total of the RNs of all
devices connected to a single line at anytime
should not exceed 5. The RN of this Equipment
is 0.5.
WARNING:
CONNECTION OF NON CERTIFIED/
APPROVED PERIPHERALS MAY RESULT IN
THE EQUIPMENT OPERA TING OUTSIDE THE
NEW ZEALAND EMI STANDARDS.
ix
Page 10

NOTE: Modem setting in Windows
XP
A. If you are located in Australia
1. Click Start select Control panel select
"Phone and Modem Options".
2. Double click New Location.
3. Choose "Australia" in Country/region pull
down menu bar.
4. Select Phone system as "Tone Dialing".
5. Click OK and Apply.
B. If you are located in New Zealand
1. Click start select Control panel select
"Phone and Modem Options".
2. Double click New Location.
3. Choose "New Zealand" in Country/region
pull down menu bar.
4. Select Phone system as "Tone Dialing".
5. Click OK and Apply.
NOTE:
The screens and illustrations shown in this
examples may slightly vary depending on the
operating environment that you have installed.
x
Page 11

Table of Contents
Table of Contents
NAMES OF THE PARTS
AND THEIR FUNCTIONS ............. 1
Front features of the notebook .....................1
Exterior features: Side view.......................... 3
Exterior features: Bottom view
of the notebook .......................................5
Exterior features: Front view
of the notebook .......................................6
Exterior features: Rear view of notebook .....7
STATUS INDICATOR LED................. 8
Num Lock Indicator ......................................8
Caps Lock Key .............................................8
Scroll Lock Indicator..................................... 8
Battery Charging Indicator ...........................8
Battery Level Indicators................................8
Disk Drive Access Indicator .........................8
RUNNING THE NOTEBOOK
ON ITS BATTERY ......................... 9
Recharging the battery................................. 9
Running the notebook on its battery ............10
Checking the power level of the battery .......10
Low battery condition ...................................11
USING FINGERPRINT
AUTHENTICATION............................ 12
Characteristics of fingerprint
authentication ......................................... 12
Configuration of registration information ......13
Register log-in information
on homepages ........................................13
Log into homepages using fingerprint
authentication ......................................... 16
Change registration information ...................17
Save/Read registration information.............. 20
Setup window............................................... 23
SHOCK SENSOR UTILITY ............... 26
POWER SOURCES........................... 28
Connecting the Power Adapter ....................28
Power On .....................................................29
Power Off .....................................................29
CHANGING THE INTERNAL
BATTERY PACK ........................... 30
ADDING MEMORY MODULE ........... 31
Where to install memory module ................. 31
Preparing necessary items .......................... 31
Installing memory module ............................ 31
Checking the memory capacity ....................33
Changing memory module ...........................33
TROUBLESHOOTING....................... 35
Identifying the Problem ................................35
Specific Problems ........................................35
T roub leshooting Table .................................. 36
NOTE:
A copy of LifeBook User's Manual is located on
your Microsoft Windows Desktop and Software
Drivers CD. You can use this LifeBook User's
Manual to find out more information about the
functions and features of your notebook.
xi
Page 12

Getting to Know Your LifeBook
8
1
2
3
7
6
(This picture is for illustration purpose only and may look different from the actual unit)
NAMES OF THE PARTS
AND THEIR FUNCTIONS
Front features of the
notebook
1. LCD Panel
The display screen of the notebook.
4
5
The phenomena described below are
characteristics of LCD panels and do not
indicate that LCD panels are defective.
• The TFT color LCD screen of your
notebook, composes of more than
2,350,000 picture elements (number
of dots when the screen resolution
is set at 1024 by 768 pixels). It was
manufactured using advanced
technologies. F or technical reasons,
LCD screen may have pix els that do
not light and pixels that are always
lit.
• LCD panels may display slight
varying colors and uneven density.
1
Page 13

2. LifeBook Application Panel
The LifeBook application panel provides onetouch application launch capability.
3. Status Indicator LED
This indicator displays operating status
symbols that correspond to specific
components of your notebook.
4. Power and Suspend/Resume Button
This button allows you to power on or off the
notebook. You can use also this button to
suspend notebook activity without turning off
the power to it and to resume the notebook
from suspend mode.
5. Spill Resistant Keyboard
A full-function keyboard with dedicated
Windows keys.
Spill resistant keyboard does not imply the
keyboard is water-proof. If liquid is spilled
onto the keyboard, power off your notebook
immediately and turn the notebook upside
down to drain off the liquid.
6. Touch Pad with scroll buttons
It allows you to control the display cursor
(mouse pointer).
The Scroll Buttons allow you to scroll up and
down a document.
Some applications may not allow you
to scroll up and down a document using
the scroll button.
7. Status Indicator LED
This indicator displays operating status
symbols that correspond to specific
components of your notebook.
8. Fingerprint Sensor or Scroll Buttons
Your notebook may be equipped with either
Fingerprint Sensor or Scroll Buttons.
The Fingerprint Sensor provides an
alternative way for Windows logon
authentication as well as software application
and web sites logon authentications. Please
refer to the section on “Using Fingerprint
Authentication” for more details. The
Fingerprint Sensor also allows you to scroll
up and down a document by sweeping y our
finger up or down the sensor.
The Scroll Buttons allow you to scroll up and
down a document.
Some applications may not allow you to
scroll up and down a document.
2
Page 14

Getting to Know Your LifeBook
23
1
(This picture is for illustration purpose only and may look different from the actual unit)
57
46
Exterior features: Side view
Right view of the notebook
1. ExpressCard™ and PC Card Eject
Buttons
You press these buttons to eject the
ExpressCard™ module and PC card
installed in the card slots.
2. ExpressCard™ Slot
It allows you to connect ExpressCard™
module.
There are two sizes of ExpressCard™
module. One is 34mm wide (ExpressCard™/
34) and the other is 54mm wide
(ExpressCard™/54).
This LifeBook can support both sizes of
ExpressCard™ accessory.
NOTE:
ExpressCard™ Compliance ID: EC100096
(A6016).
ExpressCard™ Compliance ID: EC100097
(A3110).
3. PC Card
It allows you to install an optional PC Card.
4. SD/MS/xD Card Slot
The Memory Stick/SD card slot allows you
to install a flash memory card for data
storage. This architecture allows you to
transfer data from a variety of different
digital devices, such as SD card, xD card
and Memory Stick.
5. USB 2.0 Port
The USB 2.0 port allows you to connect
Universal Serial Bus devices. USB 2.0
devices transfer data at up to 480Mbps and
is backward compatible with USB 1.1
devices, which transf er data at up to 12Mbps.
6. IEEE 1394 Port
You can use this port to connect to a
multimedia device with an IEEE 1394 port
such as a digital video camera.
7. DC-IN Jack
You plug in the supplied AC adapter into this
port to power your notebook and charge the
battery.
3
Page 15

(This picture is for illustration purpose only and may look different from the actual unit)
Left view of the notebook
1. Multi-Purpose Bay
Y our notebook comes with an internal optical
disk drive, which may vary between
countries. Please check with your local
distributor for actual configuration.
1
4
Page 16

Exterior features: Bottom
view of the notebook
1
2
3
(This picture is for illustration purpose only and may look different from the actual unit)
1. Expansion RAM Module Slot
The location of the expansion memory slot.
Getting to Know Your LifeBook
2. Internal Battery Pack Bay
The location of the internal battery pack.
3. Battery Release Latch
Slide and hold this latch before sliding the
Battery Bay Lock Latch to unlock the battery .
5
Page 17
23
1
(This picture is for illustration purpose only and may look different from the actual unit)
4
Exterior features: Front view
of the notebook
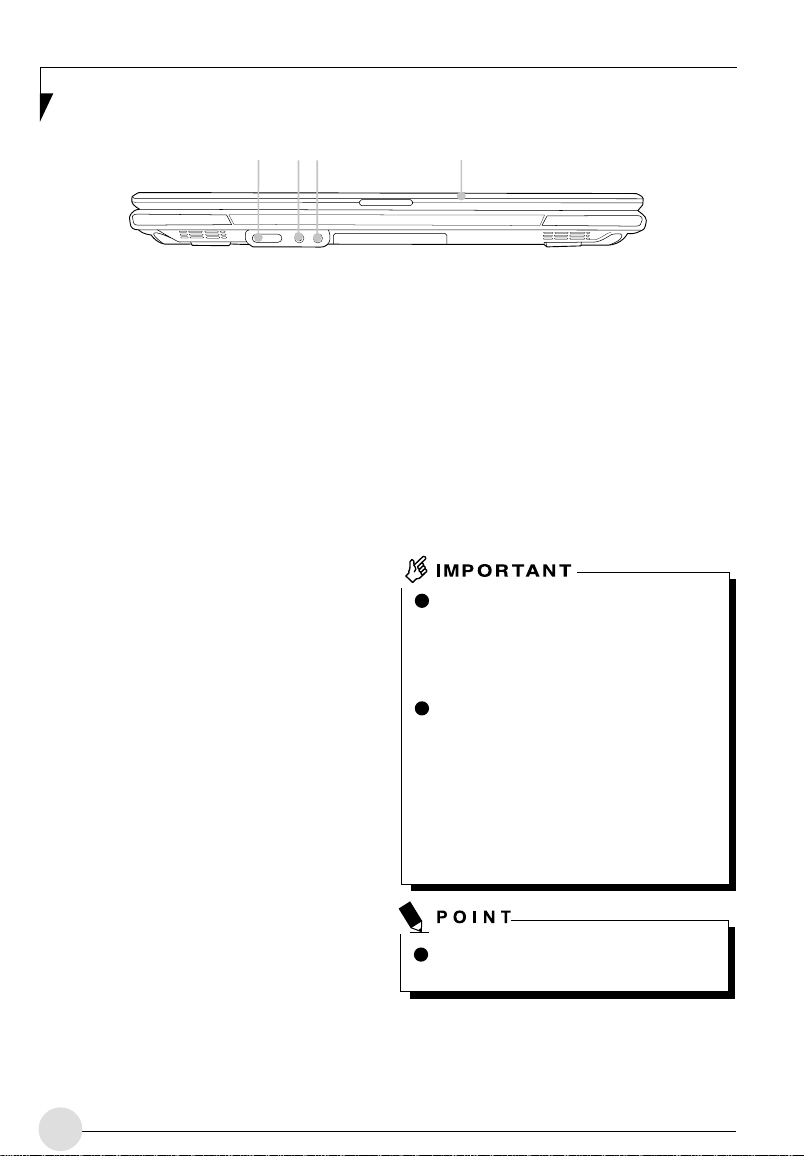
1. Wireless LAN/ Bluetooth* ON/OFF Switch
The switch allows you to turn on and off the
Wireless LAN/ Bluetooth communications.
Slide the switch to the right to turn it on, or
slide the switch to the left to turn it off.
Remember to off this switch where the use
of electronic devices is restricted, for
example, in hospitals and on airplanes.
T urn off this switch if you intend to carry your
notebook around. If you set your notebook
in standby mode with this switch on, the
notebook may resume operation
unexpectedly when it is carried around. This
may damage the hard disk.
* For model with Bluetooth.
2. HDA-In
It allows jack sensing of the following audio
input devices.
• Microphone
It allows you to connect a Ø3.5mm mono
or stereo microphone to it.
• Line-in
It allows you to connect an external audio
source to it e.g. an external CD player or
a MP3 player.
3. HDA-Out
It allows jack sensing of the following audio
output devices.
• Headphone
It allows you to connect a Ø3.5mm
headphone to it. There are commercially
available headphones with different types
of connector. Please check the compatibility
of these headphones before purchase.
• Line-out
It allows you to connect an external audio
device e.g a pair of stereo speakers to it.
If this LifeBook come with an optical
drive that can read DVD titles , then this
drive is pre-set at factory to read DVD
titles with region codes for specific Asia
Pacific markets (e.g. code 3 for Asian,
code 4 for Australia, code 6 for China).
The first time you play a D VD title with a
region code different from that of the
DVD optical drive - the region code set
at factory, you will be prompted to
change the region code of the DVD
optical drive. The region code of a DVD
optical drive can be changed up to 4
times, after which it will be locked so that
the DVD optical drive can only pla y D VD
titles of the final region code set.
Do not leave this bay vacant. This may
cause unexpected system failure.
4. Built-in Wireless LAN
The location of the dual Wireless LAN
antenna.
6
Page 18

Getting to Know Your LifeBook
23
1
(This picture is for illustration purpose only and may look different from the actual unit)
4
Exterior features: Rear vie w of
the notebook
1. Anti-theft Lock Slot
It allows you to attach an optional physical
lock down device.
2. USB 2.0 Ports
The USB 2.0 ports allow you to connect
Universal Serial Bus devices. USB 2.0
devices transfer data at up to 480Mbps and
is backward compatible with USB 1.1
devices, which transf er data at up to 12Mbps.
3. Modem (RJ-11) Port
It allows you to connect your notebook
internal modem to a phone line socket using
a supplied RJ-11 cable.
5
4. Video Output (S-Video) Terminal
You can use this port to connect to a TV
with S-video port for high quality video
output using an optional S-video cable.
5. External VGA Port
The external V GA port allows you to connect
an external display or CRT monitor.
6. LAN (RJ-45) Port
This port allows you to connect to a LAN
(local area network) using an optional LAN
cable. The port is compatible with 1000/100/
10 Base-T networks.
6
7
Page 19

2 3
5
4
(This picture is for illustration purpose only and may look different from the actual unit)
6
1
STATUS INDICATOR LED
1. Num Lock Indicator (1)
This indicator lights up when the keyboard
is locked in Num Lock mode. (Y ou can use
the keyboard as a ten-digit keyboard when
the Num Lock mode is turned on).
Y ou can toggle the Num Lock mode b y using
the [
2. Caps Lock Key (A)
You can toggle the Caps Lock mode by
using the [
3. Scroll Lock Indicator ( )
This indicator turns on when the lock mode
is turned on.
You can toggle the Scroll Lock button by
using the [
the [
] key.
] key.
] key while holding down
] key.
4. Battery Charging
Indicator (
This indicator turns on when internal battery
is being charged.
)
5. Battery Level Indicators
The standard Battery Level Indicator state
the presence of stardard Li-ion battery. The
indicator show the remaining power of the
battery.
6. Disk Drive Access
Indicator (
This indicator turns on when an internal
hard disk drive or a removable disk drive is
being accessed.
Do not power off the notebook when the
disk drive access indicator is shown.
Failure to do so corrupt data on the disk
as well as the installed operating system.
)
8
Page 20

RUNNING THE NOTEBOOK
ON ITS BATTERY
Recharging the battery
1. Connect the AC adapter to your notebook.
The moment you connect an AC adapter to
your notebook, the notebook begins to
charge the internal standard battery pack.
2. When the indicator turns off after the
battery is completely charged, disconnect
the AC adapter from the notebbok.
Before using the supplied battery pack
for the very first time after purchase,
remember to charge it fully . If a charged
battery has not been recharged for more
than a month, charge it fully before using
it.
When the battery is fully charged while
the notebook is in power off mode, the
Battery Level Battery Level LED
indicator turns off.
Getting to Know Your LifeBook
When the battery is 90% or more
charged, it cannot be recharged even if
the AC adapter is connected. The
battery can be recharged when its power
level (i.e. remaining battery life) is 89%
or less.
When a notebook is turned off, the
Battery Level LED indicator goes off
immediately if the battery is completely
charged.
The chargeability of the battery
degrades when it is used in an extremely
hot or cold place.
When the battery is very hot, for
example, immediately after long usage
of the notebook, the battery protection
feature may be activated to prevent the
battery from being recharged. When the
temperature decreases, the notebook
automatically begins to charge the
battery.
When an optional modular bay battery
is installed, it is charged along with the
internal standard battery.
9
Page 21

Running the notebook on its
battery
Checking the power level of
the battery
This section describes the steps to run the
notebook on its internal standard battery.
1. Disconnect the AC adapter from your
notebook and press the power button.
Power button
(This picture is for illustration purpose only and may
look different from the actual unit)
The power level of the battery decreases
faster when it is used in a cold place.
The chargeability of the battery decreases
after it has been used over a long period
of time. If the battery runs down very fast,
replace it with a new battery.
When an optional modular bay battery is
installed, it is charged along with the
internal standard battery.
Checking the power level of the
battery
When the power is turned off, the status
display LEDs are all OFF except f or during
battery charging.
1. Built-in Battery Pack Charging
Lamp (
This lamp indicates charging status of builtin battery when AC adaptor is connected to
PC.
• Green lamp is lit
Charging completed or not charging due
to no built-in battery pack installed.
• Orange lamp is lit
Charging
• Orange lamp flashes
Charging stopped (due to battery
temperature alarm, etc. [Note 1])
• OFF
No charging due to disconnected AC
adaptor.
)
10
2. Built-in Battery Pack Level
Indicator Lamp ( )
This lamp indicates remaining level of the
built-in battery pack.
• Green lamp is lit
Remaining battery level: 100% – 50%
[Note 2]
• Orange lamp is lit
Remaining battery level: 49 – 13% [Note
2]
Page 22

Getting to Know Your LifeBook
• Red lamp is lit
Remaining battery level: 12% or below
[Note 2]
• Orange lamp flashes
Measuring remaining battery level (for 4
seconds after built-in battery pack is
installed)
• Red lamp flashes
Abnormal battery condition.
• OFF
Built-in battery pack disconnected.
Due to certain characteristics of Li-ion
battery, the Battery Level Indicators may
not correctly show the remaining power
of the battery, especially under extreme
temperature conditions.
When the battery is 90% or more
charged, it cannot be recharged even if
the AC adapter is connected to the
notebook. The battery can be recharged
when its remaing power is 89% or less.
Battery failure alert
When the Battery Level LED indicator is not lit, it
indicates that the battery cannot be chanrged
properly.
Low battery condition
When the battery is discharged to a very low
level, the Battery Level LED indicator is lit Red.
Immediately, connect the AC adapter to your
notebook to recharge the battery.
The use of a weak battery may result in
lost of data you are currently working
on. When the battery runs low, connect
the AC adapter to your notebook as
soon as an external power source is
available or immediately save the data
you are working on, exit all applications
and turn off the notebook.
Accessing data on the hard disk
consumes a lot of power. Therefore
when the battery is weak, connect an
AC adapter to the notebook before
accessing data on the hard disk.
If a battery is weak and there is no
system activity, the notebook may go
into standby (i.e. suspend) mode.
However, if there is system activity, the
notebook will go into standby mode only
after the system activity has completed
its processing.
The notebook will go into standby mode
when the indicator reaches 3%. This is
the default setting of the notebook.
If the Battery Level LED indicator is not
lit, turn off the notebook, remove the
battery and reinstall it properly.
NOTE 1:
Battery temperature alarm is to stop charging
with battery protection function when temperature
of built-in battery pack or extended built-in battery
unit becomes too high or too low due to battery
heat or cooling down of the battery.
NOTE 2:
Operational status or battery charging.
11
Page 23

USING FINGERPRINT
AUTHENTICATION*
With fingerprint authentication, you can omit
entering a user name and a password by just
sliding your finger onto the fingerprint sensor at
the time of logging in homepages or logging on
Windows. This chapter describes how to use
fingerprint authentication.
* NOTE:
This is only applicable for LifeBook with
Fingerprint Sensor.
To use finger print authentication, the user’s
fingerprints must be registered.
Characteristics of fingerprint
authentication
Fingerprint authentication can be
used in the following case.
• Logging on to Windows
When the user account of Windows is
password-protected, only persons who know
that password can log on to Windows using
that account. How ever , you ha ve to enter the
password each time when you log on to
Windows.
With use of fingerprint authentication, you
can log on to Windows by only authenticating
fingerprints that have previously been
registered, thus omitting entering a
password.
• Recovery from the power-saving status
If the computer is password-protected for the
recovery from power-saving status, y ou have
to enter a password each time when your
computer is recovered from the power-saving
status.
With use of fingerprint authentication, you
can recover from the power-sa ving status by
authenticating fingerprints that have
previously been registered, thus omitting
entering a password.
You can log on
to Windows or
recover from the
power-saving
status by
authenticating
the fingerprints
It is unnecessary to input
a password.
• Canceling password-protected screen
saver
You can lock your computer if the screen
saver is password-protected. However, you
have to cancel this lock when canceling the
screen saver .
With use of fingerprint authentication, just
authenticating fingerprints that have
previously been registered enables this lock
to be canceled, thus omitting entering a
password.
• Logging into the homepage that requires
an ID (user name) and a password
To log into the homepage of which secur ity
is set up, you may have to enter log-in
information such as an ID (user name) and
a password.
With fingerprint authentication, you can log
into these homepages by just authenticating
fingerprints if log-in information is previously
memorized for specific homepages.
Status for entering log-in information differs
depending on homepages; direct entering
log-in information into homepages, and
indication of screens specific to entering. In
either case, log-in using fingerprint
authentication can be performed.
that have been
registered.
12
Page 24

Using Fingerprint Authentication
Configuration of registration
information
Registration information is set up in the following
configuration.
T o use fingerprint authentication, it is necessary
to register the user’s fingerprint.
Registration information on
fingerprint authentication (User
name and password are just an
example.)
• User name
This is the user’s name f or which a fingerprint
has been registered. It is necessary to give
the same name as used for logging on to
Windows.
• Domain
The full name of the computer is displayed.
• Fingerprint
Fingerprints are registered.
• Password
The user’s password for a user whose
fingerprint has been registered. It is
necessary to use the same password to be
used in logging on to Windows.
Register log-in information
on homepages
To log into homepages of which secur ity is set
up, you may ha ve to enter log-in inf ormation such
as an ID (user name) and a password.
With fingerprint authentication, you can log in
these homepages by only sliding your finger onto
the fingerprint sensor if log-in information is
previously memorized for specific homepages.
Register log-in information according to the
following procedure.
Register log-in information on
homepages
1. Display a homepage you want log-in
informating to be registered.
2. Enter log-in information.
• When directly registering log-in information
to homepage.
Do not press the “Sign-in” button, etc.
• Log-in information on homepages
Register an ID (user name) and a password
beforehand, so that homepages that require
entering an ID (user name) and a password
can be viewed just by authenticating
fingerprints.
13
Page 25

• When a screen specific for entering log-in
information is indicated.
Do not press the “OK” button.
• When directly registering log-in information
to homepage.
Click the area where a user name and a
password are entered.
3. Right-click on the OmniPass icon
from the notification area in the right
corner of the screen, and click on
“Memorize password.”
The mouse pointer changes into
4. With the mouse pointer changed to
click on the area of log-in information
entered in Step 2.
The “OmniPass-Remenber Password”
window will appear.
14
• When a screen specific for entering log-in
information is indicated.
Click on the input screen.
.
,
Page 26

Using Fingerprint Authentication
5. Enter the name of log-in information from
the “OmniPass-Friendly Name.
6. Click on “Finish.”
Registration of log-in information is completed.
The homepage that has been set here can be
logged in by just authenticating the registered
fingerprints without entering a user name and a
password.
Managing log-in information on
homepages
Information to be logged in homepages with
fingerprint authentication can be managed from
the following screen.
2. Click on “Vault management.”
The “Vault access authentication” window
appears.
3. Slide any finger of which fingerprints have
been registered onto the fingerprint
sensor.
When authentication of fingerprints is
successful, the “ID management” window will
appear.
1. Click on “Start,” “All programs,” “Softex”
and “OmniPass control center” in this
order.
The “OmniPass control center” window will
appear.
15
Page 27

4. Select the user name, and click on
“Manage Passwor ds. ”
The “Password management” window will
appear.
5. Log-in information is displayed on the
“Dialog protected by passwor d.”
T o change log-in inf ormation, it is necessary
to reregister log-in information. Select the login information name you desire to change,
and click on “Delete page.” Then, after log-in
information has been deleted, reregister the
log-in information to be registered.
Log into homepages using
fingerprint authentication
With fingerprint authentication, just by sliding your
finger onto the fingerprint sensor, you can log
into the homepage where security is set.
Register log-in information on
homepages
1. Display a homepage which log-in
information such as an ID (user name) and
a password are registered.
The “Access authentication” window will
appear.
2. Slide any finger of which fingerprint has
been registered onto the fingerprint
sensor.
When the authentication of fingerprints is
succeeded, log-in to a homepage will be
automatically performed.
16
Page 28

Using Fingerprint Authentication
Change registration
information
This chapter describes how to change the
information registered for using fingerprint
authentication.
After the registration of fingerprint
authentication has been completed, do
not change the user name that is required
for logging on to Windows and the user
name that has been set to the registration
information of fingerprint authentication.
• Registration information
Registration information includes a user
name, a password, a fingerprint, and log-in
information on homepages. When
registration information is updated, delete all
of registration information such as a user
name and a password before reregistering
it.
However, when adding new fingerprints or
adding/deleting log-in information for
homepages, it is unnecessary to delete the
registered information on fingerprint
authentication.
• Fingerprint
The number of fingerprints to be registered
can be added. To delete the fingerprints
already registered, it is necessary to delete
all of registration information on fingerprint
authentication before reregistering it.
• Log-in information for homepages
When log-in information for homepages is
changed, before reregistering, it is necessary
to delete the log-in information that has been
registered. In this case, it is unnecessary to
delete registration information on fingerprint
authentication.
Deletes registration information
on fingerprint authentication
1. Click on “Start,” “All programs,” “Softex”
and “OmniPass control center” in this
order.
The “OmniPass control center” window will
appear.
2. Click on “Remove users fr om OmniPass.”
The “Log-in user authentication” window will
appear.
• User name
Do not change a user name.
• Password
When a password for logging on to Windows
has been changed, it is necessary that the
password that has been set for registration
information for fingerprint authentication must
be changed to the password same as for
Windows after the change. When the
password that has been set for the
registration information on fingerprint
authentication is changed, delete all of
registration information on fingerprint
authentication before reregistering it.
17
Page 29

3. Slide any finger which fingerprint has
been registered onto the fingerprint
sensor.
When authentication of fingerprints is
succeeded, the “User delete confirmation”
window will appear.
4. Click on “OK.”
The message “A user has normally been
deleted” will be displayed.
Registration information on fingerprint
authentication has been deleted.
Adding registration information
to fingerprint authentication
1. Click on “Add new users to OmniPass.”
The “Confirmation of user name and
password” window will appear.
When “OmniPass control center” is not
displayed, click on the “Start” button -> “All
Programs” -> “Softex” -> “OmniPass control
center” in this order.
2. Enter the same password for logging on
to Windows and click on “Next.”
The “Select finger” window will appear. Do
not change a user name and domain.
18
Page 30

Using Fingerprint Authentication
3. Select a finger which fingerprint is
registered, and click on “Next.”
The “Fingerprint verification” window will
appear.
4 Slide a finger onto the fingerprint sensor
to confirm that a fingerprint has been
lifted. When “Fingerprint confirmation” is
completed, click on “OK.”
Perform “fingerprint verification” three times.
After three times of “fingerprint verification”
have been "successfull", slide your finger
again onto the fingerprint sensor for
“Fingerprint confirmation.”
5. When the message “Recommend to
register another finger” is displa yed, c lick
on “Yes.”
The “Select finger” windo w will appear.
6. Perform Steps 3 to 5 again, and register
the fingerprint of another finger.
When the “Setting up audio and task bar”
window appears, proceed to Step 7.
7. Click on “OK” from the “Setting up audio
and task bar” window.
The “OmniPass user account has been
created” window appears.
8. Click on “Finish.”
9. When the message “Do you log on for a
new user” is displayed, click on “Yes.”
The “OmniPass control center” window
appears again.
10. Click on “OK.”
The “OmniPass control center” window will
be closed.
Re-registration of fingerprint authentication has
been completed.
19
Page 31

Save/Read registration
information
Information such as user names and passwords,
fingerprints and log-in information for homepages
that have once been registered can be saved
altogether. It is recommended that registration
information be saved in case where registration
information is mistakenly deleted.
Save registration information.
1. Click on “Start,” “All programs,” “Softex”
and “OmniPass control center” in this
order.
The “OmniPass control center” window will
appear.
2. Click on “Import/export of users.”
The “Import/export of users” window will
appear.
3. Click on “Export of OmniPass user
profile.”
The “Authentication of user export” window
will appear.
4. Authenticate the fingerprint registered.
When authentication of fingerprints is
succeeded, “Save users that have been
exported by providing a name” window will
appear.
20
Page 32

Using Fingerprint Authentication
5. Enter the name of the registration
information to save, and click on “Save.”
The message “User export has been
completed.” will be displayed.
Save in the “My document” folder as an
example. Any names can be used for the
registration information to be saved.
6. Click on “OK” from the message “User
export is completed.”
User’s export is completed, and registration
information is saved.
1. Click on “Start,” “All programs,” “Softex”
and “OmniPass control center” in this
order.
The “OmniPass control center” window will
appear.
2. Click on “Import/export of users.”
The “Import/export of users” window will
appear.
3. Click on “Import new users into
OmniPass.”
The “Open files to import users” window will
appear
Read registration information.
When no users are registered for
fingerprint authentication, the “OmniPass
registration wizard” window may appear
when starting the computer. When
importing registration information, click on
“Cancel.”
21
Page 33

4. Select the registration information that
has been saved and click on “Open.”
The “OmniPass import user” window will
appear.
How to confirm domain
“Domain” for setting the registration
information for fingerprint authentication
can be checked by the following
procedure.
1. Click on “Start.”
2. Right-click on “My Computer,” and
click on “Properties” in the menu
to be displayed.
The “System Properties” window will
appear.
3. Click on the “Computer Name” tab.
5. Enter a user name, a domain, and a
password, then click on “Next.”
The message “User import of OmniPass has
been completed” will be displayed.
Enter the same user name and password to
be used in logging on to Windows.
4. A name that has been set to “Full
computer name” is “Domain.”
6. Click on “OK.”
7. Restart your computer.
Restarting the computer enables the
registration information that has been read
(imported) to be effective.
22
Page 34

Using Fingerprint Authentication
Setup window
Setting for fingerprint authentication can be
changed with “OmniPass control center.”
How to start “OmniPass control
center”
Start “OmniPass control center” in the following
procedure.
1. Click on “Start,” “All programs,” “Softex”
and “OmniPass control center” in this
order.
The “OmniPass control center” starts.
User Management
• Adding and deleting users
Users that use fingerprint authentication can
be added and deleted.
“Change registration information”
• User import/export
The user information that has already been
set can be saved (exported), or the user
information that is saved can be read
(imported).
“Save/Read registration information”
User settings
• Audio
Sound coming from the computer when
finger authentication is used is set.
• Taskbar Tips
This setting is for messages to be displayed
OmniPass icon in the notification area
in
in the bottom-right corner of your desktop
when Windows is logged on.
• Enrollment
In addition to the fingerprints that have
already been registered, new fingerprints can
be added and registered.
23
Page 35

System settings
• Starting option
Fingerprint authentication can be used for
logging on to Windows or you can terminate
its use.
• Password management
The user name and password for logging in
homepages by using fingerprint
authentication are managed. To change login information, delete log-in information once,
then reregister it.
Vault management
Manage information for logging into homepages.
When this setting screen is displayed, the
fingerprints that have already been registered are
to be authenticated.
“Register log-in information on homepages”
• ID management
A user ID (user name) to be logged in
homepages is managed.
24
Encrypt and Decrypt
It allows you to encrypt files and entire folders
with finger print sensor.
Page 36

Using Fingerprint Authentication
• File & Folder encryption
In order to encrypt a file or folder, click on
the folder or file to encrypt, right click on your
mouse button, choose “Omnipass Encrypt
File(s)”. Omnipass will then perform the
encryption on the file selected. To decrypt,
click on the file and right click on your mouse
button and choose “Omnipass Decrypt
File(s)”. Omnipass will decrypt your file for
viewing.
Please take note that certain files and folder
in Windows are not possible to encrypt.
Please refer to Omnipass help file in your
LifeBook for further information.
Version information
Version inf ormation on fingerprint authentication
utility is displayed.
Scrolling
The Fingerprint sensor now comes with a
scrolling function. Taking advantage of the
sensor’s technology, users will be able to scroll
up and down a document by swiping the finger
upwards to scroll up and swiping down to scroll
down.
25
Page 37

SHOCK SENSOR UTILITY
General information
The Shock Sensor Utility is designed to decrease
the risk of damage to the computer's hard disk
drive (HDD) in the event of excessive impact or
vibration. Additionally, the Shock Sensor Utility
has the ability to improve the security of the
computer by automatically locking the computer
with a password when it is carried. Note that the
HDD protection and computer locking features
are mutually exclusive; both cannot be selected
at the same time.
Setting up the Shock Sensor Utility
1. Double-click the Shock Sensor Utility icon
) in the Notification Area at the bottom-
(
right of the screen. The [Shock Sensor Utility]
window appears.
• Action
Select the action you wish this utility to
perform:
– Protect HDD from impact
HDD head is retracted when an impact
to the computer is detected.
– Lock computer when carried
Lock the computer when it is being
carried.
– Nothing
No action.
2. Click the [Setting] button (
Sensor Utility Settings] window appears.
). The [Shock
26
• Sensitivity of impact/horizontal move/
fall/carry detection
Adjust the sensitivity of the acceleration
sensor based on system motion or
impact.
• Ignore periodic vibration
If vibration is periodic, disregard it.
• Ignore mouse click
When the mouse is clicked, sensitivity is
temporarily lowered.
Page 38

Getting Started with your LifeBook
Notebook
• Ignore keyboard action
When the keyboard is used, sensitivity is
temporarily lowered.
• Confirm calibration when user logs on
Select [Confirm calibration when user
logs on] if you want to recognize the
current orientation as horizontal at logon.
• Perform calibration automatically
when user logs on
Select [Perform calibration automatically
when user logs on] if the system is
normally used on a horizontal surface.
• [Calibrate Now]
The calibration is executed. Please
position the computer as horizontally as
possible, then click the [Calibrate Now]
button. The current horizontal position will
be recognized as the true horizontal by
performing the calibration.
3. Click the [OK] or [Cancel] button (
[Setup] window closes.
Notes
Before using the Shock Sensor utility, please be
aware of the following points.
• The Shock Sensor Utility does not completely
protect the HDD of the computer.
• The Shock Sensor Utility does not provide the
computer with absolute security.
• The computer may stop temporarily while HDD
head is being retracted. To start the computer
again, please keep it horizontal.
). The
System Requirements
The Shock Sensor Utility runs under the following
operating environment.
System
OS
Available
hard disk
space
Microsoft® Windows® XP Home
Edition Service Pack 2
Microsoft® Windows® XP
Professional Service Pack 2
Microsoft® Windows® XP Tablet
PC Edition 2005
5 MB or more
Requirements
27
Page 39

DC Output Cable
AC Adapter
POWER SOURCES
DC Power Jack
AC Cable
Connecting the Power
Adapter
The AC adapter provides power for operating
your notebook and charging the batteries.
Connecting the AC Adapter
1. Plug the DC output cable into the DC power
jack on your notebook.
2. Plug the AC adapter into an AC electrical
outlet.
The Li-ion battery is not charged at the point
of purchase. Remember to connect an AC
adapter to your notebook to charge it when
you use it for the first time.
28
Page 40

Getting Started with your LifeBook
Notebook
Power On
Power/Suspend/Resume button
Y ou can use the P ower/Suspend/Resume b utton
to turn on your notebook. Once you have
connected an AC adapter to the notebook or
charged the internal Lithium ion battery, you can
power on your notebook.
When you turn on your notebook, be sure
you have a pow er source connected to it. This
means that at least one battery is installed
and charged or that the AC adapter is
connected and has power.
You can press the Power/Suspend/Resume
button to turn off the notebook. After you have
finished working on the notebook, you can either
leave it in Standby (i.e. suspend) mode or turn it
off.
Do not carry the notebook around when it is
still power on. Do not subject the notebook
to shocks and vibrations. Failure to do so ma y
damage the notebook.
Power Off
Before turning off the power, chec k that the Hard
Disk Access, Optical Disk Drive Access and PC
Card Slot Access indicators are off. If you po wer
off the notebook when it is accessing the disk or
PC Card, data may be lost or corrupted. To power
off the notebook, always shut down the notebook
properly using the Windows shutdown procedure.
Remember to close all files, exit all
applications and shut down the operating
system prior to turning off the power using
the power button. If documents are opened
when the notebook is turned off, data may
be lost and this may result in disk errors.
Remember to use the correct procedure to shut
down the notebook. The proper procedure is:
1. Click the Start button and then click Shut
Down or turn Off notebook.
2. Select the Shut Down option from within the
Shut Down Windows dialog box.
3. Click OK to shut down your notebook.
When you power on your notebook, it will perf orm
a Power On Self T est (POST) to chec k the internal
parts and configuration for normal functionality.
If an error is found, your notebook will emit an
audio warning and/or show an error message.
After satisfactory completion of the Power On Self
Test (POST), your notebook will load your
operating system.
29
Page 41

CHANGING THE
INTERNAL BATTERY
PACK
Before changing the internal battery
pack, turn off the notebook and
disconnect the AC adapter from it. To
avoid shock hazards and damage to
your notebook, be careful not to touch
internal components of the notebook,
including the battery connector.
Changing the internal battery
pack
1. T urn off the notebook and disconnect the
AC adapter from it.
2. Close the LCD panel and place your
notebook upside down.
Battery Release Latches
Battery Compartment
4. Install a new battery pack.
Press the latches on the battery pack and
align it to fit into the battery compartment of
the notebook. When the battery falls in place,
push the battery inwards as shown and
release the latches.
Battery Release Latches
Close the LCD panel gently . Do not e xert
excessive pressure to it. Failure to do
so may damage the LCD panel.
3. Remove the battery pack.
While pressing the latches that lock the
battery, push the battery outwards in the
direction of the arrow as shown.
30
Battery Compartment
After removing the internal battery pack,
please take necessary precautions to
prevent it from being shorted. For
example, you can seal the connector
ends with insulating tape. After remo ving
the battery pack, do not mix it with other
types of battery.
The internal battery pack contains
recycle material.
Page 42

User-Installable Features
ADDING MEMORY
MODULE
Where to install memory
module
Your notebook has an expansion RAM module
slot (slot 2) to add in one additional memory
module.
The memory capacity of the notebook can be
increased to a maximum of 4 GB (2048 MB x 2).
Preparing necessary items
• Philips screwdriver
Use a screwdriver of appropriate size to
remove the screws on the cover. Failure to
do so may damage the head of the screws.
Memory
compartment
cover
Total capacity Slot 1 Slot 2
256 MB 256 MB
512 MB 256 MB 256 MB
768 MB 256 MB 512 MB
1 GB 512 MB 512 MB
2 GB 1024 MB 1024 MB
4 GB 2048 MB 2048 MB
This LifeBook is capable of operating in dual
channel memory mode. To realize the full
performance benefits of dual channel operations,
we recommend you upgrade memory module
using Fujitsu memory module such that the two
memory modules in the memory slots are of the
same capacity and specification.
Installing memory module
To install memory, perform these steps.
Before installing any memory module,
remember to power off the notebook
and disconnect the AC adapter from it.
Keep small objects, such as a cover,
caps and screws, out of the reach of
babies and children. These small
objects may suffocate a baby or child if
they are swallow ed accidentally . Should
such an accident happen, consult a
doctor immediately.
Memory Module Configuration Table.
The table below shows combinations of
memory that can be installed on your
notebook.
The installation of any combination of memory
other than the combinations shown below can
impair the functioning of your notebook.
Certain components around the
memory slots are very hot when the
notebook is powered on for a long period
of time.
To avoid possible burns, do not install
or remove memory module immediately
after turning off the notebook but wait
for a while until its internal components
cool down.
31
Page 43

To install or remove a memory module,
hold it by the edge and be careful not to
touch any component and IC.
Memory module is made of materials
sensitive to human body static charges.
Before handling a memory module,
always touch an appropriate metal
object to discharge static charges from
your body.
Please remember to turn off the
notebook before you begin to install or
remove a memory module. If the
notebook is placed in standby or
hibernate mode while the memory is
removed, data may be lost or corrupted.
This may also damage the memory
module.
1. T urn off the notebook and disconnect the
AC adapter from it.
2. Close the LCD panel and place the
notebook upside down.
3. Remove the two screws securing the
memory compartment slot cover and
remove it.
Remove the battery compartment cover at
the bottom of the notebook.
4. Install the memory module
Insert the memory module into the slot with
the notch in the memory module aligned with
the projection on the connector, and push
the memory module down unit it locks in
place with a click sound.
Notch in the memory module
5. Attach the memory compar tment cover
and secure it with screws.
Attach the cover removed in step 3.
Memory
compartment
cover
32
Memory
compartment
cover
Page 44

User-Installable Features
Checking the memory
capacity
If the memory is not installed correctly,
an error message "Expansion memory
error" may be displayed when you turn
on the notebook. If such a message
appears, turn off the notebook, remove
the memory module and reinstall it.
1. Turn on the notebook.
2. Click the Start button and select Control
Panel.
The Control Panel window appears.
3. Click Performance and Maintenance, and
then System.
The System Properties dialog box appears.
4. Check whether the numeric value has
increased by the size of the memory you
have added.
The notebook specifications may vary
between countries, please check with your
local distributor for actual configuration.
Changing memory module
The memory module installed on your notebook
can be replaced with a larger size of memory.
1. Turn off the notebook and disconnect the
AC adapter from it.
2. Close the LCD panel and place the
notebook upside down.
3. Remove the two screws securing the
memory compartment cover and remove
it.
Remove memory compartment cover at the
bottom of the notebook.
Memory
compartment
cover
5. Click OK.
If the numeric value displayed does not
agree with the memory capacity of your
notebook, check the newly installed
memory module.
33
Page 45

4. Remove the memory module.
Displace the hook on each side from the
memory module. The memory module
comes up slightly. Pull the memory module
diagonally up to detach it from the slot.
6. Attach the memory compartment cover.
Attach the cover removed in step 3.
Memory
compartment
cover
5. Install a new memory module.
Insert the memory module diagonally into the
slot with the notch in the memory module
aligned with the projection on the connector.
Push memory module down until it clicks into
place.
Notch in the memory module
After you have installed or remove a
memory module, check the memory
capacity of you notebook to verify that
the memory module is installed properly.
34
Page 46

Troubleshooting
TROUBLESHOOTING
Your Fujitsu LifeBook notebook is sturdy and
undergoes stringent reliability tests. However,
you may encounter simple setup or operating
problems that you can solve on the spot or
problems with peripheral devices, that you can
solve by replacing the device . The inf ormation in
this section helps you isolate and resolve some
of these straightforward problems and identify
failures that require service.
Identifying the Problem
If you encounter a problem, go through the
following procedure before pursuing complex
troubleshooting:
1. Turn off your LifeBook notebook.
2. Make sure the AC adapter is plugged into
your notebook and to an active AC power
source.
3. Make sure that any card installed in the PC
Card slot is seated properly. You can also
remove the card from the slot, thus
eliminating it as a possible cause of failure.
4. Make sure that any devices connected to the
external connectors are plugged in properly .
You can also disconnect such devices, thus
eliminating them as possible causes of failure.
5. T urn on your notebook. Make sure it has been
off at least 10 seconds before you turn it back
on.
6. Go through the boot sequence.
7. If the problem has not been resolved, refer
to the Troubleshooting Table that follows for
more detailed troubleshooting information.
8. If you have tried the solutions suggested in
the Troubleshooting Table without success,
contact your support representative.
Before you place the call, you should have the
following information ready so that the customer
support representative can provide you with the
fastest possible solution:
• Product name
• Product configuration number
• Product serial number
• Purchase date
• Conditions under which the problem occurred
• Any error messages that have occurred
• Hardware configuration
• Type of device connected, if any
See the Configuration Label on the bottom of your
notebook for configuration and serial numbers.
Specific Problems
Using the Troubleshooting Table
When you have problems with your LifeBook
notebook, try to find the symptoms under the
Problem column of the troubleshooting table. You
will find a description of common causes for that
symptom under the column Possible Cause.
Follow the instructions on the Possible Solution
column to resolve the problem. All possible
causes or solutions may not apply to your
notebook.
If you keep notes about what you hav e tried,
your support representative may be able to
help you more quickly by giving additional
suggestions over the phone.
35
Page 47

T roubleshooting T able
Problem Possible Cause Possible Solution
Audio Problem
There is no sound
coming from the
built-in speakers.
The software volume
control is set too low.
Adjust the sound volume control settings in
your software, operating system and
applications.
Headphones are plugged
into your notebook.
BIOS audio settings
are incorrect.
Software driver is not
configured correctly.
The speakers have been
muted using the Volume
icon in the system tray.
DVD/CD-RW/CD-ROM Drive Problems
LifeBook notebook
fails to recognize
DVD/CD-RW/ CDROM’s.
Protective sheet is still in
the DVD/CD-RW/CDROM drive tray.
DVD/CD-RW/CD-ROM is
not pushed down onto
raised center circle of the
drive.
DVD/CD-RW/CD-ROM
tray is not latched shut.
Incorrect DVD Player or
no DVD Player software is
installed.
Plugging in headphones disables the built-in
speakers, remove the headphones.
Set the BIOS setup utility to the default values
within the Multimedia Device Configuration
menu.
Refer to your application and operating system
documentation for help.
Click on the Volume icon in the tool tray on the
bottom right of the screen. (It looks like a
speaker).
If the Mute box is checked, click on it to
uncheck it.
Remove the protective sheet from the DVD/
CD-RW/CDROM drive tray.
Open DVD/CD-RW/CD-ROM tray and reinstall DVD/CD-RW/CD-ROM properly.
Push on the front of the DVD/CD-RW/CDROM tray until it latches.
Install DVD Player software.
36
Page 48

Troubleshooting
Problem Possible Cause Possible Solution
DVD/CD-RW/CD-ROM Drive Problems
LifeBook notebook
fails to recognize
DVD/CD-RW/ CDROM’s.
(continued)
Wrong drive designator
was used for DVD/CDRW/CD-ROM in the
application.
Verify the drive designator used by the
application is the same as the one used by the
operating system.
When the operating system is booted from a
DVD/ CD, drive designations are automatically
adjusted.
The DVD/CD-RW/
CD-ROM Access
indicator on the
Status Indicator
Panel blinks at
regular intervals
when no DVD/CDRW/CD-ROM is in
the tray or the
optical drive is not
installed.
Windows DVD/CD-RW/
CD-ROM auto insertion
function is disabled.
DVD/CD-RW/CD-ROM is
dirty or defective.
The Windows DVD/CDRW/CD-ROM auto
insertion function is active
and is checking to see if a
DVD/CD-RW/CD-ROM is
ready to run.
Start the DVD/CD-RW/CD-ROM from the
desktop or application software or re-enable
the Windows DVD/CD-RW/CD-ROM auto
insertion function.
Wipe DVD/CD-RW/CD-ROM with a nonabrasive CD cleaning cloth and reinsert. If it
still does not work, replace a new DVD/CDRW/CD-ROM in the drive.
This is normal. However, you may disable this
feature.
37
Page 49

Problem Possible Cause Possible Solution
Floppy Disk Drive Problems
You cannot access
your floppy disk.
You tried to write to a write
protected floppy disk.
Eject the floppy disk and set it to write enable.
Floppy disk is not
loaded correctly.
The floppy disk drive may
not be properly installed.
Security is set to protect
access to floppy disk data.
Hard Drive Problems
You cannot access
your hard drive.
Keyboard or Mouse Problems
The built-in
keyboard does
not seem to work.
The setup utility is
incorrectly set for your
internal (Primary Master)
or optional second hard
drive (Primary Slave).
The wrong drive
designator was used by
an application when a
bootable CD-ROM was
used to start the
notebook.
Security is set so your
operating system cannot
be started without a
password.
The notebook has gone
into Suspend mode.
Your application has
locked out your keyboard.
Eject floppy disk, check orientation and reinsert.
Remove and re-install your floppy disk drive.
Verify your password and security settings.
Revise BIOS settings to set both Primary
Master and Primary Slave correctly .
Verify drive designator used by application is
in use by the operating system. When the
operating system is booted from a CD, drive
designations are automatically adjusted.
Verify your password and security settings.
Push the Power/Suspend/Resume button.
Try to use your integrated pointing device to
restart your system.
38
Page 50

Troubleshooting
Problem Possible Cause Possible Solution
Keyboard or Mouse Problems
You have installed
an external
keyboard or
mouse, and it does
not seem to work.
Your external device is not
properly installed.
Your operating system
software is not setup with
the correct software driver
for that device.
Re-install your device.
Check your device and operating system
documentation and activate the proper driver.
You have
connected an
external keyboard
or a mouse and it
seems to be
locking up the
system.
Memory Problems
Your Power On
screen, or Main
menu of the BIOS
setup utility
information, does
not show the
correct amount of
installed memory.
Modem Problems
Messages about
modem operation.
Your mouse or keyboard
is connected to the wrong
PS/2 port on the optional
Port Replicator.
Your operating system
software is not setup with
the correct software driver
for that device.
Your system has crashed.
Your memory upgrade
module is not properly
installed.
You have a memory
failure.
Messages about modem
operation are generated
by whichever modem
application is in use.
Plug the mouse into the PS/2 Mouse port and
the external keyboard or numeric key pad into
the PS/2 Keyboard port.
Check your device and operating system
documentation and activate the proper driver.
Try to restart your notebook.
Remove and re-install your memory upgrade
module.
Check for Power On Self Test (POST)
messages.
See your application software documentation
for additional information.
39
Page 51

Problem Possible Cause Possible Solution
PC Card Problems
A card inserted in
the PC Card slot
does not work or
is locking up the
system.
The card is not properly
installed.
The card may have been
installed while an
application was running,
so your notebook is not
aware of its installation.
Remove and re-install the card.
Close the application and restart your
notebook.
Power Failures
You turn on your
LifeBook notebook
and nothing seems
to happen.
Your software may not
have the correct software
driver active.
You may have the wrong
I/O address selected for
the activated PC Card.
Your PC Card device and
another device are
assigned the same I/O
address.
The installed primary
battery is completely
discharged, there is no
optional second battery
installed or there is no
Power adapter (AC
adapter) installed.
The primary battery is
installed but is faulty.
The battery or batteries
are low.
See your software documentation and activate
the correct driver.
See your PC Card documentation to
determine the required I/O address. Change
the settings in the BIOS.
Check all I/O addresses located within the
BIOS setup utility and any other installed
hardware or software to make sure there are
no duplications.
Check the Status Indicator Panel to determine
the presence and condition of the batteries.
Install a charged battery or a Power adapter.
Use the Status Indicator panel to verify the
presence and condition of the batteries. If a
battery is indicating a short, remove that
battery and operate from another power
source or replace that battery.
Check the Status Indicator Panel to determine
the presence and condition of the batteries.
Use a Power adapter to oper ate until a battery
is charged or install a charged battery.
40
The power adapter (AC
adapter) is not plugged
in properly.
Verify that your adapter is connected correctly.
Page 52

Troubleshooting
Problem Possible Cause Possible Solution
Power Failures
You turn on your
LifeBook notebook
and nothing seems
to happen.
(continued)
The power adapter (AC
adapter) has no power
from the AC outlet.
The power adapter (AC
adapter) is faulty.
Move the AC cord to a different outlet, check
for a line switch or tripped circuit breaker for
the AC outlet.
Try a different power adapter or install a
charged optional second battery.
Your LifeBook
notebook turns off
all by itself.
The power management
parameters are set for
auto timeouts which are
too short for your
operating needs.
You are operating on
battery power only and
have ignored a low battery
alarm until the batteries
are all power drained
empty and your machine
has gone into Dead
Battery Suspend mode.
You have a battery failure.
Your power adapter has
failed or lost its power
source.
Press any button on the keyboard, or move
the mouse to restore operation. If that fails,
push the Power/Suspend/Resume b utton.
Check your power management settings, or
close your applications and go to the Power
Options menu to adjust the timeout values to
better suit your needs.
Install a power adapter or a charged battery
and then push the Power/Suspend/Resume
button.
Verify the condition of the batteries using the
Status Indicator Panel, and replace or remove
battery that is shorted.
Make sure the adapter is plugged in and the
outlet has power.
41
Page 53

Problem Possible Cause Possible Solution
Power Failures
Your LifeBook
notebook will not
work on battery
alone.
The installed batteries
are dead.
No batteries are installed.
Replace the battery with a charged one or
install a Power adapter.
Install a charged battery.
The batteries
seem to discharge
too quickly.
The batteries are
improperly installed.
Your installed batteries
are faulty.
You are running an
application that uses a
great deal of power due to
frequent hard drive
access or DVD/CD-ROM
access, use of a modem
card or a LAN PC card.
The power savings
features may be disabled.
The brightness is turned
all the way up.
The batteries are very old.
The batteries have been
exposed to high
temperatures.
The batteries are too hot
or too cold.
Verify that the batteries are properly
connected by re-installing them.
Verify the condition of the batteries using the
Status Indicator panel and replace or remove
any batteries that are shorted.
Use both the primary battery and an optional
second battery and/or use a power adapter for
this application when at all possible.
Check the power management and/or setup
utility settings in the Power Savings menu and
adjust according to your operating needs.
Turn down the brightness adjustment. The
higher the brightness the more power your
display uses.
Replace the batteries.
Replace the batteries.
Restore the notebook to normal operating
temperature. The Charging icon on the Status
Indicator panel will flash when the battery is
outside its operating range.
42
Page 54

Troubleshooting
Problem Possible Cause Possible Solution
Shutdown and Startup Problems
The Suspend/
Resume button
does not work.
The Suspend/Resume
button is disabled from the
Advanced submenu of the
Power menu of the setup
utility.
Enable the button from the setup utility.
The system
powers up, and
displays power on
information, but
fails to load the
operating system.
An error message
is displayed on the
screen during the
notebook (boot)
sequence.
You did not hold the
button in long enough.
There may be a conflict
with the application
software.
The boot sequence
settings of the setup utility
are not compatible with
your configuration.
You have a secured
system requiring a
password to load your
operating system.
Internal hard drive was
not detected.
Power On Self Test
(POST) has detected a
problem.
Hold the button longer. This may need to be a
few seconds if your application is preventing
the CPU from checking for button pushes.
Close all applications and try the button again.
Set the operating source by pressing the
[ESC] key while the Fujitsu logo is on screen
or use the [F2] key and enter the setup utility
and adjust the source settings from the Boot
menu.
Make sure you have the right password. Enter
the setup utility and verify the Security settings
and modify them as accordingly.
Use the BIOS setup utility or Primary Master
submenu, located within the Main menu, to try
to auto detect the internal hard drive.
See the Power On Self Test (POST) messages
to determine the meaning and severity of the
problem.
Not all messages are errors; some are simply
status indicators.
43
Page 55

Problem Possible Cause Possible Solution
Shutdown and Startup Problems
Your notebook
appears to change
setup parameters
when you start it.
BIOS setup changes were
not saved when you made
them and exited the BIOS
setup utility returning it to
previous settings.
Make sure you select Save Changes And Exit
when exiting the BIOS setup utility.
Your system
display won’t turn
on when the
system is turned
on or when the
system has
resumed.
Video Problems
The built-in display
is blank when you
turn on your
LifeBook notebook.
The BIOS CMOS hold-up
battery has failed.
The system may be
password-protected.
Something is pushing on
the Closed Cover switch.
Contact your support representative for
repairs.
This is not a user serviceable part but has a
normal life of 3 to 5 years.
Check the status indicator panel to verify that
the Security icon is blinking. If it is blinking,
enter your password.
Clear the Closed Cover switch.
44
Page 56

Troubleshooting
Problem Possible Cause Possible Solution
Video Problems
The built-in display
is blank when you
turn on your
LifeBook notebook.
(continued)
The notebook is set for an
external monitor only.
Pressing [F10] while holding down the [Fn] key
allows you to change your selection of where
to send your display video. Each time you
press the combination of keys you will step to
the next choice. The choices, in order are:
built-in display only, external monitor only, both
built-in display and external monitor.
The LifeBook
notebook turned
on with a series of
beeps and your
built-in display is
blank.
The display goes
blank by itself after
you have been
using it.
The angle of the display
and the brightness
settings are not adequate
for your lighting
conditions.
The power management
time-outs may be set for
very short intervals and
you failed to notice the
display come on and go
off again.
Power On Self Test
(POST) has detected a
failure which does not
allow the display to
operate.
The notebook has gone
into Video Timeout,
Standby mode, Suspend
mode or Save-to-Disk
mode because you have
not used it for a period of
time.
The power management
time-outs may be set for
very short intervals and
you failed to notice the
display come on and go
off again.
Move the display and the brightness control
until you have adequate visibility.
Press any button the keyboard, or move the
mouse to restore operation. If that fails, push
the Power/Suspend/Resume button. (The
display may be shut off by Stanby mode, Auto
Suspend or Video Timeout)
Contact your support representative.
Press any button on the keyboard, or move
the mouse to restore operation. If that fails,
push the Power/Suspend/Resume b utton.
Check your power management settings, or
close your applications and go to the Power
Savings menu of the setup utility to adjust the
timeout values to better suit your operation
needs.
Press any button on the keyboard, or move
the mouse to restore operation. If that fails,
push the Power/Suspend/Resume b utton.
(The display may be shut off by Standby
Mode, Auto Suspend or Video Timeout)
Something is pushing on
the Closed Cover switch.
Check the Closed Cover switch.
45
Page 57

Problem Possible Cause Possible Solution
Video Problems
The application
display uses only a
portion of your
screen and is
surrounded by a
dark frame.
You are running an
application that does not
support 800 x 600/1024 x
768 pixel resolution
display and display
compression is enabled.
Display compression gives a clearer but
smaller display for applications that do not
support 800 x 600/1024 x 768 pixel resolution.
You can fill the screen but have less resolution
by changing your display compression setting,
(See the Video Features submenu, located
within the Advanced menu of the BIOS.)
The Display is dark
when on battery
power.
You have
connected an
external monitor
and it does not
display any
information.
You have
connected an
external monitor
and it does not
come on.
Miscellaneous Problems
An error message
is displayed on the
screen during the
operation of an
application.
The Power Management
utility default is set on low
brightness to conserve
power.
Your BIOS setup is not set
to enable your external
monitor.
Your external monitor is
not properly installed.
Your operating system
software is not setup with
the correct software driver
for that device.
Your external monitor is
not compatible with your
LifeBook notebook.
Application software often
has its own set of error
message displays.
Press [Fn] + [F7] to increase brightness or
double- click on the battery gauge and adjust
Power Control under battery settings.
Try toggling the video destination by pressing
[Fn] and [F10] together, or check your BIOS
setup and enable your external monitor. (See
the Video Features submenu, located within
the Advanced Menu of the BIOS.)
Reinstall your device.
Check your device and operating system
documentation and activate the proper driver.
See your monitor documentation and the
External Monitor Support portions of the
Specifications section.
See your application manual and help display
screens for more information. Not all
messages are errors. Some may simply be
status messages.
46
 Loading...