

Page 1
Getting started with your new
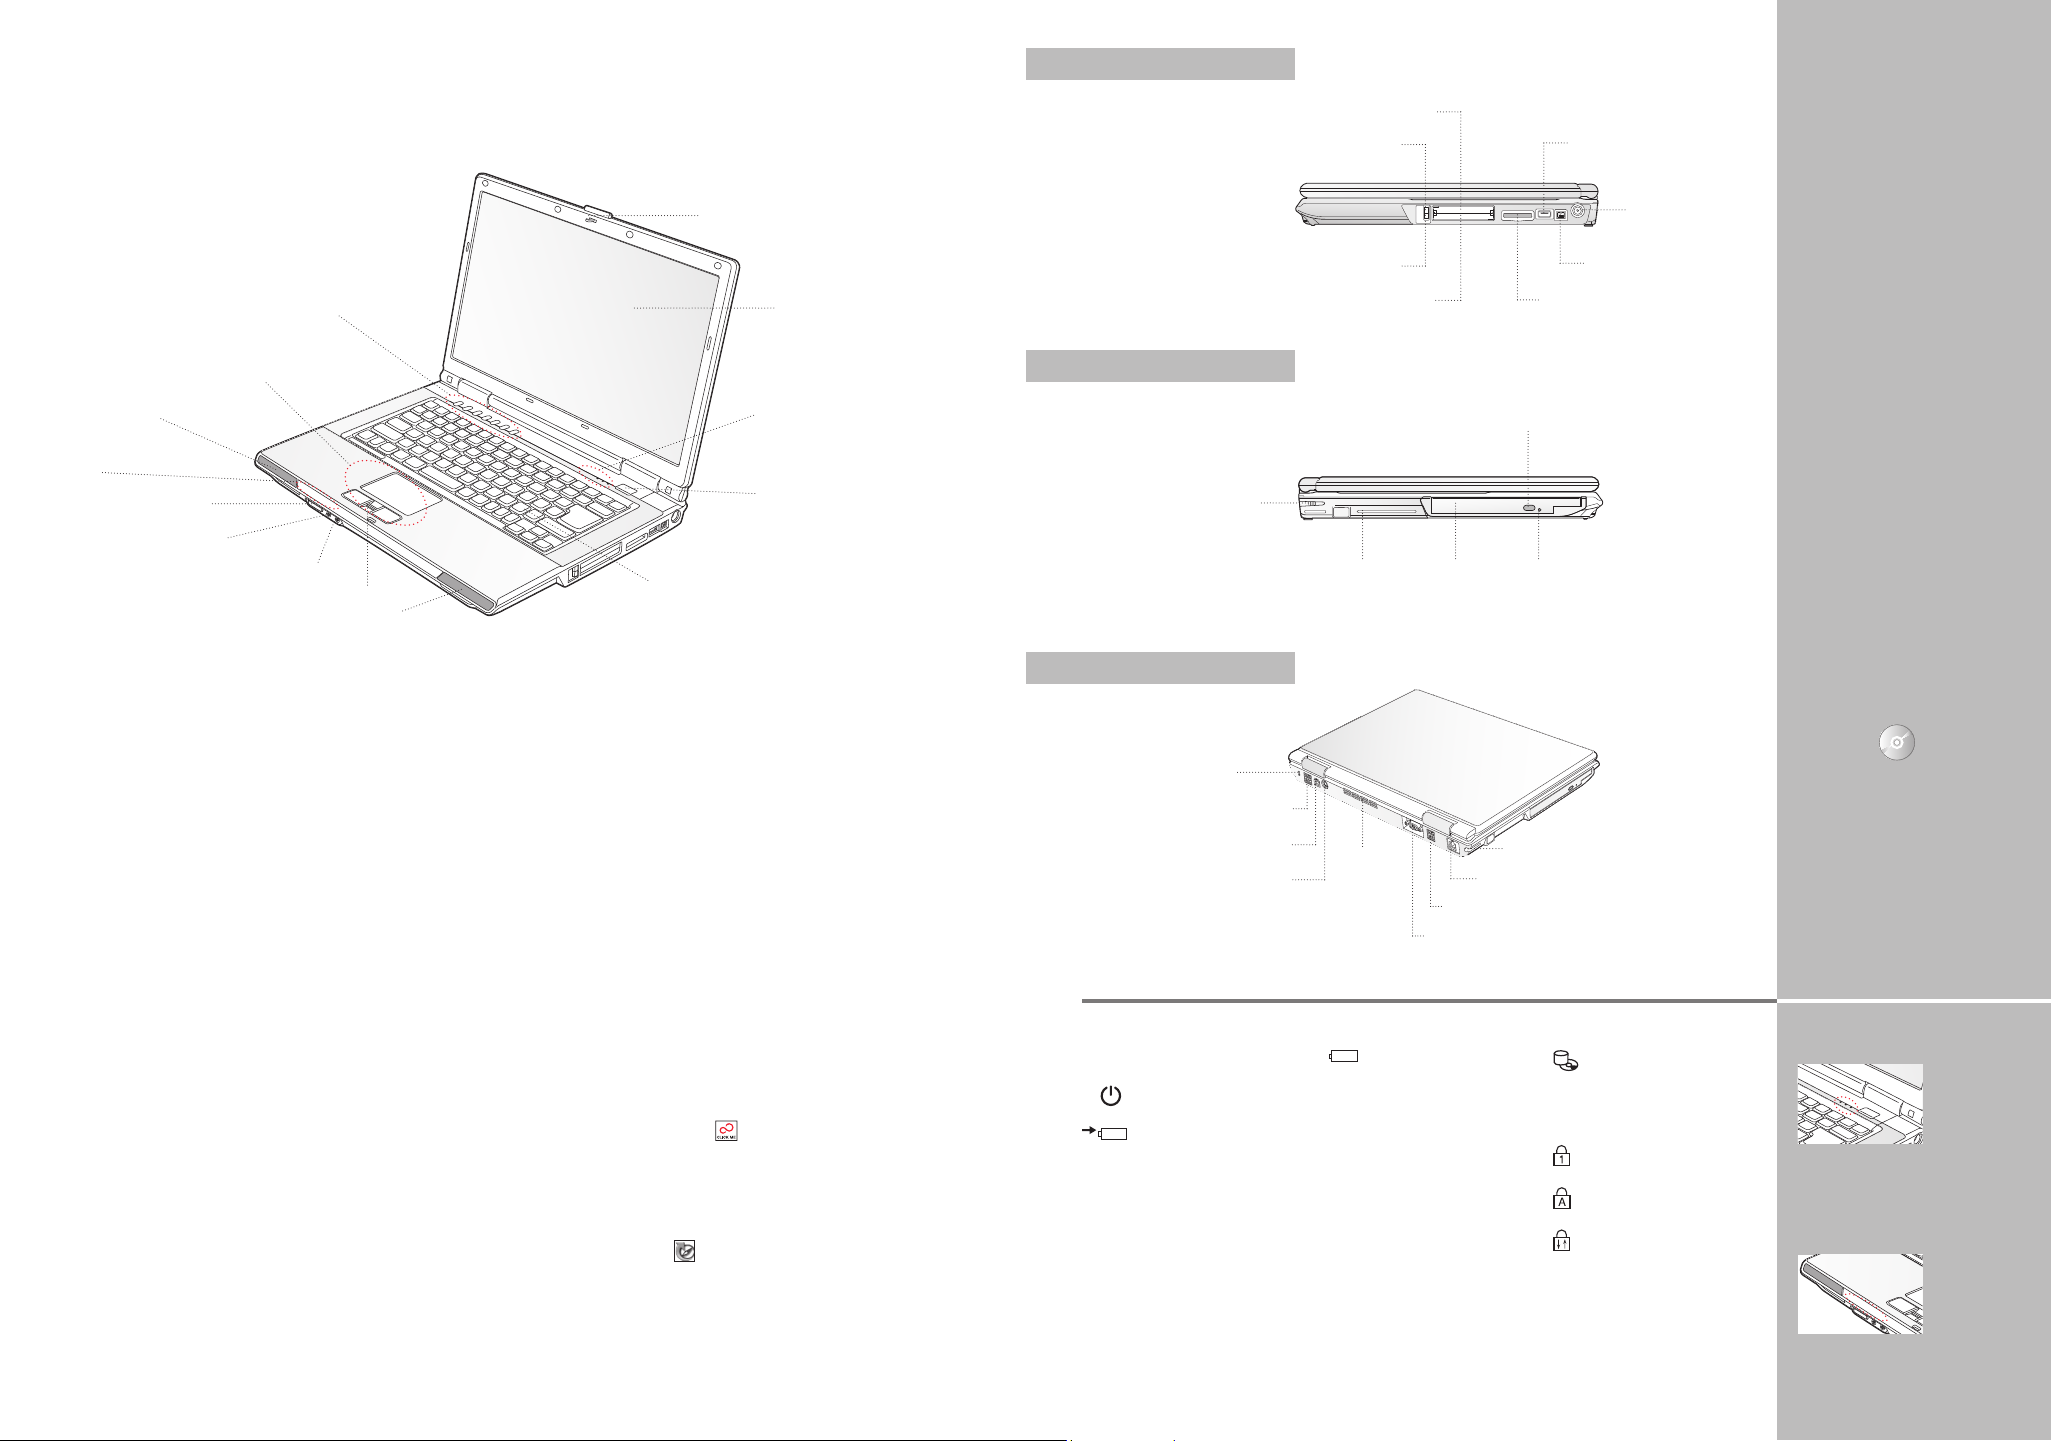
RIGHT PANEL
Fujitsu LifeBook® A3130 notebook
This convenient guide will lead you through the start-up process in four easy steps and will also offer some valuable tips.
Display Panel Latch
LifeBook Application Panel
and Volume Buttons
Touchpad Pointing Device
(Optional Point and Write Pad)
Left Stereo
Speaker
Status Indicator
Panel
Wireless LAN/Bluetooth
On/Off Switch
Headphone/Line-Out Jack
Microphone /Line-In Jack
* Scroll/Fingerprint Sensor
Right Stereo Speaker
1. What’s in the Box
Check to see that all of the following are in the box:
❍ LifeBook notebook
❍ Lithium ion battery,
pre-installed
❍
AC adapter with power cord
❍ Phone/modem (RJ-11)
telephone cable
❍ Drivers and Applications
Restore ( DAR) disc
❍ User’s Guide
❍
International Limited Warranty
and Registration booklet
Depending upon your confi guration, the following
may also be included:
❍ Roxio Easy Media Creator disc (See Readme fi le on disc
for installation instructions)
❍ CyberLink PowerProducer, PowerDirector disc
❍ CyberLink MakeDVD disc (Only with Genuine
Windows Vista® Home Premium)
❍ Additional Lithium ion bat tery
❍
Remote Control, Remote Control manual, batteries,
and USB IR receiver (for Windows Vista™
Home Premium Operating System only)
❍
Stylus in pen garage (with Point and Write Pad only)
❍ Microsoft® associated
product materials
❍ Microsoft® application CDs
❍ End User License Agreement
❍ Recovery and utility disc
❍ Genuine Windows Vista®
recovery and utility disc
❍ Genuine Windows® XP
recovery and utility disc
(For Genuine Windows
Vista® Business Operating
System)
Keyboard
2. Turn on Your Notebook
Plug the AC adapter into your notebook.•
Plug the power cord into the AC adapter.•
Connect the power cord to an electrical outlet.•
Connect the phone cord or an ethernet cable to your •
notebook and to a wall jack.
Press the power button (above the keyboard) to turn •
on the notebook.
The notebook is now on and the batter y is being charged.•
The notebook will begin a power-on self test. Once •
successfully completed, the operating system will
begin the initialization process. The screen will go dark
for approximately two minutes.
3. Register
Enter the information as prompted to personalize your notebook •
and confi gure your modem to dial.
Register your notebook with Fujitsu Ser vice and Support via our •
website at us.fujitsu.com/computers.
4. Activate Additional Utilities
After the fi rst boot setup has run, the “Primary Settings for the PC”
window will appear. It explains about installations and setups that
can be done by “ClickMe!” If the Execute button in the window
is clicked, installations and setups will start. However, after clicking
the button, a “User Account Control” window will appear asking
your permission to run “ClickMe !” If you click the Continue button,
“ClickMe!” runs. If canceled, the “ClickMe!” desktop icon will appear
on the desktop so you can run “ClickMe!” later. Right click the Fujitsu
Update Utility ( FDU ) icon and follow the on-screen instructions
to update your drivers. For more information, see your User’s Guide.
Display Panel
Status Indicator
Panel
Power/Suspend/
Resume Button
ExpressCard Slot
ExpressCard Eject Button
PC Card Eject Button
PC Card Slot
LEFT PANEL
Stylus (For optional fl at point
digitizer only)
Air Vents
Optical Drive
BACK PANEL
Anti-Theft Lock Slot
2 USB 2.0 Ports
Gigabit LAN Jack (RJ-45)
S-Video Out Port
Air Vents
External Video Port
Following are some common indicators
Status Indicators
Front
Power
Visible when notebook is on
Battery Charging
Solid Green: Fully charged
or no battery pack installed
Solid Orange: Charging
Blinking Orange: Charging
is suspended
Off: No AC adapter
Battery Level
Solid Green: 51% to 100%
charged
Solid Orange: 13% to 50%
Solid Red: 0% to 12%
Blinking Orange: Me asuring
battery status
Blinking Red : Battery
problem
Off: No battery installed
USB 2.0 Port
SD Card/Memory Stick
xD Card Slot
Optical Drive Eject Button
Emergency Tray Release
Stylus (for optional fl at point digitizer only)
Modem Jack (RJ-11)
2 USB 2.0 Ports
DC Power Jack
IEEE 1394 Port
HDD/ODD Access
Indicates HD or CD access
Top of keyboard
Number Lock
Visible when in use
Caps Lock
Visible when in use
Scroll Lock
Visible when active window
is locked
Quick Tips
It takes approximately 3.6 hours
to charge the 6 cell battery if
the notebook is turned off
or in suspended mode, or up
to 11 hours if the notebook
is being used.
Optimizing Batter y Life
• Adjust display brightness levels
to lowest comfortable setting
• Remove PC Cards and E xpressCards when not needed
• Utilize Sleep mode when
not using your notebook
• Turn-off Wireless LAN when
not in use
• Close unused programs
• Remove unused USB
powered devices
• Read the Power Management
section in your User’s Guide
for additional fe atures
Adjusting display brightness
• Fn + F6 to decrease brightness
• Fn + F7 to increase brightness
Adjusting volume
• Fn + F8 to decrease volume
• Fn + F9 to increase volume
Drivers
Look for the latest drivers on the
Drivers and Applications Restore
disc. Right-click the FDU icon
and select “update”, or go to
us.fujitsu.com/computers.
Top of Keyboard
Status Indicators
Front Status
Indicators
Page 2
Popular Accessories
Memory modules
• 1 GB DDR2 SDRAM, 667 MHz
• 2 GB DDR2 SDRAM 667 MHz
USB 2.0 docking station
USB Universal Docking Station with Video
USB optical mouse
External USB Floppy Disk Drive
Main Lithium ion battery
Auto/Airline adapter
Additional AC adapter
Notebook Guardian™ Lock
*Remote Control
Have questions or need help?
• Visit our website at us.fujitsu.com/computers
• Call us anytime at 1.800.8FUJITSU
• Email us at 8fujitsu@us.fujitsu.com
Want more information on Fujitsu products?
• Visit our website at www.shopfujitsu.com
• Call us anytime at 1.800.FUJITSU
Replacement Stylus Set
Carrying cases
• Diplomat (ballistic nylon)
• Workstation Plus
• Mobile Lite Wheeled Case
• Mobile Max Wheeled Case
Fujitsu extended service plans available.
Visit us.fujitsu.com/computers
to purchase any of these accessories
or to get more information.
Record your notebook serial number here:
Serial #______________________
(see bottom of computer)
Fujitsu Computer Systems Corporation
1250 E. Arques Avenue M/S 122
Sunnyvale, CA 940 85
Fujit su, the Fujit su logo, and Lif eBook are regi stered tra demar ks of Fujits u Limit ed.
Micro soft and Genuine W indow s Vista are re gist ered tradem arks o r trademar ks
of Microsof t Corp oration, in t he Unit ed States an d/or other count ries. All ot her
trademar ks ment ioned herei n are the prope rt y of their resp ecti ve owners.
Produ ct des cript ion data rep resen ts Fujitsu d esign objec tives and is p rovid ed
for com para tive p urpo ses; a ctual resu lts ma y var y base d on a var iety of
facto rs. Specifi c ations are s ubjec t to change wi thou t notice.
©2007 Fuj itsu C omputer Sys tems Corpo rati on. All r ights reser ved.
*Only for Windows Vista® Home Premium
operating system.
Getting Started
Get Started with your
®
LifeBook
A3130 Notebook
 Loading...