

Page 1
Owner’s Manual
BL00005018-201
EN
Page 2

Introduction
Thank you for your purchase of this product. Be sure that
you have read this manual and understood its contents before using the camera. Keep the manual where it will be
read by all who use the product.
For the Latest Information
The latest versions of the manuals are available from:
http://fujifilm-dsc.com/en/manual/
The site can be accessed not only from your
computer but also from smartphones and
tablets. It also contains information on the
software license.
For information on rmware updates, visit:
http://www.fujifilm.com/support/digital_cameras/software/
ii
Page 3

Chapter Index
P
Menu List
1 Before You Begin
2 First Steps
3 Basic Photography and Playback
4 Movie Recording and Playback
5 Taking Photographs
6 The Shooting Menus
7 Playback and the Playback Menu
8 The Setup Menus
9 Shortcuts
iv
1
19
33
39
45
91
129
151
173
10 Peripherals and Optional Accessories
11 Connections
12 Technical Notes
181
187
199
iii
Page 4

Menu List
1⁄
2⁄
1⁄
FOCUS AREA
FOCUS MODE
AF MODE
NUMBER OF FOCUS POINTS
PRE-AF
AF ILLUMINATOR
FACE/EYE DETECTION SETTING
AF+MF
2⁄
MF ASSIST
FOCUS CHECK
INTERLOCK SPOT AE & FOCUS AREA
RELEASE/FOCUS PRIORITY
TOUCH SCREEN MODE
Camera menu options are listed below.
Shooting Menus
Adjust settings when shooting photos or movies.
Menu List
See page 91 for details.
N
H IMAGE QUALITY SETTING
IMAGE SIZE 92
IMAGE QUALITY 93
FILM SIMULATION 94
PORTRAIT ENHANCER LV 95
1⁄
BRIGHT MODE 95
DYNAMIC RANGE 96
WHITE BALANCE 97
HIGHLIGHT TONE 100
SHADOW TONE 100
COLOR 100
SHARPNESS 100
2⁄
NOISE REDUCTION 101
LONG EXPOSURE NR 101
COLOR SPACE 101
P
G AF/MF SETTING
FOCUS AREA 102
FOCUS MODE 102
AF MODE 103
NUMBER OF FOCUS POINTS 104
1⁄
PRE-AF 104
AF ILLUMINATOR 104
FACE/EYE DETECTION SETTING 105
AF+MF 106
MF ASSIST 106
FOCUS CHECK 107
2⁄
INTERLOCK SPOT AE & FOCUS AREA 107
RELEASE/FOCUS PRIORITY 107
TOUCH SCREEN MODE 107
P
iv
Page 5

Menu List
1⁄
SCENE POSITION
ADVANCED FILTER
SELF-TIMER
INTERVAL TIMER SHOOTING
TIME-LAPSE MOVIE MODE
AE BKT SETTING
FILM SIMULATION BKT
LIGHT TRAIL SHOOTING SETTING
2⁄
PHOTOMETRY
SHUTTER TYPE
IS MODE
ISO
MOUNT ADAPTER SETTING
TOUCH ZOOM
WIRELESS COMMUNICATION
1⁄
MOVIE MODE
HD HIGH SPEED VIDEO
COUNTDOWN VIDEO RECORDING
FF FOCUS MODE
MOVIE AF MODE
DIGITAL IMAGE STABILIZER
FF ISO
HDMI OUTPUT INFO DISPLAY
2⁄
4K MOVIE OUTPUT
HDMI REC CONTROL
MIC LEVEL ADJUSTMENT
MIC/REMOTE RELEASE
A SHOOTING SETTING
SCENE POSITION 108
ADVANCED FILTER 109
SELF-TIMER 110
INTERVAL TIMER SHOOTING 111
1⁄
TIME-LAPSE MOVIE MODE 113
AE BKT SETTING 114
FILM SIMULATION BKT 115
LIGHT TRAIL SHOOTING SETTING 116
PHOTOMETRY 116
SHUTTER TYPE 117
IS MODE 118
2⁄
ISO 118
MOUNT ADAPTER SETTING 120
TOUCH ZOOM 122
WIRELESS COMMUNICATION 122
F FLASH SETTING
FLASH MODE 123
FLASH COMPENSATION 123
RED EYE REMOVAL 123
P
B MOVIE SETTING
MOVIE MODE 124
HD HIGH SPEED VIDEO 125
COUNTDOWN VIDEO RECORDING 125
FOCUS MODE
1⁄
MOVIE AF MODE 126
DIGITAL IMAGE STABILIZER 126
ISO
HDMI OUTPUT INFO DISPLAY 127
4K MOVIE OUTPUT 127
HDMI REC CONTROL 128
2⁄
MIC LEVEL ADJUSTMENT 128
MIC/REMOTE RELEASE 128
P
P
126
Menu List
127
v
Page 6

1⁄
RAW CONVERSION
ERASE
CROP
RESIZE
PROTECT
IMAGE ROTATE
RED EYE REMOVAL
IMAGE TRANSFER ORDER
2⁄
WIRELESS COMMUNICATION
SLIDE SHOW
PHOTOBOOK ASSIST
PC AUTO SAVE
PRINT ORDER (DPOF)
instax PRINTER PRINT
DISP ASPECT
Playback Menus
Adjust playback settings.
See page 135 for details.
N
Menu List
C PLAY BACK MENU
RAW CONVERSION 135
ERASE 137
CROP 139
RESIZE 140
1⁄
PROTECT 141
IMAGE ROTATE 142
RED EYE REMOVAL 143
IMAGE TRANSFER ORDER 144
P
C PLAY BACK MENU
WIRELESS COMMUNICATION 145
SLIDE SHOW 145
PHOTOBOOK ASSIST 146
2⁄
PC AUTO SAVE 147
PRINT ORDER (DPOF) 148
instax PRINTER PRINT 149
DISP ASPECT 150
P
vi
Page 7

Setup Menus
FORMAT
DATE/TIME
TIME DIFFERENCE
QQa
SENSOR CLEANING
SOUND & FLASH
RESET
AF BEEP VOL.
SELF-TIMER BEEP VOL.
OPERATION VOL.
SHUTTER VOLUME
SHUTTER SOUND
PLAYBACK VOLUME
1⁄
LCD BRIGHTNESS
LCD COLOR
IMAGE DISP.
PREVIEW EXP./WB IN MANUAL MODE
NATURAL LIVE VIEW
FRAMING GUIDELINE
AUTOROTATE PB
FOCUS SCALE UNITS
2⁄
DISP. CUSTOM SETTING
FOCUS LEVER SETTING
EDIT/SAVE QUICK MENU
FUNCTION (Fn) SETTING
SHOOT WITHOUT LENS
FOCUS RING
TOUCH SCREEN SETTING
AUTO POWER OFF
PERFORMANCE
FRAME NO.
SAVE ORG IMAGE
EDIT FILE NAME
DATE STAMP
Bluetooth SETTINGS
PC AUTO SAVE
instax PRINTER CONNECTION SETTING
USB IMAGE TRANSFER SETTING
GENERAL SETTINGS
INFORMATION
RESET WIRELESS SETTING
Adjust basic camera settings.
See page 151 for details.
N
Menu List
D USER SETTING
FORMAT 152
DATE/TIME 153
TIME DIFFERENCE 153
a
SENSOR CLEANING 154
SOUND & FLASH 154
RESET 155
D SOUND SETTING
AF BEEP VOL. 156
SELF-TIMER BEEP VOL. 156
OPERATION VOL. 156
SHUTTER VOLUME 157
SHUTTER SOUND 157
PLAYBACK VOLUME 157
D SCREEN SETTING
LCD BRIGHTNESS 158
LCD COLOR 158
IMAGE DISP. 158
PREVIEW EXP./WB IN MANUAL MODE
1⁄
NATURAL LIVE VIEW 159
FRAMING GUIDELINE 160
AUTOROTATE PB 160
FOCUS SCALE UNITS 160
2⁄
DISP. CUSTOM SETTING 161
P
D BUTTON SETTING
FOCUS LEVER SETTING 162
EDIT/SAVE QUICK MENU 163
FUNCTION (Fn) SETTING 164
SHOOT WITHOUT LENS 165
154
FOCUS RING 165
TOUCH SCREEN SETTING 165
D POWER MANAGEMENT
AUTO POWER OFF 166
P
PERFORMANCE 166
D SAVE DATA SETTING
FRAME NO. 167
SAVE ORG IMAGE 168
EDIT FILE NAME 168
DATE STAMP 168
P
D CONNECTION SETTING
Bluetooth SETTINGS 169
PC AUTO SAVE 170
159
instax PRINTER CONNECTION SETTING
USB IMAGE TRANSFER SETTING 171
GENERAL SETTINGS 172
INFORMATION 172
RESET WIRELESS SETTING 172
P
P
P
P
171
Menu List
vii
Page 8

1
Before You Begin 1
Introduction
Table of Contents
P
Introduction ........................................................................................................... ii
For the Latest Information ............................................................................................ ii
Menu List................................................................................................................ iv
Shooting Menus ................................................................................................................iv
Playback Menus .................................................................................................................vi
Setup Menus .......................................................................................................................vii
Supplied Accessories .......................................................................................xvi
About This Manual ...........................................................................................xvii
Symbols and Conventions ......................................................................................xvii
Terminology .....................................................................................................................xvii
Before You Begin 1
1
Parts of the Camera ............................................................................................. 2
The Mode Dial ......................................................................................................................4
The Focus Stick (Focus Lever) .....................................................................................5
The DRIVE Button ...............................................................................................................5
The Command Dials ........................................................................................................6
The Indicator Lamp ..........................................................................................................7
The LCD Monitor ................................................................................................................7
Camera Displays ................................................................................................... 8
The Standard Shooting Display ................................................................................ 8
The Touch Menu Display ............................................................................................ 10
Adjusting Display Brightness ................................................................................... 11
The DISP/BACK Button ................................................................................................ 11
Customizing the Standard Display ...................................................................... 12
Using the Menus ................................................................................................14
Touch Screen Mode ...........................................................................................15
Shooting Touch Controls ........................................................................................... 15
Playback Touch Controls ............................................................................................18
viii
Page 9

Table of Contents
First Steps 19
Basic Photography and Playback 33
Movie Recording and Playback 39
Taking Photographs 45
First Steps 19
2
Attaching the Shoulder Strap ........................................................................20
Attaching a Lens .................................................................................................21
Inserting the Battery and a Memory Card ................................................22
Compatible Memory Cards ...................................................................................... 25
Charging the Battery ........................................................................................26
Turning the Camera On and O ...................................................................28
Checking the Battery Level.............................................................................29
Basic Setup ...........................................................................................................30
Choosing a Di erent Language.............................................................................32
Changing the Time and Date .................................................................................. 32
Basic Photography and Playback 33
3
Taking Photographs ..........................................................................................34
Viewing Pictures .................................................................................................36
Deleting Pictures ................................................................................................37
Movie Recording and Playback 39
4
Recording Movies ..............................................................................................40
Adjusting Movie Settings ........................................................................................... 42
Viewing Movies ...................................................................................................43
Taking Photographs 45
5
Choosing a Shooting Mode ...........................................................................46
S ADVANCED SR AUTO ........................................................................................... 46
Program AE (P) .................................................................................................................. 47
Shutter-Priority AE (S) ...................................................................................................48
Aperture-Priority AE (A) ...............................................................................................50
Manual Exposure (M) .................................................................................................... 51
u PANORAMA ................................................................................................................54
SP SCENE POSITION /h/M/N/O .................................................................. 57
Adv. ADVANCED FILTER ...............................................................................................60
Autofocus ..............................................................................................................62
Focus Mode ........................................................................................................................ 63
Autofocus Options (AF Mode) ................................................................................ 65
Focus-Point Selection...................................................................................................67
Manual Focus.......................................................................................................71
Checking Focus ................................................................................................................ 72
1
Introduction
ix
Page 10

1
The Shooting Menus 91
Introduction
Exposure Compensation .................................................................................73
Focus/Exposure Lock ........................................................................................74
The Fn1 Button .................................................................................................................74
White Balance ......................................................................................................75
WHITE BALANCE ..............................................................................................................76
Custom White Balance ................................................................................................77
k: Color Temperature ...............................................................................................78
Using the Self Timer ..........................................................................................79
2 SEC/10 SEC ...................................................................................................................... 80
FACE AUTO SHUTTER ....................................................................................................81
SMILE ......................................................................................................................................81
BUDDY ...................................................................................................................................82
GROUP ...................................................................................................................................82
Bracketing .............................................................................................................83
O AE BKT ............................................................................................................................. 84
W ISO BKT .........................................................................................................................84
X FILM SIMULATION BKT ........................................................................................ 84
V WHITE BALANCE BKT ........................................................................................... 84
Y DYNAMIC RANGE BKT ......................................................................................... 85
h HDR ..................................................................................................................................85
Continuous Shooting (Burst Mode) ............................................................86
Using the Flash ....................................................................................................88
Self-Portraits (Sel es) ........................................................................................90
The Shooting Menus 91
6
IMAGE QUALITY SETTING ................................................................................92
IMAGE SIZE .......................................................................................................................... 92
IMAGE QUALITY ............................................................................................................... 93
FILM SIMULATION ...........................................................................................................94
PORTRAIT ENHANCER LV ............................................................................................ 95
BRIGHT MODE ...................................................................................................................95
DYNAMIC RANGE ............................................................................................................ 96
WHITE BALANCE ..............................................................................................................97
HIGHLIGHT TONE .........................................................................................................100
SHADOW TONE ............................................................................................................. 100
COLOR .................................................................................................................................100
SHARPNESS ...................................................................................................................... 100
x
Page 11

Table of Contents
NOISE REDUCTION ...................................................................................................... 101
LONG EXPOSURE NR .................................................................................................. 101
COLOR SPACE ................................................................................................................. 101
AF/MF SETTING ................................................................................................ 102
FOCUS AREA ................................................................................................................... 102
FOCUS MODE .................................................................................................................102
AF MODE ........................................................................................................................... 103
NUMBER OF FOCUS POINTS ................................................................................. 104
PRE-AF ................................................................................................................................. 104
AF ILLUMINATOR .......................................................................................................... 104
FACE/EYE DETECTION SETTING .......................................................................... 105
AF+MF ................................................................................................................................ 106
MF ASSIST ......................................................................................................................... 106
FOCUS CHECK ................................................................................................................107
INTERLOCK SPOT AE & FOCUS AREA................................................................107
RELEASE/FOCUS PRIORITY .....................................................................................107
TOUCH SCREEN MODE ............................................................................................. 107
SHOOTING SETTING ....................................................................................... 108
SCENE POSITION ........................................................................................................... 108
ADVANCED FILTER ....................................................................................................... 109
SELF-TIMER .......................................................................................................................110
INTERVAL TIMER SHOOTING .................................................................................. 111
TIME-LAPSE MOVIE MODE...................................................................................... 113
AE BKT SETTING ............................................................................................................ 114
FRAMES/STEP SETTING .................................................................................... 114
1 FRAME/CONTINUOUS .................................................................................. 114
SEQUENCE SETTING .......................................................................................... 114
FILM SIMULATION BKT .............................................................................................. 115
LIGHT TRAIL SHOOTING SETTING ......................................................................116
Long Exposure setting ..................................................................................... 116
RELEASE TYPE ........................................................................................................ 116
PHOTOMETRY .................................................................................................................116
SHUTTER TYPE ...............................................................................................................117
IS MODE ............................................................................................................................. 118
ISO ......................................................................................................................................... 118
MOUNT ADAPTER SETTING ................................................................................... 120
TOUCH ZOOM ................................................................................................................122
WIRELESS COMMUNICATION ............................................................................... 122
1
Introduction
xi
Page 12

1
Playback and the Playback Menu 129
Introduction
FLASH SETTING ................................................................................................ 123
FLASH MODE .................................................................................................................. 123
FLASH COMPENSATION ........................................................................................... 123
RED EYE REMOVAL ...................................................................................................... 123
MOVIE SETTING ............................................................................................... 124
MOVIE MODE .................................................................................................................. 124
HD HIGH SPEED VIDEO ............................................................................................. 125
COUNTDOWN VIDEO RECORDING ................................................................... 125
F FOCUS MODE .......................................................................................................... 126
MOVIE AF MODE ..........................................................................................................126
DIGITAL IMAGE STABILIZER .................................................................................... 126
F ISO ..................................................................................................................................127
HDMI OUTPUT INFO DISPLAY............................................................................... 127
4K MOVIE OUTPUT ...................................................................................................... 127
HDMI REC CONTROL .................................................................................................. 128
MIC LEVEL ADJUSTMENT ........................................................................................128
MIC/REMOTE RELEASE ..............................................................................................128
Playback and the Playback Menu 129
7
The Playback Display ..................................................................................... 130
The DISP/BACK Button ............................................................................................. 131
Viewing Pictures ..............................................................................................133
Playback Zoom .............................................................................................................. 134
Multi-Frame Playback ................................................................................................ 134
The Playback Menu ........................................................................................ 135
RAW CONVERSION ...................................................................................................... 135
ERASE ................................................................................................................................... 137
CROP .................................................................................................................................... 139
RESIZE .................................................................................................................................. 140
PROTECT ............................................................................................................................ 141
IMAGE ROTATE ............................................................................................................... 142
RED EYE REMOVAL ...................................................................................................... 143
IMAGE TRANSFER ORDER ........................................................................................ 144
WIRELESS COMMUNICATION ............................................................................... 145
SLIDE SHOW .................................................................................................................... 145
PHOTOBOOK ASSIST .................................................................................................. 146
PC AUTO SAVE ................................................................................................................ 147
xii
Page 13

Table of Contents
The Setup Menus 151
PRINT ORDER (DPOF) ................................................................................................. 148
instax PRINTER PRINT ................................................................................................. 149
DISP ASPECT ...................................................................................................................150
The Setup Menus 151
8
USER SETTING .................................................................................................. 152
FORMAT ............................................................................................................................. 152
DATE/TIME ........................................................................................................................ 153
TIME DIFFERENCE ........................................................................................................153
Qa ................................................................................................................. 154
SENSOR CLEANING ..................................................................................................... 154
SOUND & FLASH ........................................................................................................... 154
RESET ................................................................................................................................... 155
SOUND SETTING .............................................................................................. 156
AF BEEP VOL. ...................................................................................................................156
SELF-TIMER BEEP VOL. ...............................................................................................156
OPERATION VOL. ........................................................................................................... 156
SHUTTER VOLUME ....................................................................................................... 157
SHUTTER SOUND ......................................................................................................... 157
PLAYBACK VOLUME .................................................................................................... 157
SCREEN SETTING .............................................................................................158
LCD BRIGHTNESS .......................................................................................................... 158
LCD COLOR ......................................................................................................................158
IMAGE DISP. ...................................................................................................................... 158
PREVIEW EXP./WB IN MANUAL MODE ............................................................. 159
NATURAL LIVE VIEW .................................................................................................... 159
FRAMING GUIDELINE .................................................................................................160
AUTOROTATE PB ........................................................................................................... 160
FOCUS SCALE UNITS .................................................................................................. 160
DISP. CUSTOM SETTING ............................................................................................ 161
BUTTON SETTING ............................................................................................ 162
FOCUS LEVER SETTING ............................................................................................. 162
EDIT/SAVE QUICK MENU..........................................................................................163
FUNCTION (Fn) SETTING ......................................................................................... 164
SHOOT WITHOUT LENS ............................................................................................ 165
FOCUS RING .................................................................................................................... 165
TOUCH SCREEN SETTING ........................................................................................ 165
1
Introduction
xiii
Page 14

1
Shortcuts 173
Peripherals and Optional Accessories 181
Introduction
POWER MANAGEMENT ................................................................................. 166
AUTO POWER OFF ....................................................................................................... 166
PERFORMANCE ..............................................................................................................166
SAVE DATA SETTING ....................................................................................... 167
FRAME NO. ....................................................................................................................... 167
SAVE ORG IMAGE ......................................................................................................... 168
EDIT FILE NAME ............................................................................................................. 168
DATE STAMP .................................................................................................................... 168
CONNECTION SETTING .................................................................................169
Bluetooth SETTINGS ................................................................................................... 169
PC AUTO SAVE ................................................................................................................ 170
instax PRINTER CONNECTION SETTING ......................................................... 171
USB IMAGE TRANSFER SETTING .......................................................................... 171
GENERAL SETTINGS .................................................................................................... 172
INFORMATION ................................................................................................................ 172
RESET WIRELESS SETTING .......................................................................................172
Shortcuts 173
9
Shortcut Options .............................................................................................174
The Quick Menu ..............................................................................................175
The Quick Menu Display .........................................................................................175
Viewing and Changing Settings ......................................................................... 176
Editing the Quick Menu ........................................................................................... 177
The Function Button ...................................................................................... 178
Touch Function Buttons ............................................................................... 179
Peripherals and Optional Accessories 181
10
Lenses ..................................................................................................................182
Lens Parts .......................................................................................................................... 182
Power Zoom ................................................................................................................... 183
Removing Lens Caps ................................................................................................. 183
Lenses with Lens Hoods .......................................................................................... 184
Lenses with Aperture Rings................................................................................... 184
Lenses with O.I.S. Switches .....................................................................................185
Manual Focus Lenses .................................................................................................185
Lens Care ........................................................................................................................... 186
xiv
Page 15

Table of Contents
Connections 187
Technical Notes 199
Connections 187
11
HDMI Output .................................................................................................... 188
Connecting to HDMI Devices ..............................................................................188
Shooting ............................................................................................................................ 189
Playback .............................................................................................................................189
Wireless Connections (Bluetooth®, Wireless LAN/Wi-Fi) ................... 190
Smartphones and Tablets: FUJIFILM Camera Remote .......................... 190
Copying Pictures to a Computer: PC AutoSave ........................................ 192
Connecting via USB ........................................................................................ 193
Connecting to Computers .....................................................................................193
Copying Pictures to a Computer ........................................................................ 195
Connecting to Smartphones ................................................................................ 196
instax SHARE Printers ....................................................................................197
Establishing a Connection ..................................................................................... 197
Printing Pictures ............................................................................................................ 198
Technical Notes 199
12
Accessories from Fuji lm.............................................................................. 200
Software from Fuji lm ................................................................................... 202
FUJIFILM Camera Remote ...................................................................................... 202
FUJIFILM PC AutoSave .............................................................................................. 202
Capture One Express Fuji lm ............................................................................... 202
RAW FILE CONVERTER EX ........................................................................................ 202
For Your Safety ................................................................................................. 203
Product Care ..................................................................................................... 217
Cleaning the Image Sensor .........................................................................218
Firmware Updates ...........................................................................................219
Checking the Firmware Version ..........................................................................219
Troubleshooting ..............................................................................................220
Warning Messages and Displays ............................................................... 229
Memory Card Capacity .................................................................................233
Speci cations ................................................................................................... 234
1
Introduction
xv
Page 16

1
Introduction
Supplied Accessories
The following are included with the camera:
NP-W126S rechargeable battery
•
Body cap
•
USB cable
•
⌀3.5mm microphone adapter
•
Shoulder strap
•
Basic Manual
•
• If you purchased a lens kit, check that a lens is included.
N
Use the ⌀3.5 mm microphone adapter when connecting micro-
•
phones and other devices with a
⌀2.5mm microphone/remote release connector.
⌀3.5 mm jack to the camera’s
xvi
Page 17

About This Manual
This manual contains instructions for your FUJIFILM X-A7
digital camera. Be sure you have read and understood its
contents before proceeding.
Symbols and Conventions
The following symbols are used in this manual:
Information that should be read to prevent damage to the
O
product.
Additional information that may be helpful when using the
N
product.
Pages on which related information may be found.
P
Menus and other text in the displays are shown in bold. Illustrations
are for explanatory purposes only; drawings may be simpli ed,
while photographs are not necessarily taken with the model of
camera described in this manual.
Terminology
The optional SD, SDHC, and SDXC memory cards the camera uses
to store pictures are referred to as “memory cards”. The LCD monitor may be referred to as the “LCD”.
1
Introduction
xvii
Page 18

MEMO
xviii
Page 19

Before You Begin
1
Page 20
Parts of the Camera
The parts of the camera are listed below.
1
Before You Begin
Rear command dial ..........................................6
A
Fn1 button ......................................................178
B
ON/OFF button ................................................. 28
C
Mode dial ...............................................4, 34, 46
D
Hot shoe ...................................................89, 201
E
Flash ..........................................................88, 123
F
Strap eyelet ....................................................... 20
G
N (fl ash pop-up) switch ............................... 88
H
Connector cover .................................40, 49, 53
I
Lens signal contacts .............................. 21, 182
J
Lens release button ........................................ 21
K
2
Microphone ...................................................... 40
L
AF-assist illuminator............................. 34, 104
M
Self-timer lamp ......................................79, 110
Front command dial .........................................6
N
Shutter button .................................................35
O
Microphone/remote release connector
P
(⌀2.5mm) .........................................40, 49, 53
Battery chamber .............................................22
Q
Memory card slot ............................................ 22
R
Battery latch ..................................................... 24
S
Body cap ............................................................ 21
T
Page 21
Parts of the Camera
1
Before You Begin
Vari-angle LCD monitor .............................. 7, 8
U
Touch screen ..................................15, 107, 165
DRIVE button ......................................... 5, 83, 86
V
b (delete) button (playback mode) ......... 37
a (playback) button ...................................36
W
Indicator lamp ....................................................7
X
Focus stick (focus lever) ....................................5
Y
Connector cover .................................... 26, 188
Z
MENU/OK button .................... 14, 91, 135, 151
a
Do not remove the serial number plate, which provides the FCC ID,
O
KCmark, CMIIT ID, serial number, and other important information.
DISP (display)/BACK button ................ 11, 131
b
Cable channel cover for DC coupler
c
Battery-chamber cover latch ......................22
d
Battery-chamber cover ................................. 22
e
Tripod mount
f
Speaker .....................................................43, 157
g
HDMI Micro connector (Type D) ..............188
h
USB connector (Type C) .......................26, 193
i
Serial number plate..........................see below
j
3
Page 22

The Mode Dial
Mode
Description
P
A
SS (ADVANCED SR AUTO)
B
PP (PROGRAM AE)
C
SS (SHUTTER PRIORITY AE)
AA (APERTURE PRIORITY AE)
MM (MANUAL)
D
uu (PANORAMA)
E
SPSP (SCENE POSITION)
hh//MM//NN//O
F
Adv.
(ADVANCED FILTER)
To select a shooting mode, rotate the dial until
the icon for the desired mode aligns with the
index.
1
Mode
Before You Begin
A
B
C
D
E
F
(ADVANCED SR AUTO)
(PROGRAM AE) Aperture and shutter speed can be adjusted
(SHUTTER PRIORITY AE)
(APERTURE PRIORITY AE)
(MANUAL)
(PANORAMA)
(SCENE POSITION)
Adv.
O
(ADVANCED FILTER) Take photos with fi lter eff ects.
The camera automatically optimizes settings
to the scene.
using program shift.
Select for full control over camera settings,
including aperture (M and A) and/or shutter
speed (M and S).
Follow an on-screen guide to create a panorama.
Choose a scene suited to the subject or shooting conditions and let the camera do the rest.
Description
P
46
47
48
50
51
54
57
60
4
Page 23
The Focus Stick (Focus Lever)
Mode
P
B
STILL IMAGE
I
CONTINUOUS
O
AE BKT
W
ISO BKT
X
FILM SIMULATION BKT
Mode
P
V
WHITE BALANCE BKT
Y
DYNAMIC RANGE BKT
h
HDR
F
MOVIE
Tilt or press the focus stick to select the
focus area. The focus stick can also be
used to navigate the menus.
The DRIVE Button
Pressing the DRIVE button displays drive
mode options, where you can choose
from the following the drive modes.
Parts of the Camera
1
Before You Begin
Mode
STILL IMAGE 46
B
CONTINUOUS 86
I
AE BKT 84
O
ISO BKT 84
W
FILM SIMULATION BKT 84
X
P
Mode
WHITE BALANCE BKT 84
V
DYNAMIC RANGE BKT 85
Y
HDR 85
h
MOVIE 40
F
P
5
Page 24
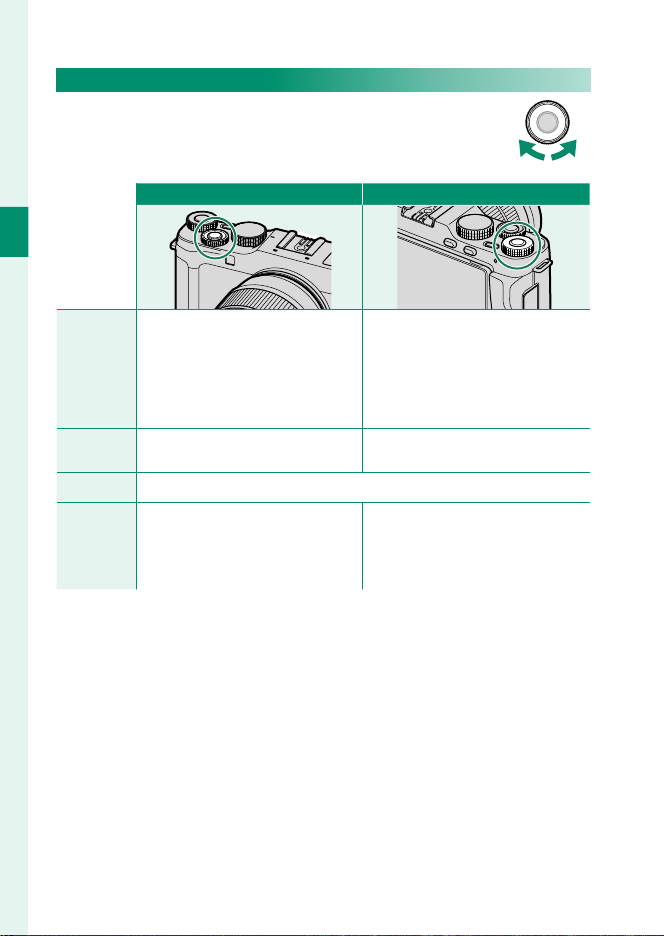
The Command Dials
Shooting
Menus
Q Menu
Playback
The rear and front command dials are used for the
operations below.
Front command dial Rear command dial
1
Before You Begin
Choose the desired combina-
•
Shooting
Menus
Q Menu
Playback
tion of shutter speed and aper-
ture (program shift).
Adjust aperture.
•
Choose a shutter speed.
•
Select menu tabs or page
through menus.
Adjust settings in the quick menu.
View other pictures.
Choose a shutter speed.
•
Adjust exposure compensation.
•
Highlight menu items.
Zoom in or out (full-frame play-
•
back).
Zoom in or out (multi-frame
•
playback).
6
Page 25
The Indicator Lamp
Indicator lamp
Camera status
The indicator lamp shows camera status
as follows:
Parts of the Camera
Indicator lamp
Glows green Focus locked.
Blinks green Focus or slow shutter speed warning. Pictures can be taken.
Camera on: Recording pictures. Additional pictures can be
•
Blinks green and
orange
Glows orange
Blinks orange Flash charging; fl ash will not fi re when picture is taken.
Blinks red Lens or memory error.
Warnings may also appear in the display.
N
taken.
Camera o : Uploading pictures to a smartphone or tablet
•
(Displayed only if pictures are selected for upload.).
Recording pictures. No additional pictures can be taken at
this time.
Camera status
The LCD Monitor
The LCD monitor can be tilted or reversed
for ease of viewing. You will nd this feature particularly helpful when shooting
self-portraits (P 90). Be careful not to
catch your ngers or other objects between the monitor and the camera body.
The LCD monitor also functions as a touch screen (P 15).
N
1
Before You Begin
7
Page 26
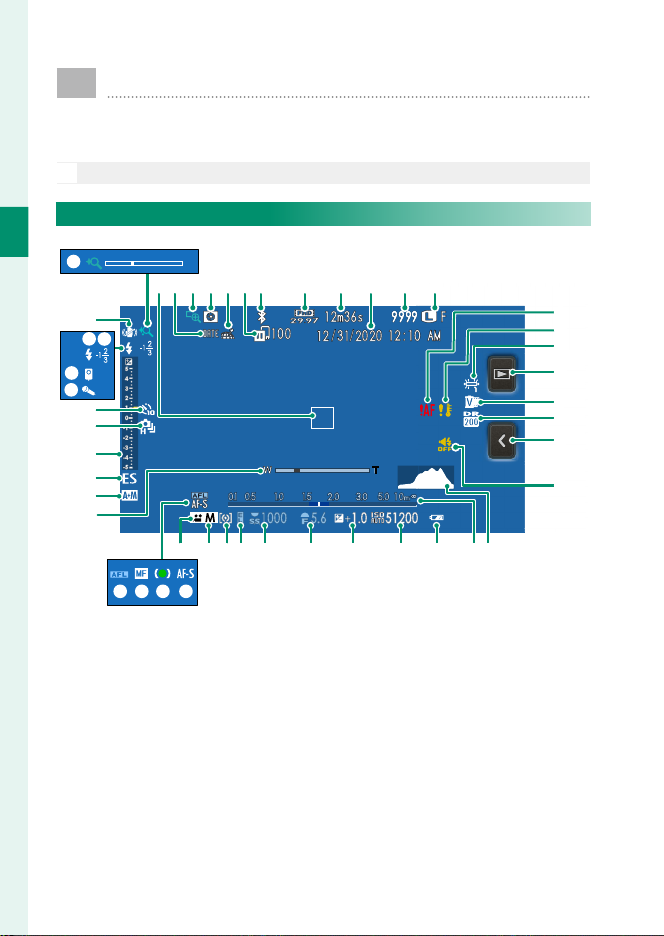
Camera Displays
During shooting, you can choose between standard and
touch menu displays.
For illustrative purposes, displays are shown with all indicators lit.
O
The Standard Shooting Display
1
Before You Begin
u
t
r
s
q
p
o
n
m
l
k
j
GABC EF JI K LD H
M
N
O
P
Q
R
S
T
c
b
fghi
Z X WYe d UV
a
8
Page 27

Camera Displays
Focus frame ............................................... 67, 74
A
Date stamp .....................................................168
B
Focus check .............................................72, 107
C
Depth-of-fi eld preview .................................. 50
D
Location data download status ...............172
E
Image transfer status...................................144
F
Bluetooth ON/OFF ........................................169
G
Movie mode ............................................40, 124
H
Time remaining ............................................... 40
I
Date and time .........................................30, 153
J
Number of available frames1 ....................233
K
Image size .........................................................92
L
Image quality ................................................... 93
Focus warning ................................................. 35
M
Temperature warning ................................. 232
N
White balance .......................................... 75, 97
O
Playback mode button 2 ............................... 36
P
Film simulation ...............................................94
Q
Dynamic range ............................................... 96
R
Touch menu button 3 ..................................... 10
S
Sound and fl ash indicator ......................... 154
T
Histogram .........................................................13
U
Distance indicator .......................................... 72
V
Battery level ...................................................... 29
W
1 Shows “9999” if there is space for over 9999 frames.
2 Tap to start playback when shooting in self-portrait (“selfi e”) mode.
3 Tap to switch to the touch menu display (P 10).
4 Adjust digital zoom settings.
Sensitivity ........................................................118
X
Exposure compensation ............................... 73
Y
Aperture ................................................47, 50, 51
Z
Shutter speed ......................................47, 48, 51
a
AE lock ................................................................ 74
b
Metering ..........................................................116
c
Shooting mode............................................4, 46
d
Movie mode .................................................5, 40
e
Focus mode ...................................................... 63
f
Focus indicator ................................................ 64
g
Manual focus indicator.................................71
h
AF lock ................................................................ 74
i
Power zoom indicator ................................... 35
j
AF+MF indicator ...........................................106
k
Shutter type ....................................................117
l
Exposure indicator ................................... 51, 73
m
Continuous mode ........................................... 86
n
Self-timer indicator ...............................79, 110
o
Microphone ...................................................... 40
p
Remote release .........................................49, 53
q
Flash mode .............................................. 88, 123
r
Flash compensation .............................88, 123
s
IS mode ............................................................ 118
t
Touch zoom 4.................................................... 17
u
1
Before You Begin
9
Page 28
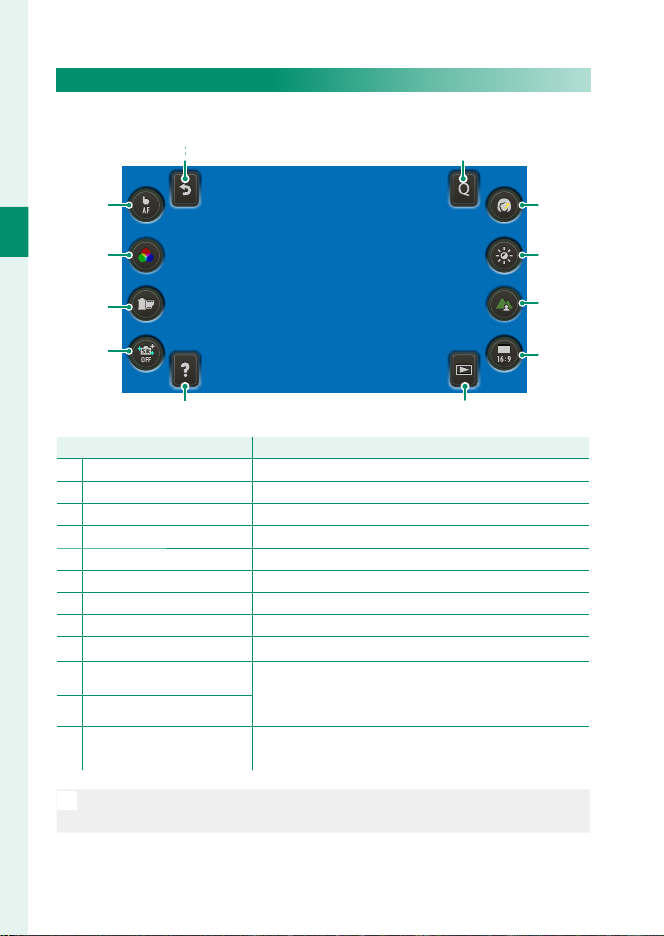
The Touch Menu Display
Touch control
Description
Select the touch menu display to use touch controls.
A B
L
C
1
Before You Begin
K
J
I
D
E
F
GH
Touch control
Back
A
Q menu
B
Portrait enhancer Lv
C
Exposure compensation
D
Depth control Adjust depth of fi eld.
E
Image aspect Choose the aspect ratio for new pictures.
F
Playback mode
G
Help View function button help.
H
Bright mode Turn bright mode on or off .
I
T.B . Fn 2
J
T.B . Fn 1
K
Touch screen mode
L
Return to standard shooting mode (P 8).
View the options assigned to the Q menu (P 175).
Choose the portrait enhancement level (P 95).
Adjust exposure (P 73).
Switch to playback mode (P 36).
View the options assigned to the function buttons
using D BUTTON SETTING> FUNCTION (Fn)
SETTING (P 179).
Choose a touch-screen mode from TOUCH
SHOOTING, AF, AREA, and OFF (P 15).
Description
Tap the “image aspect” icon (F) to choose from aspect ratios of 1 : 1,
N
3 : 2, 4 : 3, and 16 : 9.
10
Page 29
Camera Displays
Adjusting Display Brightness
Use the items in the D SCREEN SET-UP menu to adjust the
brightness and hue of the LCD monitor when changes in ambient brightness make the display di cult to read. Choose LCD
BRIGHTNESS to adjust brightness or LCD COLOR to adjust hue.
Holding the DISP/BACK button during shooting sets LCD BRIGHTNESS
N
to +5 and displays LCD BRIGHTNESS options.
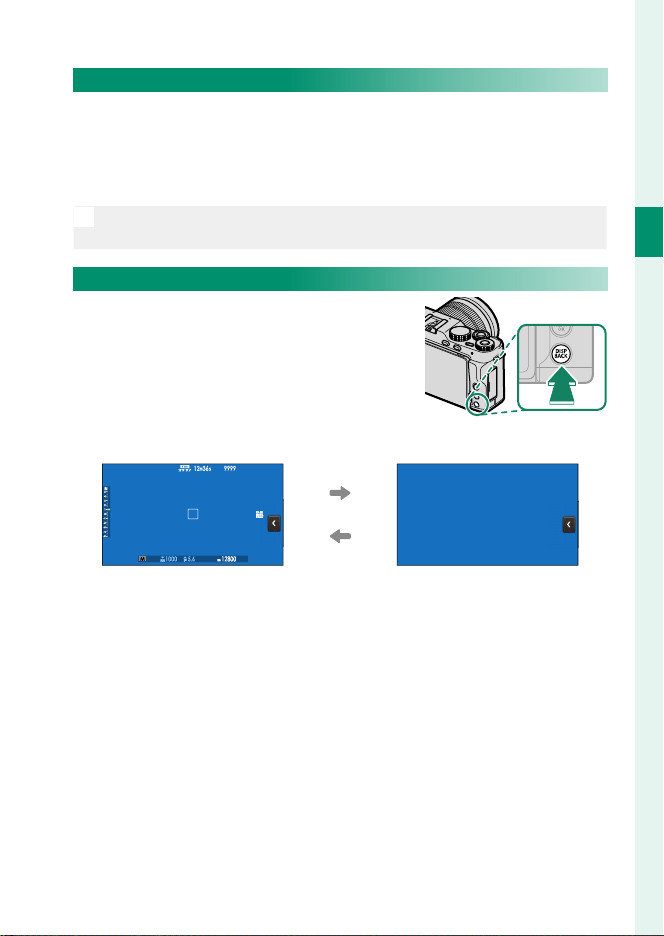
The DISP/BACK Button
Press DISP/BACK to cycle through display
modes as follows.
Standard Information o
1
Before You Begin
11
Page 30

Customizing the Standard Display
Item
Default
Item
Default
To choose the items shown in the standard display:
Display standard indicators.
1
Use the DISP/BACK button to display standard indicators.
Select DISP. CUSTOM SETTING.
2
1
Before You Begin
Select D SCREEN SET-UP> DISP. CUSTOM SETTING in the
setup menu.
Choose items.
3
Highlight items and press MENU/OK to select or deselect.
Item
FRAMING GUIDELINE
ELECTRONIC LEVEL
FOCUS FRAME
AF DISTANCE INDICATOR
MF DISTANCE INDICATOR
HISTOGRAM
SHOOTING MODE
APERTURE/S-SPEED/ISO
INFORMATION BACKGROUND
Expo. Comp. (Digit)
Expo. Comp. (Scale)
FOCUS MODE
PHOTOMETRY
Default
R
R
R
R
R
R
R
R
R
R
R
R
R
SHUTTER TYPE
FLASH
CONTINUOUS MODE
DUAL IS MODE
WHITE BALANCE
FILM SIMULATION
DYNAMIC RANGE
FRAMES REMAINING
IMAGE SIZE/QUALITY
MOVIE MODE & REC. TIME
IMAGE TRANSFER ORDER
BATTERY LE VEL
Item
Default
R
R
R
R
R
R
R
R
R
R
R
R
Save changes.
4
Press DISP/BACK to save changes.
Exit the menus.
5
Press DISP/BACK as needed to exit the menus and return to the
shooting display.
12
Page 31

Camera Displays
Virtual Horizon
Selecting ELECTRONIC LEVEL displays a virtual
horizon. The camera is level when the two lines
overlap. Note that the virtual horizon may not
be displayed if the camera lens is pointed up or
down.
Histograms
Histograms show the distribution of tones in the image. Brightness is
shown by the horizontal axis, the number of pixels by the vertical axis.
Number of pixels
1
Before You Begin
Shadows Highlights
Optimal exposure: Pixels are distributed in an
•
even curve throughout the tone range.
Overexposed: Pixels are clustered on the right
•
side of the graph.
Underexposed: Pixels are clustered on the left
•
side of the graph.
Pixel brightness
13
Page 32

Using the Menus
Shooting
Playback
To display the menus, press MENU/OK.
1
Before You Begin
To navigate the menus:
Press MENU/OK to display the menus.
1
Press the focus stick (focus lever) left
2
to highlight the tab for the current
menu.
Press the focus stick up or down to highlight the tab (H, G,
3
A, F, B, C or D) containing the desired item.
Press the focus stick right to place the cursor in the menu.
4
• You can also navigate the menus using touch controls.
N
Use the front command dial to select menu tabs or page through
•
menus and the rear command dial to highlight menu items.
Shooting
IMAGE QUALITY SETTING
IMAGE SIZE
IMAGE QUALITY
FILM SIMULATION
PORTRAIT ENHANCER LV
BRIGHT MODE
DYNAMIC RANGE
WHITE BALANCE
HIGHLIGHT TONE
Playback
PLAY BACK MENU
RAW CONVERSION
ERASE
CROP
RESIZE
PROTECT
IMAGE ROTATE
RED EYE REMOVAL
EXIT
IMAGE TRANSFER ORDER
IMAGE QUALITY SETTING
IMAGE SIZE
IMAGE QUALITY
FILM SIMULATION
PORTRAIT ENHANCER LV
BRIGHT MODE
DYNAMIC RANGE
WHITE BALANCE
HIGHLIGHT TONE
IMAGE QUALITY SETTING
IMAGE SIZE
IMAGE QUALITY
FILM SIMULATION
PORTRAIT ENHANCER LV
BRIGHT MODE
DYNAMIC RANGE
WHITE BALANCE
HIGHLIGHT TONE
EXIT
EXIT
EXIT
Ta b
14
Page 33

Touch Screen Mode
The camera’s LCD monitor can be used as a touch screen.
Shooting Touch Controls
The Touch Menu
Shooting settings can be adjusted in the touch menu, which can
be viewed by tapping the touch menu button.
Touch Photography
Touch controls can be used for such
operations as choosing the focus area
and taking photographs. Tap the touch
screen mode icon to choose a touch
screen mode.
• To disable touch controls and hide the touch screen mode indicator,
N
select OFF for D BUTTON SETTING> TOUCH SCREEN SETTING>
x TOUCH SCREEN SETTING.
When ON is selected for D BUTTON SETTING> TOUCH SCREEN
•
SETTING> x DOUBLE TAP SETTING, you can zoom in by tapping
the monitor twice.
Touch control settings can be adjusted using G AF/MF SETTING>
•
TOUCH SCREEN MODE.
1
Before You Begin
15
Page 34

Still Photography
Still Photography
Mode
Description
TOUCH
SHOOTING
AF
AREA
OFF
Movie Recording
Mode
Description
AF
AREA
OFF
1
Before You Begin
Movie Recording
Mode
TOUCH
SHOOTING
AREA
Mode
AREA
Description
Tap your subject in the display to focus and release the shutter. In burst mode, pictures will be taken while you keep your
fi nger on the display.
Tap to select a focus point and lock focus. The shutter can be
AF
released by pressing the shutter button all the way down.
Tap to select a point for focus or zoom. The focus frame will
move to the selected point.
Touch controls off .
OFF
Description
SINGLE AF selected for B MOVIE SETTING>
•
F FOCUS MODE: Tap your subject in the display to focus.
CONTINUOUS AF selected for B MOVIE SETTING>
•
AF
F FOCUS MODE
in response to changes in the distance to the subject in the
selected focus point.
SINGLE AF selected for B MOVIE SETTING>
•
F FOCUS MODE
era will focus on the subject in the selected point when
the shutter button is pressed halfway.
CONTINUOUS AF selected for B MOVIE SETTING>
•
F FOCUS MODE
in response to changes in the distance to the subject in the
selected focus point.
: The camera continually adjusts focus
: Tap to select the focus point. The cam-
: The camera continually adjusts focus
Touch controls off .
OFF
We recommend that you select AREA for B MOVIE SETTING> MOVIE
N
AF MODE before recording movies using touch controls. In some
touch-screen modes, AREA will be selected automatically.
16
Page 35

Touch Screen Mode
Touch Zoom
Touch controls can be used for digital zoom.
Touch controls can be used for digital zoom regardless of the mode
N
selected for G AF/MF SETTING> TOUCH SCREEN MODE.
Select ON for A SHOOTING SETTING> TOUCH ZOOM.
1
Use pinch-out and pinch-in gestures (P 18) to zoom in and
2
out using digital zoom.
• Regardless of where you place your ngers, the camera will
N
zoom in on and out from the center of the frame.
The camera will focus on the area selected for G AF/MF
•
SETTING> FOCUS AREA. If AREA is selected for G AF/MF
SETTING> TOUCH SCREEN MODE, you can select the focus
area by tapping the display.
Take pictures.
3
1
Before You Begin
17
Page 36

Touch Screen Mode
Playback Touch Controls
When ON is selected for D BUTTON SETTING> TOUCH SCREEN
SETTING> a TOUCH SCREEN SETTING, touch controls can be
used for the following playback operations:
Swipe: Swipe a nger across the display
•
to view other images.
1
Before You Begin
Pinch-out: Place two ngers on the dis-
•
play and spread them apart to zoom in.
Pinch-in: Place two ngers on the display
•
and slide them together to zoom out.
Pictures can be zoomed out until the entire image is visible but no
N
further.
Double-tap: Tap the display twice to zoom
•
in on the focus point.
Drag: View other areas of the image
•
during playback zoom.
18
Page 37

First Steps
19
Page 38

First Steps
Attaching the Shoulder Strap
Attach the strap to the two strap eyelets as shown below.
2
Attach the strap as shown.
•
O
To avoid dropping the camera, be sure the strap is correctly secured.
•
20
Page 39

Attaching a Lens
The camera can be used with lenses for the FUJIFILM
X-mount.
Remove the body cap from the camera
and the rear cap from the lens. Place the
lens on mount, keeping the marks on the
lens and camera aligned (
rotate the lens until it clicks into place
(B).
• When attaching lenses, ensure that dust or other foreign matter does
O
not enter the camera.
Be careful not to touch the camera’s internal parts.
•
Rotate the lens until it clicks securely into place.
•
Do not press the lens release button while attaching the lens.
•
Removing Lenses
To remove the lens, turn the camera o , then
press the lens release button (A) and rotate the
lens as shown (B).
To prevent dust accumulating on the lens
O
or inside the camera, replace the lens caps
and camera body cap when the lens is not
attached.
Lenses and Other Optional Accessories
The camera can be used with lenses and accessories for the FUJIFILM
X-mount.
), and then
A
2
First Steps
Observe the following precautions when attaching or removing (ex-
O
changing) lenses.
Check that the lenses are free of dust and other foreign matter.
•
Do not change lenses in direct sunlight or under another bright light
•
source. Light focused into the interior of the camera could cause it to
malfunction.
Attach the lens caps before exchanging lenses.
•
21
Page 40

First Steps
Inserting the Battery and a Memory Card
Insert the battery and memory card as described below.
Open the battery-chamber cover.
1
Slide the battery-chamber latch as
shown and open the battery-chamber cover.
• Do not remove the battery when the
O
2
camera is on. Failure to observe this
precaution could damage image les
or memory cards.
Do not use excessive force when
•
handling the battery-chamber cover.
Insert the battery.
2
Using the battery to keep the battery
latch pressed to one side, insert the
battery contacts rst in the direction
shown by the arrow.
• Insert the battery in the orientation
O
shown. Do not use force or attempt
to insert the battery upside down or
backwards. The battery will slide in
easily in the correct orientation.
Con rm that the battery is securely
•
latched.
22
Page 41

Inserting the Battery and a Memory Card
Insert the memory card.
3
Holding the card in the orientation
shown, slide it in until it clicks into
place at the back of the slot.
• Be sure card is in the correct orienta-
O
tion; do not insert at an angle or use
force.
Format memory cards before rst
•
use, and be sure to reformat all memory cards after using them in a computer or other device.
Close the battery-chamber cover.
4
Close and latch the cover.
If the cover does not close, check that
O
the battery is in the correct orientation. Do not attempt to force the cover shut.
2
First Steps
23
Page 42

Removing the Battery
Before removing the battery or memory card, turn the camera o and open
the battery-chamber cover.
To remove the battery, press the battery latch to
the side, and slide the battery out of the camera
as shown.
The battery may become hot when used in high-temperature environ-
2
O
First Steps
ments. Observe caution when removing the battery.
Removing Memory Cards
To remove the memory card, press it in and release it slowly. The card can then be removed
by hand.
• Press the center of the card when ejecting it.
O
When a memory card is removed, the card could be ejected too
•
quickly. Use your nger to hold it and gently release the card.
24
Page 43

Inserting the Battery and a Memory Card
Compatible Memory Cards
The camera can be used with SD, SDHC, and SDXC memory
•
cards.
The camera supports UHS-I memory cards.
•
Use a memory card with a UHS speed class of 3 or better when
•
recording movies.
A list of supported memory cards is available on the Fuji lm
•
website. For details, visit:
http://www.fujifilm.com/support/digital_cameras/compatibility/.
• Do not turn the camera o or remove the memory card while the memo-
O
ry card is being formatted or data are being recorded to or deleted from
the card. Failure to observe this precaution could damage the card.
Memory cards can be locked, making it
•
impossible to format the card or to record
or delete images. Before inserting a memory card, slide the write-protect switch to
the unlocked position.
Memory cards are small and can be swallowed; keep out of reach of
•
children. If a child swallows a memory card, seek medical assistance
immediately.
miniSD or microSD adapters that are larger or smaller than memory
•
cards may not eject normally; if the card does not eject, take the camera to an authorized service representative. Do not forcibly remove
the card.
Do not a x labels or other objects to memory cards. Peeling labels
•
can cause camera malfunction.
Movie recording may be interrupted with some types of memory
•
card.
Formatting a memory card in the camera creates a folder in which
•
pictures are stored. Do not rename or delete this folder or use a computer or other device to edit, delete, or rename image les. Always
use the camera to delete pictures; before editing or renaming les,
copy them to a computer and edit or rename the copies, not the
originals. Renaming the les on the camera can cause problems
during playback.
2
First Steps
25
Page 44

Charging the Battery
Indicator lamp
Battery status
The battery is not charged at shipment. Charge the battery
before use.
• An NP-W126S rechargeable battery is supplied with the camera.
O
Turn the camera o before charging the battery.
•
The camera can be charged via
•
USB. USB charging is available
with computers with a manu-
2
facturer-approved operating
First Steps
system and USB interface.
Leave the computer on
during charging.
• The battery will not charge while the camera is on.
O
Use the supplied USB cable.
•
Connect the camera directly to the computer; do not use a USB hub
•
or keyboard.
Charging stops if the computer enters sleep mode; to resume
•
charging, activate the computer and disconnect and reconnect the
USB cable.
Charging may not be supported depending on the model of com-
•
puter, computer settings, and the computer’s current state.
To charge the battery from a household AC power outlet, use a
•
BC-W126S battery charger (available separately).
Charge Status
The indicator lamp shows battery charge status as follows:
Indicator lamp
On Battery charging.
Off Charging complete.
Blinks Battery fault.
Battery status
26
Page 45

Charging the Battery
• Do not a x labels or other objects to the battery. Failure to observe
O
this precaution could make it impossible to remove the battery from
the camera.
Do not short the battery terminals. The battery could overheat.
•
Read the cautions in “ The Battery and Power Supply”.
•
Use only genuine Fuji lm rechargeable batteries designated for use
•
in this camera. Failure to observe this precaution could result in product malfunction.
Do not remove the labels from the battery or attempt to split or peel
•
the outer casing.
The battery gradually loses its charge when not in use. Charge the
•
battery one or two days before use.
If the battery fails to hold a charge, it has reached the end of its
•
charging life and must be replaced.
Remove dirt from the battery terminals with a clean, dry cloth. Failure
•
to observe this precaution could prevent the battery from charging.
Note that charging times increase at low or high temperatures.
•
2
First Steps
27
Page 46

Turning the Camera On and O
Use the ON/OFF button to turn the camera on and o .
Press the ON/OFF button once to turn the
camera on and again to turn it o .
Fingerprints and other marks on the lens can a ect pictures and the
O
2
First Steps
view through the lens in the camera display. Keep the lens clean.
Pressing the a button during shooting starts playback.
•
N
Press the shutter button halfway to return to shooting mode.
•
The camera will turn o automatically if no operations are performed
•
for the length of time selected for D POWER MANAGEMENT>
AUTO POWER OFF. To reactivate the camera and return to shooting
mode after the camera has turned o automatically, press the shutter
button halfway or press the ON/OFF button.
28
Page 47

Checking the Battery Level
Indicator
Description
After turning the camera on, check the battery level in the
display.
Battery level is shown as follows:
Indicator
O
(white)
M
(white)
K
(white)
J
(red)
A
(blinks red)
Description
Battery partially discharged.
Battery about two-thirds charged.
Battery about one-third charged. Charge as soon as possible.
Low battery. Charge battery.
Battery exhausted. Turn camera off and recharge battery.
2
First Steps
29
Page 48

First Steps
Basic Setup
When you turn the camera on for the rst time, you can
choose a language and set the camera clock. At default
settings, you can also pair the camera with a smartphone
or tablet so that you can later synchronize the clocks or
download pictures. Follow the steps below when turning
the camera on for the rst time.
If you intend to pair the camera with a smartphone or tablet, install
N
2
and launch the latest version of the FUJIFILM Camera Remote App on
the smart device before proceeding. For more information, visit:
http://app.fujifilm-dsc.com/en/camera_remote/
Turn the camera on.
1
A language-selection dialog will be
displayed.
Choose a language.
2
Highlight a language and press
MENU/OK.
Pair the camera with the smartphone or tablet.
3
Press MENU/OK to pair the camera with
a smartphone or tablet running the
FUJIFILM Camera Remote app.
To skip pairing, press DISP/BACK.
N
30
START MENU
PAIRING REGISTRATION
PAIR WITH SMARTPHONE?
IMAGES CAN BE EASILY TRANSFERRED
TO SMARTPHONE BY PAIRING
SCAN QR CODE OR SEARCH FOR "FUJIFILM
Camera Remote" APP ON THE WEB
HELP
SET
SKIP
Page 49

Basic Setup
Check the time.
4
When pairing is complete, you will
be prompted to set the camera clock
to the time reported by the smartphone or tablet. Check that the time
PAIRING REGISTRATION
Phone-0123
PAIRING COMPLETE
2019.1.1 12 : 00 P M
SET DATE/TIME FROM SMARTPHONE?
SET CANCEL
is correct.
To set the clock manually, press
N
DISP/BACK (P 32).
Synchronize the camera settings with
5
the settings confi gured on your smartphone or tablet.
The option selected can be changed
N
START MENU
SMARTPHONE SYNC. SETTING
LOCATION&TIME
LOCATION
TIME
OFF
SET
at any time using D CONNECTION
SETTING> Bluetooth SETTINGS.
Set the clock.
6
Press MENU/OK to set the camera clock to the time reported by
the smartphone or tablet and exit to shooting mode.
If the battery is removed for an extended period, the camera clock will
N
be reset and the language-selection dialog will be displayed when the
camera is turned on.
Skipping the Current Step
If you skip a step, a con rmation dialog will be displayed; select NO to avoid
repeating any steps you skipped the next time the camera is turned on.
2
First Steps
31
Page 50

Choosing a Di erent Language
To change the language:
Display language options.
1
Select D USER SETTING> Qa.
Choose a language.
2
Highlight the desired option and press MENU/OK.
Changing the Time and Date
2
To set the camera clock:
First Steps
Display DATE/TIME options.
1
Select D USER SETTING> DATE/TIME.
Set the clock.
2
Press the focus stick (focus lever) left or right to highlight the
year, month, day, hour, or minute and press up or down to
change. Press MENU/OK to set the clock.
Basic Setup
32
Page 51

Basic Photography and
Playback
33
Page 52

3
Basic Photography and Playback
Taking Photographs
This section explains basic photography.
Select S mode.
1
Rotate the mode dial to S
(ADVANCED SR AUTO). The follow-
ing information will be displayed in
the LCD monitor.
The camera automatically selects the
appropriate scene.
In S mode, the camera continuously adjusts focus and search-
O
es for eyes, increasing the drain on the battery; in addition, the
sound of the camera focusing may be audible.
Ready the camera.
2
Hold the camera steady with both
hands—shaking or unsteady hands
can blur your shots.
PORTRAIT
To prevent pictures that are out of focus or too dark (underexposed), keep
your ngers and other objects away
from the lens, ash, and AF-assist illuminator.
34
Page 53

Frame the picture.
3
Lenses with Zoom Rings
Use the zoom ring to frame the picture in
the display. Rotate the ring left to zoom
out, right to zoom in.
Focus.
4
Press the shutter button halfway to
focus.
Taking Photographs
AUTO
3
Basic Photography and Playback
Focus
indicator
If the camera is able to focus, it will beep twice and focus frame
•
and focus indicator will glow green.
If the camera is unable to focus, the focus frame will turn red, s
•
will be displayed, and the focus indicator will blink white.
• If the subject is poorly lit, the AF-assist illuminator may light to
N
assist the focus operation.
Focus and exposure will lock when the shutter button is pressed
•
halfway. Focus and exposure remain locked while the button is
kept in this position (AF/AE lock).
The camera will focus on subjects at any distance in the macro
•
and standard focus ranges for the lens.
Shoot.
5
Smoothly press the shutter button the rest of the way down
to take the picture.
Focus frame
35
Page 54

a Viewing Pictures
Pictures can be viewed in the LCD monitor.
To view pictures full frame, press a.
Press the focus stick (focus lever) left to page through pictures in
reverse order. Press it right to page through pictures in the order
3
recorded. Keep the stick pressed to scroll rapidly to the desired
Basic Photography and Playback
frame.
• You can also page through pictures using the front command dial or
N
swipe gestures.
Pictures taken using other cameras are marked with a m (“gift im-
•
age”) icon to warn that they may not display correctly and that playback zoom may not be available.
36
Page 55

b Deleting Pictures
Use the b (delete) button to delete pictures.
Deleted pictures cannot be recovered. Copy important pictures to a
O
computer or other storage device before proceeding.
With a picture displayed full frame, press the b button and
1
select FRAME.
ERASE
FRAME
SELECTED FRAMES
ALL FRAMES
Choose a picture and press MENU/OK to delete it.
2
The picture will be deleted when the MENU/OK button is
•
pressed; a con rmation dialog is not displayed. Be careful
not to accidentally delete pictures you wish to keep.
Additional pictures can be deleted using the MENU/OK but-
•
ton. Display the desired pictures and press MENU/OK to delete them one by one.
• Protected pictures cannot be deleted. Remove protection from any
N
pictures you wish to delete (P 141).
Pictures can also be deleted from the menus using the C PLAY BACK
•
MENU> ERASE option (P 137).
3
Basic Photography and Playback
37
Page 56

MEMO
38
Page 57

Movie Recording and
Playback
39
Page 58

F Recording Movies
Record movies with sound.
Press the DRIVE button and select
1
F MOVIE in the drive-mode menu.
Press the shutter button all the way
2
down to start recording.
A recording indicator (V) is dis-
•
played while recording is in progress.
The time remaining is displayed
4
Movie Recording and Playback
•
while recording is in progress.
Press the button again to end recording.
3
Recording ends automatically when the maximum length is
reached or the memory card is full.
At default settings, the Fn1 button can also be used to start and stop
N
movie recording (P 178). Movies can be recorded using the Fn1 but-
ton regardless of the option selected in the drive-mode menu.
Using an External Microphone
Sound can be recorded with external micro-
•
phones that connect using jacks 2.5 mm in
diameter; microphones that require plug-in
power cannot be used. See the microphone
manual for details.
Microphones with a 2.5mm jack can be con-
•
nected using the supplied
phone adapter.
⌀3.5 mm micro-
40
Page 59

Recording Movies
• Use a memory card with a UHS speed class of 3 or better when re-
O
cording movies.
Touch zoom is not available during movie recording.
•
The area recorded when ON is selected for B MOVIE SETTING >
•
DIGITAL IMAGE STABILIZER is smaller than that shown in the monitor.
Sound is recorded via the built-in microphone or an optional external
•
microphone. Do not cover the microphone during recording.
Note that the microphone may pick up lens noise and other sounds
•
made by the camera during recording.
Vertical or horizontal streaks may appear in movies containing very
•
bright subjects. This is normal and does not indicate a malfunction.
• The indicator lamp lights while recording is in progress.
N
In the case of zoom lenses, zoom can be adjusted during recording
•
using the zoom ring (if available).
Exposure compensation can be adjusted during recording, but only
•
by a maximum of ±2 EV.
Recording may be unavailable at some settings, while in other cases
•
settings may not apply during recording.
4
Movie Recording and Playback
41
Page 60

Recording Movies
Adjusting Movie Settings
Adjust movie settings in the B MOVIE SETTING menu.
•
The movie type, frame size, and frame rate can be selected us-
•
ing B MOVIE SETTING> MOVIE MODE.
The AF-area mode for movie recording is selected using
•
B MOVIE SETTING> MOVIE AF MODE; choose from MULTI
and AREA.
Focus mode is selected using B MOVIE SETTING> F FOCUS
•
MODE; for continuous focus adjustment, select CONTINUOUS
AF or choose SINGLE AF and enable Intelligent Face Detec-
tion. Intelligent Face Detection is not available in manual focus
mode.
Depth of Field
4
Manual aperture adjustment is available in shooting modes A and M; adjust
Movie Recording and Playback
aperture before recording begins. Choose low f-numbers to soften background details. The e ect can be heightened by increasing the distance
between your subject and the background.
42
Page 61

a Viewing Movies
Focus stick
(focus lever)
Full-frame playback
Playback in progress
((xx)
Playback paused
((yy)
View movies on the camera.
In full-frame playback, movies are identi ed by a W icon. Press the focus stick (focus lever) down to start movie playback.
The following operations can be performed while a movie is displayed:
PLAYPLAY
Focus stick
(focus lever)
Up — End playback
Down Start playback Pause playback Start/resume playback
Left/right View other pictures Adjust speed
Full-frame playback
Playback in progress
)
Playback paused
)
Single frame rewind/
advance
Progress is shown in the display during
playback.
PAUSESTOP
• Do not cover the speaker during playback.
O
Sound is not played back if OFF is selected for D USER SETTING>
•
SOUND & FLASH.
Press MENU/OK to pause playback and display volume controls. Press
N
the focus stick (focus lever) up or down to adjust the volume; press
MENU/OK again to resume playback. Volume can also be adjusted using
D SOUND SET-UP> PLAYBACK VOLUME.
4
Movie Recording and Playback
1m23s
43
Page 62

Playback Speed
Press the focus stick (focus lever) left or right to
adjust playback speed during playback. Speed
is shown by the number of arrows (M or N).
4
Movie Recording and Playback
Arrows
Viewing Movies
PAUSESTOP
1m23s
44
Page 63

Taking Photographs
45
Page 64

Choosing a Shooting Mode
Scene
Scene
Choose a shooting mode according to the scene or type
of subject.
S ADVANCED SR AUTO
When the mode dial is rotated to S, the
camera automatically optimizes settings
to suit the scene.
The camera automatically selects the appropriate scene.
5
Taking Photographs
Scene
AUTO
PORTRAIT
LANDSCAPE
NIGHT
The mode selected may vary with shooting conditions. If the mode
O
and subject do not match, select mode P or choose SP and select a
scene manually.
Scene
MACRO
NIGHT PORTRAIT
BACKLIT PORTRAIT
PORTRAIT
46
Page 65

Choosing a Shooting Mode
e
e
Program AE (P)
Let the camera choose shutter speed and aperture for optimal
exposure. Other values that produce the same exposure can be
selected with program shift.
Rotate the mode dial to P.
P will appear in the display.
Program Shift
Rotate the front command dial to choose the
desired combination of shutter speed and aperture (program shift).
Aperture
rtur
Shutter speed
Program shift is not available in any of the following circumstances:
O
With ash units that support TTL auto
•
When an auto option is selected for H IMAGE QUALITY SETTING>
•
DYNAMIC RANGE
To cancel program shift, turn the camera o .
N
5
Taking Photographs
47
Page 66

Shutter-Priority AE (S)
Choose a shutter speed and let the camera adjust aperture for
optimal exposure.
Rotate the mode dial to S.
1
S will appear in the display.
Use the front command dial to
2
5
Taking Photographs
choose a shutter speed.
If the correct exposure cannot be achieved at the selected shutter
O
speed, aperture will be displayed in red.
48
Page 67

Choosing a Shooting Mode
Time (T)
Shutter speeds of 1s or slower are referred to as “long time-exposures”. Use of a tripod is recommended to prevent the camera
moving during the exposure.
• A count-down timer will be displayed while the exposure is in progress.
N
To reduce “noise” (mottling) in long time-exposures, select ON for
•
H IMAGE QUALITY SETTING> LONG EXPOSURE NR. Note that
this may increase the time needed to record images after shooting.
Using a Remote Release
A remote release can be used for long time-exposures. When using an optional RR-100 remote
release or an electronic release from third-party
suppliers, connect it to the camera’s remote release connector.
A con rmation dialog will be displayed
N
when a remote release is connected; press
MENU/OK and select n REMOTE for MIC/
REMOTE RELEASE.
CHECK MIC/REMOTE RELEASE
SETTING
SKIPSET
5
Taking Photographs
49
Page 68

Aperture-Priority AE (A)
Choose an aperture and let the camera adjust shutter speed for
optimal exposure.
Rotate the mode dial to A.
1
A will appear in the display.
Use the front command dial to
2
5
Taking Photographs
choose an aperture.
If the correct exposure cannot be achieved at the selected aperture,
O
shutter speed will be displayed in red.
Previewing Depth of Field
When PREVIEW DEPTH OF FIELD is assigned
to a function (Fn1) button, pressing the button
displays a L icon and stops aperture down to
the selected setting, allowing depth of eld to
be previewed when the view through the lens
appears in the display.
50
Page 69

Choosing a Shooting Mode
Manual Exposure (M)
Alter exposure from that selected by the camera.
Rotate the mode dial to M.
1
M will appear in the display.
Rotate the rear command dial to
2
choose a shutter speed and the front
command dial to choose the aperture.
The manual exposure display includes
N
an exposure indicator that shows the
amount the picture would be underor over-exposed at current settings.
5
Taking Photographs
Shutter speed
Aperture
51
Page 70

Exposure Preview
To preview exposure in the LCD monitor, select an option other than OFF
for D SCREEN SET-UP> PREVIEW EXP./WB IN MANUAL MODE.
Select OFF when using the ash or on other occasions on which ex-
N
posure may change when the picture is taken.
5
Taking Photographs
52
Page 71

Choosing a Shooting Mode
Bulb (B)
For bulb photography, rotate the rear command dial to select a
shutter speed of BULB. Use of a tripod is recommended to prevent the camera moving during the exposure.
• The shutter will remain open for up to 60 minutes, or for 1 second
N
when the electronic shutter is used.
A count-down timer will be displayed while the exposure is in prog-
•
ress.
To reduce “noise” (mottling) in long time-exposures, select ON for
•
H IMAGE QUALITY SETTING> LONG EXPOSURE NR. Note that
this may increase the time needed to record images after shooting.
Using a Remote Release
A remote release can be used for long time-exposures. When using an optional RR-100 remote
release or an electronic release from third-party
suppliers, connect it to the camera’s remote release connector.
A con rmation dialog will be displayed
N
when a remote release is connected; press
MENU/OK and select n REMOTE for MIC/
REMOTE RELEASE.
CHECK MIC/REMOTE RELEASE
SETTING
SKIPSET
5
Taking Photographs
53
Page 72

u PANORAMA
Follow an on-screen guide to create a panorama.
Rotate the mode dial to u
1
(PANORAMA).
To select the size of the angle through which you will pan the
2
camera while shooting, press the focus stick (focus lever) left.
Highlight a size and press MENU/OK.
Press the focus stick right to view a choice of pan directions.
3
Highlight a pan direction and press MENU/OK.
Press the shutter button all the way down to start recording.
4
5
Taking Photographs
There is no need to keep the shutter button pressed during
recording.
Pan the camera in the direction
5
shown by the arrow. Shooting ends
automatically when the camera is
panned to the end of the guides and
Sweep camera along yellow
line in direction of
ANGLE DIRECTION
the panorama is complete.
For Best Results
For best results, use a lens with a focal length of 35 mm or less (50 mm or
less in 35 mm format). Prop your elbows against your sides and move the
camera slowly in a small circle at a steady speed, keeping the camera parallel or at right angles to the horizon and being careful only to pan in the
direction shown by the guides. Use a tripod for best results. If the desired
results are not achieved, try panning at a di erent speed.
54
Page 73

Choosing a Shooting Mode
• If the shutter button is pressed all the way down before the panorama
O
is complete, shooting will end and no panorama may be recorded.
The last part of the panorama may not be recorded if shooting ends
•
before the panorama is complete.
Panoramas are created from multiple frames, and the camera may in
•
some cases be unable to stitch the frames together perfectly.
Panoramas may be blurred if the subject is poorly lit.
•
Shooting may be interrupted if the camera is panned too quickly or
•
too slowly. Panning the camera in a direction other than that shown
cancels shooting.
The camera may in some cases record a greater or lesser angle than
•
selected.
The desired results may not be achieved with:
•
Moving subjects
-
Subjects close to the camera
-
Unvarying subjects such as the sky or a eld of grass
-
Subjects that are in constant motion, such as waves and waterfalls
-
Subjects that undergo marked changes in brightness
-
Exposure for the entire panorama is determined by the rst frame.
•
5
Taking Photographs
55
Page 74

Viewing Panoramas
Focus stick
(focus lever)
Full-frame
playback
Panorama
playback
Panorama
playback paused
With the panorama displayed full frame, press the focus stick (focus lever)
down to start panorama playback. Vertical panoramas will scroll vertically,
horizontal panoramas horizontally.
PLAY
In full-frame playback, you can use the rear command dial to zoom pan-
•
STOP
PAUSE
oramas in or out.
Panorama playback is controlled using the focus stick.
•
Focus stick
(focus lever)
Full-frame
playback
Panorama
playback
playback paused
Up — End playback
Down Start playback Pause playback Resume playback
5
Taking Photographs
Left/right View other pictures
Choose pan direc-
tion
Scroll panorama
Panorama
manually
56
Page 75

Choosing a Shooting Mode
Scene
Description
h
PORTRAIT
ENHANCER (
M
LANDSCAPE
N
SPORT
O
NIGHT
SP SCENE POSITION /h/M/N/O
The camera o ers a choice of “scenes”, each adapted to particular
shooting conditions or a speci c type of subject.
Rotate the mode dial to SP (SCENE
1
POSITION).
The following scenes can be selected directly using the
mode dial:
Scene
PORTRAIT
h
ENHANCER (ZZ))
LANDSCAPE
M
SPORT Choose when photographing moving subjects.
N
NIGHT Choose for poorly lit twilight or night scenes.
O
Choose for a smooth skin eff ect when shooting portraits. You can choose the portrait enhancement level in the touch menu.
Choose for daylight shots of buildings and landscapes.
Description
5
Taking Photographs
Press MENU/OK while the mode de-
2
scription is displayed.
If the view through the lens is displayed in the LCD monitor, press
N
SCENE POSITION
Clear shots of
night scenery with a
slow shutter speed.
MENU/OK and select A SHOOTING SETTING> SCENE POSITION
in the shooting menu.
NIGHT(TRIPOD)
57
Page 76

5
Scene
Description
h
PORTRAIT
H
NIGHT (TRIPOD)
p
FIREWORKS
Q
SUNSET
R
SNOW
s
BEACH
f
UNDERWATER
U
PARTY
V
FLOWER
W
TEXT
j
MULTIPLE
EXPOSURE
k
LIGHT TRAIL
Taking Photographs
Highlight one of the following options and press MENU/OK.
3
Scene
PORTRAIT Choose for portraits.
h
NIGHT (TRIPOD) Choose this mode for slow shutter speeds when
H
shooting at night.
FIREWORKS Slow shutter speeds are used to capture the expand-
p
ing burst of light from a fi rework.
SUNSET Choose this mode to record the vivid colors in sun-
Q
rises and sunsets.
SNOW Choose for crisp, clear shots that capture the bright-
R
ness of scenes dominated by shining white snow.
BEACH Choose for crisp, clear shots that capture the bright-
s
ness of sunlit beaches.
UNDERWATER Reduces the blue cast typically associated with un-
f
derwater lighting.
PAR TY Capture indoor background lighting under low-light
U
conditions.
FLOWER Eff ective for taking more vivid shots of fl owers.
V
TEXT Take clear pictures of text or drawings in print.
W
MULTIPLE
j
EXPOSURE
LIGHT TRAIL Take photographs in which light sources such as car
k
Create a photograph that combines two exposures
(P 59).
headlights or ascending fi reworks appear to be followed by trails of light.
Description
58
Page 77

Choosing a Shooting Mode
j Multiple Exposures
Create a photograph that combines two exposures.
Select j MULTIPLE EXPOSURE in the scene position menu.
1
Take the rst shot.
2
Press MENU/OK. The rst shot will be
3
shown superimposed on the view
through the lens and you will be
prompted to take the second shot.
• To return to Step2 and retake the rst shot, press the focus stick
N
(focus lever) left.
To save the rst shot and exit without creating a multiple expo-
•
sure, press DISP/BACK.
Take the second shot, using the rst
4
NEXT
frame as a guide.
EXIT
EXITRETRY
5
Taking Photographs
Press MENU/OK to create the multiple
5
exposure, or press the focus stick left
to return to Step4 and retake the second shot.
EXITRETRY
59
Page 78

Adv. ADVANCED FILTER
Filter
Description
GG TOY CAMERA
II POP COLOR
JJ HIGH-KEY
ZZ LOW-KEY
EE FISH-EYE
KK DYNAMIC TONE
ii HDR ART
HH MINIATURE
Take photos with lter e ects.
Rotate the mode dial to Adv.
1
(ADVANCED FILTER).
5
Taking Photographs
Press MENU/OK while the mode de-
2
TOY CAMERA
POP COLOR
scription is displayed.
If the view through the lens is displayed in the LCD monitor,
N
press MENU/OK and select A SHOOTING SETTING> ADVANCED
FILTER in the shooting menu.
Highlight one of the following options and press MENU/OK.
3
Filter
TOY CAMERA
POP COLOR
HIGH-KEY
LOW-KEY
FISH-EYE
DYNAMIC TONE
HDR ART
MINIATURE
Choose for a retro toy camera eff ect.
Create high-contrast images with saturated
colors.
Create bright, low-contrast images.
Create uniformly dark tones with few areas of
emphasized highlights.
Create a distorting eff ect of a fi sheye lens.
Dynamic tone expression is used for a fantasy
eff ect.
Create artistic eff ect by emphasizing tone reproduction and dynamic range.
The tops and bottoms of pictures are blurred for
a diorama eff ect.
Description
60
Page 79

Choosing a Shooting Mode
Filter
Description
LL CROSS SCREEN
nn RICH & FINE
mm MONOCHROME(NIR)
uu PARTIAL COLOR (RED)
vv PARTIAL COLOR (ORANGE)
ww PARTIAL COLOR (YELLOW)
xx PARTIAL COLOR (GREEN)
yy PARTIAL COLOR (BLUE)
zz PARTIAL COLOR (PURPLE)
jj FOG REMOVE
XX SOFT FOCUS
Filter
Create a star pattern where lines radiate out
CROSS SCREEN
RICH & FINE
MONOCHROME(NIR)
PARTIAL COLOR (RED)
PARTIAL COLOR (ORANGE)
PARTIAL COLOR (YELLOW)
PARTIAL COLOR (GREEN)
PARTIAL COLOR (BLUE)
PARTIAL COLOR (PURPLE)
FOG REMOVE
SOFT FOCUS
Depending on the subject and camera settings, images may in
N
some cases be grainy or vary in brightness or hue.
from bright objects. The eff ects of the cross
screen fi lter can be viewed after shooting.
Add a rich & fi ne eff ect recommend for tabletop
photography.
Monochrome photography as taken by Near-infrared camera.
Areas of the image that are the selected color
are recorded in that color. All other areas of the
image are recorded in black-and-white.
Create clearer image by removing fog factor.
Create a look that is evenly soft throughout the
whole image.
Description
5
Taking Photographs
61
Page 80

5
Taking Photographs
Autofocus
Take pictures using autofocus.
Use G AF/MF SETTING> FOCUS MODE to choose a focus
1
mode (P 63).
Use G AF/MF SETTING> AF MODE to choose an AF mode
2
(P 65).
Select G AF/MF SETTING> FOCUS
3
AREA and choose the position and
size of the focus frame (P 67).
Take pictures.
4
For information on the autofocus system, visit:
N
http://fujifilm-x.com/af/en/index.html
62
Page 81

Autofocus
Mode
Description
p
k
l
Focus Mode
Choose how the camera focuses.
Press MENU/OK to display the menus.
1
Select G AF/MF SETTING> FOCUS MODE in the shooting
2
menu.
Choose from the following options:
3
Mode
p
MANUAL FOCUS
k
CONTINUOUS AF
l
SINGLE AF
• Regardless of the option selected, manual focus will be used when
N
the lens is in manual focus mode.
If ON is selected for G AF/MF SETTING> PRE-AF, focus will be ad-
•
justed continuously in modes l and k even when the shutter button is not pressed.
Focus manually using the lens focus ring. Choose for manual control of focus or in situations in which the camera is
unable to focus using autofocus (P 71).
Focus is continually adjusted to refl ect changes in the distance to the subject while the shutter button is pressed
halfway. Use for subjects that are in motion.
Focus locks while the shutter button is pressed halfway.
Choose for stationary subjects.
Description
5
Taking Photographs
63
Page 82

The Focus Indicator
Focus indicator
Focus status
Focus status is shown by the focus indicator.
Focus indicator
( ) Camera focusing.
z (lights green)
(z) (lights green)
A (blinks white)
j Manual focus (focus mode p).
Subject in focus; focus locked (focus
mode l).
Subject in focus (focus mode k).
Focus is automatically adjusted for
changes in distance to subject.
Camera unable to focus.
Focus status
5
Taking Photographs
Focus indicator
64
Page 83

Autofocus Options (AF Mode)
Focus Mode
l
(SINGLE AF)
Option
Description
Sample image
r
SINGLE POINT
y
ZONE
z
WIDE
j
ALL
Choose how the camera focuses in modes l and k.
Press MENU/OK and go to the shooting menu.
1
Select G AF/MF SETTING> AF MODE.
2
Choose an AF mode.
3
How the camera focuses depends on the focus mode.
l
Option
(SINGLE AF)
Description
Sample image
Focus Mode
Autofocus
r
SINGLE POINT
y
ZONE
z
WIDE
j
ALL
Camera focuses on subject in
selected focus point. Use for pinpoint focus on selected subject.
Camera focuses on subject in selected focus zone. Focus zones include multiple focus points, making it easier to focus on subjects in
motion.
Camera focuses automatically on
high-contrast subjects; display
shows areas in focus.
Rotate the rear command dial in the focus-point selection display (P 68, 69) to cycle through AF modes in the following order: r SINGLE POINT, y ZONE, and z WIDE.
65
5
Taking Photographs
Page 84

Focus Mode
Focus Mode
k
(CONTINUOUS AF)
Option
Description
Sample image
r
SINGLE POINT
y
ZONE
z
TRACKING
j
ALL
Option
k
(CONTINUOUS AF)
Description
Sample image
5
Taking Photographs
r
SINGLE POINT
y
ZONE
z
TRACKING
j
ALL
Focus tracks subject at selected focus point. Use for subjects moving
toward or away from camera.
Focus tracks subject in selected focus zone. Use for subjects that are
moving fairly predictably.
Focus tracks subjects moving
through wide area of frame.
Rotate the rear command dial in the focus-point selection display (P 68, 69) to cycle through AF modes in the following order: r SINGLE POINT, y ZONE, and z TRACKING.
66
Page 85

Focus-Point Selection
Choose a focus point for autofocus.
Viewing the Focus-Point Display
Press MENU/OK and go to the shooting menu.
1
Select G AF/MF SETTING> FOCUS AREA to view the fo-
2
cus-point display.
Use the focus stick (focus lever) and rear command dial to
3
choose a focus area.
The focus point can also be selected using touch controls (P 15).
N
Autofocus
5
Taking Photographs
67
Page 86

Selecting a Focus Point
AF mode
Focus stick
Rear command dial
Tilt
Press
Rotate
r
y
z
Use the focus stick (focus lever) to choose
the focus point and the rear command
dial to choose the size of the focus frame.
The procedure varies with the option selected for AF mode.
5
Taking Photographs
Focus stick
AF mode
Tilt
r
Select focus point
Manual focus-point selection is not available when z WIDE/
TRACKING is selected in focus mode l.
If j ALL is selected for AF mode, you can rotate the rear command
dial in the focus-point selection display to cycle through AF modes
in the following order: r SINGLE POINT (6 frame sizes), y ZONE
(3 frame sizes), and either z WIDE (focus mode l) or z TRACKING
(focus mode k).
N
y
z
•
•
Press
Select center focus
point
Rear command dial
Rotate
Choose from 6 frame
Choose from 3 frame
sizes
sizes
—
68
Page 87

Autofocus
AF mode
rr SINGLE POINT
yy ZONE
zz WIDE/TRACKING
The Focus-Point Display
The focus-point display varies with the option selected for AF
mode.
Focus frames are shown by small squares (), focus zones by the large
N
squares.
AF mode
SINGLE POINT
ZONE
WIDE/TRACKING
Number of points available can be selected using
G AF/MF SETTING>
NUMBER OF FOCUS
POINTS.
Choose from zones with
7 × 7, 5 × 5, or 3 × 3 focus
points.
Position focus frame over
subject you want to track.
5
Taking Photographs
69
Page 88

Autofocus
Although the camera boasts a high-precision autofocus system, it may be
unable to focus on the subjects listed below.
Very shiny subjects such as mirrors or car bodies.
•
Subjects photographed through a window or other re ective object.
•
Dark subjects and subjects that absorb rather than re ect light, such as
•
hair or fur.
Insubstantial subjects, such as smoke or ame.
•
Subjects that show little contrast with the background.
•
Subjects positioned in front of or behind a high-contrast object that is
•
also in the focus frame (for example, a subject photographed against a
backdrop of highly contrasting elements).
Checking Focus
To zoom in on the current focus area for precise
focus, press the center of the focus stick (focus
lever). Press the center of the focus stick again
to cancel zoom.
5
Taking Photographs
Normal display Focus zoom
In focus mode l, zoom can be adjusted by rotating the rear com-
•
N
mand dial.
In focus mode l, select r SINGLE POINT for AF MODE.
•
Focus zoom is not available in focus mode k or when G AF/MF
•
SETTING> PRE-AF is on.
Use D BUTTON SETTING> FOCUS LEVER SETTING to change
•
the function performed by the center of the focus stick (focus lever).
D BUTTON SETTING> FUNCTION (Fn) SETTING can also be used
to assign focus zoom to other controls (P 178).
Autofocus
70
Page 89

Manual Focus
Adjust focus manually.
Select MANUAL FOCUS for G AF/MF
1
SETTING> FOCUS MODE.
Focus manually using the lens focus
2
ring. Rotate the ring left to reduce
the focus distance, right to increase.
Take pictures.
3
Use D BUTTON SETTING> FOCUS RING to reverse the direction of
•
N
rotation of the focus ring.
Regardless of the option selected, manual focus will be used when
•
the lens is in manual focus mode.
If AF lock is assigned to a function button, the button can be used to
•
quickly focus on the subject in the selected focus frame. The size of
the frame can be adjusted using the rear command dial.
To display a j indicator in manual focus mode, select FOCUS MODE
•
in the D SCREEN SET-UP> DISP. CUSTOM SETTING list and use the
DISP/BACK button to display standard indicators.
5
Taking Photographs
71
Page 90

Checking Focus
A variety of options are available for checking focus in manual
focus mode.
The Manual Focus Indicator
The manual focus indicator indicates
how closely the focus distance matches
the distance to the subject in the focus
brackets. The white line indicates the
distance to the subject in the focus area
(in meters or feet according to the option
selected for D SCREEN SET-UP> FOCUS
SCALE UNITS in the setup menu), the
blue bar the depth of eld, or in other
words the distance in front of and behind
the subject that appears to be in focus.
5
Taking Photographs
If both AF DISTANCE INDICATOR and MF DISTANCE INDICATOR are se-
N
lected in the D SCREEN SET-UP> DISP. CUSTOM SETTING list, the manual
focus indicator can also be viewed using the depth-of- eld indicator in the
standard display. Use the DISP/BACK button to display standard indicators.
Focus Zoom
If ON is selected for G AF/MF SETTING> FOCUS CHECK, the camera
will automatically zoom in on the selected focus area when the focus
ring is rotated. Zoom can be adjusted by rotating the rear command
dial. Press the center of the focus stick (focus lever) to exit zoom.
Focus distance
(white line)
Depth of eld
Manual Focus
The focus stick can be used to choose the focus area while focus zoom
N
is in e ect.
Focus Peaking
Select FOCUS PEAK HIGHLIGHT for G AF/MF SETTING> MF ASSIST
to highlight high-contrast outlines. When focusing, rotate the focus
ring until the subject is highlighted.
72
Page 91

d Exposure Compensation
Adjust exposure.
Rotate the rear command dial to adjust
exposure.
The amount of compensation available varies with the shooting
O
mode.
5
Taking Photographs
73
Page 92

Focus/Exposure Lock
Option
Description
AE-LOCK
AF-LOCK
AE/AF LOCK
Compose photographs with o -center subjects.
Position the subject in the focus
1
frame and press the shutter button
halfway to lock focus and exposure.
Focus and exposure will remain
locked while the shutter button is
pressed halfway (AF/AE lock).
Press the button all the way down.
2
The Fn1 Button
5
Focus and/or exposure lock can be as-
Taking Photographs
signed to the Fn1 button.
Option
AE-LOCK
AF-LOCK Pressing the Fn1 button locks focus.
AE/AF LOCK
When the Fn 1 button is used for focus or exposure lock, the a ected
N
setting will remain locked even when the shutter button is pressed
halfway.
Pressing the Fn1 button locks exposure.
Pressing the Fn1 button locks both
focus and exposure.
Description
74
Page 93

WB White Balance
For natural colors, choose a white balance
option that matches the light source.
Press MENU/OK to display the shooting menu.
1
Highlight H IMAGE QUALITY SETTING> WHITE BALANCE in
2
the shooting menu and press MENU/OK to view white balance
options.
Highlight a white balance option.
3
Press MENU/OK to view a WB SHIFT
•
display where white balance can
be ne-tuned using the focus stick
(focus lever).
Press DISP/BACK to select the high-
•
lighted option and exit without applying ne-tuning.
At default settings, white balance can also be accessed via the T.B . F n1
N
button in the touch menu (P 179). Tap the T. B. Fn 1 button and adjust
white balance using touch controls.
WB SHIFT
SET
5
Taking Photographs
75
Page 94

WHITE BALANCE
Option
Description
The following white balance options are available.
5
Taking Photographs
Option
AUTO White balance is adjusted automatically.
h
k
i
j
k
l
m
n
g
• Results vary with shooting conditions. Play pictures back after shoot-
N
ing to check colors.
White balance is adjusted for ash lighting only in AUTO and g
•
modes. Turn the ash o using other white balance options.
Measure a value for white balance.
Choose a color temperature.
For subjects in direct sunlight.
For subjects in the shade.
Use under “daylight” fl uorescent lights.
Use under “warm white” fl uorescent lights.
Use under “cool white” fl uorescent lights.
Use under incandescent lighting.
Reduces the blue cast typically associated with underwater lighting.
Description
76
Page 95

White Balance
Custom White Balance
Choose h to adjust white balance for
CUSTOM WB
unusual lighting conditions. White balance measurement options will be displayed; frame a white object so that it lls
the display and press the shutter button
SHUTTER : NEW WB
SHIFT NOT CHANGE
all the way down to measure white balance (to select the most
recent custom value and exit without measuring white balance,
press DISP/BACK, or press MENU/OK to select the most recent value
and display the ne-tuning dialog).
If “COMPLETED !” is displayed, press MENU/OK
•
COMPLETED !
to set white balance to the measured
value.
If “UNDER” is displayed, raise exposure
•
compensation and try again.
If “OVER” is displayed, lower exposure compensation and try again.
•
SET CANCEL
5
Taking Photographs
77
Page 96

k: Color Temperature
Selecting k in the white balance menu
displays a list of color temperatures;
highlight a color temperature and press
WHITE BALANCE
COLOR TEMPERATURE
MENU/OK to select the highlighted option
and display the ne-tuning dialog.
Color Temperature
Color temperature is an objective measure of the color of a light source,
expressed in Kelvin (K). Light sources with a color temperature close to that
of direct sunlight appear white; light sources with a lower color temperature have a yellow or red cast, while those with a higher color temperature
are tinged with blue. You can match color temperature to the light source,
or choose options that di er sharply from the color of the light source to
make pictures “warmer” or “colder.”
5
Taking Photographs
White Balance
SHIFTSET
78
Page 97

h Using the Self Timer
Option
P
RR 2 SEC
SS 10 SEC
mm FACE AUTO SHUTTER
oo SMILE
Option
P
aa BUDDY
gg GROUP
OFF
Use the timer for group- or self-portraits, to
prevent blur caused by camera shake, or to
release the shutter automatically when selected conditions are met.
Press MENU/OK to display the shooting menu.
1
Select A SHOOTING SETTING> SELF-TIMER in the shooting
2
menu to display self-timer options.
Highlight one of the following options and press MENU/OK.
3
Option
2 SEC
10 SEC
FACE AUTO SHUTTER
SMILE
• Stand behind the camera when using the shutter button. Standing in
O
front of the lens can interfere with focus and exposure.
The self-timer turns o automatically when the camera is turned o .
•
• To stop the timer before the picture is taken, press DISP/BACK.
N
Selecting m FACE AUTO SHUTTER, o SMILE, a BUDDY, or
•
g GROUP sets G AF/MF SETTING> FACE/EYE DETECTION
SETTING to FACE ON/EYE OFF. The original setting is restored when
the self timer is turned o .
P
80
80
OFF —
81
81
BUDDY
GROUP
Option
P
82
82
5
Taking Photographs
79
Page 98

2 SEC/10 SEC
Option
Description
RR 2 SEC
SS 10 SEC
The shutter is released 2 or 10 seconds after the shutter button
is pressed.
Select either of the following options in the self-timer menu.
1
Option
The shutter is released two seconds after the shutter button
2 SEC
10 SEC
Press the shutter button all the way down to start the timer.
2
is pressed. Use to reduce blur caused by the camera moving
when the shutter button is pressed. The self-timer lamp blinks
as the timer counts down.
The shutter is released ten seconds after the shutter button
is pressed. Use for photographs in which you wish to appear
yourself. The self-timer lamp blinks immediately before the picture is taken.
Description
A count-down timer will appear in the display; the picture
5
Taking Photographs
will be taken when the timer expires.
80
Page 99

Using the Self Timer
FACE AUTO SHUTTER
The picture will be taken when the camera detects a portrait subject facing the lens.
Select m (FACE AUTO SHUTTER) in the self-timer menu.
1
Frame a portrait subject in the dis-
2
play. The camera will initiate face detection and release the shutter when
the subject is facing the lens.
The camera may fail to detect subjects who are not facing the camera
O
or whose eyes are hidden.
SMILE
The camera releases the shutter when the subject smiles.
Select o (SMILE) in the self-timer menu.
1
Frame portrait subjects in the dis-
2
play. The camera will initiate face detection and release the shutter when
any of the subjects smiles.
The camera may fail to detect subjects who are not facing the camera
O
or whose eyes are obscured by hair or other objects.
EXIT
EXIT
5
Taking Photographs
81
Page 100

Using the Self Timer
BUDDY
The camera takes a picture when it detects two subjects close
together.
Select a (BUDDY) in the self-timer menu.
1
Choose how close the subjects must
2
be together before the timer starts
(the required degree of closeness is
shown by heart icons in the shooting
display: the more hearts, the closer
together the subjects must be).
LV.1 (NEAR): The timer starts when the subjects are close
•
enough to link hands.
LV.2 (CLOSE UP): The timer starts when the subjects are shoul-
•
der-to-shoulder.
LV.3 (SUPER CLOSE): The timer starts when the subjects are
5
Taking Photographs
•
cheek-to-cheek.
The timer starts only when the subjects are su ciently close together;
N
the shutter is released one second later.
GROUP
The camera takes a picture when it detects the selected number
of portrait subjects.
EXIT
Select g (GROUP) in the self-timer menu.
1
Select the desired number of sub-
2
jects (1 to 4) (the number of subjects
is indicated by h icons in the shooting display). The timer starts only
when the selected number of subjects is in the frame; the shutter is released two seconds later.
EXIT
82
 Loading...